Creating Apps in Kivy (2014)
Chapter 7. Gestures
Kivy was designed from the ground up with fingers, rather than pointing devices, in mind as a primary method of input. You haven’t had much direct interaction with input devices in this book; instead, we’ve focused on touch events that are built into widgets supplied with Kivy. Buttons can be pressed, inputs can have text entered into them, and ListViews can be scrolled with a gesture.
In this chapter, you’ll delve a bit deeper into Kivy’s event system and add a few basic gestures to the app. The gestures will be swipe left and swipe right on the current weather and forecast widgets, which will switch to the other widget. The swipe down gesture will be used to refresh the weather. This is a fairly standard interaction feature in mobile computing.
The Forecast Tab
First, take some time to implement the forecast widget, so you have something to use gestures to switch between. As in Chapter 6, this should be old hat for you, so I’m just going to summarize the changes. Then I can focus on giving you new and interesting content! I recommend you try to implement these steps before referring to the example code.
1. Create a mockup of how you would like the forecast to look. Bear in mind that your widget has to fit on a narrow mobile screen. See Figure 7-1.
2. Add a ForecastLabel class to weather.kv to render individual forecast data. Put an icon, conditions, and temperature min and max on it. See Example 7-1.
3. Add a Forecast class extending BoxLayout to main.py and weather.kv. Give it a BoxLayout with a named id so that ForecastLabel objects can be added to it later. Also give it a button to switch to the CurrentWeather widget and hook up the event listener. See Example 7-1.
4. Create an update_weather method on Forecast that downloads three days’ worth of weather (remember to query the config for metrics) from Open Weather Map’s forecast page and creates three ForecastLabel objects on the BoxLayout. You’ll probably want to import and use Python’s datetime module here (see Example 7-2).
5. Create an appropriate show_forecast function on WeatherRoot, as shown in Example 7-3. Also hook up event listeners to call it from the button on CurrentWeather.
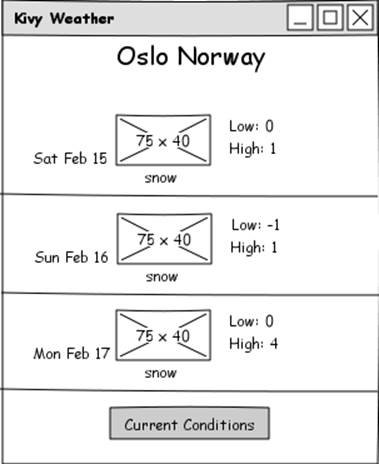
Figure 7-1. A three-day forecast
Example 7-1. ForecastLabel and Forecast classes
<ForecastLabel@BoxLayout>:
date: ""
conditions_image: ""
conditions: ""
temp_min: None
temp_max: None
canvas.before:
Color:
rgb: [0.2, 0.2, 0.2]
Line:
points: [self.pos[0], self.pos[1], self.width, self.pos[1]]
Label:
text: root.date
BoxLayout:
orientation: "vertical"
AsyncImage:
source: root.conditions_image
Label:
text: root.conditions
BoxLayout:
orientation: "vertical"
Label:
text: "Low: {}".format(root.temp_min)
Label:
text: "High: {}".format(root.temp_max)
<Forecast>:
forecast_container: forecast_container
orientation: "vertical"
Label:
size_hint_y: 0.1
font_size: "30dp"
text: "{} ({})".format(root.location[0], root.location[1])
BoxLayout:
orientation: "vertical"
id: forecast_container
BoxLayout:
orientation: "horizontal"
size_hint_y: None
height: "40dp"
Button:
text: "Current"
on_press: app.root.show_current_weather(root.location)
Example 7-2. Forecast class with update_weather method
classForecast(BoxLayout):
location = ListProperty(['New York', 'US'])
forecast_container = ObjectProperty()
def update_weather(self):
config = WeatherApp.get_running_app().config
temp_type = config.getdefault("General", "temp_type", "metric").lower()
weather_template = "http://api.openweathermap.org/data/2.5/forecast/" +
"daily?q={},{}&units={}&cnt=3"
weather_url = weather_template.format(
self.location[0],
self.location[1],
temp_type)
request = UrlRequest(weather_url, self.weather_retrieved)
def weather_retrieved(self, request, data):
data = json.loads(data.decode()) ifnotisinstance(data, dict) else data
self.forecast_container.clear_widgets()
for day indata['list']:
label = Factory.ForecastLabel()
label.date = datetime.datetime.fromtimestamp(day['dt']).strftime(
"%a %b %d")
label.conditions = day['weather'][0]['description']
label.conditions_image = "http://openweathermap.org/img/w/{}.png".format(
day['weather'][0]['icon'])
label.temp_min = day['temp']['min']
label.temp_max = day['temp']['max']
self.forecast_container.add_widget(label)
Example 7-3. show_forecast method
def show_forecast(self, location=None):
self.clear_widgets()
if self.forecast isNone:
self.forecast = Factory.Forecast()
if location isnotNone:
self.forecast.location = location
self.forecast.update_weather()
self.add_widget(self.forecast)
As Figure 7-2 shows, the forecast widget isn’t beautiful, but it gets the job done.
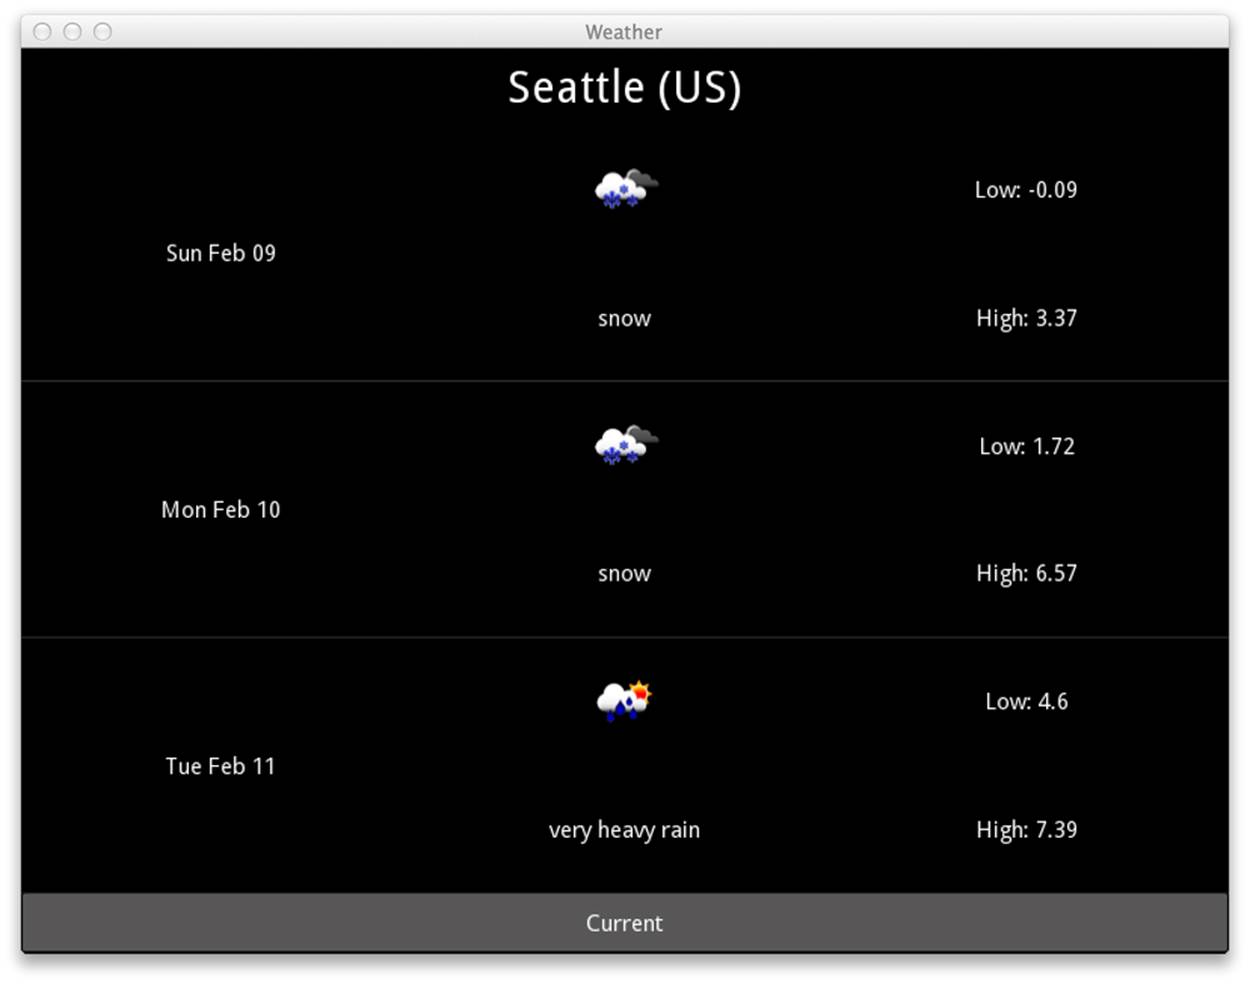
Figure 7-2. Seattle is going to get snow
Recording Gestures
The mathematics behind computational gesture recognition are quite complicated. Luckily, the Kivy developers have supplied a basic gesture library that allows you to record a gesture using an example tool, and then match user input gestures against the recording to test if it’s the same gesture. Sound simple? It’s not hard, but the process is a bit involved.
The first thing you want to do is to record the encoded representation of the three gestures you want to recognize. Do this using the gesture_board.py example that ships with Kivy. Hopefully you already have the Kivy source code checked out, either because you built it from scratch inChapter 1 or because you’ve been diligently reading through the source when you get stuck trying to understand something and the documentation is insufficient. If not, check it out with the command git clone http://github.com/kivy/kivy.
GETTING GIT
If you use Linux, Git is probably preinstalled, since Linux is a developer’s operating system. Git was originally designed for the distributed development of the Linux kernel and is an integral part of modern Linux development culture. If it’s not installed, it’ll be a simple process to install it using your distribution’s package manager.
If you’ve configured Mac OS for development by installing Apple’s XCode, you will also have Git installed. You’re going to need to do this anyway if you want to deploy to iOS devices, and XCode contains a dazzling number of other tools that may or may not be useful in your future endeavors as a developer on an Apple machine.
If you use Windows, you’ll want to install the MSysGit package. Windows was once considered a second-class citizen for Git usage, but MSysGit changes this. In addition to giving you the Git version control tool, it also provides an easy installer for the powerful bash command-line shell. You can (and should) use this shell instead of the default Windows command prompt for all your development, not just Git.
Then, in a terminal, cd into the kivy/examples/gestures directory. Run the command python gesture_board.py.
This will pop up a familiar black window. It looks like the default blank Kivy window with no widgets on it. This is a bit misleading, though, because it does have a widget that is designed to recognize Kivy gestures. The demo comes with four gestures preinstalled. If you draw a clockwise circular shape on the screen, as shown in Figure 7-3, you should get some output on the terminal similar to Example 7-4.
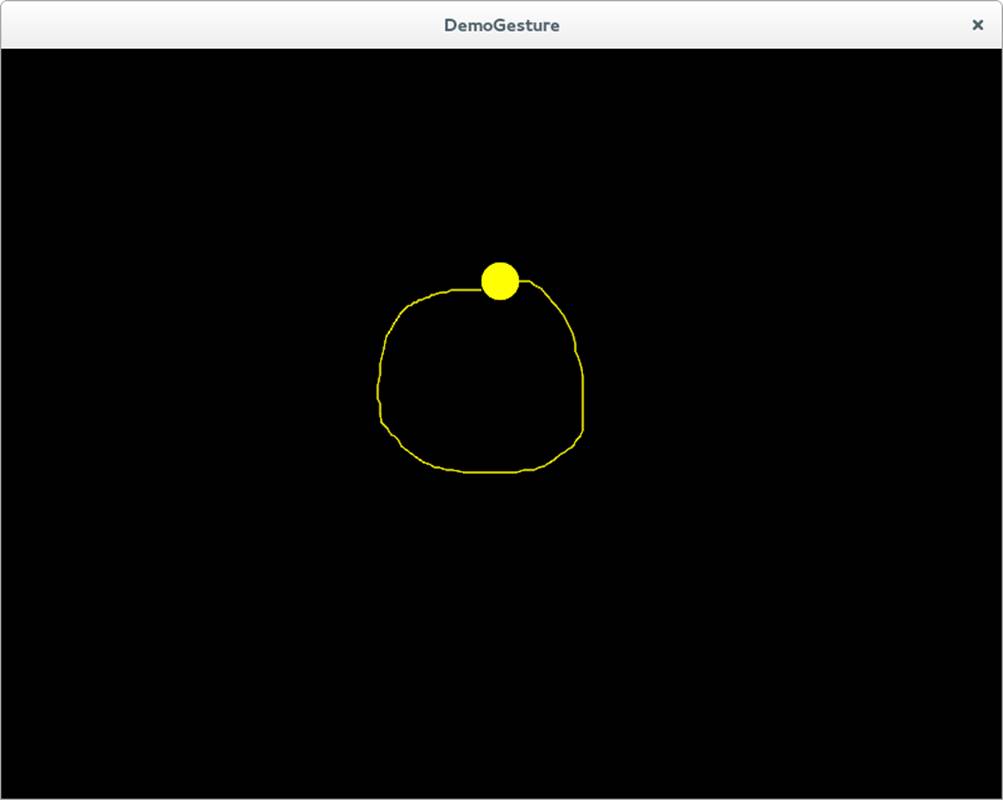
Figure 7-3. A circular gesture
Example 7-4. Output after drawing a circular gesture
gesture representation: <a very long random string of characters>
cross: 0.3540801575248498
check: -2.4878193071394503
circle: 0.9506637523286905
square: 0.7579676451240299
(0.9506637523286905, <kivy.gesture.Gesture object at 0x7f513df07450>)
circle
Read this output from bottom to top. The last line of the output indicates that the app (correctly) guessed that I drew a circle. The line above that indicates the actual gesture object that was matched and with what confidence. The four lines of text above that provide the matching scores for the four sample gestures. Unless I happened to draw exactly the same circle that whoever recorded these gestures did, I will not get a score of 1.0, but the closer it is to 1.0 the more likely it is that my drawing is a representation of the same gesture.
The first line of text, which I snipped out of this example to save you from having to read a page full of gibberish (and O’Reilly from having to print it), is a textual representation of the gesture I drew. Don’t bother trying to interpret it; it’s meaningless in this form. However, this line (likely several lines since it wraps across your terminal, but there’s no newline character, so treat it as a single line) is the information you need to record if you want to create your own gestures and match them.
So, we’ll do that next. There are three gestures you want to record: a left-to-right horizontal line, a right-to-left horizontal line, and a bottom-to-top vertical line. They are pretty simple gestures. Create a new Python file named gesture_box.py. Put each string inside a dictionary namedgesture_strings, as summarized in Example 7-5, bearing in mind that your strings will be both different and longer.
Example 7-5. Summary of three gestures
gesture_strings = {
'left_to_right_line': 'eNp91XtsU...<snip>...4hSE=',
'right_to_left_line': 'eNp91UlME...<snip>...Erg==',
'bottom_to_top_line': 'eNp91HlsD...<snip>...NMndJz'
}
Now you need to write some code to convert those strings back into the format that Kivy recognizes as gestures. In the same gesture_box.py file, add some imports and construct a GestureDatabase, as shown in Example 7-6.
Example 7-6. Constructing a GestureDatabase
fromkivy.gestureimport GestureDatabase
gestures = GestureDatabase()
for name, gesture_string ingesture_strings.items():
gesture = gestures.str_to_gesture(gesture_string)
gesture.name = name
gestures.add_gesture(gesture)
Now you have a module-level database of gestures. This database can compare gestures the user makes to its three stored gestures and tell us if the user input matches any of them.
Touch Events
The next step is to record the gestures that the user makes on the screen. My plan is to create a new widget that listens to input touch events, distinguishes gestures, and fires new events for each gesture it recognizes. In short, you’re about to learn a lot more about Kivy’s event system!
Start by creating a new class named GestureBox in gesture_box.py. Make it extend BoxLayout (remember to import the BoxLayout class, since it isn’t available in this file yet).
You’ve worked with higher-level events in most of the previous chapters. Now it’s time to get a little closer to the hardware. Kivy is designed with touchscreens in mind, so you’ll be working with touch events, even if you’re using a mouse.
There are three different kinds of touch events:
§ touch_down, which corresponds to the user touching a finger on the touchscreen or pressing the mouse button.
§ touch_move, which corresponds to the user dragging a finger after touching it onto the screen, or dragging the mouse with the button down. There may be multiple (or no) move events between a down and an up event.
§ touch_up, which corresponds to lifting the finger off the screen or releasing the mouse button.
Kivy has full multitouch support, so it’s possible for more than one touch_down-initiated touch event to be active at one time. The down, move, and up events are linked for each touch, such that you can access in the touch_move and touch_up events data that was set earlier in thetouch_down event. You do this by passing a touch argument into the event handlers that contains data about the touch itself, and to which you can add arbitrary data in typical Pythonic fashion.
To recognize a gesture, you’ll need to start recording each individual event in the touch_down handler, add the data points for each call to touch_move, and then do the gesture calculations when all data points have been received in the touch_up handler. Refer to Example 7-7.
Example 7-7. GestureBox down, up, and move events
classGestureBox(BoxLayout):
def on_touch_down(self, touch):
touch.ud['gesture_path'] = [(touch.x, touch.y)]
super(GestureBox, self).on_touch_down(touch)
def on_touch_move(self, touch):
touch.ud['gesture_path'].append((touch.x, touch.y))
super(GestureBox, self).on_touch_move(touch)
def on_touch_up(self, touch):
print(touch.ud['gesture_path'])
super(GestureBox, self).on_touch_up(touch)
As with other Kivy events, you can hook up event handlers in your Python code by implementing on_eventname_. The touch object passed into each event has a ud (short for user data) dictionary that is the same for each event. Construct a gesture_path list in the down event, append each subsequent motion event to it in the move event, and then simply print it in the up event. Each event also calls its super method so that the buttons at the bottom of the screen still work.
Now, to test this code, modify the main.py file to include a from gesture_box import GestureBox import. Then make the CurrentWeather and Forecast widgets extend this new class instead of BoxLayout. The layout functionality will be the same. However, if you now drag the mouse on these widgets, you will see a collection of points output on the terminal when you release the button.
Recognizing Gestures
Now that you have the points that the user created available, you can construct a Gesture object. Then you simply have to invite the GestureDatabase object to detect whether or not the user’s input matches any of the gestures you created. Example 7-8 demonstrates.
Example 7-8. Recognizing if a gesture occurred
def on_touch_up(self, touch):
if 'gesture_path' intouch.ud:
gesture = Gesture() ![]()
gesture.add_stroke(touch.ud['gesture_path']) ![]()
gesture.normalize() ![]()
match = gestures.find(gesture, minscore=0.90) ![]()
if match:
print("{} happened".format(match[1].name)) ![]()
super(GestureBox, self).on_touch_up(touch)
![]()
You’ll also want a from kivy.gesture import Gesture at the top of the file.
![]()
The add_stroke method accepts the list of (x, y) tuples that have been attached to the user data in the down and move methods.
![]()
Normalizing a gesture basically forces it to be converted to a unit box. This means that gestures that have the same shape, but different sizes, will match at each point.
![]()
minscore represents how confident the algorithm is that the gesture matches anything in the database. It will return the highest-matching gesture, provided the match is higher than this score.
![]()
The match object returns a tuple of (score, gesture). The name of the gesture was stored with each gesture when the GestureDatabase was populated. Here, you just print it.
Firing Events
Of course, it isn’t much use to just print that a gesture happened. It would be better to fire a new event that other classes can interpret. This is reminiscent of how you listen for press events rather than touch_down events on a button.
So, time to create a new event! Instead of creating a single on_gesture event, I’m going to dynamically create a new event type for each of the three gestures I’ve defined. I’ll end up with on_left_to_right_line, on_right_to_left_line, and on_bottom_to_top_line events. This might not be the most sensible design, but it does make it trivial to respond to individual gestures from inside the KV language file.
The first step is to register the new event type with the EventDispatcher. Every widget extends the EventDispatcher class, so we can do this trivially inside a new __init__ method on the GestureBox class in gesture_box.py, as shown in Example 7-9.
You also need to add default event handlers for each of those events, also shown in Example 7-9. The default activity can be to do nothing, but the methods still need to exist.
Example 7-9. Registering new event types
def __init__(self, **kwargs):
for name ingesture_strings:
self.register_event_type('on_{}'.format(name))
super(GestureBox, self).__init__
(**kwargs)
def on_left_to_right_line(self):
pass
def on_right_to_left_line(self):
pass
def on_bottom_to_top_line(self):
pass
Then all you have to do to fire an event is call the self.dispatch method, optionally passing any arguments that you would like to arrive with the event. In Example 7-10 I don’t pass any arguments, since gestures are binary (either they happened or they didn’t) and there is no data to supply. If you created a generic on_gesture event instead of different events for each gesture, you might pass in the gesture name as an argument. In this case, the call would be self.dispatch(on_gesture, gesture.name).
Example 7-10. Firing an event with self.dispatch
if match:
self.dispatch('on_{}'.format(match[1].name))
Now that your events are firing reliably, you can add a few event handlers to your KV language file, as shown in Example 7-11 and Example 7-12.
Example 7-11. Handling the gesture events on CurrentWeather
<CurrentWeather>:
orientation: "vertical"
on_right_to_left_line: app.root.show_forecast(root.location)
on_bottom_to_top_line: root.update_weather()
Example 7-12. Handling gesture events on the Forecast widget
<Forecast>:
forecast_container: forecast_container
orientation: "vertical"
on_left_to_right_line: app.root.show_current_weather(root.location)
on_bottom_to_top_line: root.update_weather()
File It All Away
At this point, you have a fully functional weather app with the current conditions and a three-day forecast. You can switch between the two views with a simple gesture. There are a few areas of further exploration that you can study:
§ The Locations, CurrentWeather, and Forecast classes all contain a BoxLayout that has several properties (orientation, size_hint_y, and height) in common. Refactor the KV code so that these properties are stored in a dynamic class named ButtonBar.
§ For practice, add a new gesture (maybe down or a curve or circle) that does something interesting. If you want to get fancy, look into multitouch gestures. There isn’t a lot of documentation on this, but it is doable.
§ Experiment with creating new events. Perhaps you could add something to the update_weather method to fire an event if the temperature changes.
§ You can make the GestureBox initializer dynamically create the default event handlers by calling setattr on self and attaching an empty method to it. This way, you won’t have to create a new default handler if you add a new gesture.