The Well-Grounded Rubyist, Second Edition (2014)
Part 1. Ruby foundations
Chapter 6. Control-flow techniques
This chapter covers
· Conditional execution
· Loops and looping techniques
· Iterators
· Exceptions and error handling
As you’ve already seen in the case of method calls—where control of the program jumps from the spot where the call is made to the body of the method definition—programs don’t run in a straight line. Instead, execution order is determined by a variety of rules and programming constructs collectively referred to as control-flow techniques.
Ruby’s control-flow techniques include the following:
· Conditional execution —Execution depends on the truth of an expression.
· Looping —A single segment of code is executed repeatedly.
· Iteration —A call to a method is supplemented with a segment of code that the method can call one or more times during its own execution.
· Exceptions —Error conditions are handled by special control-flow rules.
We’ll look at each of these in turn. They’re all indispensable to both the understanding and the practice of Ruby. The first, conditional execution (if and friends), is a fundamental and straightforward programming tool in almost any programming language. Looping is a more specialized but closely related technique, and Ruby provides you with several ways to do it. When we get to iteration, we’ll be in true Ruby hallmark territory. The technique isn’t unique to Ruby, but it’s a relatively rare programming language feature that figures prominently in Ruby. Finally, we’ll look at Ruby’s extensive mechanism for handling error conditions through exceptions. Exceptions stop the flow of a program, either completely or until the error condition has been dealt with. Exceptions are objects, and you can create your own exception classes, inheriting from the ones built in to Ruby, for specialized handling of error conditions in your programs.
6.1. Conditional code execution
Allow a user access to a site if the password is correct. Print an error message unless the requested item exists. Concede defeat if the king is checkmated. The list of uses for controlling the flow of a program conditionally—executing specific lines or segments of code only if certain conditions are met—is endless. Without getting too philosophical, we might even say that decision making based on unpredictable but discernible conditions is as common in programming as it is in life.
Ruby gives you a number of ways to control program flow on a conditional basis. The most important ones fall into two categories:
· if and related keywords
· Case statements
We’ll look at both in this section.
6.1.1. The if keyword and friends
The workhorse of conditional execution, not surprisingly, is the if keyword. if clauses can take several forms. The simplest is the following:
if condition
# code here, executed if condition is true
end
The code inside the conditional can be any length and can include nested conditional blocks.
You can also put an entire if clause on a single line, using the then keyword after the condition:
if x > 10 then puts x end
You can also use semicolons to mimic the line breaks, and to set off the end keyword:
if x > 10; puts x; end
Conditional execution often involves more than one branch; you may want to do one thing if the condition succeeds and another if it doesn’t. For example, if the password is correct, let the user in; otherwise, print an error message. Ruby makes full provisions for multiple conditional branches, using else and elsif.
The else and elsif keywords
You can provide an else branch in your if statement as follows:
if condition
# code executed if condition is true
else
# code executed if condition is false
end
There’s also an elsif keyword (spelled like that, with no second e). elsif lets you cascade your conditional logic to more levels than you can with just if and else:
if condition1
# code executed if condition1 is true
elsif condition2
# code executed if condition1 is false
# and condition2 is true
elsif condition3
# code executed if neither condition1
# nor condition2 is true, but condition3 is
end
You can have any number of elsif clauses in a given if statement. The code segment corresponding to the first successful if or elsif is executed, and the rest of the statement is ignored:
print "Enter an integer: "
n = gets.to_i
if n > 0
puts "Your number is positive."
elsif n < 0
puts "Your number is negative."
else
puts "Your number is zero."
end
Note that you can use a final else even if you already have one or more elsifs. The else clause is executed if none of the previous tests for truth has succeeded. If none of the conditions is true and there’s no else clause, the whole if statement terminates with no action.
Sometimes you want an if condition to be negative: if something isn’t true, then execute a given segment of code. You can do this in several ways.
Negating conditions with not and !
One way to negate a condition is to use the not keyword:
if not (x == 1)
You can also use the negating ! (exclamation point, or bang) operator:
if !(x == 1)
Both of these examples use parentheses to set apart the expression being tested. You don’t need them in the first example; you can do this:
if not x == 1
But you do need the parentheses in the second example, because the negating ! operator has higher precedence than the == operator. In other words, if you do this
if !x == 1
you’re really, in effect, comparing the negation of x with the integer 1:
if (!x) == 1
The best practice is to use parentheses most or even all of the time when writing constructs like this. Even if they’re not strictly necessary, they can make it easier for you and others to understand your code and to modify it later if necessary.
A third way to express a negative condition is with unless.
The unless keyword
The unless keyword provides a more natural-sounding way to express the same semantics as if not or if !:
unless x == 1
But take “natural-sounding” with a grain of salt. Ruby programs are written in Ruby, not English, and you should aim for good Ruby style without worrying unduly about how your code reads as English prose. Not that English can’t occasionally guide you; for instance, the unless/elsesequence, which does a flip back from a negative to a positive not normally associated with the use of the word unless, can be a bit hard to follow:
unless x > 100
puts "Small number!"
else
puts "Big number!"
end
In general, if/else reads better than unless/else—and by flipping the logic of the condition, you can always replace the latter with the former:
if x <= 100
puts "Small number!"
else
puts "Big number!"
end
If you come across a case where negating the logic seems more awkward than pairing unless with else, then keep unless. Otherwise, if you have an else clause, if is generally a better choice than unless.
Life without the dangling else ambiguity
In some languages, you can’t tell which else clause goes with which if clause without a special rule. In C, for example, an if statement might look like this:

But wait: Does the code behave the way the indentation indicates (the else belongs to the second if)? Or does it work like this?

All that’s changed is the indentation of the third line (which doesn’t matter to the C compiler; the indentation just makes the ambiguity visually obvious). Which if does the else belong to? And how do you tell?
You tell by knowing the rule in C: a dangling else goes with the last unmatched if (the first of the two behaviors in this example). But in Ruby, you have end to help you out:
if x > 50
if x > 100
puts "Big number"
else
puts "Medium number"
end
end
The single else in this statement has to belong to the second if, because that if hasn’t yet hit its end. The first if and the last end always belong together, the second if and the second-to-last end always belong together, and so forth. The if/end pairs encircle what belongs to them, includingelse. Of course, this means you have to place your end keywords correctly.
You can also put conditional tests in modifier position, directly after a statement.
Conditional modifiers
It’s not uncommon to see a conditional modifier at the end of a statement in a case like this one:
puts "Big number!" if x > 100
This is the same as
if x > 100
puts "Big number!"
end
You can also do this with unless:
puts "Big number!" unless x <= 100
Conditional modifiers have a conversational tone. There’s no end to worry about. You can’t do as much with them (no else or elsif branching, for example), but when you need a simple conditional, they’re often a good fit. Try to avoid really long statements that end with conditional modifiers, though; they can be hard to read, and hard to keep in your head while waiting for the modifier at the end:
![]()
Like other statements in Ruby, every if statement evaluates to an object. Let’s look at how that plays out.
The value of if statements
If an if statement succeeds, the entire statement evaluates to whatever is represented by the code in the successful branch. Type this code into irb and you’ll see this principle in action:
x = 1
if x < 0
"negative"
elsif x > 0
"positive"
else
"zero"
end
As irb will tell you, the value of that entire if statement is the string "positive".
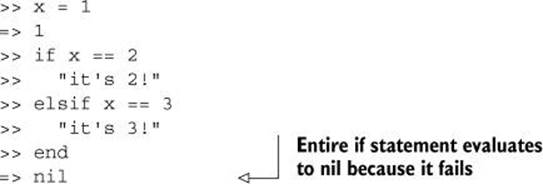
An if statement that doesn’t succeed anywhere returns nil. Here’s a full irb example of such a case:
Conditional statements interact with other aspects of Ruby syntax in a couple of ways that you need to be aware of—in particular, with assignment syntax. It’s worth looking in some detail at how conditionals behave in assignments, because it involves some interesting points about how Ruby parses code.
6.1.2. Assignment syntax in condition bodies and tests
Assignment syntax and conditional expressions cross paths at two points: in the bodies of conditional expressions, where the assignments may or may not happen at all, and in the conditional tests themselves:

What happens (or doesn’t) when you use these idioms? We’ll look at both, starting with variable assignment in the body of the conditional—specifically, local variable assignment, which displays some perhaps unexpected behavior in this context.
Local variable assignment in a conditional body
Ruby doesn’t draw as clear a line as compiled languages do between “compile time” and “runtime,” but the interpreter does parse your code before running it, and certain decisions are made during that process. An important one is the recognition and allocation of local variables.
When the Ruby parser sees the sequence identifier, equal-sign, and value, as in this expression,
x = 1
it allocates space for a local variable called x. The creation of the variable—not the assignment of a value to it, but the internal creation of a variable—always takes place as a result of this kind of expression, even if the code isn’t executed!
Consider this example:
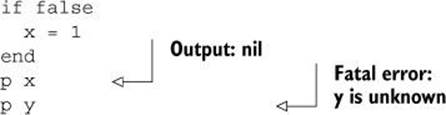
The assignment to x isn’t executed, because it’s wrapped in a failing conditional test. But the Ruby parser sees the sequence x = 1, from which it deduces that the program involves a local variable x. The parser doesn’t care whether x is ever assigned a value. Its job is just to scour the code for local variables for which space needs to be allocated.
The result is that x inhabits a strange kind of variable limbo. It has been brought into being and initialized to nil. In that respect, it differs from a variable that has no existence at all; as you can see in the example, examining x gives you the value nil, whereas trying to inspect the nonexistent variable y results in a fatal error. But although x exists, it hasn’t played any role in the program. It exists only as an artifact of the parsing process.
None of this happens with class, instance, or global variables. All three of those variable types are recognizable by their appearance (@@x, @x, $x). But local variables look just like method calls. Ruby needs to apply some logic at parse time to figure out what’s what, to as great an extent as it can.
You also have to keep your wits about you when using assignment syntax in the test part of a conditional.
Assignment in a conditional test
In this example, note that the conditional test is an assignment (x = 1) and not an equality test (which would be x==1):
if x = 1
puts "Hi!"
end
The assignment works as assignments generally do: x gets set to 1. The test, therefore, reduces to if 1, which is true. Therefore, the body of the conditional is executed, and the string "Hi!" is printed.
But you also get a warning:
warning: found = in conditional, should be ==
Ruby’s thinking in a case like this is as follows. The test expression if x = 1 will always succeed, and the conditional body will always be executed. That means there’s no conceivable reason for a programmer ever to type if x = 1. Therefore, Ruby concludes that you almost certainly meant to type something else and issues the warning to alert you to the probable mistake. Specifically, the warning suggests the == operator, which produces a real test (that is, a test that isn’t necessarily always true).
What’s particularly nice about this warning mechanism is that Ruby is smart enough not to warn you in cases where it’s not certain that the condition will be true. If the right-hand side of the assignment is itself a variable or method call, then you don’t get the warning:
![]()
Unlike x = 1, the assignment expression x = y may or may not succeed as a conditional test. (It will be false if y is false.) Therefore, it’s not implausible that you’d test that expression, so Ruby doesn’t warn you.
Why would you want to use an assignment in a conditional test? You certainly never have to; you can always do this:
x = y
if x
# etc.
But sometimes it’s handy to do the assigning and testing at the same time, particularly when you’re using a method that returns nil on failure and some other value on success. A common example is pattern matching with the match method. This method, which you’ll see a lot more of inchapter 11, tests a string against a regular expression, returning nil if there’s no match and an instance of MatchData if there is one. The MatchData object can be queried for information about the specifics of the match. Note the use of a literal regular expression, /la/, in the course of testing for a match against the string name:
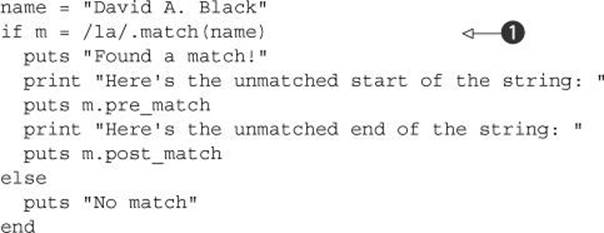
The output from this snippet is
Found a match!
Here's the unmatched start of the string: David A. B
Here's the unmatched end of the string: ck
The match method looks for the pattern la in the string "David A. Black". The variable m is assigned in the conditional ![]() and will be nil if there’s no match. The deck is stacked in the example, of course: there’s a match, so m is a MatchData object and can be queried. In the example, we ask it about the parts of the string that occurred before and after the matched part of the string, and it gives us the relevant substrings.
and will be nil if there’s no match. The deck is stacked in the example, of course: there’s a match, so m is a MatchData object and can be queried. In the example, we ask it about the parts of the string that occurred before and after the matched part of the string, and it gives us the relevant substrings.
As always, you could rewrite the assignment and the conditional test like this:
m = /la/.match(name)
if m
# etc.
You don’t have to combine them into one expression. But at least in this case there’s some semantic weight to doing so: the expression may or may not pass the conditional test, so it’s reasonable to test it.
Although if and friends are Ruby’s bread-and-butter conditional keywords, they’re not the only ones. We’ll look next at case statements.
6.1.3. case statements
A case statement starts with an expression—usually a single object or variable, but any expression can be used—and walks it through a list of possible matches. Each possible match is contained in a when statement consisting of one or more possible matching objects and a segment of code. When one of the terms in a given when clause matches, that when is considered to have “won,” and its code segment is executed. Only one match, at most, can win.
case statements are easier to grasp by example than by description. The following listing shows a case statement that tests a line of keyboard input and branches based on its value.
Listing 6.1. Interpreting user input with a case statement
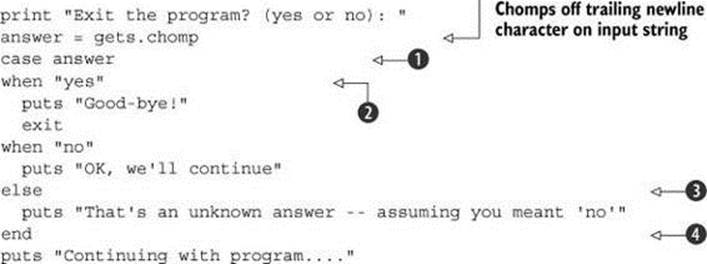
The case statement begins with the case keyword ![]() , continues through all the when blocks
, continues through all the when blocks ![]() and an (optional) else clause
and an (optional) else clause ![]() , and ends with the end keyword
, and ends with the end keyword ![]() . At most, one match will succeed and have its code executed. If it’s the one belonging to "yes", then the program exits. Any other input is either "no" or some other value, which this particular program interprets as equivalent to "no", causing the program to continue running.
. At most, one match will succeed and have its code executed. If it’s the one belonging to "yes", then the program exits. Any other input is either "no" or some other value, which this particular program interprets as equivalent to "no", causing the program to continue running.
You can put more than one possible match in a single when, as this snippet shows:
case answer
when "y", "yes"
puts "Good-bye!"
exit
# etc.
The comma between multiple conditions in a when clause is a kind of “or” operator; this code will say “Good-bye!” and exit if answer is either "y" or "yes".
Let’s look next at how when clauses work under the hood. You won’t be surprised to learn that some message sending is involved.
How when works
The basic idea of the case/when structure is that you take an object and cascade through a series of tests for a match, taking action based on the test that succeeds. But what does match mean in this context? What does it mean, in our example, to say that answer matches the word yes, or the word no, or neither?
Ruby has a concrete definition of match when it comes to when statements.
Every Ruby object has a case equality method called === (three equal signs, sometimes called the threequal operator). The outcome of calling the === method determines whether a when clause has matched.
You can see this clearly if you look first at a case statement and then at a translation of this statement into threequal terms. Look again at the case statement in listing 6.1. Here’s the same thing rewritten to use the threequal operator explicitly:
if "yes" === answer
puts "Good-bye!"
exit
elsif "no" === answer
puts "OK, we'll continue"
else
puts "That's an unknown answer—assuming you meant 'no'"
end
The === in infix operator position (that is, between a left-hand term and a right-hand term) is really syntactic sugar for a method call:
if "yes".===(answer)
A when statement wraps that method call in yet more sugar: you don’t have to use === explicitly in either operator or method position. It’s done for you.
That’s the logic of the syntax. But why does
"yes" === answer
return true when answer contains "yes"?
The method call returns true because of how the threequal method is defined for strings. When you ask a string to threequal itself against another string (string1 === string2), you’re asking it to compare its own contents character by character against the other string and report back true for a perfect match, or false otherwise.
The most important point in this explanation is the phrase “for strings.” Every class (and, in theory, every individual object, although it’s usually handled at the class level) can define its own === method and thus its own case-equality logic. For strings and, indeed, for any object that doesn’t override it, === works the same as == (the basic string-equals-some-other-string test method). But other classes can define the threequal test any way they want.
case/when logic is thus really object === other_object logic in disguise; and object === other_object is really object. === (other_object) in disguise. By defining the threequal method however you wish for your own classes, you can exercise complete control over the way your objects behave inside a case statement.
Programming objects’ case statement behavior
Let’s say we decide that a Ticket object should match a when clause in a case statement based on its venue. We can bring this about by writing the appropriate threequal method. The following listing shows such a method, bundled with enough ticket functionality to make a complete working example.
Listing 6.2. Implementing case statement behavior for the Ticket class
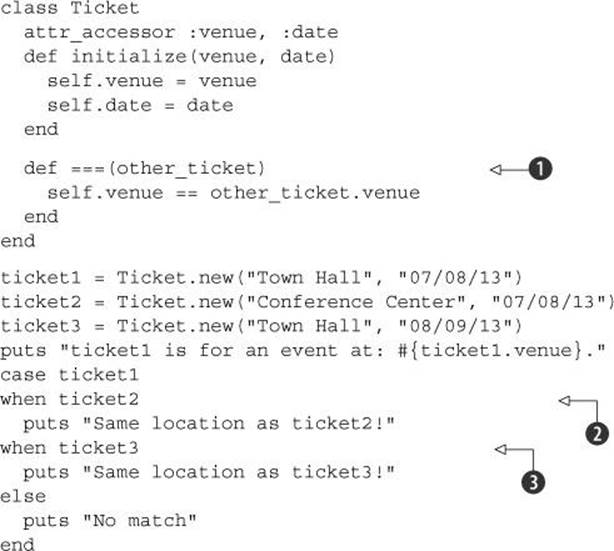
The output from this listing is as follows:
ticket1 is for an event at: Town Hall.
Same location as ticket3!
The match is found through the implicit use of the === instance method of the Ticket class ![]() . Inside the case statement, the first when expression
. Inside the case statement, the first when expression ![]() triggers a hidden call to ===, equivalent to doing this:
triggers a hidden call to ===, equivalent to doing this:
if ticket2 === ticket1
Because the === method returns true or false based on a comparison of venues, and ticket2’s venue isn’t the same as ticket1’s, the comparison between the two tickets returns false. Therefore, the body of the corresponding when clause isn’t executed.
The next test is then performed: another threequal comparison between ticket1 and ticket3 ![]() . This test returns true; the when expression succeeds, and the code in its body is executed.
. This test returns true; the when expression succeeds, and the code in its body is executed.
This kind of interflow between method definitions (===) and code that doesn’t look like it’s calling methods (case/when) is typical of Ruby. The case/when structure provides an elegant way to perform cascaded conditional tests; and the fact that it’s a bunch of === calls means you can make it do what you need by defining the === method in your classes.
The case statement also comes in a slightly abbreviated form, which lets you test directly for a truth value: case without a case expression.
The simple case truth test
If you start a case statement with the case keyword by itself—that is, with no test expression—followed by some when clauses, the first when clause whose condition is true will be the winner. Assuming an object user with first_name and last_name methods, you could imaginably write a casestatement like this:

The simple case keyword in this manner is an alternate way of writing an if statement. In fact, any case statement can be written as an if statement. case statements with explicit arguments to case are often considerably shorter than their if counterparts, which have to resort to calling === or other comparison methods. Those without explicit test arguments are usually no shorter than the equivalent if statements; for instance, the previous example would be written like this using if:
if user.first_name == "David" or user.last_name == "Black"
puts "You might be David Black."
elsif Time.now.wday == 5
puts "You're not David Black, but at least it's Friday!"
else
puts "You're not David Black, and it's not Friday."
end
The advantage of the testless case statement is that it doesn’t limit you to what you can test with === on a given object. When you have a choice between a testless case or an if, your choice will be based on your sense of what looks and reads best.
The return value of case statements
An important final point to keep in mind about case statements is that every case statement evaluates to a single object. If there’s a successful when or else clause, the return value of the entire case statement is the value returned by the code in that clause. Otherwise, if the case statement fails to find a match, the entire statement evaluates to nil, similar to if statements that fail.
Thus you could, for example, rewrite the conditionless example like this:
puts case
when user.first_name == "David", user.last_name == "Black"
"You might be David Black."
when Time.now.wday == 5
"You're not David Black, but at least it's Friday!"
else
"You're not David Black, and it's not Friday."
end
In this version, the calls to puts have been extracted out of the when clauses; the whole case statement is dedicated to finding an argument to the single puts call on the left. That argument will be whichever of the three strings the case statement returns.
Conditionals like if and case/when let you control program flow by doing one thing instead of another. But sometimes you need to perform a single task again and again. This kind of repetition can be accomplished with loops, which we’ll look at next.
6.2. Repeating actions with loops
Ruby’s facilities for looping repeatedly through code also allow you to incorporate conditional logic: you can loop while a given condition is true (such as a variable being equal to a given value), and you can loop until a given condition is true. You can also break out of a loopunconditionally, terminating the loop at a certain point, and resume execution of the program after the loop.
We’ll look at several ways to loop—starting, appropriately, with a method called loop.
6.2.1. Unconditional looping with the loop method
The loop method doesn’t take any normal arguments: you just call it. It does, however, take a code block—that is, a delimited set of program instructions, written as part of the method call (the call to loop) and available to be executed from the method. (We’ll look at code blocks in much more detail later in this chapter. You can get by with just the placeholder level of knowledge here.) The anatomy of a call to loop, then, looks like this:
loop codeblock
Code blocks can be written in one of two ways: either in curly braces ({}) or with the keywords do and end. The following two snippets are equivalent:
loop { puts "Looping forever!" }
loop do
puts "Looping forever!"
end
A loose convention holds that one-line code blocks use the curly braces, and multiline blocks use do/end. But Ruby doesn’t enforce this convention. (The braces and the do/end pair do, in fact, differ from each other slightly, in terms of precedence. You don’t have to worry about that now.)
Generally, you don’t want a loop to loop forever; you want it to stop at some point. You can usually stop by pressing Ctrl-C, but there are other, more programmatic ways, too.
Controlling the loop
One way to stop a loop is with the break keyword, as in this admittedly verbose approach to setting n to 10:
n = 1
loop do
n = n + 1
break if n > 9
end
Another technique skips to the next iteration of the loop without finishing the current iteration. To do this, you use the keyword next:
n = 1
loop do
n = n + 1
next unless n == 10
break
end
Here, control falls through to the break statement only if n == 10 is true. If n == 10 is not true (unless n == 10), the next is executed, and control jumps back to the beginning of the loop before it reaches break.
You can also loop conditionally: while a given condition is true or until a condition becomes true.
6.2.2. Conditional looping with the while and until keywords
Conditional looping is achieved via the keywords while and until. These keywords can be used in any of several ways, depending on exactly how you want the looping to play out.
The while keyword
The while keyword allows you to run a loop while a given condition is true. A block starting with while has to end with end. The code between while and end is the body of the while loop. Here’s an example:
n = 1
while n < 11
puts n
n = n + 1
end
puts "Done!"
This code prints the following:
1
2
3
4
5
6
7
8
9
10
Done!
As long as the condition n < 11 is true, the loop executes. With each iteration of the loop, n is incremented by 1. The eleventh time the condition is tested, it’s false (n is no longer less than 11), and the execution of the loop terminates.
You can also place while at the end of a loop. In this case, you need to use the keyword pair begin/end to mark where the loop is (otherwise, Ruby won’t know how many of the lines previous to the while you want to include in the loop):
n = 1
begin
puts n
n = n + 1
end while n < 11
puts "Done!"
The output from this example is the same as the output from the previous example.
There’s a difference between putting while at the beginning and putting it at the end. If you put while at the beginning, and if the while condition is false, the code isn’t executed:
n = 10
while n < 10
puts n
end
Because n is already greater than 10 when the test n < 10 is performed the first time, the body of the statement isn’t executed. But if you put the while test at the end,
n = 10
begin
puts n
end while n < 10
the number 10 is printed. Obviously, n isn’t less than 10 at any point. But because the while test is positioned at the end of the statement, the body is executed once before the test is performed.
Like if and unless, the conditional loop keywords come as a pair: while and until.
The until keyword
The until keyword is used the same way as while but with reverse logic. Here’s another labor-intensive way to print out the integers from 1 to 10, this time illustrating the use of until:
n = 1
until n > 10
puts n
n = n + 1
end
The body of the loop (the printing and incrementing of n, in this example) is executed repeatedly until the condition is true.
You can also use until in the post-block position, in conjunction with a begin/end pairing. As with while, the block will execute once before the until condition is tested.
Like their cousins if and unless, while and until can be used in a modifier position in one-line statements.
The while and until modifiers
Here’s a slightly shorter way to count to 10, using until in a modifier position:
n = 1
n = n + 1 until n == 10
puts "We've reached 10!"
In place of the until statement, you could also use while n < 10.
Note that the one-line modifier versions of while and until don’t behave the same way as the post-positioned while and until you use with a begin/end block. In other words, in a case like this
a = 1
a += 1 until true
a will still be 1; the a += 1 statement won’t be executed, because true is already true. But in this case
a = 1
begin
a += 1
end until true
the body of the begin/end block does get executed once.
In addition to looping unconditionally (loop) and conditionally (while, until), you can loop through a list of values, running the loop once for each value. Ruby offers several ways to do this, one of which is the keyword for.
6.2.3. Looping based on a list of values
Let’s say you want to print a chart of Fahrenheit equivalents of Celsius values. You can do this by putting the Celsius values in an array and then looping through the array using the for/in keyword pair. The loop runs once for each value in the array; each time through, that value is assigned to a variable you specify:

The body of the loop (the puts statement) runs 11 times. The first time through, the value of c is 0. The second time, c is 10; the third time, it’s 20; and so forth.
for is a powerful tool. Oddly enough, though, on closer inspection it turns out that for is just an alternate way of doing something even more powerful.
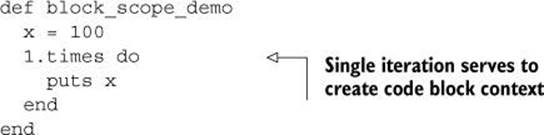
6.3. Iterators and code blocks
The control-flow techniques we’ve looked at so far involve controlling how many times, or under what conditions, a segment of code gets executed. In this section, we’ll examine a different kind of control-flow facility. The techniques we’ll discuss here don’t just perform an execute-or-skip operation on a segment of code; they bounce control of the program from one scope to another and back again, through iteration.
6.3.1. The ingredients of iteration
In focusing on movement between local scopes, it may sound like we’ve gone back to talking about method calls. After all, when you call a method on an object, control is passed to the body of the method (a different scope); and when the method has finished executing, control returns to the point right after the point where the method call took place.
We are indeed back in method-call territory, but we’re exploring new aspects of it, not just revisiting the old. We’re talking about a new construct called a code block and a keyword by the name of yield.
In section 6.2.1, you saw a code sample that looked like this:
loop { puts "Looping forever!" }
The word loop and the message in the string clue you in as to what you get if you run it: that message, printed forever. But what exactly is going on? Why does that puts statement get executed at all—and why does it get executed in a loop?
The answer is that loop is an iterator. An iterator is a Ruby method that has an extra ingredient in its calling syntax: it expects you to provide it with a code block. The curly braces in the loop example delimit the block; the code in the block consists of the puts statement.
The loop method has access to the code inside the block: the method can call (execute) the block. To do this from an iterator of your own, you use the keyword yield. Together, the code block (supplied by the calling code) and yield (invoked from within the method) are the chief ingredients of iteration.
loop itself is written in C (and uses a C function to achieve the same effect as yield). But the whole idea of looping suggests an interesting exercise: reimplementing loop in pure Ruby. This exercise will give you a first glimpse at yield in action.
6.3.2. Iteration, home-style
The job of loop is to yield control to the code block, again and again, forever. Here’s how you might write your own version of loop:
def my_loop
while true
yield
end
end
Or, even shorter:
def my_loop
yield while true
end
Then you’d call it just like you call loop
my_loop { puts "My-looping forever!" }
and the message would be printed over and over.
By providing a code block, you’re giving my_loop something—a chunk of code—to which it can yield control. When the method yields to the block, the code in the block runs, and then control returns to the method. Yielding isn’t the same as returning from a method. Yielding takes place while the method is still running. After the code block executes, control returns to the method at the statement immediately following the call to yield.
The code block is part of the method call—that is, part of its syntax. This is an important point: a code block isn’t an argument. The arguments to methods are the arguments. The code block is the code block. They’re two separate constructs. You can see the logic behind the distinction if you look at the full picture of how method calls are put together.
6.3.3. The anatomy of a method call
Every method call in Ruby has the following syntax:
· A receiver object or variable (defaulting to self if absent)
· A dot (required if there’s an explicit receiver; disallowed otherwise)
· A method name (required)
· An argument list (optional; defaults to ())
· A code block (optional; no default)
Note in particular that the argument list and the code block are separate. Their existence varies independently. All of these are syntactically legitimate Ruby method calls:
loop { puts "Hi" }
loop() { puts "Hi" }
string.scan(/[^,]+/)
string.scan(/[^,]+/) {|word| puts word }
(The last example shows a block parameter, word. We’ll get back to block parameters presently.) The difference between a method call with a block and a method call without a block comes down to whether or not the method can yield. If there’s a block, then it can; if not, it can’t, because there’s nothing to yield to.
Furthermore, some methods are written so they’ll at least do something, whether you pass them a code block or not. String#split, for example, splits its receiver (a string, of course) on the delimiter you pass in and returns an array of the split elements. If you pass it a block, split also yields the split elements to the block, one at a time. Your block can then do whatever it wants with each substring: print it out, stash it in a database column, and so forth.
If you learn to think of the code block as a syntactic element of the method call, rather than as one of the arguments, you’ll be able to keep things straight as you see more variations on the basic iteration theme.
Earlier you saw, in brief, that code blocks can be delimited either by curly braces or by the do/end keyword pair. Let’s look more closely now at how these two delimiter options differ from each other.
6.3.4. Curly braces vs. do/end in code block syntax
The difference between the two ways of delimiting a code block is a difference in precedence. Look at this example, and you’ll start to see how this plays out:
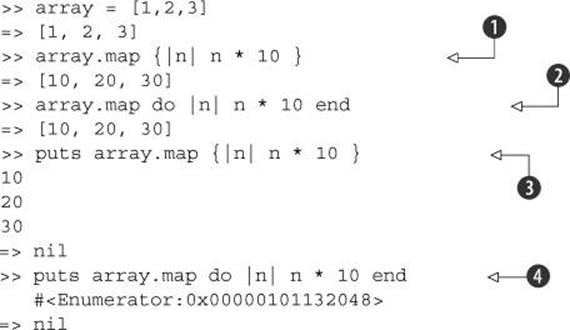
The map method works through an array one item at a time, calling the code block once for each item and creating a new array consisting of the results of all of those calls to the block. Mapping our [1,2,3] array through a block that multiplies each item by 10 results in the new array[10,20,30]. Furthermore, for a simple map operation, it doesn’t matter whether we use curly braces ![]() or do/end
or do/end ![]() . The results are the same.
. The results are the same.
But look at what happens when we use the outcome of the map operation as an argument to puts. The curly-brace version prints out the [10,20,30] array (one item per line, in keeping with how puts handles arrays) ![]() . But the do/end version returns an enumerator—which is precisely whatmap does when it’s called with no code block
. But the do/end version returns an enumerator—which is precisely whatmap does when it’s called with no code block ![]() . (You’ll learn more about enumerators in chapter 10. The relevant point here is that the two block syntaxes produce different results.)
. (You’ll learn more about enumerators in chapter 10. The relevant point here is that the two block syntaxes produce different results.)
The reason is that the precedence is different. The first puts statement is interpreted like this:
puts(array.map {|n| n * 10 })
The second is interpreted like this:
puts(array.map) do |n| n * 10 end
In the second case, the code block is interpreted as being part of the call to puts, not the call to map. And if you call puts with a block, it ignores the block. So the do/end version is really equivalent to
puts array.map
And that’s why we get an enumerator.
The call to map using a do/end–style code block illustrates the fact that if you supply a code block but the method you call doesn’t see it (or doesn’t look for it), no error occurs: methods aren’t obliged to yield, and many methods (including map) have well-defined behaviors for cases where there’s a code block and cases where there isn’t. If a method seems to be ignoring a block that you expect it to yield to, look closely at the precedence rules and make sure the block really is available to the method.
We’ll continue looking at iterators and iteration by doing with several built-in Ruby iterators what we did with loop: examining the method and then implementing our own. We’ll start with a method that’s a slight refinement of loop: times.
6.3.5. Implementing times
The times method is an instance method of the Integer class, which means you call it as a method on integers. It runs the code block n times, for any integer n, and at the end of the method the return value is n.
You can see both the output and the return value if you run a times example in irb:
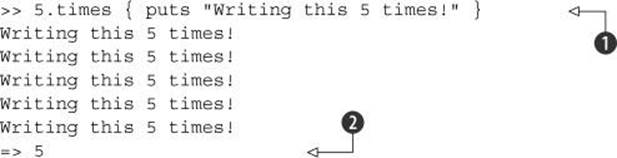
The call to the method includes a code block ![]() that gets executed five times. The return value of the whole method is the object we started with: the integer 5
that gets executed five times. The return value of the whole method is the object we started with: the integer 5 ![]() .
.
The behavior of times illustrates nicely the fact that yielding to a block and returning from a method are two different things. A method may yield to its block any number of times, from zero to infinity (the latter in the case of loop). But every method returns exactly once (assuming no fatal errors) when it’s finished doing everything it’s going to do. It’s a bit like a jump in figure skating. You take off, execute some rotations in the air, and land. And no matter how many rotations you execute, you only take off once and only land once. Similarly, a method call causes the method to run once and to return once. But in between, like rotations in the air, the method can yield control back to the block (if there is one) zero or more times.
Before we implement times, let’s look at another of its features. Each time times yields to its block, it yields something. Sure enough, code blocks, like methods, can take arguments. When a method yields, it can yield one or more values.
The block picks up the argument through its parameters. In the case of times, you can supply a single parameter, and that parameter will be bound to whatever value gets yielded to the block on each iteration. As you might guess, the values yielded by times are the integers 0 through n – 1:
>> 5.times {|i| puts "I'm on iteration #{i}!" }
I'm on iteration 0!
I'm on iteration 1!
I'm on iteration 2!
I'm on iteration 3!
I'm on iteration 4!
=> 5
Each time through—that is, each time times yields to the code block—it yields the next value, and that value is placed in the variable i.
We’re ready to implement times—or, rather, my_times—and here’s what it looks like:
class Integer
def my_times
c = 0
until c == self
yield(c)
c += 1
end
self
end
end
If you want to try an example in irb, you can either type the previous code into your irb session or put it in a file—say, my_times.rb—and then issue the command require "./my_times.rb" in irb. You can then see the results of trying it:
>> 5.my_times {|i| puts "I'm on iteration #{i}!" }
I'm on iteration 0!
I'm on iteration 1!
I'm on iteration 2!
I'm on iteration 3!
I'm on iteration 4!
=> 5
It works just like times. The implementation of my_times is by no means the most concise implementation possible, but it works. You’ll learn plenty more iteration and collection-manipulation techniques that you can use to make your method definitions both concise and clear.
Speaking of which, our next stop is the each method. As you’ll see here, and in even greater depth in the later chapters where we explore collection objects extensively, each is a busy, pivotal method.
6.3.6. The importance of being each
The idea of each is simple: you run the each method on a collection object, and each yields each item in the collection to your code block, one at a time. Ruby has several collection classes, and even more classes that are sufficiently collection-like to support an each method. You’ll see two chapters devoted to Ruby collections. Here, we’ll recruit the humble array for our examples.
Here’s a simple each operation:
array = [1,2,3,4,5]
array.each {|e| puts "The block just got handed #{e}." }
The output of the each call looks like this in an irb session:
>> array.each {|e| puts "The block just got handed #{e}." }
The block just got handed 1.
The block just got handed 2.
The block just got handed 3.
The block just got handed 4.
The block just got handed 5.
=> [1, 2, 3, 4, 5]
The last line isn’t method output; it’s the return value of each, echoed back by irb. The return value of each, when it’s given a block, is its receiver, the original array. (When it isn’t given a block, it returns an enumerator; you’ll learn about those in chapter 10.) Like times, each doesn’t have an exciting return value. All the interest lies in the fact that it yields values to the block.
To implement my_each, we’ll take another step along the lines of iteration refinement. With my_loop, we iterated forever. With my_times, we iterated n times. With my_each, the number of iterations—the number of times the method yields—depends on the size of the array.
We need a counter to keep track of where we are in the array and to keep yielding until we’re finished. Conveniently, arrays have a size method, which makes it easy to determine how many iterations (how many “rotations in the air”) need to be performed. As a return value for the method, we’ll use the original array object:

A trial run of my_each produces the result we’re aiming for:
>> array = [1,2,3,4,5]
>> array.my_each {|e| puts "The block just got handed #{e}." }
The block just got handed 1.
The block just got handed 2.
The block just got handed 3.
The block just got handed 4.
The block just got handed 5.
=> [1, 2, 3, 4, 5]
We’ve successfully implemented at least a simple version of each. The nice thing about each is that it’s so vanilla: all it does is toss values at the code block, one at a time, until it runs out. One important implication of this is that it’s possible to build any number of more complex, semantically rich iterators on top of each. We’ll finish this reimplementation exercise with one such method: map, which you saw briefly in section 6.3.4. Learning a bit about map will also take us into some further nuances of code block writing and usage.
Extra credit: Define my_each in terms of my_times
An interesting exercise is to define my_each using the existing definition of my_times. You can use the size method to determine how many iterations you need and then perform them courtesy of my_times, like so:
class Array
def my_each
size.my_times do |i|
yield self[i]
end
self
end
end
Using my_times saves you the trouble of writing loop-counter code in my_each. But it’s a bit backward: many of Ruby’s iterators are built on top of each, not the other way around. Given the definition of my_each in the main text, how would you use it in an implementation of my_times?
Unlike the first exercise, this one really will be left to you to try on your own!
6.3.7. From each to map
Like each, map walks through an array one element at a time and yields each element to the code block. The difference between each and map lies in the return value: each returns its receiver, but map returns a new array. The new array is always the same size as the original array, but instead of the original elements, the new array contains the accumulated return values of the code block from the iterations.
Here’s a map example. Notice that the return value contains new elements; it’s not just the array we started with:
>> names = ["David", "Alan", "Black"]
=> ["David", "Alan", "Black"]
>> names.map {|name| name.upcase }
=> ["DAVID", "ALAN", "BLACK"]
The mapping results in a new array, each of whose elements corresponds to the element in the same position in the original array but processed through the code block. The piece of the puzzle that map adds to our analysis of iteration is the idea of the code block returning a value to the method that yielded to it. And indeed it does: just as the method can yield a value, so too can the block return a value. The return value comes back as the value of the call to yield.
To implement my_map, then, we have to arrange for an accumulator array, into which we’ll drop the return values of the successive calls to the code block. We’ll then return the accumulator array as the result of the entire call to my_map.
Let’s start with a preliminary, but not final, implementation, in which we don’t build on my_each but write my_map from scratch. The purpose is to illustrate exactly how mapping differs from simple iteration. We’ll then refine the implementation.
The first implementation looks like this:
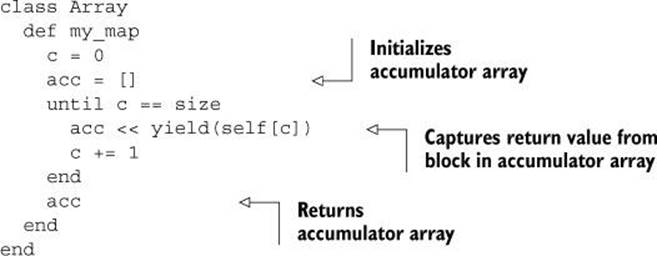
We now get the same results from my_map that we did from map:
>> names.my_map {|name| name.upcase }
=> ["DAVID", "ALAN", "BLACK"]
Like my_each, my_map yields each element of the array in turn. Unlike my_each, my_map stores the value that comes back from the block. That’s how it accumulates the mapping of the old values to the new values: the new values are based on the old values, processed through the block.
But our implementation of my_map fails to deliver on the promise of my_each—the promise being that each serves as the vanilla iterator on top of which the more complex iterators can be built. Let’s reimplement map. This time, we’ll write my_map in terms of my_each.
Building map on top of each
Building map on top of each is almost startlingly simple:
class Array
# Put the definition of my_each here
def my_map
acc = []
my_each {|e| acc << yield(e) }
acc
end
end
We piggyback on the vanilla iterator, allowing my_each to do the walk-through of the array. There’s no need to maintain an explicit counter or to write an until loop. We’ve already got that logic; it’s embodied in my_each. In writing my_map, it makes sense to take advantage of it.
There’s much, much more to say about iterators and, in particular, the ways Ruby builds on each to provide an extremely rich toolkit of collection-processing methods. We’ll go down that avenue in chapter 10. Here, meanwhile, let’s delve a bit more deeply into some of the nuts and bolts of iterators—starting with the assignment and scoping rules that govern their use of parameters and variables.
6.3.8. Block parameters and variable scope
You’ve seen that block parameters are surrounded by pipes, rather than parentheses as method parameters are. But you can use what you’ve learned about method arguments to create block parameter lists. Remember the args_unleashed method from chapter 2?
def args_unleashed(a,b=1,*c,d,e)
puts "Arguments:"
p a,b,c,d,e
end
Here’s a block-based version of the method:
def block_args_unleashed
yield(1,2,3,4,5)
end
block_args_unleashed do |a,b=1,*c,d,e|
puts "Arguments:"
p a,b,c,d,e
end
The parameter bindings and program output are the same as they were with the original version:
Arguments:
1
2
[3]
4
5
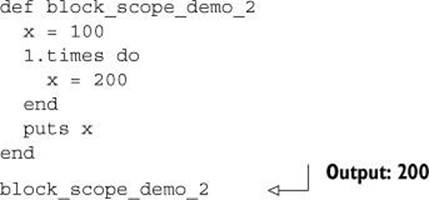
What about scope? A method definition, as you know, starts a new local scope. Blocks are a little more complicated.
Let’s start with a simple case: inside a block, you refer to a variable (not a block parameter; just a variable) called x, and you’ve already got a variable called x in scope before you write the block:
When you run the method (which includes a handy puts statement), you’ll see that the x inside the block is the same as the x that existed already:
![]()
Now, what about assigning to the variable inside a block? Again, it turns out that the variable inside the block is the same as the one that existed prior to the block, as you can see by changing it inside the block and then printing it out after the block is finished:
Blocks, in other words, have direct access to variables that already exist (such as x in the example). However, block parameters (the variable names between the pipes) behave differently from non-parameter variables. If you have a variable of a given name in scope and also use that name as one of your block parameters, then the two variables—the one that exists already and the one in the parameter list—are not the same as each other.
Note
Although it’s important in its own right, the fact that blocks share local scope with the code that precedes them will take on further significance when we look at Proc objects and closures in chapter 14. You’ll learn that blocks can serve as the bodies of anonymous function objects, and those objects preserve the local variables that are in scope at the time of their creation—even if the function objects get handed around other local scopes.
Look at the variables named x in this example:

The output from a call to this method is
Parameter x is 1
Reassigned to x in block; it's now 11
Parameter x is 2
Reassigned to x in block; it's now 12
Parameter x is 3
Reassigned to x in block; it's now 13
Outer x is still 100
The x inside the block isn’t the same as the x outside the block, because x is used as a block parameter. Even reassigning to x inside the block doesn’t overwrite the “outer” x. This behavior enables you to use any variable name you want for your block parameters without having to worry about whether a variable of the same name is already in scope.
Sometimes you may want to use a temporary variable inside a block, even if it isn’t one of the parameters being assigned to when the block is called. And when you do this, it’s nice not to have to worry that you’re accidentally reusing a variable from outside the block. Ruby provides a special notation indicating that you want one or more variables to be local to the block, even if variables with the same name already exist: a semicolon in the block parameter list.
Here’s an example. Note the semicolon in the parameter list:
def block_local_variable
x = "Original x!"
3.times do |i;x|
x = i
puts "x in the block is now #{x}"
end
puts "x after the block ended is #{x}"
end
block_local_variable
The semicolon, followed by x, indicates that the block needs its own x, unrelated to any x that may have been created already in the scope outside the block. In the example, we assign to x inside the block, but these assignments don’t affect the x that existed already. The output shows that the original x survives:
x in the block is now 0
x in the block is now 1
x in the block is now 2
x after the block ended is Original x!
Sure enough, the original x has been protected from change.
The variables listed after the semicolon aren’t considered block parameters; they don’t get bound to anything when the block is called. They’re reserved names—names you want to be able to use as temporary variables inside the block without having to check for name collisions from outside the block.
In sum, three basic “flavors” of block variable are available to you:
· Local variables that exist already when the block is created
· Block parameters, which are always block-local
· True block-locals, which are listed after the semicolon and aren’t assigned to but do protect any same-named variables from the outer scope
With these tools at hand, you should be able to engineer your blocks so they do what you need them to with respect to variables and scope, and so you don’t “clobber” any variables from the outer scope that you don’t want to clobber.
Ruby’s iterators and code blocks allow you to write and use methods that are engineered to share their own functionality with their callers. The method contains some logic and procedure, but when you call the method, you supply additional code that fills out the logic and individualizes the particular call you’re making. It’s an elegant feature with endless applications. We’ll come back to iterators when we examine collection objects in detail in chapters 10 and 11.
But now we’ll look at another control-flow mechanism. So far, we’ve been operating in a cooperative, efficient landscape. It doesn’t always work that way, though; and one of the most important aspects of control flow that you need to understand is the matter of what happens when things go wrong.
6.4. Error handling and exceptions
Way back in chapter 1, we looked at how to test code for syntax errors:
$ ruby -cw filename.rb
Passing the -cw test means Ruby can run your program. But it doesn’t mean nothing will go wrong while your program is running. You can write a syntactically correct program—a program that the interpreter will accept and execute—that does all sorts of unacceptable things. Ruby handles unacceptable behavior at runtime by raising an exception.
6.4.1. Raising and rescuing exceptions
An exception is a special kind of object, an instance of the class Exception or a descendant of that class. Raising an exception means stopping normal execution of the program and either dealing with the problem that’s been encountered or exiting the program completely.
Which of these happens—dealing with the problem or aborting the program—depends on whether you’ve provided a rescue clause. If you haven’t provided such a clause, the program terminates; if you have, control flows to the rescue clause.
To see exceptions in action, try dividing by zero:
$ ruby -e '1/0'
Ruby raises an exception:
-e:1:in `/': divided by 0 (ZeroDivisionError)
from -e:1:in `<main>'
ZeroDivisionError is the name of this particular exception. More technically, it’s the name of a class—a descendant class of the class Exception. Ruby has a whole family tree of exceptions classes, all of them going back eventually to Exception.
Some common exceptions
Table 6.1 shows some common exceptions (each of which is a class, descended from Exception) along with common reasons they’re raised and an example of code that will raise each one.
Table 6.1. Common exceptions
|
Exception name |
Common reason(s) |
How to raise it |
|
RuntimeError |
The default exception raised by the raise method. |
Raise |
|
NoMethodError |
An object is sent a message it can’t resolve to a method name; the default method_missing raises this exception. |
a = Object.new |
|
NameError |
The interpreter hits an identifier it can’t resolve as a variable or method name. |
a = some_random_identifier |
|
IOError |
Caused by reading a closed stream, writing to a read-only stream, and similar operations. |
STDIN.puts("Don't write to STDIN!") |
|
Errno::error |
A family of errors relates to file I/O. |
File.open(-12) |
|
TypeError |
A method receives an argument it can’t handle. |
a = 3 + "can't add a string to a number!" |
|
ArgumentError |
Caused by using the wrong number of arguments. |
def m(x); end; m(1,2,3,4,5) |
You can try these examples in irb; you’ll get an error message, but the session shouldn’t terminate. irb is good about making potentially fatal errors nonfatal—and you can do something similar in your programs, too.
6.4.2. The rescue keyword to the rescue!
Having an exception raised doesn’t have to mean your program terminates. You can handle exceptions—deal with the problem and keep the program running—by means of the rescue keyword. Rescuing involves a rescue block, which is delimited with the begin and end keywords and has arescue clause in the middle:
print "Enter a number: "
n = gets.to_i
begin
result = 100 / n
rescue
puts "Your number didn't work. Was it zero???"
exit
end
puts "100/#{n} is #{result}."
If you run this program and enter 0 as your number, the division operation (100/n) raises a ZeroDivisionError. Because you’ve done this inside a begin/end block with a rescue clause, control is passed to the rescue clause. An error message is printed out, and the program exits.
If you enter something other than 0 and the division succeeds, program control skips over the rescue statement and block, and execution resumes thereafter (with the call to puts).
You can refine this technique by pinpointing the exception you want to trap. Instead of a generic rescue instruction, which rescues any error that’s a descendant class of StandardError, you tell rescue what to rescue:
rescue ZeroDivisionError
This traps a single type of exception but not others. The advantage is that you’re no longer running the risk of inadvertently covering up some other problem by rescuing too eagerly.
Rescuing exceptions inside a method body or code block has a couple of distinct features worth noting.
Using rescue inside methods and code blocks
The beginning of a method or code block provides an implicit begin/end context. Therefore, if you use the rescue keyword inside a method or code block, you don’t have to say begin explicitly—assuming that you want the rescue clause to govern the entire method or block:
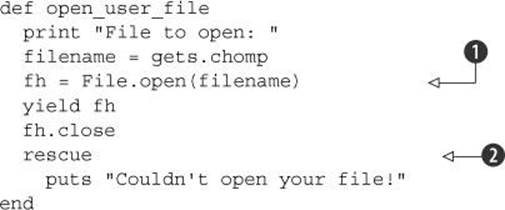
If the file-opening operation ![]() triggers an exception, control jumps directly to the rescue clause
triggers an exception, control jumps directly to the rescue clause ![]() . The def/end keywords serve to delimit the scope of the rescue operation.
. The def/end keywords serve to delimit the scope of the rescue operation.
But you may want to get a little more fine-grained about which lines your rescue clause applies to. In the previous example, the rescue clause is triggered even if an exception is raised for reasons having nothing to do with trying to open the file. For example, if the call to gets raises an exception for any reason, the rescue clause executes.
To get more fine-grained, you have to go back to using an explicit begin/end wrapper:
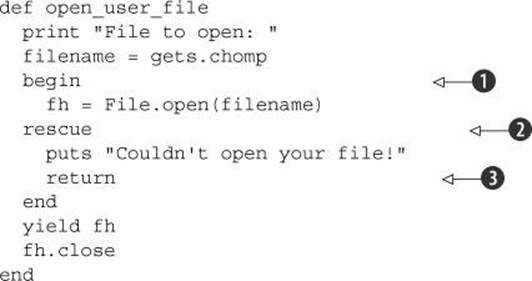
In this version, the rescue clause only governs what comes between the begin keyword ![]() and rescue
and rescue ![]() . Moreover, it’s necessary to give an explicit return command inside the rescue clause
. Moreover, it’s necessary to give an explicit return command inside the rescue clause ![]() because otherwise the method will continue to execute.
because otherwise the method will continue to execute.
So far, we’ve been looking at how to trap exceptions raised by Ruby—and you’ll learn more exception-trapping techniques. But let’s turn now to the other side of the coin: how to raise exceptions yourself.
6.4.3. Raising exceptions explicitly
When it comes to Ruby’s traditional flexibility and compact coding power, exceptions are, so to speak, no exception. You can raise exceptions in your own code, and you can create new exceptions to raise.
To raise an exception, you use raise plus the name of the exception you wish to raise. If you don’t provide an exception name (and if you’re not re-raising a different kind of exception, as described in section 6.4.4), Ruby raises the rather generic Runtime-Error. You can also give raise a second argument, which is used as the message string when the exception is raised:
def fussy_method(x)
raise ArgumentError, "I need a number under 10" unless x < 10
end
fussy_method(20)
If run from a file called fussy.rb, this code prints out the following:
fussy.rb:2:in `fussy_method': I need a number under 10 (ArgumentError)
from fussy.rb:5:in `<main>'
You can also use rescue in such a case:
begin
fussy_method(20)
rescue ArgumentError
puts "That was not an acceptable number!"
end
A nice tweak is that if you give raise a message as the only argument, rather than as the second argument where an exception class is the first argument, raise figures out that you want it to raise a RuntimeError using the message provided. These two lines are equivalent:
raise "Problem!"
raise RuntimeError, "Problem!"
In your rescue clauses, it’s possible to capture the exception object in a variable and query it for possibly useful information.
6.4.4. Capturing an exception in a rescue clause
To assign the exception object to a variable, you use the special operator => along with the rescue command. The exception object, like any object, responds to messages. Particularly useful are the backtrace and message methods. backtrace returns an array of strings representing the call stack at the time the exception was raised: method names, filenames, and line numbers, showing a full roadmap of the code that was executed along the way to the exception. message returns the message string provided to raise, if any.
To see these facilities in action, put the preceding definition of fussy_method in the file fussy.rb (if you haven’t already), and then add the following begin/end block:
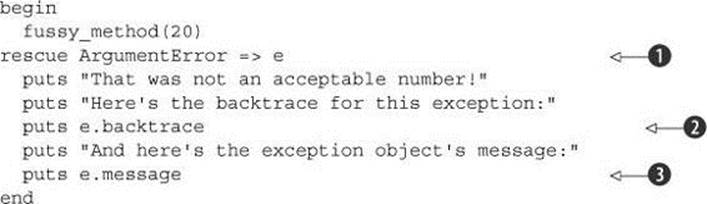
In the rescue clause, we assign the exception object to the variable e ![]() and then ask the exception object to display its backtrace
and then ask the exception object to display its backtrace ![]() and its message
and its message ![]() . Assuming you’ve got one blank line between fussy_method and the begin keyword, you’ll see the following output (and, in any case, you’ll see something almost identical, although the line numbers may differ) when you run fussy.rb:
. Assuming you’ve got one blank line between fussy_method and the begin keyword, you’ll see the following output (and, in any case, you’ll see something almost identical, although the line numbers may differ) when you run fussy.rb:
That was not an acceptable number!
Here's the backtrace for this exception:
fussy.rb:2:in `fussy_method'
fussy.rb:6:in `<main>'
And here's the exception object's message:
I need a number under 10
The backtrace shows you that we were in the fussy_method method on line 2 of fussy.rb when the exception was raised, and that we were previously on line 6 of the same file in the <main> context—in other words, at the top level of the program (outside of any class, module, or method definition). The message, “I need a number under 10” comes from the call to raise inside fussy_method.
Your rescue clause can also re-raise the exception that triggered it.
What gets raised: An exception or an exception class?
The language of exception raising is class-based: raise ZeroDivisionError rather than raise ZeroDivisionError.new. But really, instances of the exception classes are raised. The syntax lets you raise a class because that looks better and abstracts away the fact that instantiation is involved.
You can see the class/instance switch-off if you examine the object that you capture in the rescue clause:
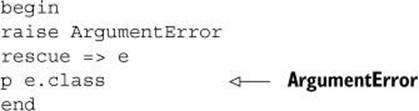
The object’s class is ArgumentError; the object itself is an instance of ArgumentError, not the class ArgumentError.
You get a reprieve from typing .new, and your code has a nice high-level look to it, providing enough information to show you what’s going on without unnecessary housekeeping details.
Re-raising an exception
It’s not uncommon to want to re-raise an exception, allowing the next location on the call stack to handle it after your rescue block has handled it. You might, for example, want to log something about the exception but still have it treated as an exception by the calling code.
Here’s a second version of the begin/end block from the open_user_file method a few examples back. This version assumes that you have a logfile method that returns a writeable file handle on a log file:
begin
fh = File.open(filename)
rescue => e
logfile.puts("User tried to open #{filename}, #{Time.now}")
logfile.puts("Exception: #{e.message}")
raise
end
The idea here is to intercept the exception, make a note of it in the log file, and then re-raise it by calling raise. (Even though there’s no argument to raise, from inside a rescue clause it figures out that you want to re-raise the exception being handled and not the usual generic RuntimeError.) The spot in the program that called open_user_file in the first place then has to handle the exception—or not, if it’s better to allow it to stop program execution.
Another refinement of handling control flow with exceptions is the ensure clause, which executes unconditionally no matter what else happens when an exception is raised.
6.4.5. The ensure clause
Let’s say you want to read a line from a data file and raise an exception if the line doesn’t include a particular substring. If it does include the substring, you want to return the line. If it doesn’t, you want to raise ArgumentError. But whatever happens, you want to close the file handle before the method finishes.
Here’s how you might accomplish this, using an ensure clause:
def line_from_file(filename, substring)
fh = File.open(filename)
begin
line = fh.gets
raise ArgumentError unless line.include?(substring)
rescue ArgumentError
puts "Invalid line!"
raise
ensure
fh.close
end
return line
end
In this example, the begin/end block wraps the line that reads from the file, and the rescue clause only handles ArgumentError—which means that if something else goes wrong (like the file not existing), it isn’t rescued. But if ArgumentError is raised based on the test for the inclusion ofsubstring in the string line, the rescue clause is executed.
Moreover, the ensure clause is executed whether an exception is raised or not. ensure is pegged to the begin/end structure of which it’s a part, and its execution is unconditional. In this example, we want to ensure that the file handle gets closed. The ensure clause takes care of this, whatever else may have happened.
Note
There’s a better way to open a file, involving a code block that wraps the file operations and takes care of closing the file for you. But one thing at a time; you’ll see that technique when we look at file and I/O techniques in chapter 12.
One lingering problem with the line_from_file method is that ArgumentError isn’t the best name for the exception we’re raising. The best name would be something like InvalidLineError, which doesn’t exist. Fortunately, you can create your own exception classes and name them whatever you want.
6.4.6. Creating your own exception classes
You create a new exception class by inheriting from Exception or from a descendant class of Exception:
class MyNewException < Exception
end
raise MyNewException, "some new kind of error has occurred!"
This technique offers two primary benefits. First, by letting you give new names to exception classes, it performs a self-documenting function: when a MyNewException gets raised, it’s distinct from, say, a ZeroDivisionError or a plain-vanilla RuntimeError.
Second, this approach lets you pinpoint your rescue operations. Once you’ve created MyNewException, you can rescue it by name:
class MyNewException < Exception
end
begin
puts "About to raise exception..."
raise MyNewException
rescue MyNewException => e
puts "Just raised an exception: #{e}"
end
The output from this snippet is as follows:
About to raise exception...
Just raised an exception: MyNewException
Only MyNewException errors will be trapped by that rescue clause. If another exception is raised first for any reason, it will result in program termination without rescue.
Here’s what our line_from_file method would look like with a custom exception—along with the code that creates the custom exception class. We’ll inherit from StandardError, the superclass of RuntimeError:
class InvalidLineError < StandardError
end
def line_from_file(filename, substring)
fh = File.open(filename)
line = fh.gets
raise InvalidLineError unless line.include?(substring)
return line
rescue InvalidLineError
puts "Invalid line!"
raise
ensure
fh.close
end
This time around, we’ve fully pinpointed the exception we want to intercept.
Simply by inheriting from StandardError, InvalidLineError provides a meaningful exception name and refines the semantics of the rescue operation. Custom exception classes are easy and cheap to produce and can add considerable value. Ruby itself has lots of exception classes—so take the hint, and don’t hesitate to create your own any time you feel that none of the built-in exceptions quite expresses what you need. And don’t forget that exceptions are classes, classes are constants, and constants can be namespaced, courtesy of nesting:
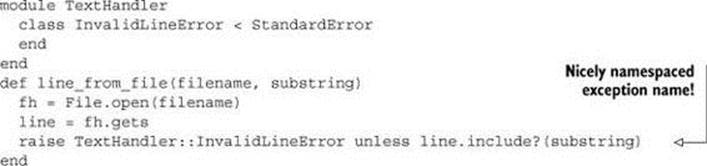
Namespacing exceptions this way is polite, in the sense that it lets other people name exceptions as they like without fearing name clashes. It also becomes a necessity once you start creating more than a very small number of exception classes.
With our exploration of exceptions and how they’re handled, we’ve reached the end of this examination of control flow. As you’ve seen, control can jump around a fair amount—but if you keep in mind the different kinds of jumping (conditionals, loops, iterators, and exceptions), you’ll be able to follow any Ruby code and write code that makes productive use of the many flow-related techniques available.
6.5. Summary
In this chapter you’ve seen
· Conditionals (if/unless and case/when)
· Loops (loop, for, while, and until)
· Iterators and code blocks, including block parameters and variables
· Examples of implementing Ruby methods in Ruby
· Exceptions and exception handling
This chapter has covered several wide-ranging topics, bundled together because they have in common the fact that they involve control flow. Conditionals move control around based on the truth or falsehood of expressions. Loops repeat a segment of code unconditionally, conditionally, or once for each item in a list. Iterators—methods that yield to a code block you provide alongside the call to the method—are among Ruby’s most distinctive features. You’ve learned how to write and call an iterator, techniques you’ll encounter frequently later in this book (and beyond).
Exceptions are Ruby’s mechanism for handling unrecoverable error conditions. Unrecoverable is relative: you can rescue an error condition and continue execution, but you have to stage a deliberate intervention via a rescue block and thus divert and gain control of the program where otherwise it would terminate. You can also create your own exception classes through inheritance from the built-in Ruby exception classes.
At this point, we’ll delve into Ruby’s built-in functionality, starting with some general, pervasive features and techniques, and proceeding to specific classes and modules. Not that you haven’t seen and used many built-in features already; but it’s time to get more systematic and to go more deeply into how the built-ins work.