Creating E-Learning Games with Unity (2014)
Chapter 4. Mission One - Future Proofing the Code
We have designed and implemented a working first pass on the first mission of our game. Take a moment to step back and celebrate! To make sure we can finish creating the last two levels and finish polishing this level, we will need to revisit some of the code we have already written to ensure it is extensible to meet the needs of the other two missions in our game.
We will restructure the existing game into a number of subscenes. Then we will reintegrate the code so that the game can support multiple scene files; hence, it will support multiple levels. We will extend our interactive object system so that it supports more general purpose operations with transforms, which are necessary for future mission requirements. Finally, we will finish the trivia cards with an eye towards testing and application for the last levels.
In this chapter, we will cover the following topics:
· Reorganizing our GameObjects in the Scene view
· Adding new scenes to the project
· Creating the PopupMainMenu GameObject
· An introduction to Finite State Machines
· Implementing the GameMgr script
· Reflecting on our code changes
· Analyzing of code functionality
· Updating some systems
Reorganizing our GameObjects in the Scene view
The following GameObjects will be the focus of our design activities in this chapter:
· GameMgr: This script will handle the choreography between the game and its particular states. It will hold the logic that moves the game from the main screen and between the individual levels.
· PlayerData: This script will hold the game instance-specific attributes of the player. This will include variables such as score and current level.
· Game: This is the GameObject that holds the scripts necessary for game control. It will hold the GameMgr script as well as the MissionMgr script.
· _level1: This class will hold all of the objects that are specific to the first level.
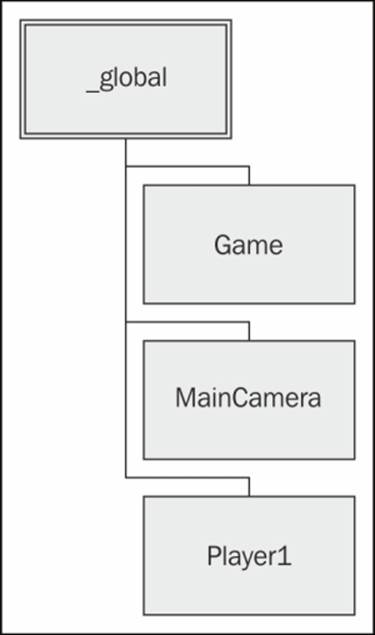
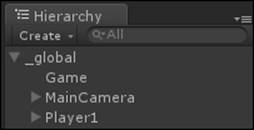
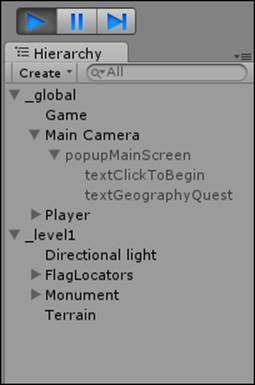
· _global: This class will hold all of the objects that are global or persistent across all game levels as shown in the following screenshot:
Taking an already working system of code and reworking it so that it is more extendible is called Refactoring. By refactoring our game into a number of scene files, we will find that the game becomes easier to extend and maintain. This is important for us to be able to add new lessons and levels to the game.
Previously, our approach to game programming in Unity was to place all GameObject instances inside one scene file. This worked because the lifespan of all GameObjects was the same—the duration of the whole program.
In a multilevel game, we will want to keep some objects persistent for the entire lifespan of the program. Other objects, we will want to only use during a particular level, and perhaps we may want some objects only fleetingly during a particular level.
Let's separate our work thus far into two scene files: one for persistent objects and one for level-one-specific objects.
Creating a global scene
The global scene file will contain all persistent GameObjects and scripts that have a lifespan of the entire game. To create this file, perform the following steps:
1. Create a new empty GameObject, and name it _global.
2. Set its position to (0, 0, 0). Doing this before we drag-and-drop objects beneath it will ensure that the world space positions of the child objects will stay the same as they were previously.
3. Drag-and-drop the following GameObjects beneath the _global GameObject. These will eventually be moved to a new scene file named MAIN as shown in the following screenshot.
· MainCamera
· MissionMgr
· Player
4. Rename MissionMgr to Game. We rename it because we are expanding the responsibilities of this object beyond just MissionMgr; we will be adding another script to this object to increase its responsibilities in the game, so a more generic name is appropriate.
5. Create a new script, and name it GameMgr. Attach it to the object named Game. We will implement this script later in this chapter.
6. Create a new script, and name it PlayerData. Attach it to the object named Game. We will implement this script later in this chapter.
7. Create a new scene by selecting New Scene from the File drop-down menu. This will be the new starting scene for our game going forward. Name it MAIN.
8. Switch back to the CHAPTER3_SCENE1 scene file. Copy the _global GameObject from the Hierarchy tab by either right-clicking on it and selecting Copy or by clicking on the object and pressing Ctrl + C.
9. Switch to the MAIN scene again, and paste the _global object into this scene by pressing Ctrl + V.
Congratulations! We have created a scene file that will act as the launcher for our new game framework. Let's repeat the process for the first level.
Creating a first level scene
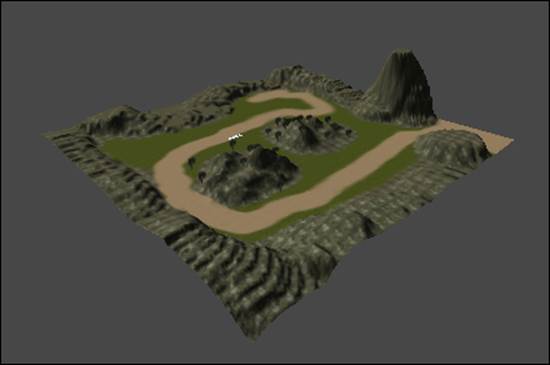
The LEVEL1 scene file will contain all transient GameObjects and scripts that have a lifespan for just the first level of the game. The level one scene will look like the following screenshot:
To create the first-level scene, perform the following steps:
1. Create a new, empty GameObject, and name it _level1.
2. Set its position to (0, 0, 0). Doing this before we drag-and-drop objects beneath it will ensure that the world space positions of the child objects will stay the same as they were previously.
3. Switch back to scene Chapter3_Scene1. Drag-and-drop the following game objects beneath the _level1 GameObject:
· Directional light
· FlagLocators
· Monument
· Terrain
4. Create a new scene by navigating to File | New Scene from the drop-down menu. This will be the scene for our first level going forward. Name it LEVEL1.
5. Switch back to the CHAPTER3_SCENE1 level. Copy the _level1 GameObject from the Hierarchy tab by either right clicking on it and selecting Copy or by selecting the object and pressing Ctrl + C.
6. Switch to the LEVEL1 scene again, and paste the _level1 object into this scene by pressing Ctrl + V.
Congratulations! We now have a second scene file that will correspond to the game content for level one. Now we need to make sure that these levels are added the project.
Adding new scenes to the project
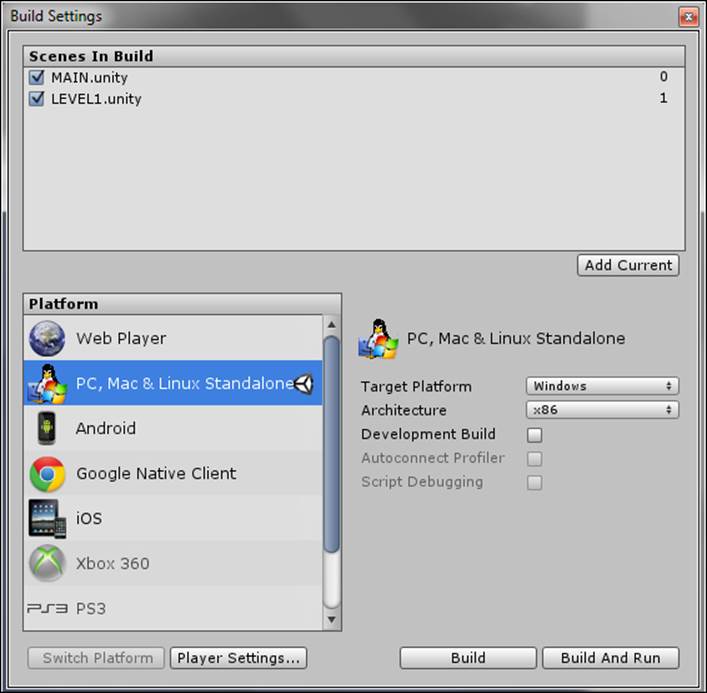
In order to ensure these scenes are available to the game project, we need to add them to the build as shown in the following screenshot:
To add the scenes to the build, perform the following steps:
1. Double-click on the MAIN scene in the project tab. Once it is loaded, select Build Settings from the File drop-down menu, and notice that the previous pop-up window appears. Once there, click on the Add Current button; observe now that a new scene file name has been added to the scenes in build window.
2. Repeat this process for LEVEL1 as well as for CHAPTER3_SCENE1, CHAPTER2_SCENE1, and CHAPTER1_SCENE1. While we don't need the last three in our final build, let's add them so that they are available for convenience.
Congratulations! Now these new scenes will be accessible to the game. Let's connect the new level one scene to the main scene file with a simple pop up.
Creating the PopupMainMenu GameObject
A great game requires an interesting and usable user interface system. Our game will require a number of pop-up windows that will be used to communicate to the user. The user will also be able to interact with the game by selecting buttons on pop ups. The first pop up we need to create is the one that starts the game on the main menu.
A number of middleware technologies exist to help the Unity developer create active UI systems quickly and with high quality; at the time of writing this book, NGUI and EGUI are pop-up systems available on the Unity asset store for this very purpose. While it is possible to use any one of these or other extensions to build your UI, we will develop our own from scratch. Let's create a start screen from which we will launch level one by performing the following steps:
1. Switch to the MAIN scene file.
2. Create a plane, and parent it to MainCamera. This will serve as the background to our pop-up window panel.
3. Set its position to (0, 0, 0), and orient it towards the camera. Translate it along its z axis so that it is forward from the camera by 9 units.
4. Scale the plane by 1.5 on the x axis, and rotate it to 270 degrees around the x axis. At this point, the plane should move with the camera and occlude its line of sight to the rest of the scene. Now, by enabling this GameObject, we have a fullscreen backdrop for menus. Name this plane PopupMainMenu.
5. Create a new, colored material, and apply it to the plane. In our example, I selected the green color.
6. Create a 3D text object. Notice that the component is named TextMesh. This will be used to communicate with the user in our simple menu page. Parent it to PopupMainMenu. Set its relative position to (-3.3, 0.8, 2.9) so that it is near the top and centered. Set its scale to (0.6, 1, 1), and apply a 90 degree rotation to the x axis so that it is nicely centered at the top of the screen.
7. Note that the TextMesh component in the inspector is a container for the 3DText specific parameters. Set the text to the name of our game Geography Quest.
8. Set the CharacterSize to 0.5 and the FontSize to 21 to make the title appear with an appealing size and shape. Just as one might do with a word processor, set the font style to bold for extra visual impact.
9. Name this 3DText object textGeographyQuest to keep the hierarchy easy to read and maintain.
10. Now, we need a prompt for the user to click to start. Let's duplicate the previous GameObject by clicking on it and pressing Ctr + D.
11. Rename this object textClickToContinue. Set the text field of the TextMesh on this object to New.
12. Move the GameObject to (-1.8, 0.9, 1.2), and scale the font size down to 15 to place and scale the text appropriately.
13. Our menu is almost complete! Let's write a script to handle the mouse-click event. Create a new script, and name it MainMenuScript. Attach this script to the PopupMainMenu object.
14. This script will have two private member variables. One to store the main Game GameObject (the one that holds the GameMgr and MissionMgr classes) and one to hold the GameMgr script instance itself (attached to Game). We make these private because the object being referred to doesn't need to change during the lifespan of the game, so finding it automatically on startup is more robust. They can be configured as shown in the following code:
15.private GameMgr gm;
Private GameObject GameObj;
16. Inside the Start() method, we will search for the object named Game. If it is found, we store a reference to the GameMgr script instance attached to this object as shown in the following code. Recall that the Start() method gets invoked by the Unity engine for any class that inherits from MonoBehavior the first time it runs after instantiation:
17.GameObj = GameObject.Find("Game");
18.if (GameObj)
19.{
20. gm = GameObj.GetComponent<GmeMgr>();
};
21. We now implement a method to handle the mouse click as shown in the following code. Unity will automatically invoke a method called OnMouseDown() when the user clicks the mouse, so we will use that for detecting the click. This is one of many methods that the MonoBehavior base class provides for new C# scripts that you create in Unity3D with the new script wizard:
void OnMouseDown() { };
22. Inside this method, if we have a GameMgr script reference, then we will do two things. We call gm.SetState(), and change the state to eGameState.eGS_Level1 as shown in the following code. This enumeration is defined inside of the GameMgr class and corresponds to the game being in level one. We will investigate how GameMgr handles this next. Of course, gm will only be defined if we remember to rename the MissionMgr to Game as requested earlier in this chapter:
gm.SetState(gameMgr.eGameState.eGS_Level1);
23. We also then set the GameObject active flag to false. This causes the object to cease to update. No scripts or components attached to PopupMainMenu will run until active is set to true again. This has the effect of disabling the pop up (which is what we will want).
Congratulations! This pop up will be created when the MAIN scene is loaded, and when clicked, it will tell the GameMgr to change levels to level one.
An introduction to Finite State Machines
A common strategy in game play programming (and computer science in general) is to model a system in terms of discrete objects and their interactions with one another. To do this requires us to understand what the participants are in a system, how they operate in different scenarios, and how they change states.
The Finite State Machine (FSM) is one such technique. With this, the idea is to model the behavior of the object in a number of code blocks. Inside each one, you put the specific code for that block that makes it unique. You also determine what scenarios cause an object to switch from one block (state) to another. Because each state is an encapsulation, it makes your code extensible and maintainable (which is a great thing!).
Implementing an FSM in a game
While there are many ways of programming an FSM, we will commonly encounter two strategies as game programmers on our e-learning example. Each one has its own unique structural components, benefits, and drawbacks.
The switch case FSM
In this form, we require three components:
· An enumeration to list the states: Each individual element in the enumerated type corresponds to a single state in the FSM model. For example, an FSM with three states could be implemented in the enumeration eMyState as shown in the following code:
· public enum eMyState {
· STATE_INVALD = -1, // an error state which can be used to
· encode the logic for processing an error condition
· STATE_A = 0, // an arbitrary state in an FSM
· STATE_B = 1, // a second arbitrary state
· STATE_C = 2 // a third arbitrary state, et cetera
};
Note that we make the enumeration public so that other client classes can have access (to set the state). Also note that we have four distinct states for an FSM with three logical states as it is useful to encode an error state in our type for -1. A variable of typeeMyState is declared in the class to store the current value of the state.
· A switch case block: This structure allows the program to jump to the current state/block (as indicated from the enumeration) to invoke the code for that state as shown in the following code:
· Switch (state) {
· case(eMyState.STATE_A):
· {
· // code for STATE A here
· break;
· }
·
· case(eMyState.STATE_B):
· {
· // code for STATE B here
· break;
· }
·
· case(eMyState.STATE_C):
· {
· // code for STATE C here
· break;
· }
·
· Default:
· {
· // handle fatal error
· break;
· }
}
· A system for encoding and switching state: Two variables of type eMyState are used. One to encode current state and one to encode previous tick state. The previous tick state updates itself to current state on every frame of the update loop. When the current state is not the same as the previous tick state, it means that we have changed state and need to update the current state var:
· if (gameState != _prevGameState)
· {
· ChangeState(gameState);
· }
_prevGameState = gameState;
Classes implementation of FSM
In this second form of FSM, an individual C# class is used for each state. This class's update loop then holds the body of the code for that state's specialization. Changing states is performed the same way as in the previous example. An enumeration is also used to give other systems in the codebase a means of setting states.
Implementing the GameMgr script
Let's implement the GameMgr script so that it can manage the loading (and future unloading) of scene files and assets. Implementing this in a flexible way now will make our game more extensible when we have future levels to add. It can be implemented by performing the following steps:
1. Recall that we have already created an empty script named GameMgr and attached it to the Game GameObject. If you have not already done this, no worries; just create a new script now, and attach it.
2. In order for GameMgr to do its job, it will act as a mediator between popupMenu and the scene files of the game. When GameMgr receives a message to change its state, it will load and unload the appropriate scene files.
3. It is important that at this point we have added the LEVEL1 scene file to the build settings; if you have not yet done this, make sure it has been added now.
4. We will use a custom enumeration in this class to build a state machine. This is a data structure that will let us build a model of how all scene files in the game interact with one another (which loads first, which stays persistent, which loads next, and so on). For complex systems later in the game, we will use this concept repeatedly.
5. We add an entry for both scene files we have created as well as a special error value that we can use to trap potential data problems. Extending this enumeration is as simple as adding more entries to this structure and assigning new entries a new unique integer as shown in the following code:
6. public enum eGameState
7. {
8. eGS_Invalid = -1, //used to encode error condition when
9. setting gamestate
10. eGS_MainMenu = 0,//a state to encode being in the mainmenu
11. eGS_Level1 = 1//a state to encode being in level1
}
12. For GameMgr to be able to detect when a state change occurs, we will require two variables: one for the GameState and one for the GameState on the previous time the Update() loop ran. By checking each frame if the GameState has changed, we can detect when to load a new level as shown in the following code:
13.public eGameState gameState;
private eGameState _prevGameState;
While we don't want the user to be able to set prevGameState ever from the inspector, we allow the GameState to be adjusted by the user for debugging purposes.
14. In the Start() method of this class, we initialize GameState and prevGameState to the same value as shown in the following code. With an initial value of eGS_MainMenu, this corresponds to the main menu scene (which is the one we will default to when we load theMAIN scene). How convenient! Note that since both the previous and current GameStates are the same, GameMgr will not try and load a new scene file right away:
15.GameState = eGameState.eGS_MainMenu
prevGameState = eGameState.eGS_MainMenu;
16. We create a public method to allow other systems to set the state as shown in the following code. By ensuring that we always use this function rather than assigning to state directly, it will allow us to change state to private later on (once the game is done) without having to change the code elsewhere:
17.public void SetState(eGameState gs)
18.{
19. GameState = gs;
}
20. In the Update() loop, the code will check if GameState is not equal to prevGameState. When this happens, it means that in this frame, the GameState was changed by another system and that GameMgr should change levels. To perform the state change, the code will invoke a custom private method ChangeState() as shown in the following code:
21.void Update() {
22. if (GameState != prevGameState)
23. {
24. ChangeState(gameState);
25. }
26. prevGameState = GameState;
}
27. The ChangeState() method checks the current game state (guaranteed to have just changed this frame) as shown in the following code. We use a switch statement to handle selection of conditional logic based on the value of the new, current game state. Switch is a variation on the compound if/else structure you may have seen before; when there are multiple options to select from, switch is regarded by many as being easier to read and maintain:
28.GameState = gs;
switch(gameState)
29. We don't need to do anything at this point for the case where we switch states to MainMenu (since we only allow this state on start by default). Recall that PopupMainMenu switches to LEVEL1 GameState on click. We handle this by callingApplication.LoadLevelAdditive("LEVEL1"). This line of code loads the scene file by name (so long as it has been added to the build) and adds all of the game objects from that scene to the current scene. The net result of this will be a scene file with two game objects at the top level; _global (and all of its children) and _level1 (and all of its children). Since we never duplicate objects between scene files, we now have a complete playable scene as shown in the following code:
30. case(eGameState.eGS_Level1):
31. {
32. Application.LoadLevelAdditive("LEVEL1");
33. break;
};
Note
If you have Unity3D Pro, you can replace Application.LoadLevelAdditive() with Application.LoadLevelAdditiveAsync(), which will make the level transition appear smoother for large levels (since it doesn't block the renderer). If you accidentally use LoadLevelAsync()or LoadLevel(), you will find that the objects that were previously loaded will be deleted when the new level loads up (possibly _global and its children in our case).
Congratulations! We now have written a game state manager class GameMgr, which uses the mediator pattern to selective load scene files that correspond to different levels in our game.
Reflecting on our code changes
Before we can test our code properly, let's reflect on what we have done. While we have made our game framework more flexible and extensible, we have also broken some assumptions from before that need repairing as discussed in the following points:
· The MissionManager class has been renamed to Game. This means that all scripts that used to do a GameObject.Find("MissionManager") need to be updated to Find("Game").
· We have separated some objects into the MAIN scene and some into the LEVEL1 scene. This means that objects that have a reference to an object that is now in another scene will be broken. To repair these, we need to modify the code for the object in the scene. See SetupSceneOne for an example of this.
Analyzing code functionality
We can test our work now by switching to the MAIN scene file and clicking on Play. Notice right off the bat that there is one GameObject in the Hierarchy view, the _global object that holds the main camera, the Game, and the Player. We should also see the main menu pop up right away as shown in the following screenshot:

Clicking anywhere on the pop up sends a message to GameMgr to switch the level to Level1. Upon doing so, we should notice two GameObjects in the hierarchy view: the _global object and the level1 object (which has the terrain, monument, flag holders, and directional light) as shown in the following screenshot. By using this structure of relating the scene name to the name of a game object at the root of the project view, we will make unloading of levels really easy.
Updating some systems
We introduce a new class, PlayerData, to track the current level and points accrued of the player. To make use of this new functionality, we need to update some systems by performing the following steps:
1. Switch to the LEVEL1 scene. Double-click on the PlayerData script to begin editing it.
2. Add a public int score and a public GameState level; note that in order to create an instance of the enumeration defined inside the GameMgr class, we need to prefix with GameMgr as shown in the following code:
3. public class playerData : MonoBehaviour {
4. public int score;
public GameMgr eGameState;
5. Add a public method called addScore(int dScore). This method will be used by the different systems (primarily MissionMgr), to add score to the player's record. Note that since we use an integer for score, we could use this same method to add score or penalize the player (by adding negative scores) as shown in the following code:
6. public void AddScore(int dScore)
7. {
8. score += dScore;
}
9. Add a public method called StoreProgress(gameMgr.eGameState lvl). This method will be used to track which level the user is currently trying to complete. We declare the method public rather than private so that other classes will be allowed to invoke this method on an instance of the PlayerData component. If it were private, then the code would not compile as shown in the following code:
10.public void StoreProgres{gameMgr.eGameState lvl)
11.{
12. level = lvl;
} ;
Now, let's connect the score tracking to the points in the game. Recall that MissionMgr stores a points field for each mission once it is completed. Let's go to MissionMgr and modify it to add the completed mission points to the PlayerData component.
13. In MissionMgr, in the Validate() method, let's add a code block that searches for the PlayerData component on the Player GameObject. If it is found, then the points from the mission are added to the PlayerData score as shown in the following code:
14.GameObject go = GameObject.Find("Player1");
15.if (go)
16.{
17. PlayerData pd = go.GetComponent<PlayerData>();
18. if (pd)
19. pd.AddScore(m.points);
}
20. In order to visualize the player's score, let's add a guiText script to the bottom-right corner of the screen to show the score. To begin, create a new guiText script.
21. Name this object score. Parent it to the _global GameObject (because it should have persistency in the game). Set its position to (1, 1, 0) to offset the coordinates of the pixel-offset to the upper-right corner of the screen. This way, the negative x and ycomponents of the pixel-offset will offset the score from the corner by the specified amount. Set x to -60 and y to -20.
Making the ScorePlate active
Let's create a simple script to update the text field of this score as shown in the following screenshot:
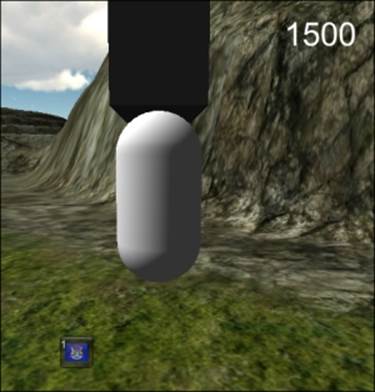
The following script will update the text field in the upper-right corner of the screen so that it reflects the score stored in PlayerData:
1. Switch to the MAIN scene. Create a new script, and name it scoreScript.cs.
2. Attach an instance of this script to the score GameObject.
3. In the start method of this script, find the GameObject named Player, and then store a reference to the PlayerData component on this script.
4. The score script needs to update a member of the GUIText GameObject score, so the update loop that this script should be called from is OnGUI(). Inside this loop, we check for a PlayerData component as shown in the following code:
5. void OnGUI() { }
GameObject go = GameObject.Find("Player")
6. If there is one, we take the score value from PlayerData and assign it to the text field of the textbox. Note that we have to use the C# helper function .ToString() to convert the integer score value to a string that the GUIText can use as shown in the following code:
7. if (pd)
8. {
9. int score = pd.GetScore();
10. this.gameObject.GetComponent<GUIText>().text = score.ToString();
}
Congratulations! Now, if we switch back to the MAIN scene and playtest, note that once you have collected five flags, the score updates to 500. Return the flags to the monument for another 500 points!
Updating the player motion algorithm
To make our game character move through the level more smoothly, we will modify the motion algorithm. Instead of relying on gravity on the rigid body to keep the player anchored to the ground, we will cast a ray downward and glue the player to the polygon directly below. In this way, the curvature of the terrain will play less of a role in restricting the player. This can be achieved by performing the following steps:
1. Switch to the MAIN scene, and double click on the PlayerControls script on the player. In the UpdateMovement() method, directly after the CharacterController.Move() method is called, declare a RayCastHit class named hitInfo as shown in the following code. This class will be used to return the position of the polygon from a raycast that is directly below the player. By invoking a raycast downward, we can check what other GameObject is intersected and use this information to glue the player to the ground directly at the point of contact:
RayCastHit hitInfo;
2. We create a new ray that points straight down from the player. We use the player's transform to determine the downward direction rather than the world transform so that even if the player is rotated, the raycast will always look down relative to the character as shown in the following code:
Ray r = new Ray(this.transform.position, -Vector3.up);
3. We query the physics system by casting the previous ray and allowing the PhysX integration to return the polygon that this raycast has hit, through the hitinfo variable, as shown in the following code:
Physics.Raycast( r, out hitinfo);
4. Finally, we set the y position of the character to the y position of the poly that was hit in the raycast, plus an offset. We do this by creating a new Vector3 variable to assign to the transform.position variable as we cannot assign to just a single component of this value type. The offset that we use to raise the character in the y direction is the height of the player's collision capsule as shown in the following code:
5. this.transform.position = new
6. Vector3(this.transform.position.x, hitinfo.point.y +
7. (this.collider as CapsuleCollider).height,
this.transform.position.z);
Playing the level!
We can test our work now by playing the level. Start the level by running the MAIN scene. Notice the main menu pop-up window that presents the game and waits for the player to click to begin. Once level one loads, drive the player around the level to find the five missing flags. Once found, press their icon in the inventory to read the information about each state as these information card Prefabs have now been updated with interesting trivia about each region. Once all five are found, the system will tell you to return them to the monument, at which time the flags will return, and the mission will be done. Note the score updating when each mission is updated and the smooth character motion across the terrain.
Summary
We have engaged in an iteration on our game program and refactored the working level from the last chapter into multiple scenes. We have created a GameMgr class to handle the new game states for our game, and we have associated individual level scenes with unique states; a good practice for flexible and extensible programming. We updated the camera, score, and PlayerData systems to add further polish and functionality to our game. Next, we will learn about the various user interface options that Unity provides. We will use these to develop a HUD system for our game that will meet the final needs of our e-learning game.