Creating E-Learning Games with Unity (2014)
Chapter 5. User Interfaces in Unity
To provide the level of polish necessary for commercial applications, Unity offers a variety of user interface systems to the game programmer. Understanding what each of these systems is designed to do, what each is good at, and how to combine them, will enable the programmer to build retail class menus, navigation buttons, and more.
In this chapter, we will investigate, analyze, and understand these systems. We will then apply this knowledge and build an extensible pop-up system using Prefabs for commonly used scenarios in our game. We will finish by integrating these into mission one with an eye on future missions and future extensibility. In this chapter, we will cover the following topics:
· Getting familiar with the Unity UI classes
· Developing the pop-up system
· Exploring the GUIText component
· Exploring the GUITexture component
· Exploring the TextMesh component
· Creating clickable text elements
· UnityScript and the GUI Button object
· Building the main menu pop up
· Testing our work
· Future extensions
Getting familiar with Unity UI classes
We will cover the following Unity UI systems:
· GUIText: This component displays a 2D font in screen space. It is well suited for the in-game HUD text that stays relatively stationary on the screen. It is displayed in screen-relative coordinates.
· GUITexture: This component displays a 2D image in screen space. It is well suited for the background and border graphics for in-game HUD elements. Just as the preceding component, this component is also displayed in screen-relative coordinates.
· TextMesh: This component generates a 3D mesh for a given string and displays it in the game world in 3D coordinates. This mesh can be positioned and oriented for in-game-specific purposes. This makes it suitable for displaying the text on the screen at a size that is invariant to the screen resolution.
· GUIButton: The Unity Engine offers a script-only API for generating user interface buttons. These are suitable for 2D elements that need to be animated in screen space and for the dynamic menu UI in the game. These elements cannot be placed in the editor like the other classes discussed earlier in this list; they are controlled entirely from within C#.
Developing the pop-up system
As a case study, we will apply our knowledge of the systems described earlier as we build the following Prefabs. The pop-up system will consist of a window that can display text and graphics. An instance of a pop up can have a number of buttons, each of which will interact with the game in an easy-to-program way. We will integrate them into our existing mission one to achieve a higher level of polish, and these will form the new active user interface, which the user will use to communicate with the game, and with which the game will communicate with the user.
· popupMenu: This pop-up Prefab will provide the usability for an in-game menu system. It will have clickable buttons for the user to interact with.
· popupInfo: This class will present information about the game to the user, with a single button to interact with.
Exploring the GUIText component
The easiest way to display text on screen in a camera-relative way is through the GUIText component. To use this component, you need to add an instance of this component to an existing game object in your scene, and set the text field to the string you want to display.
Please keep in mind that the way in which the transform component of the GUIText GameObject is processed for GUIText is different for other GameObjects with the same component, which we will discuss later.
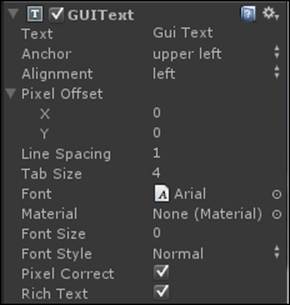
Interpreting the members on GUIText
A (0.5, 0.5, 0.0f) position corresponds to the center of the screen. For this component to work as designed, the object needs to be placed here in the world. The x and y components of the (x, y, z) vector on the transform range from 0.0f to 1.0f each.
Tip
Do not place GUIText on a moving object. If the transform moves, the meaning of the text position will change, and the text will likely go some place you don't want it to! If you want to track a moving object with GUIText, then you need to adjust the x and y values in the Pixel Inset vector instead of parenting it.
The Pixel Inset vector is a special 2D vector that specifies where on the screen (relative to the transform's x, y components) the text should be displayed. The units of this are in pixels and not screen percentages. This means that if you resize your window, these numbers may not remain correct. The fix for this is to set your pixel offsets via a script.
The Anchor and Alignment fields on the GUIText component correspond to the location where the position should be tracked on the string itself. With options in the center or at the corners, the API allows the programmer to easily align the text field at the center or the margin.
The Font Size and Font Style fields allow the programmer to specify the size of the text and whether it should be rendered normal, bold, or italic. Use these liberally to give your text some added visual pop and personality.
The Font field is where the actual font file reference for this text is established. By importing various fonts into Unity, you can render your 2D text in a variety of typesets.
Exploring the GUITexture component
As we can now display 2D text, let's discuss how we can add visually appealing graphics to our interfaces; the GUITexture component does precisely this. You can see the GUITexture component as follows:

The Texture field is a reference to a 2D graphic element. This could be a .png, .jpg, or .bmp file that you created in the Paint program on your computer. Each file type has its benefits and drawbacks depending on how much compression you need in your file. Dragging-and-dropping it into the Project tab will import the image, after which you can set the reference.
The Color field lets the user select a specific tint for the GUITexture. This is a convenient way to fine-tune the appearance of the texture without having to edit it in your external Paint program.
The Pixel Inset field works in a way similar to the Pixel Offset field. The X and Y fields correspond to the screen space coordinates of the upper-left corner of the texture. The Width and Height fields provide a way to stretch and scale the graphics vertically and horizontally; combining these two lets the programmer place and resize the visuals precisely.
The Left Border, Right Border, Top Border, and Bottom Border fields provide a way to tile the texture to the left, right, top, or bottom of the original. These measurements are in pixels as well and not in screen percentages.
Tip
To make sure that the GUITexture component you create displays behind the GUIText that you instantiate, you can adjust their relative priorities with the Z component of the transform position. Larger z components will draw closer to the camera and smaller ones (even negative ones) will draw farther away. Keeping this in mind, we can sort our textures and text elements as required by our design.
Exploring the TextMesh component
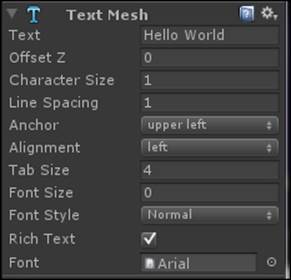
The TextMesh user interface component operates differently than the previous two components. It actually generates a polygonal mesh based on the text rather than display a 2D font or 2D texture. It then places the mesh at the location and orientation specified in the GameObject's transform. This means that we can place this mesh directly in the game world!
Ideal use of TextMesh
One of the useful applications of TextMesh is that it can be placed in the world at its transform position. This makes it adept at labeling objects that move around the world. This can be done by parenting the TextMesh component to the GameObject, with a slight vertical offset in the TextMesh transform.
Creating clickable text elements
To process whether any of the preceding elements have been clicked or not by the mouse pointer, we have to manually program the handling of this event. Luckily for us, since these components are attached to a GameObject (which inherits from MonoBehavior), we can use mouse events that MonoBehavior provides.
Detecting mouse clicks
Whenever the mouse pointer is clicked while the pointer is over the top of a GameObject, the OnMouseDown callback is invoked. With this, we can trap these button clicks and respond accordingly:
void OnMouseDown() { // insert code here }
Detecting mouse over
A second callback method is called whenever the mouse pointer moves onto a GameObject. This function is a convenient way to handle the highlighting of the GUI elements when they are selected or browsed:
void OnMouseOver() { // insert code here }
Detecting leaving mouse over
A final callback method is called whenever the mouse leaves from over the top of a GameObject. This is the complement of the preceding mouseOver handler and can be used in conjunction with the preceding method of turning highlighting on and off:
void OnMouseExit() { // insert code here }
Exploring UnityScript and the GUIButton object
The Unity Editor is laid out with an internal GUI-specification language called UnityGUI. This API is only accessible to Unity game programmers from within C# (and JavaScript) code, unlike the previous GUI elements that can be placed and adjusted within the editor itself at design time. We can use this to place buttons, textures, pop-up windows, tooltips, and many other UI primitives. The difference in use from the previous examples is that the elements are instanced and placed entirely from the script rather than at design time in the editor. For our dialog pop-up Prefabs, we will explore the GUI.Button class.
Using UnityGUI
To use the UnityGUI functionality, we must invoke the commands from within a special callback, OnGUI(). As this function is not created by default when you create a new C# script in Unity, you need to add it yourself. The Unity Engine will invoke this method automatically when GUI elements are to be redrawn; so, we put our GUIButton code and GUITexture and GUIText update code in here:
void OnGUI() { // insert code here }
Creating a clickable button
To create a button, use the GUI namespace and instantiate a button with parameters into the constructor. There are six different function signatures one can use to instantiate a GUI button, depending on which visuals or string you want to display on it. Each type, however, requires the rect class as the first parameter:
GUI.Button( new rect(x,y,width,height), string);
Note that the new rect class instance takes the x, y (position of the rect's upper-left corner) as well as the width and height dimensions of the button as the input.
Congratulations! By adding this line of code to the OnGUI() method, you will display a button at the x and y position with the text "string" on the button.
Detecting a mouse click
To detect a mouse click on this button, we need to check that the GUI.Button() function returns a Boolean; namely, true when the button is clicked and false otherwise. This means that every time the OnGUI() method is called, we have the opportunity to respond to a mouse click, each time a button is potentially drawn to the screen:
if (GUI.Button( new rect(x,y,width,height), string))
{
// handle button click here
}
Building the main menu pop up
Let's put all of this together and build a functional and extensible pop up for the main menu.
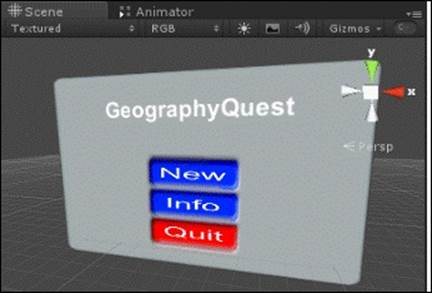
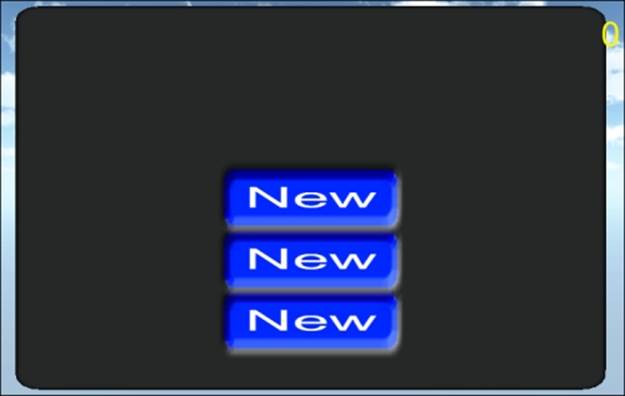
This pop up will display the name of the game on the title screen and present the user with three working buttons. From this, we will be able to make a pop-up Prefab that can be used for other UI. Perform the following steps to create a main menu pop up:
1. To start, let's create the base of the panel. Create a plane that will be the base of the pop up. Set its position to 0, 0, 8.6 and its X rotation to -90.
2. Scale the panel to 1.54, 1, 1 so that it is a bit wider than it is tall.
3. On the MeshRenderer, we associate a new material called popupMaterial. This material has a white-colored component and a texture that is opaque gray with round edges with full alpha. Applying this material makes the plane appear rounded at the corners.
4. Let's rename the plane to popup_MainMenu to reflect its actual role.
5. The main menu pop up will have four child objects: a text field for the pop-up title and three child objects for the buttons.
6. Create a 3DText object, parent it to the MainMenu panel, and set its local position to 0, 0.1, 3. This will place the text in front of the panel, that is, front and center. Set the anchor to middleCenter and the font size to 21. Set the font style to Bold.
7. Move the game object to -1.8,0.9,1.2 and scale down the font size to 15 to place and scale the text appropriately.
8. Let's create a button object to use the three interactive elements on the menu. To start, create a plane, rotate it by -90 in the x plane, parent it to the MainMenu plane, and set its local position to 0, 0.1, 0.2.
9. Set the scale of this new object to 0.3, 0.1, 0.2. Rename it to Button1 to make the object hierarchy more clear.
10. Create a 3DText object, attach it to the button, and set the font size to 68. Set the text field to New.
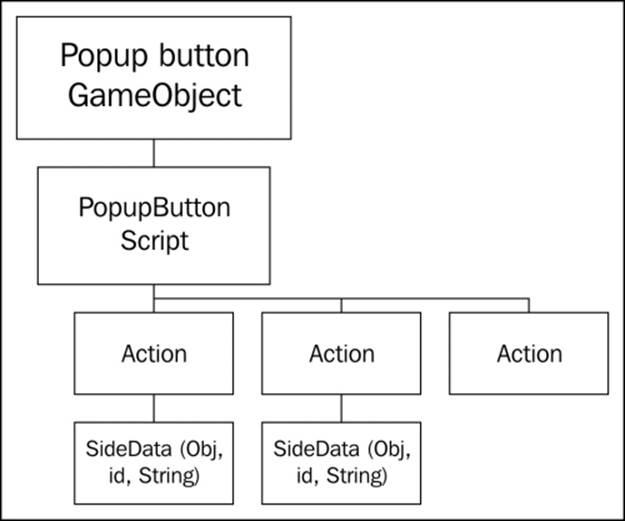
11. The first button will be for the new action. To handle this, we will need to write a script. Create a new script called popupButtonScript.cs. Attach an instance of this script to Button1 (the new button).
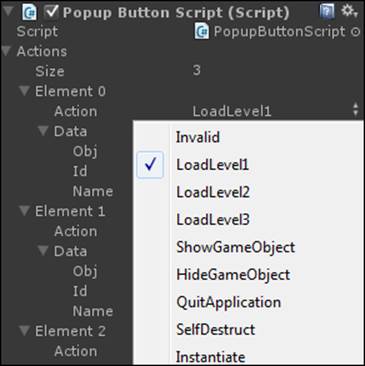
12. Inside this script, we will create a public enumeration that specifies all of the actions that can occur when the button is pressed. Loading levels one through three, showing and hiding GameObjects, instantiating a Prefab, self-destructing, and quitting the application will be the first actions our button supports:
13.public enum popUpAction {
14. Invalid = -1, //used to encode error action
15. LoadLevel1 = 0, //used to load level 0
16. LoadLevel2 = 1, //used to load level1
17. LoadLevel3 = 2, // used to load level2
18. ShowGameObject =3, //used to show a GameObject
19. HideGameObject = 4, //used to hide a GameObject
20. QuitApplication = 5, //used to quit application
21. DestroyGameObject = 6, //used to destroy a GameObject instance
22. Instantiate = 7 //used to instantiate an object from a prefab
}
23. We want to be able to set in script, when we click on a button, which action will be invoked on the click. This will require setting the enumeration as well as some side data that will be processed with the click. This class will be called popupResponse. In order to populate the array of actions on the button with this custom class, we need to make it serializable. Recall that if this class had inherited from MonoBehavior, then this would have included the serializable functionality; since we don't inherit from any base class, we need to add this back explicitly. This will allow the class properties to be saved inside the editor:
24.[System.Serializable]
25.public class popupResponse
26.{
27. public popupAction action;
28. public popupData data;
}
29. We will also need a class to describe the side data that the button needs to operate on when clicked. This will be contained in the serializable popupData class. This class contains a set of variables of different datatypes that a button may or may not use as side data while processing its action:
30.[System.Serializable]
31.public class popupData
32.{
33. public GameObject obj; // a potential GameObject to operate on
34. public int id; //an integer id to use when processing a popup
35. public string name;//a string to use when processing a popup
}
36. We keep a list of actions (pop-up response classes) that will be invoked on a click on each button. This is kept as an array and not as a single response so that a button can perform an arbitrary number of tasks on a click.
public list<popupResponse> actions;
37. We create an enumeration for the current state of the button. This will be used to codify whether or not the mouse pointer is over the button and whether we should display the highlighted or non-highlighted texture:
38.public enum eButtonState
39.{
40. Invalid = -1,
41. Off = 0,
42. On = 1 // a tri state enum used to encode if a button is clicked or not
};
43. We keep two variables of the eButtonState type. The ButtonState variable represents the current eButtonState of the button; namely, if it is On or Off. The PrevTickButtonState variable stores the ButtonState for every frame that the button itself updates. We use two state variables to search for the frame where the state changes so that we can dispatch the button actions on that frame:
44.Public eButtonState ButtonState;
Public eButtonSTate prevTickButtonState;
45. We add two public Texture references in this script. This allows the programmer to associate an On and Off texture for the button. When the mouse is over the button, the On texture will be displayed. When the mouse is not over the button, the Off texture will be shown:
46.Public Texture On;
Public Texture Off;
47. We keep references to the object named Game in the scene. We also keep a reference to the gameManager script attached to this. These are cached in the start method.
48. In the Update() loop of the button GameObject, we compare prevTickButtonState with ButtonState:
PrevTickButtonState = ButtonState;
49. In the OnMouseDown() method of this GameObject (mouse down on the button), we call the Dispatch() method, which iterates through all of the buttonResponses in the action list.
50. The Dispatch() method is where the brunt of the work for the button occurs. It loops over all of the actions in the action array (from 0 to Count):
51.for (int i= 0; I < actions.Count; i++)
52.{
53. popupResponse r = actions[i];
}
54. A switch statement is used to selectively update the logic of the button based on the type of action in the actions array in each slot. Each potential popupAction has its own implementation in this block:
55.switch(r.action)
56.{
57. // each case() implements a different behavior
}
58. The case for LoadLevel 1, LoadLevel 2, or LoadLevel 3 will use the GameMgr component reference, and set the GameState in the GameMgr component to levelLoad, which then performs the Application.LoadLevelAdditive call.
59. The case for Instantiate will dereference the GameObj object in the popupData sideData member, and perform a GameObject.Instantiate call on it to duplicate that Prefab. It will then set the parent to the GameObject that has the name 'name' from the sideData field. Lastly, it will set the position and orientation to post and rotation of the Prefab after it is initialized (the pos and rot values of the Prefab at the time it is created).
60. The HideObject and ShowObject actions will set the object referenced by the sideData to either active =true or active=false. This has the effect of disabling or enabling the renderer as well as the rest of the game logic/components on this object.
61. The self-destruct method will call Destroy() on the parent object of the button. This has the effect of destroying the pop up and all the children buttons and such. Of course, this assumes that buttons are a 1-layer child of the main pop-up root! Whether you decide to destroy or hide an object, it will depend on the specific needs of your game. Destroying an object will of course free up more memory; however, this should be done for every frame. If a lightweight way to hide and unhide an object is required, consider just disabling and enabling the renderer with HideObject and ShowObject.
Congratulations! We have an implemented popupButtonScript attached to our NEW button. Let's configure it:
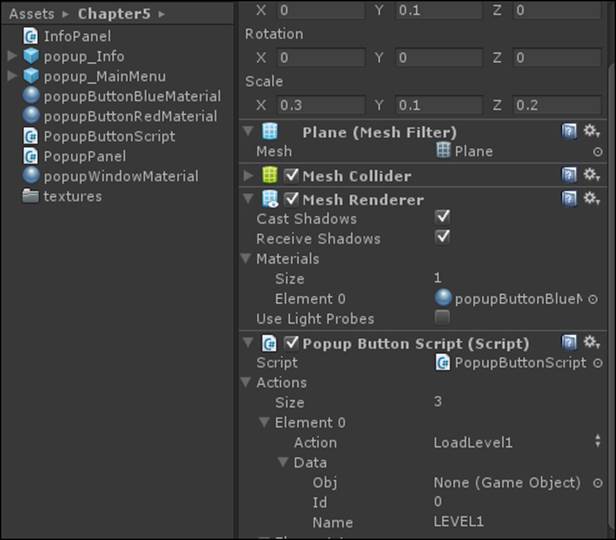
1. On the NEW button, open up the popupButtonScript and set the number of actions to 2 (by manually setting size = 2). This will correspond to two actions that will be invoked, one at a time, on mouse click.
2. Set the action of Element 0 to be LoadLevel1. Open up the Data field associated with this action and set the name to LEVEL1 (to match the scene file name).
3. For Element 1, set the action to SelfDestruct. By putting this second, we guarantee the button will load the new level and then destroy the pop up (which is what we want!).
4. Set the On texture to a light blue-colored texture and the Off texture to a dark blue variation. Set the ButtonState to Off by default.
Congratulations! We now have a working NEW button that starts a new game by loading a new level and destroying the menu pop up. At this point, we can delete the previous main menu page.
Let's continue building out the MainMenu Prefab:
1. Duplicate the NEW button twice, and translate the two copies below the first one to (0,0.1,-1.5) and (0,0.1,-3).
2. Rename the second button to Button2 and set the name of the text field to Info. Rename the third button to Button3 and set the name of the text field to QUIT.
3. Open the popupButtonScript on the third button, and change the On and Off textures to light and dark red textures, respectively. Change the number of actions in the script to 1 and set the action to QuitApplication.
4. Open the popupButtonScript on the second button and change two actions. The first one should be Instantiate, where obj is the popup_Info Prefab, and the parent object's name is codified under the name field MainCamera.
5. Set the second element of this array to SelfDestruct. With this, the Info button will create a new instance of a popup_info panel and destroy itself. The pattern we will use to return to the main menu will be such that the popup_info button allocates a new instance of the pop up when instructed to do so, after which it will destroy itself. In this way, the content of the UI pop up for both pages is completely contained inside the pop-up Prefabs we have created in the editor.
6. Let's create a new script that manages the pop up at its top level; call it popupPanel. Associate an instance of this script with the root of the MainMenu.
7. In this script, create a single public string named nametxt and a reference to TextMesh. In the start method, copy the public string variable's contents over the top of the string member of the TextMesh. This gives a simpler interface to name the pop up; we will use this script as a central place to interface with the pop up.
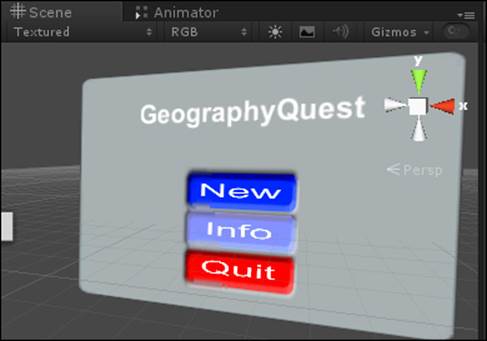
Great! Now, we have three functional buttons on our pop up. When we move over them, the PopupButton script swaps the highlighted and non-highlighted textures for an additional visual cue.
1. Drag-and-drop this pop up into the Project tab to make a Prefab out of it. Name the Prefab popup_MainMenu. We will need to reinstance our main menu from the Prefab at a later time.
2. Let's create a new Prefab based on this one. It will be used for the Information tab. To begin, copy and paste the popup_MainMenu Prefab. Rename it popup_Info.
3. Keeping the dimensions the same, rename the panel to Info by changing the pop-up name parameter in the popupPanel script.
4. Delete button 2 and button 3 from the popup_Info object; we only need one button on this panel to return to the main menu. Open the popupButtonScript on the single button and ensure that there are two valid actions.
5. Set the first action to Instantiate. In the data member for that action, set the Obj to instantiate to a reference to the popup_MainMenu Prefab. This will tell the button to create a copy of the popup_MainMenu Prefab when the button is clicked. To tell the script which GameObject to parent this new instance to, add the name of the object to the Name field and change the name field to MainCamera.
6. Set the second action to SelfDestruct so that this button will delete itself on a click.
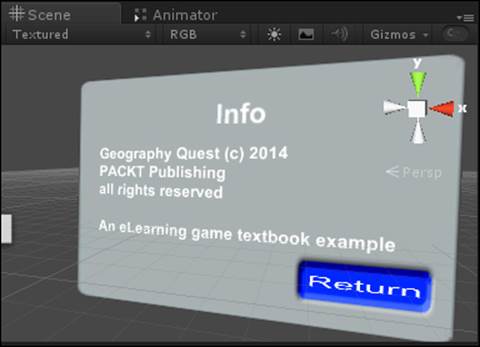
7. In the popup_Info object, add five more TextMesh GameObject instances. Put them on successive lines at a distance of 0.8 units in z from one another. These will be used to store the lines of text in your information pop up. Set the first three lines of text to the following:
8. Geography Quest © 2014
9. PACKT Publishing
all rights reserved
10. Save this Prefab to the project folder by dragging-and-dropping it into your assets folder. Name the new Prefab popup_Info.
11. Go back to your popup_MainMenu and open up the button 2 popupButtonScript component. Find the Instantiate command in the actions array for this button. Now, go to the Data field for this action, and change the obj reference to the Prefab popup_Info by dragging-and-dropping it from the Project tab back to this field. Also, make sure the name of the parent object is also set at this time to MainCamera.
Congratulations! We now have a working information screen pop-up that has been connected to the Info button of our working main menu pop up. If you have not already done so, please delete the previous main menu panel from the last chapter; we will not need this anymore as our pop-up system can do the job of starting our game. Please make sure there is only one instance of popup_MainMenu attached to the camera by default, and that there is no popup_info object instance on the main camera by default.
Testing our work
Let's trace through how the pop-up system works. When the main scene first loads, the popup_MainMenu Prefab renders in front of the camera. It does this because it is parented to the main camera's transform as a child object. This means that no matter what position and orientation the camera has, the pop up will move relative to this and always be on the screen, effectively in screen coordinates. This is a common trick in game programming used to achieve quasi-2D screen space results with 3D objects.
When the New button is clicked, the popupButtonScript iterates over the action array, and based on the enumeration for the action, it dispatches an appropriate command. For now, we set the GameState to loading level1 and let the gameManager script handle the loading of the new scene file. We then call SelfDestruct to delete the MainMenu object from the world (we won't need it anymore as we are in-game).
When the Info button is clicked, the popupButtonScript iterates over the action array, dispatching commands based on the value of the action enumeration. The first thing that happens is that popup_Info is instantiated and parented to the camera. Since this pop up has the same position and orientation as popup_MainMenu, the transition appears seamless! Then, popup_MainMenu is destroyed that leaves only the Information dialog displayed.
If the Return button on the popup_Info dialog is pressed, it iterates over its actions and invokes two commands. It instantiates popup_MainMenu again (from the Prefab in the Project window so that it is a new instance of the menu and not the original), then it callsselfDestructs and deletes the popup_Info window, leaving only the main menu. Since they share the same transform, the transition appears seamless.
If the Quit button is pressed, the application terminates. This is not readily apparent in the editor, but once we build to execute, this will terminate the program.
Future extensions
Now that we have a nice generic menu system, we could apply this to a number of situations:
· We can redesign our flag info pop up using a model similar to the popup_Info panel from the main menu. This would give each of them a Return button and a polished and consistent visual presentation.
· We can create a pause menu for the game. From this, the user can check statistics, restart the level, or quit to the main menu.
· We can use this system for NPC dialogs and interactions with the user. NPC dialogs are the conversation pop-up windows that will appear when the player interacts with NPCs. The user will interact with the NPC by selecting options from these pop-up windows.
Summary
We overviewed a wide variety of 2D and 3D user interface components that Unity provides. After some analysis, we determined the best scenarios to use each one of them. Finally, we applied our knowledge and built a pop-up system using programming techniques from previous chapters to build a generic, interactive, and responsive menu system. We built a couple of Prefabs and redesigned the frontend of the game using this new system to prove the efficiency of the technology. This adds a level of polish to our game.
In the next chapter, we will continue to add polish and interactivity as we program non-player characters for our game. By populating the game world with other characters and objects, it will add more depth to the game world that makes the experience more engaging, which will promote further learning by the user.