Teach Your Kids to Code: A Parent-Friendly Guide to Python Programming (2015)
Chapter 6. Random Fun and Games: Go Ahead, Take a Chance!
In Chapter 5, we programmed the computer to make decisions based on conditions. In this chapter, we’ll program the computer to pick a number between 1 and 10, to play Rock-Paper-Scissors, and even to roll dice or pick a card!
The common element in these games is the idea of randomness. We want the computer to pick a number at random between 1 and 10, and we guess what that number is. We want the computer to randomly pick rock, paper, or scissors, and then we choose what to play and see who wins. These examples — plus dice games, card games, and so on — are called games of chance. When we roll five dice to play Yahtzee, we usually get a different result every time we roll. That element of chance is what makes these games fun.

We can program the computer to behave randomly. Python has a module called random that allows us to simulate random choices. We can use the random module to draw random shapes on the screen and program games of chance. Let’s start with a guessing game.
A Guessing Game
We can use random numbers in the classic Hi-Lo guessing game. One player picks a number between 1 and 10 (or 1 and 100), and the other tries to guess the number. If the guess is too high, the guesser tries a lower number. If they guessed too low, they try a higher number. When they guess the right number, they win!
We already know how to compare numbers with the if statement, and we know how to keep guessing using input() and a while loop. The only new skill we need to learn is how to generate a random number. We can do this with the random module.
First, we have to import the random module with the command import random. You can try this in the Python shell by typing import random and pressing ENTER. The module has a few different functions for generating a random number. We’ll use randint(), short for random integer. Therandint() function expects us to give it two arguments — that is, two pieces of information — between its parentheses: the lowest and highest numbers we want. Specifying a lowest number and a highest number in the parentheses will tell randint() what range to choose randomly from. Type the following in IDLE:
>>> import random
>>> random.randint(1, 10)
Python will respond with a random number between 1 and 10, inclusive (which means the random number can include 1 and 10). Try the random.randint(1, 10) command a few times and see the different numbers you get back. (Tip: you can use ALT-P, or CONTROL-P on a Mac, to repeat the most recently entered line without having to type it all again.)
If you run that line enough (at least 10 times), you’ll notice that numbers sometimes repeat, but there’s no pattern in the numbers as far as you can tell. We call these pseudorandom numbers because they’re not actually random (the randint command tells the computer what number to “pick” next based on a complex mathematical pattern), but they seem random.
Let’s put the random module to work in a program called GuessingGame.py. Type the following in a new IDLE window or download the program from http://www.nostarch.com/teachkids/:
GuessingGame.py
➊ import random
➋ the_number = random.randint(1, 10)
➌ guess = int(input("Guess a number between 1 and 10: "))
➍ while guess != the_number:
➎ if guess > the_number:
print(guess, "was too high. Try again.")
➏ if guess < the_number:
print(guess, "was too low. Try again.")
➐ guess = int(input("Guess again: "))
➑ print(guess, "was the number! You win!")
At ➊, we import the random module, which gives us access to all functions defined in random, including randint(). At ➋, we write the module name, random, followed by a dot and the name of the function we want to use, randint(). We pass randint() the arguments 1 and 10 so it generates a pseudorandom number between 1 and 10, and we store the number in the variable the_number. This will be the secret number the user is trying to guess.
At ➌, we ask the user for a guess between 1 and 10, evaluate the number, and store it in the variable guess. Our game loop starts with the while statement at ➍. We’re using the != (not equal to) operator to see if the guess is not equal to the secret number. If the user guesses the number on the first try, guess != the_number evaluates to False and the while loop doesn’t run.
As long as the user’s guess is not equal to the secret number, we check with two if statements at ➎ and ➏ to see if the guess was too high (guess > the_number) or too low (guess < the_number) and then print a message to the user asking for another guess. At ➐, we accept another guess from the user and start the loop again, until the user guesses correctly.
At ➑, the user has guessed the number, so we tell them it was the right number, and our program ends. See Figure 6-1 for a few sample runs of the program.
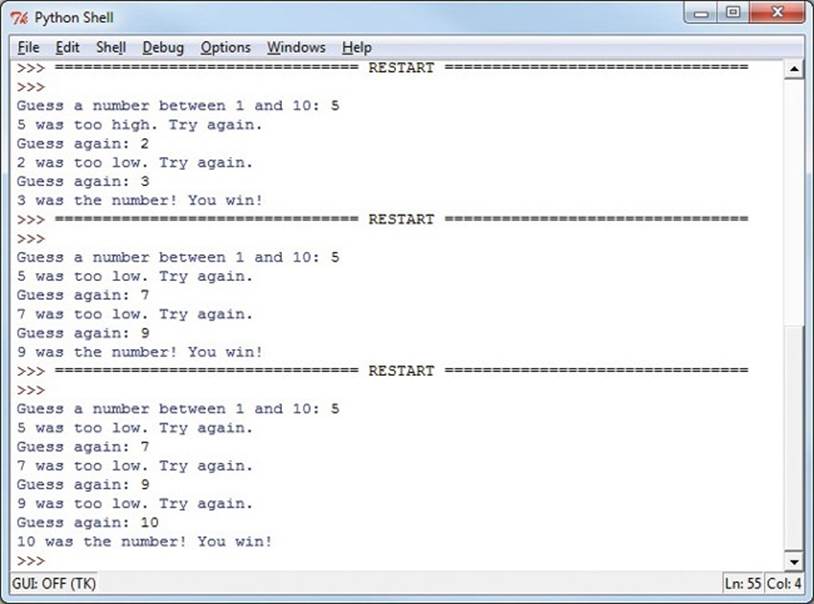
Figure 6-1. Our GuessingGame.py program, asking the user to guess higher or lower for three random numbers
In the first run of the program in Figure 6-1, the user guessed 5, and the computer responded that 5 was too high. The user guessed lower with 2, but 2 was too low. Then the user gave 3 a shot, and that was right! Guessing halfway between the lowest and highest possible numbers each time, as in the examples in Figure 6-1, is a strategy called a binary search.
If players learn to use this strategy, they can guess a number between 1 and 10 in four tries or less, every time! Give it a shot!
To make the program more interesting, you could change the arguments you pass to the randint() function to generate a number between 1 and 100 or an even higher number (be sure to change the input() prompts as well). You could also make a variable called number_of_tries and add 1 to it every time the user guesses, to keep track of the user’s number of tries. Print the number of tries at the end of the program to let the user know how well they did. For an additional challenge, you could add an outer loop that asks the user if they want to play again after they guess the number correctly. Try these on your own, and go to http://www.nostarch.com/teachkids/ for sample solutions.
Colorful Random Spirals
The random module has other handy functions besides randint(). Let’s use them to help us create an interesting visual: a screen full of spirals of random sizes and colors like the one in Figure 6-2.
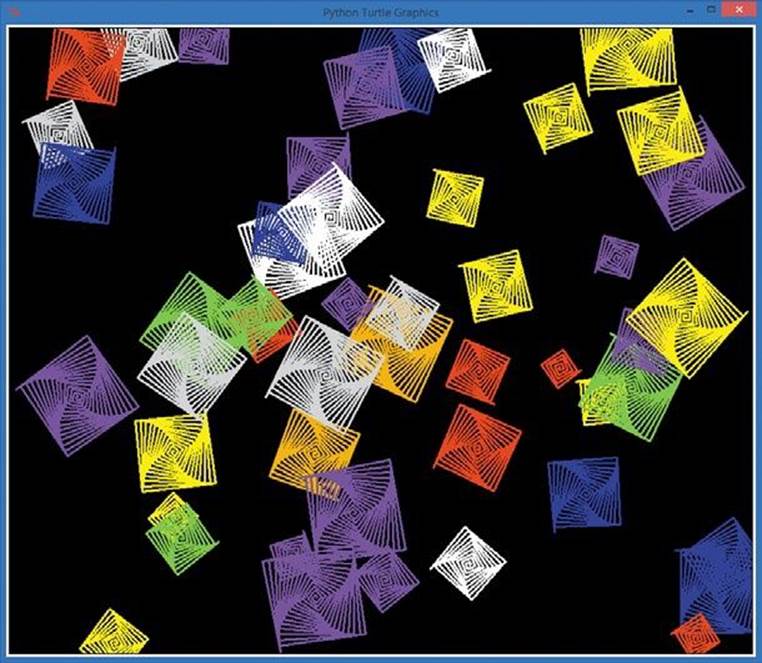
Figure 6-2. Spirals of random sizes and colors at random locations on the screen, from RandomSpirals.py
Think about how you could write a program like the one that created Figure 6-2. You know almost all of the tricks needed to draw random spirals like these. First, you can draw spirals of various colors using loops. You can generate random numbers and use one to control how many times each spiral’s for loop runs. This changes its size: more iterations create a bigger spiral, while fewer iterations create a smaller spiral. Let’s look at what else we’ll need and build the program step by step. (The final version is RandomSpirals.py.)
Pick a Color, Any Color
One new tool we’ll need is the ability to choose a random color. We can easily do this with another method in the random module, random.choice(). The random.choice() function takes a list or other collection as the argument (the part inside the parentheses), and it returns a randomly selected element from that collection. In our case, we could create a list of colors, and then pass that list to the random.choice() method to get a random color for each spiral.
You can try this in the command line shell in IDLE:
>>> # Getting a random color
>>> colors = ["red", "yellow", "blue", "green", "orange", "purple", "white", "gray"]
>>> random.choice(colors)
'orange'
>>> random.choice(colors)
'blue'
>>> random.choice(colors)
'white'
>>> random.choice(colors)
'purple'
>>>
In this code, we created our old friend colors and set it equal to a list of color names. Then we used the random.choice() function, passing it colors as its argument. The function chooses a color at random from the list. The first time, we got orange, the second time blue, the third time white, and so on. This function can give us a random color to set as our turtle’s pen color before it draws each new spiral.

Getting Coordinated
One remaining problem is how to get the spirals to spread out all over the screen, including the upper-right and lower-left corners. To place spirals randomly on the turtle screen, we need to understand the x- and y-coordinate system used in our Turtle environment.
Cartesian Coordinates
If you’ve taken a geometry course, you’ve seen (x, y) coordinates drawn on graph paper as in Figure 6-3. These are Cartesian coordinates, named after French mathematician René Descartes, who labeled points on a grid with a pair of numbers we call the x- and y-coordinates.
In the graph in Figure 6-3, the dark horizontal line is called the x-axis, and it runs from left to right. The dark vertical line is the y-axis, running from bottom to top. We call the point where these lines meet, (0, 0), the origin because all other points on the grid are labeled with coordinates measured from, or originating from, that point. Think of the origin, (0, 0), as the center of your screen. Every other point you want to find can be labeled with an x- and y-coordinate by starting at the origin and moving left or right, down or up.
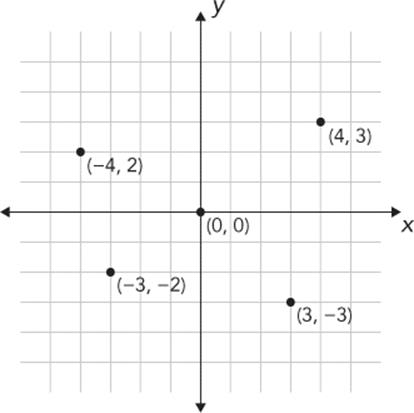
Figure 6-3. A graph with four points and their Cartesian (x, y) coordinates
We label points on a graph with this pair of coordinates inside parentheses, separated by a comma: (x, y). The first number, the x-coordinate, tells us how far to move left or right, while the second number, the y-coordinate, tells us how far to move up or down. Positive x-values tell us to move right from the origin; negative x-values tell us to move left. Positive y-values tell us to move up from the origin, and negative y-values tell us to move down.
Look at the points labeled in Figure 6-3. The point in the upper right is labeled with the x- and y-coordinates (4, 3). To find the location of this point, we start at the origin (0, 0) and move 4 spaces to the right (because the x-coordinate, 4, is positive) and then 3 spaces up (because the y-coordinate, 3, is positive).
To get to the point in the lower right, (3, –3), we go back to the origin and then move right 3 spaces or units. This time, the y-coordinate is –3, so we move down 3 units. Moving right 3 and down 3 puts us at (3, –3). For (–4, 2), we move left 4 units from the origin and then up 2 units to the point in the upper left. Finally, for (–3, –2), we move left 3 units and then down 2 units to the lower-left point.
Setting a Random Turtle Position
In turtle graphics, we can move the turtle from the origin (0, 0) to any other location by telling the computer the x- and y-coordinates of the new location with the turtle.setpos(x,y) command. The function name setpos() is short for set position. It sets the position of the turtle to the x- and y-coordinates we give it. For example, turtle.setpos(10,10) would move the turtle right 10 units and up 10 units from the center of the screen.
On the computer, the unit we usually use is our old friend the pixel. So turtle.setpos(10,10) would move the turtle right 10 pixels and up 10 pixels from the center of the screen. Because pixels are so tiny — about 1/70 of an inch (0.3 millimeters) or smaller on most displays — we might want to move 100 pixels or more at a time. setpos() can handle any coordinates we give it.
To move the turtle to a random location on the screen, we’ll generate a random pair of numbers, x and y, then use turtle.setpos(x,y) to move the turtle to those coordinates. Before we move the turtle, though, we’ll need to lift the turtle’s pen with turtle.penup(). After we’ve set the new position, we’ll call turtle.pendown() to put the pen back down and enable the turtle to draw again. If we forget to lift the pen, the turtle will draw a line as it moves to wherever we tell it to go with setpos(). As you can see in Figure 6-2, we don’t want extra lines between our spirals. Our code will look like this:
t.penup()
t.setpos(x,y)
t.pendown()
The setpos() function combined with a couple of random numbers as (x, y) coordinates will let us place spirals in different locations, but how do we know what range to use for our random numbers? That question brings us to the last issue we have to resolve in our quest for random spirals.
How Big Is Our Canvas?
Now that we know how to position spirals at random locations on the window, or canvas, we have one problem remaining: how do we know how big our canvas is? We can generate a random number for the x- and y-coordinates of a location and draw a spiral at that location, but how can we make sure that the location we choose is on the visible window — not off the window to the right, left, top, or bottom? Then, how can we make sure we cover the entire drawing window, from left to right, top to bottom?
To answer the question about canvas size, we need to use two more functions, turtle.window_width() and turtle.window_height(). First, window_width() tells us how wide our turtle window is, in pixels. The same goes for window_height(); we get the number of pixels from the bottom of our turtle window to the top. For example, our turtle window in Figure 6-2 is 960 pixels wide and 810 pixels tall.
turtle.window_width() and turtle.window_height() will help us with random x- and y-coordinates, but we have one more obstacle. Remember that in turtle graphics, the center of the window is the origin, or (0, 0). If we just generate random numbers between 0 and turtle.window_width(), the first problem is that we will never draw anything in the lower left of the window: the coordinates there are negative in both the x- and y-directions (left and down), but a random number between 0 and our window_width() value is always positive. The second problem is that if we start from the center and go window_width() to the right, we’ll end up off the righthand edge of the window.
We have to figure out not just how wide and tall the window is but also what the range of the coordinates is. For example, if our window is 960 pixels wide and the origin (0, 0) is at the center of our window, we need to know how many pixels we can move to the right and left without leaving the visible window. Because (0, 0) is in the middle of our window, halfway across, we just divide the width in half. If the origin is in the middle of a window that is 960 pixels across, there are 480 pixels to the right of the origin and 480 pixels to the left of the origin. The range of x-coordinate values would be from –480 (left 480 pixels from the origin) to +480 (480 pixels right of the origin) or, in other words, from –960/2 to +960/2.
To make our range work for any size window, we would say the x-coordinates go from -turtle.window_width()//2 to +turtle.window_ width()//2. Our origin is also in the middle of the window from bottom to top, so there are turtle.window_height()//2 pixels above and below the origin. We use integer division, the // operator, in these calculations to make sure we’ll get an integer result when we divide by 2; a window could measure an odd number of pixels wide, and we want to keep all our pixel measurements in whole numbers.
Now that we know how to calculate the size of our canvas, we can use these expressions to limit the range of our random coordinates. Then we can be sure that any random coordinates we generate will be visible in our window. The random module in Python has a function that lets us generate a random number within a specified range: randrange(). We just tell the randrange() function to use negative one-half the window width as the start value for the range and positive one-half the window width as the end value for the range (we’ll have to import both turtle and random in our program to make these lines work):
x = random.randrange(-turtle.window_width()//2,
turtle.window_width()//2)
y = random.randrange(-turtle.window_height()//2,
turtle.window_height()//2)
These lines of code will use the randrange() function to generate a pair of (x, y) coordinate values that are always on the viewing window and cover the full area of the viewing window from left to right, bottom to top.
Putting It All Together
Now we have all the pieces — we just have to put them together to build a program that will draw random spirals in different colors, sizes, and locations. Here’s our finished RandomSpirals.py program; in just about 20 lines, it creates the kaleidoscope-like picture in Figure 6-2.
RandomSpirals.py
import random
import turtle
t = turtle.Pen()
turtle.bgcolor("black")
colors = ["red", "yellow", "blue", "green", "orange", "purple",
"white", "gray"]
for n in range(50):
# Generate spirals of random sizes/colors at random locations
➊ t.pencolor(random.choice(colors)) # Pick a random color
➋ size = random.randint(10,40) # Pick a random spiral size
# Generate a random (x,y) location on the screen
➌ x = random.randrange(-turtle.window_width()//2,
turtle.window_width()//2)
➍ y = random.randrange(-turtle.window_height()//2,
turtle.window_height()//2)
➎ t.penup()
➏ t.setpos(x,y)
➐ t.pendown()
➑ for m in range(size):
t.forward(m*2)
t.left(91)
First we import the random and turtle modules and set up our turtle window and a list of colors. At our for loop (n will go from 0 to 49 to give us 50 spirals total), things get interesting. At ➊, we pass colors to random.choice() to have the function choose a random color from the list. We pass the random color choice to t.pencolor() to set the turtle’s pen color to that random color. At ➋, random.randint(10,40) picks a random number from 10 to 40. We store that number in the variable size, which we’ll use at ➑ to tell Python how many lines to draw in a spiral. The lines at ➌ and ➍ are exactly the ones we built earlier to generate a random pair of coordinate values (x, y) that give us a random location on our viewing window.
At ➎, we lift the turtle’s pen off the virtual paper before we move the turtle to its new random location. At ➏, we move the turtle to its new location by setting its position to x and y, the random coordinates chosen by randrange() earlier. Now that the turtle is in position, we put the pen back down at ➐ so we’ll be able to see the spiral we’re about to draw. At ➑, we have a for loop to draw each line of the spiral. For m in range(size), the turtle will move forward a distance of m*2, drawing a line segment of length m*2 (m is 0, 1, 2, 3, and so on, so the length of the segment is 0, 2, 4, 6, and so on). The turtle will then rotate left 91 degrees and get ready to draw the next segment.
The turtle starts in the center of the spiral, draws a segment (length 0), and rotates left; that’s the first time through the loop. The next time through, m is 1, so the turtle draws a segment of length 2, then rotates. As Python iterates through the loop, the turtle will move outward from the center of the spiral, drawing longer and longer line segments. We use the randomly generated size, an integer between 10 and 40, as the number of lines we draw in our spiral.
After we finish drawing the current spiral, we go back to the top of our outer for loop. We pick a new random color, size, and location; lift the pen; move it to the new location; put down the pen; and go through the inner for loop to draw a new spiral of some new random size. After drawing this spiral, we go back to the outer loop and repeat the entire process. We do this 50 times, giving us 50 spirals of assorted colors and shapes spread randomly across the screen.
Rock-Paper-Scissors
One game that we have the skills to program now is Rock-Paper-Scissors. Two players (or one player and the computer) each pick one of three possible items (rock, paper, or scissors); both show their choice; and the winner is decided by three rules: rock crushes scissors, scissors cut paper, paper covers rock.
To simulate this game, we’ll create a list of choices (like our colors list in RandomSpirals.py) and we’ll use random.choice() to pick one of the three items from the list as the computer’s choice. Then, we’ll ask the user for their choice and use a series of if statements to determine the winner. The user will be playing against the computer!
Let’s jump into the code. Type RockPaperScissors.py into a new window in IDLE or download it from http://www.nostarch.com/teachkids/.
RockPaperScissors.py
➊ import random
➋ choices = ["rock", "paper", "scissors"]
print("Rock crushes scissors. Scissors cut paper. Paper covers rock.")
➌ player = input("Do you want to be rock, paper, or scissors (or quit)? ")
➍ while player != "quit": # Keep playing until the user quits
player = player.lower() # Change user entry to lowercase
➎ computer = random.choice(choices) # Pick one of the items in choices
print("You chose " +player+ ", and the computer chose " +computer+ ".")
➏ if player == computer:
print("It's a tie!")
➐ elif player == "rock":
if computer == "scissors":
print("You win!")
else:
print("Computer wins!")
➑ elif player == "paper":
if computer == "rock":
print("You win!")
else:
print("Computer wins!")
➒ elif player == "scissors":
if computer == "paper":
print("You win!")
else:
print("Computer wins!")
else:
print("I think there was some sort of error...")
print() # Skip a line
➓ player = input("Do you want to be rock, paper, or scissors (or quit)? ")
At ➊, we import the random module to get access to the functions that help us make random choices. At ➋, we set up the list of the three items — rock, paper, and scissors — and call the list choices. We print the simple rules of the game to make sure the user knows them. At ➌, we prompt the user to input their choice of rock, paper, scissors, or quit and store their choice in the variable player. At ➍, we begin the game loop by checking whether the user chose quit at the input prompt; if they did, the game ends.
As long as the user has not entered quit, the game begins. After changing the player’s input to lowercase for easy comparison in our if statements, we tell the computer to pick an item. At ➎, we tell the computer to pick at random one of the items in the list choices and store the item in the variable computer. Once the computer’s choice is stored, it’s time to begin testing to see who won. At ➏, we check whether the player and the computer picked the same item; if so, we tell the user that the outcome was a tie. Otherwise, we check at ➐ whether the user selected rock. Inside theelif statement at ➐, we nest an if statement to see whether the computer picked scissors. If our player picks rock and the computer chooses scissors, rock crushes scissors, and the player wins! If it’s not rock and rock, and if the computer didn’t pick scissors, then the computer must have picked paper, and we print that the computer wins.
At the remaining two elif statements, ➑ and ➒, we do the same testing to check for wins when the user picks paper or scissors. If none of those statements was true, we let the user know they’ve entered something that did not compute: either they made a choice that doesn’t exist, or they misspelled their choice. Finally, at ➓, we ask the user for their next choice before beginning the game loop all over again (a new round). See Figure 6-4 for a sample run of the program.
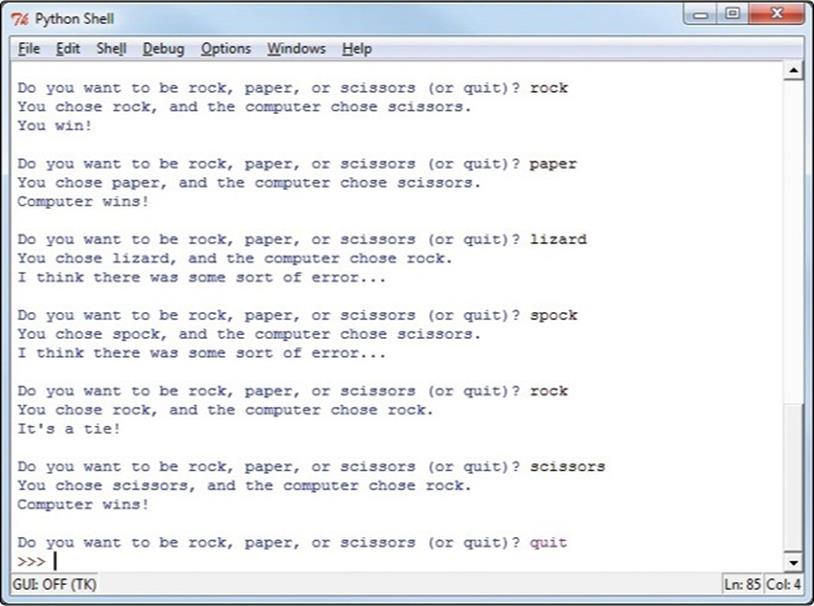
Figure 6-4. Thanks to random choices by the computer, RockPaperScissors.py is a fun game!
Sometimes the user wins, sometimes the computer wins, and sometimes they tie. Because the outcome is somewhat random, the game is fun enough to play to pass a little time. Now that we have a sense of how a game with two players can use the computer’s random choices, let’s try creating a card game.
Pick a Card, Any Card
One thing that makes card games fun is randomness. No two rounds turn out exactly the same (unless you’re bad at shuffling), so you can play again and again without getting bored.
We can program a simple card game with the skills we’ve learned. Our first try at this won’t show graphical playing cards (we need to learn more tricks to make that possible), but we can generate a random card name (“two of diamonds” or “king of spades,” for example) just by using anarray, or list, of strings, like we did with color names in our spiral programs. We could program a game like War in which two players each pull a random card from the deck, and the player with the higher card wins; we just need some way of comparing cards to see which is higher. Let’s see how that might work, step by step. (The final program is HighCard.py.)
Stacking the Deck
First, we need to think about how to build a virtual deck of cards in our program. As I mentioned, we won’t draw the cards yet, but we at least need the card names to simulate a deck. Fortunately, card names are just strings ("two of diamonds", "king of spades"), and we know how to build an array of strings — we’ve done it with color names since the very first chapter!
An array is an ordered or numbered collection of similar things. In many programming languages, arrays are a special type of collection. In Python, though, lists can be used like arrays. We’ll see how to treat a list like an array in this section, accessing individual elements in the array one at a time.
We could build a list of all the card names by creating an array name (cards) and setting it equal to a list of all 52 card names:
cards = ["two of diamonds",
"three of diamonds",
"four of diamonds",
# This is going to take forever...
But ouch — we’re going to have to type 52 long strings of card names! Our code will be 52 lines long before we even program the game part, and we’ll be so tired from typing that we won’t have energy left to play the game. There’s got to be a better way. Let’s think like a programmer! All of that typing is repetitive, and we want to let the computer do the repetitive work. The suit names (diamonds, hearts, clubs, spades) are going to be repeated 13 times each, for the 13 cards in each suit. The face values (two through ace) are going to be repeated 4 times each, because there are 4 suits. Worse, we’re typing the word of 52 times!
When we ran into repetition before, we used loops to make the problem easier. If we wanted to generate the whole deck of cards, a loop would do the job nicely. But we don’t need the whole deck to play a single hand of War: we just need two cards, the computer’s card and the player’s. If a loop won’t help us avoid repeating all those suits and face values, we need to break the problem down further.
In War, each player shows one card, and the higher card wins. So as we’ve discussed, we need just 2 cards, not 52. Let’s start with one card. A card name consists of a face value (two through ace) and a suit name (clubs through spades). Those look like good possibilities for lists of strings: one list for faces and one for suits. Instead of using a list of 52 repeated entries for each separate card, we pick a face value at random from the list of 13 possibilities, then pick a suit name at random from the 4 possible choices. This approach should let us generate any single card in the deck.
We replace our long array cards with two much shorter arrays, suits and faces:
suits = ["clubs", "diamonds", "hearts", "spades"]
faces = ["two", "three", "four", "five", "six", "seven", "eight", "nine",
"ten", "jack", "queen", "king", "ace"]
We reduced 52 lines of code to about 3! That’s smart programming. Now let’s see how to use these two arrays to deal a card.
Dealing Cards

We already know how to use the random.choice() function to pick an item at random from a list. So to deal a card, we simply use random.choice() to pick a face value from a list of faces and a suit name from a list of suits. Once we have a random face and a random suit, all we do to complete a card name is add the word of between them (two of diamonds, for example).
Notice that we might deal the same card twice or more in a row using random.choice() this way. We’re not forcing the program to check whether a card has already been dealt, so you might get two aces of spades in a row, for example. The computer’s not cheating; we’re just not telling it to deal from a single deck. It’s like this program is dealing cards from an infinite deck, so it can keep dealing forever without running out.
import random
suits = ["clubs", "diamonds", "hearts", "spades"]
faces = ["two", "three", "four", "five", "six", "seven", "eight", "nine",
"ten", "jack", "queen", "king", "ace"]
my_face = random.choice(faces)
my_suit = random.choice(suits)
print("I have the", my_face, "of", my_suit)
If you try running this code, you’ll get a new, random card every time. To deal a second card, you’d use similar code, but you’d store the random choices in variables called your_face and your_suit. You’d change the print statement so it printed the name of this new card. Now we’re getting closer to our game of War, but we need some way to compare the computer’s card and the user’s card to see who wins.
Counting Cards
There’s a reason we listed face card values in ascending order, from two through ace. We want the cards’ faces list to be ordered by value from lowest to highest so that we can compare cards against each other and see which card in any pair has the higher value. It’s important to determine which of two cards is higher, since in War the higher card wins each hand.
Finding an Item in a List
Fortunately, because of the way lists and arrays work in Python, we can determine where a value occurs in a list, and we can use that information to decide whether one card is higher than another. The position number of an item in a list or array is called the index of that item. We usually refer to each item in an array by its index.
For a visual representation of the suits array and the index of each suit, see Table 6-1.
Table 6-1. The suits Array
|
value |
"clubs" |
"diamonds" |
"hearts" |
"spades" |
|
index |
0 |
1 |
2 |
3 |
When we create our list suits, Python automatically assigns an index to each value in the list. The computer starts counting at zero, so the index of "clubs" is 0, "diamonds" is at index 1, and so on. The function to find the index of an item in a list is .index(), and it can be used on any list or array in Python.
To find the index of the suit name "clubs" in the list suits, we call the function suits.index("clubs"). It’s like we’re asking the suits array which index corresponds to the value "clubs". Let’s try that in our Python shell. Enter the following lines:
>>> suits = ["clubs", "diamonds", "hearts", "spades"]
>>> suits.index("clubs")
0
>>> suits.index("spades")
3
>>>
After we create the array of suit values, suits, we ask Python what the index of the value "clubs" is, and it responds with the correct index, 0. In the same way, the index of "spades" is 3, and diamonds and hearts are at index locations 1 and 2, respectively.
Which Card is Higher?
We created our faces array with values in order from two to ace, so the value two, the first item in faces, would get the index 0, all the way through the ace at index 12 (the 13th location, starting from 0). We can use the index to test which card value is higher — in other words, which face value’s index is larger. Our lowest card is two, and its index is the smallest, 0; the ace is our highest card, and its index is the largest, 12.
If we generate two random face card values (my_face and your_face), we can compare the index of my_face with the index of your_face to see which card is higher, as follows.
import random
faces = ["two", "three", "four", "five", "six", "seven", "eight", "nine",
"ten", "jack", "queen", "king", "ace"]
my_face = random.choice(faces)
your_face = random.choice(faces)
if faces.index(my_face) > faces.index(your_face):
print("I win!")
elif faces.index(my_face) < faces.index(your_face):
print("You win!")
We use random.choice() twice to pull two random values out of the faces array, and then we store the values in my_face and your_face. We use faces.index(my_face) to find the index of my_face in faces, and we use faces.index(your_face) to get the index of your_face. If the index ofmy_face is higher, my card has a higher face value, and the program prints I win!. Otherwise, if the index of my_face is lower than the index of your_face, your card’s face value is higher, and the program prints You win!. Because of the way we ordered our list, a higher card will always correspond to a higher index. With this handy tool, we’ve got almost everything we need to build a “high card” game like War. (We haven’t added the ability to test for a tie game yet, but we’ll add that as part of the complete program in Putting It All Together.)
Keeping It Going
The final tool we need is a loop so the user can keep playing as long as they want. We’re going to build this loop a little differently so that we can reuse it in other games.
First, we need to decide which kind of loop to use. Remember that a for loop usually means we know exactly the number of times we want to do something. Because we can’t always predict how many times someone will want to play our game, a for loop is not the right fit. A while loop can keep going until some condition becomes false — for example, when the user presses a key to end the program. The while loop is what we’ll use for our game loop.
The while loop needs a condition to check, so we’re going to create a variable that we’ll use as our flag, or signal, to end the program. Let’s call our flag variable keep_going and set it equal to True to start:
keep_going = True
Because we start with keep_going = True, the program will enter the loop at least the first time.
Next we’ll ask the user if they want to keep going. Rather than make the user enter Y or yes every time they want to play, let’s make it easier by just asking them to press ENTER.
answer = input("Hit [Enter] to keep going, any other keys to exit: ")
if answer == "":
keep_going = True
else:
keep_going = False
Here we set a variable answer equal to an input function. Then we use an if statement to check whether answer == "" to see if the user pressed ENTER only or if they pressed other keys before ENTER. (The empty string "" tells us the user didn’t type any other characters before pressing ENTER.) If the user wants to exit, all they have to do is make answer equal anything other than the empty string, "". In other words, they just have to press any key or keys before pressing ENTER, and the Boolean expression answer == "" will evaluate to False.
Our if statement checks whether answer == "" is True, and if so, it stores True in our flag variable keep_going. But do you notice some repetition there? If answer == "" is True, we assign the value True to keep_going; if answer == "" evaluates to False, we need to assign the value False tokeep_going.
It would be simpler if we just set keep_going equal to whatever answer == "" evaluates to. We can replace our code with the following, more concise code:
answer = input("Hit [Enter] to keep going, any other keys to exit: ")
keep_going = (answer == "")
The first line hasn’t changed. The second line sets keep_going equal to the result of the Boolean expression answer == "". If that’s True, keep_going will be True, and our loop will continue. If that’s False, keep_going will be False, and our loop will end.
Let’s see the whole loop together:
keep_going = True
while keep_going:
answer = input("Hit [Enter] to keep going, any key to exit: ")
keep_going = (answer == "")
Here we add the while statement, so our loop will continue as long as keep_going evaluates to True. In the final program, we will “wrap” this while loop around the code to play a single hand. We’ll do this by putting the while statement before the code that chooses the cards, and by putting the prompt to hit a key after the code that tells who wins. Remember to indent the code inside the loop!
Putting It All Together
Putting all those components together, we can build a War-like game that we’ll call HighCard.py. The computer draws a card for itself and a card for the player, checks to see which card is higher, and declares the winner. Type the code for HighCard.py into a new IDLE window or go tohttp://www.nostarch.com/teachkids/ to download it and play.
HighCard.py
import random
suits = ["clubs", "diamonds", "hearts", "spades"]
faces = ["two", "three", "four", "five", "six", "seven", "eight", "nine",
"ten", "jack", "queen", "king", "ace"]
keep_going = True
while keep_going: my_face = random.choice(faces)
my_suit = random.choice(suits)
your_face = random.choice(faces)
your_suit = random.choice(suits)
print("I have the", my_face, "of", my_suit)
print("You have the", your_face, "of", your_suit)
if faces.index(my_face) > faces.index(your_face):
print("I win!")
elif faces.index(my_face) < faces.index(your_face):
print("You win!")
else:
print("It's a tie!")
answer = input("Hit [Enter] to keep going, any key to exit: ")
keep_going = (answer == "")
Run the game, and it’ll print the computer’s card and your card, followed by an announcement of who won and a prompt that offers you the opportunity to play again or exit. Play a few rounds and you’ll notice that the cards are random enough to make the outcome fun — sometimes the computer wins, sometimes you win, but it’s a fun game thanks to the element of chance.
Roll the Dice: Creating a Yahtzee-Style Game
We used arrays in our card game to help simplify the code needed to deal a card, and to test which card was higher in value based on its position in the list of cards. In this section, we’ll use the array concept to generate five random dice and check to see if we roll three of a kind, four of a kind, or five of a kind, like a simplified version of the dice game Yahtzee.
In Yahtzee, you have five dice. Each die has six sides, with each side showing a number of dots from one to six. In the full game, the user rolls all five dice, trying to get points by rolling three dice of the same value (which we call three of a kind) and other various “hands,” similar to the card game poker. Rolling five of the same value (say, all five dice land with the six-dot side facing up) is called a Yahtzee and scores the highest points possible. In our simplified version of the game, we’re just going to simulate the roll of five dice and check whether the user rolled three of a kind, four of a kind, or Yahtzee and let them know the outcome.

Setting Up the Game
Now that we understand the game’s objective, let’s talk about how we’ll code the game. First, we’ll need to set up a game loop so that the user can keep rolling until they want to quit. Second, we’ll need to set up a hand of five simulated dice as an array that can hold five random values, from 1 to 6, representing the value of each of the rolled dice. Third, we’ll simulate the roll of the dice by assigning a random value from 1 to 6 in each of the five array slots. Finally, we need to compare the five rolled dice to each other to see whether we have three, four, or five of the same value and let the user know the outcome.
That last part is perhaps the most challenging. We could check for a Yahtzee by seeing if all five dice are a 1, or if all five dice are a 2, and so on, but that would mean a long list of complex if statement conditions. Since we don’t care whether we have five 1s, five 2s, or five 6s — we just care that we have five of a kind — we could simplify this process by checking to see if the first die’s value equals the second die’s value and the second die’s value equals the third die’s value, all the way to the fifth die. Then, no matter what the value of the five of a kind, we know all five dice are the same, and we have a Yahtzee.
Five of a kind seems easy enough to test for, but let’s try to figure out how we might test for four of a kind. A possible hand for four of a kind might be an array of values like [1, 1, 1, 1, 2] (here we rolled four 1s and a 2). However, the array [2, 1, 1, 1, 1] would also be a four of a kind with four 1s, as would [1, 1, 2, 1, 1], [1, 2, 1, 1, 1], and [1, 1, 1, 2, 1]. That’s five possible configurations just to test for four 1s! That sounds like it’s going to take a long set of if conditions. . . .
Fortunately, as a skilled programmer, you know that there’s usually an easier way to do things. What all five arrays in the previous paragraph have in common is that there are four 1s in the list of values; the problem is that the fifth value, the 2, can be in any of the five different array positions. We could test for four of a kind much more easily if the four 1s were side by side, with the other value (the 2) off by itself. If we could sort the array in order from lowest to highest or highest to lowest, for example, all of the 1s would be grouped together, reducing the five different cases to just two: [1, 1, 1, 1, 2] or [2, 1, 1, 1, 1].
Sorting the Dice
Lists, collections, and arrays in Python have a built-in sort function, sort(), that allows us to sort the elements in the array by value in order from smallest to largest or vice versa. For example, if our dice array were called dice, we could sort the values with dice.sort(). By default, sort()will order the elements in dice from smallest to largest, or in ascending order.
For our test to see if the array of dice contains four of a kind, sorting the array means we only have to test for two cases: four matching low values and a high value (as in [1, 1, 1, 1, 2]), or a low value and four matching high values (like [1, 3, 3, 3, 3]). In the first case, we know that if the dice are sorted and the first and fourth dice are equal in value, we have four of a kind or better. In the second case, again with sorted dice, if the second and fifth dice are equal in value, we have four of a kind or better.
We say four of a kind or better, because the first and fourth dice are also the same in a five of a kind. This brings us to our first logic challenge: if a user rolls five of a kind, they have also rolled four of a kind, and we only want to give them credit for the larger score. We’ll handle this with anif-elif chain so that if a user gets Yahtzee, they don’t also get four of a kind and three of a kind; only the highest hand wins. Combining this if-elif sequence with what we learned about sorting the dice to check for four of a kind, the code would look like this:
if dice[0] == dice[4]:
print("Yahtzee!")
elif (dice[0] == dice[3]) or (dice[1] == dice[4]):
print("Four of a kind!")
First, if we have already sorted the dice array, we notice a shortcut: if the first and last dice have the same value (if dice[0] == dice[4]), we know we have a Yahtzee! Remember that we number our array positions from 0 through 4 for the first through fifth dice. If we don’t have five of a kind, we check for both cases of four of a kind (the first four dice are the same, dice[0] == dice[3], or the last four dice are the same, dice[1] == dice[4]). We use the Boolean operator or here to recognize four of a kind if either of the two cases evaluates to True (the first four or the last four).
Testing the Dice
We’re referring to each die in the array individually by its index, or position: dice[0] refers to the first item in the dice array, and dice[4] refers to the fifth item because we start counting from zero. This is the way we can check the value of any of the dice individually or compare them to one another. Just as in our suits[] array back in Table 6-1, each entry in the dice[] array is an individual value. When we call on dice[0] to see if it’s equal to dice[3], we’re looking at the value in the first dice element and comparing it to the value in the fourth dice element. If the array is sorted, and these are the same, we have four of a kind.
To test for three of a kind, we add another elif statement, and we put the three-of-a-kind test after the four-of-a-kind test so that we test for three of a kind only if there’s no five of a kind and no four of a kind; we want the highest hand to be reported. There are three possible cases of three of a kind if we’re working with sorted dice: the first three dice match, the middle three, or the last three. In code, that would be:
elif (dice[0] == dice[2]) or (dice[1] == dice[3]) or (dice[2] == dice[4]):
print("Three of a kind")
Now that we can test for various winning hands in our dice game, let’s add the game loop and the dice array.
Putting It All Together
Here’s the complete FiveDice.py program. Type the code in a new window or download it from http://www.nostarch.com/teachkids/.
FiveDice.py
import random
# Game loop
keep_going = True
while keep_going:
# "Roll" five random dice
➊ dice = [0,0,0,0,0] # Set up an array for five values dice[0]-dice[4]
➋ for i in range(5): # "Roll" a random number from 1-6 for all 5 dice
➌ dice[i] = random.randint(1,6)
➍ print("You rolled:", dice) # Print out the dice values
# Sort them
➎ dice.sort()
# Check for five of a kind, four of a kind, three of a kind
# Yahtzee - all five dice are the same
if dice[0] == dice[4]:
print("Yahtzee!")
# FourOfAKind - first four are the same, or last four are the same
elif (dice[0] == dice[3]) or (dice[1] == dice[4]):
print("Four of a kind!")
# ThreeOfAKind - first three, middle three, or last three are the same
elif (dice[0] == dice[2]) or (dice[1] == dice[3]) or (dice[2] == dice[4]):
print("Three of a kind")
keep_going = (input("Hit [Enter] to keep going, any key to exit: ") == "")
After we import the random module and start the game loop with a while statement, the next few lines deserve a little explanation. At ➊, we set up an array called dice that holds five values, and we initialize all those values to zero. The square brackets, [ and ], are the same ones we used for our very first lists of colors, as well as for the arrays of card face values and suit names earlier in this chapter. At ➋, we set up a for loop to run five times for the five dice, using the range from 0 to 4; these will be the array positions, or index numbers, of the five dice.
At ➌, we set each individual die, from dice[0] to dice[4], equal to a random integer from 1 to 6 to represent our five dice and their randomly rolled values. At ➍, we show the user what dice they rolled by printing the contents of the dice array; the result of this print statement is shown inFigure 6-5.
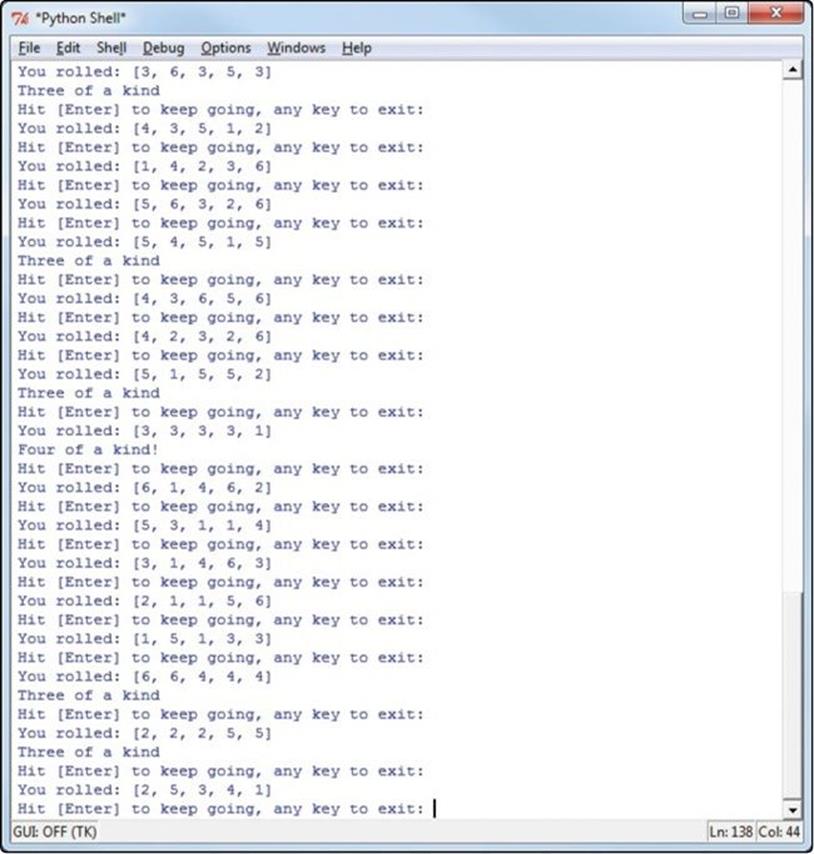
Figure 6-5. A sample run of our dice program. Notice that we rolled several three of a kinds and one four of a kind.
At ➎, we call the .sort() function on the dice array. This makes it easy to test for various hands — like five of a kind, four of a kind, and so on — by arranging the rolled dice values from smallest to largest, grouping like values. So, for example, if we roll [3, 6, 3, 5, 3], the dice.sort()function turns that into [3, 3, 3, 5, 6]. The if statement checks if the first value is equal to the fifth value; in this case, since the first and fifth values (3 and 6) aren’t equal, we know not all the dice landed on the same value and it’s not five of a kind. The first elif checks for four of a kind by comparing the first and fourth values (3 and 5) and second and fifth values (3 and 6); again, there are no matches here, so it’s not four of a kind. The second elif checks for three of a kind; since the first and third values, 3 and 3, are equal, we know the first three values are equal. We inform the user that they got three of a kind and then prompt them to press keys depending on whether they want to continue playing or exit, as shown in Figure 6-5.
Run the program and press ENTER several times to see what you roll.
You’ll notice that you roll three of a kind fairly often, as much as once every five or six rolls. Four of a kind is rarer, occurring about once every 50 rolls. We rolled four of a kind only once in a screen full of attempts in Figure 6-5. The Yahtzee is even rarer: you could roll several hundred times before getting a Yahtzee, but because of the random-number generator, you might roll one the first few times you try. Even though it’s not as complex as the real game, our simplified version of Yahtzee is interesting enough to play because of its random nature.
We’ve seen how randomness can make a game interesting and fun by adding the element of chance to dice and card games, Rock-Paper-Scissors, and a guessing game. We also enjoyed the kaleidoscope-like graphics we created using a random number generator to place colorful spirals all over the screen. In the next section, we’ll combine what you’ve learned about random numbers and loops with a bit of geometry to turn the random spirals program into a true virtual kaleidoscope that generates a different set of reflected images every time you run it!

RUNNING THE NUMBERS ON YAHTZEE
If you’re interested in the math behind Yahtzee and why five of a kind is so rare, here’s a quick explanation. First, there are five dice, each with six sides, so the number of possible combinations is 6 × 6 × 6 × 6 × 6 = 65 = 7,776. There are 7,776 ways to roll five normal, six-sided dice. To figure out the probability of rolling five dice with the same face value (five of a kind), we have to figure out how many possible Yahtzees there are: five 1s, five 2s, and so on up through five 6s. So there are six possible Yahtzee hands of five of a kind that we can roll with our five dice. Divide 6 Yahtzees by the 7,776 total possible rolls, and you get the probability that you’ll roll five of a kind: 6/7,776, or 1/1,296.
That’s right: the odds that you’ll roll five of a kind on a single roll are just 1 out of 1,296. So don’t get discouraged if you roll for a long time before you get your first five of a kind. On average, you’ll get one every 1,300 rolls or so. No wonder they give 50 points for a Yahtzee!
Kaleidoscope
The random spiral color graphic from Figure 6-2 looked a bit like a kaleidoscope. To make it look more like a real kaleidoscope, let’s add an important feature that our spiral program was missing: reflections.
In a kaleidoscope, it’s the positioning of the mirrors that makes random colors and shapes into a lovely pattern. In this closing example, we’re going to mimic the mirror effect by modifying our RandomSpiral.py program to “reflect” the spirals four times on the screen.

To understand how to achieve this mirror effect, we need to talk more about Cartesian coordinates. Let’s take a look at four points, (4, 2), (–4, 2), (–4, –2), and (4, –2), as shown in Figure 6-6.
Compare (4, 2) and (–4, 2), the top two points. If the vertical y-axis were a mirror, these two points would be mirror images of each other; we call (4, 2) a reflection of (–4, 2) about the y-axis. Something similar occurs with (4, 2) and (4, –2), the two points on the right, but with the horizontal x-axis as the imaginary mirror: (4, –2) is the reflection of (4, 2) about the x-axis.
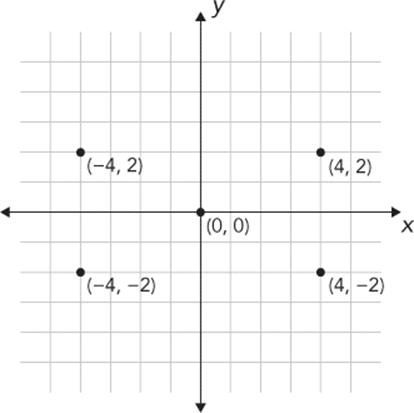
Figure 6-6. Four points reflected about the x- and y-axes starting with (4, 2)
If you look at each pair of (x, y) coordinates in Figure 6-6, you’ll notice something: all four (x, y) coordinates use the same numbers, 4 and 2, just with different signs, + or –, depending on their location. We can create any four reflected points around the x- and y-axes by changing the signs on the two coordinates as follows: (x, y), (–x, y), (–x, –y), (x, –y). If you’d like, you can try drawing this on a piece of graph paper with any pair of (x, y) coordinates. Try (2, 3), for example: (2, 3), (–2, 3), (–2, –3), and (2, –3) are four reflected points above and below the x-axis and on either side of the y-axis.
With this knowledge, we can build the outline of a kaleidoscope program as follows:
1. Pick a random location (x, y) in the upper right of the screen and draw a spiral there.
2. Draw the same spiral at (–x, y) in the upper left of the screen.
3. Draw the same spiral at (–x, –y) in the lower left of the screen.
4. Draw the same spiral at (x, –y) in the lower right of the screen.
If we repeat these steps over and over, we’ll have a lovely kaleidoscope effect with our random spirals.
Let’s step through the full code for Kaleidoscope.py and see this in action.
Kaleidoscope.py
import random
import turtle
t = turtle.Pen()
➊ t.speed(0)
turtle.bgcolor("black")
colors = ["red", "yellow", "blue", "green", "orange", "purple", "white", "gray"]
for n in range(50):
# Generate spirals of random sizes/colors at random locations on the screen
t.pencolor(random.choice(colors)) # Pick a random color from colors[]
size = random.randint(10,40) # Pick a random spiral size from 10 to 40
# Generate a random (x,y) location on the screen
➋ x = random.randrange(0,turtle.window_width()//2)
➌ y = random.randrange(0,turtle.window_height()//2)
# First spiral
t.penup()
➍ t.setpos(x,y)
t.pendown()
for m in range(size):
t.forward(m*2)
t.left(91)
# Second spiral
t.penup()
➎ t.setpos(-x,y)
t.pendown()
for m in range(size):
t.forward(m*2)
t.left(91)
# Third spiral
t.penup()
➏ t.setpos(-x,-y)
t.pendown()
for m in range(size):
t.forward(m*2)
t.left(91)
# Fourth spiral
t.penup()
➐ t.setpos(x,-y)
t.pendown()
for m in range(size):
t.forward(m*2)
t.left(91)
Our program begins with the turtle and random modules imported as usual, but at ➊ we do something new: we change the speed of the turtle to the fastest value possible with t.speed(0). The speed() function in turtle graphics takes an argument from 0 to 10, with 1 as the slow animation setting, 10 as the fast animation setting, and 0 meaning no animation (draw as fast as the computer can go). It’s an odd scale from 1 to 10, then 0, but just remember that if you want the fastest turtle possible, set the speed to 0. You’ll notice when you run the program that the spirals appear almost instantly. You can make this change to any of our previous drawing programs if you’d like the turtle to move faster.
Our for loop looks just like the one from our RandomSpirals.py program, until we get to ➋ and ➌. At ➋, we cut the horizontal range for our random number in half, to just the positive x-coordinate values (the right side of the screen, from x = 0 to x = turtle.window_ width()//2), and at ➌, we restrict the vertical range to the upper half of the screen, from y = 0 to y = turtle.window_height()//2. Remember that we’re doing integer division with the // operator to keep our pixel measurements in whole numbers.
These two lines of code give us a random (x, y) coordinate pair in the upper right of the screen every time. We set the turtle pen’s position to that point at ➍, and we draw the first spiral with the for loop immediately after. Then, we change the signs of each of the coordinate values, like we did in Figure 6-6, to create the three reflections of this point in the upper left (–x, y) at ➎, lower left (–x, –y) at ➏, and lower right (x, –y) at ➐. See Figure 6-7 for an example of the patterns Kaleidoscope.py can produce.
You can find the three reflections for each spiral by looking in the other three corners of the screen. These are not true mirror images: we don’t start at the same angle for each spiral, and we don’t turn right in our reflected spirals and left in the originals. However, these are tweaks you can make to the program if you’d like. See this chapter’s Programming Challenges for ideas to make this kaleidoscope program even cooler.
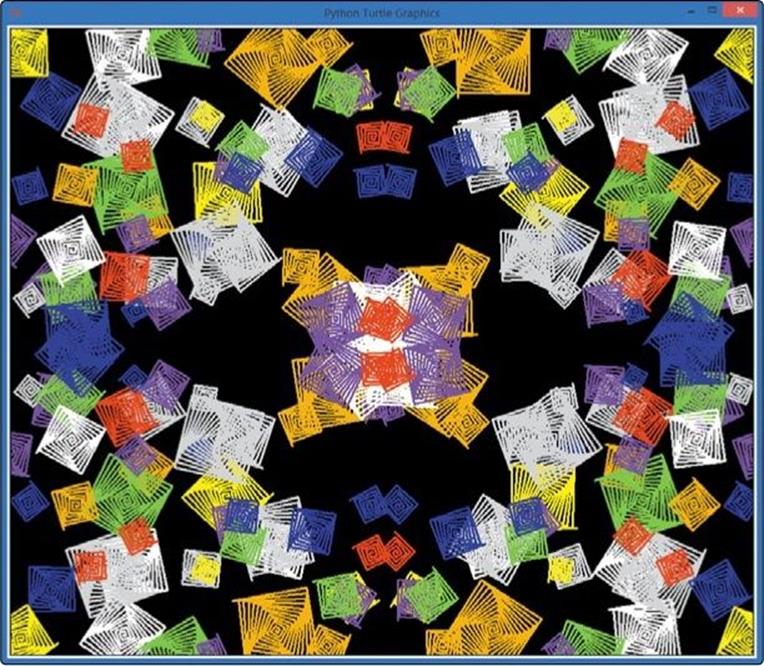
Figure 6-7. The mirrored/repeated effect in Kaleidoscope.py.
What You Learned
Before this chapter, we had no way of making a computer behave randomly. Now we can make a computer roll dice; draw random cards from a deck; draw spirals of random color, shape, size, and location; and even beat us now and then at Rock-Paper-Scissors.
The tool that made these programs possible was the random module. We used random.randint(1, 10) to generate a random number between 1 and 10 in our guessing game. We added the random.choice() function to pick a random color out of a list in our random spirals program. You learned how to use the functions turtle.window_width() and turtle.window_height() to find the width and height of our turtle screen.
You also learned how to use Cartesian coordinates to find an (x, y) location on the screen, and you used the random.randrange() function to generate a number in the range between our left and right x-coordinate values and top and bottom y-coordinate values. We then usedturtle.setpos(x,y) to move the turtle to any position on the drawing screen.
We combined our ability to choose an item from a list at random using random.choice() with our ability to test and compare variables using if-elif statements to build a “user versus computer” version of Rock-Paper-Scissors.
You learned the concept of an array, and we made our card game easier to code by building one array of suit names and one array of face values. We used random.choice() on each array to simulate dealing a card. We ordered the face values from least to greatest and used the .index()function to find the location of an element in an array. We used the index of each of two card face values to see which card had a higher index value and which player won a hand of the card game War. We built a reusable game loop with user input, a flag variable keep_going, and a whilestatement; we can put the loop into any game or app that a user might want to play or run multiple times in a row.
We extended our understanding of arrays by building a simplified version of Yahtzee. We created an array of five values from 1 to 6 to simulate five dice, used randint() to simulate rolling the dice, and used sort() on the dice array to make it easier to check for winning hands. We saw that, in a sorted array, if the first and last values are the same, all elements in the array are the same. In our game, this meant we had five of a kind. We used compound if statements joined by the or operator to test for two cases of four of a kind and three cases of three of a kind. We used if-elifstatements to control the logic of our program so that five of a kind wasn’t also counted as four of a kind, and so on.
We worked more with Cartesian coordinates in the kaleidoscope program and simulated the effect of reflections by changing the signs of (x, y) coordinate values. We repeated each spiral of random size, color, and location four times on the screen to create our kaleidoscope effect. You learned how to increase the turtle’s drawing speed with t.speed(0).
Random numbers and choices add an element of chance to make a game more interesting. Just about every game you’ve played has an element of chance. Now that you can build randomness into programs, you can code games people love to play.
At this point, you should be able to do the following:
§ Import the random module into your programs.
§ Use random.randint() to generate a random integer number in a given range.
§ Use random.choice() to pick a value at random out of a list or array.
§ Use random.choice() to generate 52 card values from two arrays of strings containing only the faces and suits.
§ Determine the size of your drawing window with turtle.window_ width() and turtle.window_height().
§ Move the turtle to any position on the drawing screen with turtle.setpos(x,y).
§ Use the random.randrange() function to generate a random number in any range.
§ Find the index of an element in a list or array with the .index() function.
§ Build a while game loop using a Boolean flag variable like keep_going.
§ Construct an array of similar types of values, assign values to elements in the array by their index (as in dice[0] = 2), and use array elements like regular variables.
§ Sort lists or arrays with the .sort() function.
§ Reflect points about the x- and y-axes by changing the signs of the points’ (x, y) coordinate values.
§ Change the turtle’s drawing speed with the .speed() function.
PROGRAMMING CHALLENGES
For this chapter’s challenge problems, we’ll extend the Kaleidoscope.py and HighCard.py programs. (If you get stuck, go to http://www.nostarch.com/teachkids/ for sample answers.)
#1: RANDOM SIDES AND THICKNESS
Add more randomness to Kaleidoscope.py by adding two more random variables. Add a variable sides for the number of sides and then use that variable to change the angle we turn each time in the spiral loop (and therefore, the number of sides in the spiral) by using 360/sides + 1 as your angle instead of 91. Next, create a variable called thick that will store a random number between 1 and 6 for the turtle pen’s thickness. Add the line t.width(thick) in the right place to change the thickness of the lines of each spiral in our random kaleidoscope.
#2: REALISTIC MIRRORED SPIRALS
If you know some geometry, two more tweaks make this kaleidoscope even more realistic. First, keep track of the direction (between 0 and 360 degrees) the turtle is pointing before drawing the first spiral by getting the result of t.heading() and storing it in a variable called angle. Then, before drawing each mirrored spiral, change the angle to the correct mirrored direction by pointing the turtle with t.setheading(). Hint: the second angle will be 180 - angle, the third spiral’s angle will be angle - 180, and the fourth will be 360 - angle.
Then, try turning left after each drawn line for the first and third spirals and turning right each time for the second and fourth spirals. If you implement these improvements, your spirals should really look like mirror images of each other in size, shape, color, thickness, and orientation. If you like, you can even keep the shapes from overlapping so much by changing the range of the x- and y-coordinate values to random.randrange(size,turtle.window_width()//2) and random.randrange(size,turtle.window_height()//2).
#3: WAR
Turn HighCard.py into the full game of War by making three changes. First, keep score: create two variables to keep track of how many hands the computer has won and how many the user has won. Second, simulate playing one full deck of cards by dealing 26 hands (perhaps by using a for loop instead of our while loop or by keeping track of the number of hands played so far) and then declare a winner based on which player has more points. Third, handle ties by remembering how many ties have happened in a row; then, the next time one of the players wins, add the number of recent ties to that winner’s score and set the number of ties back to zero for the next round.
All materials on the site are licensed Creative Commons Attribution-Sharealike 3.0 Unported CC BY-SA 3.0 & GNU Free Documentation License (GFDL)
If you are the copyright holder of any material contained on our site and intend to remove it, please contact our site administrator for approval.
© 2016-2026 All site design rights belong to S.Y.A.