Learning Python (2013)
Part III. Statements and Syntax
Chapter 15. The Documentation Interlude
This part of the book concludes with a look at techniques and tools used for documenting Python code. Although Python code is designed to be readable, a few well-placed human-accessible comments can do much to help others understand the workings of your programs. As we’ll see, Python includes both syntax and tools to make documentation easier. In particular, the PyDoc system covered here can render a module’s internal documentation as either plain text in a shell, or HTML in a web browser.
Although this is something of a tools-related concept, this topic is presented here partly because it involves Python’s syntax model, and partly as a resource for readers struggling to understand Python’s toolset. For the latter purpose, I’ll also expand here on documentation pointers first given in Chapter 4. As usual, because this chapter closes out its part, it also ends with some warnings about common pitfalls and a set of exercises for this part of the text, in addition to its chapter quiz.
Python Documentation Sources
By this point in the book, you’re probably starting to realize that Python comes with an amazing amount of prebuilt functionality—built-in functions and exceptions, predefined object attributes and methods, standard library modules, and more. And we’ve really only scratched the surface of each of these categories.
One of the first questions that bewildered beginners often ask is: how do I find information on all the built-in tools? This section provides hints on the various documentation sources available in Python. It also presents documentation strings (docstrings) and the PyDoc system that makes use of them. These topics are somewhat peripheral to the core language itself, but they become essential knowledge as soon as your code reaches the level of the examples and exercises in this part of the book.
As summarized in Table 15-1, there are a variety of places to look for information on Python, with generally increasing verbosity. Because documentation is such a crucial tool in practical programming, we’ll explore each of these categories in the sections that follow.
Table 15-1. Python documentation sources
|
Form |
Role |
|
# comments |
In-file documentation |
|
The dir function |
Lists of attributes available in objects |
|
Docstrings: __doc__ |
In-file documentation attached to objects |
|
PyDoc: the help function |
Interactive help for objects |
|
PyDoc: HTML reports |
Module documentation in a browser |
|
Sphinx third-party tool |
Richer documentation for larger projects |
|
The standard manual set |
Official language and library descriptions |
|
Web resources |
Online tutorials, examples, and so on |
|
Published books |
Commercially polished reference texts |
# Comments
As we’ve learned, hash-mark comments are the most basic way to document your code. Python simply ignores all the text following a # (as long as it’s not inside a string literal), so you can follow this character with any words and descriptions meaningful to programmers. Such comments are accessible only in your source files, though; to code comments that are more widely available, you’ll need to use docstrings.
In fact, current best practice generally dictates that docstrings are best for larger functional documentation (e.g., “my file does this”), and # comments are best limited to smaller code documentation (e.g., “this strange expression does that”) and are best limited in scope to a statement or small group of statements within a script or function. More on docstrings in a moment; first, let’s see how to explore objects.
The dir Function
As we’ve also seen, the built-in dir function is an easy way to grab a list of all the attributes available inside an object (i.e., its methods and simpler data items). It can be called with no arguments to list variables in the caller’s scope. More usefully, it can also be called on any object that has attributes, including imported modules and built-in types, as well as the name of a data type. For example, to find out what’s available in a module such as the standard library’s sys, import it and pass it to dir:
>>> import sys
>>> dir(sys)
['__displayhook__', ...more names omitted..., 'winver']
These results are from Python 3.3, and I’m omitting most returned names because they vary slightly elsewhere; run this on your own for a better look. In fact, there are currently 78 attributes in sys, though we generally care only about the 69 that do not have leading double underscores (two usually means interpreter-related) or the 62 that have no leading underscore at all (one underscore usually means informal implementation private)—a prime example of the preceding chapter’s list comprehension at work:
>>> len(dir(sys)) # Number names in sys
78
>>> len([x for x in dir(sys) if not x.startswith('__')]) # Non __X names only
69
>>> len([x for x in dir(sys) if not x[0] == '_']) # Non underscore names
62
To find out what attributes are provided in objects of built-in types, run dir on a literal or an existing instance of the desired type. For example, to see list and string attributes, you can pass empty objects:
>>> dir([])
['__add__', '__class__', '__contains__', ...more..., 'append', 'clear', 'copy',
'count', 'extend', 'index', 'insert', 'pop', 'remove', 'reverse', 'sort']
>>> dir('')
['__add__', '__class__', '__contains__', ...more..., 'split', 'splitlines',
'startswith','strip', 'swapcase', 'title', 'translate', 'upper', 'zfill']
The dir results for any built-in type include a set of attributes that are related to the implementation of that type (technically, operator overloading methods); much as in modules they all begin and end with double underscores to make them distinct, and you can safely ignore them at this point in the book (they are used for OOP). For instance, there are 45 list attributes, but only 11 that correspond to named methods:
>>> len(dir([])), len([x for x in dir([]) if not x.startswith('__')])
(45, 11)
>>> len(dir('')), len([x for x in dir('') if not x.startswith('__')])
(76, 44)
In fact, to filter out double-underscored items that are not of common program interest, run the same list comprehensions but print the attributes. For instance, here are the named attributes in lists and dictionaries in Python 3.3:
>>> [a for a in dir(list) if not a.startswith('__')]
['append', 'clear', 'copy', 'count', 'extend', 'index', 'insert', 'pop',
'remove', 'reverse', 'sort']
>>> [a for a in dir(dict) if not a.startswith('__')]
['clear', 'copy', 'fromkeys', 'get', 'items', 'keys', 'pop', 'popitem',
'setdefault', 'update', 'values']
This may seem like a lot to type to get an attribute list, but beginning in the next chapter we’ll learn how to wrap such code in an importable and reusable function so we don’t need to type it again:
>>> def dir1(x): return [a for a in dir(x) if not a.startswith('__')] # See Part IV
...
>>> dir1(tuple)
['count', 'index']
Notice that you can list built-in type attributes by passing a type name to dir instead of a literal:
>>> dir(str) == dir('') # Same result, type name or literal
True
>>> dir(list) == dir([])
True
This works because names like str and list that were once type converter functions are actually names of types in Python today; calling one of these invokes its constructor to generate an instance of that type. Part VI will have more to say about constructors and operator overloading methods when we discuss classes.
The dir function serves as a sort of memory-jogger—it provides a list of attribute names, but it does not tell you anything about what those names mean. For such extra information, we need to move on to the next documentation source.
NOTE
Some IDEs for Python work, including IDLE, have features that list attributes on objects automatically within their GUIs, and can be viewed as alternatives to dir. IDLE, for example, will list an object’s attributes in a pop-up selection window when you type a period after the object’s name and pause or press Tab. This is mostly meant as an autocomplete feature, though, not an information source. Chapter 3 has more on IDLE.
Docstrings: __doc__
Besides # comments, Python supports documentation that is automatically attached to objects and retained at runtime for inspection. Syntactically, such comments are coded as strings at the tops of module files and function and class statements, before any other executable code (#comments, including Unix-stye #! lines are OK before them). Python automatically stuffs the text of these strings, known informally as docstrings, into the __doc__ attributes of the corresponding objects.
User-defined docstrings
For example, consider the following file, docstrings.py. Its docstrings appear at the beginning of the file and at the start of a function and a class within it. Here, I’ve used triple-quoted block strings for multiline comments in the file and the function, but any sort of string will work; single- or double-quoted one-liners like those in the class are fine, but don’t allow multiple-line text. We haven’t studied the def or class statements in detail yet, so ignore everything about them here except the strings at their tops:
"""
Module documentation
Words Go Here
"""
spam = 40
def square(x):
"""
function documentation
can we have your liver then?
"""
return x ** 2 # square
class Employee:
"class documentation"
pass
print(square(4))
print(square.__doc__)
The whole point of this documentation protocol is that your comments are retained for inspection in __doc__ attributes after the file is imported. Thus, to display the docstrings associated with the module and its objects, we simply import the file and print their __doc__ attributes, where Python has saved the text:
>>> import docstrings
16
function documentation
can we have your liver then?
>>> print(docstrings.__doc__)
Module documentation
Words Go Here
>>> print(docstrings.square.__doc__)
function documentation
can we have your liver then?
>>> print(docstrings.Employee.__doc__)
class documentation
Note that you will generally want to use print to print docstrings; otherwise, you’ll get a single string with embedded \n newline characters.
You can also attach docstrings to methods of classes (covered in Part VI), but because these are just def statements nested in class statements, they’re not a special case. To fetch the docstring of a method function inside a class within a module, you would simply extend the path to go through the class: module.class.method.__doc__ (we’ll see an example of method docstrings in Chapter 29).
Docstring standards and priorities
As mentioned earlier, common practice today recommends hash-mark comments for only smaller-scale documentation about an expression, statement, or small group of statements. Docstrings are better used for higher-level and broader functional documentation for a file, function, or class, and have become an expected part of Python software. Beyond these guidelines, though, you still must decide what to write.
Although some companies have internal standards, there is no broad standard about what should go into the text of a docstring. There have been various markup language and template proposals (e.g., HTML or XML), but they don’t seem to have caught on in the Python world. Frankly, convincing Python programmers to document their code using handcoded HTML is probably not going to happen in our lifetimes. That may be too much to ask, but this doesn’t apply to documenting code in general.
Documentation tends to have a lower priority among some programmers than it should. Too often, if you get any comments in a file at all, you count yourself lucky (and even better if it’s accurate and up to date). I strongly encourage you to document your code liberally—it really is an important part of well-written programs. When you do, though, there is presently no standard on the structure of docstrings; if you want to use them, anything goes today. Just as for writing code itself, it’s up to you to create documentation content and keep it up to date, but common sense is probably your best ally on this task too.
Built-in docstrings
As it turns out, built-in modules and objects in Python use similar techniques to attach documentation above and beyond the attribute lists returned by dir. For example, to see an actual human-readable description of a built-in module, import it and print its __doc__ string:
>>> import sys
>>> print(sys.__doc__)
This module provides access to some objects used or maintained by the
interpreter and to functions that interact strongly with the interpreter.
Dynamic objects:
argv -- command line arguments; argv[0] is the script pathname if known
path -- module search path; path[0] is the script directory, else ''
modules -- dictionary of loaded modules
...more text omitted...
Functions, classes, and methods within built-in modules have attached descriptions in their __doc__ attributes as well:
>>> print(sys.getrefcount.__doc__)
getrefcount(object) -> integer
Return the reference count of object. The count returned is generally
one higher than you might expect, because it includes the (temporary)
reference as an argument to getrefcount().
You can also read about built-in functions via their docstrings:
>>> print(int.__doc__)
int(x[, base]) -> integer
Convert a string or number to an integer, if possible. A floating
point argument will be truncated towards zero (this does not include a
...more text omitted...
>>> print(map.__doc__)
map(func, *iterables) --> map object
Make an iterator that computes the function using arguments from
each of the iterables. Stops when the shortest iterable is exhausted.
You can get a wealth of information about built-in tools by inspecting their docstrings this way, but you don’t have to—the help function, the topic of the next section, does this automatically for you.
PyDoc: The help Function
The docstring technique proved to be so useful that Python eventually added a tool that makes docstrings even easier to display. The standard PyDoc tool is Python code that knows how to extract docstrings and associated structural information and format them into nicely arranged reports of various types. Additional tools for extracting and formatting docstrings are available in the open source domain (including tools that may support structured text—search the Web for pointers), but Python ships with PyDoc in its standard library.
There are a variety of ways to launch PyDoc, including command-line script options that can save the resulting documentation for later viewing (described both ahead and in the Python library manual). Perhaps the two most prominent PyDoc interfaces are the built-in help function and the PyDoc GUI- and web-based HTML report interfaces. We met the help function briefly in Chapter 4; it invokes PyDoc to generate a simple textual report for any Python object. In this mode, help text looks much like a “manpage” on Unix-like systems, and in fact pages the same way as a Unix “more” outside GUIs like IDLE when there are multiple pages of text—press the space bar to move to the next page, Enter to go to the next line, and Q to quit:
>>> import sys
>>> help(sys.getrefcount)
Help on built-in function getrefcount in module sys:
getrefcount(...)
getrefcount(object) -> integer
Return the reference count of object. The count returned is generally
one higher than you might expect, because it includes the (temporary)
reference as an argument to getrefcount().
Note that you do not have to import sys in order to call help, but you do have to import sys to get help on sys this way; it expects an object reference to be passed in. In Pythons 3.3 and 2.7, you can get help for a module you have not imported by quoting the module’s name as a string—for example, help('re'), help('email.message')—but support for this and other modes may differ across Python versions.
For larger objects such as modules and classes, the help display is broken down into multiple sections, the preambles of which are shown here. Run this interactively to see the full report (I’m running this on 3.3):
>>> help(sys)
Help on built-in module sys:
NAME
sys
MODULE REFERENCE
http://docs.python.org/3.3/library/sys
...more omitted...
DESCRIPTION
This module provides access to some objects used or maintained by the
interpreter and to functions that interact strongly with the interpreter.
...more omitted...
FUNCTIONS
__displayhook__ = displayhook(...)
displayhook(object) -> None
...more omitted...
DATA
__stderr__ = <_io.TextIOWrapper name='<stderr>' mode='w' encoding='cp4...
__stdin__ = <_io.TextIOWrapper name='<stdin>' mode='r' encoding='cp437...
__stdout__ = <_io.TextIOWrapper name='<stdout>' mode='w' encoding='cp4...
...more omitted...
FILE
(built-in)
Some of the information in this report is docstrings, and some of it (e.g., function call patterns) is structural information that PyDoc gleans automatically by inspecting objects’ internals, when available.
Besides modules, you can also use help on built-in functions, methods, and types. Usage varies slightly across Python versions, but to get help for a built-in type, try either the type name (e.g., dict for dictionary, str for string, list for list); an actual object of the type (e.g., {}, '', []); or a method of an actual object or type name (e.g., str.join, 's'.join).[32] You’ll get a large display that describes all the methods available for that type or the usage of that method:
>>> help(dict)
Help on class dict in module builtins:
class dict(object)
| dict() -> new empty dictionary.
| dict(mapping) -> new dictionary initialized from a mapping object's
...more omitted...
>>> help(str.replace)
Help on method_descriptor:
replace(...)
S.replace (old, new[, count]) -> str
Return a copy of S with all occurrences of substring
...more omitted...
>>> help(''.replace)
...similar to prior result...
>>> help(ord)
Help on built-in function ord in module builtins:
ord(...)
ord(c) -> integer
Return the integer ordinal of a one-character string.
Finally, the help function works just as well on your modules as it does on built-ins. Here it is reporting on the docstrings.py file we coded earlier. Again, some of this is docstrings, and some is information automatically extracted by inspecting objects’ structures:
>>> import docstrings
>>> help(docstrings.square)
Help on function square in module docstrings:
square(x)
function documentation
can we have your liver then?
>>> help(docstrings.Employee)
Help on class Employee in module docstrings:
class Employee(builtins.object)
| class documentation
|
...more omitted...
>>> help(docstrings)
Help on module docstrings:
NAME
docstrings
DESCRIPTION
Module documentation
Words Go Here
CLASSES
builtins.object
Employee
class Employee(builtins.object)
| class documentation
|
...more omitted...
FUNCTIONS
square(x)
function documentation
can we have your liver then?
DATA
spam = 40
FILE
c:\code\docstrings.py
PyDoc: HTML Reports
The text displays of the help function are adequate in many contexts, especially at the interactive prompt. To readers who’ve grown accustomed to richer presentation mediums, though, they may seem a bit primitive. This section presents the HTML-based flavor of PyDoc, which renders module documentation more graphically for viewing in a web browser, and can even open one automatically for you. The way this is run has changed as of Python 3.3:
§ Prior to 3.3, Python ships with a simple GUI desktop client for submitting search requests. This client launches a web browser to view documentation produced by an automatically started local server.
§ As of 3.3, the former GUI client is replaced by an all-browser interface scheme, which combines both search and display in a web page that communicates with an automatically started local server.
§ Python 3.2 straddles this fence, supporting both the original GUI client scheme, as well as the newer all-browser mode mandated as of 3.3.
Because this book’s audience is both users of the latest-and-greatest as well as the masses still using older tried-and-true Pythons, we’ll explore both schemes here. As we do, keep in mind that the way these schemes differ pertains only to the top level of their user interfaces. Their documentation displays are nearly identical, and under either regime PyDoc can also be used to generate both text in a console, and HTML files for later viewing in whatever manner you wish.
Python 3.2 and later: PyDoc’s all-browser mode
As of Python 3.3 the original GUI client mode of PyDoc, present in 2.X and earlier 3.X releases, is no longer available. This mode is present through Python 3.2 with the “Module Docs” Start button entry on Windows 7 and earlier, and via the pydoc -g command line. This GUI mode was reportedly deprecated in 3.2, though you had to look closely to notice—it works fine and without warning on 3.2 on my machine.
In 3.3, though, this mode goes away altogether, and is replaced with a pydoc -b command line, which instead spawns both a locally running documentation server, as well as a web browser that functions as both search engine client and page display. The browser is initially opened on a module index page with enhanced functionality. There are additional ways to use PyDoc (e.g., to save the HTML page to a file for later viewing, as described ahead), so this is a relatively minor operational change.
To launch the newer browser-only mode of PyDoc in Python 3.2 and later, a command-line like any of the following suffice: they all use the –m Python command-line argument for convenience to locate PyDoc’s module file on your module import search path. The first assumes Python is on your system path; the second employs Python 3.3’s new Windows launcher; and the third gives the full path to your Python if the other two schemes won’t work. See Appendix A for more on –m, and Appendix B for coverage of the Windows launcher.
c:\code> python -m pydoc -b
Server ready at http://localhost:62135/
Server commands: [b]rowser, [q]uit
server> q
Server stopped
c:\code> py −3 -m pydoc -b
Server ready at http://localhost:62144/
Server commands: [b]rowser, [q]uit
server> q
Server stopped
c:\code> C:\python33\python -m pydoc -b
Server ready at http://localhost:62153/
Server commands: [b]rowser, [q]uit
server> q
Server stopped
However you run this command line, the effect is to start PyDoc as a locally running web server on a dedicated (but by default arbitrary unused) port, and pop up a web browser to act as client, displaying a page giving links to documentation for all the modules importable on your module search path (including the directory where PyDoc is launched). PyDoc’s top-level web page interface is captured in Figure 15-1.
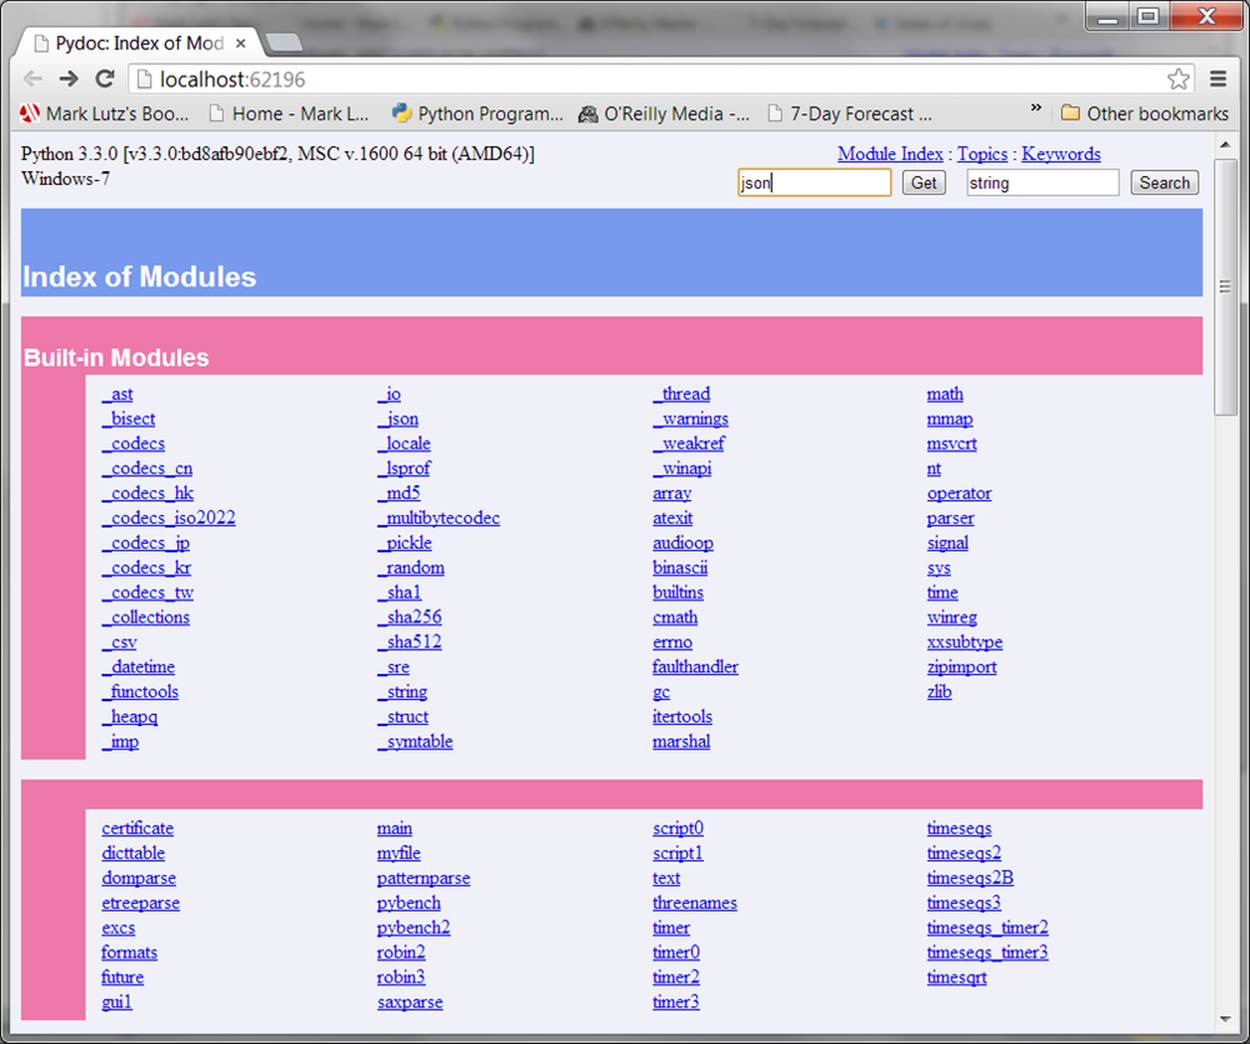
Figure 15-1. The top-level index start page of the all-browser PyDoc HTML interface in Python 3.2 and later, which as of 3.3 replaces the former GUI client in earlier Pythons.
Besides the module index, PyDoc’s web page also includes input fields at the top to request a specific module’s documentation page (Get) and search for related entries (Search), which stand in for the prior interface’s GUI client fields. You can also click on this page’s links to go to theModule Index (the start page), Topics (general Python subjects), and Keywords (overviews of statements and some expressions).
Notice that the index page in Figure 15-1 lists both modules and top-level scripts in the current directory—the book’s C:\code, where PyDoc was started by the earlier command lines. PyDoc is mostly intended for documenting importable modules, but can sometimes be used to show documentation for scripts too. A selected file must be imported in order to render its documentation, and as we’ve learned, importing runs a file’s code. Modules normally just define tools when run, so this is usually irrelevant.
If you ask for documentation for a top-level script file, though, the shell window where you launched PyDoc serves as the script’s standard input and output for any user interaction. The net effect is that the documentation page for a script will appear after it runs, and after its printed output shows up in the shell window. This may work better for some scripts than others, though; interactive input, for example, may interleave oddly with PyDoc’s own server command prompts.
Once you get past the new start page in Figure 15-1, the documentation pages for specific modules are essentially the same in both the newer all-browser mode and the earlier GUI-client scheme, apart from the additional input fields at the top of page in the former. For instance, Figure 15-2shows the new documentation display pages—opened on two user-defined modules we’ll be writing in the next part of this book, as part of Chapter 21’s benchmarking case study. In either scheme, documentation pages contain automatically created hyperlinks that allow you to click your way through the documentation of related components in your application. For instance, you’ll find links to open imported modules’ pages too.
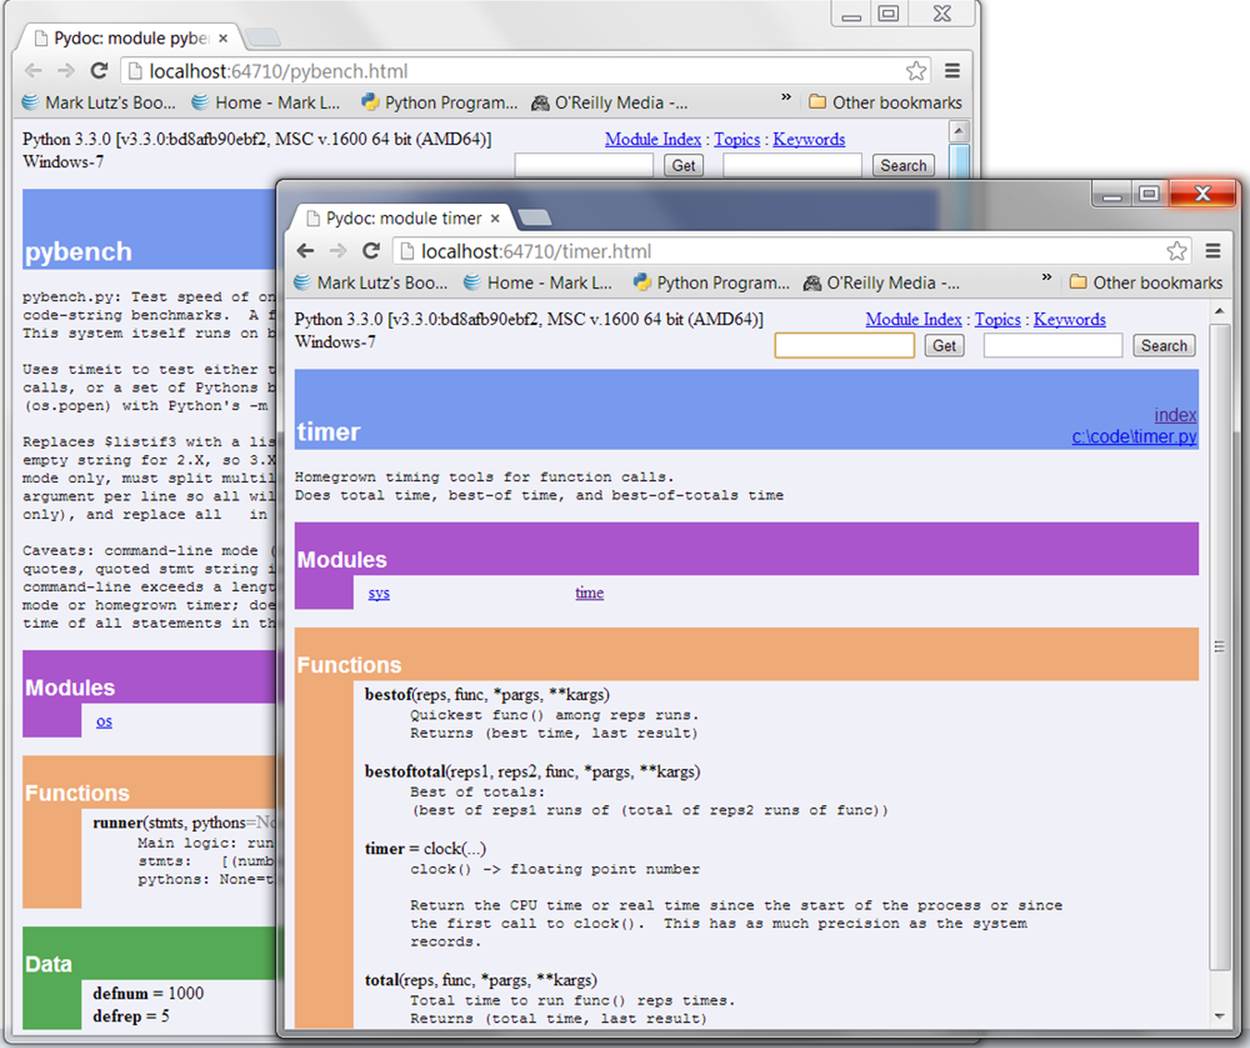
Figure 15-2. PyDoc’s module display page in Python 3.2 and later with input fields at the top, displaying two modules we will be coding in the next part of this book (Chapter 21).
Because of the similarity in their display pages, the next section on pre-3.2 PyDoc and its screen shots largely apply after 3.2 too, so be sure to read ahead for additional notes even if you’re using more recent Python. In effect, 3.3’s PyDoc simply cuts out the pre-3.2 GUI client “middleman,” while retaining its browser and server.
PyDoc in Python 3.3 also still supports other former usage modes. For instance, pydoc –p port can be used to set its PyDoc server port, and pydoc -w module still writes a module’s HTML documentation to a file named module.html for later viewing. Only the pydoc -g GUI client mode is removed and replaced by pydoc -b. You can also run PyDoc to generate a plain-text form of the documentation (its Unix “manpage” flavor shown earlier in this chapter)—the following command line is equivalent to the help call at an interactive Python prompt:
c:\code> py −3 -m pydoc timeit # Command-line text help
c:\code> py −3
>>> help("timeit") # Interactive prompt text help
As an interactive system, your best bet is to take PyDoc’s web-based interface for a test drive, so we’ll cut its usage details short here; see Python’s manuals for additional details and command-line options. Also note that PyDoc’s server and browser functionality come largely “for free” from tools that automate such utility in the portable modules of Python’s standard library (e.g., webbrowser, http.server). Consult PyDoc’s Python code in the standard library file pydoc.py for additional details and inspiration.
CHANGING PYDOC’S COLORS
You won’t be able to tell in the paper version of this book, but if you have an ebook or start PyDoc live, you’ll notice that it chooses colors that may or may not be to your liking. Unfortunately, there presently is no easy way to customize PyDoc’s colors. They are hardcoded deep in its source code, and can’t be passed in as arguments to functions or command lines, or changed in configuration files or global variables in the PyDoc module itself.
Except that, in an open source system, you can always change the code—PyDoc lives in the file pydoc.py in Python’s standard library, which is directory C:\Python33\Lib on Windows for Python 3.3. Its colors are hardcoded RGB value hex strings embedded throughout its code. For instance, its string '#eeaa77' specifies 2-byte (16-bit) values for red, green, and blue levels (decimal 238, 170, and 119), yielding a shade of orange for function banners. The string '#ee77aa' similarly renders the dark pinkish color used in nine places, including class and index page banners.
To tailor, search for these color value strings and replace them with your preferences. In IDLE, an Edit/Find for regular expression #\w{6} will locate color strings (this matches six alphanumeric characters after a # per Python’s re module pattern syntax; see the library manual for details).
To pick colors, in most programs with color selection dialogs you can map to and from RGB values; the book’s examples include a GUI script setcolor.py that does the same. In my copy of PyDoc, I replaced all #ee77aa with #008080 (teal) to banish the dark pink. Replacing #ffc8d8 with #c0c0c0 (grey) does similar for the light pink background of class docstrings.
Such surgery isn’t for the faint of heart—PyDoc’s file is currently 2,600 lines long—but makes for a fair exercise in code maintenance. Be cautious when replacing colors like #ffffff and #000000 (white and black), and be sure to make a backup copy of pydoc.py first so you have a fallback. This file uses tools we haven’t yet met, but you can safely ignore the rest of its code while you make your tactical changes.
Be sure to watch for PyDoc changes on the configurations front; this seems a prime candidate for improvement. In fact, there already is an effort under way: issue 10716 on the Python developers’ list seeks to make PyDoc more user-customizable by changing it to support CSS style sheets. If successful, this may allow users to make color and other display choices in external CSS files instead of PyDoc’s source code.
On the other hand, this is currently not planned to appear until Python 3.4, and will require PyDoc’s users to also be proficient with CSS code—which unfortunately has a nontrivial structure all its own that many people using Python may not understand well enough to change. As I write this, for example, the proposed PyDoc CSS file is already 234 lines of code that probably won’t mean much to people not already familiar with web development (and it hardly seems reasonable to ask them to learn a web development tool just to tailor PyDoc!).
Today’s PyDoc in 3.3 already supports a CSS style sheet that offers some customization options, but only half-heartedly, and ships with one that is empty. Until this is hashed out, code changes seem the best option. In any event, CSS style sheets are well beyond this Python book’s scope—see the Web for details, and check future Python release notes for PyDoc developments.
Python 3.2 and earlier: GUI client
This section documents the original GUI client mode of PyDoc, for readers using 3.2 and earlier, and gives some addition PyDoc context in general. It builds on the basics covered in the prior section, which aren’t repeated here, so be sure to at least scan the prior section if you’re using an older Python.
As mentioned, through Python 3.2, PyDoc provides a top-level GUI interface—a simple but portable Python/tkinter script for submitting requests—as well as a documentation server. Requests in the client are routed to the server, which produces reports displayed in a popped-up web browser. Apart from your having to submit search requests, this process is largely automatic.
To start PyDoc in this mode, you generally first launch the search engine GUI captured in Figure 15-3. You can start this either by selecting the Module Docs item in Python’s Start button menu on Windows 7 and earlier, or by launching the pydoc.py script in Python’s standard library directory with a -g command-line argument: it lives in Lib on Windows, but you can use Python’s –m flag to avoid typing script paths here too:
c:\code> c:\python32\python -m pydoc -g # Explicit Python path
c:\code> py −3.2 -m pydoc -g # Windows 3.3+ launcher version
Enter the name of a module you’re interested in, and press the Enter key; PyDoc will march down your module import search path (sys.path), looking for the requested module and references to it.
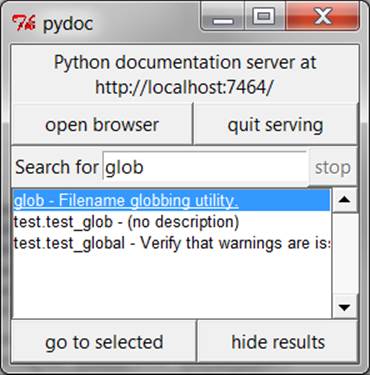
Figure 15-3. The PyDoc top-level search engine GUI client in 3.2 and earlier: type the name of a module you want documentation for, press Enter, select the module, and then press “go to selected” (or omit the module name and press “open browser” to see all available modules).
Once you’ve found a promising entry, select it and click “go to selected.” PyDoc will spawn a web browser on your machine to display the report rendered in HTML format. Figure 15-4 shows the information PyDoc displays for the built-in glob module. Notice the hyperlinks in theModules section of this page—you can click these to jump to the PyDoc pages for related (imported) modules. For larger pages, PyDoc also generates hyperlinks to sections within the page.
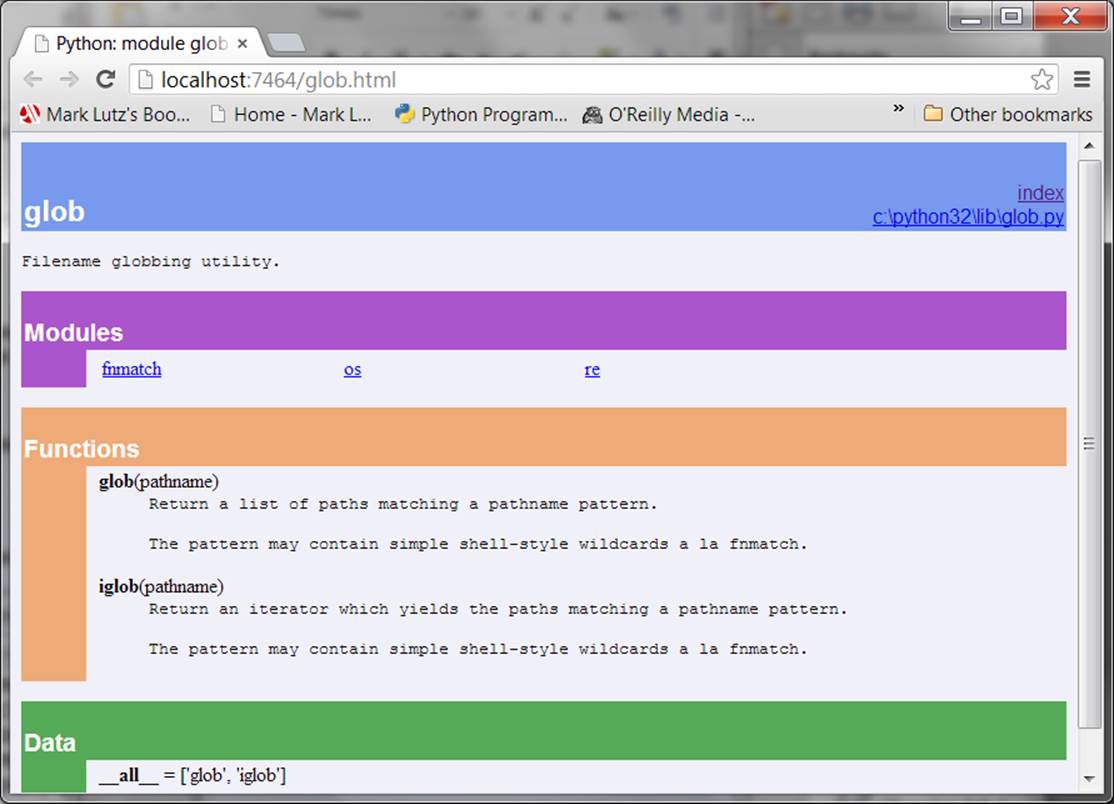
Figure 15-4. When you find a module in the Figure 15-3 GUI (such as this built-in standard library module) and press “go to selected,” the module’s documentation is rendered in HTML and displayed in a web browser window like this one.
Like the help function interface, the GUI interface works on user-defined modules as well as built-ins. Figure 15-5 shows the page generated for our docstrings.py module file coded earlier.
Make sure that the directory containing your module is on your module import search path—as mentioned, PyDoc must be able to import a file to render its documentation. This includes the current working directory—PyDoc might not check the directory it was launched from (which is probably meaningless when started from the Windows Start button anyhow), so you may need to extend your PYTHONPATH setting to get this to work. On Pythons 3.2 and 2.7, I had to add “.” to my PYTHONPATH to get PyDoc’s GUI client mode to look in the directory it was started from by command line:
c:\code> set PYTHONPATH=.;%PYTYONPATH%
c:\code> py −3.2 -m pydoc -g
This setting was also required to see the current directory for the new all-browser pydoc -b mode in 3.2. However, Python 3.3 automatically includes “.” in its index list, so no path setting is required to view files in the directory where PyDoc is started—a minor but noteworthy improvement.
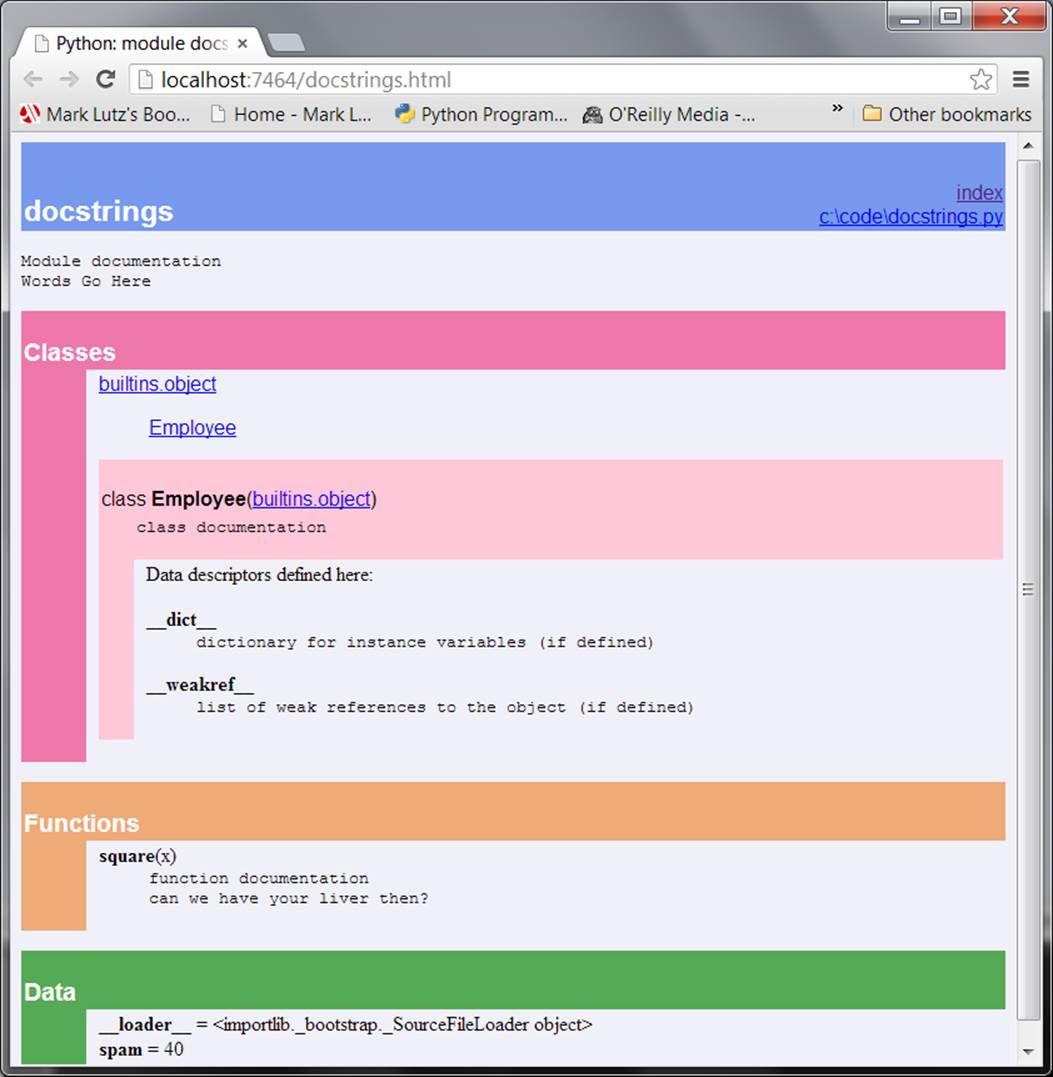
Figure 15-5. PyDoc can serve up documentation pages for both built-in and user-coded modules on the module search path. Here is the page for a user-defined module, showing all its documentation strings (docstrings) extracted from the source file.
PyDoc can be customized and launched in various ways we won’t cover here; see its entry in Python’s standard library manual for more details. The main thing to take away from this section is that PyDoc essentially gives you implementation reports “for free”—if you are good about using docstrings in your files, PyDoc does all the work of collecting and formatting them for display. PyDoc helps only for objects like functions and modules, but it provides an easy way to access a middle level of documentation for such tools—its reports are more useful than raw attribute lists, and less exhaustive than the standard manuals.
PyDoc can also be run to save the HTML documentation for a module in a file for later viewing or printing; see the preceding section for pointers. Also, note that PyDoc might not work well if run on scripts that read from standard input—PyDoc imports the target module to inspect its contents, and there may be no connection for standard input text when it is run in GUI mode, especially if run from the Windows Start button. Modules that can be imported without immediate input requirements will always work under PyDoc, though. See also the preceding section’s notes regarding scripts in PyDoc’s -b mode in 3.2 and later; launching PyDoc’s GUI mode by command line works the same—you interact in the launch window.
NOTE
PyDoc GUI client trick of the day: If you press the “open browser” button in Figure 15-3’s window, PyDoc will produce an index page containing a hyperlink to every module you can possibly import on your computer. This includes Python standard library modules, modules of installed third-party extensions, user-defined modules on your import search path, and even statically or dynamically linked-in C-coded modules. Such information is hard to come by otherwise without writing code that inspects all module sources. On Python 3.2, you’ll want to do this immediately after the GUI opens, as it may not fully work after searches. Also note that in PyDoc’s all-browser –b interface in 3.2 and later, you get the same index functionality on its top-level start page ofFigure 15-1.
Beyond docstrings: Sphinx
If you’re looking for a way to document your Python system in a more sophisticated way, you may wish to check out Sphinx (currently at http://sphinx-doc.org). Sphinx is used by the standard Python documentation described in the next section, and many other projects. It uses simplereStructuredText as its markup language, and inherits much from the Docutils suite of reStructuredText parsing and translating tools.
Among other things, Sphinx supports a variety of output formats (HTML including Windows HTML Help, LaTeX for printable PDF versions, manual pages, and plain text); extensive and automatic cross-references; hierarchical structure with automatic links to relatives; automatic indexes; automatic code highlighting using Pygments (itself a notable Python tool); and more. This is probably overkill for smaller programs where docstrings and PyDoc may suffice, but can yield professional-grade documentation for large projects. See the Web for more details on Sphinx and its related tools.
The Standard Manual Set
For the complete and most up-to-date description of the language and its toolset, Python’s standard manuals stand ready to serve. Python’s manuals ship in HTML and other formats, and they are installed with the Python system on Windows—they are available in your Start button’s menu for Python on Windows 7 and earlier, and they can also be opened from the Help menu within IDLE. You can also fetch the manual set separately from http://www.python.org in a variety of formats, or read it online at that site (follow the Documentation link). On Windows, the manuals are a compiled help file to support searches, and the online versions at the Python website include a web-based search page.
When opened, the Windows format of the manuals displays a root page like that in Figure 15-6, showing the local copy on Windows. The two most important entries here are most likely the Library Reference (which documents built-in types, functions, exceptions, and standard library modules) and the Language Reference (which provides a formal description of language-level details). The tutorial listed on this page also provides a brief introduction for newcomers, which you’re probably already beyond.
Of notable interest, the What’s New documents in this standard manual set chronicle Python changes made in each release beginning with Python 2.0, which came out in late 2000—useful for those porting older Python code, or older Python skills. These documents are especially useful for uncovering additional details on the differences in the Python 2.X and 3.X language lines covered in this book, as well as in their standard libraries.
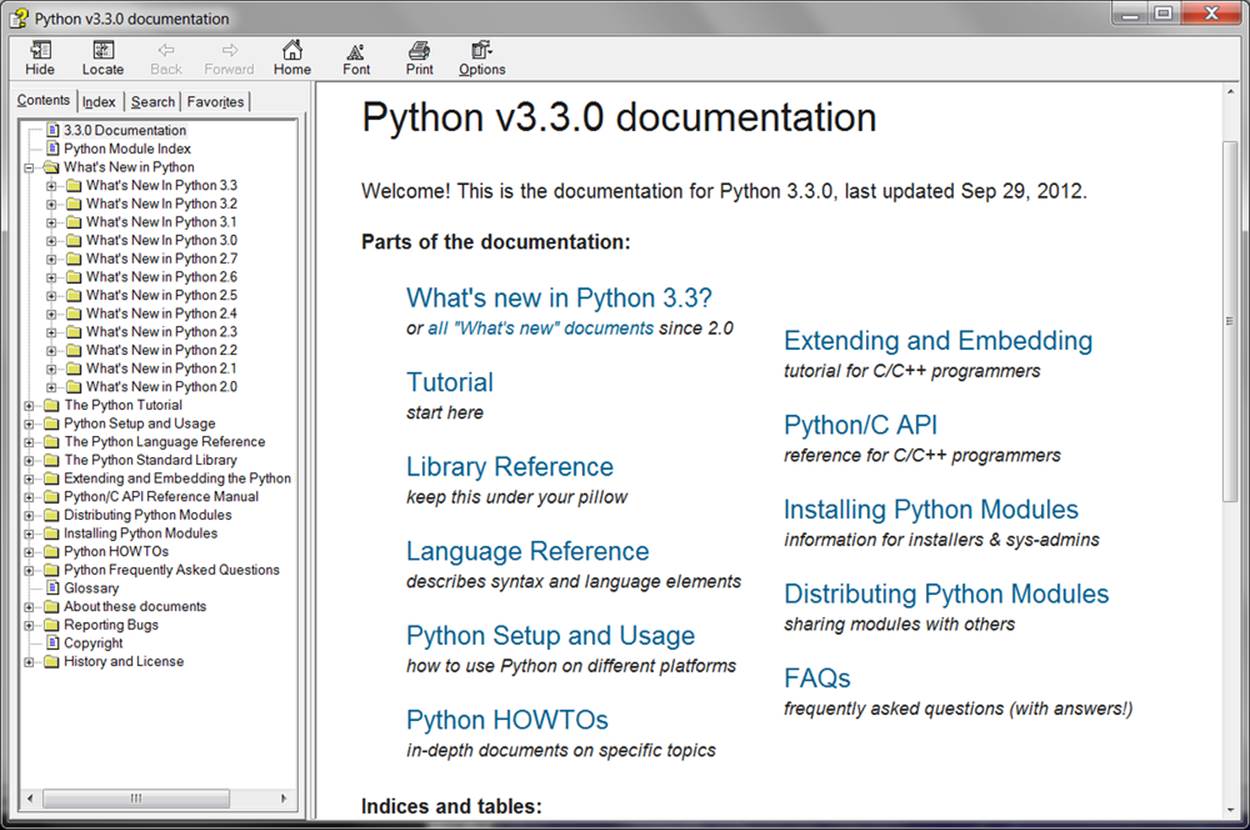
Figure 15-6. Python’s standard manual set, available online at http://www.python.org, from IDLE’s Help menu, and in the Windows 7 and earlier Start button menu. It’s a searchable help file on Windows, and there is a search engine for the online version. Of these, the Library Reference is the one you’ll want to use most of the time.
Web Resources
At the official Python website (http://www.python.org), you’ll find links to various Python resources, some of which cover special topics or domains. Click the Documentation link to access an online tutorial and the Beginners Guide to Python. The site also lists non-English Python resources, and introductions scaled to different target audiences.
Today you will also find numerous Python wikis, blogs, websites, and a host of other resources on the Web at large. To sample the online community, try searching for a term like “Python programming” in Google, or search on any topic of interest; chances are good you’ll find ample material to browse.
Published Books
As a final resource, you can choose from a collection of professionally edited and published reference books for Python. Bear in mind that books tend to lag behind the cutting edge of Python changes, partly because of the work involved in writing, and partly because of the natural delays built into the publishing cycle. Usually, by the time a book comes out, it’s three or more months behind the current Python state (trust me on that—my books have a nasty habit of falling out of date in minor ways between the time I write them and the time they hit the shelves!). Unlike standard manuals, books are also generally not free.
Still, for many, the convenience and quality of a professionally published text is worth the cost. Moreover, Python changes so slowly that books are usually still relevant years after they are published, especially if their authors post updates on the Web. See the preface for pointers to otherPython books.
[32] Note that asking for help on an actual string object directly (e.g., help('')) doesn’t work in recent Pythons: you usually get no help, because strings are interpreted specially—as a request for help on an unimported module, for instance (see earlier). You must use the str type name in this context, though both other types of actual objects (help([])) and string method names referenced through actual objects (help(''.join)) work fine (at least in Python 3.3—this has been prone to change over time). There is also an interactive help mode, which you start by typing just help().
Common Coding Gotchas
Before the programming exercises for this part of the book, let’s run through some of the most common mistakes beginners make when coding Python statements and programs. Many of these are warnings I’ve thrown out earlier in this part of the book, collected here for ease of reference. You’ll learn to avoid these pitfalls once you’ve gained a bit of Python coding experience, but a few words now might help you avoid falling into some of these traps initially:
§ Don’t forget the colons. Always remember to type a : at the end of compound statement headers—the first line of an if, while, for, etc. You’ll probably forget at first (I did, and so have most of my roughly 4,000 Python students over the years), but you can take some comfort from the fact that it will soon become an unconscious habit.
§ Start in column 1. Be sure to start top-level (unnested) code in column 1. That includes unnested code typed into module files, as well as unnested code typed at the interactive prompt.
§ Blank lines matter at the interactive prompt. Blank lines in compound statements are always irrelevant and ignored in module files, but when you’re typing code at the interactive prompt, they end the statement. In other words, blank lines tell the interactive command line that you’ve finished a compound statement; if you want to continue, don’t hit the Enter key at the ... prompt (or in IDLE) until you’re really done. This also means you can’t paste multiline code at this prompt; it must run one full statement at a time.
§ Indent consistently. Avoid mixing tabs and spaces in the indentation of a block, unless you know what your text editor does with tabs. Otherwise, what you see in your editor may not be what Python sees when it counts tabs as a number of spaces. This is true in any block-structured language, not just Python—if the next programmer has tabs set differently, it will be difficult or impossible to understand the structure of your code. It’s safer to use all tabs or all spaces for each block.
§ Don’t code C in Python. A reminder for C/C++ programmers: you don’t need to type parentheses around tests in if and while headers (e.g., if (X==1):). You can, if you like (any expression can be enclosed in parentheses), but they are fully superfluous in this context. Also, do not terminate all your statements with semicolons; it’s technically legal to do this in Python as well, but it’s totally useless unless you’re placing more than one statement on a single line (the end of a line normally terminates a statement). And remember, don’t embed assignment statements inwhile loop tests, and don’t use {} around blocks (indent your nested code blocks consistently instead).
§ Use simple for loops instead of while or range. Another reminder: a simple for loop (e.g., for x in seq:) is almost always simpler to code and often quicker to run than a while- or range-based counter loop. Because Python handles indexing internally for a simple for, it can sometimes be faster than the equivalent while, though this can vary per code and Python. For code simplicity alone, though, avoid the temptation to count things in Python!
§ Beware of mutables in assignments. I mentioned this in Chapter 11: you need to be careful about using mutables in a multiple-target assignment (a = b = []), as well as in an augmented assignment (a += [1, 2]). In both cases, in-place changes may impact other variables. SeeChapter 11 for details if you’ve forgotten why this is true.
§ Don’t expect results from functions that change objects in place. We encountered this one earlier, too: in-place change operations like the list.append and list.sort methods introduced in Chapter 8 do not return values (other than None), so you should call them without assigning the result. It’s not uncommon for beginners to say something like mylist = mylist.append(X) to try to get the result of an append, but what this actually does is assign mylist to None, not to the modified list (in fact, you’ll lose your reference to the list altogether).
A more devious example of this pops up in Python 2.X code when trying to step through dictionary items in a sorted fashion. It’s fairly common to see code like for k in D.keys().sort():. This almost works—the keys method builds a keys list, and the sort method orders it—but because the sort method returns None, the loop fails because it is ultimately a loop over None (a nonsequence). This fails even sooner in Python 3.X, because dictionary keys are views, not lists! To code this correctly, either use the newer sorted built-in function, which returns the sorted list, or split the method calls out to statements: Ks = list(D.keys()), then Ks.sort(), and finally, for k in Ks:. This, by the way, is one case where you may still want to call the keys method explicitly for looping, instead of relying on the dictionary iterators—iterators do not sort.
§ Always use parentheses to call a function. You must add parentheses after a function name to call it, whether it takes arguments or not (e.g., use function(), not function). In the next part of this book, we’ll learn that functions are simply objects that have a special operation—a call that you trigger with the parentheses. They can be referenced like any other object without triggering a call.
In classes, this problem seems to occur most often with files; it’s common to see beginners type file.close to close a file, rather than file.close(). Because it’s legal to reference a function without calling it, the first version with no parentheses succeeds silently, but it does not close the file!
§ Don’t use extensions or paths in imports and reloads. Omit directory paths and file extensions in import statements—say import mod, not import mod.py. We discussed module basics in Chapter 3 and will continue studying modules in Part V. Because modules may have other extensions besides .py (.pyc, for instance), hardcoding a particular extension is not only illegal syntax, it doesn’t make sense. Python picks an extension automatically, and any platform-specific directory path syntax comes from module search path settings, not the import statement.
§ And other pitfalls in other parts. Be sure to also see the built-in type warnings at the end of the prior part, as they may qualify as coding issues too. There are additional “gotchas” that crop up commonly in Python coding—losing a built-in function by reassigning its name, hiding a library module by using its name for one of your own, changing mutable argument defaults, and so on—but we don’t have enough background to cover them yet. To learn more about both what you should and shouldn’t do in Python, you’ll have to read on; later parts extend the set of “gotchas” and fixes we’ve added to here.
Chapter Summary
This chapter took us on a tour of program documentation—both documentation we write ourselves for our own programs, and documentation available for tools we use. We met docstrings, explored the online and manual resources for Python reference, and learned how PyDoc’s helpfunction and web page interfaces provide extra sources of documentation. Because this is the last chapter in this part of the book, we also reviewed common coding mistakes to help you avoid them.
In the next part of this book, we’ll start applying what we already know to larger program constructs. Specifically, the next part takes up the topic of functions—a tool used to group statements for reuse. Before moving on, however, be sure to work through the set of lab exercises for this part of the book that appear at the end of this chapter. And even before that, let’s run through this chapter’s quiz.
Test Your Knowledge: Quiz
1. When should you use documentation strings instead of hash-mark comments?
2. Name three ways you can view documentation strings.
3. How can you obtain a list of the available attributes in an object?
4. How can you get a list of all available modules on your computer?
5. Which Python book should you purchase after this one?
Test Your Knowledge: Answers
1. Documentation strings (docstrings) are considered best for larger, functional documentation, describing the use of modules, functions, classes, and methods in your code. Hash-mark comments are today best limited to smaller-scale documentation about arcane expressions or statements at strategic points on your code. This is partly because docstrings are easier to find in a source file, but also because they can be extracted and displayed by the PyDoc system.
2. You can see docstrings by printing an object’s __doc__ attribute, by passing it to PyDoc’s help function, and by selecting modules in PyDoc’s HTML-based user interfaces—either the -g GUI client mode in Python 3.2 and earlier, or the -b all-browser mode in Python 3.2 and later (and required as of 3.3). Both run a client/server system that displays documentation in a popped-up web browser. PyDoc can also be run to save a module’s documentation in an HTML file for later viewing or printing.
3. The built-in dir(X) function returns a list of all the attributes attached to any object. A list comprehension of the form [a for a in dir(X) if not a.startswith('__')] can be used to filter out internals names with underscores (we’ll learn how to wrap this in a function in the next part of the book to make it easier to use).
4. In Python 3.2 and earlier, you can run the PyDoc GUI interface, and select “open browser”; this opens a web page containing a link to every module available to your programs. This GUI mode no longer works as of Python 3.3. In Python 3.2 and later, you get the same functionality by running PyDoc’s newer all-browser mode with a -b command-line switch; the top-level start page displayed in a web browser in this newer mode has the same index page listing all available modules.
5. Mine, of course. (Seriously, there are hundreds today; the preface lists a few recommended follow-up books, both for reference and for application tutorials, and you should browse for books that fit your needs.)
Test Your Knowledge: Part III Exercises
Now that you know how to code basic program logic, the following exercises will ask you to implement some simple tasks with statements. Most of the work is in exercise 4, which lets you explore coding alternatives. There are always many ways to arrange statements, and part of learning Python is learning which arrangements work better than others. You’ll eventually gravitate naturally toward what experienced Python programmers call “best practice,” but best practice takes practice.
See Part III in Appendix D for the solutions.
1. Coding basic loops. This exercise asks you to experiment with for loops.
a. Write a for loop that prints the ASCII code of each character in a string named S. Use the built-in function ord(character) to convert each character to an ASCII integer. This function technically returns a Unicode code point in Python 3.X, but if you restrict its content to ASCII characters, you’ll get back ASCII codes. (Test it interactively to see how it works.)
b. Next, change your loop to compute the sum of the ASCII codes of all the characters in a string.
c. Finally, modify your code again to return a new list that contains the ASCII codes of each character in the string. Does the expression map(ord, S) have a similar effect? How about [ord(c) for c in S]? Why? (Hint: see Chapter 14.)
2. Backslash characters. What happens on your machine when you type the following code interactively?
3. for i in range(50):
4. print('hello %d\n\a' % i)
Beware that if it’s run outside of the IDLE interface this example may beep at you, so you may not want to run it in a crowded room! IDLE prints odd characters instead of beeping—spoiling much of the joke (see the backslash escape characters in Table 7-2).
5. Sorting dictionaries. In Chapter 8, we saw that dictionaries are unordered collections. Write a for loop that prints a dictionary’s items in sorted (ascending) order. (Hint: use the dictionary keys and list sort methods, or the newer sorted built-in function.)
6. Program logic alternatives. Consider the following code, which uses a while loop and found flag to search a list of powers of 2 for the value of 2 raised to the fifth power (32). It’s stored in a module file called power.py.
7. L = [1, 2, 4, 8, 16, 32, 64]
8. X = 5
9.
10.found = False
11.i = 0
12.while not found and i < len(L):
13. if 2 ** X == L[i]:
14. found = True
15. else:
16. i = i+1
17.
18.if found:
19. print('at index', i)
20.else:
21. print(X, 'not found')
22.
23.C:\book\tests> python power.py
24.at index 5
As is, the example doesn’t follow normal Python coding techniques. Follow the steps outlined here to improve it (for all the transformations, you may either type your code interactively or store it in a script file run from the system command line—using a file makes this exercise much easier):
a. First, rewrite this code with a while loop else clause to eliminate the found flag and final if statement.
b. Next, rewrite the example to use a for loop with an else clause, to eliminate the explicit list-indexing logic. (Hint: to get the index of an item, use the list index method—L.index(X) returns the offset of the first X in list L.)
c. Next, remove the loop completely by rewriting the example with a simple in operator membership expression. (See Chapter 8 for more details, or type this to test: 2 in [1,2,3].)
d. Finally, use a for loop and the list append method to generate the powers-of-2 list (L) instead of hardcoding a list literal.
Deeper thoughts:
e. Do you think it would improve performance to move the 2 ** X expression outside the loops? How would you code that?
f. As we saw in exercise 1, Python includes a map(function, list) tool that can generate a powers-of-2 list, too: map(lambda x: 2 ** x, range(7)). Try typing this code interactively; we’ll meet lambda more formally in the next part of this book, especially inChapter 19. Would a list comprehension help here (see Chapter 14)?
25.Code maintenance. If you haven’t already done so, experiment with making the code changes suggested in this chapter’s sidebar Changing PyDoc’s Colors. Much of the work of real software development is in changing existing code, so the sooner you begin doing so, the better. For reference, my edited copy of PyDoc is in the book’s examples package, named mypydoc.py; to see how it differs, you can run a file compare (fc on Windows) with the original pydoc.py in 3.3 (also included, lest it change radically in 3.4 as the sidebar describes). If PyDoc is more easily customized by the time you read these words, customize colors per its current convention instead; if this involves changing a CSS file, let’s hope the procedure will be well documented in Python’s manuals.
All materials on the site are licensed Creative Commons Attribution-Sharealike 3.0 Unported CC BY-SA 3.0 & GNU Free Documentation License (GFDL)
If you are the copyright holder of any material contained on our site and intend to remove it, please contact our site administrator for approval.
© 2016-2026 All site design rights belong to S.Y.A.