Learning Python (2013)
Part V. Modules and Packages
Chapter 25. Advanced Module Topics
This chapter concludes this part of the book with a collection of more advanced module-related topics—data hiding, the __future__ module, the __name__ variable, sys.path changes, listing tools, importing modules by name string, transitive reloads, and so on—along with the standard set of gotchas and exercises related to what we’ve covered in this part of the book.
Along the way, we’ll build some larger and more useful tools than we have so far that combine functions and modules. Like functions, modules are more effective when their interfaces are well defined, so this chapter also briefly reviews module design concepts, some of which we have explored in prior chapters.
Despite the word “advanced” used in this chapter’s title for symmetry, this is mostly a grab-bag assortment of additional module topics. Because some of the topics discussed here are widely used—especially the __name__ trick—be sure to browse here before moving on to classes in the next part of the book.
Module Design Concepts
Like functions, modules present design tradeoffs: you have to think about which functions go in which modules, module communication mechanisms, and so on. All of this will become clearer when you start writing bigger Python systems, but here are a few general ideas to keep in mind:
§ You’re always in a module in Python. There’s no way to write code that doesn’t live in some module. As mentioned briefly in Chapter 17 and Chapter 21, even code typed at the interactive prompt really goes in a built-in module called __main__; the only unique things about the interactive prompt are that code runs and is discarded immediately, and expression results are printed automatically.
§ Minimize module coupling: global variables. Like functions, modules work best if they’re written to be closed boxes. As a rule of thumb, they should be as independent of global variables used within other modules as possible, except for functions and classes imported from them. The only things a module should share with the outside world are the tools it uses, and the tools it defines.
§ Maximize module cohesion: unified purpose. You can minimize a module’s couplings by maximizing its cohesion; if all the components of a module share a general purpose, you’re less likely to depend on external names.
§ Modules should rarely change other modules’ variables. We illustrated this with code in Chapter 17, but it’s worth repeating here: it’s perfectly OK to use globals defined in another module (that’s how clients import services, after all), but changing globals in another module is often a symptom of a design problem. There are exceptions, of course, but you should try to communicate results through devices such as function arguments and return values, not cross-module changes. Otherwise, your globals’ values become dependent on the order of arbitrarily remote assignments in other files, and your modules become harder to understand and reuse.
As a summary, Figure 25-1 sketches the environment in which modules operate. Modules contain variables, functions, classes, and other modules (if imported). Functions have local variables of their own, as do classes—objects that live within modules and which we’ll begin studying in the next chapter. As we saw in Part IV, functions can nest, too, but all are ultimately contained by modules at the top.
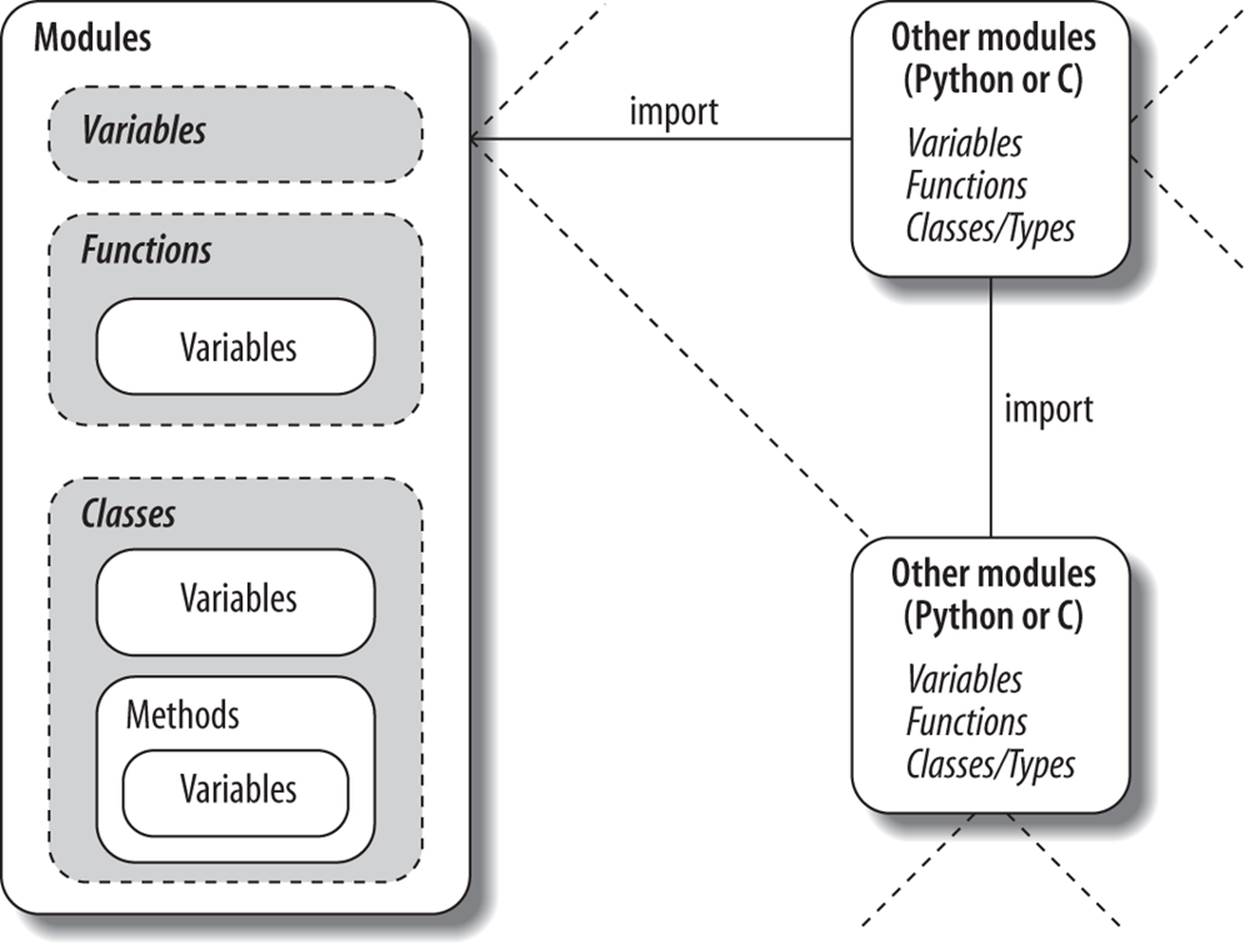
Figure 25-1. Module execution environment. Modules are imported, but modules also import and use other modules, which may be coded in Python or another language such as C. Modules in turn contain variables, functions, and classes to do their work, and their functions and classes may contain variables and other items of their own. At the top, though, programs are just sets of modules.
Data Hiding in Modules
As we’ve seen, a Python module exports all the names assigned at the top level of its file. There is no notion of declaring which names should and shouldn’t be visible outside the module. In fact, there’s no way to prevent a client from changing names inside a module if it wants to.
In Python, data hiding in modules is a convention, not a syntactical constraint. If you want to break a module by trashing its names, you can, but fortunately, I’ve yet to meet a programmer for whom this was a life goal. Some purists object to this liberal attitude toward data hiding, claiming that it means Python can’t implement encapsulation. However, encapsulation in Python is more about packaging than about restricting. We’ll expand this idea in the next part in relation to classes, which also have no privacy syntax but can often emulate its effect in code.
Minimizing from * Damage: _X and __all__
As a special case, you can prefix names with a single underscore (e.g., _X) to prevent them from being copied out when a client imports a module’s names with a from * statement. This really is intended only to minimize namespace pollution; because from * copies out all names, the importer may get more than it’s bargained for (including names that overwrite names in the importer). Underscores aren’t “private” declarations: you can still see and change such names with other import forms, such as the import statement:
# unders.py
a, _b, c, _d = 1, 2, 3, 4
>>> from unders import * # Load non _X names only
>>> a, c
(1, 3)
>>> _b
NameError: name '_b' is not defined
>>> import unders # But other importers get every name
>>> unders._b
2
Alternatively, you can achieve a hiding effect similar to the _X naming convention by assigning a list of variable name strings to the variable __all__ at the top level of the module. When this feature is used, the from * statement will copy out only those names listed in the __all__ list. In effect, this is the converse of the _X convention: __all__ identifies names to be copied, while _X identifies names not to be copied. Python looks for an __all__ list in the module first and copies its names irrespective of any underscores; if __all__ is not defined, from * copies all names without a single leading underscore:
# alls.py
__all__ = ['a', '_c'] # __all__ has precedence over _X
a, b, _c, _d = 1, 2, 3, 4
>>> from alls import * # Load __all__ names only
>>> a, _c
(1, 3)
>>> b
NameError: name 'b' is not defined
>>> from alls import a, b, _c, _d # But other importers get every name
>>> a, b, _c, _d
(1, 2, 3, 4)
>>> import alls
>>> alls.a, alls.b, alls._c, alls._d
(1, 2, 3, 4)
Like the _X convention, the __all__ list has meaning only to the from * statement form and does not amount to a privacy declaration: other import statements can still access all names, as the last two tests show. Still, module writers can use either technique to implement modules that are well behaved when used with from *. See also the discussion of __all__ lists in package __init__.py files in Chapter 24; there, these lists declare submodules to be automatically loaded for a from * on their container.
Enabling Future Language Features: __future__
Changes to the language that may potentially break existing code are usually introduced gradually in Python. They often initially appear as optional extensions, which are disabled by default. To turn on such extensions, use a special import statement of this form:
from __future__ import featurename
When used in a script, this statement must appear as the first executable statement in the file (possibly following a docstring or comment), because it enables special compilation of code on a per-module basis. It’s also possible to submit this statement at the interactive prompt to experiment with upcoming language changes; the feature will then be available for the remainder of the interactive session.
For example, in this book we’ve seen how to use this statement in Python 2.X to activate 3.X true division in Chapter 5, 3.X print calls in Chapter 11, and 3.X absolute imports for packages in Chapter 24. Prior editions of this book used this statement form to demonstrate generator functions, which required a keyword that was not yet enabled by default (they use a featurename of generators).
All of these changes have the potential to break existing code in Python 2.X, so they were phased in gradually or offered as optional extensions, enabled with this special import. At the same time, some are available to allow you to write code that is forward compatible with later releases you may port to someday.
For a list of futurisms you may import and turn on this way, run a dir call on the __future__ module after importing it, or see its library manual entry. Per its documentation, none of its feature names will ever be removed, so it’s safe to leave in a __future__ import even in code run by a version of Python where the feature is present normally.
Mixed Usage Modes: __name__ and __main__
Our next module-related trick lets you both import a file as a module and run it as a standalone program, and is widely used in Python files. It’s actually so simple that some miss the point at first: each module has a built-in attribute called __name__, which Python creates and assigns automatically as follows:
§ If the file is being run as a top-level program file, __name__ is set to the string "__main__" when it starts.
§ If the file is being imported instead, __name__ is set to the module’s name as known by its clients.
The upshot is that a module can test its own __name__ to determine whether it’s being run or imported. For example, suppose we create the following module file, named runme.py, to export a single function called tester:
def tester():
print("It's Christmas in Heaven...")
if __name__ == '__main__': # Only when run
tester() # Not when imported
This module defines a function for clients to import and use as usual:
c:\code> python
>>> import runme
>>> runme.tester()
It's Christmas in Heaven...
But the module also includes code at the bottom that is set up to call the function automatically when this file is run as a program:
c:\code> python runme.py
It's Christmas in Heaven...
In effect, a module’s __name__ variable serves as a usage mode flag, allowing its code to be leveraged as both an importable library and a top-level script. Though simple, you’ll see this hook used in the majority of the Python program files you are likely to encounter in the wild—both for testing and dual usage.
For instance, perhaps the most common way you’ll see the __name__ test applied is for self-test code. In short, you can package code that tests a module’s exports in the module itself by wrapping it in a __name__ test at the bottom of the file. This way, you can use the file in clients byimporting it, but also test its logic by running it from the system shell or via another launching scheme.
Coding self-test code at the bottom of a file under the __name__ test is probably the most common and simplest unit-testing protocol in Python. It’s much more convenient than retyping all your tests at the interactive prompt. (Chapter 36 will discuss other commonly used options for testing Python code—as you’ll see, the unittest and doctest standard library modules provide more advanced testing tools.)
In addition, the __name__ trick is also commonly used when you’re writing files that can be used both as command-line utilities and as tool libraries. For instance, suppose you write a file-finder script in Python. You can get more mileage out of your code if you package it in functions and add a __name__ test in the file to automatically call those functions when the file is run standalone. That way, the script’s code becomes reusable in other programs.
Unit Tests with __name__
In fact, we’ve already seen a prime example in this book of an instance where the __name__ check could be useful. In the section on arguments in Chapter 18, we coded a script that computed the minimum value from the set of arguments sent in (this was the file minmax.py in “The min Wakeup Call!”):
def minmax(test, *args):
res = args[0]
for arg in args[1:]:
if test(arg, res):
res = arg
return res
def lessthan(x, y): return x < y
def grtrthan(x, y): return x > y
print(minmax(lessthan, 4, 2, 1, 5, 6, 3)) # Self-test code
print(minmax(grtrthan, 4, 2, 1, 5, 6, 3))
This script includes self-test code at the bottom, so we can test it without having to retype everything at the interactive command line each time we run it. The problem with the way it is currently coded, however, is that the output of the self-test call will appear every time this file is imported from another file to be used as a tool—not exactly a user-friendly feature! To improve it, we can wrap up the self-test call in a __name__ check, so that it will be launched only when the file is run as a top-level script, not when it is imported (this new version of the module file is renamedminmax2.py here):
print('I am:', __name__)
def minmax(test, *args):
res = args[0]
for arg in args[1:]:
if test(arg, res):
res = arg
return res
def lessthan(x, y): return x < y
def grtrthan(x, y): return x > y
if __name__ == '__main__':
print(minmax(lessthan, 4, 2, 1, 5, 6, 3)) # Self-test code
print(minmax(grtrthan, 4, 2, 1, 5, 6, 3))
We’re also printing the value of __name__ at the top here to trace its value. Python creates and assigns this usage-mode variable as soon as it starts loading a file. When we run this file as a top-level script, its name is set to __main__, so its self-test code kicks in automatically:
c:\code> python minmax2.py
I am: __main__
1
6
If we import the file, though, its name is not __main__, so we must explicitly call the function to make it run:
c:\code> python
>>> import minmax2
I am: minmax2
>>> minmax2.minmax(minmax2.lessthan, 's', 'p', 'a', 'a')
'a'
Again, regardless of whether this is used for testing, the net effect is that we get to use our code in two different roles—as a library module of tools, or as an executable program.
NOTE
Per Chapter 24’s discussion of package relative imports, this section’s technique can also have some implications for imports run by files that are also used as package components in 3.X, but can still be leveraged with absolute package path imports and other techniques. See the prior chapter’s discussion and example for more details.
Example: Dual Mode Code
Here’s a more substantial module example that demonstrates another way that the prior section’s __name__ trick is commonly employed. The following module, formats.py, defines string formatting utilities for importers, but also checks its name to see if it is being run as a top-level script; if so, it tests and uses arguments listed on the system command line to run a canned or passed-in test. In Python, the sys.argv list contains command-line arguments—it is a list of strings reflecting words typed on the command line, where the first item is always the name of the script being run. We used this in Chapter 21’s benchmark tool as switches, but leverage it as a general input mechanism here:
#!python
"""
File: formats.py (2.X and 3.X)
Various specialized string display formatting utilities.
Test me with canned self-test or command-line arguments.
To do: add parens for negative money, add more features.
"""
def commas(N):
"""
Format positive integer-like N for display with
commas between digit groupings: "xxx,yyy,zzz".
"""
digits = str(N)
assert(digits.isdigit())
result = ''
while digits:
digits, last3 = digits[:-3], digits[-3:]
result = (last3 + ',' + result) if result else last3
return result
def money(N, numwidth=0, currency='$'):
"""
Format number N for display with commas, 2 decimal digits,
leading $ and sign, and optional padding: "$ -xxx,yyy.zz".
numwidth=0 for no space padding, currency='' to omit symbol,
and non-ASCII for others (e.g., pound=u'\xA3' or u'\u00A3').
"""
sign = '-' if N < 0 else ''
N = abs(N)
whole = commas(int(N))
fract = ('%.2f' % N)[-2:]
number = '%s%s.%s' % (sign, whole, fract)
return '%s%*s' % (currency, numwidth, number)
if __name__ == '__main__':
def selftest():
tests = 0, 1 # fails: −1, 1.23
tests += 12, 123, 1234, 12345, 123456, 1234567
tests += 2 ** 32, 2 ** 100
for test in tests:
print(commas(test))
print('')
tests = 0, 1, −1, 1.23, 1., 1.2, 3.14159
tests += 12.34, 12.344, 12.345, 12.346
tests += 2 ** 32, (2 ** 32 + .2345)
tests += 1.2345, 1.2, 0.2345
tests += −1.2345, −1.2, −0.2345
tests += −(2 ** 32), −(2**32 + .2345)
tests += (2 ** 100), −(2 ** 100)
for test in tests:
print('%s [%s]' % (money(test, 17), test))
import sys
if len(sys.argv) == 1:
selftest()
else:
print(money(float(sys.argv[1]), int(sys.argv[2])))
This file works identically in Python 2.X and 3.X. When run directly, it tests itself as before, but it uses options on the command line to control the test behavior. Run this file directly with no command-line arguments on your own to see what its self-test code prints—it’s too extensive to list in full here:
c:\code> python formats.py
0
1
12
123
1,234
12,345
123,456
1,234,567
...etc...
To test specific strings, pass them in on the command line along with a minimum field width; the script’s __main__ code passes them on to its money function, which in turn runs commas:
C:\code> python formats.py 999999999 0
$999,999,999.00
C:\code> python formats.py −999999999 0
$-999,999,999.00
C:\code> python formats.py 123456789012345 0
$123,456,789,012,345.00
C:\code> python formats.py −123456789012345 25
$ −123,456,789,012,345.00
C:\code> python formats.py 123.456 0
$123.46
C:\code> python formats.py −123.454 0
$-123.45
As before, because this code is instrumented for dual-mode usage, we can also import its tools normally to reuse them as library components in scripts, modules, and the interactive prompt:
>>> from formats import money, commas
>>> money(123.456)
'$123.46'
>>> money(-9999999.99, 15)
'$ −9,999,999.99'
>>> X = 99999999999999999999
>>> '%s (%s)' % (commas(X), X)
'99,999,999,999,999,999,999 (99999999999999999999)'
You can use command-line arguments in ways similar to this example to provide general inputs to scripts that may also package their code as functions and classes for reuse by importers. For more advanced command-line processing, see Python Command-Line Arguments in Appendix A, and the getopt, optparse, and argparse modules’ documentation in Python’s standard library manual. In some scenarios, you might also use the built-in input function, used in Chapter 3 and Chapter 10, to prompt the shell user for test inputs instead of pulling them from the command line.
NOTE
Also see Chapter 7’s discussion of the new {,d} string format method syntax added in Python 2.7 and 3.1; this formatting extension separates thousands groups with commas much like the code here. The module listed here, though, adds money formatting, can be changed, and serves as a manual alternative for comma insertions in earlier Pythons.
Currency Symbols: Unicode in Action
This module’s money function defaults to dollars, but supports other currency symbols by allowing you to pass in non-ASCII Unicode characters. The Unicode ordinal with hexadecimal value 00A3, for example, is the pound symbol, and 00A5 is the yen. You can code these in a variety of forms, as:
§ The character’s decoded Unicode code point ordinal (integer) in a text string, with either Unicode or hex escapes (for 2.X compatibility, use a leading u in such string literals in Python 3.3)
§ The character’s raw encoded form in a byte string that is decoded before passed, with hex escapes (for 3.X compatibility, use a leading b in such string literals in Python 2.X)
§ The actual character itself in your program’s text, along with a source code encoding declaration
We previewed Unicode in Chapter 4 and will get into more details in Chapter 37, but its basic requirements here are fairly simple, and serve as a decent use case. To test alternative currencies, I typed the following in a file, formats_currency.py, because it was too much to reenter interactively on changes:
from __future__ import print_function # 2.X
from formats import money
X = 54321.987
print(money(X), money(X, 0, ''))
print(money(X, currency=u'\xA3'), money(X, currency=u'\u00A5'))
print(money(X, currency=b'\xA3'.decode('latin-1')))
print(money(X, currency=u'\u20AC'), money(X, 0, b'\xA4'.decode('iso-8859-15')))
print(money(X, currency=b'\xA4'.decode('latin-1')))
The following gives this test file’s output in Python 3.3 in IDLE, and in other contexts configured properly. It works the same in 2.X because it prints and codes strings portably. Per Chapter 11, a __future__ import enables 3.X print calls in 2.X. And as introduced in Chapter 4, 3.Xb'...' bytes literals are taken as simple strings in 2.X, and 2.X u'...' Unicode literals as treated as normal strings in 3.X as of 3.3.
$54,321.99 54,321.99
£54,321.99 ¥54,321.99
£54,321.99
€54,321.99 €54,321.99
¤54,321.99
If this works on your computer, you can probably skip the next few paragraphs. Depending on your interface and system settings, though, getting this to run and display properly may require additional steps. On my machine, it behaves correctly when Python and the display medium are in sync, but the euro and generic currency symbols in the last two lines fail with errors in a basic Command Prompt on Windows.
Specifically, this test script always runs and produces the output shown in the IDLE GUI in both 3.X and 2.X, because Unicode-to-glyph mappings are handled well. It also works as advertised in 3.X on Windows if you redirect the output to a file and open it with Notepad, because 3.X encodes content on this platform in a default Windows format that Notepad understands:
c:\code> formats_currency.py > temp
c:\code> notepad temp
However, this doesn’t work in 2.X, because Python tries to encode printed text as ASCII by default. To show all the non-ASCII characters in a Windows Command Prompt window directly, on some computers you may need to change the Windows code page (used to render characters) as well as Python’s PYTHONIOENCODING environment variable (used as the encoding of text in standard streams, including the translation of characters to bytes when they are printed) to a common Unicode format such as UTF-8:
c:\code> chcp 65001 # Console matches Python
c:\code> set PYTHONIOENCODING=utf-8 # Python matches console
c:\code> formats_currency.py > temp # Both 3.X and 2.X write UTF-8 text
c:\code> type temp # Console displays it properly
c:\code> notepad temp # Notepad recognizes UTF-8 too
You may not need to take these steps on some platforms and even on some Windows distributions. I did because my laptop’s code page is set to 437 (U.S. characters), but your code pages may vary.
Subtly, the only reason this test works on Python 2.X at all is because 2.X allows normal and Unicode strings to be mixed, as long as the normal string is all 7-bit ASCII characters. On 3.3, the 2.X u'...' Unicode literal is supported for compatibility, but taken the same as normal '...'strings, which are always Unicode (removing the leading u makes the test work in 3.0 through 3.2 too, but breaks 2.X compatibility):
c:\code> py −2
>>> print u'\xA5' + '1', '%s2' % u'\u00A3' # 2.X: unicode/str mix for ASCII str
¥1 £2
c:\code> py −3
>>> print(u'\xA5' + '1', '%s2' % u'\u00A3') # 3.X: str is Unicode, u'' optional
¥1 £2
>>> print('\xA5' + '1', '%s2' % '\u00A3')
¥1 £2
Again, there’s much more on Unicode in Chapter 37—a topic many see as peripheral, but which can crop up even in relatively simple contexts like this! The takeaway point here is that, operational issues aside, a carefully coded script can often manage to support Unicode in both 3.X and 2.X.
Docstrings: Module Documentation at Work
Finally, because this example’s main file uses the docstring feature introduced in Chapter 15, we can use the help function or PyDoc’s GUI/browser modes to explore its tools as well—modules are almost automatically general-purpose tools. Here’s help at work; Figure 25-2 gives the PyDoc view on our file.
>>> import formats
>>> help(formats)
Help on module formats:
NAME
formats
DESCRIPTION
File: formats.py (2.X and 3.X)
Various specialized string display formatting utilities.
Test me with canned self-test or command-line arguments.
To do: add parens for negative money, add more features.
FUNCTIONS
commas(N)
Format positive integer-like N for display with
commas between digit groupings: "xxx,yyy,zzz".
money(N, numwidth=0, currency='$')
Format number N for display with commas, 2 decimal digits,
leading $ and sign, and optional padding: "$ -xxx,yyy.zz".
numwidth=0 for no space padding, currency='' to omit symbol,
and non-ASCII for others (e.g., pound=u'£' or u'£').
FILE
c:\code\formats.py
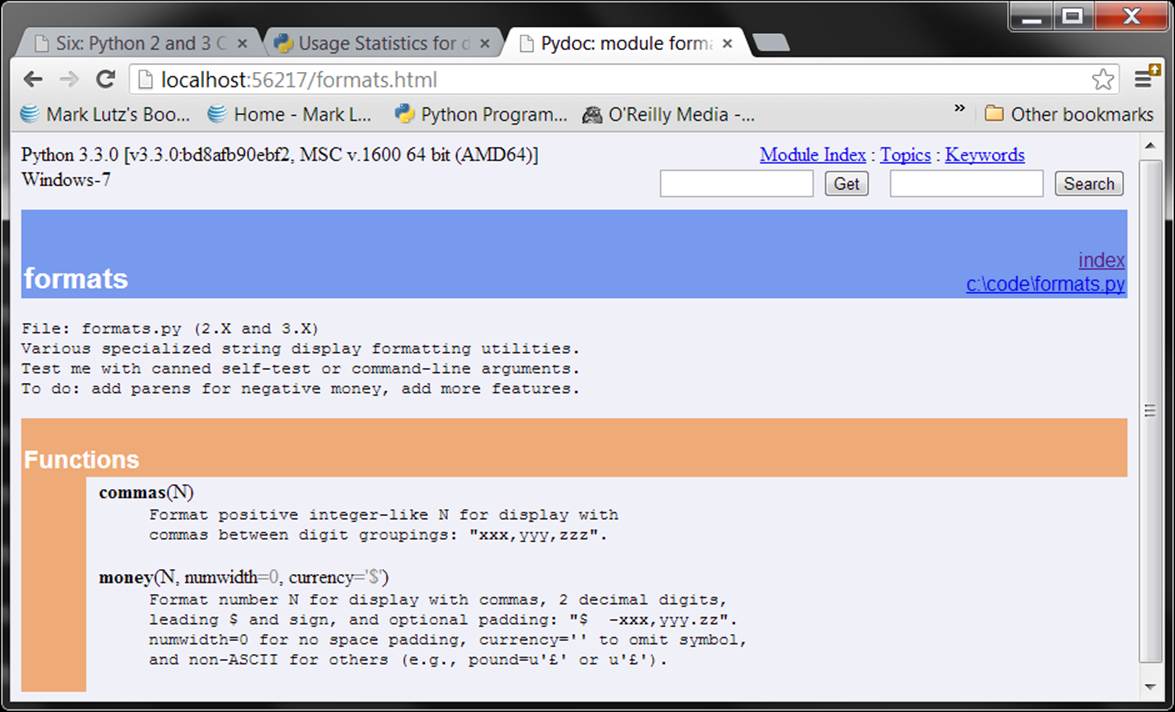
Figure 25-2. PyDoc’s view of formats.py, obtained by running a “py −3 -m pydoc –b” command line in 3.2 and later and clicking on the file’s index entry (see Chapter 15)
Changing the Module Search Path
Let’s return to more general module topics. In Chapter 22, we learned that the module search path is a list of directories that can be customized via the environment variable PYTHONPATH, and possibly via .pth files. What I haven’t shown you until now is how a Python program itself can actually change the search path by changing the built-in sys.path list. Per Chapter 22, sys.path is initialized on startup, but thereafter you can delete, append, and reset its components however you like:
>>> import sys
>>> sys.path
['', 'c:\\temp', 'C:\\Windows\\system32\\python33.zip', ...more deleted...]
>>> sys.path.append('C:\\sourcedir') # Extend module search path
>>> import string # All imports search the new dir last
Once you’ve made such a change, it will impact all future imports anywhere while a Python program runs, as all importers share the same single sys.path list (there’s only one copy of a given module in memory during a program’s run—that’s why reload exists). In fact, this list may be changed arbitrarily:
>>> sys.path = [r'd:\temp'] # Change module search path
>>> sys.path.append('c:\\lp5e\\examples') # For this run (process) only
>>> sys.path.insert(0, '..')
>>> sys.path
['..', 'd:\\temp', 'c:\\lp5e\\examples']
>>> import string
Traceback (most recent call last):
File "<stdin>", line 1, in <module>
ImportError: No module named 'string'
Thus, you can use this technique to dynamically configure a search path inside a Python program. Be careful, though: if you delete a critical directory from the path, you may lose access to critical utilities. In the prior example, for instance, we no longer have access to the string module because we deleted the Python source library’s directory from the path!
Also, remember that such sys.path settings endure for only as long as the Python session or program (technically, process) that made them runs; they are not retained after Python exits. By contrast, PYTHONPATH and .pth file path configurations live in the operating system instead of a running Python program, and so are more global: they are picked up by every program on your machine and live on after a program completes. On some systems, the former can be per-user and the latter can be installation-wide.
The as Extension for import and from
Both the import and from statements were eventually extended to allow an imported name to be given a different name in your script. We’ve used this extension earlier, but here are some additional details: the following import statement:
import modulename as name # And use name, not modulename
is equivalent to the following, which renames the module in the importer’s scope only (it’s still known by its original name to other files):
import modulename
name = modulename
del modulename # Don't keep original name
After such an import, you can—and in fact must—use the name listed after the as to refer to the module. This works in a from statement, too, to assign a name imported from a file to a different name in the importer’s scope; as before you get only the new name you provide, not its original:
from modulename import attrname as name # And use name, not attrname
As discussed in Chapter 23, this extension is commonly used to provide short synonyms for longer names, and to avoid name clashes when you are already using a name in your script that would otherwise be overwritten by a normal import statement:
import reallylongmodulename as name # Use shorter nickname
name.func()
from module1 import utility as util1 # Can have only 1 "utility"
from module2 import utility as util2
util1(); util2()
It also comes in handy for providing a short, simple name for an entire directory path and avoiding name collisions when using the package import feature described in Chapter 24:
import dir1.dir2.mod as mod # Only list full path once
mod.func()
from dir1.dir2.mod import func as modfunc # Rename to make unique if needed
modfunc()
This is also something of a hedge against name changes: if a new release of a library renames a module or tool your code uses extensively, or provides a new alternative you’d rather use instead, you can simply rename it to its prior name on import to avoid breaking your code:
import newname as oldname
from library import newname as oldname
...and keep happily using oldname until you have time to update all your code...
For example, this approach can address some 3.X library changes (e.g., 3.X’s tkinter versus 2.X’s Tkinter), though they’re often substantially more than just a new name!
Example: Modules Are Objects
Because modules expose most of their interesting properties as built-in attributes, it’s easy to write programs that manage other programs. We usually call such manager programs metaprograms because they work on top of other systems. This is also referred to as introspection, because programs can see and process object internals. Introspection is a somewhat advanced feature, but it can be useful for building programming tools.
For instance, to get to an attribute called name in a module called M, we can use attribute qualification or index the module’s attribute dictionary, exposed in the built-in __dict__ attribute we met in Chapter 23. Python also exports the list of all loaded modules as the sys.modulesdictionary and provides a built-in called getattr that lets us fetch attributes from their string names—it’s like saying object.attr, but attr is an expression that yields a string at runtime. Because of that, all the following expressions reach the same attribute and object:[48]
M.name # Qualify object by attribute
M.__dict__['name'] # Index namespace dictionary manually
sys.modules['M'].name # Index loaded-modules table manually
getattr(M, 'name') # Call built-in fetch function
By exposing module internals like this, Python helps you build programs about programs. For example, here is a module named mydir.py that puts these ideas to work to implement a customized version of the built-in dir function. It defines and exports a function called listing, which takes a module object as an argument and prints a formatted listing of the module’s namespace sorted by name:
#!python
"""
mydir.py: a module that lists the namespaces of other modules
"""
from __future__ import print_function # 2.X compatibility
seplen = 60
sepchr = '-'
def listing(module, verbose=True):
sepline = sepchr * seplen
if verbose:
print(sepline)
print('name:', module.__name__, 'file:', module.__file__)
print(sepline)
count = 0
for attr in sorted(module.__dict__): # Scan namespace keys (or enumerate)
print('%02d) %s' % (count, attr), end = ' ')
if attr.startswith('__'):
print('<built-in name>') # Skip __file__, etc.
else:
print(getattr(module, attr)) # Same as .__dict__[attr]
count += 1
if verbose:
print(sepline)
print(module.__name__, 'has %d names' % count)
print(sepline)
if __name__ == '__main__':
import mydir
listing(mydir) # Self-test code: list myself
Notice the docstring at the top; as in the prior formats.py example, because we may want to use this as a general tool, the docstring provides functional information accessible via help and GUI/browser mode of PyDoc—a tool that uses similar introspection tools to do its job. A self-test is also provided at the bottom of this module, which narcissistically imports and lists itself. Here’s the sort of output produced in Python 3.3; this script works on 2.X too (where it may list fewer names) because it prints from the __future__:
c:\code> py −3 mydir.py
------------------------------------------------------------
name: mydir file: c:\code\mydir.py
------------------------------------------------------------
00) __builtins__ <built-in name>
01) __cached__ <built-in name>
02) __doc__ <built-in name>
03) __file__ <built-in name>
04) __initializing__ <built-in name>
05) __loader__ <built-in name>
06) __name__ <built-in name>
07) __package__ <built-in name>
08) listing <function listing at 0x000000000295B488>
09) print_function _Feature((2, 6, 0, 'alpha', 2), (3, 0, 0, 'alpha', 0), 65536)
10) sepchr -
11) seplen 60
------------------------------------------------------------
mydir has 12 names
------------------------------------------------------------
To use this as a tool for listing other modules, simply pass the modules in as objects to this file’s function. Here it is listing attributes in the tkinter GUI module in the standard library (a.k.a. Tkinter in Python 2.X); it will technically work on any object with __name__, __file__, and__dict__ attributes:
>>> import mydir
>>> import tkinter
>>> mydir.listing(tkinter)
------------------------------------------------------------
name: tkinter file: C:\Python33\lib\tkinter\__init__.py
------------------------------------------------------------
00) ACTIVE active
01) ALL all
02) ANCHOR anchor
03) ARC arc
04) At <function At at 0x0000000002BD41E0>
...many more names omitted...
156) image_types <function image_types at 0x0000000002BE2378>
157) mainloop <function mainloop at 0x0000000002BCBBF8>
158) sys <module 'sys' (built-in)>
159) wantobjects 1
160) warnings <module 'warnings' from 'C:\\Python33\\lib\\warnings.py'>
------------------------------------------------------------
tkinter has 161 names
------------------------------------------------------------
We’ll meet getattr and its relatives again later. The point to notice here is that mydir is a program that lets you browse other programs. Because Python exposes its internals, you can process objects generically.[49]
[48] As we saw briefly in “Other Ways to Access Globals” in Chapter 17, because a function can access its enclosing module by going through the sys.modules table like this, it can also be used to emulate the effect of the global statement. For instance, the effect of global X; X=0 can be simulated (albeit with much more typing!) by saying this inside a function: import sys; glob=sys.modules[__name__]; glob.X=0. Remember, each module gets a __name__ attribute for free; it’s visible as a global name inside the functions within the module. This trick provides another way to change both local and global variables of the same name inside a function.
[49] You can preload tools such as mydir.listing and the reloader we’ll meet in a moment into the interactive namespace by importing them in the file referenced by the PYTHONSTARTUP environment variable. Because code in the startup file runs in the interactive namespace (module __main__), importing common tools in the startup file can save you some typing. See Appendix A for more details.
Importing Modules by Name String
The module name in an import or from statement is a hardcoded variable name. Sometimes, though, your program will get the name of a module to be imported as a string at runtime—from a user selection in a GUI, or a parse of an XML document, for instance. Unfortunately, you can’t use import statements directly to load a module given its name as a string—Python expects a variable name that’s taken literally and not evaluated, not a string or expression. For instance:
>>> import 'string'
File "<stdin>", line 1
import "string"
^
SyntaxError: invalid syntax
It also won’t work to simply assign the string to a variable name:
x = 'string'
import x
Here, Python will try to import a file x.py, not the string module—the name in an import statement both becomes a variable assigned to the loaded module and identifies the external file literally.
Running Code Strings
To get around this, you need to use special tools to load a module dynamically from a string that is generated at runtime. The most general approach is to construct an import statement as a string of Python code and pass it to the exec built-in function to run (exec is a statement in Python 2.X, but it can be used exactly as shown here—the parentheses are simply ignored):
>>> modname = 'string'
>>> exec('import ' + modname) # Run a string of code
>>> string # Imported in this namespace
<module 'string' from 'C:\\Python33\\lib\\string.py'>
We met the exec function (and its cousin for expressions, eval) earlier, in Chapter 3 and Chapter 10. It compiles a string of code and passes it to the Python interpreter to be executed. In Python, the byte code compiler is available at runtime, so you can write programs that construct and run other programs like this. By default, exec runs the code in the current scope, but you can get more specific by passing in optional namespace dictionaries if needed. It also has security issues noted earlier in the book, which may be minor in a code string you are building yourself.
Direct Calls: Two Options
The only real drawback to exec here is that it must compile the import statement each time it runs, and compiling can be slow. Precompiling to byte code with the compile built-in may help for code strings run many times, but in most cases it’s probably simpler and may run quicker to use the built-in __import__ function to load from a name string instead, as noted in Chapter 22. The effect is similar, but __import__ returns the module object, so assign it to a name here to keep it:
>>> modname = 'string'
>>> string = __import__(modname)
>>> string
<module 'string' from 'C:\\Python33\\lib\\string.py'>
As also noted in Chapter 22, the newer call importlib.import_module does the same work, and is generally preferred in more recent Pythons for direct calls to import by name string—at least per the current “official” policy stated in Python’s manuals:
>>> import importlib
>>> modname = 'string'
>>> string = importlib.import_module(modname)
>>> string
<module 'string' from 'C:\\Python33\\lib\\string.py'>
The import_module call takes a module name string, and an optional second argument that gives the package used as the anchor point for resolving relative imports, which defaults to None. This call works the same as __import__ in its basic roles, but see Python’s manuals for more details.
Though both calls still work, in Pythons where both are available, the original __import__ is generally intended for customizing import operations by reassignment in the built-in scope (and any future changes in “official” policy are beyond the scope of this book!).
Example: Transitive Module Reloads
This section develops a module tool that ties together and applies some earlier topics, and serves as a larger case study to close out this chapter and part. We studied module reloads in Chapter 23, as a way to pick up changes in code without stopping and restarting a program. When you reload a module, though, Python reloads only that particular module’s file; it doesn’t automatically reload modules that the file being reloaded happens to import.
For example, if you reload some module A, and A imports modules B and C, the reload applies only to A, not to B and C. The statements inside A that import B and C are rerun during the reload, but they just fetch the already loaded B and C module objects (assuming they’ve been imported before). In actual yet abstract code, here’s the file A.py:
# A.py
import B # Not reloaded when A is!
import C # Just an import of an already loaded module: no-ops
% python
>>> . . .
>>> from imp import reload
>>> reload(A)
By default, this means that you cannot depend on reloads to pick up changes in all the modules in your program transitively—instead, you must use multiple reload calls to update the subcomponents independently. This can require substantial work for large systems you’re testing interactively. You can design your systems to reload their subcomponents automatically by adding reload calls in parent modules like A, but this complicates the modules’ code.
A Recursive Reloader
A better approach is to write a general tool to do transitive reloads automatically by scanning modules’ __dict__ namespace attributes and checking each item’s type to find nested modules to reload. Such a utility function could call itself recursively to navigate arbitrarily shaped and deep import dependency chains. Module __dict__ attributes were introduced in Chapter 23 and employed earlier in this chapter, and the type call was presented in Chapter 9; we just need to combine the two tools.
The module reloadall.py listed next defines a reload_all function that automatically reloads a module, every module that the module imports, and so on, all the way to the bottom of each import chain. It uses a dictionary to keep track of already reloaded modules, recursion to walk the import chains, and the standard library’s types module, which simply predefines type results for built-in types. The visited dictionary technique works to avoid cycles here when imports are recursive or redundant, because module objects are immutable and so can be dictionary keys; as we learned in Chapter 5 and Chapter 8, a set would offer similar functionality if we use visited.add(module) to insert:
#!python
"""
reloadall.py: transitively reload nested modules (2.X + 3.X).
Call reload_all with one or more imported module module objects.
"""
import types
from imp import reload # from required in 3.X
def status(module):
print('reloading ' + module.__name__)
def tryreload(module):
try:
reload(module) # 3.3 (only?) fails on some
except:
print('FAILED: %s' % module)
def transitive_reload(module, visited):
if not module in visited: # Trap cycles, duplicates
status(module) # Reload this module
tryreload(module) # And visit children
visited[module] = True
for attrobj in module.__dict__.values(): # For all attrs
if type(attrobj) == types.ModuleType: # Recur if module
transitive_reload(attrobj, visited)
def reload_all(*args):
visited = {} # Main entry point
for arg in args: # For all passed in
if type(arg) == types.ModuleType:
transitive_reload(arg, visited)
def tester(reloader, modname): # Self-test code
import importlib, sys # Import on tests only
if len(sys.argv) > 1: modname = sys.argv[1] # command line (or passed)
module = importlib.import_module(modname) # Import by name string
reloader(module) # Test passed-in reloader
if __name__ == '__main__':
tester(reload_all, 'reloadall') # Test: reload myself?
Besides namespace dictionaries, this script makes use of other tools we’ve studied here: it includes a __name__ test to launch self-test code when run as a top-level script only, and its tester function uses sys.argv to inspect command-line arguments and importlib to import a module by name string passed in as a function or command-line argument. One curious bit: notice how this code must wrap the basic reload call in a try statement to catch exceptions—in Python 3.3, reloads sometimes fail due to a rewrite of the import machinery. The try was previewed inChapter 10, and is covered in full in Part VII.
Testing recursive reloads
Now, to leverage this utility for normal use, import its reload_all function and pass it an already loaded module object—just as you would for the built-in reload function. When the file runs standalone, its self-test code calls reload_all automatically, reloading its own module by default if no command-line arguments are used. In this mode, the module must import itself because its own name is not defined in the file without an import. This code works in both 3.X and 2.X because we’ve used + and % instead of a comma in the prints, though the set of modules used and thus reloaded may vary across lines:
C:\code> c:\Python33\python reloadall.py
reloading reloadall
reloading types
c:\code> C:\Python27\python reloadall.py
reloading reloadall
reloading types
With a command-line argument, the tester instead reloads the given module by its name string—here, the benchmark module we coded in Chapter 21. Note that we give a module name in this mode, not a filename (as for import statements, don’t include the .py extension); the script ultimately imports the module using the module search path as usual:
c:\code> reloadall.py pybench
reloading pybench
reloading timeit
reloading itertools
reloading sys
reloading time
reloading gc
reloading os
reloading errno
reloading ntpath
reloading stat
reloading genericpath
reloading copyreg
Perhaps most commonly, we can also deploy this module at the interactive prompt—here, in 3.3 for some standard library modules. Notice how os is imported by tkinter, but tkinter reaches sys before os can (if you want to test this on Python 2.X, substitute Tkinter for tkinter):
>>> from reloadall import reload_all
>>> import os, tkinter
>>> reload_all(os) # Normal usage mode
reloading os
reloading ntpath
reloading stat
reloading sys
reloading genericpath
reloading errno
reloading copyreg
>>> reload_all(tkinter)
reloading tkinter
reloading _tkinter
reloading warnings
reloading sys
reloading linecache
reloading tokenize
reloading builtins
FAILED: <module 'builtins'>
reloading re
...etc...
reloading os
reloading ntpath
reloading stat
reloading genericpath
reloading errno
...etc...
And finally here is a session that shows the effect of normal versus transitive reloads—changes made to the two nested files are not picked up by reloads, unless the transitive utility is used:
import b # File a.py
X = 1
import c # File b.py
Y = 2
Z = 3 # File c.py
C:\code> py −3
>>> import a
>>> a.X, a.b.Y, a.b.c.Z
(1, 2, 3)
# Without stopping Python, change all three files' assignment values and save
>>> from imp import reload
>>> reload(a) # Built-in reload is top level only
<module 'a' from '.\\a.py'>
>>> a.X, a.b.Y, a.b.c.Z
(111, 2, 3)
>>> from reloadall import reload_all
>>> reload_all(a) # Normal usage mode
reloading a
reloading b
reloading c
>>> a.X, a.b.Y, a.b.c.Z # Reloads all nested modules too
(111, 222, 333)
Study the reloader’s code and results for more on its operation. The next section exercises its tools further.
Alternative Codings
For all the recursion fans in the audience, the following lists an alternative recursive coding for the function in the prior section—it uses a set instead of a dictionary to detect cycles, is marginally more direct because it eliminates a top-level loop, and serves to illustrate recursive function techniques in general (compare with the original to see how this differs). This version also gets some of its work for free from the original, though the order in which it reloads modules might vary if namespace dictionary order does too:
"""
reloadall2.py: transitively reload nested modules (alternative coding)
"""
import types
from imp import reload # from required in 3.X
from reloadall import status, tryreload, tester
def transitive_reload(objects, visited):
for obj in objects:
if type(obj) == types.ModuleType and obj not in visited:
status(obj)
tryreload(obj) # Reload this, recur to attrs
visited.add(obj)
transitive_reload(obj.__dict__.values(), visited)
def reload_all(*args):
transitive_reload(args, set())
if __name__ == '__main__':
tester(reload_all, 'reloadall2') # Test code: reload myself?
As we saw in Chapter 19, there is usually an explicit stack or queue equivalent to most recursive functions, which may be preferable in some contexts. The following is one such transitive reloader; it uses a generator expression to filter out nonmodules and modules already visited in the current module’s namespace. Because it both pops and adds items at the end of its list, it is stack based, though the order of both pushes and dictionary values influences the order in which it reaches and reloads modules—it visits submodules in namespace dictionaries from right to left, unlike the left-to-right order of the recursive versions (trace through the code to see how). We could change this, but dictionary order is arbitrary anyhow.
"""
reloadall3.py: transitively reload nested modules (explicit stack)
"""
import types
from imp import reload # from required in 3.X
from reloadall import status, tryreload, tester
def transitive_reload(modules, visited):
while modules:
next = modules.pop() # Delete next item at end
status(next) # Reload this, push attrs
tryreload(next)
visited.add(next)
modules.extend(x for x in next.__dict__.values()
if type(x) == types.ModuleType and x not in visited)
def reload_all(*modules):
transitive_reload(list(modules), set())
if __name__ == '__main__':
tester(reload_all, 'reloadall3') # Test code: reload myself?
If the recursion and nonrecursion used in this example is confusing, see the discussion of recursive functions in Chapter 19 for background on the subject.
Testing reload variants
To prove that these work the same, let’s test all three of our reloader variants. Thanks to their common testing function, we can run all three from a command line both with no arguments to test the module reloading itself, and with the name of a module to be reloaded listed on the command line (in sys.argv):
c:\code> reloadall.py
reloading reloadall
reloading types
c:\code> reloadall2.py
reloading reloadall2
reloading types
c:\code> reloadall3.py
reloading reloadall3
reloading types
Though it’s hard to see here, we really are testing the individual reloader alternatives—each of these tests shares a common tester function, but passes it the reload_all from its own file. Here are the variants reloading the 3.X tkinter GUI module and all the modules its imports reach:
c:\code> reloadall.py tkinter
reloading tkinter
reloading _tkinter
reloading tkinter._fix
...etc...
c:\code> reloadall2.py tkinter
reloading tkinter
reloading tkinter.constants
reloading tkinter._fix
...etc...
c:\code> reloadall3.py tkinter
reloading tkinter
reloading sys
reloading tkinter.constants
...etc...
All three work on both Python 3.X and 2.X too—they’re careful to unify prints with formatting, and avoid using version-specific tools (though you must use 2.X module names like Tkinter, and I’m using the 3.3 Windows launcher here to run per Appendix B):
c:\code> py −2 reloadall.py
reloading reloadall
reloading types
c:\code> py −2 reloadall2.py Tkinter
reloading Tkinter
reloading _tkinter
reloading FixTk
...etc...
As usual we can test interactively, too, by importing and calling either a module’s main reload entry point with a module object, or the testing function with a reloader function and module name string:
C:\code> py −3
>>> import reloadall, reloadall2, reloadall3
>>> import tkinter
>>> reloadall.reload_all(tkinter) # Normal use case
reloading tkinter
reloading tkinter._fix
reloading os
...etc...
>>> reloadall.tester(reloadall2.reload_all, 'tkinter') # Testing utility
reloading tkinter
reloading tkinter._fix
reloading os
...etc...
>>> reloadall.tester(reloadall3.reload_all, 'reloadall3') # Mimic self-test code
reloading reloadall3
reloading types
Finally, if you look at the output of tkinter reloads earlier, you may notice that each of the three variants may produce results in a different order; they all depend on namespace dictionary ordering, and the last also relies on the order in which items are added to its stack. In fact, under Python 3.3, the reload order for a given reloader can vary from run to run. To ensure that all three are reloading the same modules irrespective of the order in which they do so, we can use sets (or sorts) to test for order-neutral equality of their printed messages—obtained here by running shell commands with the os.popen utility we met in Chapter 13 and used in Chapter 21:
>>> import os
>>> res1 = os.popen('reloadall.py tkinter').read()
>>> res2 = os.popen('reloadall2.py tkinter').read()
>>> res3 = os.popen('reloadall3.py tkinter').read()
>>> res1[:75]
'reloading tkinter\nreloading tkinter.constants\nreloading tkinter._fix\nreload'
>>> res1 == res2, res2 == res3
(False, False)
>>> set(res1) == set(res2), set(res2) == set(res3)
(True, True)
Run these scripts, study their code, and experiment on your own for more insight; these are the sort of importable tools you might want to add to your own source code library. Watch for a similar testing technique in the coverage of class tree listers in Chapter 31, where we’ll apply it to passed class objects and extend it further.
Also keep in mind that all three variants reload only modules that were loaded with import statements—since names copied with from statements do not cause a module to be nested and referenced in the importer’s namespace, their containing module is not reloaded. More fundamentally, the transitive reloaders rely on the fact that module reloads update module objects in place, such that all references to those modules in any scope will see the updated version automatically. Because they copy names out, from importers are not updated by reloads—transitive or not—and supporting this may require either source code analysis, or customization of the import operation (see Chapter 22 for pointers).
Tool impacts like this are perhaps another reason to prefer import to from—which brings us to the end of this chapter and part, and the standard set of warnings for this part’s topic.
Module Gotchas
In this section, we’ll take a look at the usual collection of boundary cases that can make life interesting for Python beginners. Some are review here, and a few are so obscure that coming up with representative examples can be a challenge, but most illustrate something important about the language.
Module Name Clashes: Package and Package-Relative Imports
If you have two modules of the same name, you may only be able to import one of them—by default, the one whose directory is leftmost in the sys.path module search path will always be chosen. This isn’t an issue if the module you prefer is in your top-level script’s directory; since that is always first in the module path, its contents will be located first automatically. For cross-directory imports, however, the linear nature of the module search path means that same-named files can clash.
To fix, either avoid same-named files or use the package imports feature of Chapter 24. If you need to get to both same-named files, structure your source files in subdirectories, such that package import directory names make the module references unique. As long as the enclosing package directory names are unique, you’ll be able to access either or both of the same-named modules.
Note that this issue can also crop up if you accidentally use a name for a module of your own that happens to be the same as a standard library module you need—your local module in the program’s home directory (or another directory early in the module path) can hide and replace the library module.
To fix, either avoid using the same name as another module you need or store your modules in a package directory and use Python 3.X’s package-relative import model, available in 2.X as an option. In this model, normal imports skip the package directory (so you’ll get the library’s version), but special dotted import statements can still select the local version of the module if needed.
Statement Order Matters in Top-Level Code
As we’ve seen, when a module is first imported (or reloaded), Python executes its statements one by one, from the top of the file to the bottom. This has a few subtle implications regarding forward references that are worth underscoring here:
§ Code at the top level of a module file (not nested in a function) runs as soon as Python reaches it during an import; because of that, it cannot reference names assigned lower in the file.
§ Code inside a function body doesn’t run until the function is called; because names in a function aren’t resolved until the function actually runs, they can usually reference names anywhere in the file.
Generally, forward references are only a concern in top-level module code that executes immediately; functions can reference names arbitrarily. Here’s a file that illustrates forward reference dos and don’ts:
func1() # Error: "func1" not yet assigned
def func1():
print(func2()) # OK: "func2" looked up later
func1() # Error: "func2" not yet assigned
def func2():
return "Hello"
func1() # OK: "func1" and "func2" assigned
When this file is imported (or run as a standalone program), Python executes its statements from top to bottom. The first call to func1 fails because the func1 def hasn’t run yet. The call to func2 inside func1 works as long as func2’s def has been reached by the time func1 is called—and it hasn’t when the second top-level func1 call is run. The last call to func1 at the bottom of the file works because func1 and func2 have both been assigned.
Mixing defs with top-level code is not only difficult to read, it’s also dependent on statement ordering. As a rule of thumb, if you need to mix immediate code with defs, put your defs at the top of the file and your top-level code at the bottom. That way, your functions are guaranteed to be defined and assigned by the time Python runs the code that uses them.
from Copies Names but Doesn’t Link
Although it’s commonly used, the from statement is the source of a variety of potential gotchas in Python. As we’ve learned, the from statement is really an assignment to names in the importer’s scope—a name-copy operation, not a name aliasing. The implications of this are the same as for all assignments in Python, but they’re subtle, especially given that the code that shares the objects lives in different files. For instance, suppose we define the following module, nested1.py:
# nested1.py
X = 99
def printer(): print(X)
If we import its two names using from in another module, nested2.py, we get copies of those names, not links to them. Changing a name in the importer resets only the binding of the local version of that name, not the name in nested1.py:
# nested2.py
from nested1 import X, printer # Copy names out
X = 88 # Changes my "X" only!
printer() # nested1's X is still 99
% python nested2.py
99
If we use import to get the whole module and then assign to a qualified name, however, we change the name in nested1.py. Attribute qualification directs Python to a name in the module object, rather than a name in the importer, nested3.py:
# nested3.py
import nested1 # Get module as a whole
nested1.X = 88 # OK: change nested1's X
nested1.printer()
% python nested3.py
88
from * Can Obscure the Meaning of Variables
I mentioned this earlier but saved the details for here. Because you don’t list the variables you want when using the from module import * statement form, it can accidentally overwrite names you’re already using in your scope. Worse, it can make it difficult to determine where a variable comes from. This is especially true if the from * form is used on more than one imported file.
For example, if you use from * on three modules in the following, you’ll have no way of knowing what a raw function call really means, short of searching all three external module files—all of which may be in other directories:
>>> from module1 import * # Bad: may overwrite my names silently
>>> from module2 import * # Worse: no way to tell what we get!
>>> from module3 import *
>>> . . .
>>> func() # Huh???
The solution again is not to do this: try to explicitly list the attributes you want in your from statements, and restrict the from * form to at most one imported module per file. That way, any undefined names must by deduction be in the module named in the single from *. You can avoid the issue altogether if you always use import instead of from, but that advice is too harsh; like much else in programming, from is a convenient tool if used wisely. Even this example isn’t an absolute evil—it’s OK for a program to use this technique to collect names in a single space for convenience, as long as it’s well known.
reload May Not Impact from Imports
Here’s another from-related gotcha: as discussed previously, because from copies (assigns) names when run, there’s no link back to the modules where the names came from. Names imported with from simply become references to objects, which happen to have been referenced by the same names in the importee when the from ran.
Because of this behavior, reloading the importee has no effect on clients that import its names using from. That is, the client’s names will still reference the original objects fetched with from, even if the names in the original module are later reset:
from module import X # X may not reflect any module reloads!
. . .
from imp import reload
reload(module) # Changes module, but not my names
X # Still references old object
To make reloads more effective, use import and name qualification instead of from. Because qualifications always go back to the module, they will find the new bindings of module names after reloading has updated the module’s content in place:
import module # Get module, not names
. . .
from imp import reload
reload(module) # Changes module in place
module.X # Get current X: reflects module reloads
As a related consequence, our transitive reloader earlier in this chapter doesn’t apply to names fetched with from, only import; again, if you’re going to use reloads, you’re probably better off with import.
reload, from, and Interactive Testing
In fact, the prior gotcha is even more subtle than it appears. Chapter 3 warned that it’s usually better not to launch programs with imports and reloads because of the complexities involved. Things get even worse when from is brought into the mix. Python beginners most often stumble onto its issues in scenarios like this—imagine that after opening a module file in a text edit window, you launch an interactive session to load and test your module with from:
from module import function
function(1, 2, 3)
Finding a bug, you jump back to the edit window, make a change, and try to reload the module this way:
from imp import reload
reload(module)
This doesn’t work, because the from statement assigned only the name function, not module. To refer to the module in a reload, you have to first bind its name with an import statement at least once:
from imp import reload
import module
reload(module)
function(1, 2, 3)
However, this doesn’t quite work either—reload updates the module object in place, but as discussed in the preceding section, names like function that were copied out of the module in the past still refer to the old objects; in this instance, function is still the original version of the function. To really get the new function, you must refer to it as module.function after the reload, or rerun the from:
from imp import reload
import module
reload(module)
from module import function # Or give up and use module.function()
function(1, 2, 3)
Now, the new version of the function will finally run, but it seems an awful lot of work to get there.
As you can see, there are problems inherent in using reload with from: not only do you have to remember to reload after imports, but you also have to remember to rerun your from statements after reloads. This is complex enough to trip up even an expert once in a while. In fact, the situation has gotten even worse in Python 3.X, because you must also remember to import reload itself!
The short story is that you should not expect reload and from to play together nicely. Again, the best policy is not to combine them at all—use reload with import, or launch your programs other ways, as suggested in Chapter 3: using the Run→Run Module menu option in IDLE, file icon clicks, system command lines, or the exec built-in function.
Recursive from Imports May Not Work
I saved the most bizarre (and, thankfully, obscure) gotcha for last. Because imports execute a file’s statements from top to bottom, you need to be careful when using modules that import each other. This is often called recursive imports, but the recursion doesn’t really occur (in fact, circularmay be a better term here)—such imports won’t get stuck in infinite importing loops. Still, because the statements in a module may not all have been run when it imports another module, some of its names may not yet exist.
If you use import to fetch the module as a whole, this probably doesn’t matter; the module’s names won’t be accessed until you later use qualification to fetch their values, and by that time the module is likely complete. But if you use from to fetch specific names, you must bear in mind that you will only have access to names in that module that have already been assigned when a recursive import is kicked off.
For instance, consider the following modules, recur1 and recur2. recur1 assigns a name X, and then imports recur2 before assigning the name Y. At this point, recur2 can fetch recur1 as a whole with an import—it already exists in Python’s internal modules table, which makes it importable, and also prevents the imports from looping. But if recur2 uses from, it will be able to see only the name X; the name Y, which is assigned below the import in recur1, doesn’t yet exist, so you get an error:
# recur1.py
X = 1
import recur2 # Run recur2 now if it doesn't exist
Y = 2
# recur2.py
from recur1 import X # OK: "X" already assigned
from recur1 import Y # Error: "Y" not yet assigned
C:\code> py −3
>>> import recur1
Traceback (most recent call last):
File "<stdin>", line 1, in <module>
File ".\recur1.py", line 2, in <module>
import recur2
File ".\recur2.py", line 2, in <module>
from recur1 import Y
ImportError: cannot import name Y
Python avoids rerunning recur1’s statements when they are imported recursively from recur2 (otherwise the imports would send the script into an infinite loop that might require a Ctrl-C solution or worse), but recur1’s namespace is incomplete when it’s imported by recur2.
The solution? Don’t use from in recursive imports (no, really!). Python won’t get stuck in a cycle if you do, but your programs will once again be dependent on the order of the statements in the modules. In fact, there are two ways out of this gotcha:
§ You can usually eliminate import cycles like this by careful design—maximizing cohesion and minimizing coupling are good first steps.
§ If you can’t break the cycles completely, postpone module name accesses by using import and attribute qualification (instead of from and direct names), or by running your froms either inside functions (instead of at the top level of the module) or near the bottom of your file to defer their execution.
There is additional perspective on this issue in the exercises at the end of this chapter—which we’ve officially reached.
Chapter Summary
This chapter surveyed some more advanced module-related concepts. We studied data hiding techniques, enabling new language features with the __future__ module, the __name__ usage mode variable, transitive reloads, importing by name strings, and more. We also explored and summarized module design issues, wrote some more substantial programs, and looked at common mistakes related to modules to help you avoid them in your code.
The next chapter begins our look at Python’s class—its object-oriented programming tool. Much of what we’ve covered in the last few chapters will apply there, too: classes live in modules and are namespaces as well, but they add an extra component to attribute lookup called inheritance search. As this is the last chapter in this part of the book, however, before we dive into that topic, be sure to work through this part’s set of lab exercises. And before that, here is this chapter’s quiz to review the topics covered here.
Test Your Knowledge: Quiz
1. What is significant about variables at the top level of a module whose names begin with a single underscore?
2. What does it mean when a module’s __name__ variable is the string "__main__"?
3. If the user interactively types the name of a module to test, how can your code import it?
4. How is changing sys.path different from setting PYTHONPATH to modify the module search path?
5. If the module __future__ allows us to import from the future, can we also import from the past?
Test Your Knowledge: Answers
1. Variables at the top level of a module whose names begin with a single underscore are not copied out to the importing scope when the from * statement form is used. They can still be accessed by an import or the normal from statement form, though. The __all__ list is similar, but the logical converse; its contents are the only names that are copied out on a from *.
2. If a module’s __name__ variable is the string "__main__", it means that the file is being executed as a top-level script instead of being imported from another file in the program. That is, the file is being used as a program, not a library. This usage mode variable supports dual-mode code and tests.
3. User input usually comes into a script as a string; to import the referenced module given its string name, you can build and run an import statement with exec, or pass the string name in a call to the __import__ or importlib.import_module.
4. Changing sys.path only affects one running program (process), and is temporary—the change goes away when the program ends. PYTHONPATH settings live in the operating system—they are picked up globally by all your programs on a machine, and changes to these settings endure after programs exit.
5. No, we can’t import from the past in Python. We can install (or stubbornly use) an older version of the language, but the latest Python is generally the best Python (at least within lines—see 2.X longevity!).
Test Your Knowledge: Part V Exercises
See Part V in Appendix D for the solutions.
1. Import basics. Write a program that counts the lines and characters in a file (similar in spirit to part of what wc does on Unix). With your text editor, code a Python module called mymod.py that exports three top-level names:
o A countLines(name) function that reads an input file and counts the number of lines in it (hint: file.readlines does most of the work for you, and len does the rest, though you could count with for and file iterators to support massive files too).
o A countChars(name) function that reads an input file and counts the number of characters in it (hint: file.read returns a single string, which may be used in similar ways).
o A test(name) function that calls both counting functions with a given input filename. Such a filename generally might be passed in, hardcoded, input with the input built-in function, or pulled from a command line via the sys.argv list shown in this chapter’s formats.py andreloadall.py examples; for now, you can assume it’s a passed-in function argument.
All three mymod functions should expect a filename string to be passed in. If you type more than two or three lines per function, you’re working much too hard—use the hints I just gave!
Next, test your module interactively, using import and attribute references to fetch your exports. Does your PYTHONPATH need to include the directory where you created mymod.py? Try running your module on itself: for example, test("mymod.py"). Note that test opens the file twice; if you’re feeling ambitious, you may be able to improve this by passing an open file object into the two count functions (hint: file.seek(0) is a file rewind).
2. from/from *. Test your mymod module from exercise 1 interactively by using from to load the exports directly, first by name, then using the from * variant to fetch everything.
3. __main__. Add a line in your mymod module that calls the test function automatically only when the module is run as a script, not when it is imported. The line you add will probably test the value of __name__ for the string "__main__", as shown in this chapter. Try running your module from the system command line; then, import the module and test its functions interactively. Does it still work in both modes?
4. Nested imports. Write a second module, myclient.py, that imports mymod and tests its functions; then run myclient from the system command line. If myclient uses from to fetch from mymod, will mymod’s functions be accessible from the top level of myclient? What if it imports with import instead? Try coding both variations in myclient and test interactively by importing myclient and inspecting its __dict__ attribute.
5. Package imports. Import your file from a package. Create a subdirectory called mypkg nested in a directory on your module import search path, copy or move the mymod.py module file you created in exercise 1 or 3 into the new directory, and try to import it with a package import of the form import mypkg.mymod and call its functions. Try to fetch your counter functions with a from too.
You’ll need to add an __init__.py file in the directory your module was moved to make this go, but it should work on all major Python platforms (that’s part of the reason Python uses “.” as a path separator). The package directory you create can be simply a subdirectory of the one you’re working in; if it is, it will be found via the home directory component of the search path, and you won’t have to configure your path. Add some code to your __init__.py, and see if it runs on each import.
6. Reloads. Experiment with module reloads: perform the tests in Chapter 23’s changer.py example, changing the called function’s message and/or behavior repeatedly, without stopping the Python interpreter. Depending on your system, you might be able to edit changer in another window, or suspend the Python interpreter and edit in the same window (on Unix, a Ctrl-Z key combination usually suspends the current process, and an fg command later resumes it, though a text edit window probably works just as well).
7. Circular imports. In the section on recursive (a.k.a. circular) import gotchas, importing recur1 raised an error. But if you restart Python and import recur2 interactively, the error doesn’t occur—test this and see for yourself. Why do you think it works to import recur2, but notrecur1? (Hint: Python stores new modules in the built-in sys.modules table—a dictionary—before running their code; later imports fetch the module from this table first, whether the module is “complete” yet or not.) Now, try running recur1 as a top-level script file: python recur1.py. Do you get the same error that occurs when recur1 is imported interactively? Why? (Hint: when modules are run as programs, they aren’t imported, so this case has the same effect as importing recur2 interactively; recur2 is the first module imported.) What happens when you run recur2 as a script? Circular imports are uncommon and rarely this bizarre in practice. On the other hand, if you can understand why they are a potential problem, you know a lot about Python’s import semantics.
All materials on the site are licensed Creative Commons Attribution-Sharealike 3.0 Unported CC BY-SA 3.0 & GNU Free Documentation License (GFDL)
If you are the copyright holder of any material contained on our site and intend to remove it, please contact our site administrator for approval.
© 2016-2026 All site design rights belong to S.Y.A.