Python in Practice: Create Better Programs Using Concurrency, Libraries, and Patterns (2014)
Chapter 8. OpenGL 3D Graphics in Python
Many modern applications, such as design tools, data visualization tools, games—and, of course, screensavers—use 3D graphics. All of the Python GUI toolkits mentioned in the previous chapter provide support for 3D graphics, either directly or through add-ons. The 3D support is almost invariably in the form of an interface to the system’s OpenGL libraries.
There are also many 3D Python graphics packages that provide high-level interfaces to simplify OpenGL programming. Some examples of these include the Python Computer Graphics Kit (cgkit.sourceforge.net), OpenCASCADE (github.com/tenko/occmodel), and VPython (www.vpython.org).
It is also possible to access OpenGL more directly. The two main packages that provide this functionality are PyOpenGL (pyopengl.sourceforge.net) and pyglet (www.pyglet.org). Both faithfully wrap the OpenGL libraries, which makes it very easy to translate examples in C (OpenGL’s native language and used in OpenGL textbooks) into Python. Both packages can be used to create stand-alone 3D programs, in the case of PyOpenGL by using its wrapper for the OpenGL GLUT GUI library, and in the case of pyglet through its own event handling and top-level window support.
For stand-alone 3D programs, it is probably best to use an existing GUI toolkit in conjunction with PyOpenGL (which can interoperate with Tkinter, PyQt, PySide, and wxPython, among others) or, where a simpler GUI is sufficient, pyglet.
There are many versions of OpenGL, and there are two quite different ways of using it. The traditional approach (called “direct mode”) works everywhere and for all versions: it involves calling OpenGL functions that are executed immediately. A more modern approach, available since version 2.0, is to set up the scene using the traditional approach and then write OpenGL programs in the OpenGL Shading Language (a kind of specialized version of the C language). Such programs are then sent (as plain text) to the GPU, which compiles and executes them. This approach can produce much faster programs and is much more versatile than the traditional approach, but it isn’t as widely supported.
In this chapter, we will review one PyOpenGL program and two pyglet programs, which between them illustrate many fundamental aspects of 3D OpenGL programming. We will use the traditional approach throughout, since it is much easier to see how to do 3D graphics through using function calls than having to learn the OpenGL Shading Language, and, in any case, our primary concern is with Python programming. This chapter assumes prior knowledge of OpenGL programming, so most of the OpenGL calls shown in this chapter are not explained. Readers unfamiliar with OpenGL might find the OpenGL SuperBible mentioned in the Selected Bibliography (![]() 286) to be a useful starting point.
286) to be a useful starting point.
One important point to note is an OpenGL naming convention. Many OpenGL function names end with a number followed by one or more letters. The number is the number of arguments and the letters the arguments’ type. For example, the glColor3f() function is used to set the current color using three floating-point arguments—red, green, and blue, each in the in the range 0.0 to 1.0—whereas the glColor4ub() function is used to set the color using four unsigned byte arguments—red, green, blue, alpha (transparency), each in the range 0 to 255. Naturally, in Python, we can normally use numbers of any type and rely on the conversions being done automatically.
Three-dimensional scenes are usually projected onto two-dimensional surfaces (e.g., the computer screen) in one of two ways: orthographically or with perspective. Orthographic projection preserves object sizes and is usually preferred for computer-aided design tools. Perspective projections show objects larger when they are near the viewer and smaller when they are further away. This can produce more realistic effects, particularly when showing landscapes. Both projections are used for games. In the chapter’s first section we will create a scene that uses perspective, and in the second section we will create a scene that uses an orthographic projection.
8.1. A Perspective Scene
In this section, we will create the Cylinder programs shown in Figure 8.1. Both programs show three colored axes and a lighted hollow cylinder. The PyOpenGL version (shown on the left) is the purest in terms of adherence to the OpenGL interfaces, while the pyglet version (shown on the right) is perhaps slightly easier to program and is a tiny bit more efficient.
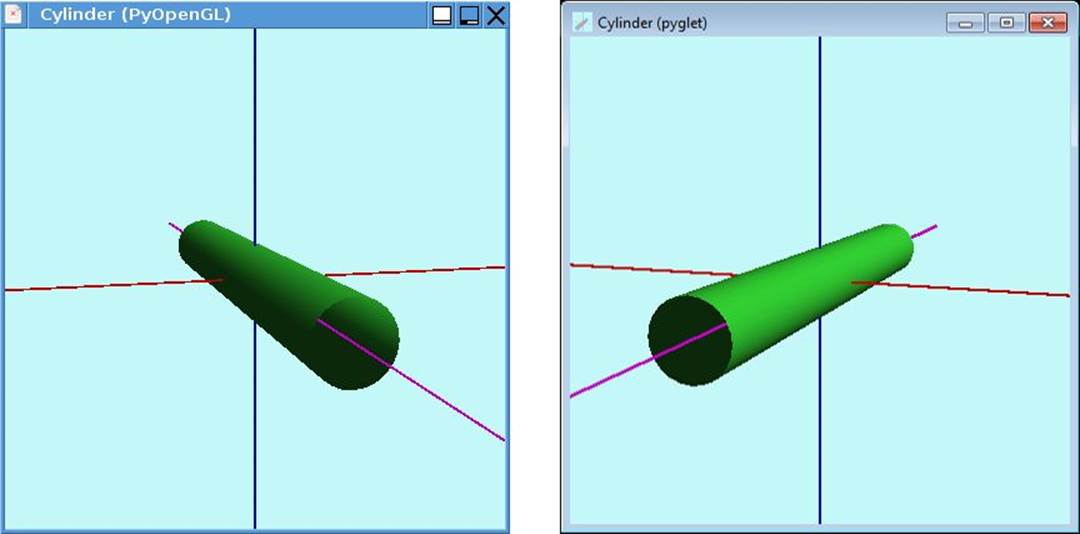
Figure 8.1 The Cylinder programs on Linux and Windows
Most of the code is the same in both programs, and some of those methods that differ do so only in their names. In view of this, we will review the full PyOpenGL version in the first subsection, and only those things that are different in the pyglet version will be shown in the second subsection. We will see plenty more pyglet code further on (§8.2, ![]() 272).
272).
8.1.1. Creating a Cylinder with PyOpenGL
The cylinder1.pyw program creates a simple scene that the user can rotate independently about the x and y axes. And when the window containing the scene is resized, the scene is scaled to fit.
from OpenGL.GL import *
from OpenGL.GLU import *
from OpenGL.GLUT import *
The program makes use of the OpenGL GL (core library), GLU (utility library), and GLUT (windowing toolkit). It is normally best practice to avoid importing using the from module import * syntax, but for PyOpenGL it seems reasonable, because all the imported names begin with a prefix of gl, glu, glut, or GL, and so they are easy to identify and unlikely to cause conflicts.
SIZE = 400
ANGLE_INCREMENT = 5
def main():
glutInit(sys.argv)
glutInitWindowSize(SIZE, SIZE)
window = glutCreateWindow(b"Cylinder (PyOpenGL)")
glutInitDisplayString(b"double=1 rgb=1 samples=4 depth=16")
scene = Scene(window)
glutDisplayFunc(scene.display)
glutReshapeFunc(scene.reshape)
glutKeyboardFunc(scene.keyboard)
glutSpecialFunc(scene.special)
glutMainLoop()
The GLUT library provides the event handling and top-level windows that a GUI toolkit normally supplies. To use this library, we must begin by calling glut-Init() and passing it the program’s command-line arguments; it will apply and remove any that it recognizes. We can then, optionally, set an initial window size (as we do here). Next, we create a window and give it an initial title. The call to glutInitDisplayString() is used to set some of the OpenGL context’s parameters—in this case, to turn on double-buffering, to use the RGBA (red, green, blue, alpha) color model, to turn on antialiasing support, and to set a depth buffer with 16 bits of precision. (See the PyOpenGL documentation for a list of all the options and their meanings.)
The OpenGL interfaces use 8-bit strings (normally ASCII-encoded). One way to pass such strings is to use the str.encode() method, which returns a bytes encoded with the given encoding—for example, "title".encode("ascii"), which returns b'title'—but here we have usedbytes literals directly.
The Scene is a custom class that we will use to render OpenGL graphics onto the window. Once the scene is created, we register some of its methods as GLUT call-back functions; that is, functions that OpenGL will call in response to particular events. We register the Scene.display()method, which will be called whenever the window is shown (i.e., for the first time and whenever revealed if it is uncovered). We also register the Scene.reshape() method, which is called whenever the window is resized; the Scene.keyboard() method, which is called when the user presses a key (excluding certain keys); and the Scene.special() method, which is called when the user presses a key not handled by the registered keyboard function.
With the window created and the callback functions registered, we start off the GLUT event loop. This will run until the program is terminated.
class Scene:
def __init__(self, window):
self.window = window
self.xAngle = 0
self.yAngle = 0
self._initialize_gl()
We begin the Scene class by keeping a reference to the OpenGL window and setting the x and y axes angles to zero. We defer all the OpenGL-specific initialization to a separate function that we call at the end.
def _initialize_gl(self):
glClearColor(195/255, 248/255, 248/255, 1)
glEnable(GL_DEPTH_TEST)
glEnable(GL_POINT_SMOOTH)
glHint(GL_POINT_SMOOTH_HINT, GL_NICEST)
glEnable(GL_LINE_SMOOTH)
glHint(GL_LINE_SMOOTH_HINT, GL_NICEST)
glEnable(GL_COLOR_MATERIAL)
glEnable(GL_LIGHTING)
glEnable(GL_LIGHT0)
glLightfv(GL_LIGHT0, GL_POSITION, vector(0.5, 0.5, 1, 0))
glLightfv(GL_LIGHT0, GL_SPECULAR, vector(0.5, 0.5, 1, 1))
glLightfv(GL_LIGHT0, GL_DIFFUSE, vector(1, 1, 1, 1))
glMaterialf(GL_FRONT_AND_BACK, GL_SHININESS, 50)
glMaterialfv(GL_FRONT_AND_BACK, GL_SPECULAR, vector(1, 1, 1, 1))
glColorMaterial(GL_FRONT_AND_BACK, GL_AMBIENT_AND_DIFFUSE)
This method is called just once to set up the OpenGL context. We begin by setting the clear color (i.e., the background color) to a shade of light blue. Then we enable various OpenGL features, of which the most important is creating a light. The presence of this light is why the cylinder isn’t of a uniform color. We also make the cylinder’s basic (unlit) color depend on calls to the glColor...() functions; for example, having enabled the GL_COLOR_MATERIAL option, setting the current color to red with, say, glColor3ub(255, 0, 0) will also affect the material color (in this case the cylinder’s color).
def vector(*args):
return (GLfloat * len(args))(*args)
This helper function is used to create an OpenGL array of floating-point values (each of type GLfloat).
def display(self):
glClear(GL_COLOR_BUFFER_BIT|GL_DEPTH_BUFFER_BIT)
glMatrixMode(GL_MODELVIEW)
glPushMatrix()
glTranslatef(0, 0, -600)
glRotatef(self.xAngle, 1, 0, 0)
glRotatef(self.yAngle, 0, 1, 0)
self._draw_axes()
self._draw_cylinder()
glPopMatrix()
This method is called when the scene’s window is first shown and whenever the scene is revealed (e.g., if a covering window is moved or closed). It moves the scene back (along the z axis) so that we are viewing it from in front, and rotates it in the x and y axes depending on the user’s interaction. (Initially, these rotations are of zero degrees.) Once the scene has been translated and rotated, we draw the axes and then the cylinder itself.
def _draw_axes(self):
glBegin(GL_LINES)
glColor3f(1, 0, 0) # x-axis
glVertex3f(-1000, 0, 0)
glVertex3f(1000, 0, 0)
glColor3f(0, 0, 1) # y-axis
glVertex3f(0, -1000, 0)
glVertex3f(0, 1000, 0)
glColor3f(1, 0, 1) # z-axis
glVertex3f(0, 0, -1000)
glVertex3f(0, 0, 1000)
glEnd()
A vertex is the OpenGL term for a point in three-dimensional space. Each axis is drawn the same way: we set the axis’s color and then give its start and end vertices. The glColor3f() and glVertex3f() functions each require three floating-point arguments, but we have used ints and left Python to do the conversions.
def _draw_cylinder(self):
glPushMatrix()
try:
glTranslatef(0, 0, -200)
cylinder = gluNewQuadric()
gluQuadricNormals(cylinder, GLU_SMOOTH)
glColor3ub(48, 200, 48)
gluCylinder(cylinder, 25, 25, 400, 24, 24)
finally:
gluDeleteQuadric(cylinder)
glPopMatrix()
The GLU utility library has built-in support for creating some basic 3D shapes, including cylinders. We begin by moving our starting point further back along the z axis. Then we create a “quadric”, an object that can be used to render various 3D shapes. We set the color using three unsigned bytes (i.e., red, green, blue values in the range 0 to 255). The gluCylinder() call takes the generic quadric, the cylinder’s radii at each end (in this case they are the same), the cylinder’s height, and then two granularity factors (where higher values produce smoother results that are more expensive to process). And at the end, we explicitly delete the quadric rather than rely on Python’s garbage collection to minimize our resource usage.
def reshape(self, width, height):
width = width if width else 1
height = height if height else 1
aspectRatio = width / height
glViewport(0, 0, width, height)
glMatrixMode(GL_PROJECTION)
glLoadIdentity()
gluPerspective(35.0, aspectRatio, 1.0, 1000.0)
glMatrixMode(GL_MODELVIEW)
glLoadIdentity()
This method is called whenever the scene’s window is resized. Almost all of the burden is passed on to the gluPerspective() function. And, in fact, the code shown here should serve as a sensible starting point for any scene that uses a perspective projection.
def keyboard(self, key, x, y):
if key == b"\x1B": # Escape
glutDestroyWindow(self.window)
If the user presses a key (excluding a function key, an arrow key, Page Up, Page Down, Home, End, or Insert), this method (registered with glutKeyboardFunc()) is called. Here, we check to see if the Esc key was pressed, and if so, we delete the window, and since there are no other windows, this terminates the program.
def special(self, key, x, y):
if key == GLUT_KEY_UP:
self.xAngle -= ANGLE_INCREMENT
elif key == GLUT_KEY_DOWN:
self.xAngle += ANGLE_INCREMENT
elif key == GLUT_KEY_LEFT:
self.yAngle -= ANGLE_INCREMENT
elif key == GLUT_KEY_RIGHT:
self.yAngle += ANGLE_INCREMENT
glutPostRedisplay()
This method was registered with the glutSpecialFunc() function and is called whenever the user presses a function key, an arrow key, Page Up, Page Down, Home, End, or Insert. Here, we only respond to arrow keys. If an arrow key is pressed, we increment or decrement the x- ory-axis angle and tell the GLUT toolkit to redraw the window. This will result in the callable registered with the glutDisplayFunc() being called—in this example, the Scene.display() method.
We have now seen the complete code for the PyOpenGL cylinder1.pyw program. Those familiar with OpenGL should feel immediately at home, since the OpenGL calls are almost all the same as in C.
8.1.2. Creating a Cylinder with pyglet
Structurally, the pyglet version (cylinder2.pyw) is very similar to the PyOpenGL version. The key difference is that pyglet provides its own event-handling and window-creation interface, so we don’t need to use GLUT calls.
def main():
caption = "Cylinder (pyglet)"
width = height = SIZE
resizable = True
try:
config = Config(sample_buffers=1, samples=4, depth_size=16,
double_buffer=True)
window = Window(width, height, caption=caption, config=config,
resizable=resizable)
except pyglet.window.NoSuchConfigException:
window = Window(width, height, caption=caption,
resizable=resizable)
path = os.path.realpath(os.path.dirname(__file__))
icon16 = pyglet.image.load(os.path.join(path, "cylinder_16x16.png"))
icon32 = pyglet.image.load(os.path.join(path, "cylinder_32x32.png"))
window.set_icon(icon16, icon32)
pyglet.app.run()
Rather than passing the OpenGL context configuration as a bytes string, pyglet supports using a pyglet.gl.Config object to specify our requirements. Here, we begin by creating our preferred configuration and then creating our own custom Window (apyglet.window.Window subclass), based on the configuration; if this fails, we fall back to creating the window with a default configuration.
One nice feature of pyglet is that it supports setting the application’s icon, which typically appears in the corner of the title bar and in task switchers. Once the window has been created and the icons set, we start off the pyglet event loop.
class Window(pyglet.window.Window):
def __init__(self, *args, **kwargs):
super().__init__(*args, **kwargs)
self.set_minimum_size(200, 200)
self.xAngle = 0
self.yAngle = 0
self._initialize_gl()
self._z_axis_list = pyglet.graphics.vertex_list(2,
("v3i", (0, 0, -1000, 0, 0, 1000)),
("c3B", (255, 0, 255) * 2)) # one color per vertex
This method is similar to the equivalent Scene method we reviewed in the previous subsection. One difference is that, here, we have set a minimum size for the window. As we will see in a moment, pyglet can draw lines in three different ways. The third way is to draw a preexisting list of vertex–color pairs, and here we create such a list. The function that creates the list takes the number of vertex–color pairs followed by a sequence of that number of pairs. Each pair consists of a string format and a sequence. In this case, the first pair’s string format means “vertices specified by three integer coordinates”, so, here, two vertices are given. The second pair’s string format means “colors specified by three unsigned bytes”; here, two colors are given (both the same), one for each vertex.
We do not show the _initialize_gl(), on_draw(), on_resize(), or _draw_cylinder() methods. The _initialize_gl() method is very similar to the one used in cylinder1.pyw. Furthermore, the body of the on_draw() method that pyglet calls automatically to display pyglet.window.Window subclasses is identical to the body of the cylinder1.pyw program’s Scene.display() method. Similarly, the on_resize() method that is called to handle resizing has the same body as the previous program’s Scene.reshape()method. Both programs’ _draw_cylinder() methods (Scene._draw_cylinder() and Window._draw_cylinder()) are identical.
def _draw_axes(self):
glBegin(GL_LINES) # x-axis (traditional-style)
glColor3f(1, 0, 0)
glVertex3f(-1000, 0, 0)
glVertex3f(1000, 0, 0)
glEnd()
pyglet.graphics.draw(2, GL_LINES, # y-axis (pyglet-style "live")
("v3i", (0, -1000, 0, 0, 1000, 0)),
("c3B", (0, 0, 255) * 2))
self._z_axis_list.draw(GL_LINES) # z-axis (efficient pyglet-style)
We have drawn each axis using a different technique to show some of the options available. The x axis is drawn using traditional OpenGL function calls in exactly the same way as for the PyOpenGL version of the program. The y axis is drawn by telling pyglet to draw lines between 2 points (it could be any number, of course), and for which we provide the corresponding vertices and colors. Especially for large numbers of lines, this should be a bit more efficient than the traditional approach. The z axis is drawn in the most efficient way possible: here we take a preexisting list of vertex–color pairs stored as a pyglet.graphics.vertex_list and tell it to draw itself as lines between the vertices.
def on_text_motion(self, motion): # Rotate about the x or y axis
if motion == pyglet.window.key.MOTION_UP:
self.xAngle -= ANGLE_INCREMENT
elif motion == pyglet.window.key.MOTION_DOWN:
self.xAngle += ANGLE_INCREMENT
elif motion == pyglet.window.key.MOTION_LEFT:
self.yAngle -= ANGLE_INCREMENT
elif motion == pyglet.window.key.MOTION_RIGHT:
self.yAngle += ANGLE_INCREMENT
If the user presses an arrow key, this method is called (provided we define it). Here, we do the same work as we did in the previous example’s special() method, only now we use pyglet-specific constants rather than GLUT constants for the keys.
We have not provided an on_key_press() method (which would be called for other key presses), because pyglet’s default implementation closes the window (and hence terminates the program) if Esc is pressed, which is the behavior we want.
The two cylinder programs are both around 140 lines. However, if we use pyglet.graphics.vertex_lists and other pyglet extensions, we gain both convenience—particularly for event and window handling—and efficiency.
8.2. An Orthographic Game
In Chapter 7, we showed the code for a 2D Gravitate game, although we omitted the code that draws the tiles. In fact, each tile was produced by drawing a square surrounded by four isosceles trapezoids positioned above, below, left, and right. The above and left trapezoids were drawn in a lighter shade of the square’s color and the below and right in a darker shade; this resulted in a 3D-look. (See Figure 7.7, 254 ![]() , and the “Gravitate” sidebar, 254
, and the “Gravitate” sidebar, 254 ![]() .)
.)
In this section, we will review most of the code for the Gravitate 3D game shown in Figure 8.2. This program uses spheres rather than tiles and arranges the spheres with gaps in between so that the user can see into the three-dimensional structure as they rotate the scene about the x and yaxes. We will focus on the GUI and 3D code, omitting some of the low-level details that implement the game’s logic. The complete source code is in gravitate3d.pyw.
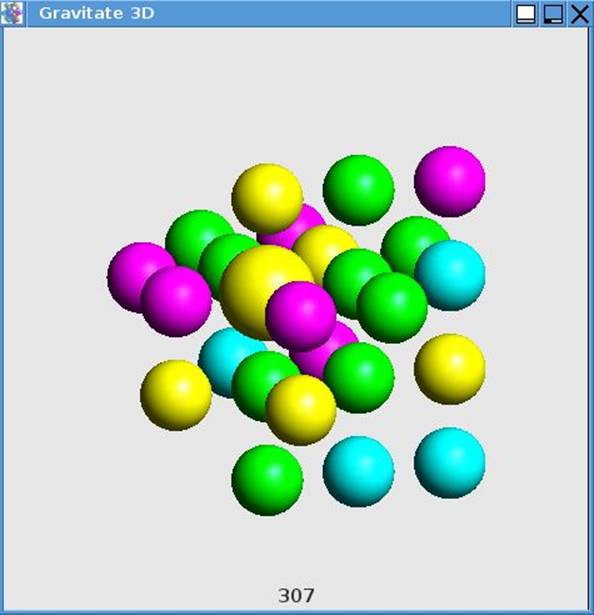
Figure 8.2 The Gravitate 3D program on Linux
The program’s main() function (not shown) is almost identical to the one in cylinder2.pyw, the only differences being the name of the caption and the names of the icon images.
BOARD_SIZE = 4 # Must be > 1.
ANGLE_INCREMENT = 5
RADIUS_FACTOR = 10
DELAY = 0.5 # seconds
MIN_COLORS = 4
MAX_COLORS = min(len(COLORS), MIN_COLORS)
Here are some of the constants that the program uses. The BOARD_SIZE is the number of spheres in each axis; when set to 4, this produces a 4 × 4 × 4 board of 64 spheres. The ANGLE_INCREMENT set to 5 means that when the user presses an arrow key, the scene will be rotated in steps of 5°. The DELAY is the time to wait between deleting the sphere (and all its adjoining spheres of the same color, as well as their adjoining spheres of the same color) that the user has selected and clicked, and moving any spheres toward the center to fill any gaps. The COLORS (not shown) is a list of 3-tuples of integers (each in the range 0 to 255), each representing a color.
When the user clicks an unselected sphere, it is selected (and any selected sphere deselected), and this is shown by drawing the sphere with a radius that is RADIUS_FACTOR bigger than the radius normally used. When a selected sphere is clicked, that sphere and any spheres of the same color adjoining it (at 90°, not diagonally), and any adjoining them, and so on, are deleted—providing at least two spheres are deleted. Otherwise, the sphere is simply unselected.
class Window(pyglet.window.Window):
def __init__(self, *args, **kwargs):
super().__init__(*args, **kwargs)
self.set_minimum_size(200, 200)
self.xAngle = 10
self.yAngle = -15
self.minColors = MIN_COLORS
self.maxColors = MAX_COLORS
self.delay = DELAY
self.board_size = BOARD_SIZE
self._initialize_gl()
self.label = pyglet.text.Label("", bold=True, font_size=11,
anchor_x="center")
self._new_game()
This __init__() method has more statements than the equivalent cylinder-program methods, because we need to set the colors, delay, and board size. We also start the program off with some initial rotation, so that the user can see straight away that the game is three dimensional.
One particularly useful feature offered by pyglet is text labels. Here, we create an empty label centered at the bottom of the scene. We will use this to show messages and the current score.
The call to the custom _initialize_gl() method (not shown, but similar to the one we saw before) sets up the background and a light. With everything set up in terms of the program’s logic and OpenGL, we start a new game.
def _new_game(self):
self.score = 0
self.gameOver = False
self.selected = None
self.selecting = False
self.label.text = ("Click to Select • Click again to Delete • "
"Arrows to Rotate")
random.shuffle(COLORS)
colors = COLORS[:self.maxColors]
self.board = []
for x in range(self.board_size):
self.board.append([])
for y in range(self.board_size):
self.board[x].append([])
for z in range(self.board_size):
color = random.choice(colors)
self.board[x][y].append(SceneObject(color))
This method creates a board where each sphere has a random color chosen from the COLORS list and where there are at most self.maxColors colors in use. The board is represented by a list of lists of lists of SceneObjects. Each of these objects has a color (the sphere color passed to the constructor) and a selection color (automatically generated and used for selecting, explained later; §8.2.2, ![]() 277).
277).
Since we changed the label text, pyglet will redraw the scene (by calling our on_draw() method), and the new game will be visible and waiting for user interaction.
8.2.1. Drawing the Board Scene
When a scene is shown for the first time or revealed when a covering window is closed or moved, pyglet calls the on_draw() method. And when a scene is resized (i.e., when its window is resized), pyglet calls the on_resize() method.
def on_resize(self, width, height):
size = min(self.width, self.height) / 2
height = height if height else 1
width = width if width else 1
glViewport(0, 0, width, height)
glMatrixMode(GL_PROJECTION)
glLoadIdentity()
if width <= height:
glOrtho(-size, size, -size * height / width,
size * height / width, -size, size)
else:
glOrtho(-size * width / height, size * width / height,
-size, size, -size, size)
glMatrixMode(GL_MODELVIEW)
glLoadIdentity()
We have used an orthographic projection for Gravitate 3D. The code shown here should work as is for any orthographic scene. (So, if we were using PyOpenGL, we would call this method reshape() and register it with the glutReshapeFunc() function.)
def on_draw(self):
diameter = min(self.width, self.height) / (self.board_size * 1.5)
radius = diameter / 2
offset = radius - ((diameter * self.board_size) / 2)
radius = max(RADIUS_FACTOR, radius - RADIUS_FACTOR)
glClear(GL_COLOR_BUFFER_BIT|GL_DEPTH_BUFFER_BIT)
glMatrixMode(GL_MODELVIEW)
glPushMatrix()
glRotatef(self.xAngle, 1, 0, 0)
glRotatef(self.yAngle, 0, 1, 0)
with Selecting(self.selecting):
self._draw_spheres(offset, radius, diameter)
glPopMatrix()
if self.label.text:
self.label.y = (-self.height // 2) + 10
self.label.draw()
This is pyglet’s equivalent to a PyOpenGL display() method registered with the glutDisplayFunc() function. We want the board to fill as much of the window’s space as possible while allowing for it to be rotated without any spheres being clipped. We also need to compute an offset to ensure that the board is correctly centered.
Once the preliminaries have been taken care of, we rotate the scene (e.g., if the user has pressed any arrow keys), and then we draw the spheres in the context of a custom Selecting context manager. This context manager ensures that certain settings are turned on or off depending on whether the scene is being drawn to be seen by the user or is in effect being drawn out of sight for the purpose of detecting which sphere the user has clicked. (Selecting is discussed in the following subsection; §8.2.2, ![]() 277.)
277.)
If the label has any text, we make sure that the label’s y position is at the bottom of the window—since the window might have been resized—and then tell the label to draw itself (i.e., to draw its text).
def _draw_spheres(self, offset, radius, diameter):
try:
sphere = gluNewQuadric()
gluQuadricNormals(sphere, GLU_SMOOTH)
for x, y, z in itertools.product(range(self.board_size),
repeat=3):
sceneObject = self.board[x][y][z]
if self.selecting:
color = sceneObject.selectColor
else:
color = sceneObject.color
if color is not None:
self._draw_sphere(sphere, x, y, z, offset, radius,
diameter, color)
finally:
gluDeleteQuadric(sphere)
Quadrics can be used to draw spheres as well as cylinders, although, in this case, we must draw many spheres (up to 64) rather than just one cylinder. We can use the same quadric to draw every sphere, though.
Rather than writing for x in range(self.board.size): for y in range(self.board.size): for z in range(self.board.size): to produce an x, y, z triple for every sphere in the board list of lists of lists, we have achieved the same thing using a singlefor loop in conjunction with the itertools.product() function.
For each triple, we retrieve the corresponding scene object (whose colors will be None if it has been deleted) and set the color to the selection color, if we are drawing to see which sphere has been clicked, or to the sphere’s color, if we are drawing for the user to see. If the color is not Nonewe draw the particular sphere.
def _draw_sphere(self, sphere, x, y, z, offset, radius, diameter,
color):
if self.selected == (x, y, z):
radius += RADIUS_FACTOR
glPushMatrix()
x = offset + (x * diameter)
y = offset + (y * diameter)
z = offset + (z * diameter)
glTranslatef(x, y, z)
glColor3ub(*color)
gluSphere(sphere, radius, 24, 24)
glPopMatrix()
This method is used to draw each sphere offset into its correct position in the 3D grid of spheres. If the sphere is selected we draw it with an increased radius. The last two arguments to gluSphere() are two granularity factors (where higher values produce smoother results that are more expensive to process).
8.2.2. Handling Scene Object Selection
Selecting an object in a three-dimensional space that is displayed on a two-dimensional surface is not easy! Various techniques have been developed over the years, but the one that seems to be the most reliable and widely used is the one we have used for Gravitate 3D.
The technique works as follows. When the user clicks the scene, the scene is redrawn in an off-screen buffer not visible to the user, with every object drawn with a unique color. The color of the pixel at the click position is then read from the buffer and used to identify the unique scene object associated with that color. For this to succeed, we must draw the scene with no antialiasing, no lighting, and no textures, so that each object is drawn in its unique color with no additional color processing.
We will begin by looking at the SceneObject that each sphere is represented by, and then we will review the Selecting context manager.
class SceneObject:
__SelectColor = 0
def __init__(self, color):
self.color = color
SceneObject.__SelectColor += 1
self.selectColor = SceneObject.__SelectColor
We give each scene object its display color (self.color), which need not be unique, and a unique select color. The private static __SelectColor is an integer that is incremented for every new scene object; it is used to give each object a unique select color.
@property
def selectColor(self):
return self.__selectColor
This property returns the scene object’s select color, which is either None (e.g., for a deleted object) or a 3-tuple of color integers (each in the range 0 to 255).
@selectColor.setter
def selectColor(self, value):
if value is None or isinstance(value, tuple):
self.__selectColor = value
else:
parts = []
for _ in range(3):
value, y = divmod(value, 256)
parts.append(y)
self.__selectColor = tuple(parts)
This select-color setter accepts the given value if it is None or a tuple; otherwise, it computes a unique color tuple based on the unique integer value it is given. The first scene object is passed a value of 1, and so its color is (1, 0, 0). The second is passed 2, so its color is (2, 0, 0), and so on up to the 255th, whose color is (255, 0, 0). The 256th color is (0, 1, 0), the 257th is (1, 1, 0), and the 258th (2, 1, 0), and so on. This system can cope with over sixteen million unique objects, which should be enough for most situations.
SELECTING_ENUMS = (GL_ALPHA_TEST, GL_DEPTH_TEST, GL_DITHER,
GL_LIGHT0, GL_LIGHTING, GL_MULTISAMPLE, GL_TEXTURE_1D,
GL_TEXTURE_2D, GL_TEXTURE_3D)
We need to turn antialiasing, lighting, textures, and anything else that changes an object’s color on or off depending on whether we are drawing for the user to see or off-screen for the purpose of detecting which object the user has clicked. These are the OpenGL enums that affect object color in the Gravitate 3D program.
class Selecting:
def __init__(self, selecting):
self.selecting = selecting
The Selecting context manager remembers whether the spheres drawn in its context (276 ![]() ) are for the user or for clicked-object detection; that is, for selecting.
) are for the user or for clicked-object detection; that is, for selecting.
def __enter__(self):
if self.selecting:
for enum in SELECTING_ENUMS:
glDisable(enum)
glShadeModel(GL_FLAT)
When the context manager is entered, if the drawing is for selecting, we disable all the color-changing aspects of OpenGL’s state and switch to a flat shading model.
def __exit__(self, exc_type, exc_value, traceback):
if self.selecting:
for enum in SELECTING_ENUMS:
glEnable(enum)
glShadeModel(GL_SMOOTH)
When the context manager is exited when we are drawing for selecting, we reenable all the color-changing aspects of the OpenGL state and switch back to a smooth shading model.
It is easy to see how the selecting works by making two changes to the source code. First, change the += 1 in the SceneObject.__init__() method to += 500. Second, comment out the self.selecting = False statement in the Window.on_mouse_press() method (that we will review in the next subsection). Now run the program and click any sphere: the scene will be redrawn to show the normally off-screen selecting scene but in all other respects will work normally.
8.2.3. Handling User Interaction
The Gravitate 3D game is mostly mouse driven. However, the arrow keys are used to provide a means of rotating the board, and other keys are used to start a new game and to quit.
def on_mouse_press(self, x, y, button, modifiers):
if self.gameOver:
self._new_game()
return
self.selecting = True
self.on_draw()
self.selecting = False
selectColor = (GLubyte * 3)()
glReadPixels(x, y, 1, 1, GL_RGB, GL_UNSIGNED_BYTE, selectColor)
selectColor = tuple([component for component in selectColor])
self._clicked(selectColor)
This method is called by pyglet whenever the user clicks a mouse button (providing we have defined the method). If the game has finished, we take this click to mean start a new game. Otherwise, we assume that the user is clicking a sphere. We set selecting to True and redraw the scene (this happens off-screen, so the user doesn’t notice), then we reset selecting to False.
The glReadPixels() function is used to read the colors of one or more pixels; in this case, we use it to read the off-screen pixel in the position that the user clicked and retrieve its RGB value as three unsigned bytes (each in the range 0 to 255). Then we put these bytes into a 3-tuple of integers so that we can compare it with each sphere’s unique select color.
Note that our glReadPixels() call assumes a coordinate system whose y origin is bottom-left (which it is in pyglet). If the coordinate system has a top-left y origin, two extra statements are needed: viewport = (GLint * 4)(); glGetIntegerv(GL_VIEWPORT, viewport), and the y in the glReadPixels() call must be replaced with viewport[3] - y.
def _clicked(self, selectColor):
for x, y, z in itertools.product(range(self.board_size), repeat=3):
if selectColor == self.board[x][y][z].selectColor:
if (x, y, z) == self.selected:
self._delete() # Second click deletes
else:
self.selected = (x, y, z)
return
We call this method whenever the user clicks, except when the click results in a new game being started. We use the itertools.product() function to produce every x, y, z triple for the board and compare the scene object at each coordinate triple’s select color with the color of the clicked pixel. If we get a match, we have uniquely identified the scene object that the user has clicked. If this object is already selected, then the user is clicking it for a second time, so we attempt to delete it and its adjoining spheres of the same color. Otherwise, the object is being clicked to select it (and any previously selected scene object will be unselected).
def _delete(self):
x, y, z = self.selected
self.selected = None
color = self.board[x][y][z].color
if not self._is_legal(x, y, z, color):
return
self._delete_adjoining(x, y, z, color)
self.label.text = "{:,}".format(self.score)
pyglet.clock.schedule_once(self._close_up, self.delay)
This method is used to delete the clicked sphere and its adjoining spheres of the same color (and their adjoining spheres of the same color). We begin by unselecting the selected sphere, and then we check to see if the deletion is legal (i.e., there is at least one suitable adjoining sphere). If the deletion is legal, we perform the deletion using the _delete_adjoining() method and its helper methods (none of which are shown). Then, we update the label to show the newly increased score and schedule a call to the self._close_up() method (not shown) after half a second. This allows the user to see which spheres have been deleted before any gaps are filled by spheres gravitating toward the center. (A more sophisticated alternative would be to animate the closing up by moving the spheres one or a few pixels at a time to their new positions.)
def on_key_press(self, symbol, modifiers):
if (symbol == pyglet.window.key.ESCAPE or
((modifiers & pyglet.window.key.MOD_CTRL or
modifiers & pyglet.window.key.MOD_COMMAND) and
symbol == pyglet.window.key.Q)):
pyglet.app.exit()
elif ((modifiers & pyglet.window.key.MOD_CTRL or
modifiers & pyglet.window.key.MOD_COMMAND) and
symbol == pyglet.window.key.N):
self._new_game()
elif (symbol in {pyglet.window.key.DELETE, pyglet.window.key.SPACE,
pyglet.window.key.BACKSPACE} and
self.selected is not None):
self._delete()
The user can terminate the program by clicking the × close button, but we also allow them to do so by clicking Esc or Ctrl+Q (or ![]() Q). The user can start a new game when the existing game has finished simply by clicking, or they can start a new game at any time by clicking Ctrl+N (or
Q). The user can start a new game when the existing game has finished simply by clicking, or they can start a new game at any time by clicking Ctrl+N (or ![]() N). We also allow the user to delete the selected sphere (and its adjoining spheres) either by clicking it a second time or by pressing Del, Space, or Backspace.
N). We also allow the user to delete the selected sphere (and its adjoining spheres) either by clicking it a second time or by pressing Del, Space, or Backspace.
The Window also has an on_text_motion() method that handles the arrow keys and rotates the scene about the x or y axis. The method isn’t shown here, because it is identical to the one we saw earlier (§8.1.2, 270 ![]() ).
).
This completes our coverage of the Gravitate 3D game. The only methods we have omitted are those concerned with the details of the game’s logic, in particular the methods that handle the deletion of adjoining spheres (by setting their color and select colors to None), and those that handle the moving of the spheres toward the center.
Creating 3D scenes programmatically can be quite challenging, especially since the traditional OpenGL interfaces are entirely procedural (i.e., based on functions) rather than object oriented. Nonetheless, thanks to PyOpenGL and pyglet, it is straightforward to port OpenGL C code directly into Python and to use the complete OpenGL interfaces. Furthermore, pyglet in particular provides convenient support for event handling and window creation, while PyOpenGL provides integration with many GUI toolkits, including Tkinter.
All materials on the site are licensed Creative Commons Attribution-Sharealike 3.0 Unported CC BY-SA 3.0 & GNU Free Documentation License (GFDL)
If you are the copyright holder of any material contained on our site and intend to remove it, please contact our site administrator for approval.
© 2016-2026 All site design rights belong to S.Y.A.