50 Android Hacks (2013)
Chapter 2. Creating cool animations
In this chapter, you’ll learn about animations. You’ll find different examples that use a variety of APIs to add animations to your application widgets.
Hack 5 Snappy transitions with TextSwitcher and ImageSwitcher: Android v1.6+
Imagine you need to cycle through information in a TextView or in an ImageView. Some examples of this would be
· Navigating through a list of dates with Left and Right buttons
· Changing numbers in a date picker
· Countdown clock
· News headlines
Changing the contents of a view is a basic function of most applications, but it doesn’t have to be boring. If we use the default TextView, you’ll notice there’s no eye candy when we swap its content. It’d be nice to have a way to apply different animations to content being swapped. So to make our transitions more visually appealing, Android provides two classes called TextSwitcher and ImageSwitcher. TextSwitcher replaces a TextView and ImageSwitcher replaces an ImageView.
TextView and TextSwitcher work in a similar way. Suppose we’re navigating through a list of dates, as mentioned earlier. Every time the user clicks a button, we need to change a TextView’s content with each date. If we use a TextView, we’re swapping out some text in a view usingmTextView.setText("something"). Our code should look something like the following:
private TextView mTextView;
@Override
public void onCreate(Bundle savedInstanceState) {
super.onCreate(savedInstanceState);
mTextView = (TextView) findViewById(R.id.your_textview);
...
mTextView.setText("something");
}
As you might’ve noticed, if we change the content of a TextView, it’ll change instantly; TextSwitcher is what we need if we want to add an animation to avoid the hard swap. A TextSwitcher is useful to animate a label onscreen. Whenever it’s called, TextSwitcher animates the current text out and animates the new text in. We can get a more pleasant transition by following these easy steps:
1. Get the view using findViewById(), or construct it in your code like any normal Android view.
2. Set a factory using switcher.setFactory().
3. Set an in-animation using switcher.setInAnimation().
4. Set an out-animation using switcher.setOutAnimation().
Here’s how TextSwitcher works: it uses the factory to create new views, and whenever we use setText(), it first removes the old view using an animation set with the setOutAnimation() method, and then places the new one using the animation set by the setInAnimation()method. So let’s see how to use it:
private TextSwitcher mTextSwitcher;
@Override
public void onCreate(Bundle savedInstanceState) {
super.onCreate(savedInstanceState);
setContentView(R.layout.main);
Animation in = AnimationUtils.loadAnimation(this,
android.R.anim.fade_in);
Animation out = AnimationUtils.loadAnimation(this,
android.R.anim.fade_out);
mTextSwitcher = (TextSwitcher) findViewById(R.id.your_textview);
mTextSwitcher.setFactory(new ViewFactory() {
@Override
public View makeView() {
TextView t = new TextView(YourActivity.this);
t.setGravity(Gravity.CENTER);
return t;
}
});
mTextSwitcher.setInAnimation(in);
mTextSwitcher.setOutAnimation(out);
}
That’s it. The user gets the new text, and we get some cool animations for free. The new transition fades out the original text while the new text fades in to replace it. Because we used android.R.anim.fade_in in our example, the effect was a fade-in. This technique works equally well with other effects. Providing your own animation or using one from android.R.anim. ImageSwitcher works in the same way, except with images instead of text.
5.1. The bottom line
The TextSwitcher and ImageSwitcher methods give you a simple way to add animated transitions. Their role is to make these transitions less dull and more vibrant. Don’t abuse them; you don’t want your application to look like a Christmas tree!
5.2. External links
http://developer.android.com/reference/android/widget/TextSwitcher.html
http://developer.android.com/guide/topics/graphics/view-animation.html
Hack 6 Adding eye candy to your ViewGroup’s children: Android v1.6+
By default, when you add views to a ViewGroup, they’re instantly added and displayed, but there’s an easier way to animate that action. In this hack, I’ll show you how to apply an animation to children views being added to their parent ViewGroup. I’ll show you how to add eye candy to your application in a few lines.
Android provides a class called LayoutAnimationController. This class is useful to animate a layout’s or a ViewGroup’s children. It’s important to mention that you won’t be able to provide different animations for each child, but the LayoutAnimationController can help you decide when the animation should apply to each child.
The best way to understand how to use LayoutAnimationController is through an example. We’ll animate ListView’s children with a mix of two animations, alpha and translate. You can use the LayoutAnimationController in two ways: from the code and from the XML. I’ll show how to do it from code and you can try converting it to XML as an exercise. Let’s look at the code used to apply the animation:
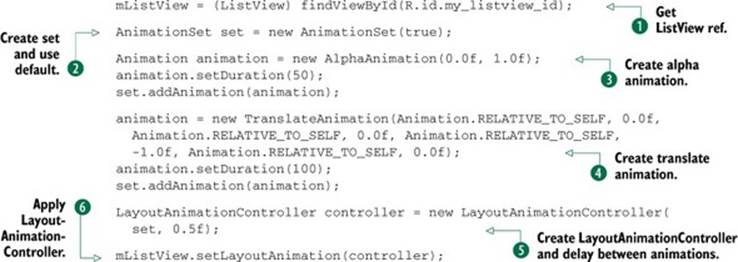
First, you need to get the ListView reference ![]() . Because we want to add more than one animation, we’ll need to use a set
. Because we want to add more than one animation, we’ll need to use a set ![]() . The Boolean variable will determine whether every animation will use the same interpolator. In this example, we’ll use the default interpolator, and then create the alpha animation
. The Boolean variable will determine whether every animation will use the same interpolator. In this example, we’ll use the default interpolator, and then create the alpha animation ![]() and the translate animation
and the translate animation ![]() , and add them to the set. We create the LayoutAnimationController with the set and the delay between child animations
, and add them to the set. We create the LayoutAnimationController with the set and the delay between child animations ![]() . Finally, we apply the LayoutAnimationController to the ListView
. Finally, we apply the LayoutAnimationController to the ListView ![]() .
.
Most of the animations provided by the framework look like TranslateAnimation, so let’s take a closer look at that particular code. The constructor is defined as follows:
public TranslateAnimation(int fromXType, float fromXValue, int toXType,
float toXValue, int fromYType, float fromYValue, int toYType,
float toYValue) {
The idea is simple: we need to provide initial and final x,y coordinates. Android provides a way to specify where it should calculate the position from, with three options:
· Animation.ABSOLUTE
· Animation.RELATIVE_TO_SELF
· Animation.RELATIVE_TO_PARENT
If we go back to our example, we can explain every child position with words like this:
· Initial X: Position provided by its parent
· Initial Y: -1 from the position provided by its parent
· Final X: Position provided by its parent
· Final Y: Position provided by its parent
The end result will be every child “falling” through the y axis to its position. Because we have a delay between children, it’ll look like a cascade.
6.1. The bottom line
Adding animations to ViewGroups is easy, and they make your application look professional and polished. This hack only covered a small portion of what you can do, but, for example, you can try changing the default interpolator to the BounceInterpolator. This will make your views bounce when they reach their final position. You can also change the order in which to animate the children.
Use your imagination to create something cool, but don’t overdo it—you should avoid using too many animations.
6.2. External links
http://developer.android.com/reference/android/view/animation/LayoutAnimationController.html
Hack 7 Doing animations over the Canvas: Android v1.6+
If you’re animating your own widgets, you might find the animation APIs a bit limited. Is there an Android API to draw things directly to the screen? The answer is yes. Android offers a class called Canvas.
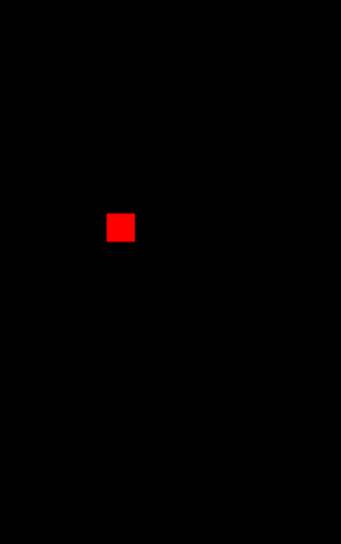
In this hack, I’ll show you how to use the Canvas class to draw elements and animate them by creating a box that will bounce around the screen. You can see the finished application in figure 7.1.
Figure 7.1. Box bouncing around the screen
Before we create this application, let’s make sure you understand what the Canvas class is—the following is from the documentation (see section 7.2):
A Canvas works for you as a pretense, or interface, to the actual surface upon which your graphics will be drawn—it holds all of your “draw” calls. Via the Canvas, your drawing is performed upon an underlying Bitmap, which is placed into the window.
Based on that definition, the Canvas class holds all of the draw calls. We can create a View, override the onDraw() method, and start drawing primitives there.
To make everything more clear, we’ll create a DrawView class that will take care of drawing the box and updating its position. Because we don’t have anything else onscreen, we’ll make it the Activity’s content view. The following is the code for the Activity:
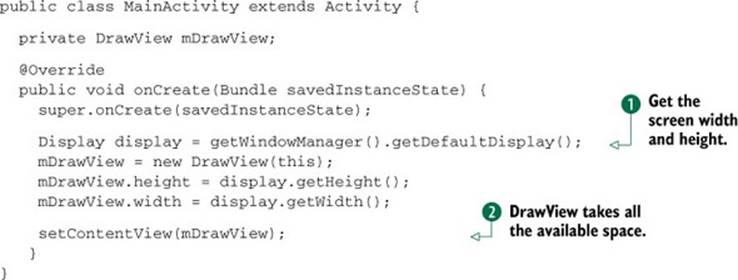
We’ll use the WindowManager to get the screen width and height ![]() . These values will be used inside the DrawView to limit where to draw. Afterward, we’ll set the DrawView as the Activity’s contentView
. These values will be used inside the DrawView to limit where to draw. Afterward, we’ll set the DrawView as the Activity’s contentView ![]() . This means that the DrawView will take all of the available space.
. This means that the DrawView will take all of the available space.
Let’s take a look at what’s happening inside the DrawView class:
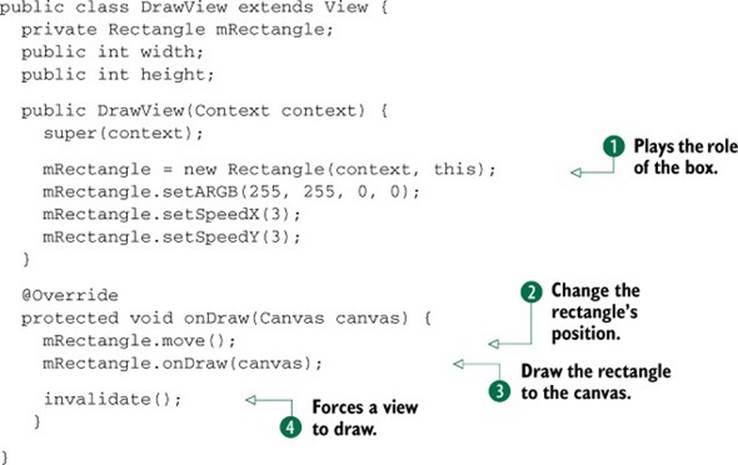
We’ll first create a Rectangle instance that will play the role of the box ![]() . The Rectangle class also knows how to draw itself to a canvas and contains all of the boring logic regarding how to update its position to be drawn in the correct place. When the onDraw() method gets called, we’ll change the rectangle’s position
. The Rectangle class also knows how to draw itself to a canvas and contains all of the boring logic regarding how to update its position to be drawn in the correct place. When the onDraw() method gets called, we’ll change the rectangle’s position ![]() and draw it to the canvas
and draw it to the canvas ![]() . The invalidate() call
. The invalidate() call ![]() is the hack itself. The invalidate() call is a View’s method to force a view to draw. Placing it inside the onDraw() method means that onDraw() will be called as soon as the view finishes drawing itself. To put it differently, we’re looping over the Rectangle’s move() and onDraw() calls to create a nice animation.
is the hack itself. The invalidate() call is a View’s method to force a view to draw. Placing it inside the onDraw() method means that onDraw() will be called as soon as the view finishes drawing itself. To put it differently, we’re looping over the Rectangle’s move() and onDraw() calls to create a nice animation.
7.1. The bottom line
Updating view positions in the onDraw() method through the invalidate() call is an easy way to provide custom animations. If you’re planning to make a small game, using this trick is a simple way to handle your game’s main loop.
7.2. External links
http://developer.android.com/reference/android/graphics/Canvas.html
http://developer.android.com/guide/topics/graphics/2d-graphics.html
Hack 8 Slideshow using the Ken Burns effect: Android v1.6+
One of the first products my company created is called FeedTV. The idea behind FeedTV is to change the way we read RSS feeds. Instead of showing them in a long list, we created something like a photo frame application that shows the feed’s headline and its main image. FeedTV for the iPad can be seen in figure 8.1.
Figure 8.1. FeedTV running in an iPad

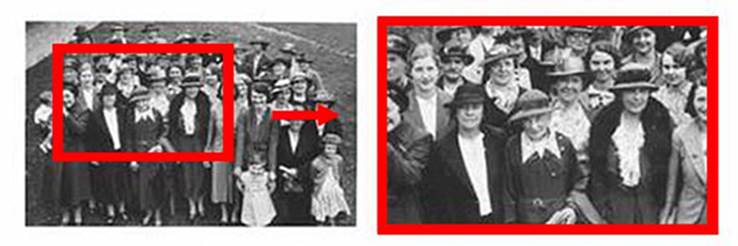
To make it even cooler, instead of placing a still image, we’ll analyze the image and, using it’s size and aspect ratio, apply something called the Ken Burns effect. The Ken Burns effect is nothing more than a type of panning and zooming effect used in video production from still imagery. The best way to understand the Ken Burns effect is to watch a video, but figure 8.2 can also give you an idea of how it works.
Figure 8.2. Ken Burns effect example taken from Wikipedia
In this hack, I’ll show you how to mimic the Ken Burns effect in an image slideshow. To do this, we’ll use a library created by Jake Wharton called Nine Old Androids. The Nine Old Androids library lets you use the new Android 3.0 animation API in older versions.
To create the Ken Burns effect, we’ll have a number of preset animations. These animations will be applied randomly to an ImageView and, when the animation is finished, we’ll start another animation with the next photo. The main layout will be a FrameLayout, and we’ll placeImageViews inside it. The layout is created with the following code:
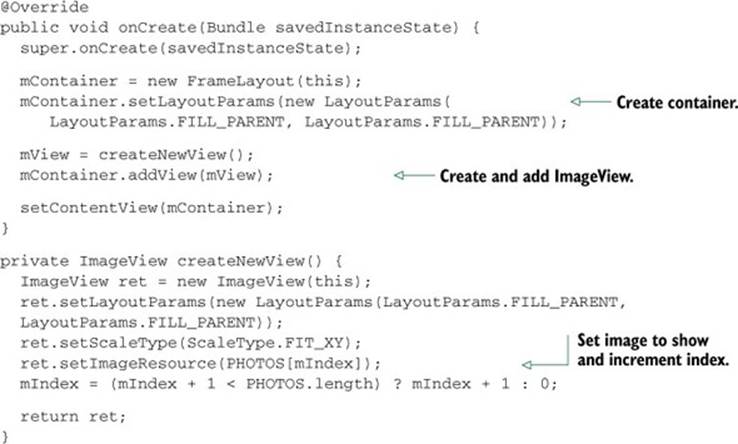
So far, so good. We’ll use the createNewView() to create new ImageViews and keep track of the image we’re showing next. The next step is to create a method called nextAnimation(). This method will take care of setting the animation and start it. The code follows:

The AnimatorProxy ![]() is a class available in the Nine Old Androids library to modify View’s properties. The new animation framework is based on the possibility of modifying View’s properties over time. The AnimatorProxy is used because on Android versions lower than 3.0 some properties had no getters/setters.
is a class available in the Nine Old Androids library to modify View’s properties. The new animation framework is based on the possibility of modifying View’s properties over time. The AnimatorProxy is used because on Android versions lower than 3.0 some properties had no getters/setters.
The remaining code is calling the nextAnimation() method when the animation is finished. Remember, we set the Activity as the animation listener ![]() ? Let’s look at the overridden method:
? Let’s look at the overridden method:

That’s it. We have our Ken Burns effect running on every photo. You can try improving the sample by doing two things: adding an alpha animation when switching views and adding an AnimationSet that pans and zooms at the same time. You can get additional ideas from the Nine Old Androids sample code.
8.1. The bottom line
The new animation API has better potential than the previous one. Following is a short list of improvements:
· Previous version supported animations only on View objects
· Previous version limited to move, rotate, scale, and fade
· Previous version changed the visual appearance, not the real position, in the case of a move
The fact that a library like Nine Old Androids exists means there’s no excuse for not trying it out on the new API.
8.2. External links
www.nasatrainedmonkeys.com/portfolio/feedtv/
https://github.com/JakeWharton/NineOldAndroids
http://en.wikipedia.org/wiki/Ken_Burns_effect
http://android-developers.blogspot.com.ar/2011/02/animation-in-honeycomb.html
http://android-developers.blogspot.com.ar/2011/05/introducing-viewpropertyanimator.html