50 Android Hacks (2013)
Chapter 3. View tips and tricks
In this chapter, you’ll read about different hacks that use views. Most of them show how to customize and/or tweak widgets to perform certain functionalities.
Hack 9 Avoiding date validations with an EditText for dates: Android v1.6+
We all know that validating data in forms is boring as well as error-prone. I worked on an Android application that used a lot of forms and had a couple of date inputs. I didn’t want to validate the date fields, so I found an elegant way to avoid it. The idea is to make users think they have anEditText when it’s in fact a button that will show a DatePicker when clicked.
To make this happen, we’ll change the default background of an Android Button to the EditText’s background. We can do this easily from the XML:
<Button android:id="@+id/details_date"
android:layout_width="wrap_content"
android:layout_height="wrap_content"
android:gravity="center_vertical"
android:background="@android:drawable/edit_text" />
Note how we used @android:drawable instead of a drawable of our own. Using Android’s resources inside your application has its pros and cons. It makes your application fit in the device, but it’ll look different on different devices. Some developers prefer using their own resources, drawables, and themes to have their own look.
If you’ve been testing your application in different devices, you’ll notice that widgets might not have the same styles. Using Android’s resources will make your application maintain Android’s styles.
After creating the button, we need to set its click listener. It should look something like the following:
mDate = (Button) findViewById(R.id.details_date);
mDate.setOnClickListener(new OnClickListener() {
@Override
public void onClick(View v) {
showDialog(DATE_DIALOG_ID);
}
});
The rest of the code sets up the DatePicker and sets the text into the Button after the user has picked a date.
9.1. The bottom line
You might be asking yourself why we didn’t set a click listener to the EditText instead of using a Button. Using a Button is safer because the user won’t be able to modify the text. If you used an EditText and only set the click listener, the user could gain focus by using the arrow and modifying the text without going through your picker.
You can always use a TextWatcher with your EditText to validate user input, but it’s boring and it takes a lot of time. Using this hack means less coding and avoiding user input errors. Remember that using Android’s resources is a good way to use the device’s styles inside your application.
9.2. External links
http://developer.android.com/reference/android/widget/DatePicker.html
http://developer.android.com/reference/android/widget/EditText.html
Hack 10 Formatting a TextView’s text: Android v1.6+
Imagine a Twitter application showing a tweet (see figure 10.1). Note the different text styles within it. You might think that Twitter created a new custom view, but the widget used is a TextView.
Figure 10.1. Twitter example

Sometimes you’ll want to add text with different styles to show emphasis or provide visual feedback on links and make your application more user friendly. Other examples of where it’s useful to use text styles include these:
· Showing links for the telephone field
· Using a different background color for different parts of the text
In this hack, I’ll show how the TextView helps us add styled text and links.
The first thing we’ll add is the hyperlink. We can set a TextView’s text using Html.fromHtml(). The idea is simple: we’ll use HTML for the TextView’s text. Here’s the code:
mTextView1 = (TextView) findViewById(R.id.my_text_view_html);
String text =
"Visit <a href=\"http://manning.com/\">Manning home page</a>";
mTextView1.setText(Html.fromHtml(text));
mTextView1.setMovementMethod(LinkMovementMethod.getInstance());
Using HTML to set styles in a TextView is fine, but what does the Html.fromHtml() method do? What does it return? It converts HTML into a Spanned object to use with a TextView’s setText() method.
Now we’ll try something different. Instead of using HTML to format the text, we’ll create a Spanned object using the SpannableString class. Here’s the source code:
mTextView2 = (TextView) findViewById(R.id.my_text_view_spannable);
Spannable sText = new SpannableString(mTextView2.getText());
sText.setSpan(new BackgroundColorSpan(Color.RED), 1, 4, 0);
sText.setSpan(new ForegroundColorSpan(Color.BLUE), 5, 9, 0);
mTextView2.setText(sText);
We can see the visual output of both examples in figure 10.2. The idea is simple: we add different spans using different indexes inside the text. Using a SpannableString, we can place different styles in different parts of the text.
Figure 10.2. TextView using spannables

10.1. The bottom line
Android’s TextView is a simple but powerful widget. You can use styled texts in different ways inside your application. Although TextView doesn’t support all the HTML tags, they’re enough to format the text nicely. Try it out.
10.2. External links
http://developer.android.com/reference/android/widget/TextView.html
Hack 11 Adding text glowing effects: Android v1.6+
Imagine you need to create an application that shows the time. Do you remember those digital clocks that displayed a superbright green light? In this hack, I’ll show you how to tweak Android’s TextView to generate that exact effect. The final image we’re after can be seen in figure 11.1.
Figure 11.1. Digital clock demo

The first thing we’ll do is create an LedTextView class that extends TextView. This class will be used to set a specific font, which makes the text look like it was written in LEDs (light-emitting diodes). Let’s look at the code:
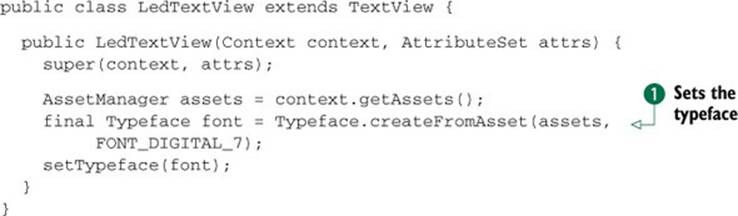
When the object is created, we get the font from the assets folder and set it as the typeface ![]() . Now that we have a widget capable of showing text with a custom font, we’ll take care of how the numbers will be drawn. If you check figure 11.1 you’ll notice it can be done with twoTextViews. The first one is a shadow in the back that draws 88:88:88, and the second one draws the current time.
. Now that we have a widget capable of showing text with a custom font, we’ll take care of how the numbers will be drawn. If you check figure 11.1 you’ll notice it can be done with twoTextViews. The first one is a shadow in the back that draws 88:88:88, and the second one draws the current time.
To add the glowing effect, the TextView provides a method with the following signature:
public void setShadowLayer (float radius, float dx, float dy, int color)
This can also be accessed from the XML with the following properties: android :shadowColor, android:shadowDx, android:shadowDy, and android:shadowRadius.
Let’s take a look on how we can apply it:

The first LedTextView draws the 88:88:88 in the back. The purpose of this view is mocking the ghosting effect in old digital clocks. We’ve achieved that look by setting the text color to be a bit transparent ![]() . The second LedTextView shows the current time. Note that the text color and the shadow color are the same
. The second LedTextView shows the current time. Note that the text color and the shadow color are the same ![]() . We could’ve played with the alpha as well.
. We could’ve played with the alpha as well.
Modifying the android:shadowDx and android:shadowDy values differentiates the shadow position from the text position. The shadow radius will give the sensation of the text being brighter. To create the glowing effect, we didn’t use the android:shadowDx or android:shadowDyproperties, but we modified the shadow radius to make it look brighter ![]() .
.
11.1. The bottom line
Making your application look great is the best way to get good reviews in the market. Sometimes, polishing your widgets takes a few more lines of code, but they’re worth it. In addition, using shadows in texts is simple and will make your views look professional. Try it out. You won’t regret it.
11.2. External links
http://www.styleseven.com/php/get_product.php?product=Digital-7
http://developer.android.com/reference/android/widget/TextView.html
Hack 12 Rounded borders for backgrounds: Android v1.6+
When you pick a background for your application’s widgets, you typically use images. In general, you want to avoid the default styles, adding your own colors and shapes. Rounded borders are a feature you can add to your application that looks nice, using only a few lines of code.
As an example, let’s add a gray Button with rounded corners to the Hello World demonstration. What we’ll create is shown in figure 12.1.
Figure 12.1. Button with rounded corners

For this, we’ll add a Button to the layout using the following XML:
<Button android:layout_width="wrap_content"
android:layout_height="wrap_content"
android:text="@string/hello"
android:textColor="#000000"
android:padding="10dp"
android:background="@drawable/button_rounded_background"/>
As you can see, we didn’t add any strange properties. A drawable is assigned as a background, but it’s not an image, it’s an XML file. In the drawable’s XML resides a ShapeDrawable object. A ShapeDrawable is a drawable object that creates primitive shapes such as rectangles. Here’s the XML for the ShapeDrawable:
<shape xmlns:android="http://schemas.android.com/apk/res/android"
android:shape="rectangle">
<solid android:color="#AAAAAA"/>
<corners android:radius="15dp"/>
</shape>
Apart from the radius, we defined a shape and solid color. These aren’t the only available properties; you can read the documentation (section 12.2) and see what else is available for ShapeDrawables.
12.1. The bottom line
The ShapeDrawable is a nice tool to add effects to your widgets. This trick works for every widget that can have a background. You can also try using it with ListViews to make your applications look more professional.
12.2. External links
http://developer.android.com/guide/topics/resources/drawable-resource.html#Shape
Hack 13 Getting the view’s width and height in the onCreate() met- thod: Android v1.6+
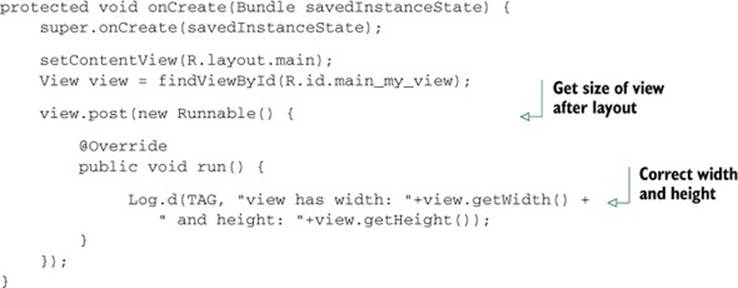
When you want to do something that depends on a widget’s width and height, you might want to use View’s getHeight() and getWidth() methods. A common pitfall for new Android developers is trying to get a widget’s width and height inside the Activity’s onCreate() method. Unfortunately, those methods will return 0 if you call them from there, but I’ll show you an easy way around this.
Let’s first see why we get a 0 when we ask for the view’s sizes inside the Activity’s onCreate() method. When the onCreate() method is called, the content view is set inflating the layout XML with a LayoutInflater. The process of inflation involves creating the views but not setting their sizes. So when does the view get assigned its size? Let’s review what the Android documentation (see section 13.2) says:
Drawing the layout is a two pass process: a measure pass and a layout pass. The measuring pass is implemented in measure(int, int) and is a top-down traversal of the View tree. Each View pushes dimension specifications down the tree during the recursion. At the end of the measure pass, every View has stored its measurements. The second pass happens in layout(int, int, int, int) and is also top-down. During this pass each parent is responsible for positioning all of its children using the sizes computed in the measure pass.
The conclusion is the following: Views get their height and width when the layout happens. Layout happens after the onCreate() method is called, so we get a 0 when we call getHeight() or getWidth() from it.
Imagine the XML layout as a cake recipe: the LayoutInflater would be the person in charge of buying all of the items; the bakers would do the measuring and layout of passes; and the view would be the cake itself. During the onCreate() method, the ingredients will be purchases, but knowing what ingredients make up the cake isn’t enough information to know how big the cake will end up being.
To solve this issue, we can use the View’s post() method. This method receives a Runnable and adds it to the message queue. An interesting thing is that the Runnable will be executed on the user interface thread. The code to use the post() call should look like the following:
13.1. The bottom line
The post() method is used in several parts inside Android itself, and isn’t only for getting the width and height of a view. Look at the View class source code and search for the post keyword. You’ll be surprised how many times it gets called. Understanding how the framework works is important in avoiding these kinds of pitfalls. As I always say, understand what it’s for and don’t abuse it.
13.2. External links
http://source.android.com/source/downloading.html
http://developer.android.com/guide/topics/ui/how-android-draws.html
Hack 14 VideoViews and orientation changes: Android v1.6+
Adding video to an application is a great way to create a rich user experience. I’ve seen applications that provide company information using fancy graphs containing videos. Sometimes videos are an easy way to present information in complex views without the need for coding the animation logic.
I noticed that when a video is available, users tend to turn the device to landscape to enjoy it, so in this hack I’ll show you how to make the video full-screen when the device is rotated.
To create this, we’ll tell the system that we’ll handle the orientation changes ourselves. When the device is rotated, we’ll change the size and position of the videoView.
The first thing to do is create the layout we want for our Activity. For this hack, I created a layout divided in two by a small line. The upper part will have a small bit of text on the left with a video on the right, and the bottom part will have a long description. When I created the XML for this view, instead of adding a videoView, I added a View with a white background. This view will be used to copy its size and position to place the videoView correctly. You can see the finished layout in figure 14.1.
Figure 14.1. Finished layout
In figure 14.2 you can see how the view tree is created. The videoView hangs from the root view at the same level as the portrait content. Placing the videoView there will allows us to change its size and position without needing to use two different layouts or changing the videoView’s parent when rotation occurs. On the other hand, the white background view, called the portrait position, is placed deeper in the tree.
Figure 14.2. View tree

Now that we have the layout, we can take care of the Activity’s code. The first thing to do is to enable handling the orientation changes. To do this, we need to add android:configChanges="orientation" to the proper <Activity> element inside AndroidManifest.xml. Adding that attribute will cause the onConfigurationChanged() method to be called instead of restarting the Activity when the device is rotated.
When the orientation is changed, we need to change the video’s size and position. For this we’ll call a private method called setVideoViewPosition(). Here’s is the content of this method:
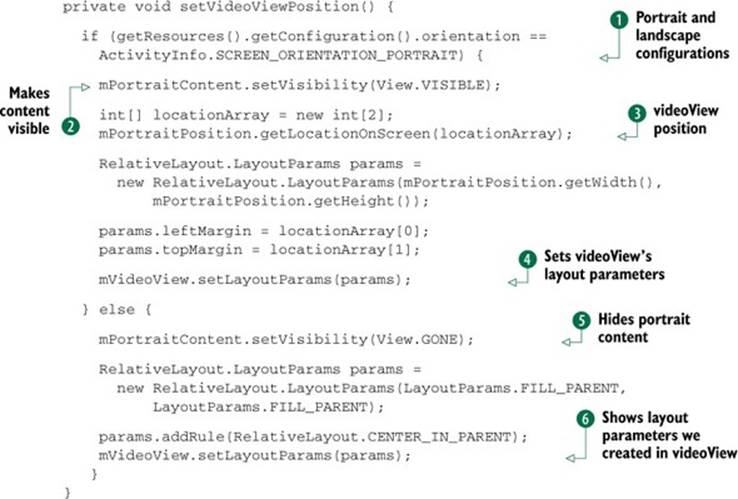
The setVideoViewPosition() method is separated into two parts: the portrait and the landscape configurations ![]() . First, we’ll make the portrait content visible
. First, we’ll make the portrait content visible ![]() . Because the videoView will have the same position and size as the white view, we want its position
. Because the videoView will have the same position and size as the white view, we want its position ![]() to be set as thevideoView’s layout parameters
to be set as thevideoView’s layout parameters ![]() .
.
Something similar is done in the second part, for the landscape orientation. In this case, we first hide the portrait content ![]() , and afterward we create the layout parameters to make the videoView use the whole screen. Finally, we set the layout parameters we’ve created to the videoView
, and afterward we create the layout parameters to make the videoView use the whole screen. Finally, we set the layout parameters we’ve created to the videoView ![]() .
.
14.1. The bottom line
As I mentioned at the beginning of this hack, videos can be useful for improving your application content. You should know that the default videoView class will respect the aspect ratio when resizing, and if you wish to make it fill the space available, you’ll need to override theonMeasure() method in your own custom view.
14.2. External links
http://developer.android.com/guide/topics/resources/runtime-changes.html
Hack 15 Removing the background to improve your Activity startup - time: Android v1.6+
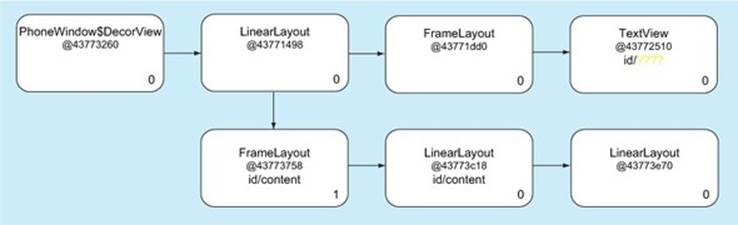
Inside the Android SDK, you’ll find a tool called Hierarchy Viewer. You can use this tool to detect unused views and lower the view tree height. If you open a view tree inside the tool, you’ll see some nodes over which you don’t have control. In this hack, we’ll look at what these nodes are and see how we can tweak them to improve our Activity startup time.
If we create the default new Android application and run it, we’ll see something similar to figure 15.1. When we run the Hierarchy Viewer with this Activity, we’ll see something like figure 15.2. We need to diminish the height of the tree.
Figure 15.1. The default Android application

Figure 15.2. Hierarchy Viewer showing the view tree
First, let’s remove some of the nodes by removing the title. The title is the gray bar on top with the text that reads BackgroundTest, which is formed by a FrameLayout and a TextView. We can delete these nodes by creating a theme.xml file under the res/values directory with the following content:
<?xml version="1.0" encoding="utf-8"?>
<resources>
<style name="Theme.NoBackground" parent="android:Theme">
<item name="android:windowNoTitle">true</item>
</style>
</resources>
We can apply this theme in our Android manifest by modifying the <application> tag and adding android:theme="@style/Theme.NoBackground" as an attribute. If we run the application again, the title will disappear and the view tree will look like figure 15.3.
Figure 15.3. Hierarchy Viewer showing the view tree without title

You already know what LinearLayout and TextView are, but what about PhoneWindow$DecorView and FrameLayout?
FrameLayout is created when we execute the setContentView() method, and the DecorView is the root of the tree. By default, the framework fills our window with a default background color and the DecorView is the view that holds the window’s background drawable. So if we have an opaque UI or a custom background, our device is wasting time drawing the default background color.
If we’re sure that we’ll use opaque user interfaces in our activity, we can remove the default background to boost our startup time. To do this, we need to add a line to the theme mentioned previously, as shown next:
<?xml version="1.0" encoding="utf-8"?>
<resources>
<style name="Theme.NoBackground" parent="android:Theme">
<item name="android:windowNoTitle">true</item>
<item name="android:windowBackground">@null</item>
</style>
</resources>
15.1. The bottom line
Removing the window background is a simple trick to gain some speed. The rule is simple: if the UI of your application is drawing 100% of the window contents, you should always set windowBackground to null. Remember that the theme can be set in an <application> or an<activity> tag.
15.2. External links
http://developer.android.com/guide/developing/debugging/debugging-ui.html#HierarchyViewer
http://stackoverflow.com/questions/6499004/androidwindowbackground-null-to-improve-app-speed
Hack 16 Toast’s position hack: Android v1.6+
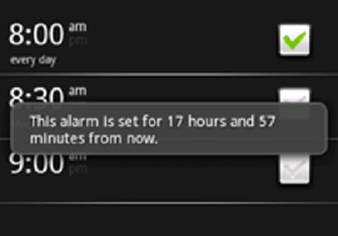
In Android, whenever you need to notify the user that something happened you can use a class called Toast. A Toast is a pop-up notification that usually shows a text, and it’s placed in the bottom middle of the screen. If you’ve never seen a Toast, take a look at figure 16.1. The Toast is the black box that says, “This alarm is set for 17 hours and 57 minutes from now.”
Figure 16.1. A Toast example from the Alarm application
The API to launch a Toast is super simple. For example, to launch a Toast that says, “Hi!” we only need to write the following code:
Toast.makeText(this, "Hi!", Toast.LENGTH_SHORT).show();
The Toast class isn’t flexible at all. For example, for the duration parameter we can only pick between Toast.LENGTH_SHORT and Toast.LENGTH_LONG. Although there aren’t many things we can change about Toast, what we can change is where the pop-up is placed.
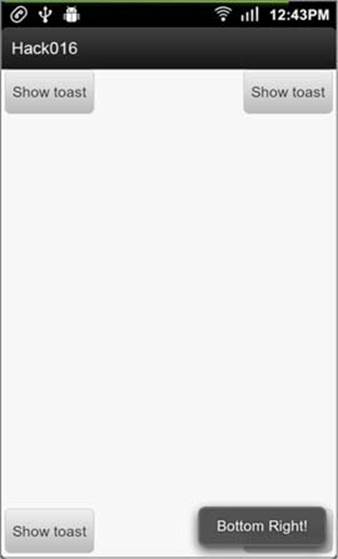
Depending on our application layout, we might want to position the Toast somewhere else, for instance, on top of certain views. Let’s see how to create a Toast so that it’s shown in a different position than the default one. A working example can be seen in figure 16.2. In the sample application, we have four bottoms, one on each corner. When a button is clicked, a Toast is created and positioned over the corner where the button is located.
Figure 16.2. Toast with different position
To move the Toast around the screen, we need to create it a bit differently. It has a public method inside the class with the following signature:
public void setGravity(int gravity, int xOffset, int yOffset);
To reproduce the Toast shown in figure 16.2 we’d need to use the following:

16.1. The bottom line
Although this hack might look simple, many Android developer aren’t aware of this solution. You might find changing the position useful when your screen is split into different Fragments and you want the Toast to show in a specific place.
16.2. External links
http://developer.android.com/guide/topics/ui/notifiers/toasts.html
Hack 17 Creating a wizard form using a Gallery: Android v2.1+
You may find circumstances will arise when you need your users to fill out a long form. Maybe you need to create a registration form, or your application needs some form to upload content. In other platforms, you can create something called a wizard form, which is a form separated in different views. But in Android, this type of widget doesn’t exist. In this hack, we’ll use the Gallery widget to create a registration form with many fields. The result we’re after is shown in figure 17.1.
Figure 17.1. Wizard form using a Gallery
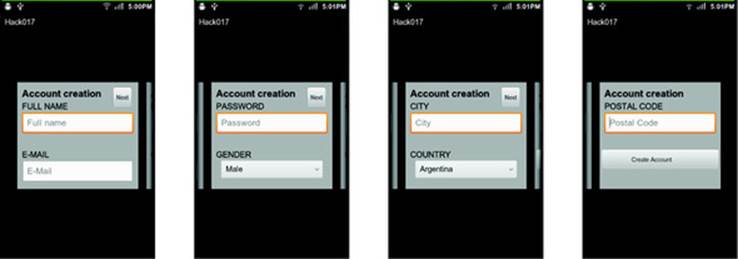
For the sake of this example, we’ll create a registration form where the user will need to fill in the following information:
· Full name
· Password
· Gender
· City
· Country
· Postal code
We’ll have two fields per page, so in total we’ll have four pages. To create the wizard form, we need to create an Activity called CreateAccountActivity. This Activity will use a Theme.Dialog style to give the form the look and feel of a pop-up. Inside it we’ll place a Gallery, which will be populated with an Adapter. The Adapter will need to communicate with the Activity, and for that we’ll use a Delegate interface.
Let’s first create the generic view for each page. The XML follows:

As you can see, we placed a LinearLayout as a placeholder to every field. You’ll see later how to populate it from the Gallery’s Adapter code.
Now that we have the XML for the generic view, we should create the Adapter’s code. We’ll call our AdapterCreateAccountAdapter and extend from BaseAdapter. Because the Adapter’s code is quite long, we’ll discuss only the important methods. The first thing to write is the interface we’ll use to communicate with the Activity. Use the following:
public static interface CreateAccountDelegate {
int FORWARD = 1;
int BACKWARD = -1;
void scroll(int type);
void processForm(Account account);
}
We’ll use the scroll() method when the user presses the next button and the proccessForm() method when the user submits the form. We’ll need to call the delegate when these buttons are pressed, so we’ll want to set the click listeners in the getView() method, which is shown here:
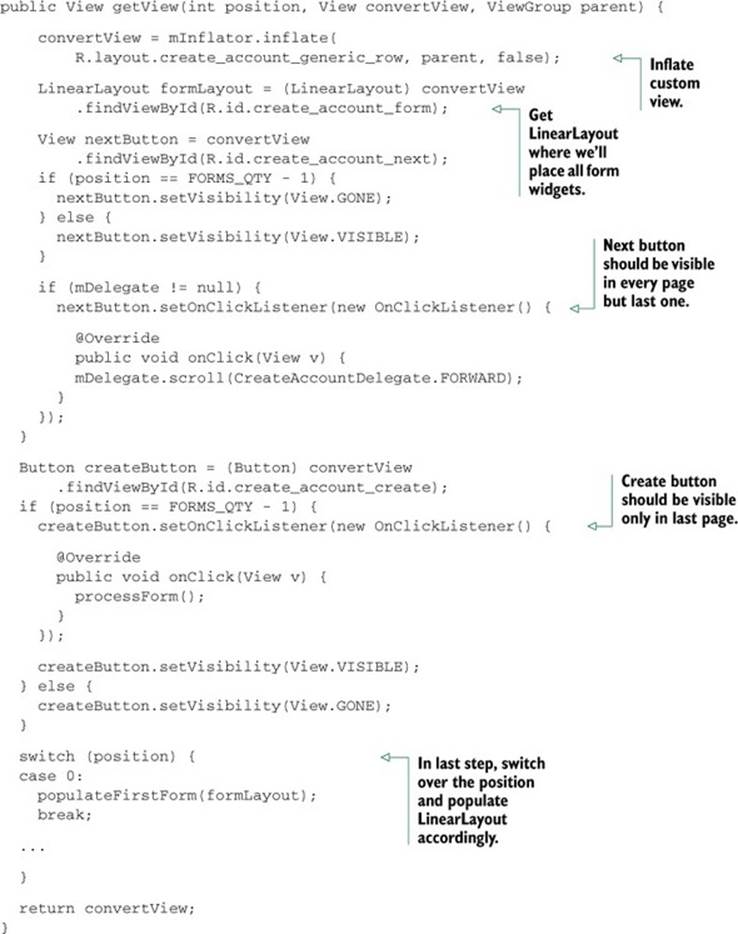
The code inside the populateFirstForm() is the creation of fields and titles, which will end inside the LinearLayout. In the sample code, I decided to do everything by code, but we could easily create the views by inflating XMLs.
The missing piece of the puzzle is the one in charge of implementing the CreateAccountDelegate. In this case, it will be our CreateAccountActivity.
CreateAccountActivity will track the page that the user is in and it will be in charge of the page turn logic. The code is the following:

Unfortunately, we can’t animate the page turn in Android’s Gallery widget. The only way I found is to send a KeyEvent.KEYCODE_DPAD_RIGHT event. It’s hacky but it works.
The remaining code of the CreateAccountActivity takes care of validations and error handling. It contains nothing out of the ordinary, so I’ll leave it for you to read from the sample code.
17.1. The bottom line
Using the Gallery widget to create wizard forms makes it easy for the user to fill out a long form. Having different pages and using the Gallery’s default animation adds nice eye candy to make the process of filling the form less frustrating.
Depending on your needs, you can also try doing the same thing with the ViewPager class. Your Adapter would return Fragments instead of views.
17.2. External links
http://developer.android.com/reference/android/widget/Gallery.html