50 Android Hacks (2013)
Chapter 4. Tools
In this chapter, we’ll look at two interesting tools you can use to create an Android application.
Hack 18 Removing log statements before releasing: Android v1.6+
If your application is making requests to a server, you might be using some type of log to check whether or not your requests are successful. Unfortunately, those logs don’t get removed when you build the final APK (Android application package file). Removing logs is important to keep thelogcat output as clean as possible. Leaving log statements in could also expose you to unintentional disclosure of sensitive information. In this hack, I’ll show you how easy it is to remove logs for your market release.
Developers have their own technique preferences for removing logs from the final release. Some prefer doing something like the following:
if (BuildConfig.DEBUG) LOG.d(TAG, "The log msg");
From my point of view, the best way to remove logs is to use the ProGuard tool. If you’ve never used ProGuard, let me introduce it with the following quote from the Android documentation (see section 18.2):
The ProGuard tool shrinks, optimizes, and obfuscates your code by removing unused code and renaming classes, fields, and methods with semantically obscure names. The result is a smaller sized .apk file that is more difficult to reverse engineer.
If you haven’t noticed yet, when we build an Android application we’ll find a proguard.cfg file in our project root directory. Its presence there doesn’t mean it’s on by default; we need to enable it. Fortunately, it’s simple: we need to add the following line in the default.properties file located in our project root directory:
proguard.config=proguard.cfg
Now ProGuard is enabled, but it’ll only be used when exporting a signed APK. We need to add the necessary lines to the proguard.cfg to get rid of those logs. Append the following lines to proguard.cfg:
-assumenosideeffects class android.util.Log {
public static *** d(...);
}
What we’re telling ProGuard is this: remove every use of a d() method with any amount of parameters that returns something and belongs to the android.util.Log class. This will match with Log’s d() method and every debug log will be removed.
18.1. The bottom line
The ProGuard tool offers another way of polishing a release. Make sure you read the ProGuard manual and create a correct configuration for your project because ProGuard might remove essential code, thinking it’s not necessary for the application to work. If this happens, be sure to check that you’re telling ProGuard to keep everything you need.
Notice that ProGuard isn’t only used to remove log statements. As I’m testing, I usually create methods in my Activity to populate forms. These methods are also something I use ProGuard to remove.
18.2. External links
http://proguard.sourceforge.net/
http://developer.android.com/tools/help/proguard.html
http://mng.bz/ZR3t
Hack 19 Using the Hierarchy Viewer tool to remove unnecessary vie- ews: Android v1.6+
The Android SDK comes with a lot of tools; one of them is the Hierarchy Viewer. This tool lets you see the view tree and analyze how long it took to measure, lay out, and draw the views in your view. With the information this tool provides, you’ll be able to detect unneeded views in the tree and bottlenecks. In this hack, we’ll look at how to find these issues and solve them.
Note
I won’t explain how to use the Hierarchy Viewer itself, so you might want to read Android’s documentation at http://mng.bz/7ZXl for more information before proceeding.
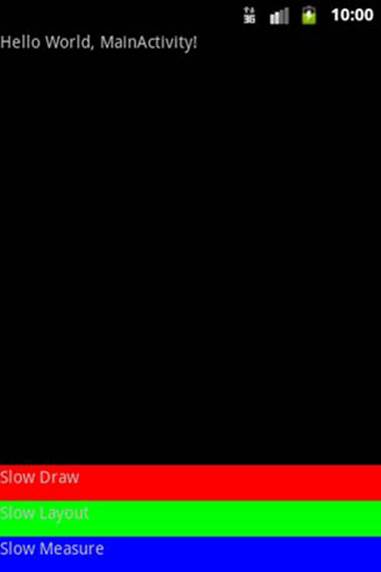
For this hack, I’ve created a toy application with slow views that we’ll try to fix using the Hierarchy Viewer. The application has a unique Activity, which you can see in figure 19.1, and it has the following XML:
Figure 19.1. Subject application
<?xml version="1.0" encoding="utf-8"?>
<RelativeLayout
xmlns:android="http://schemas.android.com/apk/res/android"
android:layout_width="fill_parent"
android:layout_height="fill_parent">
<TextView
android:layout_width="fill_parent"
android:layout_height="wrap_content"
android:layout_alignParentTop="true"
android:text="@string/hello"/>
<RelativeLayout
android:id="@+id/slow_container"
android:layout_width="fill_parent"
android:layout_height="wrap_content"
android:layout_alignParentBottom="true">
<com.test.SlowDrawView
android:id="@+id/slow_draw"
android:layout_width="fill_parent"
android:layout_height="30dp"
android:layout_alignParentTop="true"
android:background="#FF0000"
android:text="Slow Draw"/>
<com.test.SlowLayoutView
android:id="@+id/slow_layout"
android:layout_width="fill_parent"
android:layout_height="30dp"
android:layout_below="@id/slow_draw"
android:background="#00FF00"
android:text="Slow Layout"/>
<com.test.SlowMeasureView
android:id="@+id/slow_measure"
android:layout_width="fill_parent"
android:layout_height="30dp"
android:layout_below="@id/slow_layout"
android:background="#0000FF"
android:text="Slow Measure"/>
</RelativeLayout>
</RelativeLayout>
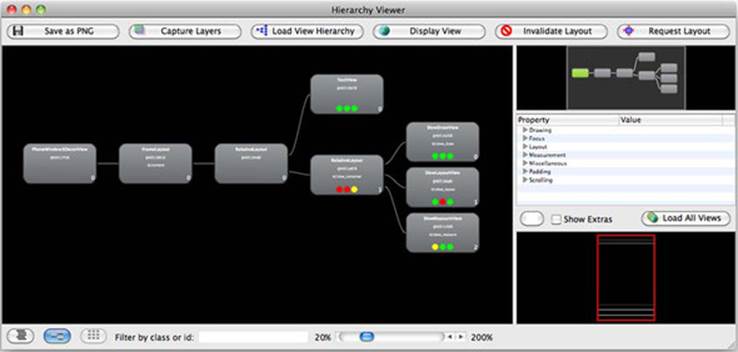
This application is the default one, with some minor modifications. I’ve added three custom views in the button and removed the title bar. Let’s load the Hierarchy Viewer with this application. You can see the results in figure 19.2.
Figure 19.2. Hierarchy Viewer showing the application
Note
For now, forget the definitions for the PhoneWindow$DecorView and the FrameLayout. Let’s say they’re nodes placed by the framework and unmodifiable. We talked about them in hack 15.
The first things to look for are ViewGroups inside ViewGroups. In this case, we have a TextView that has the android:layout_alignParentTop attribute and a second RelativeLayout holding all of the custom views, with android:layout_align-ParentBottom. You can also see that the second RelativeLayout has its three performance indicators in red. This means that it’s the slowest view in the tree. Let’s try removing it by changing the other view’s attributes. The modified XML looks like the following:
<?xml version="1.0" encoding="utf-8"?>
<RelativeLayout
xmlns:android="http://schemas.android.com/apk/res/android"
android:layout_width="fill_parent"
android:layout_height="fill_parent">
<TextView
android:layout_width="fill_parent"
android:layout_height="wrap_content"
android:layout_alignParentTop="true"
android:text="@string/hello"/>
<com.test.SlowMeasureView
android:id="@+id/slow_measure"
android:layout_width="fill_parent"
android:layout_height="30dp"
android:layout_alignParentBottom="true"
android:background="#0000FF"
android:text="Slow Measure"/>
<com.test.SlowLayoutView
android:id="@+id/slow_layout"
android:layout_width="fill_parent"
android:layout_height="30dp"
android:layout_above="@id/slow_measure"
android:background="#00FF00"
android:text="Slow Layout"/>
<com.test.SlowDrawView
android:id="@+id/slow_draw"
android:layout_width="fill_parent"
android:layout_height="30dp"
android:layout_above="@id/slow_layout"
android:background="#FF0000"
android:text="Slow Draw"/>
</RelativeLayout>
The last fix reduced the view tree height by one. When creating views, it’s always better to avoid tall view trees. Android draws the layout in a two-pass process: a measure pass and a layout pass. If you have a lot of nodes, it’ll take longer to do the tree traversal.
After you’ve modified the XML to generate the shallowest tree, start looking at the performance indicators. Note that this indicator is relative to other view objects in the tree, so don’t be fooled by this. Most of the nodes might be green, but that doesn’t mean they’re OK. Check how long it takes for them to draw and make sure everything is working well.
19.1. The bottom line
The Hierarchy Viewer is a great tool to see your view tree. As you’re developing your application, try to keep track of how your view trees evolve to make sure your layouts are as responsive as they should be and that you’re using the shallowest tree possible.
19.2. External links
http://developer.android.com/guide/developing/debugging/debugging-ui.html