50 Android Hacks (2013)
Chapter 5. Patterns
In this chapter, you’ll read about different development patterns you can use inside Android.
Hack 20 The Model-View-Presenter pattern: Android v1.6+
You’ve most likely heard of the MVC (Model-View-Controller) pattern, and you’ve probably used it in different frameworks. When I was trying to find a better way to test my Android code, I learned about the MVP (Model-View-Presenter) pattern. The basic difference between MVP and MVC is that in MVP, the presenter contains the UI business logic for the view and communicates with it through an interface.
In this hack, I’ll show you how to use MVP inside Android and how it improves the testability of the code. To see how it works, we’ll build a splash screen. A splash screen is a common place to put initialization code and verifications, before the application starts running. In this case, inside the splash screen we’ll provide a progress bar while we’re checking whether or not we have internet access. If we do, we continue to another activity, but if we don’t, we’ll show the user an error message to prevent them from moving forward.
To create the splash screen, we’ll have a presenter that will take care of the communication between the model and the view. In this particular case, the presenter will have two functions: one that knows when we’re online and another to take care of controlling the view. You can see the project structure in figure 20.1.
Figure 20.1. MVP project structure

The presenter will use a model class called ConnectionStatus that will implement the IConnectionStatus interface. This interface will answer whether we have internet access with a single method:
public interface IConnectionStatus {
boolean isOnline();
}
As you might be thinking, the code in charge of controlling the view will be an Activity that implements the ISplashView interface. The interface will be used by the presenter to control the flow of the application. Let’s look at the code for the ISplashView interface:
public interface ISplashView {
void showProgress();
void hideProgress();
void showNoInetErrorMsg();
void moveToMainView();
}
Because we’re coding in Android, the view will be the first to be created and afterward we’ll give the control to the presenter. Let’s see how we do that:
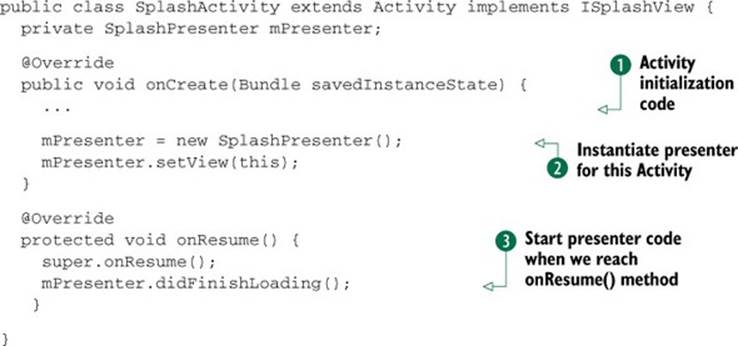
We’ll first need to initialize the Activity ![]() . Afterward, we create the presenter
. Afterward, we create the presenter ![]() that will take care of getting everything done and we set the Activity instance to the presenter. We can override the onResume() method
that will take care of getting everything done and we set the Activity instance to the presenter. We can override the onResume() method ![]() to let the presenter know the view is ready to give control to it.
to let the presenter know the view is ready to give control to it.
The presenter code is simple. Following is the presenter’s didFinishLoading() method:
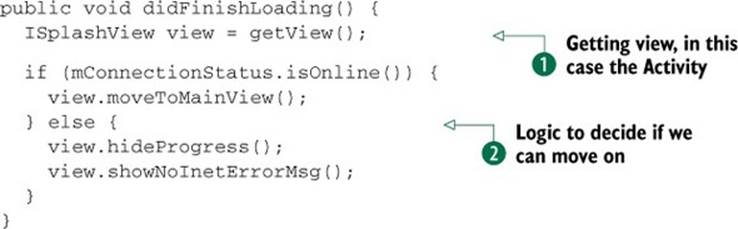
We’ll get a reference to the ISplashView implementation using a presenter’s getter ![]() . We’ll use the model’s IConnectionStatus implementation to verify whether we’re online
. We’ll use the model’s IConnectionStatus implementation to verify whether we’re online ![]() . Depending on that, we’ll do different things with the view. As you can see, the view is used through an interface without knowing it’s implemented by an Android Activity. This will end up in a view that’s easy to mock in a unit test.
. Depending on that, we’ll do different things with the view. As you can see, the view is used through an interface without knowing it’s implemented by an Android Activity. This will end up in a view that’s easy to mock in a unit test.
20.1. The bottom line
Using the MVP pattern will make your code more organized and easier to test. In the sample code, you’ll notice a test folder. The test needs to instantiate the presenter and mock the interfaces. Because you’re not using any Android-specific code in the presenter, you don’t need to run in an Android-powered device and instead can run it in the JVM. In this case, you’ve used Mockito to mock the interfaces.
Because you’ve been working with Android, you’ll notice that a lot of code ends up in the Activity. Unfortunately, testing activities is painful. Using the MVP pattern will help you create tests and apply TDD (test-driven development) in an easy way.
20.2. External links
http://en.wikipedia.org/wiki/Model_View_Presenter
Hack 21 BroadcastReceiver following Activity’s lifecycle: Android v1.6+
Android uses different kinds of messages to notify applications when something happens. For example, if you want to know whether or not a device has connected to the internet, you have to listen to an Intent whose action is android.net.conn .CONNECTIVITY_CHANGE. ThisIntent can be heard using a BroadcastReceiver.
Although using a BroadcastReceiver to listen to different notifications from the OS works well, you can’t access an Activity from the receiver.
Imagine trying to update the UI depending on the connectivity status. How would you do it? What would you do if you wanted to get the receiver’s information inside one of your activities? In this hack, I’ll show you how to use a BroadcastReceiver as an Activity’s inner class to get broadcast Intents.
Setting up a BroadcastReceiver as an Activity’s inner class lets us do two important things:
· Call the Activity’s methods from inside the receiver
· Enable and disable the receiver depending on the Activity’s status
For this hack, we’ll create a Service that, when activated, waits for 5 seconds and then broadcasts a message. For this toy application, the message we’ll send is a string with a date. The implementation of the service isn’t that important, but you should know that it’ll broadcast an Intentwith an action—com.manning.androidhacks .hack021.SERVICE_MSG—and the date travels as an extra.
Because we want to use the date information the service sends in order to update the UI, we’ll want to listen to this message only when the Activity’s screen is shown. Let’s see how to achieve that using the following code:
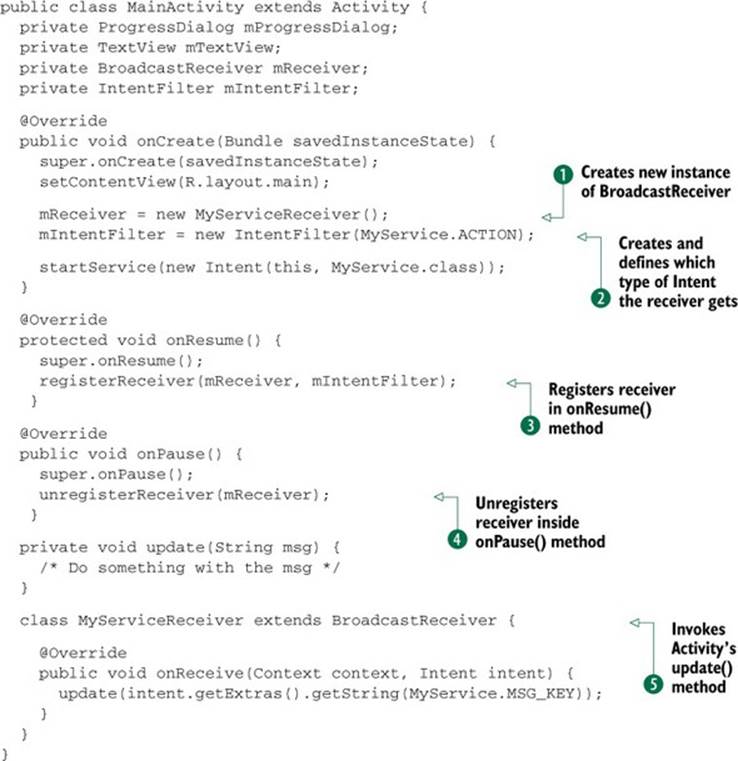
We’ll create a new instance of the BroadcastReceiver ![]() and create an Intent-Filter
and create an Intent-Filter ![]() that we’ll use to define which type of Intent the receiver should get. Because the receiver is only used inside the Activity, we’ll need to register it in the onResume() method
that we’ll use to define which type of Intent the receiver should get. Because the receiver is only used inside the Activity, we’ll need to register it in the onResume() method ![]() and unregister it inside the onPause() method
and unregister it inside the onPause() method ![]() . When the receiver is called
. When the receiver is called ![]() , it’ll invoke the Activity’s update() method with the Intent’s extra information as a parameter.
, it’ll invoke the Activity’s update() method with the Intent’s extra information as a parameter.
That’s it—we now have a receiver that only updates the UI when the Activity is shown.
21.1. The bottom line
The whole Android ecosystem uses Intents to communicate. You’ll need to use them sooner or later. By placing a receiver as an inner class in your Activity, you can give visual feedback using the information inside an Intent. Unregistering the receiver is a good way to avoid unnecessary calls to modify the UI when it’s not needed.
21.2. External links
http://developer.android.com/reference/android/content/Intent.html
http://developer.android.com/reference/android/content/BroadcastReceiver.html
Hack 22 Architecture pattern using Android libraries: Android v1.6+
Before Android library projects were released, sharing code between Android projects was hard or even impossible. You could use a JAR to share Java code, but you couldn’t share code that needed resources. Sharing an Activity or a custom view was impossible because you can’t add resources to JARs and use them later in an Android application. Android library projects were created as a way to share Android code. In this hack, we’ll look at a way to use them.
As an example, we’ll create a small application with a login screen. The application is divided into three layers:
· Back-end logic and model (JAR file)
· Android library
· Android application
22.1. Back-end logic and model
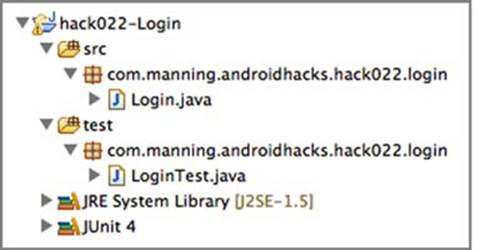
This layer is a simple JAR file that can hold logic and doesn’t involve or use Android-specific code. It’s here that we place the server calls and business objects and logic. In our example, we’ll have a project that creates a JAR file to handle login-specific functionality.
As you can see in figure 22.1, Login doesn’t need to have Android as a dependency. The output of this project will be a JAR file to be included in our Android application. Having the business logic in a Java project means we can test everything with JUnit without setting up an Android test, which is painful. Also, separating code allows developers with different skills to work on the appropriate layer.
Figure 22.1. Login project loaded in Eclipse
22.2. Android library
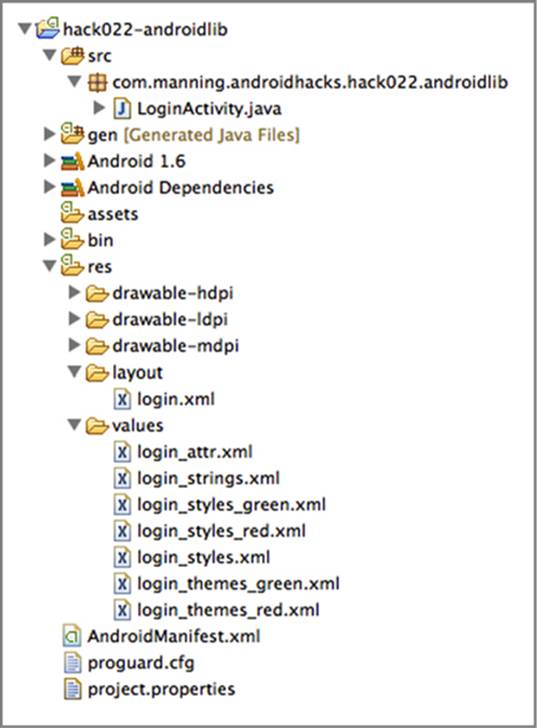
As I mentioned earlier, an Android library is like a JAR file but with the possibility of using Android resources. When we add an Android library as a dependency of our application, we get a second R class with the library’s IDs and we’ll be able to use the library’s resources from our code. This layer will have Android-specific activities, a custom view, or services that Android applications will be able to reuse.
In figure 22.2, you can see the Android library androidlib. Here you can see Android as a dependency, which means that you can use every Android class and resource. Every Android library will have its own R class.
Figure 22.2. The Android library loaded in Eclipse
Note that this library can use the JAR mentioned earlier as a dependency. In this example, we placed the JAR as a dependency for the Android library. This way, we have a modular and maintainable library to use in any Android project.
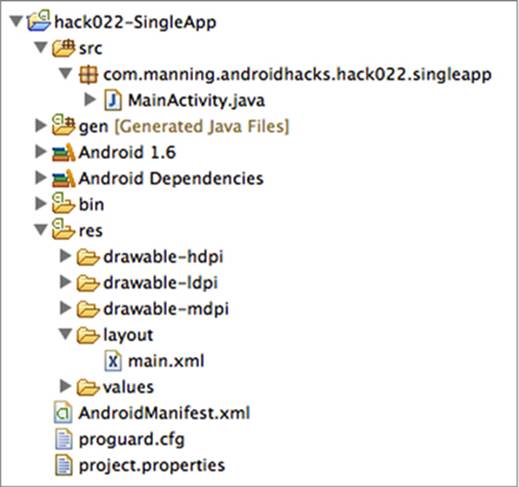
22.3. Android application
The resulting Android application depends on the back-end JAR to handle business logic and the Android library to handle Android-related stuff. You can see in figure 22.3 how the Android library is included in the project.
Figure 22.3. Android application folder structure
In this layer, we’ll be able to use code from the JAR and from the Android library. We now can start developing our application, taking care of the distribution of code between layers.
22.4. The bottom line
This was a short introduction to a possible architecture design using Android libraries. Reusable code and maintainability is hard to achieve, but now that you have Android libraries, it’s possible.
22.5. External links
http://developer.android.com/tools/projects/index.html#LibraryProjects
http://developer.android.com/tools/projects/projects-eclipse.html#SettingUpLibraryProject
Hack 23 The SyncAdapter pattern: Android v2.2+
Almost every Android application uses the internet to fetch information or to sync data. If you’ve already created a couple of applications, you’ll be able to describe many different ways to create a connection and show a progress animation while fetching results.
23.1. Common approaches
I’ve been working as a contractor for different companies, and in my experiences I’ve seen developers handle data fetching in a variety of ways. Most of the code I’ve seen falls into one of the approaches that I’ll cover next.
23.1.1. Using the AsyncTask class
AsyncTask is an Android class that handles threads for you, making it easy to move logic to another thread. If you’ve used it in previous projects, the following story might ring a bell.
Some time ago, you started developing for Android. You learned that you shouldn’t place background logic in the main thread. You searched the web for an explanation of how to do it and you found a nice Android developer’s article entitled “Painless Threading.” Near the end of the article (see section 23.4), it states this:
Always remember these two rules about the single thread model. Do not block the UI thread, and make sure that you access the Android UI toolkit only on the UI thread.
AsyncTask just makes it easier to do both of these things.
So you learned how to use the AsyncTask class and you started using it everywhere. No matter how complex your UI was, or how long it took to parse those big chunks of data, the AsyncTask was always there for you. You left work early pointing and laughing at the iOS developers from your company, saying “Android is easier than iOS; I finished earlier than you. Enjoy your night coding, Apple fan boys!”
Unfortunately, this didn’t last long. You noticed that if you rotated the device while an AsyncTask was running, your application crashed. It was hard to fix, but an ugly hack did the trick. Later you noticed that your application also crashed after some time due to a limitation in the amount of concurrent tasks the AsyncTask supported. When you tried to fix this second issue, you noticed that your Activity’s code was polluted with a lot of inner classes extending AsyncTask. After a long day, you started questioning where you went wrong.
If you’re planning to use an AsyncTask, think it over. The only reason to use it is when the background task is simple or you don’t depend on the result. Let’s look at another approach.
23.1.2. Using a Service
The second approach is to use a Service. Using a Service solves a lot of issues but comes with some difficulties. Following is a list of concerns that always caused me to wonder whether or not I was making the correct choice:
· Communicating with an Activity
· Deciding when and how to start the Service
· Detecting connectivity status while working
· Persisting data
The issue with this approach is the system’s flexibility. For example, you have many ways to communicate with an Activity. Should the Activity bind to the Service? Should it use a Handler? Should it communicate via Intents? Should it communicate through a database? Many possibilities exist and the answer to the question of which you should use is always “it depends.”
The question I started asking myself was, how does the Gmail application work? How does it sync and work offline without an issue? Google uses something called SyncAdapter. Unfortunately, this is one of Android’s best but least documented features. If you ask Android developers if they know what it is, they’ll say yes, but they’ve never used it.
In this hack, we’ll see how to use a SyncAdapter to organize an internet-dependent application, making our development life easier.
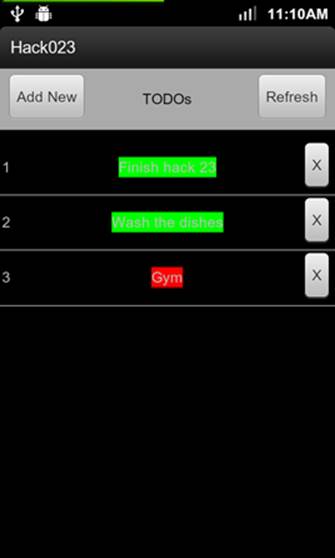
23.2. What we’ll create
For this example, we’ll create a TODO list. We’ll use a server that will have a front end to add items from the browser. You can see how it looks in figure 23.1. The server will also have an API so we can have the same functionality in an Android device. The running Android application can be seen in figure 23.2.
Figure 23.1. Server’s front end
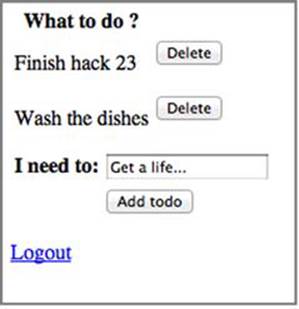
Figure 23.2. Android application’s front end
23.2.1. What’s a SyncAdapter?
A SyncAdapter is an Android Service that’s started by the platform. There we’ll place all of our sync logic. Before you get lost, go watch Virgil Dobjanschi’s Google I/O 2010 Android REST (see section 23.4)client application presentation. This is without a doubt the best Google I/O presentation ever and the only good documentation on SyncAdapters.
The benefits of using SyncAdapters include
· Automatically syncs in the background (even when our application isn’t open)
· Handles authentication against the server
· Handles retries
· Respects user’s preferences regarding background syncs
23.2.2. Hitting a database instead of the server
The first thing to do is to forget about syncing. We’ll create the application to only work locally and save information inside a database. To do this, we’ll need a DatabaseHelper, a TodoContentProvider, and a TodoDAO. Let’s first understand the DatabaseHelper:
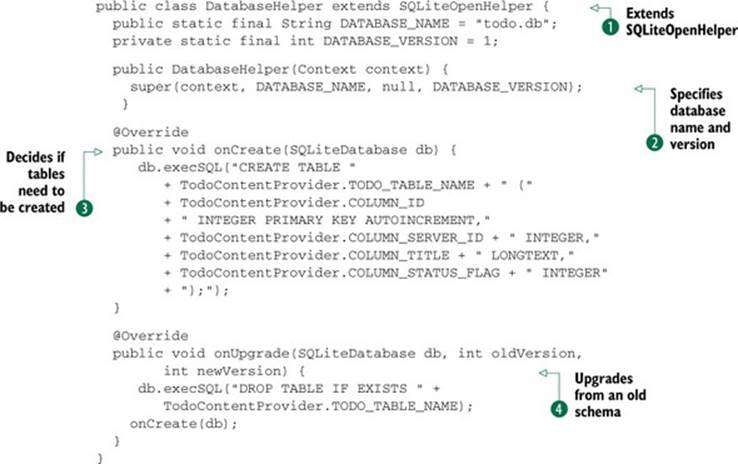
The DatabaseHelper extends SQLiteOpenHelper ![]() . When the class is created, we specify the database name and its version
. When the class is created, we specify the database name and its version ![]() . The SQLiteOpenHelper will use that to decide whether some tables need to be created
. The SQLiteOpenHelper will use that to decide whether some tables need to be created ![]() or upgraded from an old schema
or upgraded from an old schema ![]() . Don’t worry about the schema for now. You’ll understand all its rows in short order.
. Don’t worry about the schema for now. You’ll understand all its rows in short order.
Now that we have the DatabaseHelper in place, we’ll need to set up our ContentProvider. Note that if you’ve never used a ContentProvider, you should try doing a fast web search before you continue reading. The TodoContentProvider class for this hack has nothing out of the ordinary. Let’s look at how the query method is created:
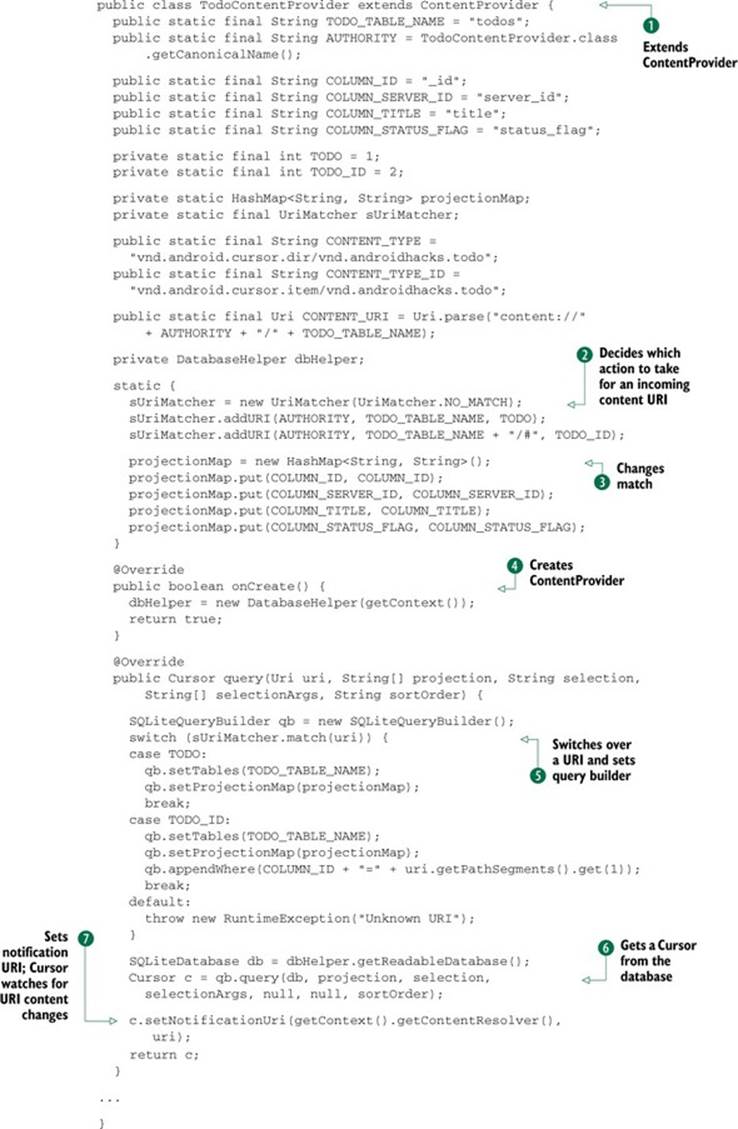
The TodoContentProvider extends ContentProvider ![]() . Inside it we define a UriMatcher that will help us decide which action to take for an incoming content URI
. Inside it we define a UriMatcher that will help us decide which action to take for an incoming content URI ![]() . In this case, the content values to use with the ContentProvider have a one-to-one match with the database columns. If we want to change that, we can use a projection map
. In this case, the content values to use with the ContentProvider have a one-to-one match with the database columns. If we want to change that, we can use a projection map ![]() . When the ContentProvider is created
. When the ContentProvider is created ![]() , we get an instance of the DatabaseHelper, which will be useful for querying the database. For the sake of brevity I only show the query() method. The rest of theContentProvider methods look alike. Inside the query() method, we can see how to switch over a URI and set the query builder correctly
, we get an instance of the DatabaseHelper, which will be useful for querying the database. For the sake of brevity I only show the query() method. The rest of theContentProvider methods look alike. Inside the query() method, we can see how to switch over a URI and set the query builder correctly ![]() . After that we use the query builder to get a Cursor from the database that will be returned to the user
. After that we use the query builder to get a Cursor from the database that will be returned to the user ![]() . Pay attention to the last line
. Pay attention to the last line ![]() . Before returning the Cursor, we set the notification URI. This will make the Cursor watch for URI content changes. This means that every time something gets modified, the Cursor will update automagically.
. Before returning the Cursor, we set the notification URI. This will make the Cursor watch for URI content changes. This means that every time something gets modified, the Cursor will update automagically.
Finally, the TodoDAO will be in charge of calling the ContentProvider through a ContentResolver. This is the layer where conversions from Java objects to database values and from database values to Java objects occur, as follows:
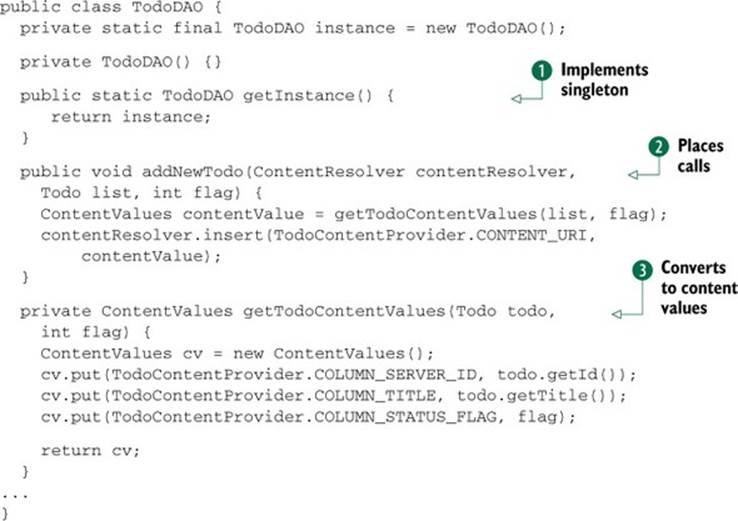
As you can see, the TodoDAO is implemented with a singleton ![]() . There, we placed calls such as addNewTodo()
. There, we placed calls such as addNewTodo()![]() which, after a proper conversion to content values
which, after a proper conversion to content values ![]() , will end in a database insert.
, will end in a database insert.
23.2.3. Populating the database
In this section, you’ll see how to deal with the database from the application. We’ll use two activities:
· MainActivity—Will show the list of TODOs
· AddNewActivity—Will present a form to add a new TODO
Both activities function in a similar way. When they need to modify some data, they’ll do it through the TodoDAO. Let’s take a look at the code for the MainActivity:
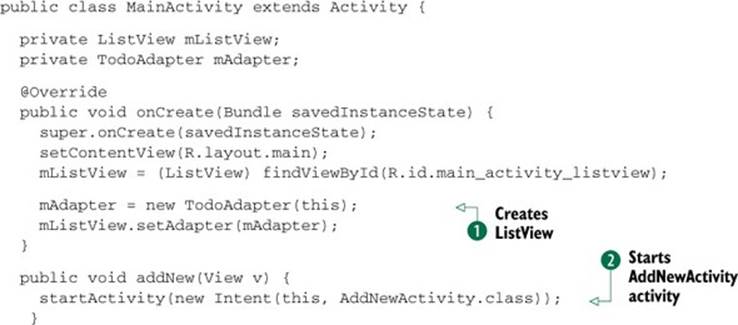
Nothing out of the ordinary here. We created a ListView that will use a TodoAdapter ![]() , and every time the user clicks on the Add New button, we’ll start the AddNewActivity activity
, and every time the user clicks on the Add New button, we’ll start the AddNewActivity activity ![]() .
.
The TodoAdapter holds more interesting code. Let’s see how it’s done:
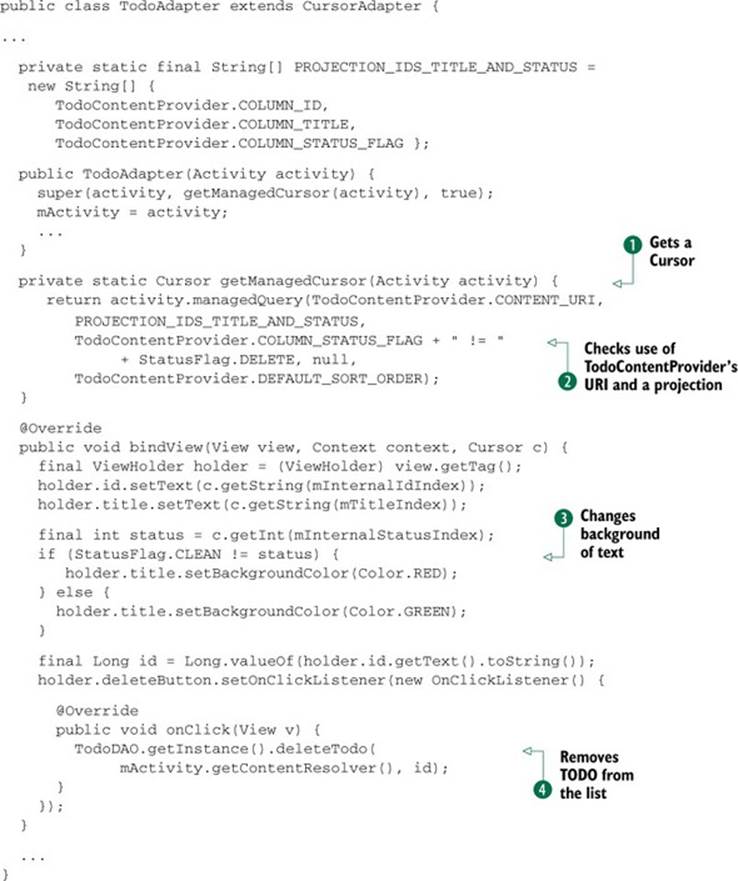
When the TodoAdapter is created, we get a Cursor ![]() using Activity’s managedQuery() method. Check how we used the TodoContentProvider’s URI and a projection
using Activity’s managedQuery() method. Check how we used the TodoContentProvider’s URI and a projection ![]() . Finally, we have the bindView() method. With it we change the background of the text depending on the status flag (I’ll discuss that later)
. Finally, we have the bindView() method. With it we change the background of the text depending on the status flag (I’ll discuss that later) ![]() and set a click listener for the Delete button. Inside the listener, we use the TodoDAO to remove the TODO from the list
and set a click listener for the Delete button. Inside the listener, we use the TodoDAO to remove the TODO from the list ![]() .
.
Where’s the notifyDataSetChanged()? There’s no need for it. Do you remember the setNotificationUri() call we used inside the TodoContentProvider? The Cursor returned by the TodoContentProvider will get updated when changes are made to the database through the ContentProvider.
Up to this point, we have a working application that saves data to a database. Now we need to take the authentication step and sync with the server.
23.2.4. Adding login functionality
Before adding the SyncAdapter to our code, let’s first see how to deal with the authentication with the server. Instead of saving the login details inside a database or a shared preference, we’ll save them in an Android Account. To handle accounts, we’ll use an Android class calledAccountManager. The AccountManager is in charge of managing user credentials inside Accounts. The basic idea is that users enter their credentials once, and they’re saved inside an Account. All of the applications that have the USE_CREDENTIALS permission can query the manager to obtain an account where an authentication token or whatever is necessary to authenticate against a server is saved.
Before coding this part, you need to understand that the login functionality will be used in these situations:
· When the application starts and no account has been created
· When the user goes to Accounts & Sync and clicks on New Account
· When the SyncAdapter tries to sync and the authentication fails
Let’s look at the first two situations in this section and the last one after we have the SyncAdapter working. For the first one, we’ll create a BootstrapActivity:
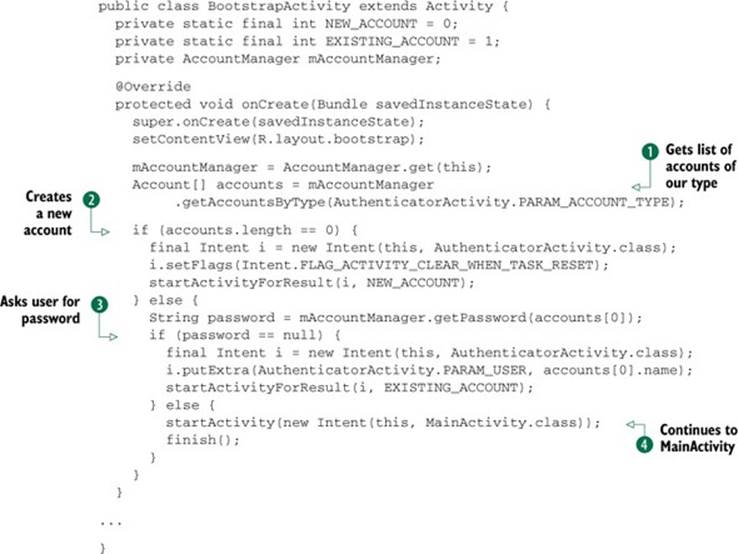
Inside the onCreate() method, we get a list of accounts of our type ![]() . If we have no account, we launch the AuthenticatorActivity to help create a new account
. If we have no account, we launch the AuthenticatorActivity to help create a new account ![]() . If the account exists but the AccountManager doesn’t have a password for it, we need to ask the user for the password
. If the account exists but the AccountManager doesn’t have a password for it, we need to ask the user for the password ![]() . This can happen when the password gets invalidated. The last case is when everything is in place, so we can continue to the MainActivity
. This can happen when the password gets invalidated. The last case is when everything is in place, so we can continue to the MainActivity ![]() .
.
The second situation is more complicated but will leave everything in place for the last situation. To create a new account through the Accounts & Sync settings, we’ll need to extend AbstractAccountAuthenticator.
The AbstractAccountAuthenticator is a base class for creating account authenticators. In order to provide an authenticator, we must extend this class, provide implementations for the abstract methods, and write a service that returns the result of getIBinder() in the service’sonBind(android.content.Intent) method when invoked with an Intent with action AccountManager.ACTION_AUTHENTICATOR_INTENT.
We’ll extend the AbstractAccountAuthenticator with a class called Authenticator. It’s OK to return null values from the methods we’re not going to use. The important ones are addAcount() and getAuthToken(). The code follows:
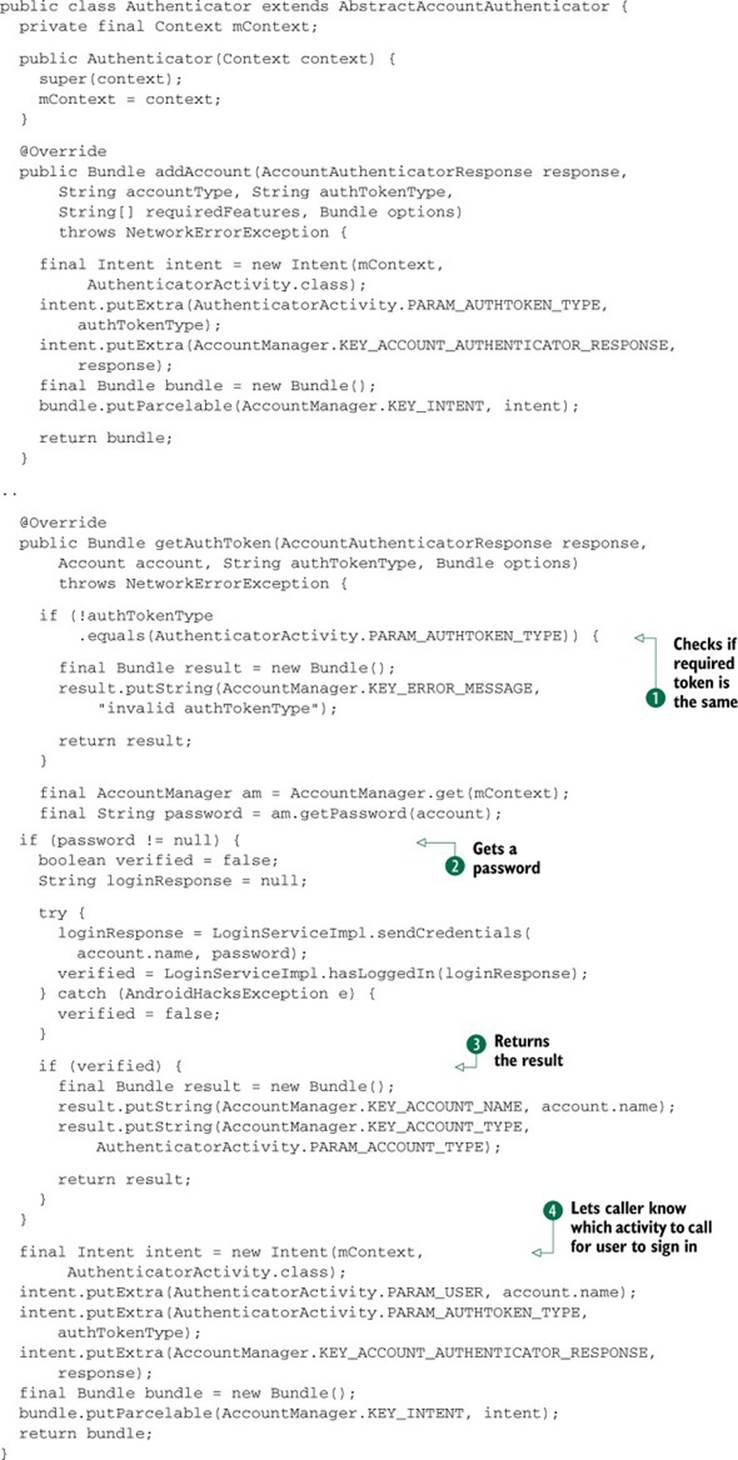
The addAccount() method is straightforward. There we prepare the Intent that the AccountManager will use to create a new account. Let’s now investigate the getAuthToken() method. This method will be called when we need to log in to the server using the credentials inside theAccount. We’ll first check if the required token is the same as the one we handle ![]() . Afterward, we use the AccountManager to get a password. If there’s a password stored
. Afterward, we use the AccountManager to get a password. If there’s a password stored ![]() , we sign in against the server, and if it’s OK
, we sign in against the server, and if it’s OK ![]() , we return the result. If we can’t sign in, we’ll return an Intentto let the caller know which activity to call to let the user sign in
, we return the result. If we can’t sign in, we’ll return an Intentto let the caller know which activity to call to let the user sign in ![]() . This happens when the password changes or the credentials were revoked.
. This happens when the password changes or the credentials were revoked.
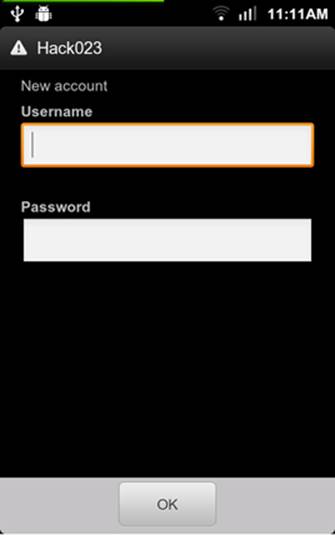
The next class to create is AuthenticatorActivity. This activity will be used to show the login form. You can see how it looks in figure 23.3.
Figure 23.3. Login form from AuthenticatorActivity
The code is the following:
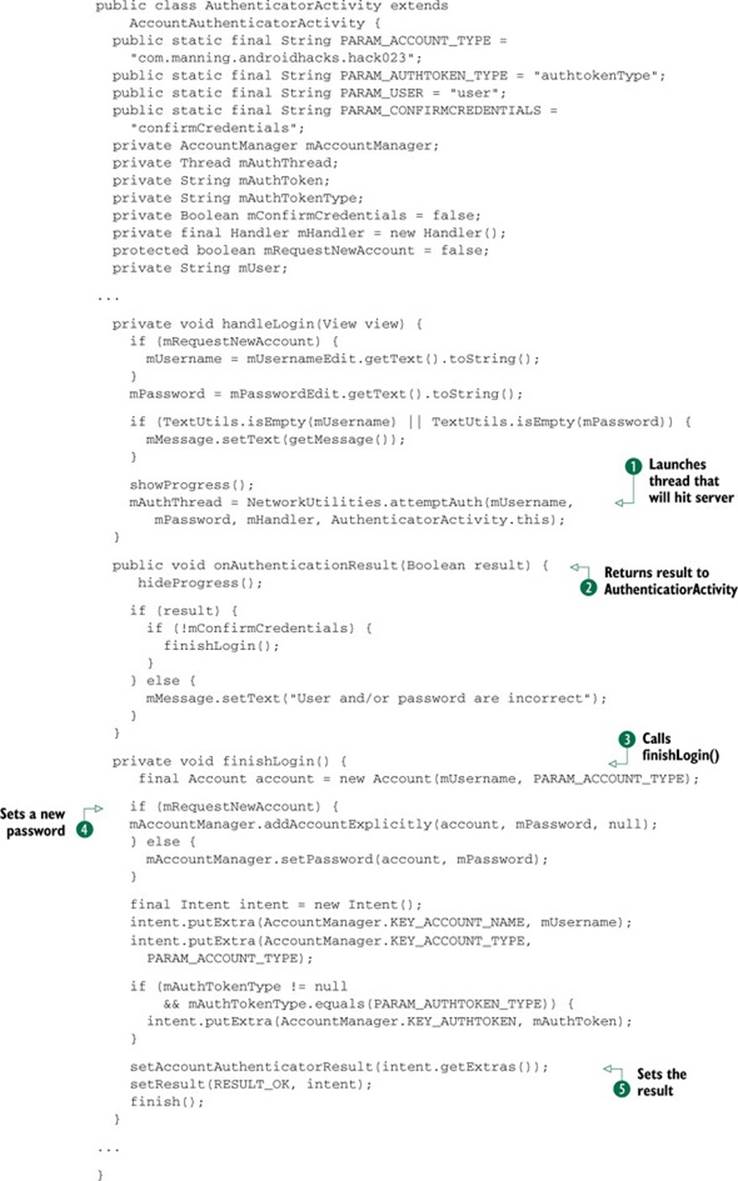
When the user enters the login details and clicks OK, handleLogin() gets executed. There we launch a thread that will hit the server ![]() and return the result to the AuthenticatorActivity in the onAuthenticationResult() method
and return the result to the AuthenticatorActivity in the onAuthenticationResult() method ![]() . If the service can authenticate correctly, we’ll call finishLogin()
. If the service can authenticate correctly, we’ll call finishLogin() ![]() , and if not we’ll show an error and let the user try again. Inside finishLogin(), if the Request New Account flag is set, we use the AccountManager to create an account. If the account exists, we’ll set a new password
, and if not we’ll show an error and let the user try again. Inside finishLogin(), if the Request New Account flag is set, we use the AccountManager to create an account. If the account exists, we’ll set a new password ![]() . Finally, we set the result that’s to be sent as the result of the request that caused this activity to be launched
. Finally, we set the result that’s to be sent as the result of the request that caused this activity to be launched ![]() .
.
The last step is modifying the AndroidManifest.xml to register the Service. We do that by adding the following:
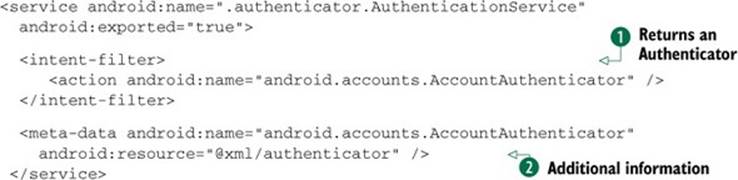
The android.accounts.AccountAuthenticator Intent filter will make the system notice that this particular Service returns an Authenticator ![]() . We’ll also need to give additional information using a separate XML file
. We’ll also need to give additional information using a separate XML file ![]() . In this example, the authenticator XML contains the following:
. In this example, the authenticator XML contains the following:
<account-authenticator
xmlns:android="http://schemas.android.com/apk/res/android"
android:accountType="com.manning.androidhacks.hack023"
android:icon="@drawable/ic_launcher"
android:smallIcon="@drawable/ic_launcher"
android:label="@string/app_name"/>
The most important piece of information is the android:accountType. That means that the Service will return an Authenticator to authenticate only accounts of type com.manning.androidhacks.hack023. The rest of the information we can place there determines how the Accounts & Sync row will look.
23.2.5. Adding the SyncAdapter
The last step is to add a SyncAdapter. After so many pages, we still don’t know what it’s for, so let’s try to understand how the SyncAdapter will add a happy ending to everything we wrote so far.
The SyncAdapter is a Service handled by Android that will use an Account to authenticate to the server and a ContentProvider to sync data. When we finish coding it, the application will sync with the server without us telling it anything. The OS will register it with every otherSyncAdapter inside the device. The SyncAdapters run one at a time to avoid making our internet connection choke. Isn’t it the best Android feature you’ve used so far? Let’s learn how to code it.
We first need to declare it in the AndroidManifest.xml:

Similar to the AuthenticationService, we define the android.content.SyncAdapter action to let Android know that TodoSyncService is a SyncAdapter ![]() . It also has some additional XML
. It also has some additional XML ![]() with the following information:
with the following information:
<sync-adapter xmlns:android="http://schemas.android.com/apk/res/android"
android:contentAuthority=
"com.manning.androidhacks.hack023.provider.TodoContentProvider"
android:accountType=
"com.manning.androidhacks.hack023" />
This means that the TodoSyncService will use the TodoContentProvider’s authority and will need a com.manning.androidhacks.hack023 account type.
The next step is to extend AbstractThreadedSyncAdapter. Following is the code:
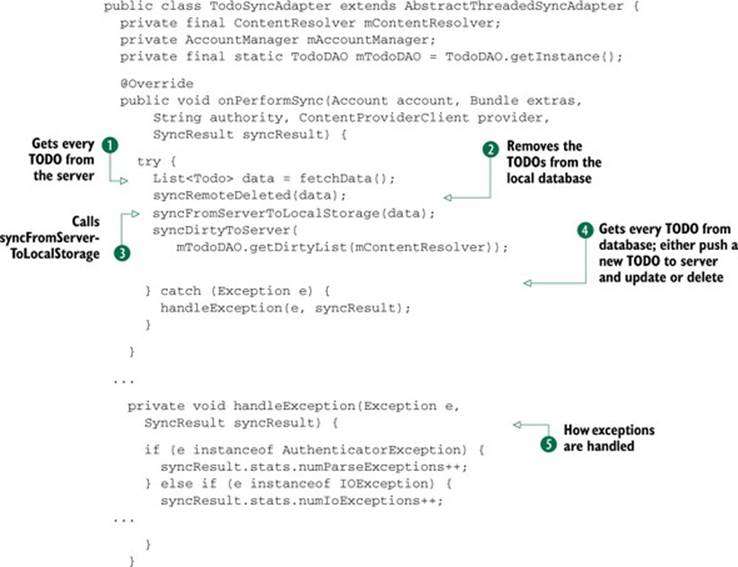
When the onPerformSync() method gets called, we’re already in a background thread. Here’s where we add the logic to sync with the server. In the next few lines, I’ll explain a sync approach that works for me; it doesn’t mean you’re obliged to do it this way.
Do you remember what a row in the TODO table looked like? The TODO table has the following columns:
· _id— Local ID.
· server_id— After syncing, every row will get the server’s ID.
· status_flag— The status can be CLEAN, MOD, ADD, DELETE.
· title— The text of the TODO.
When the sync starts, we first get every TODO from the server ![]() . Note that if we have lots of TODOs, we might need to use some sort of pagination. The next step is removing from the local database TODOs that are no longer in the server
. Note that if we have lots of TODOs, we might need to use some sort of pagination. The next step is removing from the local database TODOs that are no longer in the server ![]() . We do this by getting a list of TODOs from our local database with the CLEAN flag set, and checking whether a TODO is in the server’s list. If it’s not there, we can delete it from our local database. After that, syncFromServerToLocalStorage is called
. We do this by getting a list of TODOs from our local database with the CLEAN flag set, and checking whether a TODO is in the server’s list. If it’s not there, we can delete it from our local database. After that, syncFromServerToLocalStorage is called ![]() . There we’ll iterate over the server’s TODOs. We can use the server_idto check whether it exists locally. If it exists, we update it with the information from the server. If not, we create a new one. The last step is syncDirtyToServer()
. There we’ll iterate over the server’s TODOs. We can use the server_idto check whether it exists locally. If it exists, we update it with the information from the server. If not, we create a new one. The last step is syncDirtyToServer() ![]() . In this case, we get every TODO from the local database that’s dirty (not clean). There, depending on the status flag, we push a new TODO to the server and update or delete.
. In this case, we get every TODO from the local database that’s dirty (not clean). There, depending on the status flag, we push a new TODO to the server and update or delete.
Note how the exceptions are handled ![]() . Depending on the exception, we modify the syncResult object. We do this to help the SyncManager decide when to call the SyncAdapter again.
. Depending on the exception, we modify the syncResult object. We do this to help the SyncManager decide when to call the SyncAdapter again.
The final step is to wrap the SyncAdapter inside the TodoSyncService, which we can do using the following code:
public class TodoSyncService extends Service {
private static final Object sSyncAdapterLock = new Object();
private static TodoSyncAdapter sSyncAdapter = null;
@Override
public void onCreate() {
synchronized (sSyncAdapterLock) {
if (sSyncAdapter == null) {
sSyncAdapter = new TodoSyncAdapter(
getApplicationContext(), true);
}
}
}
@Override
public IBinder onBind(Intent intent) {
return sSyncAdapter.getSyncAdapterBinder();
}
}
23.3. The bottom line
You might be thinking that using a SyncAdapter is a lot of work, but note how after creating the model and the ContentProvider, everything got easier. Users can use the application offline or online; they won’t notice the difference.
Note that I didn’t explain anything about the server. For this example, I’ve coded a small Python server using web.py. If you’re giving SyncAdapters a try, I recommend you use something like StackMob. You’ll avoid wasting time coding the back end.
23.4. External links
http://developer.android.com/reference/android/os/AsyncTask.html
http://www.youtube.com/watch?feature=player_embedded&v=xHXn3Kg2IQE
http://android-developers.blogspot.com.ar/2009/05/painless-threading.html
http://logc.at/2011/11/08/the-hidden-pitfalls-of-asynctask/
http://developer.android.com/reference/android/content/AbstractThreadedSyncAdapter.html
http://www.youtube.com/watch?v=xHXn3Kg2IQE&feature=youtu.be
http://developer.android.com/guide/topics/providers/contentprovider-creating.html
http://naked-code.blogspot.com/2011/05/revenge-of-syncadapter-synchronizing.html
http://developer.android.com/reference/android/content/AbstractThreadedSyncAdapter.html
https://www.stackmob.com/