CCNP Security FIREWALL 642-618 Official Cert Guide (2012)
Chapter 13. Creating Virtual Firewalls on the ASA
This chapter covers the following topics:
• Cisco ASA Virtualization Overview: This section presents an overview of the virtual firewall capabilities on the Cisco ASA.
• Virtual Firewall Deployment Guidelines: This section describes the information you will need to gather before you deploy virtual firewalls. The section also covers the caveats and limitations of using virtual firewalls on the ASA.
• Configuration Tasks Overview: This section provides an overview of the configuration tasks that you must perform to implement virtual firewalls on the Cisco ASA.
• Configuring Security Contexts: This section details the actual virtual firewall configuration process systematically.
• Verifying Security Contexts: This section details how you can easily verify the virtual firewalls and their configuration.
• Managing Security Contexts: This section describes the various management tasks you may need to perform on your virtual firewalls.
• Configuring Resource Management: This section describes how to manage the various resources consumed by the virtual firewalls.
• Verifying Resource Management: This section describes how to verify the implementation of your resource management.
• Troubleshooting Security Contexts: This section covers details required to effectively troubleshoot a Cisco ASA implementation that includes virtual firewalls.
The Cisco Adaptive Security Appliance (ASA) is known for the robustness and flexibility of its features. Supporting that reputation is the capability of the device to be “carved up” into multiple virtual firewalls. Each virtual firewall can serve a specific customer or a specific need within an organization. Virtual firewalls are created in the Cisco ASA using a technology called Security Contexts. This chapter provides you with all the information you need to know about this process for success on the FIREWALL exam and beyond.
“Do I Know This Already?” Quiz
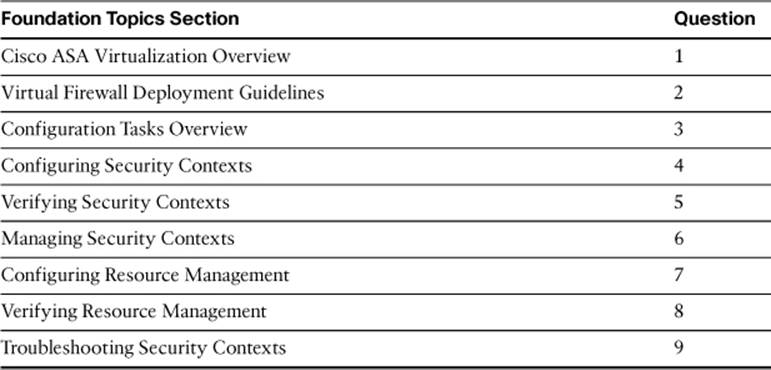
The “Do I Know This Already?” quiz allows you to assess whether you should read this entire chapter thoroughly or jump to the “Exam Preparation Tasks” section. If you are in doubt about your answers to these questions or your own assessment of your knowledge of the topics, read the entire chapter. Table 13-1 lists the major headings in this chapter and their corresponding “Do I Know This Already?” quiz questions. You can find the answers in Appendix A, “Answers to the ‘Do I Know This Already?’ Quizzes.”
Table 13-1. “Do I Know This Already?” Section-to-Question Mapping
Caution
The goal of self-assessment is to gauge your mastery of the topics in this chapter. If you do not know the answer to a question or are only partially sure of the answer, you should mark that question wrong for purposes of the self-assessment. Giving yourself credit for an answer you correctly guess skews your self-assessment results and might provide you with a false sense of security.
1. Before you can implement virtual firewalls on the Cisco ASA, you must convert the device into which mode?
a. Virtual firewall mode
b. Multiple mode
c. Advanced mode
d. Virtual mode
2. Which of the following deployment guidelines is not correct?
a. When you use transparent firewall mode and multiple mode, you cannot use shared interfaces.
b. When you use shared interfaces, assign a different MAC address to the interface in each context.
c. Each Security Context can be configured for transparent mode or routed mode.
d. Consider resource management with your Security Contexts to avoid system failures.
3. Which of these is not a valid configuration procedure with virtual firewalls on the Cisco ASA?
a. Map each Security Context to an ASA image file.
b. Configure Security Context resource management.
c. Create Security Contexts.
d. Configure each Security Context as a separate security appliance.
4. Which Security Context does the Cisco ASA create automatically during the conversion for virtual firewalls?
a. Base
b. Main
c. System
d. Admin
5. Which command do you use to view Security Context information, including allocated interfaces, the configuration file URL, and the number of Security Contexts that you have configured?
a. show virtual-firewall
b. show context
c. show partitions
d. show versions
6. Which command do you use to switch from one Security Context to another in the CLI?
a. revert
b. moveto
c. changeto
d. enter-context
7. By default, each Security Context belongs to which resource class?
a. Main
b. Admin
c. Default
d. System
8. Which command displays the resource allocation for each resource across all classes?
a. show usage
b. show resource usage
c. show resource classes
d. show resource allocation
9. Which is not a common command to use when troubleshooting virtual firewalls?
a. show context
b. show interface
c. show resource usage
d. show virtual devices
Foundation Topics
Perhaps you are an Internet service provider and would like to set up multiple firewalls for different customers that use your services. Alternatively, perhaps you are a network engineer for a large enterprise that wants multiple firewalls for different areas of the enterprise network. A powerful option that the Cisco ASA provides is the use of virtual firewalls inside a single Cisco ASA. This configuration is a possibility thanks to what are called Security Contexts, which can be created once the ASA is switched to multiple mode. This chapter provides you with all the information you will need to plan for and implement the use of virtual firewalls inside your Cisco ASA. You will also be able to properly verify and troubleshoot such a configuration.
Cisco ASA Virtualization Overview
Cisco ASA virtualization refers to the capability to create multiple virtual firewalls inside a single Cisco ASA. This can be useful if you have dramatically different security policies and rules that you want to enforce for different customers or different departments within your organization. Through the Cisco ASA virtualization process, you define Security Contexts on the device. You create a separate Security Context to represent each new virtual firewall that you want to create. Before you can create these additional Security Contexts, you must convert the ASA to multiple mode. Once you have done this and have defined your contexts, you can assign interfaces, administrators, and security policies to each context just as though it is an independent firewall device.
The multiple virtual firewalls inside the Cisco ASA have the capability to run most of the features found on the Cisco ASA itself. There are some notable exceptions. The following features are not supported in multiple mode with the different virtual firewalls:
• IP Security (IPsec) VPNs and other IPsec services
• Secure Sockets Layer (SSL) VPNs
• Dynamic routing protocols
• Phone Proxy
• Threat detection
• Multicast IP routing
You might wonder about a key interface on the Cisco ASA in multiple mode. For example, you have an important interface that connects to the Internet. This physical interface can actually be shared across different Security Contexts for use by the different virtual firewalls with different security policies.
A High-Level Examination of a Virtual Firewall’s Configuration
As described in the previous section, in pure Cisco terms, a virtual firewall is called a Security Context. You might think of this Security Context as its own firewall within the Cisco ASA. You can define your own security policy for this virtual firewall. It can possess it own interfaces or even share interfaces with other virtual firewalls (with the exception of transparent mode virtual firewalls). It can even feature its own administrative user accounts. In fact, for those responsible for the device, it will appear to be a fully functional standalone device, and they can even be completely unaware of the fact that it is truly a firewall within another firewall.
As you might expect, to have a Cisco ASA engage in this rather remarkable capability, you must convert the operational mode of the device. Thus, an important first step in the configuration is converting the device to what is termed “multiple mode.”
Once the device is in the correct mode to support virtualization, the job of the administrator is to create the required Security Contexts and assign the required resources. The administrator can also configure important resource limits for the various contexts to ensure the overall Cisco ASA does not have its performance degraded due to resource oversubscription. Finally, the Cisco ASA administrator must configure each context with the required IP addressing and access controls appropriate for each virtual device.
The System Configuration, System Context, and Other Security Contexts

As the previous section described, when you want to partition your single ASA into multiple virtual devices, you do so by creating additional Security Contexts. Each Security Context then becomes akin to a separate ASA, with its own security policy, its own interfaces, and even its own administrators if needed. Obviously, the different Security Contexts that you define as the Cisco ASA administrator are critical for defining the different virtual firewalls. But even more critical is what Cisco terms the system configuration. This critical system configuration defines basic security settings for the Cisco ASA itself and is the entity that stores information about all the other Security Contexts. The system configuration also maintains the settings of the physical interfaces inside the Cisco ASA. As when running your ASA in a single mode of operation, the system configuration resides as the startup configuration in flash memory.
The system administrator adds and manages contexts by configuring each context location and other such parameters. All of this is done in the system configuration. The system configuration does not include any interfaces for the System Contexts. This means that if the System Context needs to access network resources (such as Cisco ASDM), the System Context uses the networking resources assigned to a special Security Context called the admin context. The admin context is just like any other context, except that when a user logs in to this context, they have administrative rights over all the Security Contexts set up on the system.
The individual Security Context configurations that you create and edit can be stored on the local disk (flash memory). They can also be downloaded from external servers, such as TFTP or HTTPS servers.
Packet Classification
Creating a Security Context on the Cisco ASA does not automatically assign interfaces to the context. Note that an exception to this rule is the admin context. All interfaces that were enabled in single mode are available to this important context.
A context can use physical or subinterfaces of the Cisco ASA. In transparent mode, only two interfaces can be used for user traffic, and one additional management interface is supported.
As previously described, in routed mode, an interface can be shared between contexts. Obviously, this might be required when there is a single interface that provides Internet connectivity for multiple virtual firewalls. The Cisco ASA uses a “classifier algorithm” to determine the destination Security Context for an inbound packet on the shared interface. The following criteria are used in this process:
• Unique interfaces: This is the method always used in transparent firewall mode because interfaces cannot be shared between contexts in this mode.
• Unique MAC addresses: The classifier uses the packet destination MAC address and compares it to the interface MAC address for each context sharing the interface. Obviously, you should set a unique MAC address for each context; the Cisco ASA even provides automation of this process should you elect for it.
• Network Address Translation (NAT): If there are not unique MAC addresses configured, the classifier uses the NAT configuration to determine the subnets serviced by each context. The destination IP address is matched to either a global IP address in a static configuration or to an address in the xlate table in the result of a dynamic configuration.
Note
If you are using a shared interface, and you fail to configure unique MAC addresses, and you are not using NAT, the classifier is forced to drop packets. Cisco recommends that unique MAC addresses be used to solve this issue. Obviously, this is the only option if you are not using NAT.
Virtual Firewall Deployment Guidelines
Like many other aspects of the Cisco ASA implementation, you will want to plan carefully before implementing your virtual firewalls. Be sure to determine the following:
• The number of Security Contexts you require: You will use this information to create and name the Security Contexts you require. Note that the number of Security Contexts that you can create depends on the type of license you have purchased with your ASA.
• The configuration storage for each context: The options are Flash memory or external servers.
• The network topology information for your deployment: You need to carefully plan which interfaces will be associated with which Security Contexts. You also need to plan for the IP addressing and routing to use inside each Security Context.
• The security policy used inside each of the Security Contexts: This information could be quite elaborate and involved, depending on the complexity of the network and the associated security policies.
Deployment Choices
You may be forced to use single mode with your Cisco ASA implementation if you require features that are available only in single mode. Multiple physical ASA devices are the solution in this case.
When you are deciding whether to use virtual firewalls, consider the following conditions that typically necessitate their usage:
• You have distinct security policies that need to be assigned to different customers or different departments within your enterprise network.
• You are an Internet service provider (ISP) that needs to separate traffic from different customers.
• You are interested in providing robust redundancy in your firewall environment. The use of multiple Security Contexts enables the use of active/active failover. This method of failover is detailed in Chapter 14, “Deploying High Availability Features.”
You also need to plan for your use of shared interfaces. Remember, if your Security Contexts are in transparent mode, they cannot use shared interfaces at all. If your Security Contexts are in routed mode, they can use shared interfaces if they connect to the same network. For interfaces that connect to different networks, you cannot implement the shared interfaces feature.
Deployment Guidelines
There are plenty of other important deployment guidelines you should consider before implementing a multiple mode Cisco ASA with multiple Security Contexts. Here are some of the most critical for you to consider and memorize for the FIREWALL exam:
• The transparent mode option cannot be set on a per–Security Context basis. If you need a transparent mode Security Context, all of your other virtual firewalls must also use transparent mode.
• When creating a transparent mode device, make that change first, and then create your Security Contexts. If you create your Security Contexts first and then initiate the cutover to transparent mode, the Security Contexts will be removed.
• Only two interfaces are supported in a Security Context running in transparent mode.
• Shared interfaces cannot be used when the Security Contexts are running in transparent mode.
• When using shared interfaces, ensure that you assign a unique MAC address to the interface in each context.
• Always consider the use of context resource management to ensure that a single context cannot deplete all resources available on the Cisco ASA. (Resource management is covered in depth later in this chapter.)
Limitations
Here are some of the most important limitations you should know regarding virtual firewalls on the Cisco ASA:
• Key features that are not supported on a Cisco ASA in multiple mode are dynamic routing protocols, IPsec and SSL VPNs, multicast IP routing, threat detection, and Phone Proxy.
• The Cisco ASA 5505 does not support multiple mode.
• The number of Security Contexts you can create depends on the software license you possess and the Cisco ASA hardware model you are using.
Configuration Tasks Overview
When you are preparing to implement complex configurations on the Cisco ASA, it is valuable to examine a high-level overview of the configuration process. Here is an overview for the configuration of virtual firewalls on the Cisco ASA. This chapter covers these steps in detail.
Step 1. Enable multiple mode on the Cisco ASA.
Step 2. Create a Security Context.
Step 3. Allocate interfaces to the context.
Step 4. Specify the startup configuration location for the context.
Step 5. Configure the Security Context resource management.
Step 6. Configure each Security Context as a separate security appliance.
Configuring Security Contexts
Before you dive in and start reconfiguring your Cisco ASA for virtual firewalls, you should make sure that you understand the major changes that are about to take place in your Cisco ASA configuration. As you know, an important first step in this configuration process is to change the Cisco ASA from single mode to multiple mode. When this change occurs, the following changes take place within the device:
• The Cisco ASA automatically creates a Security Context named admin. (The following section, “The Admin Context,” elaborates more on this important Security Context.)
• The running configuration of the device is converted to a system configuration for the admin Security Context. The file is stored as admin.cfg.
• The original running configuration is saved as old_running.cfg.
• Interfaces that were enabled in single mode are added to the admin Security Context.
• Disabled interfaces at the time of conversion are not assigned to any Security Context.
As mentioned previously, a new Security Context is not operational until you specify the location for the context startup configuration. You specify this location as a URL. Options include the following:
• Disk0/flash: Stored in flash memory
• Disk1: Stored on a CompactFlash memory card
• Tftp: Stored on an external TFTP server
• Ftp: Stored on an external FTP server
• http(s): Stored on a web server or SSL web server
Note
The admin context must be stored on internal flash (Disk0/flash:).
The Admin Context
The system configuration relies on the admin context to access interfaces that can pass traffic. Common uses of this special context are to retrieve configurations for other contexts and to send system-level syslog messages. When you want to create new contexts or change the system configuration in any way, you log in to the admin context. Note that you can change the name of this context from the default of admin.
Configuring Multiple Mode
The switch to multiple mode is one of those unique configurations on the Cisco ASA that can be accomplished only by using the command-line interface (CLI). Use the mode command in global configuration mode. There is a noconfirm keyword option that makes the change without a confirmation request. This option is useful for automating the process with a script.
Here is an example of using the command:
ciscoasa(config)# mode multiple noconfirm
Note
This change requires a reboot of the Cisco ASA.
Creating a Security Context
Security Contexts can be created using the ASDM or the CLI. To use the ASDM, first ensure you are in the system execution space by double-clicking the System option in the Device List pane, shown in Figure 13-1.
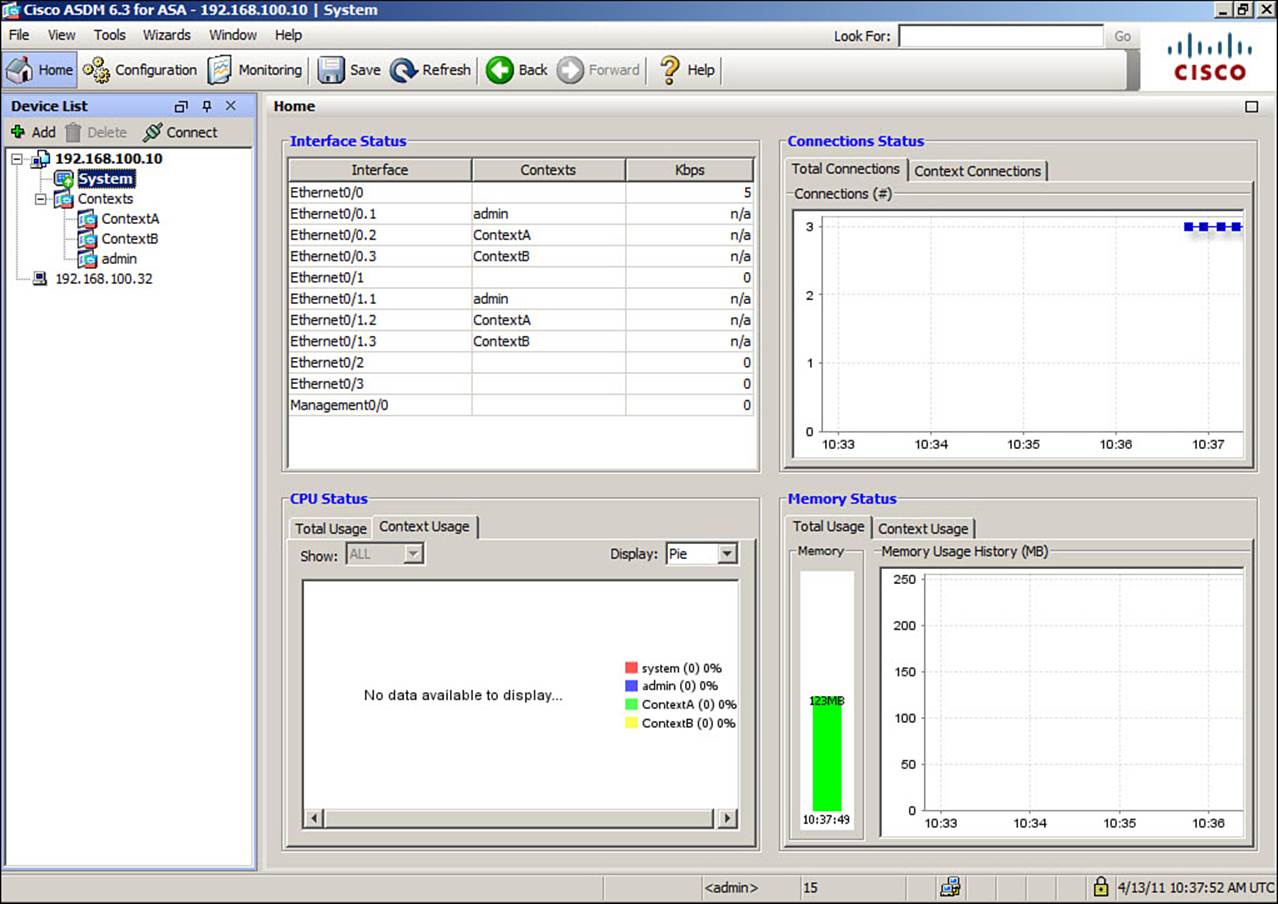
Figure 13-1. Ensuring You Are in the System Execution Space
Next, navigate to Configuration > Context Management > Security Contexts, and click Add to open the Add Context dialog box, as shown in Figure 13-2.
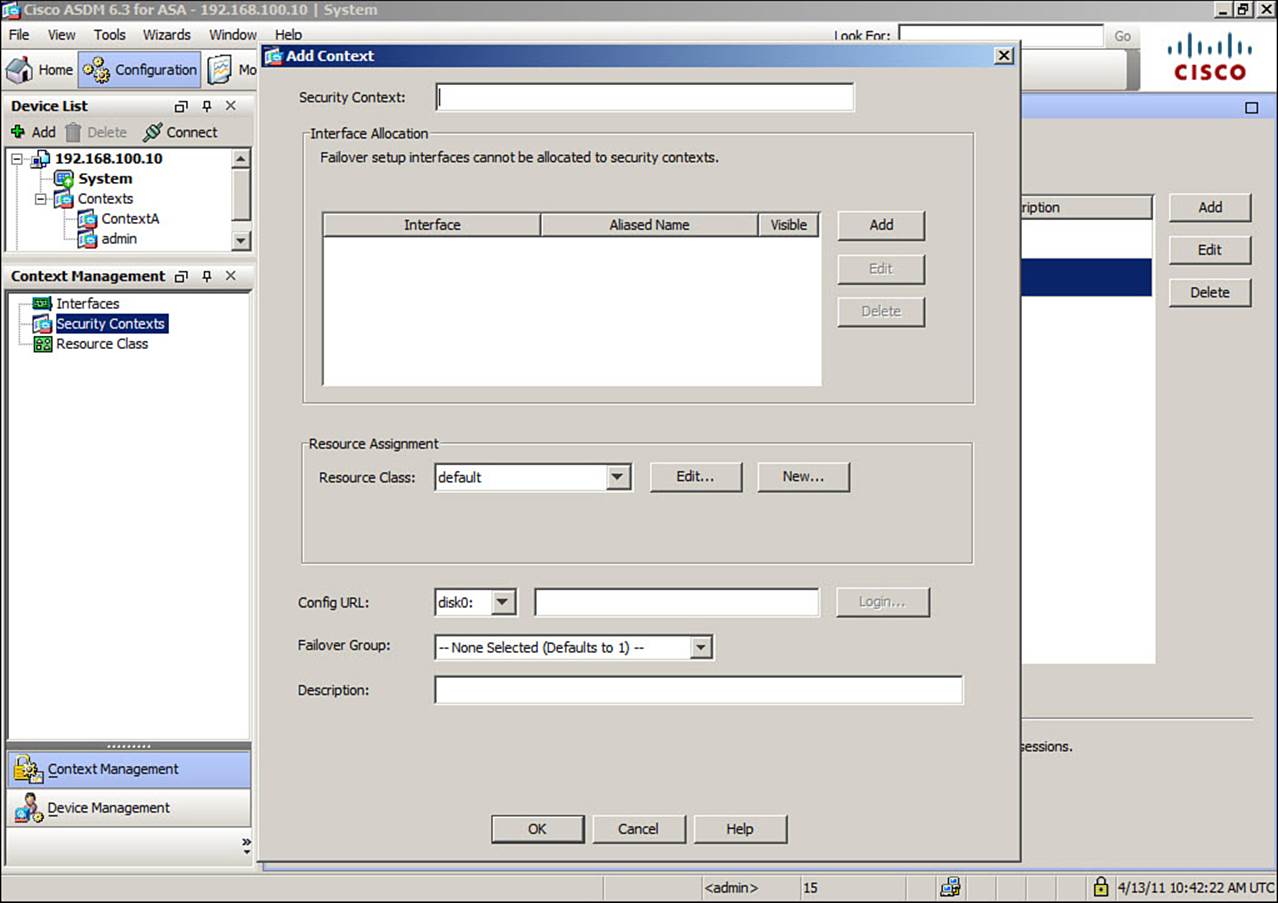
Figure 13-2. Add Context Dialog Box
Enter a name in the Security Context field. Click the Add button in the Interface Allocation area to add the appropriate interfaces to the Security Context. Finally, specify where the configuration file should be stored for the context.
In the CLI, use the context command to create a context and the allocate-interface command to provision the correct interfaces. Use the config-url command to specify the configuration file location.
Verifying Security Contexts
When you are in the system execution space at the CLI, you can easily view a list of Security Contexts on the system. The name of each Security Context is displayed along with the allocated interfaces and the configuration URL. As demonstrated in Example 13-1, the command to display all of this information is simply show context. Note that an asterisk (*) to the left of the context name indicates the current admin context. Remember, by default, this is the context named admin.
Example 13-1. show context Command Output
CiscoASA# show context
Context Name Interfaces URL
*admin GigabitEthernet0/1.100 disk0:/admin.cfg
GigabitEthernet0/1.101
contexta GigabitEthernet0/1.200 disk0:/contexta.cfg
GigabitEthernet0/1.201
contextb GigabitEthernet0/1.300 disk0:/contextb.cfg
GigabitEthernet0/1.301
Total active Security Contexts: 3
Managing Security Contexts
Managing a Security Context is a matter of entering the context environment. In the ASDM, this is a simple matter of double-clicking the context name in the Device List pane. You will notice that the ASDM allows you to configure for the virtual firewall almost all the options that you can configure for the original firewall itself. The only features that are missing are those that are not supported for multiple mode, as mentioned earlier in the chapter.
To change between contexts using the CLI, use the changeto command in privileged mode. For example:
ciscoasa# changeto MYCONTEXT
or
ciscoasa# changeto system
You can easily edit or delete a Security Context using the ASDM. Navigate to Configuration > Context Management > Security Contexts, and then click the Edit or Delete button. Realize that deleting a context does not automatically remove its configuration files.
Packet Classification Configuration
Remember, when your Security Contexts are in routed mode and are sharing interfaces across contexts, the Cisco ASA requires some method for determining to which context it should send a packet. The ASA always checks for the following to do this:
• A unique interface
• A unique MAC address
• A global IP address in a NAT configuration
Remember, as stated earlier, using unique MAC addresses is always recommended if you are in multiple mode with Security Contexts. You can change MAC addresses manually, or you can call upon the Cisco ASA to generate a unique MAC address for you. To do the latter, navigate toConfiguration > Context Management > Security Contexts and check the Enable auto-generation of MAC addresses for context interfaces that share a system interface check box, as shown in Figure 13-3.
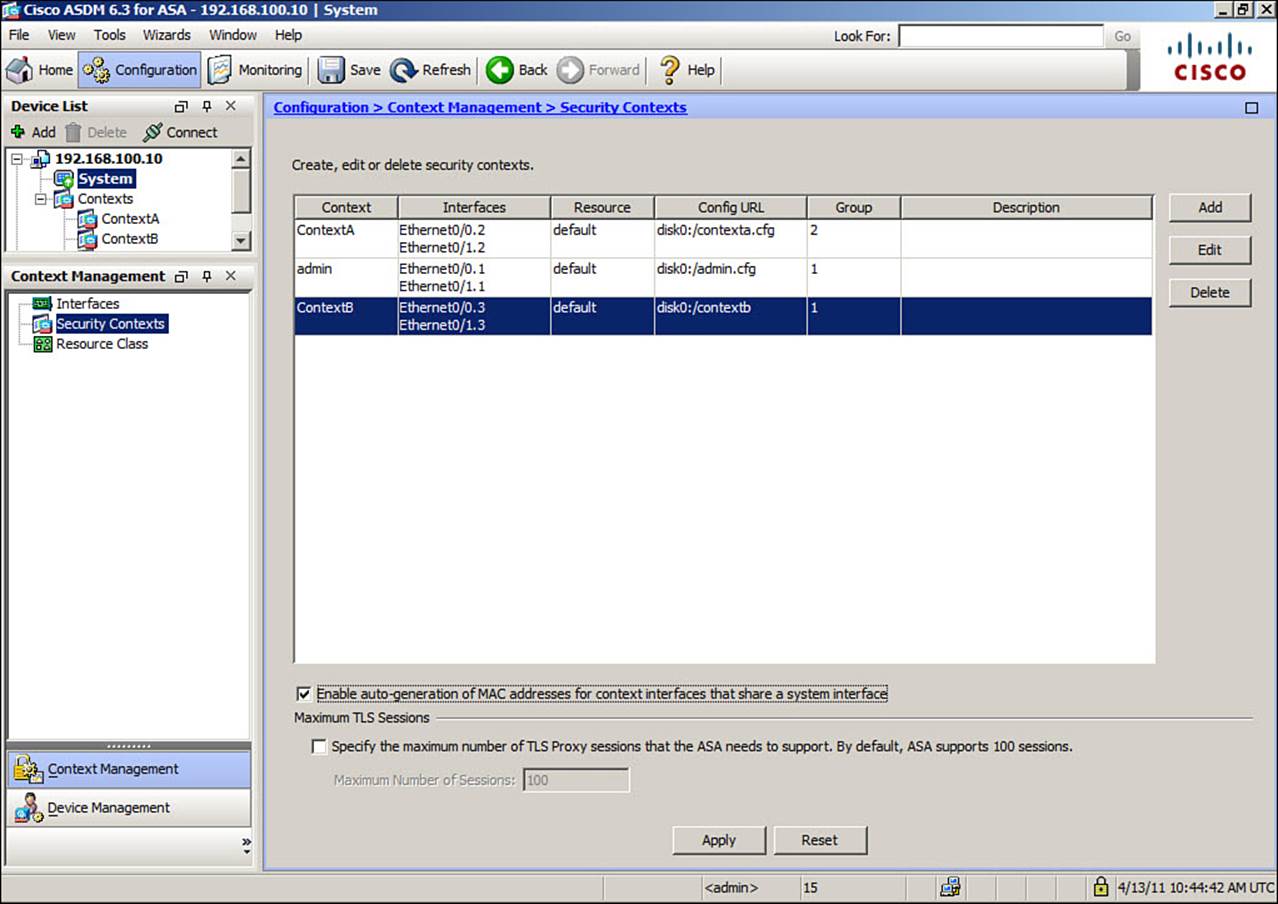
Figure 13-3. Enabling the Auto-Generation of Unique MAC Addresses
To change the MAC address at the CLI, use the mac-address command. You can use the optional auto keyword to configure the dynamic assignment.
Changing the Admin Context
To change the context that is the admin context, use the admin-context command in privileged mode and simply specify the name of the new admin context, as demonstrated here:
ciscoASA(config)# admin-context administrator
Editing and Removing Contexts
To edit or remove a Security Context, in the ASDM, choose Configuration > Context Management > Security Contexts. Choose a context, and click the Edit or Delete button as needed.
Note
Deleting a context does not automatically remove its configuration file from its storage location. This must be deleted manually if desired.
Configuring Resource Management
Although technically, configuring resource management on your multiple mode Cisco ASA is optional, you should consider it. The reason is that, by default, a particular Security Context has unlimited access to the resources of the Cisco ASA. By engaging the powerful resource management capabilities, you can impose limits on the use of specific hardware resources per Security Context. This is obviously an important aspect of virtual firewall implementation and can guard against malicious or accidental issues. Realize that a single context that is depleting a large number of resources of the Cisco ASA can have an impact on all the Security Contexts on the device.
You can configure resource limits for the following:
• Cisco ASDM sessions
• Connections (two options, count and rate, are available)
• Hosts that can connect
• SSH sessions
• Telnet sessions
• Address translations
• Rate of application inspections per second
• Rate of system log messages per second
• Number of MAC addresses allowed in the MAC address table
The Default Class
Resource management for a multiple mode Cisco ASA requires the creation and configuration of resource classes. You create and define resource classes and then assign Security Contexts to these classes. By default, there is a resource class created on the Cisco ASA called the default class. This class has predefined limits, and every Security Context you have created belongs to this class. Initially, when you create a new resource class, it will inherit the settings of the default class.
Creating a New Resource Class
To create a resource class in the ASDM, first ensure that you are in the system configuration mode by double-clicking System in the Device List pane. Once you have confirmed you are in the correct area, choose Configuration > Context Management > Resource Class, and then clickAdd to open the Add Resource Class dialog box, shown in Figure 13-4.
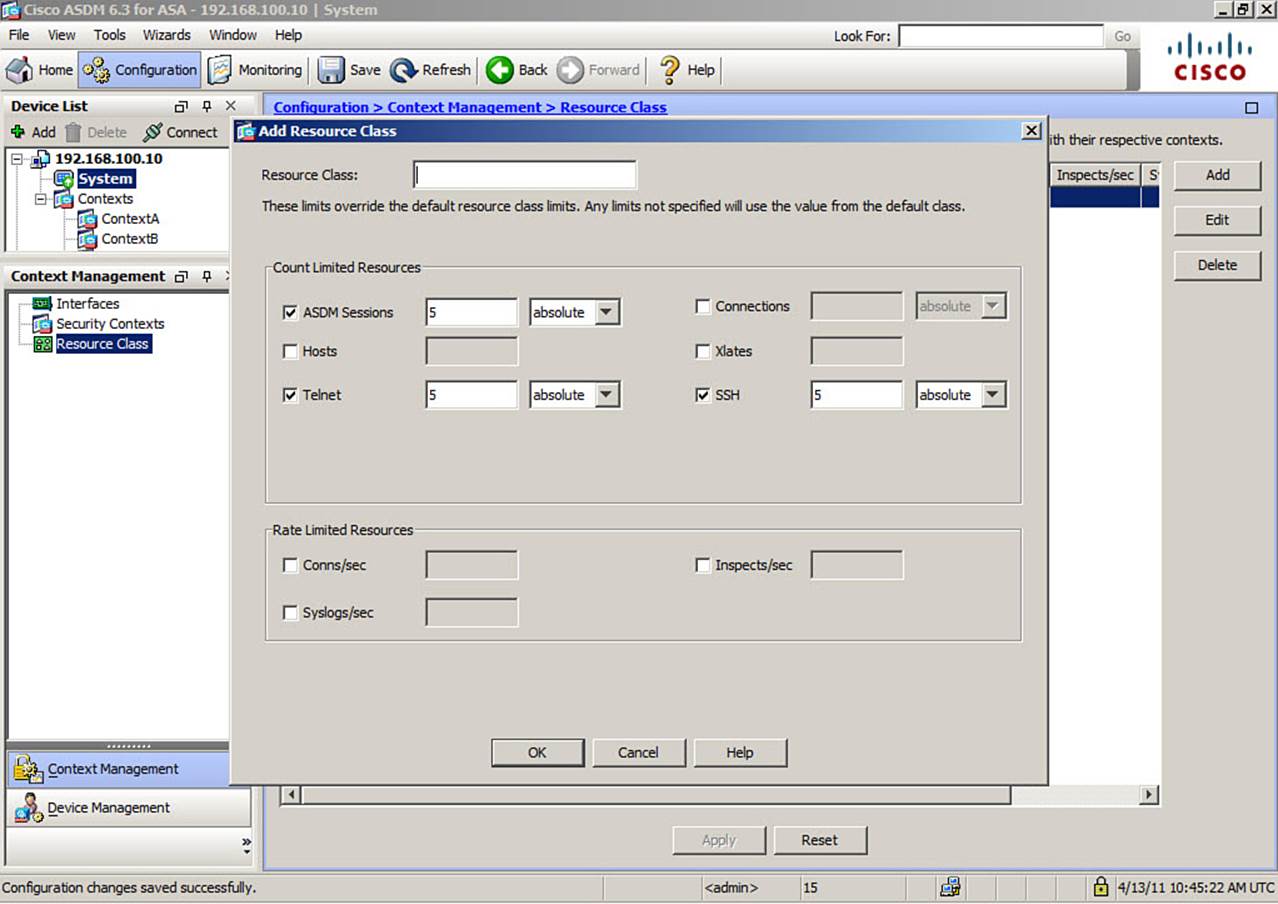
Figure 13-4. Add Resource Class Dialog Box
You can name the class and then configure resource limits for the various parameters. The Cisco ASA organizes the resources that you can control by Count Limited and Rate Limited.
To assign a context to a resource class, navigate to Configuration > Context Management > Security Contexts and click Edit. Use the Resource Class drop-down list to assign the resource class.
Caution
Do not assign more than 100 percent of your resources across Security Contexts. It is up to you to plan and implement the available resources. The configuration software will allow you to overallocate resources, resulting in poor performance and access to fewer resources than intended.
To configure a resource class at the CLI, simply use the class command. Use the limit-resource command to set resource limits. Finally, use the member command in context configuration mode to assign the resource class. Example 13-2 demonstrates how to configure a resource class.
Example 13-2. Configuring a Resource Class
hostname(config)# class gold
hostname(config-class)# limit-resource mac-addresses 10000
hostname(config-class)# limit-resource conns 15%
hostname(config-class)# limit-resource rate conns 1000
hostname(config-class)# limit-resource rate inspects 500
hostname(config-class)# limit-resource hosts 9000
hostname(config-class)# limit-resource asdm 5
hostname(config-class)# limit-resource ssh 5
hostname(config-class)# limit-resource rate syslogs 5000
hostname(config-class)# limit-resource telnet 5
hostname(config-class)# limit-resource xlates 36000
! And then later to make the context a member of the class:
hostname(config-ctx)# member gold
Verifying Resource Management
As demonstrated in Example 13-3, entering the show resource allocation command at the CLI displays the resource allocation for each resource across all classes and class members. Notice that the output shows the total allocation for each resource both as an absolute value and as a percentage of the available system resources.
Example 13-3. show resource allocation Command Output
hostname# show resource allocation
Resource Total % of Avail
Conns [rate] 35000 N/A
Inspects [rate] 35000 N/A
Syslogs [rate] 10500 N/A
Conns 305000 30.50%
Hosts 78842 N/A
SSH 35 35.00%
Telnet 35 35.00%
Xlates 91749 N/A
All unlimited
The show resource usage command displays the resource usage for each context, enabling you to see a resource, the current resource usage, and the peak resource usage.
Troubleshooting Security Contexts
Troubleshooting Cisco ASA devices in multiple mode poses extra challenges that do not exist in single mode systems. Troubleshooting efforts will often be split between time in the system execution space and time in individual Security Contexts. In the system configuration area, you’ll often rely on the show context, show interface, and show resource usage commands. While in a particular context, you often simply need to use show interface.
A common set of steps to use when troubleshooting Security Context issues is as follows:
Step 1. Verify interface status in the system execution space; use the no shutdown command as necessary.
Step 2. Verify interface status in a context environment. Use the no shutdown command as necessary.
Step 3. In the case of shared interfaces, ensure that packets can be classified properly into specific Security Contexts. Perhaps you need to create unique MAC addresses or properly configure NAT.
Step 4. Verify resource usage.
Step 5. Troubleshoot within a Security Context as if you were troubleshooting a standalone security appliance. Refer to the “Troubleshooting” sections in other chapters for guidance.
Note
The Cisco ASA logs system messages when a context cannot pass traffic due to a resource limit. You should monitor for these messages carefully.
Exam Preparation Tasks
As mentioned in the section, “How to Use This Book,” in the Introduction, you have a couple of choices for exam preparation: the exercises here, Chapter 17, “Final Preparation,” and the exam simulation questions on the CD-ROM.
Review All Key Topics
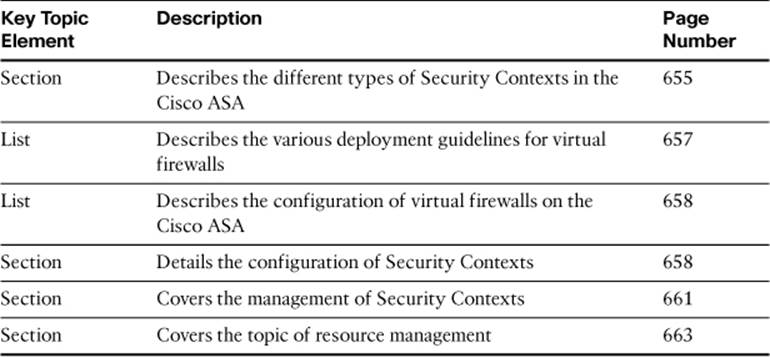
Review the most important topics in this chapter, noted with the Key Topic icon in the outer margin of the page. Table 13-2 lists a reference of these key topics and the page numbers on which each is found.
Table 13-2. Key Topics for Chapter 13
Define Key Terms
Define the following key terms from this chapter, and check your answers in the glossary:
single mode
multiple mode
Security Context
admin context
shared interface
resource class
default class
virtual firewall
Command Reference to Check Your Memory
This section includes the most important configuration and EXEC commands covered in this chapter. It might not be necessary to memorize the complete syntax of every command, but you should be able to remember the basic keywords that are needed.
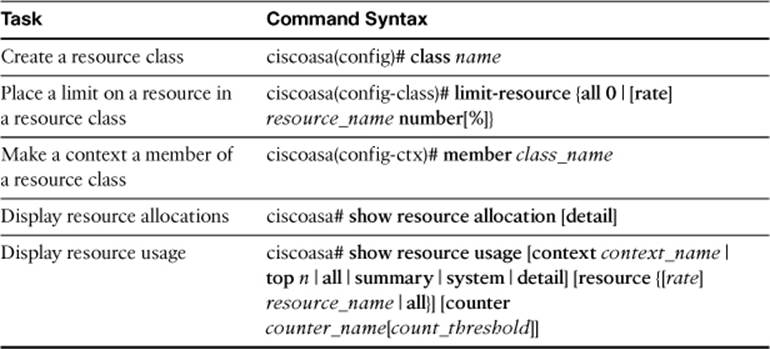
To test your memory of the commands, cover the right side of Tables 13-3 through 13-5 with a piece of paper, read the description on the left side, and then see how much of the command you can remember.
Table 13-3. Commands Related to Configuring and Verifying Security Contexts
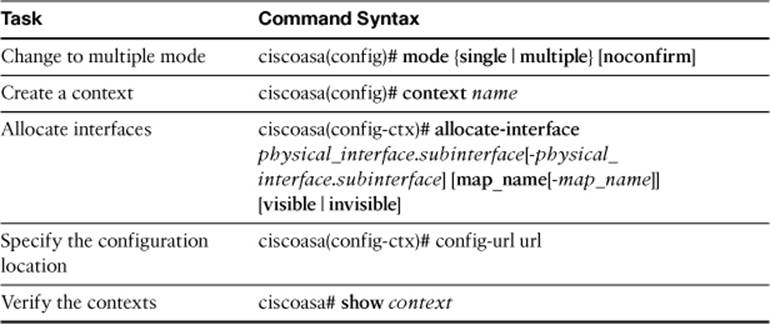
Table 13-4. Commands Related to Managing Security Contexts
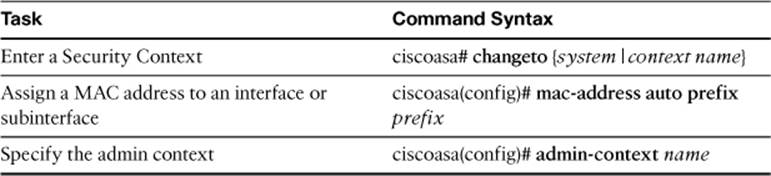
Table 13-5. Commands Related to Resource Management
The FIREWALL exam focuses on practical, hands-on skills that are used by a networking professional. Therefore, you should be able to identify the commands needed to configure and test an ASA feature.
All materials on the site are licensed Creative Commons Attribution-Sharealike 3.0 Unported CC BY-SA 3.0 & GNU Free Documentation License (GFDL)
If you are the copyright holder of any material contained on our site and intend to remove it, please contact our site administrator for approval.
© 2016-2026 All site design rights belong to S.Y.A.