EnCase Computer Forensics (2012)
Chapter 3
First Response
EnCE Exam Topics Covered in This Chapter:
· Incident response planning and preparation
· Handling evidence at the scene
How we respond to an incident or crime involving computers is largely based on how well we plan and prepare for such a response. History has proven repeatedly that even a mediocre plan is better than no plan. That having been said, the importance of proper planning and preparation can’t be emphasized enough.
Regardless of your response capacity, be it law enforcement officer, military personnel, civilian examiner, or member of an enterprise incident-response team, you will have certain issues and concerns in common with other forensics examiners. You will always need a plan. Because every incident is different, you will have to tailor your plan to fit the incident.
Once at a scene or incident, the number and types of systems you may encounter are vast and ever-changing. It is important for you to be able to identify the various platforms and properly handle each type of evidence so as to secure the evidence and yet not damage critical systems in the process. How evidence is handled at the scene is often far more important than the laboratory analysis work that is done later. Data recovery and analysis and subsequent prosecution depend on the proper seizure and handling of evidence at the scene.
Once the incident is over, an often-overlooked part of the process is that of debriefing. By critically analyzing what went well and what went wrong, you ensure that plans and procedures can be modified and improved so that future incidents are handled more effectively than the previous ones.
In this chapter, you will learn the basics of incident-response planning and preparation. We will discuss the various items and issues you should consider while making your plans and preparations. You will also learn the basic rules and procedures for handling computer evidence at the scene.
Planning and Preparation
Incident response does not exist in a vacuum. Its successful implementation rests on policies and procedures, plans, drills, staff training and experience, and proper equipment. Although this chapter will focus on the pragmatic aspects of planning and preparation, you should review and follow the policies and procedures unique to your organizational unit. Many organizations have well-developed incident-response plans and flowcharts that define various incident types, as well as types of response. Furthermore, you should strive to continually build your knowledge and skills as well as to obtain and use the best hardware and software your budget can support. Finally, even though we are all busy, you should take the time to test your plans and preparations by conducting practice drills. It is far better to make mistakes while practicing than to do so in the field. Practice drills provide the opportunity to build teamwork, improve techniques, and test your plan and your staff.
Responding to an incident or scene involving computers requires some specific considerations or protocols; however, in most respects, they are like any other response. You need to know beforehand, as much as possible, the who, what, when, where, why, and how. Every scene holds its share of unknowns, but the goal is to minimize the unknowns as much as possible before responding. The more you know in advance, the better and safer your response will be.
The Physical Location
Safety is the foremost consideration for all first responders, regardless of your response capacity. People who use computers to commit crimes can hurt you just as much and just as easily as people who don’t use computers to commit crimes. When a person’s livelihood is jeopardized (losing their job over computer misuse) or their freedom is at stake (going to jail for distributing child pornography with their computer), they can become unpredictable, desperate, or violent. This aspect of human behavior and its potential tragic consequences can never be overstated or underestimated and, therefore, must be considered in every response plan.
When you are assessing a physical location, one of your first considerations must be its physical address, its description, and the type of structure it is. Is the location residential or business? Is it a single-family residence or an apartment building? Is it one-story, two-story, or more? Is it a warehouse, laboratory, office building, strip mall, or office suite?
After determining the type of location, you must consider its size, scope, and other special characteristics. If it is a residence, what kind of neighborhood is it in? Does it have an alarm system? Is there a watchdog? Does your computer-assisted dispatch (CAD) show any calls for service at the location, and if so, what was their nature? Were weapons involved? If it is an apartment building, does the apartment complex management provide Internet access, and if so, where is the wiring closet, and who is the administrator? If it is in an office complex, does it cover one office on one floor, an entire floor, or multiple floors? Does it cover multiple buildings? Are some of the computers located with the suspected users, and are other involved computers, usually servers, located elsewhere, perhaps thousands of miles away in another jurisdiction?
Personnel
The personnel present at a scene affects safety and incident-response plans. To the greatest extent possible, you should attempt to determine as much as possible about the people expected to be present. Personnel records and criminal histories are possible sources for this information. Naturally, access to these records will vary in accordance with your jurisdiction, employment status, and so forth.
If the location is a business, you must determine its hours of operation. In some cases, it may be better to respond while employees are present. In this manner, a suspect can be placed physically at the computer, but it also poses the risk that the suspect may attempt to destroy data when first responders arrive. In other cases, an after-hours response may be preferred.
When accessing a business, determining the number and arrival pattern of employees is important, as well as how many employees are expected to be using computers when you arrive. When possible, it is advisable to identify a friendly system administrator on the inside. You must first, however, make certain the system administrator is not involved and is truly “friendly.” This person is often helpful and can save you countless steps. He or she can often point you to sources of information you would probably have overlooked, particularly when it comes to logs, old backups, and so forth. System administrators are also an excellent source of determining the network topography, usernames, and passwords.
If is it a business and the suspect is known, you should gather as much information as possible about the suspect(s):
· Determine whether they work at a desk, on the road, in an office, in a lab, or in a warehouse.
· Determine whether they are physically located where they can observe arriving first responders.
· Determine in advance their username and email address.
· Determine their home address and phone number.
· Determine what kind of car they drive and its registration number and state.
· Determine their physical description, or, better yet, obtain a photograph.
· Determine whether they have a close friend in the office who may help them, tip them off, or be in collusion with them.
· Determine their “history” to the greatest extent possible, using the resources at your disposal, which vary according to your response capacity.
Computer Systems
Although accessing the physical layout and personnel involved may be routine for most incident responses of any nature, it is the computer systems involved and the associated specialized preplanning for them that makes computer incidents unique and challenging. The field of computer forensics is becoming increasingly specialized. There is simply too much out there for any one person to know it all. If you know you are going to be conducting a field acquisition of a live multi-terabyte server configured with RAID 5 and running Microsoft Exchange Server, you probably want to have someone on the team who is knowledgeable with those systems, and you want to have adequate resources to acquire an image from a live machine and store that image. Only by gathering information and planning can you be assured those resources will be available when needed.
Let’s review a list of various questions or issues for you to consider that are specific to computer systems when they are subject to a first-response scenario. Although not every question or issue will be present in every scenario, it is nevertheless a good checklist to use as a baseline:
· What type of evidence is believed to be present? Are you searching for bootleg software on a company computer? Are you looking for child pornography? Are you looking for a set of “cooked books” in an embezzlement case?
· What will be the limit or scope of your search? Are you authorized to search only certain computers? Are you authorized to search only for specific files?
· How many computers will be at the location? Are those computers expected to be running, or does company policy dictate that they be turned off at night?
· If it is a business or government facility, is there a computer-use policy? What are its provisions? Do the employees have any expectation of privacy on company machines? Are there logon “banners” present? Have they consented to monitoring?
· Will people who present special privacy concerns be there? Examples include publishers, attorneys, physicians, and clergy. (If you expect to encounter data from any of these groups of people who are known to have privileged data, things can get incredibly complicated very quickly. You should consult counsel in advance in these situations.)
· What kinds of computers are present? Are they all new with 2TB drives in each machine, or are they older machines with 80GB drives? What kind of operating systems are in use?
· Is any form of encryption being used, such as Microsoft Encrypted File System (EFS) or BitLocker, PGPdisk, Jetico’s BestCrypt, or others?
· Is a network present; if so, what kind? Is it wired, wireless, or both?
· Where are the servers, and what operating systems are they running?
· Is a map available showing the network topography? As importantly, can you have a copy?
· Where are the server backups located (both on-site and off-site, including the “cloud”)?
· Where are the proxy server, router, firewall, web server, and other critical system logs stored?
· Is the network/IT function outsourced or in-house?
· Is the network administrator part of the problem or part of the solution?
· Who has the root or administrator passwords?
· Will the network or specific machines have to be shut down?
· Is a wireless network present, and if so, what are its type, scope, and other particulars? (I suggest carrying a pocket wireless detector to assist in this exploration. If a specialized detector is not available, a smartphone will work in a pinch.)
· Depending on the systems present and their use, will the computers be shut down if they are running? If so, at what point, how, and by whom?
· Because some people using computers may be innocent and others may be suspect, how will the incident-response team interact or direct the people using computers when they arrive? Will everyone be asked to step away from their computers, or only those who are suspects or targets?
· Who are the suspects or targets? How many are present, and where will they expected to be?
· Does the suspect or target use a laptop or other mobile computing device? Does the suspect or target use a thumb drive or similar portable storage device? If so, does the device belong to the company, and is it usually with the suspect when at work?
· Will all computers be seized or all imaged in place? Will some be seized for lab imaging and some be imaged in place? What will be the criteria to determine whether a machine is seized or imaged?
· If you have a requirement for previewing and searching for keywords prior to seizure, what keywords can be used to distinguish computers containing evidence from those that do not?
· Does the evidence sought involve images? What types of images are expected (stills or movies)? What is the expected image content?
· If this is a civilian response, does the suspected activity rise to the level where law enforcement involvement is going to be necessary? Child pornography is one example. If so, who is going to coordinate this with the chief executive officer (CEO), corporate counsel, and law enforcement? Are suspects going to be brought in initially, or only if illegal activity is discovered during your incident response?
· Are network connections, running processes, or other volatile data important to the investigation? If so, how is such going to be preserved and acquired?
· Where is the nearest computer-supply store? What are the address, phone number, store hours, and manager’s name? You may need something you don’t have with you, and a local computer store might be much closer than your lab.
What to Take with You Before You Leave
The best answer to this question is to pack everything imaginable and take at least two of everything! There is a basic rule in this business: cables will never fail in the lab when you have a spare on the shelf; they will, however, invariably fail in the field when you are miles from the lab, it’s after-hours, and the computer stores are closed. With that in mind, let’s go over some basic items for your field kit.
Checklists are an absolute necessity for fieldwork. Create them, customize them for various “jobs,” and revise them as needed. Despite your best efforts, you will fail to include some much-needed item on your list. Make sure you update your lists as you find deficiencies.
Your goal in creating your list will be to replicate your lab function on a smaller scale for portability and field use. Here are some suggested items as a starting point for you to use to create your own lists:
· Toolkits. A computer field technician service kit is a nice start. Include cable ties. Consider also a set of the star head attachments for the hard-to-open devices and don’t forget the new “pentalobe” screwdrivers for Apple devices!
· Portable lighting, flashlights, batteries, and a magnifying glass. (One of my favorites devices in the category is a lightweight headlamp. It frees both hands and puts the light right where you need it!)
· Latex gloves.
· Small first aid kit.
· PC reference guide.
· Digital camera to capture live data on screens and the state of the scene. Include a ruler!
· Extension cords, surge protectors, multistrip receptacles, and uninterruptible power supplies (UPSs). You take UPS power for granted in the lab, but when you must image in the field, the power will invariably fail near the end of the imaging job. Protect your data by packing a UPS or two.
· Hub or switch and network cables for setting up a small network in the field. You may want to create a small gigabit network if you have a team and are acquiring several systems in the field. You could send all your images to one large storage device, keeping all your images in one place and sharing other resources as needed.
· Network cross-over cables and spare network interface cards (NICs) for network cable acquisition or field intelligence module (FIM) acquisition.
· Spare internal floppy drive—if direct DOS acquisition must be made from a suspect computer using EnCase 6, it may or may not have a working floppy drive from which to boot.
· EnCase network bootable floppies (EnCase6 or older only) and CDs loaded with versions of Linux EnCase (linen) to match versions on portable acquisition computer(s). Have images of the same, and have extra blank floppies and CDs to make more in the field as needed.
· Forensically sound bootable Linux distributions such as Knoppix distributed by the EnCase Training Department or Raptor, which can create an EnCase evidence file and is useful for many imaging tasks.
· Storage hard drives on which to place images, wiped and formatted, along with USB to IDE/SATA adapters.
· EnCase Portable for triage searches and hard drive acquisitions.
· A supply of 4, 8, and 16 GB thumb drives that have been wiped and formatted and upon which you have placed WinEn and WinAcq. They are used, respectively, to image RAM on Windows machines and/or to do a live acquisition of running Windows machines. Both are command-line interfaces (CLIs).
· MacLockPick, which is a tool originally designed to collect volatile data from Macintosh systems but that can now do the same for both Windows and Linux systems.
· Faraday bags for shielding mobile devices from the network.
· Guidance Software’s Tableau hardware write-blocking device. Include an IDE-SATA bridge for attaching SATA drives to Tableau as well as a 2.5-inch notebook hard drive adapter.
· Portable field imaging computer (laptop, custom briefcase model, small form factor unit, and so on). Include all adapter cards, cables, power supplies, peripherals, system disks, spare keyboard and mouse, and so forth, needed for your unit. Have all necessary software loaded and an updated OS with patches, updated antivirus protection, and sync time with the time standard before going in the field. Don’t rely on one field-imaging computer. Carry a backup unit!
· EnCase manuals on disk; keep a current set of manuals downloaded and loaded on your field units.
· Cables, cables, and more cables! Pack power supply cables, IDE 80 wire cables, SCSI cables, SATA cables, molex power cables, floppy disk cable, and so forth. A good set of USB and FireWire cables with the “multiple personality” plugs for either end is a good thing to pack.
· Adapters: IDE to SATA, USB to SATA, SCSI 50-pin to 68-pin, SCSI 68-pin to 80-pin, Toshiba Protégé 1.8 drive to 3.5-inch IDE (Apple iPods), mini-SATA to SATA…and the list goes on.
· Tags, labels, bags, antistatic bags, evidence tape, and indelible ink markers.
· Field logbook or notebook, pens, and pencils.
· Anything special required for the upcoming job.
· Pack your dongles! Need I say more?
![]()
You’ll see references to various types of acquisition methods and devices, such as network cable acquisition, direct DOS or Linux acquisition, and Tableau throughout this chapter. I’ll cover those methods and devices in more depth in Chapter 4.
![]()
A useful tool to pack for the field—or to have in the lab, for that matter—is a bar code scanner. Serial numbers are becoming increasingly more complex and smaller. Seeing them and recording them accurately is always a challenge. You can purchase a simple USB bar code scanner for about $200. It’s a simple matter to plug it in and let the drivers load. At this point, you need to merely open your favorite text editor and scan in serial numbers. If you work with a database or spreadsheet in the field or lab, this is great. Simply place your cursor in the appropriate field or cell and scan in the serial number. It will save you immeasurable time and aggravation. Furthermore, entry errors will approach zero. Once you start using one, you will wonder how you ever managed without one!
The more information you can acquire about the computer systems that you are about to search, the better you can pack for the job. The hardest jobs to pack for are the ones where you know next to nothing about what’s there. When that occurs, you have to over-prepare in all regards, including equipment and staffing.
Regardless, have a plan, and work according to that plan. Create your packing list, use it, and modify it, keeping it current at all times. When you have to go out in the field, many times the response will be unexpected and with a sense of urgency. You will have many things on your mind, and the stress level is often elevated. It’s a great comfort to be able to pull out a list, pack, and mark off the items, knowing you probably will have most of what you need, consistently and reliably. If you do a significant amount of fieldwork, it is advisable to have most of what you need packed in field cases and ready to go. Even so, before venturing out, check what you have packed against your list. Preparation is the key to success when it comes to fieldwork.
Search Authority
Regardless of your response capacity, your actions must be permitted by some authority. In a law enforcement setting, the authorization could be a search warrant, consent to search, or a call from a victim whose computer system is in some way involved in their victimization, as in a network-intrusion case. In a non-law-enforcement setting, the authorization to search for evidence may be a directive from corporate counsel, it may be authorized by policy pursuant to an incident-response activation, or it may be a court order to a special master for the court in a civil matter. Regardless, all responders are bound to certain limits imposed by your authorizing process.
In that regard, all first responders must be fully aware of the limits of that search authority as part of the preparation and planning phase. The limits may be specified computers, specified types of files, specified user files, or types of evidence. Each person conducting the search and seizure must limit the scope of their searches to stay within the boundaries of their authorized limits. Also, you need a plan in effect as to how to proceed if evidence is found in plain sight that exceeds the search authority. It happens often!
If, for example, you were investigating an embezzlement case, you would reasonably find yourself limited to searching for a set of “cooked books.” If you find contraband images in the same folder as spreadsheets, with the latter being covered in your search authority, then the contraband images would be held to have been found in plain view while you were acting within the scope of your search authority or warrant and thus admissible as evidence. If you were to start searching for more contraband images, such an act would exceed the scope of your authority and subsequent images so would generally be inadmissible. The proper course of action in such circumstances is to stop searching for contraband images and seek authorization in the form of an additional search warrant. Only then can you legally search for more contraband images. Your planning process should account for these possibilities so you’ll be prepared in the event they occur.
With regard to search warrants in general, the laws are much too variable to attempt any meaningful discussion as to form, substance, and specific procedures. Because computer search warrants can get rather complex, I strongly advise you to review your warrant with your prosecutor, who will be the one ultimately carrying the burden of introducing it into evidence. When the prosecutor is involved early in the process, things generally go better in court.
When you execute a search warrant, most jurisdictions require you to leave a copy of the warrant at the premises searched, but not the affidavit for probable cause. Also, you are usually required to leave behind a list of the items seized pursuant to the search warrant. I also strongly recommend that each member of the search team have a copy of the warrant in the preparation phase when possible. In this manner, everyone involved knows their boundaries, and misunderstandings are less likely to occur when you arrive on the scene.
![]()
For additional legal information, you can download Guidance Software’s EnCase Legal Journal from its website: www.guidancesoftware.com.
Handling Evidence at the Scene
In this section, I’ll cover the various aspects of handling evidence at the scene. I’ll begin with securing the scene. Once the scene is secured, you need to document everything in place. After documenting the scene, the next step is that of seizing various items, namely, computers. Before computers can be seized, they typically have to be shut down. I’ll discuss the various issues associated with operating systems and system function as they relate to shutting down various systems. I’ll end the discussion with the bagging-and-tagging process, transporting, and securing, all in support of the all-important chain of custody. Let’s get started!
Securing the Scene
When you arrive at the scene, safety is the number-one priority. Regardless of your response capacity, those assigned to search and seize digital evidence need to be able to do so safely. Typically, two basic functions or teams are designated.
One team is the entry or security team. Their job is to establish perimeter control, make the initial entry, secure the area for the search team, and provide ongoing security and perimeter control throughout the search-and-seizure operation. The second team conducts the search operation.
Recording and Photographing the Scene
After the area is secure, the search team enters the area and begins their job. Before anything is touched or removed, the scene is recorded through a combination of field notes, sketches, video, or still images. Once the area has been recorded to show how things were initially found, the search team begin their methodical search-and-seizure process. Search teams are often responsible for the following functions:
Recorder Takes detailed notes of everything seized.
Photographer Photographs all items in place before they are seized.
Search-and-seizure specialist Searches and seizes and then bags and tags traditional evidence (documents, pictures, drugs, weapons, and so on).
Digital evidence search-and-seizure specialist Searches and seizes and then bags and tags digital evidence of all types.
Seizing Computer Evidence
Before seizing computer evidence, you must consider many issues. However, before considering those issues, stick to the basics. One of the most fundamental rules is that you should employ measures that avoid contaminating any evidence.
Physical Evidence
Computers may be subjected to computer forensic examinations, but they may also be subjected to other forms of analyses. Often fingerprints are lifted from computer components such as the mouse, DVDs, CDs, thumb drives, or perhaps even a hard drive. It is best in these circumstances that the prints lifted be those of the suspect and not yours.
Also, computers may contain hairs, fibers, or body tissues, depending on the incident or circumstances. When other examinations are to be conducted, coordinate your activities with others who will be conducting such examinations. In all cases, you must avoid commingling your fingerprints, hairs, fibers, and body tissues with those already present. At a bare minimum, you should use latex (or a nonallergenicsubstitute) gloves as a standard practice when handling computer evidence. If you follow this guideline as a matter of practice, it minimizes the concern of whether you did wear them in one case and not in another. If the other examinations are going to include hairs, fibers, and body tissues, a Tyvek suit or equivalent is recommended while handling computer evidence, both at the scene and in the lab. Your goal is to protect the evidence—both digital evidence and more traditional forms of evidence—from contamination.
Finally, some computer components are particularly unsanitary. Without going into great detail, suffice it to say that some computer components reflect the rather unsanitary habits and practices of their respective users. Gloves can serve as a barrier in these circumstances and help protect you from certain pathogens that can survive even when exposed to air. Because computers create an electrostatic field inside, they are magnets for dust, dirt, hair, fibers, and other airborne particles, aided by the fan that draws in outside air (and debris) for cooling. This collection of airborne debris has the potential to transmit disease, so many examiners opt to wear a breathing mask in addition to gloves when opening cases to remove hard drives.
Those Computers Don’t Work Anymore!
A large safe was stolen during a burglary, and the case went cold. As luck would have it, the safe contained a wealth of credit card information, and six months later one of the credit card holders reported unauthorized activity on their card. I’m sure most would be shocked to learn that some of the online purchases were pornography!
Once we got over our shock, which lasted less than a nanosecond, we traced the IP address, captured during the online purchase of pornography, to a residence in an adjoining state. The son of the owners of the residence used to work for the establishment from which the safe was stolen. Within 36 hours, we greeted those occupying the residence at dawn with a search warrant in hand.
We started in the living room of the main house and saw two computers sitting in the middle of the living room floor. They were a matching pair with the only apparent difference being the serial numbers. When questioned about the computers, the suspect’s mother replied, “Those computers don’t work anymore. They are pieces of junk [referring to them by brand name], and I was getting ready to throw them away.” We seized them nevertheless, along with other computers in the main residence.
As we continued the search, we were very careful what we touched and where we stepped. There were young teens sleeping on every available bed or sofa, in varying stages of alertness from the previous night’s activities. Pets roamed rather freely and relieved themselves where convenient. At best, the last time this house had been cleaned was most likely the day they moved in, and that was years ago.
Our suspect, however, was not to be found. As the occupants started to wake up, information started flowing, and to our surprise, we found that our suspect did not live in the residence. He was, however, supposed to be living in the equipment shed in the backyard. As we later discovered, our suspect was, in addition to being a burglar, an electrician. He had trenched in electricity, telephone, and cable (including high-speed Internet) from the house to the equipment shed in which he had taken up residence.
When we looked at the shed, we were somewhat doubtful that anyone would be living inside. Nevertheless, when we hit the shed, our suspect was inside, asleep, and enjoying his air-conditioned abode. It was a two-room shed, and both rooms were full of stolen goods, including computers, credit cards, checks, and the safe he had stolen. He had since peeled it open and removed its contents, but he could not dispose of it since he had wrecked the truck he originally used to steal and transport it. We needed a truck to remove all of the stolen goods. We also learned that in some areas, an equipment shed is also a residence.
Back in the lab, it was time to pull the hard drives from the computers. When I carefully opened the two that did not work and were about to be discarded, I was shocked when I saw the motherboards, CPUs, and cooling fans. The CPU cooling fans were jammed with hair (human, pet, and other) and other chunks of dust and debris. They looked more like nests or termite mounds on the motherboard than they did a CPU and cooling fan. They made weird noises and barely turned when powered on to get the system time. The motherboards and all electrical components were likewise coated with the same collection of materials that, when combined, would make a “Hazmat Cocktail” like no other!
Rather than risk cooking the components to get the system time, I subjected both systems to a thorough cleaning, using appropriate environmental and personal protection safeguards. Once cleaned, the systems worked flawlessly. As it turned out, these two systems were not stolen or involved in any of the criminal activity and were later returned to the mother. She was told she wouldn’t have to discard them because they had been fixed. Since she opened the door by asking what was wrong with them, the explanation involved a diplomatic lesson in cleanliness and housekeeping and how that might be more economical than discarding computers when they are less than a year old.
As an aside, one of my favorite findings in that case was from the laptop next to the suspect’s bed in the room that adjoined the “peeled safe.” Two Google searches were found:
www.google.com/search?sourceid=navclient&ie=UTF-8&oe=UTF-8&q=how+to+crack+a+vault
www.google.com/search?sourceid=navclient&ie=UTF-8&oe=UTF-8&q=how+to+crack+a+safe
And, yes, you can find plenty of information on “how to crack a safe” using Google!
Volatile Digital Evidence
Now that you have protected the traditional evidence as well as the examiner, it is time to turn your attention to protecting and capturing the digital evidence. Therefore, as one of the first things on your list, you should photograph the screen to capture the “state” of the system as you found it. If there’s an instant messenger window open with a conversation recorded on the screen, this is likely your only chance to capture it because it is in RAM and will be gone upon shutdown (unless the user was logging their instant messenger traffic).
When photographing screens, a short desktop-style tripod is useful, coupled with a camera that affords macro focusing for getting close-ups of screen details in sharp focus. If you are not going to take these photographs yourself, you want to make sure, as diplomatically as possible, that the person taking photographs of the screen has some experience doing so and knows what they are doing. I prefer doing this myself; I get what I want, I have the resultant images in my possession throughout, and I can easily include them in my report without having to seek them elsewhere. Regardless, you don’t want a picture of the screen; you want pictures of the details shown on the screen!
As alluded to in the previous paragraph, data contained in volatile RAM is gone upon shutdown, as are running processes, network connections, and other important data. With increasing frequency, investigations depend in varying degrees on the state of the system when it was live. For example, for a network-intrusion case in progress, the network connections, logged-in users, and running processes would be vital to the case. Shutting down a computer would effectively destroy some of your best evidence in the case.
Similarly, the live system state could be an issue in a child porn possession case if the defendant makes the claim they were hacked and not responsible for the content of the computer. In other words, the “Trojan Defense” is raised by the accused. Although an examiner could later restore an image to a drive and attempt to reconstruct the live state, you can only approximate it since the volatile RAM data disappeared the moment the system was shut down. In such circumstances, you use the best evidence you have available, which is the examination of the live restored system coupled with the forensic examination of the hard drive, along with antivirus and spyware scans.
Many cases, therefore, can benefit in various degrees by capturing live system state data before shutting down the computer. The nature of the case and your available resources (time, equipment, and staff) will determine whether you can capture live system state data. Although it is beyond the scope of this text to cover methods of capturing and analyzing system state data, it is worthwhile to note that EnCase Enterprise, Field Intelligence Model (FIM) 6, and EnCase Portable have the capability of capturing this data using the snapshot feature. The snapshot feature is also planned to be included in a future release of EnCase Forensic 7. As such, these versions of EnCase are tremendous tools by which to carry out the analysis and imaging of live systems.
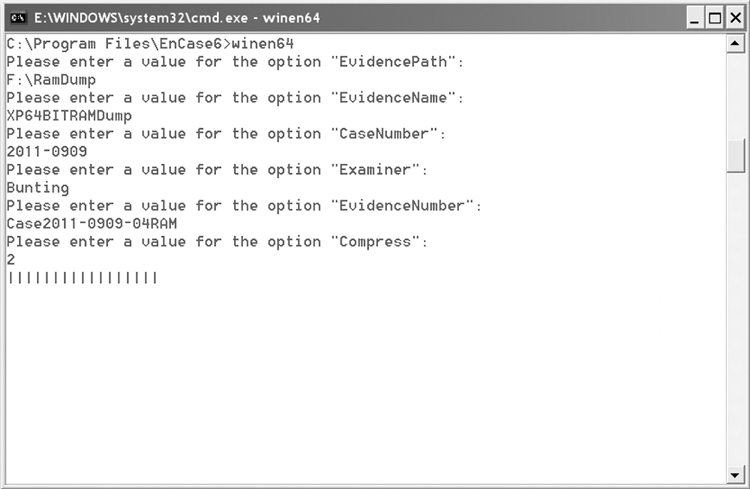
EnCase, starting with version 6.11, ships with a commandline tool named WinEn, which is used to image RAM memory. It is located in the root directory of the EnCase program files and is named winen.exe or winen64.exe for the 64-bit version. It is best run from a USB drive and by placing the resultant image file on the same USB drive. You want to launch a command-line interface (run as Administrator for Windows Vista, Windows Server 2008, or Windows 7) from which you’ll launch the executable. As shown in Figure 3-1, you will be prompted for the various pieces of information required to complete the image. When done, you can use EnCase to examine the resultant image. You can also use EnCase Portable to image the RAM.
We have reached a point now where not imaging RAM and otherwise capturing volatile data is the exception instead of the norm. There is simply too much valuable information that is destroyed by not capturing it.
Figure 3-1: WinEn is being used to capture RAM. Note that this is the 64-bit version and that the user is prompted for the various input items. Just a helpful hint, Compress is either 0, 1, or 2 (no compression, good compression, or best compression)
You can use the same versions (Enterprise and newer versions of EnCase Forensic) to image live systems via a network connection without shutting them down. This can be useful in a variety of circumstances. If you encounter a disk or volume encrypted with Windows BitLocker or with software such as BestCrypt or PGPdisk and the disk is mounted (you can see the unencrypted data), it can be imaged while mounted, allowing the data to be captured in an unencrypted state in the resultant image. But if the computer were shut down and then imaged, the image would be a stream of encrypted data. If you are tasked with imaging a production server that cannot be shut down without harming a business operation, EnCase Enterprise or EnCase Forensic 7 will again be your tool of choice for the job.
![]()
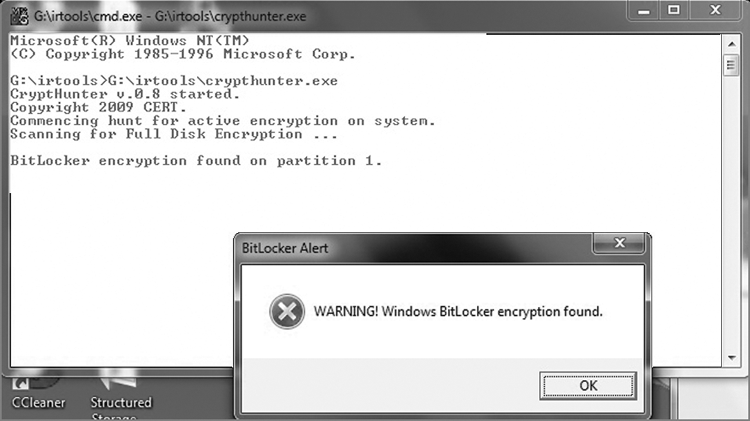
First responders should check any live machine for mounted encryption before deciding to “pull the plug.” Failing to do so is asking for trouble, given the increasing prevalence of various encryption schemes, such as BitLocker, PGP, BestCrypt, TrueCrypt, and so forth. Fortunately, there are tools becoming available for this task, such as CryptHunter. It is a command-line tool that searches for characteristics known to be associated with various encryption schemes. Figure 3-2 shows how CryptHunter responds to the discovery of BitLocker.
Figure 3-2: CryptHunter has discovered the presence of BitLocker. Your choice now is to disable the protectors on BitLocker or image the mounted encryption while live and mounted. An even better choice would be to do both!
![]()
I just mentioned disabling the protectors on BitLocker. Without delving too deeply into BitLocker intricacies, suffice it to say that you can enter a command from the Windows CLI (running as administrator) that will disable the protectors on BitLocker by rendering the key into clear text into an unencrypted partition. During mounting of the BitLocker-encrypted volume, Windows will see this key, use it to mount the encrypted volume, and ignore other protectors that would normally be required. Enter the following command from the Windows CLI:
cscript manage-bde.wsf -protectors -disable c:
Before doing so in a live case, I suggest you test this procedure in the lab first!
To assist with imaging live systems, EnCase started shipping WinAcq with EnCase 6.16. It is a command-line tool with prompts given to provide the necessary information to complete the image. You can image a live physical drive or logical volume with this tool. As with WinEn, WinAcq is located in the root of the EnCase program files, is named winacq.exe (there is no 64-bit version currently) and needs to be run from the command line with administrator rights starting with Windows Vista.
![]()
The EnCase FIM version was available only to law enforcement or government entities and was retired in version 6, with the incorporation of the functionality into EnCase Forensic in a later release of version 7. The Enterprise version has the same functionality and is available for corporate or civilian use. The differences between the two rest primarily with the Secure Authentication for EnCase (SAFE) configuration and licensing.
If the Enterprise, FIM 6, Portable, or Forensic 7 versions are not available to you and the live system-state data is critical to your investigation, you have a decision to make: either forgo the data or capture it by less-than-ideal means. If you must capture the data without Enterprise, FIM 6, Portable, Forensic 7, or some third-party tool, you are left with carefully navigating to the areas where your data is located, capturing it, and meticulously documenting your rationale, process, and findings. Examples of areas of interest might be using the netstat.exe command to capture network connections and porting the output to a USB drive. Another might be capturing running processes using Task Manager or doing so using a command-line interface, again porting the output to a floppy disk. Although that is not the best method to employ, if you can document the process and basis for doing so thoroughly, there’s usually little difficulty resulting from this method. You must, however, understand that if a rootkit has been installed, nothing can be trusted as output from any Windows binary because it can be altered. Thus, you should bring your own trusted binaries when capturing volatile data by this method.
Clearly, live analysis is warranted in many cases. Depending on your operating environment, you may be involved almost exclusively in analyzing and imaging live systems. Such is the case with many corporate examinations using the EnCase Enterprise model. Quite by contrast, in a law enforcement setting, much of your work will likely be on systems that have been shut down and seized by field agents and delivered to you in the lab for analysis. Most of us find ourselves somewhere in between, with some of both. Regardless, your operating environment, resources, policies and procedures, and the nature of the case will combine to be the factors that decide whether the analysis and imaging will be done on a live system or one that has been shut down and imaged offline.
![]()
Live analysis is clearly beyond the scope of this text. If you want more information on this topic, Mastering Windows Network Forensics and Investigation by Steve Anson and yours truly covers this topic in detail. The use of the EnCase FIM and Enterprise models as live-response tools is covered as well. The text is available from Wiley at www.wiley.com/WileyCDA/WileyTitle/productCd-0470097620.html.
Computer Shutdown Procedures
At this point in our discussion, I’m proceeding as though you’ve decided to shut down the computer and image it in the lab. The screen information has been photographed, and relevant information about its system state has been recorded to the greatest extent possible with the resources at hand. Before shutting down the computer, disconnect it from its network connection by removing the network cable. This prevents the possible remote destruction of data.
The manner in which a computer is shut down is very much dependent on the operating system and function. Most Windows workstation models can simply be shut down by pulling the power cord. By contrast, some Windows servers running high-end business databases are not very fault tolerant, and a power loss (pulling the plug) can corrupt the database—and with it comes potential liability for you. To preserve data, these systems require a normal system shutdown.
Since the decision of how to shut down a computer is operating system dependent, you must first determine what kind of operating system is running. Simplicity is often the best choice in this business, and in this case it means asking someone who likely knows. Usually the computer system owner or user knows what the operating system is. In an office, often the same operating system is deployed on all the workstations, and someone in the office usually knows which operating system is in use. The system administrator is most helpful in making these determinations, especially when your work involves the server room. Often your preplanning information gathering will include what operating systems are at your target location. Table 3-1 shows the recommended shutdown procedures for various operating systems commonly encountered. Figure 3-3 shows a Linux prompt where the user is changed to root and the shutdown command has been entered. You will note that the $ prompt changes to # when the user is changed to the root user.
Figure 3-3: A Unix/Linux prompt. You must be root to shut down most Linux/Unix systems. The su root com root mand logs in as root (a password is necessary). At the root prompt, the shutdown command sequence is entered.

Table 3-1: Best shutdown procedures based on operating system in use
|
Operating System |
Characteristics |
Shutdown Procedures |
|
DOS |
Full-screen text on a solid background, usually black. Prompt includes drive letters, backslashes, and usually an >; for example, C:\DOS>. |
Photograph the screen, and note any running programs, messages, and so on. Pull the plug from the rear of the computer. |
|
Windows 3.1 |
Program Manager instead of Windows Explorer. Colored tile bar. Standard menu. |
Photograph the screen, and note any running programs, messages, and so on. Pull the plug from the rear of the computer. |
|
Windows 95 |
Start button with Windows symbol. |
Photograph the screen, and note any running programs, messages, and so on. Pull the plug from the rear of the computer. |
|
Windows NT Workstation |
Start button with Windows symbol. |
Photograph the screen, and note any running programs, messages, and so on. Pull the plug from the rear of the computer. |
|
Windows NT Server |
Start button with Windows symbol. |
Photograph the screen, and note any running programs, messages, and so on. Use normal shutdown procedure. |
|
Windows 98/Me |
Start button with Windows symbol. |
Photograph the screen, and note any running programs, messages, and so on. Pull the plug from the rear of the computer. |
|
Windows 2000 Professional |
Start button with Windows symbol. |
Photograph the screen, and note any running programs, messages, and so on. Pull the plug from the rear of the computer. |
|
Windows 2000 Server |
Start button with Windows symbol. |
Photograph the screen, and note any running programs, messages, and so on. Use normal shutdown procedure. |
|
Windows XP |
Green Start button with Windows symbol. |
Photograph the screen, and note any running programs, messages, and so on. Pull the plug from the rear of the computer. |
|
Windows 2003 Server |
Green Start button with Windows symbol. |
Photograph the screen, and note any running programs, messages, and so on. Use normal shutdown procedure. |
|
Windows 2008 Server |
Round Aero circle with Windows symbol in lower-left corner (default location) |
Photograph the screen, and note any running programs, messages, and so on. Use normal shutdown procedure. |
|
Windows Vista / Windows 7 / Windows 7 Enterprise |
Round Aero circle with Windows symbol in lower-left corner (default location) |
Photograph the screen, and note any running programs, messages, and so on. Pull the plug from the rear of the computer. |
|
Linux/Unix |
If GUI present, look to the Start button with the Unix/Linux version symbol or icon, such as a red hat or fedora. If in console (no GUI), look to prompt for something like [root@localhost root]#[user@host dir]$. |
Photograph the screen, and note any running programs, messages, and so on. Use normal shutdown procedure. In many cases, the user will need to log in as root to shut down the system. If GUI, right-click the desktop and select Console or Terminal from the context menu. At the resulting prompt, look for # at the right end. If not, type su root. You will be prompted for a password. If you have it, type it in. If you don’t, you’ll probably have no choice but to pull the power cord. When at root, note the # at the end of the prompt. When at root, type shutdown -h now, and the system should shut down. (For Irix or Solaris, you should use shutdown -i0 -g0 to achieve the same result.) |
|
Macintosh |
Apple symbol in top-left corner. Trash icon usually in lower right. |
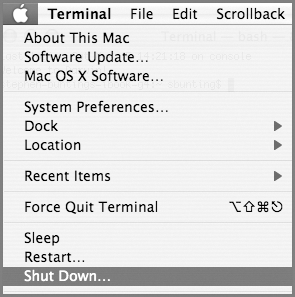
Photograph screen, and note any running programs, messages, and so on. Record time from the menu bar, and simultaneously record the known standard time. Pull the plug from the rear of the computer. Note: If Mac is running OS X, BSD (a Unix variant) is running as a subsystem process. Also, Macs can run as servers (web, database, email, and so on). If any of these conditions apply, a normal Mac shutdown is the safer course of action. For OS X, click the Apple icon, and choose Shut Down. You will be prompted to confirm (see Figure 3-4). For legacy Macs, click Special, and click Shut Down. When it is shut down, pull the power cord. |
Figure 3-4: Max OS X shutdown. Note the Apple icon in the upper left. Click this icon, and you’ll see the Shut Down menu option.
The characteristics noted in Table 3-1 are general guidelines to follow when you are completely in the dark and have no other information. Alternatively, you can interact with the system to attempt to determine the operating system. If this becomes necessary, use caution, and document, in detail, every step taken. Such cases are actually rare, and with experience, most examiners recognize most operating systems when they see them. What is tricky, however, is whether the operating system is a server variety or the computer needs to be treated as though it were a server. Sometimes a “workstation” flavor of an OS is used with a database server application. This rarely occurs in a home setting, but it is something to watch for in a business setting. When critical business applications are known to be running or you are in doubt, it pays to err on the side of a normal shutdown procedure.
If you are “pulling the plug” to shut down a system, you should pull the plug from the rear of the computer. If you get in the habit of pulling it from the wall, you may encounter a situation where a UPS might be in place, and pulling it from the wall under such conditions only triggers a power failure condition. If so configured, this information is recorded on the host computer, and sometimes emails or pages are sent, and the host may start into a normal shutdown. Instead of preserving data, your actions are now causing data to be written to the system, overwriting potential evidence in the process. Get into the habit of pulling the plug from the rear of the computer.
Similarly, if you are attempting to shut down a laptop and you pull the power from either the wall or the rear of the computer, most often the battery still remains, providing power to the laptop. You must remove the battery as well. Keep the battery and the power supply with the laptop when you seize them.
As a final note on shutting down computer systems, remember to document what procedure you used, when you did it, how you went about it in detail, and the rationale or reason why. For the purposes of this discussion, assume that you must shut down and seize a Windows 7 Enterprise system on which a large SQL-based business database application is running. Although you would ordinarily pull the plug on a Windows 7 Enterprise workstation, in this case there is a more compelling need to protect the database from being corrupted from a sudden power outage caused by pulling the plug. A normal shutdown is advised so that the SQL database can go through a normal shutdown before the OS shuts down.
By documenting what you did and why, you will probably avoid questions regarding why you shut down normally when most of the documentation calls for pulling the plug for a Windows 7 Enterprise workstation. If the question is still asked, you can refer to your report, which is already in opposing counsel’s hands, to answer that question.
Bagging and Tagging
Once the computer is shut down, it is time—well, almost time—to treat it like most other forms of evidence, which involves subjecting it to the bagging-and-tagging process. Even if you are conducting a live acquisition and leaving the target computer in place when you leave, you will still want to document the cabling and physical configuration of that computer. You will also want to bag and tag the drive or media that contains the image that you obtained. Thus, bagging and tagging refers to either form of acquisition, with some variation in degree depending on whether you are physically removing the target computer.
Before bagging and tagging occurs, you need to make sure you label all the cables and photograph the rear of the computer with cables and tags in place. Since you should have already removed the network cable earlier, you should reconnect it for this process. If your photographer did not already photograph the rear of the computer, as they should have at the outset, have it done now before attaching labels so that the rear appears as you found it.
To label a cable and connection, attach a label to the cable near its terminal end, and place one next to its corresponding port on the computer. For each cable and port pair, mark the labels with a unique letter, starting with A and sequencing through the alphabet until you have all labeled and marked. In this manner, cable A goes with port A, cable B goes with port B, and so forth. Photograph the rear from different angles. When done, remove the cables, and you are ready for bagging and tagging. Using this method, you can show how the computer was configured and connected when you found it and provide for a means to reconstruct that configuration if necessary.
Bagging and tagging has a purpose, and it is not to bolster the revenues of the makers of such products. Bagging protects against contamination and tampering. Tagging provides a means of associating the attached and bagged evidence with a particular location, date, time, case, event, and seizing agent. Tagging also provides for a means of creating the first link in the chain of custody of the evidence. Chain of custody is a concept in jurisprudence that applies to the process by which evidence is handled to assure its integrity as proof of a fact in court. Practically speaking, it refers to the “paper trail” that tracks seizure, custody, control, transfer, analysis, and disposition of all evidence. Tagging can also serve as an integrity seal for the bag, part of the chain of custody, depending on the type of tag used.
Because evidence, including computer evidence, comes in all shapes and sizes, bagging can be challenging. Computer evidence also presents another complication in that it is subject to potential damage from static discharges. This occurs when objects of dissimilar electrical potential make contact. Accordingly, when bagging computer components, you must avoid using plastic bagging materials that do not possess antistatic properties. Large plastic antistatic bags can be purchased for this purpose; however, brown wrapping paper or paper bags are more economical alternatives.
When bagging smaller items such as hard drives, flash media, and the like, small antistatic bags are recommended because you can see the contents and have antistatic protection as well. These are often in surplus from component purchases and can be purchased quite inexpensively.
When completing information on the tag, don’t skimp on details. If you get in a hurry and plan to do it “later,” you may find that you forget to do it at all or complete it with incorrect information since the details are no longer fresh in your mind. Be thorough by recording the details at the time of the seizure event.
When transporting computer evidence from the scene to the lab, pack it carefully so that a bump or sudden deceleration doesn’t cause it to shift and become damaged. Also, you want to keep it away from strong magnets such as the type that are often found on the “Kojak lights” of unmarked police vehicles, which are the style that are temporarily attached to the roof via a strong magnet in the base.
Don’t Forget to Look Up!
Once while investigating the criminal activities of a “rogue” system administrator, I interviewed one of his associates. Apparently our suspect admitted to his associate that, while working for his previous employer, he had installed a “hidden” NT server above the drop ceiling of the computer room while working the night shift. He told his associate that he made frequent use of this “hidden” resource for a long time.
I called the head of the IT department for this institution and advised them of my apparent discovery. Two hours later, the IT manager called back. Upon removing the ceiling panels, they had found an NT server hidden in the ceiling, surreptitiously hardwired into their main system. He commented that for more than a year he had system problems that defied resolution. Needless to say, another investigation commenced, with a clear suspect indicated.
When searching an area for computer evidence, look in unexpected or hidden areas. Especially nowadays, with ubiquitous wireless connectivity, it is easy to conceal a networked laptop or wireless router almost anywhere.
Over the years much has been said about keeping magnetic media away from the radio frequency (RF) energy emitted by police radio transmitters located in police cars. Theoretically, this is to avoid data corruption from the radio frequency energy. As yet, no one I know has confirmed such data corruption in actual practice. I have read accounts of people deliberately attempting to induce such a loss by exposing magnetic media to RF energy and failing to corrupt the data. It is hard to conceive of a burst of energy that would corrupt data in such a pattern as to create an image depicting child pornography where none previously existed! Nevertheless, it is probably still good practice to keep the media as far away from such sources as possible to minimize such claims.
Once the evidence arrives at the lab, just like traditional evidence, it should be logged into the master evidence log or database and secured in an environment or space that assures its evidentiary integrity. In this manner, it is safeguarded against claims of tampering, and the documentary trail secures the chain of custody for the evidence.
If at any point in the examination process the evidence is removed or the seal is broken, this should be recorded in the evidence log or database. Similarly, when evidence is resealed and returned to storage, it should be dutifully recorded in the log.
Exercise 3.1
First Response to a Computer Incident
The purpose of this exercise is to prepare you for the second part of your EnCE examination, which is the practical. After passing your written examination, you’ll be given a CD with a case to work. Part of that process will be to document your first-response procedures for your report. To prepare for the phase, assume the following:
1. You are responding with others to the scene of a computer incident. You are the one responsible for the computers at the scene. The target system (only one) is in a business. The screen is locked, with the operating system logo displayed as Windows 2008 Server. The prompt explains that the computer is locked and that only the administrator can unlock it. The system administrator is available and is not the target of the investigation, and she is considered a person with high integrity who is willing to assist.
2. Describe in detail how you would take down this machine and take it to the lab for imaging if the Enterprise, FIM 6, Portable, or EnCase 7 version is not an option and if your directive is to seize it and take it to the lab.
3. Write your narrative as though it were going to be included in your report. Be sure to describe your shutdown methodology and reasoning. Include details sufficient to establish the complete chain of custody from the scene to the lab.
When all is said and done, the computer evidence has been preserved and secured in such a manner as to prevent contamination or tampering. Furthermore, its entire history of possession and processing has been documented in such a way as to maintain its chain of custody. Although questions can always be raised, it is the answers to the questions that are important. If you consistently treat evidence in the manner I’ve described, you’ll always be in a position to answer the questions in a way that ensures your evidence will be introduced in court to the finder of the facts.
Summary
This chapter explained the fundamentals of the incident-response process. I discussed the importance of planning, with a focus on gathering information about the target of your incident response and on packing for the task at hand, thus ensuring you have the staff and equipment resources you need on-site.
Next, I discussed how to handle evidence at the scene, highlighting the importance of securing and then processing the scene. I explored the pros and cons of employing immediate shutdown vs. first capturing the volatile system-state data. I also covered the various shutdown methods based on the type of operating system in place and the function of the computer system. Finally, I discussed how to bag and tag computer evidence as a means of protecting it from contamination and tampering and thus assuring the chain of custody from the scene to the courtroom.
Exam Essentials
Know how to plan for an incident response. Understand the planning and preparation process. Know what information to seek about the target location, specifically the type of facility, the personnel present, the suspect or target, and the computer systems expected to be present. Know how to prepare a detailed packing list for field equipment needed for an incident response.
Understand the importance of scene security and safety. Understand that the safety of all people present is everyone’s primary responsibility, and, simply because it is a computer incident, this responsibility is in no way lessened or diminished. Understand how the scene is secured initially and throughout the process, most often by people for whom scene safety and security is the primary function.
Know what data is lost when you shut down a computer. Understand that volatile system-state data (network connections, running processes, logged-in users, and so on) is effectively gone when a system is shut down. Understand that encrypted volumes are often deployed and that pulling the plug effectively renders this data useless in most cases. Know your options for capturing volatile data if it is necessary to your investigation. Know how to identify encrypted volumes and to take steps to mitigate their impact and/or image them while live and mounted.
Know when to shut down normally and when to pull the plug. Understand the risks involved when pulling the plug on certain computer systems. Know for which operating systems it is usually the best practice to pull the plug and for which operating systems it is usually the best practice to go through a normal shutdown sequence. Be able to list what the exceptions are and why they exist.
Understand the importance of bagging and tagging. Understand the unique nature of computer evidence and how it must be carefully bagged so as to protect it from static discharges. Be able to explain how bagging and tagging protect the evidence from contamination and tampering and preserve the chain of custody. Be able to explain the phrase chain of custody.
Review Questions
1. What is the first consideration when responding to a scene?
A. Your safety
B. The safety of others
C. The preservation of evidence
D. Documentation
2. What are some variables regarding a facility that you should consider prior to responding to a scene?
A. What type of structure is it?
B. How large is the structure?
C. What are the hours of operation?
D. Is there a helpful person present to aid in your task?
E. All of the above.
3. What are some variables regarding items to be seized that you should consider prior to responding to a scene?
A. Location(s) of computers
B. Type of operating system
C. Workstations or mainframes
D. System-critical or auxiliary machine
E. All of the above
4. Generally speaking, if you encounter a desktop computer running Windows 7, how should you take down the machine?
A. Shut down using Windows 7.
B. Shut down by pulling the power cord from the outlet.
C. Shut down by pulling the plug from the computer box.
D. All of the above.
5. Generally speaking, if you encounter a computer running Windows 2008 Server, how should you take down the machine?
A. Shut down using its operating system.
B. Shut down by pulling the power cord from the outlet.
C. Shut down by pulling the plug from the computer box.
D. All of the above.
6. Generally speaking, if you encounter a Unix/Linux machine, how should you take down the machine?
A. Shut down using its operating system.
B. Shut down by pulling the power cord from the outlet.
C. Shut down by pulling the plug from the computer box.
D. All of the above.
7. When unplugging a desktop computer, from where is it best to pull the plug?
A. The back of the computer
B. The wall outlet
C. A or B
8. What is the best method to shut down a notebook computer?
A. Unplug from the back of the computer.
B. Unplug from the wall.
C. Remove the battery.
D. Both A and C.
9. Generally speaking, if you encounter a Macintosh computer, how should you take down the machine?
A. Shut down using the operating system.
B. Shut down by pulling the power cord from the outlet.
C. Shut down by pulling the plug from the computer box.
D. All of the above.
10. Which selection displays the incorrect method for shutting down a computer?
A. DOS: Pull the plug.
B. Windows 7: Pull the plug.
C. Windows XP: Pull the plug.
D. Linux: Pull the plug.
11. When shutting down a computer, what information is typically lost?
A. Data in RAM memory
B. Running processes
C. Current network connections
D. Current logged-in users
E. All of the above
12. Which of the following is not acceptable for “bagging” a computer workstation?
A. Large paper bag.
B. Brown wrapping paper.
C. Plastic garbage bag.
D. Large antistatic plastic bag.
E. All of the above are acceptable for bagging a workstation.
13. In which circumstance is pulling the plug to shut down a computer system considered the best practice?
A. When the OS is Linux/Unix
B. When the OS is Windows 7 and known to be running a large business database application
C. When the OS is Windows (NT/2000/2003/2008) Server
D. When Mac OS X Server is running as a web server
E. None of the above
14. How is the chain of custody maintained?
A. By bagging evidence and sealing it to protect it from contamination or tampering
B. By documenting what, when, where, how, and by whom evidence was seized
C. By documenting in a log the circumstances under which evidence was removed from the evidence control room
D. By documenting the circumstances under which evidence was subjected to analysis
E. All of the above
15. It is always safe to pull the plug on a Windows 7 Enterprise operating system.
A. True
B. False
16. On a production Linux/Unix server, you must generally be which user to shut down the system?
A. sysadmin
B. administrator
C. root
D. system
17. When would it be acceptable to navigate through a live system?
A. To observe the operating system to determine the proper shutdown process
B. To document currently opened files (if Enterprise/FIM edition is not available)
C. To detect mounted encryption
D. To access virtual storage facility (if search warrant permits; some are very specific about physical location)
E. All of the above
18. A console prompt that displayed backslashes (\) as part of its display would most likely be which of the following?
A. Red Hat Linux operating system
B. Unix operating system
C. Linux or Unix operating system logged in as root
D. MS-DOS
19. When called to a large office complex with numerous networked machines, it is always a good idea to request the assistance of the network administrator.
A. True
B. False
20. Subsequent to a search warrant where evidence is seized, what items should be left behind?
A. Copy of the affidavit
B. Copy of the search warrant
C. List of items seized
D. A and B
E. B and C
All materials on the site are licensed Creative Commons Attribution-Sharealike 3.0 Unported CC BY-SA 3.0 & GNU Free Documentation License (GFDL)
If you are the copyright holder of any material contained on our site and intend to remove it, please contact our site administrator for approval.
© 2016-2026 All site design rights belong to S.Y.A.