EnCase Computer Forensics (2012)
Chapter 5
EnCase Concepts
EnCE Exam Topics Covered in This Chapter:
· EnCase evidence file
· CRC, MD5, and SHA-1
· EnCase evidence file format
· New evidence file format
· Evidence file verification
· Hashing disks and volumes
· EnCase case file
· EnCase backup utility
· Configuration, or .INI, files
· Evidence cache folder
This book has made numerous references to the EnCase evidence file. I’ve talked about many of its properties, such as compression, file chunk size, protection via password, MD5 hash, and CRC frequency. In this chapter, I’ll closely examine the evidence file. I’ll describe its major components and its various properties in detail. The evidence file, as you’ll see, is constructed to maintain the authenticity and integrity of the original evidence, both of which are crucial in maintaining the chain of custody.
It is important that you understand how EnCase works with the evidence file “under the hood” so you can explain or demonstrate why or how the evidence is preserved and unaltered in the EnCase environment. To that end, you’ll use evidence files included on the online resource page (www.sybex.com/go/ence3e) for this book in an exercise that demonstrates what happens when the evidence file is corrupted or subjected to deliberate tampering. When you finish this chapter, you’ll thoroughly understand the EnCase evidence file and have a high degree of confidence in the integrity of the data under examination.
![]()
Examples are included on the online resource page and in Exercise 5.1.
EnCase Evidence File Format
The EnCase evidence file is often called the image file. This is a carryover from the original imaging methods that had their roots in the Unix dd command. In Linux or Unix, everything is a file. Thus, a device, such as a hard drive, can be addressed as a file. Using the dd command, you can copy one hard drive onto another hard drive with the apparent ease of copying a file, although the process certainly takes longer. The copy produced can be a stream of data sent from the original drive to the copy drive, with the end result being two identical drives, assuming the copy drive contained the same number of sectors. Alternatively, you could direct the copy to an actual file instead of a device. The end result of this process is a large file whose contents are a bit-by-bit copy of the original device. This image file is often given the extension .img to denote it as such.
Regardless of its name, the primary purpose of an EnCase evidence file is to preserve an exact bit-for-bit copy of the target media. Unlike a Linux dd image, which contains only the bit-for-bit copy, the EnCase evidence file contains the bit-for-bit copy plus other information that serves to “bag-and-tag” the evidence file to preserve the chain of custody. Achieving this same bag-and-tag effect in Linux would require several separate steps. Even then, the bag-and-tag items are still separate items and not integrated into the image. With EnCase, by contrast, this bag-and-tag information is created automatically and integrated into the evidence file while it is created. By doing so in one automated step, you ensure that the evidence is placed in a sealed, self-authenticating evidence container, thus preserving the integrity of the evidence.
CRC, MD5, and SHA-1
Throughout this book, I have mentioned the CRC and the MD5. During the discussion of acquisitions, I described MD5 in detail. For purposes of understanding the file integrity component or function of the EnCase evidence file, I need to digress at this point to review and expand your understanding of the CRC and MD5. In this manner, you can better appreciate what these values mean and how they contribute to the file integrity measures employed by EnCase.
You may recall from the previous discussions that an MD5 (Message Digest 5) is an algorithm or calculation applied to streams of data (files, devices, and so on). The result of this calculation is a 128-bit hexadecimal value (32 characters with each character or byte containing 8 bits each). The number of possible values for this hexadecimal number is 2128. Thus, the odds of any two files having the same MD5 value are 1 in 2128. In tangible terms (to the extent that such numbers are tangible), that is one in approximately 340 billion billion billion billion. Because the odds are so remote of two files having the same hash value, one can statistically infer, with an extremely high degree of confidence, that two files having the same hash value have the same file contents. The reverse can also be inferred: if two files have different hash values, their contents are different. For this reason, the MD5 is an industry standard in the computer forensics field for verifying the integrity of files and data streams.
A Cyclical Redundancy Check (CRC) is similar in function and purpose to the MD5. The CRC algorithm results in a 32-bit hexadecimal value. The number of possible values for a 32-bit hexadecimal value is 232, and the odds of any two numbers having the same CRC is one in 232. Translated, this means that the odds of any two files having the same CRC are 1 in 4,294,967,296 (4 billion and some change!). Although the odds associated with a CRC hardly approach those offered by the MD5, 1 in 4 billion is still a statistically strong validation.
The MD5 requires more calculations than the CRC, and hence more time and system resources are required to generate an MD5. Because the CRC is faster to generate and uses fewer system resources, it has value in that regard and is used frequently for maintaining data integrity in a variety of applications. It is a good compromise solution for providing data integrity checking when performance is an issue. As you’ll come to appreciate, EnCase makes frequent use of the CRC during its program operations and uses both the CRC and the MD5 when validating the entire evidence file. Combined, the CRC and MD5 provide powerful data integrity tests throughout the entire acquisition and examination process.
With the release of EnCase 6, support for SHA-1 was added. SHA-1 is another cryptographic hashing algorithm that was designed by the U.S. National Security Agency (NSA) and released in 1995. Whereas the MD5 produces a 128-bit value, SHA-1 produces a 160-bit value. By providing a greater number of potential outcomes, hash collisions are reduced by this more robust algorithm. EnCase supports both MD5 and SHA-1, allowing either or both to be calculated.
Evidence File Components and Function
An EnCase evidence file has three major components: the header, the data blocks, and the file integrity component (CRC and MD5/SHA-1). The header will appear on the front end of the evidence file, and the data blocks follow the header. The file integrity component exists throughout and provides redundant levels of file integrity.
Each compartment has its own integrity seal, and the header is sealed with its own CRC. Each data block is verified with its own CRC. The entire data block section is subjected to an MD5/SHA-1 hash, called an acquisition hash, which is appended after the data blocks. The header and all CRCs are not included in this MD5/SHA-1 hash. It is important to understand that the MD5/SHA-1 hash is calculated only on the data.
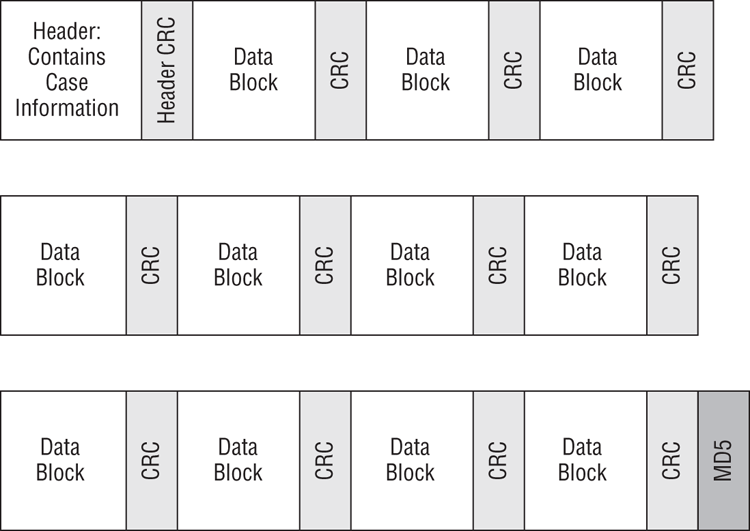
Although the header and the data blocks are clearly separate data areas, the file integrity component is interwoven throughout. It can be viewed abstractly as a separate component, but when viewed in its physical form, it is ubiquitous throughout the evidence file, as you can see in Figure 5-1.
Figure 5-1: Physical layout of the EnCase evidence file. The header appears at the front of the file, followed by the data blocks. Note that the file integrity components (CRCs and MD5/SHA-1) are interwoven throughout.

![]()
The above physical layout in Figure 5-1, and subsequent discussion, applies to evidence files that are not compressed. When compression is applied, there are no CRC’s following Data Blocks. Rather, the compression/decompression process contains its own validation process.
Now that you have an overall understanding of the construction of the evidence file, I’ll show how one is created, starting with the header. The header contains much of the case information that you entered at the Options screen during acquisition, along with other information. You may expect the following, among other data, to be contained within the header:
· Evidence name
· Evidence number
· Notes
· Date/time of acquisition
· Version of EnCase used for acquisition
· Operating system under which acquisition took place
Once the acquisition options (name, number, notes, and so on) have been entered and the system information has been gathered, this information is placed in the header. The header is subjected to a CRC and compressed. The header is always subjected to compression even when the data is not. Compressing it saves space and removes the ability to alter clear-text data. In this manner, the documentary information concerning the evidence is sealed for integrity. This component, the header, and its CRC are placed on the front of the evidence file.
Immediately following the header are the blocks of data. Before EnCase 5, these data blocks were always 64 sectors (32 KB), except for the last data block, which was almost always less than 64 sectors. Starting with EnCase 5 in Windows and LinEn in Linux, the block sizes can be changed up to 32,768 sectors (16 MB). The default size is still 64 sectors. In the discussions that follow, you must understand that changing the block size when you acquire data will affect the block sizes in the evidence file and, with that, change the frequency of the CRC values. For example, changing the block size to 128 sectors will mean that a CRC will be written for every 128 sectors instead of the default size of every 64 sectors.
For now, let’s assume that the block size is unchanged and remains the default size of 64 sectors. With this default setting, the buffer or memory size is set at 64 sectors. This means data will be read into memory in blocks of 64 sectors. Once this data is in memory, a CRC is computed for this block of 64 sectors. Additionally, this block is computed into the cumulative MD5 hash that is being calculated over the entire set of data from the first sector to the last sector acquired. If you opt for no compression, the data block and its CRC are appended to the evidence file. If you select compression, the block of data and its CRC are compressed and appended to the data file.
EnCase uses industry-standard compression algorithms when compressing its evidence files. The amount of compression you will achieve will vary, depending on the type of data on your drive. Drives with lots of zeros in the unallocated space compress very well. By contrast, if the unallocated space contains lots of data of types that don’t compress well, you’ll obviously achieve less overall compression. On the average, using compression enabled, you’ll see average compression rates approaching 50 percent. Compression comes with a cost, which is increased acquisition time. Acquisition times with compression can approach three times the amount that no compression requires. Also, as previously noted, when compression is applied, the compression / decompression algorithm verifies the data in lieu of CRC’s for each data block as used with uncompressed evidence files.
When the last block of data in the target device is reached, it will rarely be exactly 64 sectors—it is usually smaller than 64 sectors. That block of data is written to the evidence file along with its CRC. At this point, there is no more data to process, and the acquisition hash (MD5/SHA-1 value) is complete and is written in the section, which is then appended to the end of the evidence file. In addition to the MD5/SHA-1 acquisition hash, you will find other data in this area. This data area is the last segment of the evidence file. It is approximately 3 KB in size and contains metadata that describes various properties of the evidence file, such as offsets for start and stop points for header, data area, and so forth. The MD5/SHA-1 is part of the metadata contained in this final segment.
If the target media will not fit in one evidence file, as defined in the file segment size (file chunk size) setting, it will span as many evidence files as are needed to contain it. The first evidence file created will contain the header at its beginning, followed by as many data blocks as will fit based on the file segment size and the degree of compression selected. When more than one evidence file is required, the MD5/SHA-1 can’t be completed and written until the last block of data is read. Therefore, no MD5/SHA-1 will be written to the first evidence file when multiple files are required.
![]()
When creating file segment sizes, EnCase 7 has new minimums and maximums for file segment sizes. The minimum file segment size is 30 MB, and the maximum file segment size is 8,796,093,018,112 MB. Naturally, the file system being used for storage must be able to support file sizes this large.
Since the header is contained in the first evidence file, it is not necessary for the header to be written again. This means all subsequent evidence files will have no header section. The MD5/SHA-1 value can’t be completely calculated and written until the last data block is processed, so only the last evidence file in the series will contain the MD5/SHA-1 value and metadata appended to the end.
Figure 5-2 shows how evidence files are constructed when multiple evidence files are required. Any evidence file that is neither the first nor the last will contain only data blocks and CRC values for each block. In Figure 5-2, the diagram in the middle, between the first and last blocks, depicts evidence files that are neither first nor last. In most cases, evidence file segments looks like the middle one in Figure 5-2, because most cases involve relatively large devices that result in a large number of evidence files when the image is acquired.
When the first evidence file is written, the filename is the one you designated when selecting the acquisition options. The extension for the first file is .e01; the extension for the second file is .e02, and so on, until evidence file numbers reach 100. The extension for evidence file 100 is .eaa. The extension for evidence file 101 is .eab, which continues until evidence file number 126 (.eaz). The file extension for evidence file 127 is .eba. The sequencing continues as needed until the last evidence file is created. If you are using the new evidence file format, which we’ll cover momentarily, the extension will be .ex01, .ex02, and so on.
Figure 5-2: Evidence file format when multiple evidence files are required
![]()
The above physical layout in Figure 5-2 applies to evidence files that are not compressed. When compression is applied, there are no CRC’s following Data Blocks. Rather, the compression / decompression process contains its own validation process.
When selecting a source drive to hold your evidence files, it’s best to try to contain your files on one drive. Thus, the size of the source drive should be adequate to hold all the data from the target drive. If you are imaging an 80 GB drive with no compression, logic might lead you to think you can contain the image on an 80 GB drive. But, assuming the two 80 GB drives contain the same number of sectors, this will not be the case because an evidence file contains some data overhead in addition to the actual data. The header takes some space, the MD5/SHA-1 area takes some space, and the CRC values require 4 bytes per block of data. The overhead is small, but it is enough that you can’t put the uncompressed image of a drive on a drive of equal size.
If you make this mistake, EnCase will warn you when your source drive is full and will prompt you for a path to continue the acquisition. In such a case, you could finish the acquisition by placing the small amount remaining on your system drive. The data must be placed on a drive that is currently mounted on your system. If you need to image a drive that was 100 GB and you have only two 60 GB drives, you should mount them both before starting your acquisition. When the first one fills, EnCase will prompt you for a path to continue, at which point you would point EnCase to your second source drive.
If you span your acquisition over two or more drives, when you add your image to EnCase, it will eventually prompt you for the location of the rest of the evidence files as it loads the image. The capability to span drives when acquiring is a nice feature. There have been many times when this feature has saved my day.
![]()
If you’ll recall from Chapter 4, EnCase includes an option in the Acquisition Options menu called Alternate Path. If you provide an alternate path for your evidence file output, EnCase will automatically switch over to the alternate path if the primary path fills, writing the remainder of the evidence files to that location.
When choosing a source drive to contain a compressed target image, you can expect to achieve a nearly 50 percent compression factor using compression. You can’t count on that factor, however; it is only an average, and your actual results will depend on the type of data on the target drive. It is best to always have extra room for storage beyond what you expect. As a general rule, when using compression, I prefer to have 75 GB available on a source drive to image a 100 GB device. Even then, you should still have some reserve space mounted and ready in the event your storage drive fills.
New Evidence File Format
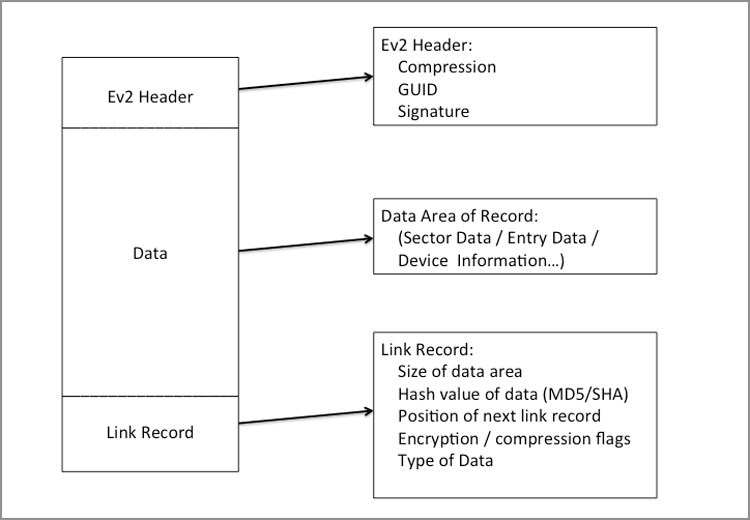
With EnCase 7, a new evidence file format emerged, dubbed the Ex01 format. Following suit, a new logical evidence file format also emerged, dubbed the Lx01 format. This new format allows for encryption and extensibility. Originally, the compression format changed to BZIP, which is better for compressing files, but is also slower. Therefore, for performance issues, the LZ compression format was reinstituted with EnCase 7.02. The same information stored in the E01 format is stored in the Ex01 format; however, additional information is present, and the data format has been restructured, as shown in Figure 5-3.
When you acquire in EnCase 7, the default evidence file format will be the new format (Ex01 or Lx01 in the case of a logical acquisition). You still have the option in EnCase 7 to create the legacy format (E01 or L01). EnCase 7 will open the legacy format as well. With time, you can expect to see a phasing out of the legacy format which will be replaced by the new format altogether.
![]()
I just mentioned that the new evidence file format restructured how data was stored. Figures 5-1 and 5-2 show the CRC values stored at the end of each data block that they represent. In the new format, they are now stored in a table in the Link Record area.
Figure 5-3: New EnCase evidence file format
Evidence File Verification
At this point, you know that when EnCase creates an evidence file, it calculates CRC values for its header and each block of data. Additionally, it calculates an MD5/SHA-1 value for the data only. No other data (header, CRC, metadata, and so on) is included in this MD5/SHA-1 hash. If you were to use a third-party tool to calculate an MD5 and/or SHA-1 hash of the device imaged by EnCase, the MD5 and/or SHA-1 hashes should match. If EnCase included data other than the target drive in the hash, those values would not match. Thus, it’s important to understand that EnCase calculates the MD5/SHA-1 value from the data contained in the target device only.
![]()
The acquisition hash (MD5 or SHA-1) is calculated on the original subject media. The verification hash (MD5 or SHA-1) is calculated on the data only portion of the evidence file.
After a device is imaged, its image file is brought into EnCase automatically. Whenever an evidence file is added to an open case, a file verification process automatically occurs. When an evidence file is being verified, as shown in Figure 5-4, there is a progress bar indicator in the lower-right corner of the EnCase window. If the evidence file is small, as in the case of a small USB drive, the verification occurs so quickly that the progress bar isn’t seen.
Figure 5-4: File verification progress bar shown in lower-right corner of EnCase window
If for any reason you want to cancel the verification process, double-click this progress bar, and you will be provided with a prompt that lets you terminate the verification process.
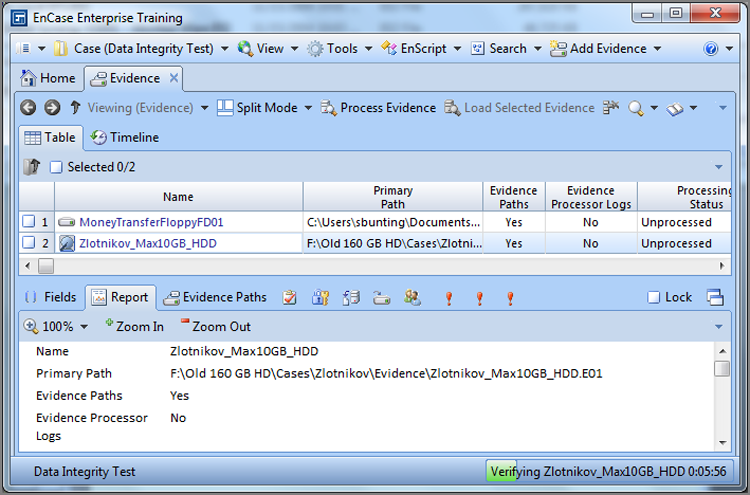
If you look at the Report tab for a device that is currently being verified, such as the one shown in Figure 5-5, you’ll note the absence of a verification hash, and the File Integrity field will indicate that the file is verifying. Figure 5-6 shows the same report after the verification process has completed. The verification hash value is included in the report and should match the acquisition hash. Additionally, the File Integrity field should report that the file verified with zero errors.
The fact that the image file verified is reassuring; however, you should understand what happens “under the hood” when this process occurs. By understanding that process, you’ll feel even better about the results. Furthermore, you’ll be in a position to explain the process to a court or jury if the authenticity of the evidence is challenged. A solid explanation can thwart defense challenges regarding the authenticity of the evidence and bolster your image as a competent examiner.
The verification process is actually simple. Each block of data in the evidence file is subjected to a verification CRC calculation. For a block of data to pass the test, its verification CRC must match the CRC value calculated when it was acquired and stored in the evidence file with the block of data. If a CRC for a block of data does not match its stored acquisition value, an error is reported for that block of data. This CRC recalculation and verification occurs for each block of data in the evidence file.
Figure 5-5: Report view for a device in which verification is underway. Note the absence of a verification hash.
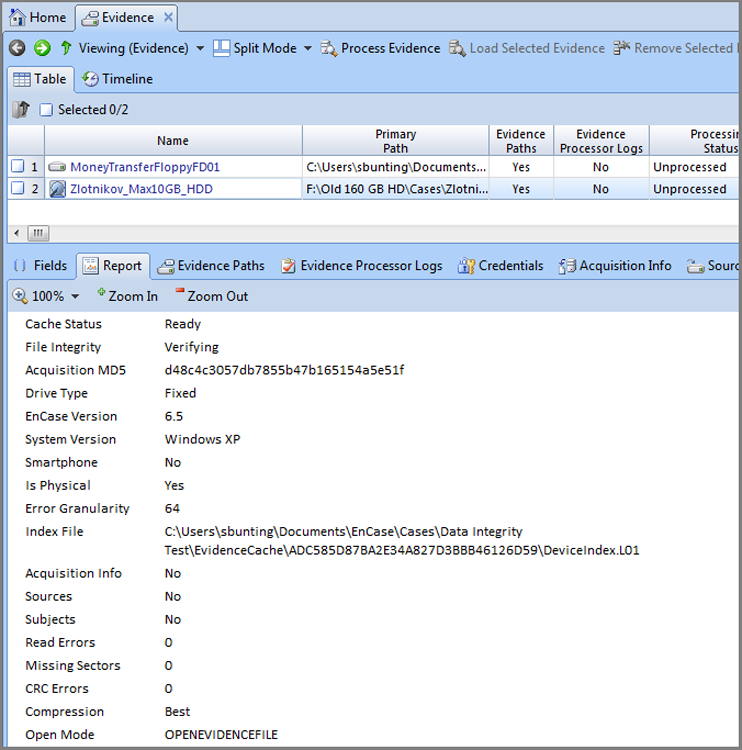
Figure 5-6: Report view for a device after verification has completed. Note that the verification hash is present and matches the acquisition hash. Note also that the File Integrity field reports that the file verified with zero errors.
In addition to the CRC verifications, the blocks of data are subjected to a recalculation of the MD5/SHA-1 hash. The resultant value is called the verification hash value. The verification hash value and the acquisition hash value are compared and should match. To achieve successful file verification, the verification CRC values for all blocks of data must match their acquisition values, and the verification MD5/SHA-1 hash must match the acquisition MD5/SHA-1 hash. As you can see, the verification process is redundant, with one (CRC) cross-validating the other (MD5/SHA-1), thus providing an extremely strong mechanism for ensuring the integrity of the digital evidence within the EnCase environment.
![]()
Much has been written about MD5 hash collisions. A hash collision occurs when two dissimilar data streams have the same hash value. As previously stated, the odds are remote (2128), but they can occur. Some have criticized the continued use of the MD5 because of this. Keep in mind that EnCase is not relying on just the MD5. Rather, EnCase uses both a CRC and an MD5 to validate data. I am unaware of any reports of an MD5 hash collision with a simultaneous CRC collision!
Additionally, EnCase allows you to choose a SHA-1 hash instead of an MD5 hash, or, for those wanting both, you can choose an MD5 and a SHA-1 hash.
The verification process occurs automatically whenever an evidence file is added to a case. At times you should reverify an evidence file. If you have copied the evidence file to another drive, you may want to check that the file did not get corrupted in the process. Also, as a best practice, you should check it one more time at the conclusion of a case and also before going to court. Whatever the reason, there is a mechanism for doing this.
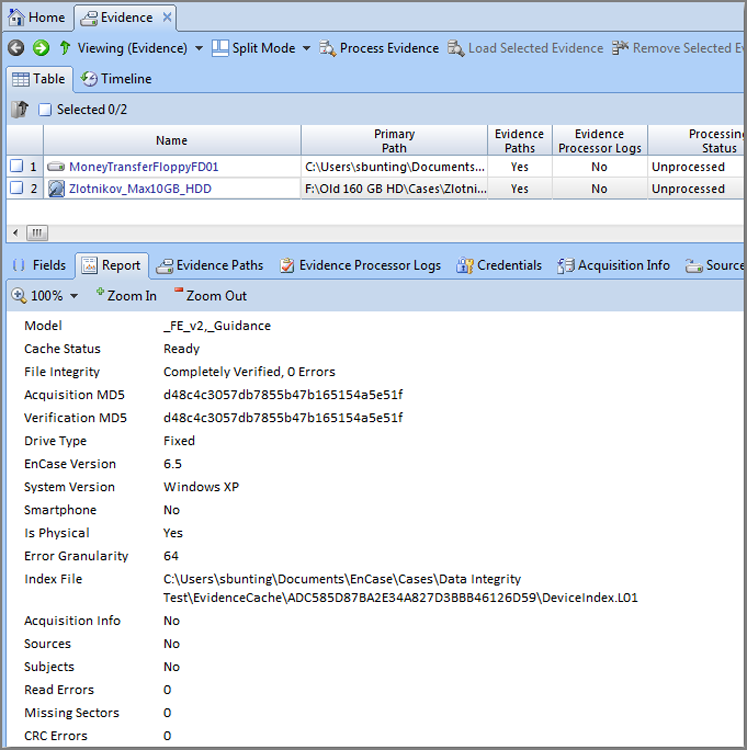
To verify an evidence item, go to the Evidence tab and view the evidence items in the Table tab. Place your focus (cursor) on the evidence item you want to verify, and then go to the Evidence tab’s drop-down menu at the extreme right and choose Verify File Integrity, as shown in Figure 5-7. You will be prompted to confirm. When you click Yes, you will see the verification progress bar in the lower-right corner. When the reverification is complete, you won’t see a report of the results, unless there is a verification failure, at which time you will receive a pop-up error message. To view the results, simply place your cursor on the evidence item in the Table tab of the Evidence tab. In the view or bottom pane, go to the Report tab, and the results will be among those items reported for the device. Specifically, look for File Integrity, Acquisition MD5/SHA-1, Verification MD5/SHA-1, and CRC errors. If errors are present, which is rare, you will find the sector groups in which the CRC errors were found at the bottom of the report.
To demonstrate how a corrupted evidence file would appear upon verifying file integrity, a 4 in an evidence file was altered to a 5 with a hex editor. This effectively changes only one bit in the evidence file (0000-0100 is changed to 0000-0101). After verifying the evidence file, Figure 5-8 shows the results in the Report tab for the selected device.
Figure 5-7: To verify the integrity of an evidence file, place your focus (cursor) on the device, open the drop-down menu at the far right, and select Verify File Integrity.
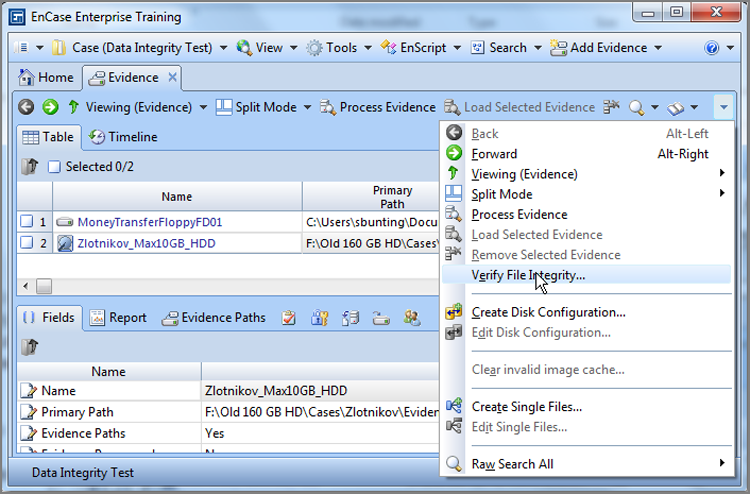
Figure 5-8: Report view for device with corrupted data. Note that changing one bit from a 0 to a 1 (changing a 4 to a 5) produces a drastic change in the verification hash (MD5 value) when compared to the acquisition hash. If there are errors, the impacted sector groups will be reported at the end of the report, which is shown in the inset in the lower right.
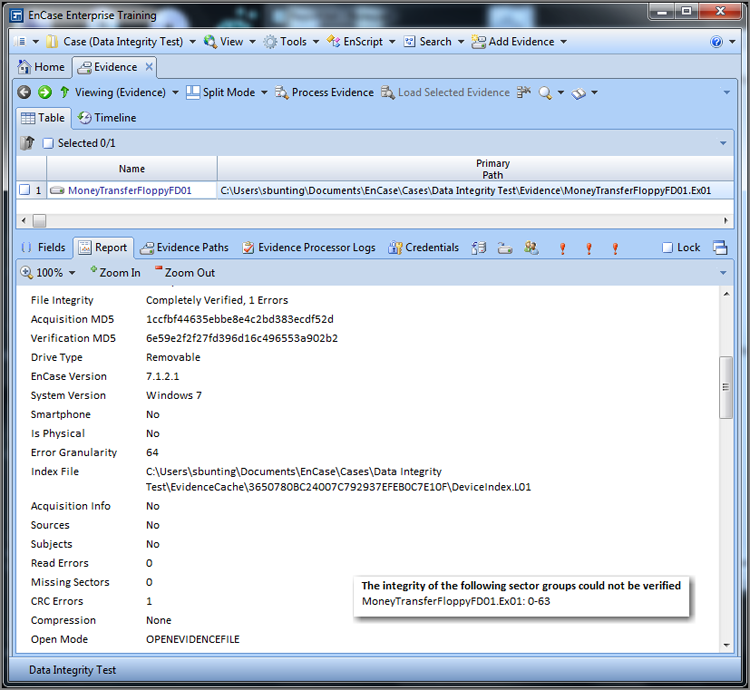
The File Integrity field indicates that the verification completed and found one error, meaning the CRC for one block failed to match its stored acquisition value. The one block of data could have one or many errors. All that EnCase can determine is that the CRC values for one block (64 sectors by default) do not match, which is reported as one error. If another block of data also contained one or many errors, then EnCase would report two errors.
Next, you can see that the verification hash does not match the acquisition hash and that the difference is drastic despite that only one bit changed. If you look further down the report, you can see the details of the errors, which is shown in the inset of Figure 5-8. The block of data containing the CRC error begins at sector 0 and ends with sector 63. Since the block size is 64, the block covers sectors 0 through 63, which is a range of 64 sectors.
With earlier versions of EnCase (up through and including version 4), if a block of data contained an error, you could not view any of the data in that block. An error of this type would be that the data block’s CRC value, when read by EnCase, did not match its acquisition value. Such an error could occur if the evidence file were corrupted or altered. Since a block of data, by default, is 64 sectors, one corrupted bit could preclude the examiner from viewing otherwise good and valuable evidence contained in that block. Therefore, the ability to see or work with data in a corrupted block was enabled beginning with EnCase 5.
With this added feature, I can’t overstate the importance of verifying an evidence file at the conclusion of a case. For certain, you must be assured that your evidence file is verified at the conclusion of your work so you can affirmatively state that the evidence file’s integrity was maintained throughout. This is a simple matter of reverifying the various evidence files in the case, which I’ve already described.
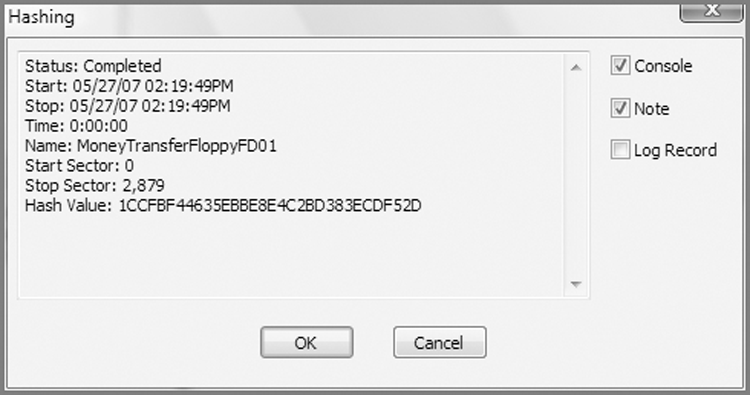
In addition to reverifying, you may also need to hash the various devices, because the resultant bookmark will contain a time stamp for the calculation as well as the hash value, as shown in Figure 5-9. Because the verification report lacks a time stamp, this extra step is highly recommended. I describe the process of hashing a device later in the chapter.
Figure 5-9: Results of hashing a device. Note the time stamp and the hash value are contained in this report, which can be stored as a notes bookmark.
Best practices call for making an evidence file image and creating a copy on which to work. If you found that your working copy of your evidence had been corrupted, such as that shown in Figure 5-8, you would immediately make another working copy from your original image and reverify your work in the case.
As you begin to grasp the inner workings of EnCase, you will appreciate the work that has gone into the program to ensure data integrity at every step of the process. Also, you will learn the importance of the relationship between acquisition block sizes and the corresponding frequency of the CRC values.
Increasing the block size can have an adverse effect if corruption occurs in a block of data, because the block of data protected by the CRC is larger. If the block size is changed from the default size of 64 sectors to 128 sectors to speed up the acquisition, the downside is that a CRC value will be written for every 128 sectors instead of every 64 sectors. If the evidence file later developed a corrupted block, the affected block size would be 128 sectors instead of 64 sectors, and more data would be unavailable to the examiner. If you must increase the block size to speed up an acquisition, it is recommended that you reacquire it with a default setting of 64 sectors when time permits. In that way, you enjoy the faster acquisition when you need it, and you can later restore your data integrity protection to a more acceptable level.
Exercise 5.1
Understanding How EnCase Maintains Data Integrity
In this exercise, you will create a case and add to it an evidence file. That evidence file will verify correctly. You’ll then save the case and exit EnCase. Next you’ll substitute your verified evidence file with another one of the same name that is identical in all respects except that one bit has been changed. This change could simulate unintentional data corruption, or it could simulate intentional alteration of evidence. Regardless of how or why the evidence file changed, EnCase cares not. You’ll reopen the case with the altered evidence file, and you’ll see EnCase’s file integrity protection features at work. When you are done, you’ll be able to affirmatively assert and testify as to what happens if original evidence has been altered in the EnCase environment. You can also use these files to test versions of EnCase as they are released. Let’s get started!
1. Open EnCase 7, create a new case named Data Integrity Test, and accept all the default path locations.
2. By using the default paths, you should have a folder named Data Integrity Test located in the path Documents\EnCase\Cases\Data Integrity Test. Create a subfolder named Evidence under the folder Data Integrity Test. You should note while in the root of Data Integrity Test that EnCase has already created and saved the case file for you!
3. On the online resource web page is a folder named DataIntegrityTest. Under that folder are two subfolders: Normal and Corrupted. In each of these subfolders is one evidence file: MoneyTransferFloppyFD01.e01. From outward appearances, the files seem identical; however, their parent folder names (Normal and Corrupted) are indicative of their true contents. Copy the evidence file from the Normal folder to the Evidence folder you just created.
4. Go back to EnCase; from the Home tab, click Add Evidence and then Add Evidence File. Browse to the file MoneyTransferFloppyFD01.e01 that you just placed in the Evidence folder and click Open.
5. EnCase will display the new piece of evidence in the Table tab of the Evidence tab. When a new evidence file is added to EnCase, it will automatically begin verifying the integrity of that evidence file. Since this was a floppy image, it happened nearly instantaneously. Let’s see whether the file verified. You should be in the Evidence tab with only one evidence item showing in the Table tab. Place your cursor on that evidence item and click the Report tab in the view or bottom pane. Scroll down the report, and note that the file verified successfully and that the verification and acquisition hashes match.
6. Double-click the evidence item in the Table tab, and the evidence item will load, parse, and display in the Viewing tab of the Evidence tab. In the Tree pane, place your cursor on the floppy device, and the root-level directory structure will appear in the Table pane. Examine the contents of the only intact file in the root directory, which is a text file (MoneyTransfer.txt) containing information about a money transfer. Note carefully the account numbers because the next time you see these numbers, one digit will have changed!
7. Save your case, and exit EnCase.
8. On the online resource web page, locate the folder DataIntegrityTest\Corrupted\. Copy the evidence file in this folder into your Evidence folder. When asked if you want to overwrite the existing evidence file by the same name, select Yes. You now have a file by the same name and attributes as your previously verified evidence file. The only difference between the files is that someone has altered your evidence file by one bit when they changed one digit in an account number.
9. Start EnCase, and open your previously saved case. EnCase thinks that it has already verified this evidence file, so no file integrity check will occur. Check the contents of the text file in the root directory. You should note that the last digit of the account number has been changed.
10. To view the contents of the text file, you are in the Viewing tab of the Evidence tab. Click the green left-arrow (Back) to go back to the Table tab under the Evidence tab. Place your cursor on your evidence item, and at the far right of the Evidence tab, click the triangle for the drop-down menu and select Verify File Integrity (as depicted earlier in Figure 5-7). This process should take a matter of seconds because the evidence file is very small. Because there is an error, you should receive a pop-up warning indicating a file integrity check error. Click OK on the error message, and repeat the process for checking the results on the Report tab for the floppy device. You should see that the verification completed with an error. You should see that the hashes do not match, and you should see a notation that sectors 0-63 could not be verified, meaning the error is contained in one 64 sector block of data starting at sector 0. If you go back to text file containing the account number, you’ll note that this data is found in physical sector 33, which is in the unverified block.
11. You should now have an appreciation for the importance of post-case verification. If this had been a real-world case, you would replace the corrupted evidence file with another copy made from the original evidence file image.
12. Close EnCase without saving.
![]()
EnCase provides a tool that allows the examiner to verify individual evidence file segments. The need for this arises when evidence files are archived onto CDs and DVDs. You can access this feature by choosing Tools > Verify Evidence Files. The MD5/SHA-1 hash can’t be checked with this feature; however, EnCase verifies the CRC values for each block of data in a single evidence file.
Hashing Disks and Volumes
At this stage you understand that when EnCase acquires data, it calculates and writes CRC values for each block of data and then computes an MD5 hash (alternatively a SHA-1 or both) for the entire device or stream of data acquired. Whenever the resultant evidence file is added to a case, it is automatically verified. Every block of data is subjected to CRC reverification, and the entire device is subjected to a reverification of the MD5 hash (alternatively a SHA-1 or both). You can also reverify an evidence file manually at any time and should always do so at the conclusion of a case. Thus, EnCase was built with data integrity at its very core, and by understanding how it functions, you can better appreciate its built-in protections and be in a better position to explain them.
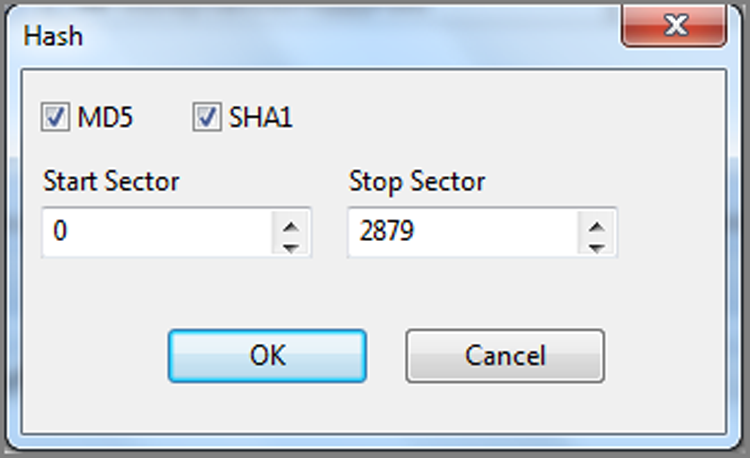
In addition to the protections and integrity checks discussed thus far, you can employ yet another integrity check by manually hashing a disk or volume that has been acquired. The hash feature will calculate an MD5 hash (alternatively a SHA-1 or both) for the selected physical or logical device. You can compare this value to the acquisition hash in the Report view. To hash a device, go to the Viewing tab. In the Tree pane, place your cursor at the root level, forcing the devices to be viewed in the Table pane. In the Table pane, place your cursor on the device to be hashed. On the Evidence tab, go to the Device Functions drop-down menu and choose Hash, as shown in Figure 5-10. You are next asked for the range of sectors to hash. Usually you will select the defaults—which is the entire device, as shown in Figure 5-11. Also, you can choose which hash algorithm you want to use, MD5, SHA-1, or both.
Figure 5-10: To hash a device, place your cursor on it in the Table pane, go to the Device Functions drop-down menu, and choose Hash.
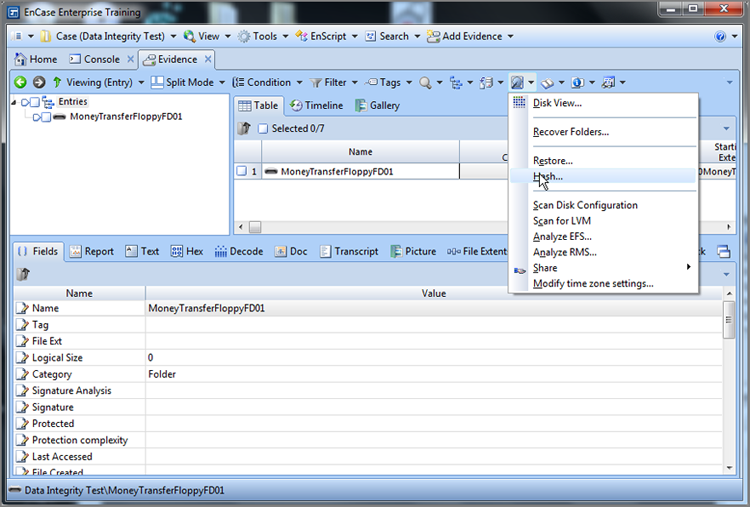
Figure 5-11: Before hashing, you are given an option to choose a start and stop sector. Usually, you’ll choose the default, which is the entire device.
After the hash is done, you can compare this value to the acquisition hash, and they should match. The nice part about this feature is that you will be presented with a report, as shown in Figure 5-12, which contains the date, time, evidence name, sectors hashed, and hash value. You can include this report in your overall report as a note bookmark by selecting the Note check box. As I mentioned earlier in this chapter, since the Verify File Integrity function does not date/time stamp its results, you can include this hash report to reinforce your report.
Figure 5-12: Results of hashing a physical device. All the details displayed can be bookmarked and included in a “note bookmark.”

![]()
The Verify File Integrity function can be run only at the level of the acquired device. If you acquired a physical device, you can use the Verify File Integrity feature at the physical level only, and not at the volume level. If you acquired a physical device, you can hash it at either the physical level or the volume level. If you are using the hash feature to check the integrity of your acquired physical device, make sure you conduct your hash of the physical device. If you hash the volume instead, the results will differ as you are hashing a different set of sectors. In short, make sure you are comparing apples to apples, not apples to oranges!
EnCase Case Files
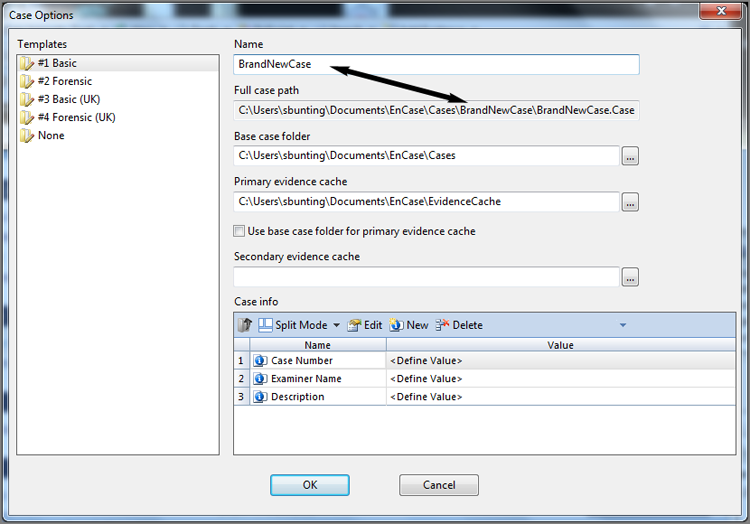
A case file is created when you first create a case in EnCase 7. Prior to EnCase 7, you had to manually create the various folders needed for EnCase to store various case-specific files. Starting with EnCase 7, you need only to accept the default base case folder or point to another location. EnCase 7 then creates the various subfolders as shown in Figure 5-13. Figure 5-14 shows the screen that opens when you tell EnCase to create a new case. You can see the default base case folder. Since I named this case BrandNewCase, you can see that it creates a folder by that name under the base case folder, as shown in the full case path entry. Also, if you look in Figure 5-13, you will see that EnCase now creates the case file for you initially and stores it in the root of the case name folder.
Figure 5-13: Various subfolders automatically created by EnCase under main case folder
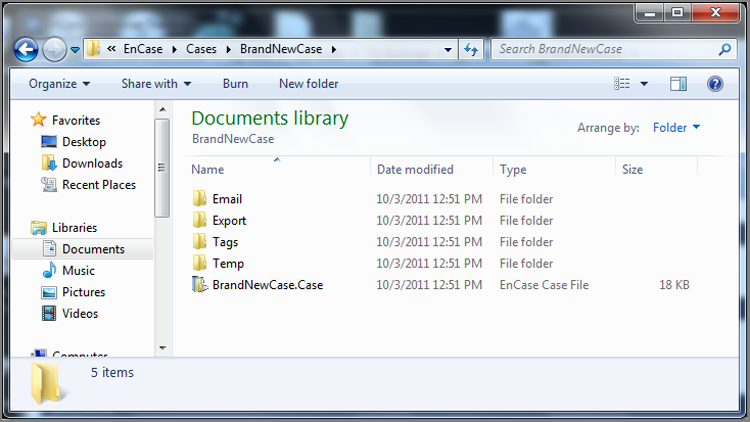
Figure 5-14: When you click Create New Case, the Case Options dialog appears, and you can set the Base Case folder and Case Name, as well as other parameters.
The case file is a plain-text file, mostly in Unicode, that contains pointers to the evidence file and case-specific information. Because the evidence file itself never changes, all search hits, bookmarks, notes, sorts, hash analysis, file verification information, and so forth, are stored in the case file with pointers to the evidence file. When you recover a partition, there is no partition inserted into the original evidence file. Rather, the partition is virtually reconstructed with data and pointers in the case file.
With time and analysis work, in prior versions of EnCase, these case files could get quite large and take some time to load. EnCase 7 changes this by saving compound (compressed archive files such as .zip and .rar), email archive files (.pst, .ost, .nsf, and so on) and other such files to disk as devices. They are accessed as needed for analysis and allow the case file to open almost instantly. The case file represents all your work in a case, so maintaining its integrity is important. You should frequently save your work by clicking Save as you complete a process or are about to start another step of the analysis. It takes only one unexpected crash and the loss of significant work to make this habit second nature.
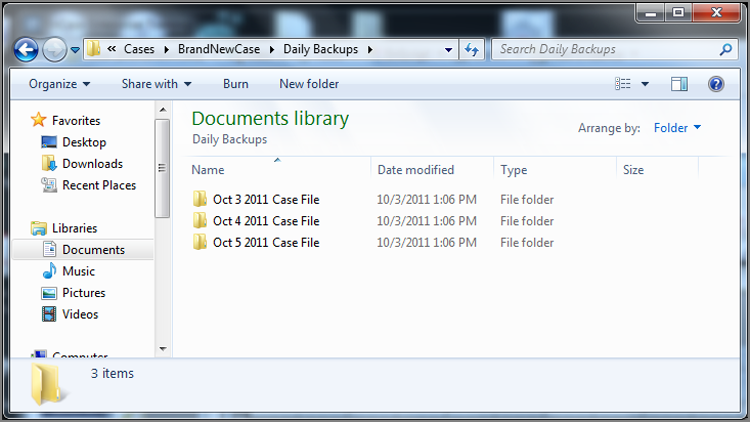
Backing up the case file is also an important function. EnCase creates a backup automatically, as you’ll see in the next section, but it is important to back up the case file at various points in your case, preferably daily. If a case file develops a problem, the backup can also be corrupted. Keeping daily backups of your case file in appropriately named folders gives you the Windows 7 equivalent of restore points. Figure 5-15 shows how you can organize such a daily case-file backup system. It takes only a few seconds to copy your case file to a backup folder, and if faithfully carried out, this process can save you a full day of work at some future point.
Figure 5-15: Folder naming and organizational structure to contain daily backups of your case file
EnCase Backup Utility
The EnCase backup utility made its debut in EnCase 7.04 in May 2012. With its release, you can forget about .cbak files and the old way of backing up EnCase case files. In its place is a robust backup engine that will back up the following:
· Case file
· The contents of your case file, except for the following:
· Temp folder
· Export folder
· Evidence files (.e01, .ex01, .l01, and .lx01)
· Primary evidence cache (only those cache files referenced in the case being backed up)
· Secondary evidence cache (only those cache files referenced in the case being backed up)
· Metadata for all files in backup (timestamps, file sizes, and so on), which are stored, among other data, in a SQLite database situated in the root of the backup path.
Before creating a case and defining the path for the case backup, you should first give careful consideration to where this backup will be stored. By default, the backup will be stored on the operating system drive, specifically in your user space. For some examiners, this may be acceptable; however, for most it will likely not be acceptable. If you’ve optimized your system and are running your OS on a relatively small SSD, you will not want to use the default location. In keeping with best practices, your backup should not be on your local system but should be safe on yet another attached system or perhaps a SAN or NAS.
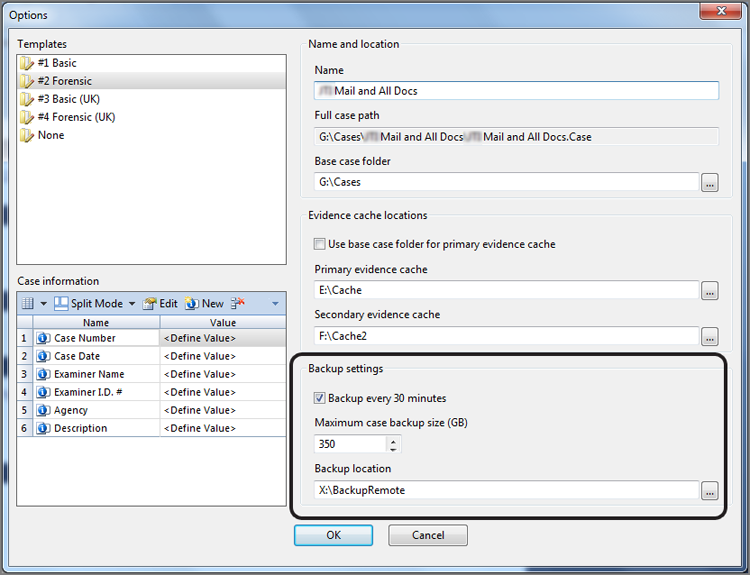
You will select the path for the backup location when you create a new case, as shown in Figure 5-16. You have a choice of having a backup occur every 30 minutes or not at all, by selecting or deselecting the Backup Every 30 Minutes option. Future releases may allow adjusting this interval from within the new case Options menu. Clearly, turning this backup off is not a very good practice, because you will not have any backup at all.
From the Options menu in Figure 5-16, you may choose the maximum size for your case size backup in gigabytes. Currently the default size with version 7.04 is only 30 gigabytes, which I find to be far too small. You don’t know what size your evidence cache will be until you process it. If this setting is too low, your initial backup, regardless of size, will complete. However, no subsequent backup will occur until you adjust this setting upward. You will see warnings occur on the bottom of the EnCase window. If so, change this setting at once so that your system can properly continue to back up critical files. I recommend setting this figure high at first and then later evaluating the size of your backup and how large you want it to be. You can then lower this setting if you’d like.
Figure 5-16: The new case Options menu contains basic backup configuration settings.
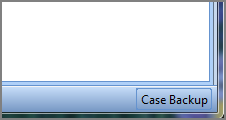
Once you create your case with the proper backup settings in place, the process will run as a background task. When it runs, every 30 minutes, you will see a green progress bar in the lower right, labeled Case Backup, as shown in Figure 5-17. There are a few pointers you should know about your backup feature in addition to knowing the contents it protects.
· By default a schedule backup will occur on 30-minute intervals, normally starting 30 minutes after the previous one completed (not started!).
· If you need to stop the backup, double-click the thread in the progress window in the lower right.
· The backup will stop when you close the case.
· When the backup runs, it disables the automatic timer, thus making sure the 30-minute interval is based on when the previous backup completes.
· When EEP runs, the backup stops as EEP creates and modifies a large number of files that the backup is trying to back up as they are being added or modified, which is not a good thing to have occur.
· When EEP completes, the backup process will start shortly thereafter and usually will run for a long time because of the amount of new data in the evidence cache. While work can be done while the backup is running, it is a good practice to let this backup occur uninterrupted, because you want to get your evidence cache backed up for the first time. You may want to think of this first backup as just an extension of the EEP process in terms of workflow and time.
Figure 5-17: Backup thread running as shown in progress bar in the lower-right corner
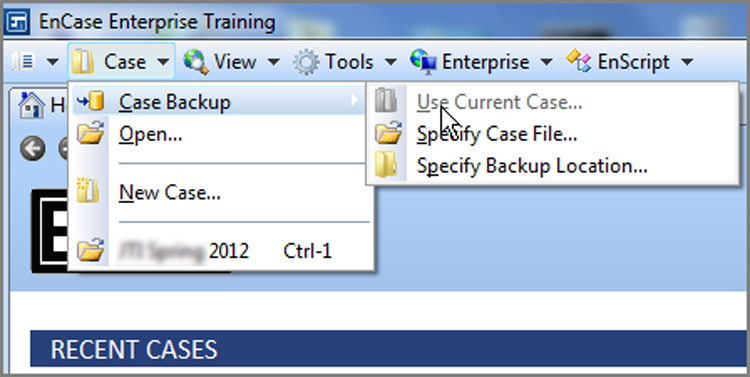
It will be rare that you will need to recover from the backup. If, however, you need to do so, you will need to first close the case that you want to back up. You access the backup dashboard from the drop-down menu on the Case tab, as shown in Figure 5-18. From there, Use Current Case, Specify Case File, or Specify Backup Location will all eventually take you to backup dashboard. In Figure 5-18, there is no current case open (Use Current Case is therefore grayed out) because I’m about to show you the basics of restoring a case. Thus, I’ll specify a case file for the case I want to restore.
Figure 5-18: Click the Case tab’s drop-down menu to access the backup dashboard.
Once you select the case file for the case you want to back up, you’ll next see the backup dashboard, as shown in Figure 5-19. Before you can see any backup dates and times, you must first place your cursor on the Scheduled folder in the left, or Tree, pane. Only then do you see in the Table pane the list of dates and times for the various backups that have been created. Figure 5-19 shows one backup having been selected from which to restore. With one selected, the next step is to click Restore, which is found on the toolbar and is one of the items circled in Figure 5-19.
Figure 5-19: Backup dashboard showing available “restore points” based on scheduled backups that have been made
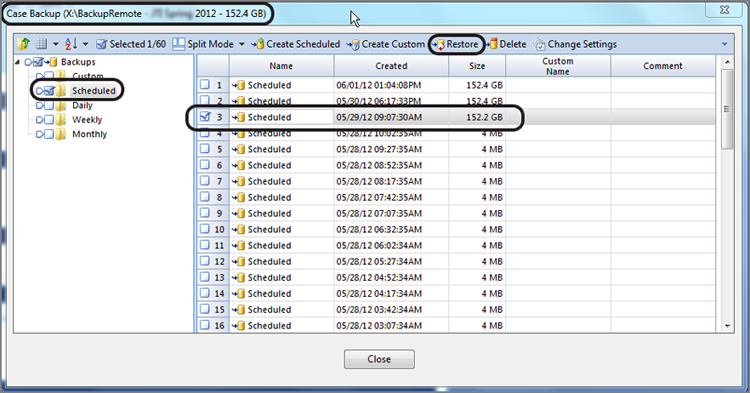
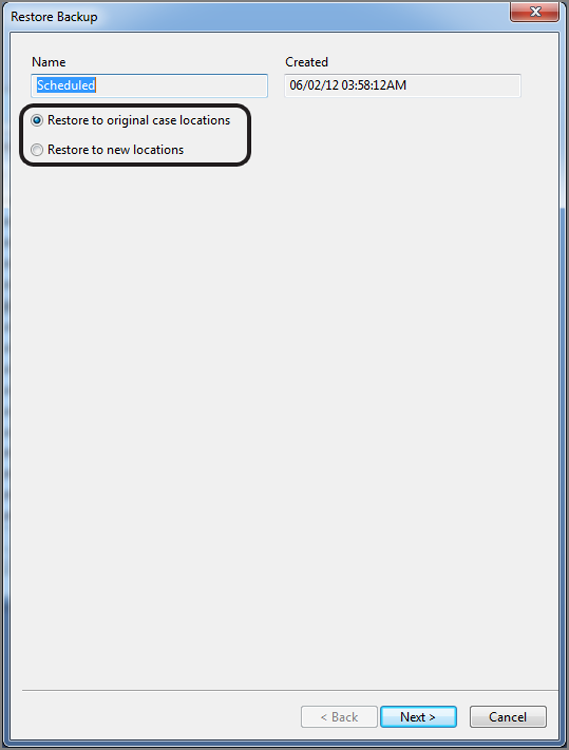
Clicking Restore will launch yet another menu, which will force you to make a decision to restore your case to its current location or to a new location, as shown in Figure 5-20. Whatever you do, do not rush through this process simply accepting the defaults, because the default here is to restore to the same location. By all means, give this some thought. If you accept the default, EnCase will write over your evidence cache and your case folder, except for the Temp and Export folders and evidence files. If you overwrite existing files and folders, even with those exceptions, you could, potentially, make your problem worse. Just keep in mind that the default option will overwrite the current state of your case. Before doing so, make sure this is what you want to do. I would suggest, before restoring to the original location, that you copy your case folder and evidence cache elsewhere, just in case.
The first time I attempted to restore to the original location, a path error message occurred. After clicking through the error, my next choice was that of reopening the case. When I did so, a message appeared that my case file was corrupt. When I went to examine my case file, I found it was missing. I had to recover my case file before I could continue. From that experience I learned a valuable lesson, and it is one that forms the basis of my recommendation to make a copies of evidence cache and your case folder before restoring to the original location.
Figure 5-20: When restoring, you must choose between the original case location or a new location.
If you decide to restore to a new location, you’ll be prompted for a location for both your case and your evidence cache. If you’ve opted to restore to the original location, you will see a screen similar to that in Figure 5-21, with all the original path settings in place, except grayed out because they are locked in as everything is configured to be restored in its original place. If you opt for a new location, you’ll see the screen as in Figure 5-21 in which all the path locations are configurable. You could, as I have done in this example, restore your evidence cache to its original location and restore the case file to a new location. Once you have selected your options, click Finish, and the restoration will start. As is often the case, there is considerable data to be written, and restoring will take a commensurate amount of time. When the task is completed, you can reopen your case, and you will be at the point in time you selected from your list of backups.
Figure 5-21: Restore Backup dialog on which you may configure new paths and from which you launch the restoration task
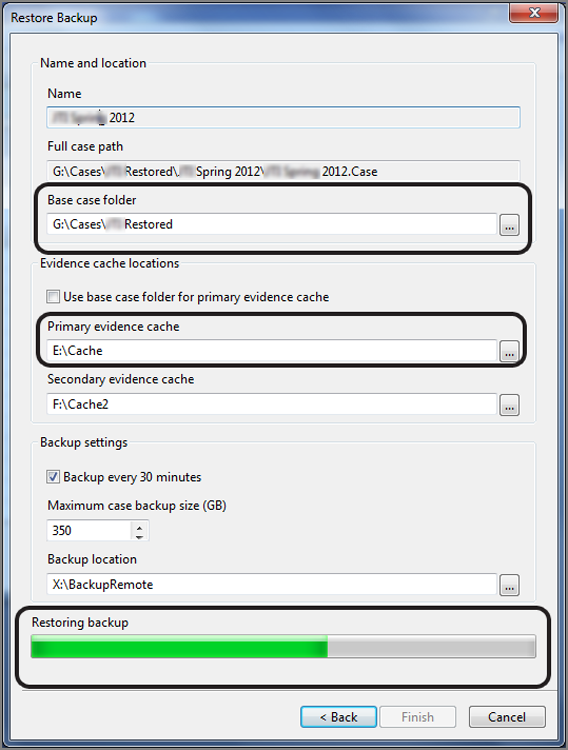
If you look carefully at Figure 5-21, you will note that the case file (and with it the evidence files) are on drive letter G. The primary evidence cache is on yet another drive letter, which is E. The secondary evidence cache is on yet another drive letter, which is F. The backup location is on yet another drive, which is X and is a mapped drive. Notice that none of these storage locations is found on drive letter C, which is the operating system. Drive G (primary evidence cache) is a RAID 0 array of SSD drives, thus optimized for high throughput reads and writes. Drive F (secondary evidence cache) is also SSD storage. Drive C (the O/S) is also SSD storage. Drive G (case and evidence files) is a high-performance RAID 5 with platter-based storage.
This configuration reflects the author’s recommended hardware configuration for running EnCase 7. If you missed those recommendations, they are at the beginning of the book at the very end of the foreword. Providing EnCase with adequate resources that are properly configured is essential for having EnCase 7 perform the way it was designed. You will not regret following these recommendations!
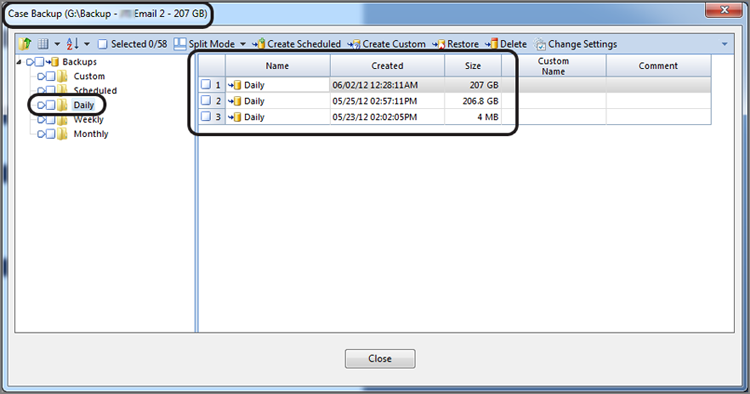
Before we conclude our discussion of the EnCase Backup utility, you may have noted the presence of daily, weekly, and monthly backups on the backup dashboard. For example, Figure 5-22 shows daily backups. These are not special backups created daily but rather the first backup (not the last!) that occurs on each day the case is open. It is simply dubbed or virtually established as a daily backup. For each daily backup listed, you’ll find a scheduled backup for that precise time. Much the same can be said for the weekly and monthly backups. They are organizational constructs, if you will, created out of the scheduled backups. You can recover or restore from any of them, just as I demonstrated with the scheduled backups.
Figure 5-22: Daily backups shown in the backup dashboard
You will also note that you can create custom backups, create additional scheduled backups, delete backups, and change settings from the toolbar menu. While the default backup settings I have discussed will more than suffice for most examiners, you can embark on a much more customized backup program. The release notes for EnCase 7.04 and subsequent user manuals do a very nice job of discussing these custom options, including describing size and frequency limitations. If you are interested in further customizing the backup process, you should read this material first.
![]()
If you need to, you can change the logical name of the evidence file. This does not change the contents of the evidence file, and the evidence file will still verify. For example, you can change SuspectFloppy01.e01 to SuspectFloppyFD01.e01. You can also move the evidence file to another path or drive. When EnCase opens a case and the evidence file is not where EnCase last recorded it, it will prompt you for the new path. Changing the evidence filename or its location does not affect file integrity or the verification process at all. Changing the evidence file’s logical name on the examiner hard drive will not change the unique name of the evidence file displayed in the EnCase case file and report. That name is included in the header of the evidence file and is protected by a CRC. To change the unique name of an evidence file, the original evidence must be reimaged, thus creating a new evidence file with the new name.
EnCase Configuration Files
Prior to EnCase 7, global configuration settings for EnCase were stored in a series of initialization files (dubbed ini files after their file extension). By default they were all stored in \Program Files\Encase#\Config, and they were all applied globally to every instance of EnCase, regardless of the user on the system.
EnCase 7 has certainly undergone a significant change in the way configuration files are stored. Starting with Windows Vista, Microsoft became more security conscious and encouraged programmers to separate program data from user data because of security permissions for the different data types. Also, the user could go to one general area for user files and thereby stay away from critical program and configuration data.
With EnCase 7, Guidance Software designed its program to adhere to these data storage recommendations. An added benefit to this scheme is that by separating program data from user data, global configuration files could be updated without overwriting custom user settings. For example, if you created custom text styles, upgrading EnCase could result in the loss of those custom settings. Under the new storage scheme, the default text styles that ship with EnCase can be updated when the program is updated. The user-created text styles are stored with user data and are untouched by these changes. This is a most welcome change.
The following are the storage paths used by EnCase to store configuration data, along with a brief description of the files stored therein:
· User data (C:\Users\UserName\Documents\EnCase): You may expect to find files created by the user in this folder, which will, in turn, contain many subfolders for organizational purposes, as shown in Figure 5-23. The default location for the base case folder is in this folder.
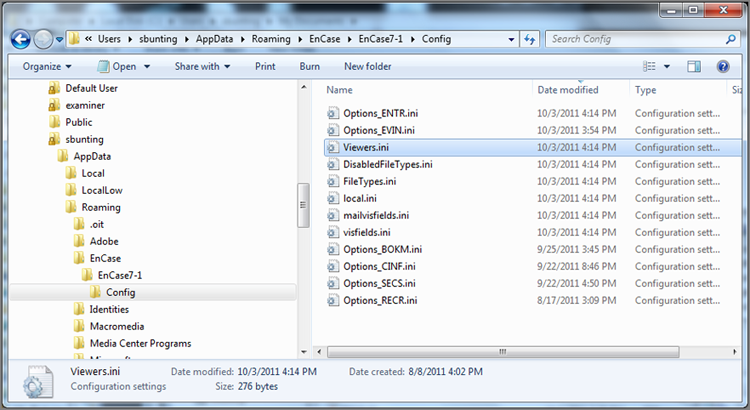
· User application data (C:\Users\UserName\AppData\Roaming\EnCase7-1\Config): These are files that are configuration files, along with some temporary files that are user-specific. As such, other users of EnCase on this system will not be affected by these settings. Figure 5-24 shows a typical set of files found in this folder. Veteran users of EnCase will recognize some of these filenames. The viewer configuration file (viewers.ini) is where file viewers configured by the user are stored. The file local.ini is a familiar file, but its use has been greatly expanded under EnCase 7. It traditionally held recently opened cases and other historical information but now holds, for example, user-defined text styles. In this fashion, you can have global text styles and user text styles combined, and updating one doesn’t impact the other. You should note that this folder (EnCase7-1) and the one that follows under Global Application Data are version-specific, and the suffix following EnCase will change as EnCase is updated.
· Global application data (C:\Users\Default\AppData\Roaming\EnCase7-1\Config): This folder contains global configuration settings for all users on this machine and typically contains the NAS settings.
Figure 5-23: Subfolders organized under the folder reserved for user data
![]()
With Windows Vista and Windows 7 came a new folder structure under the user’s root folder. The folder named My Documents in Windows XP and earlier was renamed Documents, or at least that is what is shown by EnCase. However, when you see the Documents folder in Windows Explorer, you’ll see it as My Documents in some views and as Documents in other views. It is seen as My Documents because of a hidden file located in the Documents folder that points to a registry location that defines how the file is supposed to appear, regardless of its real name.
Figure 5-24: Files typically found in the folder reserved for user application data
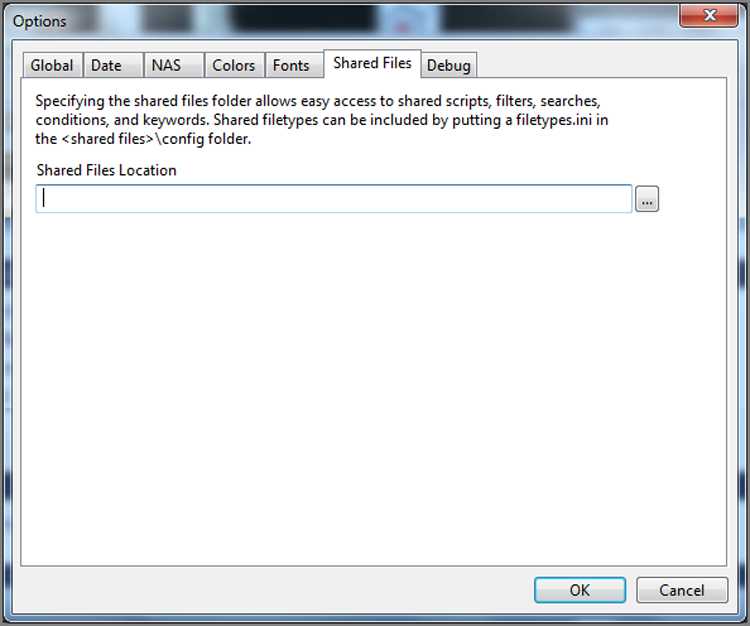
In addition to the previous configuration file locations, you can also define a shared location to keep various settings such that they can be shared by other users in your lab group. Settings that can be shared are, for example, Keys, Text Styles, File Types, Conditions, Searches, and EnScript modules. Figure 5-25 shows the Shared Files tab under Tools > Options where this location is configured.
Figure 5-25: Shared Files tab where shared configuration files can be stored for group access
EnScripts can be stored in two or sometimes three locations now. The EnScripts folder under \Program Files\EnCase 7 is where veteran EnCase users would expect to find it, and it is one of the locations. The user can now have their own EnScript folder located at \Users\UserName\Documents\EnCase\EnScript. In the previous paragraph, we learned that we could share EnScripts under the Shared Files tab. Therefore, if configured, the third location would be defined under that tab, as shown in Figure 5-25.
Filters and conditions used to be stored en masse within a single configuration file and were constantly being overwritten by updates, which frustrated users. Now, user-created conditions and filters will be stored in the user data area (Condition and Filter folders, respectively) and in individual files within those folders. Conditions will have .Enfilter extensions, and conditions will have .EnCondition extensions. Thus, filters and conditions will become separate files, easily stored, easily shared, and therefore much better managed.
File types and file signatures used to be stored in separate configuration files. Now they are combined into a single table (FileTypes.ini), except that there will be at least two such files (one global and one user), and perhaps even three if a shared location is defined. Individual user settings will override the shipped (global) and shared settings.
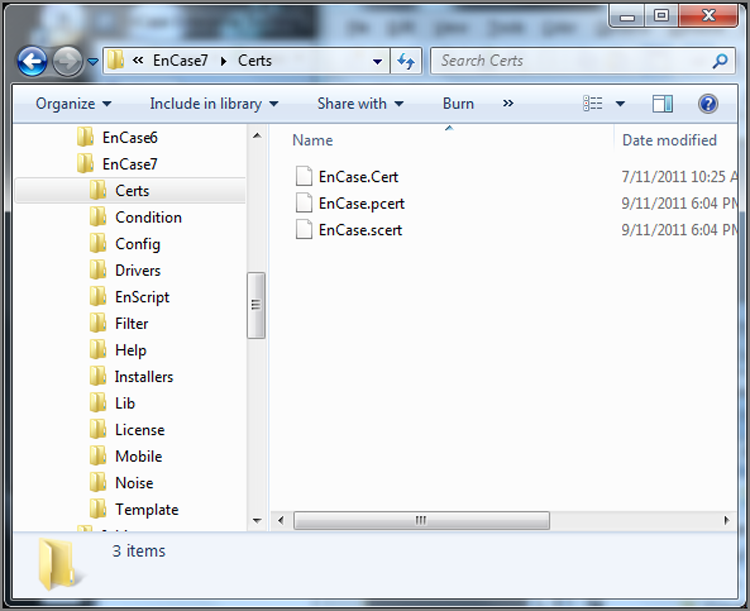
Although there are several folders under \Program Files\Encase 7, as shown in Figure 5-26, one of considerable import for configuration purposes is the certs folder. Your dongle may require certificates for proper licensing. When you receive your software and licensing information from myaccount@guidancesoftware.com, any certificates that are needed will be provided via download links. Place these certificates in this folder for proper licensing and function of your software, as shown in Figure 5-27. You should note that the pcert and scert files are installed as part of EnCase. In this case, the EnCase.cert file is required for this particular dongle to have EnCase 7 functionality. There are other cert files that may be required to be placed here depending on your version of EnCase and licensing methods in use.
Figure 5-26: Folders under EnCase 7
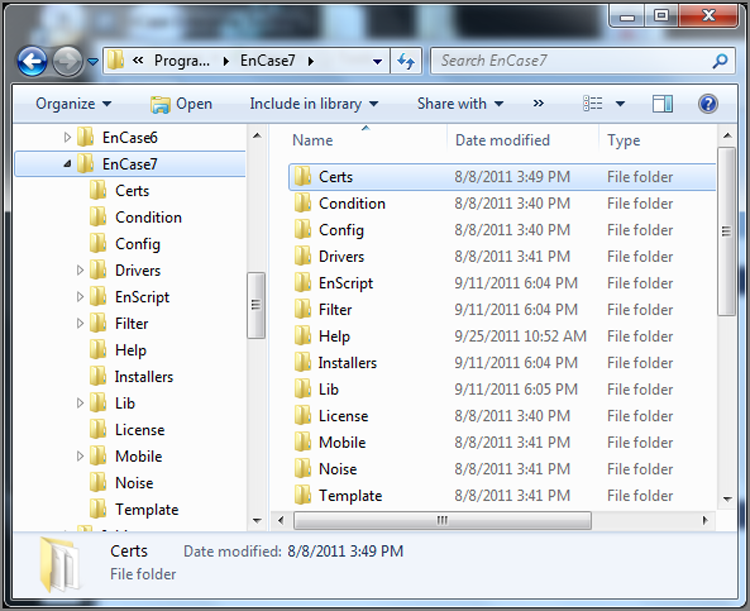
Figure 5-27: Licensing files (.cert extension) in the Certs folder
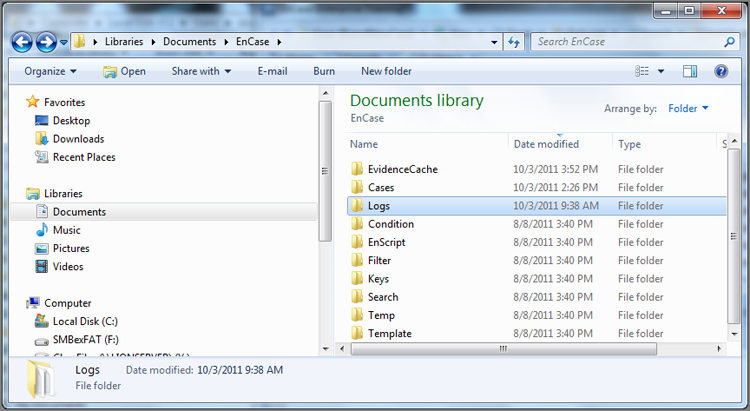
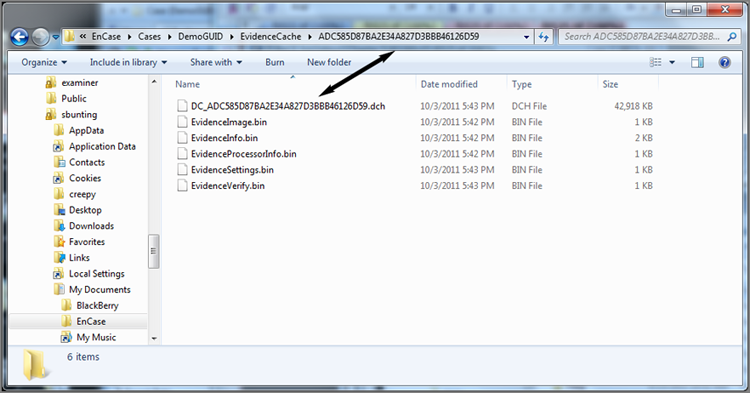
Evidence Cache Folder
The evidence cache folder is a container folder for a variety of files associated with the parsing of the evidence file when it is first loaded and also the subsequent processing by the EnCase evidence processor. At a minimum, it will contain the device caches, device index, and keyword search results. The location of this folder is defined when you first create a new case, as shown in Figure 5-14 in the entry named Primary Evidence Cache. Each device in the case has a GUID, as shown in the report area for the device in Figure 5-28. If this same file were to be reacquired, it would be assigned a new GUID even though the hashes would be identical. When the evidence cache is created for a device in a case, the folder containing the evidence cache information will be assigned a folder name bearing that GUID, as shown in Figure 5-29. Figure 5-29 also shows the various files stored in the evidence cache folder.
Figure 5-28: GUID for device that is unique to each acquisition
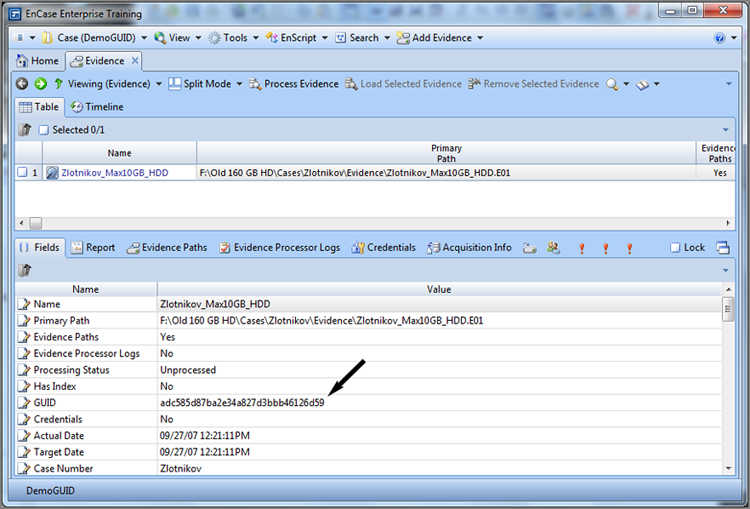
Figure 5-29: GUID-named folder in evidence cache folder bearing same GUID assigned in Figure 5-28
Terminology Is Important!
It seems each time I attend a computer forensics course, I am told to rephrase the wording of how I acquire a forensic copy of digital evidence. Terms such as mirror, bit-by-bit, bitstream, and image have been used at one time or another to describe a forensic acquisition of digital evidence. With regard to acquiring evidence using EnCase, I use the phrase “an exact copy to an EnCase evidence file.”
Defense attorneys have asserted that the EnCase evidence file is not an exact duplicate of the original evidence. Some savvy ones try to prove their point by mentioning that the MD5/SHA-1 hash value of the original evidence does not match that of an EnCase evidence file—and they are correct. Forensic examiners have commonly used the previous terms to describe how they acquired evidence using EnCase because that is what they were taught. Now that you have a better understanding of the EnCase process, you can explain that an EnCase evidence file does contain an exact copy of the original evidence in the data blocks. The matching acquisition and verification hashes are derived from original evidence and the data blocks. In addition, an EnCase evidence file contains additional data such as case information, CRC checks, and MD5/SHA-1 hash values of the original evidence outside the data blocks.
So, when someone challenges an EnCase evidence file claiming it is not an exact duplicate of the original evidence because of different MD5/SHA-1 hash values, you can argue that an EnCase evidence file does contain an exact duplicate of the original evidence along with additional information. As to whether an EnCase evidence file has the same MD5/SHA-1 hash value as the original evidence—of course it doesn’t, because of the additional information contained within the evidence file. However, EnCase will only verify and generate an MD5/SHA-1 hash value of the information contained within the data blocks of an evidence file, which is then compared to the MD5/SHA-1 hash value of the original evidence obtained during the acquisition.
Summary
This chapter covered the EnCase evidence file. This file has three essential parts: the header, the data blocks, and the file integrity components.
The header contains the case information. It appears at the front of the evidence file and is subjected to its own CRC calculation to ensure its integrity. It is always compressed.
The data blocks contain, by default, 64 sectors (32 K) of data. The block size can be adjusted upward, starting with EnCase 5, to speed acquisitions. Each block of data contains its own CRC value, and each block is included in the overall MD5 calculation (alternatively SHA-1 or both) for the entire device being imaged. If compression is chosen, the block of data and its CRC are compressed.
The file integrity components are the CRC values and the MD5 hash (alternatively SHA-1 or both). CRC values are calculated and stored for the header and all data blocks. The MD5 hash is calculated against the data only and does not include the header or any CRCs. The CRC values are stored with each block of data. The MD5 is stored at the end of the file in an appendix containing the MD5 along with other evidence file metadata.
EnCase 7 introduces a new evidence file format, dubbed ex01 and lx01. This new format changes the storage structure somewhat and allows for encryption and a new compression format (bzip2). The new format contains three major sections or parts within the file(s), which are Ev2 Header, Data, and Link Record.
Whenever an evidence file is added to a case in EnCase, it undergoes a file integrity check. The CRC for each block of data is recalculated and compared to the stored acquisition CRC value. The MD5 (alternatively SHA-1 or both) for the entire device is recalculated, resulting in a verification hash, which is then compared to the acquisition hash. For a file to be successfully verified, all CRC values must match, and the verification and acquisition hashes must match. A reverification can be run at any time to reaffirm a file’s integrity.
A CRC is an algorithm that results in a 32-bit value. The odds of any two files having the same CRC value are roughly 1 in 4 billion. An MD5 is an algorithm that results in a 128-bit value. The odds of any two files having the same MD5 value are roughly 1 in 340 billion billion billion billion.
EnCase has a feature that allows you to hash a physical device or volume. This feature generates an MD5 (alternatively SHA-1 or both) hash in a report that is date/time stamped. This can be included in your report to reinforce EnCase’s file integrity features.
The EnCase case file stores information about the evidence file in the form of data and pointers to the evidence file. In this way, search hits, bookmarks, notes, file signature analyses, and so forth, are contained in a file separate from the evidence file yet “married” to it through metadata and pointers. The case file is saved when you exit EnCase or click the Save button. It is usually stored in the root of the case name folder.
The EnCase backup files are created automatically by EnCase. The files backed up by this process are the evidence cache and the case folder, except for the Temp and Export folders and EnCase evidence files. They are stored separately from the case files and are stored, by default, in a folder located in the user space on the operating system drive. In most cases, this default location is not recommended and should be configured elsewhere in a safe location, suitable for critical backup data. By default the backup process runs every 30 minutes after the previous backup completes. Backup options are set when a new case is created or can be modified from the backup dashboard. The backup dashboard is accessed from the Case tab’s drop-down menu. The backup dashboard, among other things, lists the various backups that have been created. The EnCase backup dashboard enables you to select any backup point and restore your case to that point in time, either overwriting your original data folder paths or creating new ones.
EnCase stores its configuration settings in INI files. There are, starting with EnCase 7, both global and user configuration files. Global configuration files are stored in Program Files\EnCase 7\Config and Users\Default\AppData\Roaming\EnCase7-1\Config. Configuration files specific to the user are stored in Users\UserName\AppData\Roaming\EnCase7-1\Config and Users\UserName\Documents\EnCase. The storage paths for various configuration files can be configured to a shared location so that examiners in a multiuser lab can share configuration files and work under one standardized EnCase environment.
Exam Essentials
Understand the components and function of the EnCase evidence file. Be able to name and describe the three major components of an EnCase evidence file, in both the legacy and new formats. Understand and be able to explain the mechanisms by which data integrity is maintained in the evidence file. Describe how an EnCase evidence file is created. Explain how changing the block size changes the frequency of CRC values.
Know how the file verification process works. Know under what circumstances the verification process occurs. Understand and be able to explain what takes place during the file verification process and what conditions must be met for a successful evidence file verification. Be able to conduct a manual file verification. Know where to find the results of the file verification process, and be able to describe the results and their meaning to the file integrity process.
Know how to hash a physical device or a volume. Understand and be able to explain the MD5 and SHA-1 hash. Describe how to hash a physical device or a volume and bookmark the results. Understand how to compare the results of these hash values with the acquisition and verification hashes. If hashing to verify an acquisition value, explain the importance of hashing the correct device (physical or logical).
Understand the content and function of the EnCase case file. Explain the purpose of the EnCase case file. Be able to explain in general terms the kind of information contained in the file. Explain when and how the file is named, its extension, when it is saved, and where it should normally be stored.
Understand the function of the EnCase backup process. Explain the purpose and features of the EnCase backup dashboard. Be able to explain which files and folders are backed and which are not. Know how often the default backup process occurs. Explain how the path for the backup is established as well as where this path should be located. Describe the process by which the backup dashboard is used to restore a case to a given point in time.
Understand how and where EnCase stores its configuration settings. Know where both the global and user configuration files are stored. Explain how to configure a shared location such that various configuration files can be shared in a lab group. Explain what kind of data is stored in the common configuration files.
Review Questions
1. The EnCase evidence file is best described as follows:
A. A mirror image of the source device written to a hard drive
B. A sector-by-sector image of the source device written to corresponding sectors of a secondary hard drive
C. A bitstream image of a source device written to the corresponding sectors of a secondary hard drive
D. A bitstream image of a source device written to a file or several file segments
2. How does EnCase verify the contents of an evidence file, using the default settings?
A. EnCase writes an MD5 and/or SHA-1 hash value for every 32 sectors copied.
B. EnCase writes an MD5 and/or SHA-1 value for every 64 sectors copied.
C. EnCase writes a CRC value for every 32 sectors copied.
D. EnCase writes a CRC value for every 64 sectors copied.
3. What is the smallest file size that an EnCase evidence file can be saved as?
A. 64 sectors
B. 512 sectors
C. 1 MB
D. 30 MB
E. 640 MB
4. What is the largest file segment size that an EnCase evidence file can be saved as?
A. 640 MB
B. 1 GB
C. 2 GB
D. 8,796,093,018,112 MB
E. No maximum limit
5. How does EnCase verify that the evidence file contains an exact copy of the source device?
A. By comparing the MD5 hash value (alternatively SHA-1 or both) of the source device to the MD5 hash value (alternatively SHA-1 or both) of the data stored in the evidence file
B. By comparing the CRC value of the source device to the CRC of the data stored in the evidence file
C. By comparing the MD5 hash value (alternatively SHA-1 or both) of the source device to the MD5 hash value (alternatively SHA-1 or both) of the entire evidence file
D. By comparing the CRC value of the source device to the CRC value of the entire evidence file
6. How does EnCase verify that the case information—such as case number, evidence number, notes, and so on—in an evidence file has not been damaged or altered after the evidence file has been written?
A. The case file writes a CRC value for the case information and verifies it when the case is opened.
B. EnCase does not verify the case information, because it can be changed at any time.
C. EnCase writes a CRC value for the case information and verifies the CRC value when the evidence is added to a case.
D. EnCase writes an MD5 value of the case information and verifies the MD5 value when the evidence is added to a case.
7. For an EnCase evidence file to successfully pass the file verification process, which of the following must be true?
A. The MD5 hash value (alternatively SHA-1 or both) must verify.
B. The CRC values and the MD5 hash value (alternatively SHA-1 or both) both must verify.
C. Either the CRC or MD5 hash values (alternatively SHA-1 or both) must verify.
D. The CRC values must verify.
8. The MD5 hash algorithm produces a _____ value.
A. 32-bit
B. 64-bit
C. 128-bit
D. 256-bit
9. Regarding the EnCase backup process (EnCase 7.04 and newer), which are the following are true?
A. The case file backup is stored with a .cbak extension.
B. By default, the backup frequency is every 30 minutes after completion of the previous backup.
C. The evidence cache and the case folder are backed up, except for EnCase evidence files and the Temp and Export folders.
D. All of the above are correct.
E. Only B and C are correct.
10. If an evidence file has been added to a case and completely verified, what happens if the data area within the evidence file is later altered?
A. EnCase will detect the error when that area of the evidence file is accessed by the user.
B. EnCase will detect the error only if the evidence file is manually reverified.
C. EnCase will allow the examiner to continue to access the rest of the evidence file that has not been changed, but will not allow access to the corrupted or changed block.
D. All of the above.
11. Which of the following aspects of the EnCase evidence file can be changed during a reacquisition of the evidence file?
A. Investigator’s name
B. Evidence number
C. Notes
D. Evidence file size
E. All of the above
12. An evidence file was archived onto five CD-ROMs with the third file segment on disc 3. Can the contents of the third file segment be verified by itself while still on the CD-ROM?
A. No. All evidence file segments must be put back together.
B. Yes. Any evidence file segment can be verified independently by comparing the CRC values.
13. Will EnCase allow a user to write data into an acquired evidence file?
A. Yes, when adding notes or comments to bookmarks.
B. Yes, when adding search results.
C. A and B.
D. No, data cannot be added to the evidence file after the acquisition is made.
14. All investigators using EnCase should run tests on the evidence file acquisition and verification process to do which of the following?
A. To further the investigator’s understanding of the evidence file
B. To give more weight to the investigator’s testimony in court
C. To verify that all hardware and software is functioning properly
D. All of the above
15. When a noncompressed evidence file is reacquired with compression, the acquisition and verification hash values for the evidence file will remain the same for both files.
A. True
B. False
16. The Ex01 evidence file format consists of three parts, which are the Ev2 Header, Data, and CRC record block.
A. True
B. False
17. The EnCase evidence file’s logical filename can be changed without affecting the verification of the acquired evidence.
A. True
B. False
18. An evidence file can be moved to another directory without changing the file verification.
A. True
B. False
19. What happens when EnCase attempts to reopen a case once the evidence file has been moved?
A. EnCase reports that the file’s integrity has been compromised and renders the file useless.
B. EnCase reports a different hash value for the evidence file.
C. EnCase prompts for the location of the evidence file.
D. EnCase opens the case, excluding the moved evidence file.
20. During reacquisition, you can change which of the following? (Choose all that apply.)
A. Block size and error granularity
B. Add or remove a password
C. Investigator’s name
D. Compression
E. File segment size
All materials on the site are licensed Creative Commons Attribution-Sharealike 3.0 Unported CC BY-SA 3.0 & GNU Free Documentation License (GFDL)
If you are the copyright holder of any material contained on our site and intend to remove it, please contact our site administrator for approval.
© 2016-2026 All site design rights belong to S.Y.A.