EnCase Computer Forensics (2012)
Chapter 6
EnCase Environment
EnCE Exam Topics Covered in This Chapter:
· Home Screen
· EnCase layout
· Creating a case
· Tree pane case Entries view
· Table pane case Entries view
· View pane case Entries view
· Adjusting panes
· Other views
· Other global views
· EnCase options
In this chapter, you will explore the many views and features of EnCase. Each version of EnCase has introduced new features, resulting in additional interfaces or views. Screen real estate is always a scarce resource, and the arrangement and placement of features will always be a programming challenge. EnCase 7 changes the viewing landscape significantly when compared to previous versions. Veteran users, myself included, grumbled when they first experienced the changes; however, once you take the time to learn the new interface, you’ll find that it is logically arranged and easy to use. The best way to learn the new interface is to use it, so, with that being said, let’s get started.
Home Screen
When you launch EnCase 7, you will see the Home screen, as shown in Figure 6-1. From this screen, aside from what is available on the various toolbar menus, you can open a case, create a new case, choose options, view paths, or access the help screens. If you have recently opened cases, they will also be available to you under the Recent Cases section, as shown in Figure 6-1.
From the Home screen shown in Figure 6-1, I opted to open an existing case, which was called bbtest. Soon, I’ll go into creating a new case, but for now I simply want to show the EnCase landscape. Upon opening the existing case, you can see many options still on the Home screen pertaining to the open case, as shown in Figure 6-2.
In the Evidence category, you can add evidence or process evidence. In the Search category, you can search the case or view the results of a search. In the Browse category, you can view evidence or view records, such as email or Internet artifacts. In the Report category, you can go to the reports created thus far, go to the bookmarks view, or work with report templates. In the Case category, you can view case information, modify options, modify hash library settings, or save the case.
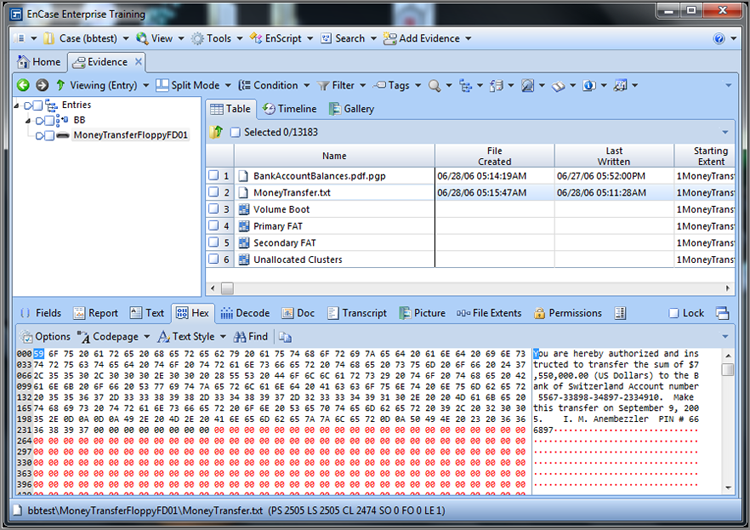
So that you can see how EnCase 7 displays information, let’s choose to browse evidence (click Evidence in the Browse section). This will open the Evidence tab, and in the Table tab of the Evidence tab you will see, in table and row format, the various evidence items in the case, as shown in Figure 6-3.
Figure 6-1: EnCase 7 Home screen, from which you can open cases, create a new case, select options, view current paths, or access help
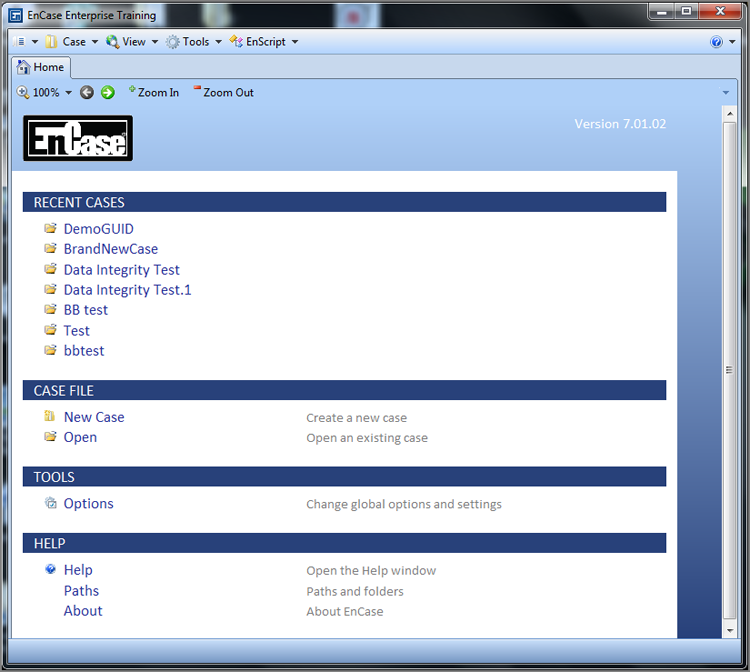
Figure 6-2: After opening an existing case, the Home screen provides the examiner with many options pertaining to the case.
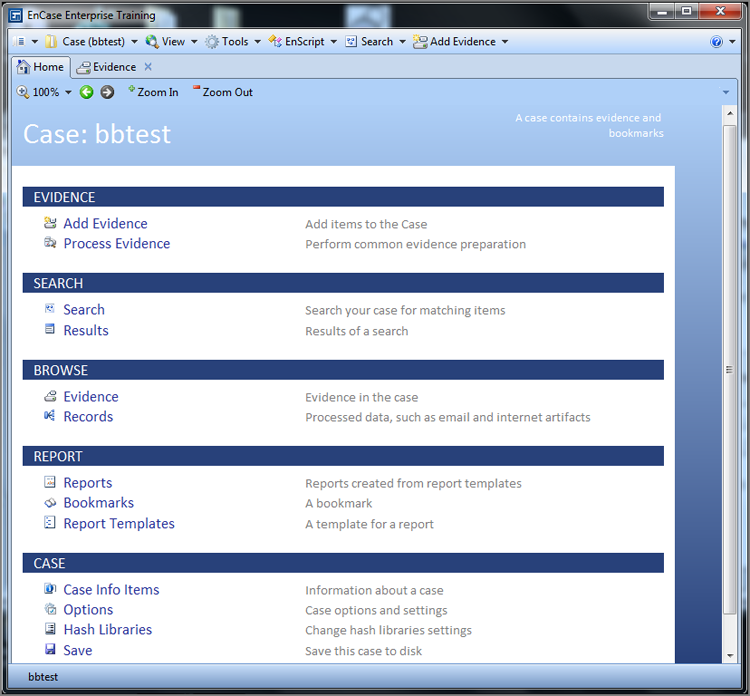
Figure 6-3: Upon choosing to browse evidence, the examiner is taken to a tab displaying the evidence items currently in the case.
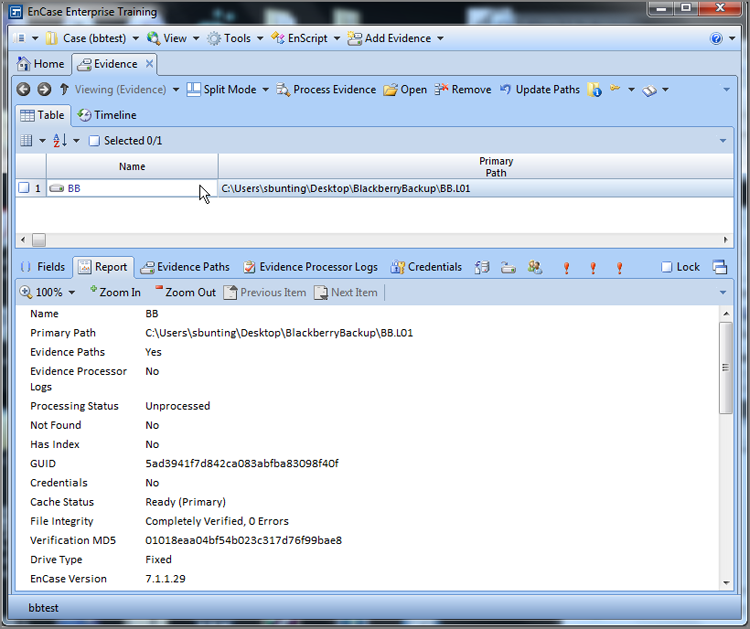
At this point, EnCase is displaying only a list of evidence items in the case and no data. To view a particular evidence item, you need only double-click it in the Table tab, which will parse and load into a Viewing tab. If you’ve already viewed it before, the data will be read from the evidence cache, and the results will be displayed quickly. If it is the first time viewing an evidence item, it must first be parsed and the evidence cache created, which may take a few minutes depending on the size and complexity of the evidence being loaded.
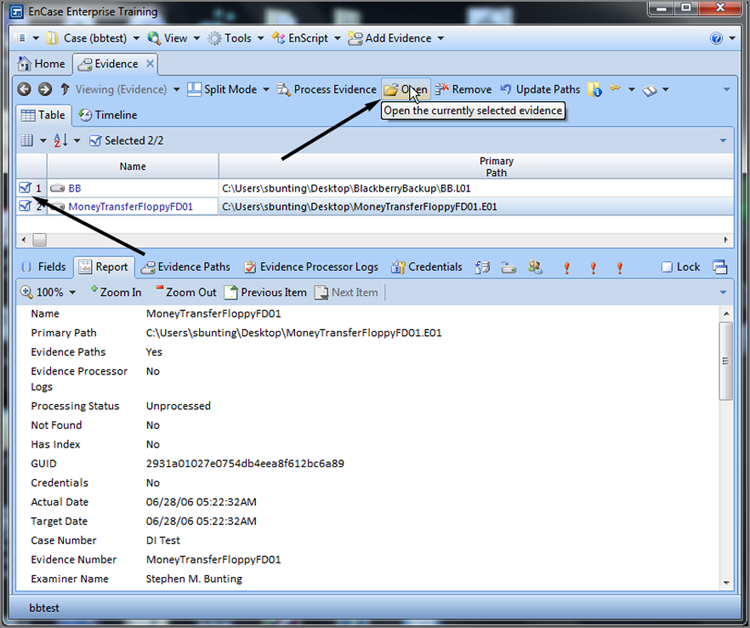
Of course, there are few times when you have multiple evidence items and want to see only one item. Usually, you want to browse them all. Many veteran users of EnCase miss a step here that enables them to browse multiple items, and thus they get frustrated. It is very simple to do but often overlooked. To load and view multiple evidence items, simply select them with blue check marks. As soon as you select one item, the Load Selected Evidence toolbar option (on the Evidence tab) becomes active (no longer grayed out). Select the evidence items you want to load and view and click Open, as shown in Figure 6-4.
Figure 6-4: To load and view multiple evidence items, select them (the blue check mark) and click Open on the Evidence tab toolbar.
Once your evidence item loads, you’ll see the results displayed in the Viewing Entry tab under the Evidence tab. For veteran EnCase users, this view will be quite familiar, as shown in Figure 6-5.
Figure 6-5: Evidence loaded and ready for viewing
EnCase Layout
Once you’ve loaded the evidence, EnCase provides you with, by default, a Tree-Table view from the Evidence tab. As just stated, this view is quite familiar to veteran EnCase users and will probably be the view most often used, but it is not the only view, which I’ll discuss shortly.
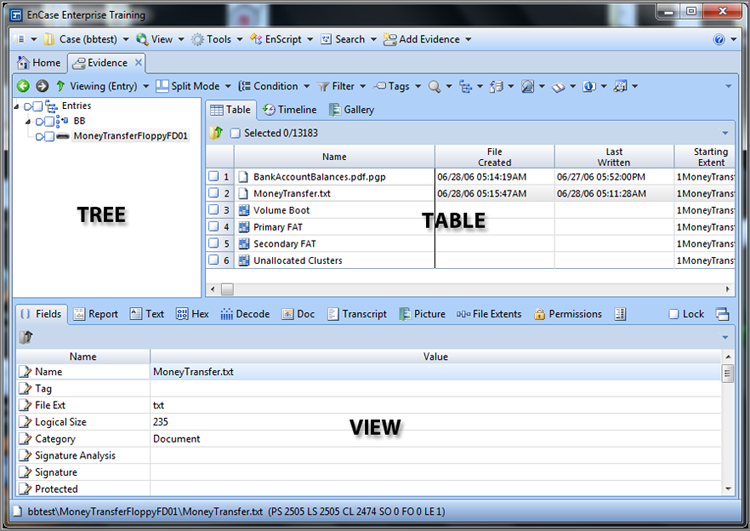
In the Entries Tree-Table view, EnCase divides its screen real estate into three windows that are named for their primary examination function: the Tree pane (formerly the Left pane), the Table pane (formerly the Right pane), and the View pane (formerly the Bottom pane), as shown in Figure 6-6. Granularity or detail increases as you move through the primary panes from the Tree pane to the Table pane and finally to the View pane. If you want details about an object (physical device, volume, or folder), place the cursor focus on it (in other words, highlight it) in the Tree pane, and the Table pane will display the details about that object. If you want more details about an object in the Table pane, highlight it in the Table pane, and the details will appear in the View pane. Once you get down to the data level of granularity in the View pane, you can view or interpret that data in several ways, effectively getting still more information or granularity from the View pane.
![]()
EnCase uses what amounts to a tabbed viewing environment. The tabs have labels that describe the view available under that tab. In this book and in the formal documentation, we’ll refer to the various views by the view offered by the tab, such as Report view, Hex view, and so forth. Many examiners, however, refer to the views as tabs, such as Report tab, Hex tab, and so forth. There is really no difference, so don’t be confused. The tab gives you access to the view, and it becomes, to many, a matter of preference how they name it when talking about it.
Figure 6-6: EnCase divides its screen real estate into the Tree, Table, and View panes.
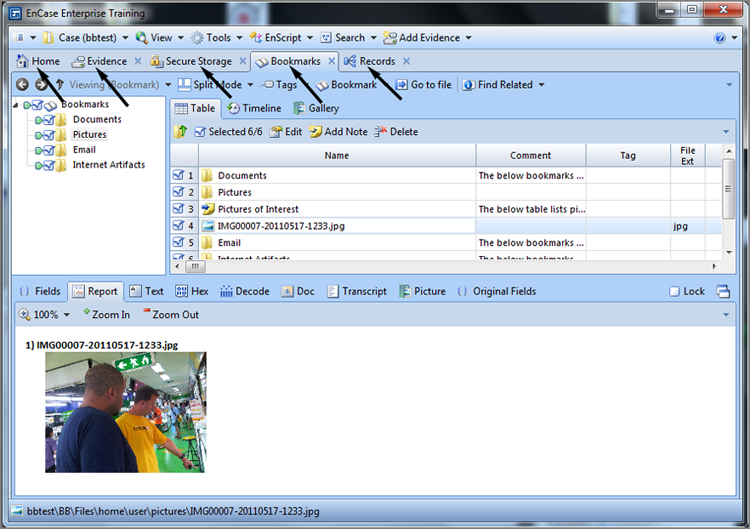
In addition to case Entries view, EnCase offers many other views or features that function in the same manner, providing more granularity as you move through the viewing panes. EnCase 7 uses tab views. As you open other views (Bookmarks, Secure Storage, or Records, for example), tabs will appear for each view. In Figure 6-7, I simply went to the View menu and opened Bookmarks, Secure Storage, and Records, which caused each to launch in its own tab. Once you take a few minutes to familiarize yourself with how it works, it is easy to find your way around.
Figure 6-7: Arrows point to various tabs.
I cover many of these other views or features later in this chapter. For now, I’ll focus on showing how to create a case and work in the Entries Tree-Table view. The option to work with the cases appears on the Home screen and also on the case drop-down menu on the application toolbar. Which you decide to use is often a matter of personal preference. For now, let’s use the Home screen and open its tab, which is the leftmost tab, as shown in Figure 6-7(note the house icon next to it). Another reason for working from the Home screen is because you will see this screen by default whenever you open EnCase. Thus, it is from here that you will start your exploration of EnCase’s environment and features.
Creating a Case
The Tree pane is the starting point for the detail that follows in the other two panes and the location from where you will do much of your work in EnCase. However, before you can work with the Tree pane, or any pane for that matter, you need to have a case open. And before you can have a case open, you need to create a case. When EnCase starts, it opens by default to the Home screen. From the Home screen, you create a case by clicking New Case in the case file section. Alternatively, you can select Case > New Case from the application toolbar. After you click New Case, you are presented with the dialog box shown in Figure 6-8. I have sectioned this box into four major areas to assist with the discussion. Those areas are the templates area (A), case name area (B), path area (C), and the Case Info area (D). I discussed this dialog box to some degree in Chapter 5 when I covered the paths and storage locations of EnCase files.
Figure 6-8: The Case Options dialog box
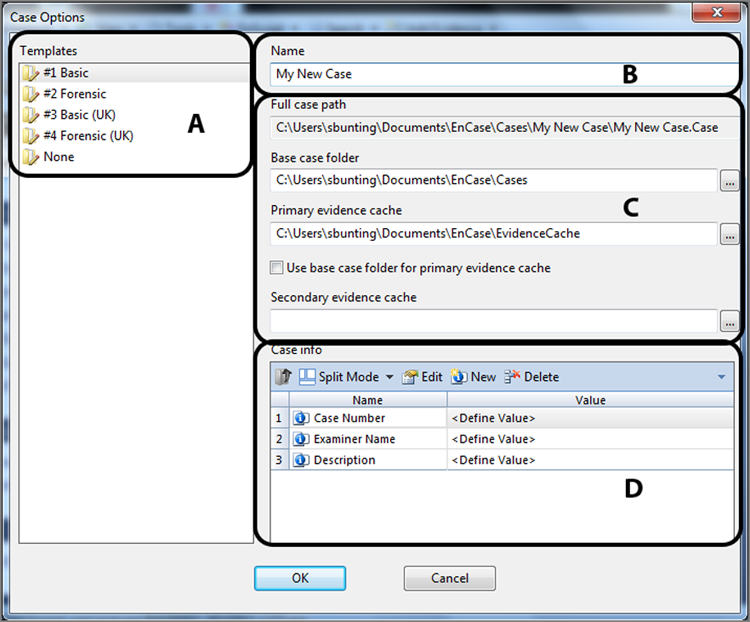
Templates Templates, section A, are new in EnCase 7. A template has an extension of .CaseTemplate and is stored in the Users\<Username>\Documents\EnCase\Templates folder. EnCase ships with predefined templates, and the user can create more if needed. Templates save time, and you are encouraged to use them. Each template contains a uniquely defined set of case template information for the following:
· Case information items with default values
· Bookmark folders and notes
· Tag names
· Report template
· User-defined report styles
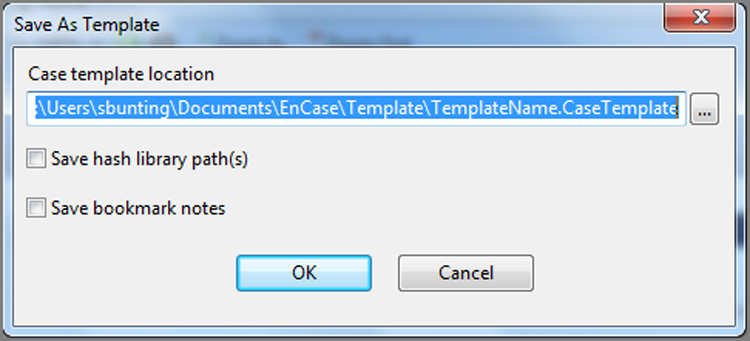
Many users prefer their own template. This is very simple to do as you create a case using a template. Once you create the various customized items you want to save, such as the examiner name or bookmark folders, simply go to the Case drop-down menu on the application toolbar and choose Save As Template. When you do, you will see a dialog box, as shown in Figure 6-9, in which you can choose a name and path, as well as whether you want to include hash library path(s) or bookmark notes to the template.
Figure 6-9: Save As Template dialog box
Name In the section labeled B, there is a field in which to enter the case name. Enter a descriptive name for your case, which may include a case or complaint number. The text you enter here will also populate the full case path immediately below, in which the containing folder will bear the case name as will the name of the case file. When you have many cases to manage, being very descriptive and detailed, while still being brief, is quite helpful.
Full Case Path The first field in the section labeled C is the full case path. This field is grayed out, and you can write to it directly. Rather, its data is a derivative of the base case folder (immediately below) and the case name (immediately above).
Base Case Folder The base case folder is the second field in the section labeled C. By default, your cases will be stored in your Documents or My Documents folder. It is usually better to have this location on a drive other than your system drive and to store your evidence and evidence cache with your case files.
Primary Evidence Cache The primary evidence cache path is the third field in the section labeled C. When EnCase loads an evidence item for viewing, it parses and stores metadata associated with that evidence item. Each acquired evidence item is assigned a GUID, and a folder by that GUID name will contain the cached data associated with that evidence item. When the evidence processor runs, it likewise stores data in this folder. Naturally the purpose of caching this data and storing it separately for each evidence item is increased performance as well as increased scalability across large evidence sets. By selecting the box under this field, you can assign this path to the base case folder.
Secondary Evidence Cache The secondary evidence cache path is the last field in the section labeled C. This location is for previously created caches, and you can store them in this location. EnCase will only read previously stored caches from this location. All new caches will be written to the primary cache folder.
Case Info In the section labeled D in Figure 6-8, you will see several fields into which you can or should enter data pertaining to the case. Of course, the fields will vary according to the template you select in the section labeled A. Minimally you should enter your name as the examiner, along with a case number and description. Some fields will not change from case to case (your name, for example), and thus a custom template could save you time, if you take the time to create one. In the past, EnCase required you to at least enter your name to proceed; however, this is no longer required.
Case file organization and management are extremely important skills for an examiner to acquire. When computer forensics was in its infancy, best practices and technology at the time called for storing only one case image per drive to prevent comingling or cross-contamination of data. As caseloads grew and technology evolved, best practices have been modified accordingly. Because EnCase encapsulates a device image into an evidence file that has powerful and redundant internal integrity checks, cross-contamination of image files is not the issue it was in the past. In that regard and in many other areas, EnCase has changed the face of computer forensics and, with it, best practices.
Many labs have massive storage servers that hold EnCase evidence and case files. Instead of segregating storage in separate physical devices, as in the past, storage today is often networked and segregated using distinctive folder-naming conventions that are consistent with best practices for case management. In this manner, several examiners can access the same evidence files concurrently and work on different facets of the same case as a team. What used to be physical separation of cases is now facilitated by logical or virtual separation.
EnCase also allows the examiner to open multiple cases at the same time and to conduct concurrent analyses on them. Sometimes cases are created separately and are found later to be related. In these instances, EnCase facilitates examining them as separate yet related cases. Or, if the cases are separate, the examiner can multitask, working manually on one case while another case is being subjected to simultaneous automated processing.
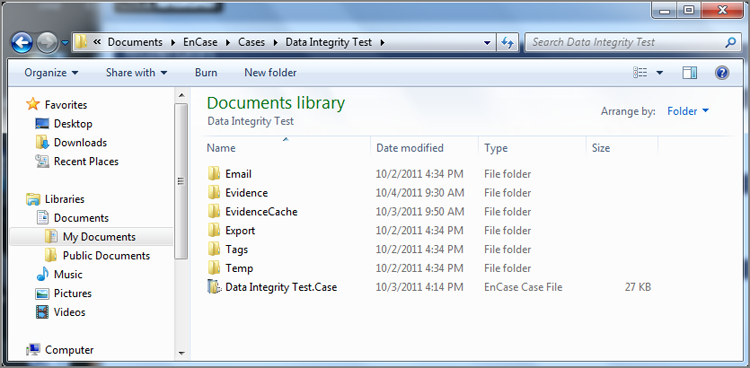
Regardless of how you use EnCase, file management and organization are critical components for keeping case evidence and information segregated. Guidance Software recommends case folder-naming conventions that follow along the lines of those shown in Figure 6-10. In this manner, all cases are contained in the folder Cases and yet are separated by distinct subfolder names. With prior versions of EnCase, the examiner had to create this folder structure; however, with EnCase 7, the structure is automatically created when you create a new case. You need only identify the base path. EnCase creates subfolders called Email, Export, Tags, and Temp. Figure 6-10 contains these folders and two more, which are Evidence and EvidenceCache. You can place these folders anywhere you like. I like to keep them all in one place. For performance, you should consider keeping all of them off the system drive. You could place the Evidence and EvidenceCache folders on separate drives as well to, again, enhance performance. If you do, however, you add to the complexity of your configuration with more locations to track. As soon as you have created your case, EnCase 7 will automatically save the case in the root of the case folder using the case name you assigned. As you go along and do work, you should save using the Ctrl+S key combination, or you can do so from the Case drop-down menu.
It is a good practice to have the case, the case file, and the case folder all named the same, and EnCase 7 does all of that for you. It’s also wise to incorporate the case filename as part of the evidence filename. When they are all named consistently, errors and confusion are less likely to occur. Table 6-1 shows an example of a good file- and folder-naming practice. If the files are misplaced, the naming convention alone can associate them with their lost relatives.
Table 6-1: Examples of good file and folder naming conventions
|
Description |
Name |
|
Case name entered in Case Options dialog box |
ABCStockFraud_39_05_003487 |
|
Case folder name under Cases folder (automatic with EnCase 7) |
\Cases\ ABCStockFraud_39_05_003487 |
|
Case file name (automatic with EnCase 7) |
\Cases\ ABCStockFraud_39_05_003487\ ABCStockFraud_39_05_003487.case |
|
Hard drive evidence file |
\Cases\ ABCStockFraud_39_05_003487\Evidence\ ABCStockFraud_39_05_003487_40GBWDHDD01 |
|
USB thumb drive evidence file |
\Cases\ ABCStockFraud_39_05_003487\Evidence\ ABCStockFraud_39_05_003487_1GBUSBTD01 |
Figure 6-10: Multiple cases stored in a single Cases folder
![]()
Remember that, by default, the backup case file (.cbak) is located in \Users\UserName\Documents\EnCase\Cases\Backup. \EnCase*\Backup. This location places the backup files in very close proximity to the case files and on the same drive. By default, they had to be configured somewhere and to a location that exists. It is wise to place your backups on a drive that is separate from your case files. Also, remember that, starting with EnCase 6, multiple backup files are maintained (the frequency and number of backup files retained is configurable).
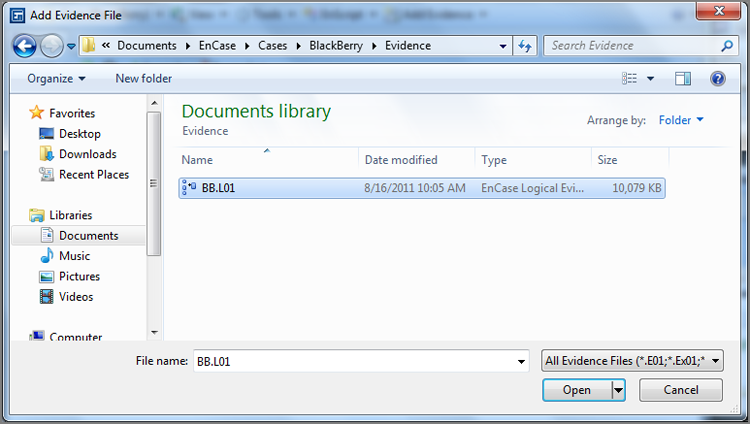
After you have created a case and it is automatically saved with first created, it is time to add evidence to that case. To do so, click Add Evidence, which is located on the Home screen. (This option is not available until you either create or open a case.) At this stage, you add a local device, add an evidence file, add a raw image, acquire a smartphone, or add a crossover preview, as shown in Figure 6-11. If you are operating in the enterprise or FIM environment, you can connect to a network device that is running the servlet. I covered adding a local device and acquiring it in Chapter 4, so now I’ll simply add an evidence file by choosing Add Evidence File and browsing to its location, as shown in Figure 6-12. Once you have added evidence to your case, save your case.
Figure 6-11: Add Evidence screen
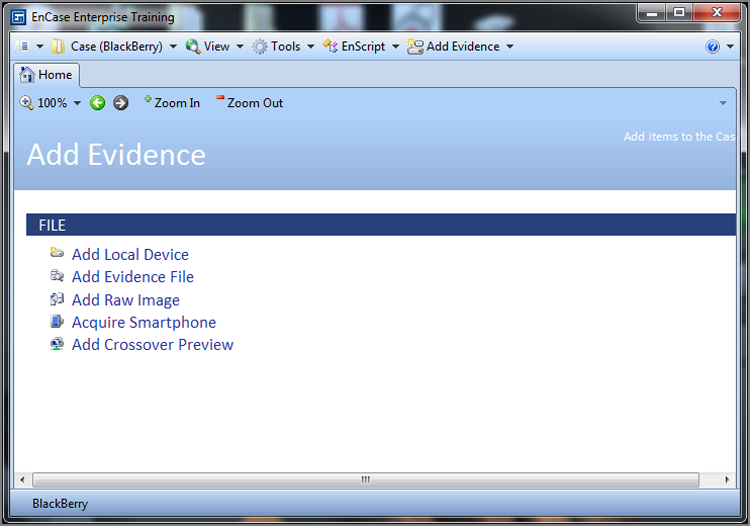
Figure 6-12: Browsing to an evidence file
There is a saying that has its roots in Chicago: “Vote early and vote often.” In forensics, you should apply similar logic by saving early and saving often. Get into the habit of clicking the Save button (easier yet is the Ctrl+S key combination) when you have completed significant work and when you are about to embark on a new task or process. An even better practice is to use the File > Save All command!
Tree Pane Navigation
Let’s navigate within the EnCase environment. In the previous section, you created a case and added a device (I added an evidence file, but you can add your own local hard drive). If you use your own drive, you’ll find that it is an excellent place to explore and to conduct research. Before you can work in the Tree pane, you have to open your evidence item. As you’ll recall, you can double-click the evidence item or select it and click Open on the Evidence tab toolbar. Now you are in the case Entries view, in which the Tree pane displays the devices in your case along with their hierarchical structure down to the folder level. Files contained at any level will be displayed in the Table pane along with any folders at that same level as the displayed files.
Figure 6-13 shows the EnCase case Entries view with the local hard drive added to the case along with a BlackBerry backup logical evidence file, a Mac OS X evidence file, a Linux evidence file, and three hardware RAID 5 evidence files configured and mounted as a logical RAID within EnCase. When you look at the Tree pane, you can see all the devices in the case along with their associated icons. EnCase uses a vast number of icons in its environment. You can find a complete listing for the last three versions on this page https://support.guidancesoftware.com/node/.
Figure 6-13: EnCase supports many different file systems, which can be mounted in the same case and searched simultaneously.

Figure 6-14 shows a physical device (live in this case, with a blue triangle in the lower right) and its associated volume. The physical device icon is a depiction of a hard drive with the arm and heads spanning the platter. It takes some imagination, but that’s what it is. The volume icon is a gray 3D box of some sort.
Figure 6-14: A live physical device and its associated volume. Note the icon for the physical device has a blue triangle in the lower right, indicating it is a live device.

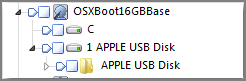
Figure 6-15 shows an OS X (Macintosh) image file mounted in EnCase. Because there is no blue triangle in the lower-right corner, you know you are not looking at a live device but rather an evidence file. The icon is the same except for the absence of the blue icon in the lower-right corner.
Figure 6-15: An OS X evidence file physical disk icon that does not have a blue triangle in the lower right, indicating it is not a live device
![]()
EnCase offers another type of live device view: a remote preview carried out over the network using the Enterprise of FIM models of EnCase. In this case, the blue triangle would be a red triangle.
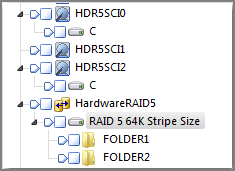
Figure 6-16 shows three devices that have no volumes because they are three physical devices imaged from a hardware RAID 5 system. As such, all you see are three physical device icons. Well, that’s not entirely true, because you do see icons for volumes, but there’s nothing under them because there are no black triangles. What happens is that, on Drive 0, the beginning data is present (MBR, VBR, and start of FAT1), but because the next stripe of data (in this case 64 KB) goes to the next drive, there is nothing to support the remaining structure, and you get an empty volume icon. In this case, the second 64 KB, which goes on Drive 1, is all zeros, which rarely happens except in a controlled data set such as this one. The first parity stripe, an XOR of the first 64 KB on Drives 0 and 1, goes onto the first 64 KB of Drive 2, making it a mirror of Drive 0. Anything XOR’d with all zeros is a mirror of itself, in essence. Since you’ve probably heard more than you wanted to know about a RAID at this point, we’ll move on.
Anyway, within EnCase, these devices have been manually configured to form a logical RAID 5 device, shown by a special icon. This icon in EnCase 7 appears as two gold cylinders, spanned with black arrows. This logical physical RAID 5 device has a logical partition in it, labeled Raid 5 64K Stripe Size. This volume has been renamed using a feature available in EnCase 7. When you right-click a volume, one of the options is Rename, which has been selected in this case both to demonstrate the feature and to describe the properties of the RAID.
Figure 6-16: Three physical devices from a hardware RAID 5 configured and mounted as a logical RAID 5 within EnCase
If you turn your attention back to the physical device named 0 in Figure 6-14, you will note that next to the device icon is a black triangle pointing downward. Immediately below the physical icon, you see a volume icon labeled C. To the far left of the volume icon you see a clear triangle pointing to the right; it indicates that the object is collapsed and that there are more objects under it. You can view these additional items by clicking the clear triangle and thus expanding the object to reveal its contents, as shown in Figure 6-17. If you contrast the physical device named 0 with those associated with the hardware RAID in Figure 6-16, you’ll note that one of the physical drives in the RAID does not have a clear triangle, which is the one labeled HDR5SCI1.
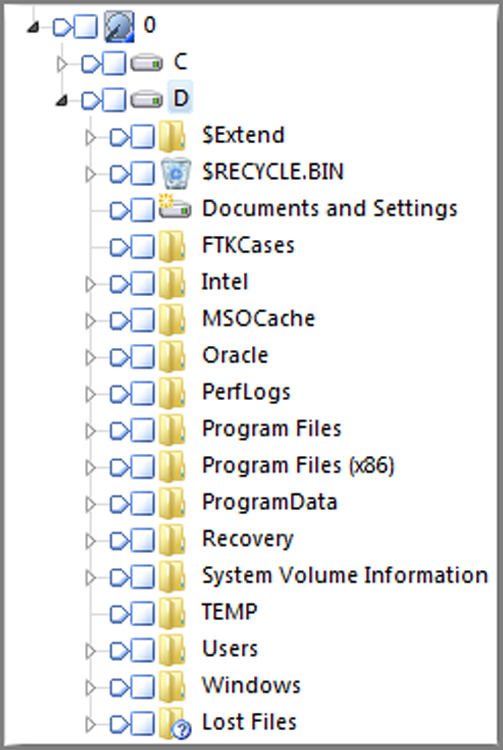
Figure 6-17: Clicking the clear triangle next to an object expands that object one level below the level of the object.
![]()
Figure 6-17 depicts the new folder structure that earmarks it, at a glance, as Windows 7 (Server 2008 and Vista also). One of the most significant changes from its predecessors in this structure is the relocation of user profiles from Documents and Settings to Users. You should note the special icon for Documents and Settings, which denotes a link. Whenever you have a link, look in the column in the table viewed named Symbolic Link, and you will find the location to which the link points, which in this case is the folder Users.
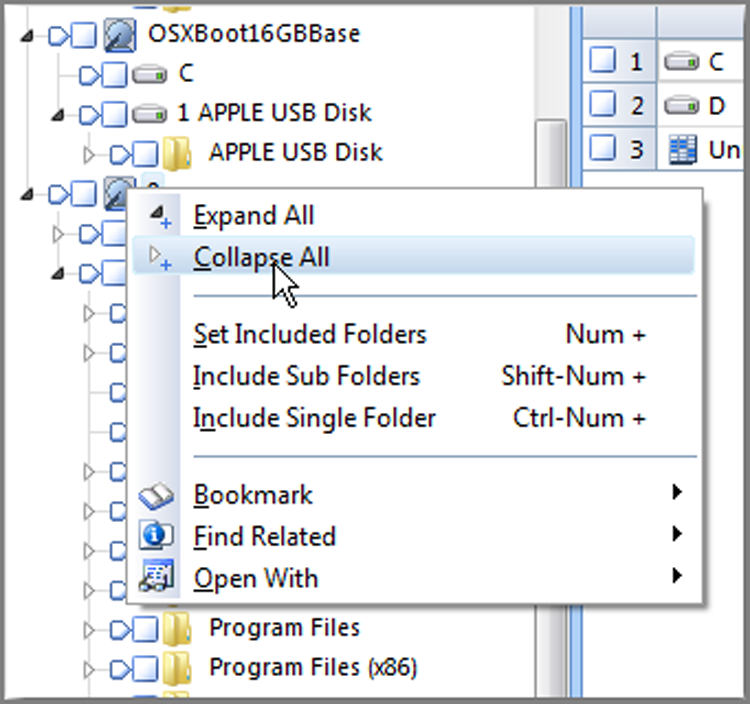
At times, you will drill down so deep into the hierarchical structure that you can’t see the forest for the trees. Rather than reverse your way back to the top by clicking triangles until you have a bad case of carpal tunnel, you can right-click any object and contract everything below it by selecting Collapse All, as shown in Figure 6-18. By choosing this option at the level of the physical device, you can contract the device completely. Conversely, you can right-click and choose Expand All at any level you choose. You will find the former far more useful than the latter.
Figure 6-18: You can expand all or collapse all by right-clicking an object in the Tree pane.
Between the triangle collapse or contract signs and the device icon are two other boxes. One is a square, and the other is five-sided and shaped like the home plate on a baseball field. The square box is for selecting objects for subsequent action or processing. When objects are selected, a blue check appears in the box next to the object. Selecting an object in the Tree pane selects that object and all child objects. Selecting an object in the Table pane selects only that object.
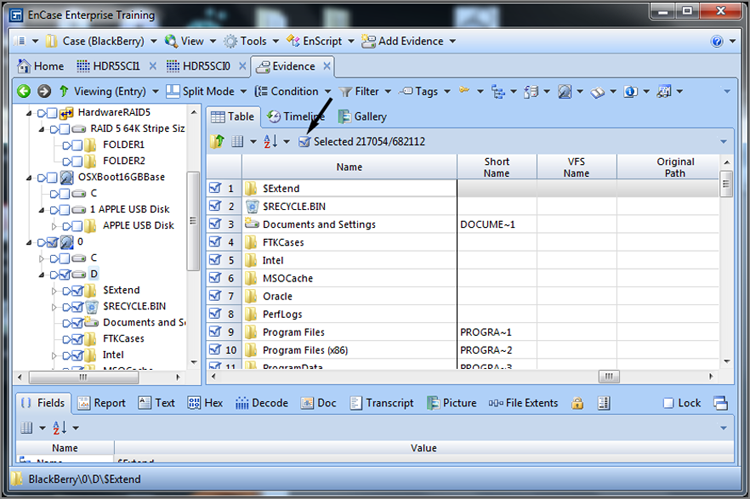
As objects are selected, a cumulative count of selected objects appears in the Dixon box, named after the examiner who suggested this feature. This box has moved from its location on legacy versions of EnCase and is now located below and just to the right of the table tab itself and above the first column in the table, as shown in Figure 6-19. The count tells how many objects are selected out of the number of objects in the case. Before choosing an action to perform on selected files, it pays to check the Dixon box to make sure the count of selected files accurately reflects your intentions. If you really wanted to copy/unerase six files but instead had accidentally selected 200,000-plus files, it’s better to catch it before you click OK than after.
![]()
By clicking directly in the Dixon box, you can select or deselect all objects in the case.
Figure 6-19: The Dixon box shows the number of selected objects (217,054) out of the number of objects in the case (682,112).
The interface element that looks like a five-sided home plate box has been called many things (see the sidebar “What Do You Call That Thing?”). In this book I call it by its official name, the Set Included Folders trigger or button. When this box is enabled, all files and objects at that level and below are shown in the Table pane. The Set Included Folders trigger remains at the level and location activated until you toggle it off or on at another location, as shown in Figure 6-20. Optionally, you can hold down the Ctrl key and selectively set included folders at different locations, as shown in Figure 6-21.
Figure 6-20: The Set Included Folders trigger activated at the Content.IE5 folder level, showing all child objects in the Table pane
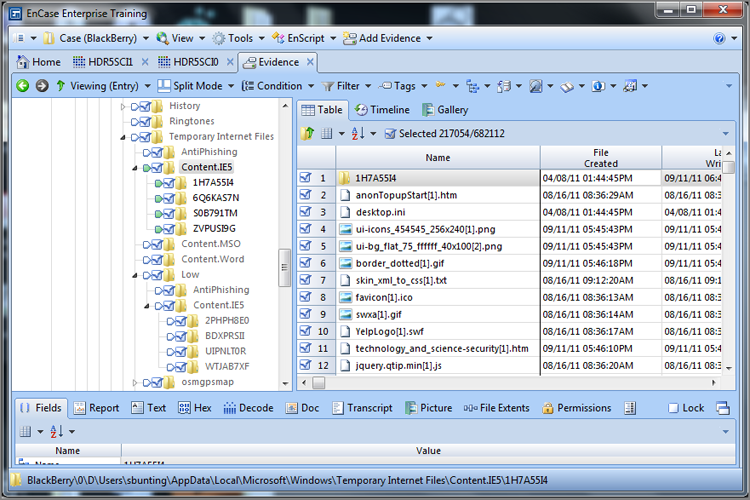
Figure 6-21: In addition to having Set Included Folders activated at the Content.IE5 folder, you can hold down the Ctrl key and activate it at multiple locations; in this case, it is activated at the Content.IE5 level for the Low folder also, which allows you to see the Internet cache files from both locations combined.

What Do You Call That Thing?
You’ll also see the following names used in the field for the Set Included Folders trigger:
· Green box
· Home plate (the name most often used in the field by examiners)
· Show-all button
· Set-Include Switch
· Set-Include Button
· Set Included Option
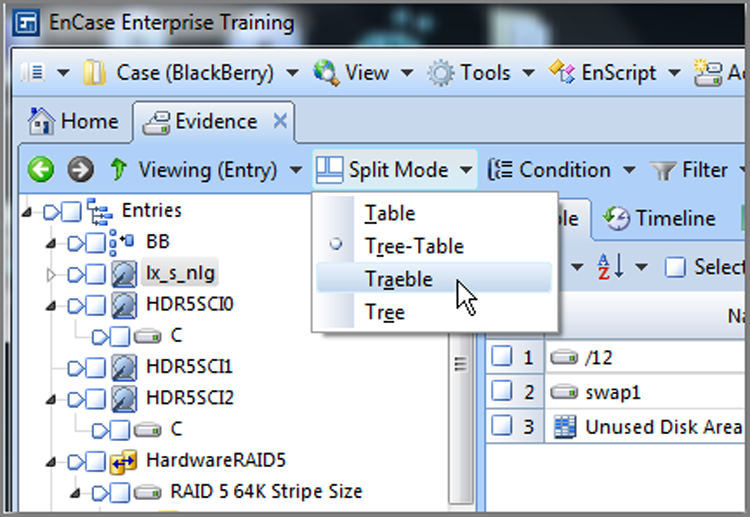
While in the Tree pane, EnCase 7 gives you new views or modes, which effectively provide choices over how you split the Tree pane or whether you want to see the Tree pane at all. The default view is the Tree-Table view, which is the traditional Tree in the left pane, Table in the right, and View in the bottom pane view by which examiners have viewed EnCase since the beginning of time. To change from the default view, the Tree-Table view, click the Split Mode drop-down menu, which is located on the Evidence tab toolbar immediately to the left of the Condition menu, as shown in Figure 6-22.
Figure 6-22: Split Mode menu from which the examiner can choose between Table, Tree-Table, Traeble, and Tree modes of views
If you opt for the Table view, you will have no Tree view, only the table. The Tree-Table view is the default, which probably needs no further explanation because you have been working in this view from the outset. You may opt for the Traeble view, which offers a unique view in that the tree is brought into the Name column of the Table view. The Tree view is gone, and you have only the Table and View panes (top and bottom). From the Name column you can start with a device and drill down to a volume and from there to a folder and finally down to a file, all in the Name column. The details of each item selected in the Name column will appear in the View pane, as shown in Figure 6-23. The final option is the Tree view, in which the Table view is gone and the tree is in the left pane and the View pane in the right. From the Tree pane, you can drill all the way down to the file level, meaning you can select files in the Tree pane and view the data in the View pane, as shown in Figure 6-24. In both figures, the same file is being viewed, which is 1.txt.
Before we move to the Table pane, let’s look at various functions you can perform from the Table pane and how that is achieved in the new EnCase 7 interface. In past versions of EnCase, most of the functionality of EnCase was on the right-click context mouse button. While the menu under the right-click button wasn’t always well-organized, it was very functional once you knew what was there and the lay of the land, so to speak. EnCase 7 has taken most of the right-click functionality and organized it over a series of menus along the Evidence tab toolbar, as shown in Figure 6-25.
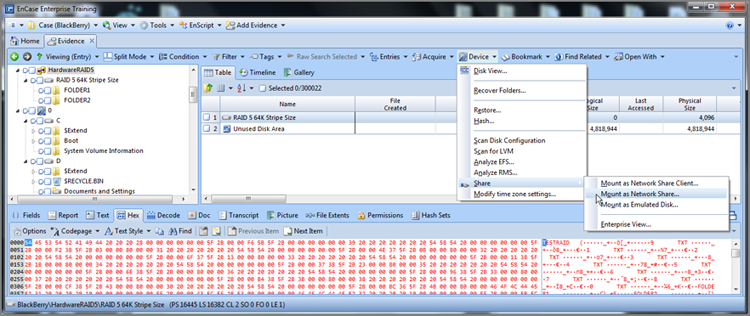
As you can see, they are grouped by various categories or functions. For example, in Figure 6-26, you can see the various functions or operations under the device menu. In our example, you can see that the VFS (Virtual File System) and PDE (Physical Disk Emulator) functions are under the Device menu, off the Share submenu, and are listed as Mount As Network Share and Mount As Emulated Disk, respectively.
Figure 6-23: Traeble view
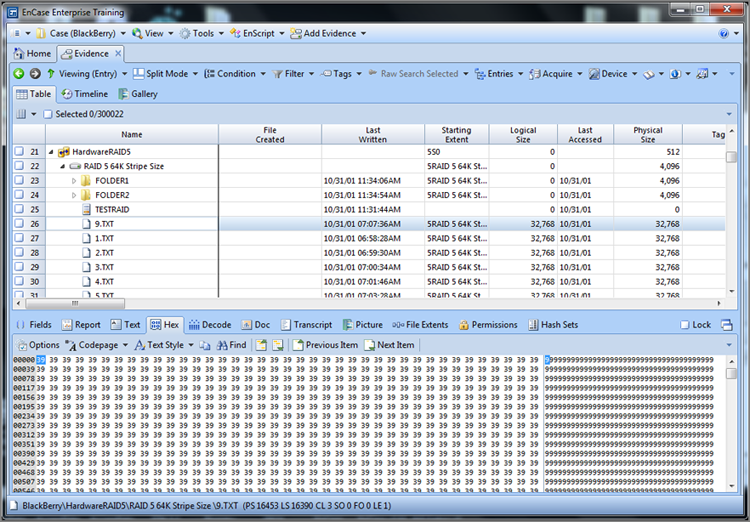
Figure 6-24: Tree view

Figure 6-25: Evidence-level menus located along the Evidence tab’s toolbar

Figure 6-26: Various functions available from the Device menu, specifically showing VFS and PDE
At first, admittedly, this can be a bit confusing to find features in the various menus, especially for those who have become used to these features being on a right-click menu. However, the right-click menu functions can be a bit daunting to a new EnCase user as well. As more and more features are added to EnCase, there’s a limit to what can be reasonably added to a right-click menu, and thus the decision was reached to create menus for these function instead of overloading an already crowded right-click menu. That being said, with improvements and new features come change, and we all have to adjust and learn new methods and workflows.
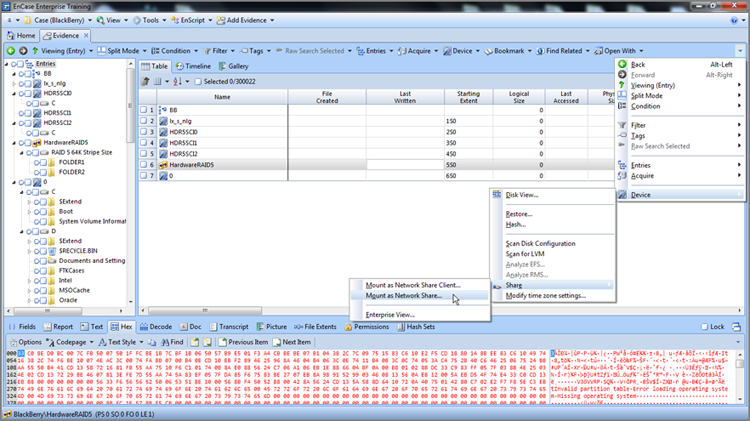
However, for those veteran “right-clickers,” there is a right-click equivalent menu system, although it is not so obvious. This system of menus is officially called the right-side menu, but many have unofficially dubbed it the “super secret menu.” One may forget about something called a right-side menu, but something called a “super secret menu” is something one remembers. I’ll call this menu, going forward, the right-side menu, but don’t forget its unofficial name! Figure 6-27 shows the Evidence tab’s right-side menu, specifically showing accessing the same features shown in Figure 6-26.
![]()
In 7.03, there is now the availability through a right-click of the Entries, Acquire and Device submenus through a right-click.
Figure 6-27: The right-side menu contains a collection of the menus found individually along the Evidence tab toolbar.
The Evidence tab is not the only pane or toolbar with a right-side menu. Figure 6-28 shows an open right-side menu for the Table pane. The arrows show the other available right-side menus. You should explore their contents and then decide whether you prefer one menu for everything or specific menus. It is largely a personal choice.
Finally, evidence is not the only thing that can be viewed in the Tree view. If you click View, as shown in Figure 6-29, you can open tabs for many other purposes. If, for example, you were to open bookmarks or records, they would open in a tab in the Tree-Table view. While the default view, you could also open bookmarks, records, or others in the Table, Traeble, or Tree mode.
Figure 6-28: Another open right-side menu with arrows pointing to other right-side menus
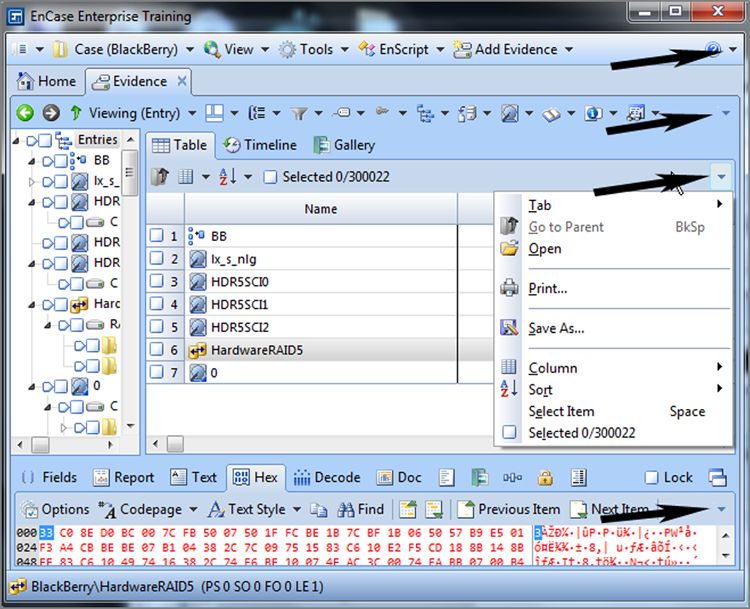
Figure 6-29: Views or tabs available from the View menu on the application toolbar
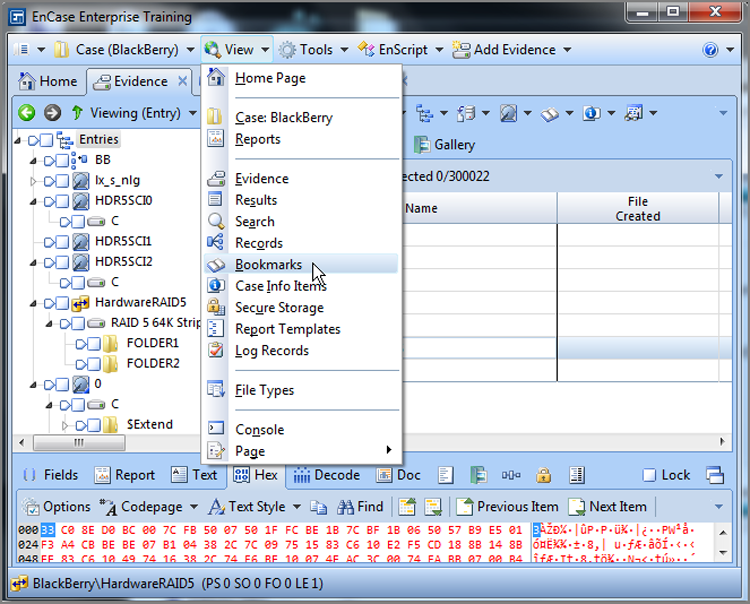
Table Pane Navigation
Now that I’ve covered most of the case Entries view features in the Tree pane, I’ll focus on the features of the Table pane. To simplify things for now, I have not covered the various tab views in the Tree pane. I’ll return to them later. The Table pane has several tabs, but the default tab is Table View, in which the objects appear in a spreadsheet view, with the various attributes or properties of the objects appearing in columns.
Table View
From the Table view, you can sort, hide, move, lock, and otherwise configure columns to streamline your examination. There are more columns than you can see at once unless you have multiple monitors configured to accommodate such a view. Except for those lucky enough to have dual- or triple-monitor configurations, most of us need to arrange the columns so that we can view meaningful and related information.
One of the most useful features is the ability to lock a column, which is most often applied to the Name column. In fact, the Name column is locked by default in EnCase 7. When the Name column is locked, you can scroll through the columns, and the object name remains visible throughout the process. If you wanted to lock a column other than Name, or perhaps lock the first two columns including Name, you must first unlock the Name column. To do so, place your cursor in the Name column. Next, open the right-side menu for the table, as shown in Figure 6-30. On the right-side menu, open the Column submenu and choose Unlock.
![]()
You can also use the Column drop down menu above.
Figure 6-30: Unlock a column by clicking in a locked column, opening the right-side menu, choosing Column, and then choosing Unlock.
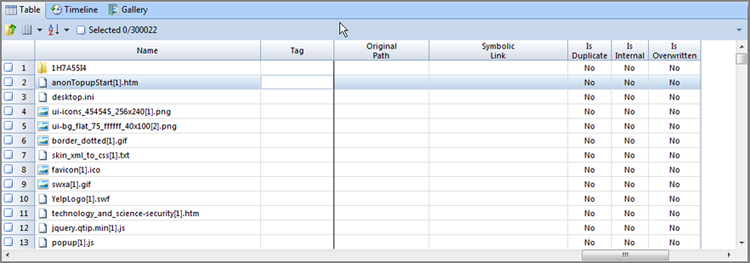
To lock a column, you simply repeat the steps, except that you lock instead of unlock. First decide which column you are going to lock. In my example, my columns are in the default configuration, with the Name column first and the Tag column second. I have decided to lock the Tag column such that I can always see both the Name and Tag columns as I scroll across the Table view. First I place my cursor focus in the Tag column. Next I go to the right-side menu, open the Column submenu, and click Set Lock. A dark line appears on the right side of the locked Tag column indicating the location of the locked column. As shown in Figure 6-31, when you scroll across the columns, both the Name and Tag columns remain visible.
Figure 6-31: A dark line marks the right edge of the locked column. The column(s) to the left of the dark line will remain locked while those to the right of it will scroll by.
Sorting columns is an excellent analysis tool. With EnCase you can apply up to six sort levels, although three levels are the most you will typically ever require.
To sort a column, you can do one of the following:
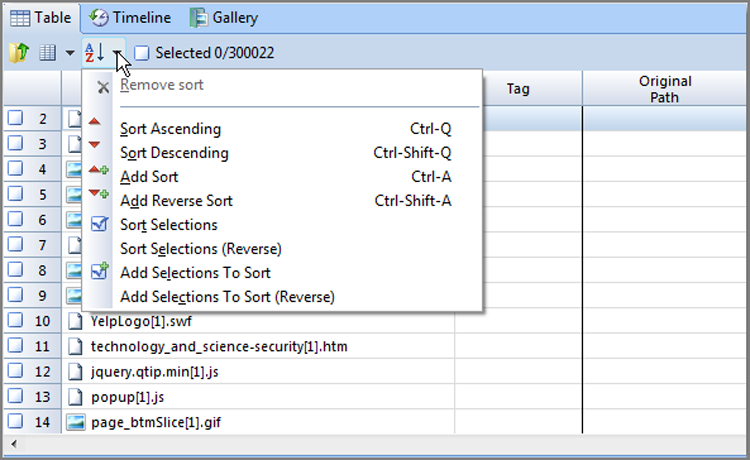
· Place your cursor in the column, and open the Sort menu from the Table toolbar, as shown in Figure 6-32. Next, pick your option from among those offered.
· Double-click the header of the column you want to sort. Double-click it again to reverse the sort order.
Figure 6-32: The Sort menu allows various sorting options for columns.
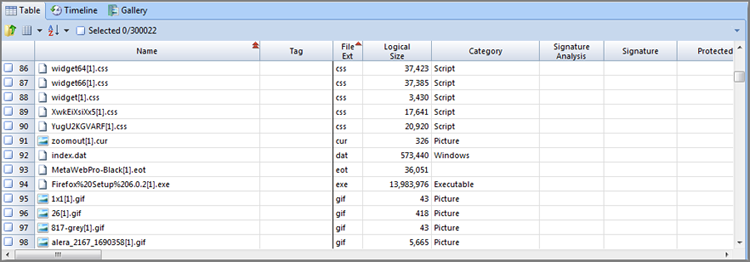
In Figure 6-33, I’ve applied a sort just to the File Ext column. The little red triangle indicates the direction of the sort. I’ve also applied a second sort to the Name column (see two triangles on that column) such that all files are sorted first by file extension and second by name. If you want to apply a second sort, simply hold down the Shift key, and double-click the column header. You can also place your cursor in the second column to be sorted and choose among the options under the Sort menu.
Figure 6-33: A second sort has been applied, shown by the two triangles on the Name column.
If you want to sort in the opposite direction, hold down the Ctrl key while double-clicking the column header. If applying a second sort, hold down both Ctrl and Shift (in other words, press Ctrl+Shift) while double-clicking the column header.
If you prefer using menus, select a column to see a variety of sort options in the Sort menu.
To remove a sort, double-click the column header. Without the Shift key, this action replaces the old sort with your new sort.
To return all columns to their unsorted state, select any column anywhere in the table, and choose Remove Sort in the Sort menu.
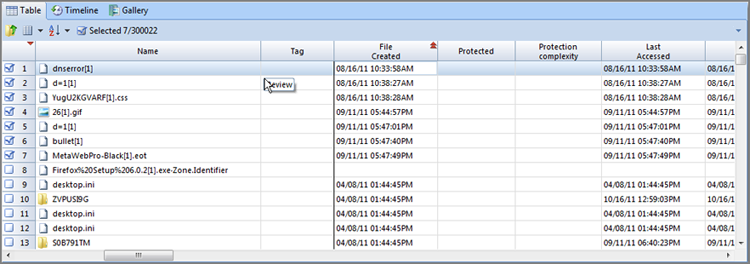
EnCase features a very useful sort that is not obvious. You can sort on the very first column (which has no name). When you have items “blue checked” and selected, a simple double-click to this column brings all your selected items to the top; that is, EnCase sorts selected items from unselected items. Once you have your files selected and sorted on the “blue check mark” column, you can add a second sort to put your selected files in chronological order. In Figure 6-34, several files of interest were selected from several hundred in the sample. Once selected with blue check marks, they were sorted by the unnamed column containing the blue check marks. They were subjected to a second sort based on time, creating a chronological listing of the files selected.
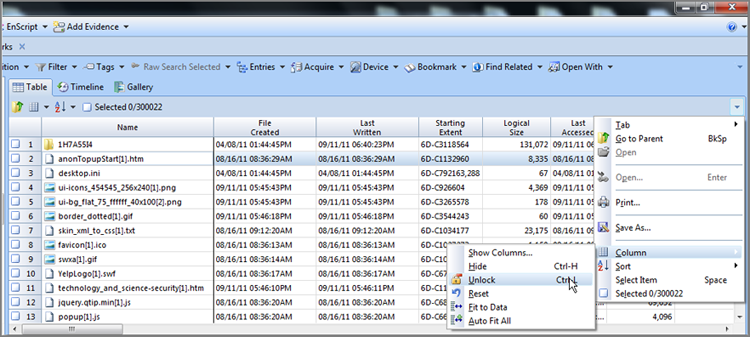
Columns can be hidden or displayed easily. This allows you to remove irrelevant data and focus on what’s important to your case. The quick way to hide a column is to place your cursor on it and press Ctrl+H. Pressing Ctrl+H again hides another column—the one your cursor moves to after you hide the first column.
Figure 6-34: An undocumented but extremely useful sort occurs when you select files and sort on the unnamed column header above the blue checked boxes. EnCase sorts between those selected and those not selected.
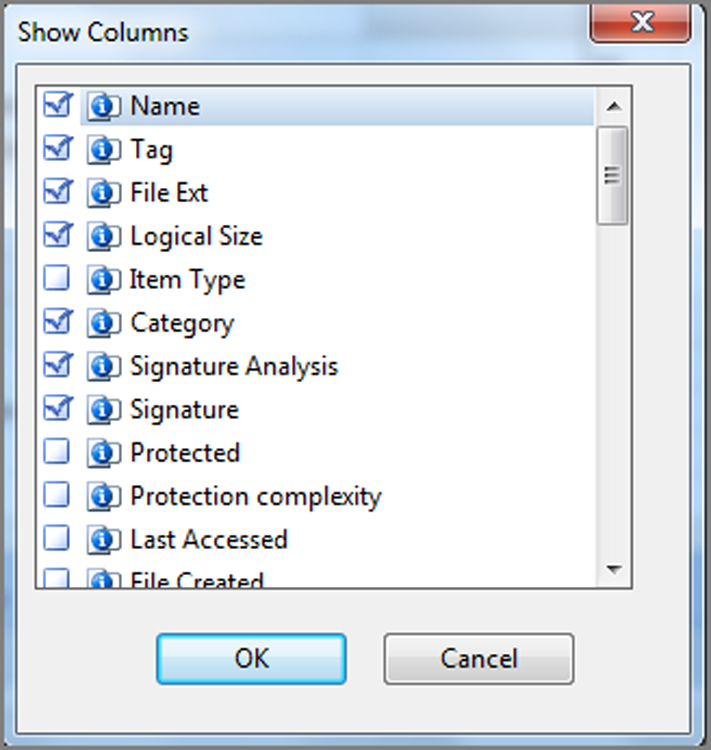
You can show a hidden column in two ways. To show, or hide, specific columns, open the Table right-side menu, open the Column submenu, and choose Show Columns, as shown in Figure 6-35. Any box that is hidden or deactivated will not have a blue check. You can place blue checks in these boxes and click OK to restore them. With this feature, you can be precise in selecting which columns to display. To restore all columns to their default view, open the Table right-side menu, open the Columns submenu, and then select Reset. This restores the window to the default settings.
Figure 6-35: Show Columns gives you precise control over which columns are displayed. Access this menu from the Table right-side menu, under the Column submenu.
Of all the tasks you can perform on columns, perhaps the most useful is the ability to pick them up and move them around. In this manner, you can compare relevant data within the context of other relevant data. It is handy to have that data next to the comparison data rather than somewhere off the screen where you can’t see it.
To move a column, click and drag the column header to where you want it moved. When you release the mouse button, the column moves to its new location. You can even replace a locked column by dragging a new column onto the locked column. If you ever get your columns hopelessly rearranged, hidden, and otherwise not to your liking, use the Reset command (see the earlier discussion of Reset) to restore the default settings.
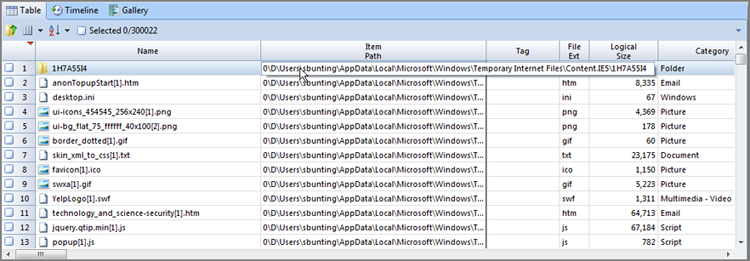
While working in the Table pane, invariably there will be times when the data in a column exceeds the column width. You can always go to the top where the column name is, hover your mouse over the column separator, and drag it to the desired width, as shown in Figure 6-36. A faster option is to simply place your cursor over the data you want to view; a floating box will appear that displays all data for that particular entry, as shown in Figure 6-37.
Figure 6-36: Adjusting column width

Figure 6-37: Floating box reveals data too large to display in column
If at any point while working in the Table view you see data that you want to copy, place your cursor on the data, right-click, and choose Copy. Your data is now stored in your clipboard and can be pasted anywhere that is enabled within the Windows environment. This is most useful when need to copy a long filename, hash value, path, or the like.
![]()
Just before press time, EnCase 7.04 was released and with it came some changes. One that was nearly overlooked was the changing of the column names Signature and Signature Tag to File Type and File Type Tag. This began as a change late in EnCase 6.19, changing the column name from Signature to File Type. To be consistent, EnCase 7.04 carried through this change, extending it to include the change from Signature Tag to File Type Tag.
The column names describe the property or attribute of the objects; Table 6-2 lists the column names.
Table 6-2: Column names explained (column order is default for EnCase 7.02—use Reset in Column submenu)
|
Column header name |
Description |
|
Name |
This column identifies the object as a file, folder, or volume. It is sometimes preceded by an icon that indicates the object’s status. |
|
Tag |
This will display any tags you placed on an entry. |
|
File Ext |
This column displays the file’s extension if it has one. Windows uses file extensions to determine which application to use to open it, while other OSs instead use headers or other metadata information in addition to file extensions to do so. EnCase reports the actual extension used by the file. If it has been changed, the real extension remains an unknown until a file signature analysis is run. |
|
Logical Size |
This column specifies the actual size of data in a file from first byte to last byte, reported in bytes. |
|
Category |
The file category is pulled from the File Types table and is a general category, such as documents or images. |
|
Signature Analysis |
Returns the results of the file signature analysis. |
|
File Type |
This column is populated after a file signature analysis and returns the result of that process. Thus, the File Type column returns the identifier of the header or signature of the object that has been identified within the File Types table. (See Chapter 8 for more information.) |
|
Item Type |
An item type describes the type of evidence, be it an entry (file or folder), email, record, or document. |
|
Protected |
This field will be populated after evidence processing has occurred and will indicate whether it’s encrypted or password-protected. |
|
Protection Complexity |
Tied to Protected and indicates details found regarding file’s protection. |
|
Last Accessed |
This column indicates the date/time a file was last accessed. The file does not have to change but be accessed only. Programs vary in the way they touch this time stamp. It may or may not reflect user activity. Some hex editors allow data to be altered, and no date/time stamps are changed. |
|
File Created |
This column indicates the date/time a file was created in that particular location. You can edit a file after it was originally written, giving it a last-written date/time later than originally written (created) date/time. If you move it to a new location, the file will take on a new creation date/time for when and where it was moved, making it “appear” to have been created after it was last written. This concept confuses many, but the key is understanding that the creation date/time typically indicates when it was created in its current location and that files can be moved around after they were last written. |
|
Last Written |
This column displays the date/time that a file was opened, the data was changed, and the file was saved. If the file is opened and the data isn’t changed, there shouldn’t be a change in the last-written date/time. |
|
Is Picture |
If the file is an image, this will display a Boolean for true, and how this is displayed will be based on the settings in the Tools a Options a Global menu. |
|
Code Page |
This is the character encoding table upon which the file is based. |
|
MD5 |
This is the MD5 hash value of each file that is displayed after hash analysis processing is completed. |
|
SHA1 |
This is the MD5 hash value of each file that is displayed after hash analysis processing is completed. |
|
Item Path |
This displays the full path to the file, including the evidence filename. |
|
Description |
This column briefly describes the object (file, folder, volume), some of its attributes, and what the icon means that sometimes accompanies the object name. Here is an example: File, Hidden, System, Archive, Not Indexed. |
|
Is Deleted |
This column displays a Boolean true or false value* indicating whether the file has been deleted. |
|
Entry Modified |
This column indicates the date/time a file or folder’s file system record entry was changed. This pertains to NTFS and Linux file systems. For example, in an NTFS file system, if an entry in the MFT changed, then this time stamp will reflect that. Even in the case of resident data, if so much as a single byte is modified, regardless of whether the size of the data changes, the MFT is altered, and this is reflected in the entry modified time stamp. |
|
File Deleted |
This column reports the date/time of file deletion according to a Windows Recycle Bin INFO2 database. |
|
File Acquired |
This column reports the date/time the evidence file in which object resides was acquired. |
|
Initialized Size |
Initialized Size pertains to NTFS file systems only, and it is the size of the file when it is opened. Windows can preallocate space for a file such that the amount of data written to the file can be less than the allocated or logical size. For example, let’s say Windows allocates 1 MB for a file but writes only 100 bytes of data to it. The initialized size of this file is 100 bytes, and its logical size is 1 MB. On a standard search, the entire logical file is searched. But the data beyond the 100 bytes written could be residual from previous writes. The Initialized Size option specifies that you want to search only the data written and not the entire space allocated. |
|
Physical Size |
This column specifies the actual size of the file plus slack space. This figure reflects the number of clusters occupied by the file in bytes. If a cluster is two sectors (2 n 512), that cluster is 1,024 bytes. If a file is 2 bytes and contained within one cluster, then that file has a logical size of 2 bytes and a physical size of 1,024 bytes. |
|
Starting Extent |
This is the starting cluster for a file in the format Evidence File Number (order within the case) | Logical Drive Letter | Starting Cluster Number; in the case of resident data in a master file table (MFT), the starting cluster will be followed by a comma and the byte offset from the beginning of the cluster to the beginning of the data. |
|
File Extents |
This column lists the number of data runs or extents for a file. If a file has one extent, then the clusters are contiguous and it is not fragmented. If a file has two or more, the file is fragmented |
|
Permissions |
This displays a Boolean true or false value* stating whether security settings have been applied to the object. If true, security settings apply, and details are available in the Permissions tab in the View pane. Windows and Unix permissions are detailed in the resulting window. |
|
Physical Location |
The physical location is the number of bytes into the device that a file begins. In the case of unallocated clusters (UC), EnCase reads the UC as one virtual file based on reading the FAT (FAT System) or $Bitmap (NTFS). In the case of UC, the physical location will be the number of bytes into the device that UC begins, which is the byte offset to the first unallocated cluster on the device. |
|
Physical Sector |
This is the starting sector where a file starts. |
|
Evidence File |
This displays the evidence file in which object resides. |
|
File Identifier |
This is the file table index number. In NTFS, this is the record number in the MFT. For ext2/3/4 and Reiser (Linux) and UFS (Unix), this is the inode number; for HFS/HFS+ (Macintosh), this is the catalog number. |
|
GUID |
Global Unique Identifier. Entry-specific GUID assigned to enable tracking throughout the examination process. |
|
Short Name |
This displays the DOS 8.3 filename. A file named LongFileName.txt would appear here as LONGFI~1.TXT. |
|
VFS Name |
This displays the filename for files as they are mounted in Windows Explorer after EnCase Virtual File System is activated and the device is mounted. This column was formerly called Unique Name, alluding to the purpose, which was to prevent conflicts in displaying the files with the exact name in the same folder in Windows Explorer. |
|
Original Path |
If the file is an allocated, nondeleted file, this column is blank. If the file is deleted and has been overwritten, this column will show which file has overwritten the original file. If the file is in the Recycle Bin, this column shows the original location of the file when it was deleted. Also, you’ll see an entry here if the file is hard-linked, showing the other path(s) pointing to this file. |
|
Symbolic Link |
Windows (especially Windows Vista/7) and Unix (including Linux and AIX) use symbolic or soft links, which are files similar to the link files in Windows. They contain no data about the file that is pointed to, only the path to it; their value lies mostly in pointing to resources on other systems. |
|
Hash Set |
This displays the hash set a file belongs to if it matches a known value in the hash library. If it doesn’t match or no library has been defined, nothing appears in this column. This column displays only after the hash analysis has run and a file is found belonging to one or more hash sets. |
|
Is Duplicate |
This displays true if the file displayed is a duplicate of another file. |
|
Is Internal |
This denotes hidden files that are used by the operating system internally and are hidden from the user. An example would be the $MFT or $Bitmap files on and NTFS file system or the inode table on an EXT3 file system. |
|
Is Overwritten |
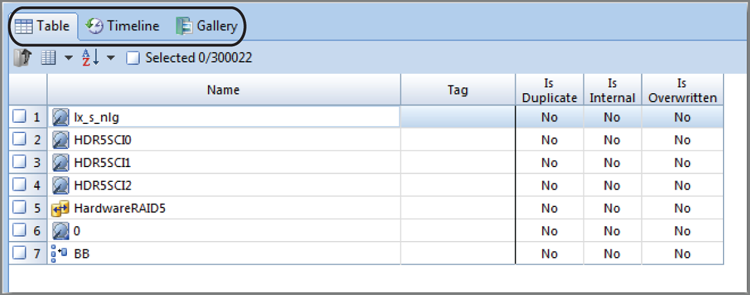
This displays true if the original file is deleted and its space is currently occupied by another file. |
*For a Boolean true or false, EnCase by default displays a dot for true and nothing for false. This display is user configurable in the Tools > Options > Global menu. For example, you could enter Yes instead of a dot or No instead of nothing.
Gallery View
Thus far, we have been working with the default tab or view in the Table pane, which is the Table view. Another view is the Gallery view, which is one of the three tabs located in the Table pane, as shown in Figure 6-38. From this view, you can see images in the case at whatever level you choose, from one folder to the entire case. Using the Set Include Folders button in the Tree pane, you can direct the content of the Table pane.
Figure 6-38: Three tabs available from the Table pane
Until a file signature analysis has been done, which is a built-in function within the EnCase evidence processor and can also be run separately on selected files, EnCase displays images based on the file extension. After the file signature analysis has been completed, the files will display based on their file header information. Firefox and other browsers rename cached files and remove their extensions. Without a file signature analysis, the temporary Internet files stored by Firefox are not visible as images within EnCase. When certain peer-to-peer programs start a download, the filename has a .dat extension and remains that way until the download completes. Many files exist as partial downloads that are images but won’t display until a file signature analysis is completed. In addition to programs altering file extensions, some users may attempt to obscure files by changing their file extensions. While this may hide a file from the casual user, it is no match for forensic software. I’ll discuss how it is done in Chapter 8, but it is an important step (running the EnCase evidence processor) if you want to see all images in the Gallery view.
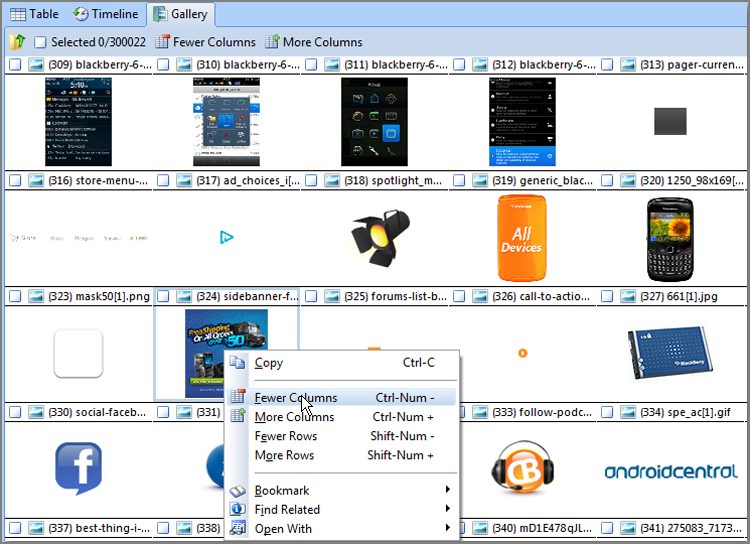
While in the Gallery view, you can select image files, bookmark image files, or copy/unerase image files, individually or in groups. Figure 6-39 shows the EnCase Gallery view. You can change the size of the image thumbnails by right-clicking in the Table pane and selecting Fewer Columns, More Columns, Fewer Rows, or More Rows, as shown in Figure 6-40.
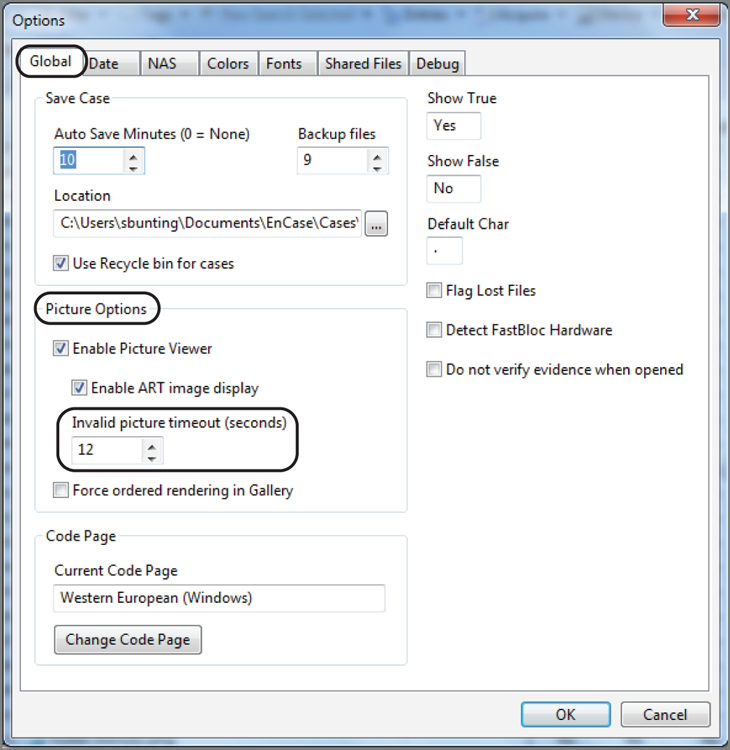
In the past, corrupted images have caused system crashes; however, starting with EnCase 5, EnCase has built-in crash protection. When corrupted images are detected, they are cached, and EnCase does not present them again. In the Tools > Options > Global menu, you can change the maximum amount of time that EnCase tries to read an invalid image before it times out and caches it. This setting defaults to 12 seconds, as shown in Figure 6-41.
Figure 6-39: EnCase Gallery view showing all images in an Internet cache by using the Set Included Folders feature
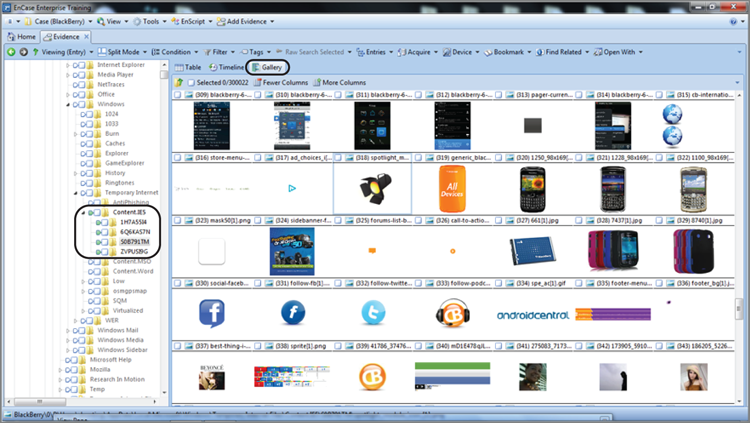
Figure 6-40: You can change the size of the Gallery view thumbnails by right-clicking and choosing more or fewer columns or rows.
EnCase supports America Online (AOL) .art files (files with an .art file extension). AOL uses a proprietary form of compression known as Johnson-Grace compression, named after the company that developed it. As a bandwidth-saving measure, AOL converts other image types to .art files, which produces an extremely high compression rate. By default, rendering AOL .art files is enabled but can be disabled by the user. If you look in the image options in Figure 6-41, you can see the box to disable rendering these files.
Figure 6-41: In the Tools > Options > Global menu, you can change the timeout period EnCase waits before caching an invalid image.
Timeline View
The Timeline view enables you to review chronological activity in a graphical view. By default, all dates and times are enabled and appear in the view. On the Timeline tab toolbar, there is a menu named Date Type from which you can enable or disable the various time stamps. In the Tree pane, by using the green Set Included Folders trigger, you can select the level of Table pane content, ranging from single folders to multiple folders, volumes, devices, or even the entire case.
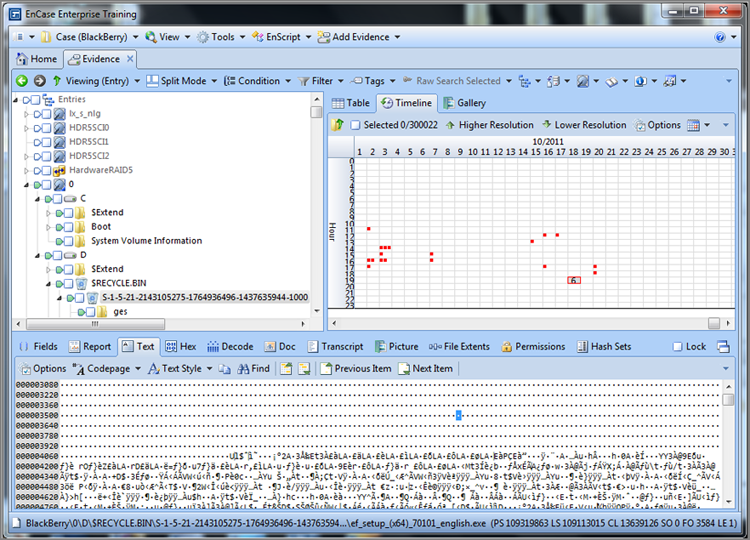
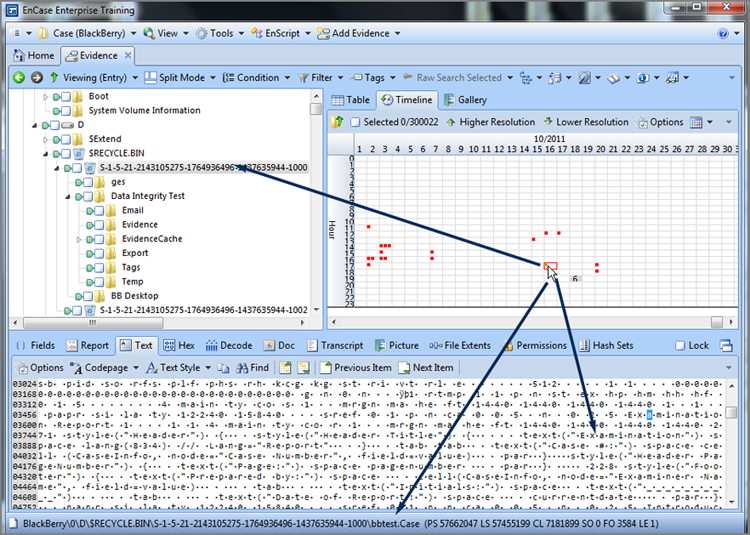
A particularly interesting view is often simply that of looking at deleted files only. If a person knew on a given date they were the target of an investigation, such a view often reveals file-deletion activity shortly thereafter. In the Timeline view, you can see this easily and visually. Figure 6-42 shows a Timeline view where the only dates and times are for file deletions. Each square represents one file, and when the number of files gets too large to show individual squares, the number of files is used instead. In Figure 6-42, you can see six files were deleted on October 18, 2011, during the hour starting at 1900.
Figure 6-42: EnCase Timeline view showing only dates and times for file deletions. Such a focused view can be quite revealing when depicted visually.
Sometimes you need to drill down and get more detail. You can double-click in numbered boxes and drill down or click Higher Resolution or Lower Resolution on the Timeline tab toolbar. Alternatively, you can use the plus and minus keys on the number pad and achieve the same result. Figure 6-43 shows drilling down to get more detail. When you place your cursor and click a square representing a file in the timeline, the contents of that file will appear in the View pane, its location is highlighted in the tree, and the full path appears at the bottom in the GPS area.
Figure 6-43: Drilling down and achieving higher resolution in the Timeline view. Each tiny red square represents a file, and placing your cursor on it displays its contents in the View pane, its location in the tree, and its path in the GPS.
Each of the different date and time stamps is separately color-coded. Toggling each one on and off is a quick way to check which color is coming and going as you toggle. You should note that on the Timeline tab toolbar, there is an Options menu. Clicking Options provides you with the color codes, as shown in Figure 6-44, along with the ability to change them if you like. Another option is the ability to manually specify a range for the Timeline view, which is nice if you are looking at a precise period and want to exclude all other data. I encourage you to use this date range filtering tool because you will find it simply works better once you have a range on which to focus your attention.
There is no reporting or printing feature for the Timeline view. The best way to use it is to take screenshots. Those images can be included in Microsoft PowerPoint presentations or placed in your final report, be it web or print based. They can make a powerful addition as a link in a web-based report.
Figure 6-44: Color codes are available by opening the Options menu on the Timeline tab toolbar. From this dialog box, you can change the colors or manually specify a time range.

Disk View
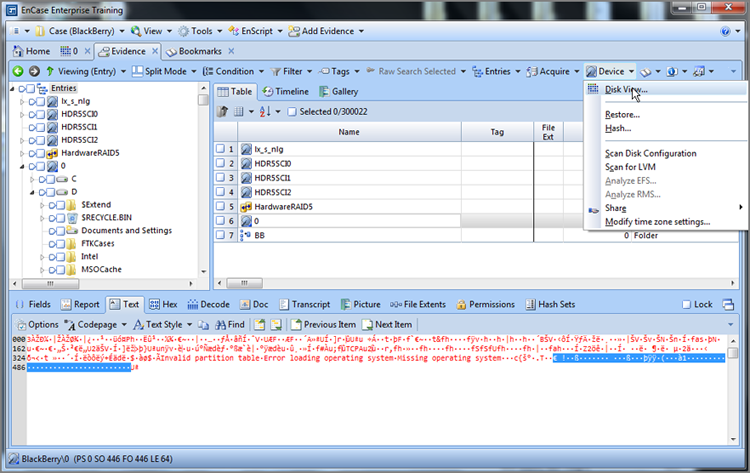
Maybe I need a life, but I make frequent use of the Disk view. Typically, this is one of the first views I go to when I first preview a device. At a glance, the topography of the drive is at your fingertips. It is no longer available as a Table view tab, but it is nearby. To use it, place the device or object you want to view in the Table pane by placing your cursor on its parent in the Tree pane. Since I want to see the device “physical disk 0” in the disk view, I place my cursor on the root of the entries in the Tree pane, and the various devices appear in the Table pane. I then place my cursor on physical drive 0 in the Table pane and click once to highlight it and make it the target for my Disk view, as shown in Figure 6-45. Let me emphasize again that the target is based only on the focus of your cursor and that blue checks don’t work for this purpose! Once you have your target in the Table pane and highlighted with your cursor, open the Device menu on the Evidence tab toolbar and choose Disk View, as shown in Figure 6-46. For those of you who have been paying attention and remember the super-secret menu (officially the right-side menu), you can also access this feature from the Evidence tab toolbar right-side menu if you drill down into the Device submenu.
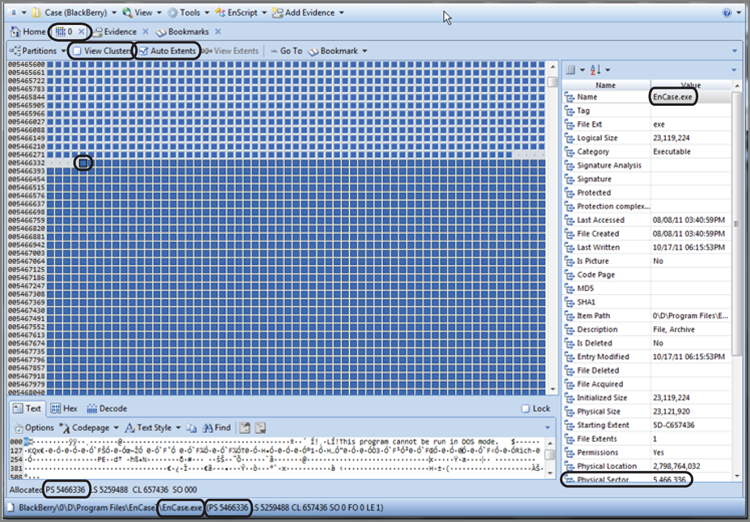
By default, you see a series of colored square blocks, each representing one sector. If you would prefer that each block represent a cluster, simply click the check box next to View Clusters on the toolbar for this view. I have circled that option in Figure 6-47. The blocks are color-coded as to their function. Former versions had a legend for these color codes, but the early releases of EnCase 7 do not. There are plans to restore the legend, so you’ll have to await for the return of that feature. Blue blocks are allocated sectors or clusters. The gray blocks with the raised bump in the center are unallocated sectors or clusters. There are many others.
Figure 6-45: The target for Disk view is in the Table pane and highlighted with the cursor.
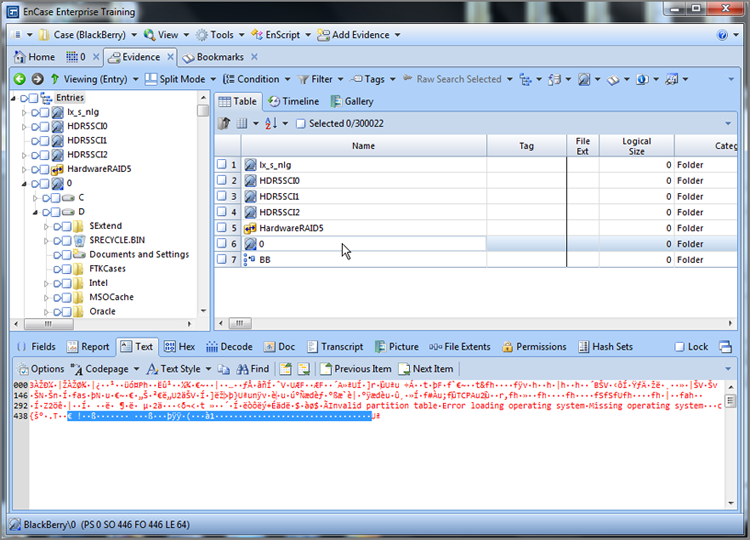
Figure 6-46: Selecting Disk View from the Device menu
When you are in the Cluster view, remember that clusters are logical units that exist within a partition. You won’t see sectors that exist outside the partition because they aren’t clusters!
I have opened disk 0 into the Disk view and have navigated to physical sector 5,466,336 (circled also in Figure 6-47), which happens to be the beginning location of a program called EnCase. Upon placing my cursor on that sector, as shown in Figure 6-47, all sectors in that set of extents become highlighted, by default. The feature is called Auto Extents and may be toggled on and off on the Disk View toolbar (also circled in Figure 6-47).
Figure 6-47: Disk view with focus on starting sector of the EnCase program file
If you right-click in the disk area, you can go to a sector by typing in the sector number. You can also use the Go To feature from its menu on the Disk View toolbar, which is shown in Figure 6-48.
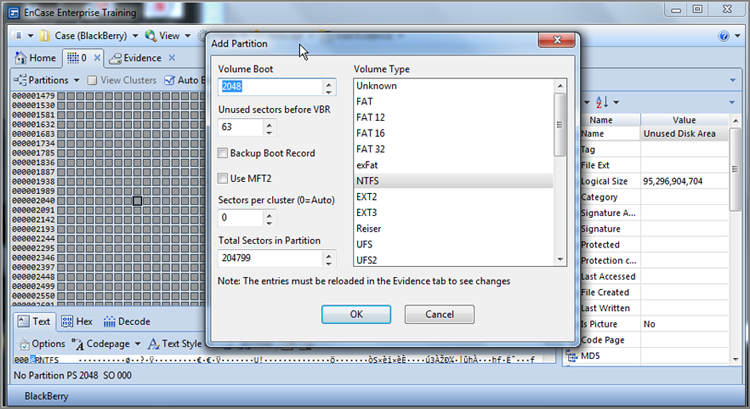
Also available from the right-click menu is the ability to add or delete partitions, which is quite helpful if someone FDISKed their drive. To add a partition, you must first locate the beginning of the partition and place your cursor in that location. Once you are at the beginning, you open the Partitions menu and choose to add a partition, as shown in Figure 6-49. In many cases, EnCase will read the partition information in the selected sector and the information needed to create the partition will be already in the window that follows, but sometimes you will need to make adjustments, which requires further knowledge. We’ll cover recovering partitions in depth in Chapter 10. Figure 6-50shows a partition about to be recovered at physical sector 2048, which is where Windows 7 now starts its first NTFS partition on a new installation. EnCase has read the data in the volume boot record (sector 2048) and knows the partition information (type, sectors per cluster, sectors in partition, and so forth).
Figure 6-48: The Go To function is available three ways: via the toolbar menu, right-click, and Ctrl+G.
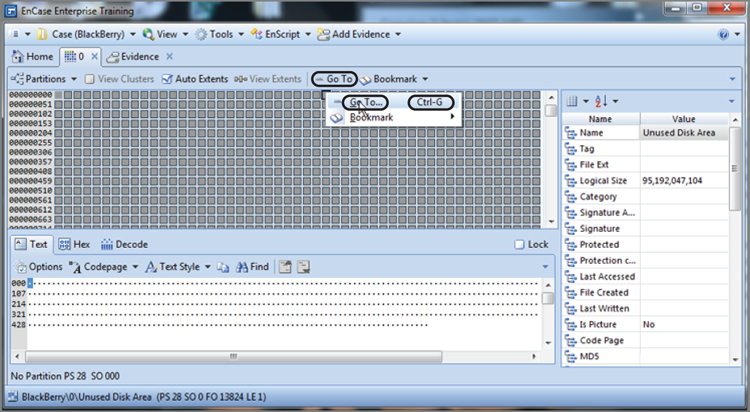
Figure 6-49: Partition menu options
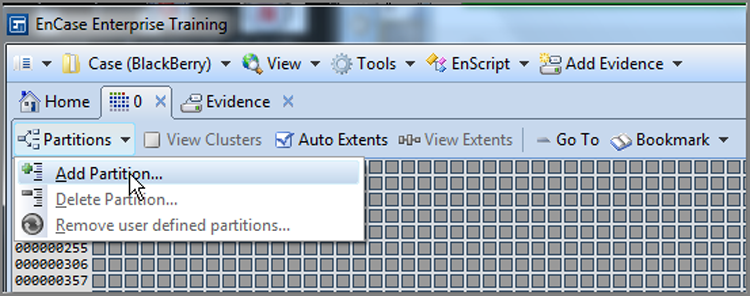
Figure 6-50: An NTFS partition about to be recovered at physical sector 2048
One final function you can carry out from the Disk view is that of bookmarking. I’ll get into bookmarking in Chapter 7, but for now, just remember that you can create bookmarks while in the Disk view.
View Pane Navigation
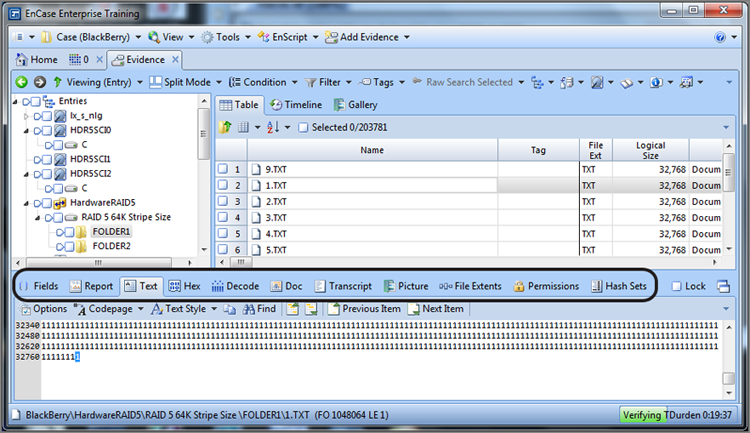
The View pane is where the data is found. The functionality of the View pane is driven by the content of the Table pane but could be otherwise if you are using the Traeble or Tree viewing mode. When you are in the Entries view, there will be various tabs in the View pane that will enable you to see multidimensional data. These options enable different ways to view data, as shown in Figure 6-51. The method you choose will depend on your preferences and the task you are performing. If your data is ASCII text, nothing beats the Text view for simplicity and formatting options.
Figure 6-51: View Pane viewing tabs
Text View
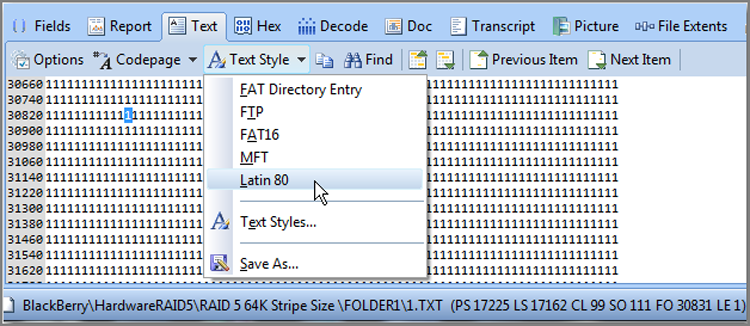
In the Text view, like all the other views in the View pane, the content is driven by the object selected in the Table pane. The format of the output is determined by the current text style as specified in the Text Style menu located on the Text tab toolbar. You can fine-tune your text style without changing your views. You can even add new styles or edit existing ones all from the Text Style menu. Figure 6-52 shows the Text view with the Text Style menu choices.
Figure 6-52: Text view with the Text Style menu open
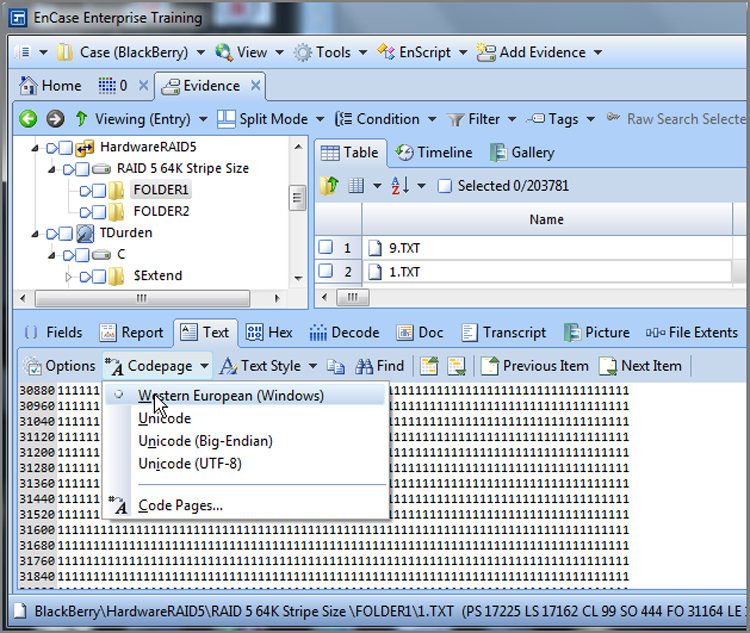
Rather than choose a text style, because first you’d have to create one, you can use the Options menu in conjunction with the adjoining Codepage menu to achieve the same effect dynamically. Essentially, these two menus are the two tabs that make up the New Text Style menu. By simply making these adjustments dynamically with these two menus, you can do most of your work in this fashion, saving text styles for the more complicated configurations for custom text styles that you save and reuse. Figure 6-53 shows the two tabs (Options and Code Page) for the New Text Style menu. Figure 6-54 shows the Options menu from the toolbar. Figure 6-55 shows the Codepage menu from the toolbar. Now that you’ve seen how it all works, you probably do as I do, which is to leave the Codepage menu set for Western European Windows and simply adjust the line wrap and length settings under Options as needed.
Figure 6-53: New Text Style menu with Options tab and Code Page tab
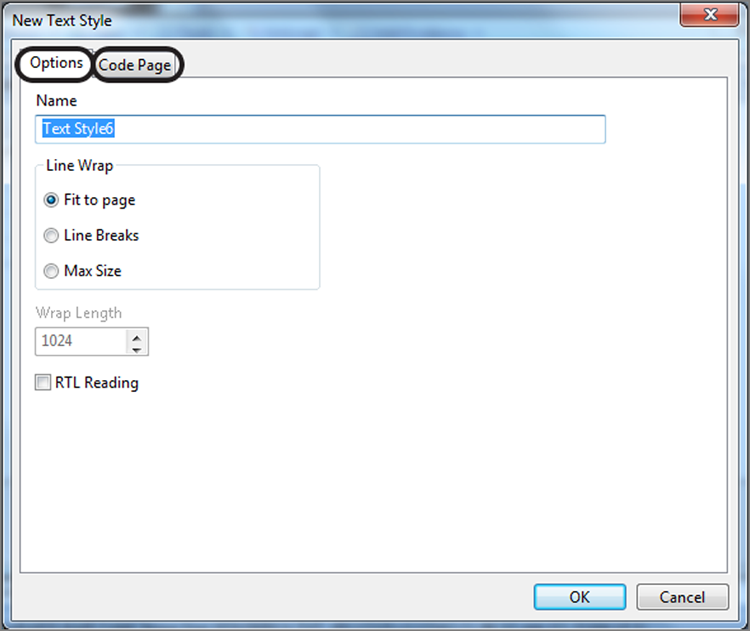
Figure 6-54: The line wrap and length can be set from the Options menu.
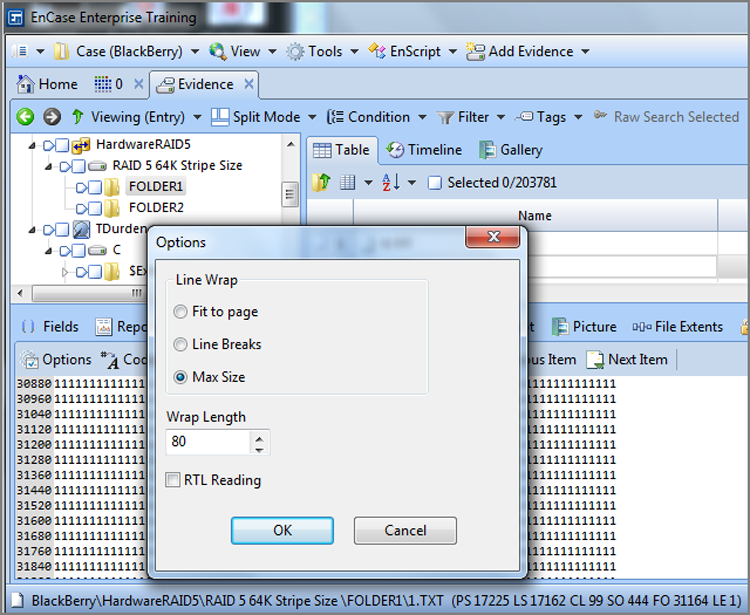
Figure 6-55: The code page for viewing text can be chosen from the Codepage menu.
While in the Text view, you can sweep data by clicking and dragging it to select it. From there you can bookmark, export, or copy/paste data as needed.
Hex View
Another way to view data is in the Hex view. As shown in Figure 6-56, in this view each byte is shown in hexadecimal notation on the left side and is also represented in a Text view in the inset to the right of the Hex view. Hex is the pure raw data (binary data expressed in hexadecimal notation), whereas the text displayed is interpreted or influenced by code pages. When you need to see raw data, use the Hex view.
Figure 6-56: The Hex view of a JPG file. Note the Text view inset to the right, and the Options, Codepage, and Text Style menus are along the Hex tab toolbar at the far left.
Like the Text view, the Hex view lets you select data and do many things with it, such as bookmarking, exporting, copying/pasting, and so forth. You will see in Chapter 7 that you can bookmark this data and view it in many different ways. You can view it as text, integer values, date/time stamps, partition tables, or DOS directory entries, just to name a few. You can pass this data to third-party decoding tools as well. When you get into advanced analysis or research and testing, you will spend considerable time in the Hex view.
Picture View
If EnCase detects that the file selected in the Table pane is an image, it will attempt to view the image using the Picture view in the View pane. If the file is not detected as an image, the image box will be unavailable. EnCase determines the file type based on extension until a file signature analysis has been completed, at which point the program determines the file type based on the file’s signature instead of its extension. As you’ll recall, the file signature analysis occurs as an automatic feature when the EnCase evidence processor runs. I’ll cover file signature analysis in detail in Chapter 8.
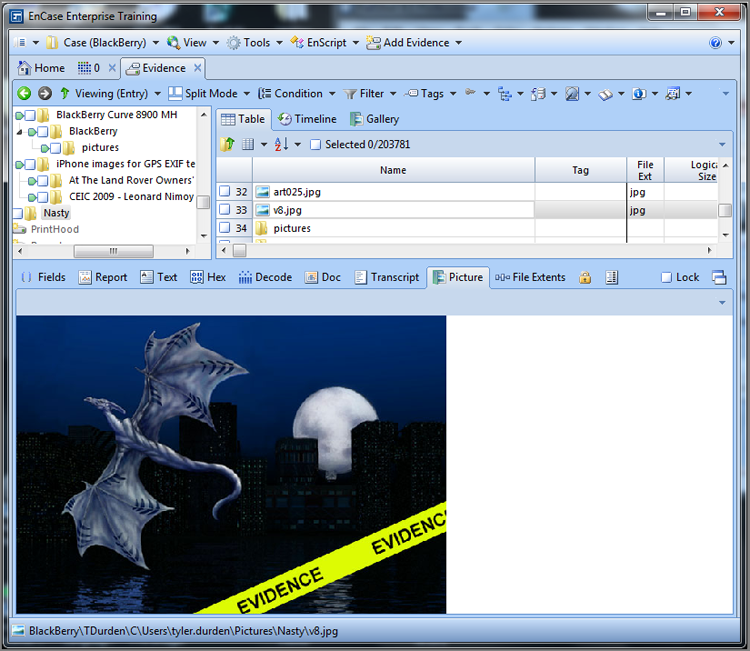
Figure 6-57 shows a file as an image. This file is from a user’s picture folder. Because this file was a picture and had a proper file extension, EnCase detected it by its signature and displayed it automatically in the Picture tab of the View pane.
Figure 6-57: A file shown as an image automatically in the Picture tab of the View pane
Report View
The Report view is a detailed report of the properties of the object selected in the Table pane. You will see all the attributes and properties of the object in this view, and if file permissions are in effect, they will be detailed as well. It is a quick way to obtain focused information on an object. You can right-click the report and export it as a web page or as a document. Sometimes you need lots of details about a couple of files. Here is the place to come to view that information and create a quick report.
Doc View
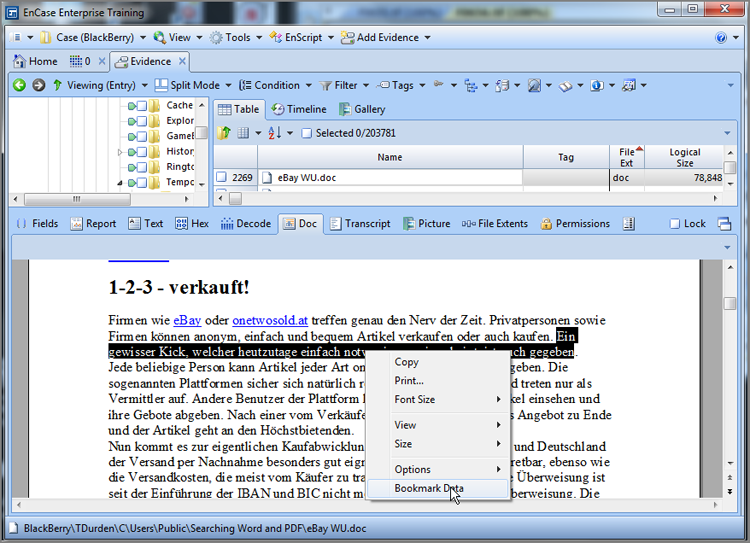
The Doc view is the integration of Stellent Inc.’s Outside In Technology into EnCase. In essence, this means that many common file formats, such as Microsoft Word, Microsoft Excel, Adobe PDF, and others can be viewed the way they would look in the native application. Printing and bookmarking are also available within the Doc view. Figure 6-58 shows a Microsoft Word document being viewed and an excerpt from that document being bookmarked.
Figure 6-58: Doc view in which many common file formats can be viewed as though shown in their native applications
Transcript View
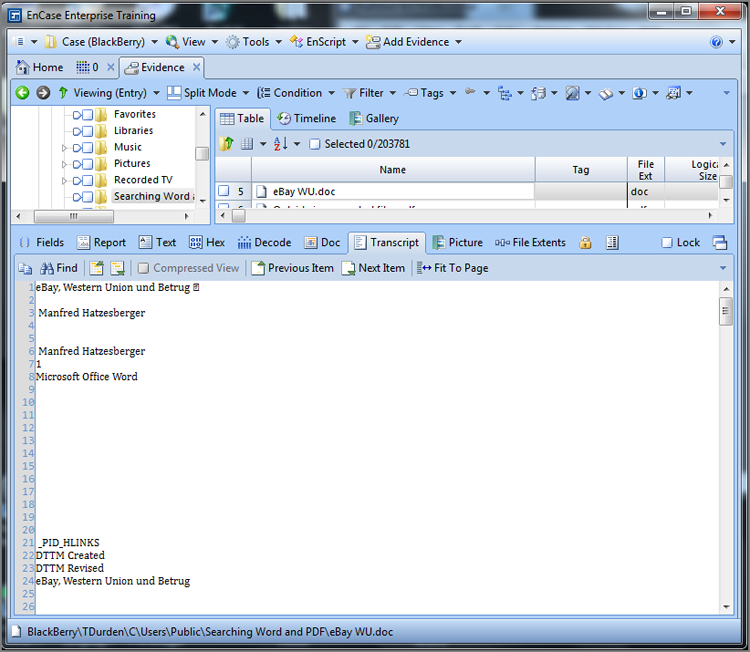
The Transcript view is also an integration of Stellent Inc.’s Outside In Technology. This view suppresses file noise, such as formatting and metadata. The text displayed within this view is text that is typically indexed for search by the indexing engine. Any search hit or bookmark will appear in both the Doc and Transcripts views. Figure 6-59 shows the Transcript view of the same document shown in Figure 6-58.
Figure 6-59: Transcript view of the document shown in Figure 6-58
File Extents View
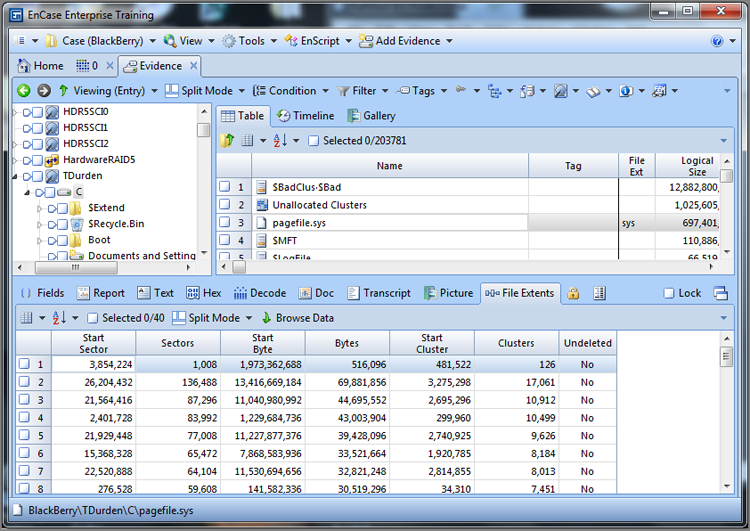
The File Extents view provides details about the cluster runs for any file. Figure 6-60 shows the File Extents view for the pagefile.sys file, which is the paging file for memory. Such files are large and can be very fragmented, such as this one.
Figure 6-60: File Extents view showing highly fragmented pagefile.sys file
Permissions View
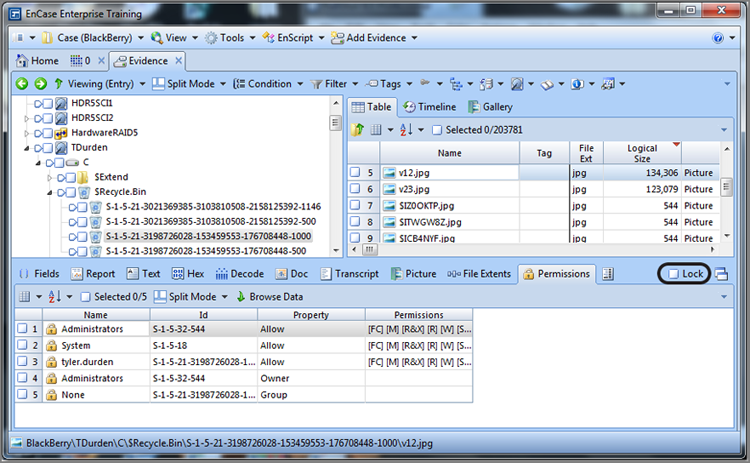
The Permissions view provides detailed security permissions for a file, including the owner, the security ID number (SID on Windows), read, write, execute, and so forth. Figure 6-61 shows a file found in a Windows Recycle Bin. Because Recycle Bins have SID-named folders, it is often difficult to determine which Recycle Bin belongs to which user when there are many users. Looking at the permissions of files in a Recycle Bin will tell you who owns the file and their SID, which you can in turn match with their SID-named Recycle Bin folders.
Figure 6-61: Permissions view for a file found in a Recycle Bin
Decode View
In legacy versions of EnCase, you had to bookmark, or at least start to bookmark, to decode certain data types and strings, such as time stamps, directory entries, integers, and so forth. EnCase 7 provides a tab for decoding, making the process much easier once you’ve figured out how it works and gotten accustomed to using it.
To decode data, first locate the data in either the Text or Hex tab and select it. Next, click the Decode viewtab and select the decoding type you want to apply, and it’s done. That was simple enough, so I will demonstrate the process to decode the partition table located in the master boot record. I like working on such data from the Disk view, so I first launched the Disk view for the physical drive. Since the MBR is located at sector 0, I put my cursor on the first sector, and that data is then displayed in the View pane below. I opted to view the data in the Hex view. I located the partition table starting at file offset 446 and ending on offset 509, for a total of 64 bytes. I selected that data, as shown in Figure 6-62.
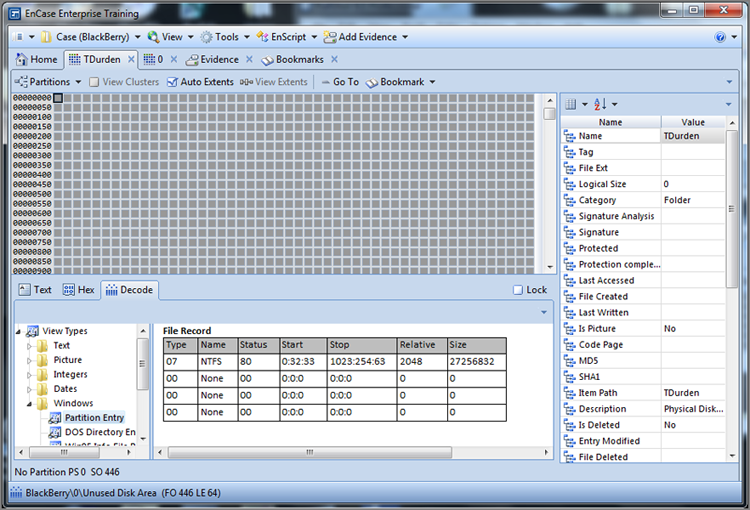
With the data selected, move to the Decode view. In the left pane of the Decode view, select the appropriate view type, which in this case is Windows > Partition Entry. As soon as you select it, the data is visible in the right pane, as shown in Figure 6-63.
Figure 6-62: Partition table selected in Hex view
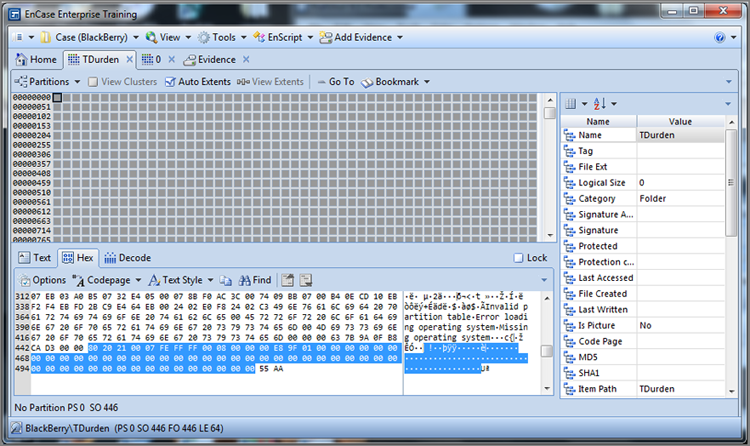
Figure 6-63: Decode view from which the view type is selected and displayed
Field View
The Field view is new to EnCase 7, but there’s nothing complicated about it. It’s nothing more than the fields displayed in the Table view displayed in the bottom pane for the times you are in the Table view and need to see the metadata contained in the various fields. For example, if you are in the Gallery view and want to know the information about a particular file, you can switch to the Field view in the View pane and see this data quickly.
Lock Option
The user can “lock” a view type for the View pane. When the lock is on, EnCase will display data in the View pane that you have locked until you toggle the lock off. This is often useful when you want to see all data in hex, including pictures. EnCase, without the lock on hex, would view an image in the Picture view. The lock is a simple toggle feature; just check the box to the right of the hash sets view. If you refer to Figure 6-61, you’ll see that I placed a circle around it.
Dixon Box
I covered the function and purpose of the Dixon box earlier in this chapter and showed you where it was located in Figure 6-19. It is located immediately to the right of the Sort menu on the Table tab toolbar. The Dixon box indicates the number of selected objects in the case and the total number of objects in the case. If no objects are selected, clicking the box selects all objects in the case. If objects are selected, clicking the box deselects all currently selected objects.
You should develop a habit of keeping a close watch on the Dixon box when selecting objects for an action. It can save you considerable time by preventing unintended copy/unerase or other actions. Suppose you select Unallocated Clusters for a search and then forget to clear the selection when you are done. Next, you locate a couple of files that you want to copy. You select those two files and choose to copy the selected files. If you glance at the Dixon box, you should see three selected instead of two, which should prompt you to modify your selection before proceeding. If you didn’t bother to check first, you better have lots of space and time—EnCase will do as you directed and copy the entire unallocated space, along with the two files you really wanted to copy.
If you start an action and it seems to be taking longer than it should and you realize you have subjected more files than you intended to the operation, you can usually abort the process by double-clicking the progress bar in the lower-right corner. You will be prompted to confirm your decision to cancel the process underway.
Depending on what you are doing, aborting in this way is not always an option. Sending a “search hit” in the unallocated clusters to a third-party viewer is one such example. Once that process starts, the only way to stop it is to stop EnCase. EnCase is a powerful tool and will caution you or prevent you from making poor or destructive choices. But as I mentioned earlier, it doesn’t stop or caution you from making choices that are not particularly smart ones. EnCase is quite accustomed to carrying out laborious tasks that can take hours or days.
The Dixon box is a valuable indicator and tool that helps you make good decisions and also allows you to select or deselect globally quickly. You should utilize it to its fullest extent—it can save you considerable time as you process cases.
![]()
You will often select many files in varied locations for later action. Before proceeding with a desired action, check to see which files you have selected. The Dixon box can tell you how many but not which ones. There are two quick methods of seeing all your selected files together. First, you can apply the green Set Included Folders trigger at the case level and sort on the column containing the selection boxes. Double-click the nameless column header (above the check boxes) that contains the blue check marks, and all selected files will be at the top of your sort.
Navigation Data (GPS)
Starting with EnCase 5, EnCase displays your precise location in the evidence file at the bottom of the screen on the status bar, as indicated in Figure 6-64. Prior versions displayed it in the bar separating the View pane from the Tree and Table panes. This is real-time information and is updated whenever you change the data being viewed. Although its official title is navigation data, most examiners simply call it the GPS, after the Global Positioning System that provides precise information on your exact position on Earth. In EnCase, the navigation data at the bottom of the screen tells you where you are in an evidence file with the same relative precision as GPS.
Figure 6-64: Navigation data (GPS) is displayed in the bottom of the screen on the status bar. This information indicates your precise position in the evidence file.
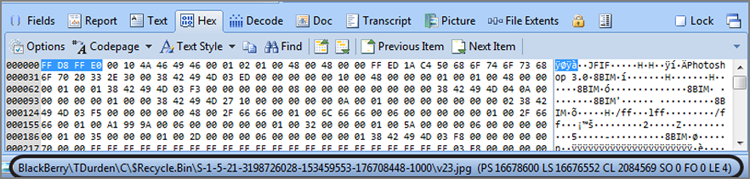
The information displayed is quite detailed. As shown in Figure 6-64, the information reads from left to right. Table 6-3 explains the format.
Table 6-3: Navigation data explained
|
Name |
Indicator |
Description |
|
Full Path Name |
Standard path-naming convention starting with the case filename, followed by the device name, followed by the complete path to the file currently being accessed. |
|
|
Physical Sector Number |
PS |
Physical sector number of the data currently being accessed. Each device starts at sector 0 and ends with a number based on the number of sectors in that device, minus one (1,000 sectors are numbered 0 through 999). |
|
Logical Sector Number |
LS |
The logical sector number relative to the partition you are in. Each partition is numbered with sectors starting at 0 and ending on a number based on the number of sectors in the partition minus one. |
|
Cluster Number |
CL |
The cluster number for the data being accessed. Remember that clusters are logical constructs within a partition. If you are outside a partition, in the MBR for example, don’t expect to see a cluster number! |
|
Sector Offset |
SO |
The byte offset value within the sector where the data currently accessed resides. With 512 bytes per sector, expect these values to range from 0 to 511. |
|
File Offset |
FO |
The byte offset value within the file currently being accessed. Values will range from 0 to the number of bytes in the file minus one. If you are sitting on the first byte in a file, the FO is 0. If you are sitting on the last byte of a 123-byte file, the FO is 122 (123 - 1 = 122). |
|
Length |
LE |
The length of bytes currently highlighted/selected. It defaults to 1 until you select data by clicking and dragging to select data. This indicator is useful when selecting ranges of data for analysis, bookmarking, or exporting. |
The GPS indicator is an extremely valuable tool. You should familiarize yourself with its format and make frequent reference to it. It is great tool for teaching and data research. With some research tasks, you can’t function without it. Regardless of your purpose, using it and understanding this indicator will make you a better examiner.
Find Feature
EnCase is, by far, one of the most user-driven products I have ever used. I can’t recall ever sending a suggestion to Microsoft and later seeing it in one of its products. By contrast, I have seen several suggestions sent by users to Guidance Software appear later as features in EnCase.
The Find feature is an example of a user-suggested feature and is quite useful. It’s not one that jumps out at you, but once you discover where it is and what it can do, you’ll use this feature frequently.
When you are in the Text or Hex view, the Find feature is available to search the data in that view. It is also available in the Console and EnScript Code views for use in programming or searching results sent to the console. You can right-click in the data area and choose Find. You can also use the shortcut Ctrl+F or open the Find menu located on the toolbar for the view you are in (Text or Hex).
The Find dialog box is straightforward in appearance and function, as shown in Figure 6-65. Before activating the feature, you can select text or data from the data present in Text or Hex view, and that data will autofill into the Expression text box, saving you time and preventing typing errors. Once the dialog box is open, you can choose regular text or GREP search options (I’ll cover GREP in Chapter 7). You can search the entire document—from the cursor to the end of the file or document or within the area of data that you have currently selected. After the first hit, you can scroll to the next hit by pressing the F3 function key.
Figure 6-65: The Find dialog box is accessed from the data area of the View pane or from the Find menu on the view toolbar. It has powerful search features and can save you time when you want to search for an expression in a file.
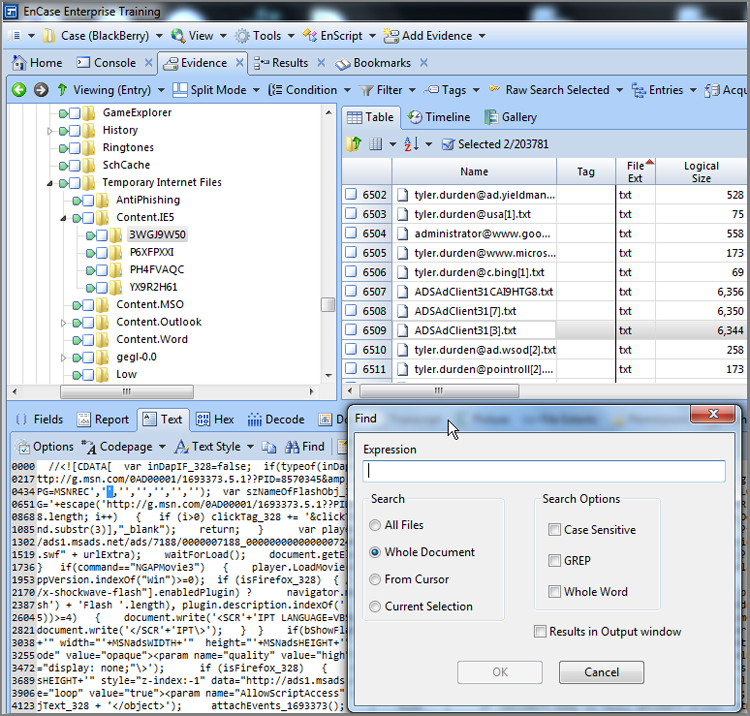
Other Views and Tools
Prior to EnCase 7, recent versions of EnCase offered a filter pane in the lower-right corner. However, with EnCase 7, that pane is no longer present. The various tools in the pane have now been moved to locations consistent with their function and have been absorbed into the new menu system. I will discuss those tools now for those used to accessing them in that location.
Conditions and Filters
Queries are no longer used in EnCase 7, and conditions and filters are located now on the toolbars for the various views and tools for which they are applicable. Figure 6-66 shows the location of the Condition and Filter menus on the Evidence Entry view , with the Filter menu open. With legacy versions of EnCase, the results of all conditions and queries were immediately viewable in the Entries view, but EnCase 7 now sends all condition and filter runs to the Results view, the tab for which is also shown in Figure 6-66. To see the results of your conditions or filters, you’ll need to open the Results tab.
Figure 6-66: The Condition and Filter menus now appear on the toolbars for the various views for which they are applicable. Open the Results view to see filter and condition results.
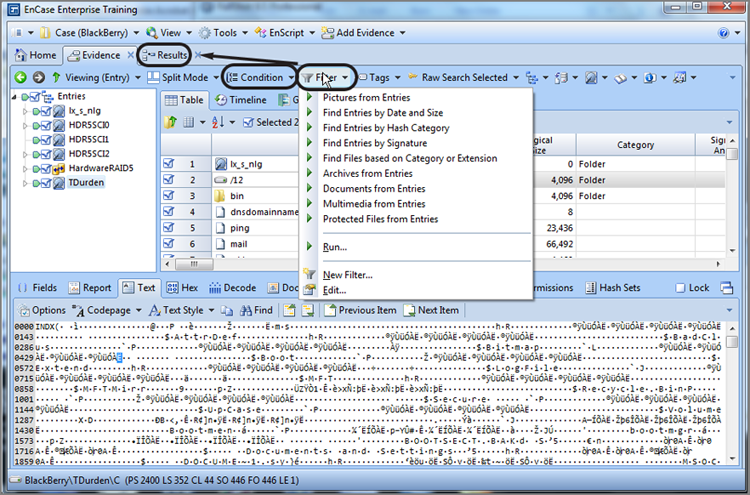
EnScript
EnScript now appears prominently on the application toolbar, as shown in Figure 6-67. You can run EnScripts from this drop-down menu or create or edit your own.
Figure 6-67: EnScript menu on application toolbar
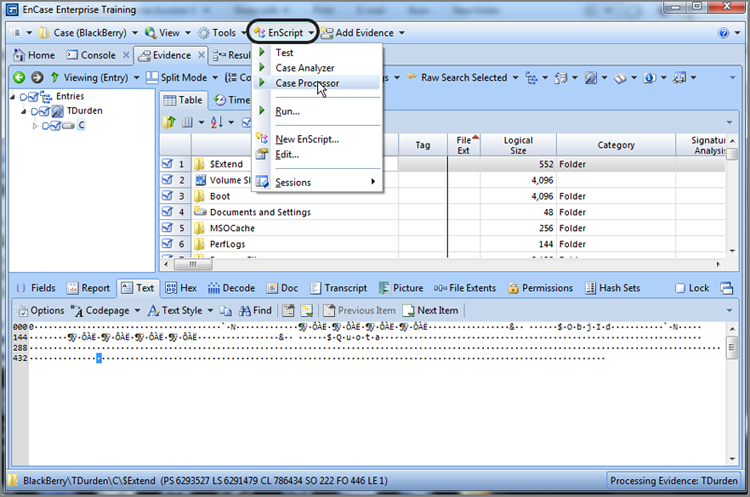
Text Styles
Text styles are located on the toolbars for the various views for which they are applicable. We covered how to use them earlier in this chapter as well as how you can use Options and Codepage menus to make dynamic adjustments to text views and thereby avoid having to create and apply text styles. Figure 6-68 shows the Text Style menu on the Text view toolbar. Note that the Options and Codepage menus appear immediately to the left of the Text Style menu.
Figure 6-68: Text Style menu on the Text view toolbar
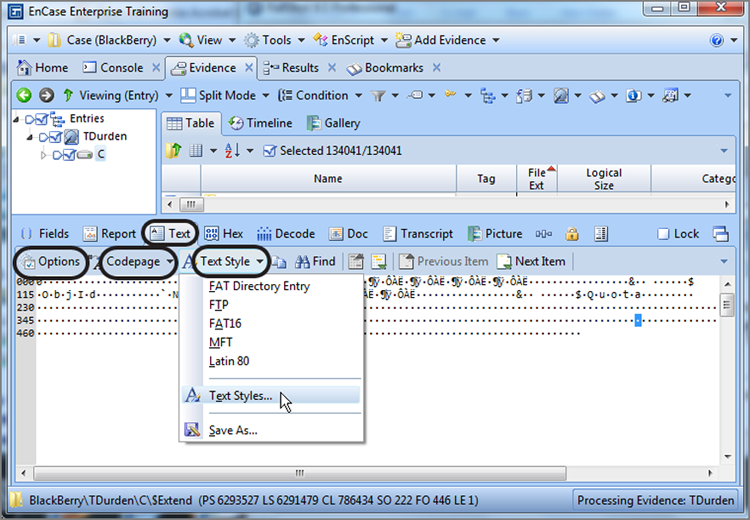
Adjusting Panes
In Exercise 6.1, you’ll navigate around the EnCase environment. Before you do so, let’s look at one more nice EnCase feature, which is adjusting the viewing panes. You can adjust the various panes to suit your viewing preferences. Between the Tree and Table panes and between the View pane and the two upper panes, you will see vertical and horizontal separator bars. If you place your cursor over these bars, as shown in Figure 6-69, the cursor changes to a horizontal or vertical sizing indicator, allowing you to click and drag the bar to the desired location.
EnCase views can be greatly enhanced by working in a multiple-monitor environment. You can spread your EnCase view over however many monitors your budget will support and greatly increase your viewing ease and efficiency. Giving EnCase plenty of screen real estate allows you to spread your view according to your particular viewing needs and do so on the fly when needed. Also, you can undock or detach the View pane to create some truly customized screen configurations. You undock the View pane by clicking the Undock icon in the upper-right corner of the View pane, as shown in Figure 6-70. To return the View pane to the main body of EnCase, simply click the red Close icon in the upper-right corner of the View pane, as shown in Figure 6-71. The View pane will simply snap back to its original location.
Figure 6-69: Placing your cursor on the horizontal or vertical separator bar causes the cursor to change to a sizing indicator, indicated by an arrow, that you can click and drag to adjust pane sizes.
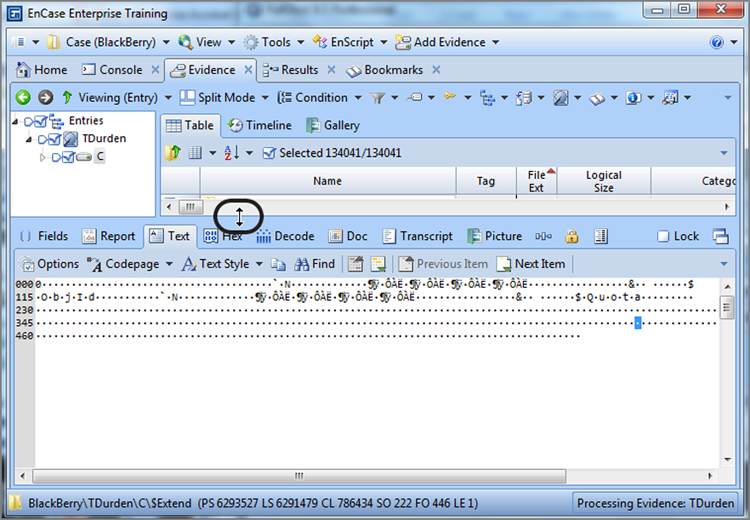
Figure 6-70: Click the undocking icon to undock View pane.
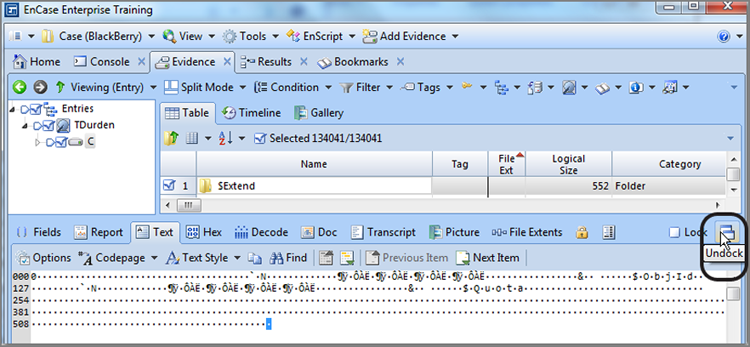
Figure 6-71: Click Close to return the docked View pane to its original location.
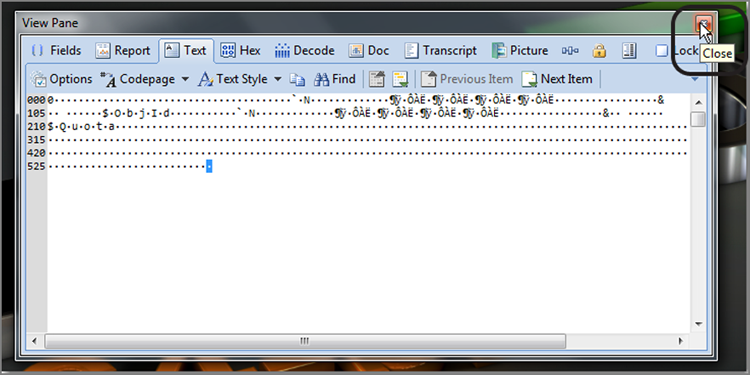
Exercise 6.1
Navigating EnCase
In this exercise, you’ll create a new case, add an evidence file, and explore the many features and interfaces of EnCase 7.
1. On the website for this book (www.sybex.com/go/ence3e), locate a folder named Navigation, and copy its single evidence file (Navigation.E01) onto your examination computer.
2. Start EnCase, create a new case, and name it Navigation. Accept the default path locations.
3. Go to the location of your case files and open the Navigation folder, which was created by EnCase. If you are using Windows 7 and accepted the defaults, the path would be C:\Users\YourUserName\Documents\EnCase\Cases\Navigation. You should take note that EnCase created four folders (Email, Export, Tags, and Temp) and saved your case already, which is named Navigation.Case and stored in the root of your current folder.
4. In the folder Navigation, create a subfolder named evidence and place the evidence file from step 1 into this folder.
5. From the EnCase Home screen, you should see your open case named Navigation and have several options. Click Add Evidence, and on the screen that follows, click Add Evidence File. Browse to the evidence file you just placed in the new subfolder. Select it and open it. When the file loads, EnCase will open the Evidence view, and you’ll see the evidence item; however, you’ll see its name as FileSigAnalysis. I’ve renamed an evidence file’s name to match the chapter’s content. You’ll use this same evidence file for a later chapter for dealing with file signature analysis, so don’t worry too much about the name. Just have fun navigating and exploring EnCase views and features.
6. Before doing any work, save your case again now that you have added evidence.
7. This is a very small evidence file, and it should have verified almost immediately. Unless there was a problem, you won’t even know it happened, but let’s be sure it verified correctly. While still in the Evidence tab Table view, highlight your evidence item and then open the Report view in the View pane.
8. From the Report view, answer the following: did your evidence file properly verify? (Answer: it should be completely verified with 0 errors.) On what date was it acquired? (Answer: 8/12/2003.) Which version of EnCase was used to acquire this file? (Answer: 4.14.)
9. Go back to the Table pane and double-click your evidence item to open it in the Entries view. In the Tree pane, place your cursor on the root of the tree on the word entries. In the Table view, highlight the evidence item. In the View pane, switch to the Report view. What file system is on this evidence item? (Answer: FAT12.) How many sectors are on this device? (Answer: 2,880.) Can you again confirm that your evidence verified correctly? Again, it should have done so.
10. Return to the Tree pane and place your cursor on the floppy icon. In the Table pane, you see five objects, one of which is a folder named FileSignatureAnalysis. Place your cursor on that folder in the Table pane. In the View pane, open the Text view. What color is the data? (Answer: Red.) In this case, what does this color indicate? (Answer: Directory data.)
11. In the exercise in Chapter 2, you should have created a text style for viewing FAT directory entries. If so, from the Text Style menu on the Text view toolbar, locate your 32-byte-wide FAT directory text style, and select it. Your data should snap into place, revealing each 32-byte directory entry on a separate line. If you did not create one, don’t worry, because you can apply the same view on the fly. Open the Options menu on the Text view toolbar. Select Max Size, set the wrap length to 32, and click OK. Immediately everything should fall in place, and now you should see the value of working with the Options menu.
12. In the Tree pane, place your cursor on the folder FileSignatureAnalysis. You should see 10 files in the Tree pane. In the Table pane, place your cursor on the file jpeg image.jpg. In the View pane, you should see the image appear. In the View pane, switch to the Hex view by clicking its tab. You are now seeing the hexadecimal notation for binary data. Note the first four bytes of the JPEG file, which are FF D8 FF E0. This is one of several JPEG headers. I’ll get into that more in a later chapter, but you should get used to seeing it and recognizing right away.
13. Return to the Table pane, where 10 files are listed, and click the Gallery view. Only two images are showing (a third is trying to display but doesn’t). At this point, EnCase is looking to file extensions for file types since you have not yet run a file signature analysis (which you will do in Chapter 8). Even though other images are present in this list, only two are legitimate JPEG images with .jpg extensions, and they are shown by EnCase.
14. Return to the Table view in the Table pane. Locate and highlight the file named jpeg image.jpg. The picture should resolve and appear in the View pane. If not, switch to the Picture view, and the image will appear. In the View pane, place a check in the Lock box. This should lock the View pane in the Picture view.
15. Go to the top of the list in the Table pane. Examine each of the 10 files by highlighting them, which forces them to resolve as pictures in the View pane as you do.
16. As you locate files that are images, select them. You can do this by clicking in the square box to the left and adjacent to each file, or you can press the spacebar, which places a blue check and advances down the list by one. When done, you should have selected two files. Check the Dixon box, and it should confirm 2 out of 16 selected.
17. At the top of the Table pane, double-click in the nameless column header above the blue check boxes. You have sorted those selected from those not selected, forcing all your selections to the top of the list. You can sort in only one direction with this particular column. By default, it is a reverse sort and places the selected items at the top. Although this is a short list, imagine the usefulness of doing this at the case level with thousands of files.
18. Add a secondary sort to this sort. Go to the File Created column. Hold down the Shift key, and double-click the File Created header at the top of this column. You are now looking at your selected files in chronological order based on when they were created. They were all created on the same date, with just a few seconds separating each of them. Note that they all have last-written dates that predate their file creation, which makes it appear they were last written before they were even created. In fact, they were, because they were really created elsewhere, modified elsewhere, and moved to their present location. As you’ll recall, the created date reflects when they were moved or created at their present location.
19. In the Table pane, click the Timeline view. Uncheck all boxes except File Created Date. You should see the number 10 in the Timeline area, indicating 10 files with file creation dates. Double-click 10 until it resolves to squares for each file. Click different squares and see the data for each appear in the View pane. In the View pane, switch to the Fields or Report view and see the metadata appear for each square or file that you click.
20. In the Tree pane, click the Set Included Folders trigger at the case level. If you click in the polygon-shaped box, it should turn green. When you do so, note that all objects in the case now appear in the Table pane. Even so, all selected files are still together at the top of the list since the previously defined sorts are applied to the new data brought into this view when you applied the Set Included Folders trigger. Turn off the Set Included Folders trigger by clicking it again.
21. In the Tree pane, highlight root or entries, which forces the evidence item to appear in the Table pane. Place your cursor on the evidence item (FileSigAnalysis), and on the Evidence toolbar, open the Device menu and select Disk view. In the View pane, click the Hex view. You have both the Disk view and Hex view now. In the Disk view, note the various colored squares. You are looking at a floppy. It is a volume device and does not have an MBR. What occupies its first sector, however, is a VBR. After the VBR, you see FAT1 and FAT2. Following the FAT is the root directory, shown in green. Immediately following the root directory is the first cluster that can hold data for files. Place your cursor on the first blue square.
22. Look at the GPS in the bottom of the screen. You should be on PS33 LS33 CL02. Recall that on FAT usable clusters start at 02 and that the first two FAT entries (00 and 01) hold other metadata. With a floppy, the volume starts with the first sector, and thus the physical sector and the logical sector offsets are the same, which is something you won’t often see. Move your cursor one blue box to the right of your present location. You should be on PS34 LS34 CL03. Note that you have moved one box, and the cluster number and the sector numbers both advanced by one. With a floppy there is one sector per cluster, and therefore one sector equals one cluster. If you look at the toolbar, you will note that View Clusters is grayed out. Because you are looking at a floppy with one sector equaling one cluster, the Sector view and the Cluster view are one in the same.
23. Right-click in the data area, and choose Go To. Type 2879, and click OK. You are now sitting on sector 2879. Because there are 2,880 sectors on this floppy (0-2879), you are sitting on the last sector of this device. Click the X in the Disk view to exit the Disk view.
24. In the Tree pane, highlight the folder FileSignatureAnalysis. In the Table pane, highlight the file named no header in table and matches no other header MATCHES.txt. In the View pane, click the Text view. You should see some text in this file. The fifth word in this file is the word file. With your cursor, click and drag over this word to select it. Note in your GPS that the LE is 4, indicating the length in bytes of the selected data. With the Word file selected, press Ctrl+F, or right-click and choose Find. Accept the default, which is Whole Document. Click OK, and the first search hit should be the text you selected. Press F3 to find the next search hit, and it should find the second and final search hit. You can press F3 until you hear the error beep, indicating there are no more matching search hits.
25. Save your case, and exit EnCase.
Other Views
Thus far, I have covered most, not all, of the EnCase views that are specific to a case. There are some more views, but they will be more meaningful to cover as you start processing evidence using the EnCase evidence processor. For example, the Records view is where you can find considerable data that is derived from the EnCase evidence processor. Figure 6-72 shows email details as they appear on the Records view. Some of the views I have referenced already as well as others will be covered in more detail in later chapters.
Global Views and Settings
EnCase has several views or settings that affect the EnCase environment and are thus considered global. Let’s start with the File Types view. In legacy EnCase versions, there were separate views for file types, file signatures, and file viewers, all of which are interrelated. EnCase 7 combines those views into one File Types view. You access this view through the View menu on the application toolbar, as shown in Figure 6-73.
Figure 6-72: Email is viewed on the Records view after running the EnCase evidence processor.
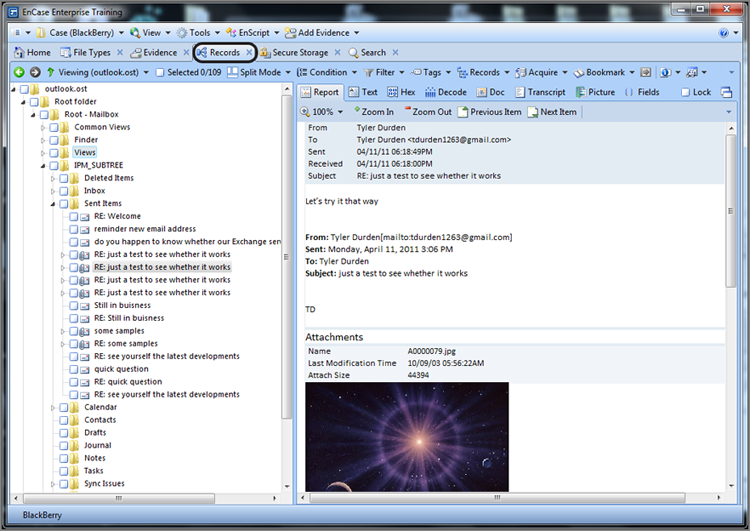
Figure 6-73: Accessing the File Types view from the application toolbar View menu
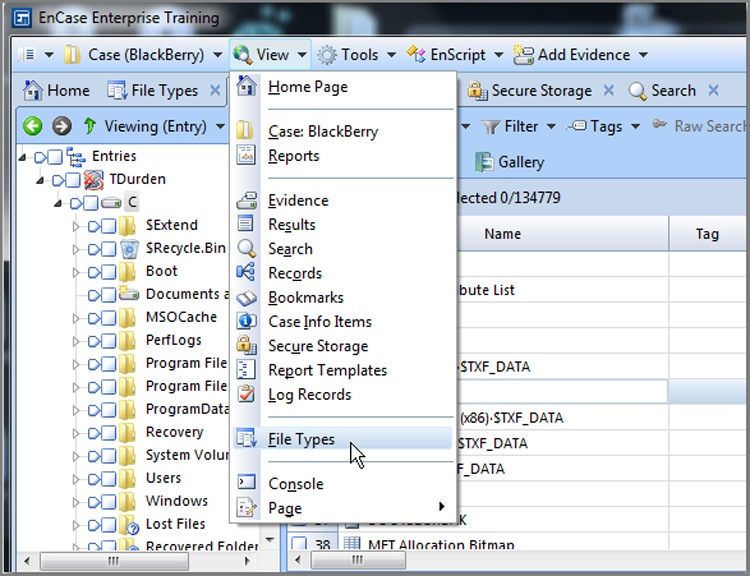
Once you open the File Types view, you will see, if you scroll to the bottom, that there are more than 800 entries or file types that are defined in this table. Figure 6-74 shows the File Types view and specifically the more significant entries for the standard JPEG image file type. You can see how the signature, file type, and viewers are combined into this one view.
Figure 6-74: File Types view highlighting a JPEG Image Standard file type
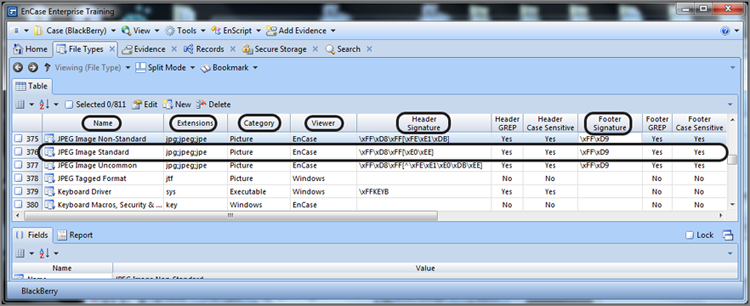
From the File Types view, you can delete, modify, or create new file types entries. On the toolbar, you’ll see the icons to do any one of the three. If, for example, you want to create a new one, simply click New, and you will be able to provide the necessary information in the New File Type dialog box, as shown in Figure 6-75. The team at Guidance Software does an excellent job of keeping up-to-date on file types but can’t possibly include them all. If you encounter new file types, you have the ability to add them. If you add one, it will be stored separately in the user’s AppData area and not in the global settings. In this manner, when Guidance Software updates its file types data, it does not overwrite ones you created.
What Happens When I Double-click a File in EnCase?
When you double-click a file in EnCase, it looks to the file types data (stored in the filetypes.ini file) for what to do. If the file type is set for internal viewing, it will have EnCase as the file viewer, and EnCase will tell you it is set for internal viewing. If the file type is set for Windows to handle the viewing, based on whatever is set in the Windows registry for that file extension, it will have Windows as the file viewer. In that case, EnCase creates a temporary file (placing it in the temp directory of the case folder) and then passes it to Windows for viewing. If the file viewer is set for an installed viewer, one you have configured, then that viewer will be listed as the viewer. Again, EnCase will create a temporary file and pass it to that specific viewer for viewing in the Windows environment.
Figure 6-75: New File Type dialog box
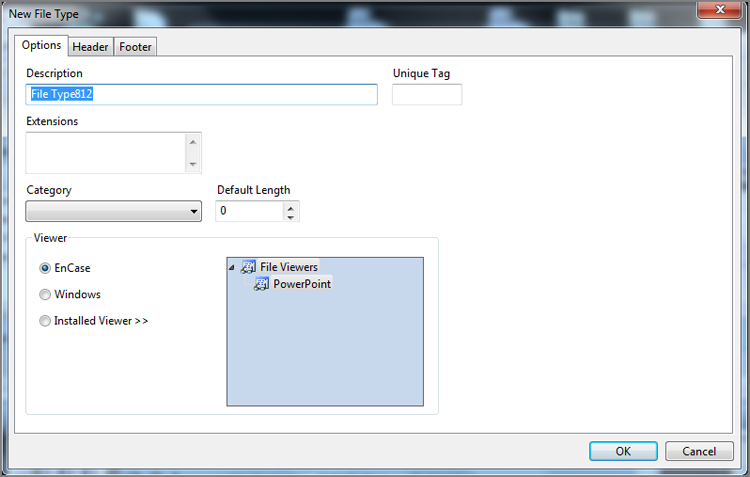
While many files can be viewed successfully within the EnCase environment, there are times when external viewers aren’t just better, they are necessary. To configure an external viewer in legacy versions of EnCase, there was a separate view, but EnCase 7 simply provides the option to do so at the point where you use one, as shown in Figure 6-76. In this case, I decided that I wanted to open this image with an external viewer. To do so, I right-clicked the file in the Table view and selected the Open With submenu. My only choice for an external viewer, as shown here, is PowerPoint. Since that is not the viewer I’d prefer to use for images, I decided to add one, which in this case is Quick View Plus. To add a viewer, simply select File Viewers, and you will see the Edit File Viewers dialog box. Click New, and you will have the ability to name the viewer and provide the path to its executable file by which it launches, as shown in Figure 6-77. Once configured, the next time you right-click and choose Open With, your newly installed viewer is available, as shown in Figure 6-78.
Figure 6-76: Using an external viewer to view a file in EnCase
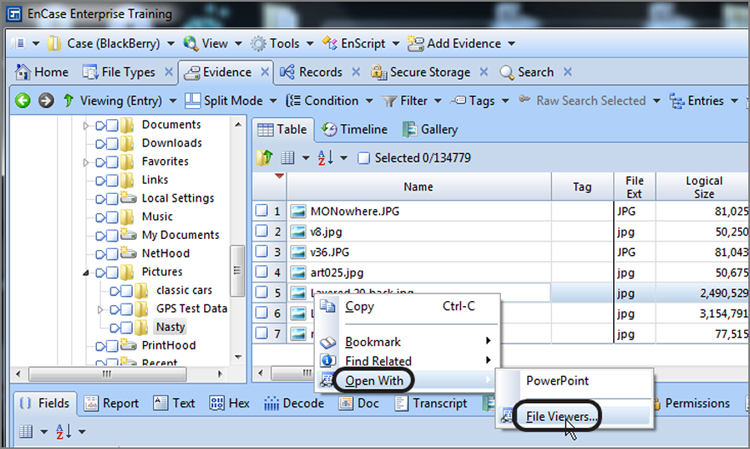
Figure 6-77: Adding a new external file viewer
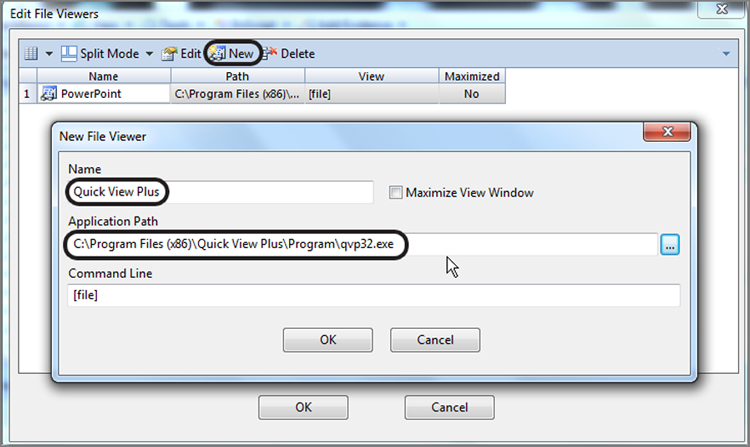
Figure 6-78: Newly configured external viewer now available
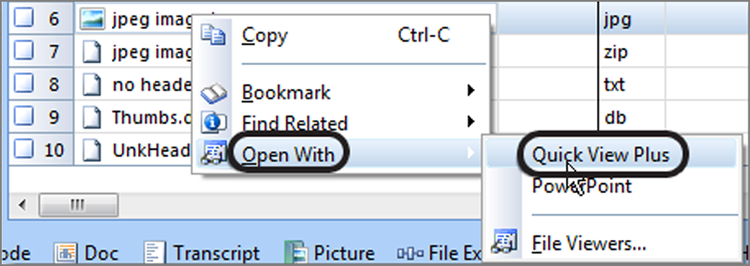
EnCase Options
EnCase provides an interface that allows the user to change many of the EnCase environment properties. This interface is available in the Tools > Options menu.
The Global view contains several options that affect EnCase globally. I have mentioned that EnCase, by default, uses a dot to indicate a Boolean true condition and null (nothing) to indicate a Boolean false condition. Many of the columns in the Table view contain dots or nulls to indicate the presence (or absence) of a condition or property. Figure 6-79 shows the default global values, including the dot and null, under Show True and Show False, respectively. Figure 6-80 demonstrates how this configuration displays for the Is Picture column in the Table view. As you can see, dots and blanks aren’t always the best way to communicate a clear meaning. To change this to a more meaningful value, many examiners replace the dot with Yes and the null with No, as shown in Figure 6-81. After making the changes, Figure 6-82 shows the effects of this change, with Yes and No showing now instead of dots and blanks.
You should note in Figures 6-79 and 6-82 that there are other options on the Global view. As previously mentioned, you can change the backup settings regarding frequency, number of files, location, and whether or not to use the Recycle Bin. I also discussed some of the picture options. You can also change the global code page as well as other settings.
Several other options presented in the Options view affect the EnCase environment. As needs arise, just remembering where they are accessed is usually sufficient. You can make a useful change to the date format from the Date view in the Global options that will cause the day of the week to be displayed in all date/time values. This change is not documented in the manuals but is a great time-saver when you need to know the day of the week, which is often quite important in analysis work. The default value for dates is MM/DD/YY, which returns, for example, 10/24/11. By changing the value to Other and customizing the string to ddd MM/dd/yy, you ensure that it will return Mon 10/24/11, as shown in Figure 6-83. This is usually quite adequate for displaying the day of the week.
Figure 6-79: Global options showing the default values. Note that Show True is populated with a dot and Show False is populated with a null.
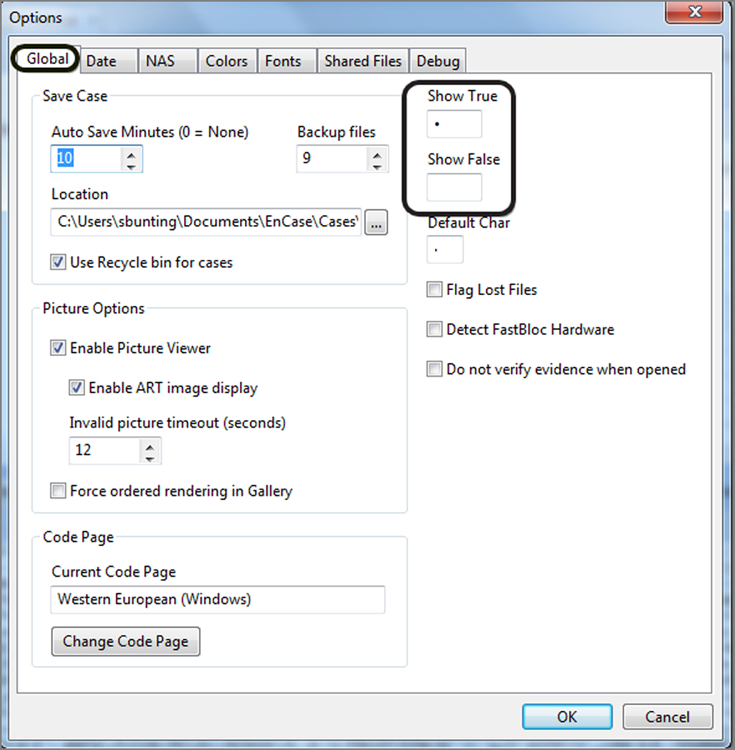
Figure 6-80: The Is Picture column populated with dots and blanks
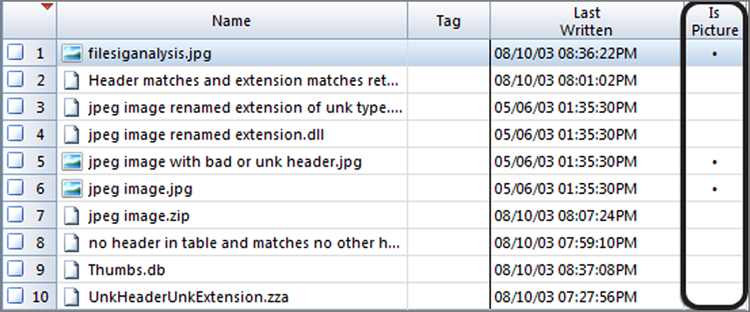
Figure 6-81: Boolean Show True is replaced with Yes, and Show False is replaced with No. These values are more meaningful when displayed in context.
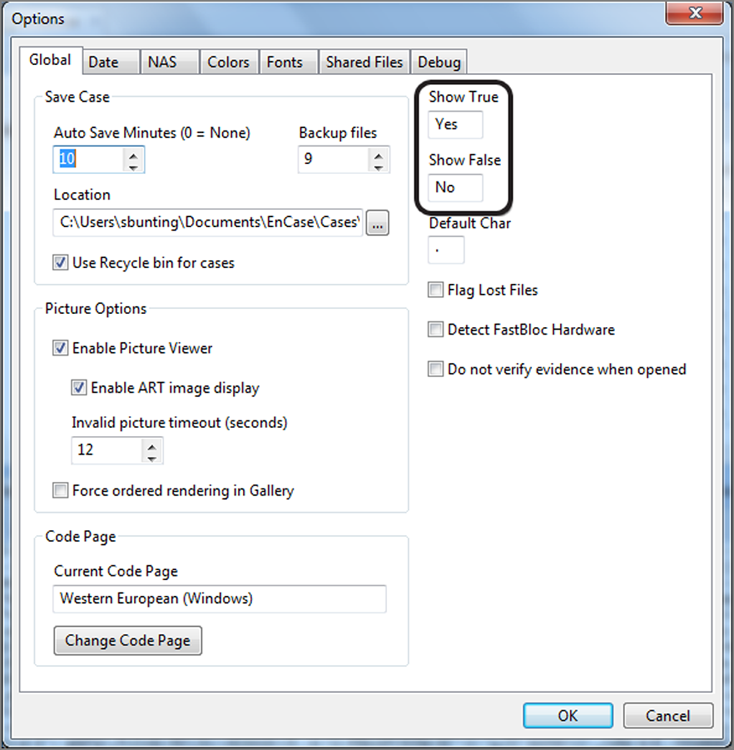
Figure 6-82: The Is Picture column populated with Yes and No instead of dots and blanks
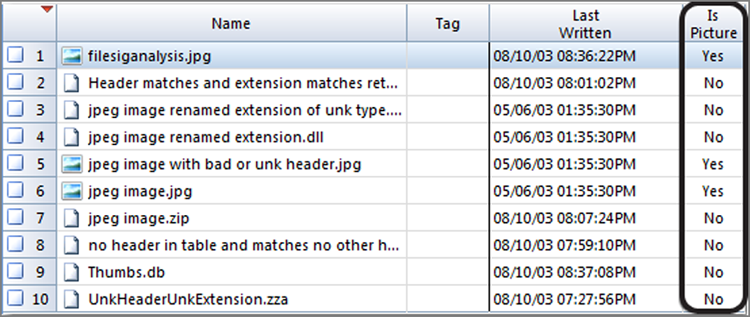
Figure 6-83: Changing the date format to show the day of week
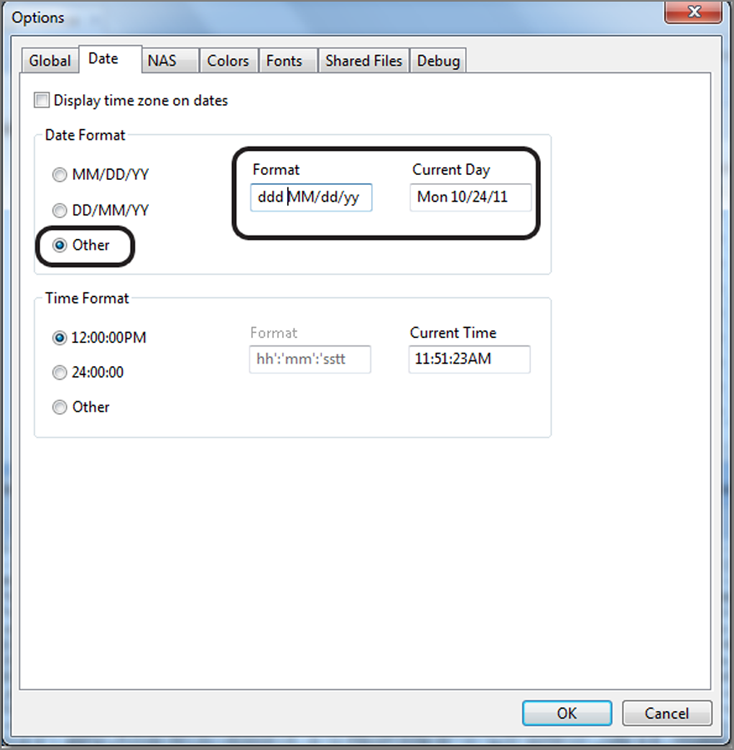
You can, however, be very elaborate with your customization. Changing the string to dddd MM/dd/yy will return Monday, 10/24/11, and changing it to dddd MMM dd, yyyy will return Monday, Oct 24, 2011.
When you enter the custom string, it is case-sensitive, so pay close attention to details. You may encounter a legacy EnScript that works only with the default date time format and usually involves prompts for the user to input date and time ranges. If you experience EnScript difficulties in that regard and those are truly rare encounters, switch back to the default to run that EnScript. You can restore your customized string when you finish.
As you can see from the various tabs or views, you can change many options as needed. If you work with foreign languages, you’ll need to work with the Fonts view. Detailed instructions are available on the Guidance Software website. If you work in a networked lab and have one central source for your EnCase environment files, you can map those paths on the Shared Files view.
One final view, the Colors view, deserves your attention. Examiners often find it necessary to modify slightly some of the default colors. You can radically change the EnCase color palette from this view. We recommend you make small incremental changes. In this fashion, you change one feature’s color palette and examine its impact throughout the EnCase environment before making additional changes.
A color that is often changed or tweaked is the Search Hit color, since the default may not view well in certain viewing and lighting conditions, especially if you are projecting your EnCase view, which is sometimes necessary. If you open the Colors tab and locate Bookmark, you will see the foreground and background colors for this feature. If you want to change the background, double-click the background, and you are presented with the color palette. Initially, you should probably stick with the same basic color, but choose one that is more or less saturated and visible, based on your tastes and viewing environment, as shown in Figure 6-84. The color palette options are endless, but you should proceed cautiously, making small incremental changes and evaluating before making more changes.
Figure 6-84: You can change the color palette for the Bookmarks background by going to the Tools > Options > Colors view.
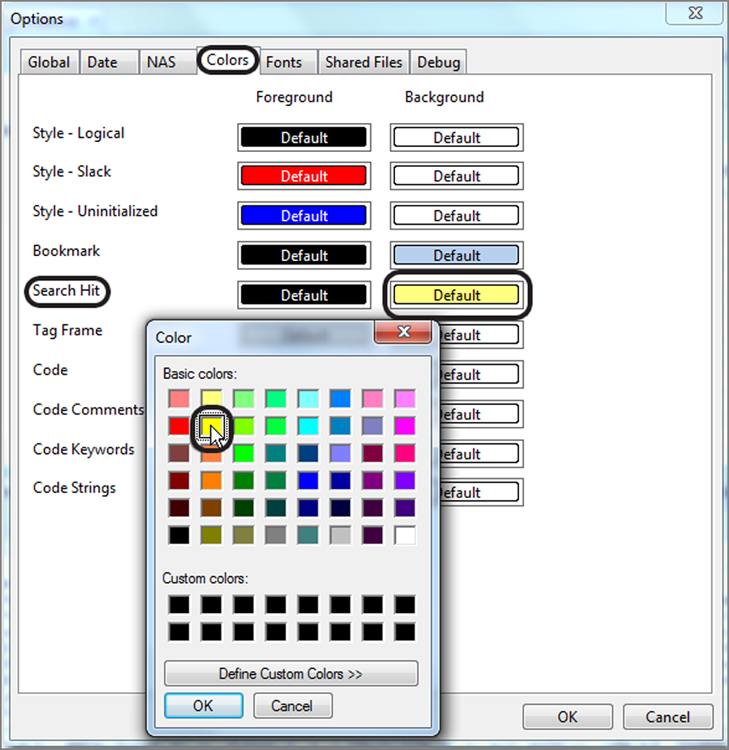
Before we leave the global options, there are two other tabs that need your attention. If you are in a lab environment that uses a network authentication server or if you are using EnCase Enterprise, the NAS tab is where you configure paths to these resources. Finally, the Debug tab, shown in Figure 6-85, provides system cache settings that can be adjusted, but usually the defaults are just fine. If you are experiencing issues with EnCase, technical support may direct you to send them a stack or heap log. To do this, you have to enable that logging on the Debug view. Ideally, you’ll never have to do this, but things do happen, and this tool can assist greatly in solving your problem.
Figure 6-85: Debug tab from which debug logging and system cache can be configured
Thinking Outside the Box
You just spent an entire chapter dealing with the EnCase interface. Sometimes it is good to get out of that frame of reference for a while so you can truly think outside the box! With that in mind, let’s digress by jumping into the Macintosh environment, which is more like culture shock than a digression.
This case eventually resulted in an employment termination. Naturally, it is necessary to protect identities, and therefore certain case details must remain purposefully vague.
The target of this investigation is a scientist who stood accused of manipulating research data to apply for and receive government research grants. This was ongoing research spanning many years as well as previous employers, and it involved significant funds, to say the least. It was the government research integrity office that initially discovered the altered data and initiated the investigation, which later broadened.
I was tasked with seizing and imaging all the computer systems used by this scientist, which was a daunting task since there was no cooperation from the scientist and little information. My directive was simple, or so it seemed: get it all! The systems covered the gamut and included Windows, Solaris, and Macintosh boxes, some of which were actively connected to scientific instrumentation.
At some point later in the process, months down the road, certain data files were identified as being relevant. They were on a Mac G4 system. These files were among hundreds of like files covering the research life of this scientist, with data ranging back to the early 1980s. Recall that some operating systems—including Mac operating systems prior to OS X—don’t use extensions to identify and associate files to applications. Examining these files in the EnCase environment provided no information as to which scientific application created the files, and cooperation was not forthcoming.
We typically think of Tableau as a hardware write-blocking device that we use in Windows. We can use it with EnCase, or we can use it within Windows with the Explorer interface or with other third-party tools. What we often don’t think of are the uses that are beyond the norm or the out-of-the-box applications of Tableau.
In the case at hand, I used EnCase to restore the Mac image onto a drive of identical make, model, and geometry. I attached the restored drive to my Tableau unit. I connected the Tableau to my lab Mac via a 1394 cable and booted the system. Upon boot, the questioned hard drive was mounted, read-only, and sitting on my Mac desktop awaiting my perusal. My first thought was that this was far too easy. I was right!
My first task was to run an MD5 of the mounted physical drive using the Mac Terminal application. This interface provides a Unix command line, and, being Unix, MD5 comes with the package. After about 90 minutes or so, the hash was completed, and the value matched the acquisition hash reported by EnCase. This was great—I had established that the drive under examination was identical to the one acquired, and nothing had changed when it was mounted in the Mac environment.
Based on my discoveries using EnCase, I knew the identity and exact location of the files in question. Using the Mac equivalent of Windows Explorer, which is called Finder, I navigated to the files in question. Mac stores information about files in metadata that is viewable via a Get Info command, similar to the Properties command in Windows. There are at least three ways to access this command:
· If you select a file and press Command+I, you get it immediately.
· A second way is via a right-click menu option called Get Info.
Since Apple likes to hobble its users by providing only a one-button mouse (or to this day by disabling right-click functionality by default on its Magic Mouse or trackpads), you have to hold down the Control key while clicking the one-button mouse to access the right-click options. If you want to use a Mac to its fullest potential, use a mouse that has two-buttons or its equivalent and enable the secondary click in the system preferences. Then you are an instant Mac power user!
· The third way is under Finder. Select the file, and from the File menu on the toolbar, choose Get Info.
The Get Info results for the files in question immediately revealed the identity of the scientific analysis program that created the files. Armed with that information, I was then in a position to read the data for the first time in this investigation.
Mac, unlike Windows, does not use a registry to store installation information for programs. When programs are installed on a Mac, the installation information is usually stored with the program files or in plist files in various standard locations. What this means for the forensics examiner is that you can run just about any program that is on the read-only target drive, and it will run flawlessly (see the note regarding licensing at the end of this sidebar). If you have any difficulties because of the read-only status, just drag the application to your Applications folder on your system drive, and you are back in business.
When I attempted to run the relevant scientific application to read the data, I encountered yet another issue. This was a legacy program and wouldn’t run under Mac OS X, requiring instead the Mac Classic environment. As it turns out, Mac ships Classic support with most versions of OS X. Although not a clearly marked road to follow, it is on the install disk labeled Additional Software. Pop in the CD, follow the prompts, and five minutes later I had support for legacy programs running under Mac Classic.
When Lion (OS X 10.7.X in July 2011) joined the line of Macintosh “cat” operating systems, legacy program support (Classic) ended. Nevertheless, as examiners, we are always encountering legacy computing equipment and software, which means we have to maintain some older gear for those nostalgic ventures we often encounter. In short, keep an older Wintel box and an older Mac box in your inventory!
After a seemingly long journey, I was able to run the scientific applications, read all the data, and export it in several formats readable by the investigators. When done, I ran another MD5 of the target drive. After all that activity, reading data and running programs directly from that drive, not one bit had changed, and the MD5 hashes were all alike.
The Tableau write-blocker is a truly versatile device, and it does block all writes regardless of the environment in which it is run. Don’t be afraid to think out of the box and use it in nontraditional ways, documenting and testing along the way to assure the integrity of your processes and analyses.
Note: In this case, to avoid legal issues over licensing, I purchased a license for the latest version of the involved software. Even though licensed for the latest and greatest, I used the older version on the target drive as well so as to see the data using the same version of the software (as did the accused party).
Summary
This chapter covered the EnCase environment and its features and functions. It covered how EnCase organizes its views into increasingly granular content, starting with the Tree pane, moving to the Table pane, and ending with the View pane. What is displayed in any given pane depends on the object highlighted in the pane before it in the hierarchy.
The chapter also covered how to create a case within EnCase from the Home screen and to subsequently add evidence to that case. I discussed how EnCase automatically creates a folder structure to contain the various case files when a new case is created and how to modify the paths for those case and evidence files.
While in the Evidence tab Entries view, the Table pane offers the Table, Gallery, and Timeline views. From the Table view, you can see all the case objects, folders, and files. Their properties are listed in columns. You can move, sort, or hide columns from view. The Timeline view offers a chronological view of data in a graphical environment. The Gallery view shows all images based on file extension. If a file signature analysis has been run, as an integral part of the EnCase evidence processor, the Gallery view will be based on the file signature data.
The Disk view, accessed from the Evidence tab toolbar Device menu, displays a device according to a color-coded legend. It defaults to Sector view, which can be changed to Cluster view. As each sector is highlighted, its data is shown in the View pane. From the Disk view, the examiner can navigate with the Go To feature, bookmark data, or create/delete partitions.
The View pane offers the Text, Hex, Doc, Transcript, Picture, Report, Fields, File Extents, Permissions, and Hash Sets views. The Text view shows plain text, while the Hex view shows both hexadecimal notation and a text view. The Doc view allows common file formats to be viewed as though in their native application. The Transcripts panel is similar to the Doc view, but it filters noise and metadata from the view, displaying the extracted text without formatting. The Picture view shows images. The Report view shows case object properties in a ready-to-export format. The file can be exported in RTF, HTML, TXT, XML, or PDF format. The Fields view is a listing of the same properties found in the Table view. File Extents lists the details for the cluster runs for any selected file. Permissions will list the security permissions for the selected file, including the owner, SID, groups, read/write/execute permissions, and so forth. The Hash Sets view will list the hash sets to which the file belongs, if any, along with their properties. EnCase offers several views or case-processing features. They can be accessed from the View menu or, if open, by clicking their tab. Some views are launched by virtue of starting a task. For example, when you add evidence to a case, the result is that the Evidence view opens and lists the evidence items in the case. The Home screen is the default screen when opening EnCase. This view allows you to open cases, create new cases, and access options. When a case is opened, the Home screen allows you the options of searching, reviewing search results, adding evidence, processing evidence, browsing evidence or records, creating reports, browsing bookmarks, and accessing options.
The Evidence tab entries view provides the examiner with a view of all devices, folders, and files in the selected case that have been parsed and loaded. Along the Evidence tab toolbar you can find several menus from which additional views or tools can be launched. At the far right end of each toolbar, and there are several, is the right-side menu, which is a collection of all the menus located on that toolbar. It is similar to the former right-click context menu in content and function.
The Bookmarks view holds all of your case bookmarks and is the point from which your final report is generated. After running the EnCase evidence processor, which I’ll cover in detail later, many of the results are available on the Records tab, some of which are email, thumbnail, and archived or compressed files. From this view, you can analyze, bookmark, and report your results. From the Device menu (located on the evidence tab toolbar), you can launch the Disk view, recover folders, restore, hash, scan disk configurations, scan for LVM, analyze EFS, analyze RMS, share (VFS and PDE), and modify time zone settings.
Examiners with programming skills can create and modify EnScripts from the EnScript menu located on the application toolbar. You can also run EnScripts from this location. The console, to which considerable output is directed by various tools and EnScripts, is located on the View menu, which is found on the application toolbar.
At the global level, the examiner can configure various options. The File Types view (available from the application toolbar View menu) combines file types, file signatures, and file viewers into one view or interface. You can modify, delete, or add entries. If you add entries to this database, they will be stored in the App Data area and thus are separate from the main file types database.
You can add external file viewers at the various points where you can view a file and send its contents to an external viewer. For example, in the Evidence tab entries view, you can right-click a file in the Table view and select Open With. At this point, you can send the file to an already configured external viewer or configure and add a viewer from the same menu.
Finally, EnCase has an Options menu, which is accessed from the Tools menu on the application toolbar. From the Global tab, you can configure backup options, picture-viewing options, default code page, and settings pertaining to Boolean viewing. On the Date tab, you can configure the formats for date and time separately. From the NAS tab, you can set paths for the NAS key path and Enterprise safe key and address. You can adjust various colors from the Color tab. From the Fonts tab, you can configure fonts for the EnCase environment, which will be required when working with many foreign languages. In a multiuser lab environment, shared settings, keywords, and the like can be configured on the Shared Files tab. The Debug tab is the location to go for adjusting the system cache or enabling debugging logs (stack or heap).
Exam Essentials
Understand how EnCase organizes its workspace. Understand the Home screen and explain how to open and create cases. Explain how to add evidence or browse evidence from the Home screen. Understand the Evidence tab entries view. Explain the Tree pane, Table pane, and View pane as to what data is displayed in each and how they interact. Describe the Table, Gallery, and Timeline views from the Table pane. Explain how to launch the Disk view and explain its purpose and features. Explain the concept of multidimensional data and how it can be viewed in the View pane. Be able to list which tabs are found in the View pane.
Understand how EnCase stores configuration and case data. Explain how and where EnCase creates paths and filenames for the various case-related files. Understand where EnCase stores both its global and user configuration files and what types of data are stored in each of the various configuration files.
Understand how to navigate within EnCase. Understand the hierarchical tree structure displayed in the Tree pane. Know the function of the Set Included Folders trigger and the file selection functions. Understand and be able to explain how they differ. Know how to move, sort, hide, and lock columns in the Table view. Understand what information is provided in the Report view and how it can be used. Explain the Gallery view and what information will be displayed and under what conditions. Explain the function and importance of the Timeline view. Know the function and purpose of the Disk view and be able to explain the meaning of the various color-coded elements.
Understand and explain the differences between the Text and Hex views. Describe the purpose of and know how to create and select a text style. Explain how to use the Options and Codepage menus to create dynamic text styles. Also describe the purpose of the Report view in the View pane. Explain the purpose and function of the Permissions tab. Explain the purpose and function of the File Extents tab.
Explain the Docs view and how the Transcripts view is both similar and dissimilar. Describe how the Pictures tab on the View pane functions. Explain the purpose and function of the Lock button. Understand and be able to explain the Dixon box and how it assists the examiner.
Understand the EnCase menu system. Be able to locate and describe the various toolbars that are in the various EnCase views. For any given menu on the Evidence toolbar, be able to describe the various functions available. Explain the function and contents of the right-side menu and how it relates to the other menus on the same toolbar.
Review Questions
1. In the EnCase Windows environment, must an examiner first create a new case before adding a device to examine?
A. Yes
B. No
2. When EnCase 7 is used to create a new case, which files are created automatically in the case folder under the folder bearing the name of the case?
A. Evidence, Export, Temp, and Index folders
B. Export, Temp, and Index folders
C. Email, Export, Tags, and Temp
D. Evidence, Email, Tags, and Temp
3. From the EnCase 7 Home screen, which of the following cannot be carried out?
A. Opening a case
B. Creating a new case
C. Opening options
D. Generating a encryption key
E. None of the above
4. When creating a new case, the Case Options dialog box prompts for which of the following?
A. Name (case name)
B. Examiner name
C. Base case folder path
D. Primary evidence cache path
E. All of the above
5. What determines the action that will result when a user double-clicks a file within EnCase?
A. The settings in the TEXTSTYLES.INI file
B. The settings in the FILETYPES.INI file
C. The settings in the FILESIGNATURES.INI file
D. The settings in the VIEWERS.INI file
6. In the EnCase environment, the term external viewers is best described as which of the following?
A. Internal programs that are copied out of an evidence file
B. External programs loaded in the evidence file to open specific file types
C. External programs that are associated with EnCase to open specific file types
D. External viewers used to open a file that has been copied out of an evidence file
7. Where is the list of external viewers kept within EnCase?
A. The settings in the TEXTSTYLES.INI file
B. The settings in the FILETYPES.INI file
C. The settings in the EXTERNALVIEWERS.CFG file
D. The settings in the VIEWERS.INI file
8. When EnCase sends a file to an external viewer, to which folder does it send the file?
A. Scratch
B. Export
C. Temp
D. None of the above
9. How is the Disk view launched?
A. By simply switching to the Disk view tab on the Table pane
B. By launching it from the Device menu
C. By right-clicking the device and choosing Open With Disk Viewer
D. None of the above
10. Which of the following is true about the Gallery view?
A. Files that are determined to be images by their file extension will be displayed.
B. Files that are determined to be images based on file signature analysis will be displayed after the EnCase evidence processor has been run.
C. Files displayed in the Gallery view are determined by where you place the focus in the Tree pane or where you activate the Set-Included Folders feature.
D. All of the above.
11. True or false? The right-side menu is a collection of the menus and tools found on its toolbar.
A. True
B. False
12. True or false? The results of conditions and filters are seen immediately in the Table pane of the Evidence tab Entries view.
A. True
B. False
13. How do you access the setting to adjust how often a backup file (.cbak) is saved?
A. Select Tools > Options > Case Options.
B. Select View > Options > Case Options.
C. Select Tools > Options > Global.
D. Select View > Options > Global.
14. What is the maximum number of columns that can be sorted simultaneously in the Table view tab?
A. Two
B. Three
C. Six
D. 28 (maximum number of tabs)
15. How would a user reverse-sort on a column in the Table view?
A. Hold down the Ctrl key, and double-click the selected column header.
B. Right-click the selected column, select Sort, and select either Sort Ascending or Sort Descending.
C. Both A and B.
16. How can you hide a column in the Table view?
A. Place the cursor on the selected column, and press Ctrl+H.
B. Place cursor on the selected column, open Columns menu on the toolbar, and select Hide.
C. Place cursor on the selected column, open the right-side menu, open the Columns submenu, and select Hide.
D. Open the right-side menu, open the Columns submenu, select Show Columns, and uncheck the desired fields to be hidden.
E. All of the above.
17. What does the Gallery view tab use to determine graphics files?
A. Header or file signature
B. File extension
C. Filename
D. File size
18. Will the EnCase Gallery view display a .jpeg file if its file extension was renamed to .txt?
A. No, because EnCase will treat it as a text file
B. Yes, because the Gallery view looks at a file’s header information and not the file extension
C. Yes, but only if a signature analysis is performed to correct the File Category to Picture based on its file header information
D. Yes, but only after a hash analysis is performed to determine the file’s true identity
19. How would a user change the default colors and text fonts within EnCase?
A. The user cannot change the default colors and fonts settings.
B. The user can change the default colors and fonts settings by right-clicking the selected items and scrolling down to Change Colors and Fonts.
C. The user can change the default colors and fonts settings by clicking the View tab on the menu bar and selecting the Colors tab or Fonts tab.
D. The user can change default colors and fonts settings by clicking the Tools tab on the menu bar, selecting Options, and selecting the Colors tab or Fonts tab.
20. An EnCase user will always know the exact location of the selected data in the evidence file by looking at which of the following?
A. Navigation Data on status bar
B. Dixon box
C. Disk view
D. Hex view
All materials on the site are licensed Creative Commons Attribution-Sharealike 3.0 Unported CC BY-SA 3.0 & GNU Free Documentation License (GFDL)
If you are the copyright holder of any material contained on our site and intend to remove it, please contact our site administrator for approval.
© 2016-2026 All site design rights belong to S.Y.A.