EnCase Computer Forensics (2012)
Chapter 8
File Signature Analysis and Hash Analysis
EnCE Exam Topics Covered in This Chapter:
· File signatures and extensions
· Adding file signatures to EnCase
· Conducting a file signature analysis and evaluating the results
· Understanding the MD5 hash
· Creating hash sets and libraries
· Importing hash sets
· Conducting a hash analysis and evaluating the results
This chapter will cover two data analysis techniques that are core skill sets for competent examiners because they are used in most examinations. You should, therefore, strive to master these techniques and their associated concepts.
The first technique is the file signature analysis. Most files have a unique signature or header that can be used by the operating system or application program to identify a file. Often, files have filename extensions to identify them as well, particularly in a Windows operating system. The file extensions and headers should, in most cases, match, although there are a variety of exceptions and circumstances where there is a mismatch, no match, unknown information, or anomalous results. A file signature analysis will compare files, their extensions, and their headers to a known database of file signatures and extensions and report the results.
The second technique is the hash analysis. You have used the MD5 and/or SHA1 hash to verify acquisitions of digital evidence, such as hard drives or removable media. You’ll use that same MD5 and/or SHA1 hash to derive hash values of individual files and compare them to known databases of hash values. In this manner, you can identify known files by their MD5 and/or SHA1 hash. If they are known safe files, such as program files, they can be eliminated from further analysis. If they are known contraband files, they can be quickly identified and bookmarked.
Both techniques are important tools for forensics examiners to use when analyzing data. I’ll begin the discussion with the file signature analysis.
File Signature Analysis
As you can imagine, the number of different file types that currently exist in the computing world is staggering—and climbing daily. Many, certainly not all, have been standardized and have unique file signatures or headers that precede their data. The two bodies that have undertaken this standardization are the International Organization for Standardization and the International Telecommunications Union Telecommunications Standardization Sector (ITU-T). When standardized headers are present, programs can recognize files by their header data. Also, many standardized files have unique extensions that are associated with the file’s unique header.
Understanding Application Binding
The process by which an operating system knows how to open a particular file type with a given application is called application binding. There are many methods employed by various operating systems, and it is beyond the scope of this book to enter this realm too deeply, but you must at least give it some consideration so you can understand the topic at hand.
Windows, for example, uses file extensions to associate or bind specific file types with specific applications. File extensions are the letters that follow the last “dot” in a filename. Under this system, a file with the extension of .pdfwill typically be opened by Adobe Reader. Windows cares only about the extension and nothing about the header. If you take a .jpg file and change its extension to .pdf, Windows will pass it along to Adobe Reader to open. Adobe Reader will report an error or problem with the file, and the file will fail to open.
![]()
Windows stores its application binding information in the registry. Because this setting can vary between users, it is stored in the user’s registry file, which is ntuser.dat. The key where this information is found is \Software\Microsoft\Windows\CurrentVersion\Explorer\FileExts. Each registered extension will have its own key. Each of those keys has two subkeys: OpenWithList and OpenWithProgids. The information directing which program to open the extension is in these two subkeys.
The fact that Windows uses file extensions and not headers gives rise to a data-hiding technique in which the user changes the extension of the file to obscure its contents. If a file named MyContrabandImage.jpg was changed to lansys32.dll and moved to the system32 folder, the casual observer would probably never find it. Even a systems administrator would probably miss it. Even if someone noticed the file, an attempt to open it in Windows would fail.
EnCase would not, however, miss its contents once a file signature analysis had been conducted, which you’ll soon understand as you progress through this chapter.
Other operating systems such as Unix (including Linux) use header information to bind file types to specific applications. Those systems are, therefore, not dependent on file extensions. You will find that many files on those operating systems do not have file extensions.
Mac operating systems use a combination of methods to bind files to applications. Macintosh uses the Hierarchical File System Plus (HFS+) on its current operating system, which is OS X. Macintosh legacy systems used an older version of this file system known as HFS. As part of the file system metadata, a Mac stores a 32-bit value called a file type code and another 32-bit value called a creator code. File type codes are 4-byte codes describing the various file types. Creator codes are 4-byte values assigned to various programs that create files. As of about 2003, there were more than 58,000 different file type and creator codes available in a third-party database for use in analyzing these codes. Legacy Mac operating systems use this metadata (file type code and creator code) to bind files with applications.
This system allows considerable flexibility, much to the delight of Mac users. One JPEG image can be opened by one program, while another JPEG image can be opened by another program based on the application that created the file rather than on its extension.
The Internet is changing the way the Mac operates, because cross-platform file exchanges are a way of life. When OS X arrived on the scene, application developers were asked to add file extensions as programs created files. Mac users protested, but the protests fell on deaf ears because Apple still insists on extensions for new Mac applications.
Mac OS X uses a list of seven rules of precedence for application binding. The first priority goes to “user defined,” meaning that if a user chooses to open a specific file with a specific application, this setting will override all other settings. The second priority goes to the creator code, meaning that the application that created the file will open it as long as there is no overriding “user defined” setting. The third priority is that of file extension, which is new to the Mac world with the advent of OS X. If there is no “user defined” setting and no creator code, Mac OS X will use the file extension as the means to bind the file to an application. The last four rules of precedence are rather complex and go beyond the scope of this discussion. If the topic interests you, search www.apple.com/search/ for the phrase application binding.
In Mac OS X version 10.7 (nicknamed Lion), if a Mac file lacks a “user defined” setting and lacks a creator code, the operating system looks next to the file extension to determine which application to use to open that file. If that file extension has been renamed to hide the file’s true nature, the file does not open or opens with the application bound to that extension, which usually means it can’t be properly viewed. Thus, as file extension application binding finds its way into the Mac operating systems, it creates another method for obscuring data on those systems. You can expect to see more filename extensions in the future when you examine Mac systems because application developers, despite protests, are being instructed to use filename extensions when they create applications. Following that trend, you may expect the use of file extension changes to hide data on Mac systems to rise commensurately.
Creating a New File Signature
When conducting a file signature analysis, EnCase compares a file’s header, if one is present, with its extension, if one is present. This information is compared to a file types database of known file signatures and extensions that is maintained within EnCase and stored in the FileTypes.ini file. In EnCase 7, the signature data in the former FileSignatures.ini file was merged into the FileTypes.ini file.
To better understand the information stored in the file types database, let’s examine the information in this database and create a new file signature. First you must go to the File Types view, which is located at View > File Types, as shown in Figure 8-1.
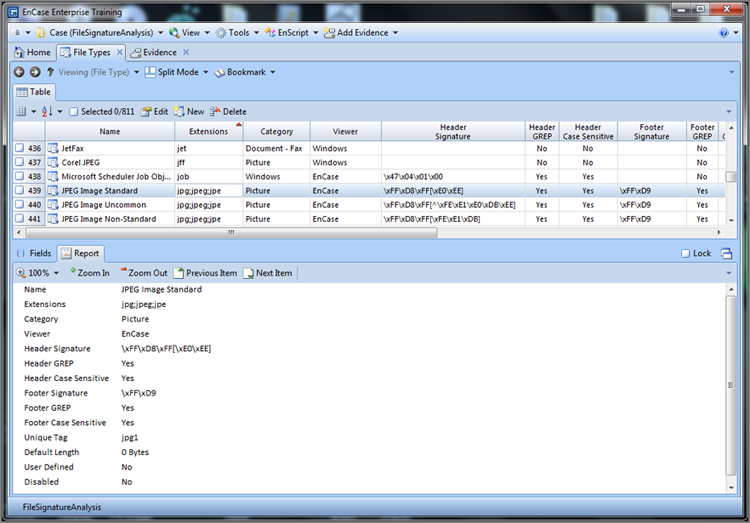
The File Types view is a table or database of file extensions, categories, names, headers, footers, viewers, and other metadata. Any item selected in the Table pane can be viewed in the View pane from either the fields or report pane, which is the same data visible in the Table view except in a report format instead of in a tabular format. Figure 8-2 shows a standard .jpg file type in both the tabular and report views.
Figure 8-1: The file types database is accessed from the View menu on the application toolbar.
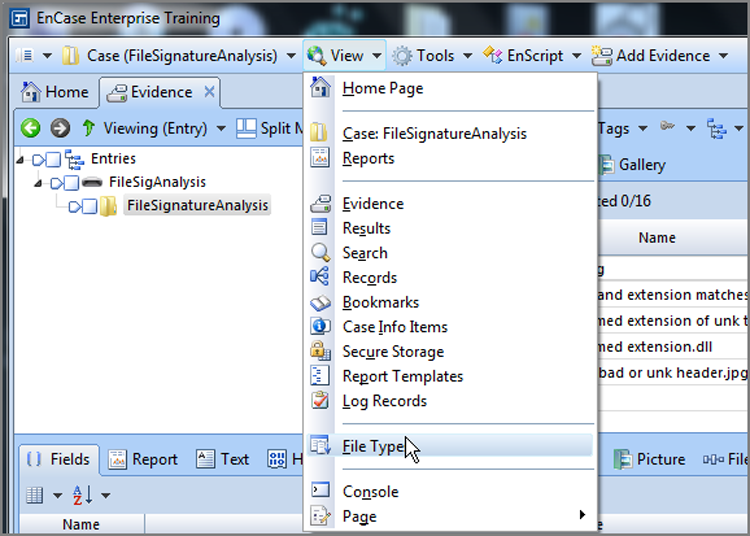
Figure 8-2: File Types view provides an interface to a database of file signatures from which you can add, modify, or delete file signature records.
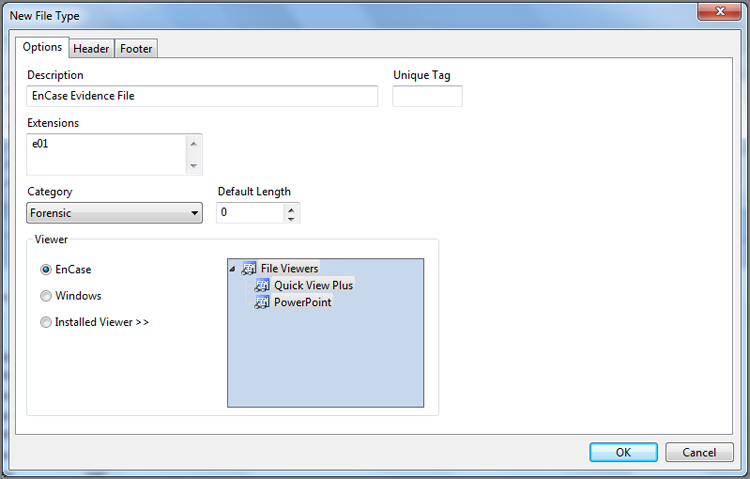
To add a record, click New on the File Types table toolbar. You will be presented with the New File Type dialog box, as shown in Figure 8-3.
Figure 8-3: The New File Type dialog box lets you enter Description, Extensions, file Category, Viewer, header, and footer strings. There are three tabs: Options, Header, and Footer.
Deleting a record is as simple as right-clicking a particular record and choosing Delete. You can also, of course, choose a record and then click Delete on the File Types toolbar.
In this example, I added an EnCase Evidence File signature and placed it in the Forensic category. After entering the hex string, I selected the GREP check box. (See Figure 8-4.) For the extension, I entered e01, as shown in Figure 8-3. When done, I clicked OK, and the new signature was added to the database. This point is a good time to select File > Save All.
Let’s modify a record. You can double-click a file type record to open its properties, or you can select the file type, right-click, and choose Edit to open the same properties screen. Finally, you can choose a record and click Edit in the File Types toolbar. In this example, I’m choosing the file record named Outlook Express Email Storage File. From my analysis work, I have determined that this file signature is used not only by Outlook Express but also by MSN Mail for its local storage. The former has a file extension of .dbx and is already entered in the Extensions tab. There is no extension listed for the MSN Mail extension, which is .MailDB. You’ll modify the name to include MSN mail and add the MSN mail extension, so double-click the file type Outlook Express Email Storage File, and you’ll see the dialog box shown in Figure 8-5, which also reflects a name change for the file signature.
Figure 8-4: Header tab of the New File Type dialog box into which I’ve placed the header string for an E01 EnCase Evidence File type, choosing the GREP option
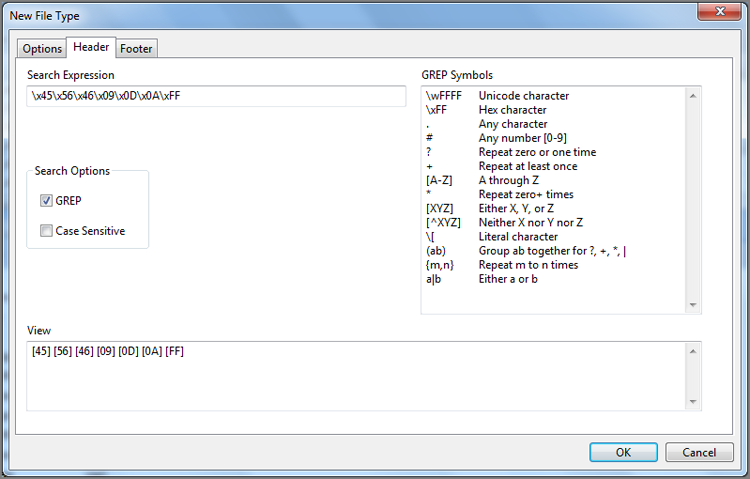
Figure 8-5: Options tab for editing a file type record. In this example, I have added “& MSN Mail” to the description and added an extension, delimited by a semicolon.
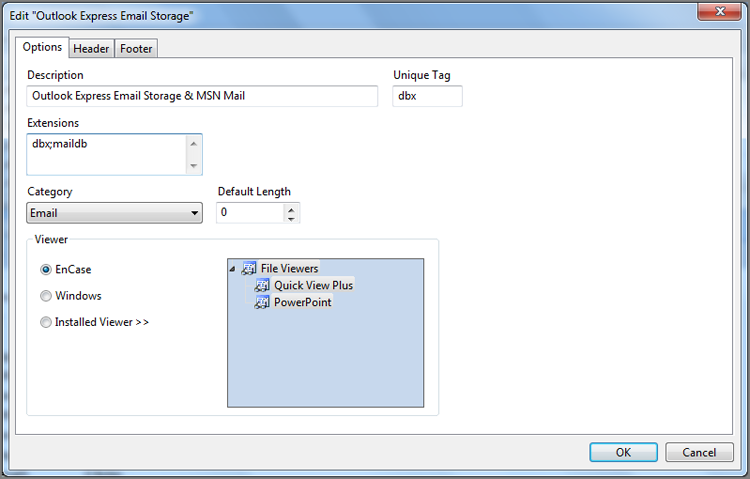
After changing the name to something that reflects its dual role, you next go to the Extensions field. Multiple extensions are separated by a semicolon as a delimiter. No spaces are used, only the delimiter. In this case, you’re adding the extension .maildb, as shown in Figure 8-5. When done, click OK to change the record.
Conducting a File Signature Analysis
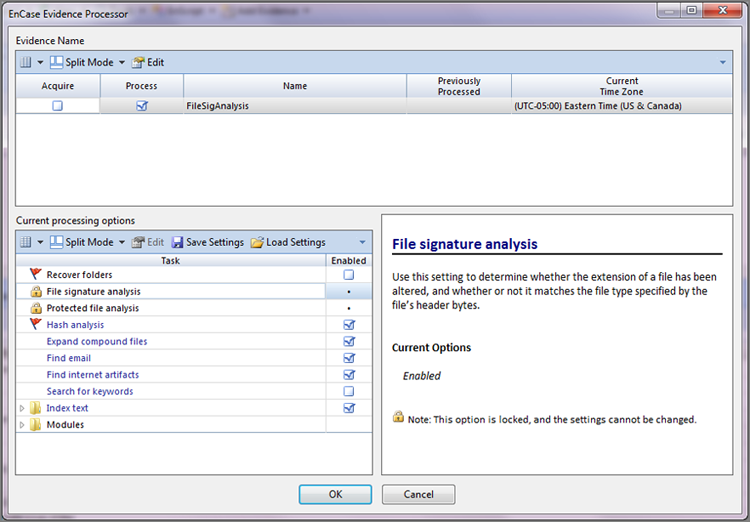
Now that you have an understanding of the information in the database, you can use that information to carry out a file signature analysis. From the File Signatures view, switch back to the Case Entries view. When running a file signature analysis, typically you want to run it over all the files in the case so that EnCase can rely on the true file type for all files instead of their extensions. With legacy versions of EnCase, you had to select files and run a file signature analysis on those selected files as an option from the search dialog box. Starting with EnCase 7, a file signature analysis is built into the Encase Evidence Processor. When you run the EnCase Evidence Processor, a file signature analysis is automatically run as a normal task during the first run.
To run a file signature analysis, simply launch the EnCase Evidence Processor and choose any set of options. You have no choice regarding choosing a file signature analysis because it is a locked option and will run always, as shown in Figure 8-6. When your processing options are selected, click OK to start processing.
Figure 8-6: File Signature Analysis is a locked option, meaning it will always run during the first run of the EnCase Evidence Processor.
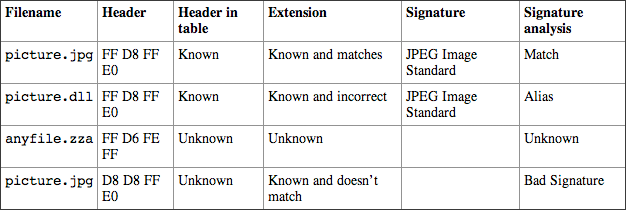
During a file signature analysis, EnCase examines every file on the device selected for processing and looks at its header to see whether there’s a matching header in the database. If it finds one, then the header is known. EnCase next looks at the file’s extension and compares it with the extension listed in the database for that known header. If the header is known and the extension matches, EnCase reports a match. If there is no extension for a given header in the file signature table, EnCase will report a match for any extension as long as the file’s extension doesn’t match any other header listed in the file extension table.
If EnCase can’t find the file’s header in the file signature database and it also can’t find the file’s extension in the database, EnCase reports the status of this file as unknown.
If EnCase locates a file’s header in the file signature database, the header is known. If the extension that should correspond with the file’s header is missing or incorrect, the header information is presumed correct and prevails. In such cases, EnCase reports the alias for this file and its proper signature.
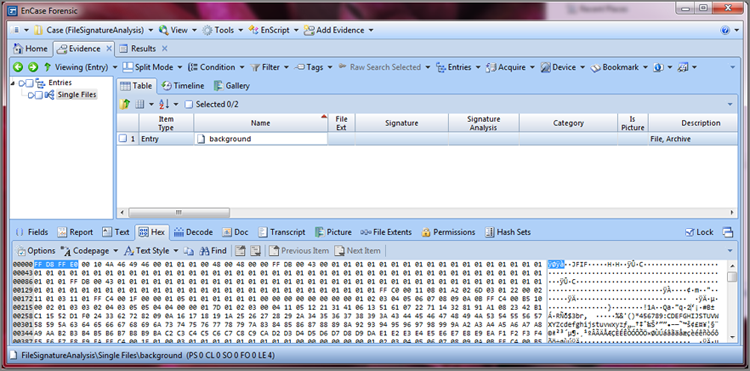
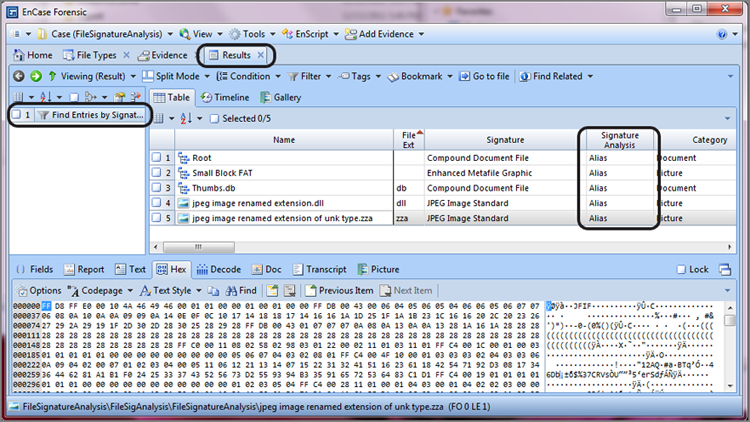
Figure 8-7 shows a single file from a Mac OS X system. The filename is background. Note that the file, like many on Mac systems, is missing a file extension. Because no file signature analysis has yet occurred, EnCase is relying on file extensions to determine file type. Because there is no extension, EnCase does not show this file as an image. If you look at the data in the Hex view, however, you can see that its header is FF D8 FF E0, which with time you will immediately recognize as a JPEG image. Note that the Table view columns have been optimally arranged for file signature analysis; they are, from left to right, Name, File Ext, Signature, Signature Analysis, and File Category.
Figure 8-7: Image file from a Mac system. This file has no file extension. Since no file signature analysis has yet been run, EnCase does not yet recognize this file as an image.
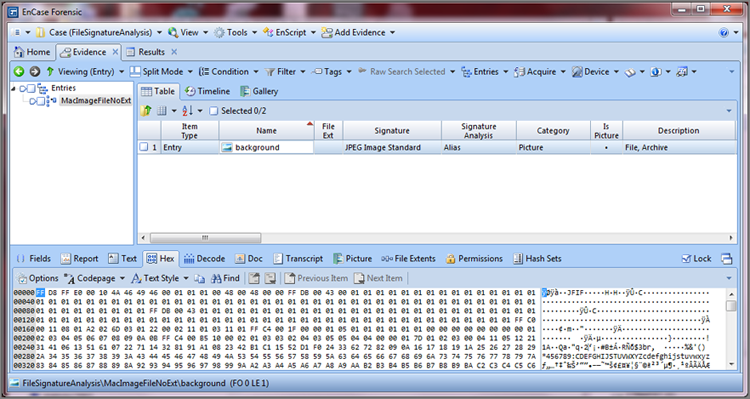
When a file signature analysis has been conducted and a file with a known header has a missing or incorrect extension, its alias is reported based on the file header information. Figure 8-8 shows the same image file after the file signature analysis has been run. Under Signature, EnCase reports JPEG Image Standard and notes an alias in the Signature Analysis column. Because EnCase now knows this file is a picture, the Picture view is enabled in the View pane, and the image appears there. Additionally, you will note that the category is now Picture and that the Is Picture column now has a positive Boolean value (a dot) in it.
Figure 8-8: The same picture files after a file signature analysis has been conducted. Note the alias is reported in the Signature Analysis column and that JPEG Image Standard appears in the Signature column.
Another set of conditions often occurs during file signature analysis that is known as a bad file signature. When EnCase discovers a file that has a known extension and that extension has a known header but the file’s header does not match that header or any other header in the database, the file status shows Bad Signature in the Signature Analysis column. Table 8-1 summaries the file signature status types reported by EnCase.
Table 8-1: Summary of file signature analysis status report
Although it is rare, you can sometimes encounter an anomaly in which a file header matches a known header and the extension is in the table but has no header. In this case, EnCase believes the header information and reports the file with an alias for the header even though the file extension is correct. This sounds a bit confusing until you see an example, and then it makes perfect sense.
If EnCase were to encounter a text file during a file signature analysis and the first two letters of the text file were someone’s initials, such as PK, you would encounter this anomaly. This is because a text file can start with anything, so it has no header. EnCase would identify the initials as a known header for a ZIP file. EnCase expects to see a .zip extension with a ZIP header. EnCase resolves conflicts using the header information, which means the file would be reported with an alias for a ZIP file even though it was a bona fide text file. These encounters are rare, but should they occur, you will recognize them for what they are based on your understanding of the file signature process and the rules for evaluating and reporting the results.
![]()
Just before press time, EnCase 7.04 was released and with it came some changes. One that was nearly overlooked was the changing of the column names Signature and Signature Tag to File Type and File Type Tag. This began as a change late in EnCase 6.19, changing the column name from Signature to File Type. To be consistent, EnCase 7.04 carried through this change, extending it to include the change from Signature Tag to File Type Tag. The text and figures in this section will reflect EnCase 7.03, but you should note the change going forward with EnCase 7.04.
![]()
File signatures are an important part of the examination process and are now built into the Evidence Processor. File signature analysis is done at the beginning of your processing so both you and EnCase are seeing files for what they really are. To make sure you understand this important tool, you’ll run a file signature analysis in Exercise 8.1.
Exercise 8.1
Performing a File Signature Analysis
In this exercise, you’ll run a file signature analysis on a small evidence file that contains a concise example of all the various file signature analysis results you will typically encounter. The filenames depict their file signature conditions and are intended to help you understand the results. It is a good exercise to do shortly before your examination to help solidify the file signature analysis concepts. Let’s begin.
1. Start a new case in EnCase 7, naming it FileSigAnalysis. In the folder structure created by EnCase 7 for this case, create an additional folder named Evidence. Download the file FileSigAnalysis.E01 from the publisher’s site for this book and place this file in the newly created folder.
2. From the Home screen, choose Add Evidence > Add Evidence File. Browse to the Evidence folder, select the evidence file you just downloaded, and add it to the case.
3. From the Evidence tab, select the newly added evidence file. In the View pane, choose either the Field or Report tab. Check to see that the evidence file verified. Since this is a small evidence file, the verification process occurs very quickly, and no progress will have been seen.
4. Return to the Tree view pane, and in the table, double-click the evidence file to cause it to parse and load. You will now be viewing the entry after it loads. In the Tree pane, open the file structure. It should contain one folder, named FileSignatureAnalysis. Select that folder, and the 10 files in that folder should appear in the Table view pane. Arrange your columns to optimize them for file signature analysis. Arrange them, from left to right, as follows: Name, File Ext, Signature, Signature Analysis, Category, Is Picture, and Description (you may want to refer to Figure 8-7).
5. In the Table Pane, switch to the Gallery view. EnCase sees three files with extensions that indicate they are pictures and attempts to show all three, but only two are visible. Switch back to the Table view.
6. On the Evidence tab, just under the Home icon, click the green left arrow. On the Evidence toolbar, click Process Evidence. Place a check mark under Process for the FileSigAnalysis device. Accept all default settings, which will include File Signature Analysis because it is locked. Click OK, and the process should complete in less than a minute.
7. From the Evidence tab’s Table view, double-click the evidence item FileSigAnalysis again to cause it to parse and load with the case processor information included. You will be taken to the viewing entry screen. With the focus in the Tree pane on the folder FileSignatureAnalysis, go to the Table view. Sort the Signature column by double-clicking the column head. Add a secondary sort on the File Ext column by holding down the Shift key and double-clicking its column head.
8. The first file in the list should be a JPEG file with a bad or corrupted header. If you look at the data in the Hex view, you’ll see that the header does not match that of a JPEG header. Since it matches nothing else either, it is reported as Bad Signature. The filename clearly spells out its contents.
9. The second file has both an unknown header and an unknown extension and is reported as Unknown.
10. The third file in the list is a Thumbs.db file, which is created when a user opts for the thumbnail view in Windows Explorer.
11. The fourth file in the list is a JPEG image file with its extension renamed to .dll. In the Signature column, EnCase is now showing this file as *JPEG Image Standard. Furthermore, it is treating the file as a picture and is displaying it as such. The same holds true for the seventh file, which is an image file with its extension renamed to .zza.
12. Files 5 and 6 are examples of various files that match.
13. Figures 8 and 9 are examples of text files. The .txt extension is known, but since a text file can start with anything, they report as matches. Some legacy versions of EnCase will report entry 8 as a ZIP file if still using an older header definition (“PK” for the header), which then makes it an anomaly, as previously mentioned.
14. Switch to the Gallery view in the Table Pane. EnCase reports five files now as pictures and attempts to display them correctly. One fails to display as its header is corrupted, leaving four actual pictures that display. EnCase is now displaying images it did not display before the file signature analysis.
15. Save your case, and exit. You may use this evidence and case file at any time you need to quickly review the file signature analysis and reporting.
You’ve looked at a file signature analysis at the micro level to understand it, which is great for that purpose. It does, however, not lend itself very well to real-world cases in which there are hundreds of thousands of data sets. If you want to see the results of a file signature analysis by renamed extension, bad signature, or unknown, you can do so using a filter. From the Evidence tab, you can click Filter on the Evidence toolbar. Under Filter, choose Find Entries By Signature, as shown in Figure 8-9. The filter menu process will start to run, as shown in Figure 8-10. Note the options, and accept the defaults by clicking OK. Figure 8-11 shows the next set of options, which are the various signature conditions. In this example, I have selected Renamed Extensions. Click OK to apply the filter.
Veteran EnCase users would normally expect to see the filter applied to the evidence items on the Evidence tab, but such is not the case with EnCase 7. To see the filtered results, go to the Results view, as shown in Figure 8-12. From this view, you can bookmark, view, decode, or perform most any other analysis function that you could employ on the Evidence tab. It allows you to keep your various sets of results and view them instantly, making it a much-improved workflow and workspace when compared to legacy versions.
Figure 8-9: File signatures filter
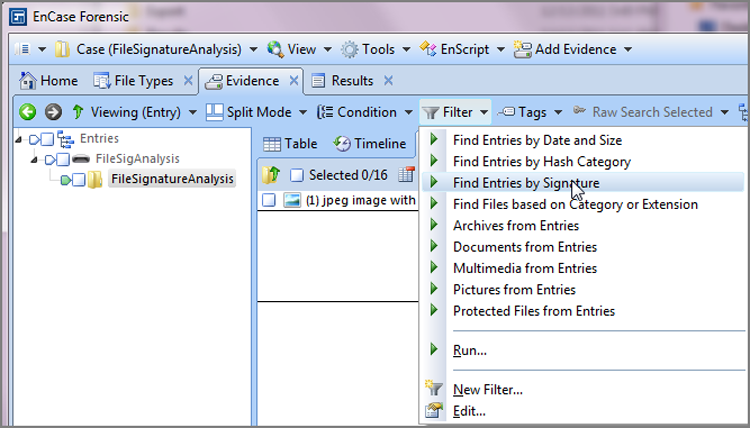
Figure 8-10: Run menu for the file signatures filter with some options
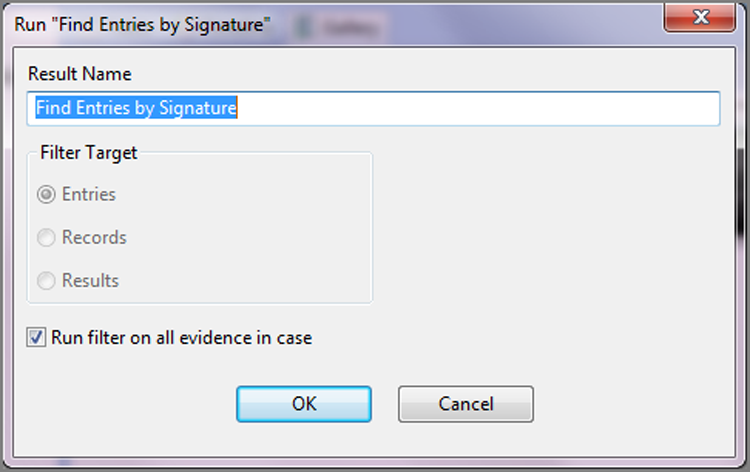
Figure 8-11: Options for different signatures from which you can choose any or all
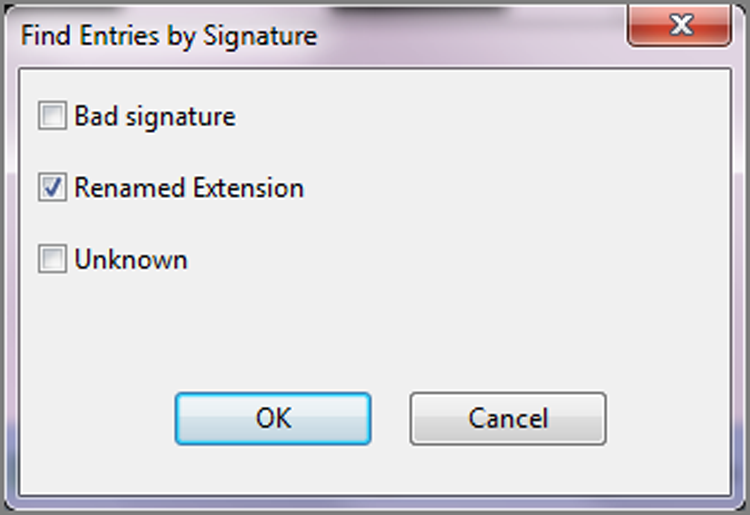
Figure 8-12: Results of the file signature filter are viewable only in the Results view.
Hash Analysis
When I discussed acquisitions and verifications in Chapter 4, I covered the concept of hashing using the MD5 and SHA1 algorithms. An MD5 or SHA1 hashing algorithm, like other hashing algorithms, can be applied to any stream of data. All that is needed is a starting point and an ending point. In the context of acquisitions, the hashes were of volume and physical devices. In the following sections, I take a more granular approach and show how to conduct your hashing at the file level.
MD5 Hash
As you recall, an MD5 hash is an algorithm that is calculated against a stream of data with the end result being a 128-bit value that is unique to that stream of data, be it a device, a volume, a file, or a stream of network data. The odds of any two dissimilar files having the same MD5, better known as a hash collision, is one in 2128, which is 340 billion billion billion billion and some change. The resultant statistical value is such that you can safely assume that the only file that will produce the same hash value is an exact duplicate of that file. Said another way, if two files have the same hash value, you can safely assume that the two files are identical in content. The inverse of this is also true, in that if two files produce different hash values, those files do not have the same content. (The names of the two files don’t matter, because the hash calculation is conducted on the data contained in the file only and the file’s name is stored elsewhere.) These concepts form the basis of hash analysis.
![]()
For those curious types who are wondering about the odds for an SHA1 hash collision, because the SHA1 algorithm produces a 120-bit value, there are 2160 possible outcomes. Expressed using scientific notation, the MD5 has 3.402823669209387e+38 possible outcomes, and the SHA1 has 1.461501637330904e+48 possible outcomes. To wrap your head around such numbers, take the astronomical figures produced by the MD5 hash and add another 10 zeros!
Hash Sets and Hash Libraries
When a file is hashed, the result is one hash value of one file. A hash set is a collection of one or more hash values that are grouped together because of common characteristics. The hash set may be a collection of hash values from a hacking tool such as SubSeven. In such a case, the hash values for that program are calculated and then gathered into a group of values and given a label, for example, SubSeven. Hash set examples could be Windows 7 program files, case “xyz contraband files,” and the like. Hash libraries are collections of hash sets, which is concept you may want to remember!
EnCase has a feature that allows you to import hash sets from external sources. EnCase also lets you create custom hash sets at your discretion.
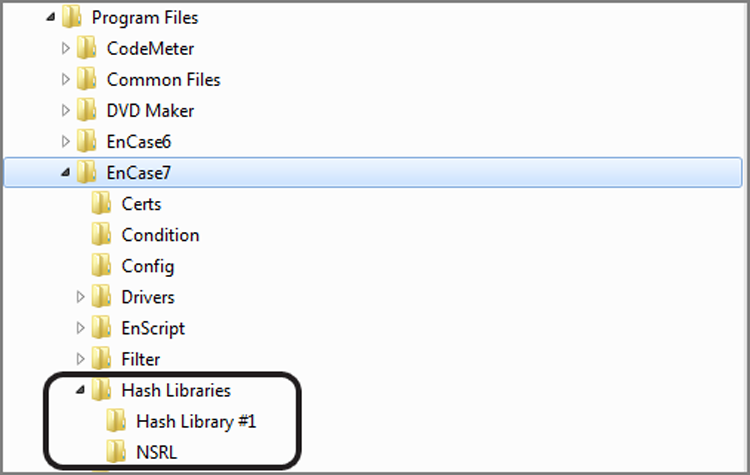
Before you can create any hash sets from within EnCase, you must first create a hash library container, which is a folder containing a series of file-based, database-like structures into which EnCase will store hash sets. To do this, I first created a folder in the EnCase 7 program files and named it Hash Libraries. I created two subfolders, one named Hash Library #1 and the other named NSRL, as shown in Figure 8-13.
Figure 8-13: Folder and subfolders created to contain Hash Libraries
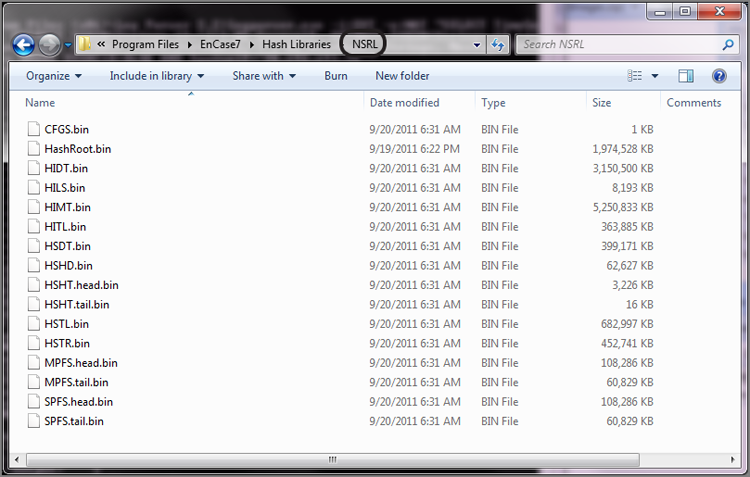
The latter subfolder (NSRL) came about by means of decompressing the NSRL files that are available when you register your dongle with Guidance Software, as shown in Figure 8-14. You need only register your dongle, download the compressed NSRL hashes, place the self-extracting file in the Hash Libraries folder, and extract. When you are done, you’ll have folder named NSRL containing an EnCase 7 hash library, as shown in Figure 8-15.
Figure 8-14: Email link to latest NSRL hash sets received after registering your dongle
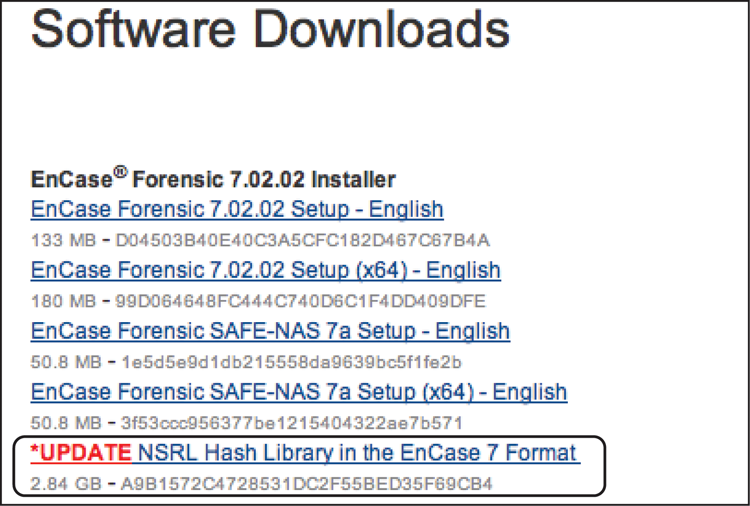
Figure 8-15: NSRL hashes in EnCase 7 hash library after downloading and decompressing
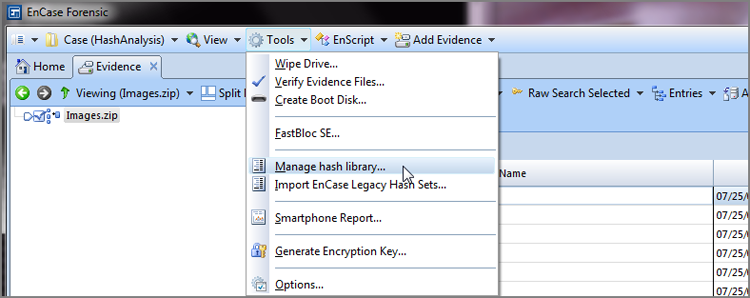
Now that you’ve created a folder structure to contain your custom hash sets and also created an NSRL hash library, the next step is to manage your hash sets. From here, you can create, open, edit, import, or export hash libraries and sets. To open the hash library manager, go to the Tools menu on the application toolbar and choose Manage Hash Library, as shown in Figure 8-16
Figure 8-16: Hash library manager on Tools menu
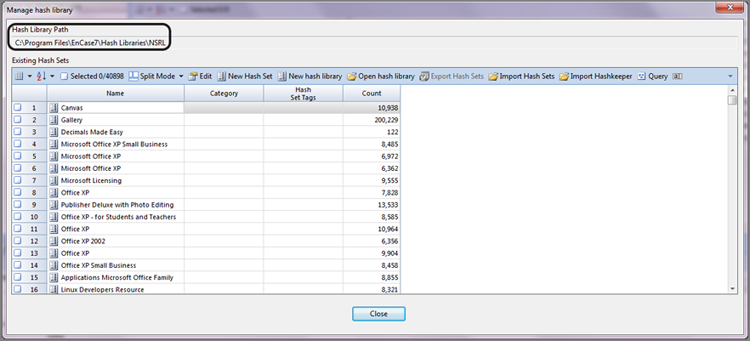
The first step is to open the NSRL hash library you just added. To do so, click Open Hash Library from the toolbar, and browse to the NSRL folder just created, as shown in Figure 8-17. Once it’s open, you’ll see the list of NSRL hash sets in this open library, as shown in Figure 8-18.
Figure 8-17: Opening a hash library
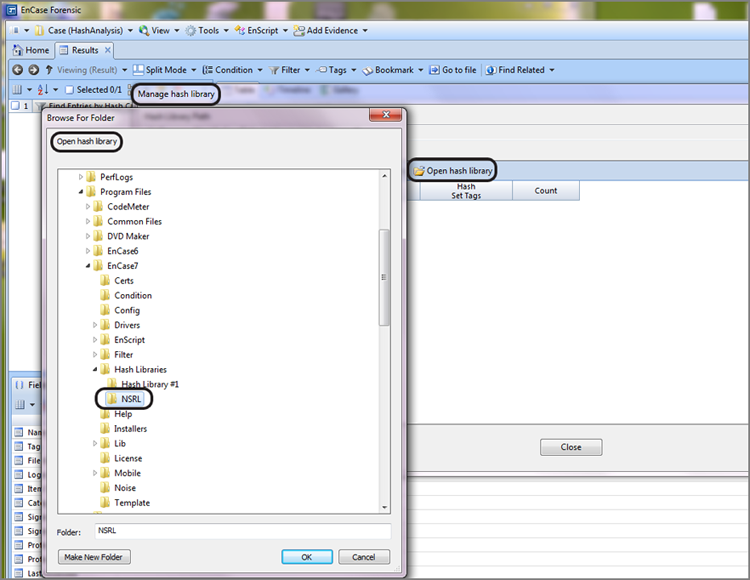
Figure 8-18: NSRL hash library open
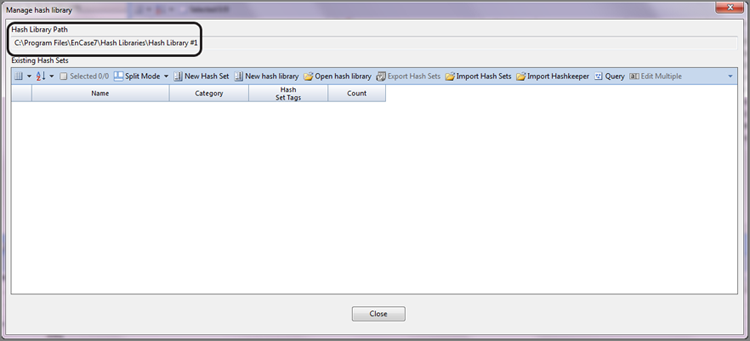
Now that you’ve opened an existing hash library, let’s next create a new hash library in the contained folder you created, named Hash Library #1. From the Hash library manager, click New Hash Library and browse to the folder you created a few moment ago, as shown in Figure 8-19. Once you’ve directed EnCase to the path of your container folder (the new hash library), click OK. EnCase informs you that a hash library has been created at that location, as shown in Figure 8-20. If you look at the contents of that once empty container folder, you’ll find that it has just been populated with the hash library database files, even though it’s currently void of any hash sets, as shown in Figure 8-21. If you take note of your hash library manager, you’ll see that the hash library you just created is open, but that it is also empty, with no hash sets yet in the newly created database, as shown in Figure 8-22.
Figure 8-19: Creating a new hash library
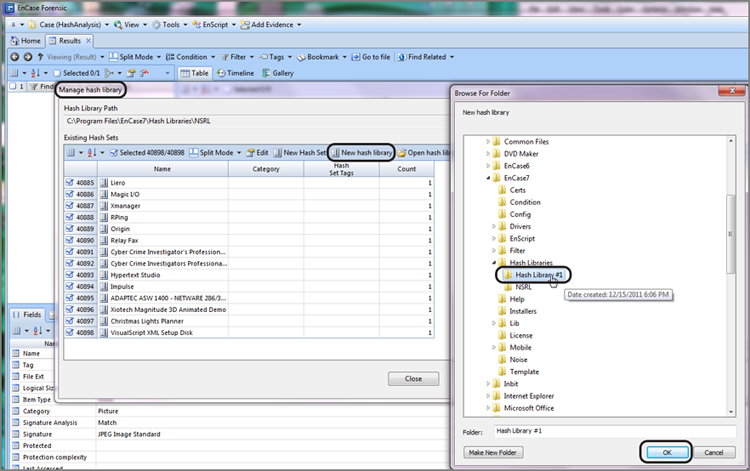
Figure 8-20: Message indicating successful creation of new hash library with path
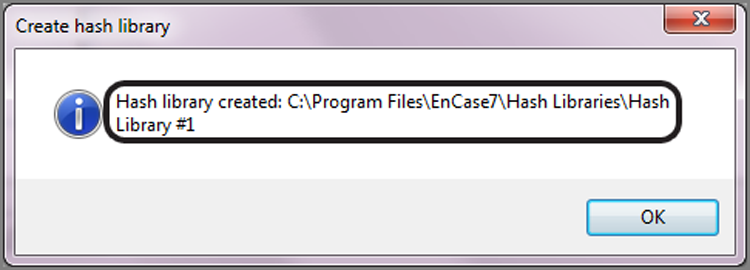
Figure 8-21: Hash library database files just created
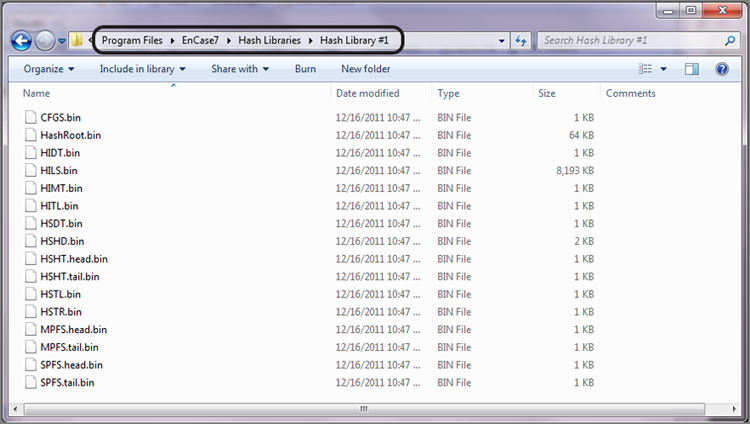
Figure 8-22: The new hash library is open, but it doesn’t contain any hash sets at this point.
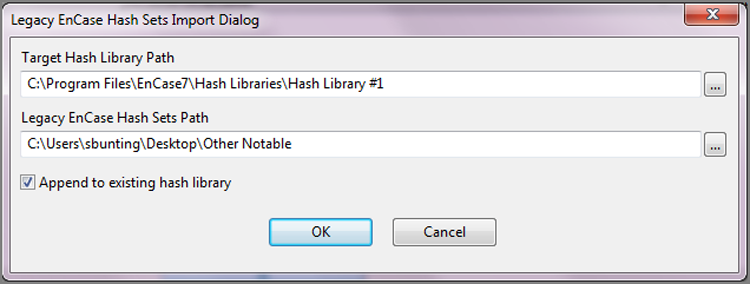
You may have collected large volumes of hash sets over your forensic careers using EnCase. As you’ve now surmised, EnCase 7 uses a much different format, and you are probably thinking you’ve lost your valued hash sets, but don’t worry—EnCase 7 has a tool to import legacy hash sets quickly and easily. If you look immediately under Manage Hash Library in the Tools menu, you’ll find another tool named Import EnCase Legacy Hash Sets, shown in Figure 8-16. Click that menu item, and you’ll see a dialog box as shown in Figure 8-23. You need to provide the path to your target hash library and to your legacy or source path containing your old or legacy hash sets. Make sure to place a check mark in the box directing EnCase to append the hash sets to the existing hash library. Click OK, and the process should be very quick.
Figure 8-23: Importing legacy hash sets into EnCase 7
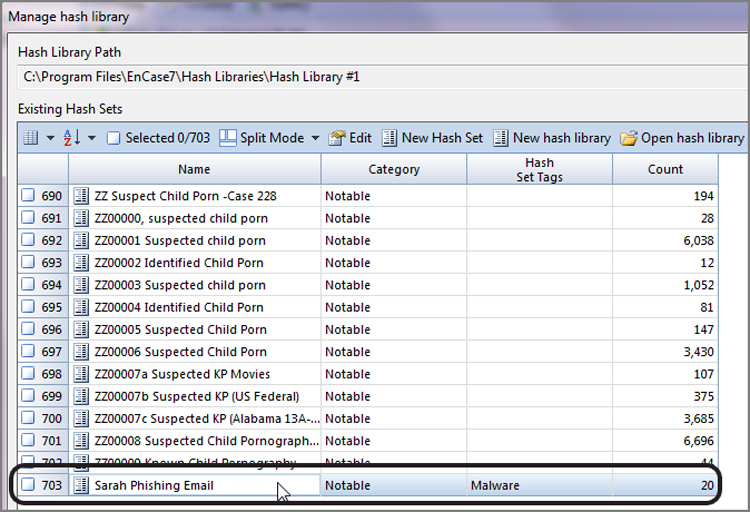
At this point, you can open the hash library manager to which you imported and view your legacy hash sets now in Encase 7, as shown in Figure 8-24. You will note that Notable was in the legacy hash sets and imported into the Category column. The Hash Set Tags column is new, and I edited that column according to the various types of hash sets.
Figure 8-24: Legacy hash sets imported into EnCase 7 hash library

From the hash library manager interface, you can export selected hash sets, import hash sets, import Hashkeeper hash sets, and run queries against the open hash library database. Most of these are fairly straightforward operations; however, the ability to conduct queries is new to EnCase 7 and can be a very useful utility. Sometimes you have a file and its hash, or sometimes just a hash, and want to see whether it is known to your hash collection without subjecting the entire set of evidence files to processing just to find out.
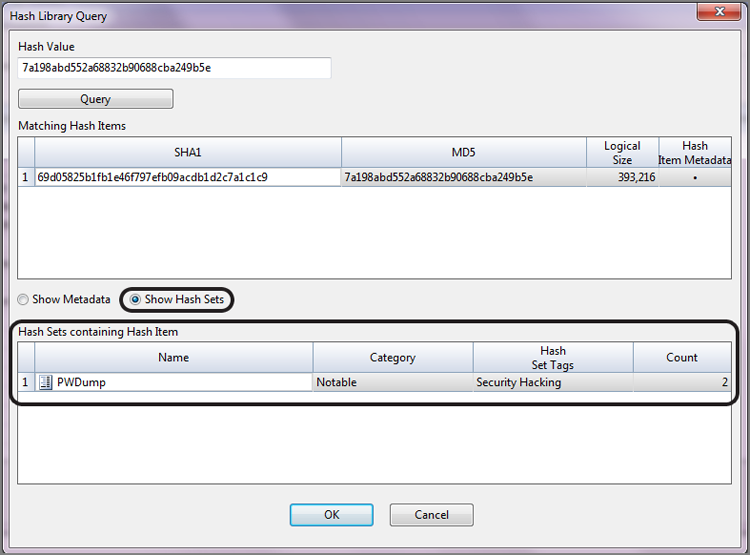
To make a query, simply copy the file’s hash value (MD5 or SHA1). Then, from within the hash library manager, launch the query from the toolbar and paste the hash value in the window so labeled. Next, click the query button; if the value is present, you’ll see the results, as shown in Figure 8-25. By default, the view will be of the metadata, as shown in Figure 8-25. Figure 8-26 shows the other view, which is of the hash sets. If no hash set is found in the database, you will see nothing returned. You can query only the open database, so if you have multiple hash libraries, you’d need to open each one and make the query.
Figure 8-25: Querying the open hash library for an MD5 hash

Figure 8-26: Alternate view showing hash sets instead of metadata
At this point, you’ve used the hash library to create hash libraries, import legacy data into hash libraries, and create an NSRL hash library. You’ve also seen how to query the hash library. Let’s suppose you want to create a hash set and add it to one of your libraries. First, you must have a set of files that have hashes. Hashes are created when running the EnCase Evidence Processor, which is one way of generating hashes. However, there can be times when you want to create a hash set very quickly. There is a way of hashing selected files. In fact, the same tool allows you to just as quickly and easily run file signatures.
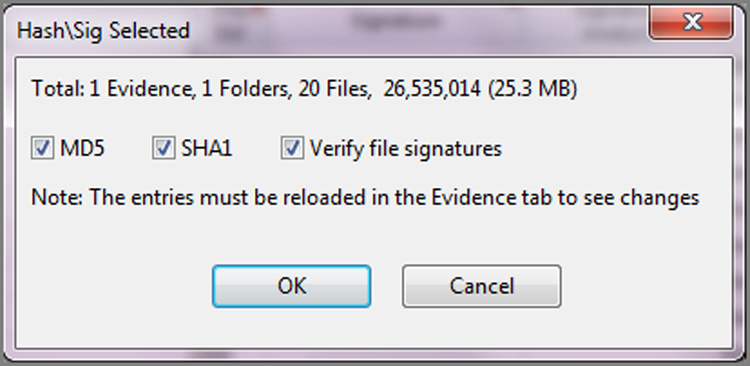
To do so, select (blue check mark) the files you want to hash. In my example, I have dragged and dropped a folder containing malware into EnCase, and the Single Files container automatically launches and contains these files. I have selected them so that I can act upon that selection. Next, I open the Entries menu on the Evidence toolbar and select Hash\Sig Selected, as shown in Figure 8-27. In the resulting dialog box, you can choose MD5, SHA1, and/or Verify File Signatures, as shown in Figure 8-28. I have chosen all three options in our example and clicked OK to finish.
Figure 8-27: Hashing or running file signatures on selected files
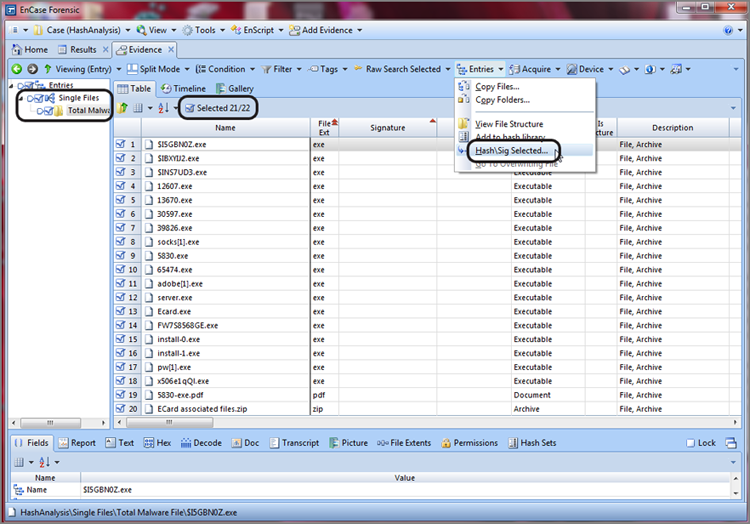
Figure 8-28: Options for hashing and file signatures
The hash values will not populate in the current view without additional user action. Click the green back button to go back to the Evidence Table tab, and double-click the evidence item to reopen it such that you are viewing the entries again, however this time with the updated hash information populated, as shown in Figure 8-29. You can see that both MD5 and SHA1 hashes were generated. Now that you have hash values for your files, you can create a hash set.
To create a hash set, you must select the files to be included in the set with blue check marks. Figure 8-29 shows that selection having been made. Next, click the Entries again, and this time select Add To Hash Library, which you will observe in Figure 8-27 to be directly above the Hash/Sig Selected tool. Next you will see the Add To Hash Library dialog box shown in Figure 8-30. At the top, you need to choose which hash library will contain the set. I have selected my secondary hash library.
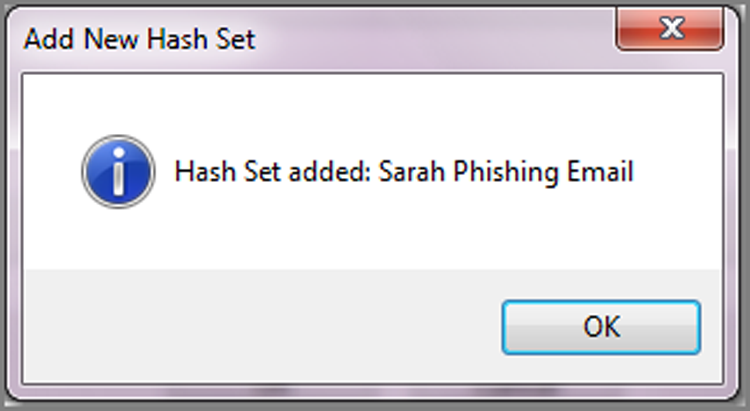
On the right side, you can choose the metadata to include with each record in the hash set. The default selections (Name, Logical Size, MD5, and SHA1) are almost always adequate. The final decision is picking which hash set to place the new hashes. You can select an existing hash set with a blue check mark, or you can create a new one into which you can place the hashes. To create a new hash set, right-click anywhere in the Existing Hash Sets table area and choose New Hash Set, as shown in Figure 8-31. In the Create Hash Set dialog box, shown in Figure 8-32, give it a Hash Set Name, a Hash Set Category, and any Hash Set Tags to describe the contents. Click OK to create new set, and a message indicating successful completion should appear, as shown in Figure 8-33.
Figure 8-29: MD5 and SHA1 hashes created
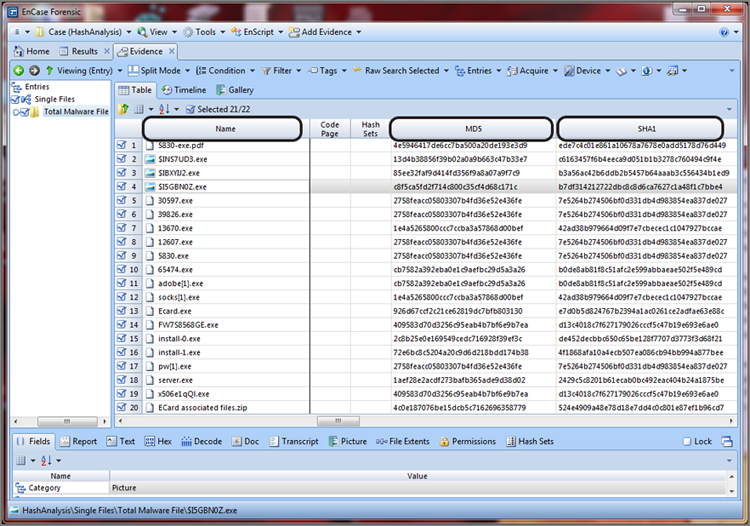
Figure 8-30: Add To Hash Library dialog box
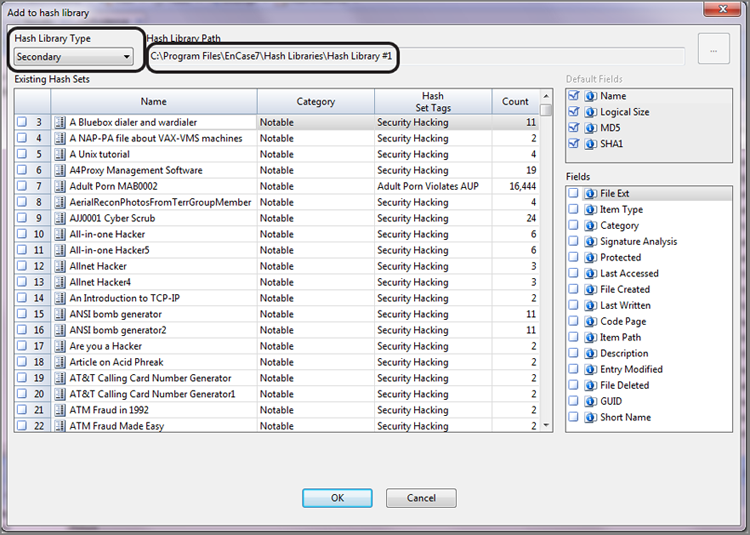
Figure 8-31: Creating a new hash set
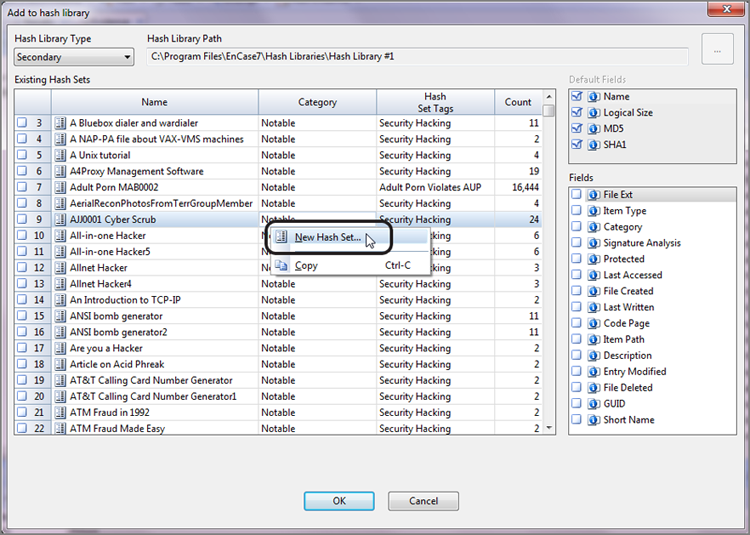
Figure 8-32: Providing new hash set with name, category, and hash set tags
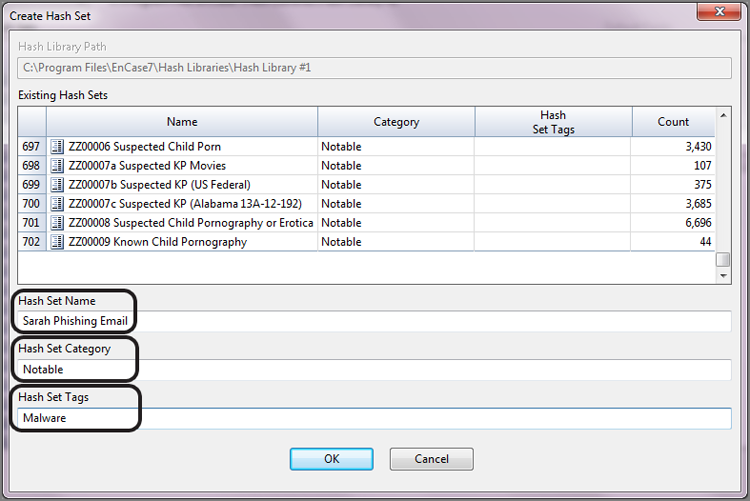
Figure 8-33: Successful creation of new hash set
Once the new set is created, select the new set to contain the new hash sets, and click OK, as shown in Figure 8-34. When you do, the dialog box will disappear as the new hash set is created. Of course, some of us, including me, like to know that the set was created. To do so, simply open the hash library manager and check the hash library to make sure, as shown in Figure 8-35.
Figure 8-34: New hash set selected to receive new hash set

Figure 8-35: Verifying new hash set in hash library manager
Hash Analysis
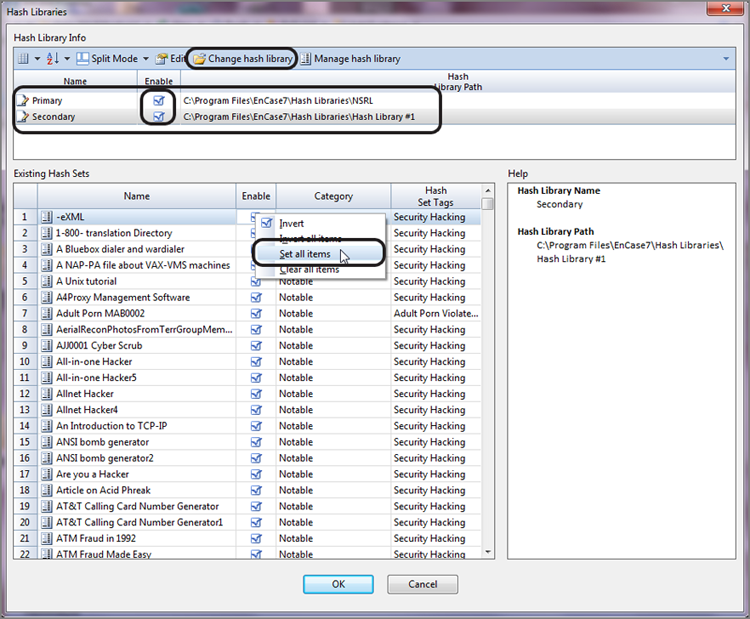
So far, you have created hash libraries and created hash sets, but you have as yet to apply given hash libraries and hash sets to a particular case. Until you do, there are no comparisons being made between hash values of files in your evidence with hash values found in your libraries. You apply the hash libraries from the Home screen for the particular case. In this example, I have a case named HashAnalysis open, and on the Home screen for this case, there is an option named Hash Libraries, as shown in Figure 8-36.
The resulting Hash Libraries option is the location by which you identify and select up to two hash libraries to apply to your case. The first time you use EnCase, you have to use Change Hash Library to identify the path to your two libraries (or just one if you so choose). Once you select the paths, you need to enable them with a blue check. Finally, you’ll need to select which hash sets within the libraries to include. If you right-click within the “existing hash sets” table area, you’ll get a menu that allows you to select all items, among other options, as circled and shown in Figure 8-36. When you are satisfied with your choices, click OK to apply the hash libraries to your case.
Figure 8-36: Hash Libraries option on Home screen of open case
Before you can benefit from hashes and hash libraries, you must first hash the files in your case. As you should recall, there are two methods to hash your files. One is using the Evidence Processor, as shown in Figure 8-6, and the other is to select files and to choose Hash/Sig Selected, as shown in Figure 8-27. Once the hashing is complete, you can analyze the results by one of several methods.
![]()
You may recall during your search options that you can save time by opting to not search in the file content areas of files that were found in the hash libraries. This is a great “under-the-hood” benefit derived from hashing your files and maintaining extensive hash libraries.
With your hashing completed and your libraries applied to your case, you are now able to view the results of your hash analysis. At the most basic analysis level, any file that has a hash value appearing in the active hash libraries will have a positive Boolean value in the Hash Set column, as shown in Figure 8-37. In this example, an executable file named Ecard.exe was downloaded while following a link in a phishing email. It is malware and has been identified as such in my hash set; because it is malware, I have placed it in a Notable category, on which I can later filter. When a file’s hash appears in the hash library, the information regarding its hash set is available on the Hash Set tab of the View pane. From this view, you can see the properties of the hash set.
Figure 8-37: View of file with hash value in hash library, including the Hash Sets tab in View pane

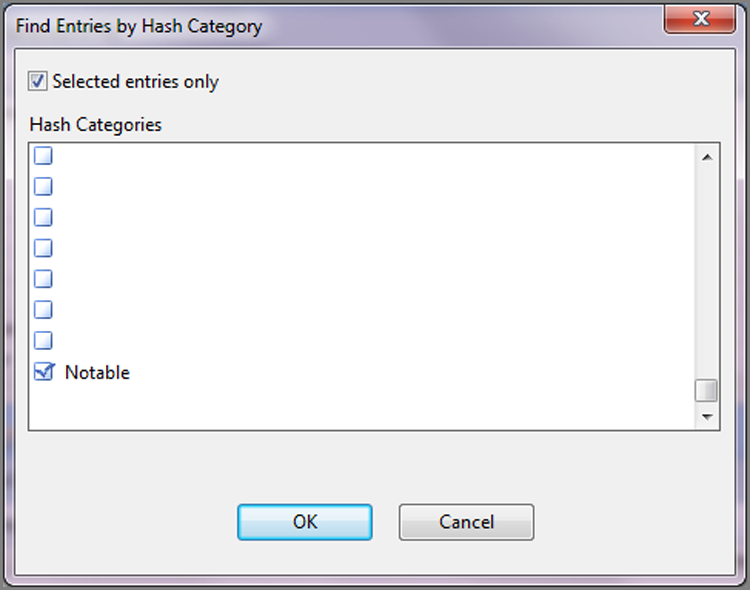
EnCase has a filtering tool that enables you to filter on hash categories. From the Evidence tab toolbar, open the Filter drop-down menu and choose Find Entries By Hash Category, as shown in Figure 8-38. In the screen that follows, accept the defaults, including the Run Filter On All Evidence In Case option, and click OK. In the screen that follows (Find Entries By Hash Category), you will find a listing of all available categories. In my example, I have located the Notable category, selected it, as shown in Figure 8-39, and finally I will click OK to apply the filter.
Figure 8-38: Running the Find Entries By Hash Category filter
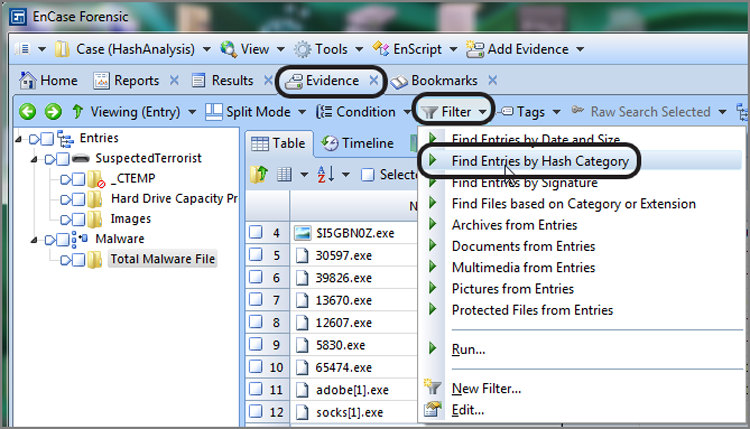
Figure 8-39: Selecting Notable hash category
Once the filter has been applied, you will be taken to the results tab where you can work with the filtered set of files in much the same manner as you can on the Evidence tab.
![]()
Legacy versions of EnCase built a hash library from selected hash sets and, in doing so, deduplicated hash sets as they were added. Thus, if a hash appeared in multiple hash sets, only the first one added would be included in the hash library. This was done for performance but excluded potentially important information. For example, if a hash appearing as known in an NSRL hash set were added first, a subsequent identical hash value listing the hash as notable would be excluded. Thus, you had to be careful about the order in which hash sets were added to the hash library. With EnCase 7, if a hash value appears in multiple hash sets, you will see a report that indicates every hash set in which the hash appears. EnCase 7’s improved database structure affords a much higher performance level along with greater extensibility and information.
![]()
When you select hash sets for inclusion in the hash library and you subsequently conduct an analysis using those hash values, you are locating files meeting criteria contained in those hash values. Thus, you are imposing a search on the files in the case. When selecting hash sets for inclusion in your hash library, make certain you are within the scope of your search authority, whatever that may be in your particular case. Let’s assume your search authority in a case was limited to evidence relating to embezzlement. If you included known child pornography hash sets in your hash library and located child pornography using hash analysis, you have most likely exceeded the scope of your search authority in most jurisdictions. Make sure hash sets that are in your hash library are included or covered within the scope of your search authority!
![]()
You can use the EnCase filter for various hash categories, including queries on Known and Notable (or any other category you create). For these conditions to produce accurate results, be sure to exercise care with case and spelling when creating and importing hash sets. More than once, I’ve seen these categories incorrectly spelled while importing hash sets from examiners who are super folks and willing to share their work, but unfortunately there is no spell checker within most forensic tools.
Hash analysis can help you cut down on searches by eliminating known files. It can also assist you in rapidly locating files that can be identified from databases of known contraband or inappropriate content files, such as child pornography, adult pornography, hacking tools, and the like. Keep your hash sets up-to-date and share them when you develop unique sets. You should conduct your hash analysis early on in your case so the benefits can be realized from that point forward in your examination.
Summary
In this chapter, I covered file signature analysis and hash analysis. File signature analysis is a tool or process used within EnCase to identify a file by its header information, if it exists, rather than by the default method, which is file extension. File header and extension information is stored in a database in the file FileTypes.ini. File signature information can be added, deleted, or modified in the File Types view, which is a global view.
Until a file signature analysis is run, which occurs by default when the EnCase Evidence Processor runs, EnCase relies on a file’s extension to determine its file type, which will in turn determine the viewer used to display the data. Once a file signature analysis is run, EnCase will view files based on file header information and not based on file extension. This is critical for viewing files whose extensions are missing or have been changed.
After a file signature analysis has been run, EnCase reports the results in the Signature and Signature Analysis columns. If a file’s header and extension information are correct and match the information in the database, EnCase will report a match. If there is no matching header for a file and no matching extension, EnCase will report the file as Unknown. If a file’s extension is in the database, the file’s header does not match the header in the database for the file’s extension, and further does not match any other header in the database, EnCase will report the file as having a Bad Signature. Finally, if a file’s header is in the database and the extension is missing or doesn’t match for the header, the signature has precedence in determining file type, and the file’s true signature is reported in the Signature column with the word Alias appearing in the Signature Analysis column.
File hashing and analysis, within EnCase, are based on the MD5 hashing algorithm in addition to the SHA1 hashing algorithm. When a file is hashed using the MD5, the result is a 128-bit value. The odds of any two dissimilar files having the same MD5 hash is one in 2128, or approximately one in 340 billion billion billion billion. Using this method, you can safely statistically infer the file content will be the same for files that have identical hash values, and the file content will differ for files that do not have identical hash values.
The MD5 or SHA1 hash thus forms a unique electronic fingerprint by which files can be identified. Using this method, files are hashed and collected in sets for files having similar characteristics. These groupings of hash values are called hash sets. Each set is given a name describing the group of files represented by the hash values. Furthermore, each hash set is assigned to a hash category, usually Known or Notable. A hash library contains a series of hash sets.
Files are hashed from within the EnCase Evidence Processor or from the Evidence tab’s Entries menu tool named Hash\Sig Selected. Once files have been hashed and have hash values, you can create hash sets by selecting files and choosing Add To Hash Library from the Entries menu on the Evidence tab toolbar. Hash sets are stored in the databases of the EnCase hash libraries.
Hash sets are managed from the hash library manager. Hash sets can be added and edited from within this management tool. Also from this tool, hash sets can be imported from NSRL or Hashkeeper hash databases. From this view, selected hash sets are placed into the hash library, which is a collection of hash sets. Hash libraries are applied to a case from the Home screen for any given open case. Up to two libraries can be used with any case. From within the Hash Libraries dialog box, individual hash sets within hash libraries can be enabled or not.
Once files have been hashed, each file’s hash value is listed. If, during the comparison process, the hash value matches any value in the hash library, a positive result will appear in the Hash Sets tab in the bottom pane, with the properties of the hash set(s) in which the value is included. Using this hash analysis, you can identify known files of various types. Known system and program files can be eliminated from further examination and searching, thereby saving time. Files that are notable for various reasons (hacking tools, contraband files, and so on) can be identified, and the appropriate action can be taken.
Hash analysis and file signature analysis both should be carried out at the beginning of your examination so that their benefits can be utilized at the outset, and they are included in the Evidence Processor for this reason. Reporting or output from the file signature can be analyzed by sorting on appropriate columns. In addition, various filters are available to assist with both file signature analysis and hash analysis. Both tools provide information to EnCase internally and to the examiner that greatly assists in the speed and accuracy of the examination process.
Exam Essentials
Know and understand the file signature process. Understand and explain what a file header is. Be able to explain what a file extension is and how it is used in a Windows environment. Understand how a file type and category are determined before and after the file signature analysis process. Understand how EnCase views files and the importance of the file signature analysis to the proper viewing of file types.
Understand the purpose and function of the File Types view. Know where the file types database is stored (FileTypes.ini). Explain how a file signature is created, modified, or deleted. Be able to explain what information is stored in a file signature record.
Understand and interpret the results of the file signature analysis. Know and understand what constitutes a file signature match, a bad signature, an unknown signature, and a file signature alias. Explain how to use EnCase’s column sorting features or file signature filter to analyze or view the results of the file signature analysis.
Know and understand file hashing and analysis. Understand and be able to explain the MD5 and SHA1 algorithm. Know the length of an MD5 hash and the approximate odds of any two dissimilar files having the same MD5 hash value. Explain the significance of files having the same or different hash values. Explain the concept of an MD5 hash being an electronic fingerprint.
Know and understand what constitutes a hash set. Explain how to hash a file. Explain what a hash set is and how it is created. Understand and be able to describe the process of naming and categorizing hash sets. Know where hash sets are stored and be able to explain their filenaming convention.
Understand the purpose and function of the hash library manager. Explain what tasks can be carried out in the hash library manager. Understand and be able to explain the difference between hash sets and hash libraries. Explain the purpose of the hash library and how one is created.
Understand and interpret the results of a hash analysis. Be able to explain what it means when a file has a hash value that returns a Notable value. Explain the importance of hash analysis in reducing search times. Explain how to use a filter to locate files with a Notable hash category.
Review Questions
1. When running a signature analysis, EnCase will do which of the following?
A. Compare a file’s header to its hash value.
B. Compare a file’s header to its file signature.
C. Compare a file’s hash value to its file extension.
D. Compare a file’s header to its file extension.
2. A file header is which of the following?
A. A unique set of characters at the beginning of a file that identifies the file type.
B. A unique set of characters following the filename that identifies the file type.
C. A 128-bit value that is unique to a specific file based on its data.
D. Synonymous with file extension.
3. The Windows operating system uses a filename’s ______________ to associate files with the proper applications.
A. signature
B. MD5 hash value
C. extension
D. metadata
4. Unix (including Linux) operating systems use a file’s ______________ to associate file types to specific applications.
A. metadata
B. header
C. extension
D. hash value
5. The Mac OS X operating system uses which of the following file information to associate a file to a specific application?
A. The “user defined” setting
B. Filename extension
C. Metadata (creator code)
D. All of the above
6. Information regarding a file’s header information and extension is saved by EnCase 7 in the _______________ file.
A. FileTypes.ini
B. FileExtensions.ini
C. FileInformation.ini
D. FileHeader.ini
7. When a file’s signature is unknown and a valid file extension exists, EnCase will display the following result after a signature analysis is performed.
A. Alias (Signature Mismatch)
B. Bad Signature
C. Unknown
D. Match
8. When a file’s signature is known and the file extension does not match, EnCase will display the following result after a signature analysis is performed.
A. Alias (Signature Mismatch)
B. Bad Signature
C. Unknown
D. Match
9. When a file’s signature is known and the file extension matches, EnCase will display the following result after a signature analysis is performed.
A. Alias (Signature Mismatch)
B. Bad Signature
C. Unknown
D. Match
10. When a file’s signature and extension are not recognized, EnCase will display the following result after a signature analysis is performed.
A. Alias (Signature Mismatch)
B. Bad Signature
C. Unknown
D. Match
11. Can a file with a unique header share multiple file extensions?
A. Yes
B. No
12. A user can manually add new file headers and extensions by doing which of the following?
A. Manually inputting the data in the FileSignatures.ini file
B. Right-clicking the file and choosing Add File Signature
C. Choosing the File Types view, right-clicking, and selecting New in the appropriate folder
D. Adding a new file header and extension and then choosing Create Hash Set
13. Select the correct answer that completes the following statement: An MD5 hash _________________.
A. is a 128-bit value
B. has odds of one in 2128 that two dissimilar files will share the same value
C. is not determined by the filename
D. All of the above
14. EnCase can create a hash value for the following.
A. Physical devices
B. Logical volumes
C. Files or groups of files
D. All of the above
15. With EnCase 7, how many hash libraries can be applied at one time to any case?
A. One
B. Two
C. Three
D. No limit to the number that can be applied
16. Will changing a file’s name affect the file’s MD5 or SHA1 hash value?
A. Yes
B. No
17. Usually a hash value found in a hash set named Windows 7 would be reported in the Hash Category column as which of the following?
A. Known
B. Notable
C. Evidentiary
D. Nonevidentiary
18. With regard to hash categories, evidentiary files or files of interest are categorized as which of the following?
A. Known
B. Notable
C. Evidentiary
D. Nonevidentiary
19. An MD5 or SHA1 hash of a specific media generated by EnCase will yield the same hash value as an independent third-party MD5 or SHA1 hashing utility.
A. True
B. False
20. A hash _______ is comprised of hash _______ , which is comprised of hash _______.
A. set(s), library(ies), value(s)
B. value(s), sets(s), library(ies)
C. library(ies), set(s), value(s)
D. set(s), values(s), library(ies)
All materials on the site are licensed Creative Commons Attribution-Sharealike 3.0 Unported CC BY-SA 3.0 & GNU Free Documentation License (GFDL)
If you are the copyright holder of any material contained on our site and intend to remove it, please contact our site administrator for approval.
© 2016-2026 All site design rights belong to S.Y.A.