EnCase Computer Forensics (2012)
Chapter 9
Windows Operating System Artifacts
EnCE Exam Topics Covered in This Chapter:
· Windows dates and times
· Adjusting for time zone offsets
· Recycle Bin and INFO records
· Windows Recycle Bin
· Link files
· Windows folders
· Recent folder
· Desktop folder
· My Documents folder
· Send To folder
· Temp folders
· Favorites folder
· Windows Low folders
· Cookies folder
· History folder
· Temporary Internet files
· Swap file
· Hibernation file
· Printing artifacts
· Windows volume shadow copy
· Windows event logs
Not many years ago, when Microsoft was announcing the release of Windows XP, many examiners were proclaiming the end of computer forensics. They claimed that the new security features of Windows XP were going to virtually eliminate all forms of artifacts and other evidence. Of the folks making these dire warnings, some were among the “who’s who” of computer forensics. Windows XP arrived, and just like its predecessor (Windows 2000), it offered more operating system artifacts than did any release of Windows to date.
Even as XP artifacts were still being discovered, Microsoft released Windows XP’s replacement, which was Windows Vista. Because Vista was not exactly well received, it was eventually replaced by Windows 7. Although Windows Vista and 7 changed some parts of the forensic landscape, others remain unchanged. Just as with all releases of Windows, Windows Vista and 7 have provided their fair share of new artifacts, and others will no doubt be discovered incrementally over the next few years as examiners test, probe, hack, reverse engineer, and so forth.
Because the term artifacts may not be a familiar term for some, here’s what they are in a nutshell. As operating systems grew more complex, they simply stored more data. As operating systems evolved, paradoxically their user interface had to simplify so that computers could be used easily by users with few or no computer skills. To facilitate this interface and its ease of use, the operating system had to store even more information about the user, such as their actions, preferences, and credentials. The result of such data storage is an environment that is loaded with artifacts, which take the form of logs, files, lists, passwords, caches, history, recently-used lists, and other data. Some is in plain text, some is obscured, and some is encrypted (albeit weak encryption in far too many cases). As a general category or label, you refer to this type of data or information as operating system artifacts. Most important, you can use this data as evidence to identify users and their computing activities.
The subject of Windows operating system artifacts could well fill several books. Clearly such an endeavor is well beyond the intent and purpose of this guide. In this chapter, the focus is on developing a solid understanding of the more common operating system artifacts rather than trying to cover them all.
Dates and Times
It is difficult to approach any Windows operating system artifact without some prior appreciation for how Windows stores and uses dates and times. Dates and times are ubiquitous on any modern operating system. Their uses are countless, and their storage formats vary. Sometimes they are stored in local time and sometimes in Greenwich mean time (GMT, also known as Universal Time or Zulu Time). Sometimes, usually involving Internet-related data, the times are local to the time zone where they were generated and not necessarily local to the host computer. If there was ever a topic that will cause you to pause and scratch your head in this business, the time issue is at or near the top of the list.
You need only look at the forensic list serves and message boards to see the questions related to date and time stamps. Although it is great to pose questions and have them answered by other examiners, there is no substitute for research and testing by the individual examiner. Once you have tested and validated your findings, only then will you have a true understanding and firsthand knowledge because, until then, it is only hearsay!
Time Zones
Before attempting to understand how time is stored and interpreted, you must first understand the context in which it is being interpreted. By context, I’m referring to the time zone reference in which the time was stored. Because the world is divided into time zones and computers must keep track of time relative to those time zones, the various operating systems must implement methods to account for time zone differences. In order to accurately interpret date and time stamps, you must understand how operating systems and EnCase resolve these differences. Although each operating system has its own method, I’ll limit this discussion to the Windows operating systems.
For Windows file-attribute dates and times (modified, accessed, and created, which are often called MAC times) the file system in use determines whether the date and time is stored in local time or in GMT.
When date and time stamps are recorded in a FAT file system, they are stored in the 32-byte DOS directory entry in local time, which is the time for the time zone for which the computer is configured. This system was developed when computing was more local and less global.
As computing became more global and the Internet evolved, Microsoft developed the NTFS file system and with it implemented a more elaborate and yet more logical time storage scheme. Dates and times stored for file creation, last written, last accessed, and last entry modified are stored in GMT using a 64-bit Windows date and time stamp. The operating system displays dates and times to the user based on the local time zone offset, which is normally set when the system is first configured but can be adjusted at any time.
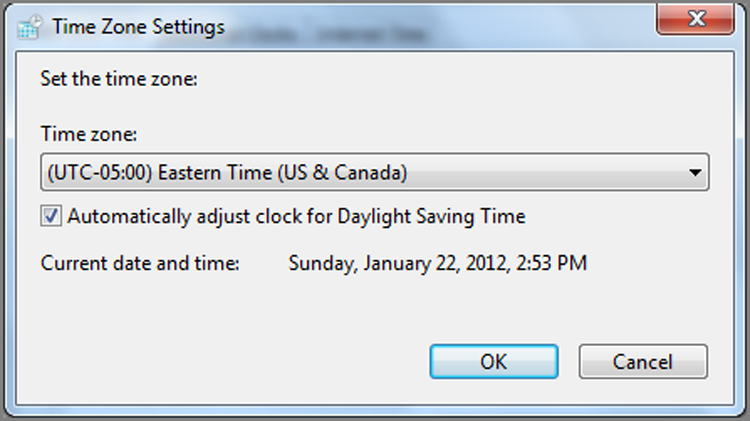
Just because a computer was seized in a particular time zone does not mean it is configured for that time zone. Figure 9-1 shows the Windows dialog box in which the time zone is set. Because computers can be moved from one zone to another, incorrectly configured, or deliberately altered, the time and time zone offset may not be accurate. To resolve these issues, you need to know the machine’s BIOS time and the time zone offset for which it is configured so you can apply the correct time zone offset to your case.
Figure 9-1: Windows 7 Time Zone Settings dialog box showing the Time Zone drop-down on which the user sets the local time zone
Prior to EnCase 4, you had to change the time zone offset of your examination machine (using the dialog box such as that shown in Figure 9-1) to match the time zone of your evidence. Starting with EnCase 4, there is an interface by which the examiner can set a time zone offset at the case or device level so all devices in a case are in proper time zone synchronization.
Aside from MAC times, as a general rule, you will find that today’s Windows operating systems store most, not all, dates and times in GMT. These include dates and times stored in the registry, Internet history databases, and other operating system artifacts. Generally, you’ll be looking to a published source to make such determinations. At other times, you’ll be on your own to test and validate the data to make the determination.
Windows 64-Bit Time Stamp
Before I cover determining time zones and actually making adjustments, let’s first examine the Windows 64-bit date and time stamp. This time stamp is one you’ll learn to spot at a glance as you gain experience. Figure 9-2 shows a 64-bit Windows time stamp. It is an 8-byte string (64 bits), and its most significant value is 01h, which is located at the far right of the string because it is stored in little endian. As you’ll recall, little endian values are calculated from right to left; thus, the most significant byte is on the right. This is the first value entered and calculated.
Now that you understand what the time stamp looks like, I’ll discuss how it tracks time. I’ll start with a concept I’ve already covered. If you’ll recall, a Unix time stamp is a 32-bit integer value that represents the number of seconds that have lapsed since epoch, which is January 1, 1970, 00:00:00 GMT. It’s an incredibly simple concept, and with a little math, you can figure out that the most number of seconds that can be represented by this value is 232, which is the integer value 4,294,967,296.
Figure 9-2: The Windows 64-bit time stamp with the most significant bit (01h) stored to the far right of the 8-byte string
On Monday, December 2, 2030, at 19:42:58 GMT, 4,294,967,296 seconds will have lapsed since epoch, and the Unix time stamp will no longer be able to track time. No doubt a new time scheme will replace it, but with everything in computing, legacy issues seem to always persist and cause problems in unanticipated ways. As that time draws near, approximately 23 years from now, you can probably expect another event similar to Y2K.
![]()
Just because the Unix time stamp uses the label Unix, do not think this date format is limited to Unix machines. The Unix time stamp is used on many platforms and is used heavily on the Internet. You should expect to find the Unix time stamp frequently on Windows-based machines.
With that understanding of the Unix time stamp, let’s look next at the Windows 64-bit time stamp. Instead of a 32-bit integer used by Unix, Windows uses a 64-bit integer. Rather than tracking seconds like Unix, Windows tracks the number of 100-nanosecond intervals (10-millionth of a second intervals). And finally, instead of starting on January 1, 1970, 00:00:00 GMT like Unix, Windows starts on January 1, 1601, at 00:00:00 GMT.
Some basic math tells you that 264 (64-bit value) can represent a maximum integer value of 18,446,744,073,709,500,000. If you divide this number by the number of 100-nanosecond intervals that tick by in a year (which is a paltry figure at 315,576,000,000,000), you find that this time stamp can address a date range of 58,000 plus years starting at 1601. It is clear that Microsoft was looking to the future when it created this one!
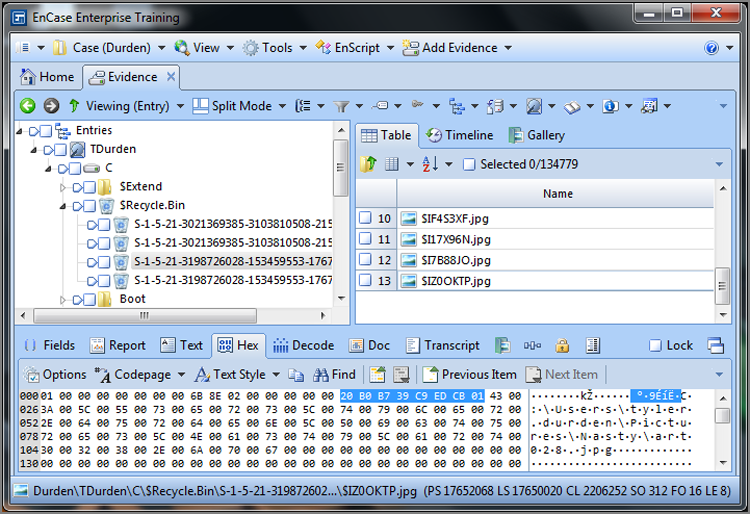
To show this at work, consider the two Windows 64-bit date stamps shown in Figure 9-3. The first one (80 22 07 E3 B0 CB CC 01) is selected, and the second one, which follows immediately (72 C8 E6 CB DA CB CC 01), is circled. These are time stamps appearing in an index.dat file for the daily Internet history. In this particular file, the two time stamps are identical (URL Last Visited times) except that the first date is stored in local time and the second date is stored in GMT. This is one of those cases where Windows deviates from the norm and stores a time in local time. Because the local time offset for this host computer is Eastern (GMT -0500), you would expect the times to differ by exactly five hours if both were normalized and viewed in GMT.
Figure 9-3: Two similar Windows 64-bit time stamps, one stored in local time (first one selected) and the other (second one circled) stored in GMT. Because local time is EST (GMT -0500), the raw time difference between these two time stamps should be exactly five hours.
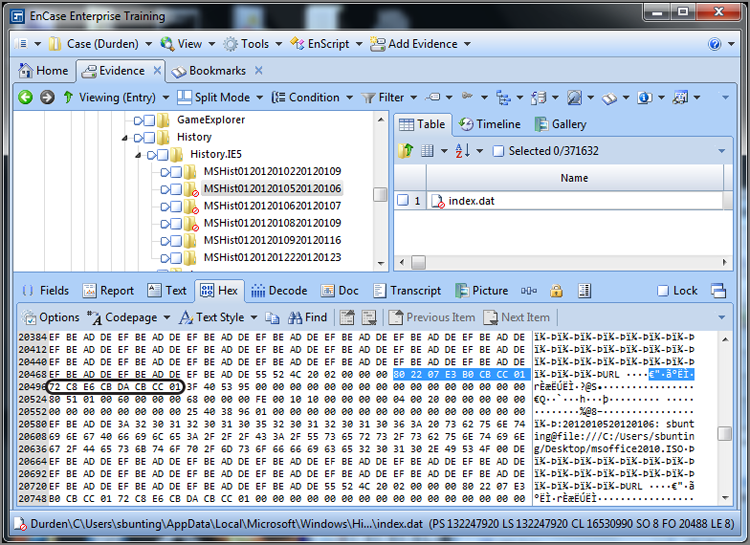
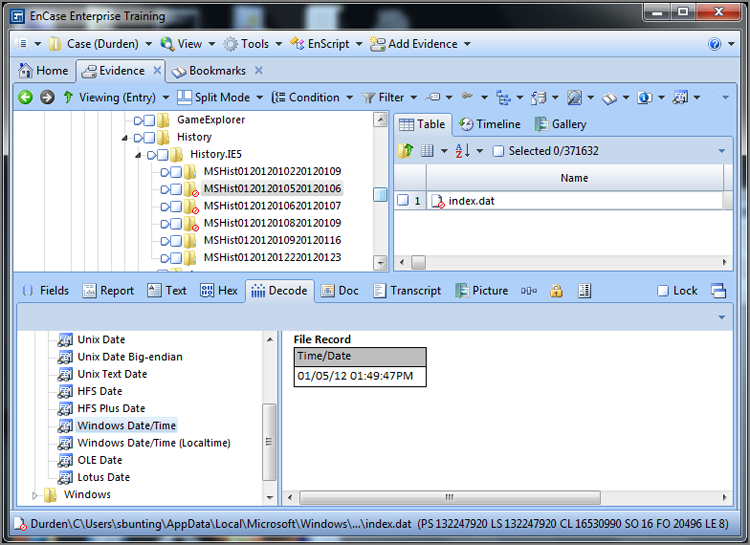
In Figure 9-4, the EnCase Decode feature is used on the selected data. (To use it, select the eight bytes in the Hex view and switch to the Decode view.) When the data is viewed as a Windows date and time, specifically using the local time option, the 64-bit value is resolved to the date and time January 5, 2012, 01:49:47 PM. Users of early versions of EnCase will note that, starting with EnCase 5, EnCase provides for a Windows local time option that was not available in previous versions. The local time option resolves time exactly as it is stored and does not apply the offset from GMT, thus rendering accurately any time stored as Local.
In Figure 9-5, the second time stamp is selected and viewed in the Decode view as a regular Windows date and time. Because this value is stored in GMT, you do not use the local time view. This value correctly resolves to the same date and time as the first date. EnCase applies the local time offset (GMT -0500) to the GMT time that is stored, and both time stamps can be resolved accurately.
Figure 9-4: First time viewed in Decode view as Windows Date/Time (Localtime)
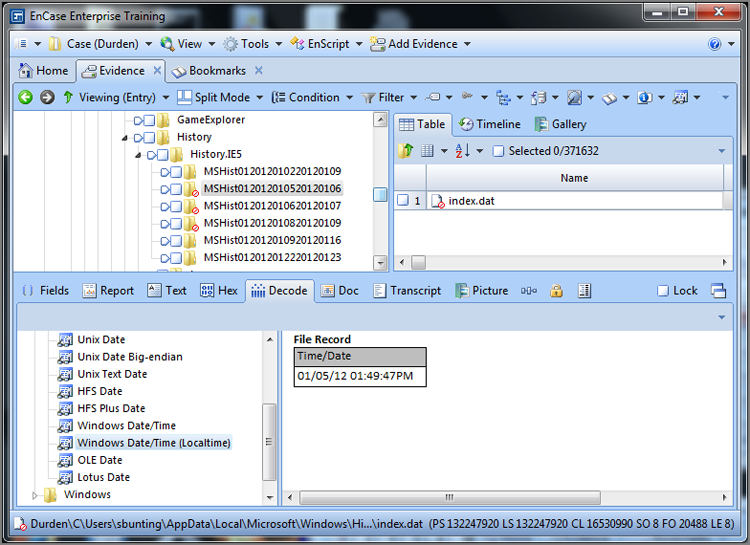
Figure 9-5: Second time viewed in Decode view as Windows Date/Time
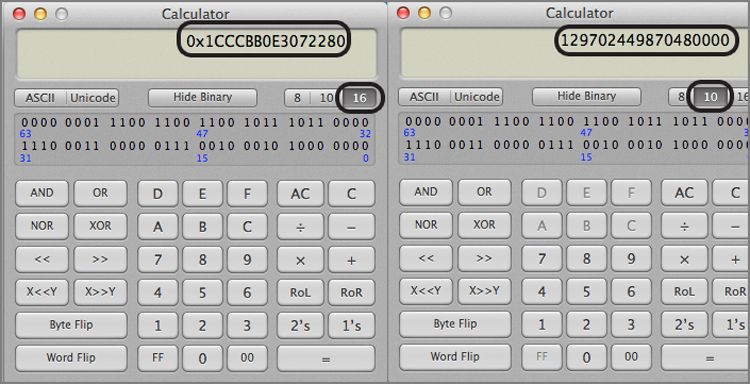
Let’s carry this one step further and look at the exact values that are stored. The first date is the hex string 80 22 07 E3 B0 CB CC 01. EnCase 7 allows you to view this string as a 64-bit integer (via the Decode view). When you do, you will see this value resolve as 129,702,449,870,480,000. You can also enter the value into a calculator (scientific or programming modes). This value is stored in little endian, so if you are using a scientific calculator, you must enter the string in the reverse order, or 01 CC CB B0 E3 07 22 80, as shown in Figure 9-6. After the string is entered in the hex mode (base 16), switching to decimal mode (base 10) or mode converts the hex string to an integer value, which is 129,702,449,870,480,000. If you apply the same methodology to the second date hex string, reversing from little endian to read: 01 CC CB DA CB E6 C8 72) you find that it resolves to an integer value of 129,702,629,871,110,258. These two integer values represent the number of 100-nanosecond intervals since January 1, 1601, 00:00:00 GMT. If you are using EnCase 7, you need only view it as a 64-bit little endian integer in the Decode view.
Figure 9-6: The Windows 64-bit time stamp is entered in a scientific/programming calculator in reverse order because it is stored in little endian format. The left view is the Hex (base 16) view, and the right is the Decimal (base 10) view.
Rather than calculate these two dates from the year 1601, let’s look at the difference between the two time stamps, which still examines the underlying principles and does so with somewhat smaller numbers. If you subtract one integer from the other, you find the difference is 180,000,630,258. Because you know the difference between these two values is five hours, the difference between the two integers should be the number of 100-nanosecond intervals that occur in four hours. Let’s see whether that is true.
You know there are 60 seconds in a minute and 60 minutes in an hour. Therefore, there are 3,600 seconds in one hour. In five hours, there are 18,000 seconds. Because a 100-nanosecond interval is one 10-millionth of a second, you multiply 18,000 seconds by 10,000,000 to convert seconds to 10-millionth seconds. The result is 180,000,000,000 and matches (or nearly so) the difference (180,000,630,258) between the two integers that you know are separated by five hours. The difference is miniscule, measured in nanoseconds, and is caused by the difference in time the system takes to record these two times.
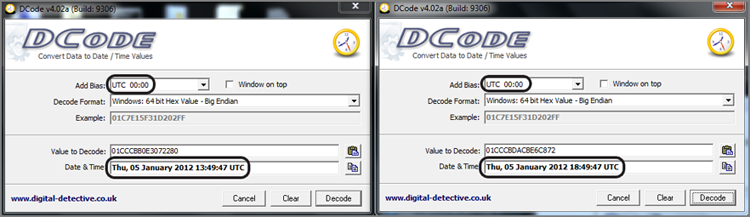
To show that these two hex values differ by five hours (and a few nanoseconds), I have placed both values in a tool named DCode (available free from www.digital-detective.co.uk/freetools/decode.asp) and resolved them both to UTC to normalize them. I would expect them to differ by five hours, and they do, as shown in Figure 9-7. You will note that the few nanoseconds by which they differ do not come into play at this level of granularity. You also know that EnCase is properly interpreting the time stamps and offsets, thus validating the tool.
Figure 9-7: DCode is used to show that raw data timestamps differ by five hours when both viewed as UTC.
Manually calculating Windows 64-bit time stamps is not something most examiners want to do with any degree of frequency, if at all. Fortunately, EnCase provides tools to convert these values for you. There is merit, however, in understanding how such dates are generated and stored. You may be asked some day in court, or you may need to engage in research and validation of data or tools. In either event, you’ll be better prepared if you understand how the calculations are done.
Adjusting for Time Zone Offsets
By now you have an understanding of how Windows stores time stamps, and you also understand the importance of time zone offsets in determining accurate times. It is now time to determine the time zone offset for a system and how to adjust the EnCase environment so it will display properly.
With Windows, the time zone offset is stored in the registry. The registry is a large database of system configuration settings. It is stored in several files and is viewed and manipulated with a registry editor such as regedit, which is a built-in Windows utility. In Chapter 10, I’ll cover the registry in more detail. If you are comfortable mounting and navigating the registry or you want to jump ahead to Chapter 10, you can ascertain the time zone offset manually in the following manner:
1. Determine which control set is the current control set.
Mount the system registry file (SYSTEM) as you would other compound files by highlighting the file and choosing View File Structure from the Entries drop-down menu. Then navigate to System\NTRegistry\Select\Current. View this value as a 32-bit integer value. The value stored here (n) determines which control set is current.
In Windows NT/2000, the system registry key can be found by default in C:\Winnt\System32\Config.
For Windows XP/Windows Server 2003 and 2008/Windows Vista/Windows 7, the system registry key can be found by default in C:\Windows\System32\Config.
2. In the system key, navigate to the control set matching the value found earlier (n), which is the current control set.
3. Under that control set, navigate to System\NTRegistry\ControlSet00n\Control\TimeZoneInformation.
Under that key, there are several values used to establish the local time zone offset. Table 9-1 lists those values and how they are used to determine the time zone offset.
Table 9-1: TimeZoneInformation key values and their meanings
|
Value name |
Data type |
Description |
|
ActiveTimeBias |
32-bit integer |
The number of minutes offset from GMT for the current system time. |
|
Bias |
32-bit integer |
Based on the time zone setting, the number of minutes offset from GMT for that time zone. |
|
DaylightBias |
32-bit integer |
Based on the time zone setting, the number of minutes offset from GMT for that time zone when daylight saving time is in effect. |
|
DaylightName |
Unicode text string |
The name of the time zone for daylight saving time setting. |
|
DaylightStart |
Binary (four 2-byte sets; ignore last 8 bytes) |
Date and time daylight saving time starts in this format: Day | Month | Week | Hour.Day: First two bytes or 16 bits. Evaluate as 16-bit integer. The seven days of the week are numbered 0-6, starting with Sunday (0).Month: Second two bytes. Evaluate as 16-bit integer with months numbered 1-12 (January being 1).Week: Third two bytes. Evaluate as 16-bit integer with weeks numbered starting with 1.Hour: Fourth two bytes. Evaluate as 16-bit integer with hour of the day being when the time will change, based on a 24-hour clock.For an example, see the StandardStart row of this table. |
|
StandardBias |
32-bit integer |
Based on the time zone setting, the number of minutes offset from GMT for that time zone, when standard time is in effect. |
|
StandardName |
Unicode text string |
The name of the time zone for standard time setting. |
|
StandardStart |
Binary (four 2-byte sets; ignore last 8 bytes) |
Date and time standard time starts in the format: Day | Month | Week | HourAll values evaluated as in DaylightStart value. A typical StandardStart value would appear as 00 00 | 0A 00 | 05 00 | 02 00Day = 00 00 = 0 = SundayMonth = 0A 00 = 10 = OctoberWeek = 05 00 = 5 = 5th weekHour = 02 00 = 2 = 0200 hrs. |
The ActiveTimeBias indicates, in minutes, the current offset from GMT. If you are in a time zone that uses daylight saving time and ActiveTimeBias equals the StandardBias, the computer is set for standard time. If the ActiveTimeBias equals the DaylightBias, the computer is set for daylight saving time. The StandardName will indicate the time zone setting for the host computer under examination.
An easier way to derive this information is through the use of the EnCase Evidence Processor and subsequently the Case Analyzer EnScript, in which you can choose to have this information summarized in a concise and informative report. In Chapter 10, I’ll cover EnScripts in more detail. When you run the Case Evidence Processor, make sure to select System Info Parser module. When the EnCase Evidence Processor has completed, you can run the Case Analyzer EnScript, which will pull the information together from the Evidence Processor results and allow you to view it or create reports. After you have run the Case Analyzer EnScript, the time zone information that you extract will appear as shown in Figure 9-8. While this information is nice to have in this format, you must also keep in mind that best practices call for determining this information and modifying time zone settings before running the case processor. Thus, knowing how to obtain this information from the raw registry is important. The Case Analyzer Report for the time zone information is good to include showing what the settings are in report format and to validate your earlier time zone offset analysis.
Figure 9-8: Time Zone Artifacts extracted by the EnCase Evidence Processor and analyzed using the Case Analyzer EnScript. The active time bias is GMT (UTC) -7 hours (circled).
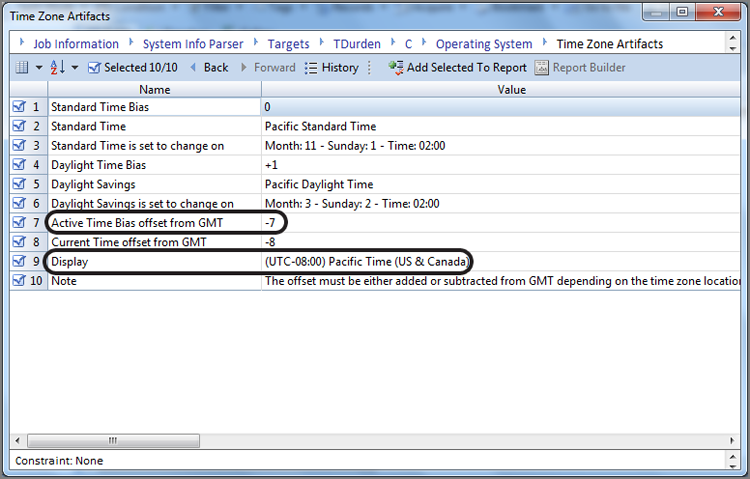
Thus, for our example as shown in Figure 9-8, the evidence item shown in the report was using Pacific time settings. During standard time, the offset from GMT is -8 hours for Pacific time. As the active offset for this device is -7 hours, we know that daylight savings time was in effect when seized. It is a good idea to validate this analysis and thinking by checking the most recent last-written timestamp on the device in question. In this case, the most recent timestamp was April 20, 2011, and thus daylight savings time was clearly in place. Thus, for this device, we’ll have to adjust our time zone settings for this device to Pacific time so that the timestamps can be viewed in the time zone in which they were created. You now have two methods by which to determine the time zone offset for which the host computer is configured. Once that offset is known, the next step is to apply that offset to the case or individual devices if they have differing offsets. When done, all devices will be in sync with regard to time zone, and you can examine dates and times accurately.
![]()
Because this step is critical to an accurate examination when dates and times are at issue, it should be done at the outset of your examination. Accordingly, you should include this step in your case-processing checklist and place it at the beginning as a standard mandatory step in the process.
Many functions in the Evidence Processor rely on the time zone settings to accurately process and display the Windows dates and times, so the time zone must be checked in the registry and set for the case or devices before running the core Evidence Processor functions, such as Index Text, Find Internet Artifacts, Find Email, and so on.
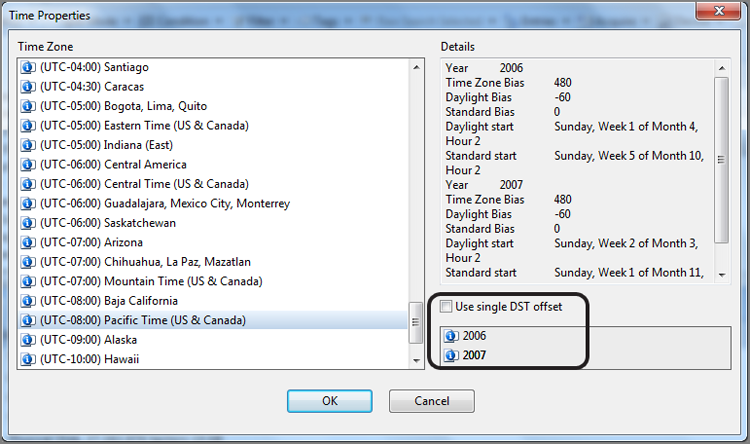
To adjust for the time zone offset, go the Evidence tab’s Entries view, and in the Tree pane, place the focus at the top or Entries level, forcing the various devices into the Table pane. Highlight the device for which you want to modify the time zone settings in the Table pane. Having highlighted the device, select Modify Time Zone Settings from the Device drop-down menu, as shown in Figure 9-9. From the Time Properties dialog box, select the correct time zone offset based on your earlier analysis of the time zone settings for your device. In our example, we found it was set for Pacific time. Figure 9-10 shows the time properties being adjusted for UTC-08:00 Pacific time.
Figure 9-9: To adjust for time zone offset, highlight the device in the Table pane and choose Modify Time Zone Settings from the Device drop-down menu.
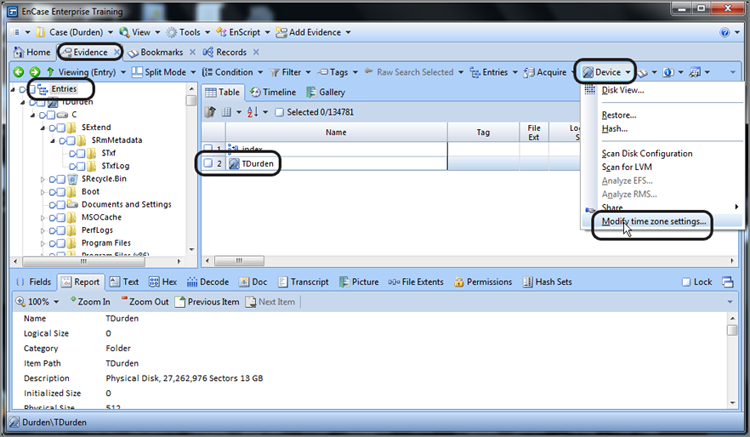
Figure 9-10: Time Properties dialog box from which the corrected time zone settings are chosen
Once you have selected your settings, click OK, and the proper time zone offset will be applied at the case or device level you chose at the outset.
Because of the change to daylight start/stop times that occurred in 2007, EnCase now allows the examiner to adjust for unpatched systems that may need to be examined. If the examiner’s machine is properly patched for the update to daylight saving time (KB931836), then EnCase will offer the option to use a single DST offset (circled in Figure 9-10) for the selected device. This allows the examiner to have EnCase employ the prior daylight start/stop times for evidence that it either is unpatched or was put in service after the change occurred. Using dual offsets (not selecting Use Single DST Offset) allows EnCase to adjust for daylight saving time based upon the date of activity—files accessed during the last week of March 2007 would, on a properly patched machine, be in daylight saving time, while other files accessed during the final week of March 2006 would not have been time stamped under DST.
At this point, your device or case will display the time stored in GMT to the accurate local time zone offset. So that you understand how all this ties together, let’s examine how the entire process works by looking at a date and time stamp from its point of origin to its interpretation by EnCase.
In this hypothetical example, a suspect is using a computer in Oregon that is running Windows XP and formatted using NTFS. The time zone offset is configured for the Pacific time zone (GMT -0800) and is configured to automatically adjust for daylight saving time. The date and time is Sunday, October 12, 2003, 16:01:22 PDT. Daylight saving time is in effect, and thus the current offset is GMT -0700. At this point in time, your suspect writes a file to his system that ultimately becomes a file of interest in your case. Here is what happens from the time it is written until you view it in EnCase:
1. The precise time the file was written, in local time, was Sunday, October 12, 2003, 16:01:22 PDT.
2. Because this system is NTFS, the operating system converts the local time to GMT before storing it. The OS adds seven hours (current offset) to the time, making it Sunday, October 12, 2003, 23:01:22 PDT.
3. The OS stores this date in the following 64-bit hex string: 2A 42 17 C1 14 91 C3 01.
4. We know this string can be converted to a little endian 64-bit integer that would represent the number of 100-nanosecond intervals from January 1, 1601, 00:00:00 GMT.
5. The following day, the suspect’s computer is seized for later forensic examination.
6. The date and time is now Monday, September 5, 2005, at 11:44:00 EDT, and the forensic examination is occurring in the Eastern time zone.
7. Because our examination machine is configured for Eastern time (GMT -0500) and daylight saving time is in effect, your current offset is Eastern daylight saving time (GMT -0400), and EnCase will default to the local offset for viewing time stamps unless told otherwise.
8. EnCase first determines that the NTFS file system is in place and decodes the time stamp in GMT as Sunday, October 12, 2003 23:01:22. Next EnCase looks to the offset applied and decides whether daylight saving time was in effect.
9. If you did not account for the offset in the evidence file, EnCase would subtract the default local offset and apply daylight saving time (GMT -0400) from the time stored in GMT and show the file as having been created on Sunday, October 12, 2003 at 19:01:22.
10. However, you follow the correct practices and determine the time zone offset in the evidence file, finding that it is PST (GMT -0800) and that daylight saving was in effect (GMT -0700). When you apply this time zone setting to your device, when EnCase reads the time stamp, it converts the date to PDT (GMT -0700) by subtracting seven hours from the time stamp as stored in GMT. It therefore correctly displays the time stamp as Sunday, October 12, 2003 16:01:22, which matches the date and time the file was written in its local time zone.
It is important to note that had this same scenario involved a FAT system, no adjustments would have been required because the time would have been stored in local time. Of course, the MS-DOS time stamp used in FAT systems, while simple, is also limiting.
The MS-DOS time stamp lacks seconds for last-accessed times because the 2 bytes that would record this information are used in FAT 32-file systems to describe starting clusters when they exceed 65,536 clusters. Also, the MS-DOS time stamp allows only 5 bits to describe seconds. Because 25 (5 bits) provides only 32 outcomes, this falls short of the 60 seconds in a minute. Thus, the stored seconds go only as high as 30 (actually 0-29) and are multiplied by 2 to achieve a time in seconds. 1 × 2 shows as 2 seconds, 2 × 2 shows as 4 seconds, and so forth. You won’t see an MS-DOS time with an odd number of seconds. You will see only even numbers for seconds for MAC times in FAT file systems.
The Windows 64-bit time stamp used to track MAC times in NTFS is, by contrast, a much more robust and accurate means of tracking time. With complexity, however, comes the need for a deeper understanding of the underlying principles and more sophisticated analysis tools.
Now that you understand times and time zones, you can apply this knowledge as you examine other operating system artifacts, because time stamps are found throughout them.
Recycle Bin
By default, when a user deletes a file in Windows, the file is placed in the Recycle Bin. To bypass the Recycle Bin, the user must hold down the Shift key while pressing Delete. Because few users are aware of this option, most deleted files pass through the Recycle Bin on most systems.
When a file is in the Recycle Bin, the user has the option of restoring the file to its original location. A user can also select an individual file or files and delete them from the Recycle Bin. The final option for the Recycle Bin is to empty it, which deletes all the files in the Recycle Bin.
With that, I have described the basic operation of the Recycle Bin as the user sees it. To enable this functionality, much is taking place under the hood. As an examiner, you need to understand the fine details of the Recycle Bin process so you can competently examine and later explain the evidence found therein. With that in mind, let’s examine the underlying activity for each of the Recycle Bin’s basic functions.
![]()
Windows Vista, Windows Server 2008, and Windows 7 use the Recycle Bin, but the manner in which files are renamed once placed in the Recycle Bin is different from previous versions. Furthermore, there is no longer an INFO or INFO2 file. I’ll discuss the new Windows Recycle Bin function later in this chapter, after I cover all Windows versions up to Windows Vista.
Details of Recycle Bin Operation
When a file is deleted and sent to the Recycle Bin, the directory or MFT entry for the file is deleted. Simultaneously, a directory entry or MFT entry is made for the file in the Recycle Bin. The new filename bears no resemblance to the original filename, however, because a special naming convention is applied to files placed in the Recycle Bin. The naming convention follows this format:
D[original drive letter of file][index number].[original file extension]
The D stands for deleted. If, for example, the file C:\My Files\letter.doc were deleted and sent to the Recycle Bin, its new filename in the Recycle Bin would be DC1.doc if it was the first file sent to the Recycle Bin (or the first file sent since the Recycle Bin was last emptied).
For earlier versions of Windows, the index numbers start at 0 for the first file sent to the Recycle Bin and increase by 1 for each file added. However, Windows XP starts its index numbers at 1 instead of 0. If the index number for whatever reason becomes an issue in your case, it is good practice to test and verify the results on a test box using the same version and service pack of Windows that is in question.
The INFO2 File
When you view a file in the Recycle Bin, you see the file’s original name and path along with other information. Because the deleted file no longer bears its original filename, the displayed information must be stored somewhere, and that storage location is a hidden file named INFO2. Thus, when a deleted file receives a new name in the Recycle Bin, an entry is also made in the INFO2 file for the deleted file.
The INFO2 file is a database containing information about the files in the Recycle Bin. When you look at files in the Recycle Bin, you are actually viewing the contents of the INFO2 file. Therefore, when a file is sent to the Recycle Bin, the following information is placed in the Recycle Bin:
· The file’s original filename and path (entered twice, once in ASCII and again in Unicode)
· The date and time of deletion
· The index number
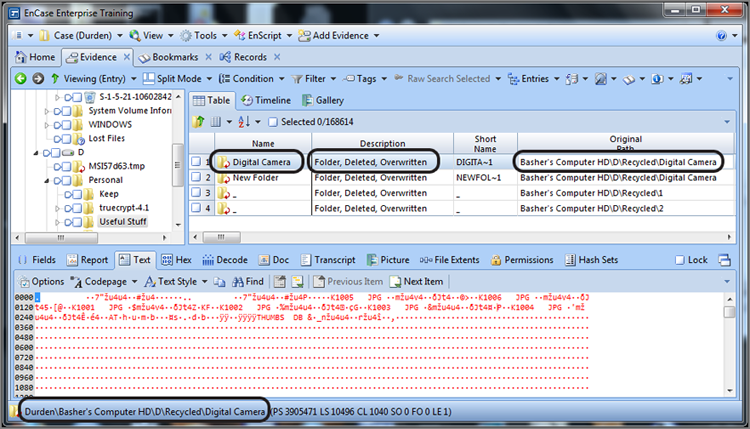
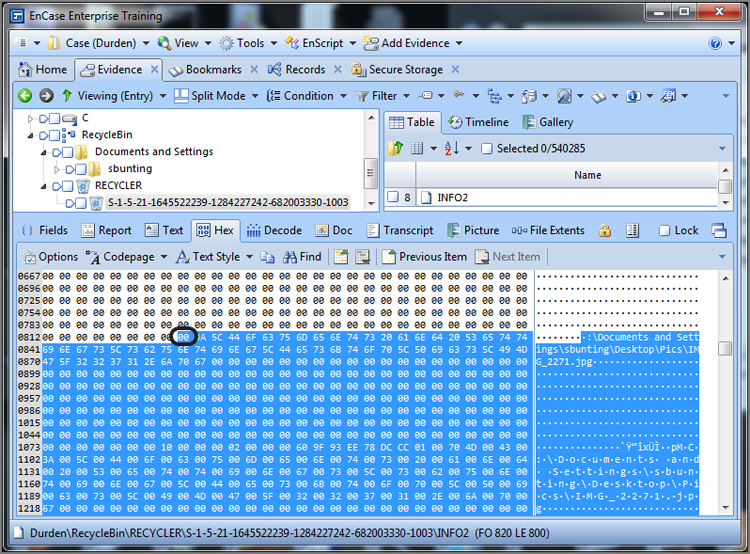
The index number is the link between the new filename and the INFO2 record because it is common to both. In Figure 9-11, the folder Digital Camera has been deleted. Because the data did not move and a new filename was created for this data in the Recycle Bin, the icon for DualMonitorStation.JPG has a red circular arrow icon in the lower right indicating the folder is overwritten because the starting cluster is in use by another folder or file. When a folder or file is overwritten, the Original Path column and the GPS locator (both circled) will indicate the path of the overwriting object, which is in this case a folder by the same name located in the Recycle Bin (D\Recycled). You should also note that the Description column also indicates that the entry is overwritten, which is again circled in Figure 9-11.
Figure 9-11: A folder is deleted and sent to the Recycle Bin. EnCase reports the original folder as overwritten because the starting cluster is in use by the new folder name created in the Recycle Bin.
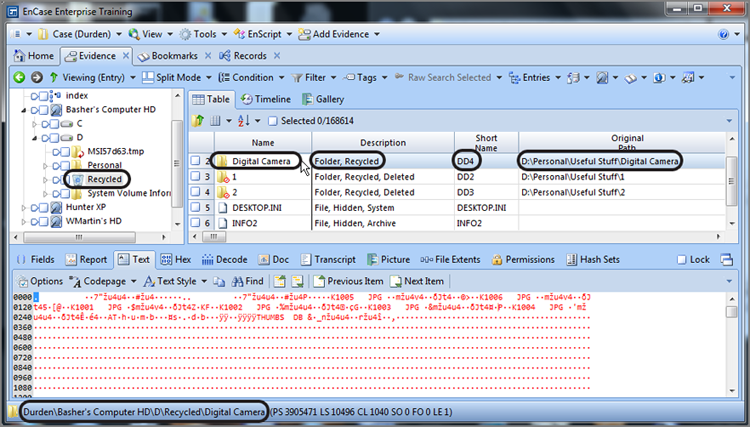
When you view the Recycle Bin, you find that the folder is present, as shown in Figure 9-12. EnCase reads the INFO2 file and reports its former name as it was in its original location as Digital Camera and further reports its original path, which is D:\Personal\Useful Stuff\Digital Camera. When you are working in the Recycle Bin, the Short Name column lists the actual filename as stored in the Recycle bin folder, which in this case is DD4. The first D means deleted; the second D means the volume on which is was stored, and the 4 is the index record number in the INFO2 file. Since this is a folder, there is no extension. If it were to have been a file, the file extension would appear here, unchanged.
Figure 9-12: When file is sent to the Recycle Bin, it is renamed, and an entry is made in the INFO2 database.
![]()
In current versions of EnCase (version 6 and newer), the original filename of a deleted file is in the Name column, and the Recycle Bin name is in the Short File Name column. This will be the case only if the deleted file is listed in the INFO2 file. If it is no longer present in the INFO2 file, EnCase can’t report the original filename and will display only the filename as it is found in the Recycle Bin.
Each record in an INFO2 database has a fixed length that varies according to the Windows version that created it. Table 9-2 shows the various pre-Windows Vista Windows operating systems and the length of their INFO2 database records. Interestingly, the name of the Recycle Bin varies also with the Windows version, and those names are likewise listed in the table.
Table 9-2: Comparison of Recycle Bins between Windows versions*
|
Operating system |
Recycle Bin folder name |
INFO2 record length |
|
Windows 9/Me |
Recycled |
280 bytes |
|
Windows NT |
Recycler |
800 bytes |
|
Windows 2000 |
Recycler |
800 bytes |
|
Windows XP/2003 |
Recycler |
800 bytes |
* Windows Vista, Windows 7, and Windows Server 2008 do not use an INFO2 file so are not listed.
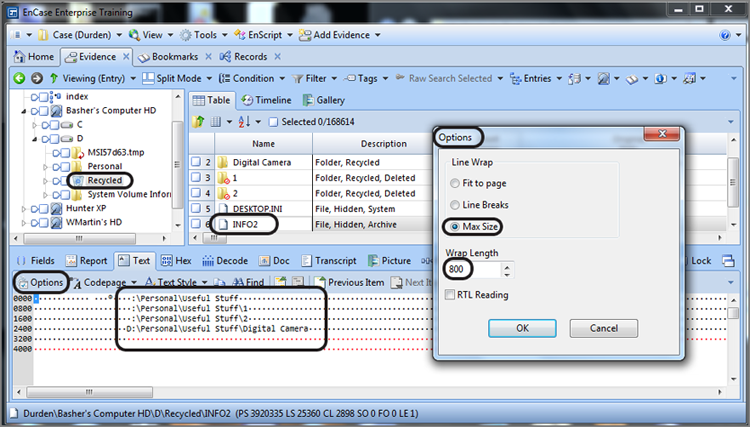
The length of each record is important because EnCase provides a bookmark-viewing tool that decodes the fields in the INFO2 records, allowing you to include this information in a sweeping data bookmark. To use this bookmarking tool, you must know both the starting point and the record length. If you look at the Options dialog box in the View pane, you can set the correct record length. When you display the records in this manner, the starting point is easy to identify, and it also greatly facilitates accurate sweeping or highlighting of the data. I covered how to use the Options feature in Chapter 7, so I’ll simply show the correct settings for a Windows NT-Windows Server 2003 series of INFO2 records in Figure 9-13. Once you have highlighted the INFO2 record in the Table view, its data is viewable in the View pane. It is at this point that you apply the Options settings. When the correct settings have been applied, the records will align in somewhat of a column, as shown and circled in Figure 9-13.
Figure 9-13: Options are set for a wrap length of 800 bytes, causing the INFO2 records to “align.”
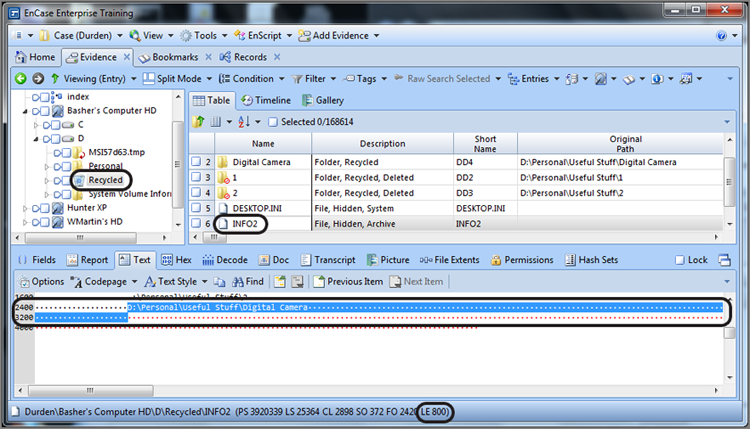
Note in Figure 9-14 that the data has been selected starting with the drive letter, which is the first character or byte of each record in the database. Remember this byte because it will have significance later. The selection will end on the row following the record, one space short of where the drive letter of the following record starts (or would have started were there another record). For clarity, I have selected only one of several records. Note also the length of our selection is shown at the bottom of the window (circled in the GPS section), which is 800 bytes.
Figure 9-14: One INFO2 record index, 800 bytes in length, has been selected.
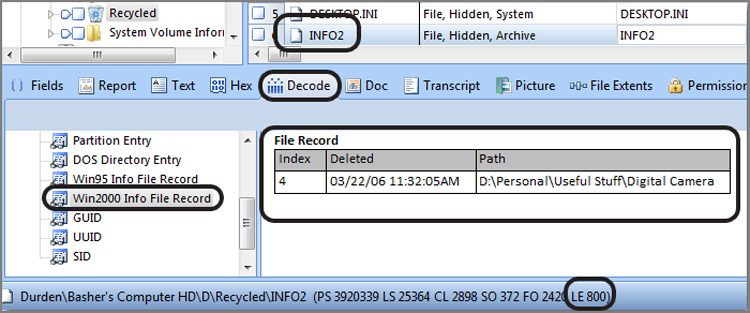
With the INFO2 record selected, to have EnCase parse it and display it, you need only switch to the Decode tab and select the correct View type in the left pane, which in our example is Windows Win2000 Info File record, as shown in Figure 9-15. The right pane will display the index number, the deleted date, and the complete path of the deleted file or folder. If you want to have this information in your report, you need only bookmark the information in the Decode tab.
![]()
EnCase uses the Decode View Type Win2000 Info File Record for INFO2 records that are 800 bytes in length (Windows NT, Windows 2000, Windows XP, and Windows Server 2003) and uses Win95 Info File Record for those that are 280 bytes in length from the Win9x legacy Windows systems. Neither type will work for the new format used starting with Vista. Again, we’ll cover that issue separately.
Figure 9-15: INFO2 record decoded
Determining the Owner of Files in the Recycle Bin
With Windows NT, Windows Server 2000, Windows XP, and Windows Server 2003, an added artifact appears in the Recycle Bin. When a user first deletes a file, a folder bearing the user’s security ID (SID) number appears. Each user on the host system is assigned a SID, which is a globally unique identification number (GUID). Anything the user deletes goes into that uniquely named folder. From a forensic point of view, this is the real-world equivalent of throwing away trash with your name and Social Security number stamped all over it. Deleted files can be traced back to their owner through the SID.
The process of manually resolving the SID involves mounting the Security Accounts Manager (SAM) registry file, reconstructing the SID from the data therein, and linking it to a username. EnCase spares you that agony by scanning the SAM hive when loading your evidence files, thereby resolving SID numbers to locally authenticated users on the fly.
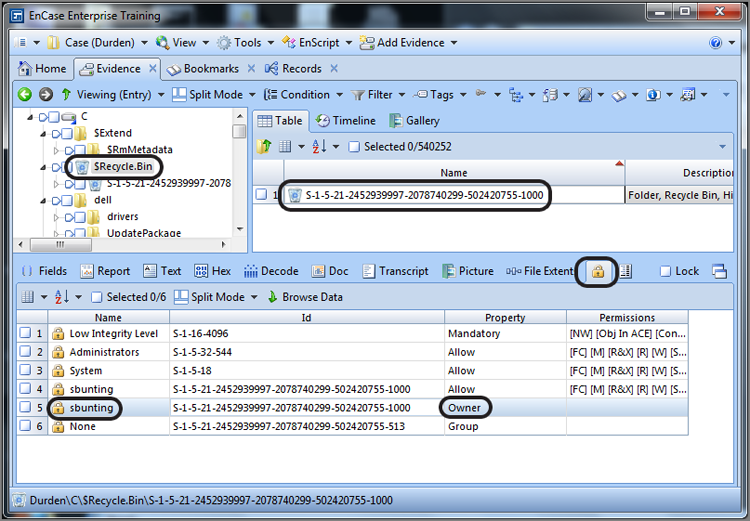
You can determine the user associated with a SID in several ways. In the case of files in the Recycle Bin, simply highlight the Recycle Bin in the Tree pane. In the Table view pane, place your focus on the folder bearing the name of the SID that is the focus of your inquiry. In the View pane, switch to the Permissions view (padlock icon), and the NTFS permissions will appear. To determine the owner, simply scroll down to the owner to determine the user associated with that SID, as shown in Figure 9-16.
This process works for local logon accounts where the host computer’s SAM stores the SID and other credentials.
When the user logs onto a Windows domain, however, the SID information is not stored on the local host but rather on the domain controller (server). In that case, EnCase can’t obtain the SID numbers by scanning the SAM hive on the local machine (they aren’t there). Thus, usernames will not be resolvable under these conditions. Therefore, when domain logons are occurring, you will need to obtain the username for the SID in question and manually enter the SID and username in the Secure Storage view. After that, EnCase will remember that SID and username combination and resolve it for you.
Figure 9-16: Recycle Bin with folders bearing SID numbers for names. You can find the SID owner by switching to the Permissions view.
![]()
If a user attempts a domain logon and the domain controller is not available, the user can often log on anyway because, by default, the last 10 domain logons are cached locally. The EnCase EDS module included with version 7 processes these cached domain accounts with the Analyze Encrypted Files System (EFS) function. To use Analyze EFS, force the volume to appear in the Table view pane of the Evidence tab and place your cursor on it to highlight it. Next, choose Analyze EFS from the Device drop-down menu. Thus, by running Analyze EFS, any cached logons will be analyzed, and the resultant user names and SID numbers will be available to the examiner.
Files Restored or Deleted from the Recycle Bin
When the user empties the entire Recycle Bin, the directory entries (if FAT) or the MFT entries (if NTFS) for all files in the Recycle Bin are marked as deleted. The INFO2 database is adjusted to its default or empty size of 20 bytes (Windows XP/2003), thereby removing any INFO2 records from the active Recycle Bin database. If, however, you examine the file slack that immediately follows the 20-byte empty bin header, you’ll see many of the INFO2 records that were in the Recycle Bin before it was emptied.
You may encounter a circumstance in which a user restores a file from the Recycle Bin. There is little in the way of documentation on this condition, and the results from it may confuse you when you view an INFO2 record in which this has occurred. When a file is restored, a record is created in the directory or MFT for the folder where the file was originally located when it was deleted. The entry for the file in the directory or MFT of the Recycle Bin is marked as deleted. So far, this is fairly logical and straightforward.
What happens next, however, is a little less than intuitive. The entry in the INFO2 record is not deleted. Rather, the first character of that record, which would ordinarily be the drive letter from which the file was deleted, is changed to 00h, as shown in Figure 9-17. This process is analogous to that of deleting a file or folder in a FAT volume where the first byte of the 32-byte entry is changed to E5h. Just as Windows Explorer ignores any entry beginning with E5h, the Recycle Bin interface ignores any record beginning with 00h.
Figure 9-17: When a file in the Recycle Bin is restored to its original path, the first character of its INFO2 record is changed to 00h.
Although it isn’t commonly done, a user can delete individual files from the Recycle Bin instead of emptying the entire Recycle Bin. From within the Recycle Bin, you can delete a selected individual file or groups of files by pressing the Delete button, right-clicking and choosing Delete, or choosing Delete from the File menu. Windows handles INFO2 records for files deleted from the Recycle Bin the same as files restored from the Recycle Bin—the directory or MFT entries are marked as deleted, and the first characters of the files’ INFO2 records are changed to 00h.
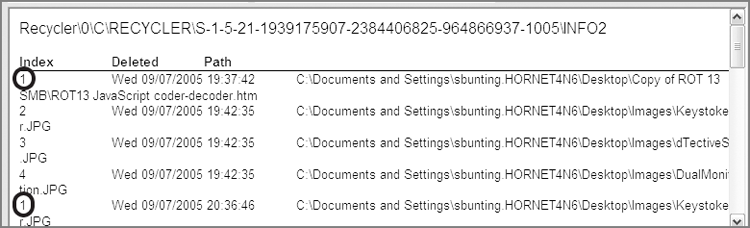
The index numbers of these deleted/restored files will be reused the next time a file is deleted and placed in the Recycle Bin. Therefore, when the INFO2 database is processed by EnCase, the records for files restored or deleted from the Recycle Bin, and those subsequently added to the Recycle Bin will display with the same index number, as shown in Figure 9-18. EnCase does not make any distinction between active Recycle Bin records and null Recycle Bin records. It processes and reports both types of records. The information displayed is accurate, but it may not be the complete story if files were restored or deleted from the Recycle Bin.
Figure 9-18: The first record has been restored and has the same index number (1) as the fifth record, which has been subsequently deleted and added to the Recycle Bin.
Using an EnCase Evidence Processor to Determine the Status of Recycle Bin Files
If artifacts in the Recycle Bin are critical elements in your case and you need to determine whether files have been restored or deleted from the Recycle Bin, search the INFO2 records for the hex string 00 3A 5C. This string looks for :\ preceded by 00h and would indicate records in the INFO2 database for files that were restored or deleted from the Recycle Bin. With that information, you can further examine original paths for restorations and examine directory or MFT entries for filenames, starting clusters, and so forth. From that information, you may be able to determine what actually occurred to a file after it “left” the Recycle Bin.
Although understanding the function of the Recycle Bin is critical and the ability to manually process it is a necessary skill, automated processing saves you time so you can process your backlog of cases. To that end, the Windows Artifact Parser is an available module in the EnCase Evidence Processor, which, among other tasks, processes INFO2 records, both intact and fragmentary.
To use this module, first launch the EnCase Evidence Processor and open the Modules at the bottom, as shown in Figure 9-19. If you double-click the Windows Artifact Parser, you will see that you have three different types of artifacts from which to choose, of which Recycle Bin Files is one; make sure it is selected, as shown in Figure 9-20. You should note that an option is available in this menu to search for artifacts in unallocated clusters. If you opt to do so, keep in mind that this will add significantly to your processing time.
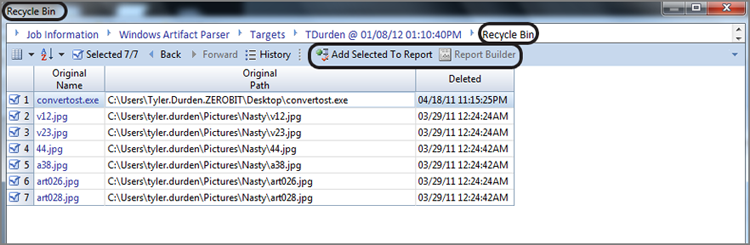
After you run the EnCase Evidence Processor, you can review the results of this module by running the Case Analyzer from the EnScript menu. The Case Analyzer will run and then provide you with an interface where you can drill down and review the various artifacts recovered. Figure 9-21 shows the Recycle Bin results. From here, you can select any item or all items for inclusion in a report.
Figure 9-19: The Windows Artifact Parser module in the EnCase Evidence Processor
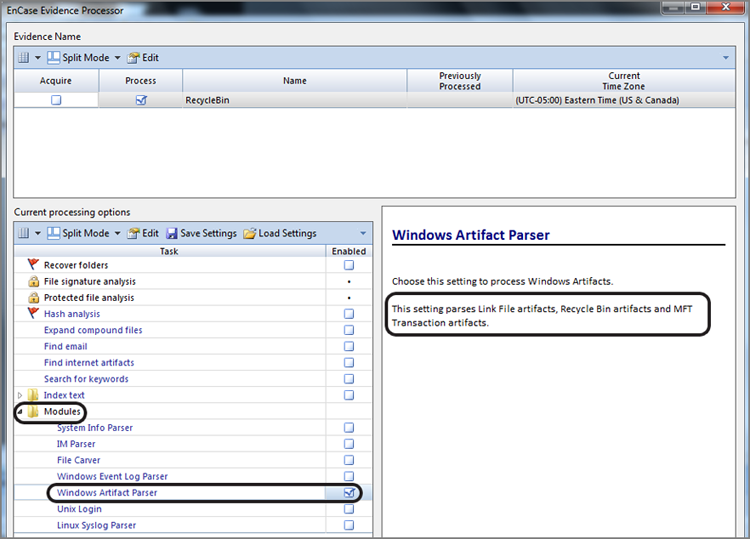
Figure 9-20: Options within the Windows Artifact Parser
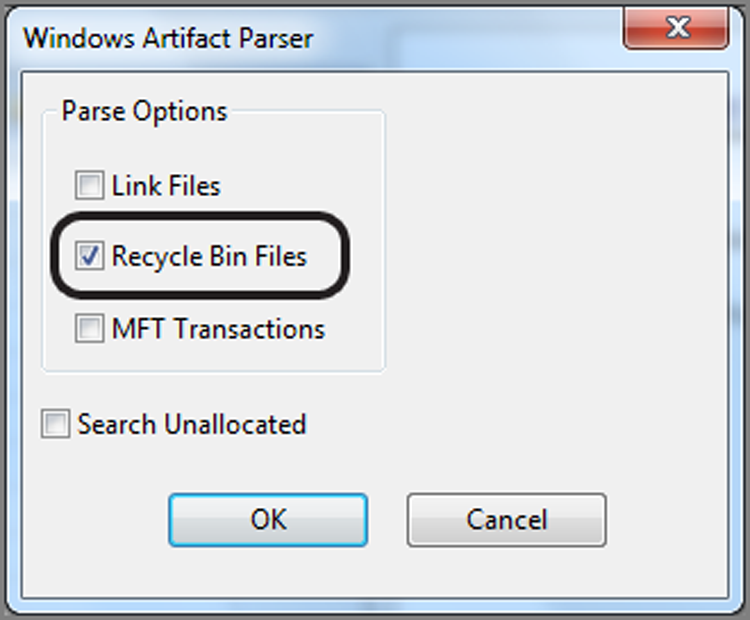
Figure 9-21: Using Case Analyzer EnScript to view Recycle Bin results from the EnCase Evidence Processor.
Recycle Bin Bypass
I cannot complete a discussion of the Recycle Bin without covering what happens when the Recycle Bin is configured to be bypassed altogether. The obvious consequence is that files are deleted from their original locations and are not sent to the Recycle Bin at all, making processing the INFO2 records a moot point.
Fortunately for forensics examiners, such a configuration is not the default, and making the changes is anything but obvious or intuitive. In fact, most users are not aware that it is an option. Nevertheless, security-conscious individuals or those wanting to cover their tracks may configure their systems to bypass the Recycle Bin when deleting files.
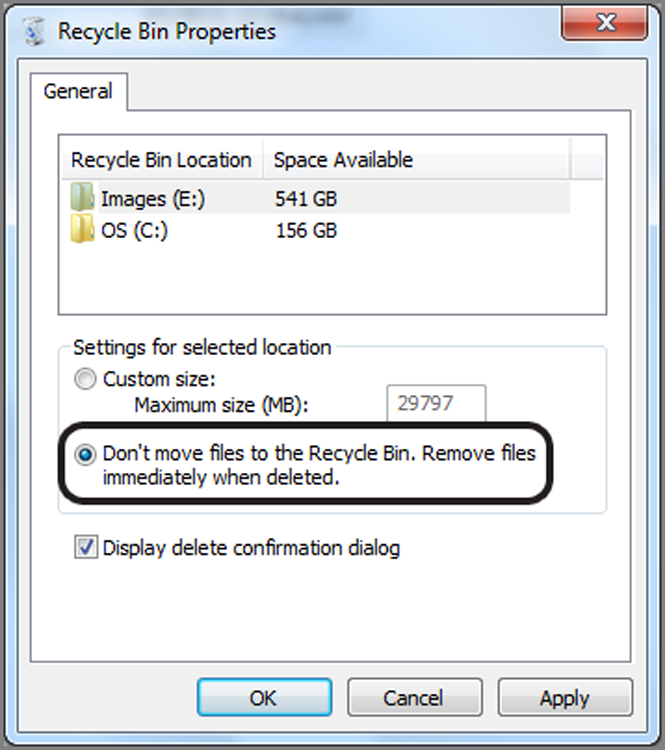
To configure your system to bypass the Recycle Bin, you must change the properties of the Recycle Bin. Right-click the Recycle Bin icon, from either the desktop or Explorer, and select Properties. Your choices are displayed in the Recycle Bin Properties dialog box shown in Figure 9-22. If you have more than one hard drive, you have the choice of creating the options globally or setting the options on a per-drive basis. In Figure 9-22 the option Do Not Move Files to the Recycle Bin has been selected. This option is being applied on the Global tab, thereby overriding any individual drive options. With this setting selected, any file deleted will be erased immediately and not sent to the Recycle Bin.
Figure 9-22: The Recycle Bin Properties dialog box provides the option to bypass the Recycle Bin globally to both hard drives on this system.
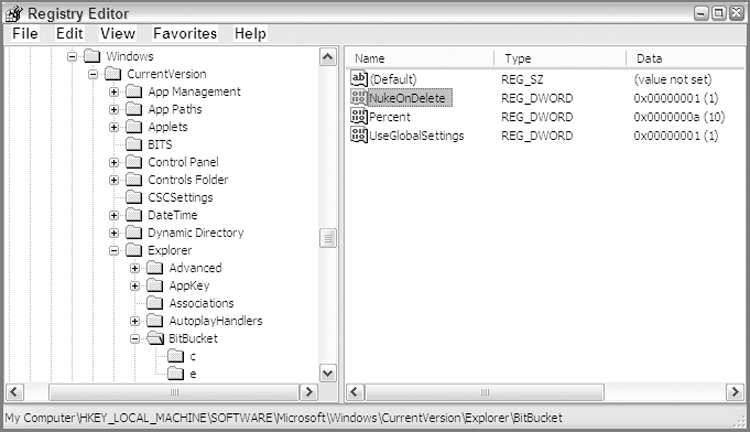
This setting, when applied, is implemented by means of values stored in the registry. This feature is represented by the NukeOnDelete registry value set to 01h, which is found in the full registry path: HKEY_LOCAL_MACHINE\SOFTWARE\Microsoft\Windows\CurrentVersion\Explorer\BitBucket. This setting is shown in the regedit interface in Figure 9-23. If this same setting were not globally applied but rather applied to a specific drive, the same value would appear in a subkey of this registry key named after the drive letter to which it applied. You can also see the two subkeys (c and e) of the BitBucket key in Figure 9-23.
Figure 9-23: Registry settings for bypassing the Recycle Bin globally for all attached drives
Applying this setting does not remove the Recycle Bin folder once it has been created, and it doesn’t remove whatever contents may be in the Recycle Bin when the setting is applied. Once this setting is applied, whenever a file is deleted, the option of sending it to the Recycle Bin is no longer available.
If you are processing a case and you see a lot of deleted user files and find little or nothing in the INFO2 record artifacts, you should suspect that the Recycle Bin has been bypassed. To confirm this suspicion, mount the registry, and examine this registry value.
I’ll cover the registry in detail in Chapter 10, after which you may want to revisit this section. This text is also quite modularized, so you may want to jump ahead now.
Windows Vista/Windows 7 Recycle Bin
Just when forensic examiners had it all figured out with regard to the INFO2 file databases, leave it to the engineers at Microsoft to change things. With the release of Windows Vista, the INFO2 file disappeared, as did the file/folder renaming convention. Microsoft also renamed the containing folder for the Recycle Bin to $Recycle.Bin. Although the renaming of the containing folder is hardly an issue, the replacement of the INFO2 database and the new renaming convention do change the landscape somewhat.
Even with the aforementioned changes, you should fear not. Instead of retaining the deleted file database information in one INFO2 file, Windows Vista keeps this information in individual index files in the Recycle Bin that begin with $I. The remainder of the filename is an abbreviated GUID of sorts, and the file extension remains unchanged. The deleted filename, when placed in the Recycle Bin, is changed to a name that begins with $R. The remainder of the renamed deleted file (or folder) is also a GUID that matches that of its corresponding index file, and its file extension also remains unchanged.
Figure 9-24 shows the pairing of an index file, containing the deleted file information, and its corresponding deleted file. The file was originally C:\Users\sbunting\Desktop\EventLogs.txt, as shown in the index file named $IHLR8PV.txt. The deleted file is renamed $RHLR8PV.txt. The filenames differ only at the second filename character, with the index file having an I and the deleted file having an R at that location.
Figure 9-24: Windows 7 Recycle Bin with a pairing of index and deleted files

You will note that we are using a hex editor to show the raw filenames in Figure 9-24. When EnCase is used to view the same data, it will read the data in the index file and show the filename as it was before deleted. You can, however, see the raw filename in EnCase if you look in the Short Name column, as shown in Figure 9-25.
Figure 9-25: EnCase view of data shown in Figure 9-24. Note that EnCase resolves the name to the filename before it was deleted.
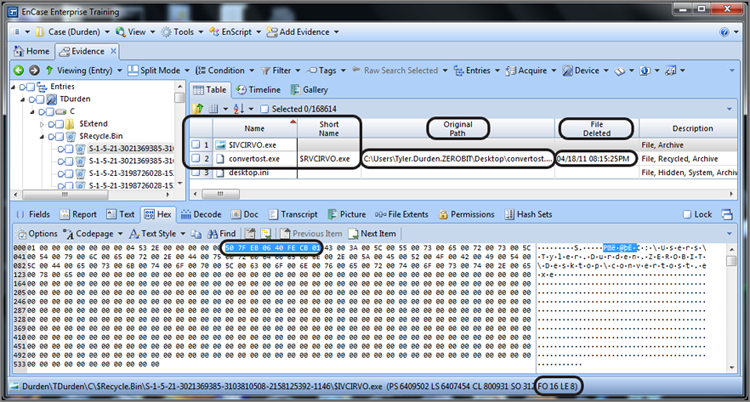
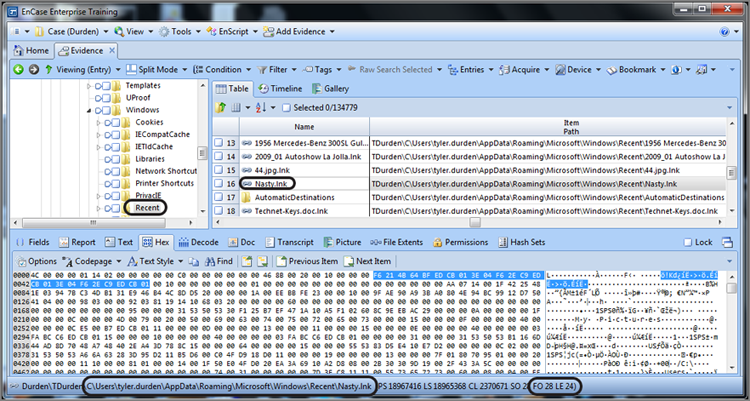
Within the index file, you can see (highlighted and circled in Figure 9-24) that the full path to the deleted file (or folder) begins at byte offset 24. This would be denoted in the GPS area as FO 24. Another important piece of metadata—the time stamp for when the file was deleted—immediately precedes the path name. This time stamp is a 64-bit Windows time stamp and is stored at byte offsets 16-23, as shown highlighted and circled in Figure 9-25. You can see (circled) in the GPS in the lower right that the highlighted area of the time stamp starts as byte offset 16 (FO 16) and is 8 bytes (64 bits) as denoted by the length (LE 8).
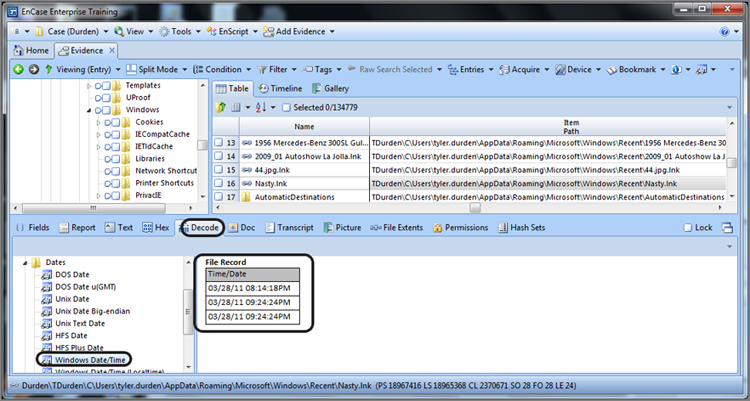
If you closely at Figure 9-26, you can see that the file creation date of the index file ($IHLR8PV.txt) was April 18, 2011, at 8:15:25 p.m. You would expect this index file to have been created in the Recycle Bin at the time the file was deleted. Therefore, the metadata in the index file that shows when the file was deleted (Decoded in Figure 9-26) should match the file creation date of the index file. In addition to seeing this timestamp decoded, it also appears in the File Deleted column. In Figure 9-23, you can see that these three time stamps (Decoded timestamp in View pane, File Deleted timestamp, and File Created timestamp for index file) do in fact match.
The index file has one other piece of metadata within it that can be of forensic interest, which is the file size of the deleted file. Since you have this information already in the properties of the deleted file, this usually is of little added value. The deleted file size is stored as a Dword value at offsets 8-11. When the deleted object is a folder with child objects (files and subfolders), this value appears to represent the total logical size of the folder and its child objects.
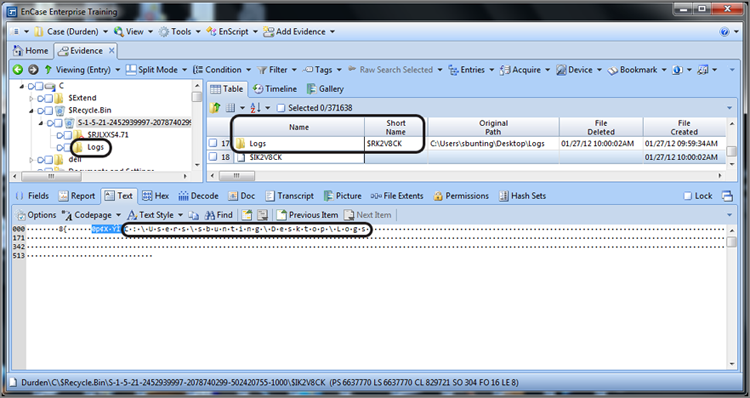
You will find that when a folder and its child objects (files and subfolders) have been deleted, only the parent folder will be renamed to match the GUID portion of the index file. Its subfolders and files (children) will not be renamed. Figure 9-27 shows a parent folder named Logs deleted and renamed $RK2V8CK. Its corresponding index filename is $IK2V8CK (see Short Name column in Figure 9-27).
Figure 9-26: File deletion timestamp decoded and matches File Deleted timestamp and File Created timestamp for index file
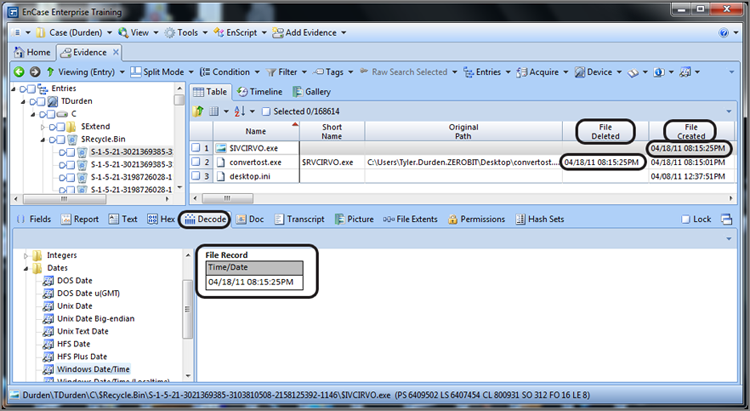
Figure 9-27: Folder named Logs has been deleted and has a raw filename (see Short Name) of $RK2V8CK.
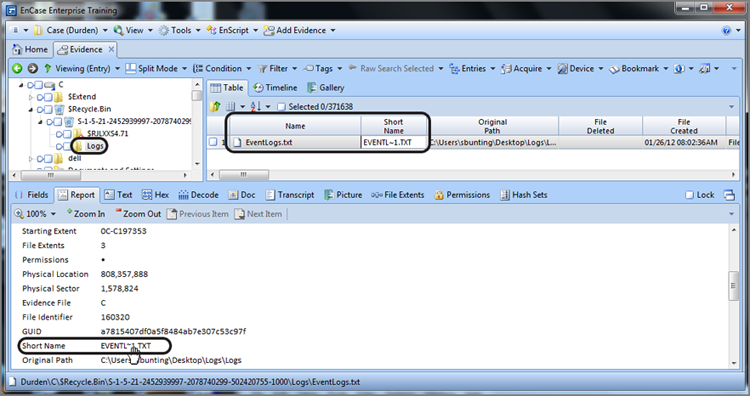
If we examine the contents of the Logs folder, we find that it contains a file named EventLogs.txt. If we look at the Short Name value for this file, we note that it has not a file beginning with $R, but rather its true short name, as shown in Figure 9-28. The user can’t see the contents of a deleted folder in the Windows Explorer interface; however, we can with EnCase.
Figure 9-28: Child object of a deleted folder. You should note that these objects are not renamed when they are placed in the Recycle Bin.
![]()
Windows Vista and 7 can provide examiners with yet another forensic nugget in the updated Recycle Bin, which is the ability to identify files placed in the Recycle Bin from mapped drives. Thus, when a file from a mapped drive is deleted via the Recycle Bin, the Windows Vista/7 Recycle Bin stores it just as another file and tracks its network drive location, or at least this is supposed to be how it works. In practice, however, it does require tweaking to get it to work. Thus, it is possible for a user to force this behavior to occur, but I would expect to see this only on a more experienced user’s computer. If it is present, it is much better for the examiner. If you want to enable it on your machine, see http://answers.microsoft.com/en-us/windows/forum/windows_7-files/windows-7-recycle-mapped-drives/95751679-428c-44b0-a8db-1783df9b5e13.
Link Files
Link files are also known as shortcuts and have the file extension .lnk. Link files refer to, or link to, target files. These target files can be applications, directories, documents, or data files. They can also be non-file-system objects such as printers or various management consoles. Clicking a shortcut causes the target file to run. If it is an application, the application is launched. If it is a document, the registered application runs and opens the document.
Link files are ubiquitous through Windows. Later in this chapter, I’ll cover the Recent, Start, Desktop, and Send To folders, which consist, for the most part, of link or shortcut files. As you will come to appreciate, they are one of the fundamental pieces of the GUI point-and-click environment.
Changing the Properties of a Shortcut
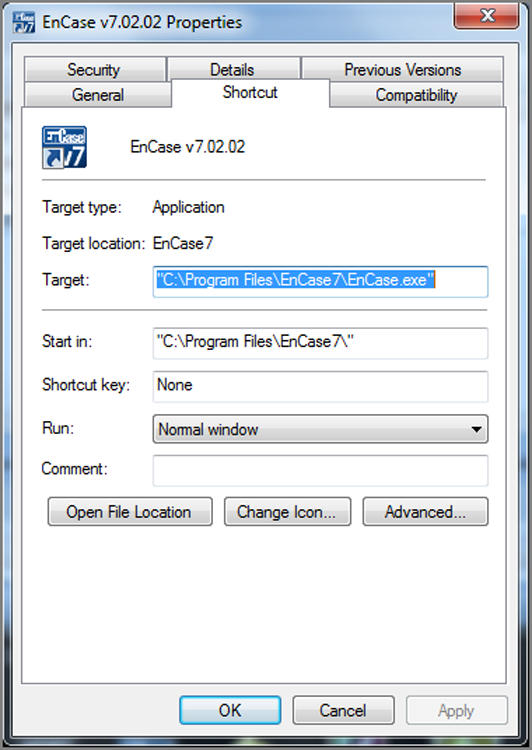
Shortcuts have associated icons (little pictures) that display in the Windows Explorer interface or on the desktop if a shortcut is present there. These icons are predefined but can be changed by the user. To change a shortcut’s icon, right-click the shortcut, and choose the Properties command. Then choose the Shortcut tab, shown in Figure 9-29.
Figure 9-29: Shortcut tab of the Properties dialog box for a shortcut or link file
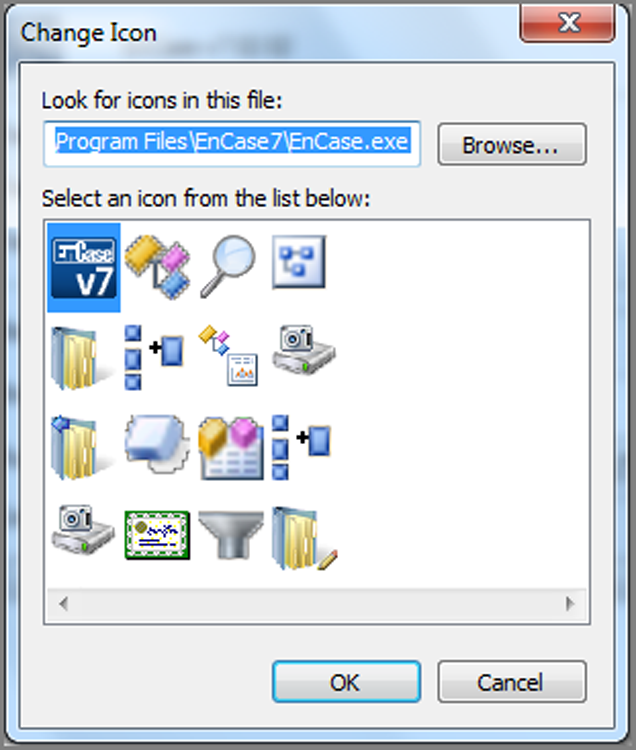
In addition to being able to change the icon, you can change other properties of the shortcut, including its target file, from this interface. To change its icon, click the Change Icon button to open the dialog box shown in Figure 9-30. Other icons are usually available with the default one. The user can browse and use other “canned” ones. There are tools that let you create your own.
Figure 9-30: The Change Icon dialog box allows the user to change a link or shortcut file’s icon.
Forensic Importance of Link Files
The forensic importance of link files lies in their properties, their contents, and the specifics surrounding their creation. Let’s examine these various aspects so that you can better understand their function and hence their forensic use. Let’s first look at how they are created.
Link files are ubiquitous. There are few places you can’t find them. They are created by the operating system upon installation and by applications with which they are installed. They are created by user activity without the user’s knowledge. Finally, they can be created deliberately by the user. Each category of link file creation has its own significance.
The operating system creates many link files by default when you install a particular version and service pack of Windows. The desktop is one place you will see default installation icons. The Recycle Bin is a typical default desktop link file. There are others in other locations that I’ll cover.
When applications are installed, link files are placed in various locations, some optionally and some automatically. These link files provide the user the ability to launch the newly installed application. By default, a link file is almost always created in the appropriate program folder that appears on the Start menu. Usually as an option, link files can be created on the desktop or on the Quick Launch taskbar.
Certain actions by the user create link files without their knowledge. Because the user is creating virtual “tracks in the snow,” such files are of particular forensic interest. Specifically, when a user opens a document, a link file is created in the Recent folder, in the root of the folder with the user’s logon name (starting with Vista, this folder is located at Users\UserName\AppData\Roaming\Microsoft\Windows\Recent). The link files in this folder serve as a record of the documents opened by the user.
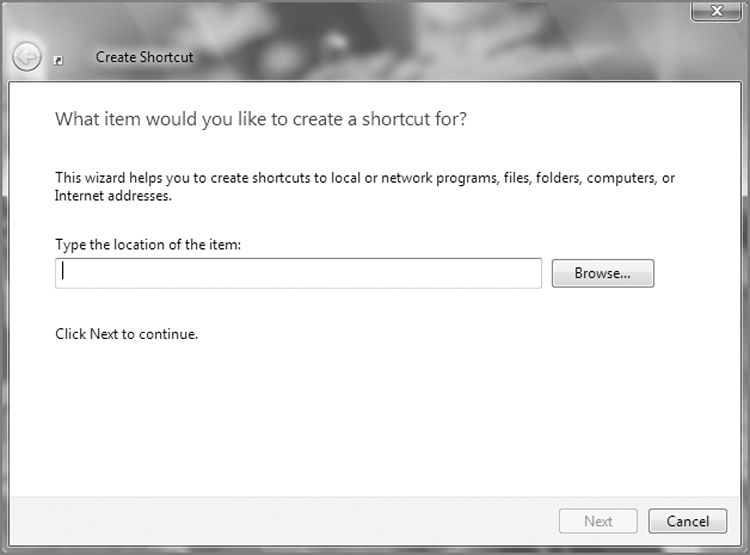
Users can create link files or move them or copy them to other locations. When a user wants frequent access to a program, file, folder, network resource, or other non-file-system resource (printer, and so on), they can create a shortcut (link file) in an easy-to-access location, most often the desktop. To create a desktop shortcut, the user right-clicks the desktop and chooses New > Shortcut. The Create Shortcut Wizard appears, as shown in Figure 9-31, and guides the user through the process of selecting a target and giving the shortcut a name. A shortcut or link file to a folder named My Hacking Tools, Second Set of Books, Underage Cuties, or SSNs for Salewould have obvious evidentiary value.
Figure 9-31: The Create Shortcut Wizard allows the user to create shortcuts, which are actually link files.
Link files, like any other file, have MAC time stamps that can be significant. If a program was installed on one date and a link file was created later, it can reveal that the user was not only aware that the program existed but went out of their way to create easy access to it. Each time a link file is “used,” knowingly or unknowingly, information about the target file is updated in the contents of the link file; thus, the link file itself is modified each time it is used if the target contents have changed, which they nearly always do. When you understand the contents of the link file, why this occurs will become clear. To that end, let’s examine the contents of a link file.
The data contained inside a link file describes the various attributes of the target file. It should be obvious that the complete path to the target file would be contained therein. In addition, various other attributes of the target file are recorded:
· Volume serial number on which the target file or folder exists. This can be useful for connecting a file to a unique volume.
· File’s size in bytes. This can be of use to the examiner.
· MAC time stamps of the target file. This second set of MAC times for the target file can prove quite valuable in an examination.
MAC times are listed in the following order: created, last accessed, and last written. They are located in the link file at byte offsets 28, 36, and 44, respectively. Byte offsets start at 0 and can be identified easily on the GPS under FO, which stands for file offset. Figure 9-32 shows the cursor on byte offset 28, which can be verified by looking at the file offset (circled) in the GPS.
Figure 9-32: The cursor is on byte offset 28 of a link file. Starting at this byte and for the next 23 bytes (24 total), three 64-bit Windows time stamps show the created, last accessed, and last written times for the target file.
![]()
I often use the simple acronym CAW, as in the call of a crow, to help me remember the order these time stamps appear. C is for created, A is for last accessed, and W is for last written.
![]()
Careful observers may note that the path (circled) to the Recent folder shown in Figure 9-32 is not where it used to be! Figure 9-32 shows the Recent folder in Windows 7. Yes, our friends in Redmond moved it, and we’ll cover that later in this chapter. For now, just concentrate on link file concepts.
To decode the MAC time stamps, start at byte offset 28 and sweep a total of 24 bytes (the LE indicator [circled] in GPS shows length or number of selected bytes). This selects the three Windows 64-bit time stamps for created, last accessed, and last written times for the target file. Once the data containing the time stamps is selected, simply switch to the Decode view. Under View Types, choosing Dates > Windows Data/Time displays all three dates in their respective order (created, last accessed, and last written), as shown in Figure 9-33.
Figure 9-33: Created, last accessed, and last written times for a target file in a link file are decoded.
Link files, like many files, have a unique file header. The hex string \x4C\x00\x00\x00\x01\x14\x02 is used to verify file signatures. This string can also be used for finding link files anywhere they may exist.
Windows Vista, Server 2008, and Windows 7 Last Accessed Time Stamp Disabled
When the operating system is Windows Vista or newer, be careful when evaluating the last accessed time stamp. By default, in Windows Vista, a file’s last accessed time stamp is disabled and is not therefore tracked. It would be nice if there were no value stored in the space allocated in the MFT for the last-accessed time stamp, but such is not the case. Windows Vista stores the file creation date and time in this space. Thus, EnCase will report what is stored in the MFT for this value, which is in reality the file or folder’s creation time and not its last accessed time. Likewise, when link files are created in Windows Vista, the last accessed time stamp found in the link file will also be that of the creation date and time.
Microsoft states that it did this for system performance improvement. This setting is stored in the registry at HKEY_LOCAL_MACHINE\SYSTEM\CurrentControlSet\Control\FileSystem. In this key, the value NtfsDisableLastAccessUpdate will normally be 1, meaning Windows Vista, by default, is not tracking the last accessed time. If it is 0, the user has changed it, and Windows Vista will then accurately track the last accessed time. If you need more information about the registry, see Chapter 10. Although this value is certainly worth checking, don’t expect to find too many home users caring enough to change this setting. In enterprise environments, the case may be different if the systems are managed by smart administrators who change this setting globally using group policy.
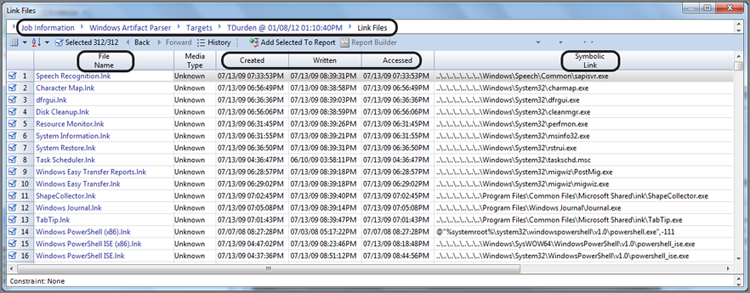
Using the Link File Parser
Link files have a complex structure, and decoding each field or piece of data within link files is beyond the scope of this text. Like for many tedious tasks facing the examiner, EnCase provides an automated method for decoding these files using an EnScript. Prior to EnCase 7, the link parsing tool was found within the Case Processor EnScript. Starting with EnCase 7, this same tool is now found within the EnCase Evidence Processor, specifically in the modules section as part of the Windows Artifact Parser. As you’ll recall, the same parse options menu for the Recycle Bin files contained link files as well. Figure 9-34 shows the parsing options for the Windows Artifact Parser. Thus, parsing link files is as simple selecting this option and running the EnCase Evidence Processor.
When the EnCase Evidence Processor (EEP) completes, run the Case Analyzer. The Case Analyzer parses information found by the EEP and presents it to you in an interface that enables hierarchical navigation. To view the results, follow the navigation to the Windows Artifact Parser and downward from there to the link file. Figure 9-35 displays the results.
Figure 9-34: The link file parser is found in the EnCase Evidence Processor Windows Artifact Parser.
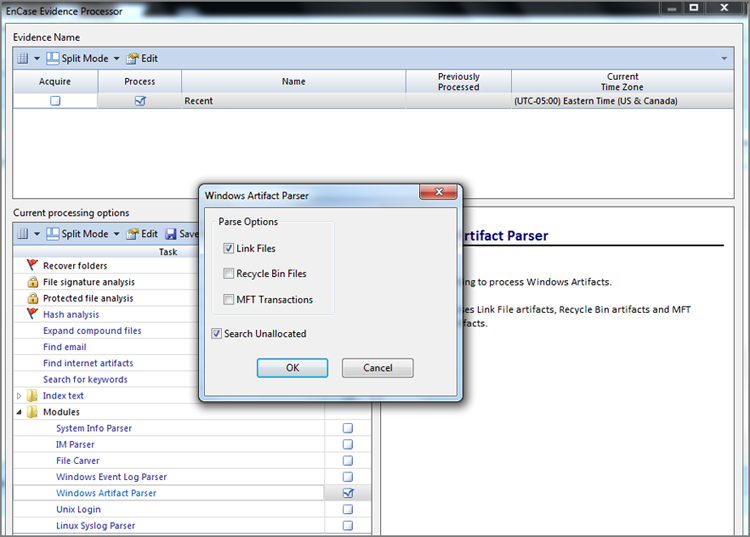
Figure 9-35: Link file parser results viewed through Case Analyzer interface. Note the hyperlink navigation bar that is circled.
Note that link file data can be found almost anywhere. As link files are processed, they are stored in RAM memory, which is volatile data. As often happens, the operating system writes volatile data that is not currently in use to the swap file (pagefile.sys) to temporarily hold it there while it makes room in volatile RAM for a current task. The swap file, by default, is configured to adjust in size. While this adjustment occurs, clusters that were formerly allocated to the swap file find themselves in unallocated space, thereby placing link files in the unallocated space along with other data. Therefore, to be thorough, you should parse for link files in the unallocated spaces. You may recall this parsing option from Figure 9-34.
With Windows XP/Vista/7, if the system is placed into hibernation or hybrid sleep, the contents of RAM are written to the hiberfil.sys file. As the result of this process, link files, not to mention other data, can be found in this file.
As you have seen, link files provide significant information to the examiner. We’ll cover in detail several folders in which link files are found, because their significance varies based on where they are found. Before delving into those specific folders, let’s examine the general directory structure created on current versions of Windows (2000, XP, Server 2003, Vista, Server 2008, and Windows 7) because the directory structure itself is forensically significant in the information it offers.
![]()
Often, you’ll need answers quickly and don’t have time to run the EnCase Evidence Processor over an entire device or case. If you need, for example, just the link files in the Recent folder, create a logical evidence file (LEF) from the Recent folder and simply run the EnCase Evidence Processor Windows Artifact Parser (Link files selected) against that single LEF. You’ll get your information returned quickly without having to wait for unnecessary information to process.
Windows Folders
Each version of Windows has its own unique directory structure and file and folder naming conventions that differentiate that version from the other versions. With experience, the examiner can usually have a good idea which version of Windows is installed by looking at the directory structure for certain telltale file and folder names. Despite how convincing these naming and structure conventions may appear, these normal conventions are not cast in granite. The final determination of what operating system is installed is derived from the registry, which I’ll cover in Chapter 10.
Nevertheless, the examiner should be familiar with the directory structures and file and folder naming conventions that are normally used by the various versions of Windows. With that knowledge and familiarity, navigating and locating operating system artifacts is greatly facilitated along with an understanding of their significance as they relate to a particular version of Windows.
The folder name that contains the Windows system files has varied with Windows versions. With Windows 9x versions, the system files were contained in the Windows folder. System files were stored in the WINNT folder with Windows NT and 2000. Just when you thought there was some discernible logic in their naming conventions, Windows XP came out and reverted to storing the system files in the Windows folder. Even with Windows Vista and beyond, the Windows folder remained the same. That seems straightforward enough, but things can deviate from this convention if an upgrade from one version of Windows to another occurred or if the user engaged in customization. Table 9-3 shows the system folder and user profile folder conventions for various versions of Windows. The naming conventions are for default new installations and do not apply to upgrades.
Table 9-3: Default new-installation system folder and user profile folder names for versions of Windows
|
Operating system |
User profile folders |
Default system folder |
|
Windows 9x/Me |
No Documents and Settings folder |
C:\Windows |
|
Windows NT |
C:\WINNT\Profiles |
C:\WINNT |
|
Windows 2000 |
C:\Documents and Settings |
C:\WINNT |
|
Windows XP/2003 |
C:\Documents and Settings |
C:\Windows |
|
Windows Vista/2008/7 |
C:\Users |
C:\Windows |
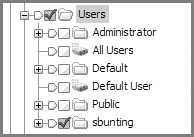
All versions of Windows NT (NT, 2000 XP, 2003, Vista, 2008, 7) create a unique artifact when the user first logs onto the system. A folder is created that bears the name of the logged-on user. This folder will appear in Documents and Settings for Windows 2000, XP, and 2003; in Users for Windows Vista and beyond; or in WINNT\Profiles for Windows NT. This folder, called the root user folder, is created regardless of whether the user logs on locally or through a domain. Thus, the directory naming convention itself bears forensic value in identifying the user by their logon name. Figure 9-36 shows various root user folders created under Users for Windows Vista/7.
Figure 9-36: Root user folders created in Windows Vista
Reparse Points
As you look at Windows Vista and beyond, one of the most dramatic changes you see immediately is that folders were moved around and renamed. When you move things around and rename them, you risk wreaking havoc with programs that address the old locations. To avoid breaking legacy programs and thereby maintaining backward compatibility, reparse points are used where the old folders used to be.
There are different types of reparse points in Windows Vista. A reparse point to a folder is called a junction. The first and most obvious reparse point (junction) that you see in Windows Vista is Documents and Settings. If you click it with Windows Vista/2008/7 Explorer, you are greeted with an “Access Denied” message.
If you look at the same folder in EnCase, I’m pleased to report you won’t be greeted by such a message. Rather, you’ll see a symbolic link icon next to the folder name. If you look at the description column, you’ll see it described as a symbolic link. If you look in the View pane on the Report tab, you see a line that again says “Symbolic Link” followed by the full path to folder to which the reparse point directs. In the case of Documents and Settings, the reparse point links to the path C:\Users.
Thus, any program that asks the operating system to address Documents and Settings will be redirected to C:\Users. You will see many reparse points representing the legacy Windows folders throughout Windows Vista/7. Now that you understand what they are and how they are used, you can move on with one more of Windows Vista/7’s mysteries behind you.
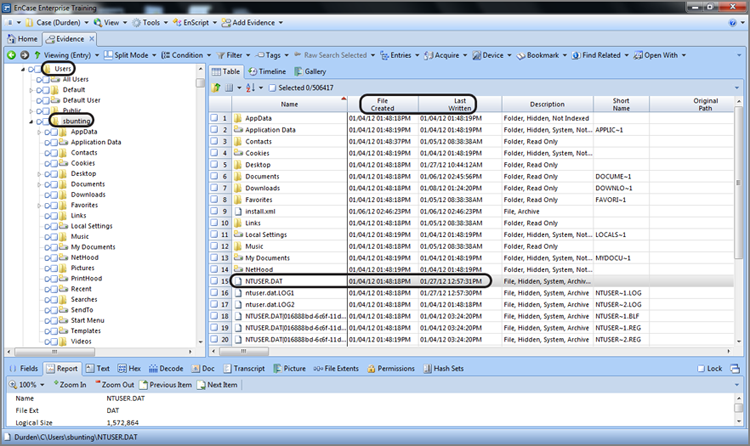
Windows, for the most part, segregates or compartmentalizes that user’s configuration, environment, and document files into subfolders under the root user folder. Further, by applying security credentials and permissions to each user’s folders, users (except those with administrator or system privileges) are generally precluded from accessing other users’ data. Forensically, this is most convenient: potential evidence for each user is neatly labeled and compartmentalized. Figure 9-37 shows the various subfolders created under the root user folder that are designed to contain the user’s documents along with their configuration and user environment data.
At the same time that the root user folder and its subfolders are created at first logon, another significant file is created: the NTUSER.DAT file. This file is selected in the Table view pane in Figure 9-37. As you’ll come to better appreciate in Chapter 10, this file comprises the user’s registry hive.
Figure 9-37: Folders containing the user’s documents, configuration, and environment data are created as subfolders under the root user folder.
Roaming Profiles in Windows
For Windows 2000, XP, and 2003, another file is created in the root user folder at first logon that is of interest to those working in domain environments where roaming profiles are in use.
Roaming profiles allow users to log onto various domain computers and have their user profiles follow them around. For the most part, this roaming profile consists of all the files and subfolders under the root user folder. There are exceptions, however, and they are defined in the ntuser.ini file, created at first logon.
Any folders listed after ExclusionList= in this file will not be included in the user’s roaming profile. By default, the History, Temp, and Temporary Internet Files folders (found in the Local Settings folder) are excluded from the roaming profile.
In a domain setting where roaming profiles are used, files found in these three folders were created locally on that machine. They don’t “follow” the user around in the domain. The ntuser.ini file can be modified on an individual basis or by group policy.
Windows Vista (and beyond) handles things differently. In AppData there are Local or Roaming folders. The data in the Local folders stays with the local host, and data in the Roaming folder follows the user in a domain.
The registry is a large database of system settings and configurations. The contents of the NTUSER.DAT file are specific to that user and their settings only. Chapter 10 covers some of the contents of this file. For now, you should understand that the file creation date for this file would normally indicate when the user first logged onto the computer under examination. This file is modified just as the user is logging off, so the last written date of this file would normally indicate when the user last used the computer under that username.
The operating system artifacts covered in the rest of this chapter are in the subfolders in the root user folder. Our approach will be that of examining the artifacts found in the folders that are generally the most significant ones for the examiner to analyze.
Recent Folder
When I discussed link files, I described how whenever a user opens a document, a link file is created in the Recent folder located in the root user folder, except for Windows Vista and beyond where it is located in the path C:\Users\%UserName%\AppData\Roaming\Microsoft\Windows\Recent. The user is unaware that this file is being created or modified. If the same document in the same location is later reopened, the link file is updated with the target file’s updated information.
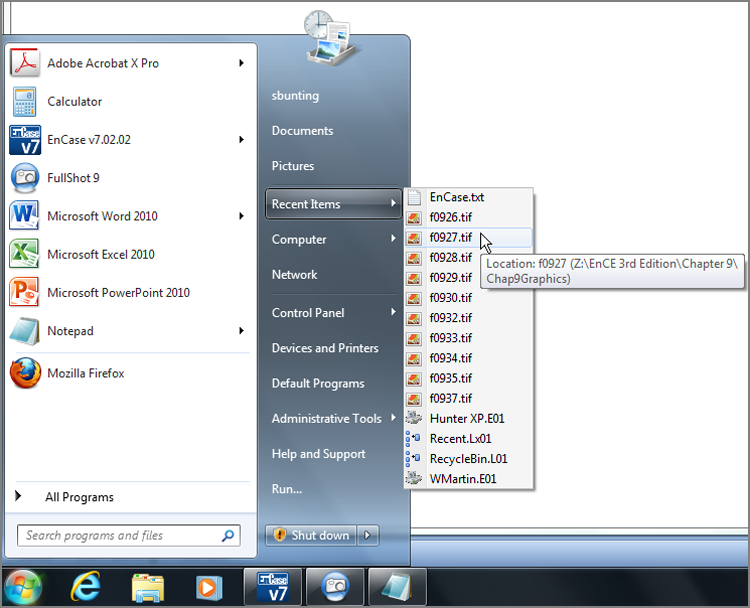
The purpose of the Recent folder is to provide a user interface that lists documents the user has recently created or modified. You can access this interface by clicking the Start button and then selecting My Recent Documents (older versions of Windows) or Recent Items (Windows Vista and beyond), as shown in Figure 9-38. By default, Windows displays the last 15 documents opened by the user.
Figure 9-38: The Recent folder contains link files that populate the Recent Items menu in Windows Vista with the last 15 files the user opened.
The Recent folder contains only link files. Windows looks to the MAC times of the link files to determine the most recent “link” file and looks to the content of the link file to display the information. If you select the properties of any file listed in My Recent Documents or Recent Items, you’ll see the properties of the file that the link file points to and not necessarily those of the link file itself.
Although Windows displays only the last 15 documents, the Recent folder can contain hundreds of link files collected over months or years. For any one file in a specific path, there will be only one link file in the Recent folder for it. Each time it is accessed, the link file content is updated. Link files in the Recent folder are named after the file (including its extension) plus the extension .lnk. For example, a file named MyFile.doc would be given a filename of Myfile.doc.lnk in the Recent folder.
Link files in the Recent folder, probably as much as any other link file, are likely to be in RAM and from there are swapped out to the pagefile.sys file. Once in the swap file, an adjustment to the size of the swap file places them into the unallocated space. If a drive is formatted, these link files will lose their directory pointers, but the data is still there unless overwritten. The Link File Parser EnScript can recover much of this data from the unallocated clusters regardless of how the data was placed there.
Link files can reveal a wealth of information. Take the time to understand them, perform your own testing and research regarding their behavior, and then use that knowledge when conducting examinations.
One of the first places I examine in a case is the Recent folder. I quickly sort the files chronologically by last written time. It serves as a quick litmus test and timeline to see what kind of files the user has been accessing and, better yet, where those files are located on their system. This approach can quickly point the way to the user’s favored or hidden storage locations, saving you lots of time and quickly focusing your resources in the right direction.
Desktop Folder
The files of any type located on your desktop are stored, in part, in the Desktop folder located in the root user folder. These files can be any type but are typically shortcuts (link files), applications, or documents. When a user first logs on and their root user folder is created, their Desktop folder has very little in it. (Currently Windows 7 Service Pack 1 deposits a shortcut file to the Windows Recycle Bin in the Desktop folder of all new users.)
Just because there is only one shortcut file in the user’s Desktop folder does not mean the user has only one file or icon on their desktop. Interestingly, the files on your desktop have more than one source of origin. In older versions of Windows, any file that appears in the Desktop folder of the root user folder named All Users appears on the desktop of every user on that local host computer. Starting with Windows Vista, All Users has been replaced by Public, as shown in Figure 9-39. Thus, any file that appears in the Desktop folder in Public appears on the desktop of every user on that local host computer.
Figure 9-39: Starting with Windows Vista, the All Users folder has been replaced by a folder named Public
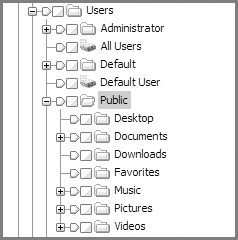
Other desktop objects are defined in the registry, such as the Recycle Bin. In addition to the Recycle Bin, the user may opt to have other desktop objects such as My Computer, My Network Places, Internet Explorer, or My Documents. You access the option to place these objects on the desktop by right-clicking the Windows Vista desktop and selecting Personalize. In the resulting dialog box, choose Change Desktop Icons under Tasks in the left pane. From there, as shown in Figure 9-40, it’s a simple matter of checking the items you want to appear on your desktop. These settings are also stored in the registry.
Figure 9-40: The Desktop Icon Settings dialog box gives users the opportunity to select several items to be displayed on their desktop.
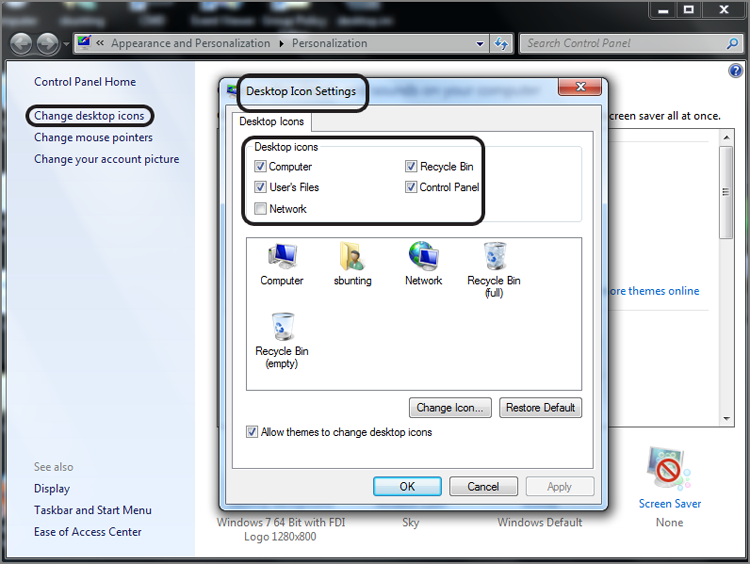
Thus, the contents that are displayed on the typical Windows desktop are derived from three sources: the registry, the All Users/Desktop or Public/Desktop folder, and the user’s Desktop folder. If the host computer is in a domain environment and the user authenticates to a domain, the desktop can have yet another source. Group policy settings can direct that individual users or groups of users have a specified desktop, thereby providing a uniform fixed desktop to domain users.
Shortly after looking at the Recent folder, I typically examine the user’s Desktop folder, which contains the files or shortcuts that a user placed there or caused to be placed there. Often, people place items they frequently access on their desktops, another good indicator of the user’s activities and preferences.
My Documents/Documents
In older versions of Windows, under each root user folder there is, by default, a folder named My Documents. By default it contains a subfolder named My Pictures and most likely My Music and My eBooks, depending on the Windows version and service pack installed.
Of course, Windows Vista had to rearrange and rename things slightly just to keep everyone on their toes. In Windows Vista (and beyond), My Documents is called Documents and is still directly under the root user folder. My Pictures is called Pictures, and My Music is called Music. Both are directly under the root user folder instead of being subfolders of My Documents.
The purpose of these folders is to have secure and segregated locations for each user’s files and folders. Most programs will default to saving files into the My Documents or Documents folder. The My Pictures or Pictures folder will typically contain several sample pictures of natural scenes, all of which are JPEG files. Beyond the default sample content, other files and folders in this folder are there as the result of user activity.
Send To Folder
The Send To folder contains the objects or links that will appear in the Explorer interface under the right-click option Send To. Several items appear here by default upon installation, and other items are created when various programs are installed. Although the user can add items here manually, this doesn’t often happen. It is a good place to examine to locate attached media such as zip drives and the like.
Temp Folder
The Temp folder is a subfolder of the Local Settings folder. With Windows Vista (and beyond), this folder appears in the path Users\%UserName%\AppData\Local\Temp. As the name implies, the purpose of the Temp folder is to temporarily store files. There seems to be no end to the types of files you can find here. This is a good place to look after running a file-signature analysis because often programs create working copies of open documents in this area, changing their extensions. Some programs delete them when done, and others simply leave behind their garbage. I once found three files that were more than 2 GB each in this area. They apparently were created during a major system malfunction and were rich with evidence.
This area is normally hidden from the user and is certainly an area you want to examine carefully. In addition to having hidden or backup copies of files here, programs often write their temporary install files and folders in this area, as you can see in Figure 9-41.
Figure 9-41: The Temp folder can contain temporary files from program installation that are often overlooked when removing programs.
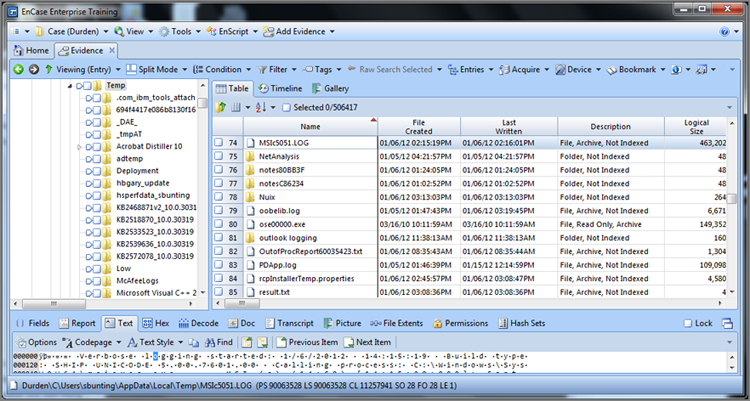
Often, a user will remove a program from an area they can access, such as Program Files, but will fail to remove files and folders in this area because it is out of the way and normally hidden. You may, therefore, find evidence here that refutes a claim that the user never had a given application installed on their system. You may find other Temp folders in other areas of the file system, but the important thing to remember is that this Temp folder (located in the Local Settings folder of the root user folder) is specific to the user.
Favorites Folder
The Favorites folder contains Internet shortcut files for Microsoft Internet Explorer. Internet shortcut files function in a similar way to link files in that they contain information about their target and the user accesses the target by clicking the shortcut file. In this case, the files have an extension of .url, which stands for Uniform Resource Locator. The target of an Internet shortcut is a URL, which is typically a web address but could just as easily be to a file on the local host or on a network resource.
A URL file has a unique header—[InternetShortcut], or at least it has remained so until recently. With Windows 7, that header has changed, as shown in Figure 9-42. Immediately following the string [InternetShortcut] will be the path to the URL target. The header (both formats) can be used to search for deleted shortcuts, depending on the version of Windows.
Figure 9-42: The data area of a URL file. This one is a default favorite that takes you to MSN.COM. Note the file header.
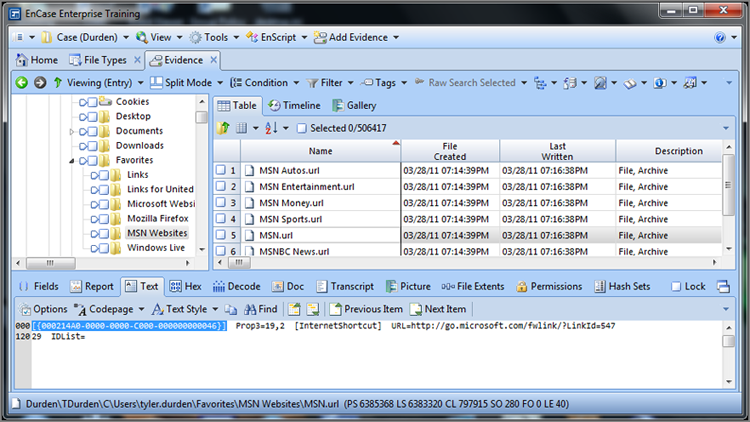
It is important to understand that some Internet shortcut files are loaded during installation. These default favorites can vary slightly depending on the Windows version and service pack. Additionally, some computer manufacturers use a customized original equipment manufacturer (OEM) version of Windows that may contain favorites to their company website or to those of their close affiliates. Figure 9-42 shows a default set of favorites for a standard installation of Windows 7.
You now understand the purpose of the Favorites folder and the structure and purpose of URL files. You also understand that you can expect, by default, that there will be some favorites preinstalled in this area. Some programs, when they are installed, may place a URL to their company site in this area. Some may ask first, and others may not. Beyond those favorites, for the most part, what is placed in this area is done or at least caused by the user. Some websites may provide a mechanism by which they can be added to the user’s favorites, with the user’s permission.
Some malicious code may add favorites without the user’s knowledge if their machine is vulnerable to such an action. Often, a telltale signature of such an act is that the creation time stamp for multiple favorites is within the same one- or two-second time period, making it clear that it was automated and not a manual act by the user.
When you examine this area, you will often find an elaborate tree of well-organized folders. When you compare this to the default, it is clear that such acts are carried out by the user. You will find that the Favorites folder is a valuable area to examine and that the evidence found here corroborates other findings. If a user claims that their visits to inappropriate websites were accidental, such can be easily refuted if the user has established an elaborate folder structure of favorites containing those same inappropriate websites.
Windows Vista Low Folders
As you go through the folders associated with the Windows 7 version of Internet Explorer 9, in addition to having new locations for these folders, you will see the presence of Low folders. The Cookies, History, and Temporary Internet Files folders will each have a subfolder named Low in which much of the structure of the Cookies, History, and Temporary Internet Files folders, subfolders, and files is repeated. Figure 9-43 shows how this structure appears for the Temporary Internet Files folder. You will note that the Content.IE5 folder appears normally as a subfolder in Temporary Internet Files. If you will look carefully, Temporary Internet Files has a new subfolder named Low in which the Content.IE5 folder appears again.
Figure 9-43: Temporary Internet Files structure including Low folder
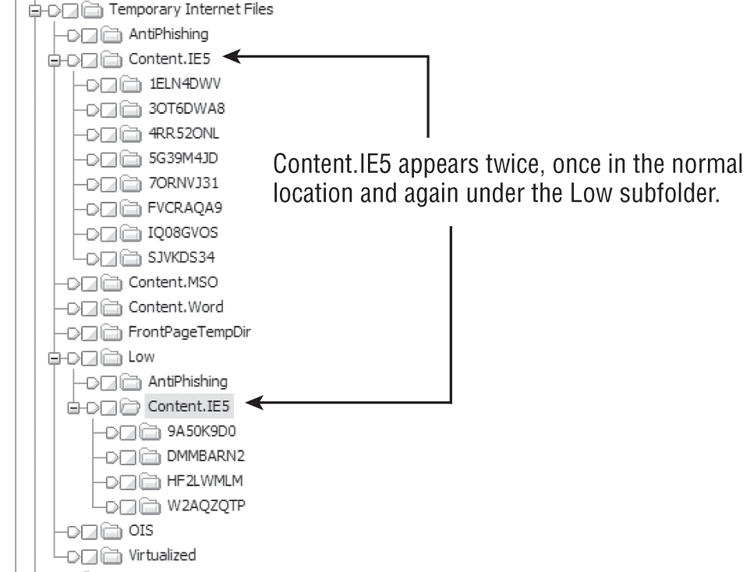
Before I explain what all of this means, I must first digress and explain some new security features that started with Windows Vista and persist through Server 2008 and Windows 7. With that understanding, the new folder structure will make a little more sense.
No doubt you have seen the commercials in which the Windows Vista operating system has been the target of humor over its warning messages asking you whether it is OK to proceed and so forth. These messages are part of Windows Vista’s new security system, which, dare I say it, is something akin to the one used in OS X. Under either of these systems, the user’s privileges upon login, even if they are administrators, are those of a mere user. When higher privileges are required by the task at hand, the process is interrupted until the user agrees to move forward.
The intent of this security model is to protect the system from malware. In the past, most Windows home users were administrators, and any process that was run by the user ran with administrator rights, which included malware. Under the new model, any process wanting to run with elevated privileges must do so with the express permission of the user.
Under Windows Vista (and beyond), the security system is a three-tiered, defense-in-depth system and is dubbed the UAC protected mode. The protected mode system uses the following three tiers of defense:
User Account Control (UAC) The UAC implements the Principle of Least Privilege in which the user, despite being an administrator, functions at a lowest level needed to carry out normal user tasks.
Mandatory Integrity Control (MIC) MIC implements a model in which data is configured or secured to prevent lower-integrity applications from accessing it. In Windows Vista and beyond, these data integrity levels are System, High, Medium, and Low. You should immediately pick up on the word Low and associate it with the Low folders. Let’s call that a hint! Tasks that run from the Start menu run with a Medium integrity level. Files run by the user from the Explorer shell interface run with a Medium integrity level. Internet Explorer 7 runs files from the Internet at the Low integrity level. That’s another hint!
User Interface Privilege Isolation (UIPI) UIPI blocks lower-integrity processes from accessing higher-integrity processes. This mechanism prevents privilege escalation by means of blocking hooks into higher-level processes.
Without further digressing into the Windows Vista (and beyond) security model, you now have sufficient information to understand the Low folders. Internet Explorer 9 has a protected mode that leverages the Windows Vista security model by placing files from the Internet into the Low folders. Data placed in the Low folders runs at the lowest possible level of integrity and is therefore contained in a protective shell. By being isolated in a Low folder, its integrity is on the bottom on the Windows Vista (and beyond) security totem pole. Since this data can run only with the lowest possible privileges and can’t climb or gain escalated privileges by virtue of UIPI, Internet browsing is made much safer.
Thus, normal Windows Vista (and beyond) Internet browsing activity will result in the data being placed in the Low folders. This goes for Cookies, History, and Temporary Internet Files. Because there is a normal or regular folder structure for Cookies, History, and Temporary Internet Files, they must be there for a reason. They exist for holding data that is run at the higher integrity levels. Given the new security model, you might ask yourself how that could be. The answer lies in a series of exceptions.
As you may recall, files run from the Windows Explorer shell are tracked in the Internet history. For example, when you open a Word document, not only is a link file created but also an entry is made in the Internet history file. As I mentioned earlier in this section, Windows Explorer runs at the medium integrity level, and therefore history entries for files opened on the local host through Windows Explorer will be tracked in the regular History folder and not in the Low folder.
At first, you may think that you may now have a place for Internet activity (Low folders) and a place for local host activity (normal folders), but that logic must give may to more exceptions. Those exceptions are as follows:
· Disabling Internet Explorer 9 protected mode in the Internet Explorer 9 Internet Options Security tab is one exception. The user would have to disable the protected mode for each zone.
· Running Internet Explorer 9 in the administrator mode is another exception.
· Turning off the User Account Control (UAC) automatically disables Internet Explorer 9 protected mode because it has dependencies upon UAC, one of which is UIPI.
· Because the trusted sites security zone is considered safe, the protected mode does not apply to those sites, which includes sites added to this zone by the user. Thus, any site in the trusted zone runs with normal privileges.
· Viewing a local HTML page is considered trusted and runs in the unprotected mode, unless that local HTML page was saved locally from a website that was in the untrusted zone. If such is the case, even though viewed locally, the protected mode will be used to view this page.
Thus, the nice clean separation between data from the Internet (Low folders) and data from the local host (normal folders) is broken by a series of exceptions. In addition to these exceptions, for reasons Microsoft can’t explain, there is some sporadic bleed over into the normal folders from data that should clearly be in the Low folders.
From a forensic standpoint, the examiner simply needs to make certain to process both the normal and Low folders to get all of the data. In Windows Vista/7, it is no longer in one convenient place. Generally speaking, except for the exceptions noted earlier, the data in the Low folder will be from normal Internet browsing, while the data in the normal folders will be from the local host or from Internet activity for which the protected mode did not apply.
Cookies Folder
In older versions of Windows, the Cookies folder is located in the root user folder. With Windows Vista (and beyond), because cookies follow the user in a domain, the Cookies folder is found at \Users\%UserName%\AppData\Roaming\Microsoft\Windows\Cookies. Also with Windows Vista, in the Cookies folder you’ll find a folder named Low, which was covered earlier. Thus, for Windows Vista (and beyond) Internet Explorer 9, you need to remember to examine and process both the normal Cookies folder and the Low folder, which is a subfolder of the Cookies folder.
Cookies are pieces of code created by websites and placed on the user’s local computer. The code is supposed to be for the purpose of enhancing the user’s browsing experience, in theory, but can be used for nefarious purposes. The data in a cookie is created by the website, and its true content or purpose is often unknown. Because of this, cookies are a serious security concern.
Cookie names have traditionally take the form of username@domain name.txt; however, recently (Microsoft patch in August 2011), they have evolved to take the format of an eight-character GUID with the .txt extension. The name changing convention is a security mechanism to prevent malicious data from being inserted into predictable cookie filenames. Each cookie is contained in one file, as shown in Figure 9-44. The total collection of cookie files is under the management of an index.dat file, which contains data about each cookie and pointers to the cookie file and to the originating web domain name. The index.dat file contains dates, and the cookie itself contains internal dates. The internal dates of a cookie describe when it was last modified by the website and its date of expiration.
Figure 9-44: Cookie files in the Cookies/Low subfolder. Microsoft apparently regards the site as untrusted by virtue of its appearance in the Low folder (an untrusted zone). The cookie data is visible in the View pane.
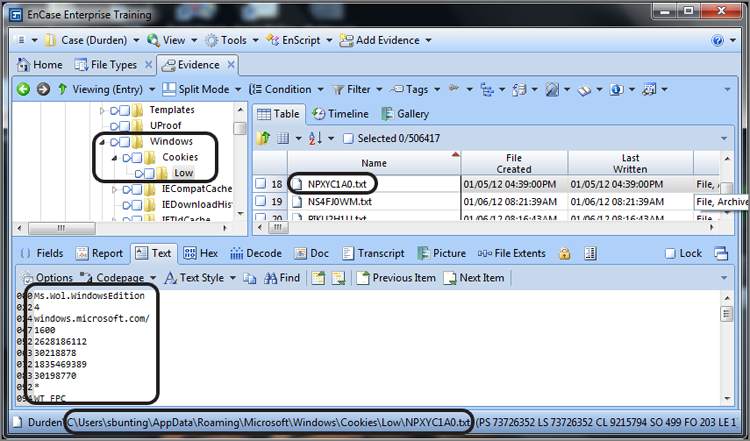
Some analytical examiners have been successful at using a cookie with a known expiration period to prove or disprove the accuracy of the system time when the cookie was last modified. Thus, there is certainly value in understanding cookie internals.
Several cookie decoders are available, but probably the best and easiest to use is CookieView, written by Craig Wilson. It is made to work in conjunction with EnCase as a viewer. When it is installed as a viewer, you can right-click a cookie in EnCase and use the Open with feature to pass the cookie file to CookieView, which will open externally and decode the values in the cookie, as shown in Figure 9-45. You can download CookieView from www.digital-detective.co.uk.
Figure 9-45: Cookie data decoded by CookieView, which can be installed as a viewer in EnCase
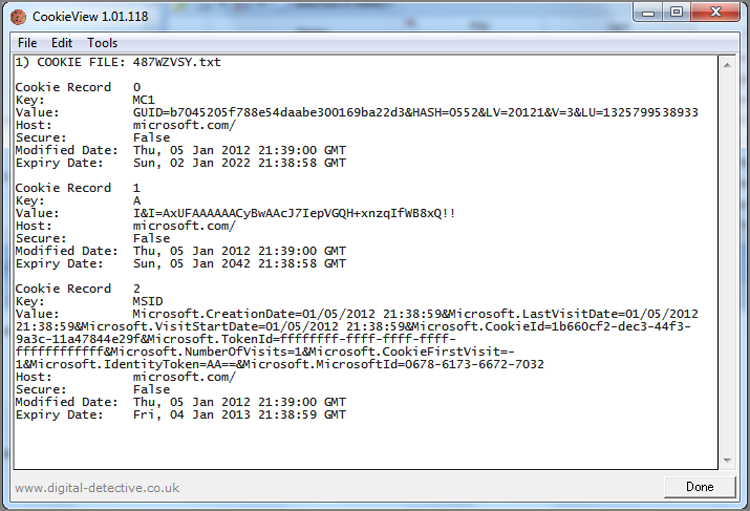
![]()
A Cookie Can Make Your Case
A woman was being stalked. She had, several years prior, preferred stalking charges against an individual, and it was her belief he was again stalking her, but he had learned many lessons, and he was very adept at concealing his identity.
Despite her extreme efforts to protect her identity, address, and so on, she received gifts in the mail, even ones for her newborn child, birthday electronic greetings, and other electronic communications. The stalker preferred public sites, especially ones in which Deep Freeze, or like programs, was installed. These programs refresh the OS and user data with each reboot, effectively sending evidence to the unallocated space and with considerable overwriting of data.
When a stalker gets comfortable with a routine, they make mistakes. This particular stalker favored a certain library with Deep Freeze. Arrangements were made with that library’s staff to seize the machine as soon as possible the next time he used it. Naturally, he continued, and we seized the machine within just a few hours of the next offense and before Deep Freeze was permitted to run.
We easily recovered his electronic greeting, but that offered no evidence. Sometimes, though, people’s habits and vices become their undoing. This was no exception. The stalker was addicted to a certain unnamed sports fantasy game by which one could win money. Thus, he couldn’t help himself but to check in on his “game.” When he did so, a cookie was left behind that contained the domain name of the game and a user ID.
After some testing using the same game, we found that the cookie expiration date and time was exactly one year from the time the site was visited, thus time stamping the cookie to coincide with the stalking event. Bingo!
Our next step was to send a subpoena to the sporting game’s host to get a history and account information for the user ID. When that information came back, the name matched our suspect and the IP address history showed hundreds of logins from his home.
Naturally, we promptly visited him with a search warrant and arrest warrants in hand. The forensics examination of his machine revealed extensive searches for the victim, her family, and her friends, which was unsettling to all involved, given his obsession and persistence over the years.
A big question was also answered by the forensics, which was how he was getting information about the victim. Surprisingly, the answer was Amazon wish lists. The default list is public, and through this mechanism the stalker watched the victim’s shopping habits and desires, including the birthday registry for her newborn.
One day a call came in from internal counsel for the sporting game company. He commented that this was the first time he was aware of that their service’s artifacts were used to place a defendant at the scene of the crime. He was concerned, naturally, about publicity, and so on. As the stalker was entering a guilty plea, in the face of overwhelming evidence, the public knowledge issue was of no further concern.
The cyberstalker was incarcerated and subjected to a long probation period and mandatory post-incarceration psychological treatment.
History Folder
In older versions of Windows, the History folder is located in the Local Settings folder, which is in turn under the root user folder. For Windows Vista (and beyond) Internet Explorer 9, since history does not follow the user in a domain, history appears under the local folder in the path: C:\Users\%UserName%\AppData\Local\Microsoft\Windows\History. Under History, you’ll find both History.IE5 and Low\History.IE5. As mentioned in the previous section, the latter is for Internet data resulting from browsing in the protected mode, while the former is from unprotected-mode activity, both local and internet.
The History folder, as the name implies, contains the history of the user’s Internet browsing history. It enables you to go back and find websites they have recently visited. When you click the History button on the Internet Explorer toolbar (alternatively, View > Explorer Bar > History), the History window opens, usually on the left side of the browser window, as shown in Figure 9-46.
Figure 9-46: The Internet history feature shows the Internet history listing.
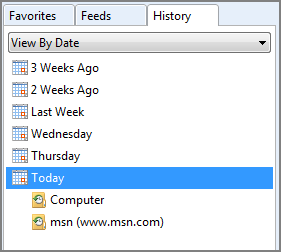
There is a top level or main index.dat database file that sits at the root level in the History.IE5 folder. All the history for the period covered is contained in this file. The default period is 20 days. In the History.IE5 folder are folders that have unique folder names. These folder names correspond with periods of time conforming to the convention MSHist01DateRange. The date range is in the format YEARMODAYEARMODA. These periods of time are in sync with the time periods you will see in the history window of your browser. Figure 9-47 depicts a typical History folder with the folders named after date ranges.
Figure 9-47: Folders named after Internet history date ranges have been located in the History.IE5 folder.
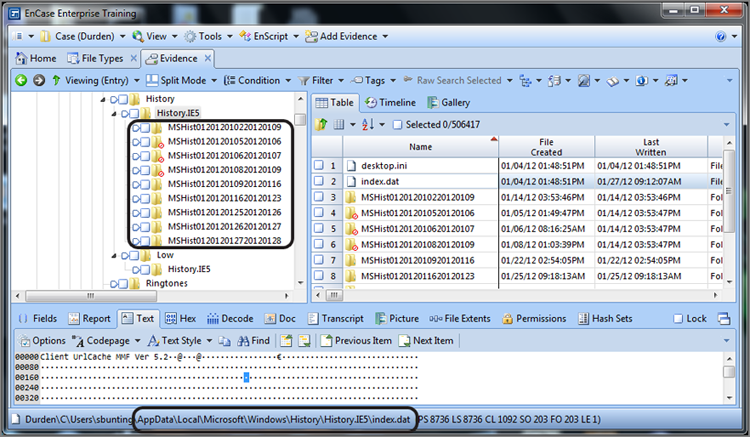
Table 9-4 maps a series of History folder names to the date ranges they represent as well as to their Internet history interface counterparts, specifically to those shown in Figures 9-46 and 9-47. It further describes which type of index.dat file (daily or weekly) is stored within that folder.
Table 9-4: History folder names are translated and linked to their browser History folder
|
History folder name |
Date range |
Browser History folder |
|
MSHist012012010220120109 (index.dat File Type: Weekly) |
2012 01 02 to 2012 01 09 |
Three weeks ago |
|
MSHist012012010520120106 (index.dat File Type: Daily) |
2012 01 05 to 2012 01 06 |
Deleted and recovered |
|
MSHist012012010620120107 (index.dat File Type: Daily) |
2012 01 06 to 2012 01 07 |
Deleted and recovered |
|
MSHist012012010820120109(index.dat File Type: Daily) |
2012 01 08 to 2012 01 09 |
Deleted and recovered |
|
MSHist012012010920120116 (index.dat File Type: Weekly) |
2012 01 09 to 2012 01 16 |
Two weeks ago |
|
MSHist012012011620120123 (index.dat File Type: Weekly) |
2012 01 16 to 2012 01 23 |
Last week |
|
MSHist012012012520120126(index.dat File Type: Daily) |
2012 01 25 to 2012 01 26 |
Wednesday |
|
MSHist012012012620120127(index.dat File Type: Daily) |
2012 01 26 to 2012 01 27 |
Thursday |
|
MSHist012012012720120128(index.dat File Type: Daily) |
2012 01 27 to 2012 01 28 |
Today |
There is an index.dat Internet history database file located in each of the folders named after date ranges. The various history index.dat files (storing main history, daily history, and weekly history) are all slightly different in their internal structures. Fortunately, EnCase will decode the history for you and present it in a separate view that lets you analyze that information and bookmark it for inclusion in your report.
For EnCase to parse the history files and decode them for viewing, you must first direct EnCase to parse the Internet history, which beginning with EnCase 7 is carried out from within the EnCase Evidence Processor (EEP), as shown in Figure 9-48. With Find Internet Artifacts selected, run the EEP to begin the process. You should again note that you can optionally search the unallocated space, which provides for the most thorough search but will take additional processing time to complete.
Figure 9-48: Find Internet Artifacts is launched from within the EnCase Evidence Processor
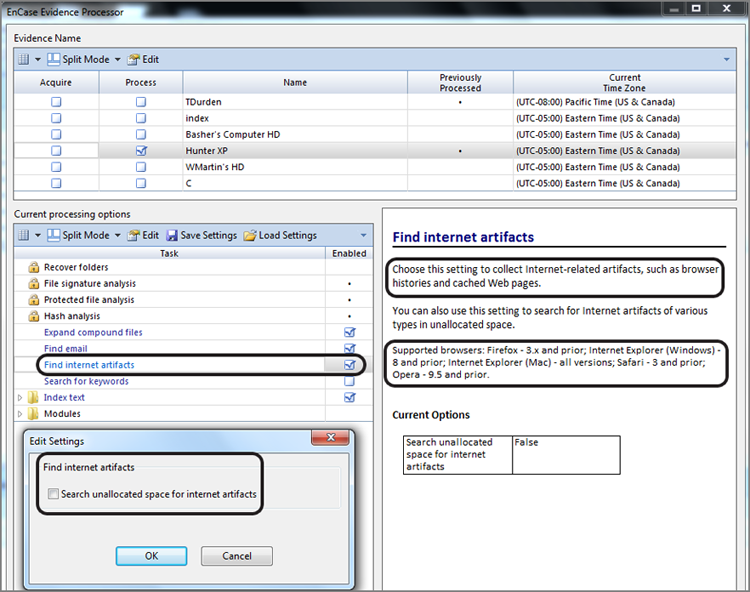
When the processing is finished, EnCase will have parsed and decoded both the Internet Explorer history and web cache, placing their results on the Records tab. Figure 9-49 shows the Records tab after the Internet history results have been processed and posted to this tab.
From the Records tab’s Table view pane, you can sort by any of the columns. You can sort by date so as to view the history in a timeline. Using the conditions and filters, you can filter and view by host, user, name, or URL. You may prefer to select and bookmark individual entries or select them all and bookmark them all at once. When bookmarked, the entries are sent to the Bookmarks view for later inclusion in your report. Figure 9-50 shows a bookmarked Internet history report.
Figure 9-49: Records tab showing results of Internet history search with both History and Cache reported in separate folders
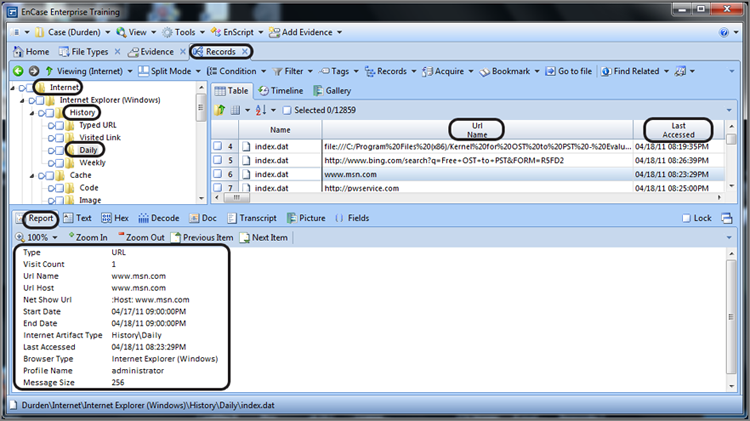
Figure 9-50: An Internet history entry is bookmarked and appears in Bookmarks view as they would appear in your final report.
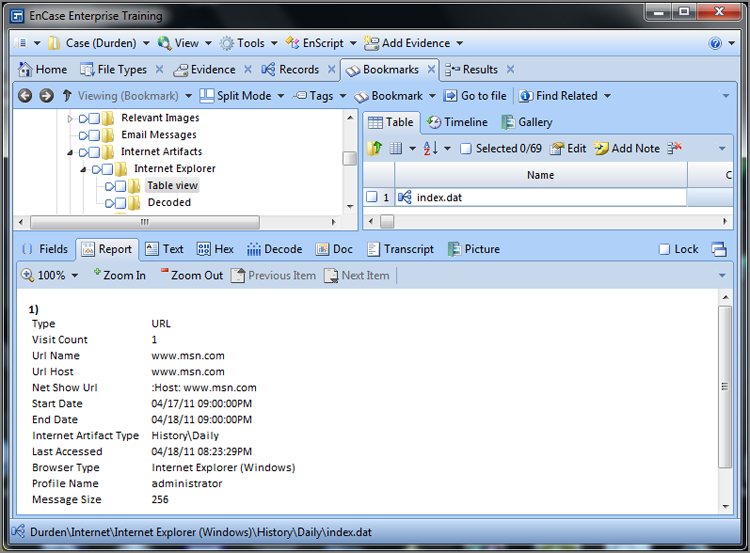
While the Records view contains the data from the EEP and you can work with it there, you can also use the Case Analyzer to summarize information from the Records view. Run the Case Analyzer and navigate to the Internet artifacts, as shown in Figure 9-51. As you can see, this view summarizes hosts by the number of visits, machines, and users. This information can be selected and sent to reports from this interface.
Figure 9-51: Case Analyzer used to summarize Internet history
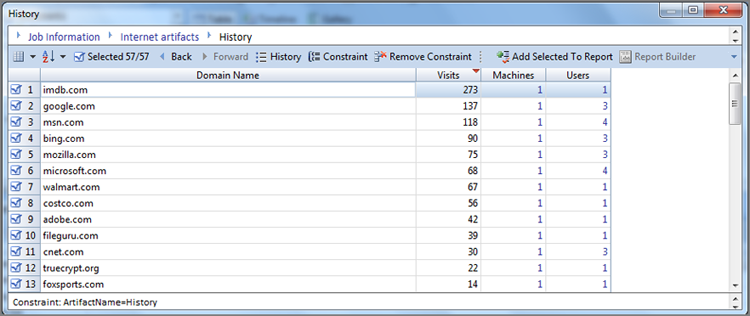
Internet History and Registered Local-Host Files
Figure 9-49 (entry #4 in Table view) illustrates a little-known or understood fact. Whenever a file on the host computer is opened or saved and that file is a registered file type, an entry is made in the history database (main, daily, and eventually weekly). The file is local and it is not cached, so don’t expect to find it in the cache. Instead of the record beginning with URL, as would be the case with a web address, the record begins with file:///, followed by the full path and filename. Many believe the file must be opened in Internet Explorer for an entry to be here, but such is not the case. If you click a file and open it with its application, it will appear here. Expect to see Microsoft Office documents of all sorts as well as other file types.
In the earlier section “Windows Vista Low Folders,” I discussed this topic in the context of where these files will be stored with Windows Vista. Because these local host files are being run via the Windows Explorer shell, they are running with Medium integrity and will not appear in the Low folders but rather in the normal folders in Windows Vista (and beyond).
Temporary Internet Files
In older versions of Microsoft Windows, the Temporary Internet Files folder, often called the “TIF folder” by many examiners, is located under the Local Settings folder. With Windows Vista (and beyond), since Internet cache does not follow a user in a domain, the TIF folder is a local setting and stored at C:\Users\%UserName%\AppData\Local\Microsoft\Windows\Temporary Internet Files\. Also recall that with Windows Vista (and beyond), Low folders will be present. Data from protected-mode Internet activity is in the Low folders, while activity from unprotected-mode Internet will be in the normal folders.
The folders contained in the TIF folder store the files downloaded and cached from the Internet. By storing or caching these files, when a user returns to a site they visit often, the browser checks to see whether the files in cache are current. If so, there is no need to clog the Internet downloading files that are locally cached and current. In that case, the file in cache is used and not downloaded. In this manner, traffic on the Web is lessened, and the user sees their web page more quickly.
Naturally there must be a method to store and manage these files. By now you shouldn’t be surprised to find that yet another index.dat file is used for this purpose. Although the name is the same as the other index.dat files I have thus far discussed, this one also differs somewhat in its structure and purpose from the others. The web cache index.dat file sits in the root of the Content.IE5 folder. In the Content.IE5 folder are at least four folders whose names consist of eight random alphanumeric characters each. As more cached files are created, a commensurate number of these folders are created to hold them. On systems where considerable browsing activity occurs, the presence of 16 or 20 of these folders is very typical.
![]()
The subfolders with random alphanumeric names under Content.IE5 are created by Windows in sets of four as they are needed. Thus, discounting recovered deleted folders, you will normal find these folders present in even multiples of four.
A typical web page consists of many files, typically a dozen or more. As those files are downloaded from the source website, they are written to the cache files. When they are written, the name of the cached file is usually modified slightly from its original name. A file that is downloaded and that has an original filename of menuicon.jpg will be stored in cache as menuicon[1].jpg unless a file by that name (menuicon[1].jpg) already exists, in which case it would be incremented by 1 and named menuicon[2].jpg.
The index.dat file keeps track of these filename changes, among other things. Each file in the cache has an entry in index.dat. That entry records its original filename and its complete URL and stores its cached filename so they can be linked back together. Each record tracks the folder number in which the cached filename is stored, along with several time stamps and other metadata. The cache folders are numbered starting at 0, and they are listed at the beginning of the index.dat file in numerical order. The first one listed is 01h, the second one listed is 02h, and so forth, until they are all listed and numbered. They are easy to spot at a glance.
As mentioned in the previous section when I discussed Internet history files as part of carrying out the Internet history search, EnCase will read the TIF index.dat files and parse the web cache for you in the Records tab. The various columns in the Table view describe the various attributes of each cached file, based on a combination of the cached file’s attributes and the data from the index.dat.
If you go to the Records tab, after running the Internet history search, in the Tree view pane you will see both the Cache and History folders. If you select the cache folder, the Table view will list all of the files in the cache folders. If you select any file, you can see it in the View pane in any one of the normal views. The Document view will show the file in web format. Figure 9-52 shows a Bing search for fight clubs that was stored in the cache.
Figure 9-52: Bing search for fight clubs found in web cache
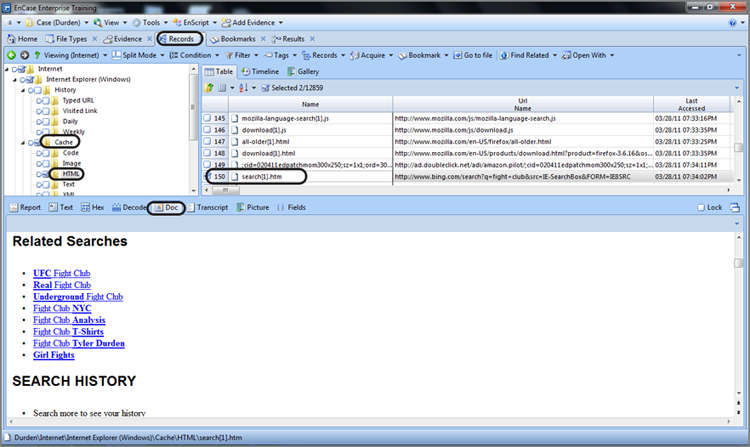
Cached items or files can be bookmarked just as any search hit or history entry. Select the cached files you want to bookmark, right-click, and bookmark the data. After you choose your destination folder in your bookmarks, click OK, and your cached file will appear in your Bookmarks view, ready for inclusion in your final report.
Cached files will show the Internet web page very close to how the user saw it. Obviously some minor formatting changes are done to make things fit in the EnCase viewing environment. While the format may change slightly, the content is otherwise present.
![]()
Artifact Recoveries After Formatting
A well-established publisher recently received a return-mail bundle from his local post office. As it turned out, the bundle of returned magazines did not belong to the publisher but belonged instead to a new competitor who had copied his publication so closely that the post office thought it belonged to their long-established postal patron and understandably mistakenly delivered the magazines being returned because of undeliverable addresses.
Upon closer inspection, the new magazine’s editorial page revealed the new publisher as a recently departed employee of the original publisher. Upon an even closer inspection of the mailing address labels, the incorrect addresses being returned matched those in his customer database in both form and content, including a couple of misspellings.
Because theft of intellectual property was patently obvious, the publisher contacted counsel. Counsel in turn asked that I examine the former employee’s hard drive to locate, to the extent possible, any evidence that would support their case.
Unfortunately, the hard drive had been used by the former employee’s replacement for several weeks and problems occurred. To remedy the problem, the outsourced system administrator formatted the drive and reinstalled the OS after which it was again used by the former employee’s replacement. Did I mention that they had also removed the former employee’s files from the server? All this had transpired despite that they had prior knowledge that the former employee was leaving to start a business of his own!
There wasn’t an intact file left belonging to the former employee. Nevertheless, all link files, FAT32 directory entries, and URLs were extracted from the unallocated clusters and slack spaces. That information was pulled together, and the events were reconstructed.
The link file content (file path and name, MAC times, and logical size) revealed that the former employee had accessed the customer database on the server at all times until he began his plans to start a competing business. His intent to start his own business was marked and time stamped by a sudden and extensive set of URL strings and web content for everything pertaining to starting one’s business, from legal issues to supplies. It was at that critical juncture that the customer database was copied onto the employee’s workstation. The database on the server was reduced to one-third its original size when he trashed thousands of entries. The target file sizes in the link files clearly showed this activity occurring within a 20-minute time period! From that point forward, the former employee never accessed the database on the server, or at least no evidence of such was found.
When the database was moved to the employee’s workstation, the content from scores of recovered link files showed the file size of this database steadily increasing as he spent his last three months conducting searches, developing the customer database, and setting up his competing business on his former employer’s time.
He created a competing website using some of his employer’s images so much so that they appeared almost as a mirror site. The web mail traffic with his web developer was also recovered.
To top it off, there was even a link file that showed the customer database on a CD on his last day of his employment. The customer database, as he transferred it to CD, was 25 percent larger than it was when he started, while his employer’s customer database was slashed by nearly two-thirds its original size. All this information was derived from recovered link file content, corroborated by URL entries.
When confronted with a substantial quantity of incriminating evidence, the former employee, through counsel, entered into an agreement with his former employer to avoid civil damages that would have bankrupted him. In the agreement, he admitted to the wrongdoing, agreed to shut down the website and cease his publication in its current format, permitted imaging of his company’s computers to establish a baseline, and agreed to future imaging and examination of his data under certain agreed-upon conditions.
The agreement was far more restrictive upon his business than any judge would likely have ordered, but to avoid the expense and possible treble damages from an adverse ruling, he agreed to those conditions.
Most of the evidence that forced his hand resulted from recovered link file content along with other supporting data. All of it, without exception, was found in the unallocated clusters or in slack space. When the link file information was placed in a spreadsheet and accompanied by graphs and a timeline, the customer database story unfolded. When accompanied by other evidence relating to him starting up his business while on his former employer’s time clock, the icing was on the cake.
Swap File
Windows and other operating systems have a limited supply of RAM with which to function. When they run out of RAM, they write some of the data that is in RAM to a file whose dedicated purpose is to cache RAM memory. This file is generically called a swap file, but more correctly called a page file. It is located in the root of the system drive, and its name is pagefile.sys on current versions of Windows.
![]()
The swap file can be configured for a drive other than the boot drive to optimize performance. If you don’t see it on the root of the boot drive, you should examine other volumes to see whether it has been placed there. There is also the possibility that the user is security conscious and has configured their machine to delete this file during shutdown. If you can’t find the file anywhere, look in the following registry key: HKEY_LOCAL_MACHINE\SYSTEM\CurrentControlSet\Control\Session Manager\Memory Management. If a value exists named ClearPageFileAtShutdown and its value is set at 1, the page file has been set to be deleted during shutdown.
When examining systems, you should always check this file. You may often find evidence that was written in RAM that was never in file format on the hard drive. You may find unencrypted text fragments in this file that are encrypted in their file format. If it was ever in RAM, it could be in the swap file. It is best to always search this file with the Unicode option enabled because files that appear normally in regular text can appear in Unicode when they are in RAM.
Hibernation File
With Windows 2000, XP, Vista, and Windows 7 allowing the computer to “hibernate” is an option. For a machine to power off and go to sleep and yet come back to life at the precise point where it went to sleep, the contents of RAM must be written to a file. Hence, you have the hibernation file, named hiberfil.sys, which is located in the root of the system drive.
Because the total contents of RAM are written to this file, this file will be the size of your system’s RAM memory. If the computer has never been in a hibernation mode, the file will still be the same size as your system RAM but will be filled with 00h characters. Once it has been in the hibernation mode, the contents will reflect the last time the machine was in hibernation mode. The same processing guidelines apply to this file as with the swap file because they both store the contents of RAM at various points and for different reasons.
Figure 9-53 shows the location of the pagefile.sys swap file and the hiberfil.sys hibernation file on a Windows 7 system. The highlighted file is the swap file. Note that because the system from which it came had 8 GB of RAM, the swap file in this case is more than 12 GB. Normally the swap file will be 1.5 times the amount of RAM.
You may notice that Windows Server versions (2000, 2003, and 2008) weren’t mentioned in the first paragraph as operating systems that allow machines to hibernate. That isn’t to say that they can’t hibernate, but server operating systems are typically not found on laptops, and servers usually run 24/7, making them unlikely candidates on which to find a hibernation file. So, while possible, don’t expect it.
Figure 9-53: The swap file (pagefile.sys) and the hibernation file (hiberfil.sys) can hold valuable evidence.
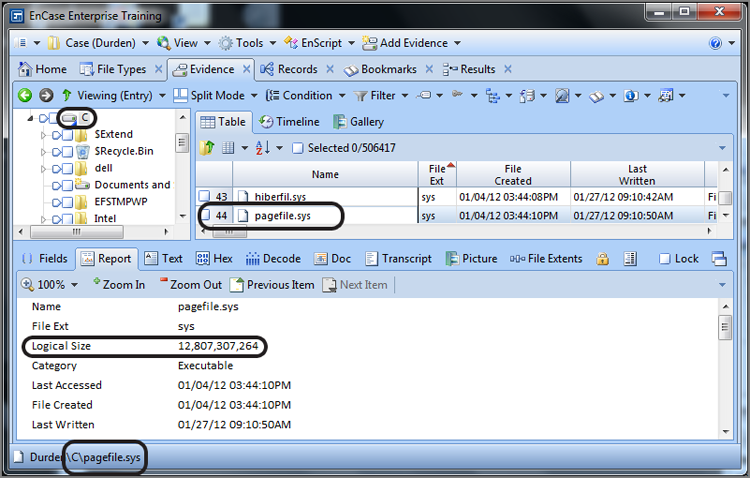
Print Spooling
When computers print files in a Windows environment, a print spooling process occurs. Spooling involves writing the print job to a couple of files so that the print job can run in the background while the user continues working with their applications. The print job is placed in a queue and prints as the printer is available to do the job. When the print job is done, the spooling files are deleted by the operating system.
When you set up your printer definition, you have the option of choosing either RAW or EMF mode. The RAW mode is a straight graphic dump of the print job. With the EMF mode, the graphics are converted to the EMF (Microsoft Enhanced Metafile) image format, and each printed page is represented by individual EMF files. These EMF files are not stand-alone files, but rather they are embedded within another file.
For each print job, two files are created. On Windows NT and 2000, these files will be located in Winnt\system32\spool\printers. On Windows XP/2003/Vista/2008/7 these files will be located in Windows\system32\spool\printers. The location is configurable by the user in the registry key HKEY_LOCAL_MACHINE\SOFTWARE\Microsoft\Windows NT\CurrentVersion\Print\Printers\DefaultSpoolDirectory. To that extent, it could exist almost anywhere.
If the workstation is connected to a network, spool files may also be sent to the server. Normally these temporary files are deleted at all locations after the print job is completed, and finding these files as allocated files is rare, unless the printer was offline and the spool files were in queue awaiting the printer to come back online—at which point the job would complete and the files would be deleted. However, I have seen hundreds of these spooled files on a Windows 2000 domain controller. For whatever reason, the server refused to delete these files when the print job was done. Bugs and poor configurations often leave added artifacts beyond your normal expectations.
Of the two temporary files created for each print job, one is called a shadow file, with the extension .shd, and the second is called the spool file, with the extension .spl. The filename will consist of five digits, and there will be a matching pair of files for each print job, differing only by their extension. For example, a print job may create the following two files: 00003.SHD and 00003.SPL. On some configurations you may find the five digits preceded by letters, such as FP00002.SHD and FP00002.SPL. The shadow file (SHD) is analogous to a job ticket. It contains information about the print job that includes the username, the printer, the name of the file being sent to print, and the print mode (RAW or EMF).
The spool file (SPL) contains the same kind of print job information, although formatted differently, and it contains the actual print job graphical data. When the mode is RAW, the graphic content is just that—a raw output of the graphical stream needed by the printer to output the job. Figure 9-54 shows two spool files created by a print job. The printer was offline, and the files are allocated files waiting for the printer to come back online. The spool file contains considerable information about the print job, including the filename, username, as so forth. This particular print job was done in the RAW mode, which is not commonly encountered because it is not the default mode.
Figure 9-54: Print job shadow and spool files on Windows XP. This print job was done in the RAW mode, which is not the default mode and is thus less common.
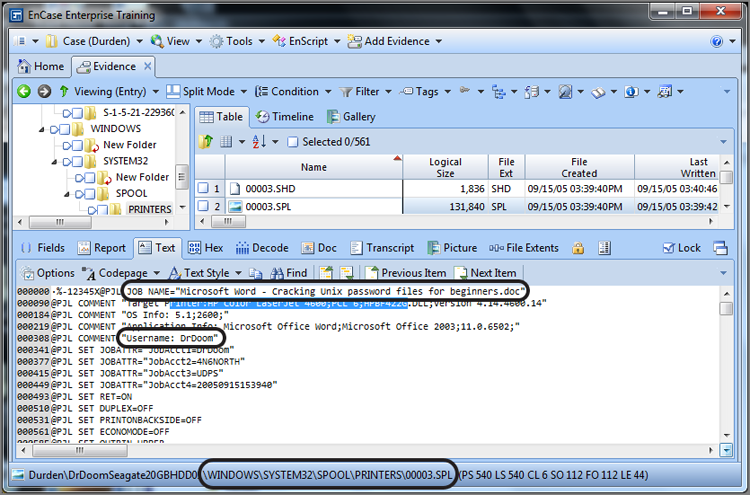
By default, printing is done using the EMF mode. Usually only special circumstances or issues warrant a change to the RAW mode, and it must be configured manually. Thus, most of the print jobs you will recover will be in the EMF mode, which are easily recovered.
In the EMF mode, each page of printed material will be represented by an EMF file embedded within the spool file in the order they will be printed. Figure 9-55 shows shadow and spool files for an EMF print job.
Figure 9-55: Print job shadow and spool files on Windows 7 (SP1). This print job was done in the EMF mode, which is the default mode.
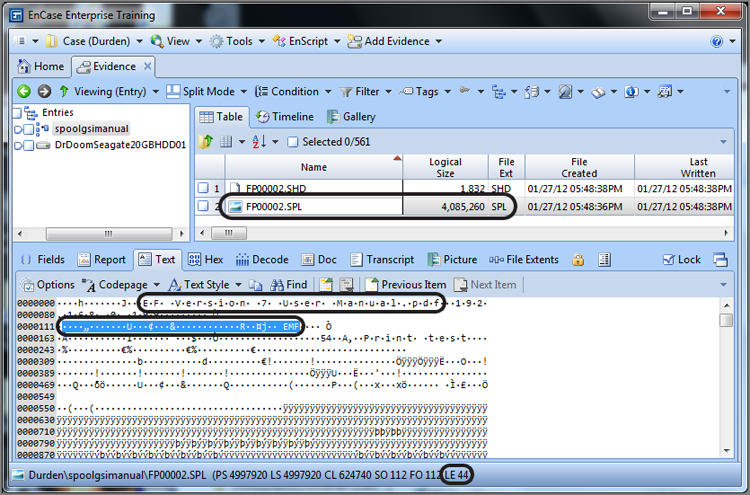
An EMF file has a unique header, which also varies with the operating system. Note that the EMF header is highlighted and circled in Figure 9-55. Table 9-5 lists the EMF header for each operating system that uses it. When attempting to recover print jobs, you should use the search string that applies to the operating system in use. Even then there are some variants with EMF headers even within the same version of Windows. If you fail to find any EMF headers, shorten your search string to the portion that is common to all, which is \x01\x00\x00\x00. Doing so will result in a significant number of false positives, and there are some better approaches to try first.
Table 9-5: EMF header search strings for different versions of Windows
|
Operating system |
EMF header (GREP search strings) |
|
Windows XP (very precise, few false positives) |
\x01\x00\x00\x00\x5C\x01\x01\x00\x00\x00\x84\x00 |
|
Windows 9x upgraded to XP |
Use both: \x01\x00\x00\x00\x5C\x01\x01\x00\x00\x00\x84\x00 and \x01\x00\x00\x00\x58\x00\x00\x00 |
|
Windows 2000 (very precise, few false positives) |
\x01\x00\x00\x00\xD8\x17\x01\x00\x00\x00\x58\x6E |
|
Windows NT and 2000 |
\x01\x00\x00\x00\x18\x17 |
|
Windows 9x* |
\x01\x00\x00\x00\x58\x00 |
|
Windows 2000, XP, 2003, Vista, 2008, Windows 7 (very precise!) |
\x01\x00\x00\x00..\x00.{34,34}EMF |
|
Universal Search String (some false positives; can miss undocumented variants) |
\x01\x00\x00\x00[\x5C\x84\xD8\x58\x18][\x01\x17\x6E\x00] |
*Windows 9x handles print jobs differently, and the process is not described in this book.
You may search for EMF print jobs in spool files, but remember that you will rarely encounter them as allocated files, unless the printer was offline or some problem prevented the print job. Mostly, you can expect to find them in slack space, unallocated clusters, page files, and hibernation files. When you find a valid EMF embedded file or fragment, select the first few bytes of the search hit, bookmark the data, and view it as a picture. Figure 9-56 shows a search hit, in Hex view, for the EMF header. The cursor is on the first byte of the found string, which is all that is needed for EnCase to decode the data that follows.
With the cursor on the first byte, or first few if you’d like, simply switch to the Decode view and set the view type to picture, as shown in Figure 9-57. Assuming you have a valid EMF graphic, the picture will display in the right pane, as shown in Figure 9-57. I’m sure that most of you will recognize the print job as the first page of the EnCase Version 7 user manual. You should keep in mind that the SPL file will contain an embedded EMF graphic for each page of the print job, and you should step through the search hits in this file to view each page of the print job.
To automate the process of searching for EMF print jobs, you can use the EnCase Evidence Processor (EEP), specifically the File Carver module. As with any module in the EEP, you need to open the module to select options, which is in this case selecting the Enhanced Metafile Graphic in the Picture category, as shown in Figure 9-58. With that done, you run EEP and review the results.
![]()
There are reports from Microsoft that Windows Vista (any beyond) quickly and thoroughly deletes spool files. From my tests, it seems true that Windows Vista (any beyond) quickly deletes and overwrites the entries in the MFT; however, the data still persists in the unallocated clusters and should still remain a good artifact that can be recovered by searching for the EMF header. Also, as another bonus, Windows Vista (and beyond) adds some information to the end of the shadow (SHD) or job ticket file. Figure 9-59 shows this information. You can see that it includes the filename (if web page, the complete URL of the printed web page), printer type, user’s name and SID, IP address of the printer, and so forth. It will be in Unicode, and Figure 9-59 shows this data after decoding it using the Decode view.
Figure 9-56: Search hit for EMF header string (circled). Note that the cursor is on the first byte of this string.
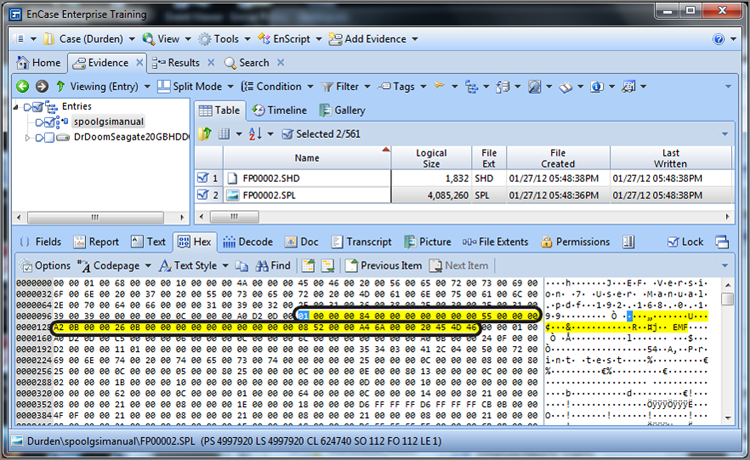
Figure 9-57: Using Decode feature to view an EMF print spool graphic
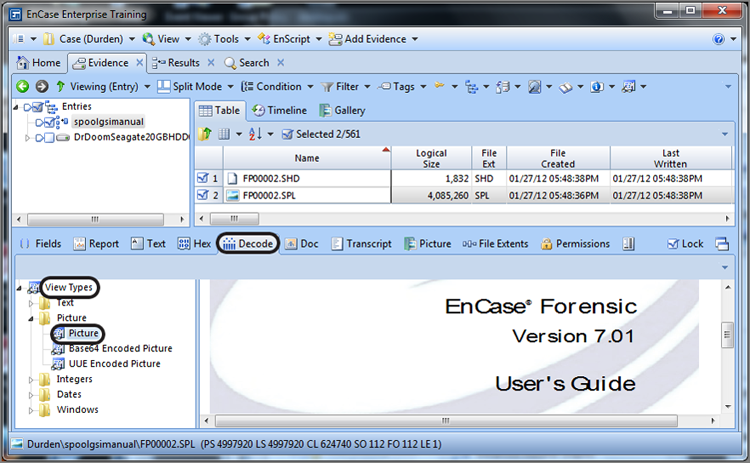
Figure 9-58: Using file carver in EEP to locate print spooler EMF graphics
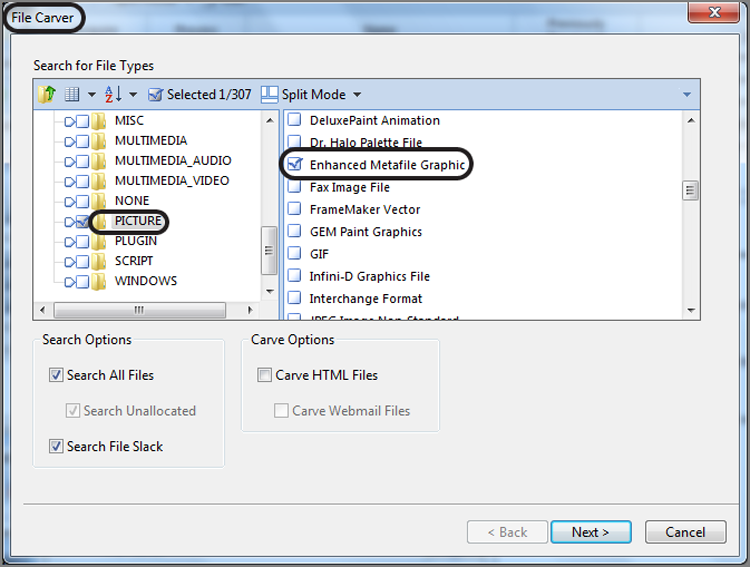
Figure 9-59: Windows 7 printer shadow file or job ticket showing considerable information about print job
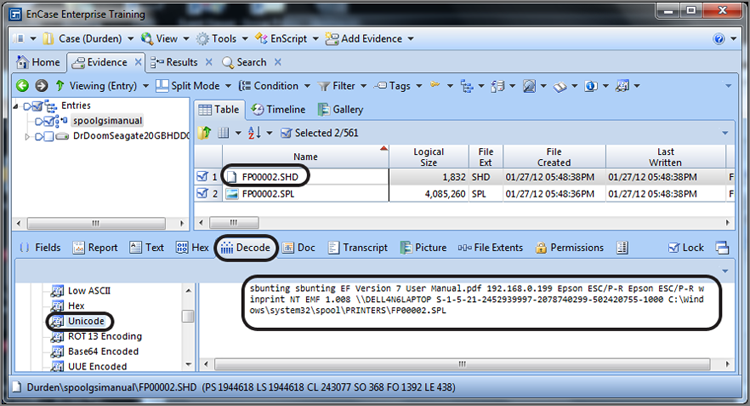
![]()
Print Jobs Artifacts Link Defendant to Crime Scene
A rather high-profile homicide case involved a lover’s triangle consisting of three Russian students. The defendant stalked her former boyfriend for months. She drove to his apartment and remained outside overnight until he left the next morning, at which point she entered the apartment and killed her former boyfriend’s new girlfriend.
Like many, she lived her life through her computer, and thus her computer provided substantial evidence throughout her trials (three mistrials due to hung juries). One significant piece of evidence surfaced, which was a recovered print job for directions from the defendant’s apartment to the former boyfriend’s apartment, printed minutes before she left on the eve of the homicide.
Recall that each page is a separate embedded graphic. This was a three-page set of directions, and there should have been three embedded graphics file; however, the first two were overwritten, and all the remained was page 3. Page 3 was almost overlooked because the page itself was blank, but at the bottom was the footer for the page, which included the defendant’s address and the former boyfriend’s address, including a date and time it was printed. Thus, take the time to look at what appear to be blank images when looking at thumbnails of recovered EMFs. Some of the best evidence is in the metadata!
Legacy Operating System Artifacts
Thus far, the artifacts mentioned have been for the most recent Windows operating systems, namely, Windows 2000/XP/2003 and Windows Vista and beyond. Windows 9x systems, while rapidly disappearing from the scene, are still encountered. Table 9-6 lists the locations of several artifacts on Windows 9x systems. Other than being located in a different place or named differently, they are functionally the same.
Table 9-6: Windows 9x artifacts and their paths
|
Description |
Filename and path |
|
Swap file. |
C:\WIN386.SWP |
|
Recent folder whose contents appear in the Windows 9x Start > Documents menu. |
C:\Recent |
|
Desktop items. |
C:\Desktop |
|
My Documents folder. |
C:\My Documents |
|
Internet cache and index.dat. |
C:\Windows\Temporary Internet Files\Content.IE5 |
|
Cookies files. |
C:\Windows\Cookies |
|
Internet history files. |
C:\Windows\History |
|
User profiles (if configured). (Each user will have their own set of the files contained in this directory.) |
C:\Windows\Profiles\<user name>\ |
Windows Volume Shadow Copy
In Chapter 10, I’ll discuss restore points that are created by the system restore feature that appears in Windows XP and Windows Me. Windows Vista (and beyond) also uses restore points, but it stores its data in a much different and far more complex manner. As part of the system restore process, Windows Vista (and beyond) creates what are called volume shadow copies (VSCs). Whatever the Microsoft engineers may have taken away from forensic examiners with the introduction of Windows Vista, they gave back triple with this one!
What, therefore, is a volume shadow copy? Whereas Windows XP restore points took snapshots of critical system files, Windows Vista (and beyond) does much more. In essence, the Volume Shadow Service (VSS) takes snapshots of all data on the volume that has changed and does so from the block-level perspective, in 16 K blocks. Since it does all data, in addition to taking snapshots of important system file changes, it makes copies of user documents as well. Figure 9-60 shows the System Protection tab of the System Properties menu. On this tab, you can see which volumes have system restore configured.
In addition to protecting system files, starting with Vista, user files are protected with a feature dubbed “previous versions.” Herein lies the forensic gold in Windows Vista (and beyond)! If a user deletes a file and dumps it from the Recycle Bin, there are often still copies of the deleted file existing as volume shadow copies within the restore point files. There are often as many copies as have been saved, and they are not typically fragmented when stored. The complexity of the storage system for Windows Vista (and beyond) restore points far exceeds that used in XP. Rather than store files in separate renamed files, Windows Vista (and beyond) stores everything in series of massive files; thus, these very large files are containers for hundreds of smaller files or file segments.
Figure 9-60: System Protection tab of Windows 7 System Properties menu
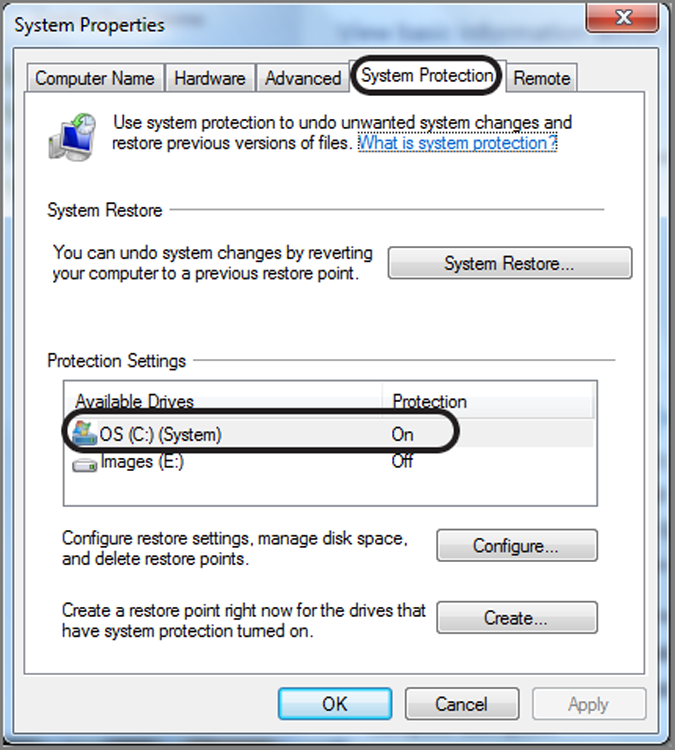
To appreciate the wealth of forensic gold maintained by Windows Vista (and beyond), one need only use one of the volume shadow copy administrator tools from the command line. To list all shadows, enter vssadmin list shadows at the command line. Figure 9-61 shows the amount of drive space used by the boot volume for shadow copies (enter vssadmin list shadow storage). For a drive that is 156 GB, 12.52 GB is currently being used to store shadow copies. There are a few tools under development to forensically process VSCs; however, none has yet arrived on the market, although one came very close. Reverse engineering the manner in which files, or portions thereof, are stored is underway and is clearly no simple process.
Figure 9-61: Command-line tool used to show storage space used by volume shadow copy
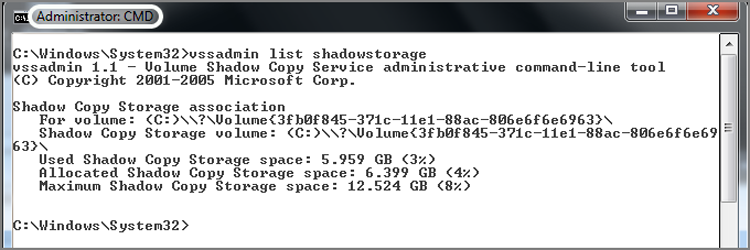
In the meantime, you can still work with these files. There are a couple of approaches that you can use. First, you can treat them very much as you would unallocated clusters, swap files, and so forth. You need only to locate them and search them. They are located in C:\System Volume Information. The easiest thing to do is to select all files in this folder and conduct specific searches depending on the type of files you seek or specific search keywords of interest in the case. You could also let EnCase’s File Carver module do the heavy lifting.
Another method of working with the volume shadow copies created by VSS is to image them in the Windows environment, using a dd tool from George Garner’s Forensic Acquisition Utility tools, which can be found at www.gmgsystemsinc.com/fau/03ddecb5-8262-4022-aaff-6559424ff8fc/fau-1.3.0.2390a.zip. In short, you list the Volume Shadow Copies using the command vssadmin list shadows, making sure you are running the command shell as an administrator. Figure 9-62 shows the output of this command for shadow copy number 5.
Figure 9-62: Command vssadmin list shadows output
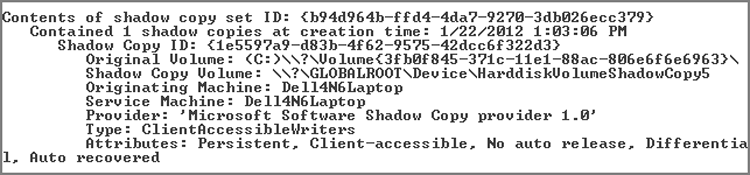
Once you have the shadows listed, it is time to use Garner’s dd tool. The syntax for running his tool to image the volume shadow copy is dd if=\\.\HarddiskVolumeShadowCopy5 of=E:\shadow5.img -localwrt, which will address and image VSC number 5, as shown in Figure 9-62. Figure 9-63 shows the output of this command after it has completed imaging. Since the target volume size here is approximately 160 GB, it does take some time. And by the way, there are five volume shadow copies. That means five times 160 GB (approximately) to get them and a commensurate amount of time. Ouch! No one said that good forensics was quick and easy.
Figure 9-63: Garner’s dd tool used to successfully image a volume shadow copy

If you didn’t have the opportunity to image the volume shadow copies while it was running and before the machine was seized, you can still image the VSCs, but it becomes more complicated. You need to virtually mount the drive from within the forensic environment and then use Windows’ vssadmin to address the volume shadow copies in that manner.
I often use the Voom Shadow to work with volume shadow copies. By inserting the Voom Shadow between the host system and its hard drive, Voom Shadow write protects the host hard drive but caches all writes to it on the Voom Shadow’s hard drive, allowing a system to be booted and examined live in a forensically sound manner. Using this configuration, I can image the volume shadow copies. Further, I can install a third-party tool called Shadow Explorer and examine the contents of the various VSCs, as shown in Figure 9-64.
Figure 9-64: Shadow Explorer enables you to examine the contents of any of the available volume shadow copies, listed by the date and time created
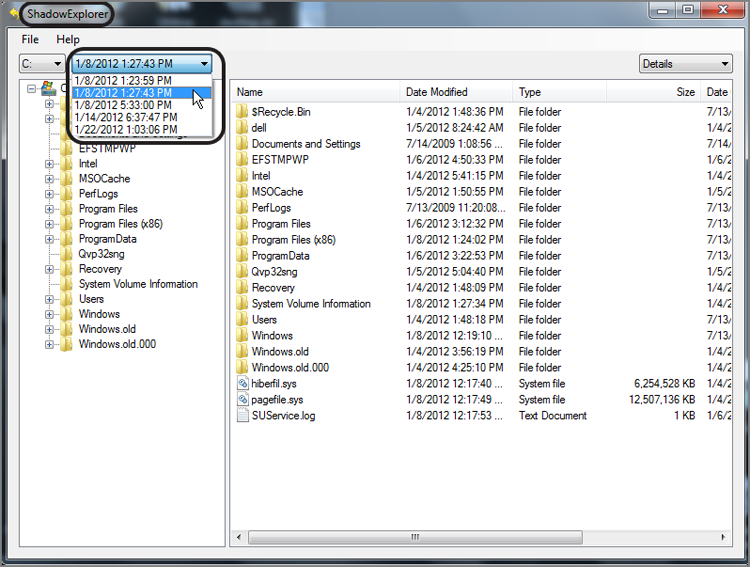
To further understand how volume shadow copy works for the Windows user, let’s say you created a file named Secrets.doc and listed all your nefarious activities in this file. Let’s also say that you kept it updated over time. On a daily basis, or thereabouts, Windows makes a restore point, and with it the volume shadow copy feature creates copies of your file if it has changed since the last restore point. Let’s say you become aware you are the focus of an investigation and decide it’s in your best interest to delete this file. To do this, you sent the file to the Recycle Bin and dumped the Recycle Bin. The file is gone, or so you believe.
The forensic examiner might be able to recover the file by traditional forensic means, but in addition, there are copies of the file in the restore point files. If the machine were running, anyone could right-click the folder that contained the deleted file, select Properties, and then go to the Previous Versions tab. This tab would list the various versions of the file stored in restore points from which you could open, copy, or restore those files. Figure 9-65shows the Previous Versions tab for the hypothetical file after it has been deleted and subsequently deleted again from the Recycle Bin.
Figure 9-65: The deleted file can be recovered from the Previous Versions tab of the Properties dialog box.
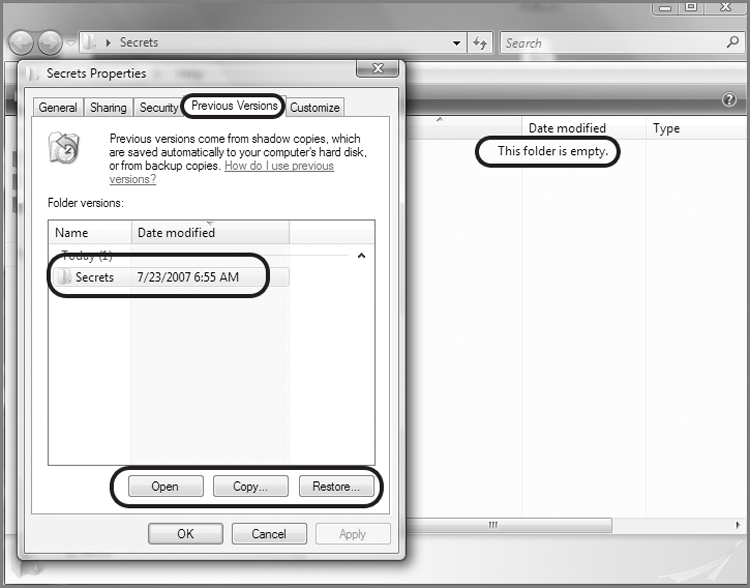
Once you’ve seen how this feature works in Windows Vista (and beyond), you’ll see the forensic gold mine that Microsoft has created for computer forensics examiners. This should also open the door for some other methods of file recovery. You could use VMware to mount an image of a Windows drive. Once mounted, you could recover files from the Previous Versions tab, exporting to removable media.
Similarly, you could restore a copy of the image to a drive and boot the drive in the suspect’s original machine. Again, once booted, you could recover files easily from the Previous Versions tab. In either method, you should take screen shots and notes of your activity as you proceed. The screen shots can be later presented to jury. It’s much easier to understand how the recovery was done because most people do understand Windows basic functions.
The volume shadow copy technology is an evolving feature of Windows system restore feature. System restore and restore points began with Windows XP, and volume shadow copy was actually introduced into Windows Server 2003. Not much was said or known about volume shadow copy at the time; it was a quiet feature and not often encountered in computer forensics. With Windows Vista, however, the volume shadow copy feature hit the masses of the Windows user base.
Since Vista was a less-than-stellar version of Windows, Vista was never widely adopted by corporate users. Windows 7, compared to Vista, was far superior, and its acceptance by corporate users was much better. However, there is still a large XP user base among corporate users because there is no direct upgrade path from XP to Windows 7. That issue, coupled with slow economic times, slowed the conversion from XP to Windows 7. With time, Windows 7, and with it volume shadow copies, will be ubiquitous in the Windows user base. As its forensic worth becomes apparent, considerable effort will be expended in harvesting this evidence. Just as the volume shadow copy technology evolves, you can expect the forensic tools and methods to process it to follow suit.
Windows Event Logs
Since Windows was first released, it has always produced event logs of system and application activities. The logging has continually evolved over time, improving considerably in the process. Windows logs have always been rather cryptic and little understood. To make matters worse, by default Windows hasn’t been very good at turning on the auditing features that are built in to the system. Thus, many people believe that Windows logging is not occurring or that what is being logged doesn’t make much sense. Accordingly, the wealth of information available in logs hasn’t been fully leveraged by the computer forensics community.
Kinds of Information Available in Event Logs
Even though Windows auditing is not enabled by default, it still captures valuable information in its event logs. Figure 9-66 shows the typical XP audit configuration, which is found in Administrative Tools > Local Security Policy. Even though, quite obviously, no auditing is turned on, Windows still produces a considerable volume of data in the system and application event logs. Figure 9-67 clearly shows significant logging activity in the system event logs, despite the No Audit setting.
Figure 9-66: Default audit policy settings in Windows XP
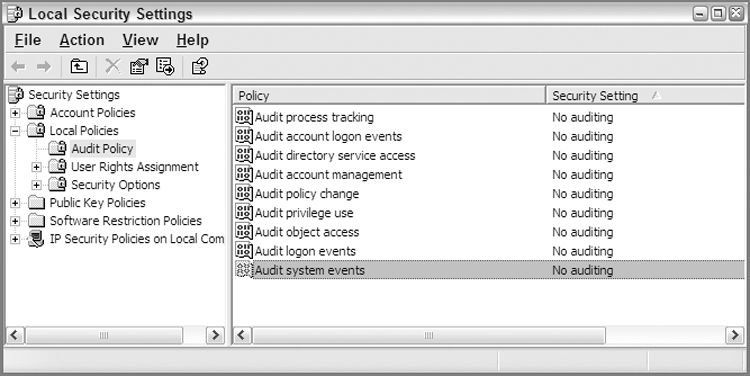
Figure 9-67: Event Viewer in Windows XP showing logging activity in system event logs despite a No Audit setting
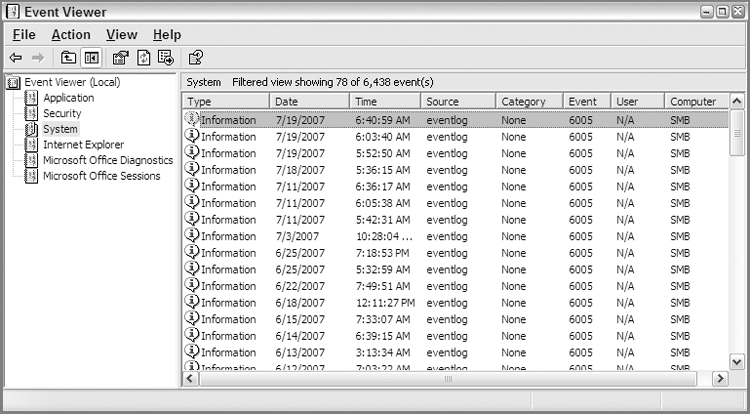
Windows Vista, as will be discussed further later in the chapter, changed the event log format. It also changed the amount of logging that occurred with the default no audit configuration. Figure 9-68 shows the default auditing policy for Windows 7 Enterprise (SP1), which on the surface appears the same as Windows XP in Figure 9-66. Despite the settings, however, Windows 7 security event logs will now contain event logs, as shown in Figure 9-69. With Windows XP, security event logs would contain one default entry; thus, there has been an improvement in the out-of-the-box logging with the introduction of Vista.
Figure 9-68: Default auditing policies for Windows 7 Enterprise (SP1)
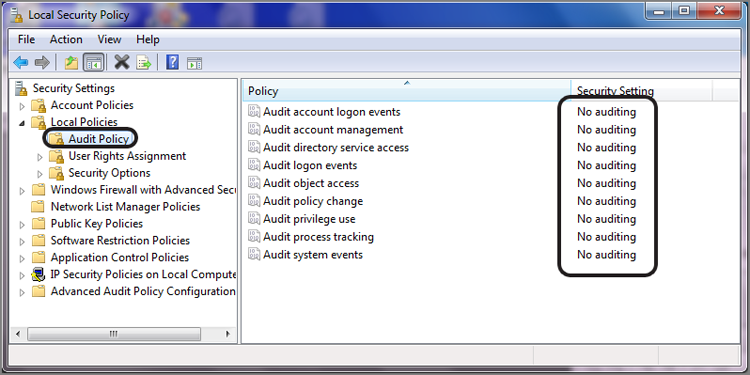
Figure 9-69: Despite “No Auditing” settings, some event logging still occurs

Windows, except for Windows Vista, stores data in three files in the folder C:\Windows\System32\config:
· secevent.evt: The Security event log
· sysevent.evt: The System event log
· appevent.evt: The Application event log
The Windows interface for viewing event logs natively is the Event Viewer, which is found in the Administrative Tools menu.
![]()
In addition to Application, Security, and System logs, the careful observer will note the addition of Internet Explorer, Microsoft Office Diagnostics, and Microsoft Office Sessions. Internet Explorer will be present if there was an upgrade to Internet Explorer 7. The log is present, unpopulated with data, and there supposedly for future debugging purposes. The two logs related to Microsoft Office are present if there was an upgrade to Office 2007. The diagnostics log records data relative to the diagnostics routine for Office 2007. The sessions log records each time an Office 2007 application is opened and closed. It also records how it was closed, in other words, whether it closed normally or crashed.
Determining Levels of Auditing
One of the questions you often need to know is what level of auditing was enabled. Knowing what level of auditing was enabled provides the examiner with some expectations as to what kind of information might be found. Since the box in question is most often offline and being viewed in EnCase, you can’t open the Local Security Policy menu and check the settings. The answer lies in the registry. If you’re not comfortable yet with the registry, you may want to jump ahead to Chapter 10 first.
The audit event policy settings are stored at the following registry key: SECURITY\Policy\PolAdtEv. The default value contains the information necessary to determine the audit policy settings. The first byte determines whether any auditing is configured. If it is 0, no auditing is enabled. If it is 1, auditing is enabled, and the various levels and types of auditing are defined in the bytes that follow.
Figure 9-70 shows the data in this value. Some of the data is relevant, and most is not. I have placed an overlay over this data such that only the relevant bytes are highlighted. In this manner, the information contained therein is much more visible and understandable.
Figure 9-70: Audit policy settings are highlighted.

To interpret the data in this registry value, refer to Tables 9-7 and 9-8. Table 9-7 describes the meaning of each byte offset as to which audit setting is affected. Table 9-8 describes the meaning of the value at the byte offset.
![]()
The following tables and audit policy definition scheme remain the same for Vista and beyond.
Table 9-7: Byte offsets and their corresponding audit types
|
Byte offset |
Description |
|
00 |
00 No Auditing/01 Auditing |
|
04 |
System Events Audit Setting |
|
08 |
Logon Events Audit Setting |
|
12 |
Object Access Audit Setting |
|
16 |
Privilege Use Audit Setting |
|
20 |
Process Tracking Audit Setting |
|
24 |
Policy Change Audit Setting |
|
28 |
Account Management Audit Setting |
|
32 |
Directory Service Access Audit Setting |
|
36 |
Account Logon Audit Setting |
Table 9-8: Bytes values and their corresponding audit settings
|
Byte value |
Audit setting |
|
00 |
No Auditing |
|
01 |
Audit Successes |
|
02 |
Audit Failures |
|
03 |
Audit Success and Failures |
With the information provided in these tables, you can interpret the data in Figure 9-62. Table 9-9 shows the audit settings configured and displayed in Figure 9-62.
Table 9-9: Audit settings in Figure 9-62 interpreted
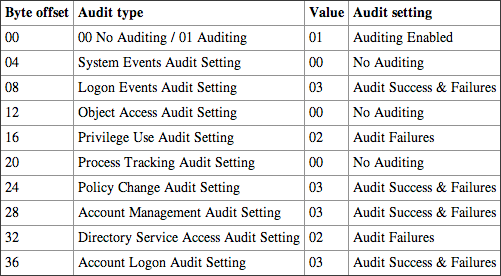
Windows Vista/7 Event Logs
Windows Vista (and beyond) event logging changed everything, or nearly everything. The event logs are now stored in the folder C:\Windows\system32\winevt\logs, and their file extension changed from .evt to .evtx. The filenames are now as follows:
· security.evtx: The Security event log
· system.evtx: The System event log
· application.evtx: The Application event log
In addition to these logs, there are nearly 100 files in this folder with event log extensions, as shown in Figure 9-71. That being said, there are considerably more logs in Windows Vista (and beyond) than in a pre-Windows Vista system. While they were changing things, the data format itself was changed to a binary XML format. Even the user interface changed. Figure 9-72 shows the new Windows Vista (and beyond) Event Viewer interface, in which you can see many of the logs.
Figure 9-71: Nearly 100 event logs in new location (\Windows\System32\winevt\Logs)

Figure 9-72: Windows Vista (and beyond) Event Viewer interface
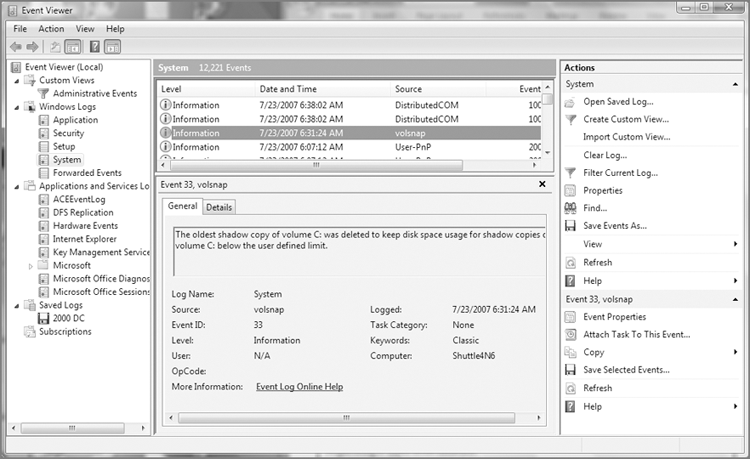
Those who used the features of the legacy Event Viewer to their fullest will recognize that much of what was under the hood with the old Event Viewer is now visible directly in the interface. For instance, the detailed information contained in the bottom pane used to require the user to open a record in a separate window. Most of the information in the right pane used to be in the Properties window or accessible via the contextual (right-click) menu.
Using the Windows Event Log Parser
Regardless of which event logs you are examining, Windows post-Vista or pre-Windows Vista, EnCase can process them all. Beginning with EnCase 6.6, Windows Vista (and beyond) event log parsing is available. EnCase does not rely upon the Windows API to parse the logs. Rather, it reads the raw data and parses it directly.
Figure 9-73 shows the EnCase 7 Windows Event Log Parser, which is a module in the EnCase Evidence Processor. Double-clicking the Windows Event Log Parser displays an options dialog box from which the user may configure conditions to apply to the parsing job. Figure 9-74 shows this dialog box.
Figure 9-73: Windows Event Log Parser is a module contained in the EnCase Evidence Processor.
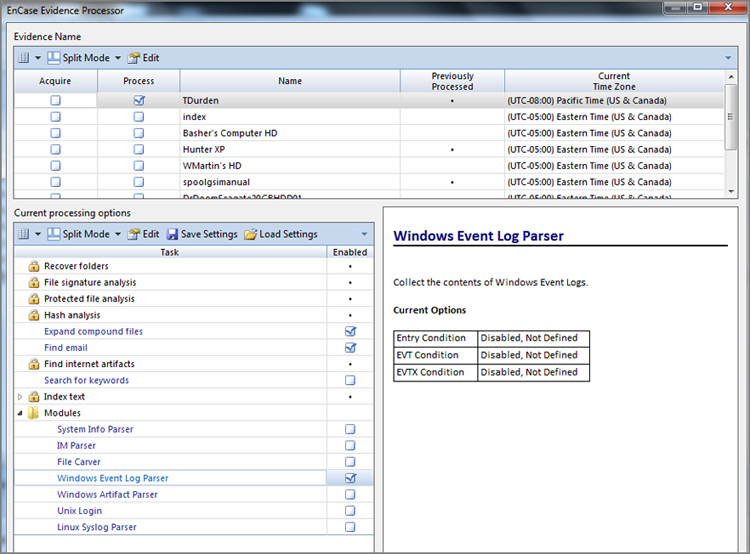
Figure 9-74: Windows Event Log Parser conditions options
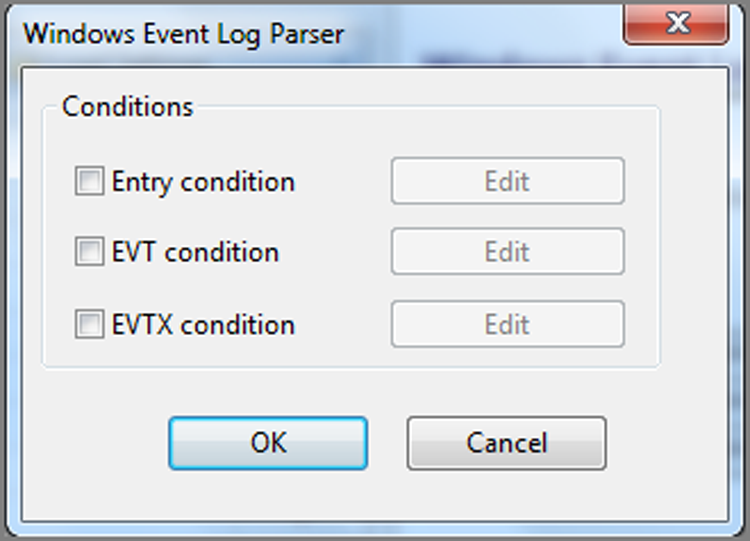
Once the EnCase Evidence Processor has completed, some of the information from the parsed data is available from the records view; however, the Case Analyzer EnScript will produce a more usable format, as shown in Figure 9-76. From here you can add all or selected records to a report. Once the report is generated, you can save by right-clicking the report, and you can save the data in several formats, depending on your final needs.
Figure 9-75: Windows Event Log Parser output as generated by the Case Analyzer EnScript
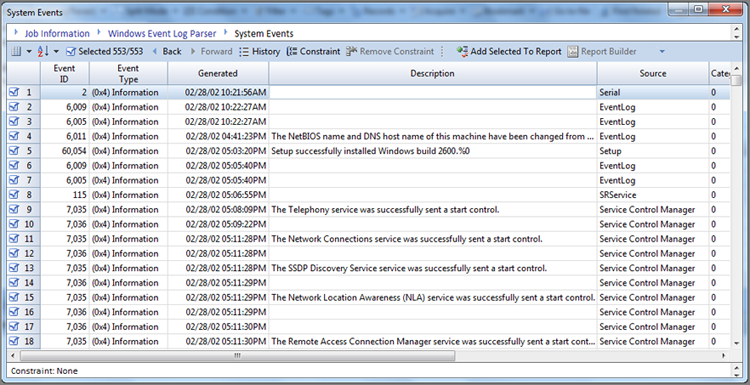
![]()
In addition to all the other changes Windows Vista made to the event logging system, Microsoft also radically changed the event ID numbers. If you were used to the pre-Windows Vista event ID numbers, you will have to learn a completely new set of numbers.
The amount of information an examiner can extract from event logs is endless. IP connection information is often available and in places you’d least expect it. No examination can be considered complete without looking at the event logs for the time period in question. What can be revealed in these logs can often change the complexion of your case.
For More Information
Understanding Windows event logs is a complex topic and beyond the scope of this book. It could, in fact, be the topic of a book unto itself. For those wanting to understand Windows event logs, I suggest reading Chapters 12-15 of the book Mastering Windows Network Forensics and Investigation. Steve Anson and yours truly devoted nearly a third of the book to understanding and processing pre-Vista Windows event logs. The intent was to cover all facets of event logs from understanding the event ID numbers to understanding them on a binary level, including recovering event log fragments and processing them with EnCase. Recently, Ryan Johnson and Scott Pearson teamed with us on the second edition of this text. In newest release, the new post-Vista event log format has been covered extensively. More information on the book is available on the Wiley website at www.wiley.com/WileyCDA/WileyTitle/productCd1118163826.html.
It’s one thing to read about Windows artifacts, but you’ll get more out of this book if you engage in hands-on examination and recovery of those artifacts. Exercise 9.1 takes you through various Windows artifacts discussed in this chapter.
Exercise 9.1
Windows Artifacts Recovery
1. In the exercise, you will recover many of the artifacts discussed in this chapter. Before you start, go to the publisher’s website for this book and download the set of evidence files named DellLaptopJohnyUser. The set of files weighs in at approximately 12 GBs, so allow ample time for the download before starting this exercise.
2. Open a new case in EnCase and name it something along the lines of Windows Artifacts Recovery.
3. From the home screen, choose Add Evidence and then choose Add Evidence File. Browse to the evidence file you downloaded and add it to your case.
4. From the Evidence view or tab, now visible after adding evidence, choose Process Evidence from the Evidence tab toolbar and allow the EnCase Evidence Processor (EEP) to initialize and load.
5. Before you can choose any modules to run or not, you must first select the evidence item for processing.
6. Select the modules you want to run at this time. For this exercise, I suggest selecting only Find Internet Artifacts and Windows Artifact Parser and turning off searching in unallocated clusters. File Signature Analysis is mandatory, and you can’t deselect it. Click OK to run the EEP. This would be a good time to take a break to allow EEP to process.
7. Once EEP has successfully run (the progress bar in the lower right disappears), click View > Records to go to the Records view.
8. From the Records view, in the Tree pane, open up Internet and drill down to Internet > Internet Explorer > History> Daily. In the Table pane, look over each entry’s data in the View pane Report tab. Look for specifically, local files opened that may be of interest (file://), external drives or mapped drives, downloads of interest, and searches of interest. You should find some of each that should catch your interest when you see them.
9. From the Tree pane, drill down to Internet > Mozilla 3 > Downloads. Do you see any programs downloaded that should cause you some concern as an examiner, especially if you are investigating a matter in which data was exfiltrated from an employer? (Hint: Dropbox!)
10. From the Records view in the Tree pane, open Evidence Processor Module Results, and in the Table pane, among other items, you should see the Windows Artifact Parser - Records entry, which is blue and therefore hyperlinked. Click the blue hyperlinked entry and should open its own view within the Records view or tab.
11. Examine the Recycle Bin. From which folder were the three items dubbed “Geo Images” deleted? How does this discovery “complicate” your examination?
12. In the Tree pane, select the Link Parser. In the Table pane, double-click the Name column to sort the filenames in ascending order (arrow points up). You should see a link file near the top that begins with “08_iceland.” You should note that this file is also blue, or hyperlinked. By clicking this hyperlinked file, you should be taken to the details for this file. You should immediately note that this link file points to a drive letter F, and that such is NOT included in the device you are examining, meaning your investigator has to locate this missing drive!
13. Bookmark your findings, save your case, and exit. Were this a real case, you should be contacting the investigator at this time and advising them that Dropbox is a factor in this case as well as another drive (F).
Summary
This chapter covered a wide array of artifacts produced by the Windows operating system. Before you could examine specific artifacts, you had to consider one artifact that was common to most artifacts: time. The NTFS file system stores its MAC times in GMT, whereas FAT file systems store their MAC times in local time. FAT uses an MS-DOS time stamp for MAC times; NTFS uses the Windows 64-bit time stamp for MAC times. The Windows 64-bit time stamp measures the number of 10 millionth-of-a-second intervals since January 1, 1601, at 00:00:00 GMT.
When displaying time to the user, NTFS file systems convert the GMT time to local time using the local time offset stored in the registry. EnCase uses the default offset based on the offset for the examiner’s machine. If the offset on your evidence under examination differs from this offset, it can be modified. The registry can be manually examined for this information, or the Evidence Processor/System Info Parser module will return the same information with much less effort. You must set the correct time zone before running the core Evidence Processor functions that work with date and time, including Index Text, Find Internet Artifacts, and Find Email.
The Recycle Bin is the default location where Windows sends files that have been deleted. The directory entry from the file’s original location is marked as deleted, and a new entry is created in the Recycle Bin folder. For Windows 2000/XP, the new name will begin with D for deleted. It will be followed by the letter of the volume from which the file was deleted. It will be followed next by the index number of the file in the INFO2 record. The file will retain its original extension.
All files in the Recycle Bin are tracked and displayed to the user using the INFO2 database. It consists of 800-byte records (280 bytes if Windows 9x) for each file in the Recycle Bin. The record contains the index number, the original filename and path, and the date/time the file was deleted. If the Recycle Bin is on an NT system, the Recycle Bin will have folders for each user’s deleted files, and the folders will be named after the user’s SID number.
With Windows Vista (and beyond), the INFO2 file was discarded and in its place are individual $I, or index, files that contain the metadata regarding the deleted file. The file renaming convention changed as well, with deleted files being renamed $R with a short GUID that corresponds with the index file GUID. The file extension remains the same for both the deleted file and the index file. As long as the $I file is intact, EnCase will report the $R file by its proper filename before it was deleted.
Link files are shortcut files. They are created by Windows, by programs, by user activity without their specific knowledge, or by deliberate intent of the user. The link file contains data about its target file. Among other information, this internal data contains the name and path of the target file; the volume serial number; the logical size of the target file; and the created, accessed, and written times (CAW) at byte offsets 28, 36, and 44, respectively.
Windows NT, 2000, XP, and 2003 create a series of files that are unique to each user. Windows NT stores them in Profiles, while Windows 2000, XP, and 2003 store them in Documents and Settings. Windows Vista (and beyond) is different still, storing them in Users. The first time a user logs onto one of these systems, a root user folder is created bearing the user’s logon name. Nearly all data unique to that user is segregated and secured in these folders. Under the root user folder are several folders created by default, many of which are of forensic interest.
The Recent folder is one of the folders created under the root user folder. The Recent folder contains link files of files and documents opened by the user. Windows displays the most recent 15 of these link files in the My Recent Documents view. Windows Vista (and beyond) stores its Recent folder at C:\Users\%UserName%\AppData\Roaming\Microsoft\Windows\Recent.
The Desktop folder is another folder created under the root user folder. Although the user’s actual desktop that they see has content from several possible sources, the contents of this folder, aside from the default content, are placed there by the user and are unique to that user’s desktop.
The My Documents folder is another folder created under the root user folder. It contains, by default, at least a My Pictures subfolder and sometimes My eBooks and My Music subfolders, depending on the Windows version and service pack that created them. The purpose of My Documents is to create a unique and secure location for each user’s documents. Generally, that which is under My Documents, aside from default folders and files, is attributable to the user to whom the folder belongs.
Windows Vista (and beyond), quite by contrast, uses Documents instead of My Documents and now places Pictures, Music, and so forth, in the root of the user’s folder instead of being a subfolder of My Documents.
The Send To folder is another folder created under the root user folder. Its contents appear in the Windows Explorer right-click menu as Send To options. The user can (but doesn’t typically) manually add items to this folder. It is most often populated by application installations and by Windows itself. It is a good place to look for external storage devices, such as zip drives and the like.
The Temp folder is another folder created under the root user folder. It is a vast dumping ground for temporary files. Looking at this area after a file signature analysis can prove quite beneficial. Files located here are specific to and attributable to the user.
The Favorites folder contains special link files for use with the Internet Explorer web browser. These special link files are called Internet Shortcut files and have the extension .url. The target file for these special shortcut files is a URL address. Some favorites are created by default, some are created by applications or websites, and some are created by the user. Very elaborate folder configurations are a telltale sign that the structure and contents were created by the user.
For each of the Cookies, History, and Temporary Internet Files folders, Windows Vista (and beyond) creates a Low subfolder. The purpose of the Low folder is to contain data that is being run in the protected-mode of Internet Explorer 9. Data for which the protected mode is not running is stored in the normal folders.
The Cookies folder contains individual files with pieces of code stored by websites to enhance the user’s browsing experience, in theory. This code can likewise be misused or exploited. Each cookie is a file using the format username, followed by the @ symbol, followed by the website name. After August 2011, the format changed such that the filename is now an eight-character random alphanumeric. Each has a .txt extension. The cookies are managed by a database file named index.dat, which is located in the Cookies folder.
The History folder contains a series of index.dat files located in folders named after date ranges. The History.IE5 folder contains the main history index.dat file. Each of the subfolders in the History.IE5 folder contains an index.dat file for the time period referenced in the containing folder’s date-range name. These files are parsed and displayed in the Records tab of EnCase after running the Internet History parsing tool from within the EnCase Evidence Processor.
The Temporary Internet Files (TIF) folder is used to store files that are downloaded from the Web and viewed in Internet Explorer. Other applications are known to use this area for file storage. Outlook Express and Hotmail both open attachments in the cache folders. Outlook creates a separate folder for opening its attachments and is located in TIF; the folder is named beginning with OLK. The Content.IE5 folder contains an index.dat file that tracks the files cached by Internet Explorer (not other applications). This file tracks, among other information, the original URL and filename, the filename as stored in cache, and the cache folder in which the file is stored. This database is parsed, and the contents of the cache are displayed in the Records tab of EnCase after running the Internet History parsing tool from within the EnCase Evidence Processor.
The swap or paging file is used to temporarily store RAM memory when RAM space runs short for its current needs. This file is currently named pagefile.sys on current versions of Windows and is located in the root of the system drive. The hibernation file, named hiberfil.sys, is used by Windows 2000, XP, Vista, and Windows 7 to go into a hibernation mode to conserve power. The contents of RAM are written to this file so that when the system wakes up, RAM can be restored from this file. It is also located in the root of the system drive. Both these files should be routinely examined as they contain valuable data that can be found in no other location.
When Windows prints data, it caches the print job into two spool files per print job (Windows 2000, XP, 2003, Vista, 2008, and Windows 7). This process allows the print job to function behind the scenes, enabling the user to continue working. Print jobs are placed in queue, and it is essentially a first in, first out (FIFO) operation unless you are working in a networked environment in which certain users or machines have priority status with regard to printing. On a stand-alone workstation, the files are stored in System32\spool\printers. This path is a subfolder of the system root, which is either WINNT or WINDOWS. If the workstation under examination is in a domain environment, you will likely find the spool files on the server as well. When the print job completes, the two spool files are deleted.
The spool files have extensions of .shd and .spl. The former is called the shadow file, and the latter is called the spool file. The shadow file contains printer job information only. The spool file contains printer job information and the actual print job data itself. If the printer is configured for the RAW mode, the print job data will be one continuous stream of graphical output data. If the printer is configured for the EMF mode (the default and therefore most common), each printed page of output is represented by an EMF file embedded within the spool file. They appear sequentially arranged in the order that the pages will print.
EMF files have unique headers, but many variants of the header exist even within the same version of Windows. Headers can be located, and print jobs can be recovered. As spool files are deleted after the print job, rarely will you find them as allocated files. Most times, you will find them in unallocated clusters, in the swap file, in the hibernation file, or in file slack, but you should search everywhere to be thorough.
Windows Vista (and beyond) adds the Volume Shadow Service feature to the system restore system that was found in Windows XP. In addition to taking system snapshots, volume shadow copy makes copies of user files on a daily basis, placing this data in the system restore files. Even after a file has been deleted, it can be restored from the previous version tab of the containing folder’s Property tab. The volume shadow copy feature is a forensic gold mine.
Windows event logs contain a wealth of information even when Windows auditing is disabled. Windows Vista increased the type and complexity of logging by using a new interface and by storing the data in a binary XML format. Starting with EnCase 6.6, Windows Vista (and beyond) event logs can be parsed with the same tool that processes pre-Windows Vista event logs.
Exam Essentials
Know and understand time stamps. Understand and explain how NTFS differs from FAT in the method by which it stores MAC times. Be able to explain GMT and local time. Know how to determine the time zone offset for an evidence file. Explain how to modify the time zone offset for a device. Explain the 64-bit Windows date and time stamp as compared to the DOS and the Unix time stamp.
Understand the purpose and function of the Recycle Bin. Explain how Windows 7 usually deletes files. Describe what happens to filenames (directory or MFT record entries) when a file is deleted from its original location and moved to the Recycle Bin. Explain the naming convention of a filename when it is located in the Recycle Bin. Describe how Windows 7 keeps this information in individual index files in the Recycle Bin that begin with $I. Know the remainder of the filename is an abbreviated GUID, and the file extension remains unchanged. Know the deleted filename, when placed in the Recycle Bin, is changed to a name that begins with $R. The remainder of the renamed deleted file (or folder) is also a GUID that matches that of its corresponding index file, and its file extension also remains unchanged.
Explain how Windows 7 usually deletes files. Describe what happens to filenames (directory or MFT record entries) when a file is deleted from its original location and moved to the Recycle Bin. Explain the naming convention of a filename when it is located in the Recycle Bin. Describe how Windows 7 keeps this information in individual index files in the Recycle Bin that begin with $I. Know the remainder of the filename is an abbreviated GUID, and the file extension remains unchanged. Know the deleted filename, when placed in the Recycle Bin, is changed to a name that begins with $R. The remainder of the renamed deleted file (or folder) is also a GUID that matches that of its corresponding index file, and its file extension also remains unchanged.
Understand the purpose and function of link files. Understand how, where, and why links files are created. Know what link files are created by the operating system, by applications, and by the user, both knowingly and unknowing. Describe how to create a desktop shortcut. Be able to explain, in detail, the contents or data portion of a link file. Know which time stamps are stored inside the link file, particularly the specific time stamps names (MAC), the correct order of their appearance, the byte offsets at which they are located, and the time stamp format. Explain the concept of a target file in the context of a link file.
Know and understand the root user folder and its default subfolders. Understand and explain what a root user folder is and when it is created. Describe the folders created under the root user folder. Understand and explain the purpose and function of the Recent folder, specifically what kind of files it contains, how they are created, what purpose these files serve for the user, and the forensic significance of the files found in this folder.
Explain the purpose and function of the My Documents, Send To, Temp, and Favorites folders. Explain how folders have changed or moved with the introduction of the Windows Vista operating system. Explain why the contents contained in the root user folder and its subfolders are usually attributable to the logged-in root user or owner of these folders and files.
Know and understand the contents, purpose, and function of the Cookies, History, and Temporary Internet Files folders and their contents. Know and understand what a cookie is and the filenaming convention in which they are stored. Explain the purpose of the index.dat file found in the Cookies folder.
Explain the purpose of the History folder. Know the purpose of the main history index.dat file located in History.IE5 folder. Explain the naming convention of the subfolders located in History.IE5. Describe the purpose of each index.dat file located in each of these subfolders as it relates to the user interface in Internet Explorer. Aside from containing Internet history, explain what other local file information may be found here and how it is created.
Explain the purpose of the Temporary Internet Files (TIF) folder. Explain the purpose of the index.dat file located in the Content.IE5 folder. Know the contents of the subfolders in the Content.IE5 folder. Explain how and why files are cached in these folders. Describe how and why a filename is changed or modified when stored in cache. Know which file stores both the cached filename and the original filename (in the URL).
Explain where post-Windows Vista stores the cookies, history, and TIF folders. Describe where Low folders are located and explain their purpose and function.
Explain how EnCase 7 parses and displays the contents of the Cookies, History, and Temporary InternettFiles. Describe what other files, aside from cached web page content, are found in the TIF subfolders.
Understand the Windows printing process. Understand and be able to explain how Windows prints data and which files are created in the process. Explain the concept of spooling. Explain the contents of a shadow file, and know what extension this file will have. Explain the contents of a spool file and know what extension this file will have. Describe the default location for printer spool files, and understand that it can be modified by the user. Be able to explain the differences between RAW and EMF modes. Explain which mode is the default and most commonly encountered mode. Explain what files are produced in the EMF mode and in which file they are stored. Explain how multiple-page printed documents are handled in the EMF mode. Explain the manual process by which EMF print jobs can be recovered.
Understand the Windows Vista/7 volume shadow copy feature. Understand and be able to explain the purpose of the Windows Vista (and beyond) volume shadow copy feature. What does it do that the XP system restore feature did not do? Explain the forensic importance of the volume shadow copy feature.
Understand the Windows event logs. Understand and be able to explain where pre-Windows Vista and post-Windows Vista store their event logs. Describe the kind of information stored in these files and their forensic importance. Explain how to determine the audit settings. Describe the process for processing Windows event logs using EnCase.
Review Questions
1. An operating system artifact can be defined as which of the following?
A. Information specific to a user’s preference
B. Information about the computer’s general settings
C. Information stored about a user’s activities on the computer
D. Information used to simplify a user’s experience
E. All of the above
2. A FAT file system stores date and time stamps in _______ , whereas the NTFS file system stores date and time stamps in _______ .
A. DOS directory, local time
B. Zulu time, GMT
C. Local time, GMT
D. SYSTEM.DAT, NTUSER.DAT
3. Where does Windows store the time zone offset?
A. BIOS
B. Registry
C. INFO2 file
D. DOS directory or MFT
4. In Windows 7, the date and time of when a file was sent to the Recycle Bin can be found where?
A. INFO2 file
B. Original filename’s last access date
C. DOS directory or MFT
D. $I index file
5. When a text file is sent a pre-Windows Vista Recycle Bin, Windows changes the short filename of the deleted file to DC0.txt in the Recycle Bin. Select the best choice that explains the deleted filename.
A. D=DOS, C=character, 0=index number, file extension remains the same
B. D=DOS, C=drive letter, 0=index number, file extension remains the same
C. D=deleted, C=character, 0=index number, file extension remains the same
D. D=deleted, C=drive letter, 0=index number, file extension remains the same
6. When a document is opened, a link file bearing the document’s filename is created in the ____________ folder.
A. Shortcut
B. Recent
C. Temp
D. History
7. Link files are shortcuts or pointers to actual items. These actual items can be what?
A. Programs
B. Documents
C. Folders
D. Devices
E. All of the above
8. In NTFS, information unique to a specific user is stored in the ____________ file.
A. USER.DAT
B. NTUSER.DAT
C. SYSTEM.DAT
D. None of the above
9. In Windows XP, Windows Vista, or Window 7, by default, how many recently opened documents are displayed in the My Recent Documents or Recent Items folder?
A. 4
B. 12
C. 15
D. Unlimited
10. Most of a user’s desktop items on a Windows 7 operating system would be located in the ________________________ directory.
A. C:\WINDOWS\Desktop
B. C:\WinNT\Desktop
C. C:\WINDOWS\System32\config\Desktop
D. C:\Users\%User%\Desktop
11. Because this file will hold the contents of RAM when the machine is powered off, the ____________ file will be the approximate size of the system RAM and will be in the root directory.
A. hiberfil.sys
B. WIN386.SWP
C. PAGEFILE.SYS
D. NTUSER.DAT
12. Where can you find evidence of web-based email such as from MSN Hotmail or Google Gmail on a Windows system?
A. In Temporary Internet Files under Local Settings in the user’s profile
B. In Unallocated Clusters
C. In the pagefile.sys file
D. In the hiberfil.sys file
E. All of the above
13. Filenames with the .url extension that direct web browsers to a specific website are normally located in which folder?
A. Favorites folder
B. Cookies folder
C. Send To folder
D. History folder
14. Data about Internet cookies such as URL names, date and time stamps, and pointers to the actual location of the cookie is stored where?
A. INFO2 file
B. index.dat file
C. EMF file
D. pagefile.sys file
15. On a Windows 98 machine, which folder is the swap or page file contained in?
A. WIN386.SWP
B. pagefile.sys
C. swapfile.sys
D. page.swp
16. When you are examining evidence that has been sent to a printer, which file contains an image of the actual print job?
A. The Enhanced Metafile (EMF)
B. The shadow file
C. The spool file
D. The RAW file
17. The two modes for printing in Windows are ____________ and ____________ .
A. spooled, shadowed
B. spooled, direct
C. spooled, EM
D. EMF, RAW
18. Although the Windows operating system removed the EMF file upon a successful print job, the examiner may still recover the file as a result of a search on its unique header information in areas such as Unallocated Clustersor the swap file.
A. True
B. False
19. The index.dat files are system files that store information about other files. They track date and time stamps, file locations, and name changes. Select the folder that does not contain an index.dat file.
A. Cookies
B. History
C. Recycle Bin
D. Temporary Internet Files
20. The Temporary Internet Files directory contains which of the following?
A. Web page files that are cached or saved for possible later reuse
B. An index.dat file that serves as a database for the management of the cached files
C. Web mail artifacts
D. All of the above
All materials on the site are licensed Creative Commons Attribution-Sharealike 3.0 Unported CC BY-SA 3.0 & GNU Free Documentation License (GFDL)
If you are the copyright holder of any material contained on our site and intend to remove it, please contact our site administrator for approval.
© 2016-2026 All site design rights belong to S.Y.A.