Praise for Gray Hat Hacking: The Ethical Hacker’s Handbook, Fourth Edition (2015)
PART I. Crash Course: Preparing for the War
CHAPTER 6. Shellcode Strategies
This chapter discusses various factors you may need to consider when designing or selecting a payload for your exploits.
In this chapter, we cover the following topics:
• User space shellcode
• Shellcode encoding, corruption, and disassembly
• Kernel space shellcode
Reliable shellcode is at the heart of virtually every exploit that results in “arbitrary code execution,” a phrase used to indicate that a malicious user can cause a vulnerable program to execute instructions provided by the user rather than the program. In a nutshell, shellcode is the arbitrary code being referred to in such cases. The term shellcode (or shell code) derives from the fact that, in many cases, malicious users utilize code that provides them with either shell access to a remote computer on which they do not possess an account or, alternatively, access to a shell with higher privileges on a computer on which they do have an account. In the optimal case, such a shell might provide root- or administrator-level access to a vulnerable system. Over time, the sophistication of shellcode has grown well beyond providing a simple interactive shell, to include such capabilities as encrypted network communications and in-memory process manipulation. To this day, however, “shellcode” continues to refer to the executable component of a payload designed to exploit a vulnerable program.
User Space Shellcode
The majority of programs that typical computer users interact with are said to run in user space. User space is that portion of a computer’s memory space dedicated to running programs and storing data that has no need to deal with lower-level system issues. That lower-level behavior is provided by the computer’s operating system, much of which runs in what has come to be called kernel space because it contains the core, or kernel, of the operating system code and data.
System Calls
Programs that run in user space and require the services of the operating system must follow a prescribed method of interacting with the operating system, which differs from one operating system to another. In generic terms, we say that user programs must perform “system calls” to request that the operating system perform some operation on their behalf. On many x86-based operating systems, user programs can make system calls by utilizing a software-based interrupt mechanism via the x86 int 0x80 instruction or the dedicated sysenter system call instruction. The Microsoft Windows family of operating systems is somewhat different, in that it generally expects user programs to make standard function calls into core Windows library functions that will handle the details of the system call on behalf of the user. Virtually all significant capabilities required by shellcode are controlled by the operating system, including file access, network access, and process creation; as such, it is important for shellcode authors to understand how to access these services on the platforms for which they are authoring shellcode. You will learn more about accessing Linux system calls in Chapter 7. The x86 flavors of BSD and Solaris use a similar mechanism, and all three are well documented by the Last Stage of Delirium (LSD) in their “UNIX Assembly Codes Development” paper.1
Making system calls in Windows shellcode is a little more complicated. On the Unix side, using an int 0x80 requires little more than placing the proper values in specific registers or on the stack before executing the int 0x80 instruction. At that point, the operating system takes over and does the rest. By comparison, the simple fact that our shellcode is required to call a Windows function in order to access system services complicates matters a great deal. The problem boils down to the fact that although we certainly know the name of the Windows function we wish to call, we do not know its location in memory (if indeed the required library is even loaded into memory at all!). This is a consequence of the fact that these functions reside in dynamic linked libraries (DLLs), which do not necessarily appear at the same location on all versions of Windows and which can be moved to new locations for a variety of reasons, not the least of which is Microsoft-issued patches. As a result, Windows shellcode must go through a discovery process to locate each function that it needs to call before it can call those functions. Here again the Last Stage of Delirium has written an excellent paper entitled “Win32 Assembly Components”2 covering the various ways in which this can be achieved and the logic behind them. Matt Miller’s (aka skape) Understanding Windows’s Shellcode3 picks up where the LSD paper leaves off, covering many additional topics as well. Many of the Metasploit payloads for Windows utilize techniques covered in Miller’s paper.
Basic Shellcode
Given that we can inject our own code into a process, the next big question is, “What code do we wish to run?” Certainly, having the full power that a shell offers would be a nice first step. It would be nice if we did not have to write our own version of a shell (in assembly language, no less) just to upload it to a target computer that probably already has a shell installed. With that in mind, the technique that has become more or less standard typically involves writing assembly code that launches a new shell process on the target computer and causes that process to take input from and send output to the attacker. The easiest piece of this puzzle to understand turns out to be launching a new shell process, which can be accomplished through use of the execve system call on Unix-like systems and via the CreateProcess function call on Microsoft Windows systems. The more complex aspect is understanding where the new shell process receives its input and where it sends its output. This requires that we understand how child processes inherit their input and output file descriptors from their parents.
Regardless of the operating system that we are targeting, processes are provided three open files when they start. These files are typically referred to as the standard input (stdin), standard output (stdout), and standard error (stderr) files. On Unix systems, these are represented by the integer file descriptors 0, 1, and 2, respectively. Interactive command shells use stdin, stdout, and stderr to interact with their users. As an attacker, you must ensure that before you create a shell process, you have properly set up your input/output file descriptor(s) to become the stdin, stdout, and stderr that will be utilized by the command shell once it is launched.
Port Binding Shellcode
When attacking a vulnerable networked application, simply execing a shell will not always yield the results we are looking for. If the remote application closes our network connection before our shell has been spawned, we will lose our means to transfer data to and from the shell. In other cases, we may use UDP datagrams to perform our initial attack but, due to the nature of UDP sockets, we can’t use them to communicate with a shell. In cases such as these, we need to find another means of accessing a shell on the target computer. One solution to this problem is to use port binding shellcode, often referred to as a bind shell. Once it’s running on the target, shellcode must take these steps to create a bind shell on the target:
1. Create a TCP socket.
2. Bind the socket to an attacker-specified port. The port number is typically hardcoded into the shellcode.
3. Make the socket a listening socket.
4. Accept a new connection.
5. Duplicate the newly accepted socket onto stdin, stdout, and stderr.
6. Spawn a new command shell process (which will receive/send its input and output over the new socket).
Step 4 requires the attacker to reconnect to the target computer to attach to the command shell. To make this second connection, attackers often use a tool such as Netcat, which passes their keystrokes to the remote shell and receives any output generated by the remote shell. Although this process may seem relatively straightforward, there are a number of things to take into consideration when attempting to use port binding shellcode. First, the network environment of the target must be such that the initial attack is allowed to reach the vulnerable service on the target computer. Second, the target network must also allow the attacker to establish a new inbound connection to the port that the shellcode has bound to. These conditions often exist when the target computer is not protected by a firewall, as shown in Figure 6-1.
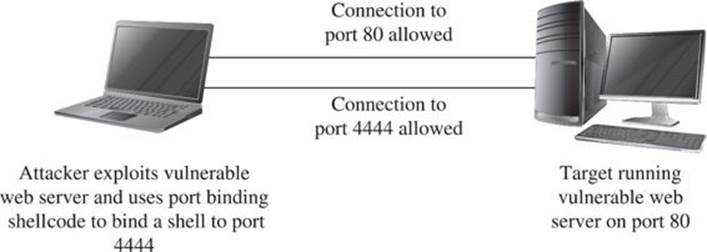
Figure 6-1 Network layout that permits port binding shellcode
This may not always be the case if a firewall is in use and is blocking incoming connections to unauthorized ports. As shown in Figure 6-2, a firewall may be configured to allow connections only to specific services such as a web or mail server, while blocking connection attempts to any unauthorized ports.
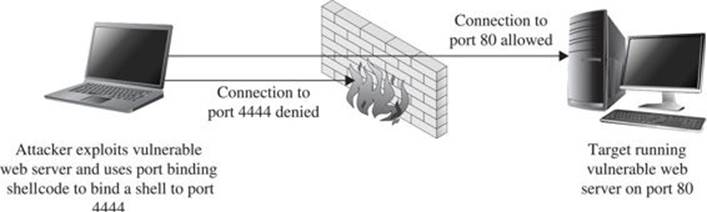
Figure 6-2 Firewall configured to block port binding shellcode
Third, a system administrator performing analysis on the target computer may wonder why an extra copy of the system command shell is running, why the command shell appears to have network sockets open, or why a new listening socket exists that can’t be accounted for. Finally, when the shellcode is waiting for the incoming connection from the attacker, it generally can’t distinguish one incoming connection from another, so the first connection to the newly opened port will be granted a shell, while subsequent connection attempts will fail. This leaves us with several things to consider to improve the behavior of our shellcode.
Reverse Shellcode
If a firewall can block our attempts to connect to the listening socket that results from successful use of port binding shellcode, perhaps we can modify our shellcode to bypass this restriction. In many cases, firewalls are less restrictive regarding outgoing traffic. Reverse shellcode, also known as callback shellcode, exploits this fact by reversing the direction in which the second connection is made. Instead of binding to a specific port on the target computer, reverse shellcode initiates a new connection to a specified port on an attacker-controlled computer. Following a successful connection, it duplicates the newly connected socket to stdin, stdout, and stderr before spawning a new command shell process on the target machine. These steps are
1. Create a TCP socket.
2. Configure the socket to connect to an attacker-specified port and IP address. The port number and IP address are typically hardcoded into the attacker’s shellcode.
3. Connect to the specified port and IP address.
4. Duplicate the newly connected socket onto stdin, stdout, and stderr.
5. Spawn a new command shell process (which will receive/send its input/output over the new socket).
Figure 6-3 shows the behavior of reverse connecting shellcode.
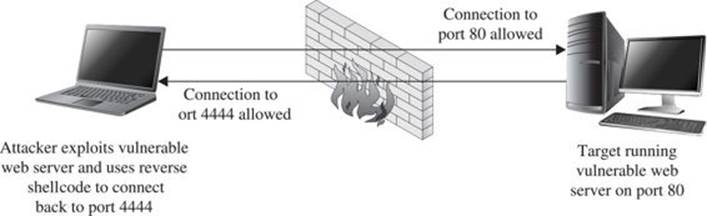
Figure 6-3 Network layout that facilitates reverse connecting shellcode
For a reverse shell to work, the attacker must be listening on the specified port and IP address prior to step 3. Netcat is often used to set up such a listener and to act as a terminal once the reverse connection has been established. Reverse shells are far from a sure thing. Depending on the firewall rules in effect for the target network, the target computer may not be allowed to connect to the port that we specify in our shellcode, a situation shown in Figure 6-4.
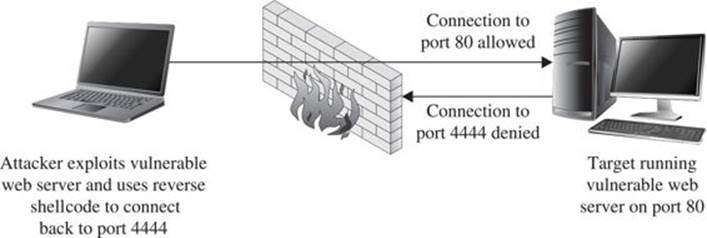
Figure 6-4 Firewall configuration that prevents reverse connecting shellcode
You may be able to get around restrictive rules by configuring your shellcode to call back to a commonly allowed outgoing port such as port 80. This may also fail, however, if the outbound protocol (HTTP for port 80, for example) is proxied in any way, as the proxy server may refuse to recognize the data that is being transferred to and from the shell as valid for the protocol in question. Another consideration if the attacker is located behind a NAT device is that the shellcode must be configured to connect back to a port on the NAT device. The NAT device must, in turn, be configured to forward corresponding traffic to the attacker’s computer, which must be configured with its own listener to accept the forward connection. Finally, even though a reverse shell may allow us to bypass some firewall restrictions, system administrators may get suspicious about the fact that they have a computer establishing outbound connections for no apparent reason, which may lead to the discovery of our exploit.
Find Socket Shellcode
The last of the three common techniques for establishing a shell over a network connection involves attempting to reuse the same network connection over which the original attack takes place. This method takes advantage of the fact that exploiting a remote service necessarily involves connecting to that service, so if we are able to exploit a remote service, then we have an established connection we can use to communicate with the service after the exploit is complete. This situation is shown in Figure 6-5.
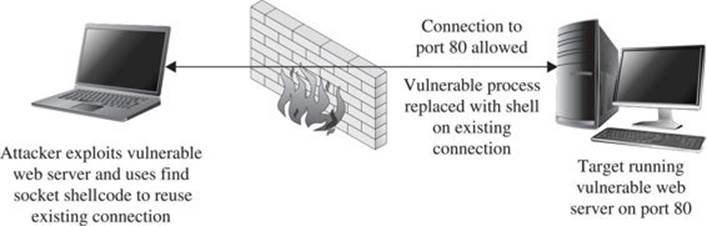
Figure 6-5 Network conditions suited for find socket shellcode
If this can be accomplished, we have the additional benefit that no new, potentially suspicious, network connections will be visible on the target computer, making our exploit at least somewhat more difficult to observe.
The steps required to begin communicating over the existing socket involve locating the open file descriptor that represents our network connection on the target computer. Because the value of this file descriptor may not be known in advance, our shellcode must take action to find the open socket somehow (hence the term find socket). Once found, our shellcode must duplicate the socket descriptor, as discussed previously, in order to cause a spawned shell to communicate over that socket. The most common technique used in shellcode for locating the proper socket descriptor is to enumerate all of the possible file descriptors (usually file descriptors 0 through 255) in the vulnerable application, and to query each descriptor to see if it is remotely connected to our computer. This is made easier by our choice of a specific outbound port to bind to when initiating a connection to the vulnerable service. In doing so, our shellcode can know exactly what port number a valid socket descriptor must be connected to, and determining the proper socket descriptor to duplicate becomes a matter of locating the one socket descriptor that is connected to the port known to have been used. The steps required by find socket shellcode are as follows:
1. For each of the 256 possible file descriptors, determine whether the descriptor represents a valid network connection and, if so, whether the remote port is one we have used. This port number is typically hardcoded into the shellcode.
2. Once the desired socket descriptor has been located, duplicate the socket onto stdin, stdout, and stderr.
3. Spawn a new command shell process (which will receive/send its input/output over the original socket).
One complication that must be taken into account is that the find socket shellcode must know from what port the attacker’s connection has originated. In cases in which the attacker’s connection must pass through a NAT device, the attacker may not be able to control the outbound port that the NAT device chooses to use, which will result in the failure of step 1, as the attacker will not be able to encode the proper port number into the shellcode.
Command Execution Code
In some cases, it may not be possible or desirable to establish new network connections and carry out shell operations over what is essentially an unencrypted Telnet session. In such cases, all that may be required of our payload is the execution of a single command that might be used to establish a more legitimate means of connecting to the target computer. Examples of such commands would be copying an SSH public key to the target computer in order to enable future access via an SSH connection, invoking a system command to add a new user account to the target computer, or modifying a configuration file to permit future access via a backdoor shell. Payload code that is designed to execute a single command must typically perform the following steps:
1. Assemble the name of the command that is to be executed.
2. Assemble any command-line arguments for the command to be executed.
3. Invoke the execve system call in order to execute the desired command.
Because there is no networking setup necessary, command execution code can often be quite small.
File Transfer Code
A target computer might not have all of the capabilities that we would wish to utilize once we have successfully penetrated it. If this is the case, it may be useful to have a payload that provides a simple file upload facility. When combined with the code to execute a single command, this payload provides the capability to upload a binary to a target system and then execute that binary. File uploading code is fairly straightforward and involves the following steps:
1. Open a new file.
2. Read data from a network connection and write that data to the new file. In this case, the network connection is obtained using the port binding, reverse connection, or find socket techniques described previously.
3. Repeat step 2 as long as there is more data; then close the file.
The ability to upload an arbitrary file to the target machine is roughly equivalent to invoking the wget command on the target in order to download a specific file.
 NOTE The wget utility is a simple command-line utility capable of downloading the contents of files by specifying the URL of the file to be downloaded.
In fact, as long as wget happens to be present on a target system, we could use command execution to invoke wget and accomplish essentially the same thing as a file upload code could accomplish. The only difference is that we would need to place the file to be uploaded on a web server that could be reached from the target computer.
Multistage Shellcode
As a result of the nature of a vulnerability, the space available for the attacker to inject shellcode into a vulnerable application may be limited to such a degree that it is not possible to utilize some of the more common types of payloads. In cases such as these, you can use a multistage process for uploading shellcode to the target computer. Multistage payloads generally consist of two or more stages of shellcode, with the sole purpose of the first (and possibly later) stage being to read more shellcode and then pass control to the newly read-in second stage, which, we hope, contains sufficient functionality to carry out the majority of the work.
System Call Proxy Shellcode
Obtaining a shell as a result of an exploit may sound like an attractive idea, but it may also be a risky one if your goal is to remain undetected throughout your attack. Launching new processes, creating new network connections, and creating new files are all actions that are easily detected by security-conscious system administrators. As a result, payloads have been developed that do none of the above yet provide the attacker with a full set of capabilities for controlling a target. One such payload, called a system call proxy, was first publicized by Core Technologies (makers of the Core Impact tool) in 2002.
A system call (or syscall) proxy is a small piece of shellcode that enables remote access to a target’s core operating system functionality without the need to start a new process like a command interpreter such as /bin/sh. The proxy code executes in a loop that accepts one request at a time from the attacker, executes that request on the target computer, and returns the results of the request to the attacker. All the attacker needs to do is package requests that specify system calls to carry out on the target and transmit those requests to the system call proxy. By chaining together many requests and their associated results, the attacker can leverage the full power of the system call interface on the target computer to perform virtually any operation. Because the interface to the system call proxy can be well defined, the attacker can create a library to handle all of the communications with the proxy, making his life much easier. With a library to handle all of the communications with the target, the attacker can write code in higher-level languages such as C that effectively, through the proxy, runs on the target computer. This is shown in Figure 6-6.
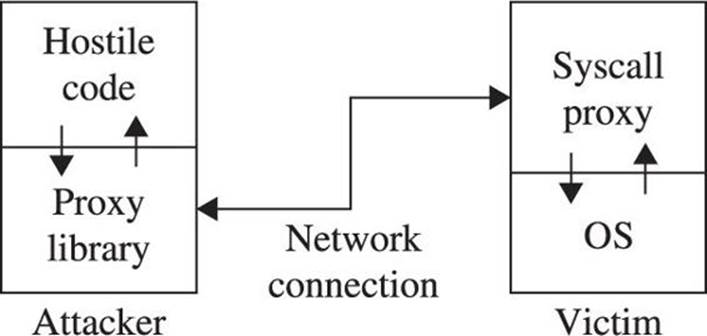
Figure 6-6 Syscall proxy operation
The proxy library shown in the figure effectively replaces the standard C library (for C programs), redirecting any actions typically sent to the local operating system (system calls) to the remotely exploited computer. Conceptually, it is as if the hostile program were actually running on the target computer, yet no file has been uploaded to the target, and no new process has been created on the target, as the system call proxy payload can continue to run in the context of the exploited process.
Process Injection Shellcode
The final shellcode technique we discuss in this section is process injection. Process injection shellcode allows the loading of entire libraries of code running under a separate thread of execution within the context of an existing process on the target computer. The host process may be the process that was initially exploited, leaving little indication that anything has changed on the target system. Alternatively, an injected library may be migrated to a completely different process that may be more stable than the exploited process and that may offer a better place for the injected library to hide. In either case, the injected library may not ever be written to the hard drive on the target computer, making forensics examination of the target computer far more difficult. The Metasploit Meterpreter is an excellent example of a process injection payload. Meterpreter provides an attacker with a robust set of capabilities, offering nearly all of the same capabilities as a traditional command interpreter, while hiding within an existing process and leaving no disk footprint on the target computer.
Other Shellcode Considerations
Understanding the types of payloads that you might choose to use in any given exploit situation is an important first step in building reliable exploits. Given that you understand the network environment that your exploit will be operating in, there are a couple of other very important things that you need to understand about shellcode.
Shellcode Encoding
Whenever we attempt to exploit a vulnerable application, we must understand any restrictions that we must adhere to when it comes to the structure of our input data. When a buffer overflow results from a strcpy operation, for example, we must be careful that our buffer does not inadvertently contain a null character that will prematurely terminate the strcpy operation before the target buffer has been overflowed. In other cases, we may not be allowed to use carriage returns or other special characters in our buffer. In extreme cases, our buffer may need to consist entirely of alphanumeric or valid Unicode characters.
Determining exactly which characters must be avoided typically is accomplished through a combined process of reverse-engineering an application and observing the behavior of the application in a debugging environment. The “bad chars” set of characters to be avoided must be considered when developing any shellcode and can be provided as a parameter to some automated shellcode encoding engines such as msfencode, which is part of the Metasploit Framework. Adhering to such restrictions while filling up a buffer generally is not too difficult until it comes to placing our shellcode into the buffer. The problem we face with shellcode is that, in addition to adhering to any input-formatting restrictions imposed by the vulnerable application, it must represent a valid machine language sequence that does something useful on the target processor. Before placing shellcode into a buffer, we must ensure that none of the bytes of the shellcode violate any input-formatting restrictions. Unfortunately, this will not always be the case. Fixing the problem may require access to the assembly language source for our desired shellcode, along with sufficient knowledge of assembly language to modify the shellcode to avoid any values that might lead to trouble when processed by the vulnerable application. Even armed with such knowledge and skill, it may be impossible to rewrite our shellcode, using alternative instructions, so that it avoids the use of any bad characters. This is where the concept of shellcode encoding comes into play.
The purpose of a shellcode encoder is to transform the bytes of a shellcode payload into a new set of bytes that adheres to any restrictions imposed by our target application. Unfortunately, the encoded set of bytes generally is not a valid set of machine language instructions, in much the same sense that an encrypted text becomes unrecognizable as English language. As a consequence, our encoded payload must, somehow, get decoded on the target computer before it is allowed to run. The typical solution is to combine the encoded shellcode with a small decoding loop that first executes to decode our actual payload and then, once our shellcode has been decoded, transfers control to the newly decoded bytes. This process is shown in Figure 6-7.
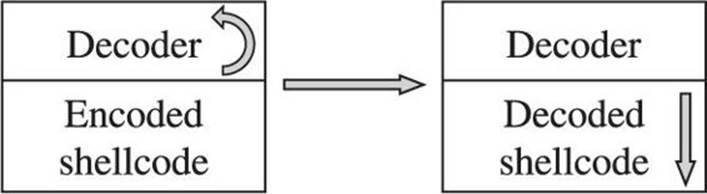
Figure 6-7 The shellcode decoding process
When you plan and execute your exploit to take control of the vulnerable application, you must remember to transfer control to the decoding loop, which will, in turn, transfer control to your actual shellcode once the decoding operation is complete. It should be noted that the decoder itself must also adhere to the same input restrictions as the remainder of our buffer. Thus, if our buffer must contain nothing but alphanumeric characters, we must find a decoder loop that can be written using machine language bytes that also happen to be alphanumeric values. The following chapter presents more detailed information about the specifics of encoding and about the use of the Metasploit Framework to automate the encoding process.
Self-Corrupting Shellcode
A very important thing to understand about shellcode is that, like any other code, it requires storage space while executing. This storage space may simply be variable storage as in any other program, or it may be a result of placing parameter values onto the stack prior to calling a function. In this regard, shellcode is not much different from any other code, and like most other code, shellcode tends to make use of the stack for all of its data storage needs. Unlike other code, however, shellcode often lives in the stack itself, creating a tricky situation in which shellcode, by virtue of writing data into the stack, may inadvertently overwrite itself, resulting in corruption of the shellcode. Figure 6-8 shows a generalized memory layout that exists at the moment a stack overflow is triggered.
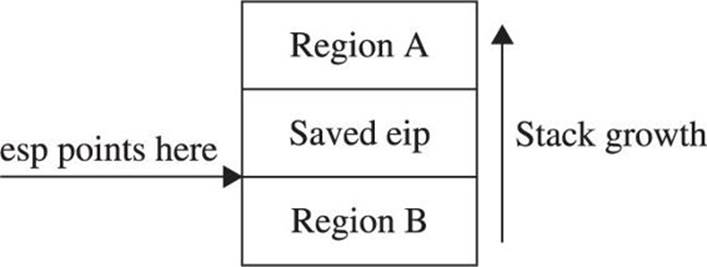
Figure 6-8 Shellcode layout in a stack overflow
At this point, a corrupted return address has just been popped off of the stack, leaving the extended stack pointer, esp, pointing at the first byte in region B. Depending on the nature of the vulnerability, we may have been able to place shellcode into region A, region B, or perhaps both. It should be clear that any data that our shellcode pushes onto the stack will soon begin to overwrite the contents of region A. If this happens to be where our shellcode is, we may well run into a situation where our shellcode gets overwritten and ultimately crashes, most likely due to an invalid instruction being fetched from the overwritten memory area. Potential corruption is not limited to region A. The area that may be corrupted depends entirely on how the shellcode has been written and the types of memory references that it makes. If the shellcode instead references data below the stack pointer, it is easily possible to overwrite shellcode located in region B.
How do you know if your shellcode has the potential to overwrite itself, and what steps can you take to avoid this situation? The answer to the first part of this question depends entirely on how you obtain your shellcode and what level of understanding you have regarding its behavior. Looking at the Aleph1 shellcode used in Chapters 10 and 11, can you deduce its behavior? All too often we obtain shellcode as nothing more than a blob of data that we paste into an exploit program as part of a larger buffer. We may, in fact, use the same shellcode in the development of many successful exploits before it inexplicably fails to work as expected one day, causing us to spend many hours in a debugger before realizing that the shellcode was overwriting itself as described earlier. This is particularly true when we become too reliant on automated shellcode-generation tools, which often fail to provide a corresponding assembly language listing when spitting out a newly minted payload for us. What are the possible solutions to this type of problem?
The first solution is simply to try to shift the location of your shellcode so any data written to the stack does not happen to hit your shellcode. Referring back to Figure 6-8, if the shellcode were located in region A and were getting corrupted as a result of stack growth, one possible solution would be to move the shellcode higher in region A, further away from esp, and to hope the stack would not grow enough to hit it. If there were not sufficient space to move the shellcode within region A, then it might be possible to relocate the shellcode to region B and avoid stack growth issues altogether. Similarly, shellcode located in region B that is getting corrupted could be moved even deeper into region B, or potentially relocated to region A. In some cases, it might not be possible to position your shellcode in such a way that it would avoid this type of corruption. This leads us to the most general solution to the problem, which is to adjust esp so it points to a location clear of our shellcode. This is easily accomplished by inserting an instruction to add or subtract a constant value to esp that is of sufficient size to keep esp clear of our shellcode. This instruction must generally be added as the first instruction in our payload, prior to any decoder if one is present.
Disassembling Shellcode
Until you are ready and willing to write your own shellcode using assembly language tools, you will likely rely on published shellcode payloads or automated shellcode-generation tools. In either case, you will generally find yourself without an assembly language listing to tell you exactly what the shellcode does. Alternatively, you may simply see a piece of code published as a blob of hex bytes and wonder whether it does what it claims to do. Some security-related mailing lists routinely see posted shellcode claiming to perform something useful, when, in fact, it performs some malicious action. Regardless of your reason for wanting to disassemble a piece of shellcode, it is a relatively easy process requiring only a compiler and a debugger. Borrowing the Aleph1 shellcode used in Chapters 10 and 11, we create the simple program that follows as shellcode.c:


Compiling this code causes the shellcode hex blob to be encoded as binary, which we can observe in a debugger, as shown here:
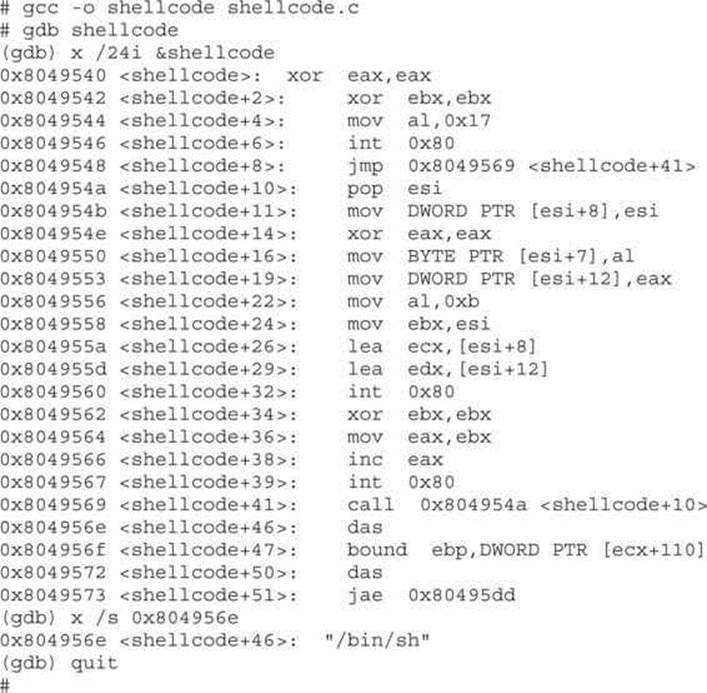
Note that we can’t use the gdb disassemble command because the shellcode array lies in the data section of the program rather than the code section. Instead, gdb’s examine facility is used to dump memory contents as assembly language instructions. Further study of the code can then be performed to understand exactly what it actually does.
Kernel Space Shellcode
User space programs are not the only type of code that contains vulnerabilities. Vulnerabilities are also present in operating system kernels and their components, such as device drivers. The fact that these vulnerabilities are present within the relatively protected environment of the kernel does not make them immune from exploitation. It has been primarily due to the lack of information on how to create shellcode to run within the kernel that working exploits for kernel-level vulnerabilities have been relatively scarce. This is particularly true regarding the Windows kernel; little documentation on the inner workings of the Windows kernel exists outside of the Microsoft campus. Recently, however, there has been an increasing amount of interest in kernel-level exploits as a means of gaining complete control of a computer in a nearly undetectable manner. This increased interest is due in large part to the fact that the information required to develop kernel-level shellcode is slowly becoming public. Papers published by eEye Digital Security4 and the Uninformed Journal have shed a tremendous amount of light on the subject, with the result that the latest version of the Metasploit Framework (version 3.3 as of this writing) contains kernel-level exploits and payloads.
Kernel Space Considerations
A couple of things make exploitation of the kernel a bit more adventurous than exploitation of user space programs. The first thing to understand is that although an exploit gone awry in a vulnerable user space application may cause the vulnerable application to crash, it is not likely to cause the entire operating system to crash. On the other hand, an exploit that fails against a kernel is likely to crash the kernel and, therefore, the entire computer. In the Windows world, “blue screens” are a simple fact of life while developing exploits at the kernel level.
The next thing to consider is what you intend to do once you have code running within the kernel. Unlike with user space, you certainly can’t do an execve system call and replace the current process (the kernel in this case) with a process more to your liking. Also unlike with user space, you will not have access to a large catalog of shared libraries from which to choose functions that are useful to you. The notion of a system call ceases to exist in kernel space, as code running in kernel space is already in “the system.” The only functions that you will have access to initially will be those exported by the kernel. The interface to those functions may or may not be published, depending on the operating system that you are dealing with. An excellent source of information on the Windows kernel programming interface is Gary Nebbett’s book Windows NT/2000 Native API Reference. Once you are familiar with the native Windows API, you will still be faced with the problem of locating all of the functions that you wish to make use of. In the case of the Windows kernel, techniques similar to those used for locating functions in user space can be employed, as the Windows kernel (ntoskrnl.exe) is itself a Portable Executable (PE) file.
Stability becomes a huge concern when developing kernel-level exploits. As mentioned previously, one wrong move in the kernel can bring down the entire system. Any shellcode you use needs to take into account the effect your exploit will have on the thread that you exploited. If the thread crashes or becomes unresponsive, the entire system may soon follow. Proper cleanup is an important piece of any kernel exploit. Another factor that influences the stability of the system is the state of any interrupt processing being conducted by the kernel at the time of the exploit. Interrupts may need to be re-enabled or reset cleanly in order to allow the system to continue stable operation.
Ultimately, you may decide that the somewhat more forgiving environment of user space is a more desirable place to run code. This is exactly what many recent kernel exploits do. By scanning the process list, a process with sufficiently high privileges can be selected as a host for a new thread that will contain attacker-supplied code. Kernel API functions can then be utilized to initialize and launch the new thread, which runs in the context of the selected process.
While the lower-level details of kernel-level exploits are beyond the scope of this book, the fact that this is a rapidly evolving area is likely to make kernel exploitation tools and techniques more and more accessible to the average security researcher. In the meantime, the references listed next will serve as excellent starting points for those interested in more detailed coverage of the topic.
Summary
Nowadays, the younger generation uses Metasploit to generate different types of shellcodes automatically without knowing how the shellcode is created, but what if, because of some program or memory restrictions, you need to create a custom shellcode? Or a shellcode that must be limited to a specific charset or size? This chapter introduced the most common types of shellcodes and how to encode and disassemble them.
References
1. Last Stage of Delirium. “Unix Assembly Codes Development.” Retrieved from Black Hat: www.blackhat.com/presentations/bh-usa-01/LSD/bh-usa-01-lsd.pdf.
2. Last Stage of Delirium (2002, December 12). “Win32 Assembly Components.” Retrieved from The Last Stage of Delirium Research Group: savannah.gatech.edu/people/lthames/dataStore/WormDocs/winasm-1.0.1.pdf.
3. Miller, Matt (2003, December 6). Understanding Windows Shellcode. Retrieved from NoLogin.org: www.hick.org/code/skape/papers/win32-shellcode.pdf.
4. Jack, Barnaby. “Remote Windows Kernel Exploitation. Retrieved from Black Hat: www.blackhat.com/presentations/bh-usa-05/BH_US_05-Jack_White_Paper.pdf.
5. Nebbett, Gary (2000). Windows NT/2000 Native API Reference. Sams Publishing.
For Further Reading
Metasploit’s Meterpreter (Matt Miller, aka skape) www.metasploit.com/documents/meterpreter.pdf.
“The Shellcode Generation,” IEEE Security & Privacy (Ivan Arce) September/October 2004, vol. 2, no. 5, pp. 72–76.
“Windows Kernel-mode Payload Fundamentals” (bugcheck and skape) www.uninformed.org/?v=3&a=4&t=txt.
All materials on the site are licensed Creative Commons Attribution-Sharealike 3.0 Unported CC BY-SA 3.0 & GNU Free Documentation License (GFDL)
If you are the copyright holder of any material contained on our site and intend to remove it, please contact our site administrator for approval.
© 2016-2026 All site design rights belong to S.Y.A.