Hacking Exposed 7: Network Security Secrets and Solutions (2012)
PART I. CASING THE ESTABLISHMENT
CASE STUDY
As you will discover in the following chapters, footprinting, scanning, and enumeration are vital concepts in casing the establishment. Just like a bank robber will stake out a bank before making the big strike, your Internet adversaries will do the same. They will systematically poke and prod until they find the soft underbelly of your Internet presence. Oh…and it won’t take long.
Expecting the bad guys to cut loose a network scanner like Nmap with all options enabled is so 1999 (which, coincidently, is the year we wrote the original Hacking Exposed book). These guys are much more sophisticated today and anonymizing their activities is paramount to a successful hack. Perhaps taking a bite out of the onion would be helpful….
IAAAS—It’s All About Anonymity, Stupid
As the Internet has evolved, protecting your anonymity has become a quest like no other. Many systems have been developed in an attempt to provide strong anonymity while, at the same time, providing practicality. Most have fallen short in comparison to “The Onion Router,” or Tor for short. Tor is the second-generation low-latency anonymity network of onion routers that enables users to communicate anonymously across the Internet. The system was originally sponsored by the U.S. Naval Research Laboratory and became an Electronic Frontier Foundation (EFF) project in 2004. Onion routing may sound like the Iron Chef gone wild, but in reality, it is a very sophisticated technique for pseudonymous or anonymous communication over a network. Volunteers operate an onion proxy server on their system that allows users of the Tor network to make anonymous outgoing connections via TCP. Tor network users must run an onion proxy on their system, which allows them to communicate to the Tor network and negotiate a virtual circuit. Tor employs advanced cryptography in a layered manner, thus the name “Onion” Router. The key advantage that Tor has over other anonymity networks is its application independence and that it works at the TCP stream level. It is SOCKetS (SOCKS) proxy aware and commonly works with instant messaging, Internet Relay Chat (IRC), and web browsing. Although not 100 percent foolproof or stable, Tor is truly an amazing advance in anonymous communications across the Internet.
While most people enjoy the Tor network for the comfort of knowing they can surf the Internet anonymously, Joe Hacker seems to enjoy it for making your life miserable. Joe knows that the advances in intrusion detection and anomaly behavior technology have come a long way. He also knows that if he wants to keep on doing what he feels is his God-given right—that is, hacking your system—he needs to remain anonymous. Let’s take a look at several ways he can anonymize his activities.
Tor-menting the Good Guys
Joe Hacker is an expert at finding systems and slicing and dicing them for fun. Part of his modus operandi (MO) is using Nmap to scan for open services (like web servers or Windows file sharing services). Of course, he is well versed in the ninja technique of using Tor to hide his identity. Let’s peer into his world and examine his handiwork firsthand.
His first order of business is to make sure that he is able to surf anonymously. Not only does he want to surf anonymously via the Tor network, but he also wants to ensure that his browser, notorious for leaking information, doesn’t give up the goods on him. He decides to download and install the Tor client, Vidalia (GUI for TOR), and Privoxy (a web filtering proxy) to ensure his anonymity. He hits http://www.torproject.org/ to download a complete bundle of all of this software. One of the components installed by Vidalia is the Torbutton, a quick and easy way to enable and disable surfing via the Tor network (torproject.org/torbutton/). After some quick configuration, the Tor proxy is installed and listening on local port 9050; Privoxy is installed and listening on port 8118; and the Torbutton Firefox extension is installed and ready to go in the bottom-right corner of the Firefox browser. He goes to Tor’s check website (check.torproject.org), and it reveals his success: “Congratulations. You are using Tor.” Locked and loaded, he begins to hunt for unsuspecting web servers with default installations. Knowing that Google is a great way to search for all kinds of juicy targets, he types this in his search box:
![]()
Instantly, a list of systems running a default install of the Apache web server are displayed. He clicks the link with impunity, knowing that his IP is anonymized and there is little chance his activities will be traced back to him. He is greeted with the all too familiar, “It Worked! The Apache Web Server is Installed on this Web Site!” Game on. Now that he has your web server and associated domain name, he is going to want to resolve this information to a specific IP address. Rather than just using something like the host command, which will give away his location, he usestor-resolve, which is included with the Tor package. Joe Hacker knows it is critically important not to use any tools that will send UDP or ICMP packets directly to the target system. All lookups must go through the Tor network to preserve anonymity.
![]()
NOTE www.example.com and 10.10.10.100 are used as examples and are not real IP addresses or domain names.
As part of his methodical footprinting process, he wants to determine what other juicy services are running on this system. Of course, he pulls out his trusty version of Nmap, but he remembers he needs to run his traffic through Tor to continue his charade. Joe fires up proxychains (proxychains.sourceforge.net/) on his Linux box and runs his Nmap scans through the Tor network. The proxychain client forces any TCP connection made by any given application, Nmap in this case, to use the Tor network or a list of other proxy servers. How ingenious, he thinks. Because he can only proxy TCP connections via proxychains, he needs to configure Nmap with very specific options. The -sT option is used to specify a full connect, rather than a SYN scan. The -PN option is used to skip host discovery since he is sure the host is online. The -n option is used to ensure no Domain Name Server (DNS) requests are performed outside of the Tor network. The -sV option is used to perform service and version detection on each open port, and the -p option is used with a common set of ports to probe. Since Tor can be very slow and unreliable in some cases, it would take much too long to perform a full port scan via the Tor network, so he selects only the juiciest ports to scan:
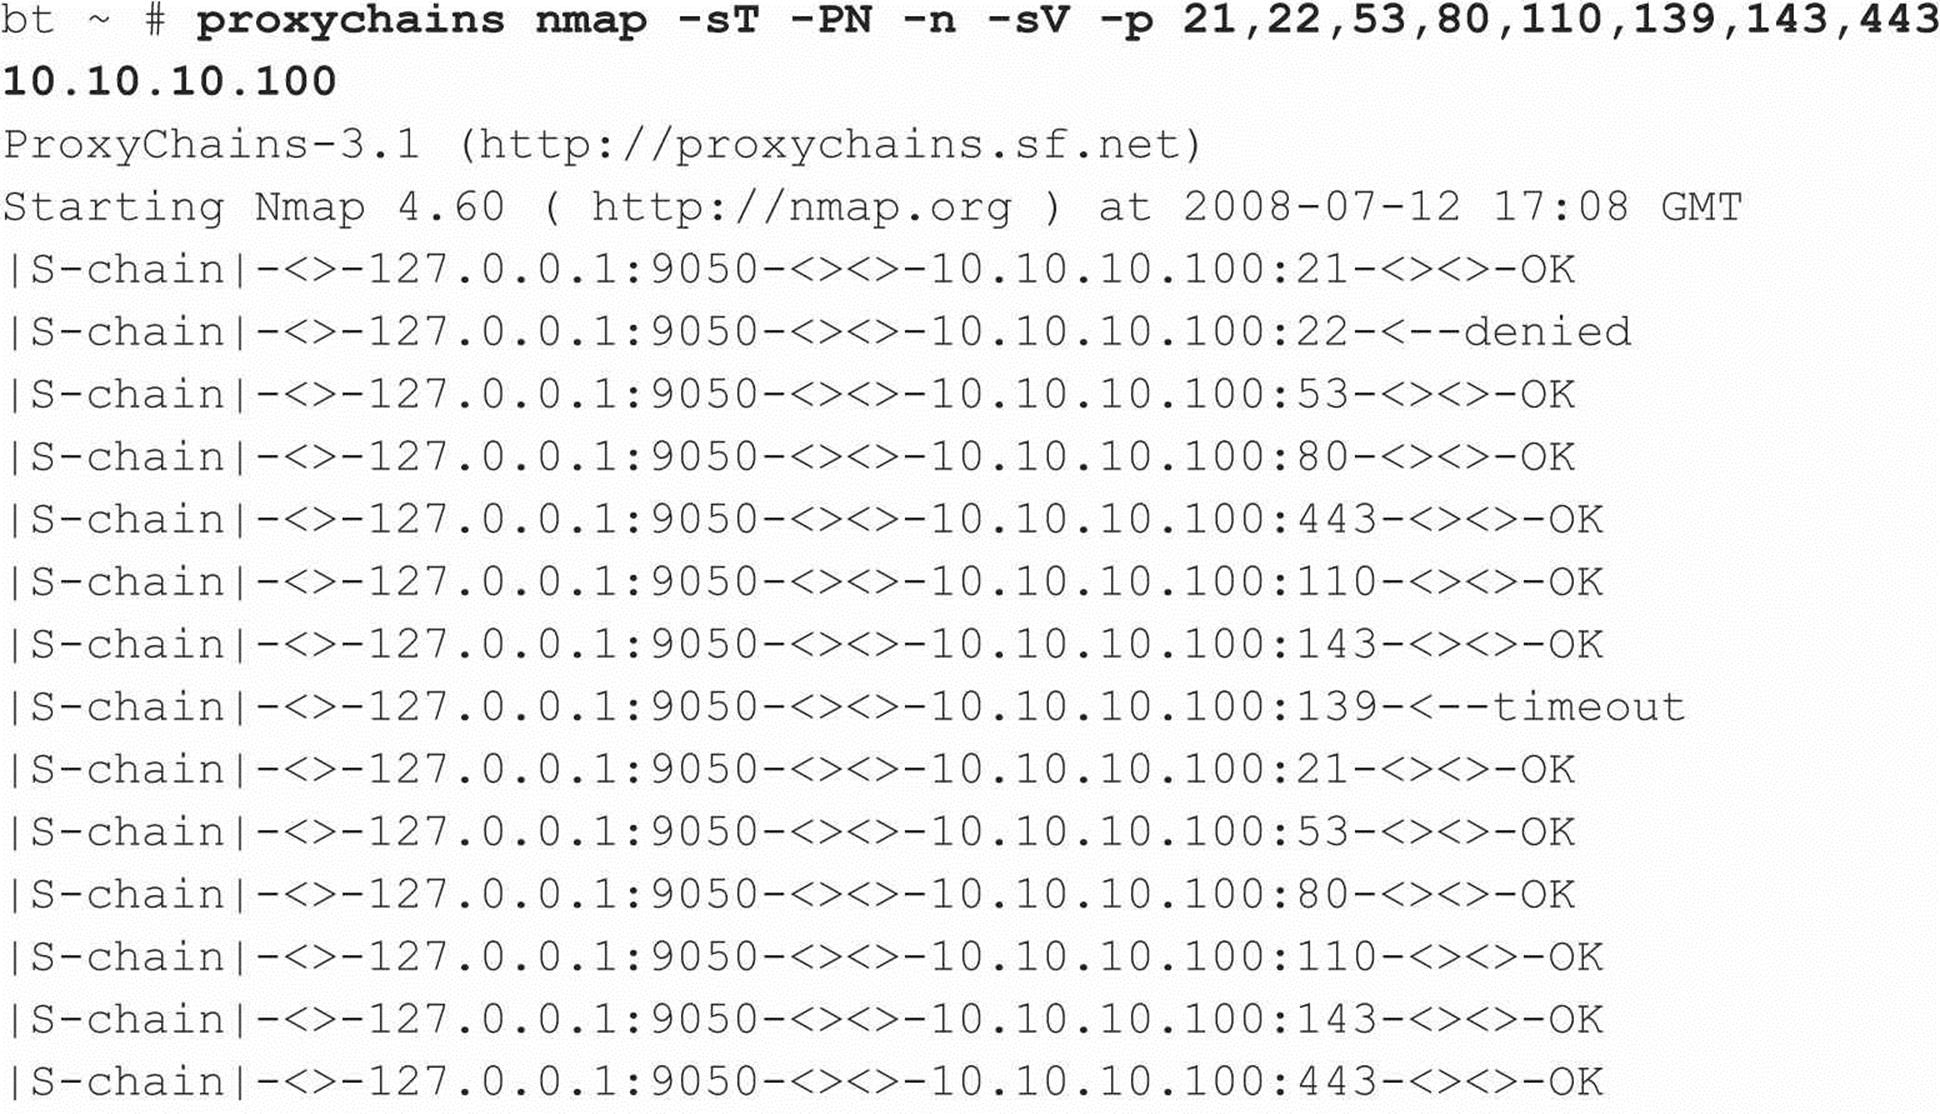
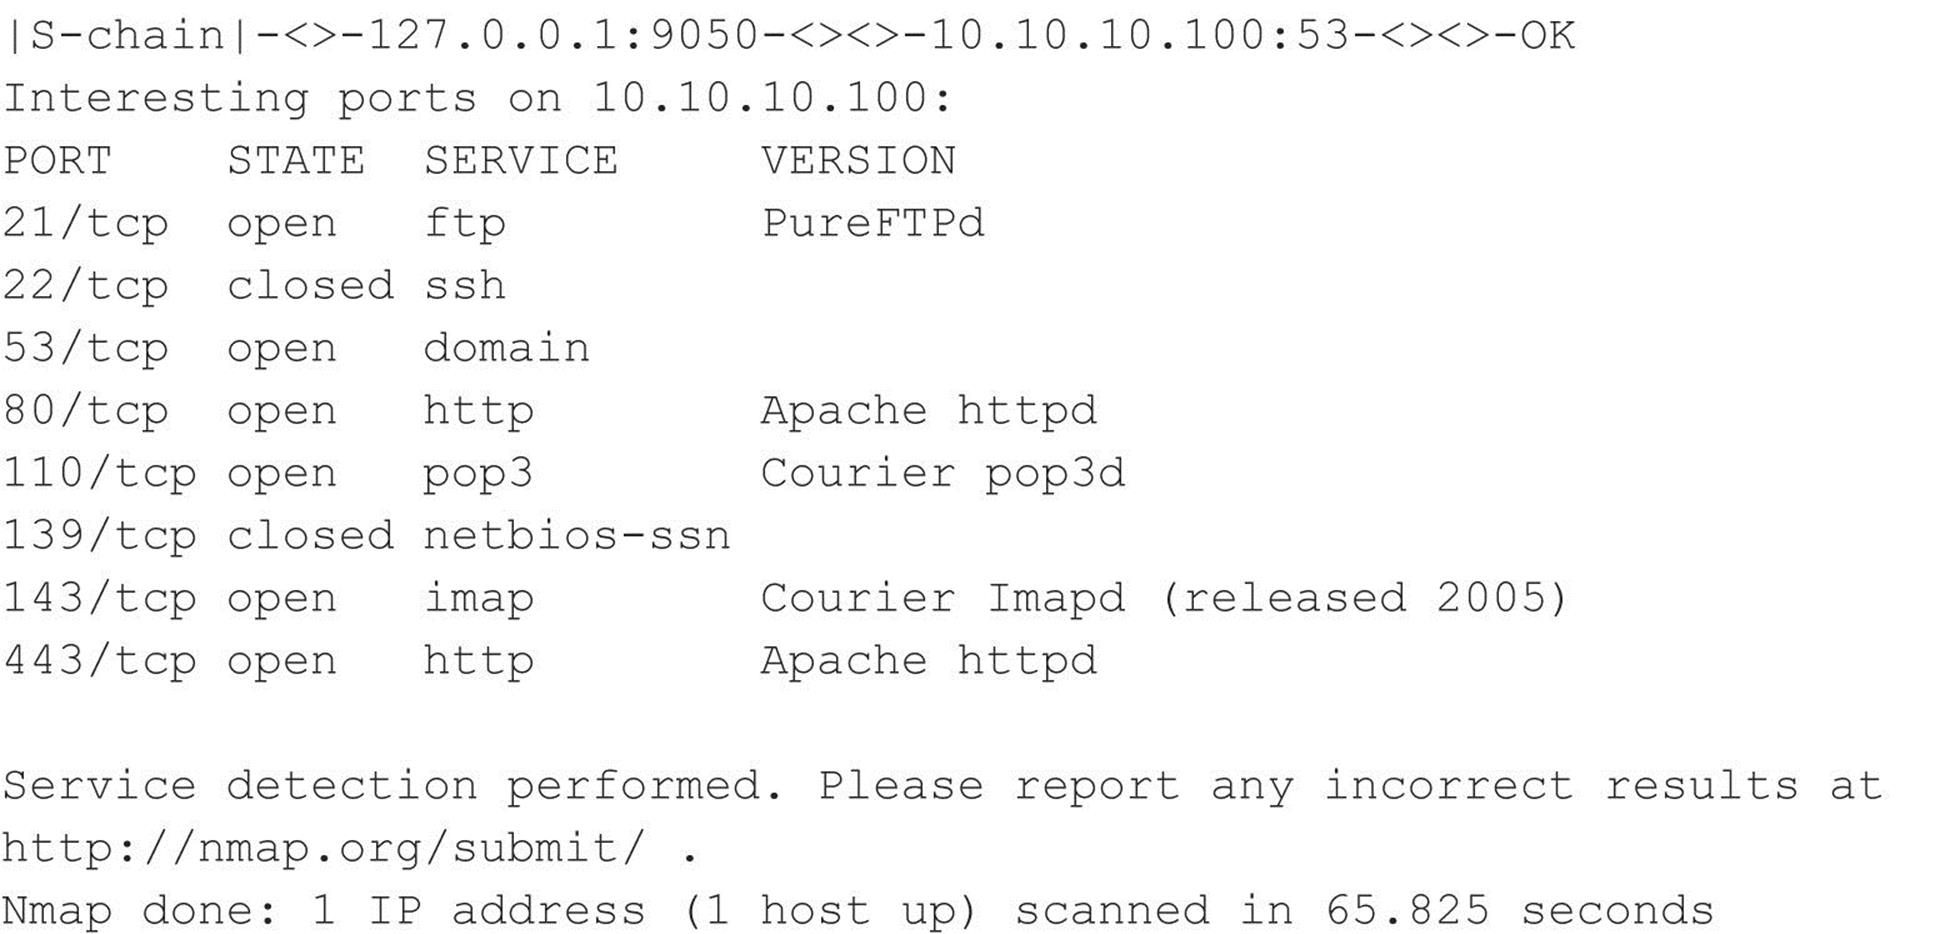
Joe Hacker now has a treasure trove of information from his covert Nmap scan in hand, including open ports and service information. He is singularly focused on finding specific vulnerabilities that may be exploitable remotely. Joe realizes that this system may not be up to date if the default install page of Apache is still intact. He decides that he will further his cause by connecting to the web server and determining the exact version of Apache. Thus, he needs to connect to the web server via port 80 to continue the beating. Of course he realizes that he needs to connect through the Tor network and ensure the chain of anonymity he has toiled so hard to create. While he could use proxychains to Torify the netcat (nc) client, he decides to use one more tool in his arsenal: socat (www.dest-unreach.org/socat/), which allows for relaying of bidirectional transfers and can be used to forward TCP requests via the Tor SOCKS proxy listening on Joe’s port 9050. The advantage to using socat is that Joe Hacker can make a persistent connection to his victim’s web server and run any number of probes through the socat relay (for example, Nessus, Nikto, and so on). In the example, he will probe the port manually rather than run an automated vulnerability assessment tool. The following socat command sets up a socat proxy listening on Joe’s local system (127.0.0.1 port 8080) and forwards all TCP requests to 10.10.10.100 port 80 via the SOCKS TOR proxy listening on 127.0.0.1 port 9050:
![]()
Joe is now ready to connect directly to the Apache web server and determine the exact version of Apache that is running on the target system. This can easily be accomplished with nc, the Swiss army knife of his hacking toolkit. Upon connection, he determines the version of Apache by typing HEAD / HTTP/1.0 and pressing ENTER twice:
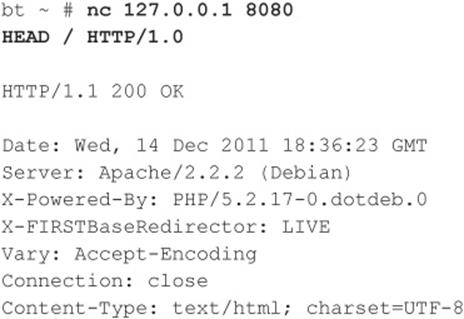
A bead of sweat begins to drop from his brow as his pulse quickens. WOW! Apache 2.2.2 is a fairly old version of the vulnerable web server, and Joe knows there are plenty of vulnerabilities that will allow him to “pwn” (hacker speak for “own” or “compromise”) the target system. At this point, a full compromise is almost academic as he begins the process of vulnerability mapping to find an easily exploitable vulnerability (that is, a chunked-encoded HTTP flaw) in Apache 2.2.2 or earlier.
It happens that fast, and it is that simple. Confused? Don’t be. As you will discover in the following chapters, footprinting, scanning, and enumeration are all valuable and necessary steps an attacker employs to turn a good day into a bad one in no time flat! We recommend reading each chapter in order and then rereading this case study. You should heed our advice: Assess your own systems first or the bad guys will do it for you. Also understand that in the new world order of Internet anonymity, not everything is as it appears. Namely, the attacking IP addresses may not really be those of the attacker. And if you are feeling beleaguered, don’t despair—hacking countermeasures are discussed throughout the book. Now what are you waiting for? Start reading!
CHAPTER 1. FOOTPRINTING
Before the real fun for the hacker begins, three essential steps must be performed. This chapter discusses the first one: footprinting, the fine art of gathering information. Footprinting is about scoping out your target of interest, understanding everything there is to know about that target and how it interrelates with everything around it, often without sending a single packet to your target. And because the direct target of your efforts may be tightly shut down, you will want to understand your target’s related or peripheral entities as well.
Let’s look at how physical theft is carried out. When thieves decide to rob a bank, they don’t just walk in and start demanding money (not the high IQ ones, anyway). Instead, they take great pains to gather information about the bank—the armored car routes and delivery times, the security cameras and alarm triggers, the number of tellers and escape exits, the money vault access paths and authorized personnel, and anything else that will help in a successful attack.
The same requirement applies to successful cyber attackers. They must harvest a wealth of information to execute a focused and surgical attack (one that won’t be readily caught). As a result, attackers gather as much information as possible about all aspects of an organization’s security posture. In the end, and if done properly, hackers end up with a unique footprint, or profile, of their target’s Internet, remote access, intranet/extranet, and business partner presence. By following a structured methodology, attackers can systematically glean information from a multitude of sources to compile this critical footprint of nearly any organization.
Sun Tzu had this figured out centuries ago when he penned the following in The Art of War:
If you know the enemy and know yourself, you need not fear the result of a hundred battles. If you know yourself but not the enemy, for every victory gained you will also suffer a defeat. If you know neither the enemy nor yourself, you will succumb in every battle.
You may be surprised to find out just how much information is readily and publicly available about your organization’s security posture to anyone willing to look for it. All a successful attack requires is motivation and opportunity. So it is essential for you to know what the enemy already knows about you!
WHAT IS FOOTPRINTING?
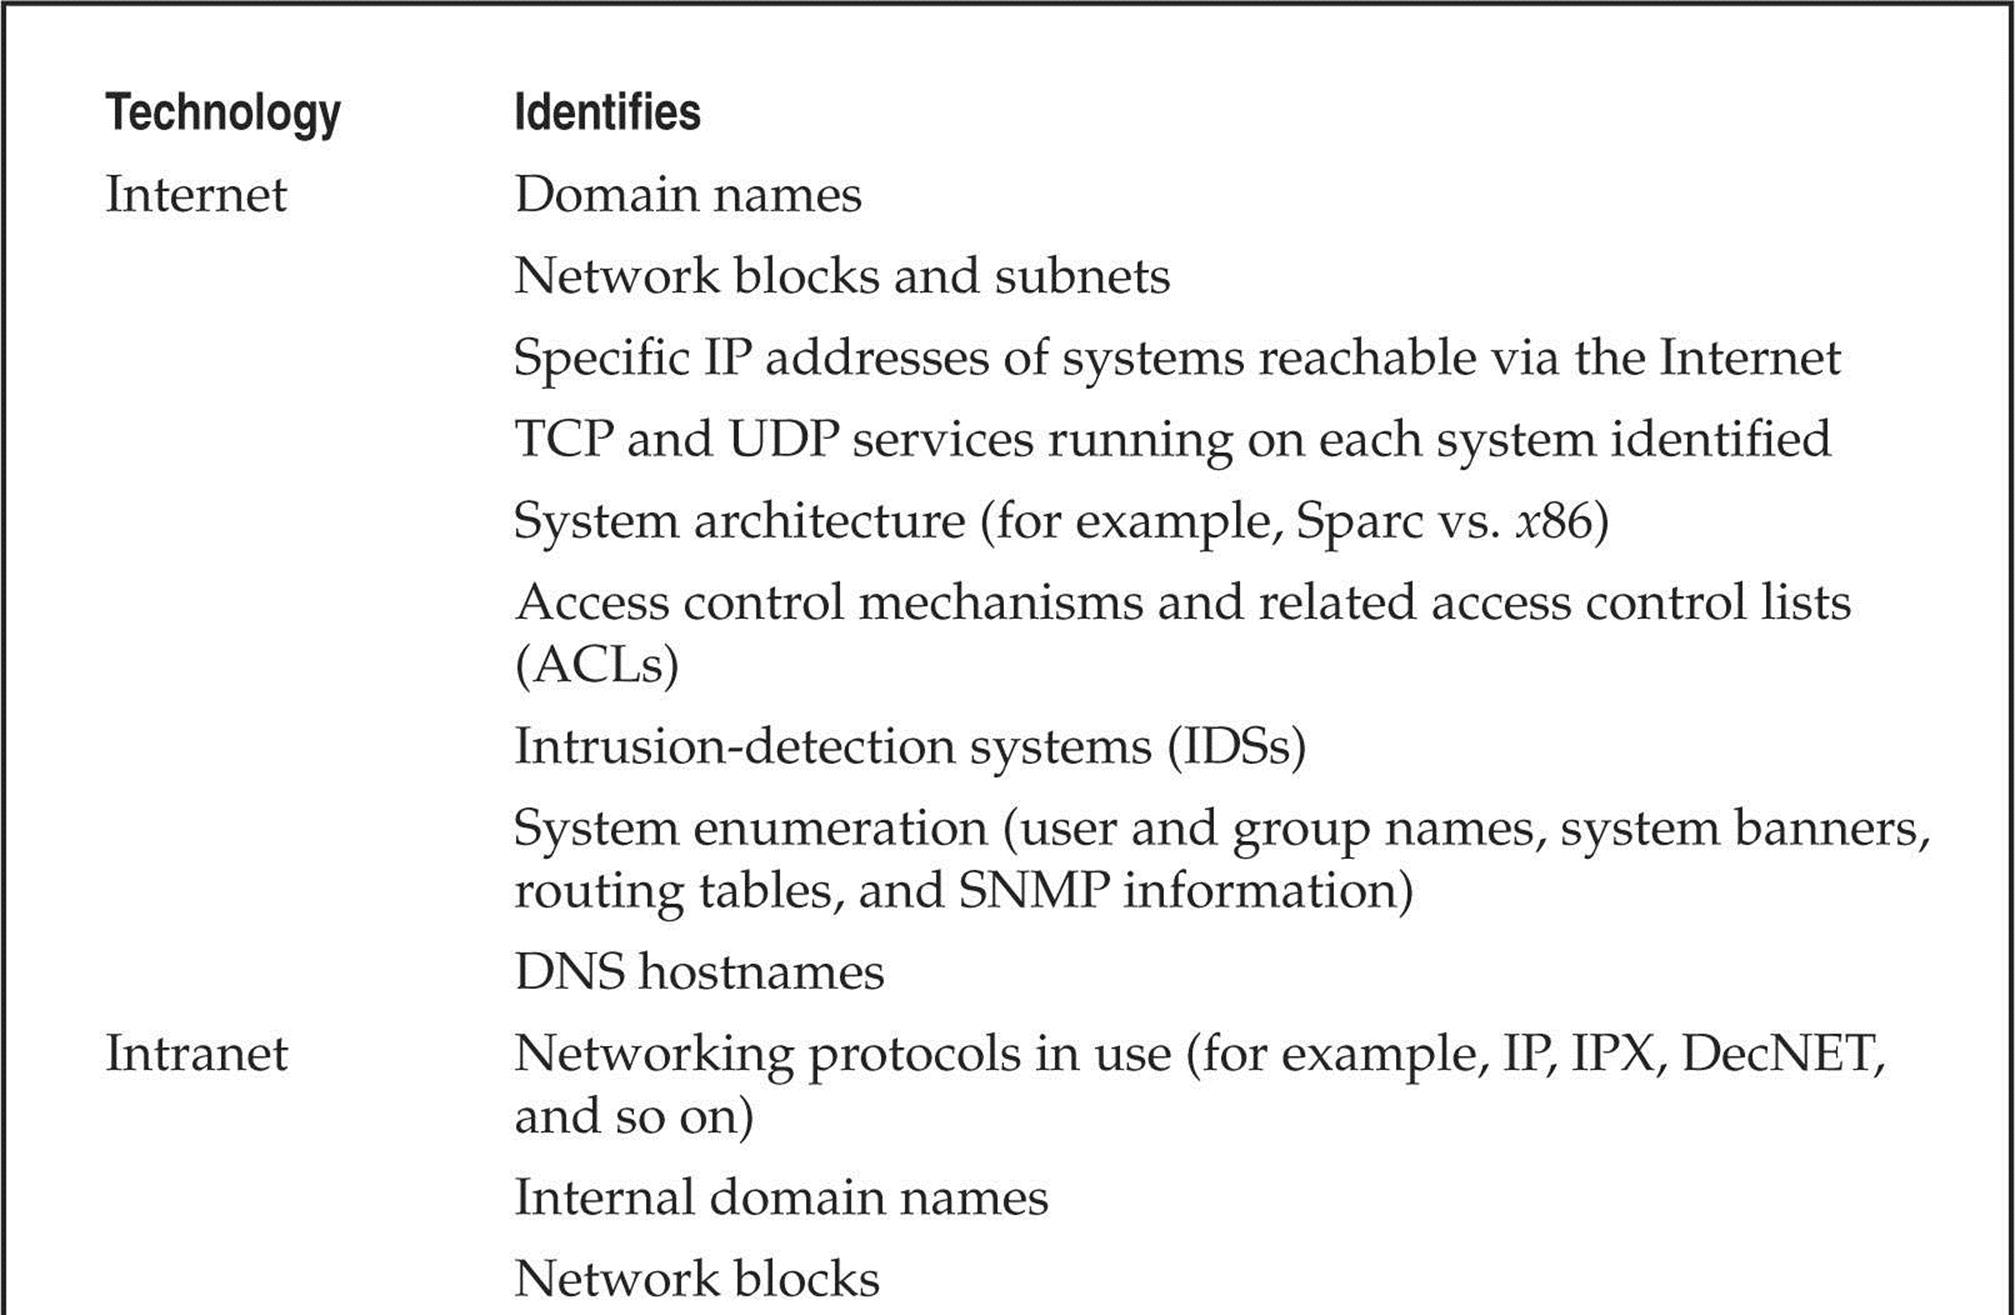
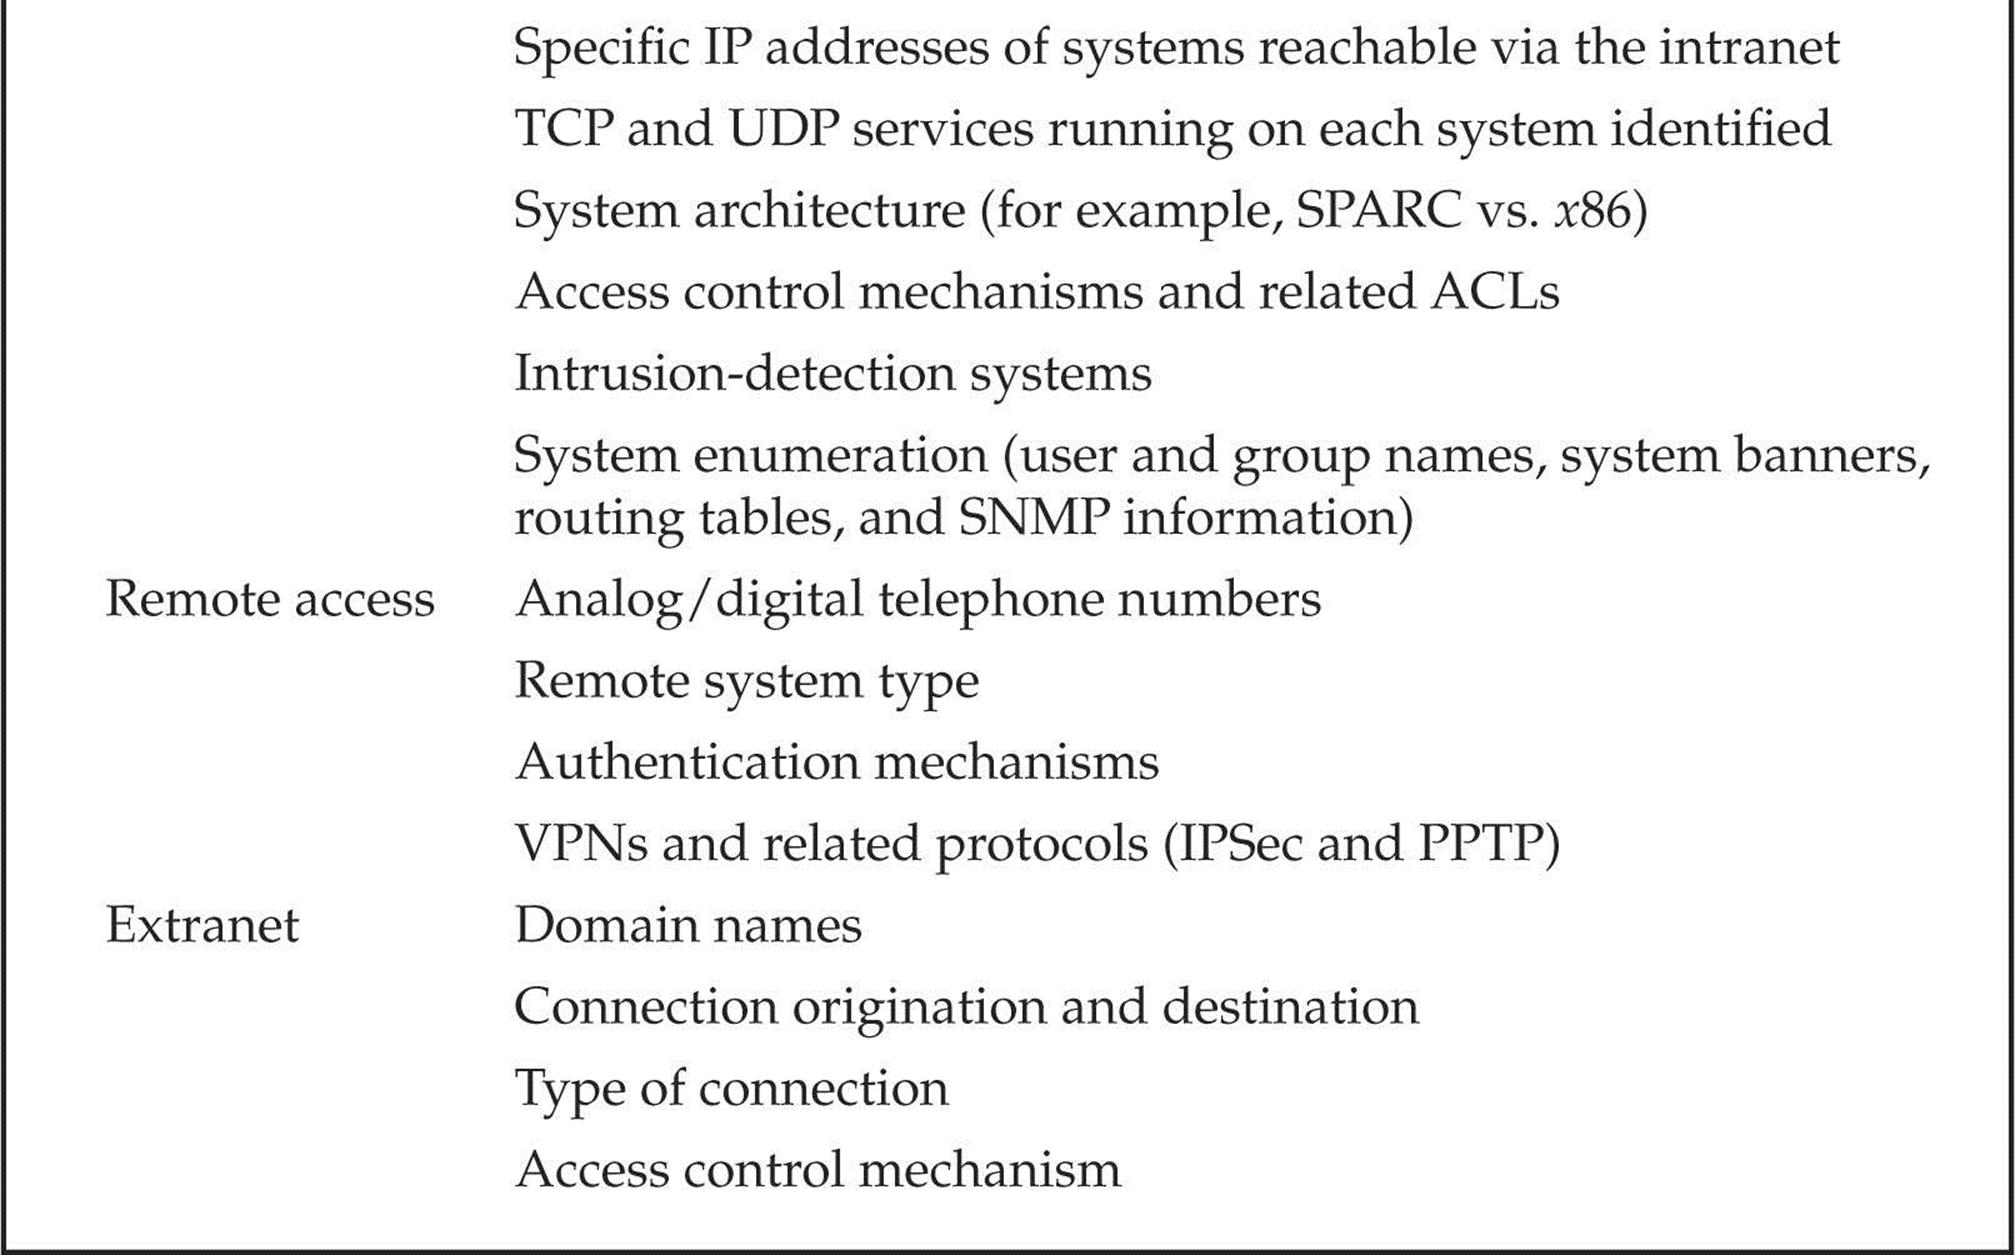
The systematic and methodical footprinting of an organization enables attackers to create a near complete profile of an organization’s security posture. Using a combination of tools and techniques, coupled with a healthy dose of patience and mind-melding, attackers can take an unknown entity and reduce it to a specific range of domain names, network blocks, subnets, routers, and individual IP addresses of systems directly connected to the Internet, as well as many other details pertaining to its security posture. Although there are many types of footprinting techniques, they are primarily aimed at discovering information related to the following environments: Internet, intranet, remote access, and extranet. Table 1-1 lists these environments and the critical information an attacker tries to identify.
Table 1-1 Tasty Footprinting Nuggets That Attackers Can Identify
Why Is Footprinting Necessary?
Footprinting is necessary for one basic reason: it gives you a picture of what the hacker sees. And if you know what the hacker sees, you know what potential security exposures you have in your environment. And when you know what exposures you have, you know how to prevent exploitation.
Hackers are very good at one thing: getting inside your head, and you don’t even know it. They are systematic and methodical in gathering all pieces of information related to the technologies used in your environment. Without a sound methodology for performing this type of reconnaissance yourself, you are likely to miss key pieces of information related to a specific technology or organization—but trust us, the hacker won’t.
Be forewarned, however, footprinting is often the most arduous task in trying to determine the security posture of an entity; and it tends to be the most boring for freshly minted security professionals eager to cut their teeth on some test hacking. However, footprinting is one of the most important steps, and it must be performed accurately and in a controlled fashion.
INTERNET FOOTPRINTING
Although many footprinting techniques are similar across technologies (Internet and intranet), this chapter focuses on footprinting an organization’s connections to the Internet. Remote access is covered in detail in Chapter 7.
Providing a step-by-step guide on footprinting is difficult because it is an activity that may lead you down many-tentacled paths. However, this chapter delineates basic steps that should allow you to complete a thorough footprinting analysis. Many of these techniques can be applied to the other technologies mentioned earlier.
Step 1: Determine the Scope of Your Activities
The first item of business is to determine the scope of your footprinting activities. Are you going to footprint the entire organization, or limit your activities to certain subsidiaries or locations? What about business partner connections (extranets), or disaster-recovery sites? Are there other relationships or considerations? In some cases, it may be a daunting task to determine all the entities associated with an organization, let alone properly secure them all. Unfortunately, hackers have no sympathy for our struggles. They exploit our weaknesses in whatever forms they manifest themselves. You do not want hackers to know more about your security posture than you do, so figure out every potential crack in your armor!
Step 2: Get Proper Authorization
One thing hackers can usually disregard that you must pay particular attention to is what we techies affectionately refer to as layers 8 and 9 of the seven-layer OSI Model—Politics and Funding. These layers often find their way into our work one way or another, but when it comes to authorization, they can be particularly tricky. Do you have authorization to proceed with your activities? For that matter, what exactly are your activities? Is the authorization from the right person(s)? Is it in writing? Are the target IP addresses the right ones? Ask any penetration tester about the “get-out-of-jail-free card,” and you’re sure to get a smile.
Although the very nature of footprinting is to tread lightly (if at all) in discovering publicly available target information, it is always a good idea to inform the powers that be at your organization before taking on a footprinting exercise.
Step 3: Publicly Available Information
After all these years on the Web, we still regularly find ourselves experiencing moments of awed reverence at the sheer vastness of the Internet—and to think it’s still quite young! Setting awe aside, here we go…
![]() Publicly Available Information
Publicly Available Information
The amount of information that is readily available about you, your organization, its employees, and anything else you can image is nothing short of amazing.
So what are the needles in the proverbial haystack that we’re looking for?
• Company web pages
• Related organizations
• Location details
• Employee information
• Current events
• Privacy and security polices, and technical details indicating type of security mechanism in place
• Archived information
• Search engines and data relationships
• Other information of interest
Company Web Pages
Perusing the target organization’s web page often gets you off to a good start. Many times, a website provides excessive amounts of information that can aid attackers. Believe it or not, we have actually seen organizations list security configuration details and detailed asset inventory spreadsheets directly on their Internet web servers.
In addition, try reviewing the HTML source code for comments. Many items not listed for public consumption are buried in HTML comment tags, such as <, !, and --. Viewing the source code offline may be faster than viewing it online, so it is often beneficial to mirror the entire site for offline viewing, provided the website is in a format that is easily downloadable—that is, HTML and not Adobe Flash, usually in a Shockwave Flash (SWF) format. Having a copy of the targeted site locally may allow you to search for comments or other items of interest programmatically, thus making your footprinting activities more efficient. A couple of tried and true website mirroring tools are
• Wget (gnu.org/software/wget/wget.html) for UNIX/Linux
• Teleport Pro (tenmax.com) for Windows
Not all files and directories a website contains are direct links, indexed by Google, or buried in HTML comments. Discovery sometimes requires brute-force techniques to enumerate “hidden” files and directories on a website. This can be performed in an automated fashion using a specialized tool such as OWASP’s DirBuster (owasp.org/index.php/Category:OWASP_DirBuster_Project). A total of nine different lists of varying size and comprehensiveness are included with the tool, but other lists can also be leveraged for enumeration. Once a list is chosen and a file extension type is specified, DirBuster attempts to enumerate hidden files and directories recursively (Figure 1-1). Once enumeration is complete, DirBuster provides a reporting feature that allows you to export any directories and/or files identified along with the request’s associated response codes. Please keep in mind that this kind of brute-force enumeration is extremely noisy and attracts attention. For this reason, DirBuster also includes a proxy feature to run the traffic through privoxy (a topic we discussed earlier in the chapter).
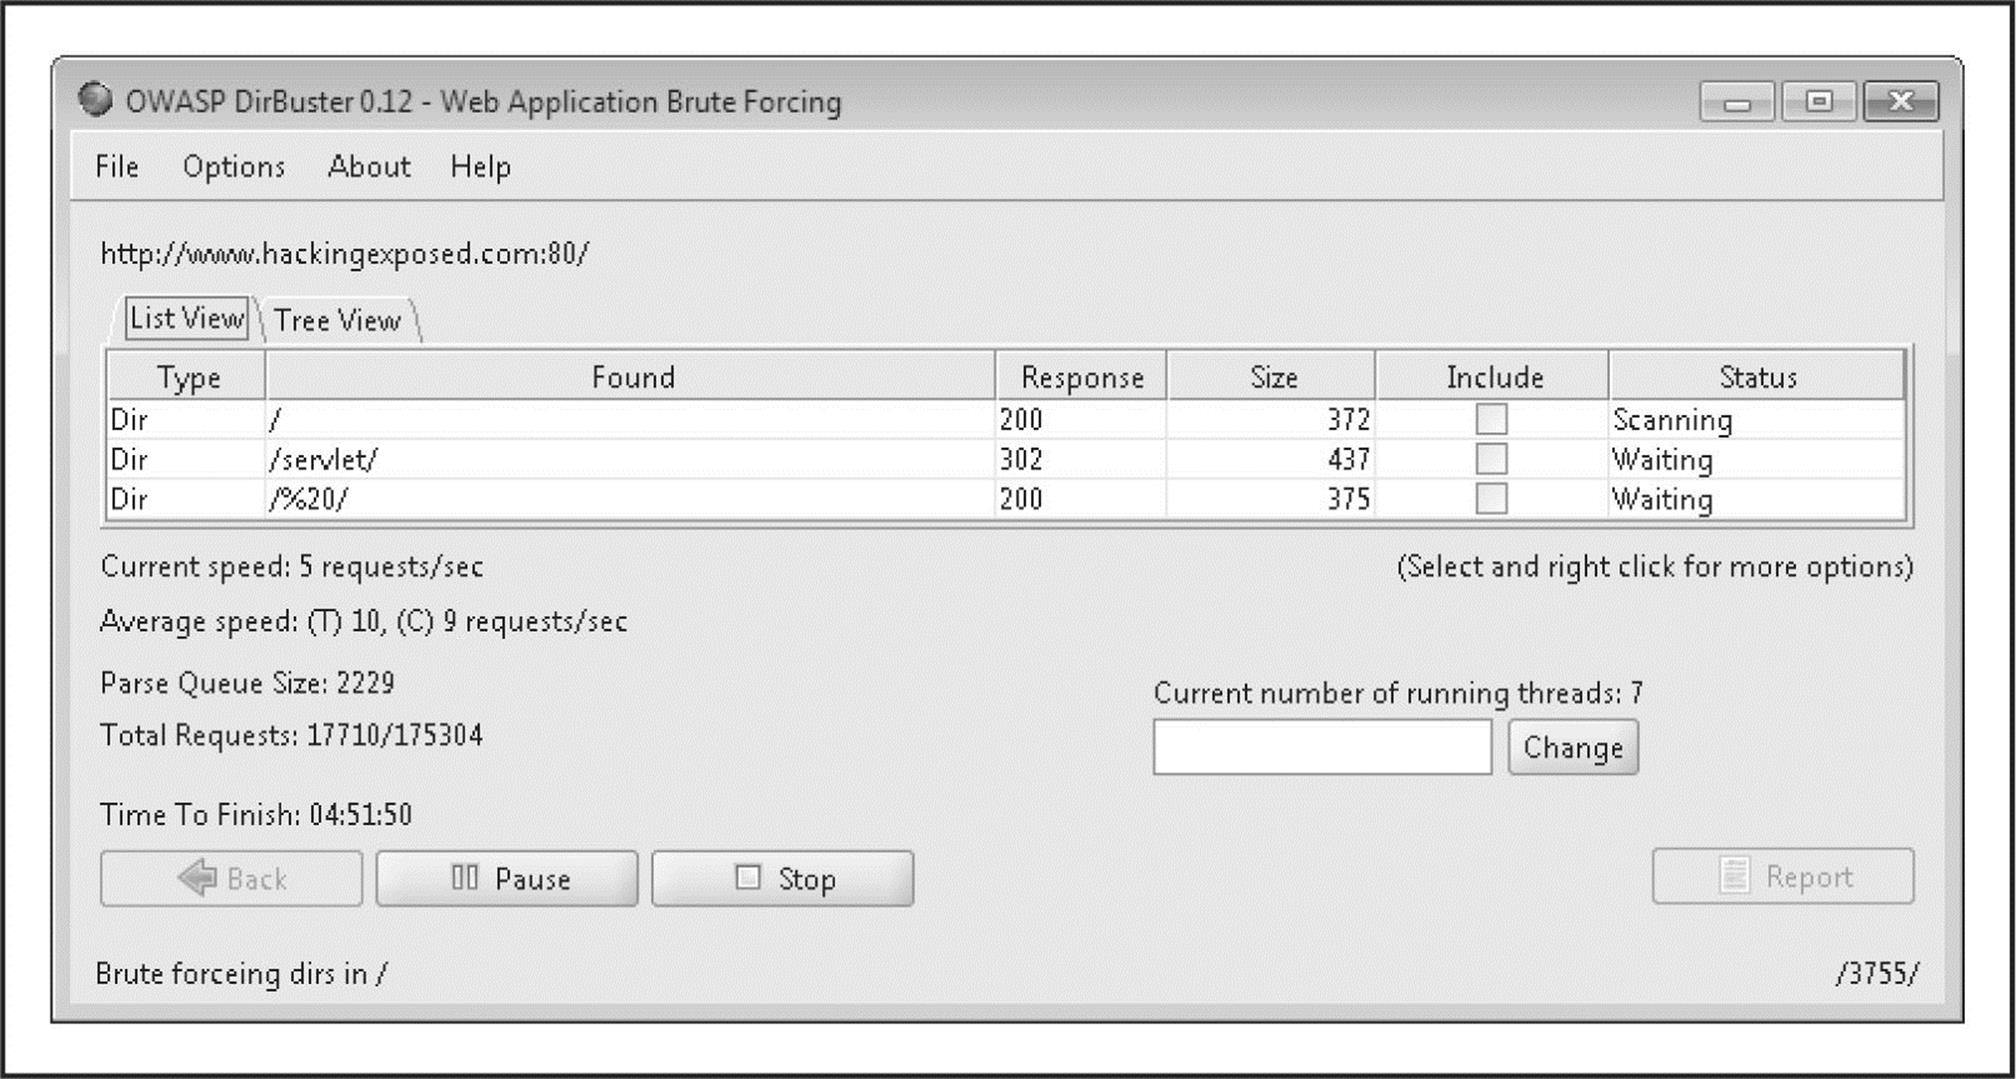
Figure 1-1 Files and directories identified using DirBuster
Be sure to investigate other sites beyond the main “http://www” and “https://www” sites as well. Hostnames such as www1, www2, web, web1, test, test1, etc., are all great places to start in your footprinting adventure. But there are others, many others.
Many organizations have sites to handle remote access to internal resources via a web browser. Microsoft’s Outlook Web Access is a very common example. It acts as a proxy to the internal Microsoft Exchange servers from the Internet. Typical URLs for this resource arehttps://owa.example.com or https://outlook.example.com. Similarly, organizations that make use of mainframes, System/36s, or AS/400s may offer remote access via a web browser via services like WebConnect by OpenConnect (openconnect.com), which serves up a Java-based 3270 and 5250 emulator and allows for “green screen” access to mainframes and midrange systems such as AS/400s via the client’s browser.
Virtual Private Networks (VPNs) are very common in most organizations as well, so looking for sites like http://vpn.example.com, https://vpn.example.com, or http://www.example.com/vpn often reveals websites designed to help end users connect to their companies’ VPNs. You may find VPN vendor and version details as well as detailed instructions on how to download and configure the VPN client software. These sites may even include a phone number to call for assistance if the hacker—er, I mean, employee—has any trouble getting connected.
Related Organizations
Be on the lookout for references or links to other organizations that are somehow related to the target organization. For example, many targets outsource much of their web development and design. It’s very common to find comments from an author in a file you find on the main web page. For example, we found the company and author of a Cascading Style Sheet (CSS) file just recently, indicating that the target’s web development was outsourced. In other words, this partner company is now a potential target for attack too.

Even if an organization keeps a close eye on what it posts about itself, its partners are usually not as security-minded. They often reveal additional details that, when combined with your other findings, could result in a more sensitive aggregate than your sites revealed on their own. Additionally, this partner information could be used later in a direct or indirect attack such as a social engineering attack. Taking the time to check out all the leads often pays nice dividends in the end.
Location Details
A physical address can prove very useful to a determined attacker. It may lead to dumpster-diving, surveillance, social engineering, and other nontechnical attacks. Physical addresses can also lead to unauthorized access to buildings, wired and wireless networks, computers, mobile devices, and so on. It is even possible for attackers to attain detailed satellite imagery of your location from various sources on the Internet. Our personal favorite is Google Earth, which can be found at earth.google.com (see Figure 1-2). It essentially puts the world (or at least most major metro areas around the world) in your hands and lets you zoom in on addresses with amazing clarity and detail via a well-designed client application.
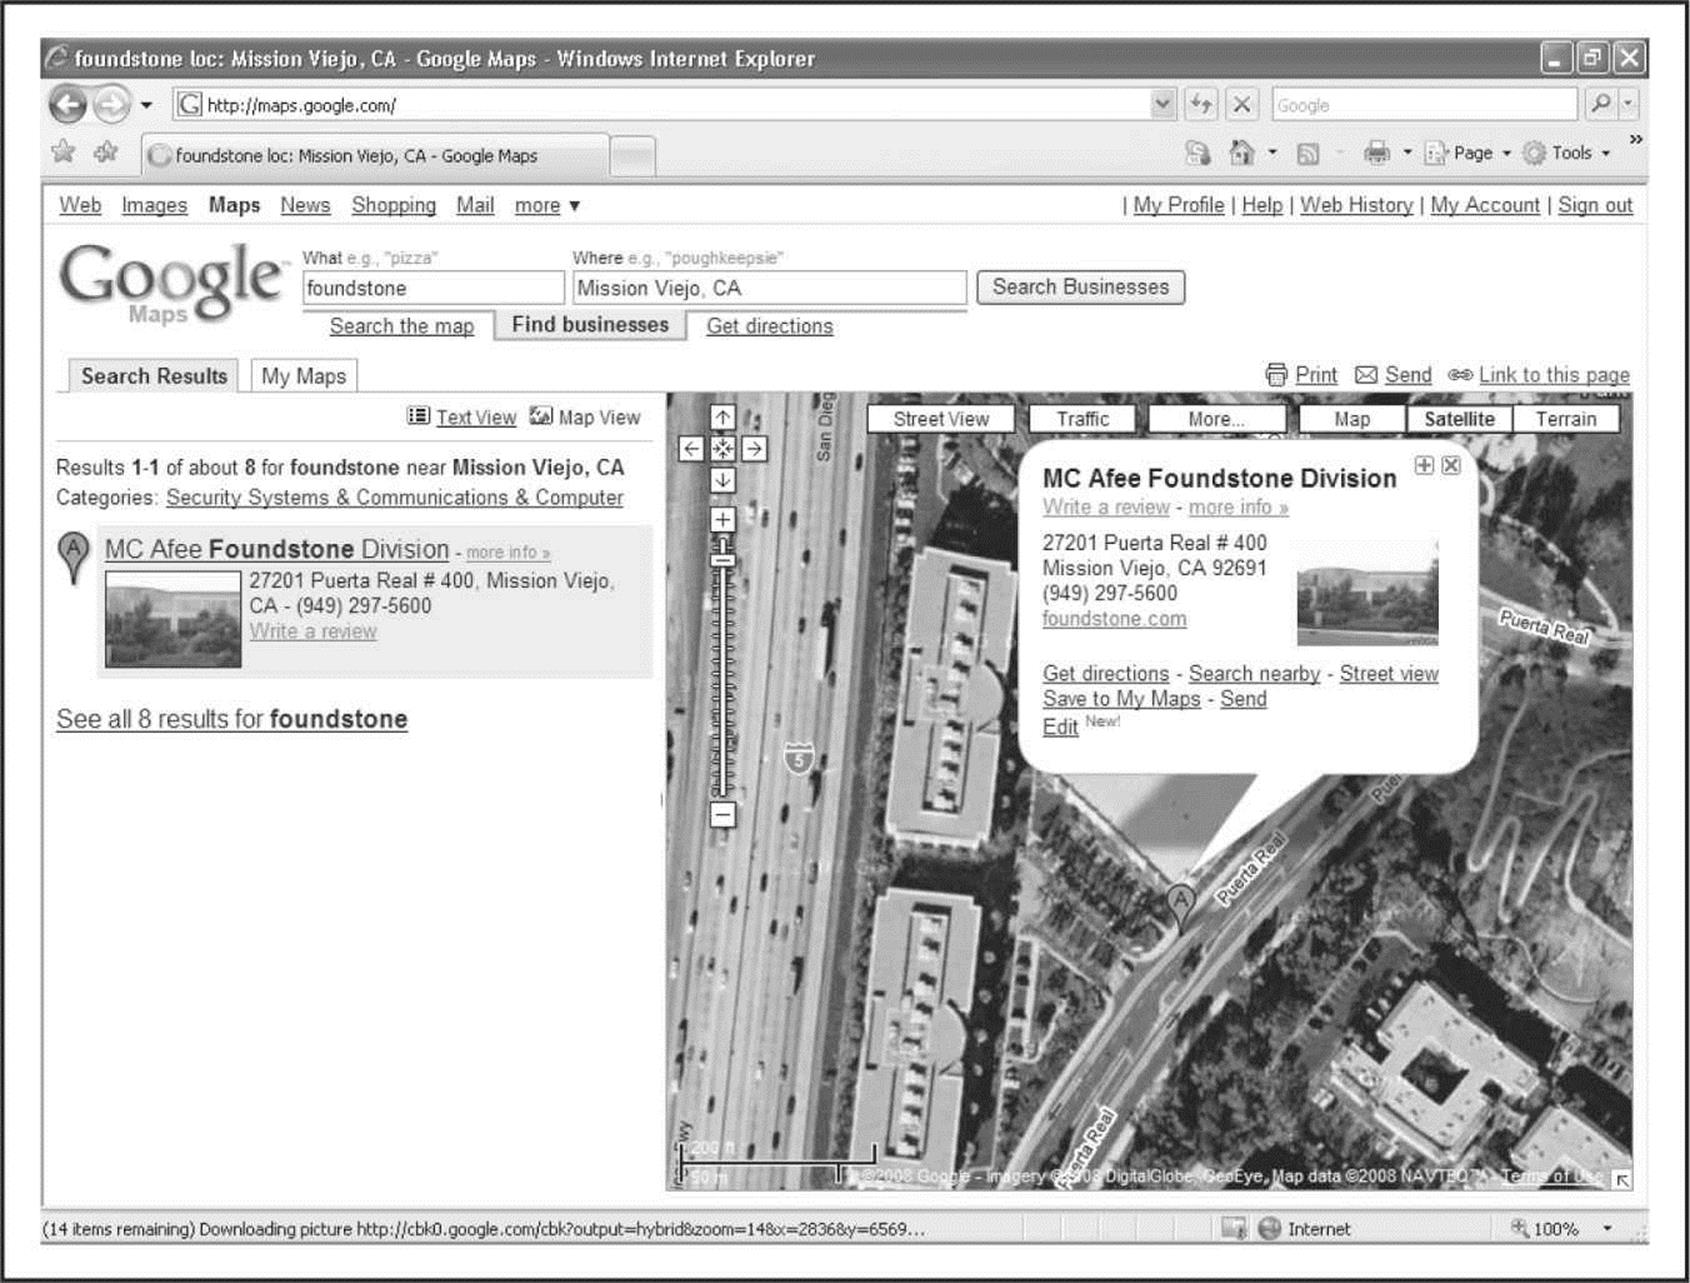
Figure 1-2 With Google Earth, someone can footprint your physical presence with remarkable detail and clarity.
Using Google Maps (maps.google.com), you can utilize the Street View (see Figure 1-3) feature, which actually provides a “drive-by” series of images so you can familiarize yourself with the building, its surroundings, the streets, and traffic of the area. All this helpful information to the average Internet user is a treasure trove of information for the bad guys.
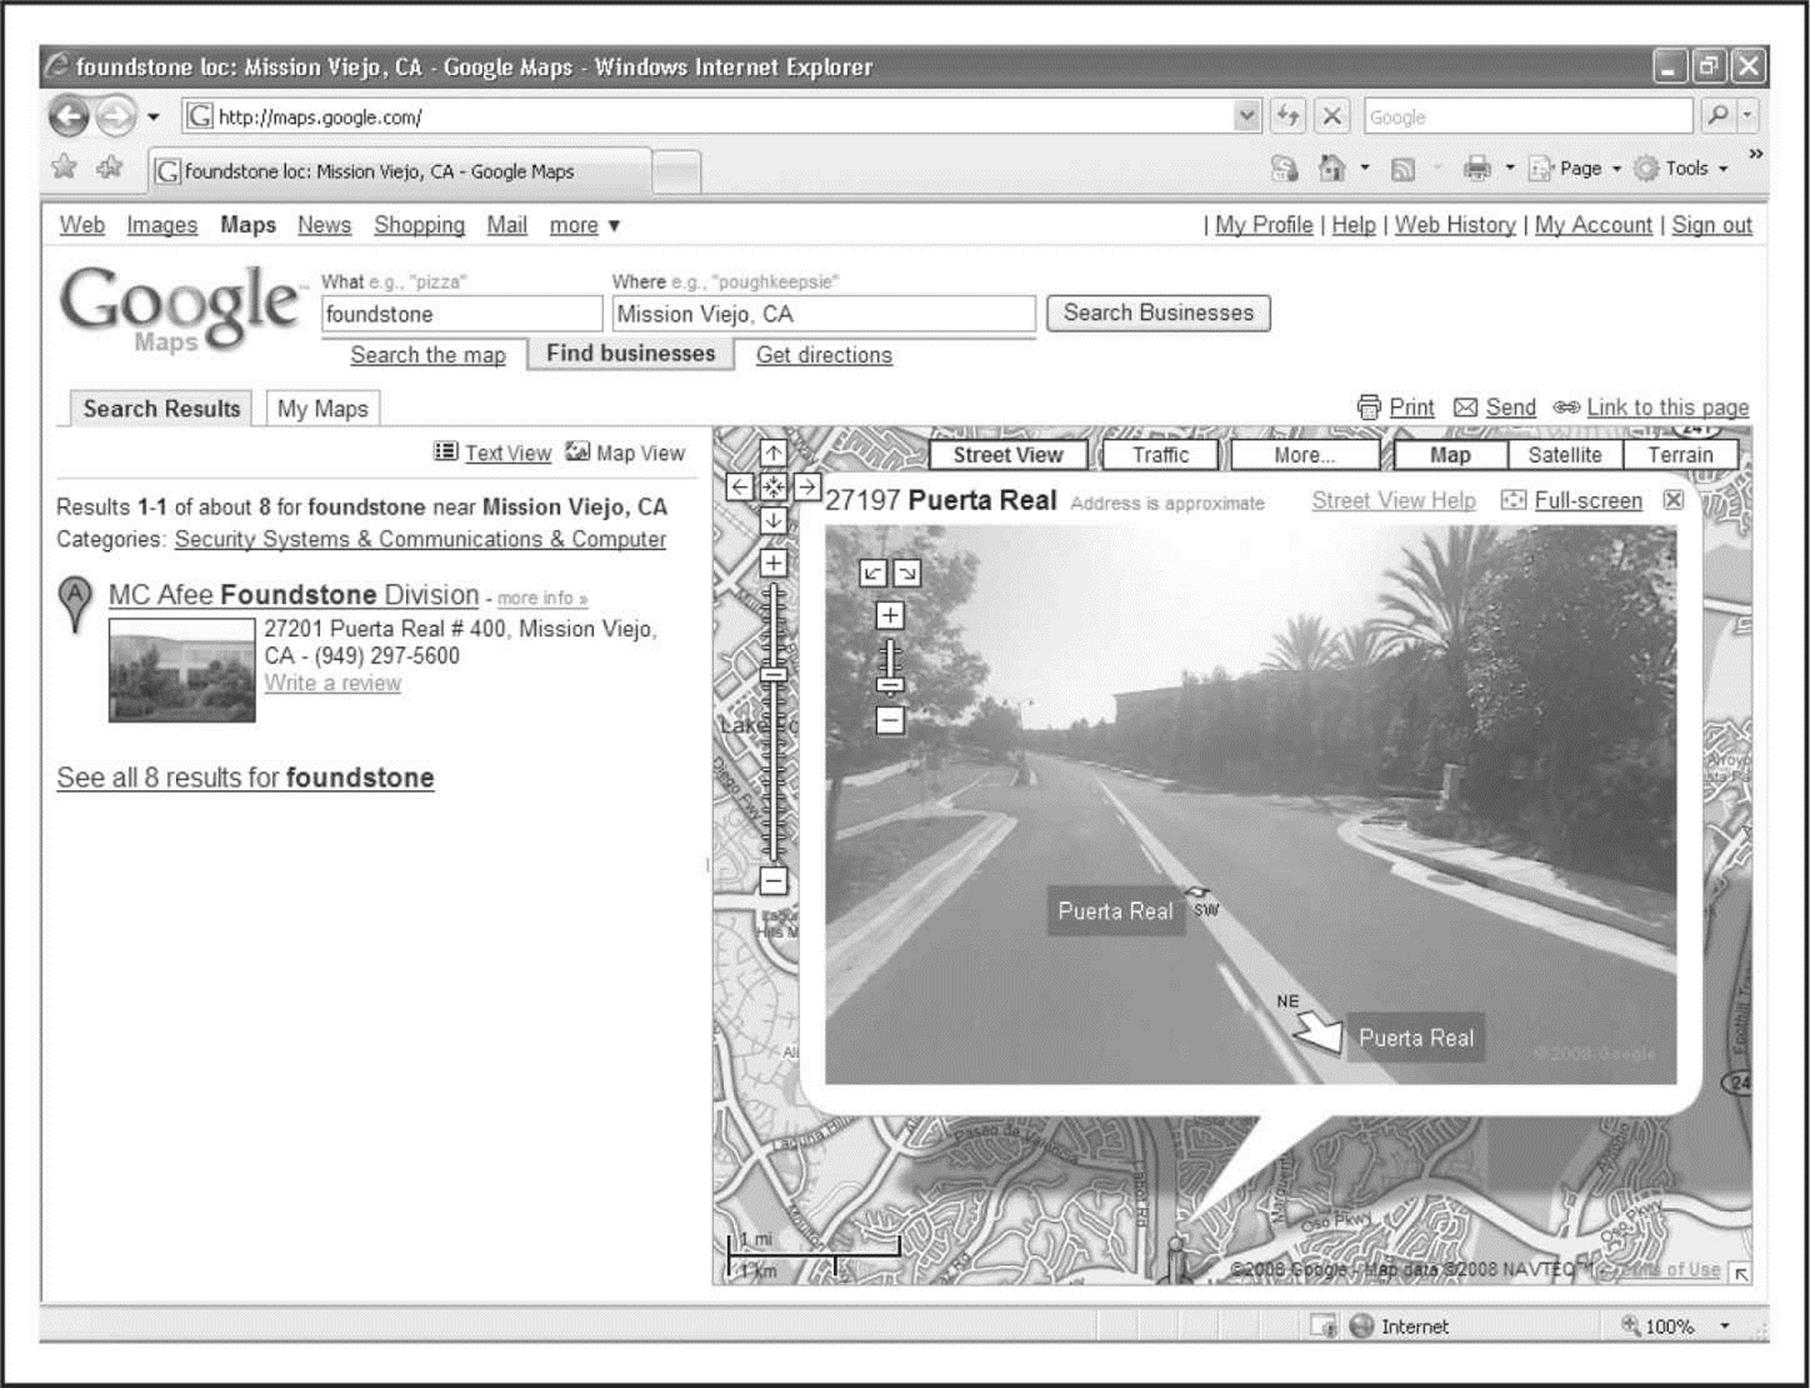
Figure 1-3 With Google Maps, you can see what the hacker sees.
Interestingly, as the Google street car drives around the country, it is not only recording visual data for the Street View feature; it is also tracking any Wi-Fi networks and their associated MAC addresses that it encounters along the way. Services for finding location information based on a MAC address are now available through Google Locations and Skyhook. For the curious and the eager, a front-end interface to Google Locations’ back-end API can be found at shodanhq.com/research/geomac. Simply supply a wireless router MAC address and the website queries Google for any geolocation information it has on the wireless device. At BlackHat 2010, Sammy Kamkar’s “How I Met Your Girlfriend” presentation demonstrated how an attacker could leverage vulnerable home routers, cross-site scripting, location services, and Google maps to triangulate the location of an individual. For the purposes of this chapter, the details of the attack are too lengthy to describe, but his presentation on the topic can be found on both youtube.com and vimeo.com.
Employee Information
Contact names and e-mail addresses are particularly useful data. Most organizations use some derivative of the employee’s name for their username and e-mail address (for example, John Smith’s username is jsmith, johnsmith, john.smith, john_smith, or smithj, and his e-mail address isjsmith@example.com or something similar). If we know one of these items, we can probably figure out the others. Having a username is very useful later in the methodology when we try to gain access to system resources. All of these items can be useful in social engineering as well (more on social engineering later).
Attackers can use phone numbers to look up your physical address via sites like phonenumber.com, 411.com, and yellowpages.com. They may also use your phone number to help them target their war-dialing ranges, or to launch social engineering attacks to gain additional information and/or access.
Other personal details can be readily found on the Internet using any number of sites like blackbookonline.info/, which links to several resources, and peoplesearch.com, which can give hackers personal details ranging from home phone numbers and addresses to social security numbers, credit histories, and criminal records, among other things.
In addition to these personal tidbits gathered, numerous publicly available websites can be pilfered for information on your current or past employees to learn more information about you and your company’s weaknesses and flaws. The websites you should frequent in your footprinting searches include social and information networking sites (Facebook.com, Myspace.com, Reunion.com, Classmates.com, Twitter.com), professional networking sites (Linkedin.com, Plaxo.com), career management sites (Monster.com, Careerbuilder.com, Dice.com), and family ancestry sites (Ancestry.com). Even online photo management sites (Flickr.com, Photobucket.com) can be used against you and your company.
On the paid-for services side, employee directories can be purchased through business directory services such as JigSaw.com (Figure 1-4). These sites are primarily used by sales teams who pay for prospective client contact information for the purposes of cold-call introductions. Members can acquire and export a single contact or an entire corporate directory with the click of a button. In addition, most business directory sites also institute a reward system to incentivize their members to keep contact records current. When a member receives a new business card from a sales encounter, they are encouraged to create a new record for the contact if it does not exist or update an existing contact if the information has changed. For every record update a member submits, the member is awarded points that they can use to acquire new contacts for free. In this way, the site’s members are motivated to police the directory service to ensure the records are kept up to date. From an attacker’s standpoint, the centralization and currency of this information is very helpful. For a nominal fee, directory services can be leveraged to reliably automate the collection process on basic employee information such as names, titles, e-mail addresses, phone numbers, and work locations. Such data can later be operationalized through social engineering and phishing attacks.
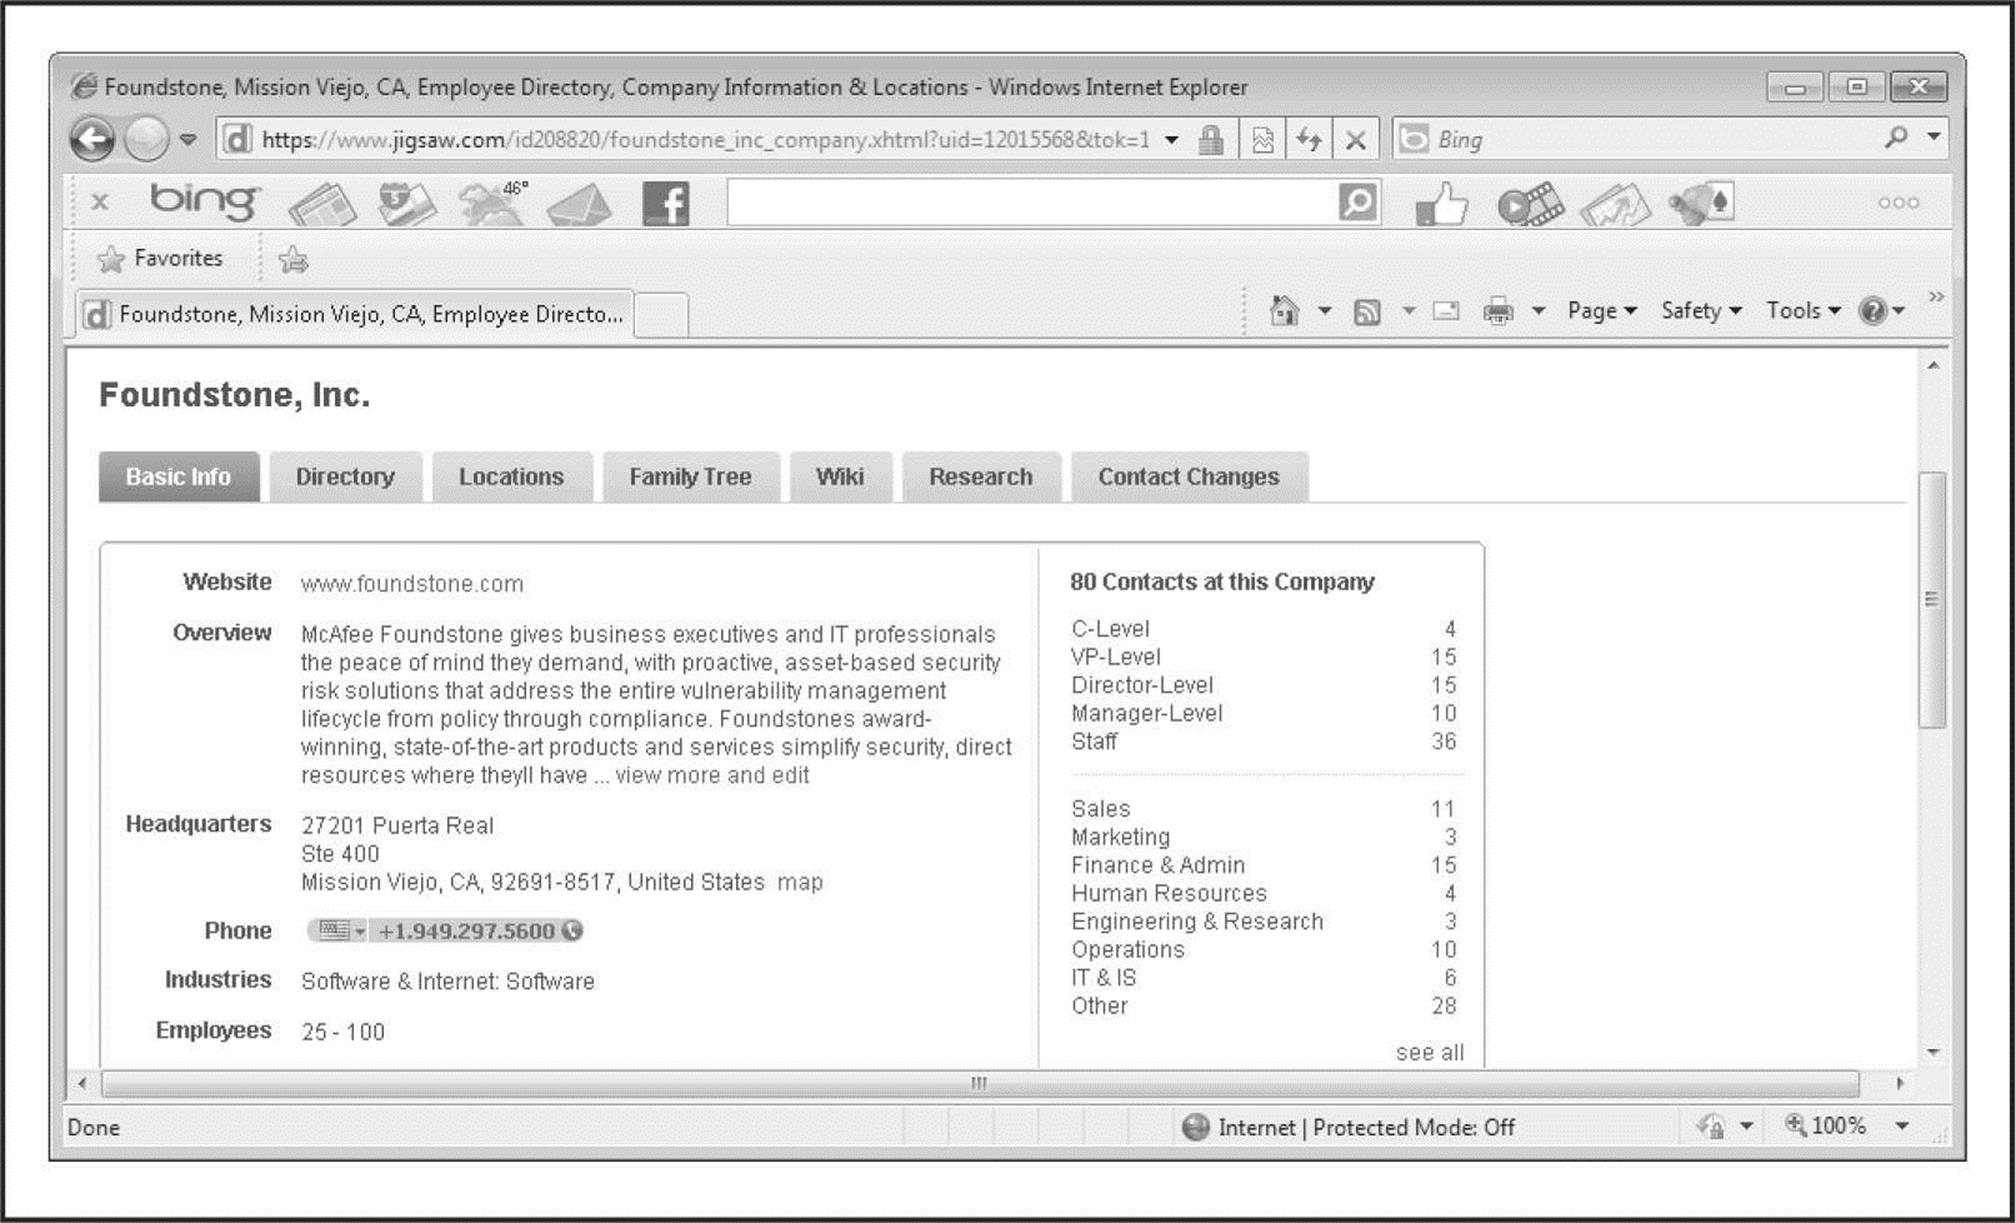
Figure 1-4 Organizational information for Foundstone obtained through JigSaw’s service
Once employees, contractor, and vendor names are associated with your company, hackers can then turn to these websites and look up boundless information about the people and companies they are associated with. Given enough information, they can build a matrix of data points to provide deductive reasoning that can reveal much of the target’s configuration and vulnerabilities. In fact, there are so many websites that spill information about your company’s assets and their relative security that we could spend an entire chapter on the topic. Suffice it to say, almost anything about your company can be revealed from the data housed in those websites. Data-mining tools, such as Maltego, are available for sifting through the burgeoning number of information sources and drawing relationship maps between the data points collected. We examine Maltego in greater detail in “Archived Information,” later in the chapter.
Another interesting source of information lies in the myriad of employee resumes available online. With the IT profession being as vast and diverse as it is, finding a perfect employee-to-position match can be quite difficult. One of the best ways to reduce the large number of false positives is to provide very detailed, often sensitive information in both the job postings and in the resumes.
Imagine that an organization is in need of a seasoned IT security professional to assume very specific roles and job functions. This security professional needs to be proficient with this, that, and the other thing, as well as able to program this and that—you get the idea. The company must provide those details in order to get qualified leads (vendors, versions, specific responsibilities, level of experience required, etc.). If the organization is posting for a security professional with, say, five or more years’ experience working with CheckPoint firewalls and Snort IDS, what kind of firewall and IDS do you think they use? Maybe they are advertising for an intrusion-detection expert to develop and lead their IR team. What does this say about their current incident detection and response capabilities? Could they be in a bit of disarray? Do they even have one currently? If the posting doesn’t provide the details, maybe a phone call will. The same is true for an interesting resume—impersonate a headhunter and start asking questions. These kinds of details can help an attacker paint a detailed picture of a target organization’s security posture—very important when planning an attack!
If you do a search on Google for something like “company resume firewall,” where company is the name of the target organization, you will most likely find a number of resumes from current and/or past employees of the target that include quite detailed information about technologies they use and initiatives they are working on. Job sites like monster.com and careerbuilder.com contain tens of millions of resumes and job postings. Searching on organization names may yield amazing technical details. In order to tap into the vast sea of resumes on these sites, you have to be a registered organization and pay access fees. However, an attacker can pretty easily front a fake company and pay the fee in order to access the millions of resumes.
A slightly different, but real threat to an organization’s security can come from disgruntled employees, ex-employees, or sites that distribute sensitive information about an organization’s internal dealings. If you ask anyone about disgruntled employee stories, you are likely to hear some pretty amazing tales of revenge. It’s not uncommon for people to steal, sell, and give away company secrets; damage equipment; destroy data; set logic bombs to go off at predetermined times; leave back doors for easy access later; or perform any number of other dubious acts. This threat is one of the reasons today’s dismissal procedures often include security guards, HR personnel, and a personal escort out of the building.
Attackers might use any of this information to assist them in their quests—extortion is still alive and well. An attacker might also be interested in an employee’s home computer, which probably has some sort of remote access to the target organization. A keystroke logger on an employee’s home machine or laptop may very well give an attacker a free ride to the organization’s inner sanctum. Why bang one’s head against the firewalls, IDSs, IPSs, etc., when the attacker can simply impersonate a trusted user?
Current Events
Current events are often of significant interest to attackers. Mergers, acquisitions, scandals, layoffs, rapid hiring, reorganizations, outsourcing, extensive use of temporary contractors, and other events may provide clues, opportunities, and situations that didn’t exist before. For instance, one of the first things to happen after a merger or acquisition is a blending of the organizations’ networks. Security is often placed on the back burner in order to expedite the exchange of data. How many times have you heard, “I know it isn’t the most secure way to do it, but we need to get this done ASAP. We’ll fix it later”? In reality, “later” often never comes, thus allowing an attacker to exploit this frailty in the name of availability to access a back-end connection to the primary target.
The human factor comes into play during these events, too. Morale is often low during times like these, and when morale is low, people may be more interested in updating their resumes than watching the security logs or applying the latest patch. At best, they are somewhat distracted. There is usually a great deal of confusion and change during these times, and most people don’t want to be perceived as uncooperative or as inhibiting progress. This provides for increased opportunities for exploitation by a skilled social engineer.
The reverse of “bad times” opportunities can also be true. When a company experiences rapid growth, oftentimes their processes and procedures lag behind. Who’s making sure there isn’t an unauthorized guest at the new-hire orientation? Is that another new employee walking around the office, or is it an unwanted guest? Who’s that with the laptop in the conference room? Is that the normal paper-shredder company? Janitor?
If the company is a publicly traded company, information about current events is widely available on the Internet. In fact, publicly traded companies are required to file certain periodic reports to the Securities and Exchange Commission (SEC) on a regular basis; these reports provide a wealth of information. Two reports of particular interest are the 10-Q (quarterly) and the 10-K (annual) reports, and you can search the EDGAR database sec.gov (see Figure 1-5) to view them. When you find one of these reports, search for keywords like “merger,” “acquisition,” “acquire,” and “subsequent event.” With a little patience, you can build a detailed organizational chart of the entire organization and its subsidiaries.
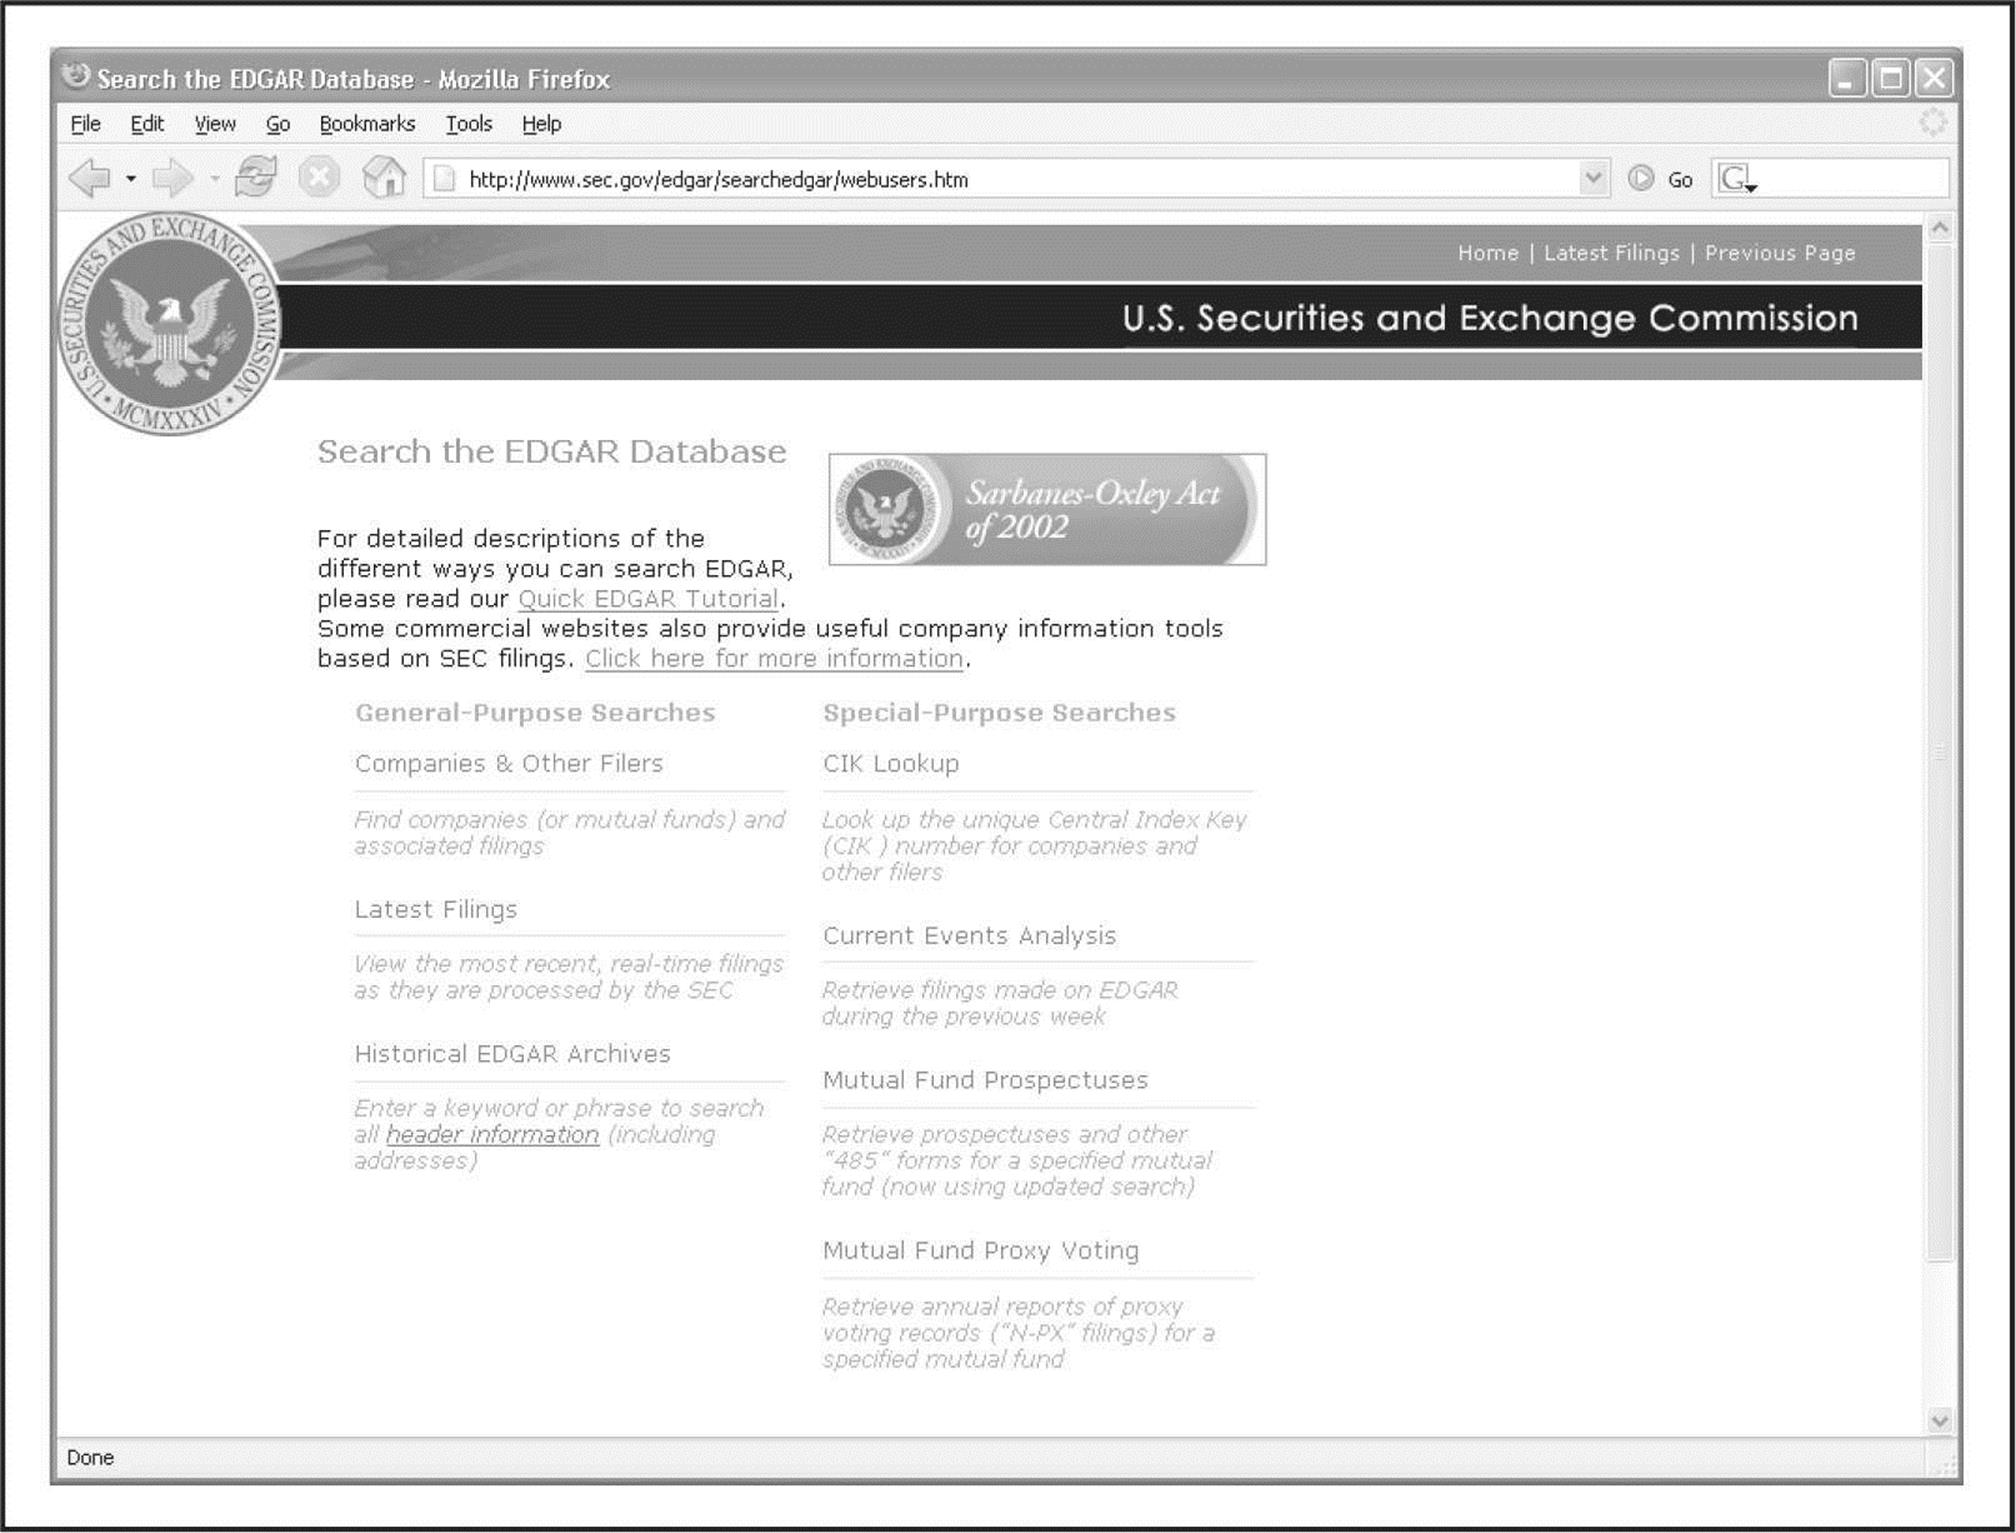
Figure 1-5 Publicly traded companies must file regular reports with the SEC. These reports provide interesting information regarding current events and organizational structure.
Business information and stock trading sites, such as Yahoo! Finance message boards, can provide similar data. For example, check out the message board for any company and you will find a wealth of potential dirt—er, I mean information—that could be used to get inside the head of the target company. Comparable sites exist for major markets around the world. An attacker can use this information to target weak points in the organization. Most hackers choose the path of least resistance—and why not?
Privacy or Security Policies and Technical Details Indicating the Types of Security Mechanisms in Place
Any piece of information that provides insight into the target organization’s privacy or security policies or technical details regarding hardware and software used to protect the organization can be useful to an attacker for obvious reasons. Opportunities most likely present themselves when this information is acquired.
Archived Information
Be aware that there are sites on the Internet where you can retrieve archived copies of information that may no longer be available from the original source. These archives could allow an attacker to gain access to information that has been deliberately removed for security reasons. Some examples of this are the WayBack Machine at archive.org (see Figure 1-6) and the cached results you see under Google’s cached results (see Figure 1-7).
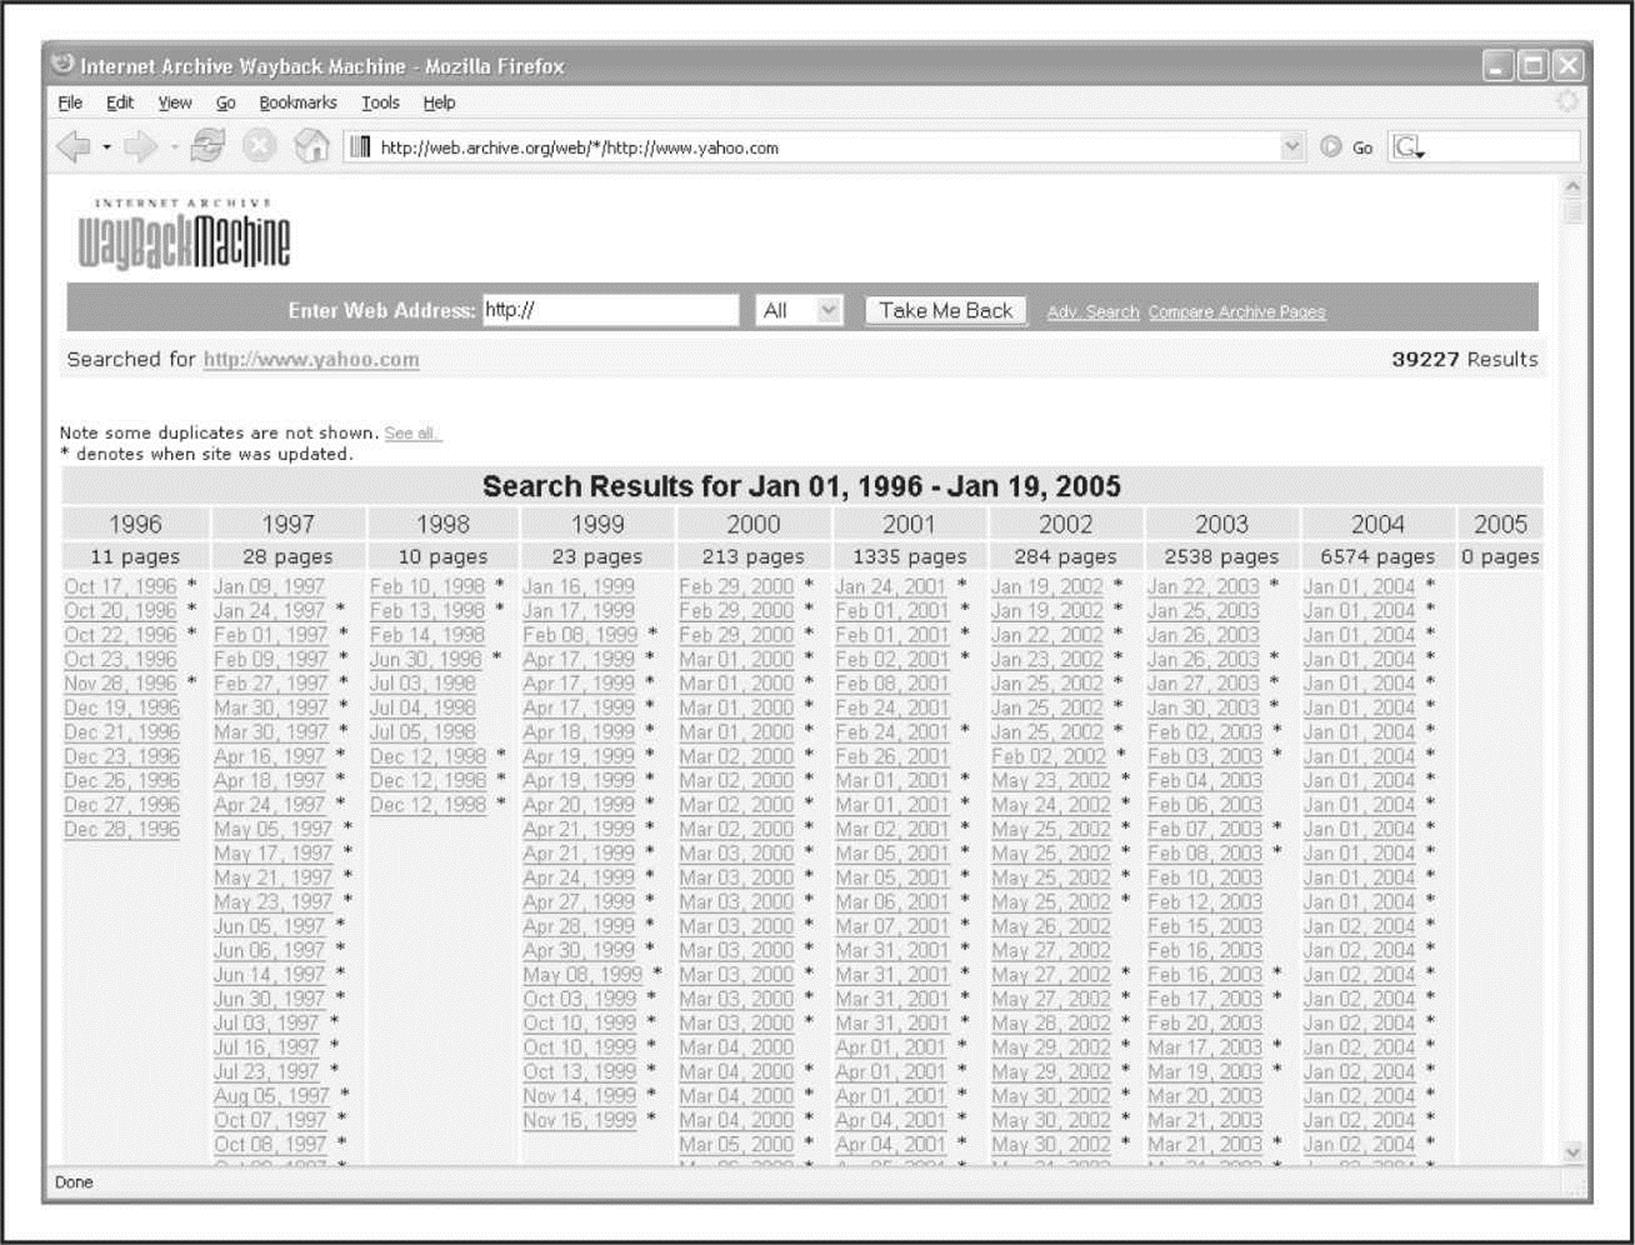
Figure 1-6 A search at http://www.archive.org reveals many years of archived pages from http://www.yahoo.com.
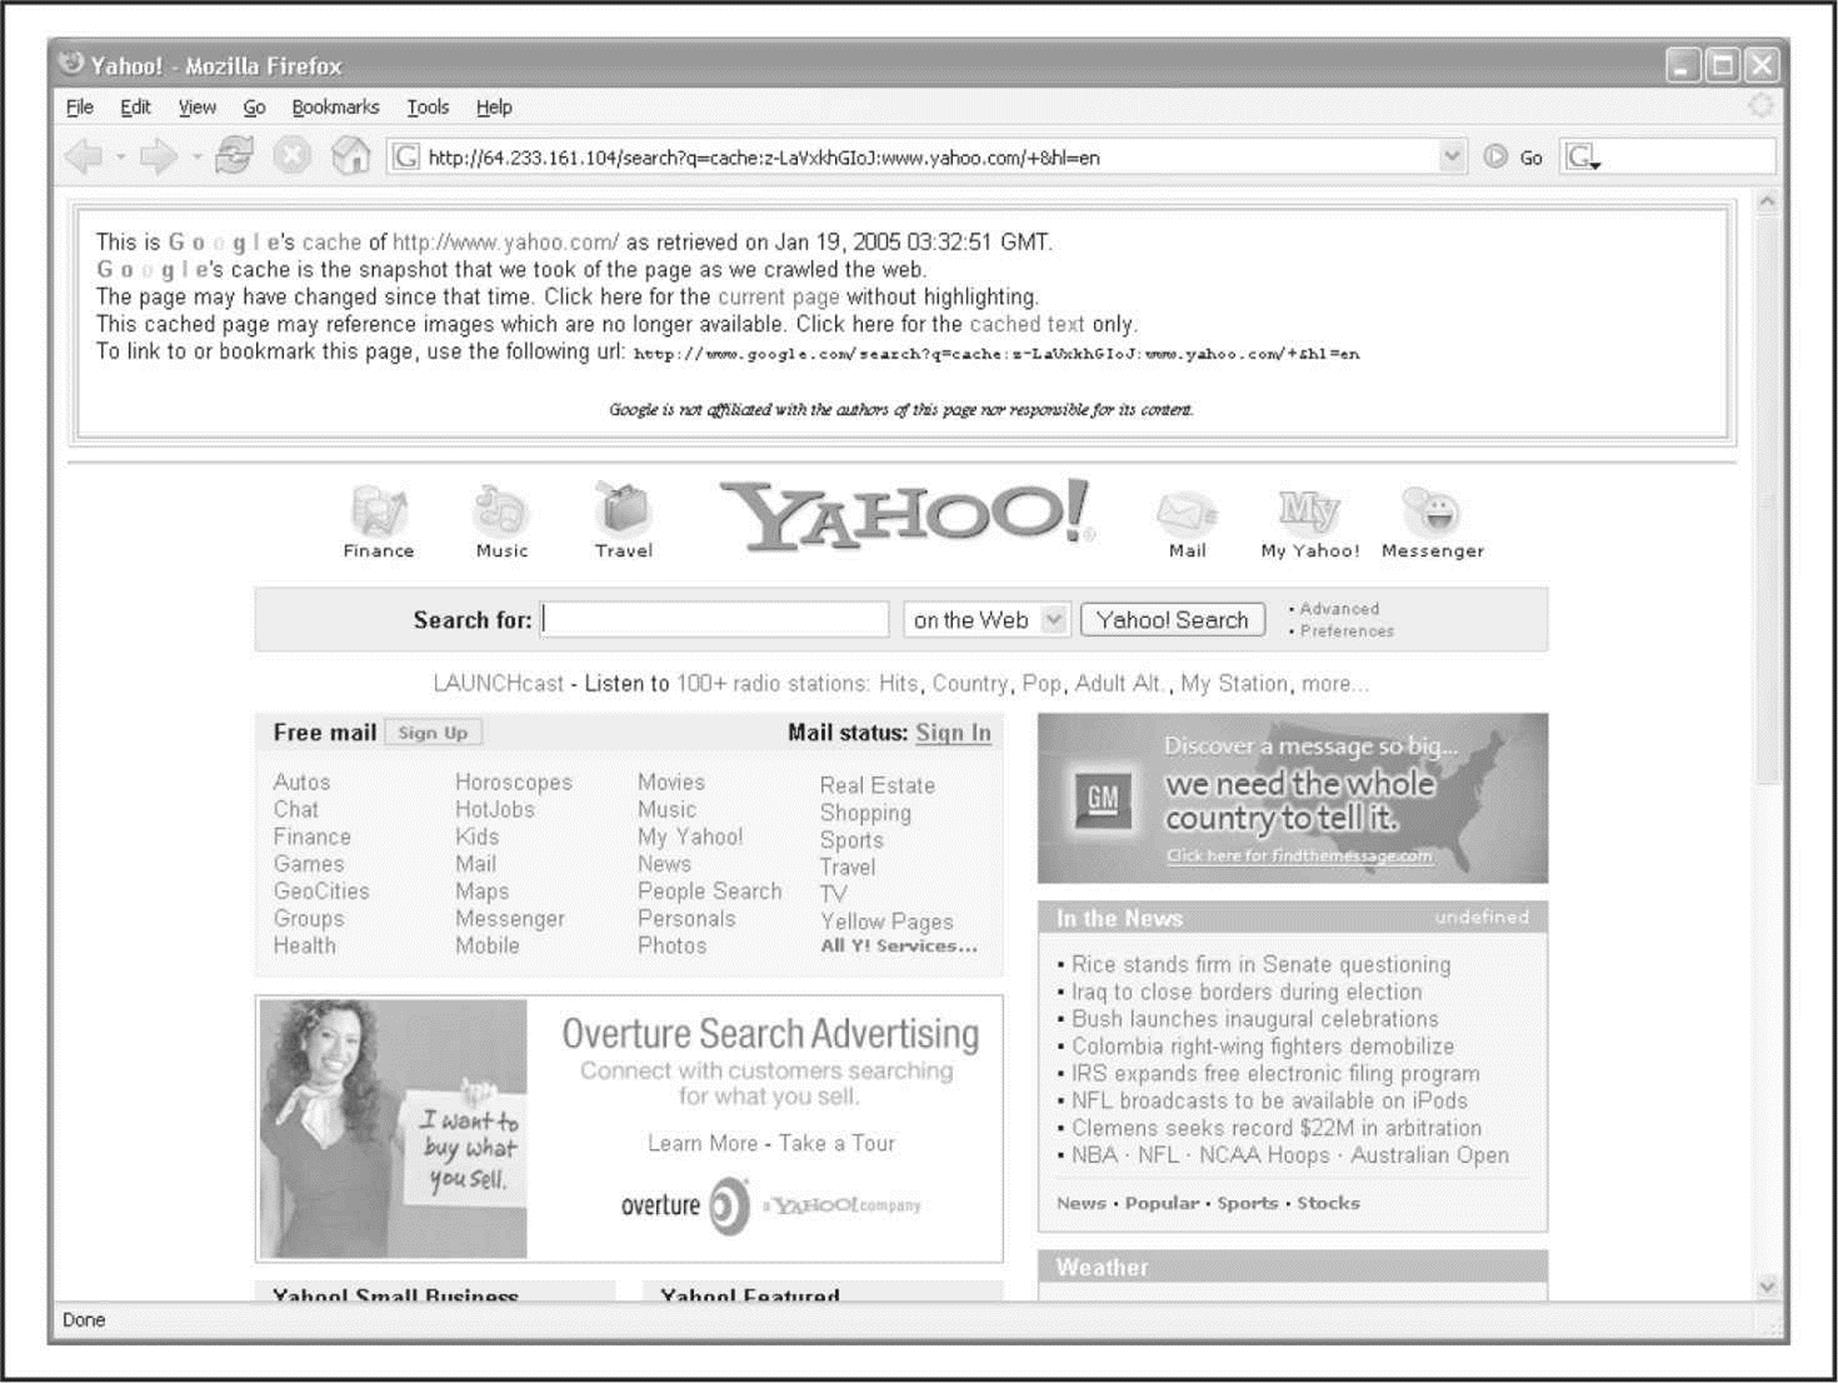
Figure 1-7 The very nature of a search engine can easily allow anyone access to cached content from sites that it has crawled. Here, we see a cached version of http://www.yahoo.com from Google’s archive.
Search Engines and Data Relationships
The search engines available today are truly fantastic. Within seconds, you can find just about anything you could ever want to know. Many of today’s popular search engines provide for advanced searching capabilities that can help you home in on that tidbit of information that makes the difference. Some of our favorite search engines are google.com, bing.com, yahoo.com, and dogpile.com (which sends your search to multiple search engines such as Google, Yahoo!, Microsoft Live Search, and Ask.com). Become familiar with the advanced searching capabilities of these sites. So much sensitive information is available through these sites that there have even been books written on how to “hack” with search engines—for example, Google Hacking for Penetration Testers Vol. 2, by Johnny Long (Syngress, 2007).
Here is a simple example: If you search Google for allinurl:tsweb/default.htm Google reveals Microsoft Windows servers with Remote Desktop Web Connection exposed. This could eventually lead to full graphical console access to the server via the Remote Desktop Protocol (RDP) using only Internet Explorer and the ActiveX RDP client that the target Windows server offers to the attacker when this feature is enabled. There are literally hundreds of other searches that reveal everything from exposed web cameras to remote admin services to passwords to databases. While Johnny Long’s original website’s charter has changed to that of charity, Johnny has still retained the Google Hacking Database (GHDB), which can now be found at hackersforcharity.org/ghdb/. Despite this hacking database not being updated frequently, it offers a fantastic basic listing of many of the best Google search strings that hackers use to dig up information on the Web.
Of course, just having the database of searches isn’t good enough, right? A few tools have been released recently that take this concept to the next level: Athena 2.0 by Steve at snakeoillabs (snakeoillabs.com), SiteDigger 2.0 (foundstone.com), and Wikto 2.0 by Roelof and the crew (sensepost.com/research/wikto). They search Google’s cache to look for the plethora of vulnerabilities, errors, configuration issues, proprietary information, and interesting security nuggets hiding on websites around the world. SiteDigger (Figure 1-8) allows you to target specific domains, uses the GHDB or the streamlined Foundstone list of searches, allows you to submit new searches to be added to the database, allows for raw searches, and—best of all—has an update feature that downloads the latest GHDB and/or Foundstone searches right into the tool so you never miss a beat.
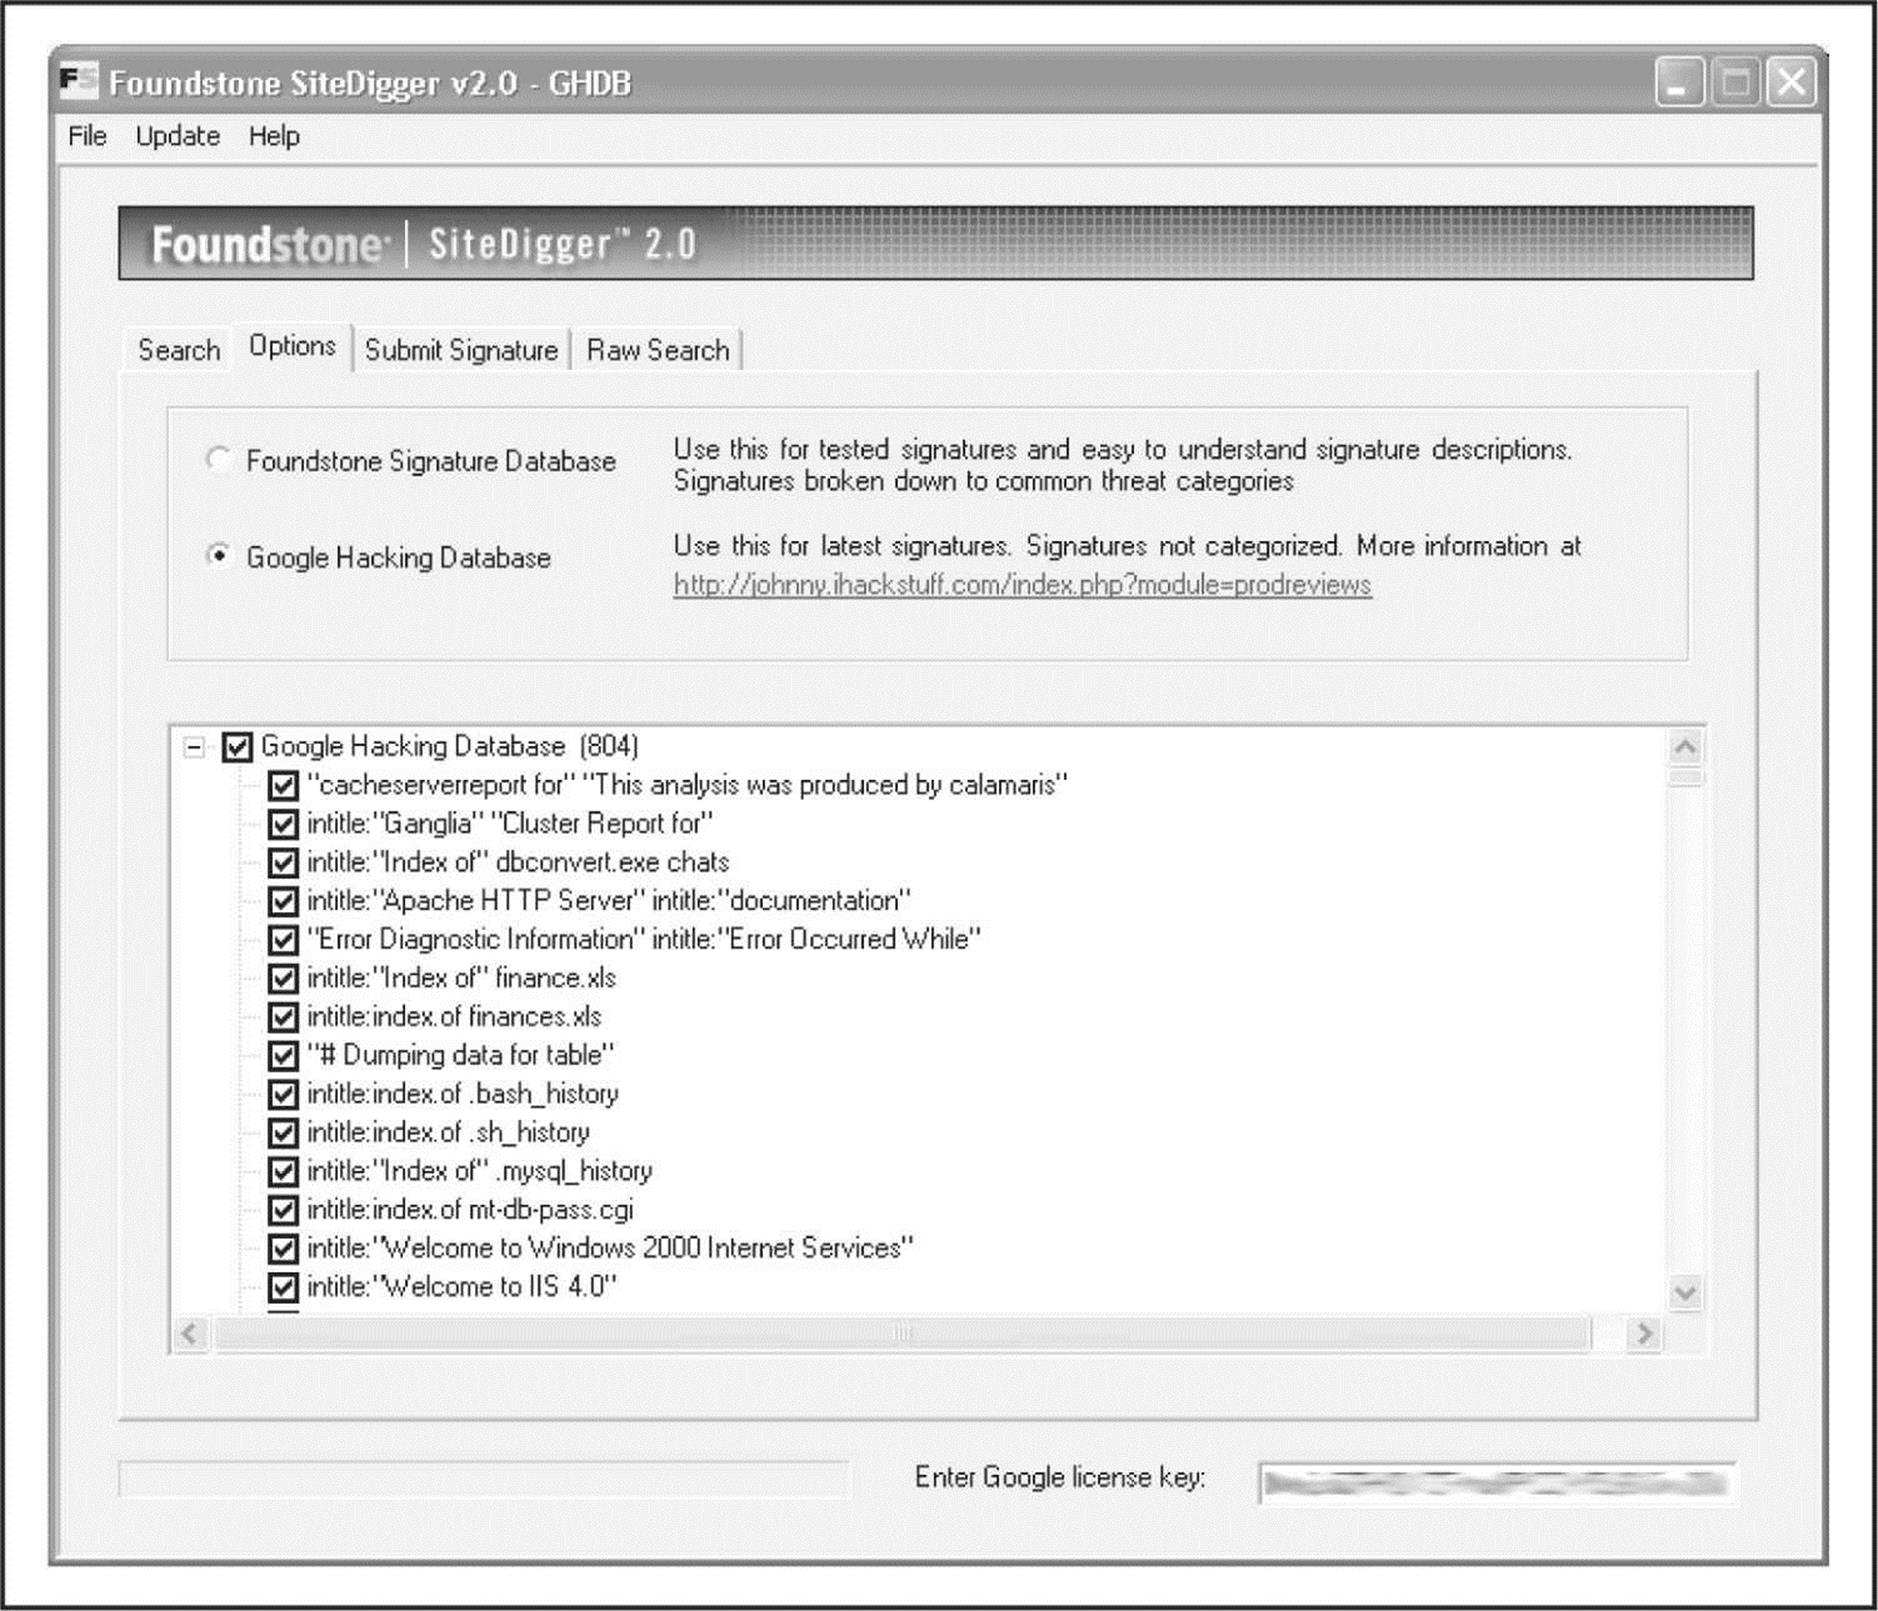
Figure 1-8 Foundstone’s SiteDigger searches Google’s cache using the Google Hacking Database (GHDB) to look for vulnerable systems.
When pillaging a website’s documents for information, peruse not only document content for potential information leaks, but also analyze the hidden metadata contained within documents as well. Tools such as FOCA, available at informatica64.com/foca.aspx, are designed to identify and analyze the metadata stored within a file. FOCA utilizes some of the same search engine hacking techniques described earlier to identify common document extensions such as .pdf, .doc(x), .xls(x), and .ppt(x). After files have been identified, the tool then allows the user to select which files to download and/or analyze (see Figure 1-9). Once analyzed, the tool categorizes the metadata results into summary information. FOCA groups and stores the results into useful categories such as users, folders, printers, passwords, e-mails, servers, operating systems, and software versions. At the time of this writing, FOCA 3.0 was offered in both free and pro versions. The free version includes all the capabilities we just discussed as well as many of the other capabilities offered in the pro version. The major exception between the two versions is the more advanced vulnerability identification features found in the pro version.
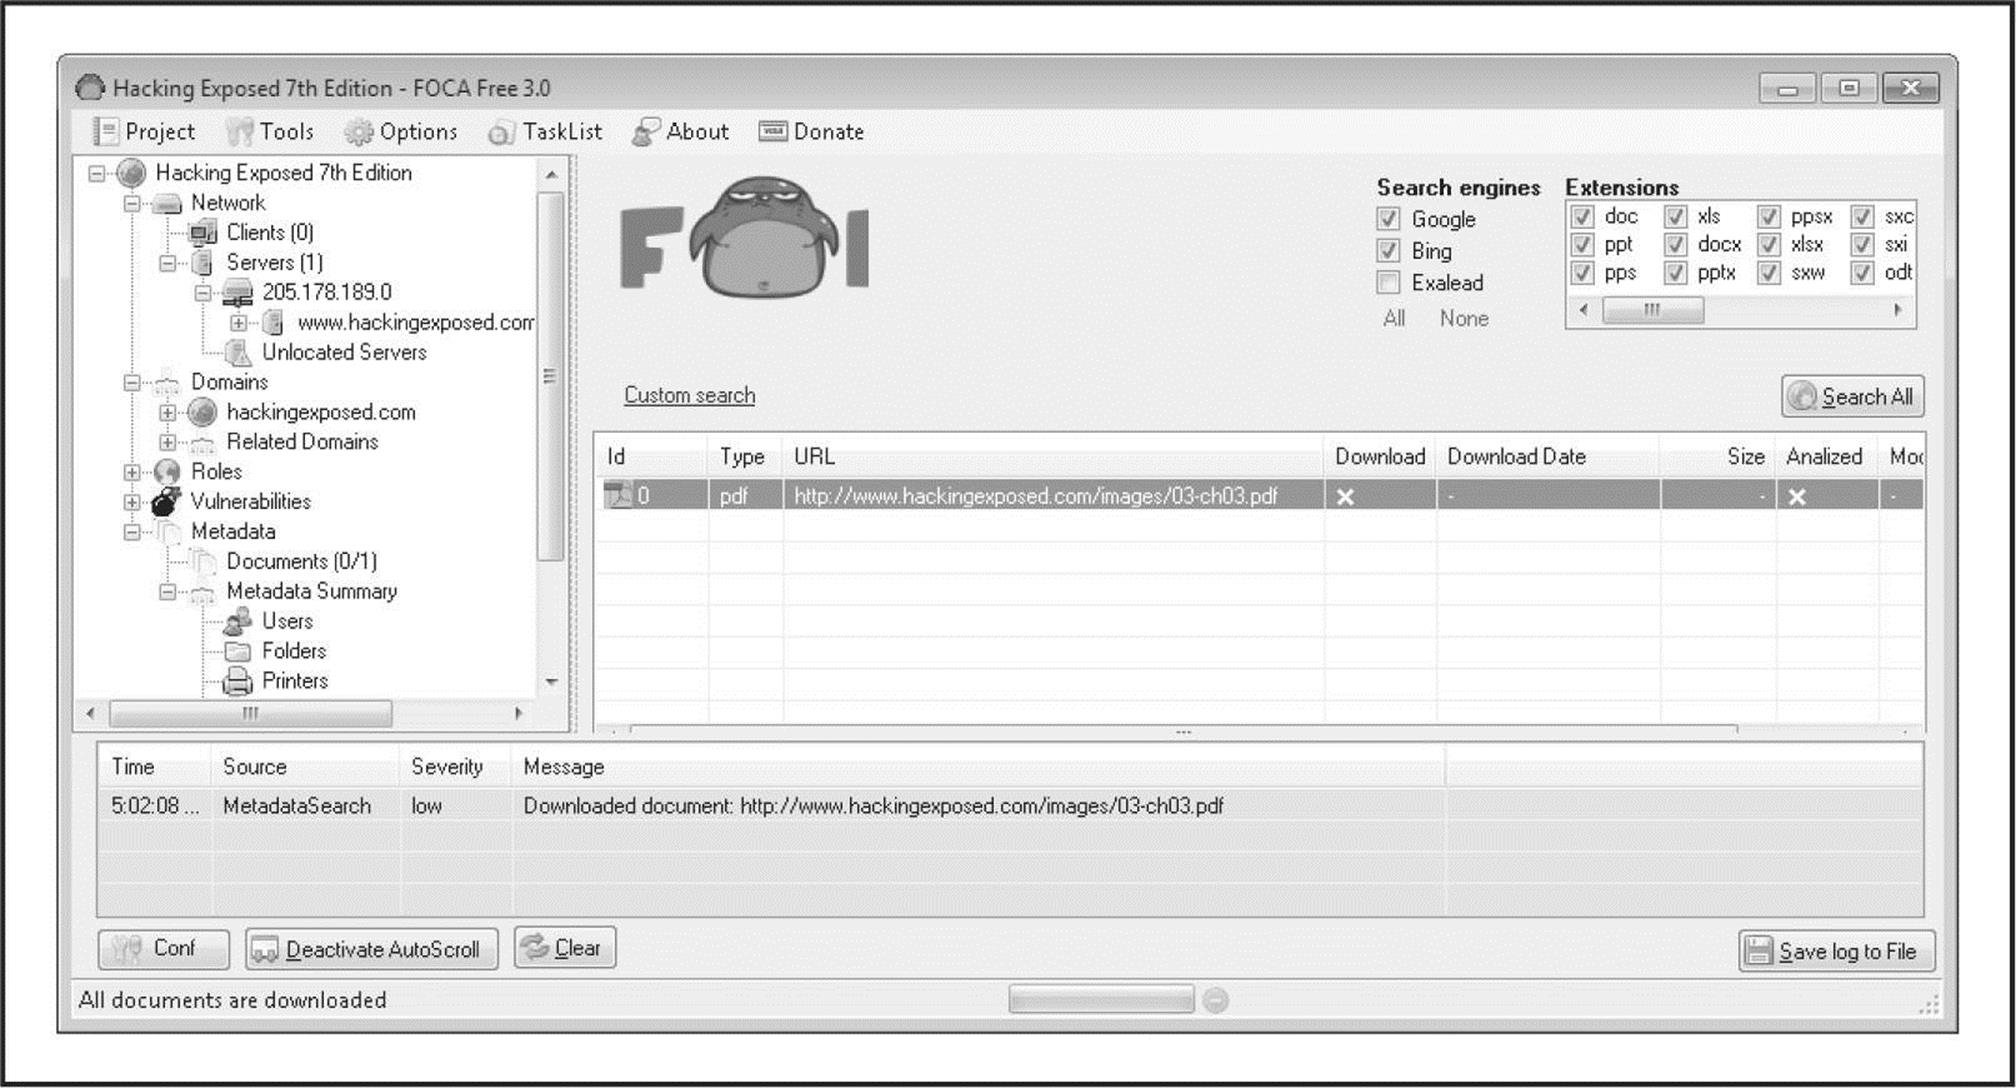
Figure 1-9 FOCA leverages search engines to identify documents with specific extensions and analyzes the documents’ metadata.
One feature integrated into FOCA, and worth exploring on its own, is the use of the Sentient Hyper-Optimized Data Access Network (SHODAN). Described by ZDnet as “the Google for hackers,” SHODAN (shodanhq.com) is a search engine that is designed to find Internet-facing systems and devices using potentially insecure mechanisms for authentication and authorization. Searches can range from home routers to advanced SCADA systems. Attackers can leverage the power of SHODAN either through its web-based interface or through an exposed set of APIs that developers can write against. You must register with the website to obtain a valid key that provides access to the API feature. For example (Figure 1-10), an attacker can run the following query on SHODAN to identify vulnerable SCADA systems:
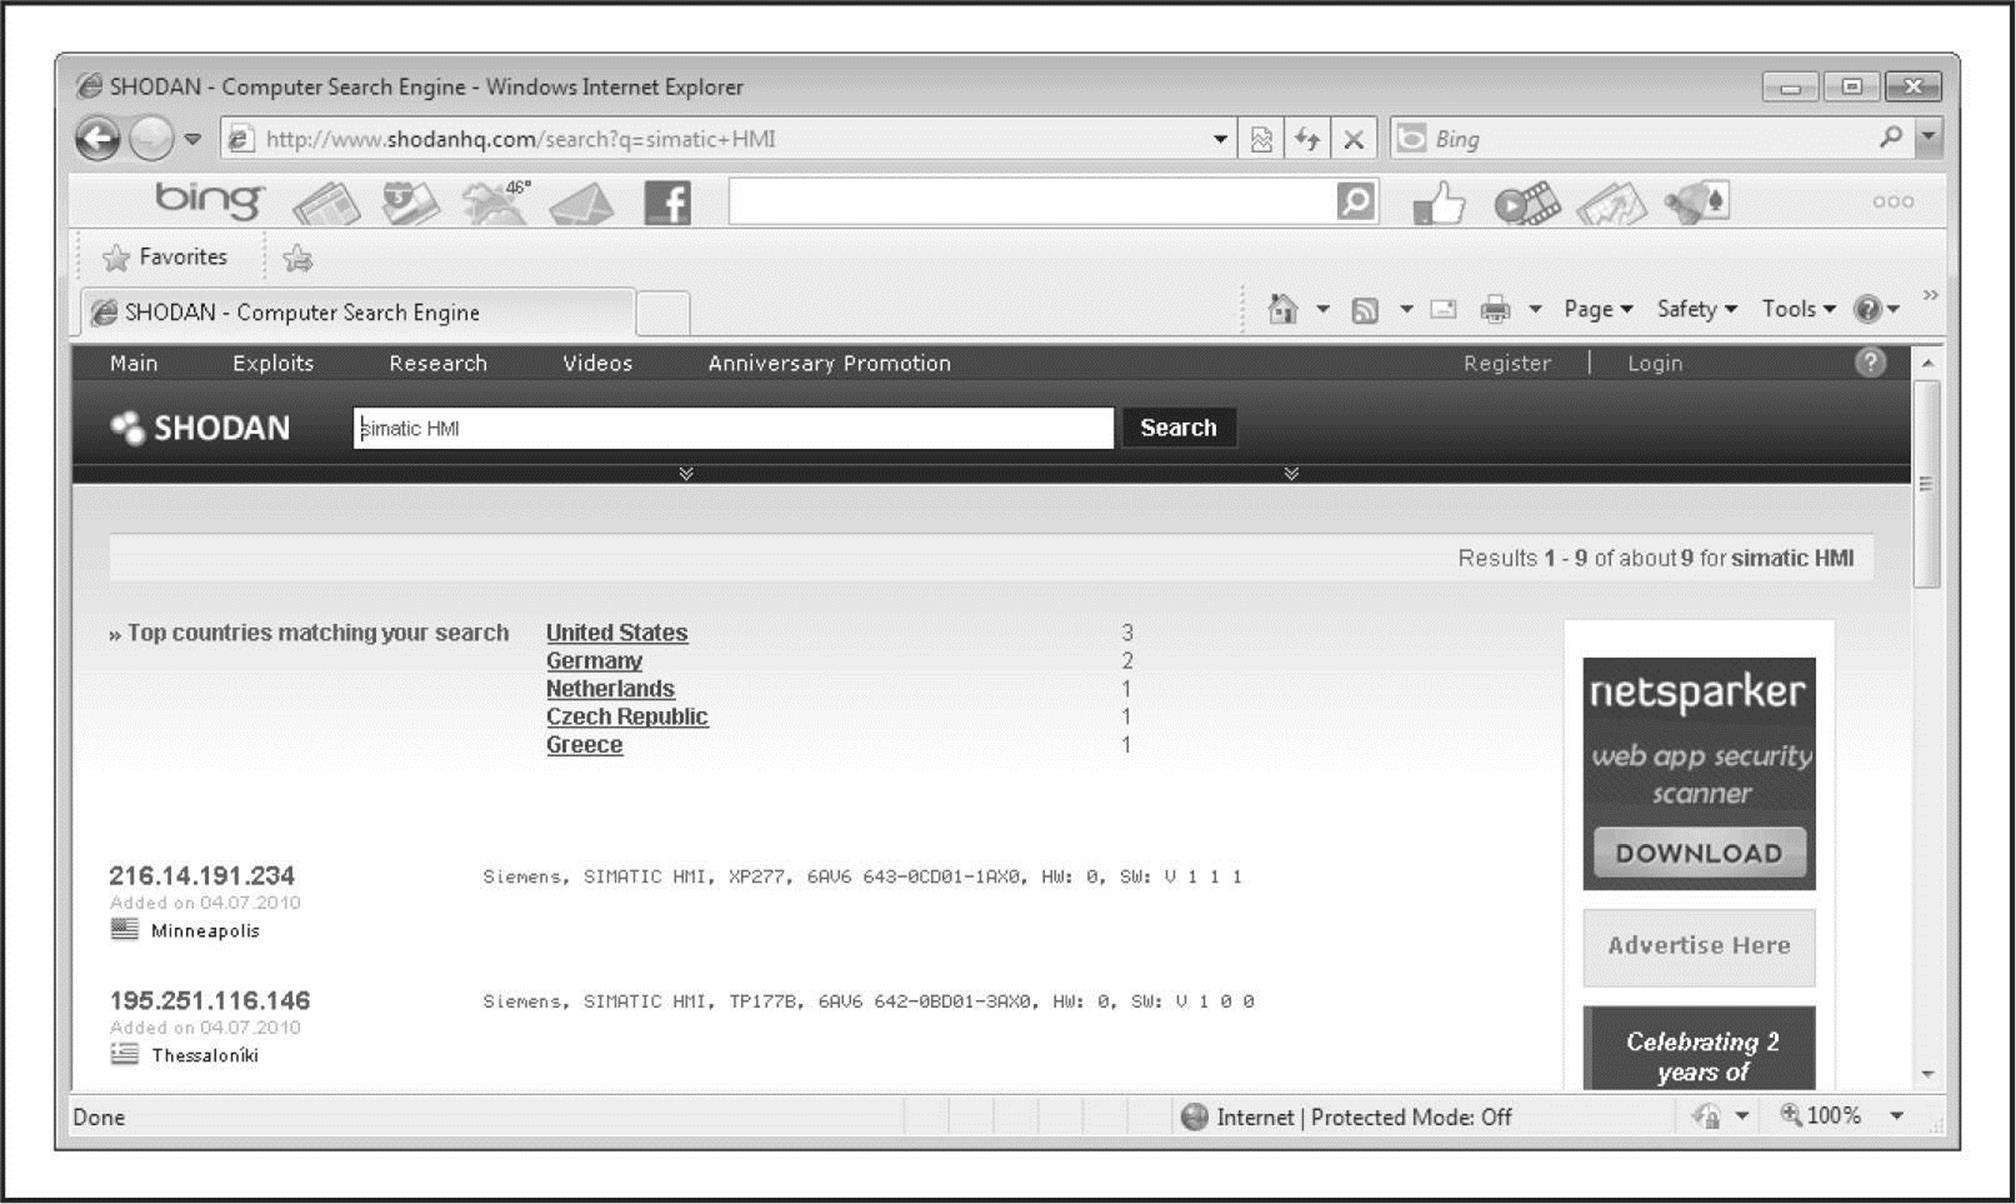
Figure 1-10 SHODAN identifi es vulnerable SCADA systems.
![]()
Usenet discussion forums or newsgroups are a rich resource of sensitive information, as well. One of the most common uses of newsgroups among IT professionals is to get quick access to help with problems they can’t easily solve themselves. Google provides a nice web interface to Usenet newsgroups, complete with its now-famous advanced searching capabilities. For example, a simple search for “pix firewall config help” yields hundreds of postings from people requesting help with their Cisco PIX firewall configurations, as shown in Figure 1-11. Some of these postings actually include cut-and-pasted copies of their production configuration, including IP addresses, ACLs, password hashes, network address translation (NAT) mappings, and so on. This type of search can be further refined to home in on postings from e-mail addresses at specific domains (in other words, @company.com) or other interesting search strings.
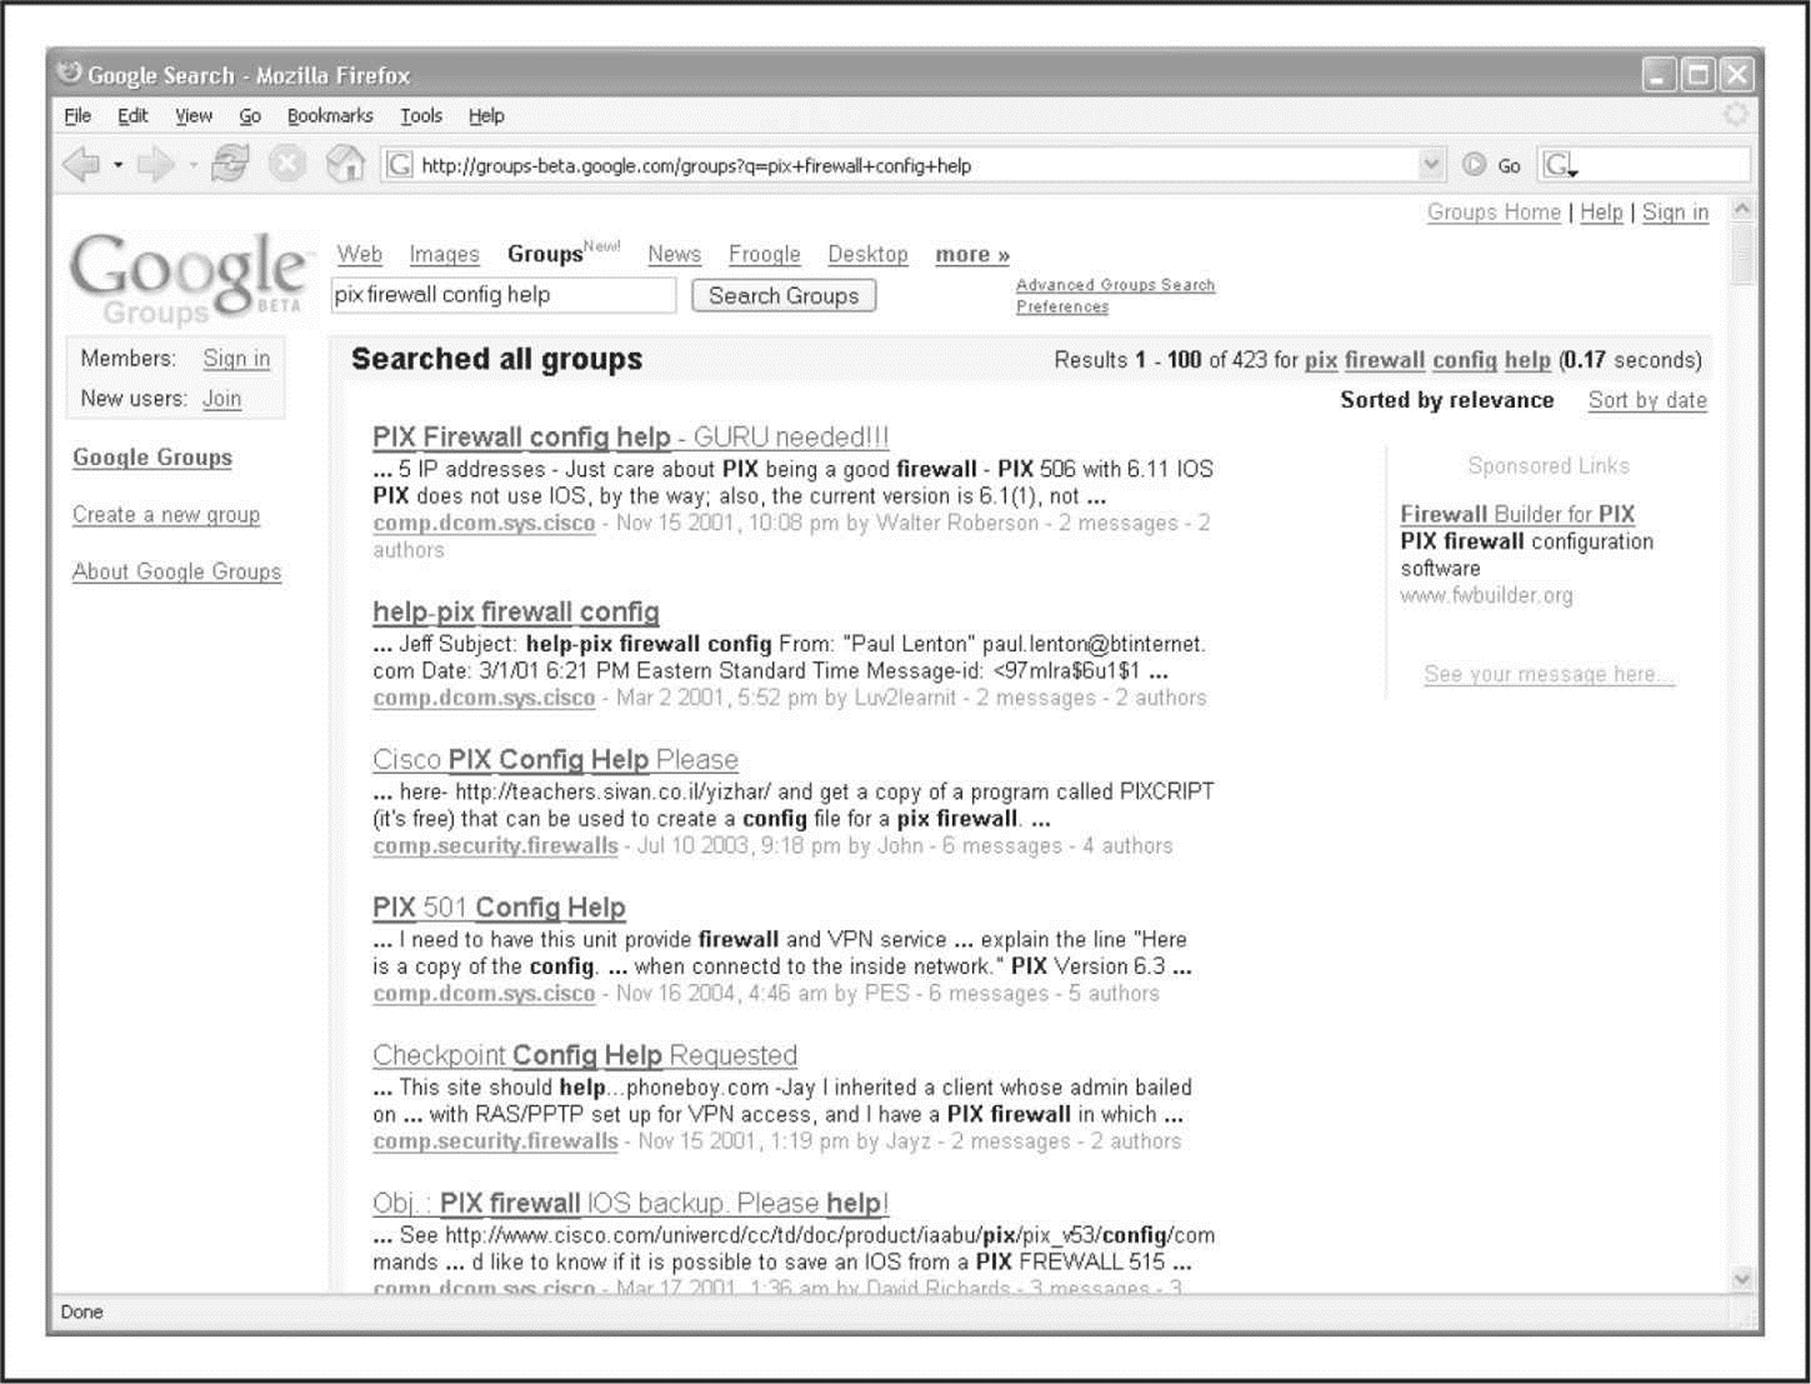
Figure 1-11 Again, Google’s advanced search options can help you home in on important information quickly.
If the person in need of help knows to not post configuration details to a public forum like this, that person might still fall prey to a social engineering attack. An attacker could respond with a friendly offer to assist the weary admin with the issue. If the attacker can finagle a position of trust, he or she may end up with the same sensitive information, despite the admin’s the initial caution.
In an effort to automate some of this process, tools such as Maltego have been created to data mine and link relevant pieces of information on a particular subject. Maltego provides the ability to aggregate and correlate information and then display those relationships to the user in an easy-to-understand graphical representation. The data that can be uncovered and how each bit of data relates to the next are extremely useful for footprinting purposes. For example, Figure 1-12 maps the relationships between the data points that were identified when attempting to search for the person “Nathan Sportsman”.
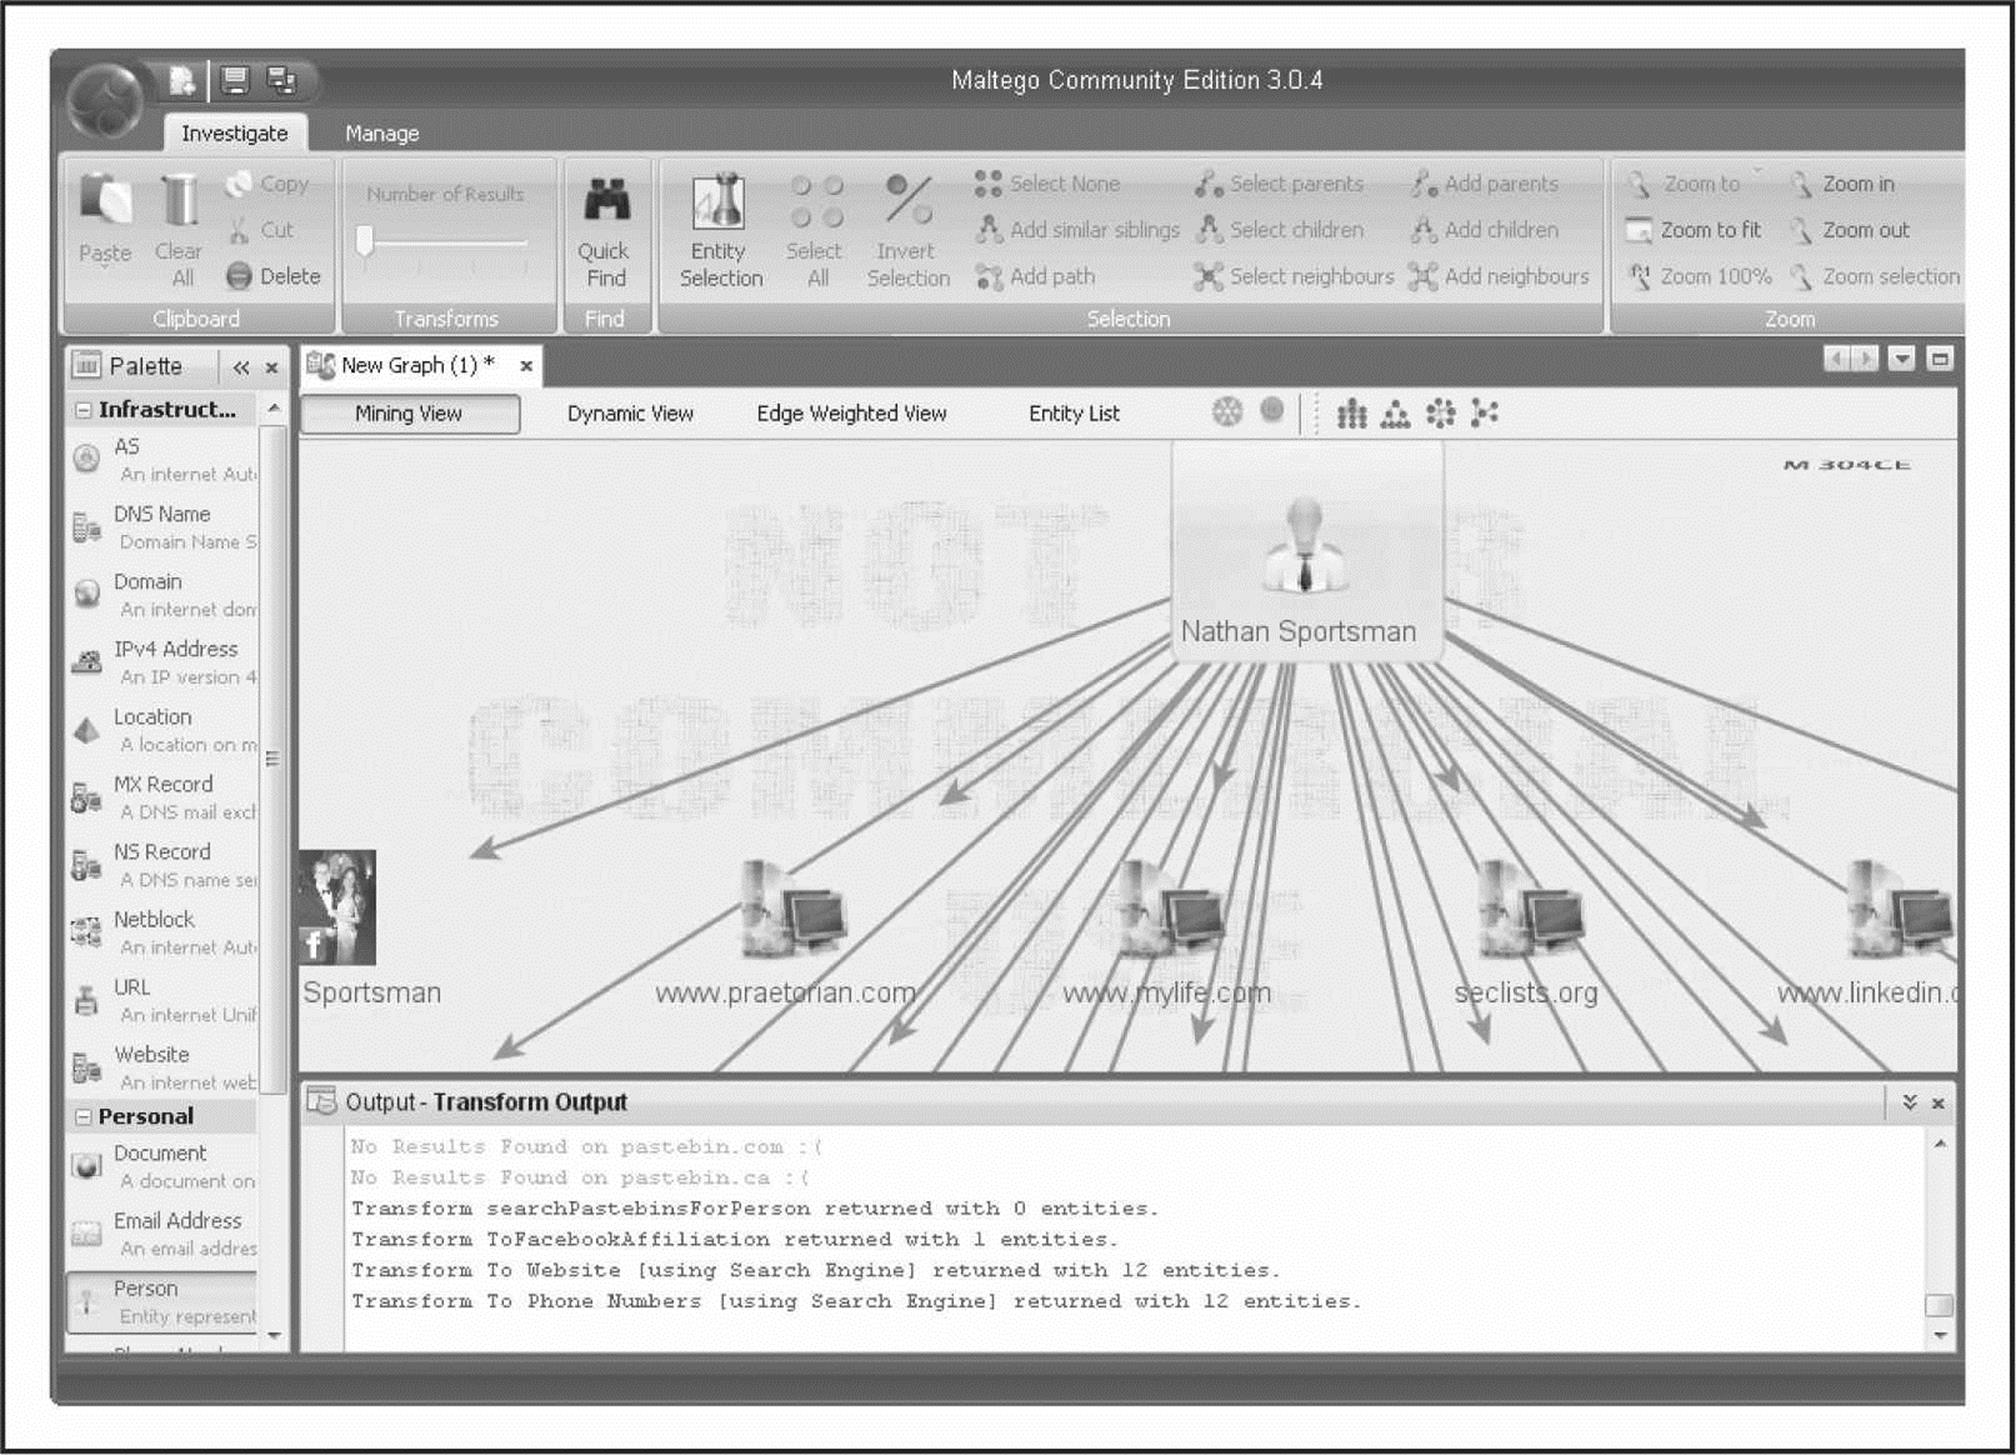
Figure 1-12 Maltego displays graphical relationship mapping for the person “Nathan Sportsman”.
Other Information of Interest
The aforementioned ideas and resources are not meant to be exhaustive but should serve as a springboard to launch you down the information-gathering path. Sensitive information could be hiding in any number of places around the world and may present itself in many forms. Taking the time to do creative and thorough searches will most likely prove to be a very beneficial exercise, both for the attackers and the defenders.
![]() Public Database Security Countermeasures
Public Database Security Countermeasures
Much of the information discussed earlier must be made publicly available and, therefore, is difficult to remove; this is especially true for publicly traded companies. However, it is important to evaluate and classify the type of information that is publicly disseminated. The Site Security Handbook (RFC 2196), found at faqs.org/rfcs/rfc2196.html, is a wonderful resource for many policy-related issues. Periodically review the sources mentioned in this section and work to remove sensitive items wherever you can. The use of aliases that don’t map back to you or your organization is advisable as well, especially when using newsgroups, mailing lists, or other public forums.
![]() Step 4: WHOIS and DNS Enumeration
Step 4: WHOIS and DNS Enumeration
While much of the Internet’s appeal stems from its lack of centralized control, in reality several of its underlying functions must be centrally managed to ensure interoperability, prevent IP conflicts, and ensure universal resolvability across geographical and political boundaries. All this means someone is managing a vast amount of information. If you understand a little about how this is actually done, you can effectively tap into this wealth of information! The Internet has come a long way since its inception. The particulars of how all this information is managed, and by whom, is still evolving as well.
So who is managing the Internet today, you ask? The core functions of the Internet are managed by a nonprofit organization, the Internet Corporation for Assigned Names and Numbers (ICANN, icann.org).
ICANN is a technical coordination body for the Internet. Created in October 1998 by a broad coalition of the Internet’s business, technical, academic, and user communities, ICANN is assuming responsibility for a set of technical functions previously performed under U.S. government contract by the Internet Assigned Numbers Authority (IANA, iana.org) and other groups. (In practice, IANA still handles much of the Internet’s day-to-day operations, but these will eventually be transitioned to ICANN.)
Specifically, ICANN coordinates the assignment of the following identifiers that must be globally unique for the Internet to function:
• Internet domain names
• IP address numbers
• Protocol parameters and port numbers
In addition, ICANN coordinates the stable operation of the Internet’s root DNS system.
As a nonprofit, private-sector corporation, ICANN is dedicated to preserving the operational stability of the Internet; to promoting competition; to achieving broad representation of global Internet communities; and to developing policy through private-sector, bottom-up, consensus-based means. ICANN welcomes the participation of any interested Internet user, business, or organization.
Although ICANN has many parts, three suborganizations are of particular interest to us at this point:
• Address Supporting Organization (ASO),.aso.icann.org
• Generic Names Supporting Organization (GNSO), gnso.icann.org
• Country Code Domain Name Supporting Organization (CCNSO), ccnso.icann.org
The ASO reviews and develops recommendations on IP address policy and advises the ICANN board. The ASO allocates IP address blocks to various Regional Internet Registries (RIRs) who manage, distribute, and register public Internet number resources within their respective regions. These RIRs then allocate IPs to organizations, Internet service providers (ISPs), or, in some cases, National Internet Registries (NIRs) or Local Internet Registries (LIRs) if particular governments require it (mostly in communist countries, dictatorships, etc.):
• APNIC (apnic.net) Asia-Pacific region
• ARIN (arin.net) North and South America, Sub-Sahara Africa regions
• LACNIC (lacnic.net) Portions of Latin America and the Caribbean
• RIPE (ripe.net) Europe, parts of Asia, Africa north of the equator, and the Middle East regions
• AfriNIC (afrinic.net, currently in observer status) Eventually both regions of Africa currently handled by ARIN and RIPE
The GNSO reviews and develops recommendations on domain-name policy for all generic top-level domains (gTLDs) and advises the ICANN board. The GNSO is not responsible for domain name registration, but rather is responsible for the generic top-level domains (for example, .com, .net, .edu, .org, and .info), which can be found at iana.org/gtld/gtld.htm.
The CCNSO reviews and develops recommendations on domain-name policy for all country-code top-level domains (ccTLDs) and advises the ICANN board. Again, ICANN does not handle domain name registrations. The definitive list of country-code top-level domains is found at iana.org/cctld/cctld-whois.htm.
Here are some other links you may find useful:
• iana.org/assignments/ipv4-address-space IPv4 allocation
• iana.org/assignments/ipv6-address-space IPv6 allocation
• iana.org/ipaddress/ip-addresses.htm IP address services
• rfc-editor.org/rfc/rfc3330.txt Special-use IP addresses
• iana.org/assignments/port-numbers Registered port numbers
• iana.org/assignments/protocol-numbers Registered protocol numbers
With all of this centralized management in place, mining for information should be as simple as querying a central super-server farm somewhere, right? Not exactly. Although management is fairly centralized, the actual data is spread across the globe in numerous WHOIS servers for technical and political reasons. To further complicate matters, the WHOIS query syntax, type of permitted queries, available data, and results formatting can vary widely from server to server. Furthermore, many of the registrars are actively restricting queries to combat spammers, hackers, and resource overload; to top it all off, information for .mil and .gov has been pulled from public view entirely due to national security concerns.
You may ask, “How do I go about finding the data I’m after?” With a few tools, a little know-how, and some patience, you should be able to mine successfully for domain- or IP-related registrant details for nearly any registered entity on the planet!
Domain-Related Searches
It’s important to note that domain-related items (such as hackingexposed.com) are registered separately from IP-related items (such as IP net-blocks, BGP autonomous system numbers, etc.). For this reason, we have two different paths in our methodology for finding these details. Let’s start with domain-related details, using keyhole.com as an example.
The first order of business is to determine which one of the many WHOIS servers contains the information we’re after. The general process flows like this: the authoritative Registry for a given TLD, “.com” in this case, contains information about which Registrar the target entity registered its domain with. Then you query the appropriate Registrar to find the Registrant details for the particular domain name you’re after. We refer to these as the “Three Rs” of WHOIS: Registry, Registrar, and Registrant.
Many places on the Internet offer one-stop shopping for WHOIS information, but it’s important to understand how to find the information yourself for those times when the auto-magic tools don’t work. Since the WHOIS information is based on a hierarchy, the best place to start is the top of the tree—ICANN. As mentioned, ICANN (IANA) is the authoritative registry for all of the TLDs and is a great starting point for all manual WHOIS queries.
NOTE You can perform WHOIS lookups from any of the command-line WHOIS clients (it requires outbound TCP/43 access) or via the ubiquitous web browser. Our experience shows that the web browser method is usually more intuitive and is nearly always allowed out of most security architectures.
If we surf to whois.iana.org, we can search for the authoritative registry for all of .com. This search (Figure 1-13) shows us that the authoritative registry for .com is Verisign Global Registry Services at verisign-grs.com. If we go to that site and click the WHOIS link to the right, we get the Verisign Whois Search page where we can search for keyhole.com and find that keyhole.com is registered through www.markmonitor.com. If we go to that site and search their “Search Whois” field (Figure 1-14), we can query this registrar’s WHOIS server via their web interface to find the registrant details for keyhole.com—voilà!
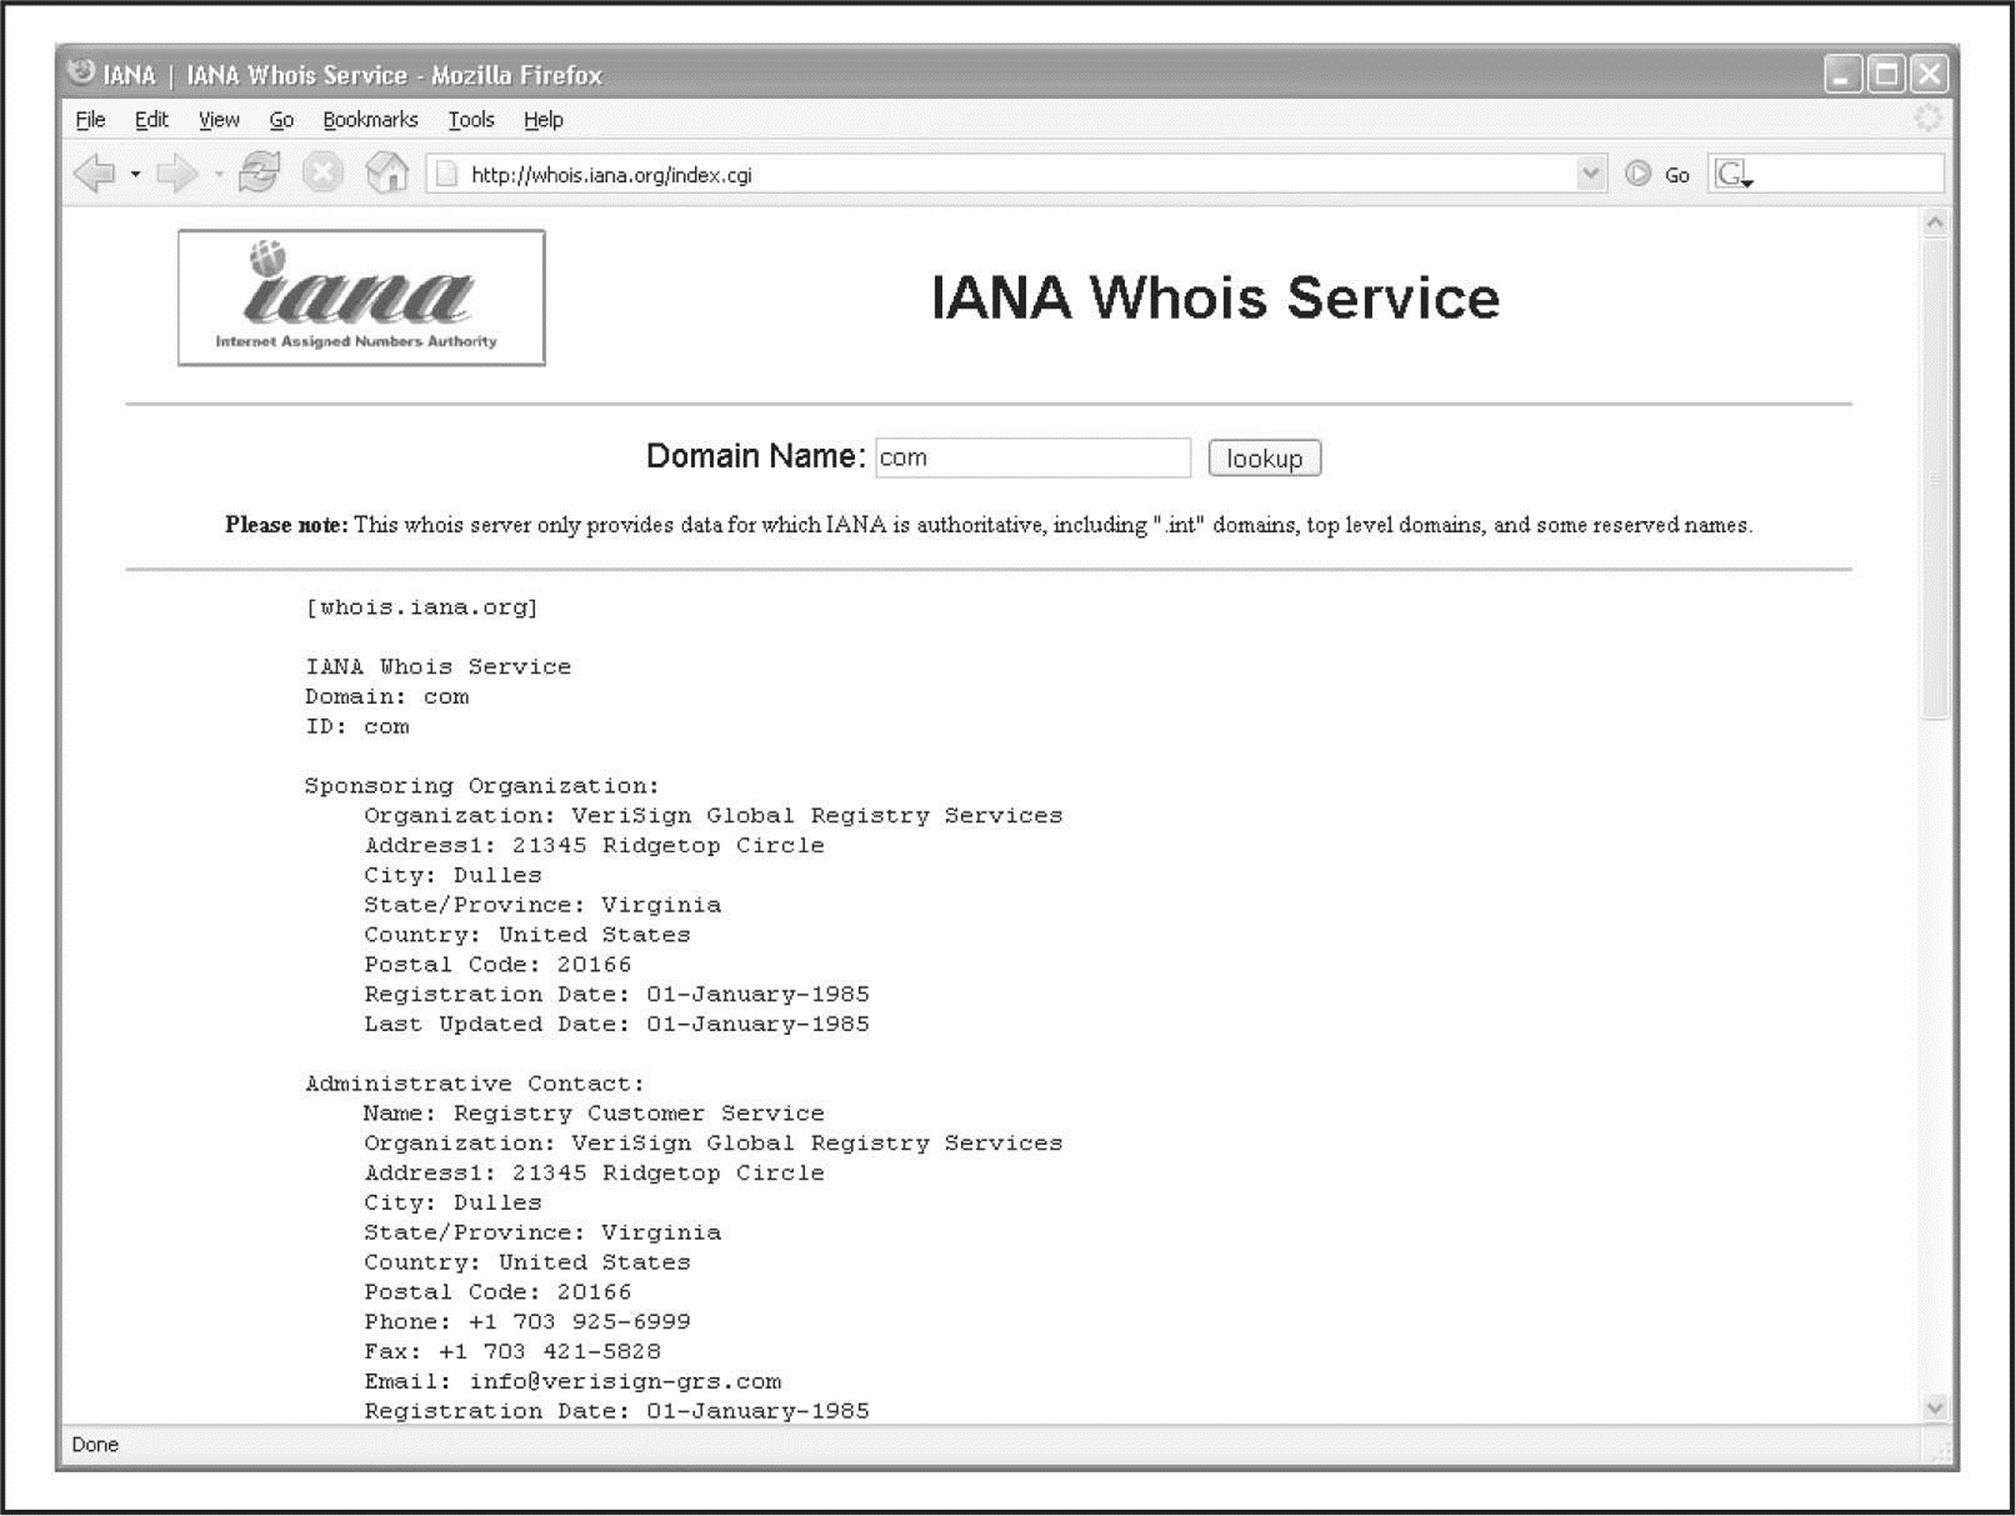
Figure 1-13 We start our domain lookup at whois.iana.org.
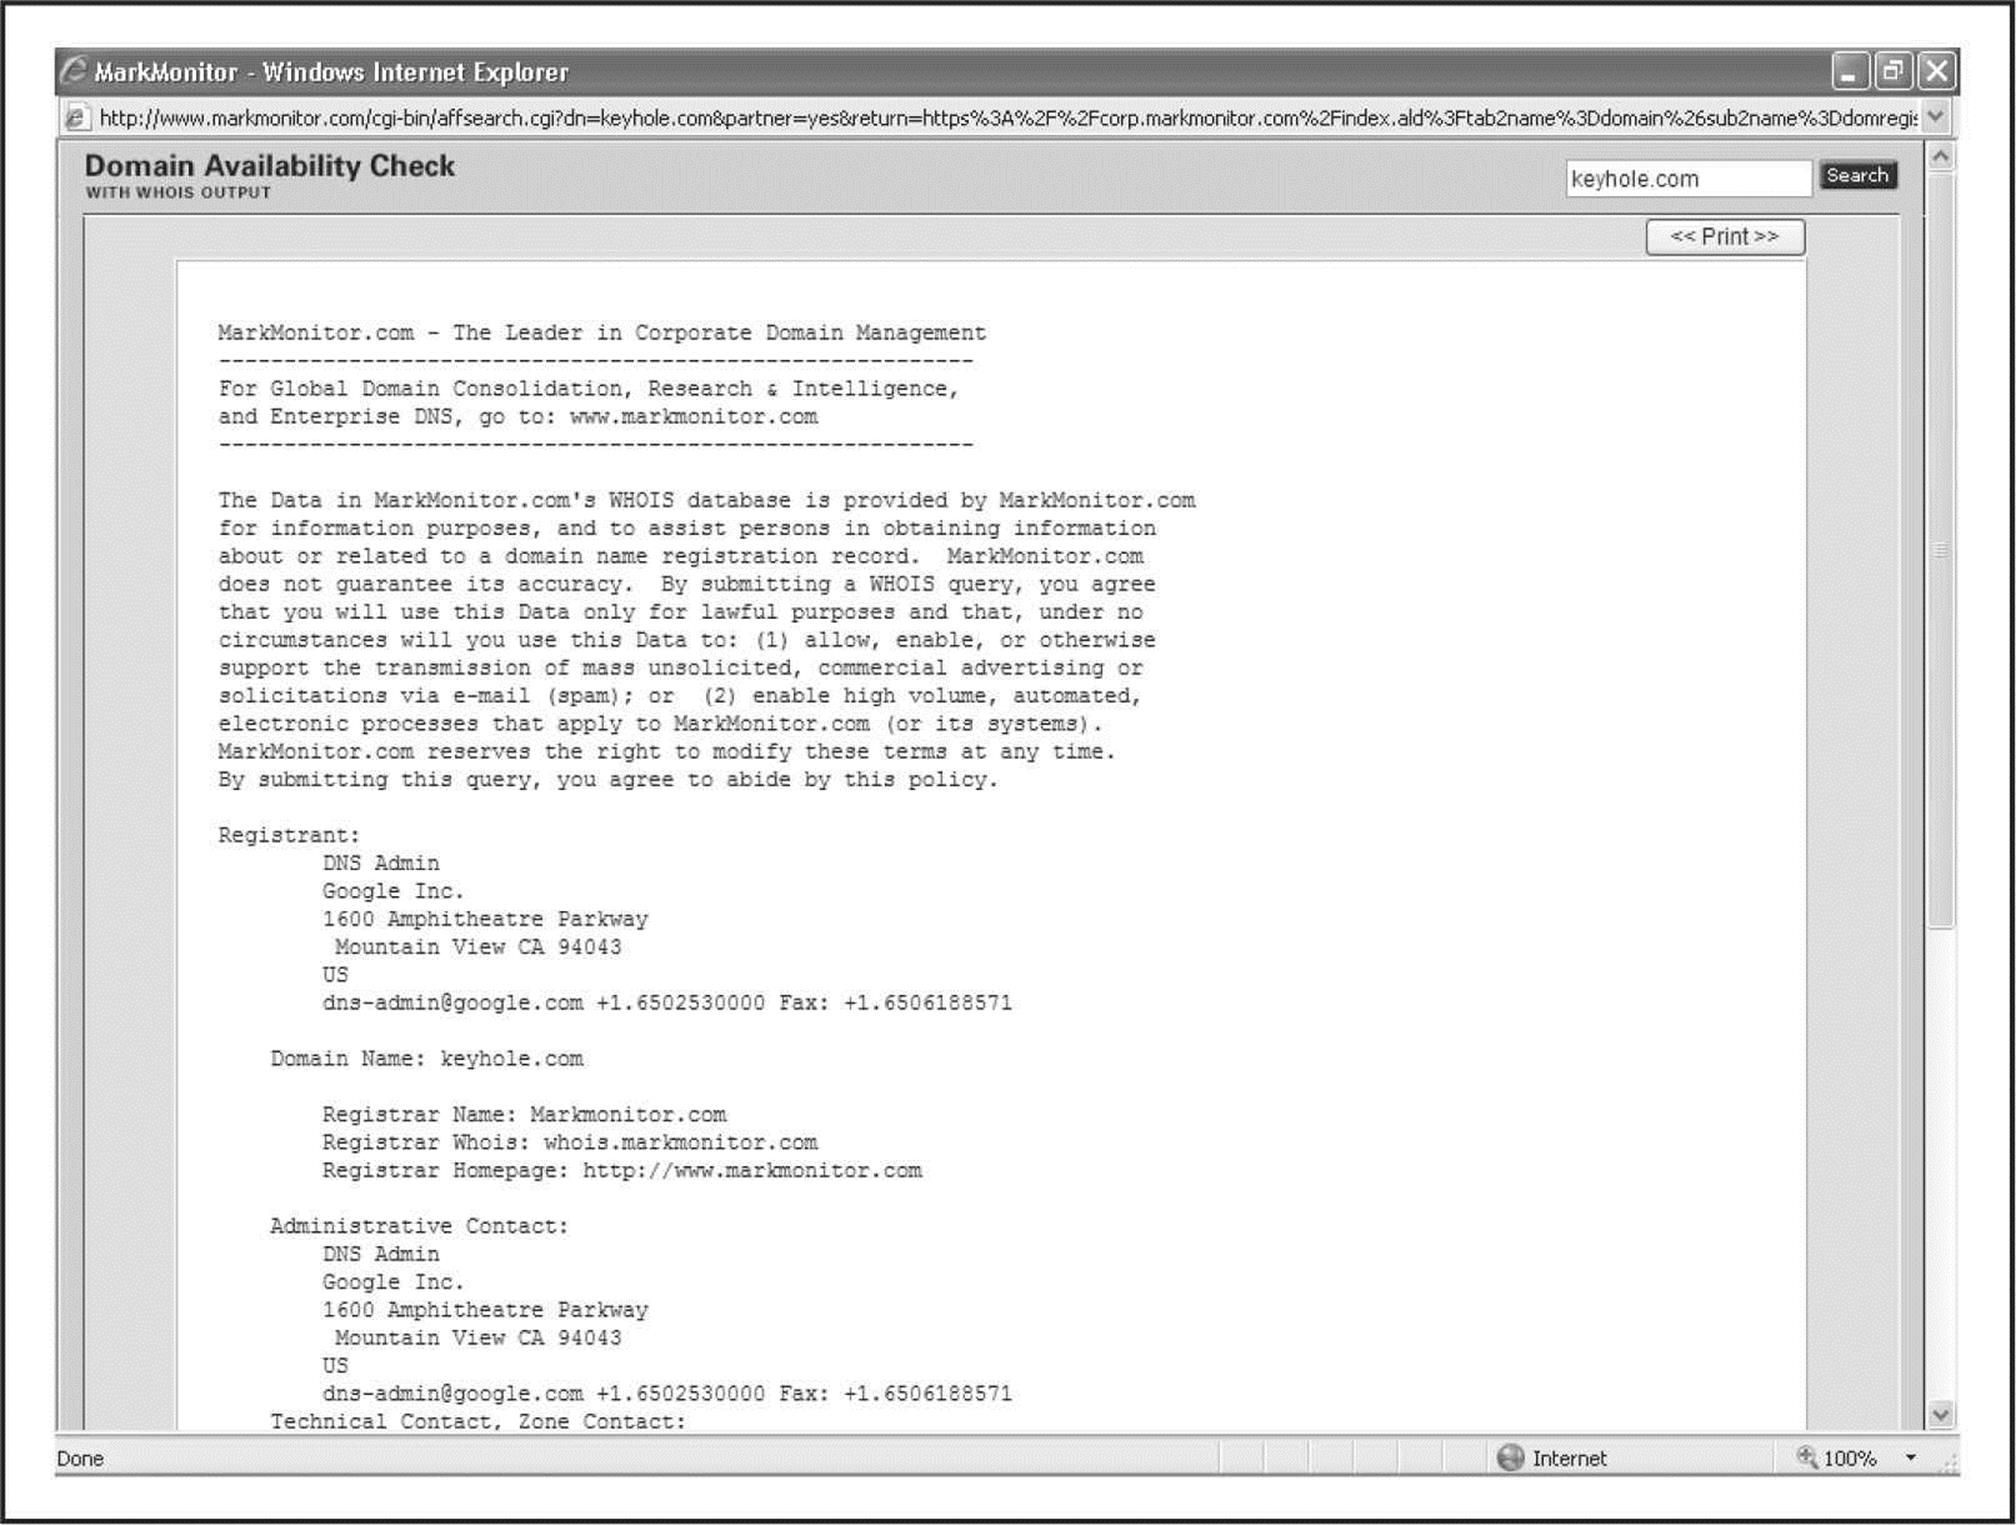
Figure 1-14 We find the registrant details for keyhole.com at the appropriate registrar’s site.
This registrant detail provides physical addresses, phone numbers, names, e-mail addresses, DNS server names, IPs, and so on. If you follow this process carefully, you shouldn’t have too much trouble finding registrant details for any (public) domain name on the planet. Remember, some domains like .gov and .mil may not be accessible to the public via WHOIS.
To be thorough, we could have done the same searches via the command-line WHOIS client with the following three commands:

Several websites also attempt to automate this process with varying degrees of success:
• HYPERLINK “http://www.allwhois.com” allwhois.com
• www.uwhois.com
• internic.net/whois.html
Last, but not least, several GUIs are available to assist you in your searches:
• SuperScan mcafee.com/us/downloads/free-tools/superscan.aspx
• NetScan Tools Pro netscantools.com
Once you’ve homed in on the correct WHOIS server for your target, you may be able to perform other searches if the registrar allows it. You may be able to find all the domains that a particular DNS server hosts, for instance, or any domain name that contains a certain string. These types of searches are rapidly being disallowed by most WHOIS servers, but it is still worth a look to see what the registrar permits. It may be just what you’re after.
IP-Related Searches
That pretty well takes care of the domain-related searches, but what about IP-related registrations? As explained earlier, IP-related issues are handled by the various RIRs under ICANN’s ASO. Let’s see how we go about querying this information.
The WHOIS server at ICANN (IANA) does not currently act as an authoritative registry for all the RIRs as it does for the TLDs, but each RIR does know which IP ranges it manages. This allows us simply to pick any one of them to start our search. If we pick the wrong one, it will tell us which one we need to go to.
Let’s say that while perusing your security logs (as I’m sure you do religiously, right?), you run across an interesting entry with a source IP of 61.0.0.2. You start by entering this IP into the WHOIS search at arin.net (Figure 1-15), which tells you that this range of IPs is actually managed by APNIC. You then go to APNIC’s site at apnic.net to continue your search (Figure 1-16). Here, you find out that this IP address is actually managed by the National Internet Backbone of India.
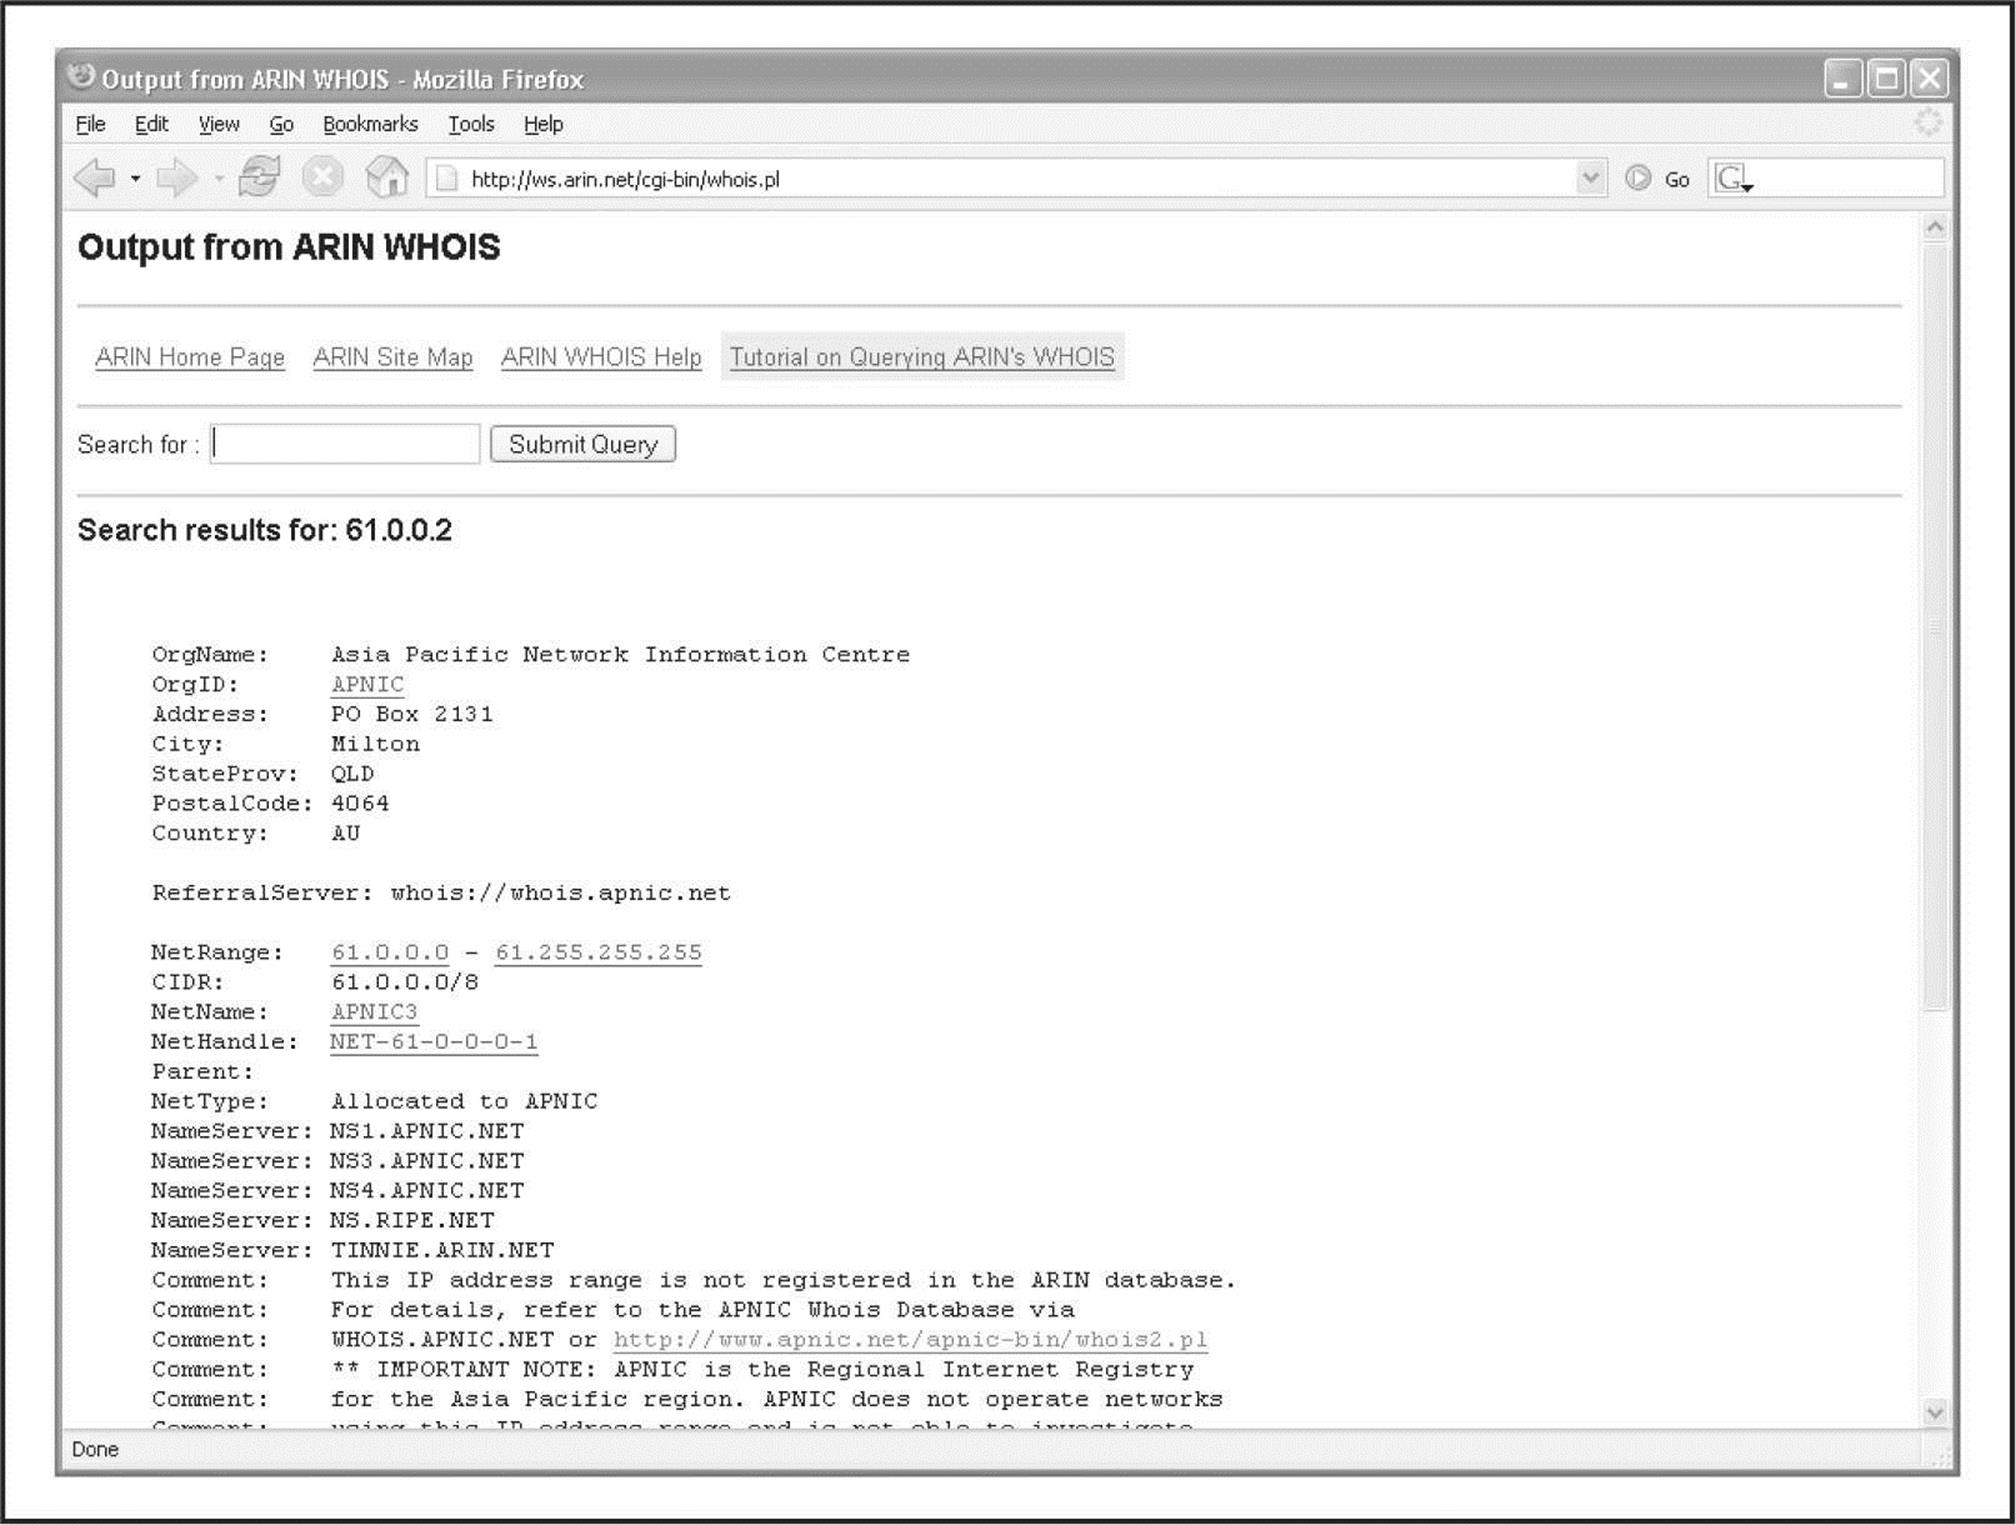
Figure 1-15 ARIN tells you which RIR you need to search.
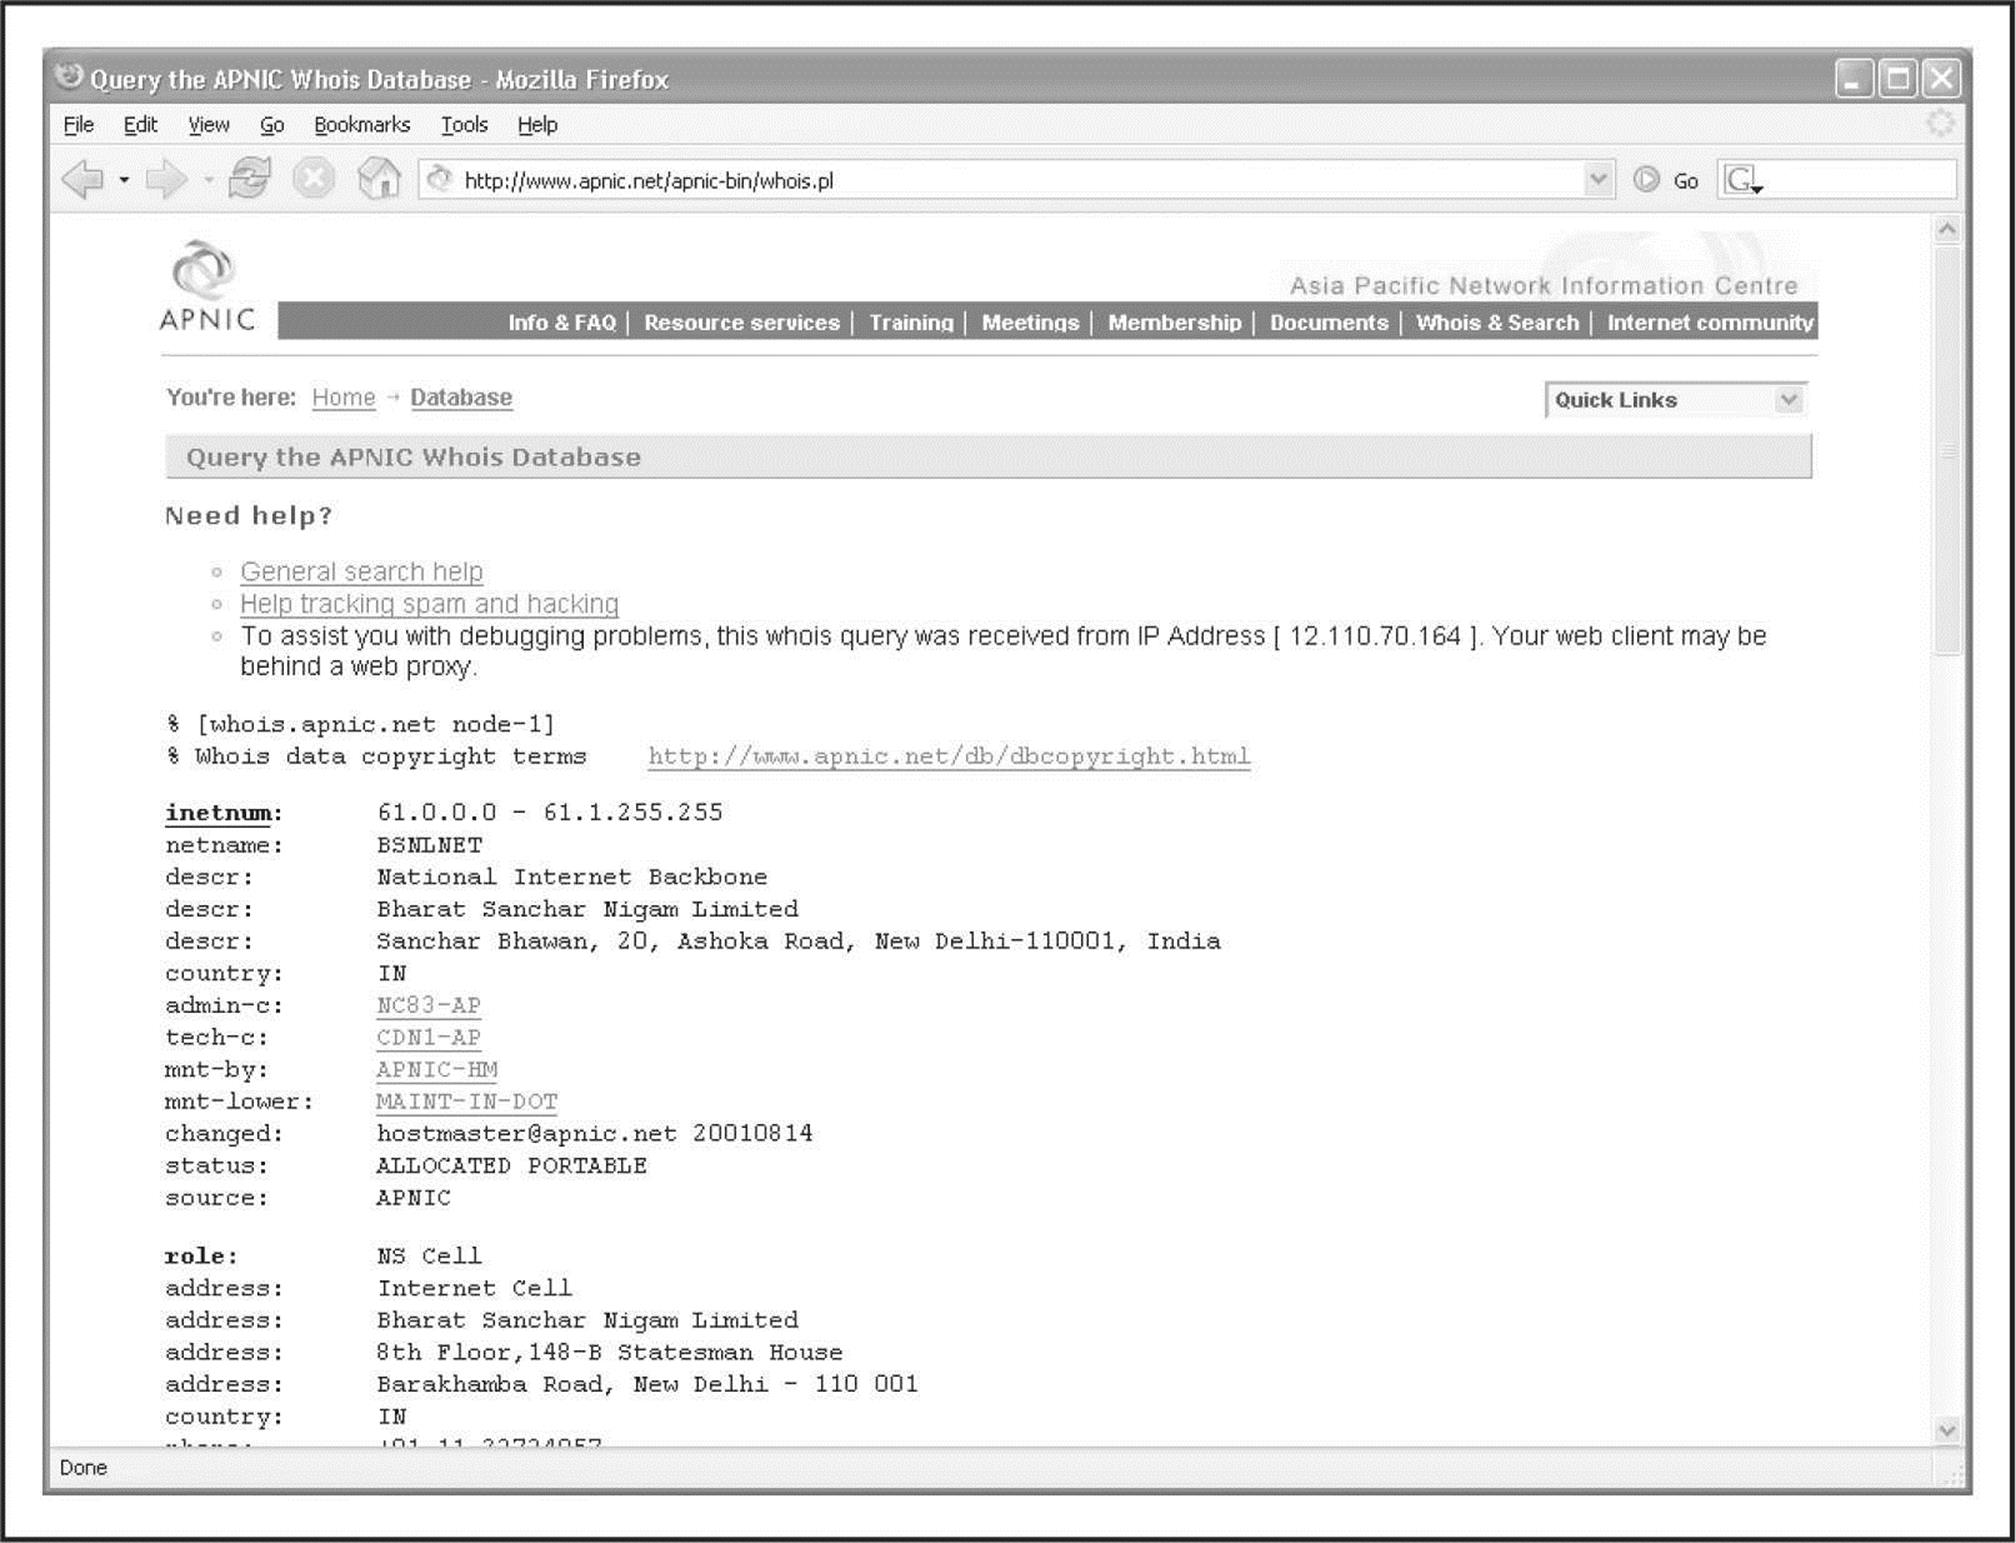
Figure 1-16 It turns out that the IP address is owned by India’s National Internet Backbone.
This process can be followed to trace back any IP address in the world to its owner, or at least to a point of contact that may be willing to provide the remaining details. As with anything else, cooperation is almost completely voluntary and will vary as you deal with different companies and different governments. Always keep in mind that there are many ways for a hacker to masquerade his or her true IP. In today’s cyberworld, it’s more likely to be an illegitimate IP address than a real one. So the IP that shows up in your logs may be what we refer to as a laundered IP address—almost untraceable.
We can also find out IP ranges and BGP autonomous system numbers that an organization owns by searching the RIR WHOIS servers for the organization’s literal name. For example, if we search for “Google” at arin.net, we see the IP ranges that Google owns under its name as well as its AS number, AS15169 (Figure 1-17).
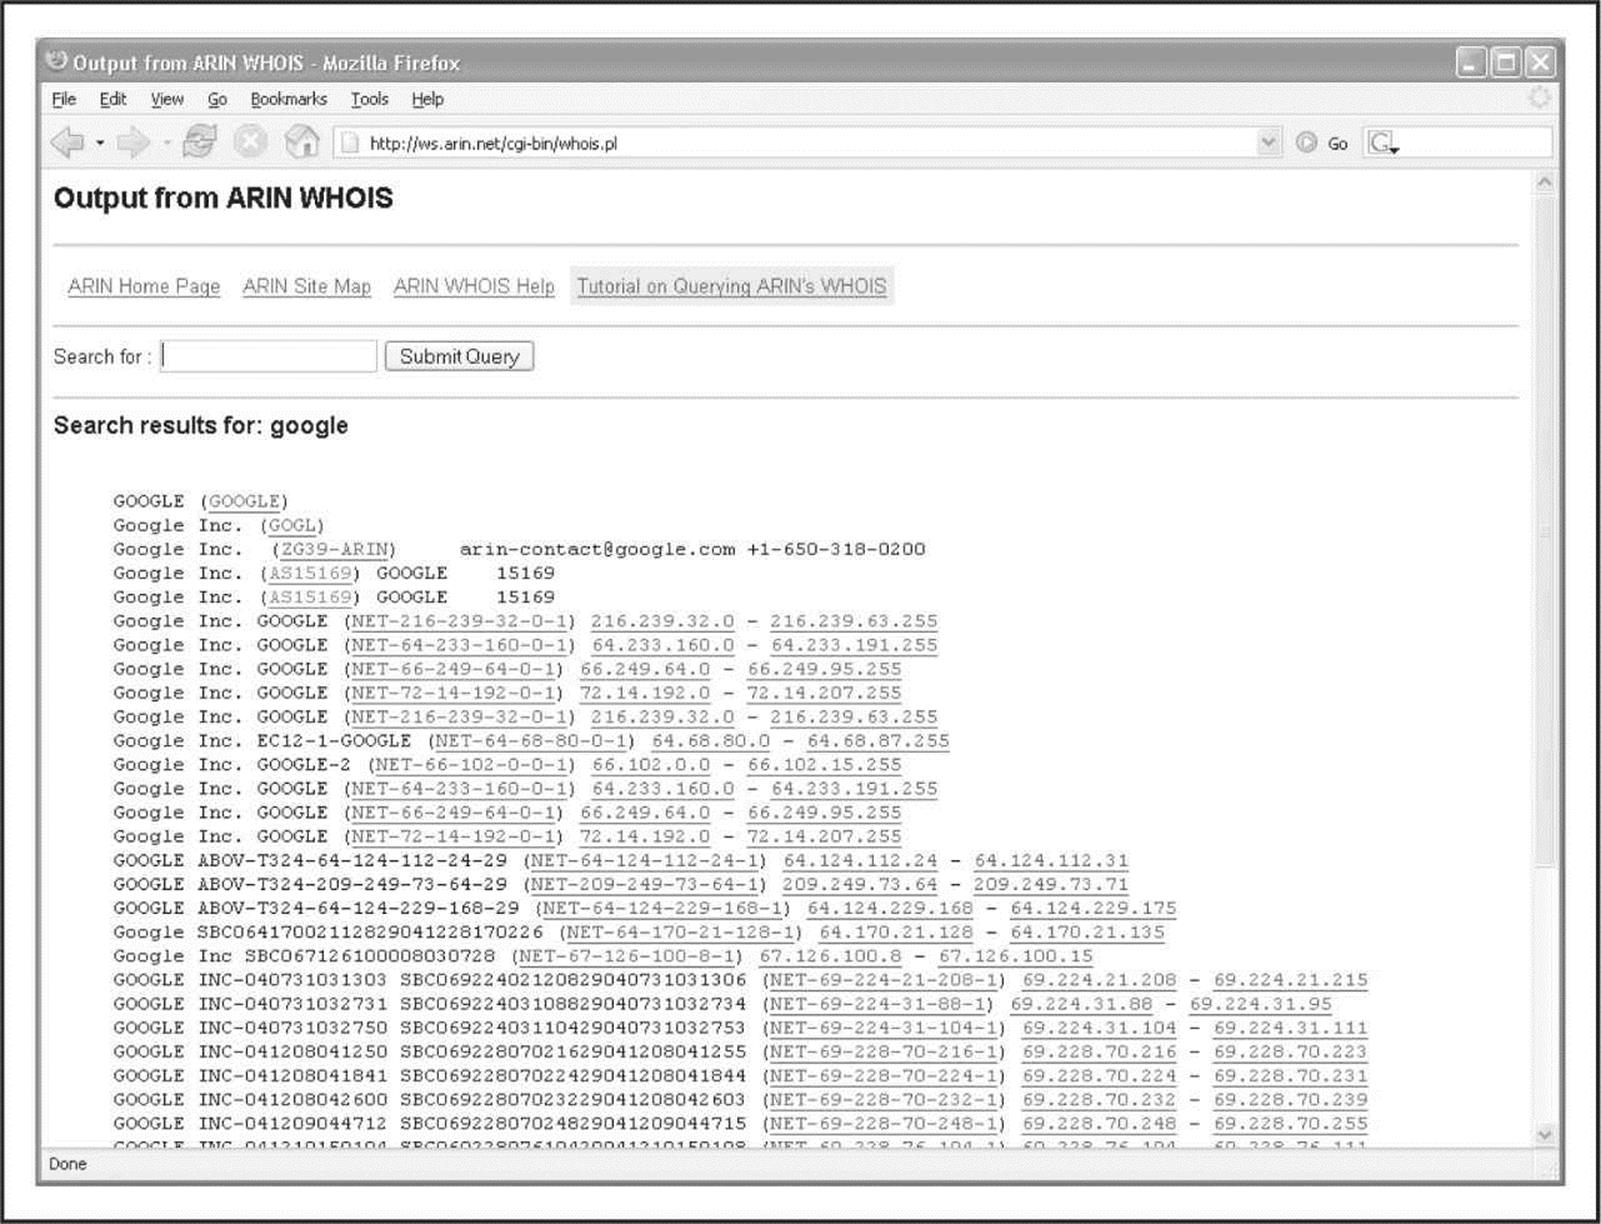
Figure 1-17 Here, we see the IP ranges and BGP AS number that Google owns under its name.
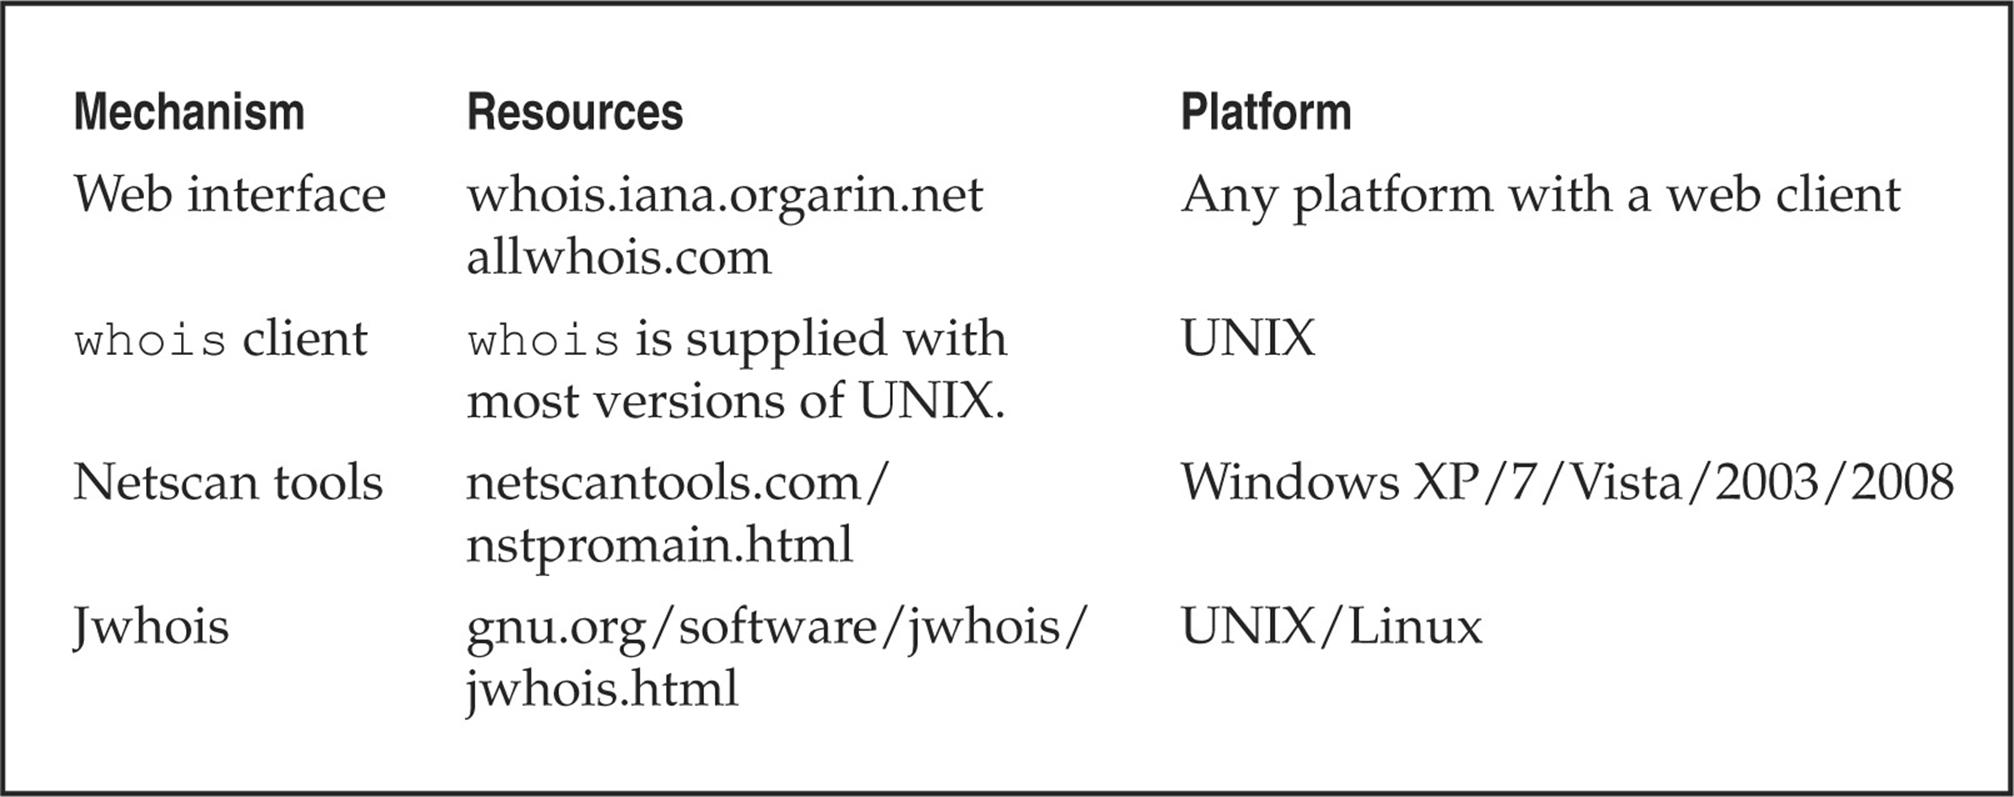
Table 1-2 shows a variety of available tools for WHOIS lookups.
Table 1-2 WHOIS Searching Techniques and Data Sources
The administrative contact is an important piece of information because it may tell you the name of the person responsible for the Internet connection or firewall. Our query also returns voice and fax numbers. This information is an enormous help when you’re performing a dial-in penetration review. Just fire up the war-dialers in the noted range, and you’re off to a good start in identifying potential modem numbers. In addition, an intruder often poses as the administrative contact using social engineering on unsuspecting users in an organization. For instance, an attacker might send spoofed e-mail messages posing as the administrative contact to a gullible user. It is amazing how many users will change their passwords to whatever you like, as long as it looks like the request is being sent from a trusted technical support person.
The record creation and modification dates indicate how accurate the information is. If the record was created five years ago but hasn’t been updated since, it is a good bet that some of the information (for example, administrative contact) may be out of date.
The last piece of information provides us with the authoritative DNS servers, which are the sources or records for name lookups for that domain or IP. The first one listed is the primary DNS server; subsequent DNS servers will be secondary, tertiary, and so on. We need this information for our DNS interrogation, discussed later in this chapter. Additionally, we can try to use the network range listed as a starting point for our network query of the ARIN database.
![]() Public Database Security Countermeasures
Public Database Security Countermeasures
Much of the information contained in the various databases discussed thus far is geared for public disclosure. Administrative contacts, registered net blocks, and authoritative nameserver information is required when an organization registers a domain on the Internet. However, security considerations should be employed to make the job of attackers more difficult.
Many times, an administrative contact leaves an organization and is still able to change the organization’s domain information. Therefore, first ensure that the information listed in the database is accurate. Update the administrative, technical, and billing contact information as often as necessary. You can best manage this by setting up alerts with your domain name providers such as Verisign. Consider the phone numbers and addresses listed. These can be used as a starting point for a dial-in attack or for social engineering purposes. Consider using a toll-free number or a number that is not in your organization’s phone exchange. In addition, we have seen several organizations list a fictitious administrative contact, hoping to trip up a would-be social engineer. If any employee has e-mail or telephone contact with the fictitious contact, it may tip off the information security department that there is a potential problem.
The best suggestion is to use anonymity features offered by your domain name provider. For example, both Network Solutions and Godaddy.com offer private registration features where you can pay them an additional $9 or $8.99 per year, plus the cost of the domain, to get your actual address, phone number, e-mail, etc., not listed. This is the best way to make sure your company’s sensitive contact information is not pilferable on the Internet.
Another hazard with domain registration arises from how some registrars allow updates. For example, the current Network Solutions implementation allows automated online changes to domain information. Network Solutions authenticates the domain registrant’s identity through the Guardian method, which uses three different types of authentication methods: the FROM field in an e-mail, a password, and a Pretty Good Privacy (PGP) key. The weakest authentication method is the FROM field via e-mail. The security implications of this authentication mechanism are prodigious. Essentially, anyone can simply forge an e-mail address and change the information associated with your domain, better known as domain hijacking. This is exactly what happened to AOL on October 16, 1998, as reported by the Washington Post. Someone impersonated an AOL official and changed AOL’s domain information so all traffic was directed to autonete.net.
AOL recovered quickly from this incident, but it underscores the fragility of an organization’s presence on the Internet. It is important to choose the most secure solution available, such as a password or PGP authentication, to change domain information. Moreover, the administrative or technical contact is required to establish the authentication mechanism via the Contact Form from Network Solutions.
Step 5: DNS Interrogation
After identifying all the associated domains, you can begin to query the DNS. DNS is a distributed database used to map IP addresses to hostnames, and vice versa. If DNS is configured insecurely, you might possibly obtain revealing information about the organization.
![]() Zone Transfers
Zone Transfers
One of the most serious misconfigurations a system administrator can make is allowing untrusted Internet users to perform a DNS zone transfer. Although this technique has become almost obsolete, we include it here for three reasons:
1. This vulnerability allows for significant information gathering on a target.
2. It is often the springboard to attacks that would not be present without it.
3. Believe it or not, you can find many DNS servers that still allow this feature.
A zone transfer allows a secondary master server to update its zone database from the primary master. This provides for redundancy when running DNS, should the primary name server become unavailable. Generally, a DNS zone transfer needs to be performed only by secondary master DNS servers. Many DNS servers, however, are misconfigured and provide a copy of the zone to anyone who asks. This isn’t necessarily bad if the only information provided is related to systems that are connected to the Internet and have valid hostnames, although it makes it that much easier for attackers to find potential targets. The real problem occurs when an organization does not use a public/private DNS mechanism to segregate its external DNS information (which is public) from its internal, private DNS information. In this case, internal hostnames and IP addresses are disclosed to the attacker. Providing internal IP address information to an untrusted user over the Internet is akin to providing a complete blueprint, or roadmap, of an organization’s internal network.
Let’s take a look at several methods we can use to perform zone transfers and the types of information that we can glean. Although many different tools are available to perform zone transfers, we are going to limit the discussion to several common types.
A simple way to perform a zone transfer is to use the nslookup client that is usually provided with most UNIX and Windows implementations. We can use nslookup in interactive mode, as follows:
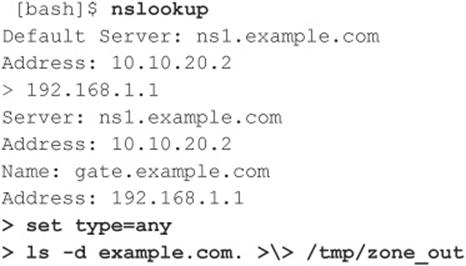
We first run nslookup in interactive mode. Once started, it tells us the default name server that it is using, which is normally the organization’s DNS server or a DNS server provided by an ISP. However, our DNS server (10.10.20.2) is not authoritative for our target domain, so it will not have all the DNS records we are looking for. Therefore, we need to manually tell nslookup which DNS server to query. In our example, we want to use the primary DNS server for example.com (192.168.1.1).
Next we set the record type to any, so we can pull any DNS records available (man nslookup) for a complete list.
Finally, we use the ls option to list all the associated records for the domain. The -d switch is used to list all records for the domain. We append a period (.) to the end to signify the fully qualified domain name—however, you can leave this off most times. In addition, we redirect our output to the file /tmp/zone_out so we can manipulate it later.
After completing the zone transfer, we can view the file to see whether there is any interesting information that will allow us to target specific systems. Let’s review simulated output for example.com:
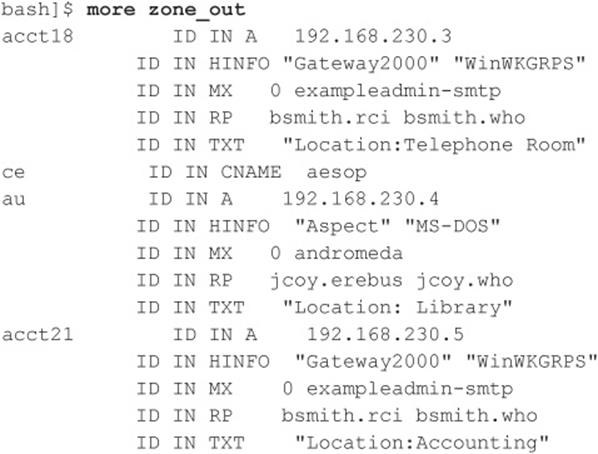
We won’t go through each record in detail, but we will point out several important types. We see that for each entry we have an “A” record that denotes the IP address of the system name located to the right. In addition, each host has an HINFO record that identifies the platform or type of operating system running (see RFC 952). HINFO records are not needed, but they provide a wealth of information to attackers. Because we saved the results of the zone transfer to an output file, we can easily manipulate the results with UNIX programs such as grep, sed, awk, or perl.
Suppose we are experts in SunOS/Solaris. We could programmatically find out the IP addresses that have an HINFO record associated with Sparc, SunOS, or Solaris:
We have 388 potential records that reference the word “Solaris.” Obviously, we have plenty of targets.
![]()
Suppose we want to find test systems, which happen to be a favorite choice for attackers. Why? Simple: they normally don’t have many security features enabled, often have easily guessed passwords, and administrators tend not to notice or care who logs in to them. They’re a perfect home for any interloper. Thus, we can search for test systems as follows:
![]()
So we have approximately 96 entries in the zone file that contain the word “test.” This should equate to a fair number of actual test systems. These are just a few simple examples. Most intruders slice and dice this data to zero in on specific system types with known vulnerabilities.
Keep a few points in mind. First, the aforementioned method queries only one nameserver at a time. This means you would have to perform the same tasks for all nameservers that are authoritative for the target domain. In addition, we queried only the example.com domain. If there were subdomains, we would have to perform the same type of query for each subdomain (for example, greenhouse.example.com). Finally, you may receive a message stating that you can’t list the domain or that the query was refused. This usually indicates that the server has been configured to disallow zone transfers from unauthorized users. Therefore, you will not be able to perform a zone transfer from this server. However, if there are multiple DNS servers, you may be able to find one that will allow zone transfers.
Now that we have shown you the manual method, we should mention there are plenty of tools that speed the process, including host, Sam Spade, axfr, and dig. The host command comes with many flavors of UNIX. Some simple ways of using host are as follows:

If you need just the IP addresses to feed into a shell script, you can just cut out the IP addresses from the host command:
![]()
Not all footprinting functions must be performed through UNIX commands. A number of Windows products, such as Sam Spade, provide the same information.
The UNIX dig command is a favorite with DNS administrators and is often used to troubleshoot DNS architectures. It, too, can perform the various DNS interrogations mentioned in this section. It has too many command-line options to list here; the man page explains its features in detail.
Finally, you can use one of the best tools for performing zone transfers: dnsrecon (github.com/darkoperator/dnsrecon) by Carlos Perez. This utility recursively transfers zone information. To run dnsrecon, you type the following:
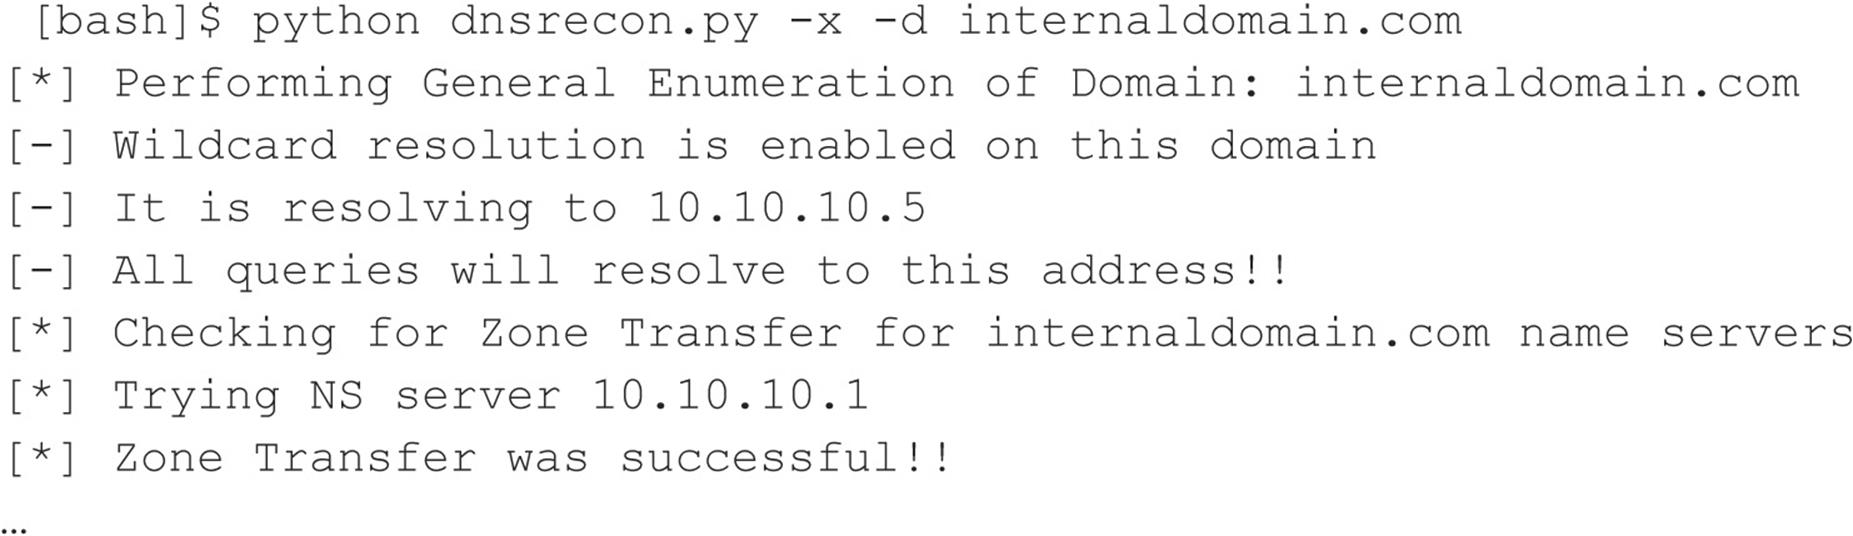
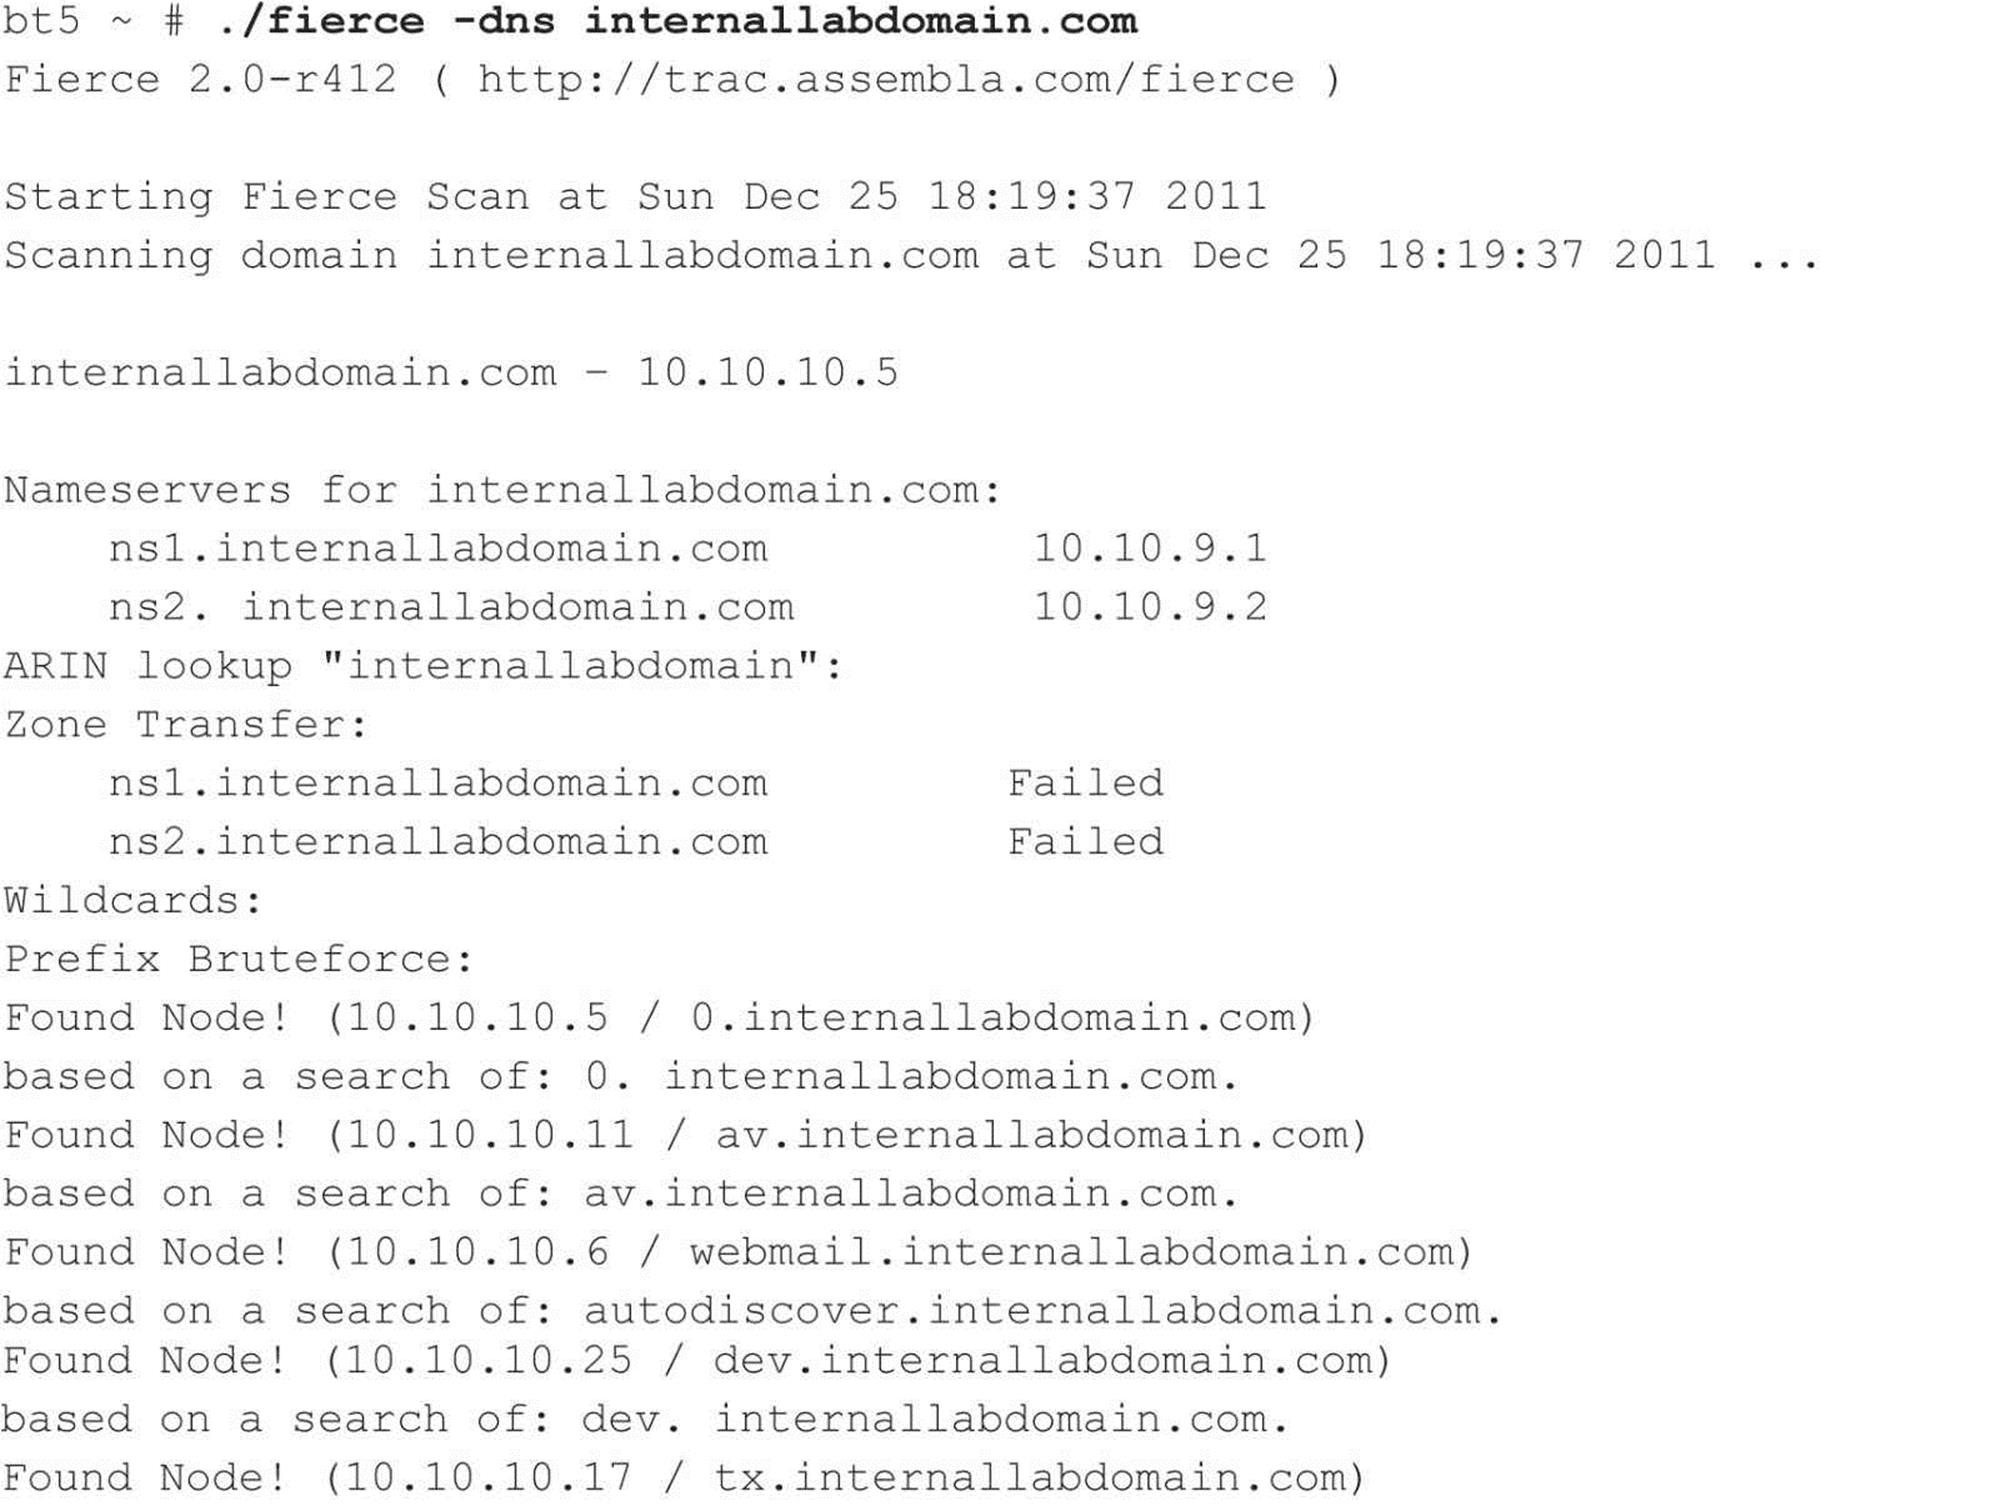
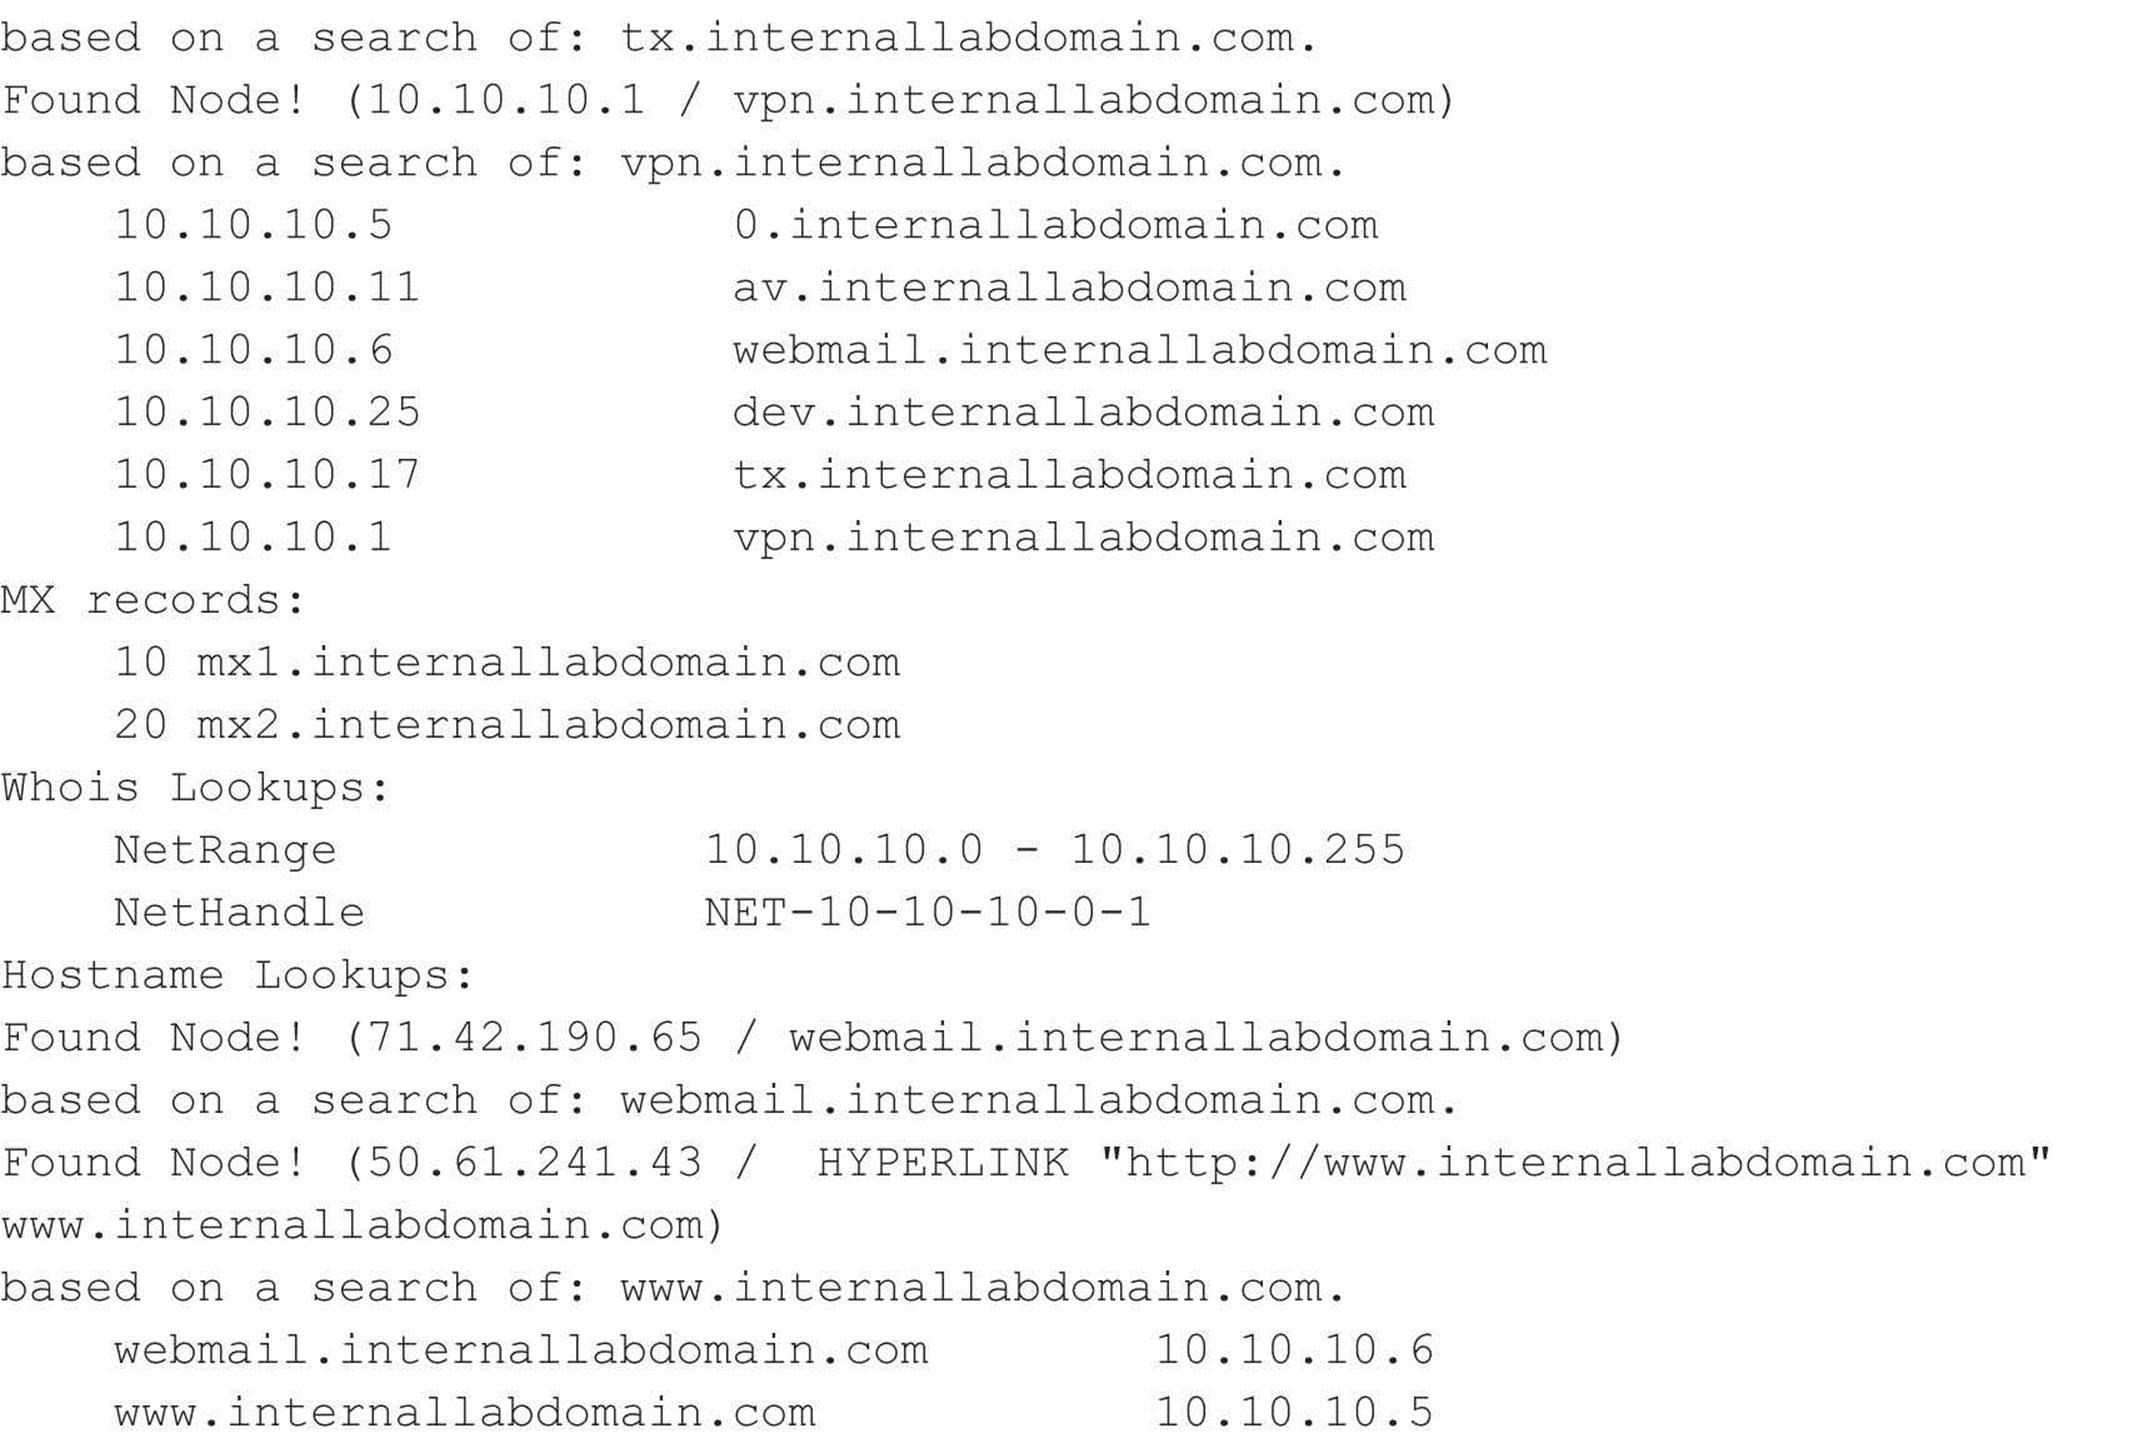
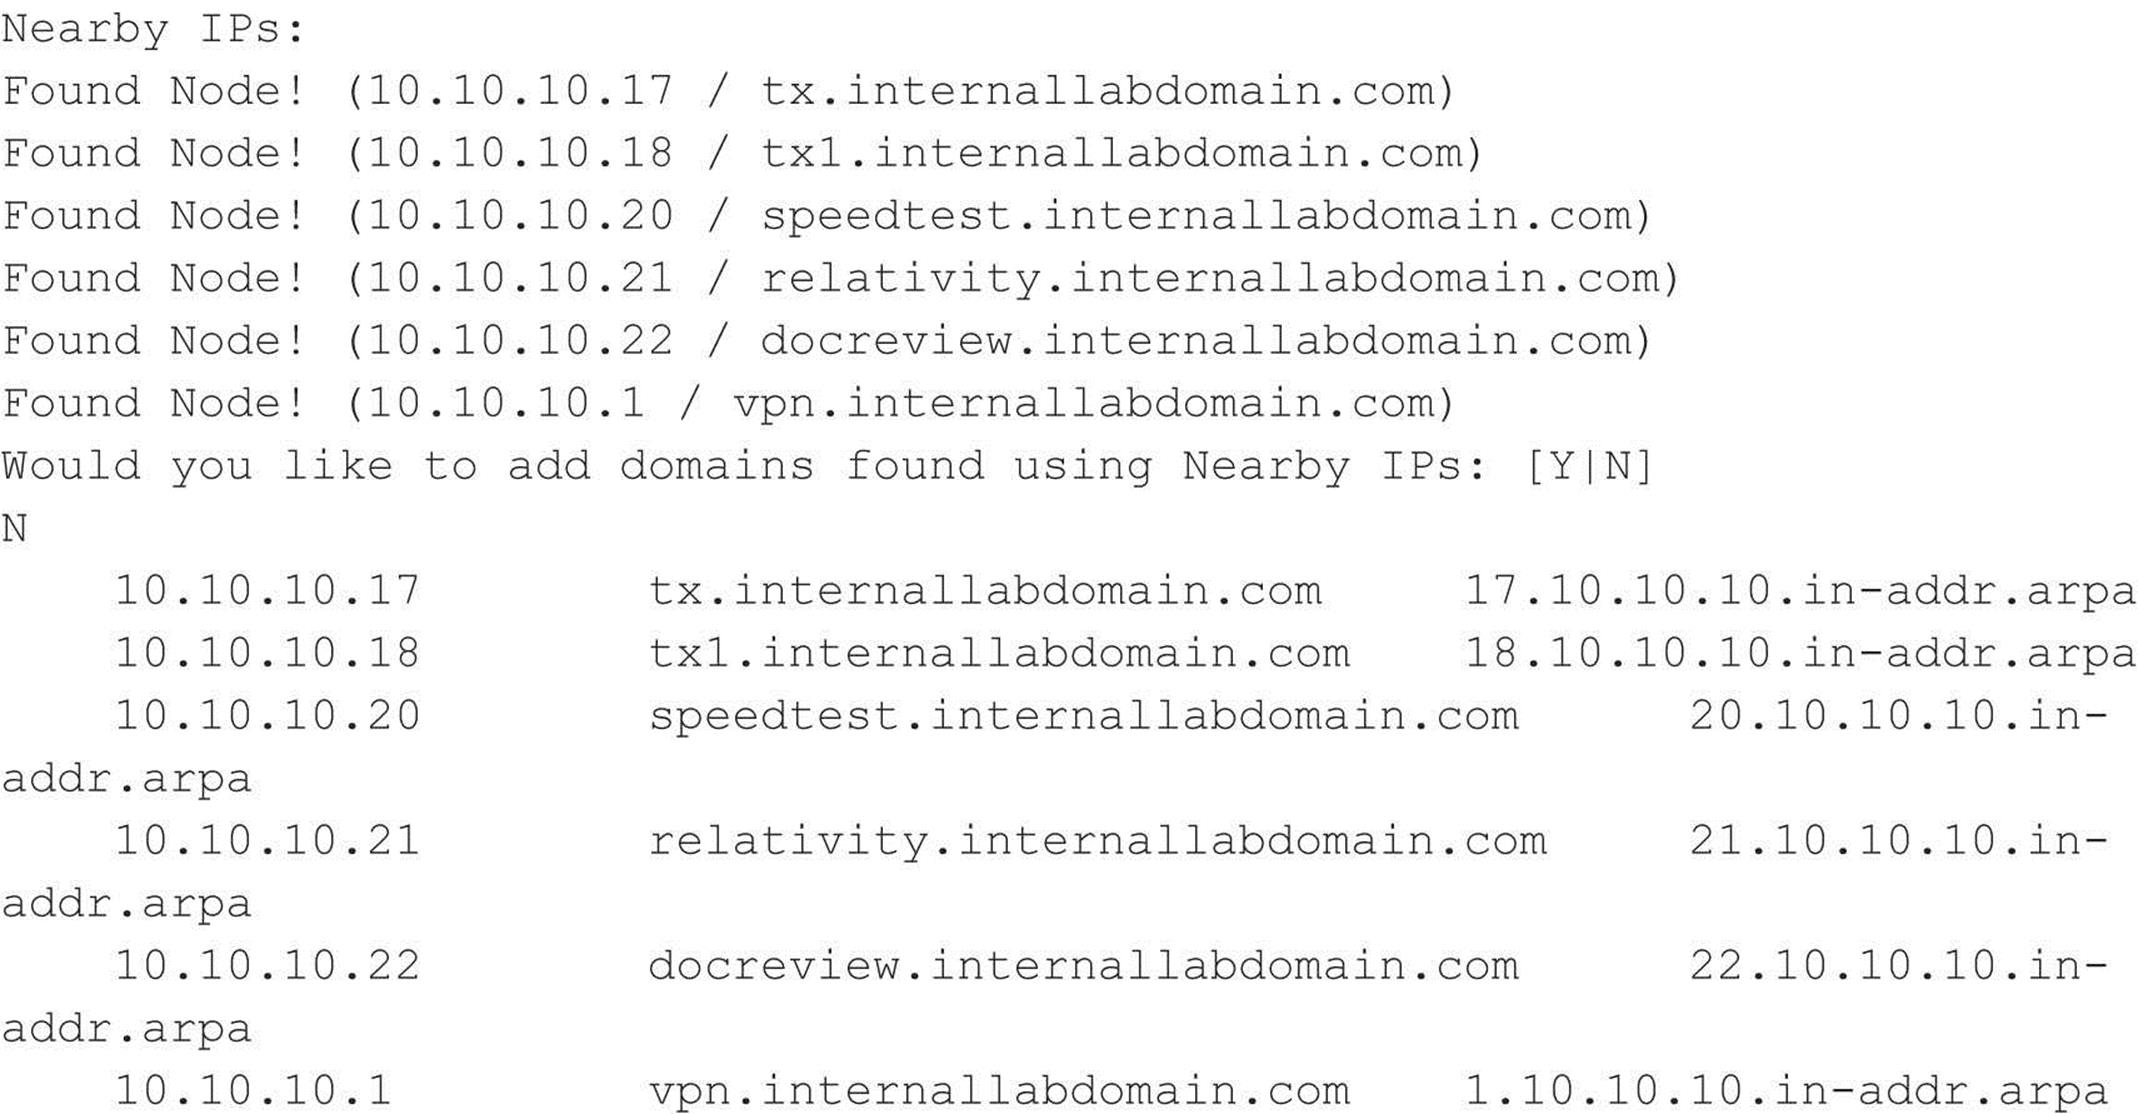
Unfortunately, the majority of DNS servers you encounter have DNS configured to not allow zone transfers from any client source IP address. However, other techniques are at your disposal for enumerating DNS entries within a domain. Freely available scripts, such as dnsenum, dnsmap, dnsrecon, and fierce, not only test for zone transfers, but also leverage DNS reverse lookups, WHOIS, ARIN, and DNS brute-forcing. For example, we can use fierce 2.0 (trac.assembla.com/fierce), rewritten by Joshua “Jabra” Abraham, to enumerate DNS entries even though zone transfer attempts fail.

![]() Determine Mail Exchange (MX) Records
Determine Mail Exchange (MX) Records
Determining where mail is handled is a great starting place to locate the target organization’s firewall network. Often in a commercial environment, mail is handled on the same system as the firewall, or at least on the same network. Therefore, we can use the host command to help harvest even more information:

![]() DNS Security Countermeasures
DNS Security Countermeasures
DNS information provides a plethora of data to attackers, so reducing the amount of information available on the Internet is important. From a host-configuration perspective, you should restrict zone transfers to only authorized servers. For modern versions of BIND, the allow-transfer directive in the named.conf file can be used to enforce the restriction. To restrict zone transfers in Microsoft’s DNS under Windows 2008, you can specify specific servers in the Name Servers tab. For other nameservers, you should consult the documentation to determine what steps are necessary to restrict or disable zone transfers.
On the network side, you could configure a firewall or packet-filtering router to deny all unauthorized inbound connections to TCP port 53. Because name lookup requests are UDP and zone transfer requests are TCP, this effectively thwarts a zone-transfer attempt. However, this countermeasure is a violation of the RFC, which states that DNS queries greater than 512 bytes will be sent via TCP. In most cases, DNS queries will easily fit within 512 bytes. A better solution would be to implement cryptographic transaction signatures (TSIGs) to allow only trusted hosts to transfer zone information. For a great primer on TSIG security for DNS, see tools.ietf.org/html/rfc2845.
Restricting zone transfers increases the time necessary for attackers to probe for IP addresses and hostnames. However, because name lookups are still allowed, attackers could manually perform reverse lookups against all IP addresses for a given net block. Therefore, you should configure external nameservers to provide information only about systems directly connected to the Internet. External nameservers should never be configured to divulge internal network information. This may seem like a trivial point, but we have seen misconfigured nameservers that allowed us to pull back more than 16,000 internal IP addresses and associated hostnames. Finally, we discourage the use of HINFO records. As you will see in later chapters, you can identify the target system’s operating system with fine precision. However, HINFO records make it that much easier to cull potentially vulnerable systems programmatically.
Step 6: Network Reconnaissance
Now that we have identified potential networks, we can attempt to determine their network topology as well as potential access paths into the network.
![]() Tracerouting
Tracerouting
To accomplish this task, we can use the traceroute (ftp://ftp.ee.lbl.gov/traceroute.tar.gz) program that comes with most flavors of UNIX and is provided in Windows. In Windows, it is spelled tracert due to the 8.3 legacy filename issues.
Traceroute is a diagnostic tool originally written by Van Jacobson that lets you view the route that an IP packet follows from one host to the next. Traceroute uses the time-to-live (TTL) field in the IP packet to elicit an ICMP TIME_EXCEEDED message from each router. Each router that handles the packet is required to decrement the TTL field. Thus, the TTL field effectively becomes a hop counter. We can use the functionality of traceroute to determine the exact path that our packets are taking. As mentioned previously, traceroute may allow you to discover the network topology employed by the target network, in addition to identifying access control devices (such as an application-based firewall or packet-filtering routers) that may be filtering our traffic.
Let’s look at an example:
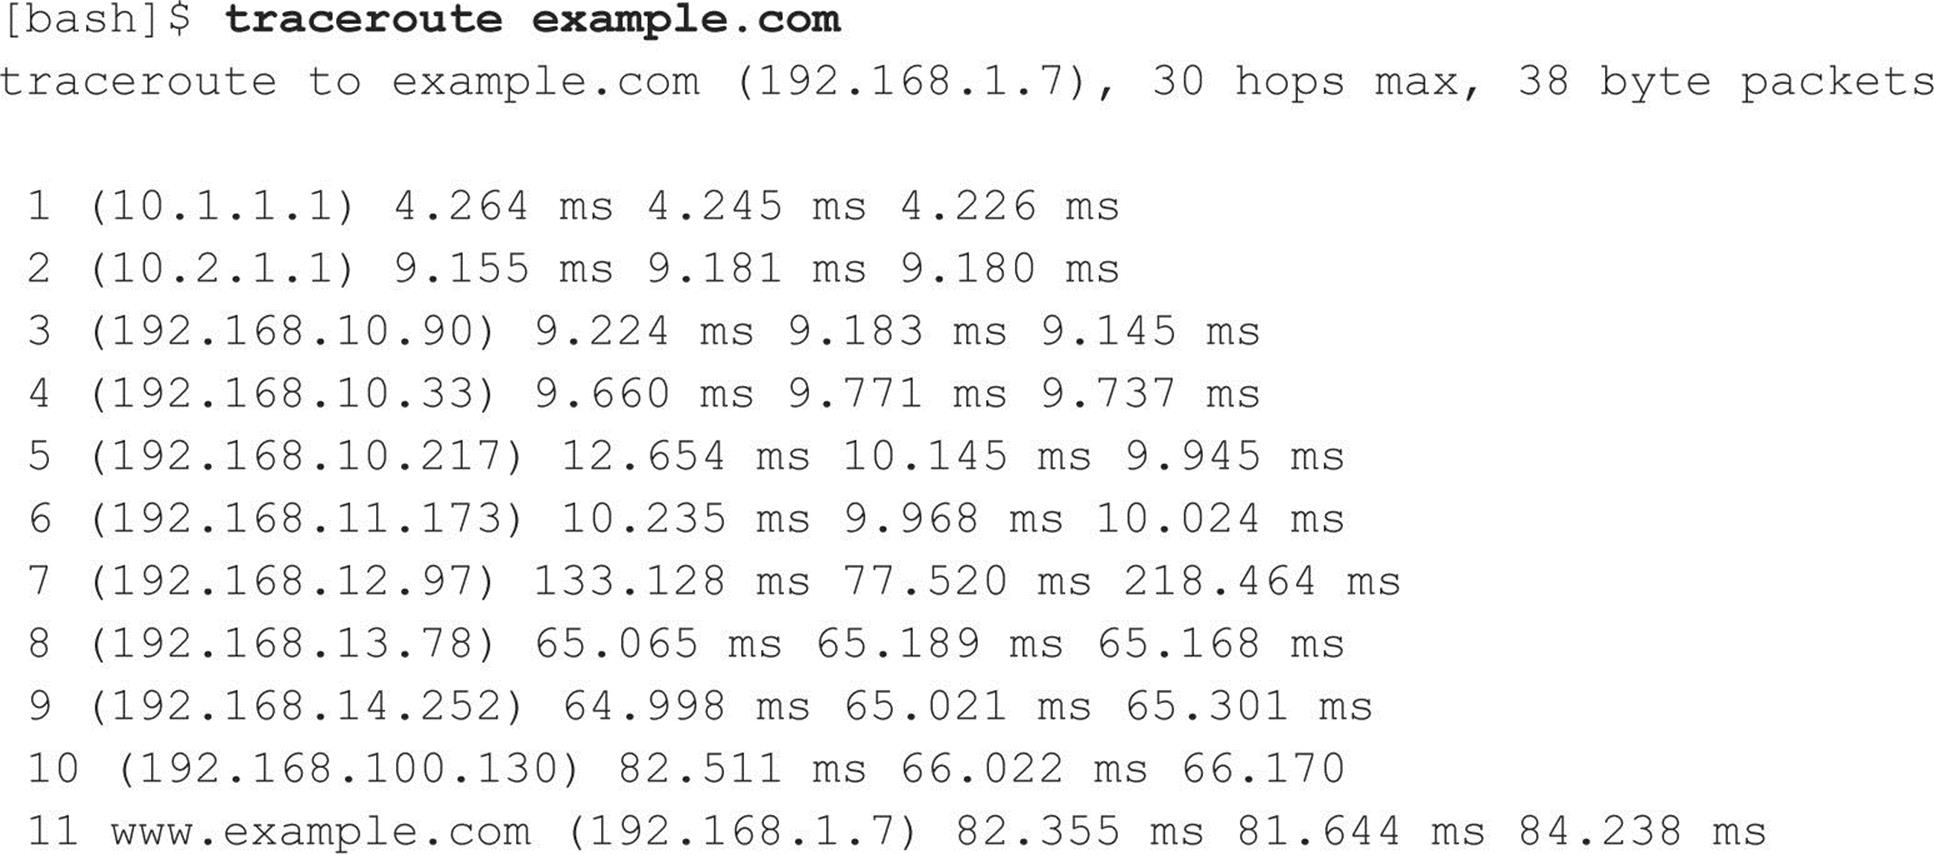
We can see the path of the packets traveling several hops to the final destination. The packets go through the various hops without being blocked. We can assume this is a live host and that the hop before it (10) is the border router for the organization. Hop 10 could be a dedicated application-based firewall, or it could be a simple packet-filtering device—we are not sure yet. Generally, once you hit a live system on a network, the system before it is a device performing routing functions (for example, a router or a firewall).
This is a very simplistic example. In a complex environment, there may be multiple routing paths—that is, routing devices with multiple interfaces (for example, a Cisco 7500 series router) or load balancers. Moreover, each interface may have different access control lists (ACLs) applied. In many cases, some interfaces pass your traceroute requests, whereas others deny them because of the ACL applied. Therefore, it is important to map your entire network using traceroute. After you traceroute to multiple systems on the network, you can begin to create a network diagram that depicts the architecture of the Internet gateway and the location of devices that are providing access control functionality. We refer to this as an access path diagram.
It is important to note that most flavors of traceroute in UNIX default to sending User Datagram Protocol (UDP) packets, with the option of using Internet Control Messaging Protocol (ICMP) packets with the –I switch. In Windows, however, the default behavior is to use ICMP echo request packets. Therefore, your mileage may vary using each tool if the site blocks UDP versus ICMP, and vice versa. Another interesting item in traceroute is the –g option, which allows the user to specify loose source routing. Therefore, if you believe the target gateway accepts source-routed packets (which is a cardinal sin), you might try to enable this option with the appropriate hop pointers (see man trace-route in UNIX for more information).
Several other switches that we need to discuss may allow us to bypass access control devices during our probe. The –p n option in traceroute allows us to specify a starting UDP port number (n) that will be incremented by 1 when the probe is launched. Therefore, we will not be able to use a fixed port number without some modification to traceroute. Luckily, Michael Schiffman, aka route/daemon9, created a patch (packetfactory.openwall.net/projects/firewalk/dist/traceroute/) that adds the –S switch to stop port incrementation for traceroute version 1.4a5 (ftp.cerias.purdue.edu/pub/tools/unix/netutils/traceroute/old). This allows us to force every packet we send to have a fixed port number, in the hopes that the access control device will pass this traffic. A good starting port number is UDP port 53 (DNS queries). Because many sites allow inbound DNS queries, there is a high probability that the access control device will allow our probes through.
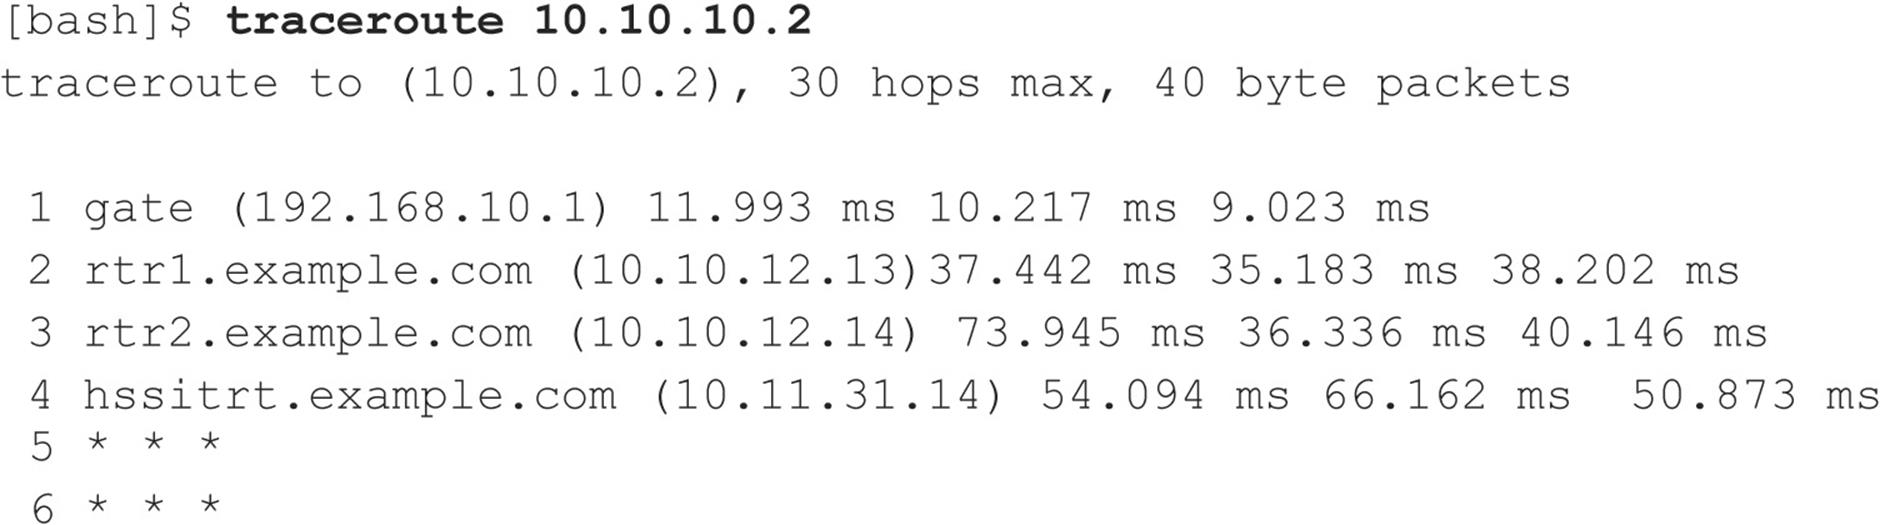
We can see in this example that our traceroute probes, which, by default, send out UDP packets, were blocked by the firewall.
Now let’s send a probe with a fixed port of UDP 53, DNS queries:
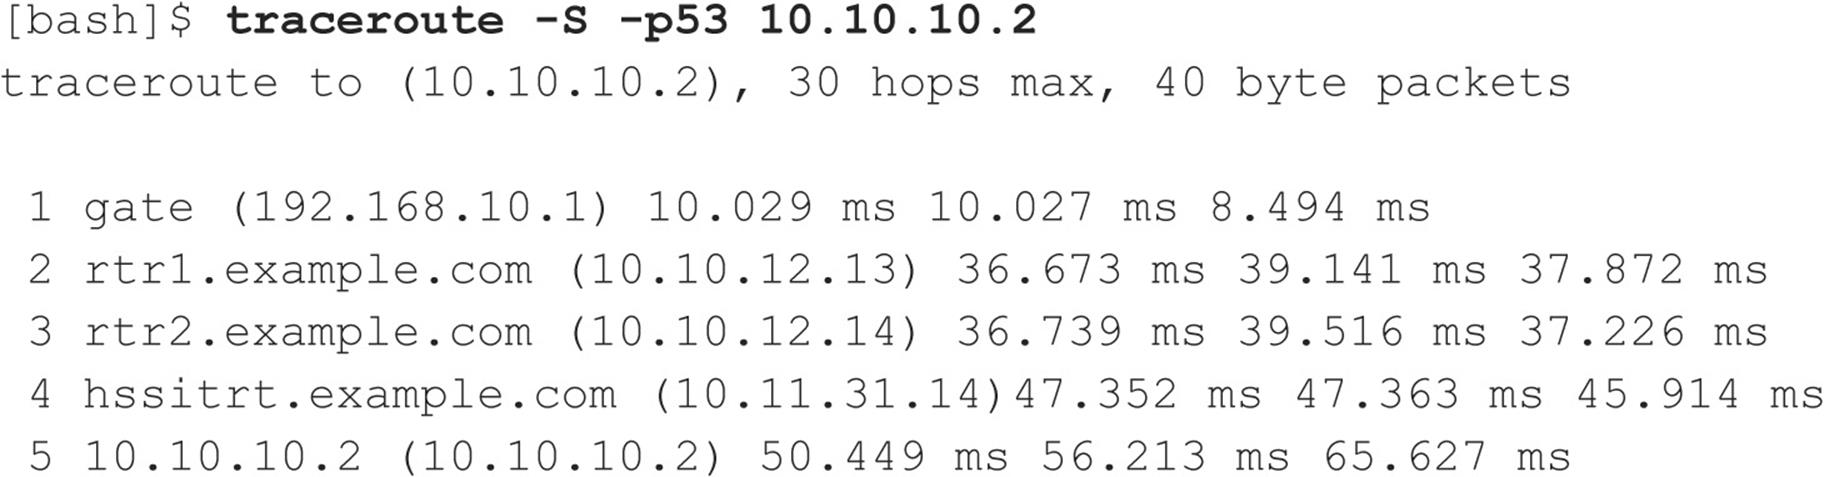
Because our packets are now acceptable to the access control devices (hop 4), they are happily passed. Therefore, we can probe systems behind the access control device just by sending out probes with a destination port of UDP 53. Additionally, if you send a probe to a system that has UDP port 53 listening, you will not receive a normal ICMP unreachable message back. Therefore, you will not see a host displayed when the packet reaches its ultimate destination.
Most of what we have done up to this point with traceroute has been command-line oriented. For the command-line challenged, you can use McAfee’s NeoTrace Professional (mcafee.com) or Foundstone’s Trout (foundstone.com) to perform your tracerouting. NeoTrace provides a graphical depiction of each network hop and integrates this with WHOIS queries. Trout’s multithreaded approach makes it one of the fastest traceroute utilities.
Note that because the TTL value used in tracerouting is in the IP header, we are not limited to UDP or ICMP packets. Literally, any IP packet could be sent. This provides for alternate tracerouting techniques to get our probes through firewalls that are blocking UDP and ICMP packets. Two tools that allow for TCP tracerouting to specific ports are the aptly named tcptraceroute (michael.toren.net/code/tcptraceroute) and Cain & Abel (oxid.it). Additional techniques allow you to determine specific ACLs that are in place for a given access control device. Firewall protocol scanning is one such technique, as well as using a tool called Firewalk (packetfactory.openwall.net/projects/firewalk/index.html) written by Michael Schiffman, the same author of the patched traceroute just used to stop port incrementation.
![]() Thwarting Network Reconnaissance Countermeasures
Thwarting Network Reconnaissance Countermeasures
In this chapter, we touched on only network reconnaissance techniques. You’ll see more intrusive techniques in the following chapters. However, several countermeasures can be employed to thwart and identify the network reconnaissance probes discussed thus far. Many of the commercial network intrusion detection systems (NIDS) and intrusion prevention systems (IPS) detect this type of network reconnaissance. In addition, one of the best free NIDS programs—Snort (snort.org) by Marty Roesch—can detect this activity. Bro-IDS (bro-ids.org), originally developed by Vern Paxson, is another open source and freely available NIDS platform that has been gaining market traction in recent years. Finally, depending on your site’s security paradigm, you may be able to configure your border routers to limit ICMP and UDP traffic to specific systems, thus minimizing your exposure.
SUMMARY
As you have seen, attackers can perform network reconnaissance or footprint your network in many different ways. We have purposely limited our discussion to common tools and techniques. Bear in mind, however, that new tools are released weekly, if not daily, so your fluency on this topic depends largely on your ability to assimilate the fire hose of hacking techniques that come out. Moreover, we chose a simplistic example to illustrate the concepts of footprinting. Often you are faced with a daunting task of trying to identify and footprint tens or hundreds of domains. Therefore, we prefer to automate as many tasks as possible via a combination of UNIX shell and Python or Perl scripts. In addition, many attackers are well schooled in performing network reconnaissance activities without ever being discovered, and they are suitably equipped. Therefore, it is important to remember to minimize the amount and types of information leaked by your Internet presence and to implement vigilant monitoring.
All materials on the site are licensed Creative Commons Attribution-Sharealike 3.0 Unported CC BY-SA 3.0 & GNU Free Documentation License (GFDL)
If you are the copyright holder of any material contained on our site and intend to remove it, please contact our site administrator for approval.
© 2016-2026 All site design rights belong to S.Y.A.