Hacking Exposed 7: Network Security Secrets and Solutions (2012)
PART I. CASING THE ESTABLISHMENT
CHAPTER 2. SCANNING
If footprinting is the equivalent of casing a place for information, then scanning is equivalent to inspecting the walls for doors and windows as potential entry points. During footprinting, we obtained a list of IP network blocks and IP addresses through a wide variety of techniques including WHOIS and ARIN queries. These techniques provide the security administrator (and hacker) with valuable information about the target network, including employee names and phone numbers, IP address ranges, DNS servers, and mail servers. In this chapter, we will determine what systems are listening for inbound network traffic (aka “alive”) and are reachable using a variety of tools and techniques. We will also look at how you can bypass firewalls to scan systems supposedly being blocked by filtering rules. Finally, we will further demonstrate how some of these activities can be done completely anonymously through passive scanning.
Before we begin, we should discuss the world of IPv4 versus IPv6. The world is moving to a much larger IP addressable space called IPv6, which will open up the once-limited 4.2B IP address range of IPv4 to an IP address range of 2128 or something like 340 undecillion addresses—basically almost infinite. As a result, once networks completely move over to IPv6 and give up backward compatibility to IPv4 addressing, there will be almost no way to scan a network of that size actively and gain any visibility into the running ports and services like you can today with IPv4. Until that day happens, most networks will maintain backward compatibility with IPv4, and all the techniques we discuss should still work. Make no mistake, however, there will be new hacker ways to enumerate IPv6 down the road, and we will cover them here.
Now let’s begin the next phase of information gathering: scanning.
DETERMINING IF THE SYSTEM IS ALIVE
Although we may have a list of ranges and some suspected servers, we don’t actually know if there is a host allocated for a specific IP and if that host is actually powered up and online. We can deduce this by performing a ping sweep of the addresses and address ranges we gathered during the footprinting phase.
![]() Network Ping Sweeps
Network Ping Sweeps

Network pinging is the act of sending certain types of traffic to a target and analyzing the results (or lack thereof). Typically, “pinging” refers to utilizing ICMP, but the term has evolved to include ARP, ICMP, TCP, and UDP traffic to identify if a host is online.
ARP Host Discovery
The Address Resolution Protocol (ARP) translates a system’s hardware (MAC) address to the IP address that has been assigned to it. For every method of host discovery described here, the system has to send some sort of ARP request to start traversing the path to reach its destination. If an attacker is positioned on the same local network segment as its target, it makes the most sense to leverage ARP for host discovery, as it takes the least amount of time and overhead to execute. An ARP scan sends an ARP request out for every host on a subnet, and the host is considered “alive” if an ARP reply is received. This technique is also powerful because it identifies hosts that are configured with a local firewall and are filtering higher layer (ICMP, TCP, etc…) traffic.
arp-scan Arp-scan by NTA Monitor (nta-monitor.com/tools/arp-scan/) is a simple ARP pinging and fingerprinting utility. Its use is extremely straightforward; note that you must run arp-scan as the root user; here we do that via sudo:
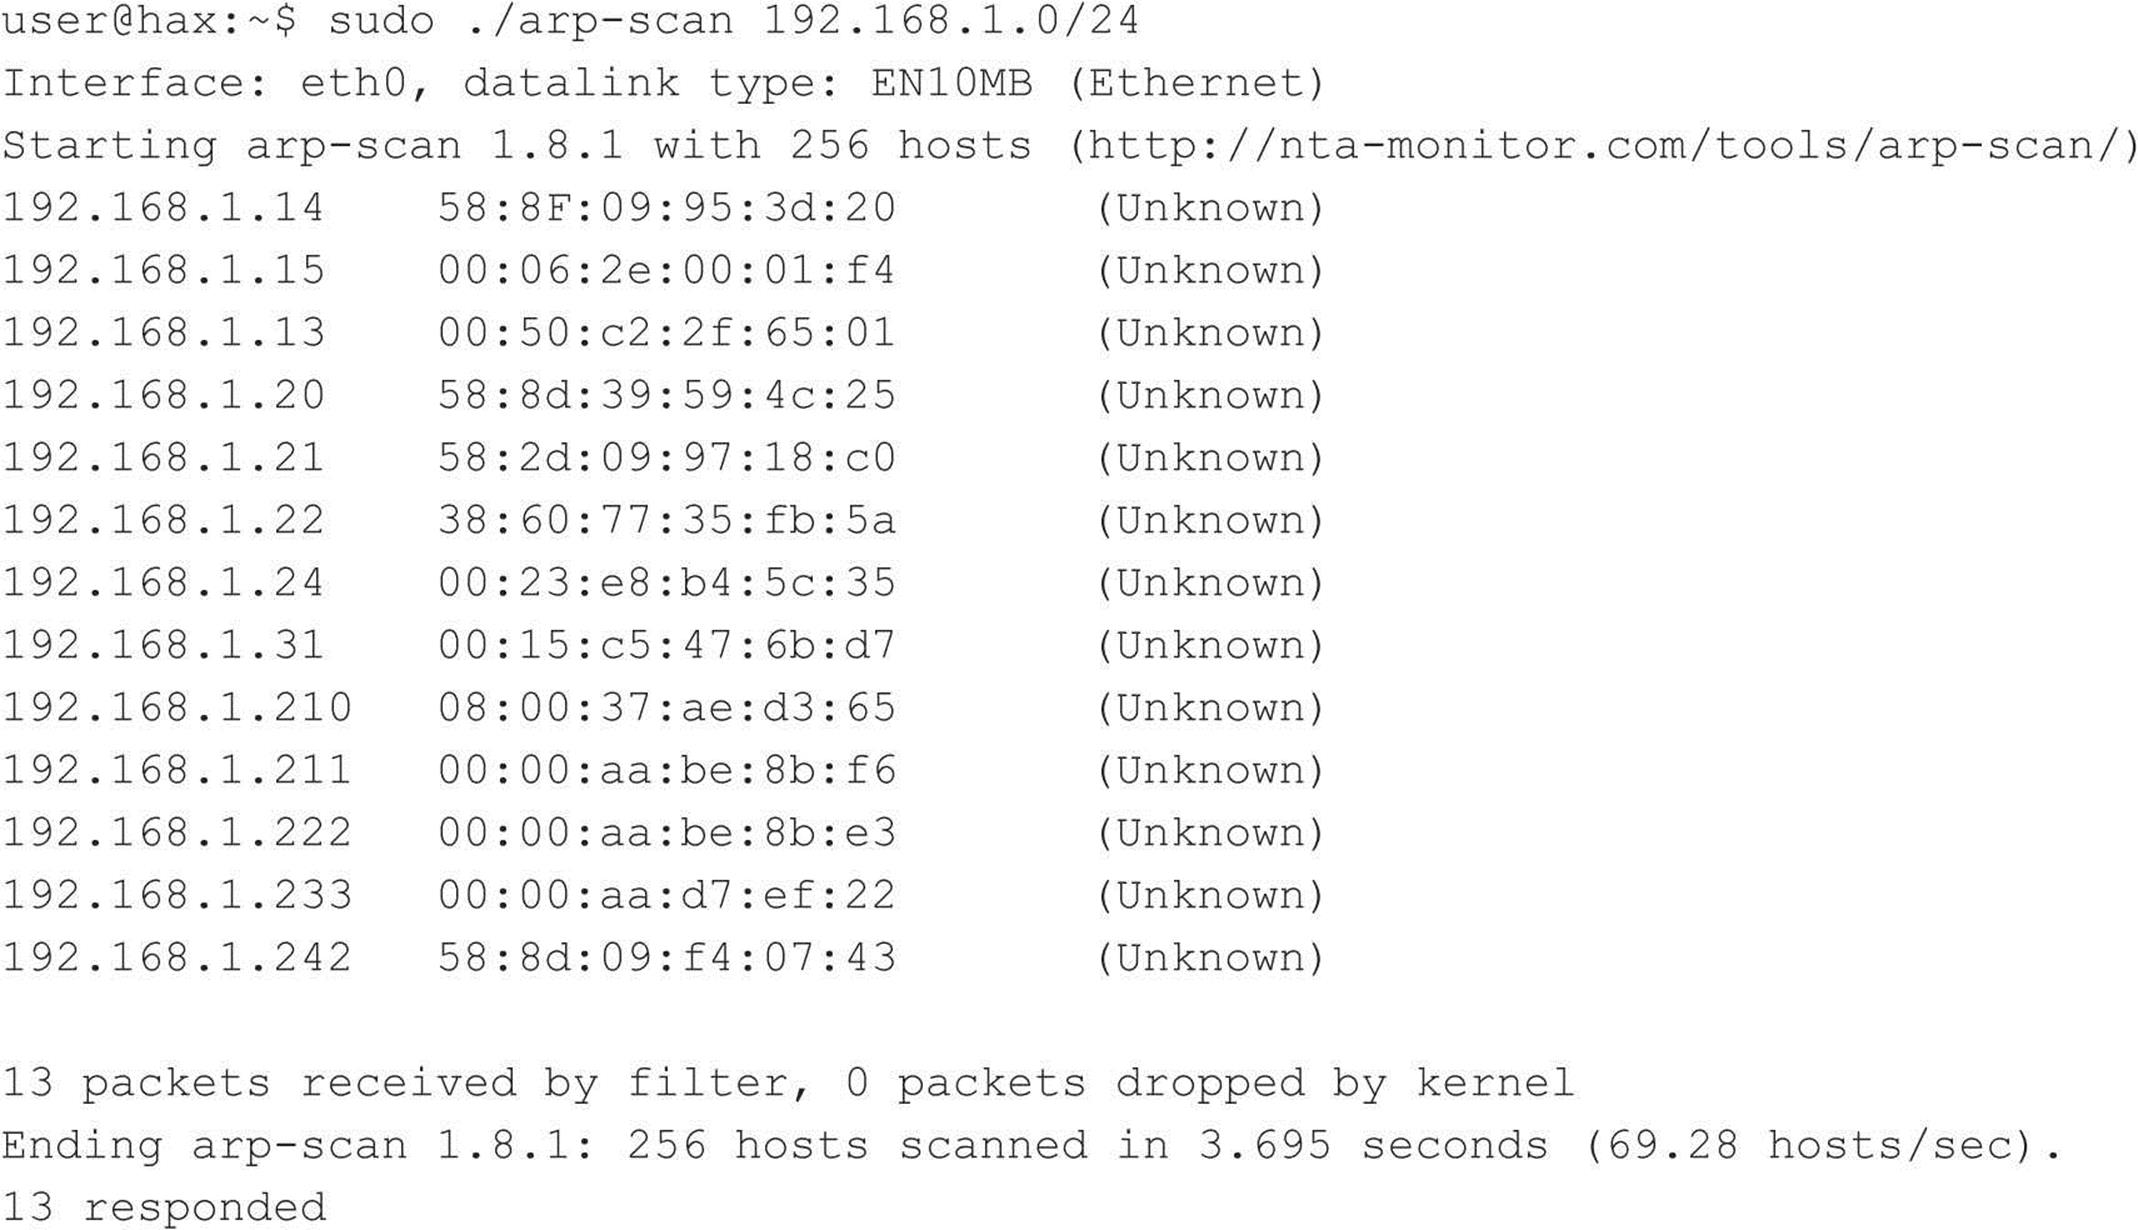
In the first two columns, you can see all of the live hosts and their MAC addresses. The third column outputs the organization that was assigned the Organizationally Unique Identifier (OUI) field of the MAC address, if available.
Network Mapper (Nmap) Nmap by Fyodor (nmap.org) is, by far, the de facto tool for anything related to host and service discovery. Nmap is supported on Linux, Windows, and Mac. As you’ll learn throughout the next couple chapters, Nmap’s feature set is extremely robust, and because of that, it has become a staple in every hacker’s toolkit.
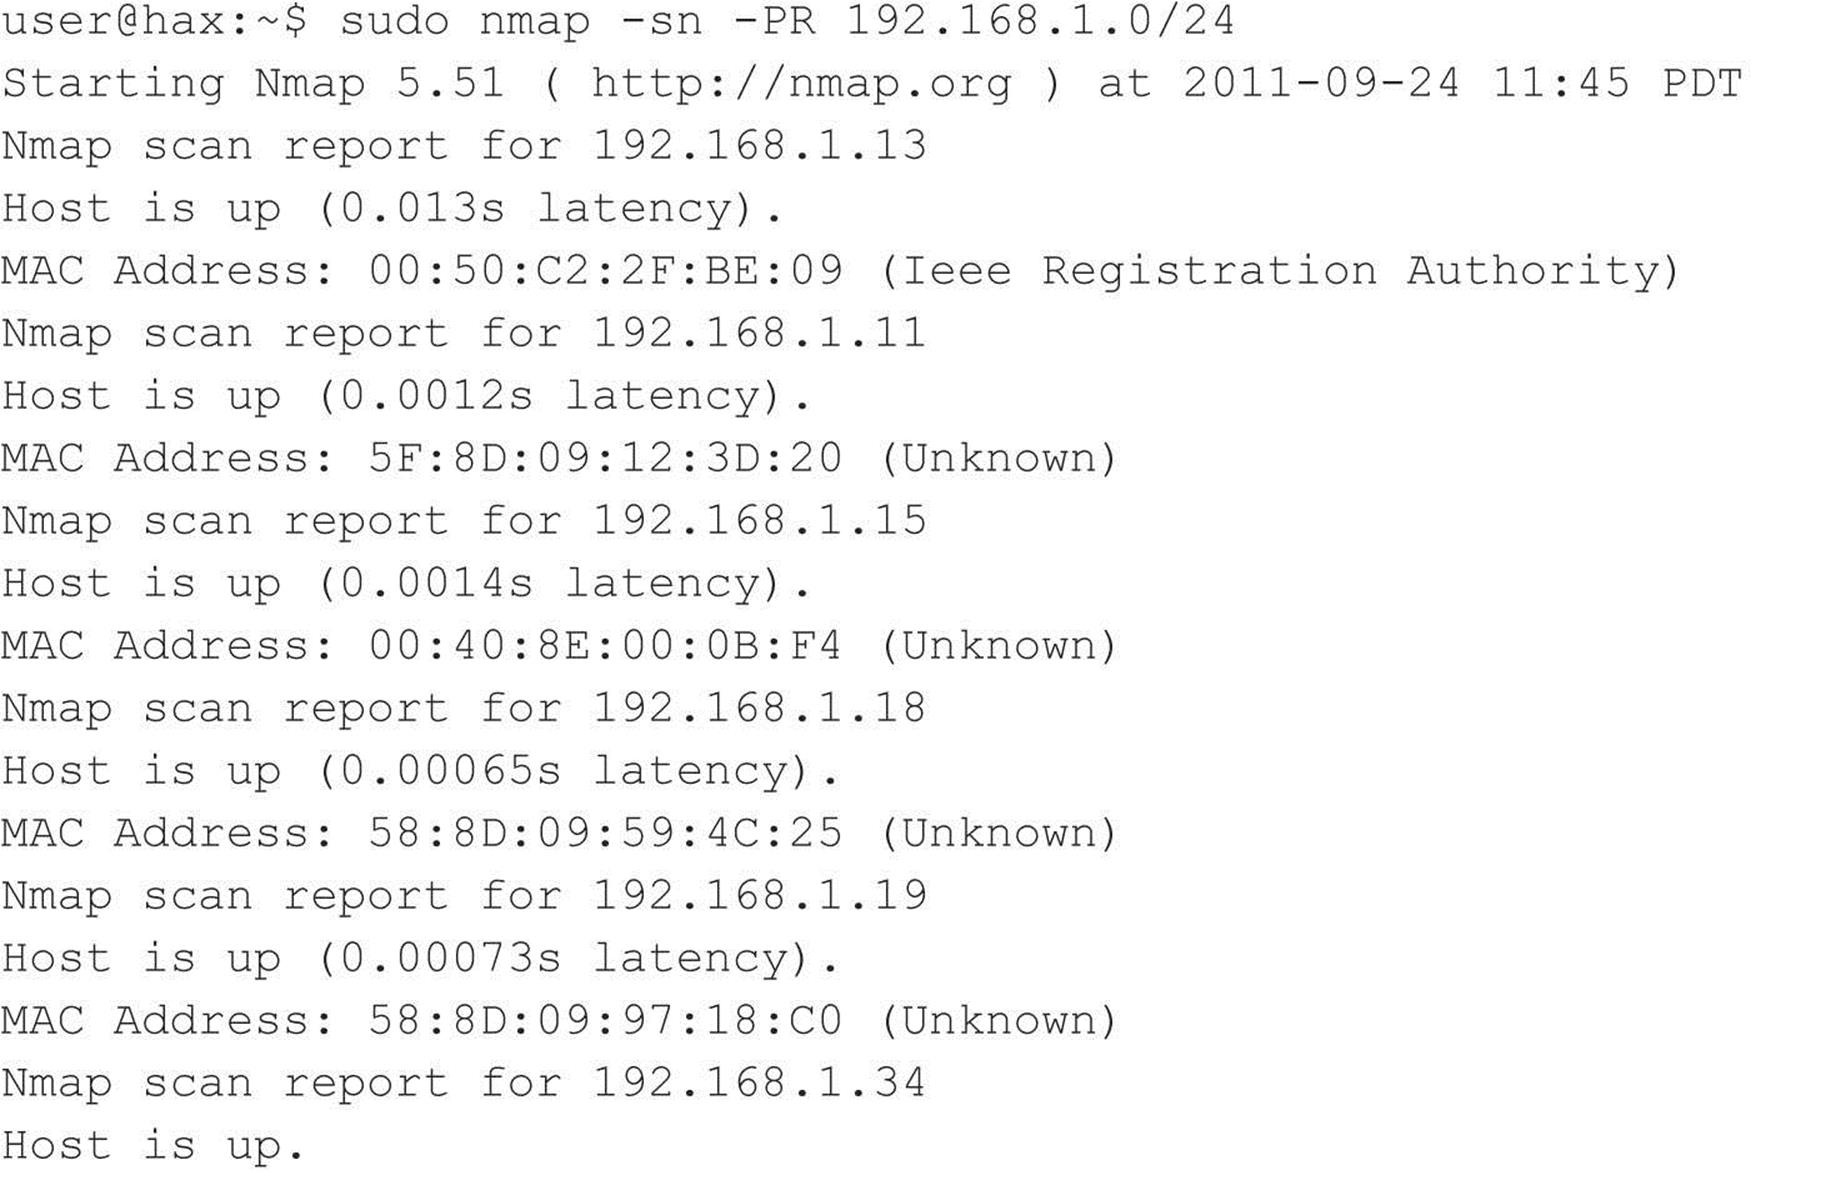
Nmap supports ARP scanning via the –PR option; however, in order to limit Nmap to just performing a host discovery and not port scanning (discussed later), you must also specify the –sn option. You can specify just a single host, but Nmap makes it easy for us to scan a complete network. As you can see, Nmap allows us to enter ranges in Classless Inter-Domain Routing (CIDR) block notation (see RFC 1519 at ietf.org/rfc/rfc1519.txt). So if the local segment range we want to target is 192.168.1.1–192.168.1.254, we can just define 192.168.1.0/24.

Cain Cain (oxid.it/cain.html) is another good all-around tool that we’ll mention a lot throughout this book. It provides a ton of functionality for the Windows-only crowd that goes way beyond host and service discovery. To perform an ARP host discovery scan on Windows, launch Cain, go to Configure, select your network interface, enable the sniffer, and then from the Sniffer tab, right-click and select Scan MAC Addresses, as shown in Figure 2-1.
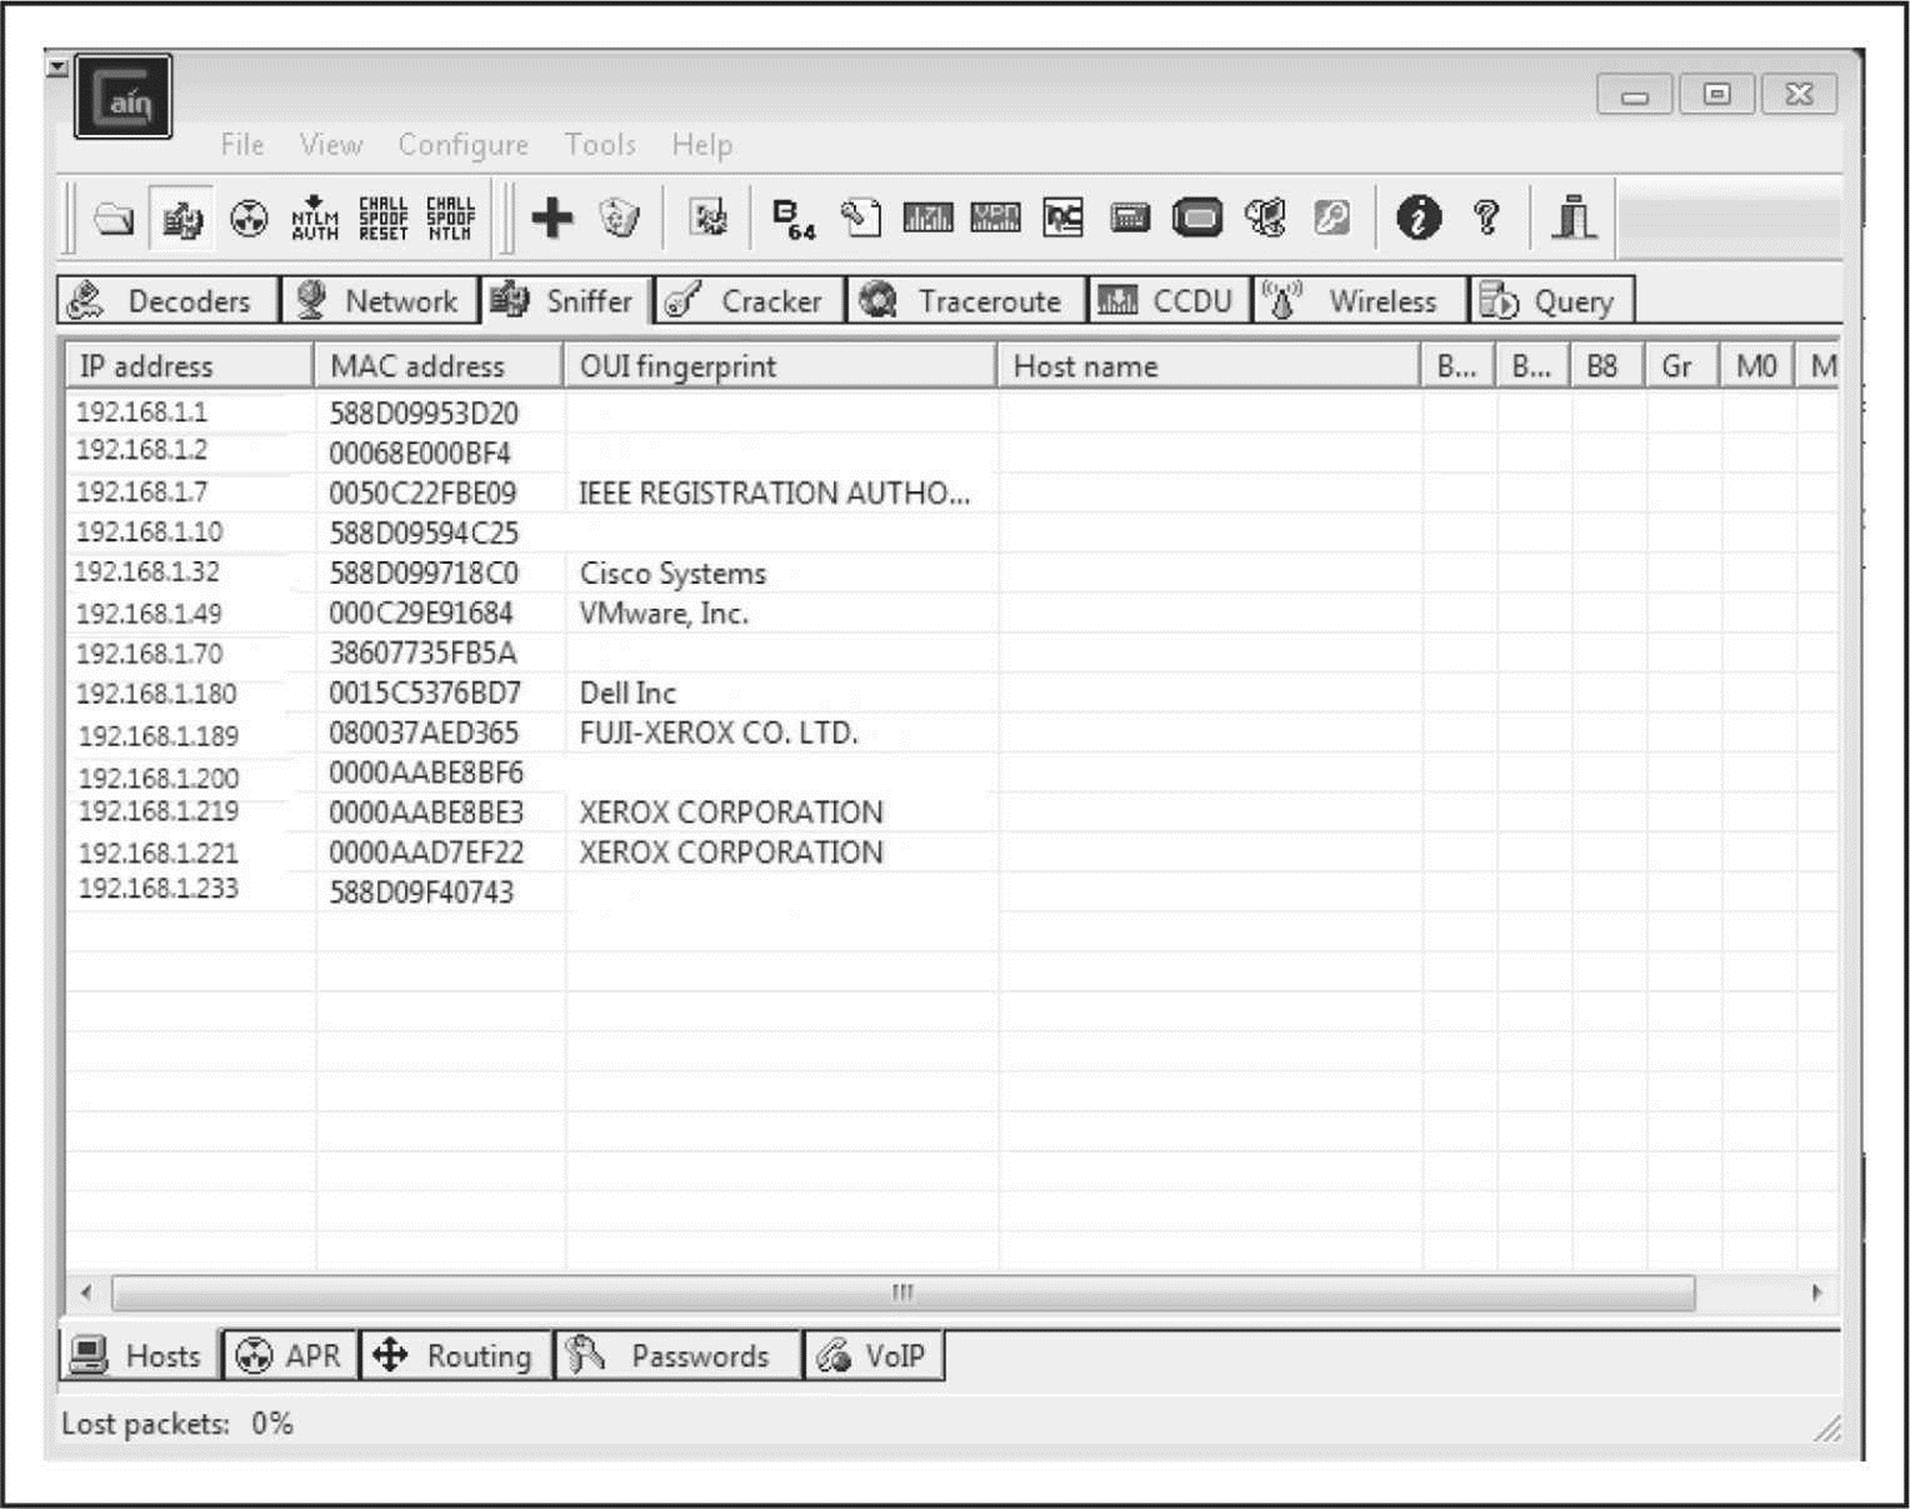
Figure 2-1 Cain performs an ARP scan to identify live hosts on a local subnet.
NOTE In situations where target systems are on distant network segments, ARP discovery becomes a bit impractical and other options such as ICMP or TCP/UDP discovery must be used.
ICMP Host Discovery
The creators of the Internet Protocol Suite realized that there are many scenarios where someone would legitimately need to identify if a system on a network is alive and reachable. They created the Internet Control Message Protocol (ICMP) as a general mechanism to support this. ICMP provides a variety of message types to help diagnose the status of a host and its network path. The following table provides a list of common ICMP message types; for more information about the protocol, see RFC 792.
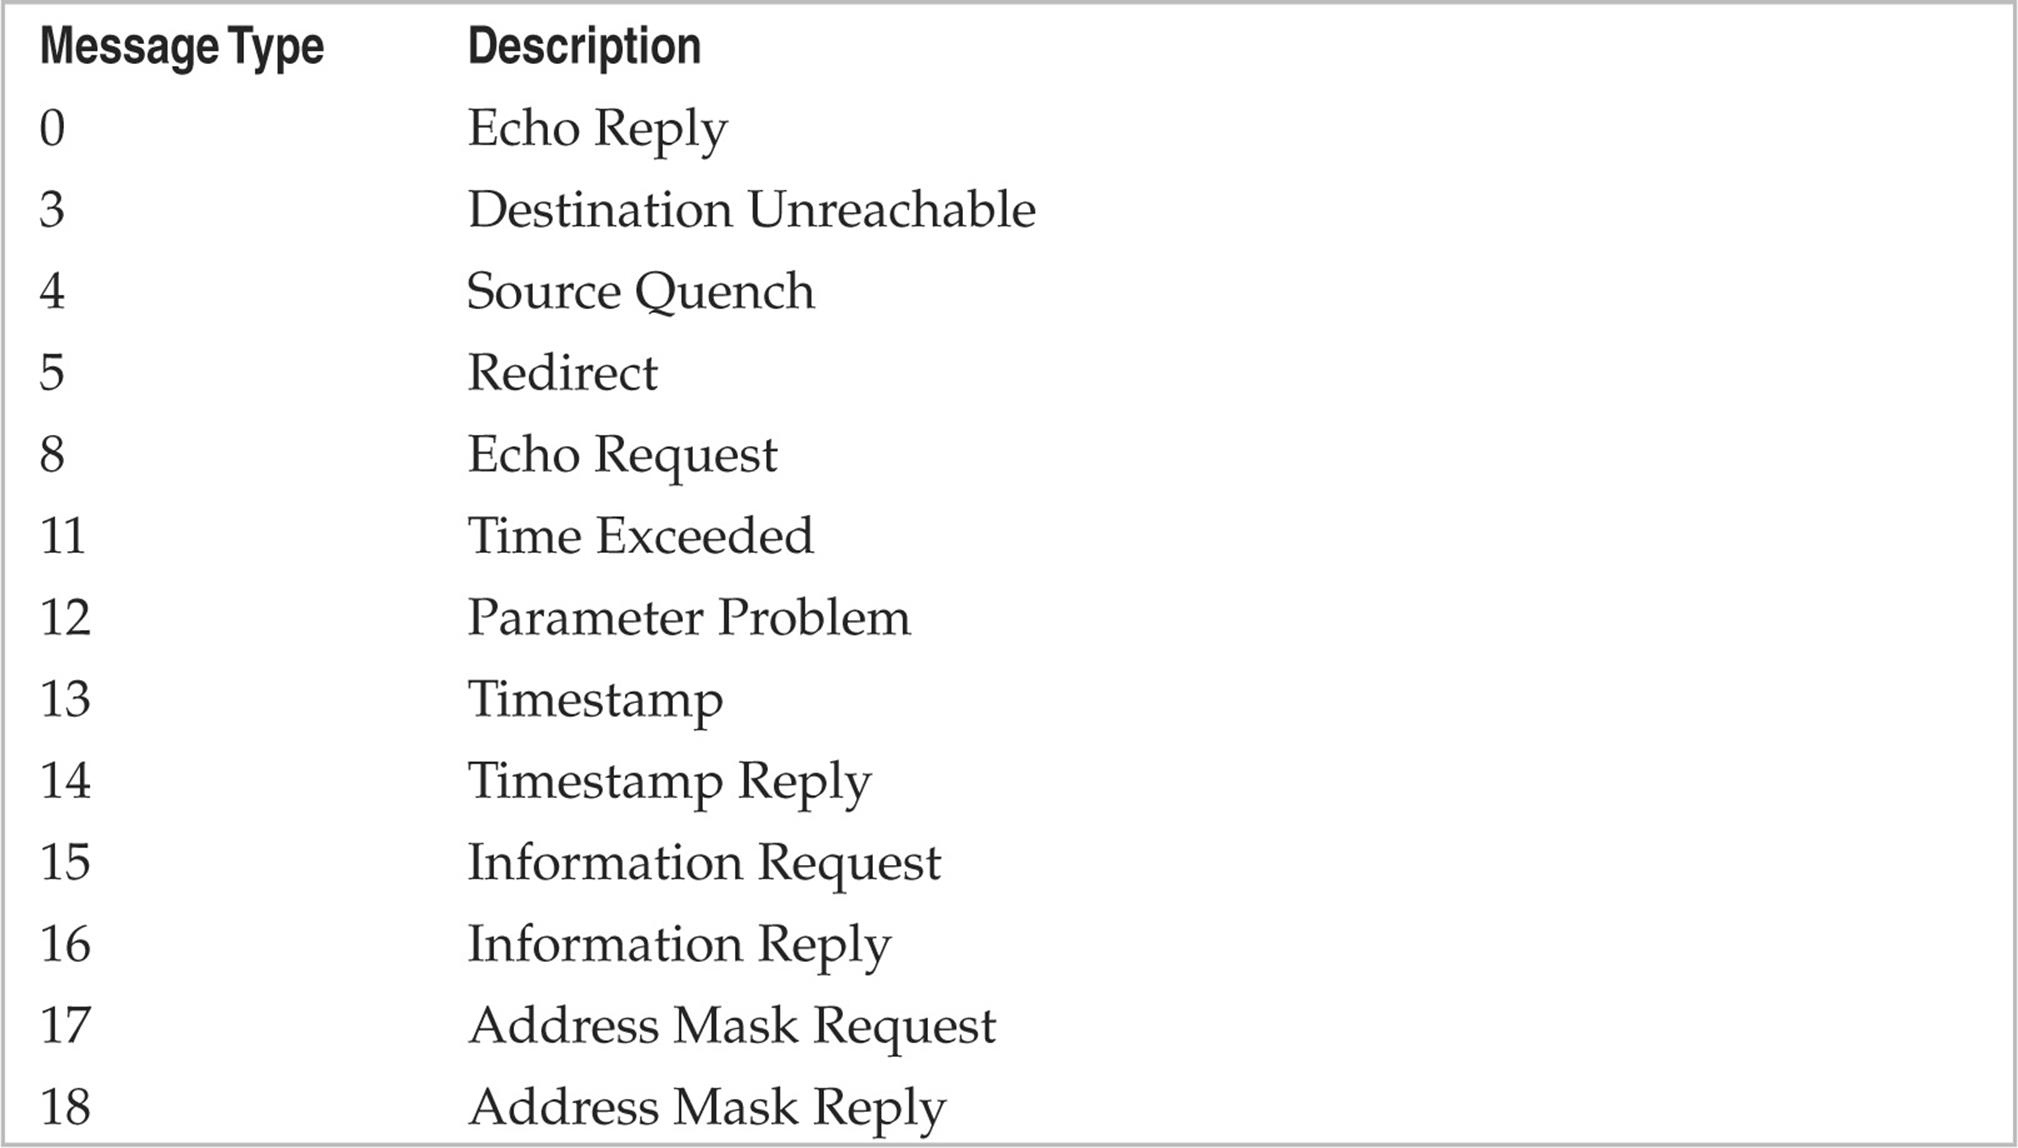
Although the term “ping” can be used in a number of different contexts, it traditionally refers to the process of sending ICMP ECHO REQUEST (type 8) packets to a target system in an attempt to elicit an ICMP ECHO_REPLY (type 0), which indicates the target system is alive.
Two other notable ICMP message types are ICMP TIMESTAMP, which can be used to identify the system time of the target, and ICMP ADDRESS MASK, which can be used to identify its local subnet mask. More information about using these two ICMP types to gather information on a target system is covered in the next chapter where we discuss enumeration. In this chapter, we’re only concerned with using these messages to identify if the target host is alive by eliciting any response from it.
Using OS Utilities
Most operating systems come with a utility named “ping” to send ICMP ECHO REQUEST packets to a single host. Some operating systems offer built-in utilities that support other message types as well. On Linux systems, the following command sends two (-c 2) ICMP ECHO REQUEST messages to host 192.168.1.1:
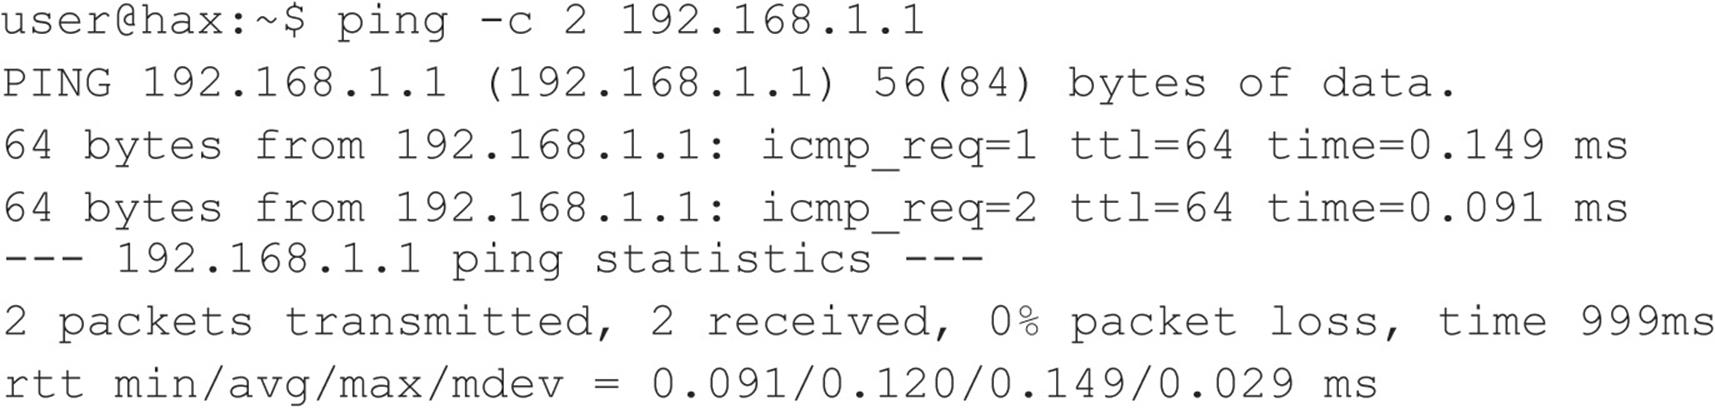
OS utilities are useful for troubleshooting basic connectivity problems on individual hosts; however, in most scenarios, using tools with more robust functionality is preferred.
Network Discovery Tools
Network discovery tools give the user greater control over the methods of identifying live hosts on a network. They offer a variety of options to perform host discovery and are flexible enough to scan both individual hosts and entire ranges of hosts.
Nmap The seemingly obvious option for performing a basic ICMP ping sweep with Nmap is to use the –sn option (which means “no port scan”; this option replaces the older –sP option). However, the –sn option not only sends an ICMP ECHO REQUEST packet; when executed as the root user, it also performs an ARP ping, sends an ICMP TIMESTAMP message, and performs some TCP pinging (discussed later on) to TCP ports 80 and 443. When executed as a non-root user, it just performs TCP pinging. That’s why understanding what tools like Nmap do is really important. If the target network is being monitored by an Intrusion Detection System (IDS), you may inadvertently trigger an alert because of all of the extra traffic being generated. Here is the purest way to have Nmap send an ICMP ECHO REQUEST:
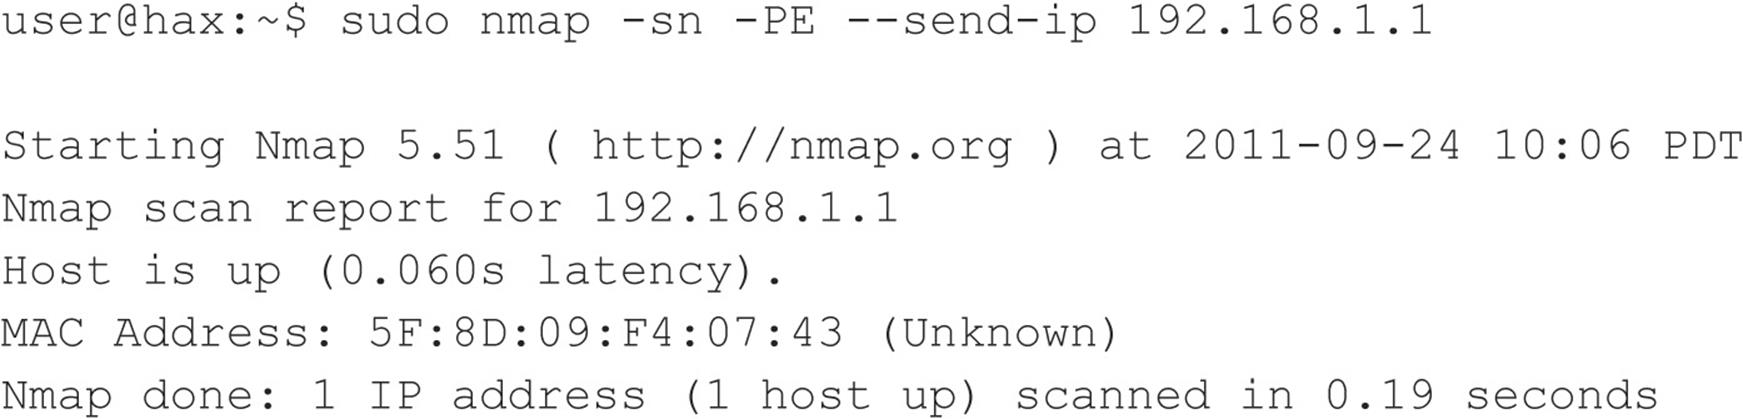
While running in the context of root (Nmap will perform a more thorough scan if run as root because it will have greater control over the system), we tell Nmap to target a specific host (192.168.1.1), skip port scanning (-sn), send an ICMP ECHO REQUEST packet (-PE), and skip any ARP resolution (--send-ip; this is applicable because we’re on the same network segment as the destination host). Had we run Nmap against a host on a different segment, or on the Internet, we could safely ignore the --send-ip option. To perform an ICMP ECHO REQUEST ping sweep on an entire range of hosts, just change the target:
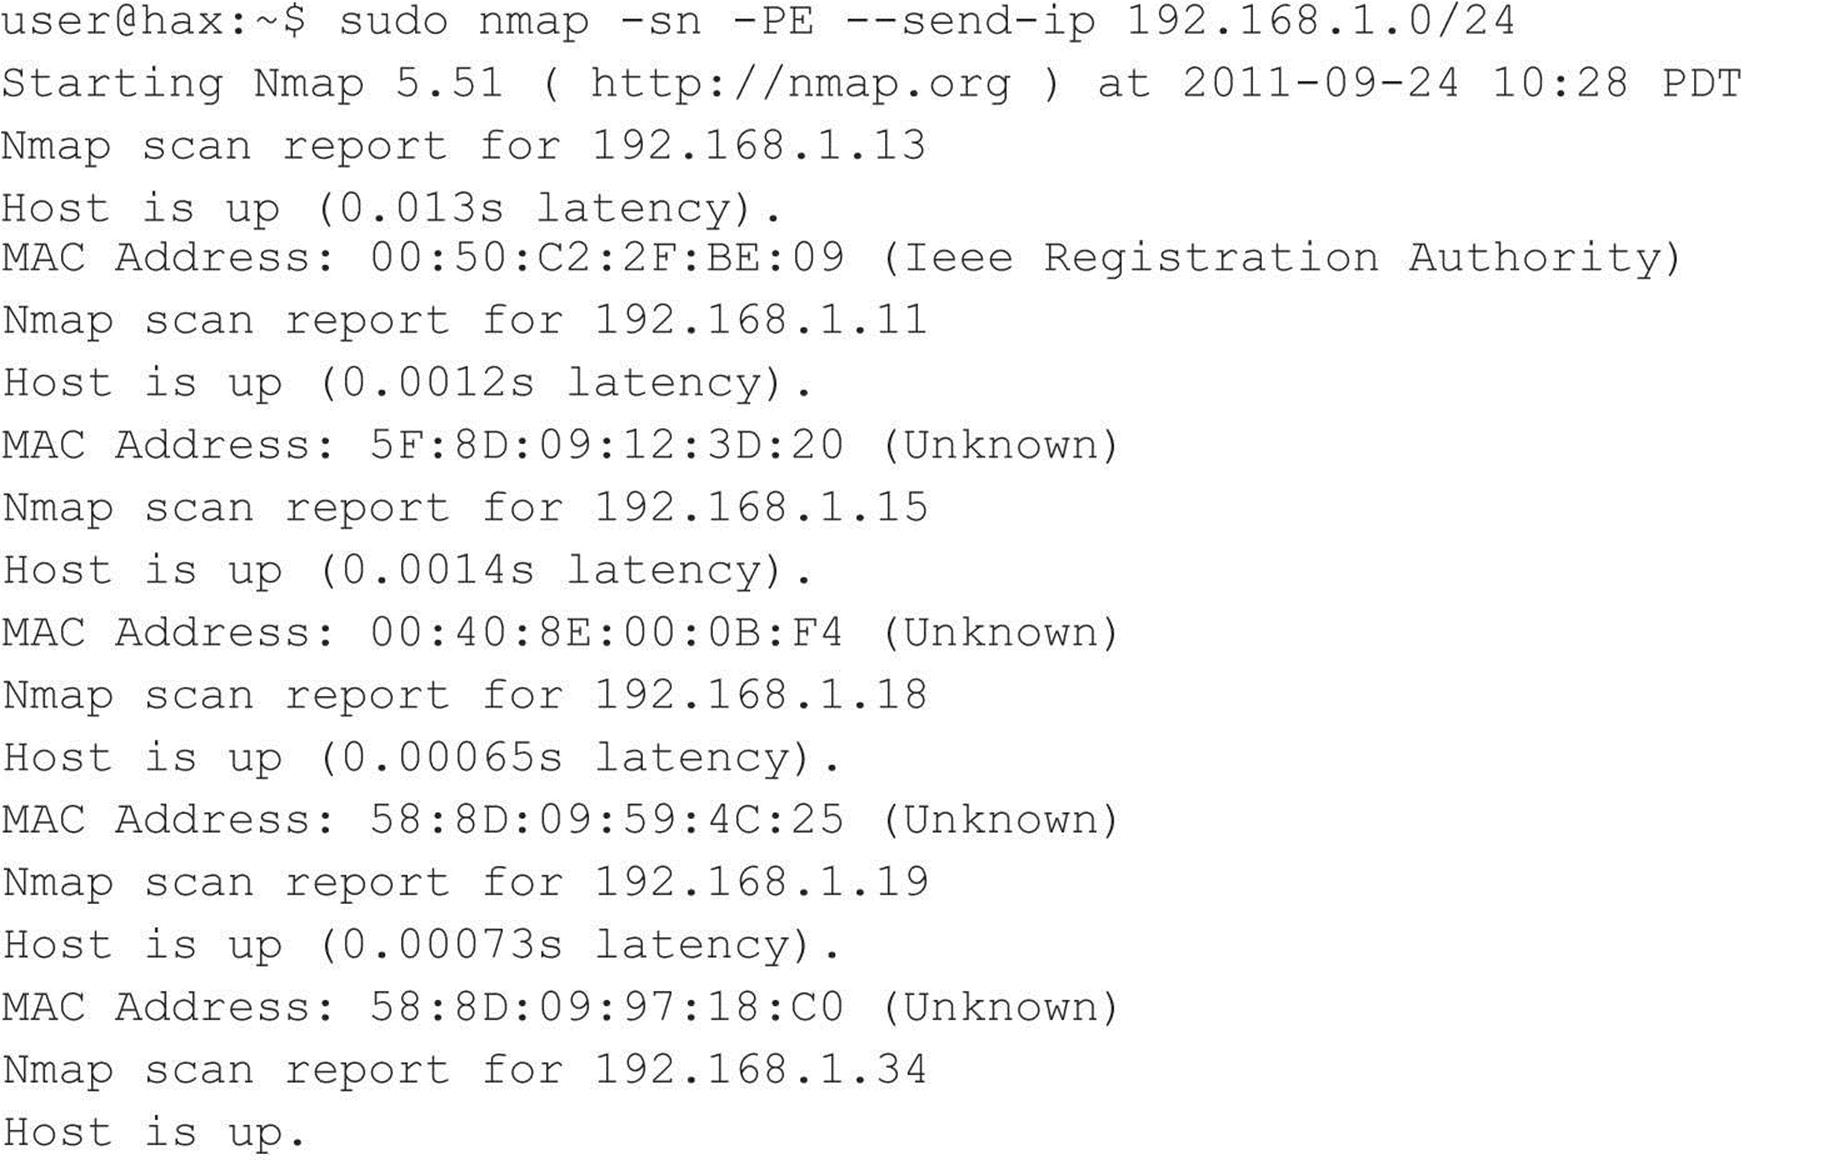
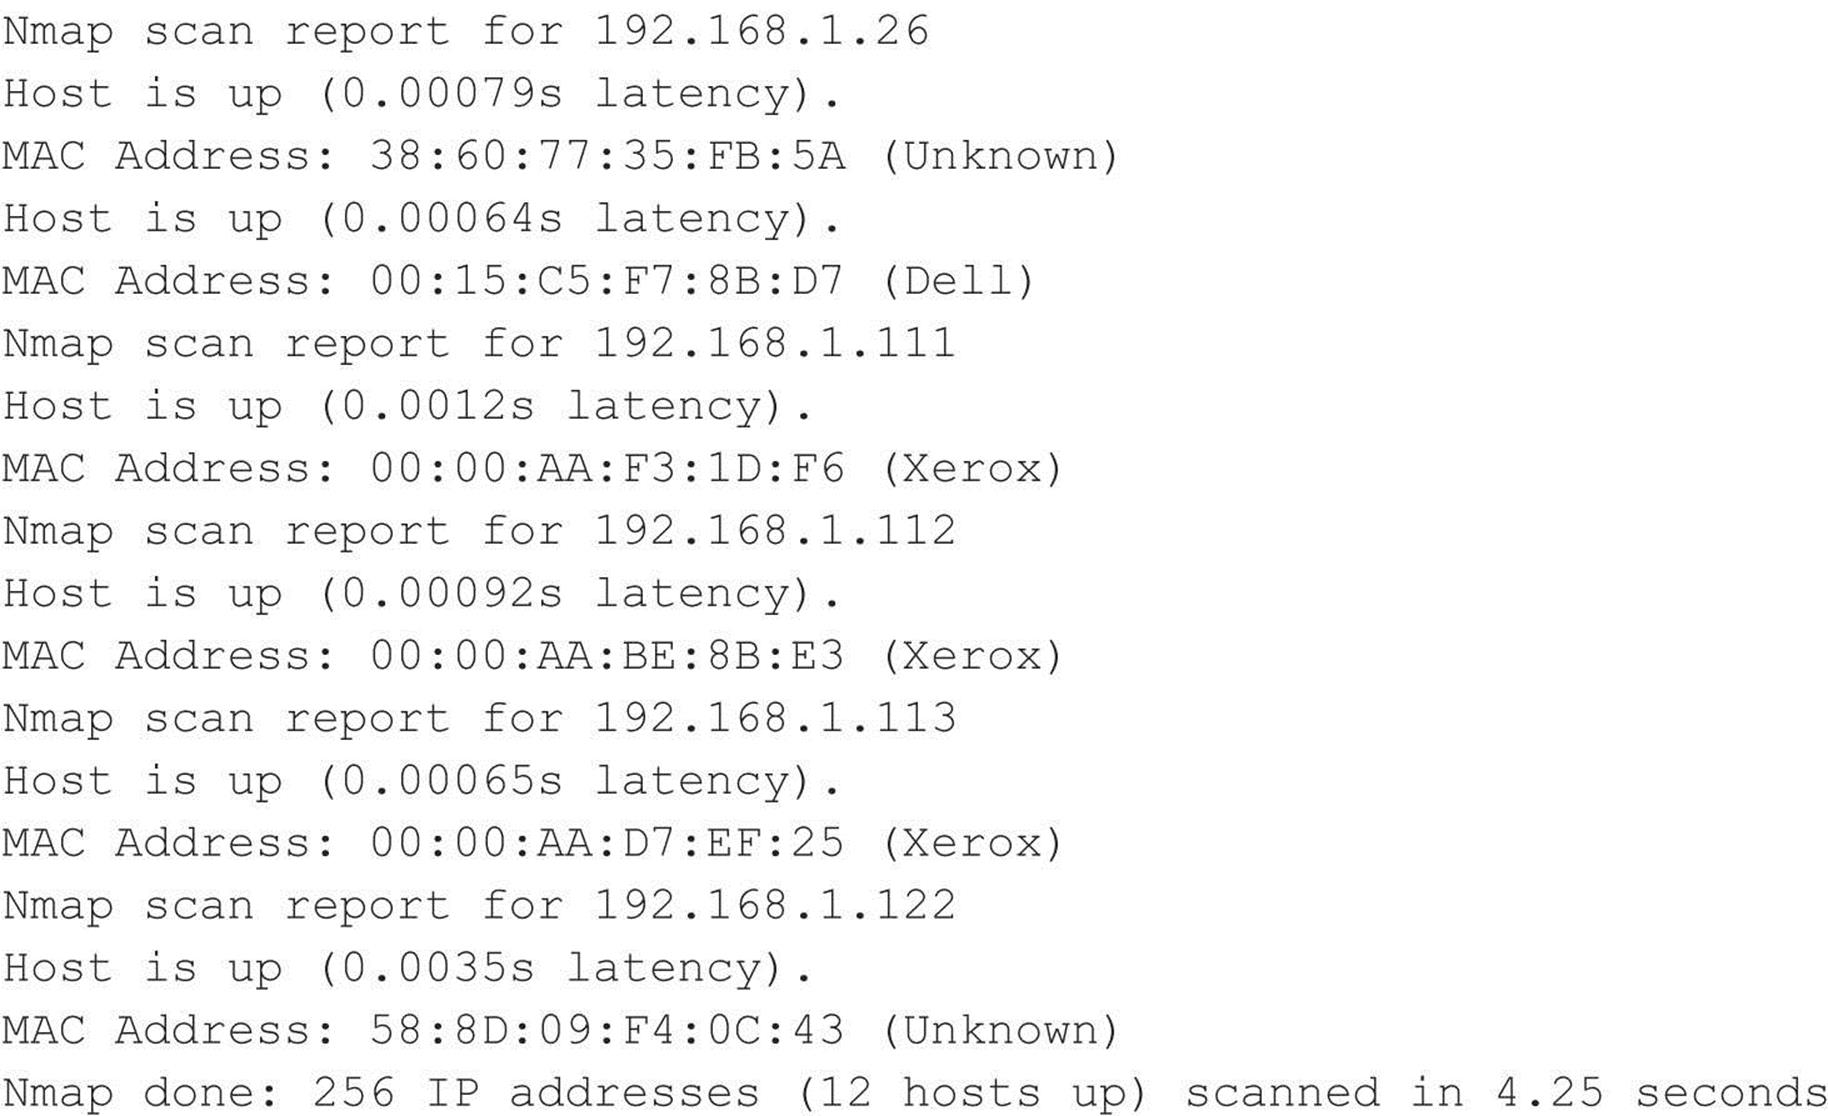
Note that this scan took nearly twice as long as the ARP discovery scan used in the previous section.
Nmap also supports ICMP address mask (-PM) and TIMESTAMP options (-PP). These additional message types can be used in the scenario in which a host is configured to ignore ICMP ECHO messages but may not ignore other ICMP message types. It all depends on the target’s ICMP implementation and how it responds to these packet types. How the different operating systems respond or don’t respond to the various ICMP types also aids in remote OS detection.
hping3 and nping Hping3 (hping.org) is an extremely robust packet-crafting tool that allows you to define any combination of flags on any combination of packet types. A tool like this has nearly limitless use cases, but in this section, we focus on using it for host discovery and port scanning. The bad news is that hping3 hasn’t been really maintained or updated since 2005. The good news is that Luis Martin Garcia and Fyodor decided to bring its functionality back to life in a tool shipped with Nmap called nping.
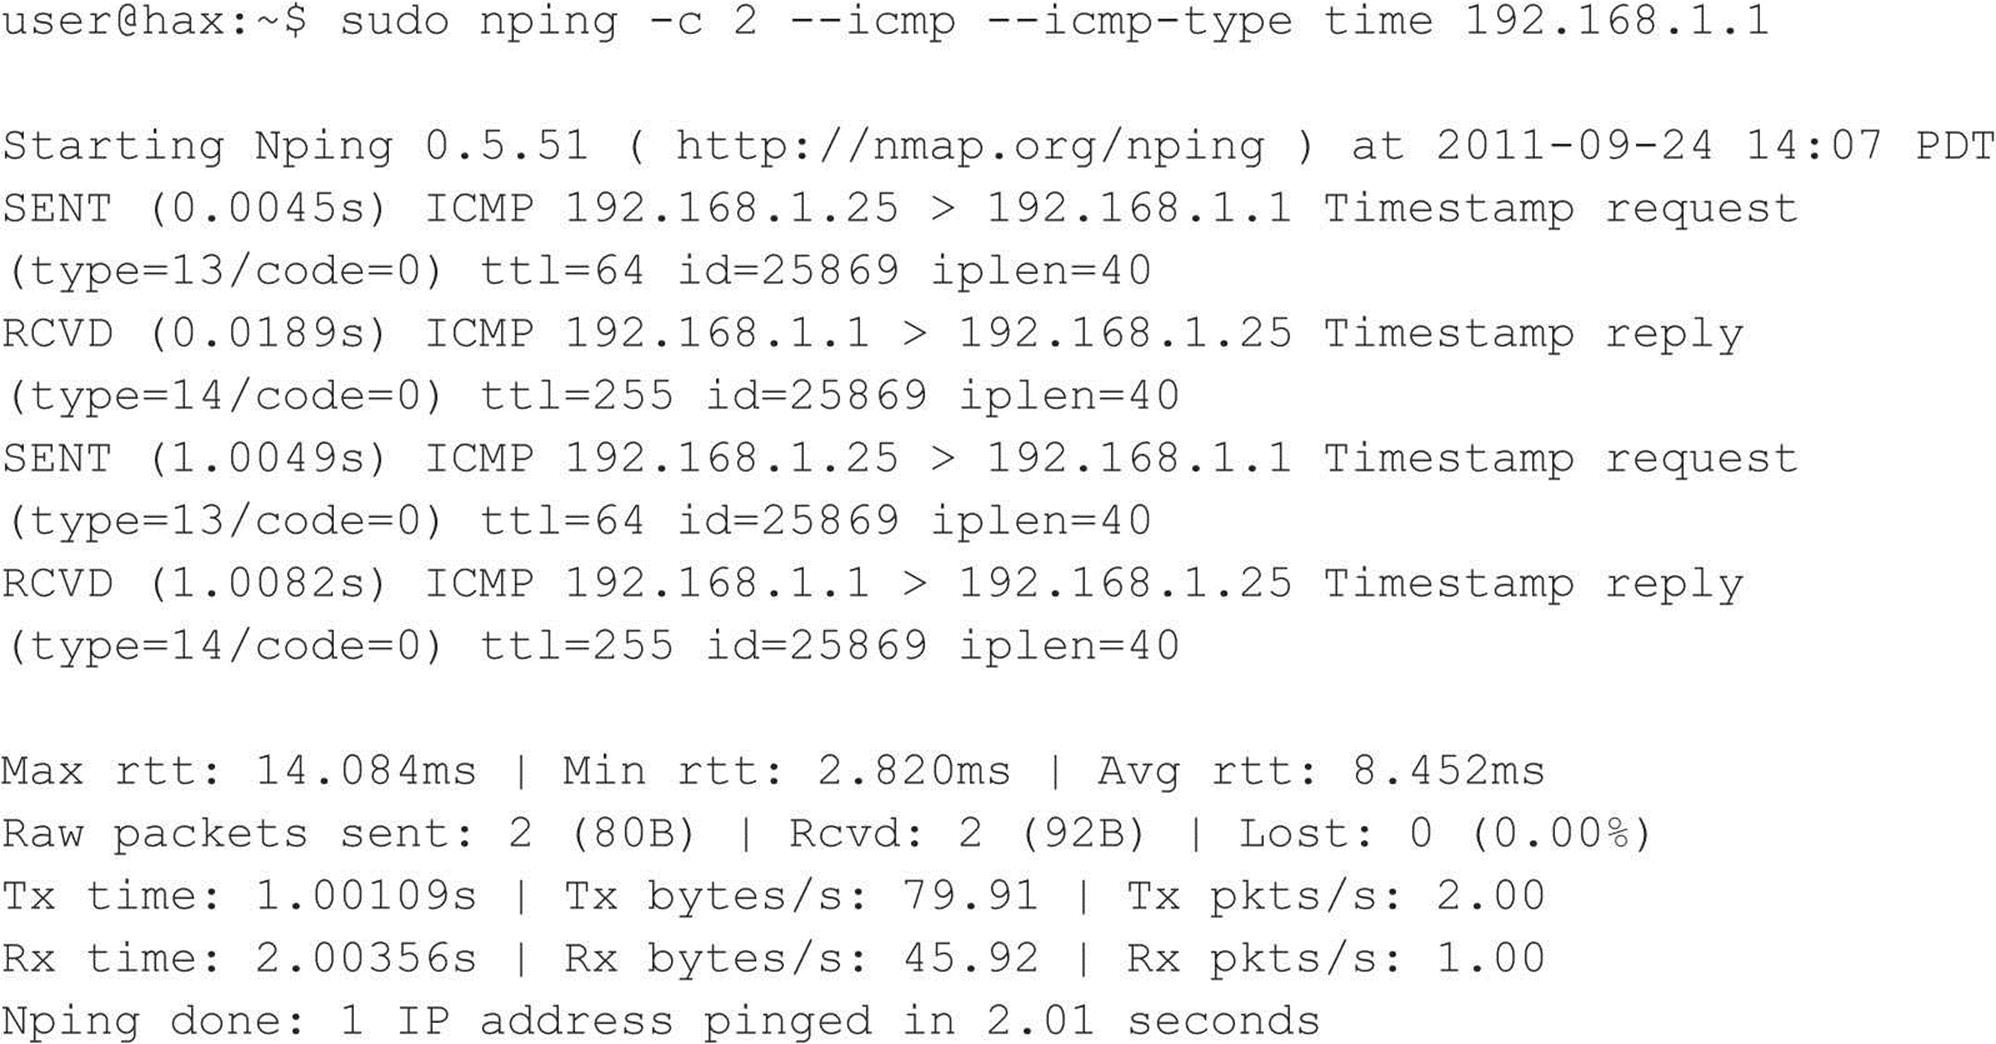
Nping must be run as root (thus the sudo). The above command tells nping to send two (-c 2) ICMP messages (--icmp) of type TIMESTAMP (--icmp-type time) to host 192.168.1.1. You can see the responses in the output, indicating the host is responding to TIMESTAMP messages and thus must be alive.
Nping even supports spoofing the source MAC addresses, source IPs, and anything else you can think of in a packet—a capability that can prove extremely useful when trying to mask your identity on a network.
SuperScan For the Windows-inclined who need another option besides Nmap, we like the tried-and-true freeware product SuperScan from Foundstone, shown in Figure 2-2. It is one of the fastest ping sweep utilities available. SuperScan sends out multiple ICMP ECHO REQUEST packets (in addition to three other types of ICMP) in parallel and simply waits and listens for responses. SuperScan also allows you to resolve hostnames and view the output in an HTML file.
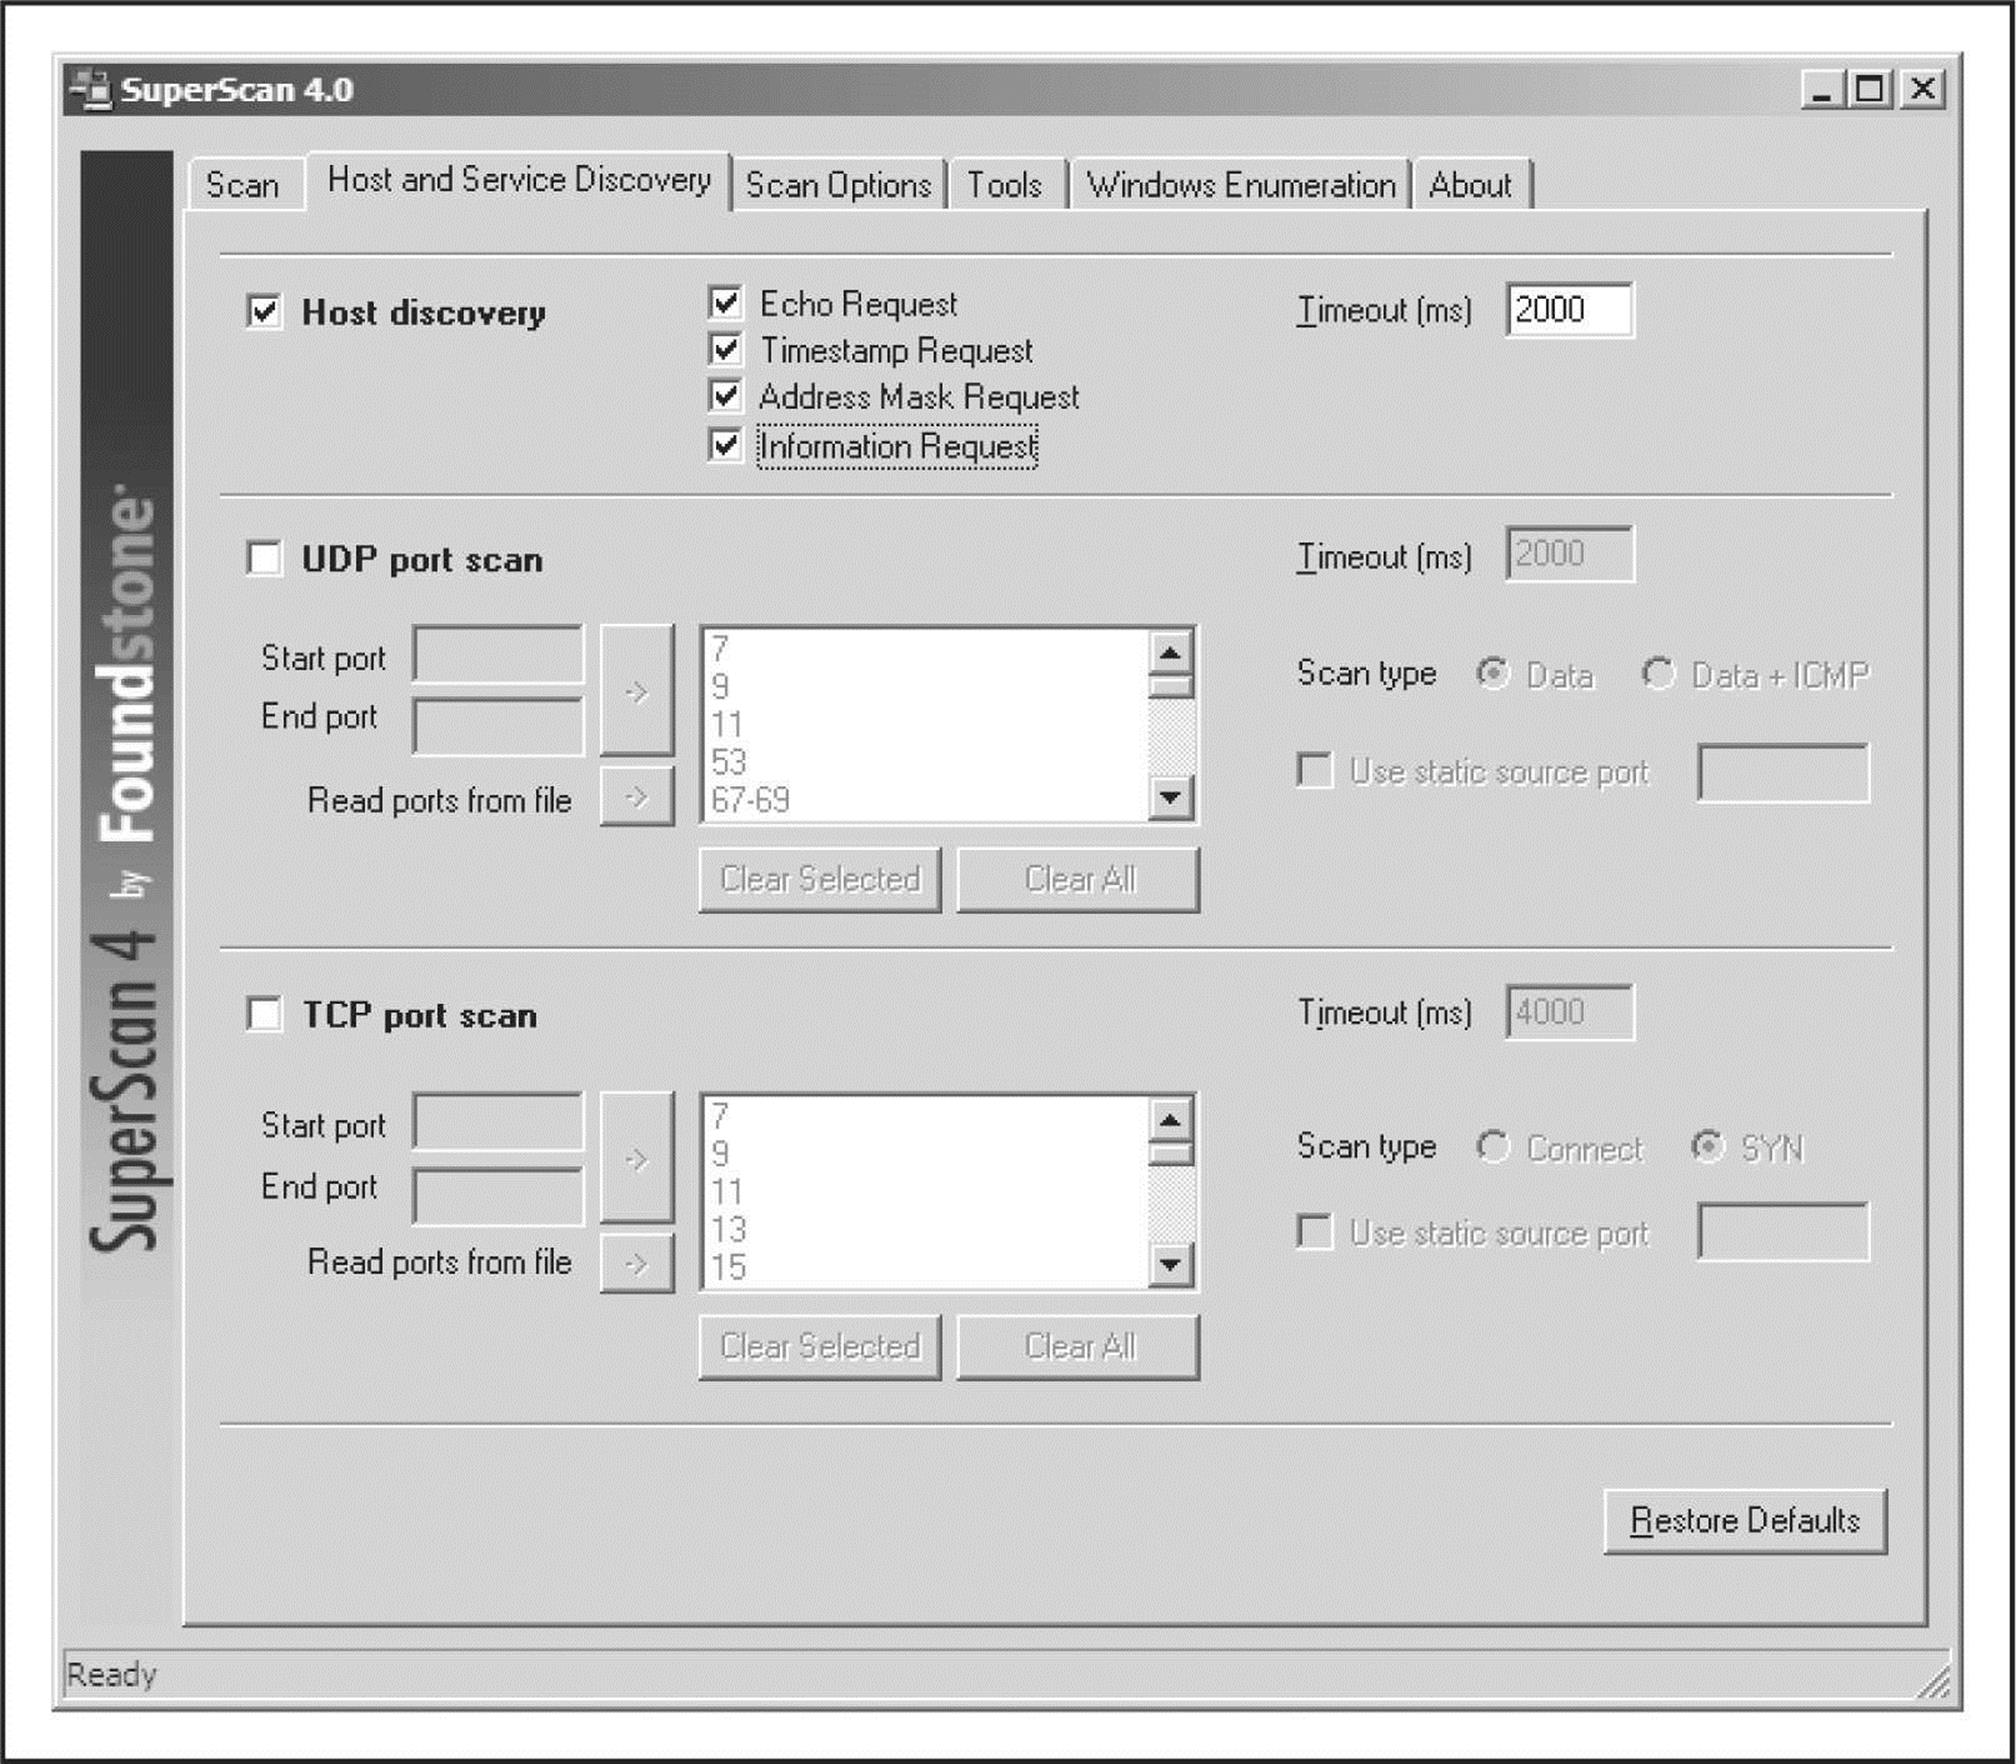
Figure 2-2 SuperScan from Foundstone is one of the fastest and most flexible ping sweep utilities available for Windows.
TCP/UDP Host Discovery
System administrators and network engineers often debate as to the threat of permitting ICMP on network devices and systems. Although ICMP can provide valuable information to an attacker, it is also extremely useful for troubleshooting purposes. The real world is comprised of a mixture of networks that permit ICMP on internal and Internet-facing segments, networks that just permit ICMP internally, and networks that don’t permit ICMP at all. For the networks that limit ICMP, the next approach an attacker can take to identify live hosts is to use TCP and/or UDP packets.
Servers usually provide some sort of network functionality; because of that, at least one open port is always available for clients to connect to. Even firewalled servers have allowances so they can perform their function. An attacker can leverage this trait to identify whether or not the host is alive. For instance, if a web server is blocking ICMP requests, but must have TCP port 80 open to accept HTTP traffic, an attacker can probe port 80, and if a response is provided, the host is considered alive. The downside to this approach is that not all servers are web servers with TCP port 80 open. So the attacker has to blindly probe a number of different ports, taking guesses at what services are available on the target network. This takes time to do and can be very noisy, posing more risk to an attacker.
Desktops, on the other hand, often do not accept inbound connections, and modern desktop operating systems commonly have local firewalls enabled by default, making them difficult to target for attack. That being said, desktop systems are far from impenetrable and many users enable things like remote desktop and file sharing, which can be leveraged to aid in discovery. In corporate environments, it’s commonplace for desktop administrators to disable the local firewall completely so they can manage their users’ systems; this makes life much easier for an attacker because, in these cases, ICMP is often allowed.
Nmap As mentioned previously, Nmap’s –sn option enables a hybrid-type of attack where it attempts ARP, ICMP, and TCP host discovery. If our target host does not have TCP port 80 open, or Nmap’s packets are otherwise dropped on the way to the target (e.g., by a firewall), Nmap considers the host down. At this point, we can either give up (not an option) or probe further. We can blindly attempt to query Nmap’s default port list (which is comprised of 1,000 common ports) by telling Nmap to ignore its host discovery options and just do a port scan (described in more detail in the next section of this chapter).
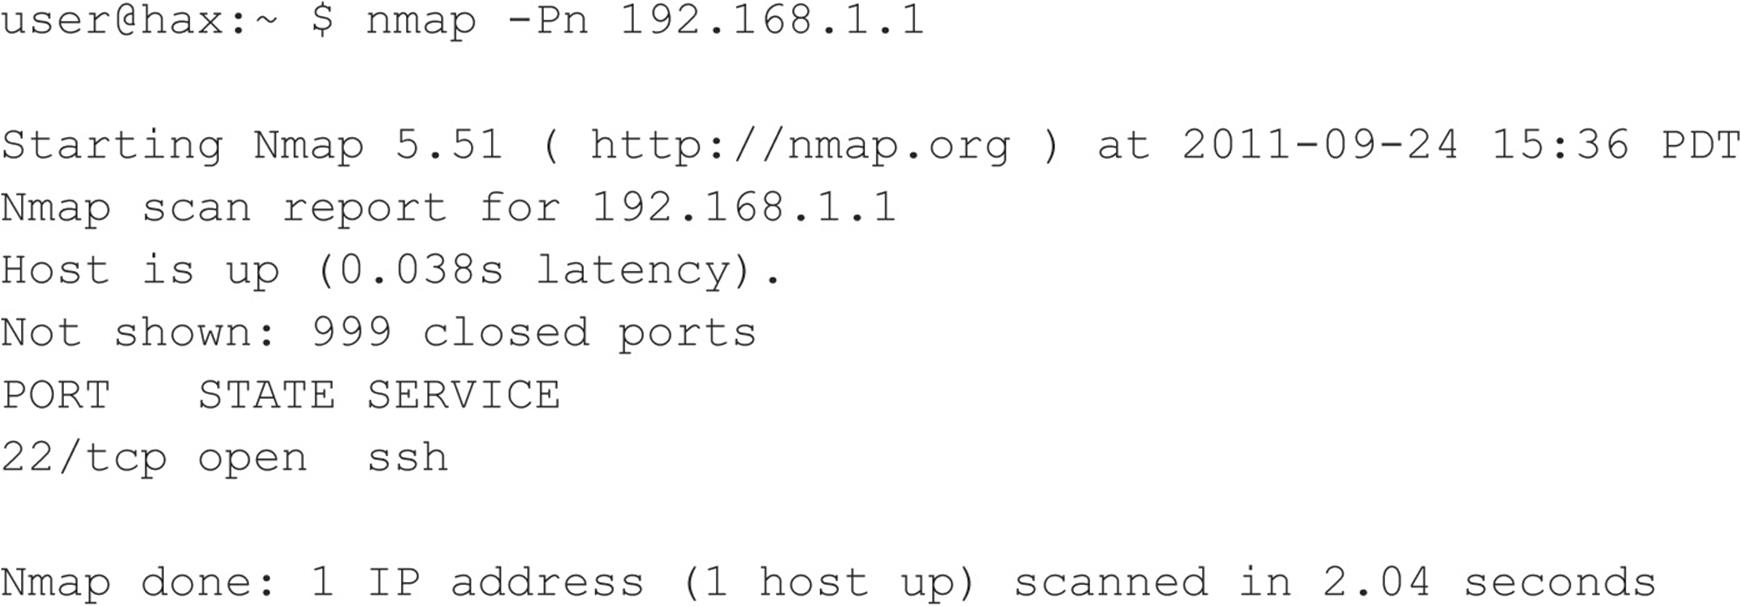
Although this may seem like a great idea at first, it doesn’t scale well when scanning a huge range of hosts. A more efficient route when dealing with an entire range of hosts is to pick a popular port and probe directly for that port. The following command ignores Nmap’s host discovery options (-Pn) and only outputs the hosts that have port 22 open (-sS –p 22 –-open) on the 192.168.1.0/24 segment. We’ll go into more detail on the direct port probing options (-sS –p 22 –-open) in the next section.
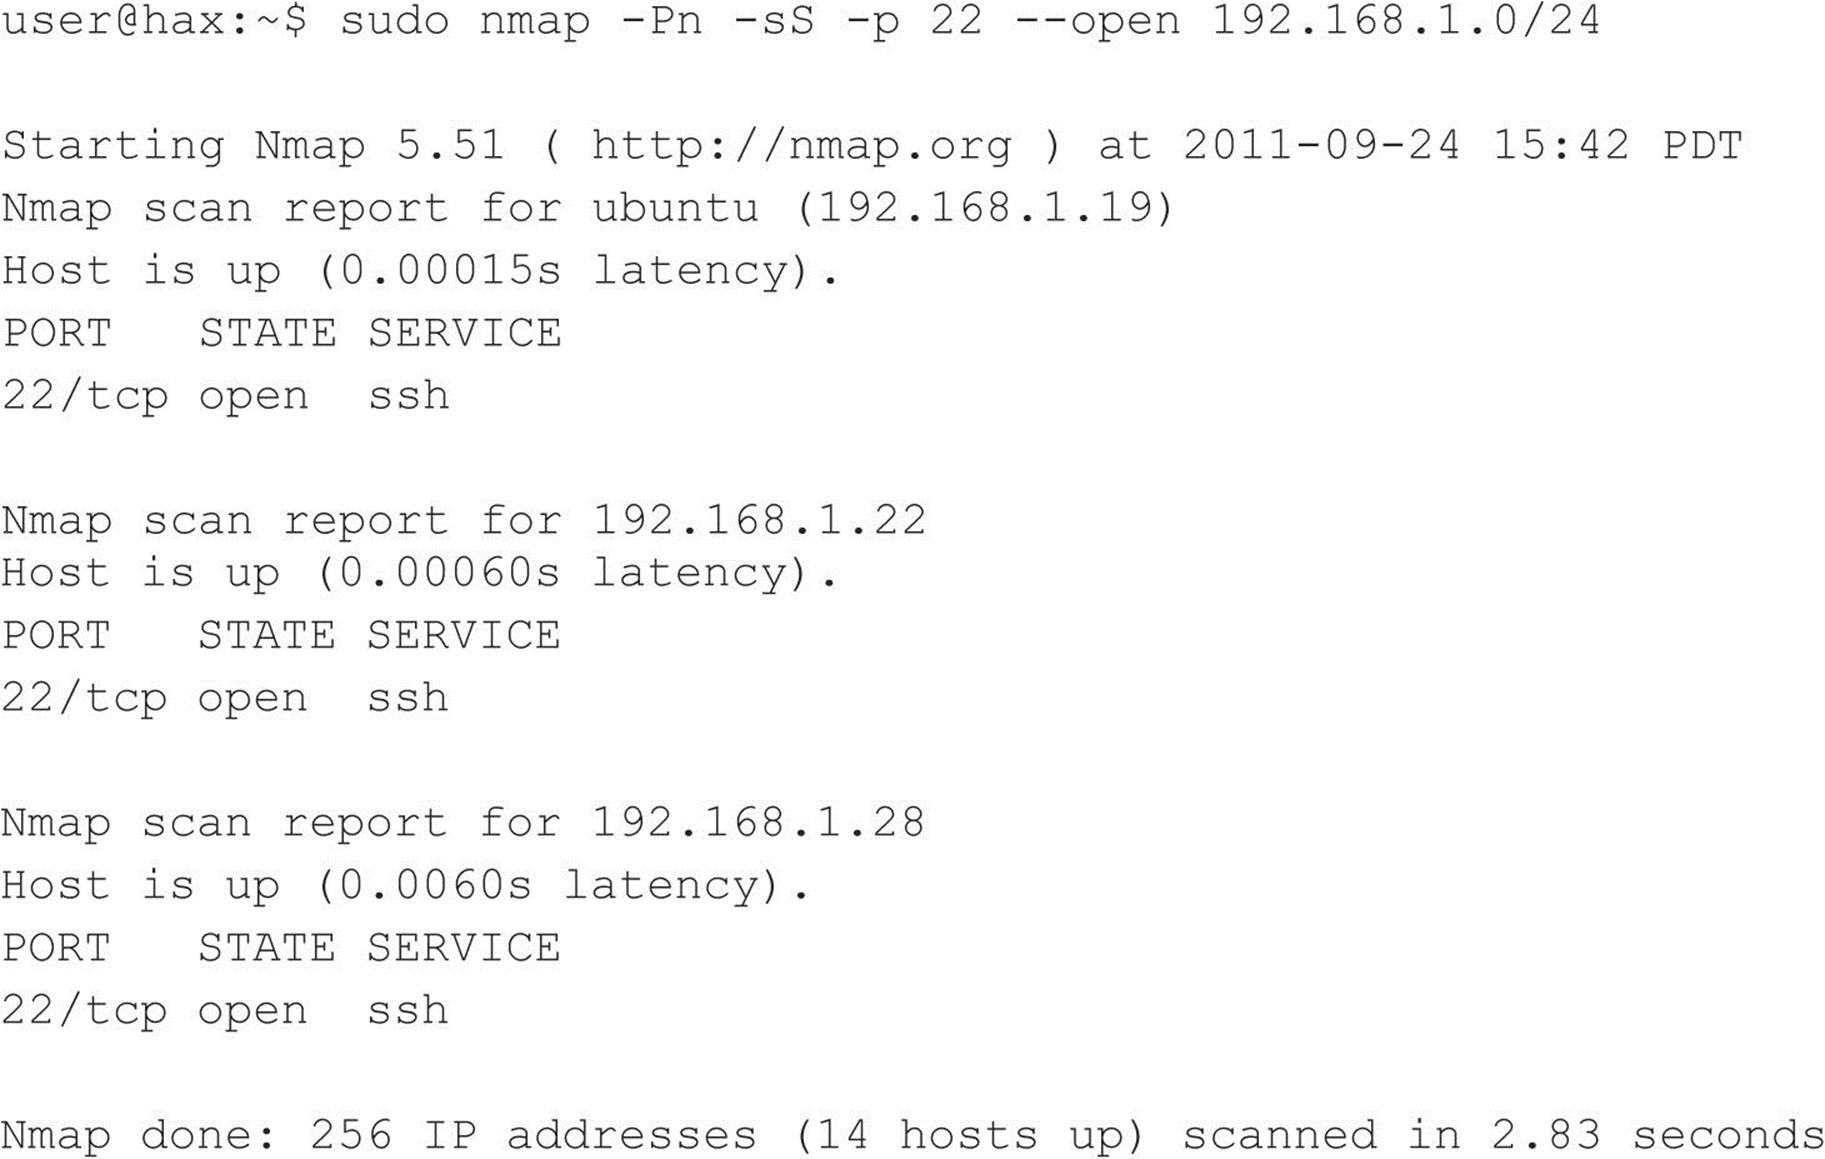
It is worth trying a few iterations of this type of scan with common ports such as SMTP (25), POP (110), AUTH (113), IMAP (143), or other ports that may be unique to the site. Although this scan still takes more time than an ICMP scan, it may be significantly shorter than using all 1,000 of Nmap’s default common ports.
SuperScan SuperScan (see Figure 2-3) has the capabilities to perform this scan as well. As discussed earlier, SuperScan performs both host and service discovery using ICMP and TCP/UDP, respectively. Using the TCP/UDP port scan options, you can determine whether a host is alive or not—without using ICMP at all. Simply select the checkbox for each protocol you wish to use and the type of technique you desire, and you are off to the races.
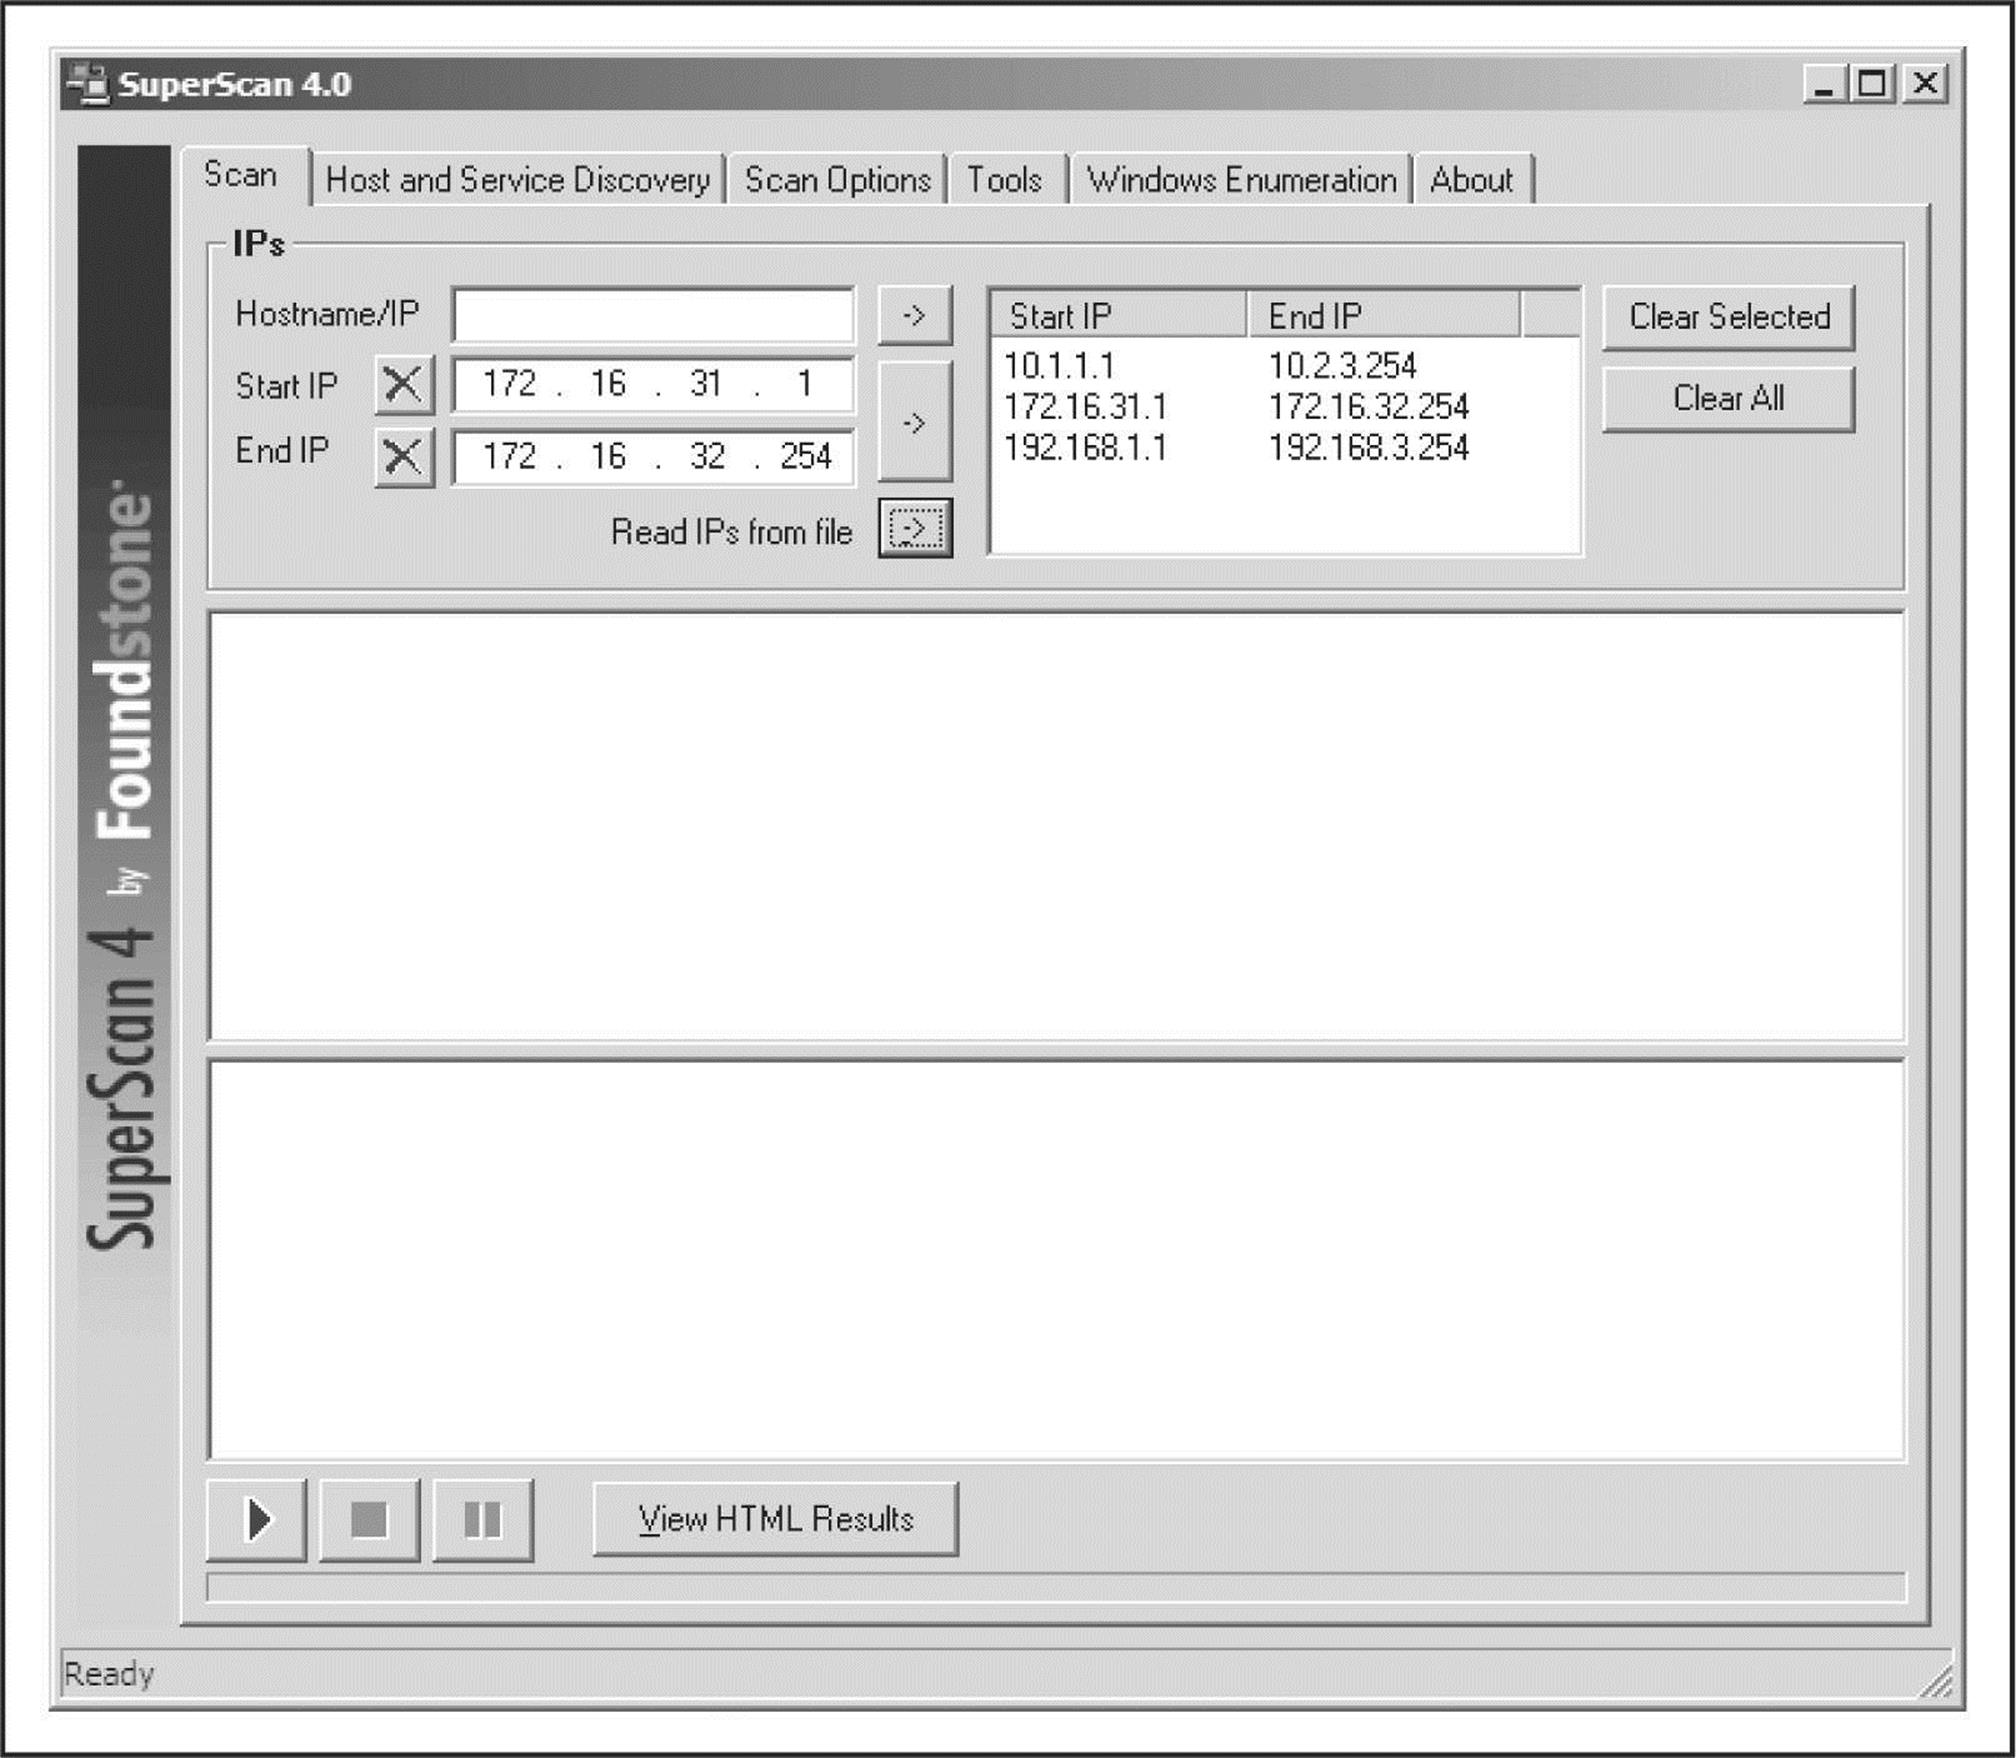
Figure 2-3 By using SuperScan from Foundstone, you can discover hosts hidden behind traditional firewalls.
nping As expected, you can also use nping to perform TCP/UDP host discovery. Since nping is so versatile, its output is more verbose by default, which may be more information than you really need. You can cut output down with the –q option (not shown here), but even then, its output is not as simple to comprehend as Nmap or SuperScan.
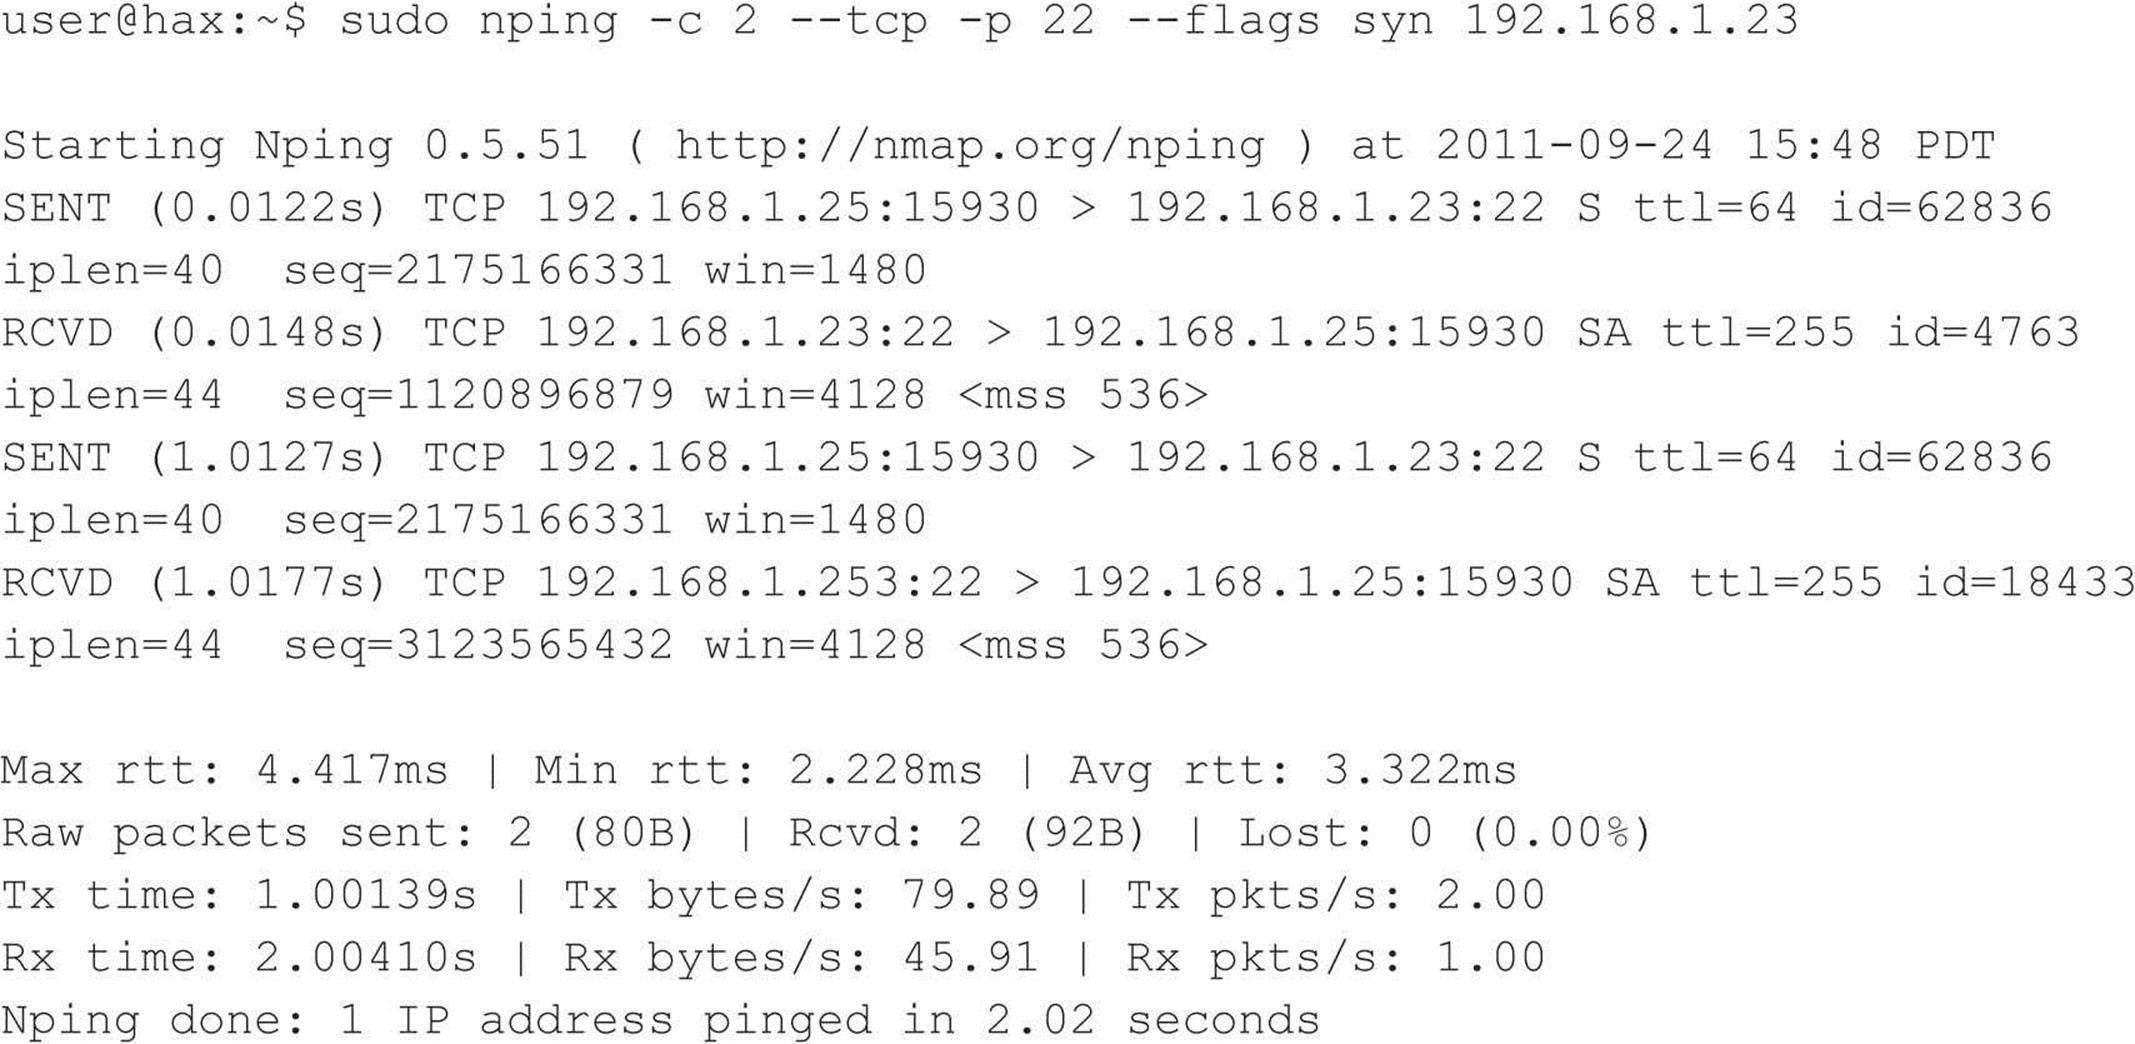
Let’s take a look at the third and fifth lines in the above output. On the third line (which starts with “SENT”), notice the “S” (which stands for SYN) between the destination host and port (192.168.1.23:22) and the time-to-live value (ttl=64). This character defines the TCP flags (we told nping to set it using the –-flags syn option), which were set on the packet when we sent it to our target. On the fifth line (which starts with “RCVD”), the “S” has been replaced by “SA”, which means SYN/ACK. This line is the response from our target. The SYN/ACK indicates that the port is open. All of these flags are defined in more detail in upcoming sections.
![]() Ping Sweeps Countermeasures
Ping Sweeps Countermeasures
Although ping sweeps may seem like an annoyance, it is important to detect this activity when it happens. Depending on your security paradigm, you may also want to block ping sweeps. We explore both options next.
Detection As mentioned, network mapping via ping sweeps is a proven method for performing network reconnaissance before an actual attack ensues. Therefore, detecting ping sweep activity is critical to understanding when an attack may occur and to identifying the attacker. The primary method for detecting ping sweep attacks involves using network-based IDS programs such as Snort (snort.org).
From a host-based perspective, several UNIX utilities detect and log such attacks. If you begin to see a pattern of ICMP ECHO packets from a particular system or network, it may indicate that someone is performing network reconnaissance on your site. Pay close attention to this activity, as a full-scale attack may be imminent.
Many commercial network and desktop firewall tools (from Cisco, Check Point, Microsoft, McAfee, Symantec, and IBM/ISS) can detect ICMP, TCP, and UDP ping sweeps. However, just because the technologies exist to detect this behavior does not mean that someone will be watching when it occurs. Over the years, we have been unable to deny the inescapable truth about monitoring functions: without eyeballs to watch the screens, understanding of what is being witnessed, and the wherewithal to react properly and swiftly, the best firewall tools and network intrusion detections tools are completely useless.
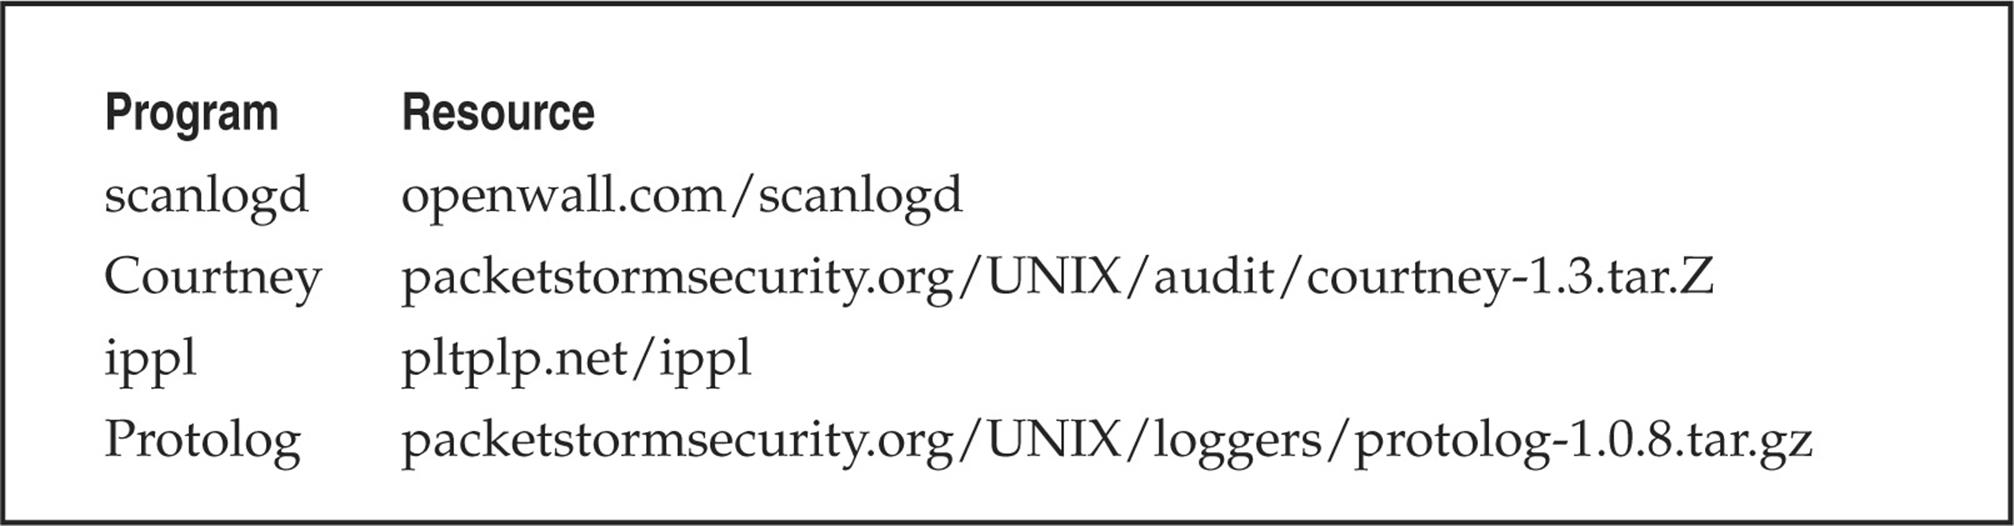
Table 2-1 lists additional UNIX ping-detection tools that can enhance your monitoring capabilities.
Table 2-1 UNIX Host-Based Ping-Detection Tools
Prevention Although detecting ping sweep activity is critical, a dose of prevention will go even further. We recommend that you carefully evaluate the type of ICMP traffic that you allow into your networks or into specific systems. There are many different types of ICMP traffic—ECHO and ECHO_REPLY are only two such types. Most routers do not require all types of ICMP traffic to all systems directly connected to the Internet. Although almost any firewall can filter ICMP packets, organizational needs may dictate that the firewall pass some ICMP traffic. If a true need exists, you should carefully consider which types of ICMP traffic you allow to pass. A minimalist approach may be to allow only ICMP ECHO_REPLY, HOST_UNREACHABLE, and TIME_EXCEEDED packets into the DMZ network and only to specific hosts. In addition, if ICMP traffic can be limited with access control lists (ACLs) to your ISP’s specific IP addresses, you are better off. This allows your ISP to check for connectivity, while making it more difficult to perform ICMP sweeps against systems connected directly to the Internet.
ICMP is a powerful protocol for diagnosing network problems, but it is also easily abused. Allowing unrestricted ICMP traffic into your border gateway may allow attackers to mount a denial of service attack, bringing down a system or affecting its availability. Even worse, if attackers actually manage to compromise one of your systems, they may be able to back-door the operating system and covertly tunnel data within an ICMP ECHO packet using a program such as loki2. For more information on loki2, check out Phrack Magazine (phrack.org).
Another interesting concept is pingd, which was developed by Tom Ptacek and ported to Linux by Mike Schiffman. Pingd is a userland daemon that handles all ICMP ECHO and ICMP ECHO_REPLY traffic at the host level. This feat is accomplished by removing support of ICMP ECHO processing from the kernel and implementing a userland daemon with a raw ICMP socket to handle these packets. Essentially, it provides an access control mechanism for ping at the system level. Pingd is available for Linux at packetstormsecurity.org/UNIX/misc/pingd-0.5.1.tgz.
DETERMINING WHICH SERVICES ARE RUNNING OR LISTENING
Thus far we have identified systems that are alive by using a variety of different ping sweeps. Now we are ready to begin probing each of those systems to identify which ports and services are available to attack.
![]() Port Scanning
Port Scanning

Port scanning is the process of sending packets to TCP and UDP ports on the target system to determine what services are running or are in a LISTENING state. Identifying listening ports is critical to determining the services running and, consequently, the vulnerabilities present on your remote system. Additionally, you can determine the type and version of operating system and applications in use. Active services that are listening are akin to the doors and windows of your house. They are ways into the domicile. Depending on the type of path in (a window or door), an unauthorized user can gain access to systems that are misconfigured or running a version of software known to have security vulnerabilities. In this section, we will focus on several popular port-scanning tools and techniques that provide you with a wealth of information and give you a window into the system’s vulnerabilities. The port-scanning techniques that follow differ from those previously mentioned, when we were trying simply to identify systems that are alive. For the following steps, we assume that the systems are alive, and we are now trying to determine all the listening ports or potential access points on our target.
We want to accomplish several objectives when port-scanning the target system(s). These include but are not limited to the following:
• Identifying both the TCP and UDP services running on the target system
• Identifying the type of operating system of the target system
• Identifying specific applications or versions of a particular service
Scan Types
Before we jump into the requisite port-scanning tools themselves, we must discuss the various port-scanning techniques available. One of the pioneers of implementing various port-scanning techniques is Fyodor. He has incorporated numerous scanning techniques into his Nmap tool. Many of the scan types we discuss are the direct work of Fyodor himself:
• TCP connect scan This type of scan connects to the target port and completes a full three-way handshake (SYN, SYN/ACK, and ACK), as the TCP RFC (Request for Comments) states. Because it performs the full three-way handshake, it takes longer than some of the other scan types available and is more likely to be logged on the target system. The full TCP connect scan is available without any increased privilege levels, so if you’re forced to run a scan as a non-root user, this is the way to go. Figure 2-4 provides a diagram of the TCP three-way handshake.
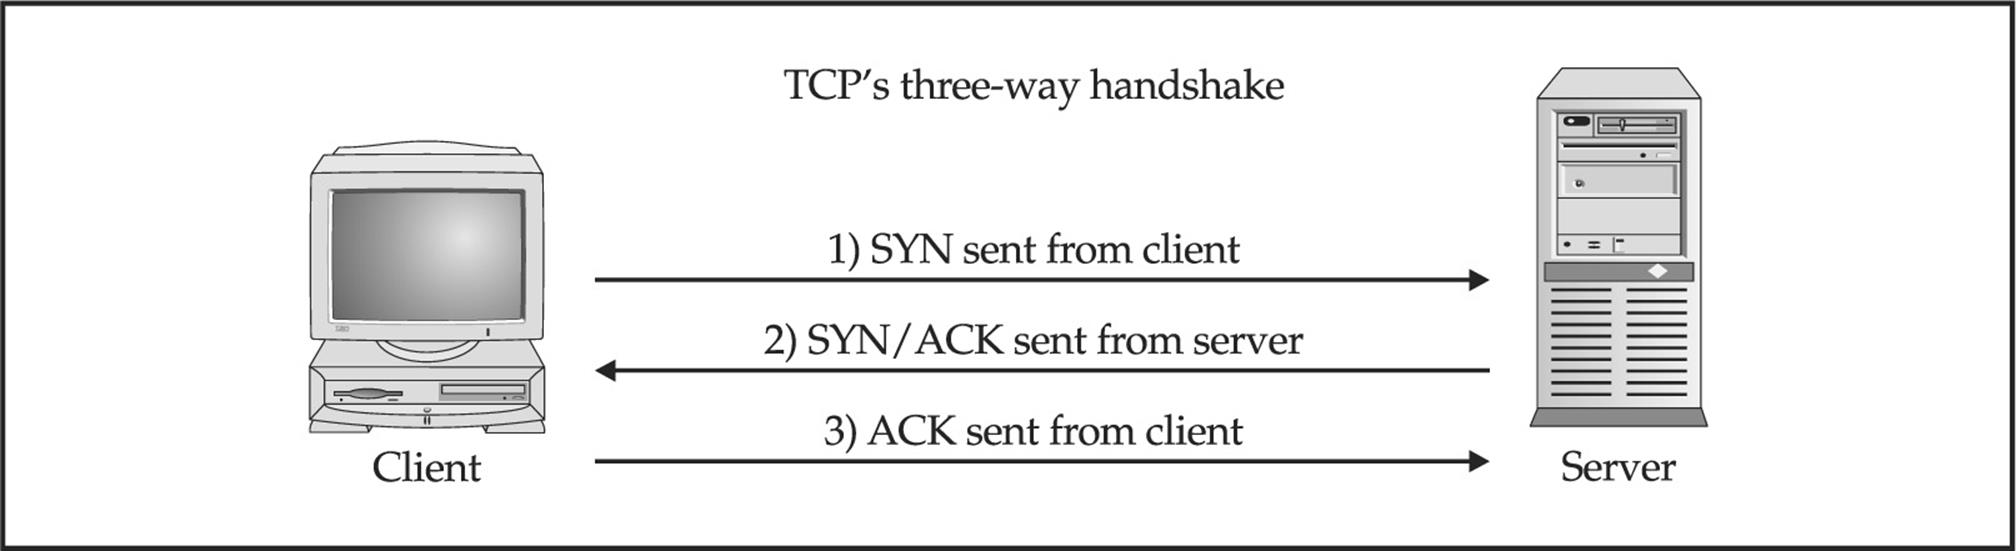
Figure 2-4 (1) Sending a SYN packet, (2) receiving a SYN/ACK packet, and (3) sending an ACK packet
• TCP SYN scan This technique is called half-open scanning because a full TCP connection is not made. Instead, only a SYN packet is sent to the target port. If a SYN/ACK is received from the target port, we can deduce that it is in the LISTENING state. If an RST/ACK is received, it usually indicates that the port is not listening. This technique has the advantage of being stealthier than a full TCP connect, and it may not be logged by the target system. However, one of the downsides of this technique is that this form of scanning can produce a denial of service condition on the target by opening a large number of half-open connections. But unless you are scanning the same system with a high number of these connections, this technique is relatively safe.
• TCP FIN scan This technique sends a FIN packet to the target port. Based on RFC 793 (ietf.org/rfc/rfc0793.txt), the target system should send back an RST for all closed ports. This technique usually only works on UNIX-based TCP/IP stacks.
• TCP Xmas Tree scan This technique sends a FIN, URG, and PUSH packet to the target port. Based on RFC 793, the target system should send back an RST for all closed ports.
• TCP Null scan This technique turns off all flags. Based on RFC 793, the target system should send back an RST for all closed ports.
• TCP ACK scan This technique is used to map out firewall rulesets. It can help determine if the firewall is a simple packet filter allowing only established connections (connections with the ACK bit set) or a stateful firewall performing advance packet filtering.
• TCP Windows scan This technique may detect open as well as filtered/nonfiltered ports on some systems (for example, AIX and FreeBSD) due to an anomaly in the way the TCP windows size is reported.
• TCP RPC scan This technique is specific to UNIX systems and is used to detect and identify Remote Procedure Call (RPC) ports and their associated program and version number.
• UDP scan This technique sends a UDP packet to the target port. If the target port responds with an “ICMP port unreachable” message, the port is closed. Conversely, if you don’t receive an “ICMP port unreachable” message, you can deduce the port is open. Because UDP is known as a connectionless protocol, the accuracy of this technique is highly dependent on many factors related to the utilization and filtering of the target network. In addition, UDP scanning is a very slow process if you are trying to scan a device that employs heavy packet filtering. If you plan on doing UDP scans over the Internet, be prepared for unreliable results.
Certain IP implementations have the unfortunate distinction of sending back reset (RST) packets for all ports scanned, regardless of whether or not they are listening. Therefore, your results may vary when performing these scans; however, SYN and connect() scans should work against all hosts.
Identifying TCP and UDP Services Running
Nowadays many tools incorporate both host discovery and port-scanning functionality. These tools often first attempt to identify if the host is alive using the host discovery methods mentioned previously and only perform a port scan if it is alive. Although many port scanners are available for both the UNIX and Windows environments, we’ll limit our discussion to some of the more popular and time-proven port scanners.
Nmap
As always, we start off with Nmap. Fyodor (and contributors) implemented all of the popular scans listed in the previous section, plus some other semiobscure ones such as the SCTP INIT scan and the TCP Maimon (see Nmap’s man page for more information), which makes Nmap one of the most feature-rich port-scanning tools out there. Like most of the other tools in this section, Nmap does intelligent port scanning by first performing host discovery and by then port-scanning only the hosts that have been identified as being alive. Let’s explore some of its most useful features, the simplest of which is the TCP SYN port scan:
Nmap has some other features we should explore as well. Notice that in the next example we use the –o option to save our output to a separate file. Using the –oN option saves the results in human-readable format:
![]()
If you want to save your results to a tab-delimited file so you can programmatically parse the results later, use the –oG option. (Note that this option is slowly being phased out in favor of the XML output defined by –oX.) Because we have the potential to receive a lot of information from this scan, saving this information to either format is a good idea. In some cases, you may want to combine the –oN option and the –oG option to save the output into both formats. If you wanted to save all formats, you can define –oA.
Suppose that after footprinting an organization, we discover that they are using a simple packet-filtering device as their primary firewall. We could use Nmap’s –f option to fragment the packets. Essentially, this option splits up the TCP headers over several packets, which may make it harder for access control devices or intrusion detection systems (IDS) to detect the scan. In most cases, modern packet-filtering devices and application-based firewalls will queue all IP fragments before evaluating them. Older access control devices or devices that require the highest level of performance may not defragment the packets before passing them along.
Depending on the sophistication of the target network and hosts, the scans performed thus far may have easily been detected. Nmap does offer additional decoy capabilities designed to overwhelm a target site with superfluous information through the use of the –D option. The basic premise behind this option is to launch decoy scans at the same time that a real scan is launched. You simply spoof the source address of legitimate servers and intermix these bogus scans with the real port scan. The target system then responds to the spoofed addresses as well as to your real port scan. Moreover, the target site has the burden of trying to track down all the scans to determine which are legitimate and which are bogus. Remember, the decoy address should be alive; otherwise, your scans may SYN-flood the target system and cause a denial of service condition. The following example uses the –D option:
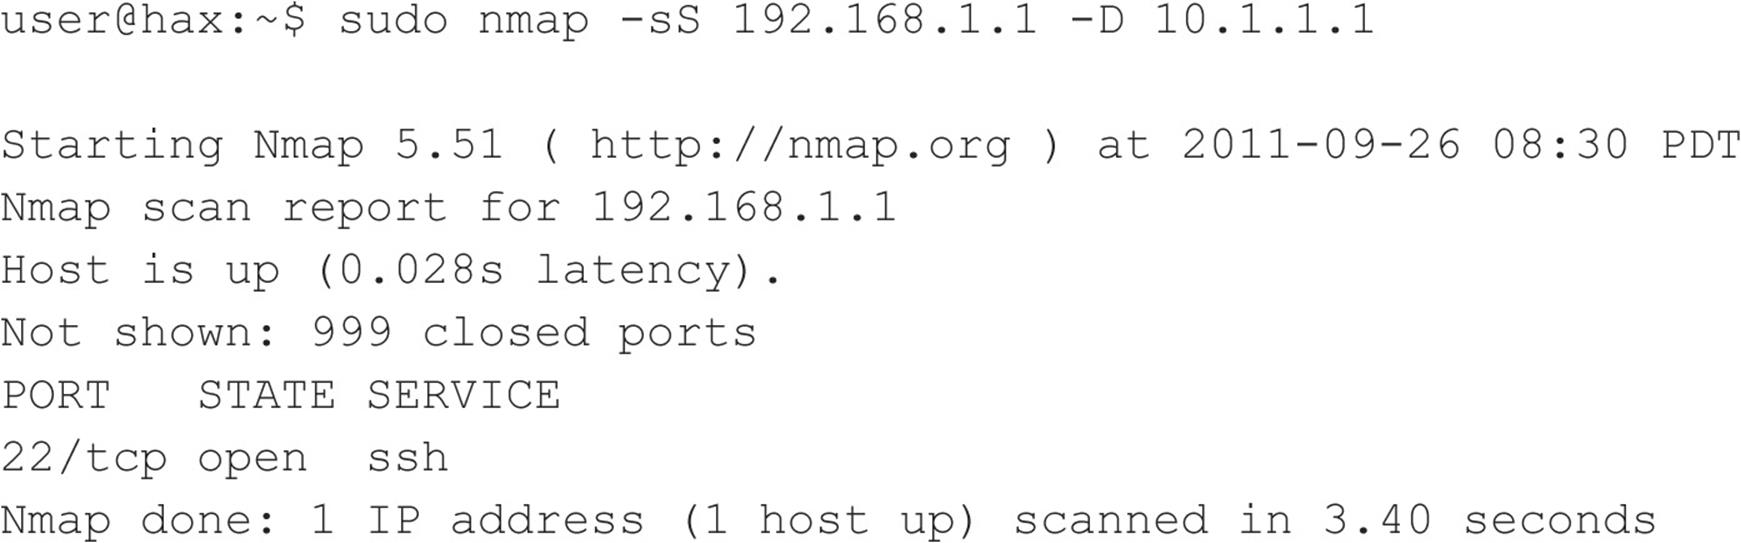
In the preceding example, Nmap provides the decoy-scan capabilities, making it more difficult to discern legitimate port scans from bogus ones.
The final scanning technique discussed is FTP bounce scanning. The FTP bounce attack was thrust into the spotlight by Hobbit in his posting to Bugtraq in 1995, where he outlines some of the inherent flaws in the FTP protocol (see RFC 959 at ietf.org/rfc/rfc0959.txt). Although dreadfully old school, arcane, and virtually unusable on the Internet today, the FTP bounce attack demonstrates an insidious method of laundering connections through an FTP server by abusing the support for “proxy” FTP connections. The technique, while outdated, is important to understand if you wish to truly understand the scope a hacker will take to get to his or her target.
As Hobbit points out in the aforementioned post, FTP bounce attacks “can be used to post virtually untraceable mail and news, hammer on servers at various sites, fill up disks, try to hop firewalls, and generally be annoying and hard to track down at the same time.” Moreover, you can bounce port scans off the FTP server to hide your identity, or better yet, bypass access control mechanisms.
Of course, Nmap supports this type of scan with the –b option; however, a few conditions must be present. First, the FTP server must have a writable and readable directory such as /incoming. Second, the FTP server must allow Nmap to feed bogus port information to it via the PORTcommand. Although this technique is very effective in bypassing access control devices as well as hiding one’s identity, the process can be very slow. Additionally, many new versions of the FTP server do not allow this type of nefarious activity to take place.
SuperScan
SuperScan from Foundstone is a great Windows-based, GUI alternative for Nmap. As you can see in Figures 2-5 and 2-6, the tool allows for ping scanning, TCP and UDP port scanning, and includes numerous techniques for doing them all.
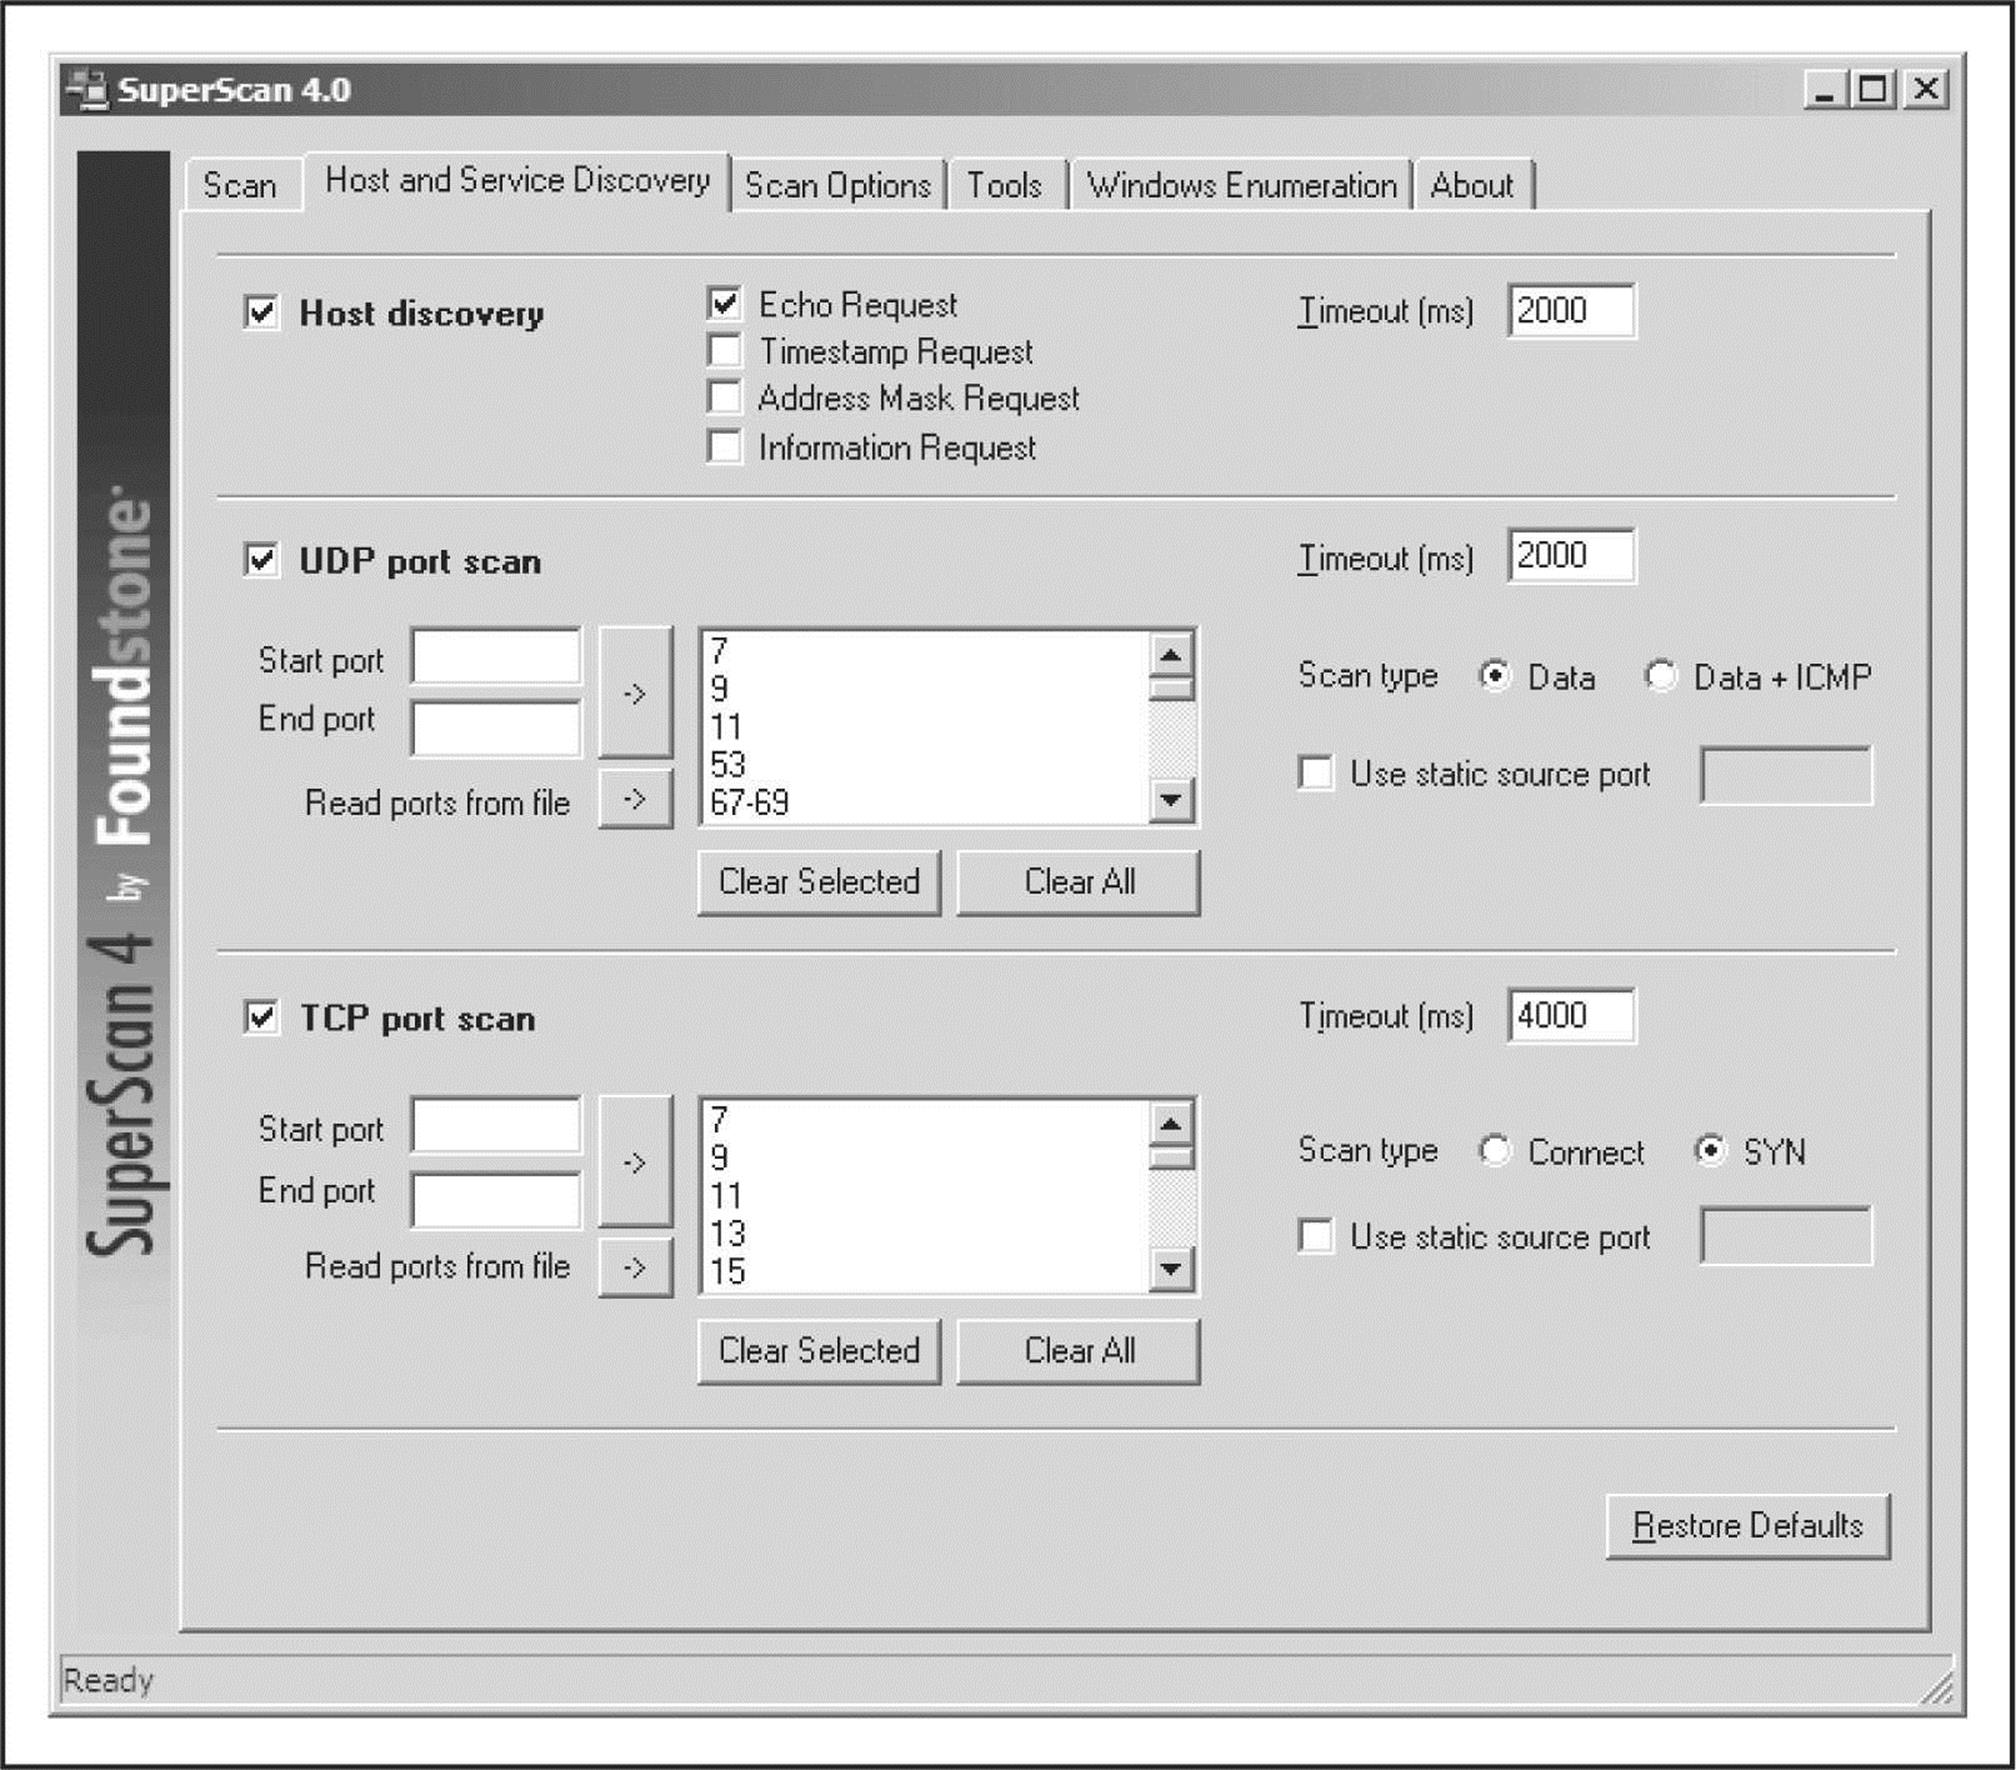
Figure 2-5 SuperScan has numerous host discovery techniques that become powerful allies in the digital battlefield.
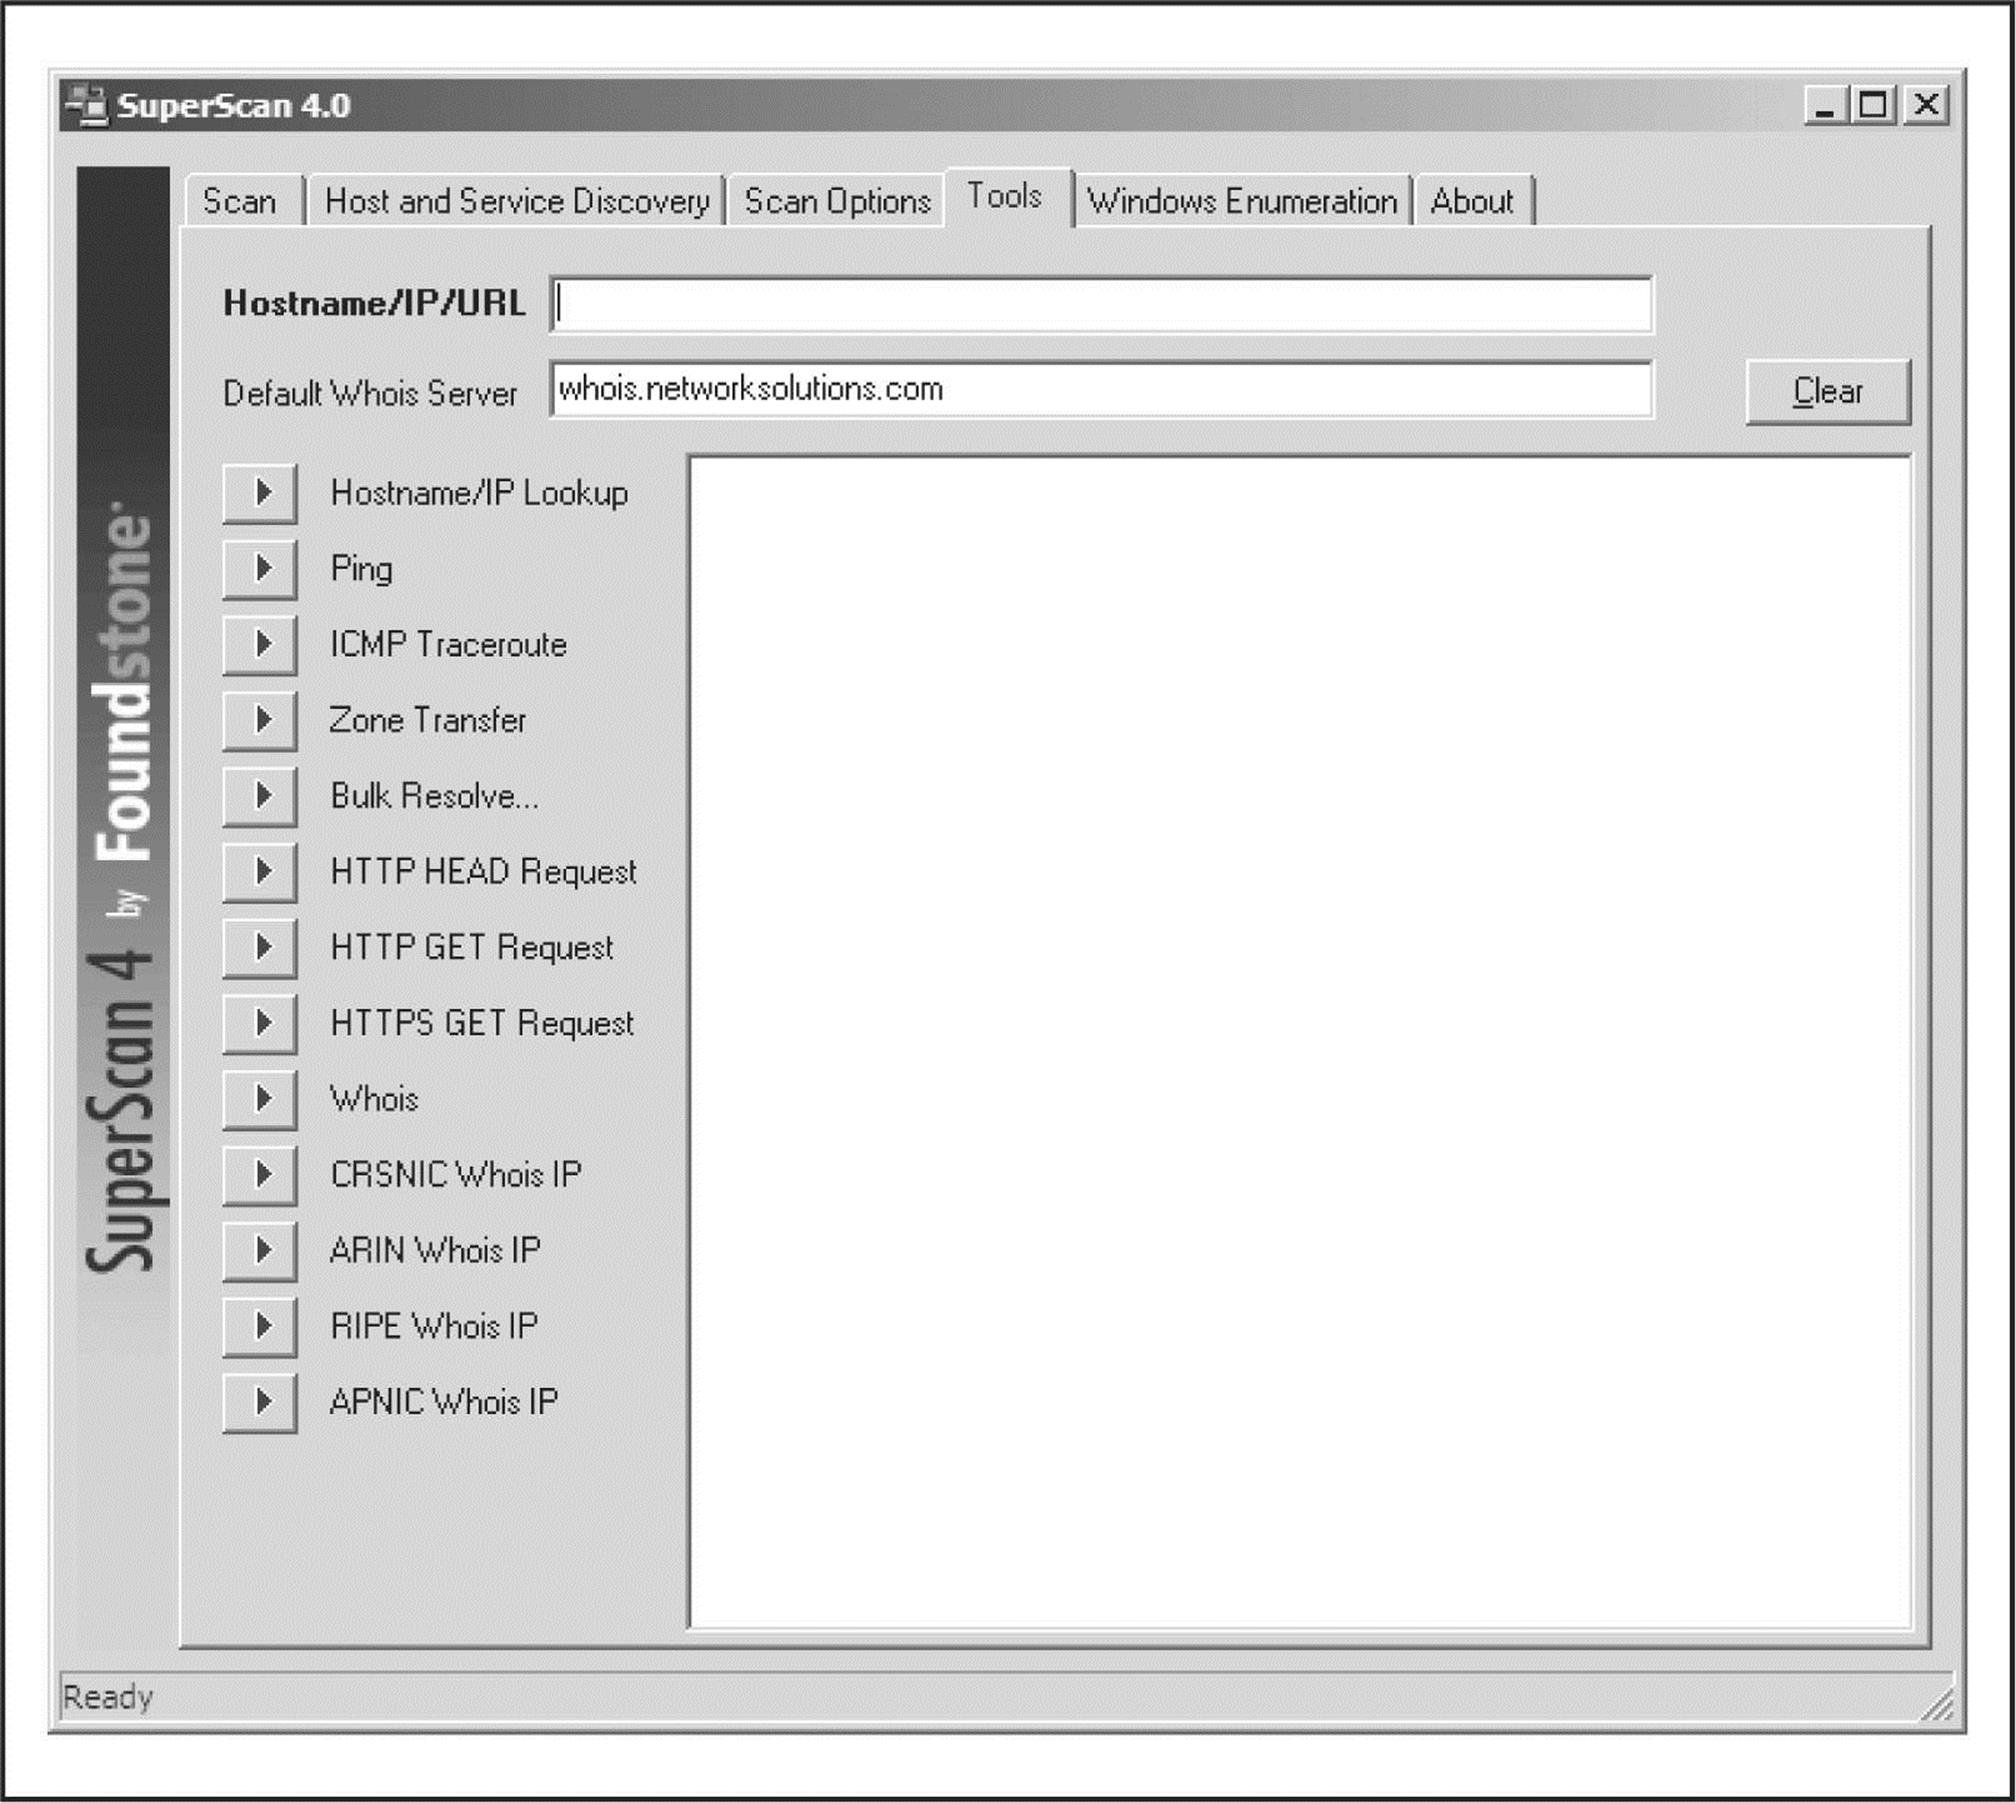
Figure 2-6 The SuperScan tool provides a number of different assessment tools, many of which are discussed in other chapters.
SuperScan allows you to choose from four different ICMP host-discovery techniques, including traditional ECHO REQUESTS and the less familiar TIMESTAMP REQUESTS, ADDRESS MASK REQUESTS, and INFORMATION REQUESTS. Each of these techniques can deliver various findings that can add to the definitive live host list. Additionally, the tool allows you to choose the ports to be scanned, the techniques for UDP scanning (including Data, Data+ICMP, and static source port scanning), and the techniques for TCP scanning (including SYN, Connect, and static source port scanning).
The UDP Data scanning technique sends a data packet to the UDP port and, based on the response, determines whether the port is open or closed. This method is not incredibly accurate and requires that the product recognize a valid nudge string. So if the UDP port is an esoteric service, you may not be able to detect its being open. Using the Data+ICMP technique takes the Data technique to the next level of accuracy, including a greatly enhanced traditional UDP scanning technique that sends multiple UDP packets to a presumed closed port. Then, based on the system’s ability to respond with ICMP packets, this technique creates a window in which to scan the target port. Data+ICMP is incredibly accurate and will find all ports that are open, but it can take some time to complete. So be sure to plan for this added scanning time when selecting this option.
ScanLine
ScanLine is a Windows-based tool from Foundstone (foundstone.com) that runs solely from the command line. Like netcat, it is just a single executable, which makes it easy to load onto a compromised host and pivot to target internal systems that may be inaccessible from your initial attack system. Take a look at this example:
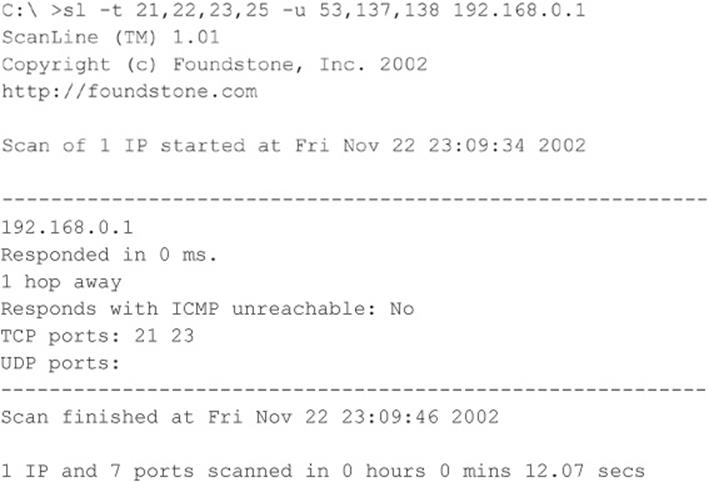
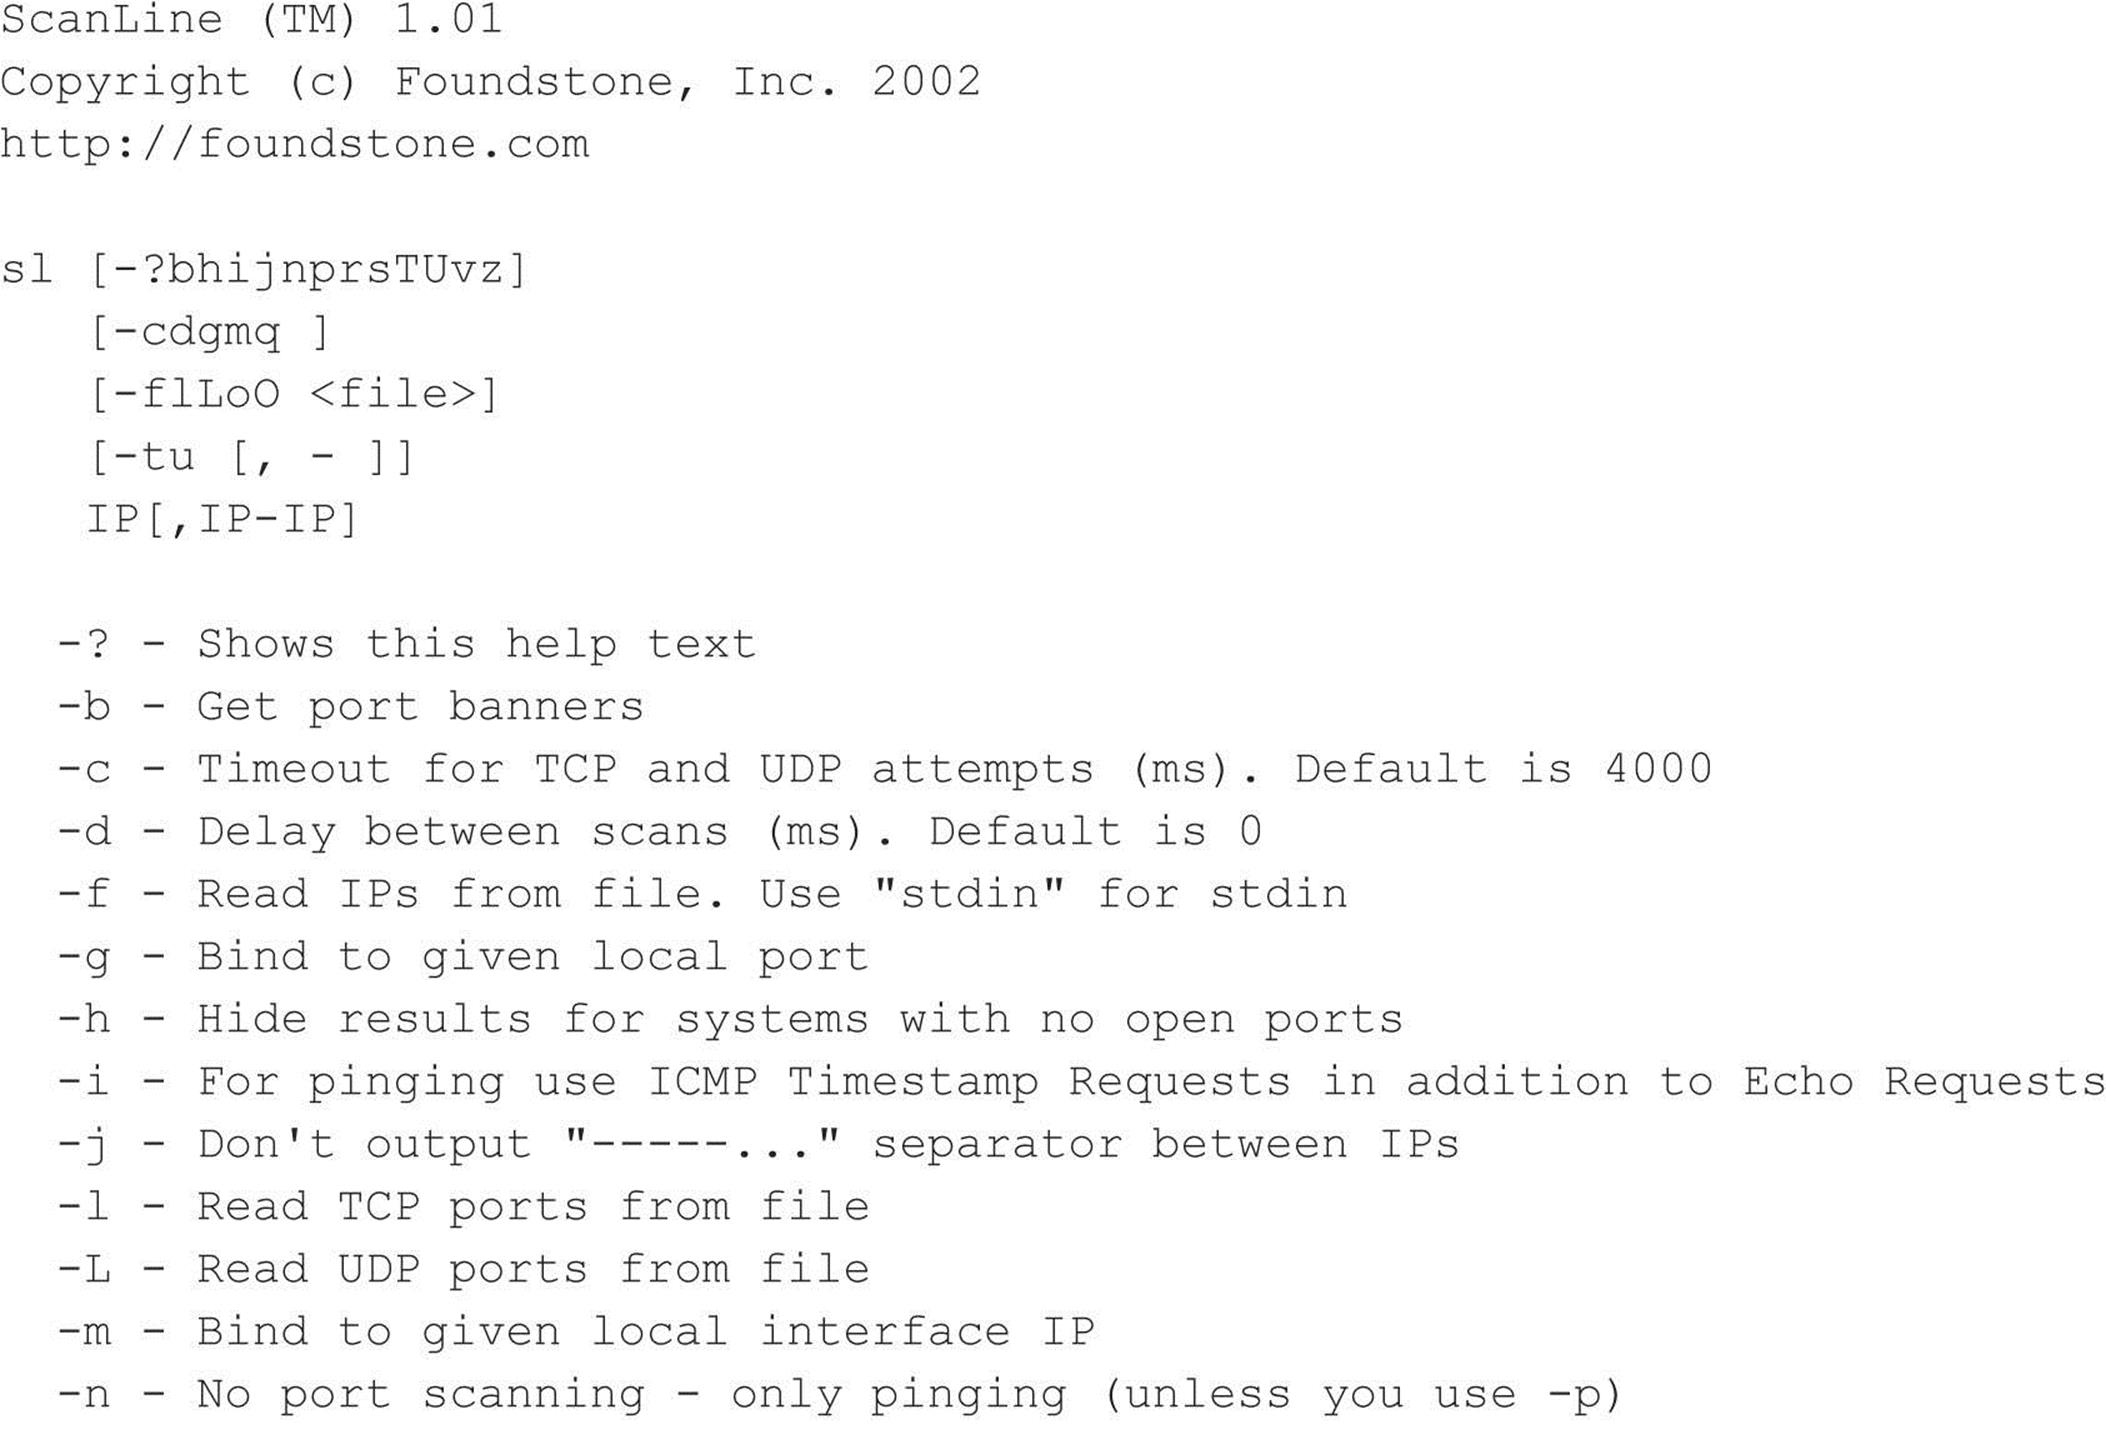
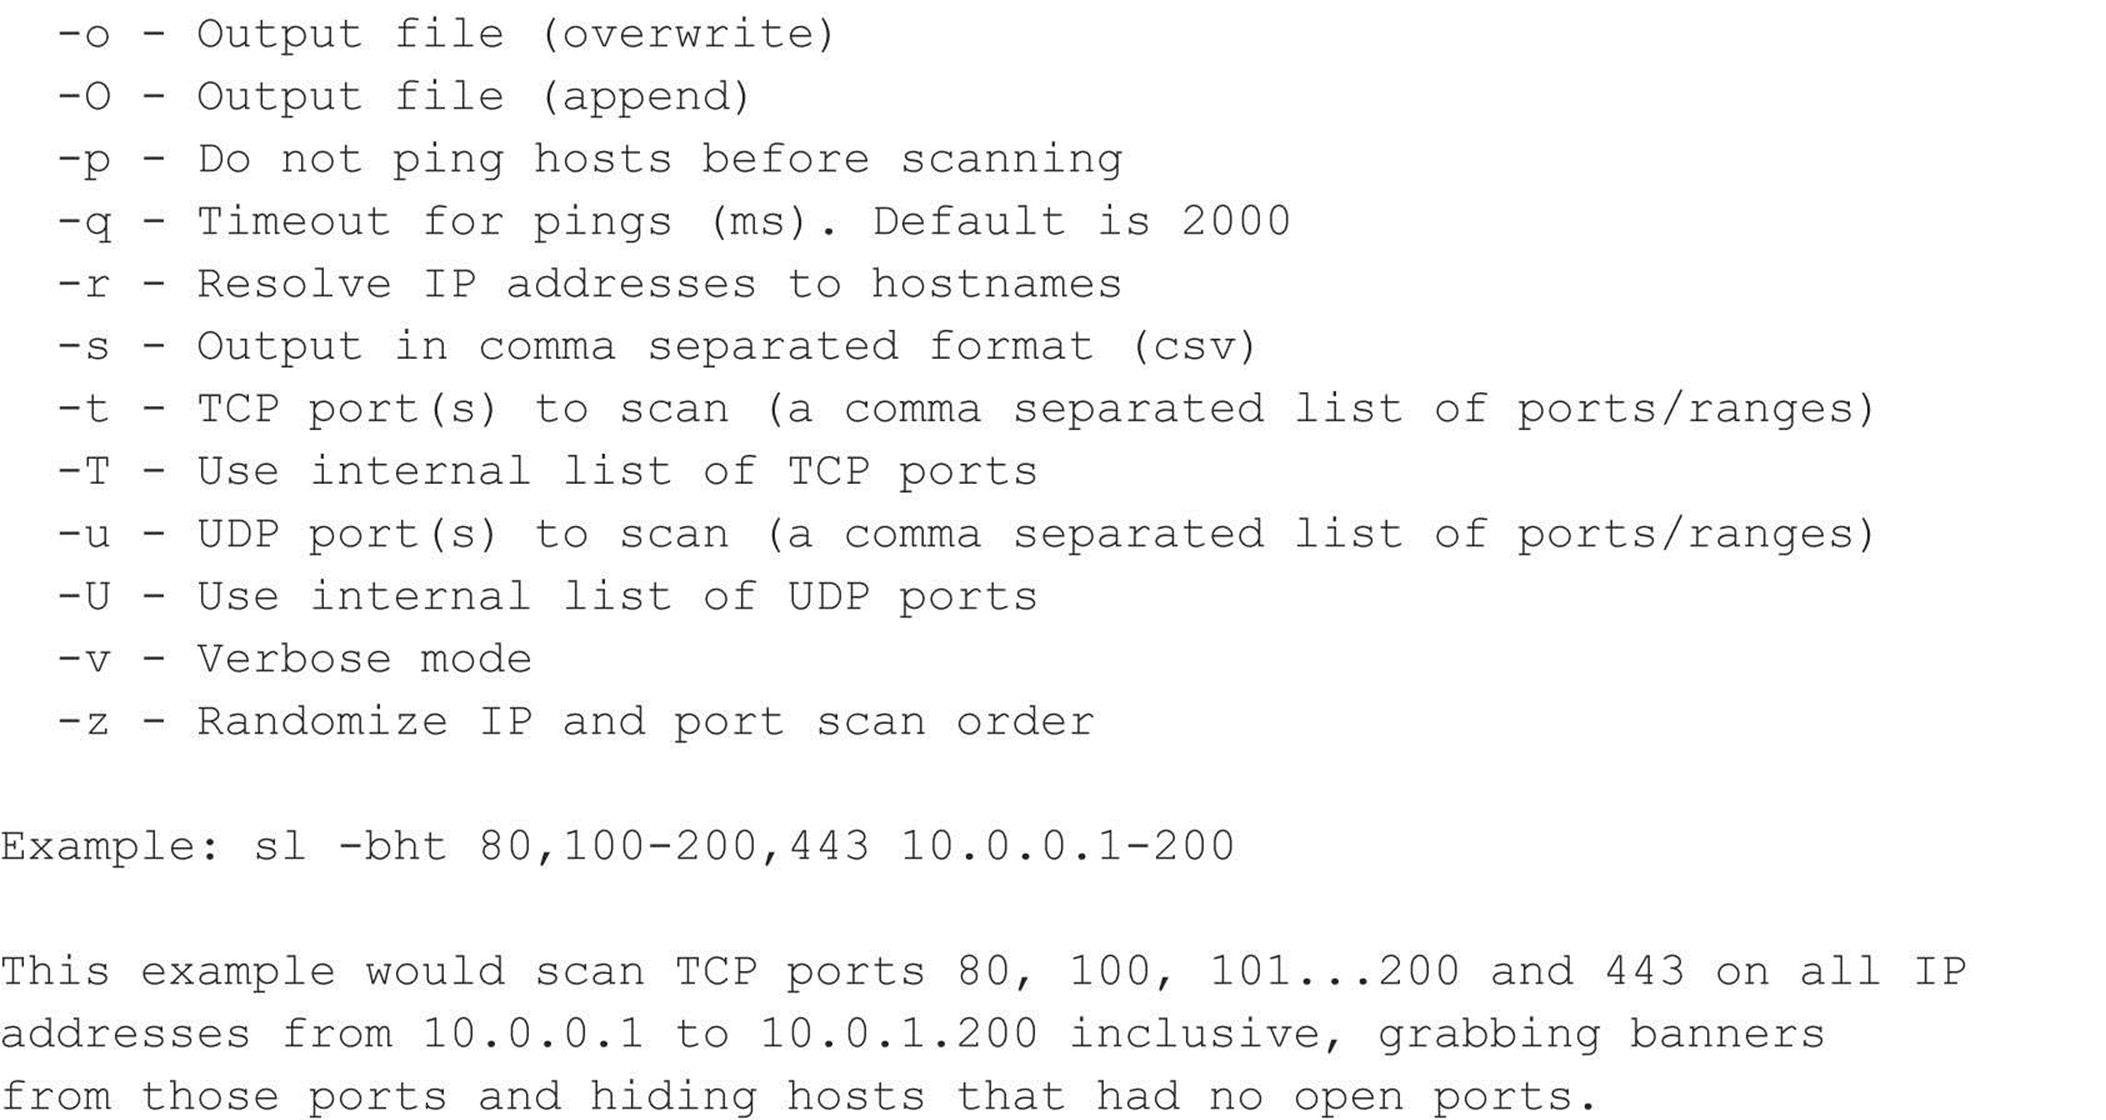
A complete breakdown of ScanLine’s functionality can be seen in the help file dump:
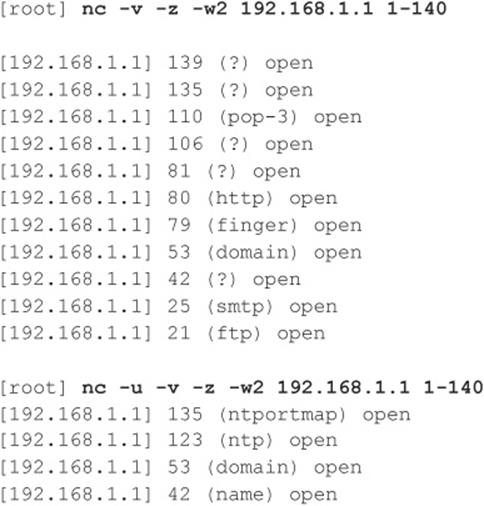
netcat
Despite the “old school” nature of this raw tool, netcat (or nc) is an excellent utility that deserves an honorable mention. Written by Hobbit, this Windows/Linux utility can perform so many tasks that everyone in the industry calls it the Swiss Army knife of security. Most of its functionality has been brought up to date in a utility that is shipped with Nmap called “ncat,” written by Fyodor, Chris Gibson, Kris Katterjohn, and Mixter; however, they decided to leave out the port-scanning capabilities (I guess they figured they already have a port scanner that does a good job) in their version.
Netcat’s basic TCP and UDP port-scanning capabilities are useful in some scenarios when you need to minimize your footprint on a compromised system. You can upload the single file to the system and use that as a pivoting point to scan other networks you may not be able to directly access. The –v and –vv options provide verbose and very verbose output, respectively. The –z option provides zero mode I/O and is used for port scanning, and the –w2 option provides a timeout value for each connection. By default, netcat uses TCP ports. Therefore, we must specify the –u option for UDP scanning, as in the second example shown next:
![]() Port Scanning Countermeasures
Port Scanning Countermeasures
Port scanning is as fundamental a weapon in the hacker’s arsenal as mom and apple pie. Unfortunately, preventing port scanning is downright painful. But here are some techniques you can use.
Detection Port scanning is often used by attackers to determine the TCP and UDP ports listening on remote systems. Detecting port-scanning activity is of paramount importance if you are interested in providing an early warning system of attacks. The primary method for detecting port scans is to use a network-based IDS program such as Snort.
Snort (snort.org) is a great free IDS, primarily because signatures are frequently available from public authors. As you may have guessed by now, this program is one of our favorites, and it makes for a great NIDS. (Note that 1.x versions of Snort do not handle packet fragmentation well.) Here is a sample listing of a port scan attempt:

From a UNIX host–based perspective, the scanlogd utility (openwall.com/scanlogd) from Solar Designer is a TCP port scan detection tool that detects and logs such attacks. Remember, if you begin to see a pattern of port scans from a particular system or network, it may indicate that someone is performing network reconnaissance on your site. You should pay close attention to such activity because a full-scale attack may be imminent. Finally, you should keep in mind that there are cons to actively retaliating against or blocking port scan attempts. The primary issue is that an attacker could spoof an IP address of an innocent party, so your system would retaliate against them. A great paper by Solar Designer can be found at openwall.com/scanlogd/P53-13.gz. It provides additional tips on designing and attacking port scan detection systems.
Most firewalls can and should be configured to detect port scan attempts. Some do a better job than others in detecting stealth scans. For example, many firewalls have specific options to detect SYN scans while completely ignoring FIN scans. The most difficult part in detecting port scans is sifting through the volumes of log files. We also recommend configuring your alerts to fire in real time via e-mail. Use threshold logging where possible, so someone doesn’t try to perform a denial of service attack by filling up your e-mail. Threshold logging groups alerts rather than sends an alert for each instance of a potential probe.
From the Windows perspective, one utility, called Attacker by Foundstone (foundstone.com), can be used to detect simple port scans. This free tool allows you to listen for particular ports and alerts you when port scans hit those ports. Although this technique is not foolproof, it can definitely show the hacker ankle biters who run full port scans and don’t even try to hide their attacking signatures.
Prevention Although preventing someone from launching a port scan probe against your systems is difficult, you can minimize your exposure by disabling all unnecessary services. In the UNIX environment, you can accomplish this by commenting out unnecessary services in /etc/inetd.conf and disabling services from launching in your startup scripts. Again, this is discussed in more detail in Chapter 5 on UNIX.
For Windows, you should also disable all unnecessary services. Unfortunately, this is more difficult because of the way Windows operates, as TCP ports 139 and 445 provide much of the native Windows functionality. However, you can disable some services from within the Control Panel | Services menu. Detailed Windows risks and countermeasures are discussed in Chapter 4. For other operating systems or devices, consult the user’s manual to determine how to reduce the number of listening ports to only those required for operation.
DETECTING THE OPERATING SYSTEM
As we have demonstrated thus far, a wealth of tools and many different types of port-scanning techniques are available for discovering open ports on a target system. If you recall, this was our first objective—port scanning to identify listening TCP and UDP ports on the target system. And with this information, we can determine if the listening port has potential vulnerabilities, right? Well, not yet. We first need to discover more information about the target system. Now our objective is to determine the type of operating system running.
![]() Active Operating System Detection
Active Operating System Detection

Specific operating system information will be useful during our vulnerability-mapping phase, discussed in subsequent chapters. Remember, we are trying to be as accurate as possible in determining the associated vulnerabilities of our target system(s). We don’t want to be crying wolf and telling the IT department to fix something that isn’t actually vulnerable, or worse, not there. Therefore, we need to identify the target operating system to as granular a level as possible.
There are a number of techniques for performing this work. We can perform simple banner-grabbing techniques, as discussed in Chapter 3, which grab information from such services as FTP, telnet, SMTP, HTTP, POP, and others. Banner grabbing is the simplest way to detect an operating system and the associated version number of the service running. And then there is a much more accurate technique: the stack fingerprinting technique. Today, we have available some good tools designed to help us with this task. One of the most accurate tools at our disposal is the omnipowerful Nmap, which provides stack fingerprinting capabilities.
Making Guesses from Available Ports
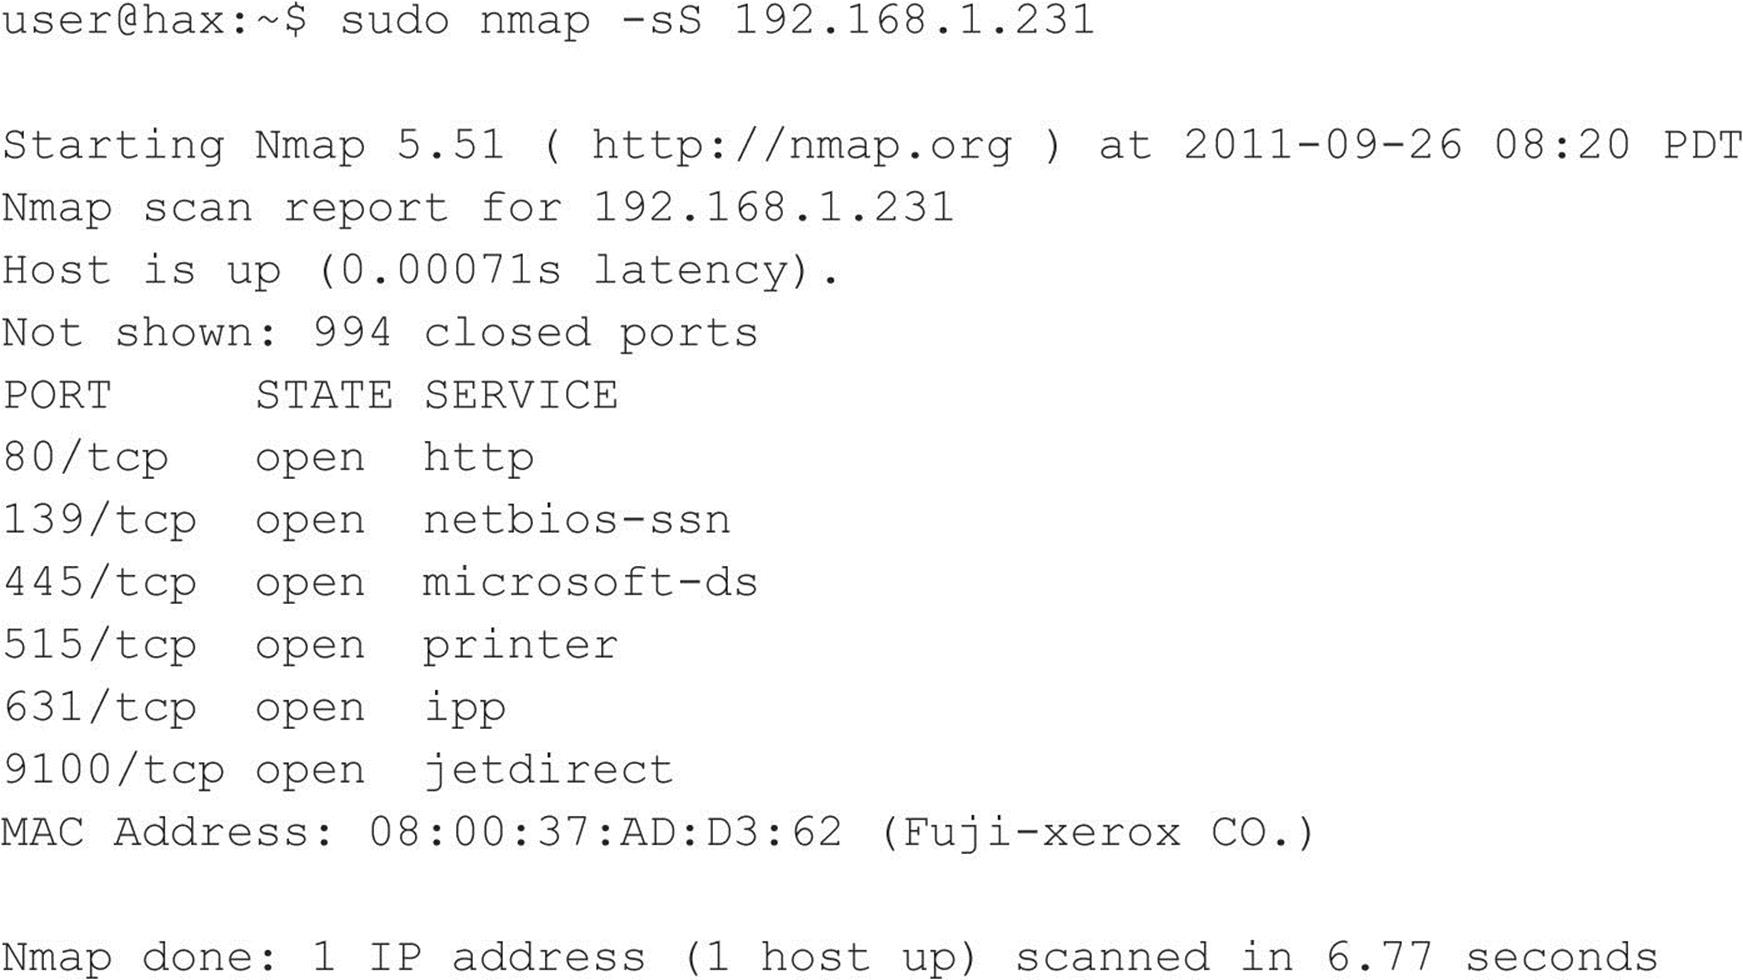
Regardless of the tool used, we are trying to identify open ports that provide telltale signs of the operating system. For example, when ports 445, 139, and 135 are open, a high probability exists that the target operating system is Windows. Pretty much all Windows-based systems listen on ports 135, 139, and 445. This differs from Windows 95/98, which only listen on port 139. Some services are operating system specific. A perfect example of this is TCP port 3389, which is used for the Remote Desktop Protocol (RDP), a common attribute of Windows systems. To know for sure, we have to probe the specific port (covered in the next chapter), but the majority of systems run essential services like RDP on their default ports.
For UNIX systems, a good indicator is TCP port 22 (SSH); however, keep in mind that Windows uses SSH and many network devices also use it for management. Many older UNIX servers have services such as portmapper (TCP/111), Berkeley R services (TCP/512–514), NFS (TCP/2049), and high-number ports (3277x and above) listening. The existence of such ports normally indicates that this system is running UNIX. Moreover, if we had to guess the flavor of UNIX, we would guess Solaris. We know in advance that Solaris normally runs its RPC services in the range of 3277x.
By performing a simple TCP and UDP port scan, we can make quick assumptions about the exposure of the systems we are targeting. For example, if port 445 or 139 or 135 is open on a Windows server, it may be exposed to a great deal of risk due to the numerous remote vulnerabilities present on the services running on those ports. Chapter 4 discusses the inherent vulnerabilities with Windows and how ports 445, 139, and 135 can be used to compromise the security of systems that do not take adequate security measures to protect access to these ports. In our example, the UNIX system appears to be at risk as well because the services listening provide a great deal of functionality and have been known to have many security-related vulnerabilities. For example, Remote Procedure Call (RPC) services and the Network File System (NFS) service are two major ways in which an attacker may be able to compromise the security of a UNIX server (see Chapter 5). Conversely, it is virtually impossible to compromise the security of a remote service if it is not listening. Remember—the greater the number of services running, the greater the likelihood of a system compromise. The more you become familiar with common port assignments, the better your ability will be to take the results of a port scan and quickly identify the low-hanging fruit that compromises a network.
Active Stack Fingerprinting
Before we jump into using Nmap, it is important to explain exactly what stack fingerprinting is. Stack fingerprinting is an extremely powerful technology that allows you to ascertain quickly each host’s operating system with a high degree of probability. Essentially, there are many nuances between one vendor’s IP stack implementation and another’s. Vendors often interpret specific RFC guidance differently when writing their TCP/IP stack. Therefore, by probing for these differences, we can begin to make an educated guess as to the exact operating system in use. For maximum reliability, stack fingerprinting generally requires at least one listening port. Nmap makes an educated guess about the operating system in use if no ports are open. However, the accuracy of such a guess is fairly low. The definitive paper on the subject was written by Fyodor, first published in Phrack Magazine, and can be found at insecure.org/nmap/nmapfingerprinting-article.html.
Let’s examine the types of probes that can be sent that help to distinguish one operating system from another:
• FIN probe A FIN packet is sent to an open port. As mentioned previously, RFC 793 states that the correct behavior is not to respond. However, many stack implementations (such as Windows 7/200X/Vista) respond with a FIN/ACK.
• Bogus flag probe An undefined TCP flag is set in the TCP header of a SYN packet. Some operating systems, such as Linux, respond with the flag set in their response packet.
• Initial Sequence Number (ISN) sampling The basic premise is to find a pattern in the initial sequence chosen by the TCP implementation when responding to a connection request.
• “Don’t fragment bit” monitoring Some operating systems set the “Don’t fragment bit” to enhance performance. This bit can be monitored to determine what types of operating systems exhibit this behavior.
• TCP initial window size Initial window size on returned packets is tracked. For some stack implementations, this size is unique and can greatly add to the accuracy of the fingerprint mechanism.
• ACK value IP stacks differ in the sequence value they use for the ACK field, so some implementations return the sequence number you sent, and others return a sequence number + 1.
• ICMP error message quenching Operating systems may follow RFC 1812 (ietf.org/rfc/rfc1812.txt) and limit the rate at which error messages are sent. By sending UDP packets to some random high-numbered port, you can count the number of unreachable messages received within a given amount of time. This type of probe is also helpful in determining if UDP ports are open.
• ICMP message quoting Operating systems differ in the amount of information that is quoted when ICMP errors are encountered. By examining the quoted message, you may be able to make some assumptions about the target operating system.
• ICMP error message—echoing integrity Some stack implementations may alter the IP headers when sending back ICMP error messages. By examining the types of alterations that are made to the headers, you may be able to make some assumptions about the target operating system.
• Type of service (TOS) For “ICMP PORT UNREACHABLE” messages, the TOS is examined. Most stack implementations use 0, but this can vary.
• Fragmentation handling As pointed out by Thomas Ptacek and Tim Newsham in their landmark paper “Insertion, Evasion, and Denial of Service: Eluding Network Intrusion Detection,” different stacks handle overlapping fragments differently (cs.unc.edu/~fabian/course_papers/PtacekNewsham98.pdf). Some stacks overwrite the old data with the new data, and vice versa, when the fragments are reassembled. By noting how probe packets are reassembled, you can make some assumptions about the target operating system.
• TCP options TCP options are defined by RFC 793 and more recently by RFC 1323 (ietf.org/rfc/rfc1323.txt). The more advanced options provided by RFC 1323 tend to be implemented in the most current stack implementations. By sending a packet with multiple options set—such as no operation, maximum segment size, window scale factor, and timestamps—you can make some assumptions about the target operating system.
Nmap employs the techniques mentioned earlier (except for the fragmentation handling and ICMP error message queuing) by using the –O option. Let’s take a look at our target network:
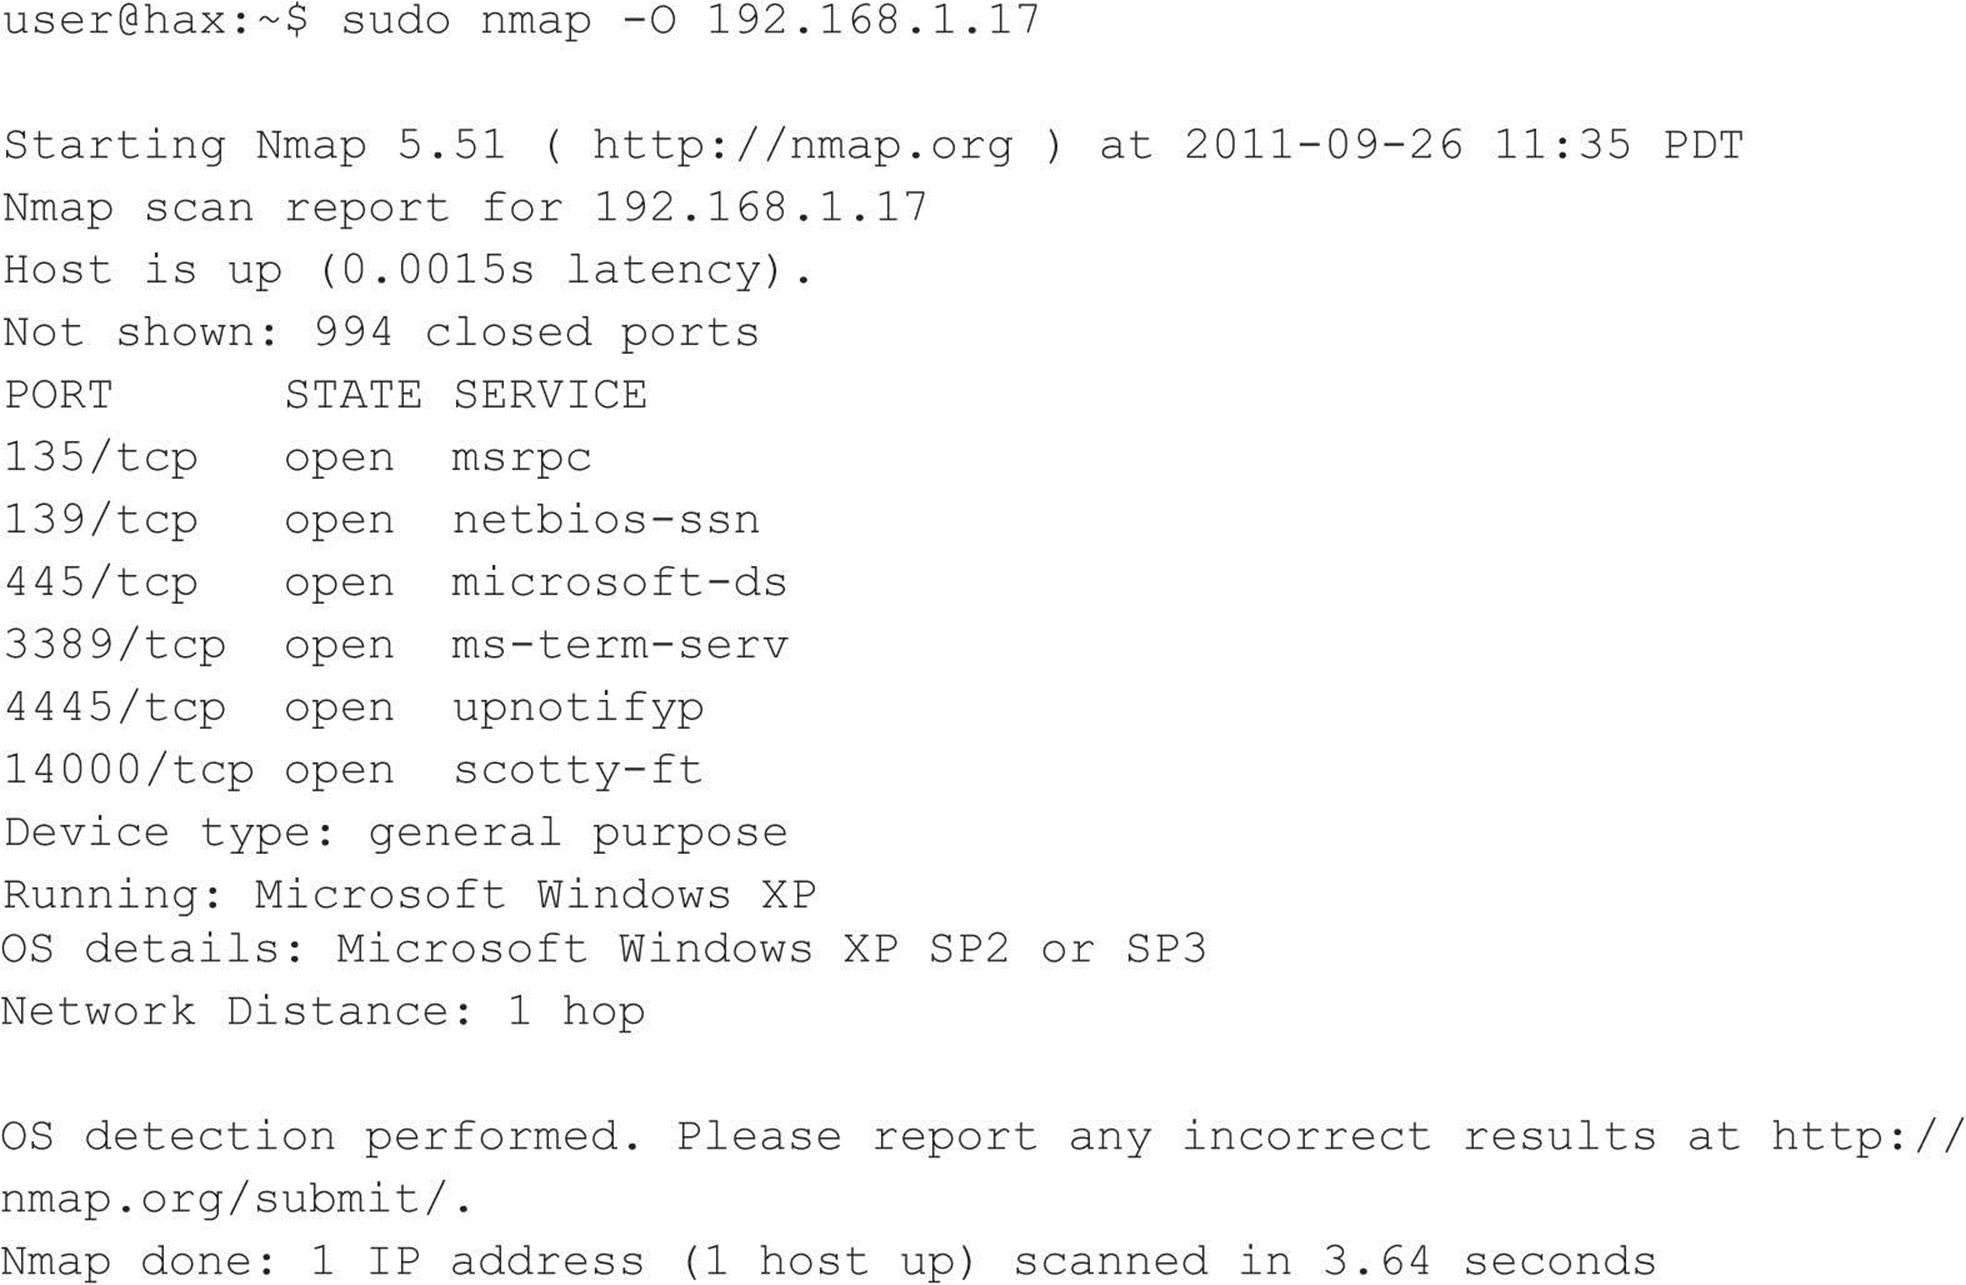
By using Nmap’s stack fingerprint option, we can easily ascertain the target operating system with precision. The accuracy of the determination is largely dependent on at least one open port on the target. But even if no ports are open on the target system, Nmap can still make an educated guess about its operating system:
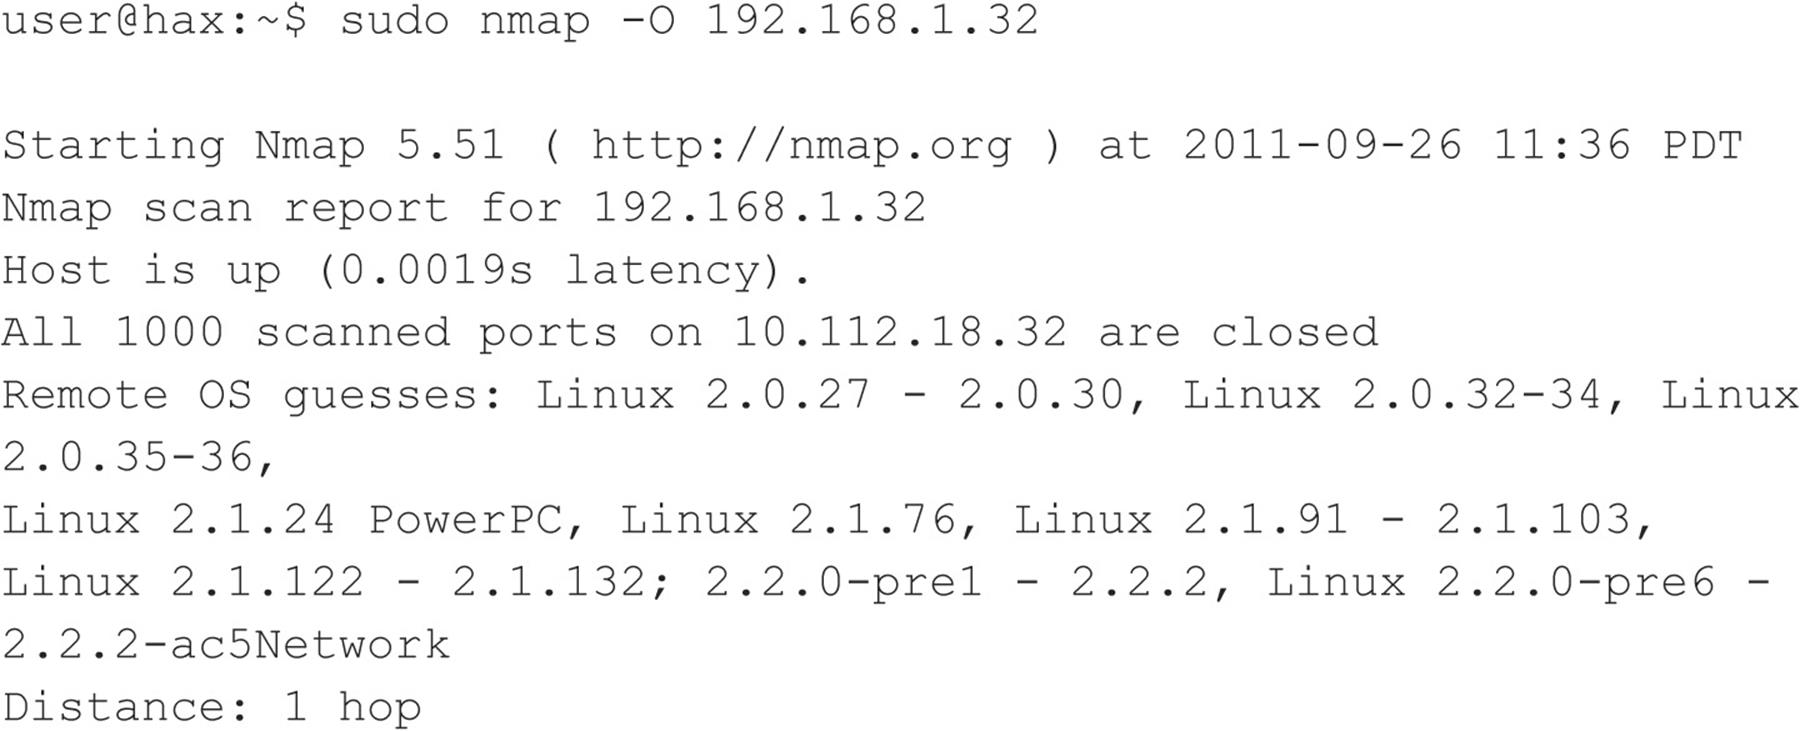
So even with no ports open, Nmap correctly guessed the target operating system as Linux (lucky guess).
One of the best features of Nmap is that its signature listing is kept in a file called Nmap-os-fingerprints. Each time a new version of Nmap is released, this file is updated with additional signatures. At this writing, hundreds of signatures are listed.
Although Nmap’s TCP detection seems to be the most accurate as of this writing, the technology is not flawless and often provides only broad guesses that, at times, seem less than helpful.
![]() Operating System Detection Countermeasures
Operating System Detection Countermeasures
Take the following steps to help mitigate your OS detection risk.
Detection You can use many of the aforementioned port-scanning detection tools to watch for operating system detection. Although they don’t specifically indicate that an Nmap operating system detection scan is taking place, they can detect a scan with specific options set, such as the SYN flag.
Prevention We wish there were an easy fix to operating system detection, but it is not an easy problem to solve. It is possible to hack up the operating source code or alter an operating system parameter to change one of the unique stack fingerprint characteristics. However, doing this may adversely affect the functionality of the operating system. For example, FreeBSD supports the TCP_DROP_SYNFIN kernel option, which is used to ignore a SYN+FIN packet used by Nmap when performing stack fingerprinting. Enabling this option may help in thwarting OS detection, but it breaks support for RFC 1644, “TCP Extensions for Transactions.”
We believe only robust, secure proxies or firewalls should be subject to Internet scans. As the old adage says, “security through obscurity” is not your first line of defense. Even if attackers know the operating system, they should have a difficult time obtaining access to the target system.
![]() Passive Operating System Identification
Passive Operating System Identification

We have demonstrated how effective active stack fingerprinting can be using tools such as Nmap. It is important to remember that the aforementioned stack-detection techniques are active by their very nature. We sent packets to each system to determine specific idiosyncrasies of the network stack, which allowed us to guess the operating system in use. Because we had to send packets to the target system, it was relatively easy for a network-based IDS system to determine that an OS identification probe was launched. Therefore, active stack fingerprinting is not one of the most stealthy techniques an attacker will employ.
Passive Stack Fingerprinting
Passive stack fingerprinting is similar in concept to active stack fingerprinting. Instead of sending packets to the target system, however, an attacker passively monitors network traffic to determine the operating system in use. Thus, by monitoring network traffic between various systems, we can determine the operating systems on a network. This technique, however, is exclusively dependent on being in a central location on the network and on a port that allows packet capture (for example, on a mirrored port).
Lance Spitzner has performed a great deal of research in the area of passive stack fingerprinting and has written a whitepaper that describes his findings at project. honeynet.org. In addition, Marshall Beddoe and Chris Abad developed siphon, a passive port-mapping, OS identification, and network topology tool. You can download the tool at packetstormsecurity.org/UNIX/utilities/siphon-v.666.tar.gz.
With that little background, let’s look at how passive stack fingerprinting works.
Passive Signatures
Various traffic characteristics can be used to identify an operating system. We limit our discussion to several attributes associated with a TCP/IP session:
• TTL What does the operating system set as the time-to-live on the outbound packet?
• Window size What does the operating system set as the window size?
• DF Does the operating system set the “Don’t fragment bit”?
By passively analyzing each attribute and comparing the results to a known database of attributes, you can determine the remote operating system. Although this method is not guaranteed to produce the correct answer every time, the attributes can be combined to generate fairly reliable results. This technique is exactly what siphon uses.
Let’s look at an example of how this works. If we telnet from the system shadow (192.168.1.10) to quake (192.168.1.11), we can passively identify the operating system using siphon:
![]()
Using our favorite sniffer, Snort, we can review a partial packet trace of our telnet connection:

Looking at our three TCP/IP attributes, we find the following:
• TTL = 255
• Window size = 0x2798
• Don’t fragment bit (DF) = Yes
Now, let’s review the siphon fingerprint database file osprints.conf:
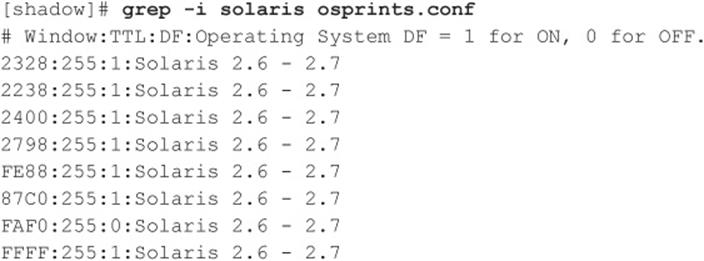
We can see the fourth entry has the exact attributes of our Snort trace: a window size of 2798, a TTL of 255, and the DF bit set (equal to 1). Therefore, we should be able to accurately guess the target OS using siphon:

As you can see, we are able to guess the target OS, which happens to be Solaris 2.6, with relative ease. It is important to remember that we are able to make an educated guess without sending a single packet to 192.168.1.11—all this analysis is done by simply capturing packets on the network.
Passive fingerprinting can be used by an attacker to map out a potential victim just by surfing to the victim’s website and analyzing a network trace or by using a tool such as siphon. Although this technique is effective, it does have some limitations. First, applications that build their own packets (for example, Nmap) do not use the same signature as the operating system. Therefore, your results may not be accurate. Second, you must be in a position to capture these packets (which can be difficult on a switch without enabling port mirroring). Third, a remote host can easily change the connection attributes. But this latter issue plagues even active detection techniques.
![]() Passive Operating System Detection Countermeasures
Passive Operating System Detection Countermeasures
See the prevention countermeasure in “Operating System Detection Countermeasures,” earlier in the chapter.
PROCESSING AND STORING SCAN DATA
Mapping a target network can result in a large amount of data, which can become quite cumbersome depending on how you perform your scans and store that data. In large networks, the more efficient you are in managing your scan results directly corresponds to the speed at which you’re able to compromise a large number of systems. Because of this, managing your data appropriately is important.
Managing Scan Data with Metasploit
Metasploit (metasploit.com) started out as a general exploit framework used to modularize exploits and payloads. Over the past couple of years its functionality has exploded way beyond that to form a vast platform of tools, payloads, and exploits, with attack management functionality. We won’t go into great detail about how to leverage all of Metasploit’s functionality here, but we will look at ways to execute our scans and input data into Metasploit for further processing.
Metasploit’s installation sets up a PostgreSQL server for managing data to allow you to make specific queries to the database for scan data. To leverage the database functionality, you have to first tell Metasploit how to connect to the database and which database to use. To do this from within Metasploit (msfconsole) type:
![]()
The password (<password>) and port (<port>) are defined within the /opt/framework-4.0.0/properties.ini configuration file. Metasploit has what it calls auxiliary modules that can perform some basic host and service discovery scans, but these often take more time to run than Nmap, so we’ll stick with using Nmap to handle all of those tasks. The db_nmap command within Metasploit allows you to run basic Nmap scans and import the data directly into the database:
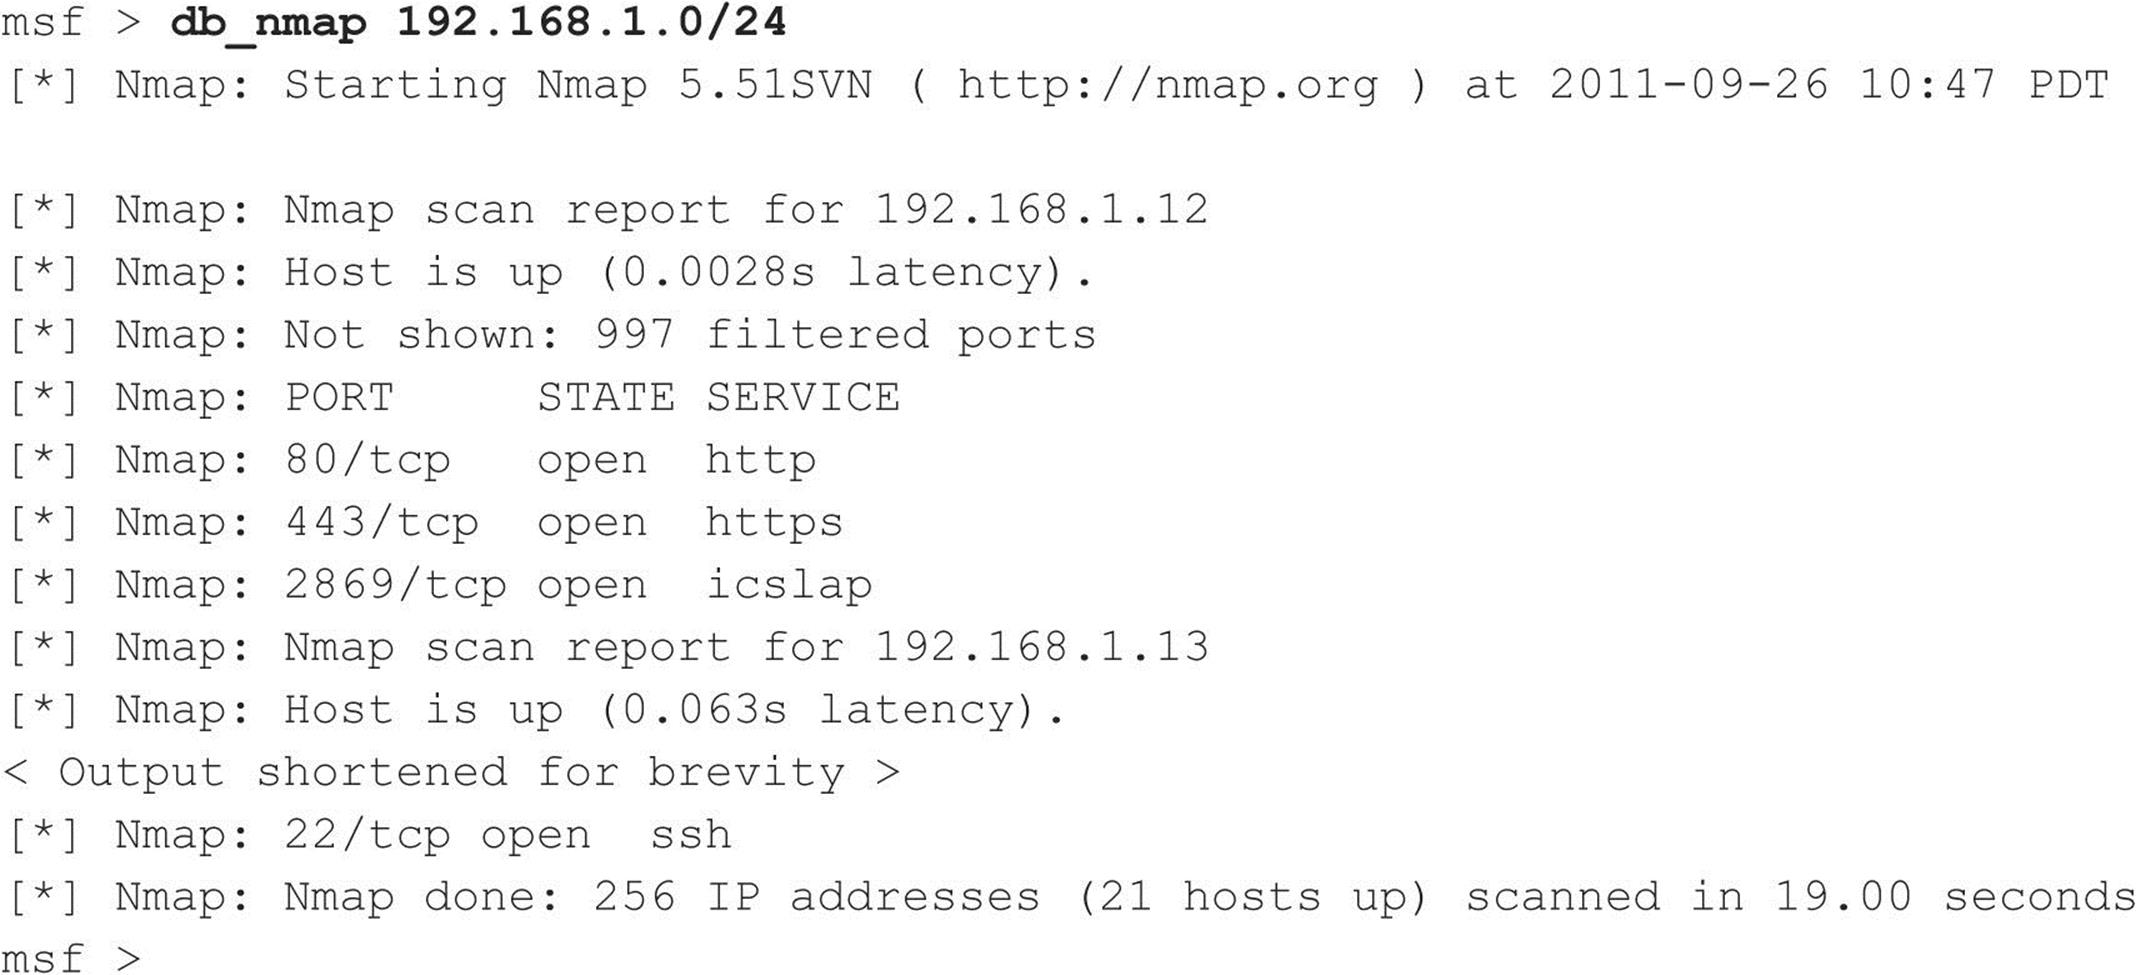
You can specify Nmap’s command options to db_nmap, and it will pass that data to the Nmap instance that runs in the background. One caveat is that if you’re logged in as a non-root user, you won’t be able to use db_nmap for scans that require elevated privileges. But that shouldn’t be a problem because you can also execute any shell commands directly through Metasploit. Here Nmap runs an OS scan of our local subnet and outputs the results to an XML file.
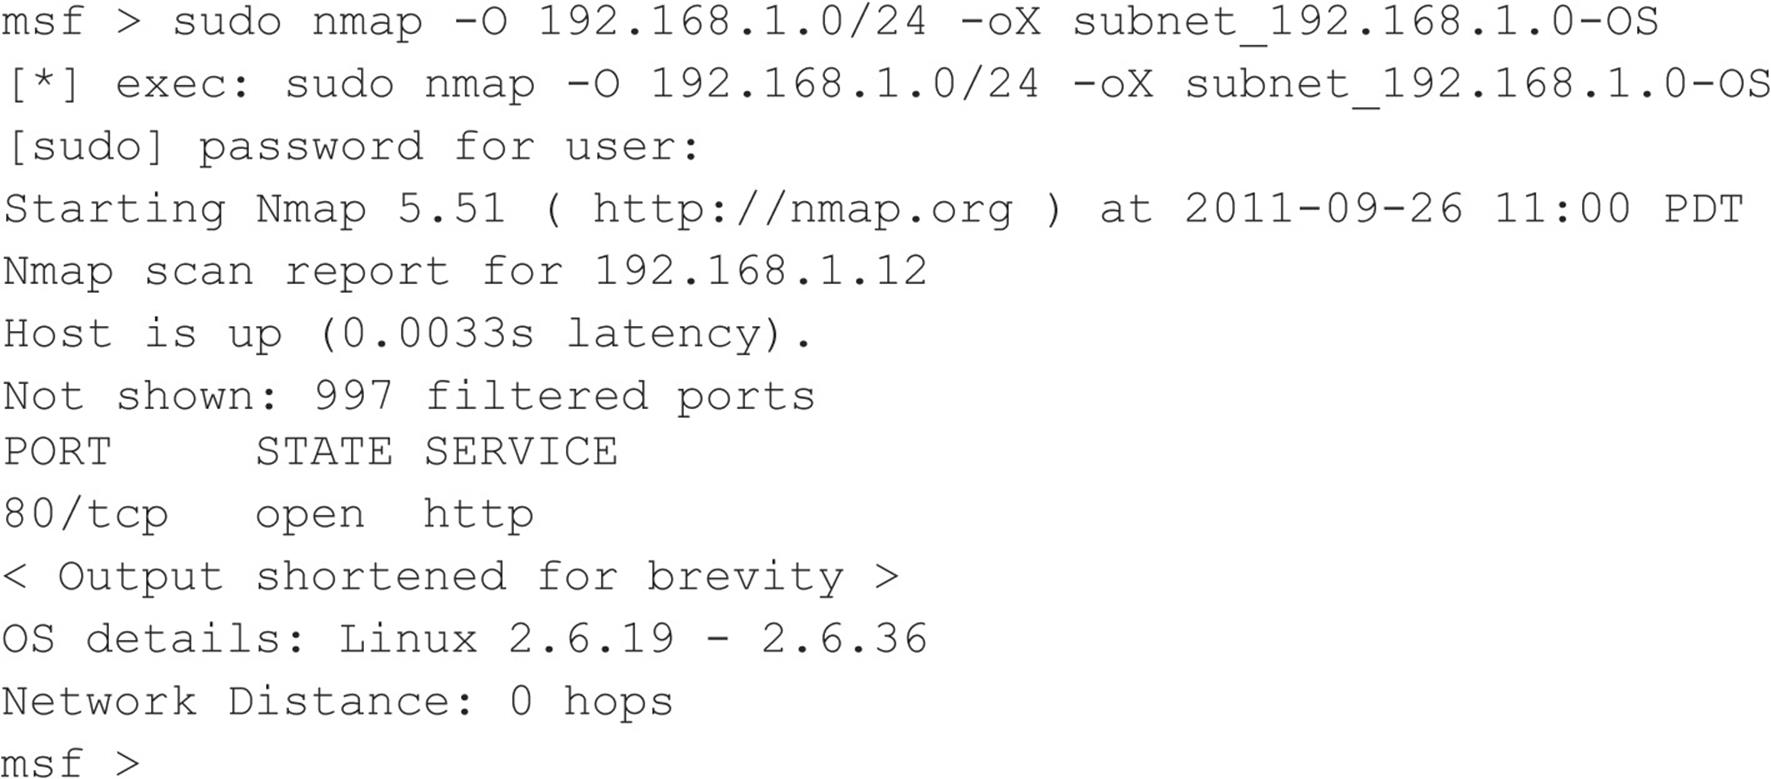
Now we import the results of Nmap’s output into the database with the db_import command:
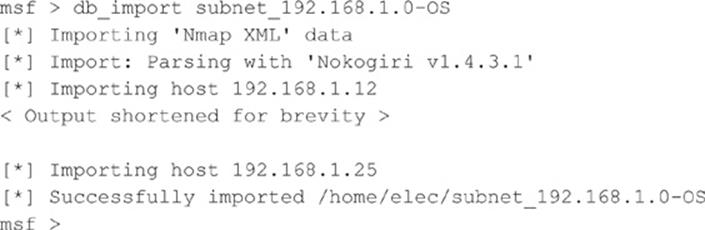
With the scan results loaded into Metasploit, we can perform a variety of queries. The hosts command lists all hosts in the database. You can select specific columns with the –c option. Here, we show all hosts and their operating systems:
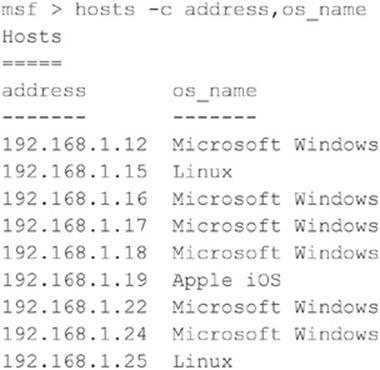
The services command can be used to show all available open ports and services on the identified hosts. You can also filter this data with some basic options. For instance, if you want to see all hosts with SSH available, use the following:
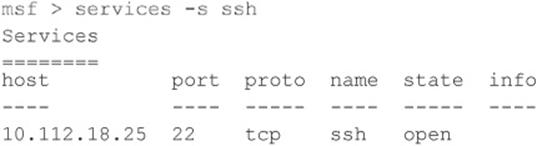
Filtering can be extremely useful when targeting a large network. For instance, if you know of a particular vulnerability that affects all Windows 2008 systems, you can filter the hosts that are running Windows 2008 to create a target list. Later, you can target those specific hosts to make your attack much more efficient.
SUMMARY
We have covered the requisite tools and techniques to perform ping sweeps; TCP, UDP, and ICMP port scanning; and operating system detection. By using ping sweep tools, you can identify systems that are alive and pinpoint potential targets. By using a myriad of TCP and UDP scanning tools and techniques, you can identify potential services that are listening and make some assumptions about the level of exposure associated with each system. Finally, we demonstrated how attackers could use operating system detection software to determine with fine precision the specific operating system used by the target system. As we continue, you will see that the information collected thus far is critical to mounting a focused attack.
All materials on the site are licensed Creative Commons Attribution-Sharealike 3.0 Unported CC BY-SA 3.0 & GNU Free Documentation License (GFDL)
If you are the copyright holder of any material contained on our site and intend to remove it, please contact our site administrator for approval.
© 2016-2026 All site design rights belong to S.Y.A.