Hacking Exposed 7: Network Security Secrets and Solutions (2012)
PART I. CASING THE ESTABLISHMENT
CHAPTER 3. ENUMERATION
Now that an attacker has successfully identified live hosts and running services using the techniques discussed in Chapter 2, he will typically turn next to probing the identified services more fully for known weaknesses, a process we call enumeration. It is also worth noting that, as an attacker progresses through later stages of the attack and obtains connectivity to hosts and segments he previously did not have access to, he will often return to this phase to find ways to greatly expand his foothold and work toward specific targets.
The key difference between the previously discussed information-gathering techniques and enumeration is in the level of intrusiveness. Enumeration involves active connections to systems and directed queries. As such, they may (should!) be logged or otherwise noticed. We will show you what to look for and how to block them, if possible.
Much of the information garnered through enumeration may appear harmless at first glance. However, the information that leaks from the following holes can be your undoing, as we illustrate throughout this chapter. In general, the information attackers seek via enumeration includes user account names (to inform subsequent password-guessing attacks), oft-misconfigured shared resources (for example, unsecured file shares), and older software versions with known security vulnerabilities (such as web servers with remote buffer overflows). Once a service is enumerated, it’s usually only a matter of time before the intruder compromises the system in question to some degree, if not completely. By closing these easily fixed loopholes, you eliminate the attacker’s first foothold.
Enumeration techniques tend to be platform-specific and are, therefore, heavily dependent on information gathered in Chapter 2 (port scans and OS detection). In fact, port scanning and enumeration functionality are often bundled into the same tool, as you saw in Chapter 2 with programs such as SuperScan, which can scan a network for open ports and simultaneously grab banners from any it discovers listening. This chapter will begin with a brief discussion of banner grabbing, the most generic of enumeration techniques, and then delve into more platform-specific mechanisms that may require more specialized tools.
We will discuss services in numeric order, according to the port on which they traditionally listen, whether TCP or UDP—for example, we discuss TCP 21 (FTP) first, TCP 23 (telnet) next, TCP 25 (SMTP) after that, and so on. This chapter does not exhaustively cover every conceivable enumeration technique against all 65,535 TCP and UDP ports; we focus only on those services that have traditionally given up the lion’s share of information about target systems, based on our experiences as professional security testers. We hope this more clearly illustrates how enumeration is designed to help provide a more concise understanding of the target, along the way to advancing the attacker’s main agenda of unauthorized system access.
NOTE Throughout this chapter, we use the phrase “NT Family” to refer to all systems based on Microsoft’s “New Technology” (NT) platform, including Window NT 3.x–4. x, Windows 2000, Windows XP, Windows 2003, Windows Vista, Windows 7, and Windows Server 2008. Where necessary, we differentiate between desktop and server versions. In contrast, we refer to the legacy Microsoft DOS/Windows 1.x/3.x/9x/Me lineage as the “DOS Family.”
SERVICE FINGERPRINTING
The bulk of this chapter focuses on manual techniques for enumerating specific services, such as SMTP, DNS, and SNMP. But before we jump into a discussion of those manual techniques, we need to point out automated techniques for evaluating entire networks for the same information—quickly and efficiently—using a process called service fingerprinting. Given the power and scale of these techniques, they are most likely to be used by modern attackers, unless extreme stealth is required, in which case manual hunt-and-peck will be employed.
In Chapter 2, we discussed how to scan for open ports across one or more networks. Service fingerprinting goes one step further, revealing the actual services (and deeper information such as their revision/patch level) associated with each port. Service fingerprinting is more thorough and provides more valuable information than scanning, but it is also more time consuming and noticeable because it generates considerably more traffic.
![]() Nmap Version Scanning
Nmap Version Scanning

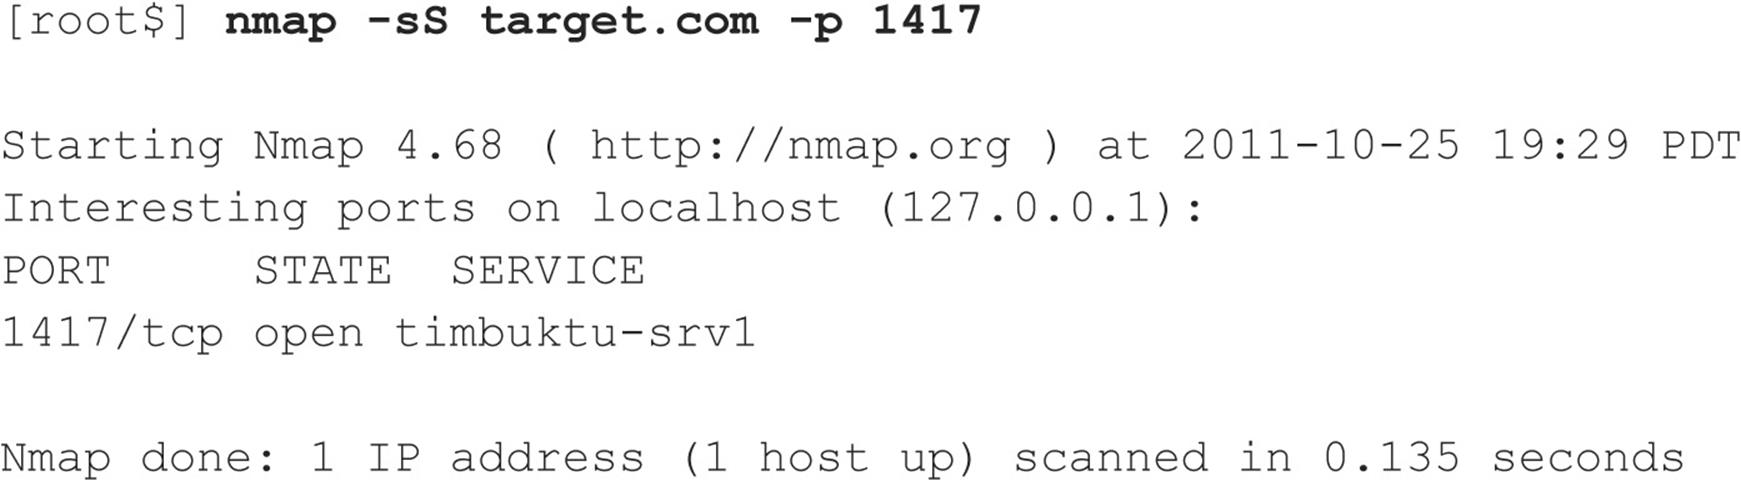
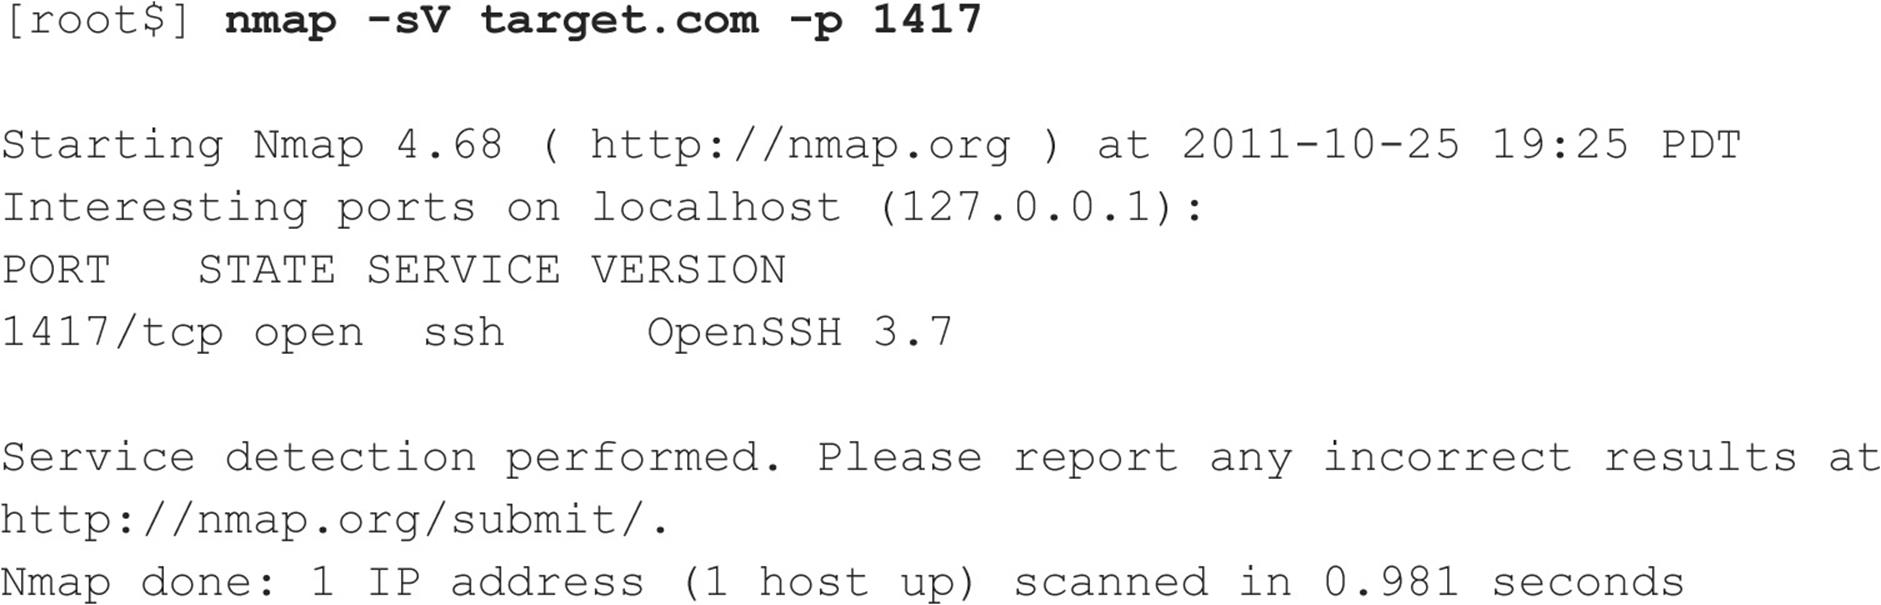
Chapter 2 introduced you to the powerful and free network scanning tool Nmap (nmap.org) and its scanning and operating system identification capabilities. As you may have noticed in the prior discussion, by default, Nmap lists service names along with ports. This service information is obtained from a file named nmap-services, which is simply a text file mapping services with their commonly associated ports. Nmap utilized with the -sV switch goes a step further and interrogates the ports, soliciting feedback and matching what it receives with known protocols and specific protocol version information using a different file called nmap-service-probe, which contains information on known service responses. With this additional insight, you can identify “hidden” services, such as an exploitable OpenSSH 3.7 service running on TCP port 1417 (as opposed to the default SSH port 22), without overlooking it as an otherwise less-interesting Timbuktu server (normally found on port 1417). The following example Nmap output demonstrates this scenario. First, here’s an Nmap SYN scan misidentifying the service:
Now, here’s an Nmap version scan getting it right:
![]() Amap Version Scanning
Amap Version Scanning

Amap (thc.org/thc-amap/) is a dedicated service fingerprinting tool, the first of its kind, predating the Nmap version scanning functionality discussed above by years. At the time of this writing, largely due to its vast preexisting user and developer base, Nmap has since gone on to become the premier version scanning tool. But when fingerprinting services, sometimes getting a second opinion is helpful. Amap utilizes its own network service pattern-matching techniques to fingerprint network services, and although Nmap’s functionality is typically more accurate and up-to-date, occasionally Amap catches something Nmap has difficulty with.
VULNERABILITY SCANNERS
When stealth isn’t required, whether because the attacker knows the target doesn’t have effective monitoring capabilities or she is simply moving quickly enough not to be concerned about detection, employing the battering-ram approach of directing an automated vulnerability scanner against a target or entire network can be an effective and time-efficient means of gathering vulnerability information.
Typically, automated vulnerability scanners contain and regularly update vast databases of known vulnerability signatures for essentially anything listening on a network port, including operating systems, services, and web applications. They can even detect vulnerabilities in client-side software given sufficient credentials, an approach that may be useful in later stages of the attack when the attacker may be interested in expanding her foothold further by compromising additional privileged user accounts.
Numerous vulnerability scanning tools are available commercially at the time of this writing, from companies including McAfee, Qualys, Rapid7, nCircle, and Tenable. On the open source front, the Open Vulnerability Assessment System (OpenVAS, openvas.org) is an alternative for those looking for free tools. We describe one of the more popular tools next to demonstrate the capability of modern scanners to perform enhanced enumeration.
![]() Nessus Scanning
Nessus Scanning

Nessus, by Tenable Network Security (nessus.org/products/nessus), has long been the gold standard of vulnerability scanners. Its easy-to-use graphical interface, frequently updated database of vulnerabilities, support for all major platforms (the Nessus client component has even been ported to iPhone and Android!), and optimized performance make it well suited for exhaustively scanning a target or network of targets in short order. Users can also develop custom plug-ins using the interpreted Nessus Attack Scripting Language (NASL) to extend its capabilities to meet most any imaginable scanning need. Figure 3-1 shows the Nessus web console.
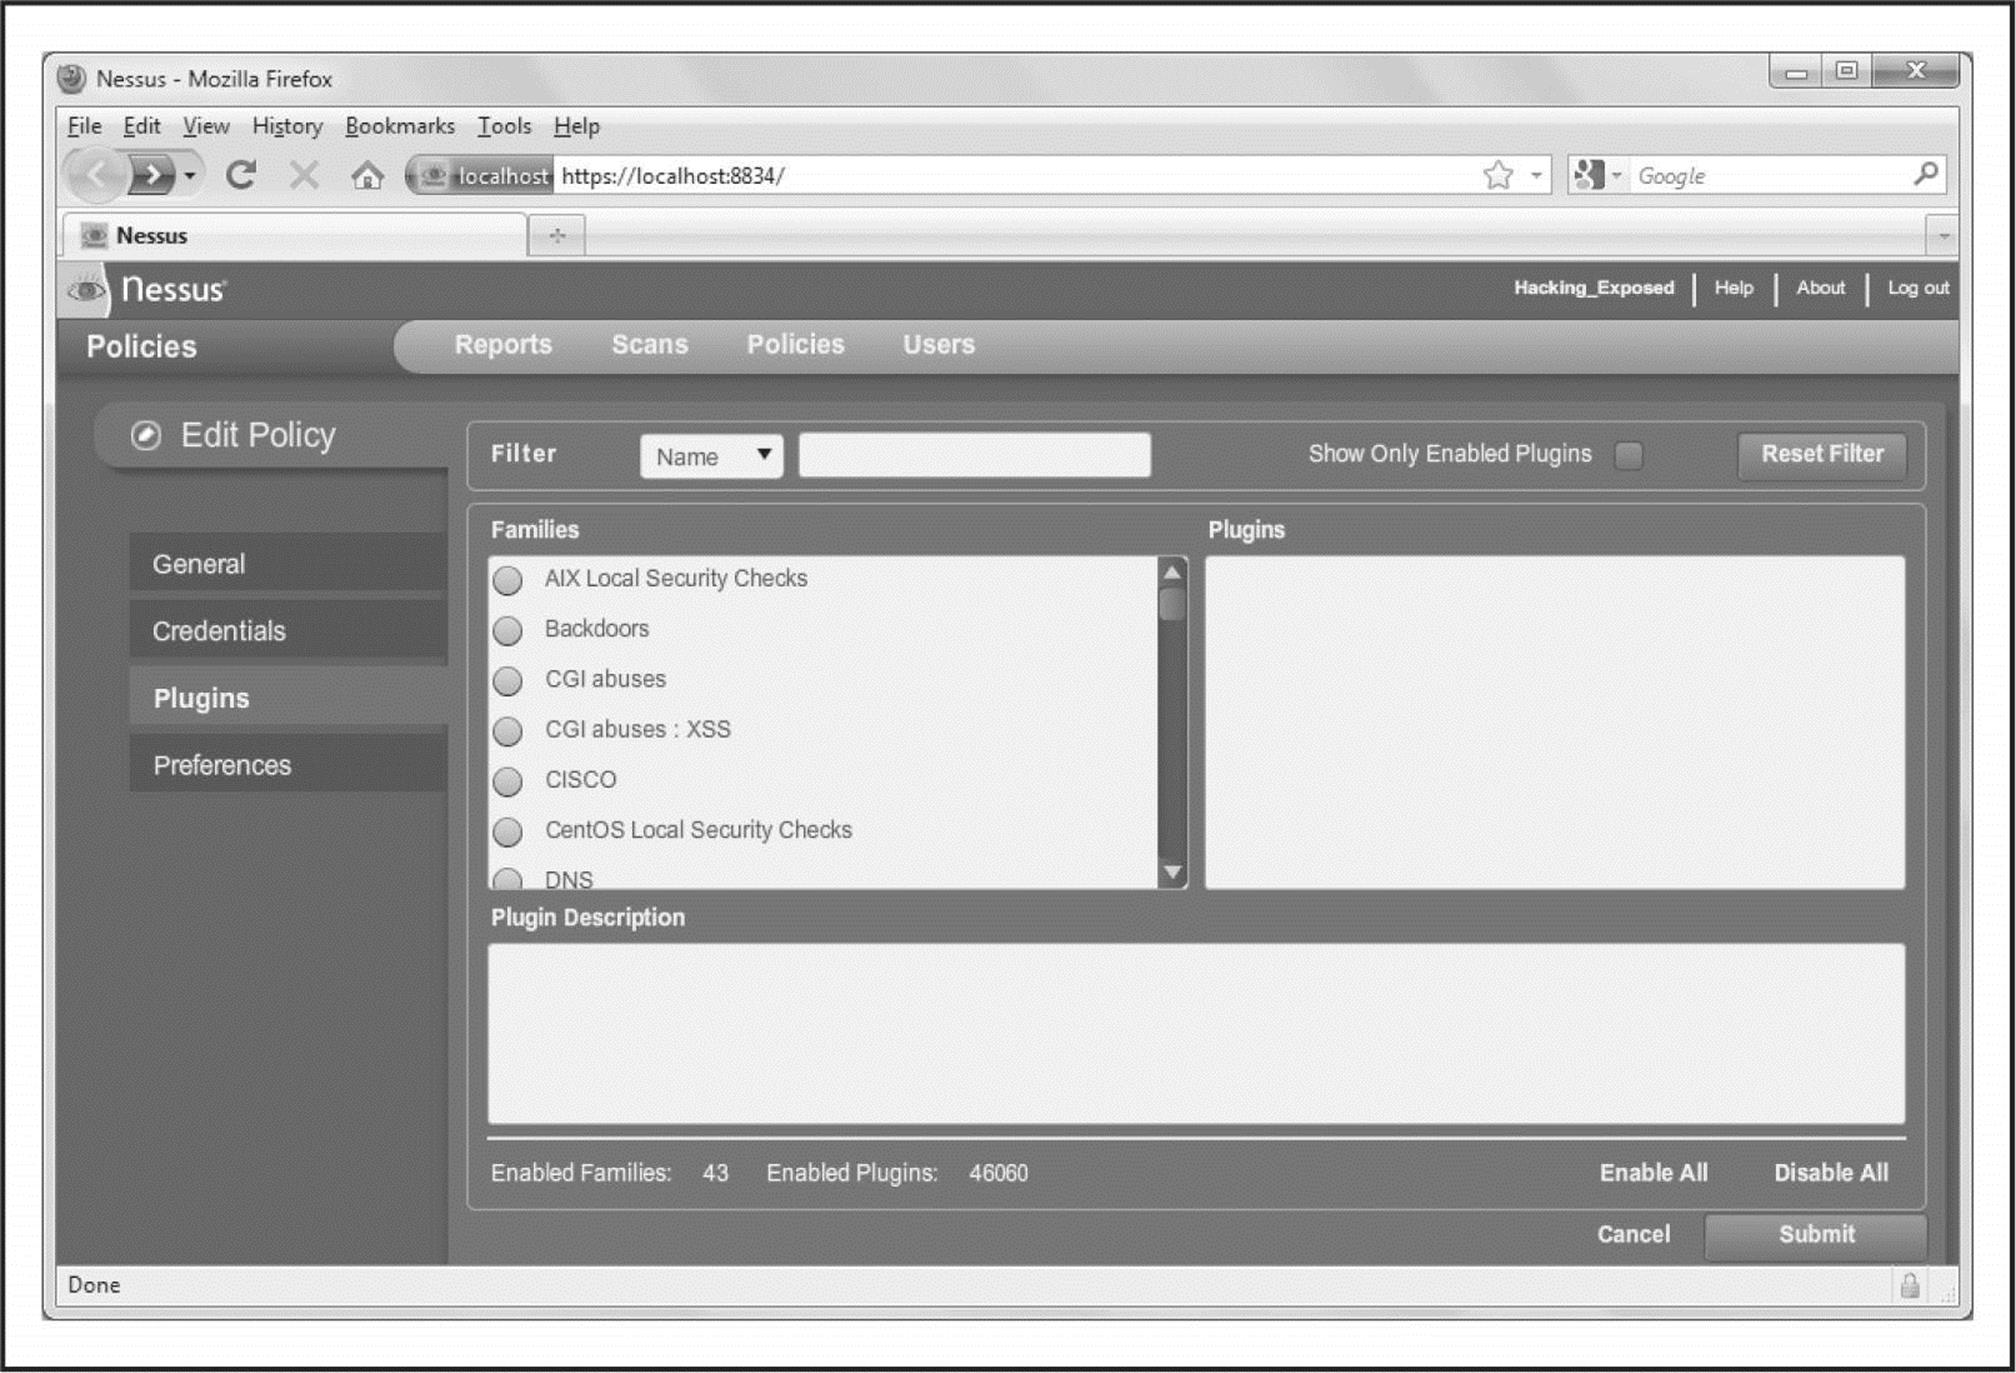
Figure 3-1 The Nessus 4.4.1 web console. Notice that, at the time of this writing, it has 46,060 plug-ins, aka unique vulnerability checks! By the time you read this, it will have many more.
NOTE Be sure you are in compliance with Nessus’s licensing model, particularly if you plan to use recent versions of it in a corporate setting. Nessus was free and open source until version 3 when it changed to a proprietary closed-source model. Because of this, some users have preferred to stay with Nessus 2 or the open source, community-driven alternative that forked out of Nessus 2, OpenVAS (openvas.org). But recent improvements to Nessus’s scanning engine and plug-ins make the newer releases compelling and most likely worthy of the investment. As of this writing, home users could use the Nessus 4 HomeFeed for free, but corporate users must purchase the ProfessionalFeed.
![]() Nessus Scanning Countermeasures
Nessus Scanning Countermeasures
To prevent your system’s vulnerabilities from being enumerated by tools like Nessus, you should, of course, implement effective patch and configuration management processes to try to prevent such vulnerabilities from being introduced in the first place. But also regularly scan your own systems with such tools, so you can detect and remediate the ones that get through, hopefully before an attacker has the opportunity.
In addition, due to the sheer popularity of automated vulnerability scanners, Intrusion Detection and Prevention System (IDS/IPS) vendors have tuned their detection signatures to alert on the behavior of tools like Nessus. In the case of IPS, products can block or simply slow scans down to a crawl, frustrating the attacker, which may cause him to move on to the next, softer target if he is simply an opportunistic individual.
![]() Nmap NSE Scripting
Nmap NSE Scripting
As if Nmap wasn’t powerful enough, it also has the ability to conduct all of the enumeration activities covered in this chapter and so much more via the Nmap Scripting Engine (NSE).
Nmap’s NSE is an interface that allows users to extend Nmap’s capabilities via their own custom scripts written in the Lua interpreted programming language to send, receive, and report on arbitrary data. This feature clearly creates some overlap between Nmap and tools like Nessus. But as stated on nmap.org, this functionality was not introduced so Nmap could compete head-to-head with Nessus (why reinvent the wheel after all?) but rather so it could be utilized to check for specific issues, typically when a scalpel is preferred to a battering ram.
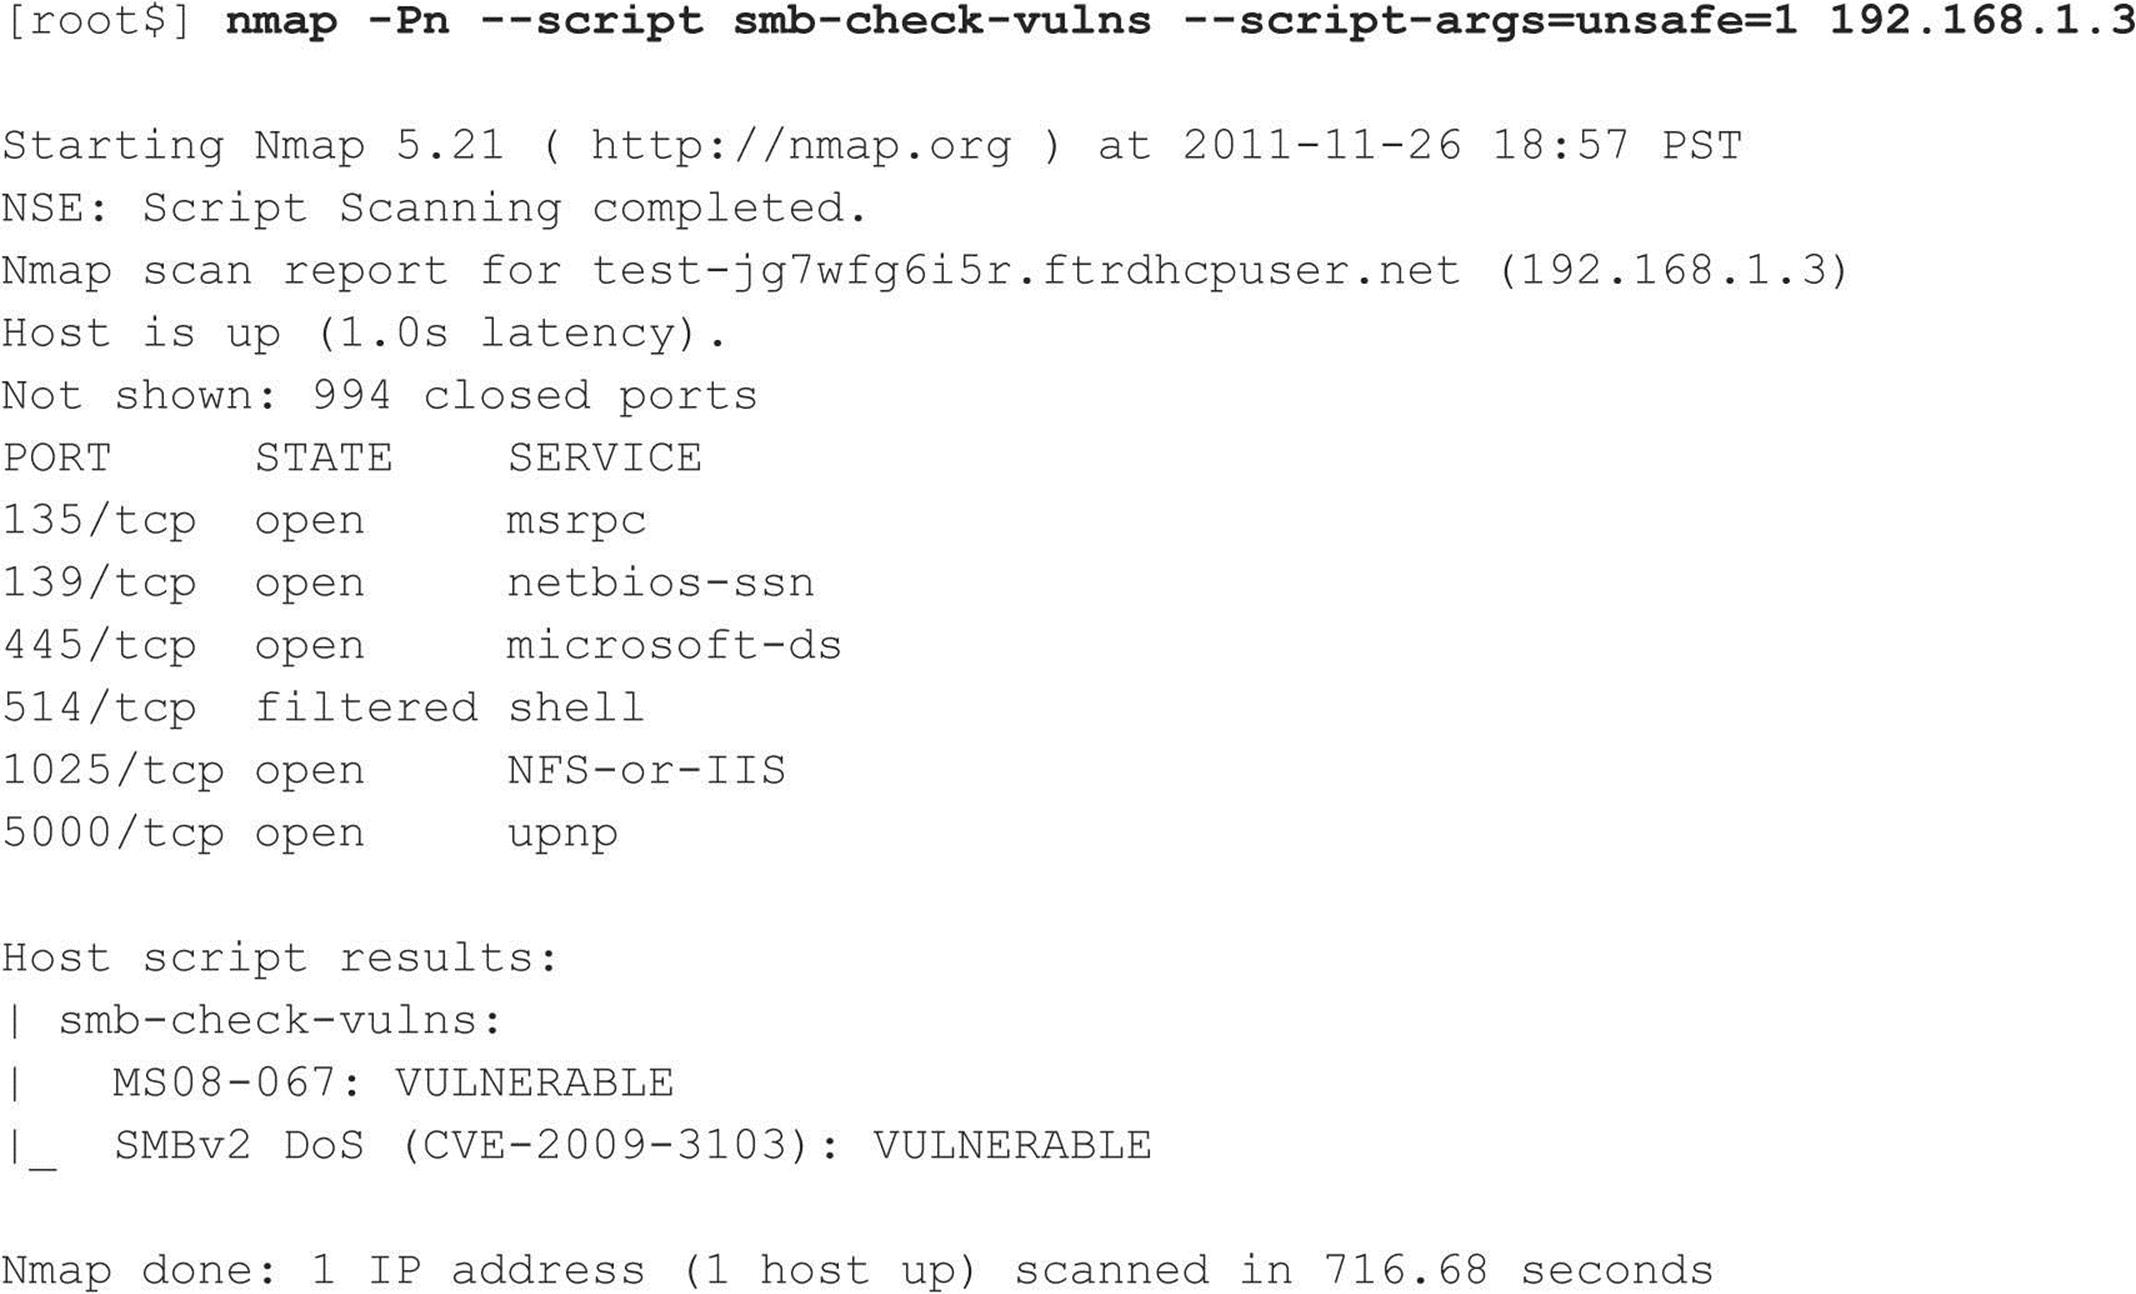
Nmap comes bundled with a library of useful NSE scripts (invoked by adding either --script to run a specific script or –sC to run a set of default scripts) capable of performing activities such as network discovery, version detection, backdoor detection, and even exploitation of vulnerabilities. The following demonstrates an SMB vulnerability checker Nmap NSE script, which comes bundled with current versions of Nmap (note this script even has an option to enable unsafe, i.e., potentially disruptive, tests):
BASIC BANNER GRABBING
The most fundamental of enumeration techniques is banner grabbing, which was mentioned briefly in Chapter 2. Banner grabbing can be simply defined as connecting to remote services and observing the output, and it can be surprisingly informative to remote attackers. At the very least, they may identify the make and model of the running service, which in many cases is enough to set the vulnerability research process in motion.
As also noted in Chapter 2, many port-scanning tools can perform banner grabbing in parallel with their main function of identifying open ports (the harbinger of an exploitable remote service). This section briefly catalogs the most common manual techniques for banner grabbing, of which no self-respecting hacker should be ignorant (no matter how automated port scanners become).
![]() The Basics of Banner Grabbing: telnet and netcat
The Basics of Banner Grabbing: telnet and netcat

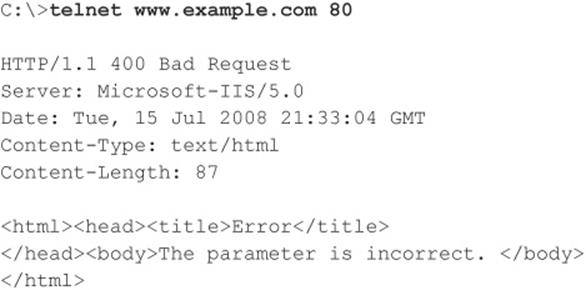
The tried-and-true manual mechanism for enumerating banners and application info has traditionally been based on telnet (a remote communications tool built into most operating systems). Using telnet to grab banners is as easy as opening a telnet connection to a known port on the target server, pressing ENTER a few times, if necessary, and seeing what comes back:
This is a generic technique that works with many common applications that respond on a standard port, such as HTTP port 80, SMTP port 25, or FTP port 21.
For a slightly more surgical probing tool, rely on netcat, the “TCP/IP Swiss Army knife.” Netcat was written by Hobbit and ported to the Windows NT Family by Weld Pond while he was with the L0pht security research group. As you will see throughout this book, netcat belongs in the permanent System Administrators Hall of Fame for its elegant flexibility. When employed by the enemy, it is simply devastating. Here, we examine one of its more simplistic uses, connecting to a remote TCP/IP port and enumerating the service banner:
![]()
A bit of input here usually generates some sort of a response. In this case, pressing ENTER causes the following:
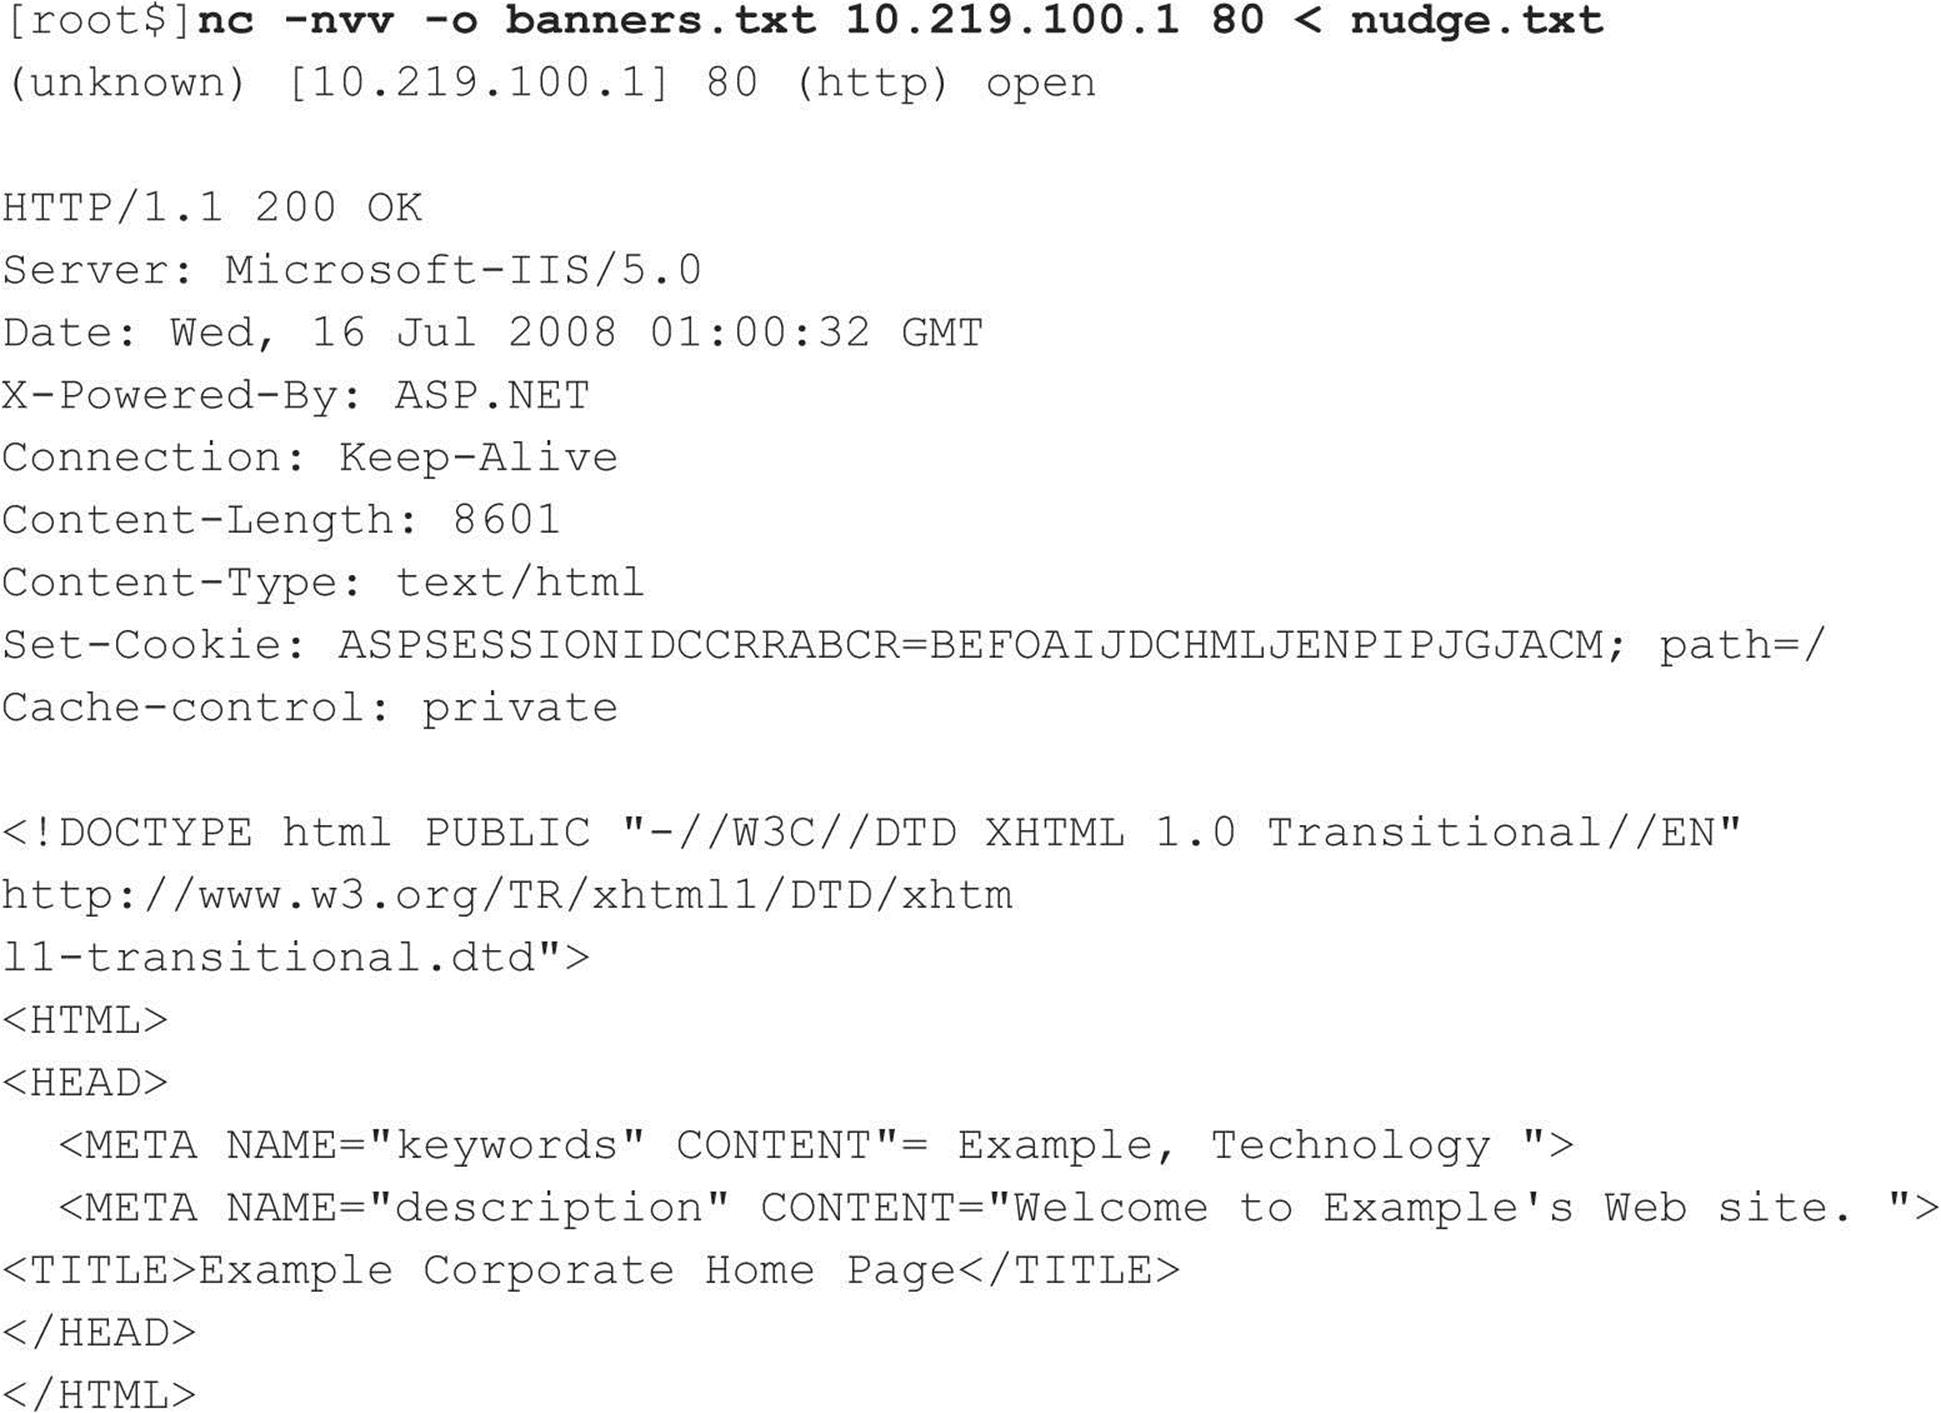
One tip from the netcat readme file discusses how to redirect the contents of a file into netcat to nudge remote systems for even more information. For example, create a text file called nudge.txt containing the single line GET / HTTP/ 1.0, followed by two carriage returns, and then the following:
TIP The netcat -n argument is recommended when specifying numeric IP addresses as a target.
Know any good exploits for Microsoft IIS 5.0? You get the point. Depending on the service being probed, the nudge file can contain various possibilities, such as HEAD/HTTP/1.0 <cr><cr>, QUIT <cr>, HELP <cr>, ECHO <cr>, or even just a couple carriage returns (<cr>).
This information can significantly focus an intruder’s effort to compromise a system. Now that the vendor and version of the server software are known, attackers can concentrate on platform-specific techniques and known exploit routines until they get one right. Time is shifting in their favor and against the administrator of this machine. You’ll hear more about netcat throughout this book.
![]() Banner-Grabbing Countermeasures
Banner-Grabbing Countermeasures
As we’ve already noted, the best defense against banner grabbing is to shut down unnecessary services. Alternatively, restrict access to services using network access control. Perhaps the widest avenue of entry into any environment is running vulnerable software services, so this access should be restricted to combat more than just banner grabbing.
Next, for those services that are business critical and can’t simply be turned off, you need to research the correct way to disable the presentation of the vendor and version in banners. Audit yourself regularly with automated tools and manual spot checks (e.g., with netcat) to make sure you aren’t giving away inappropriate information to attackers.
ENUMERATING COMMON NETWORK SERVICES
Let’s use some of these basic enumeration techniques, and much more, to enumerate services commonly turned up by real-world port scans.
![]() FTP Enumeration, TCP 21
FTP Enumeration, TCP 21

Although File Transfer Protocol (FTP) is becoming less common on the Internet, connecting to and examining the content of FTP repositories remains one of the simplest and potentially lucrative enumeration techniques. We’ve seen many public web servers that used FTP for uploading web content, providing an easy vector for uploading malicious executables (see Chapter 10 on web hacking for more details). Typically, the availability of easily accessible file-sharing services quickly becomes widespread knowledge, and public FTP sites end up hosting sensitive and potentially embarrassing content. Even worse, many such sites are configured for anonymous access.
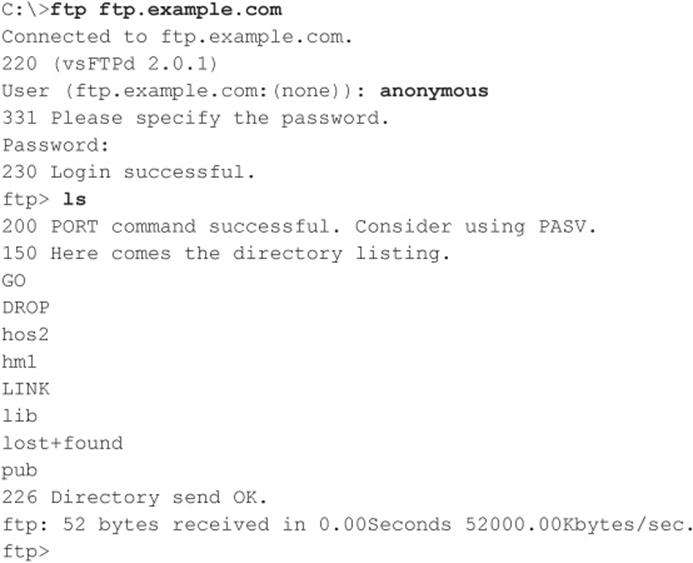
Connecting to FTP is simple, using the client that is typically built into most modern operating systems. The next example shows the Windows command-line FTP client. Note that we use “anonymous” and a spurious e-mail address (not shown in the following output) to authenticate to this anonymous service:
Of course, graphical FTP clients are also available. Most modern web browsers implement FTP and permit browsing of sites via the familiar file-and-folder metaphor. An excellent open source graphical FTP client is FileZilla from filezilla-project.org/. For a list of anonymous FTP sites, see ftp-sites.org. Although this site hasn’t been recently updated, it does contain many sites that are still available.
And, of course, the banner enumerated by FTP can indicate the presence of FTP server software with severe vulnerabilities. Washington University’s FTP server (wu-ftp), for example, was once very popular with attackers due to its history of remotely exploitable buffer overflows that permit complete compromise of the system.
![]() FTP Enumeration Countermeasures
FTP Enumeration Countermeasures
FTP is one of those “oldie-but-not-so-goodie-anymore” services that should just be turned off. Always use Secure FTP (SFTP, which utilizes SSH encryption) or FTP Secure (FTPS, which utilizes SSL) protected by strong passwords or certificate-based authentication. Be especially skeptical of anonymous FTP, and don’t allow unrestricted uploading of files under any circumstances. And public content is often better served via HTTP rather than file-sharing protocols altogether.
![]() Enumerating Telnet, TCP 23
Enumerating Telnet, TCP 23

Telnet was one of the most crucial services in use for many years. In the early days of the Internet, telnet was so valuable because it provided one of the most essential services: remote access. Telnet’s major downfall is that it transmits data in cleartext. This means that anyone with a sniffer can potentially view the entire conversation between the client and server, including the username and password used to log in. With security becoming more of a necessity, this service was later replaced by a more secure, encrypted means of remote administration called secure shell, or SSH.Even though telnet’s insecurities are widely known, this service is still commonly available.
System Enumeration via Telnet Banners From an attacker’s standpoint, telnet can be an easy way to obtain host information because telnet usually displays a system banner prior to login. This banner often contains the host’s operating system and version. With networking equipment such as routers and switches, you may not receive such an explicitly detailed banner. Many times the system displays a unique prompt from which you can easily deduce what type of device it is through prior knowledge or a simple Google search. For instance, with Cisco equipment, you’ll receive one of two prompts:
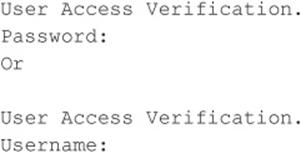
If you receive either banner, you can pretty safely assume that the host you’re connecting to is a Cisco device. The difference between the two prompts is that the Username prompt on Cisco telnet servers usually indicates that the device is using TACACS+ or some sort of authentication, authorization, and accounting (AAA) for authentication, which means some set of lockout mechanisms are most likely in place. This information can aid an attacker in choosing an attack plan when brute forcing. In the case that only a password is requested, the attacker can very likely launch a bruteforce attack without being locked out and, in many cases, go unnoticed by the owner of the device.
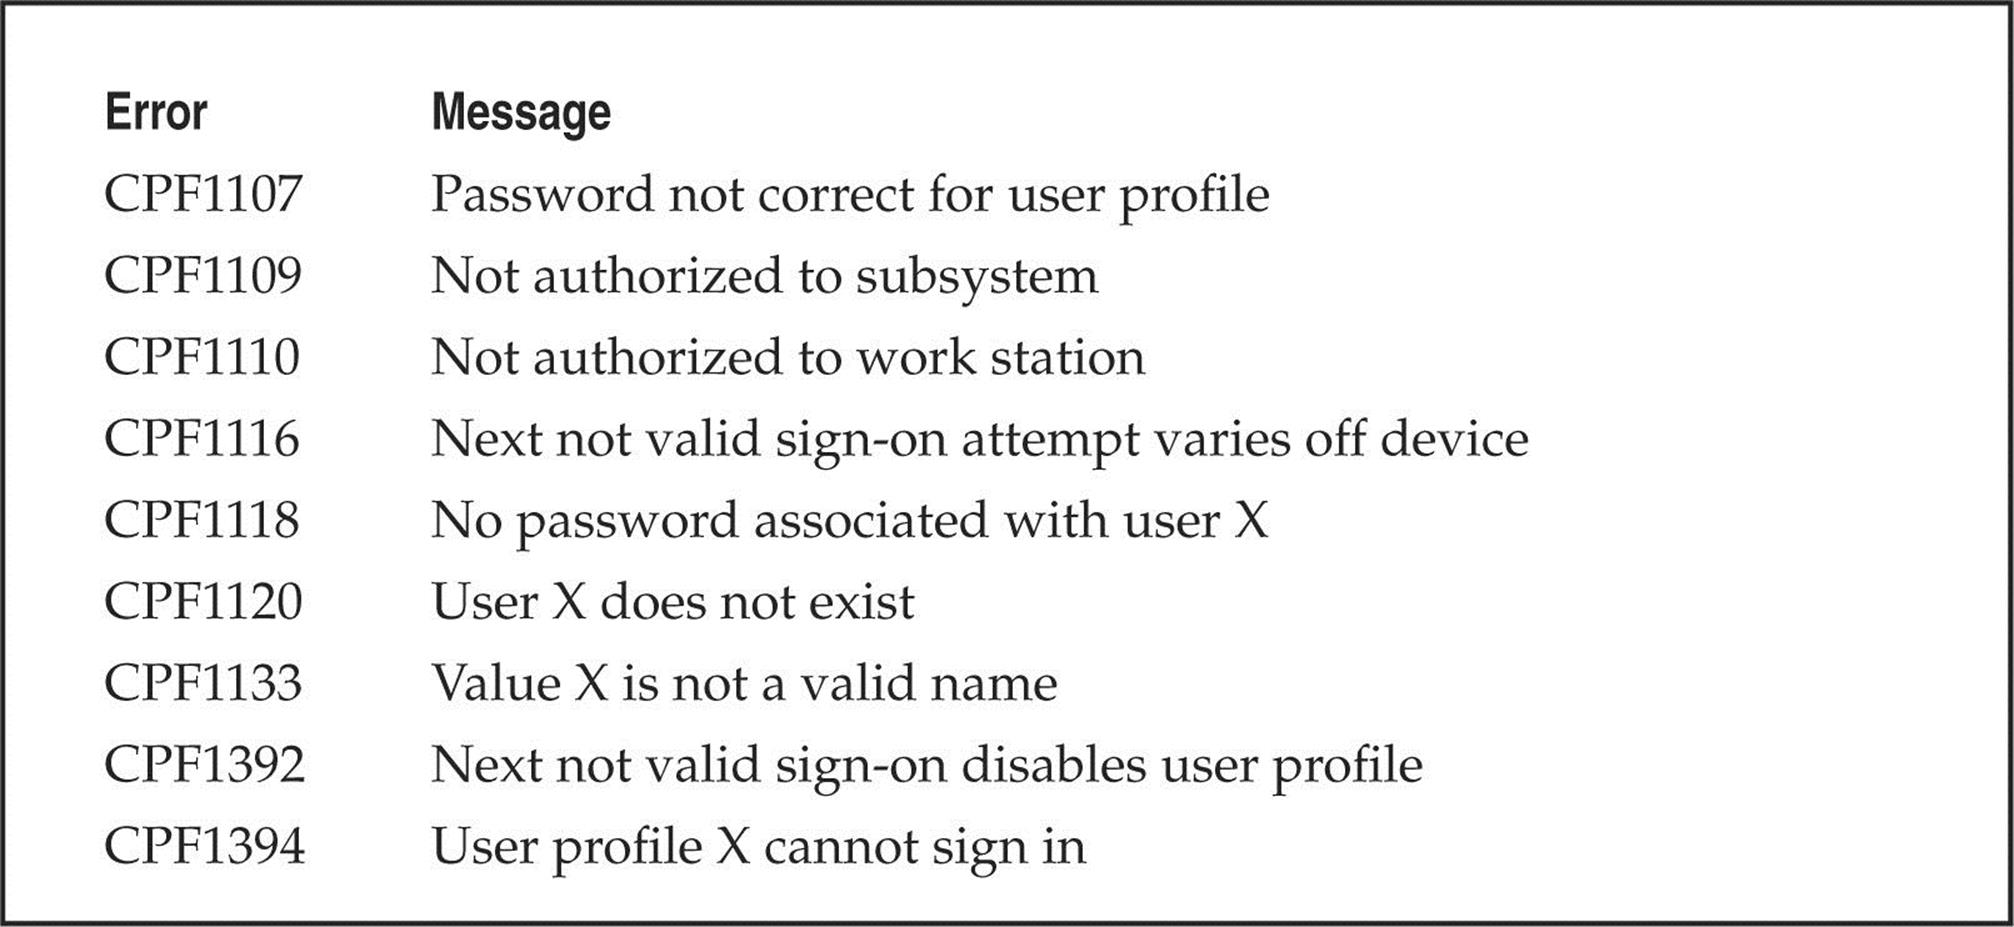
Account Enumeration via Telnet As you’re learning in this chapter, services, daemons, and all other types of client-facing applications can provide valuable information if you just know how to ask for it and what response to look for. One perfect example of this is account enumeration, which is the process of attempting to log in with a particular username and observing the error messages returned by the server. One instance of account enumeration via telnet was demonstrated by Shalom Carmel at Black Hat Europe during his presentation “AS/400 for Pentesters.” Shalom showed that the AS/400 allows for username enumeration during telnet authentication (and POP3). For instance, if an attacker attempts to log in with a valid username but an invalid password, the system responds with “CPF1107 – Password not correct for user profile.” If an attacker attempts to log in with an invalid username, the system responds “CPF 1120 – User X does not exit.” By harvesting the responses from the server for particular usernames, the attacker can begin to build a list of valid accounts for brute forcing. Shalom also provided a list of other common but useful AS/400 error messages provided during authentication, as shown in Table 3-1.
Table 3-1 Common Error Messages
![]() Telnet Enumeration Countermeasures
Telnet Enumeration Countermeasures
Generally speaking, the insecure nature of telnet should be cause enough to discontinue its use and seek alternate means of remote management. Secure shell (SSH) is a widely deployed alternative that should be used as a replacement in all possible cases. In situations where telnet must be used, mitigating controls to restrict access to the service on a host/segment basis should be deployed. Banner information can be modified in most cases, so be sure to consult your vendor for more information. In regards to the specific AS/400 telnet enumeration issue, these error messages can be modified to be generalized using the CHMSGD command, and it is recommended you require users to reconnect between failed login attempts.
![]() Enumerating SMTP, TCP 25
Enumerating SMTP, TCP 25

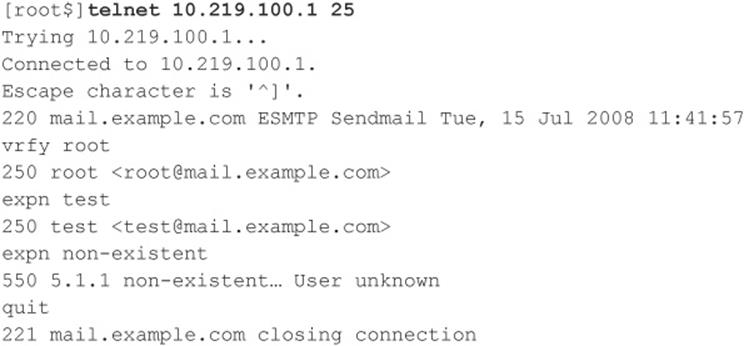
One of the most classic enumeration techniques takes advantage of the lingua franca of Internet mail delivery, the Simple Mail Transfer Protocol (SMTP), which typically runs on TCP port 25. SMTP provides two built-in commands that allow for the enumeration of users: VRFY, which confirms names of valid users, and EXPN, which reveals the actual delivery addresses of aliases and mailing lists. Although most companies give out e-mail addresses quite freely these days, allowing this activity on your mail server raises the possibility of forged e-mail and, more importantly, can provide intruders with the names of local user accounts on the server. We use telnet in the next example to illustrate SMTP enumeration, but you can use netcat as well:
A tool called vrfy.pl can speed up this process. An attacker can use vrfy.pl to specify the target SMTP server and a list of usernames to test. vrfy.pl then runs through the username file and reports back on which users the server has identified as valid.
![]() SMTP Enumeration Countermeasures
SMTP Enumeration Countermeasures
This is another one of those oldie-but-goodie services that should just be turned off. Versions of the popular SMTP server software sendmail (sendmail.org) greater than 8 offer syntax that can be embedded in the mail.cf file to disable these commands or require authentication. Microsoft’s Exchange Server prevents nonprivileged users from using EXPN and VRFY, by default, in more recent versions. Other SMTP server implementations should offer similar functionality. If they don’t, consider switching vendors!
![]() DNS, TCP/UDP 53
DNS, TCP/UDP 53

As you saw in Chapter 1, one of the primary sources of footprinting information is the Domain Name System (DNS), the Internet standard protocol for matching host IP addresses with human-friendly names such as “foundstone.com.” DNS normally operates on UDP port 53 but may also run on TCP port 53 for extended features such as zone transfers.
DNS Enumeration with Zone Transfers One of the oldest enumeration techniques is the DNS zone transfer, which can be implemented against misconfigured DNS servers via TCP port 53. Zone transfers dump the entire contents of a given domain’s zone files, enumerating information such as hostname-to-IP address mappings as well as Host Information Record (HINFO) data (see Chapter 1).
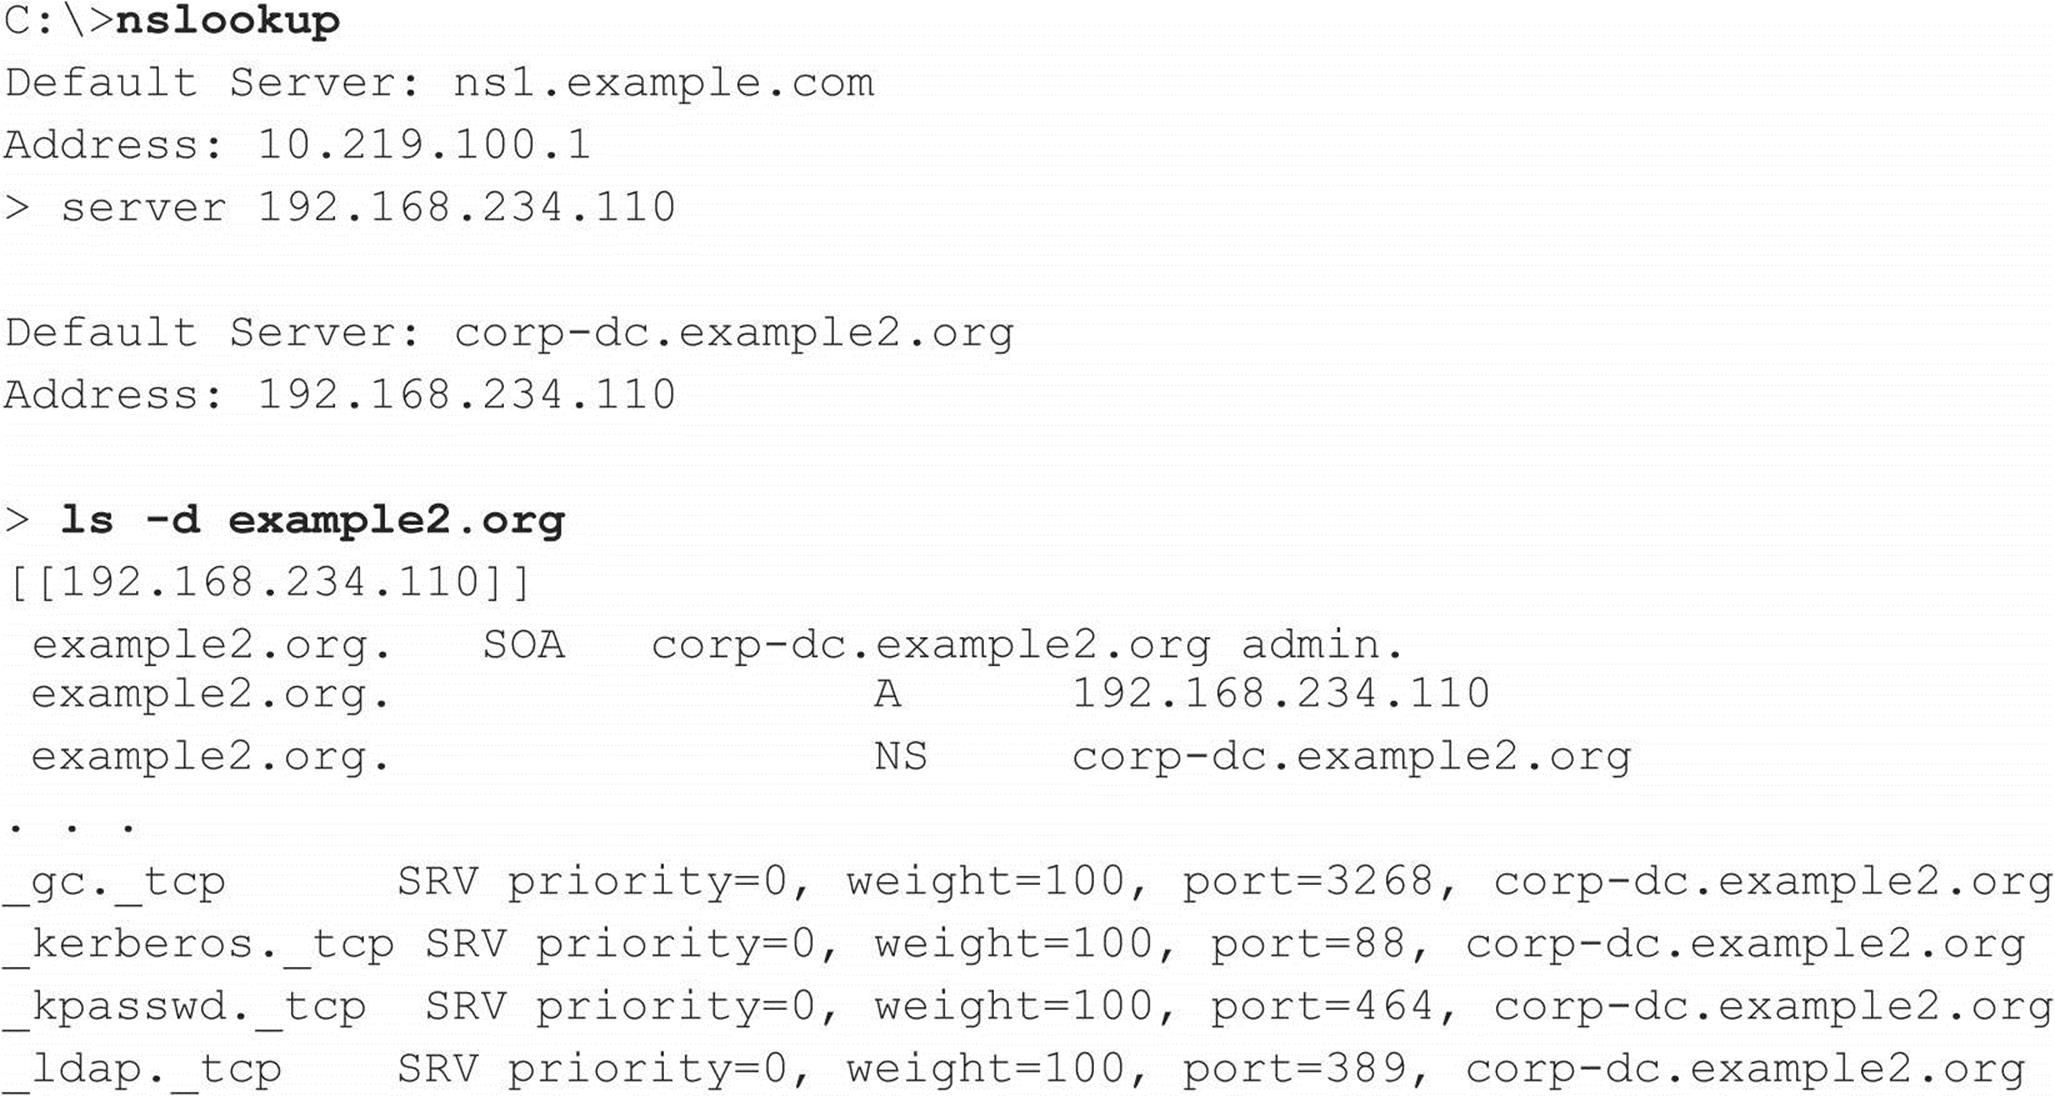
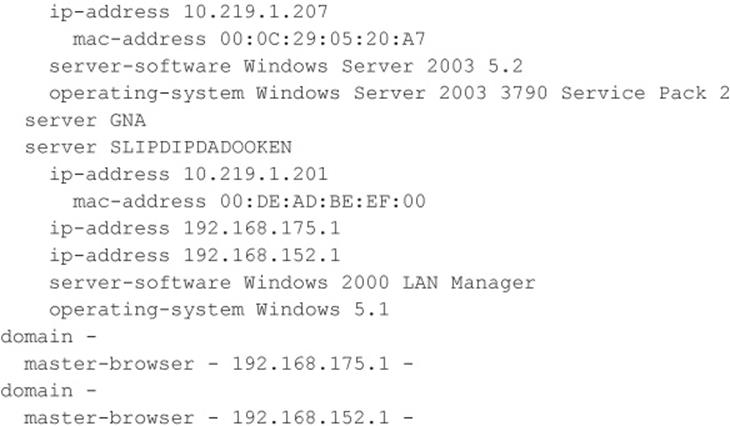
If the target server is running Microsoft DNS services to support Active Directory (AD), there’s a good chance an attacker can gather even more information. Because the AD namespace is based on DNS, Microsoft’s DNS server implementation advertises domain services such as AD and Kerberos using the DNS SRV record (RFC 2052), which allows servers to be located by service type (for example, LDAP, FTP, or WWW) and protocol (for example, TCP). Therefore, a simple zone transfer (nslookup, ls –d <domainname>) can enumerate a lot of interesting network information, as shown in the following sample zone transfer run against the domain “example2.org” (edited for brevity and line-wrapped for legibility):
Per RFC 2052, the format for SRV records is as follows:
![]()
Some very simple observations an attacker could take from this file would be the location of the domain’s Global Catalog service (_gc._tcp), domain controllers using Kerberos authentication (_kerberos._tcp), LDAP servers (_ldap._tcp), and their associated port numbers. (Only TCP incarnations are shown here.)
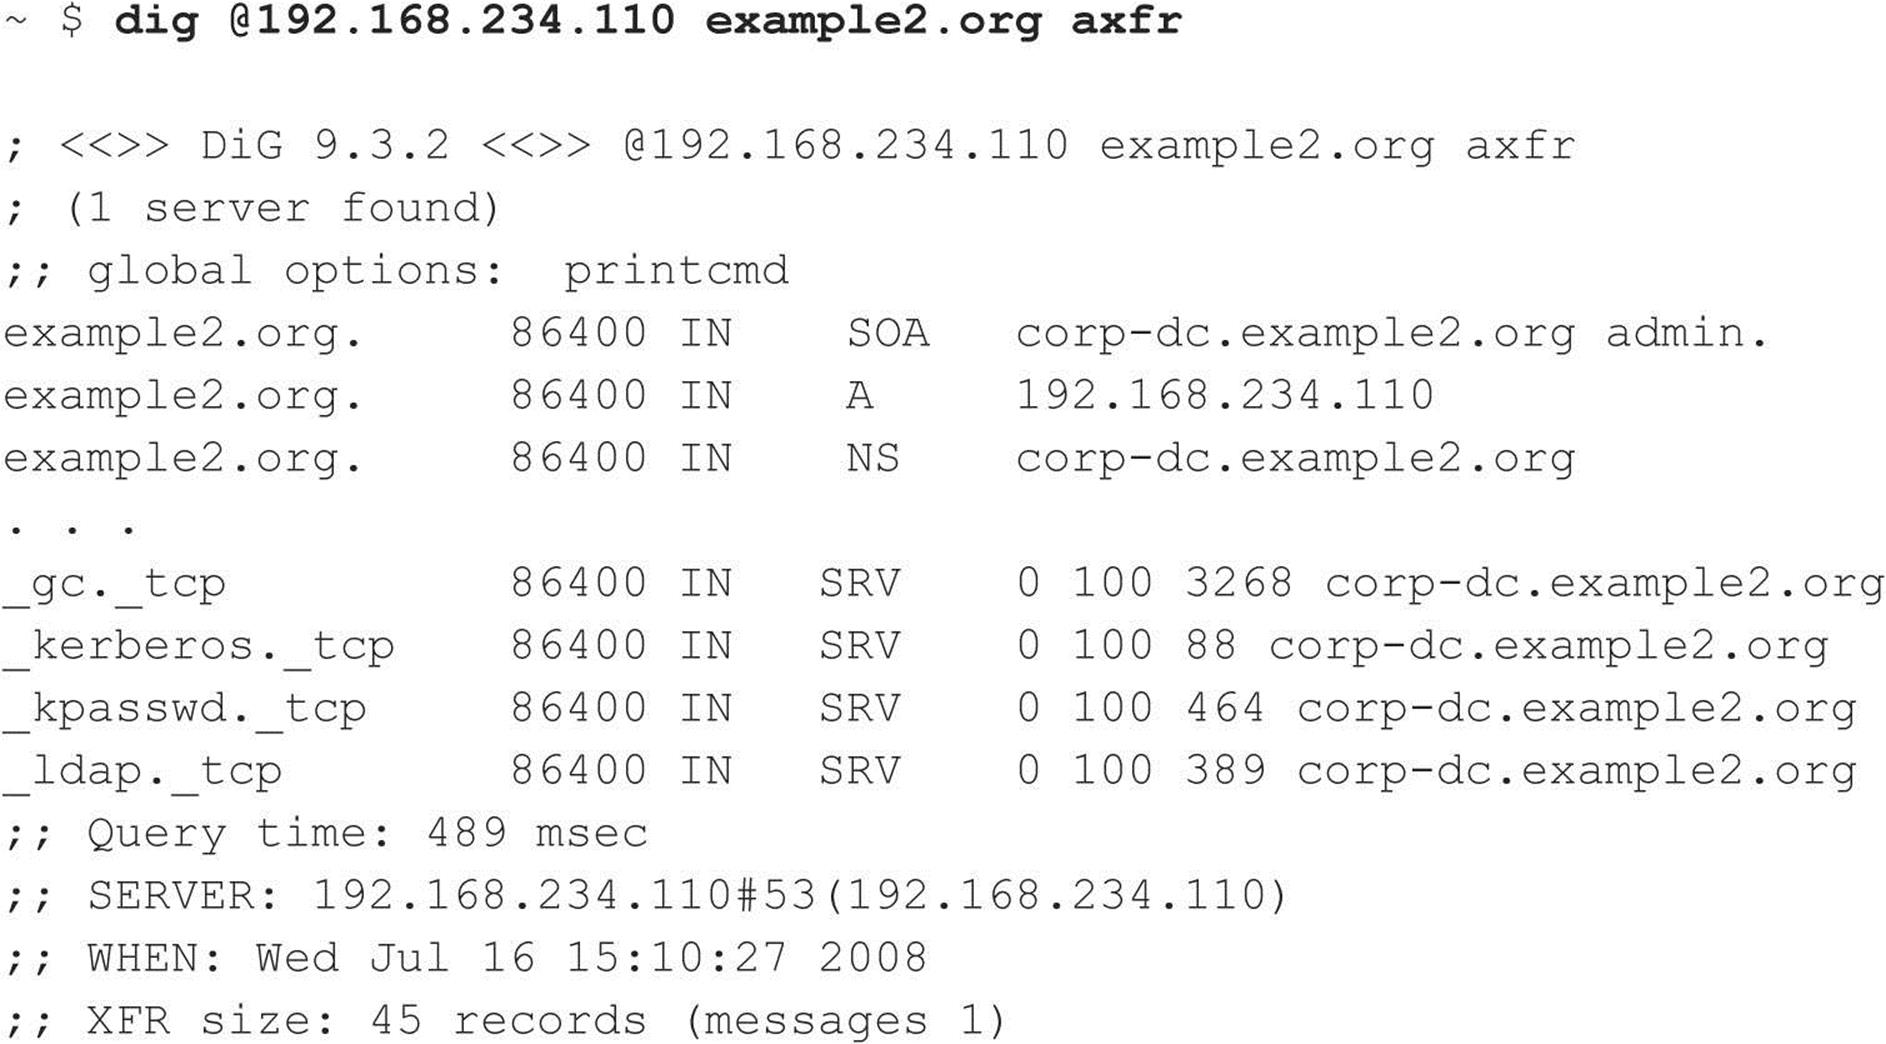
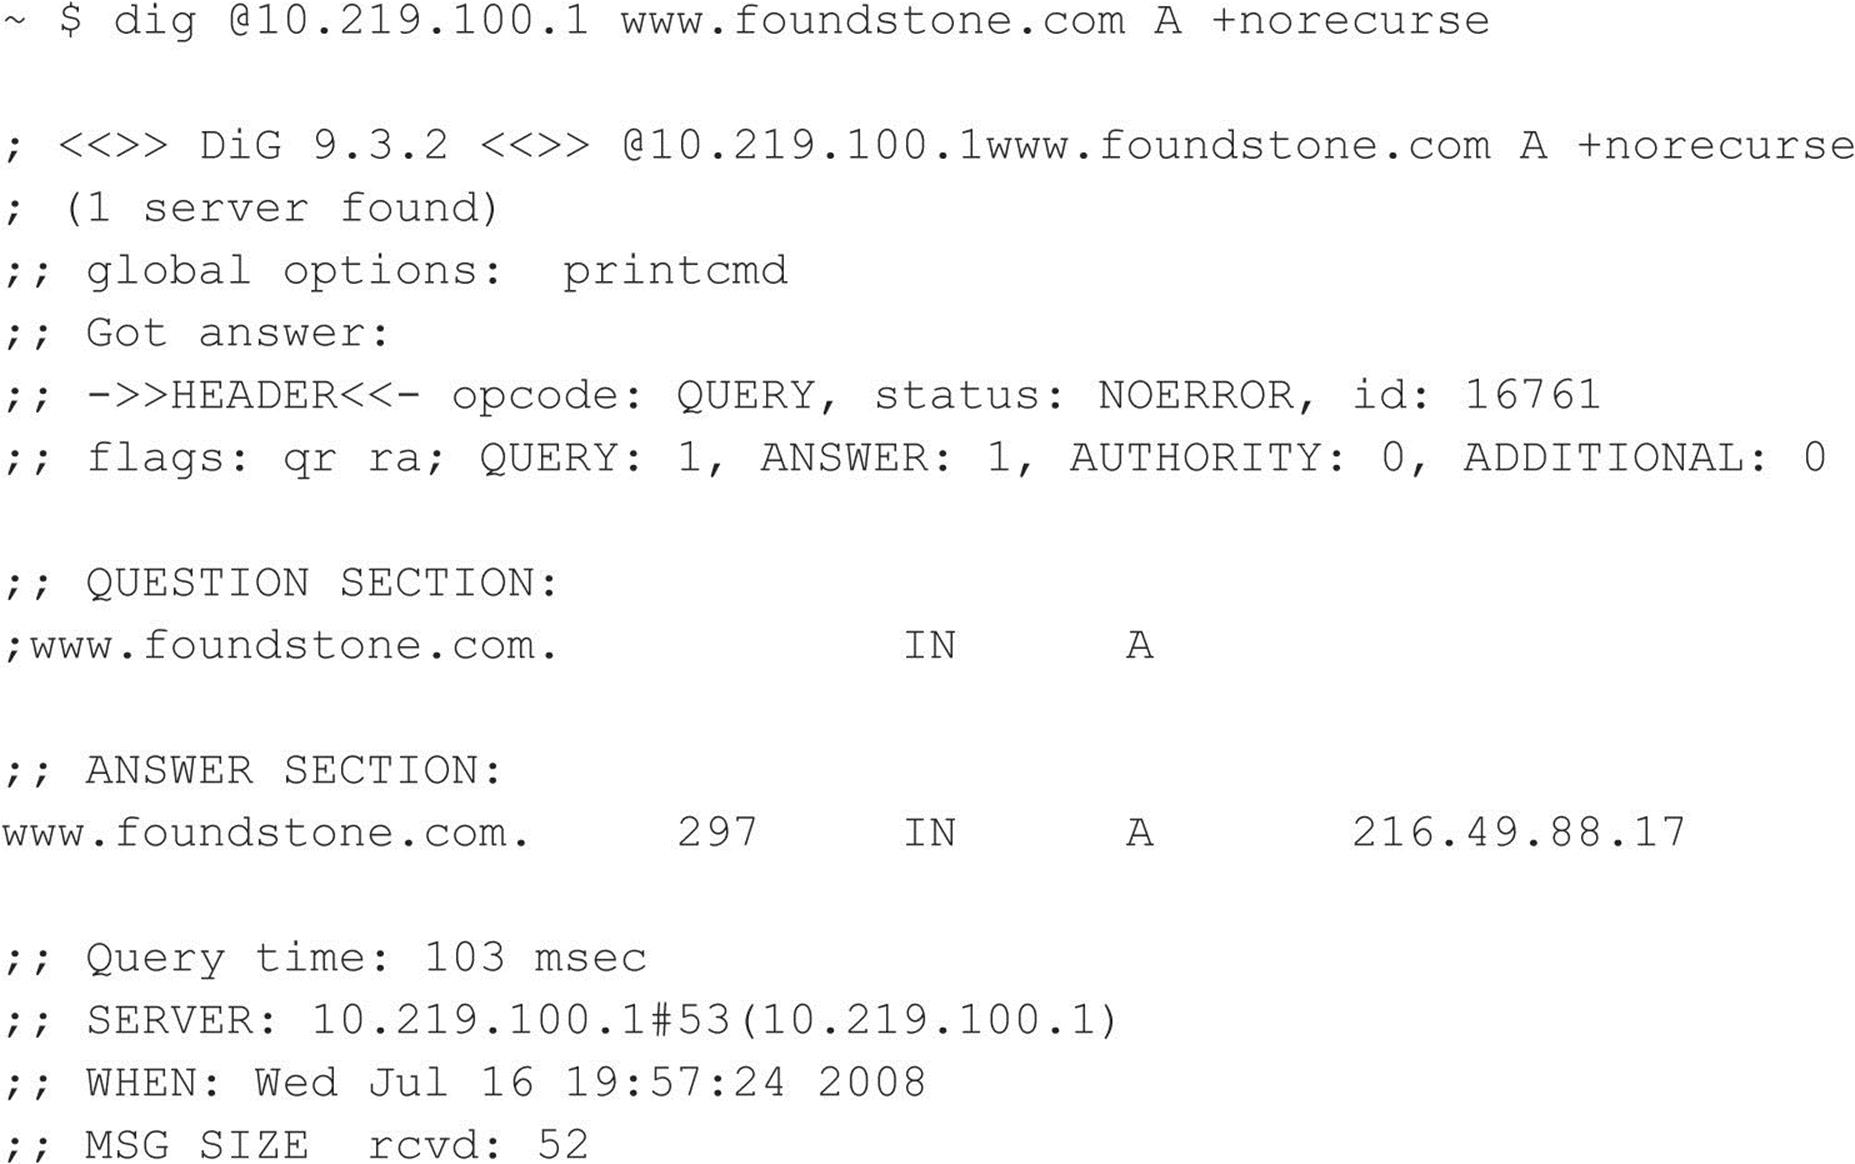
Alternatively, from within Linux (or other UNIX variants), we can use the dig command to produce similar results:
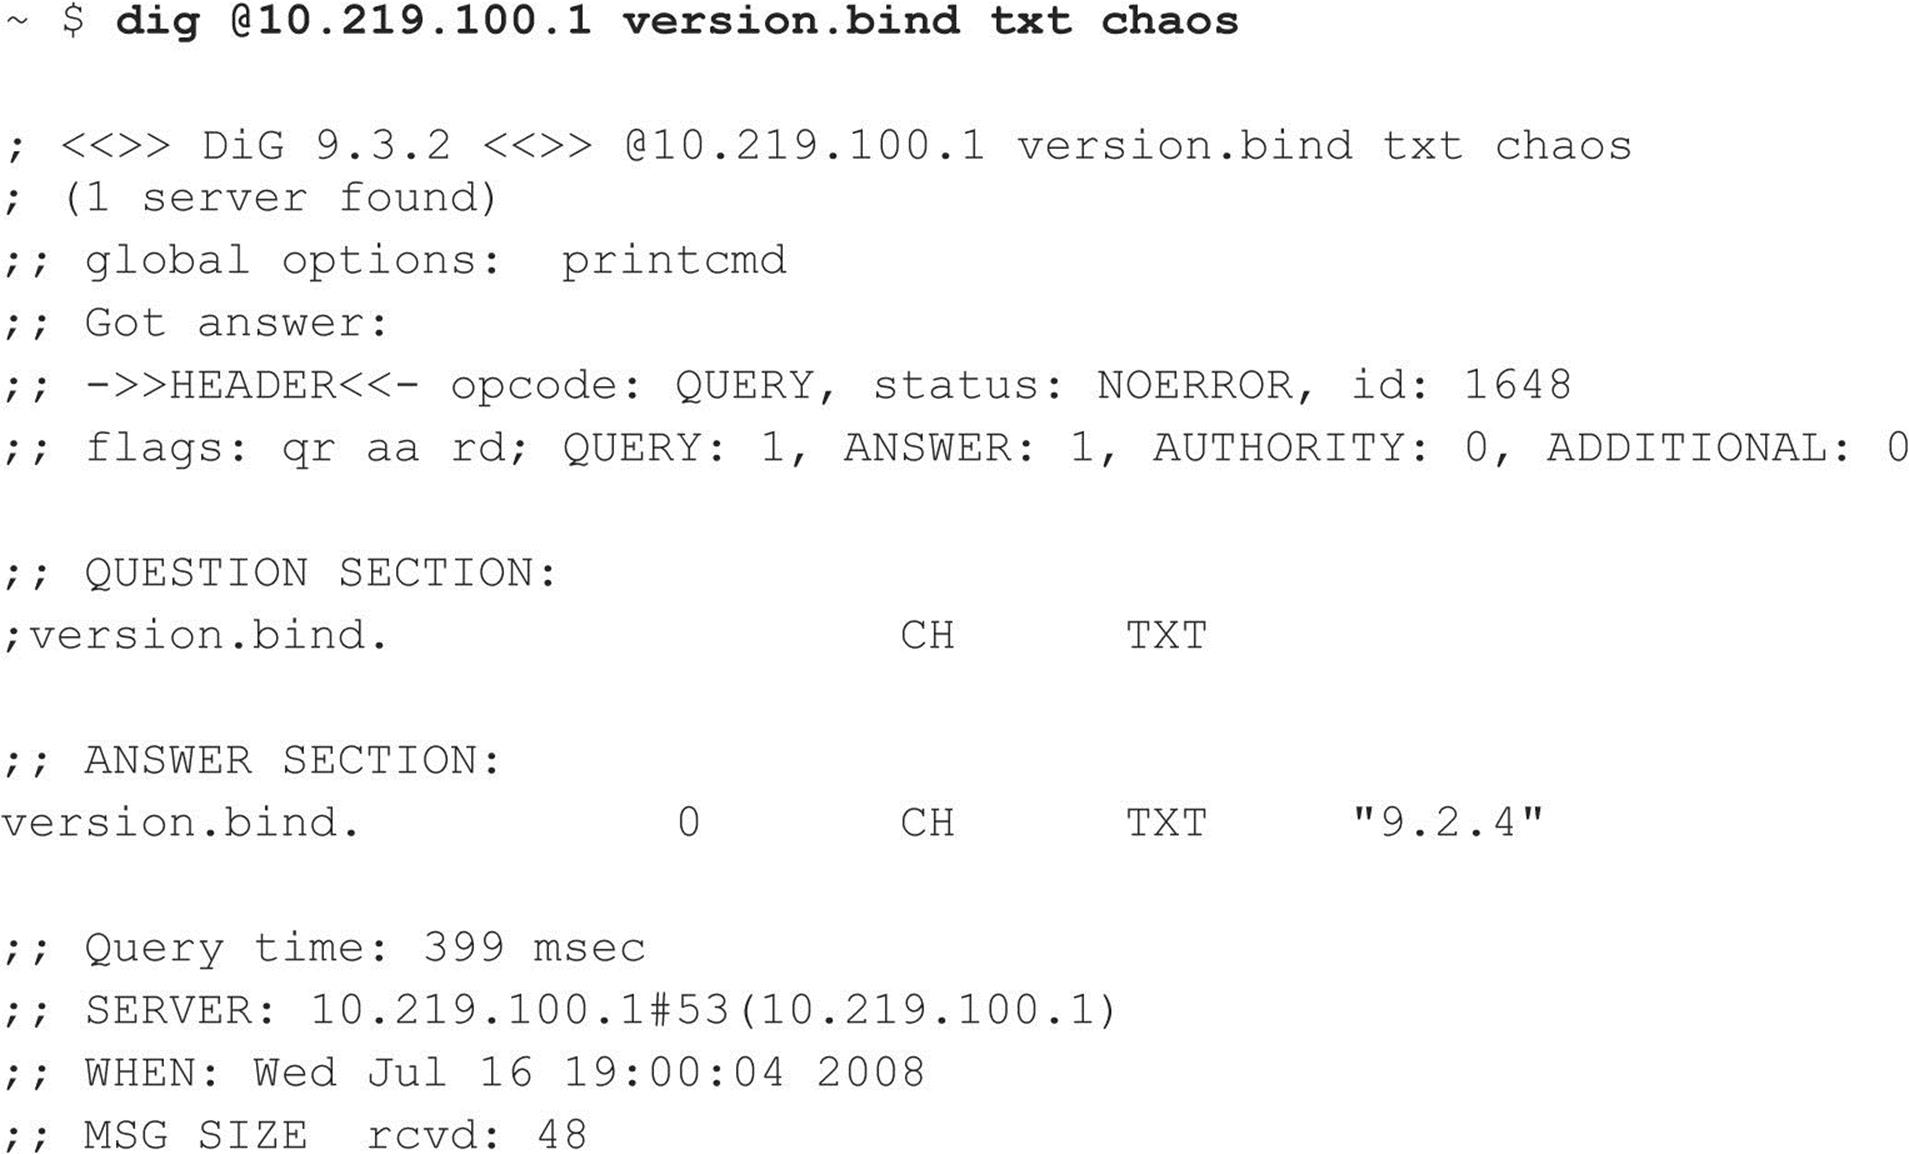
BIND Enumeration The Berkeley Internet Name Domain (BIND) server is a popular DNS server for UNIX variants. In addition to being susceptible to DNS zone transfers, BIND comes with a record within the “CHOAS” class, version.bind, which contains the version of the BIND installation loaded on the target server. To request this record, the attacker can use the dig command:
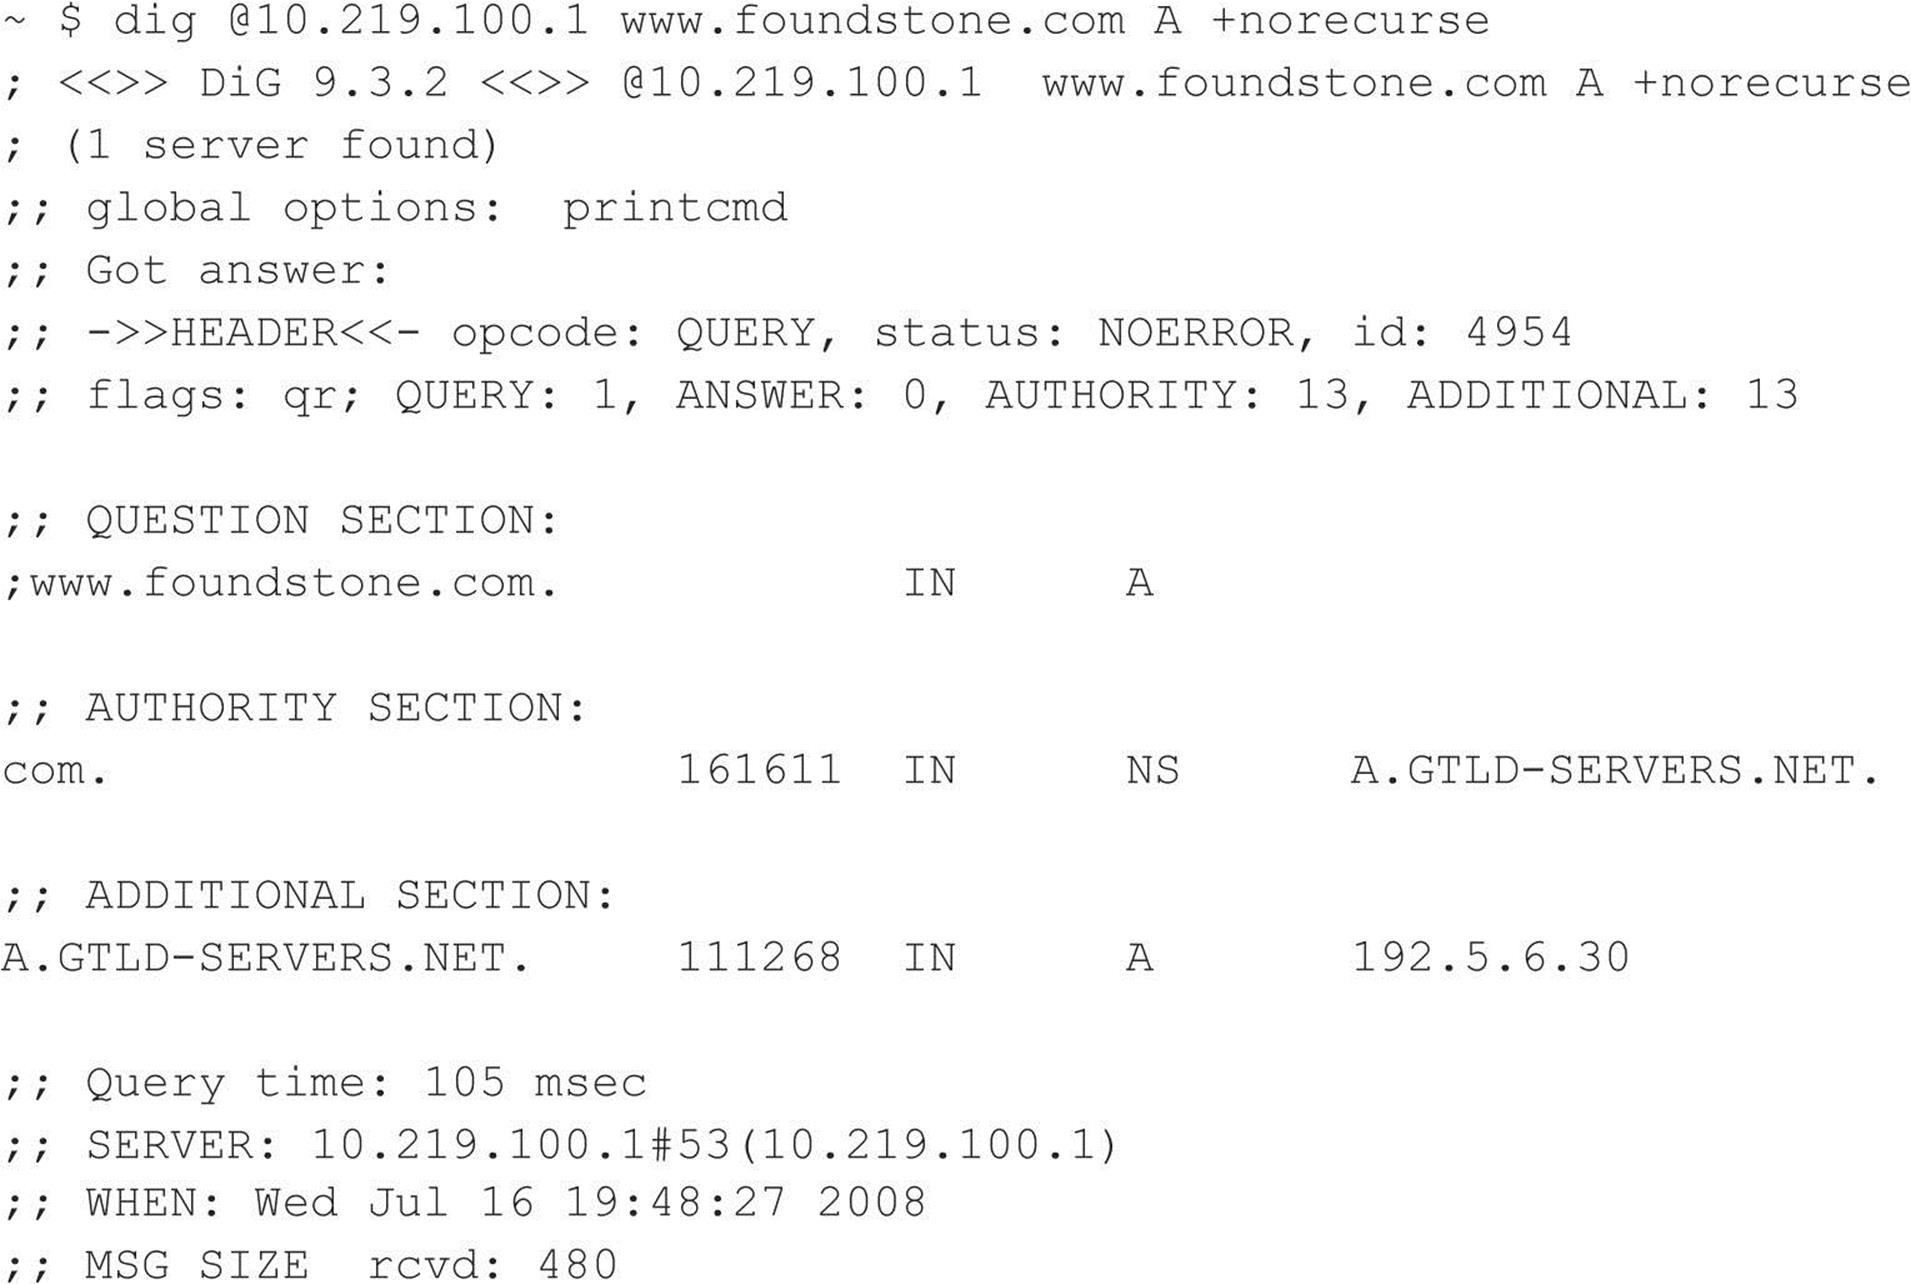
DNS Cache Snooping DNS servers maintain a cache for a variety of reasons, one of which is to resolve frequently used hostnames quickly. For requests to resolve hostnames not within the target DNS server’s domain, the DNS server queries its local cache or uses recursion to resolve the request by querying another DNS server. Attackers can abuse this functionality by requesting the DNS server to query only its cache and, by doing so, deduce if the DNS server’s clients have or have not visited a particular site. In the case that the DNS server hasn’t processed a request for a particular host, the server responds with the “Answer” flag set to 0 (output has been condensed):
Once the DNS server has processed a request for the particular hostname, the “Answer” flag is then set to 1:
Automated DNS Enumeration Various DNS tools exist that will automate the preceding enumeration techniques and perform a number of different tasks that may give you additional information about a domain and the hosts within it. dnsenum (code.google.com/p/dnsenum/), written by Filip Waeytens and tixxDZ, does a variety of different tasks, such as Google scrapping for additional names and subdomains, brute forcing subdomains, performing reverse lookups, listing domain network ranges, and performing WHOIS queries on the ranges identified. The power of dnsenum comes from the correlation it performs across each task to gather as much information for a particular domain as possible. The tool can be run on a domain name; it then deduces the DNS servers associated with it. It can also be run against a target server for a particular domain.
Another powerful automated DNS reconnaissance tool is Fierce.pl (ha.ckers.org/fierce/), a Perl script written by Robert “RSnake” Hansen that uses a number of techniques to locate IP addresses and hostnames owned by a target, including attempting zone transfers, dictionary list, and brute-force reverse lookup enumeration.
Also, web resources exist that not only speed up and simplify the process but also give the attacker the advantage of not having to send a single packet to the target from the source IP address. Rather, the attacker stays hidden behind the public resource. The site CentralOps.net hosts a number of free reconnaissance tools, including WHOIS enumeration, zone transferring, and even service scanning.
![]() DNS Enumeration Countermeasures
DNS Enumeration Countermeasures
As always, if DNS is not required, the best countermeasure is simply to disable the service. However, you will very likely need an Internet-facing DNS server on your perimeter to maintain business operations. In addition to thwarting the specific techniques just described, maintaining two DNS servers is important: one for external, Internet-facing queries and one for internal queries. With this countermeasure, if a vulnerability or misconfiguration is identified within your public-facing DNS server, internal addressing and critical targets are not exposed.
Blocking DNS Zone Transfers The easy solution for this problem is to restrict zone transfers to authorized machines only (usually, these are backup DNS servers). The Windows DNS implementation allows for easy restriction of zone transfer, as shown in the following illustration. This screen is available when the Properties option for a forward lookup zone (in this case, labfarce.org) is selected from within the “Computer Management” Microsoft Management Console (MMC) snap-in, under \Services and Applications\DNS\[server_name]\Forward Lookup Zones\[zone_name] | Properties.
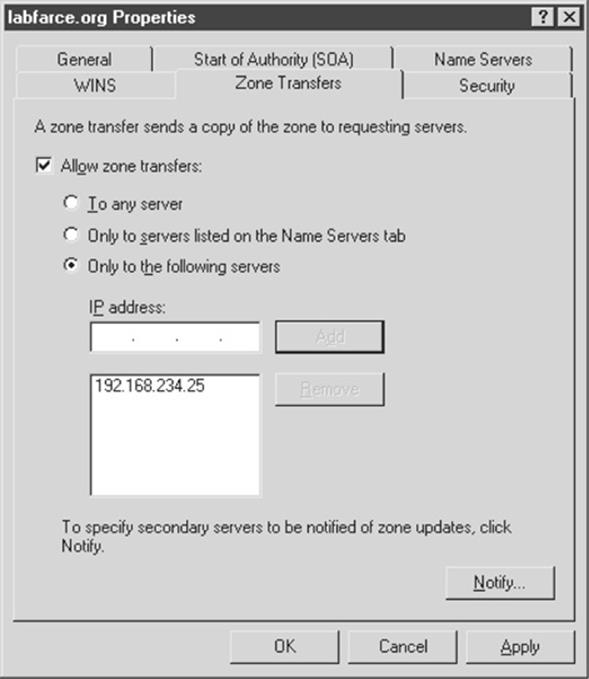
You could disallow zone transfers entirely by simply unchecking the Allow Zone Transfers box, but it is probably more realistic to assume that backup DNS servers will need to be kept up to date, so we have shown a less restrictive option here.
NOTE Past versions of Windows (up to and including Windows 2000) came configured, by default, to allow zone transfers to any server. However, thanks in part to the depiction of this issue in past editions of Hacking Exposed, Microsoft released its later server versions with a default DNS server setting that blocks zone transfers to unauthorized systems. Hats off to Redmond!
Blocking BIND version.bind Requests An excellent BIND hardening guide by Rob Thomas is available at cymru.com/Documents/secure-bind-template.html. This guide includes a number of different methods to secure BIND, including how to change or disable queries for version.bind.
Disabling DNS Cache-Snooping Luis Grangeia has written a paper (rootsecure.net/content/downloads/pdf/dns_cache_snooping.pdf) that further describes DNS cache snooping and provides methods to protect against it.
![]() Enumerating TFTP, TCP/UDP 69
Enumerating TFTP, TCP/UDP 69

Trivial File Transfer Protocol (TFTP) is a UDP-based protocol for unauthenticated “quick and dirty” file transfers commonly run on UDP port 69. The premise of TFTP is that in order to pull a file from a server, you have to know the file name. This can be a double-edged sword for an attacker because the results are not always guaranteed. For instance, if the file has been renamed by even a single character, the attacker’s request will fail.
Copying Files via a Linux TFTP Server Although it barely qualifies as an enumeration trick due to the severity of the information gathered, the granddaddy of all UNIX/Linux enumeration tricks is getting the/etc/passwd file, which we’ll discuss at length in Chapter 5. However, it’s worth mentioning here that one way to grab the passwd file is via TFTP. It’s trivial to grab a poorly secured/etc/passwd file via TFTP, as shown next:

Besides the fact that our attackers now have the passwd file to view all valid user accounts on the server, if this were an older system, they could potentially gain access to the encrypted password hashes for each user. On newer systems, they might find it worthwhile to attempt to transfer the/etc/shadow file as well.
Accessing Router/Switch Configurations via TFTP Network devices such as routers, switches, and VPN concentrators commonly provide the functionality to configure the device as a TFTP server. In some cases, attackers can leverage this functionality to their advantage in order to obtain the device’s configuration file. Files an attacker may look for on network devices include
![]() TFTP Enumeration Countermeasures
TFTP Enumeration Countermeasures
TFTP is an inherently insecure protocol—the protocol runs in cleartext on the wire, it offers no authentication mechanism, and it can leave misconfigured file-system ACLs wide open to abuse. For these reasons, don’t run TFTP—and if you do, wrap it to restrict access (using a tool such as TCP Wrappers), limit access to the/tftpboot directory, and make sure it’s blocked at the border firewall.
![]() Finger, TCP/UDP 79
Finger, TCP/UDP 79

Perhaps the oldest trick in the book when it comes to enumerating users is the UNIX/Linux finger utility. Finger was a convenient way of giving out user information automatically back in the days of a much smaller and friendlier Internet. We discuss it here primarily to describe the attack signature because many scripted attack tools still try it and many unwitting system admins leave finger running with minimal security configurations. Again, the following assumes that a valid host running the finger service (port 79) has been identified in previous scans:
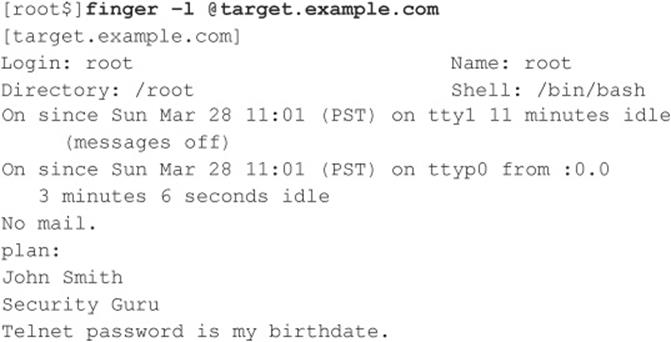

As you can see, most of the info displayed by finger is fairly innocuous. (It is derived from the appropriate/etc/passwd fields if they exist.) Perhaps the most dangerous information contained in the finger output is the names of logged-on users and idle times, giving attackers an idea of who’s watching (root?) and how attentive they are. Some of the additional information could be used in a “social engineering” attack (hacker slang for trying to con access from people using “social” skills). As noted in this example, users who place a .plan or .project file in their home directories can deal potential wildcards of information to simple probes. (The contents of such files are displayed in the output from finger probes, as shown earlier.)
![]() Finger Countermeasures
Finger Countermeasures
Detecting and plugging this information leak is easy—don’t run finger (comment it out in inetd.conf and killall –HUP inetd) and block port 79 at the firewall. If you must (and we mean must) give access to finger, use TCP Wrappers (see Chapter 5) to restrict and log host access, or use a modified finger daemon that presents limited information.
![]() Enumerating HTTP, TCP 80
Enumerating HTTP, TCP 80

Enumerating the make and model of a web server is one of the easiest and most time-honored techniques of the hacking community. Whenever a new web server exploit is released into the wild (for example, the old ida/idq buffer overflow that served as the basis for the Code Red and Nimda worms), the underground turns to simple, automated enumeration tools to check entire swaths of the Internet for potentially vulnerable software. Don’t think you won’t get caught.
We demonstrated elementary HTTP banner grabbing at the beginning of this chapter in the section titled “The Basics of Banner Grabbing: telnet and netcat.” In that section, we showed you how to connect to a web server on the standard HTTP port (TCP 80) using netcat and how to hit a few carriage returns to extract the banner. Usually the HTTP HEAD method is a clean way to elicit banner info. You can type this command right into netcat once you’ve connected to the target server, as shown here (commands to be entered are listed in bold; you’ll need to hit two or more carriage returns after the line containing the HEAD command):
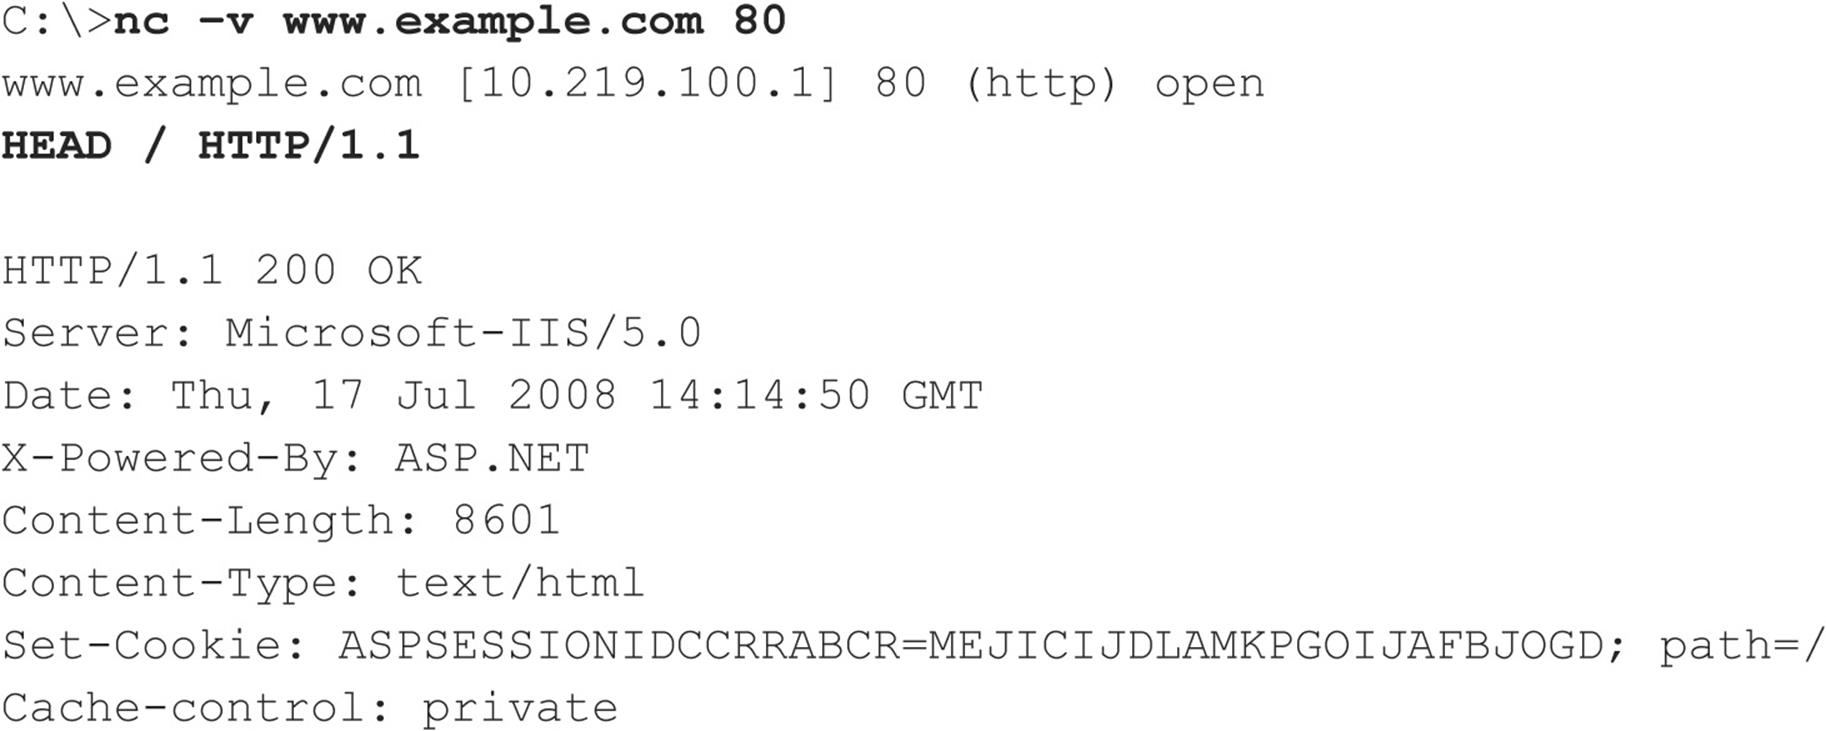
We demonstrated the HTTP HEAD request in the previous example, which is uncommon nowadays, with the notable exception of worms. Therefore, some intrusion detection systems might trigger from a HEAD request.
Also, if you encounter a website that uses SSL, don’t fret, because netcat can’t negotiate SSL connections. Simply redirect it through one of the many available SSL proxy tools, such as sslproxy, or just use openssl to perform the task:
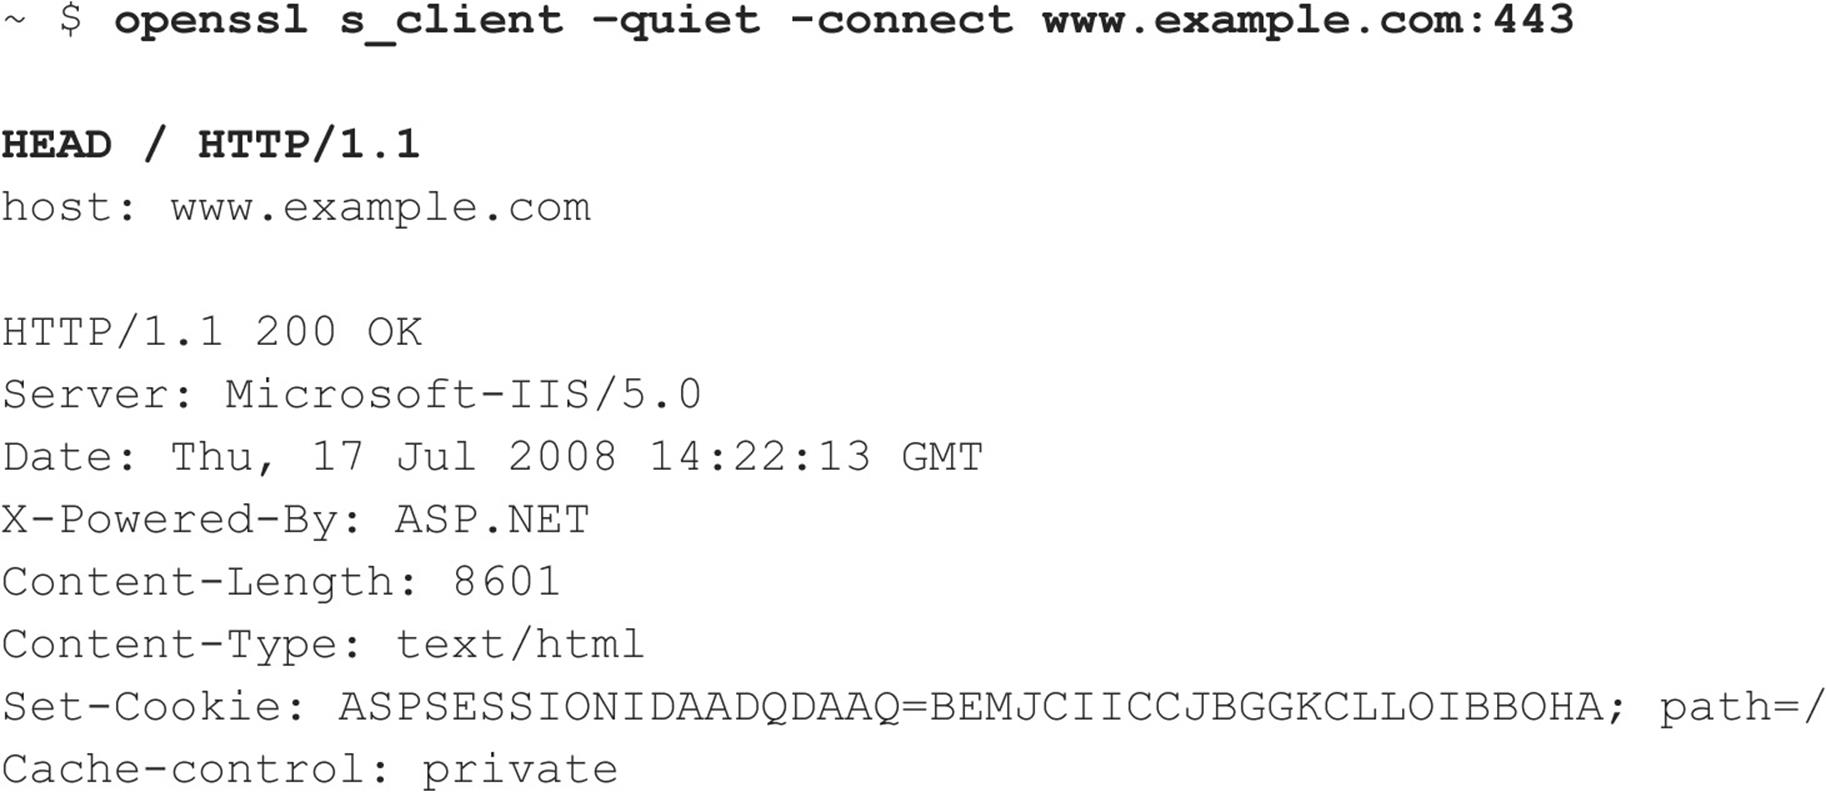
By default, openssl is extremely verbose, so specify the -quiet switch to limit its output. You may notice that we’ve also specified host: www.example.com after our HEAD/HTTP/1.1 nudge. We did this because servers have the ability to host multiple websites, so in some cases you may have to set the HTTP host header to the hostname of the web page you’re visiting to elicit a 200 OK (or “request succeeded” code) from the web server. For this particular example, the web server will provide its versioning information for just about any HTTP request, but when you start getting into more advanced techniques, the HTTP host header may save some heartache.
We should point out here that much juicy information can also be found in the content of web pages. One of our favorite automated tools for crawling entire sites and reporting on matches to a set of known vulnerabilities is Grendel-Scan by David Byrne (grendel-scan.com/download.htm).Figure 3-2 shows Grendel-Scan’s Information Leakage section, containing features such as the ability to suck down all of the comments in a website so an attacker may search these comments for juicy information such as the phrase “password” or the ability to parse a website’s robots.txt file and pay particular attention to its entries—potentially interesting web content identified for one reason or another by its author as not appropriate for search engine indexing.

Figure 3-2 Grendel-Scan’s Comment Lister features make parsing entire sites for comments easy, allowing attackers to search for juicy information such as passwords.
Crawling HTML for juicy information edges into the territory of web hacking, which we cover in Chapter 10 of this book.
TIP For an expanded and more in-depth examination of web hacking methodologies, tools, and techniques, check out Hacking Exposed Web Applications, Third Edition (McGraw-Hill Professional, 2010; webhackingexposed.com).
![]() HTTP Enumeration Countermeasures
HTTP Enumeration Countermeasures
The best way to deter this sort of activity is to change the banner on your web servers. Steps to do this vary depending on the web server vendor, but we’ll illustrate using one of the most common examples—Microsoft’s Internet Information Services (IIS). In the past, IIS was frequently targeted, due primarily to the easy availability of canned exploits for debilitating vulnerabilities such as Code Red and Nimda. Changing the IIS banner can go a long way toward dropping you off the radar screen of some really nasty miscreants.
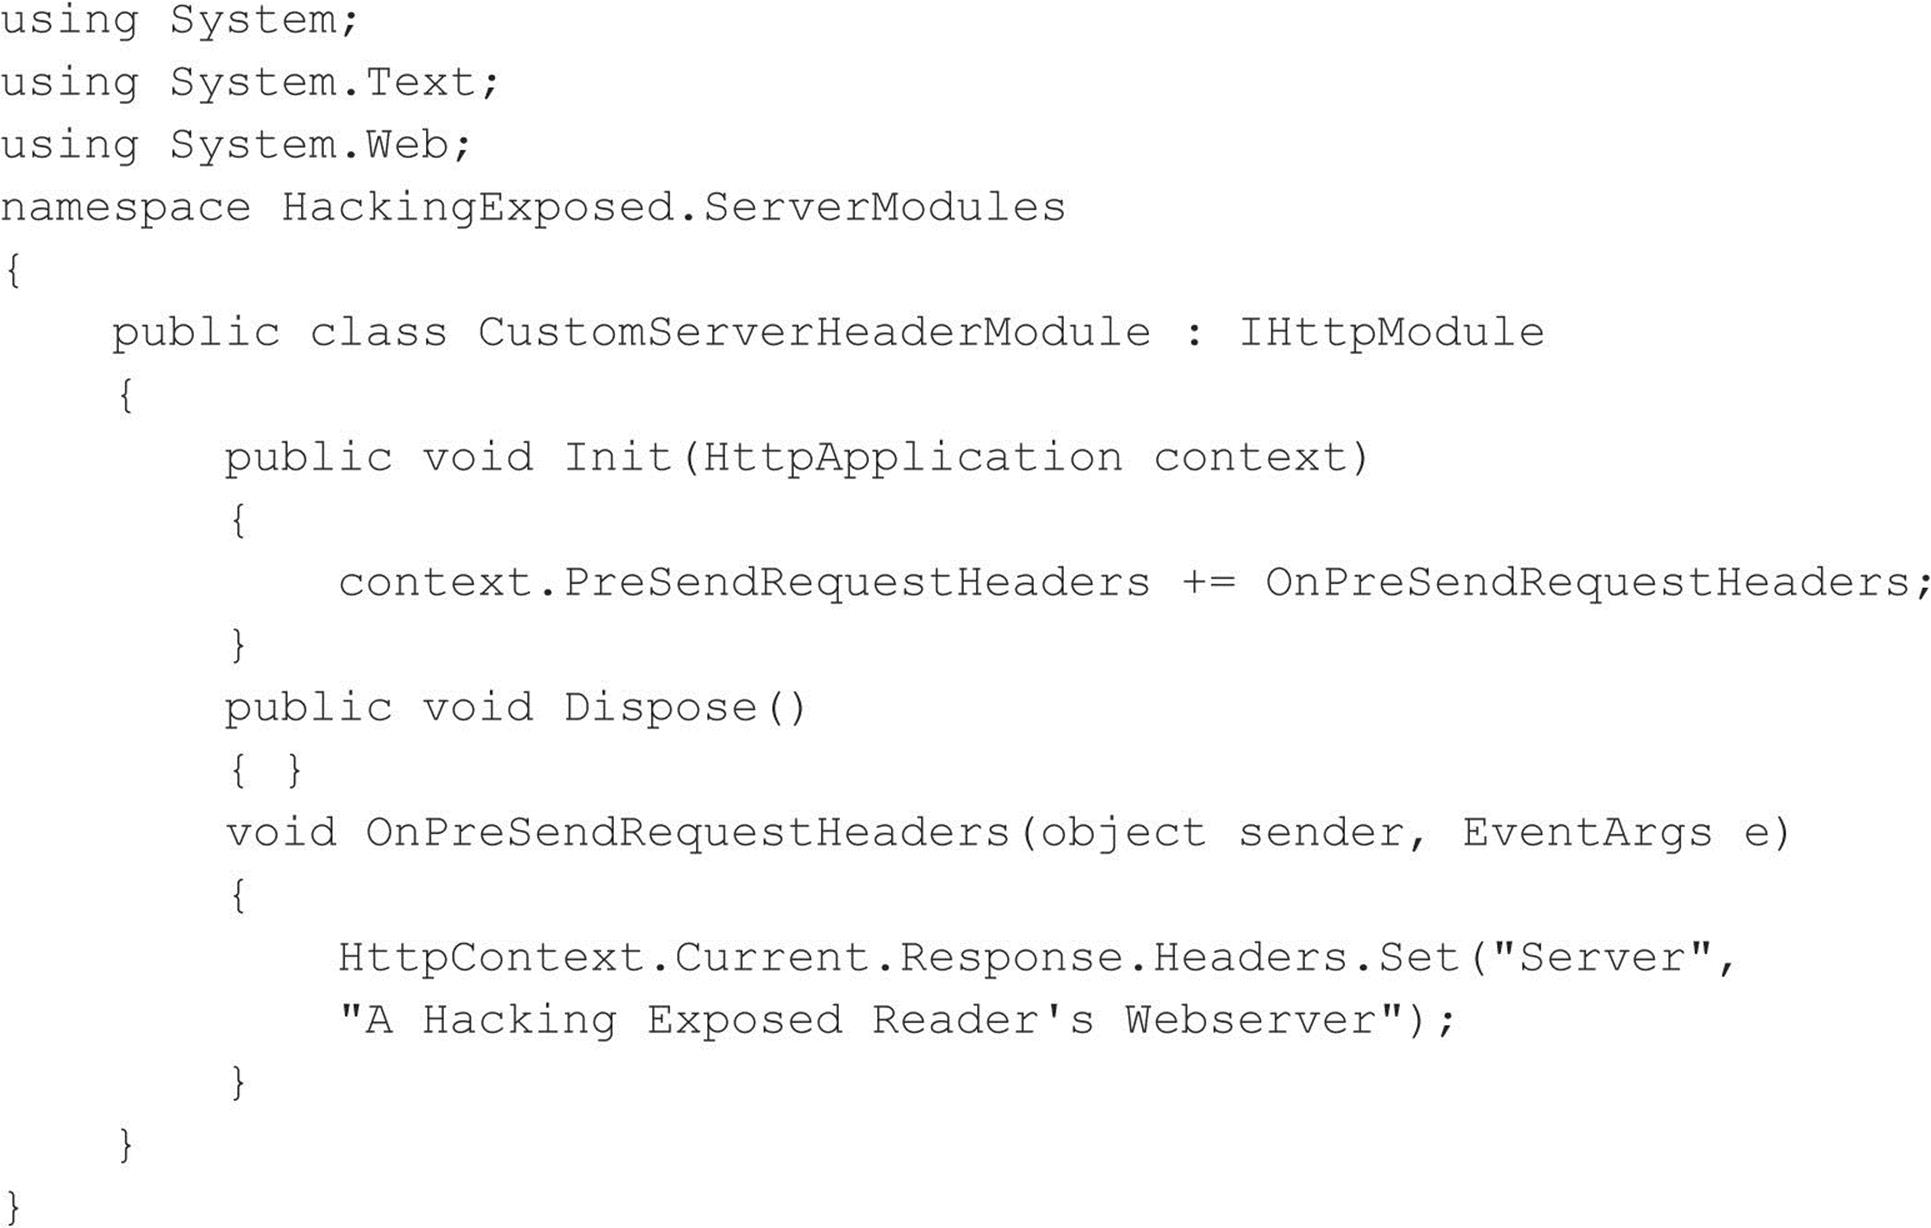
IIS 7 administrators can create a custom .Net module to accomplish this objective, using the example code provided here (some manual line breaks have been added due to page size constraints):
Unfortunately, directly changing the IIS banner in prior IIS versions involves hex-editing the DLL that contains the IIS banner, %systemroot%\system32\inetsrv\w3svc.dll. This can be a delicate maneuver, made more difficult on Windows 2000 and later by the fact that this DLL is protected by Windows System File Protection (SFP) and is automatically replaced by a clean copy unless SFP is disabled.
Another way to change the IIS banner on older versions of IIS is by installing an ISAPI filter designed to set the banner using the SetHeader function call. Microsoft has posted a Knowledge Base (KB) article detailing how this can be done, with sample source code, at support.microsoft.com/kb/294735/en-us. Alternatively, you can download and deploy Microsoft’s URLScan, part of the IIS Lockdown Tool (see microsoft.com/technet/security/tools/locktool.mspx for the IIS Lockdown Tool, applicable to IIS versions prior to 6.0, andmicrosoft.com/technet/security/tools/urlscan.mspx for URLScan, which is applicable to IIS versions up to 6.0). URLScan is an ISAPI filter that can be programmed to block many popular IIS attacks before they reach the web server, and it also allows you to configure a custom banner to fool unwary attackers and automated worms. Deployment and usage of URLScan is fully discussed in Hacking Exposed Web Applications, Third Edition (McGraw-Hill Professional, 2010).
NOTE IIS Lockdown cannot be installed on Windows Server 2003/IIS 6.0 or newer because all the default configuration settings in IIS6.0 (and later) meet or exceed the security configuration settings made by the IIS Lockdown Tool. However, you can install and run URLScan on IIS 6.0 because it provides flexible configuration for advanced administrators above and beyond the default IIS 6.0 security settings. See technet.microsoft.com/en-us/security/cc242650.aspx#EXE.
![]() Enumerating Microsoft RPC Endpoint Mapper (MSRPC), TCP 135
Enumerating Microsoft RPC Endpoint Mapper (MSRPC), TCP 135

Certain Microsoft Windows systems run a Remote Procedure Call (RPC) endpoint mapper (or portmapper) service on TCP 135. Querying this service can yield information about applications and services available on the target machine, as well as other information potentially helpful to the attacker. The epdump tool from the Windows Resource Kit (RK, or Reskit) queries the MSRPC endpoint mapper and shows services bound to IP addresses and port numbers (albeit in a very crude form). Here’s an example of how it works against a target system running TCP 135 (edited for brevity):
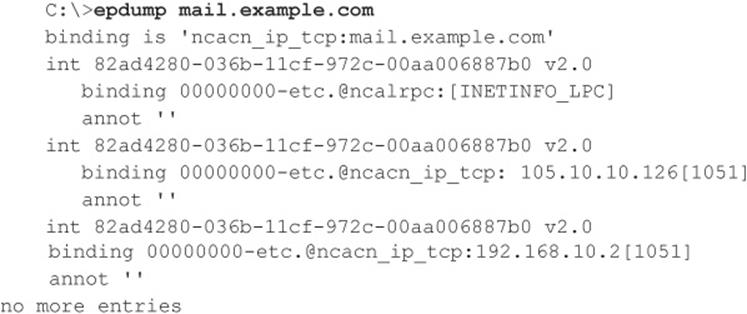
The important thing to note about this output is that we see two numbers that look like IP addresses: 105.10.10.126 and 192.168.10.2. These are IP addresses to which MSRPC applications are bound. More interesting, the second of these is an RFC 1918 address, indicating that this machine likely has two physical interfaces (meaning it is dual-homed) and one of those faces is an internal network. This can raise the interest of curious hackers who seek such bridges between outside and inside networks as key points of attack.
Examining this output further, we note that ncacn_ip_tcp corresponds to dynamically allocated TCP ports, further enumerating available services on this system (ncadg_ip_udp in the output would correspond to allocated UDP ports). For a detailed and comprehensive explanation of these and other internals of the Windows network services, see Jean-Baptiste Marchand’s excellent article at hsc.fr/ressources/articles/win_net_srv.
TIP Another good MSRPC enumeration tool (and so much more) is Winfingerprint, which can be found at sourceforge.net/projects/winfingerprint.
MSRPC Enumeration with Linux For the Linux side of the house, we have rpcdump.py by Javier Koen of CORE security (oss.coresecurity.com/impacket/rpcdump.py). rpcdump.py is a little more flexible as it permits queries over different ports/protocols besides TCP 135. Usage is shown here:

![]() MSRPC Enumeration Countermeasures
MSRPC Enumeration Countermeasures
The best method for preventing unauthorized MSRPC enumeration is to restrict access to TCP port 135. One area where this becomes problematic is providing mail services via Microsoft Exchange Server to clients on the Internet. In order for Outlook MAPI clients to connect to the Exchange Server, they must first contact the endpoint mapper. Therefore, to provide Outlook/Exchange connectivity to remote users over the Internet, you would have to expose the Exchange Server to the Internet via TCP port 135 (and a variety of others). The most common solution to this problem is to require users to first establish a secure tunnel (that is, using a VPN solution) between their system and the internal network. This way the Exchange Server is not exposed, and data between the client and server is properly encrypted. Of course, the other alternative is to use Microsoft’s Outlook Web Access (OWA) to support remote Outlook users. OWA is a web front-end to an Exchange mailbox, and it works over HTTPS. We recommend using strong authentication if you decide to implement OWA (for example, digital certificates or two-factor authentication mechanisms). In Windows Server 2003/Exchange 2003 (and later), Microsoft implemented RPC over HTTP, which is our favorite option for accessing Exchange over the Internet while preserving the rich look and feel of the full Outlook client (see support.microsoft.com/default.aspx?kbid=833401 and technet.microsoft.com/en-us/library/aa998950.aspx).
If you can’t restrict access to MSRPC, you should restrict access to your individual RPC applications. We recommend reading the article titled “Writing a Secure RPC Client or Server” at msdn.microsoft.com/en-us/library/aa379441.aspx for more information on this topic.
![]() NetBIOS Name Service Enumeration, UDP 137
NetBIOS Name Service Enumeration, UDP 137

The NetBIOS Name Service (NBNS) has traditionally served as the distributed naming system for Microsoft Windows–based networks. Beginning with Windows 2000, NBNS is no longer a necessity, having been largely replaced by the Internet-based naming standard, DNS. However, as of this writing, NBNS is still enabled by default in all Windows distributions; therefore, it is generally simple for attackers connected to the local network segment (or via a router that permits the tunneling of NBNS over TCP/IP) to “enumerate the Windows wire,” as we sometimes call NBNS enumeration.
NBNS enumeration is so easy because the tools and techniques for peering along the NetBIOS wire are readily available—most are built into the OS itself! In fact, NBNS enumeration techniques usually poll NBNS on all machines across the network and are often so transparent that it hardly appears one is even connecting to a specific service on UDP 137. We discuss the native Windows tools first and then move into some third-party tools. We save the discussion of countermeasures until the very end because fixing all this is rather simple and can be handled in one fell swoop.
Enumerating Windows Workgroups and Domains with net view The net view command is a great example of a built-in enumeration tool. It is an extraordinarily simple Windows NT Family command-line utility that lists domains available on the network and then lays bare all machines in a domain. Here’s how to enumerate domains on the network using
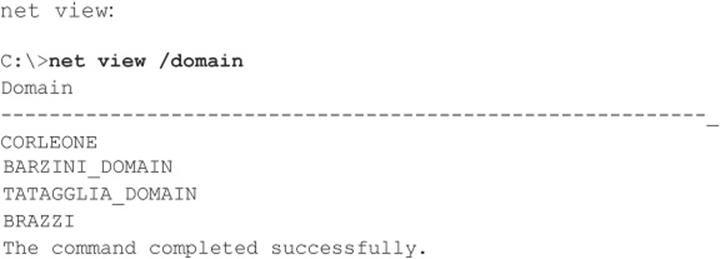
The next command lists computers in a particular domain:
Again, net view requires access to NBNS across all networks that are to be enumerated, which means it typically only works against the local network segment. If NBNS is routed over TCP/IP, net view can enumerate Windows workgroups, domains, and hosts across an entire enterprise, laying bare the structure of the entire organization with a single unauthenticated query from any system plugged into a network jack lucky enough to get a DHCP address.
TIP Remember that we can use information from ping sweeps (see Chapter 2) to substitute IP addresses for NetBIOS names of individual machines. IP addresses and NetBIOS names are mostly interchangeable; for example, \\192.168.202.5 is equivalent to \\SERVER_NAME. For convenience, attackers often add the appropriate entries to their %systemroot%\system32\drivers\etc\LMHOSTS file, appended with the #PRE syntax, and then run nbtstat –R at a command line to reload the name table cache. They are then free to use the NetBIOS name in future attacks, and the name will be mapped transparently to the IP address specified in LMHOSTS.
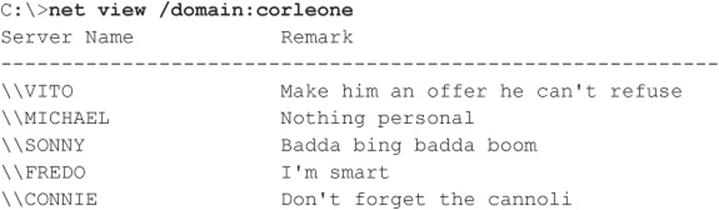
Enumerating Windows Domain Controllers To dig a little deeper into the Windows network structure, we need to use a tool from the Reskit (microsoft.com/downloads/details.aspx?FamilyId=49AE8576-9BB9-4126-9761-BA8011FABF38&displaylang=en). In the next example, you’ll see how the Reskit tool called nltest identifies the domain controllers in the domain we just enumerated using net view (domain controllers are the keepers of Windows network authentication credentials and are, therefore, primary targets of malicious hackers):
Netdom from the Reskit is another useful tool for enumerating key information about Windows domains on a wire, including domain membership and the identities of backup domain controllers (BDCs).
Enumerating Network Services with netviewx The netviewx tool by Jesper Lauritsen (see ibt.ku.dk/jesper/NTtools) works a lot like the net view command, but it adds the twist of listing servers with specific services. We often use netviewx to probe for the Remote Access Service (RAS) to get an idea of the number of dial-in servers that exist on a network, as shown in the following example (the –D syntax specifies the domain to enumerate, whereas the -T syntax specifies the type of machine or service to look for):

The services running on this system are listed between the percent sign (%) characters. netviewx is also a good tool for choosing nondomain controller targets that may be poorly secured.
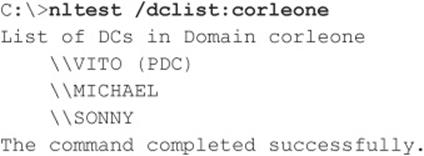
Dumping the NetBIOS Name Table with nbtstat and nbtscan nbtstat connects to discrete machines rather than enumerating the entire network. It calls up the NetBIOS name table from a remote system. The name table contains great information, as shown in the following example:
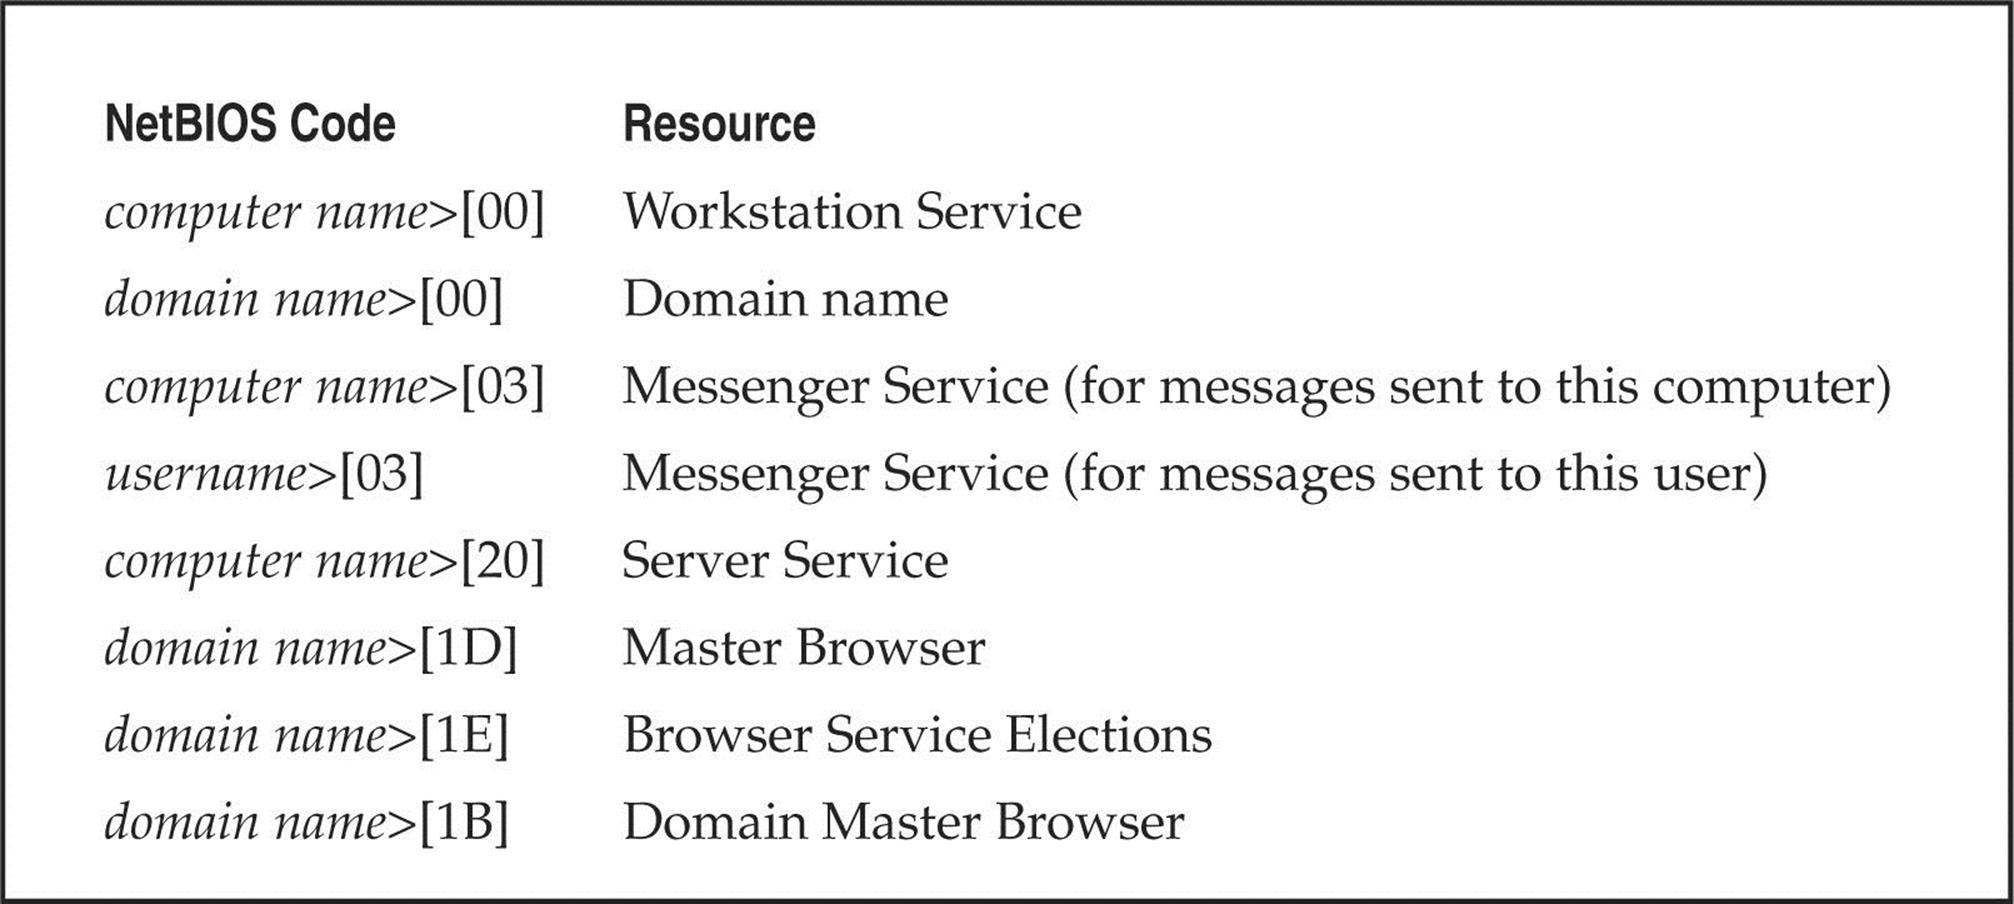
As illustrated, nbtstat extracts the system name (SERVR9), the domain it’s in (9DOMAN), any logged-on users (ADMINISTRATOR), any services running (INet Services), and the network interface hardware Media Access Control (MAC) address. These entities can be identified by their NetBIOS service code (the two-digit number to the right of the name). These codes are partially listed in Table 3-2.
Table 3-2 Common NetBIOS Service Codes
The two main drawbacks to nbtstat are its restriction to operating on a single host at a time and its rather inscrutable output. Both of those issues are addressed by the free tool nbtscan, from Alla Bezroutchko, available at inetcat.net/software/nbtscan.html. nbtscan will “nbtstat” an entire network with blistering speed and format the output nicely:
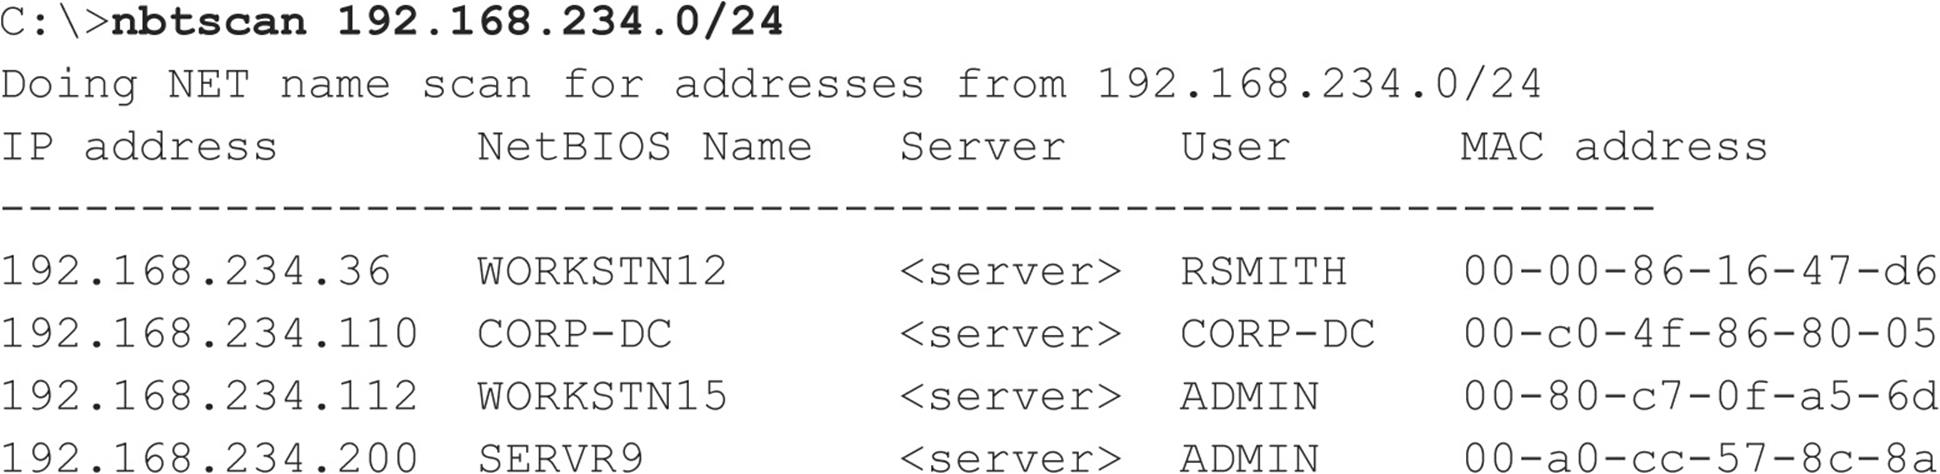
Coincidentally, nbtscan is a quick way to flush out hosts running Windows on a network. Try running it against your favorite Class C–sized network, and you’ll see what we mean.
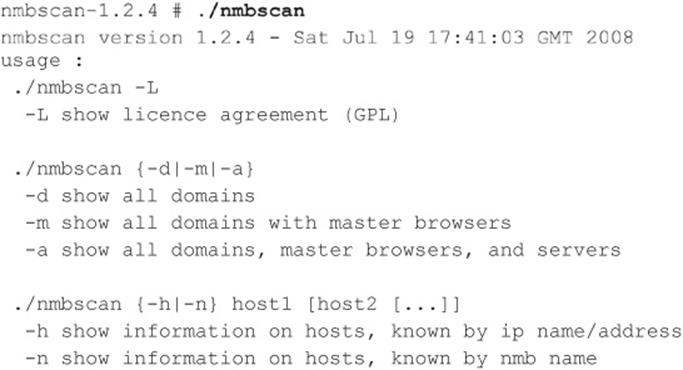
Linux NetBIOS Enumeration Tools Although we’ve described a number of different Windows-based NetBIOS enumeration tools, an equal amount are available for Linux. One tool in particular is NMBscan by Grégoire Barbier (nmbscan.g76r.eu/). NMBscan provides the ability to enumerate NetBIOS by specifying different levels of verbosity:
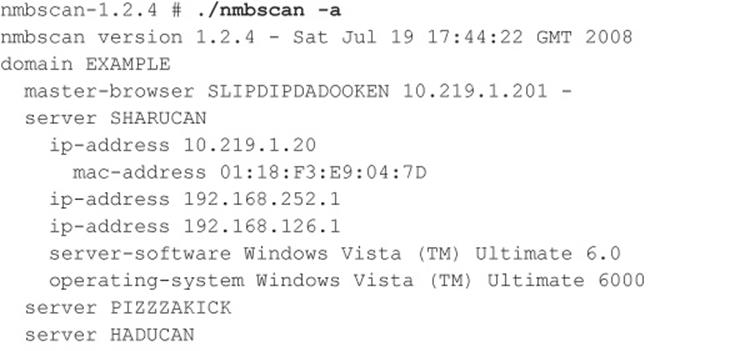
We like to specify just the -a option to obtain a complete view of the NetBIOS network around us:
![]() Stopping NetBIOS Name Services Enumeration
Stopping NetBIOS Name Services Enumeration
All the preceding techniques operate over the NetBIOS Naming Service, UDP 137. If access to UDP 137 is restricted, either on individual hosts or by blocking the protocol at network routers, none of these activities will be successful. To prevent user data from appearing in NetBIOS name table dumps, disable the Alerter and Messenger Services on individual hosts. The startup behavior for these services can be configured through the Services Control Panel. On Windows 2000 and later, the Alerter and Messenger Services are disabled by default, plus you can disable NetBIOS over TCP/IP under the settings for individual network adapters. However, we’ve experienced unreliable success in blocking NBNS enumeration using the NetBIOS over TCP/IP setting, so we wouldn’t rely on it (and, as you will see later in this chapter, there are many other misconceptions about this feature as well). Finally, be aware that if you block UDP 137 from traversing routers, you will disable Windows name resolution across those routers, breaking any applications that rely on NBNS.
![]() NetBIOS Session Enumeration, TCP 139/445
NetBIOS Session Enumeration, TCP 139/445
Windows NT and its progeny have achieved a well-deserved reputation for giving away free information to remote pilferers. This reputation is almost singularly due to the vulnerability that we are going to discuss next—the Windows null session/anonymous connection attack.
Null Sessions: The Holy Grail of Enumeration If you’ve ever accessed a file or printed to a printer associated with a Windows machine across a network, chances are good that you’ve used Microsoft’s Server Message Block (SMB) protocol, which forms the basis of Windows File and Print Sharing (the Linux implementation of SMB is called Samba). SMB is accessible via APIs that can return rich information about Windows—even to unauthenticated users. The quality of the information that can be gathered via this mechanism makes SMB one of the biggest Achilles’ heels for Windows if not adequately protected.
To demonstrate the devastation that can arise from leaving SMB unprotected, let’s perform some widely known hacking techniques that exploit the protocol. The first step in enumerating SMB is to connect to the service using the so-called “null session” command, shown next:
![]()
You might notice the similarity between this command and the standard net use syntax for mounting a network drive—in fact, they are nearly identical. The preceding syntax connects to the hidden interprocess communications “share” (IPC$) at IP address 192.168.202.33 as the built-in anonymous user (/u:“”) with a null (“”) password. If successful, the attacker now has an open channel over which to attempt the various techniques outlined in this section to pillage as much information as possible from the target, including network information, shares, users, groups, Registry keys, and so on. Regardless of whether you’ve heard it called the “Red Button” vulnerability, null session connections, or anonymous logon, it can be the single most devastating network foothold sought by intruders, as we will vividly demonstrate next.
NOTE SMB enumeration is feasible over both TCP 139 (NetBIOS Session) and TCP 445 (SMB over raw TCP/IP, also called “Direct Host”). Both ports provide access to the same service (SMB), just over different transports.
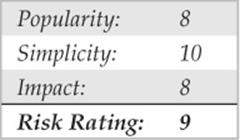
Enumerating File Shares Some of the favorite targets of intruders are mis-ACL’d Windows file shares. With a null session established, we can enumerate the names of file shares quite easily using a number of techniques. For example, the built-in Windows net view command can be used to enumerate shares on remote systems:
Two other good share-enumeration tools from the Windows Server 2003 Resource Kit are srvcheck and srvinfo (using the –s switch) (microsoft.com/downloads/details.aspx?familyid=9D467A69-57FF-4AE7-96EE-B18C4790CFFD&displaylang=en). srvcheck displays shares and authorized users, including hidden shares, but it requires privileged access to the remote system to enumerate users and hidden shares. srvinfo’s –s parameter lists shares along with a lot of other potentially revealing information.
One of the best tools for enumerating Windows file shares (and a whole lot more) is DumpSec (formerly DumpAcl), shown in Figure 3-3. It is available for free from SomarSoft (somarsoft.com). Few tools deserve their place in the NT security administrator’s toolbox more than DumpSec. It audits everything from file-system permissions to services available on remote systems. Basic user information can be obtained even over an innocuous null connection, and it can be run from the command line, making for easy automation and scripting. In Figure 3-3, we show DumpSec being used to dump share information from a remote computer.
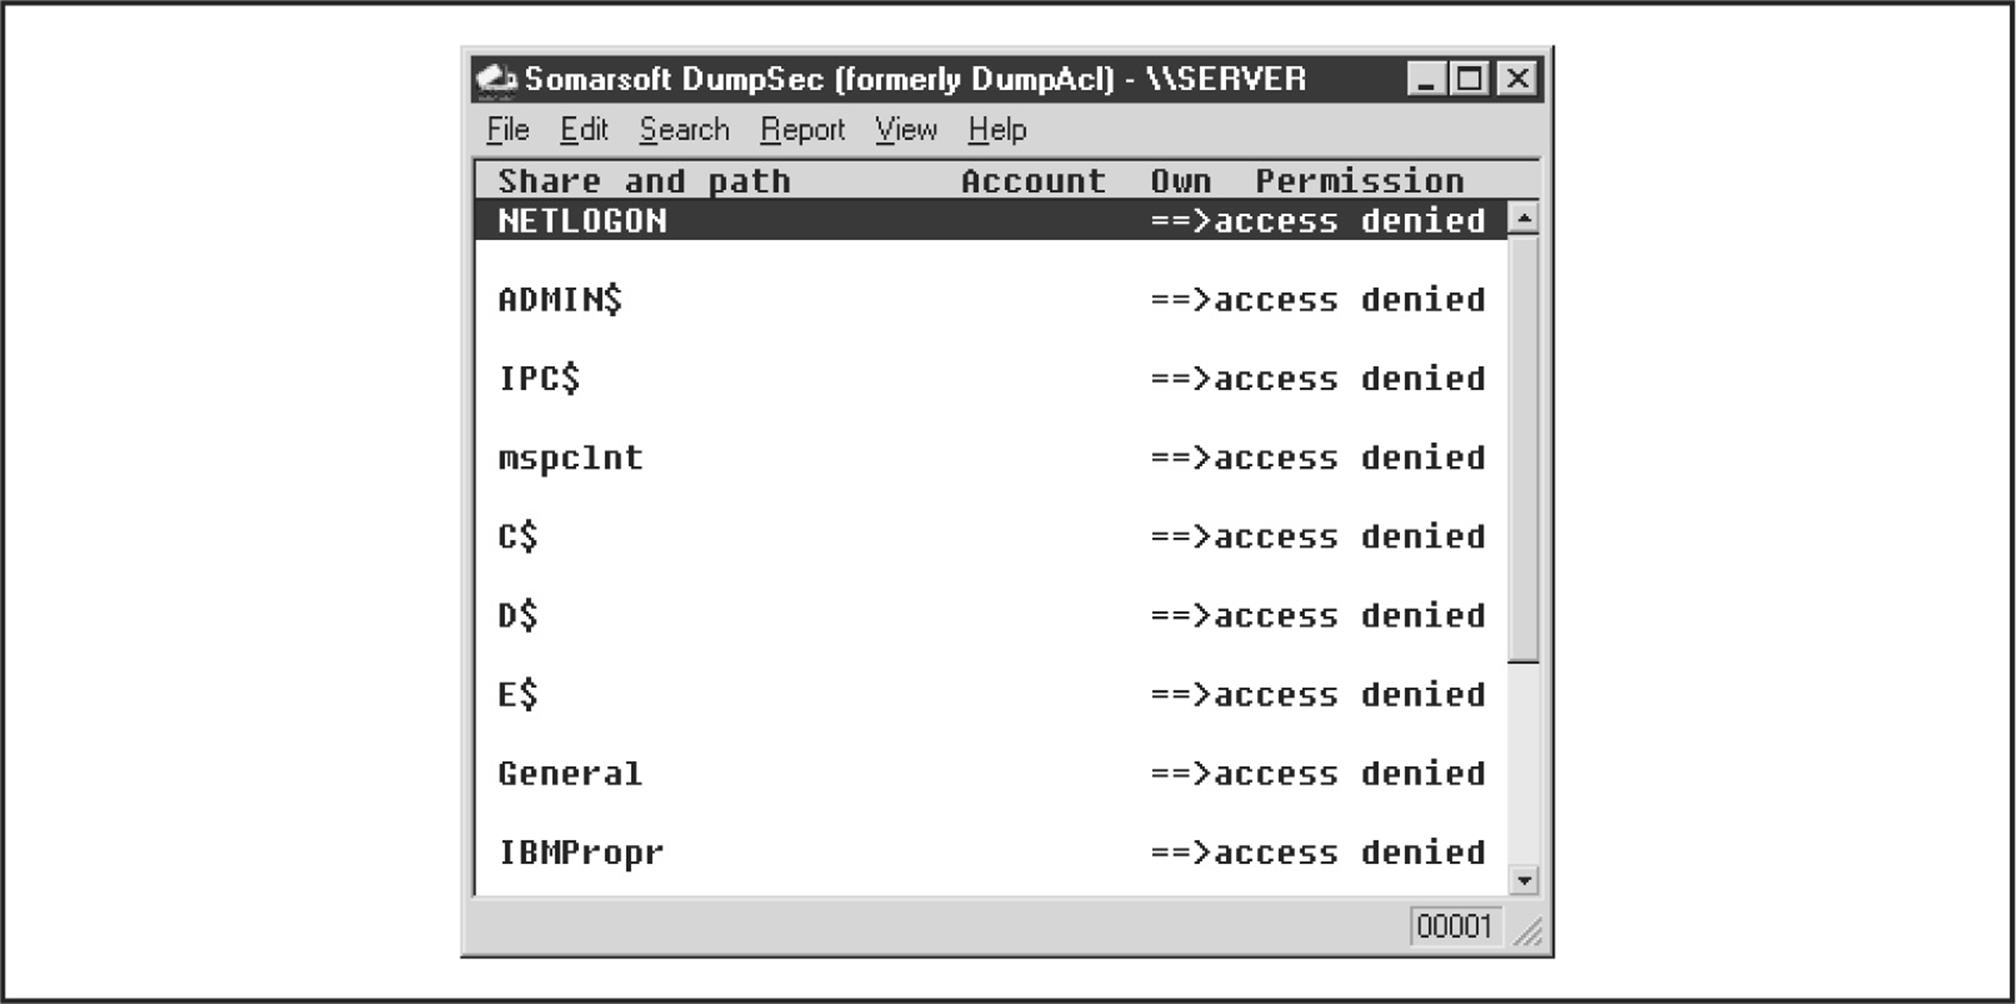
Figure 3-3 DumpSec reveals shares over a null session with the target computer.
Opening null connections and using the preceding tools manually is great for directed attacks, but most hackers commonly employ a NetBIOS scanner to check entire networks rapidly for exposed shares. Two tools that perform these tasks are SysInternals’s (acquired by Microsoft) ShareEnum (technet.microsoft.com/en-us/sysinternals/bb897442.aspx) and SoftPerfect’s Network Scanner (softperfect.com/products/networkscanner/). ShareEnum has fewer configurable options, but, by default, it provides a good amount of information and has nice comparison features that may be useful for comparing results over time. SoftPerfect’s Network Scanner is a bit more diverse but requires some minimal configuration beyond the default (see Figure 3-4).
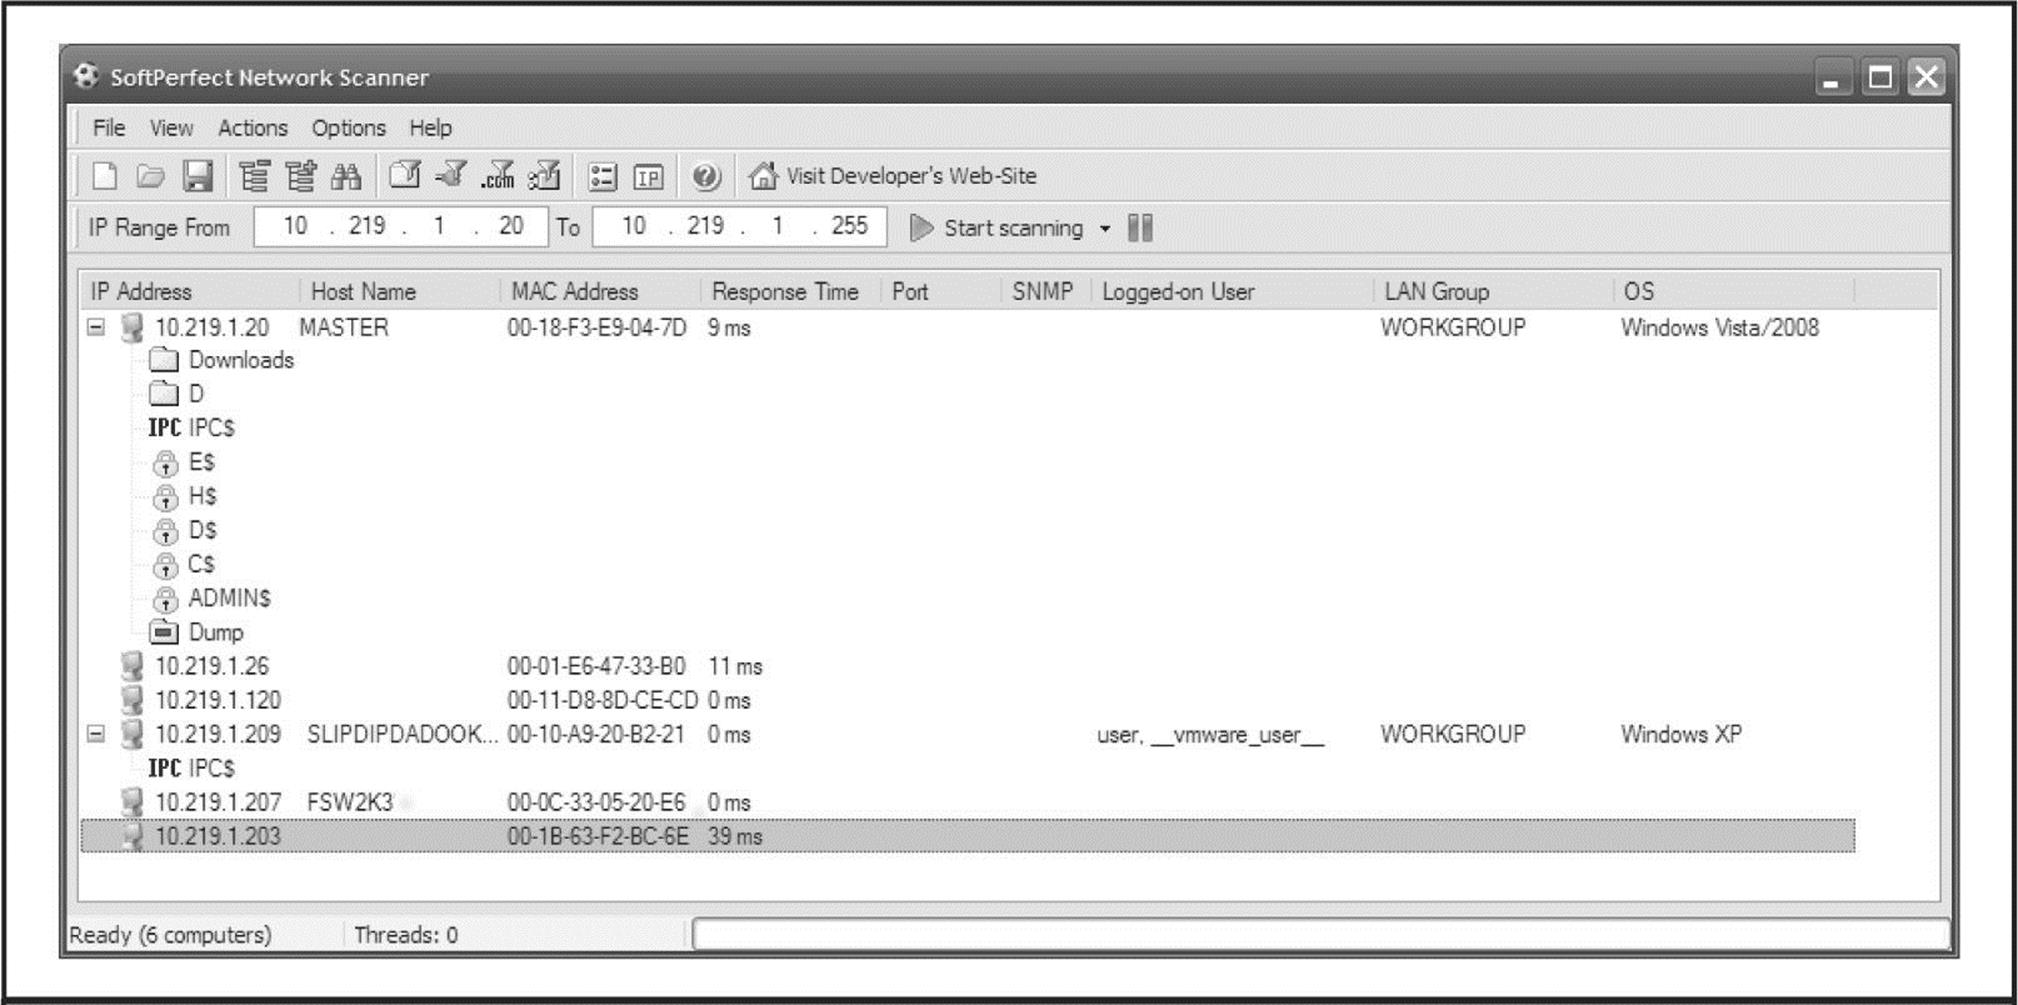
Figure 3-4 SoftPerfect’s Network Scanner automatically scans subnets for open file shares.
Unlike older tools such as Legion, or the NetBIOS Auditing Tool (NAT), these newer tools target the “security professional” rather than the “hacker,” so unfortunately you are not likely to find password brute-forcing functionality included. Regardless, you can always use the older tools to do your dirty work, or use one of the brute-forcing tools mentioned later on in this book.
Legion can chew through a Class C IP network and reveal all available shares in its graphical interface. Version 2.1 includes a “brute-force tool” that tries to connect to a given share by using a list of passwords supplied by the user. For more on brute-force cracking of Windows, seeChapter 4. Another popular Windows share scanner is the NetBIOS Auditing Tool (NAT), based on code written by Andrew Tridgell. (NAT is available through the Hacking Exposed website, hackingexposed.com.) Neon Surge and Chameleon of the now-defunct Rhino9 Security Team wrote a graphical interface for NAT for the command-line challenged, as shown in Figure 3-5. NAT not only finds shares but also attempts forced entry utilizing user-defined username and password lists.
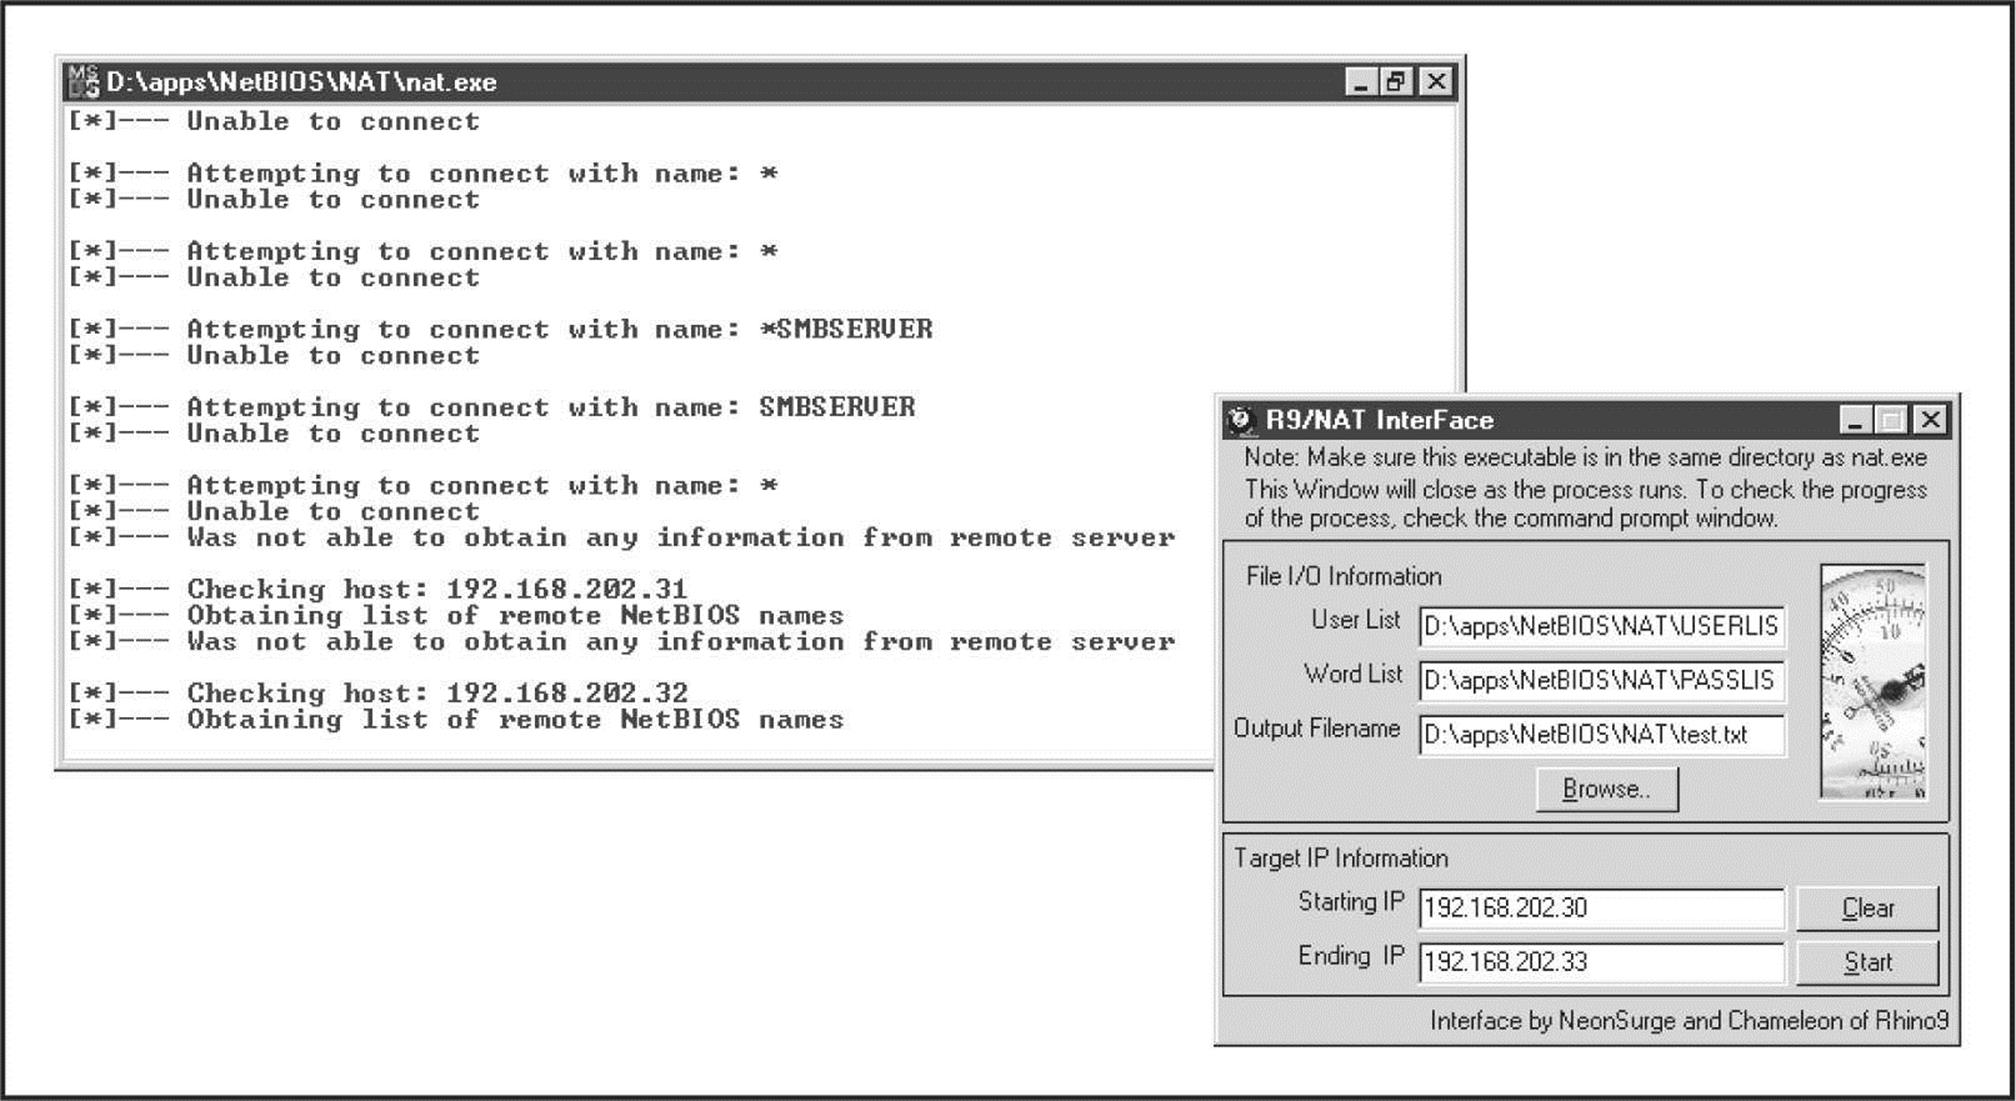
Figure 3-5 The NetBIOS Auditing Tool (NAT) with graphical interface and command-line output
Registry Enumeration Another good mechanism for enumerating NT Family application information involves dumping the contents of the Windows Registry from the target. Most any application that is correctly installed on a given NT system leaves some sort of footprint in the Registry; it’s just a question of knowing where to look. Additionally, intruders can sift through reams of user- and configuration-related information if they gain access to the Registry. With patience, some tidbit of data that grants access can usually be found among its labyrinthine hives. Fortunately, Window’s default configuration is to allow only administrators access to the Registry. Therefore, the techniques described next will not typically work over anonymous null sessions. One exception to this is when the HKLM\System\CurrentControlSet\Control\SecurePipeServer\Winreg\AllowedPaths key specifies other keys to be accessible via null sessions. By default, it allows access to HKLM\Software\Microsoft\WindowsNT\Current Version.
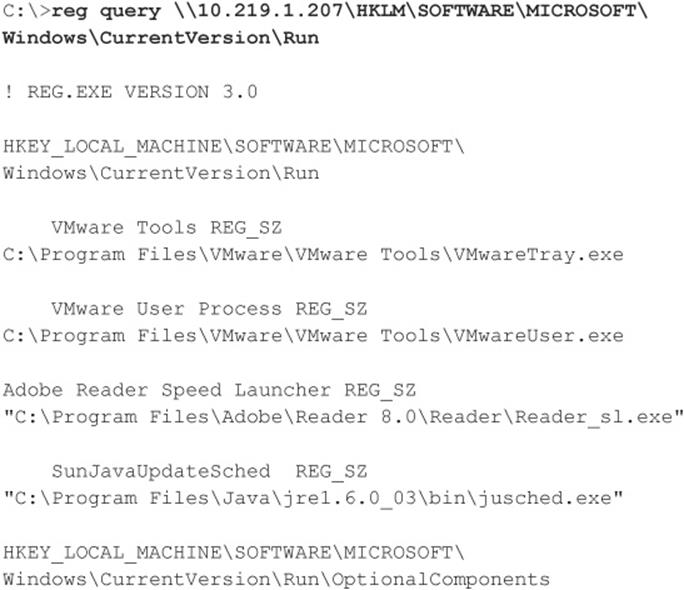
If you want to check whether a remote Registry is locked down, the best tools are the reg (built into Windows XP, 2003, and later) and SomarSoft’s DumpSec (once again). For pre–Windows 2003 systems, regdmp can be used instead of reg (regdmp was the original decommissioned tool; all of its functionality was then built into the reg utility). reg/regdmp is a rather raw utility that simply dumps the entire Registry (or individual keys specified at the command line) to the console. Although remote access to the Registry is usually restricted to administrators, nefarious do-nothings will probably try to enumerate various keys anyway in hopes of a lucky break. Hackers often plant pointers to backdoor utilities such as NetBus (see Chapter 4). Here, we check to see what applications start up with Windows:
DumpSec produces much nicer output but basically achieves the same thing, as shown in Figure 3-6. The “Dump Services” report enumerates every Win32 service and kernel driver on the remote system, whether running or not (again, assuming proper access permissions). This information could provide a wealth of potential targets for attackers to choose from when planning an exploit. Remember that a null session is required for this activity.
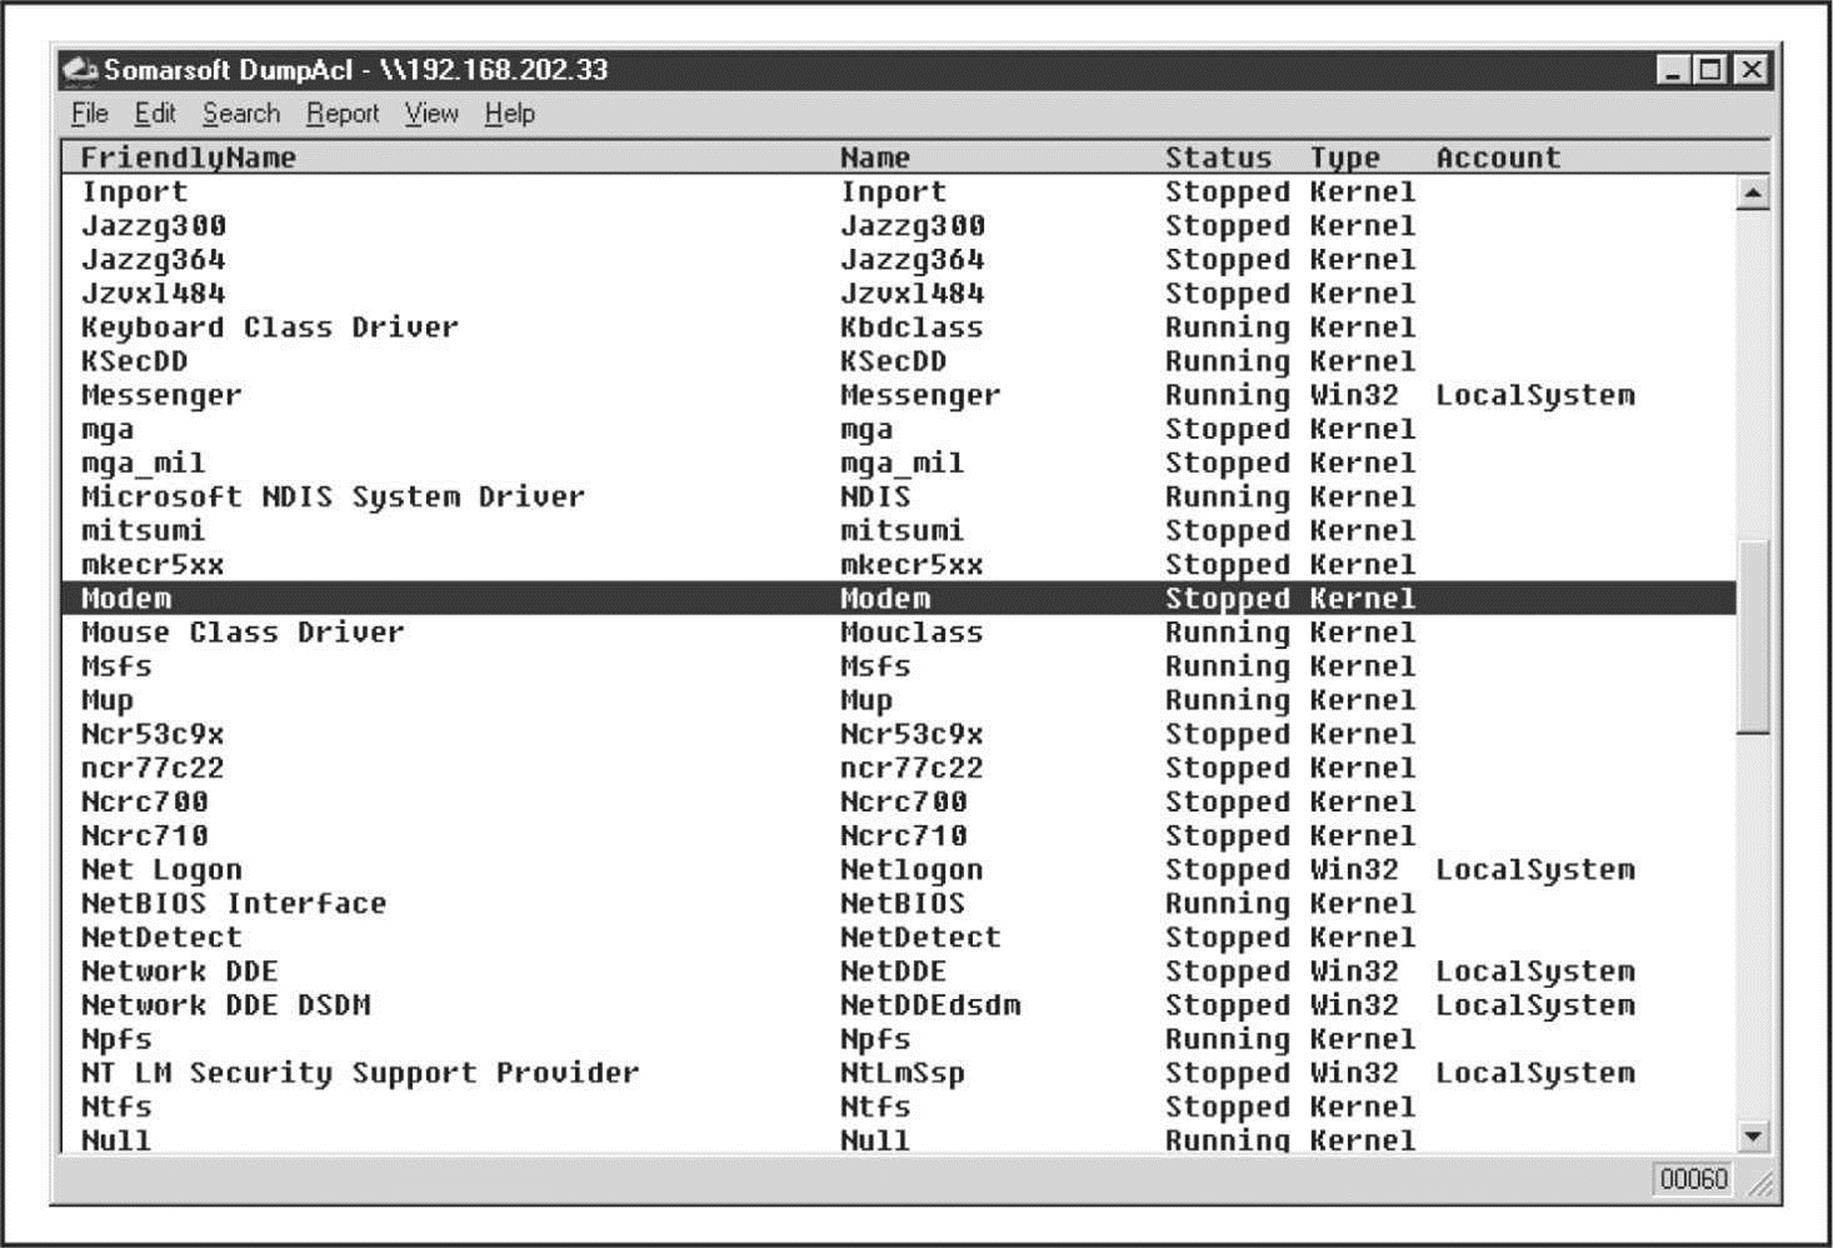
Figure 3-6 DumpSec enumerates all services and drives running on a remote system.
Enumerating Trusted Domains Remember the nltest tool, which we discussed earlier in the context of NetBIOS Name Service Enumeration? Once a null session is set up to one of the machines in the enumerated domain, the nltest/server:<server_name> and /trusted_domains syntax can be used to learn about further Windows domains related to the first. It’s amazing how much more powerful these simple tools become when a null session is available.
Enumerating Users At this point, giving up share information probably seems pretty bad, but not the end of the world—at least attackers haven’t been able to get at user account information, right? Wrong. Unfortunately, some Windows machines cough up user information over null sessions just about as easily as they reveal shares.
One of the most powerful tools for mining a null session for user information is, once again, DumpSec. It can pull a list of users, groups, and the NT system’s policies and user rights. In the next example, we use DumpSec from the command line to generate a file containing user information from the remote computer (remember that DumpSec requires a null session with the target computer to operate):

Using the DumpSec GUI, you can include many more information fields in the report, but the format just shown usually ferrets out troublemakers. For example, we once came across a server that stored the password for the renamed Administrator account in the Comments field!
Two other extremely powerful Windows enumeration tools are sid2user and user2sid by Evgenii Rudnyi (see evgenii.rudnyi.ru/soft/sid/sid.txt). These are command-line tools that look up NT Family SIDs from username input and vice versa. SID is the security identifier, a variable-length numeric value issued to an NT Family system at installation. For a good explanation of the structure and function of SIDs, read the excellent article at en.wikipedia.org/wiki/Security_Identifier. Once an intruder has learned a domain’s SID through user2sid, that intruder can use known SID numbers to enumerate the corresponding usernames. Here’s an example:
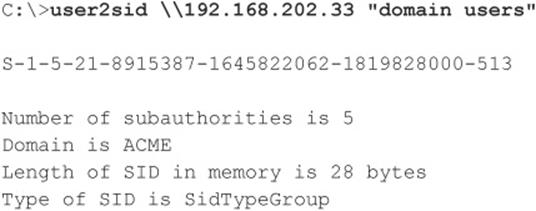
Now we know the SID for the machine—the string of numbers beginning with S-1, separated by hyphens. The numeric string following the last hyphen is called the relative identifier (RID), and it is predefined for built-in Windows users and groups such as Administrator and Guest. For example, the Administrator user’s RID is always 500, and the Guest user’s is 501. Armed with this tidbit, a hacker can use sid2user and the known SID string appended with an RID of 500 to find the name of the administrator’s account (even if it has been renamed). Here’s an example:

Note that S-1 and the hyphens are omitted. Another interesting factoid is that the first account created on any NT-based local system or domain is assigned an RID of 1000, and each subsequent object gets the next sequential number after that (1001, 1002, 1003, and so on—RIDs are not reused on the current installation). Therefore, once the SID is known, a hacker can basically enumerate every user and group on an NT Family system, past and present.
NOTE sid2user/user2sid even works if RestrictAnonymous is set to 1 (defined shortly), as long as port 139 or 445 is accessible.
Here’s a simple example of how to script user2sid/sid2user to loop through all the available user accounts on a system. Before running this script, we first determine the SID for the target system using user2sid over a null session, as shown previously. Recalling that the NT Family assigns new accounts an RID beginning with 1000, we then execute the following loop using the NT Family shell command FOR and the sid2user tool (see earlier) to enumerate up to 50 accounts on a target:
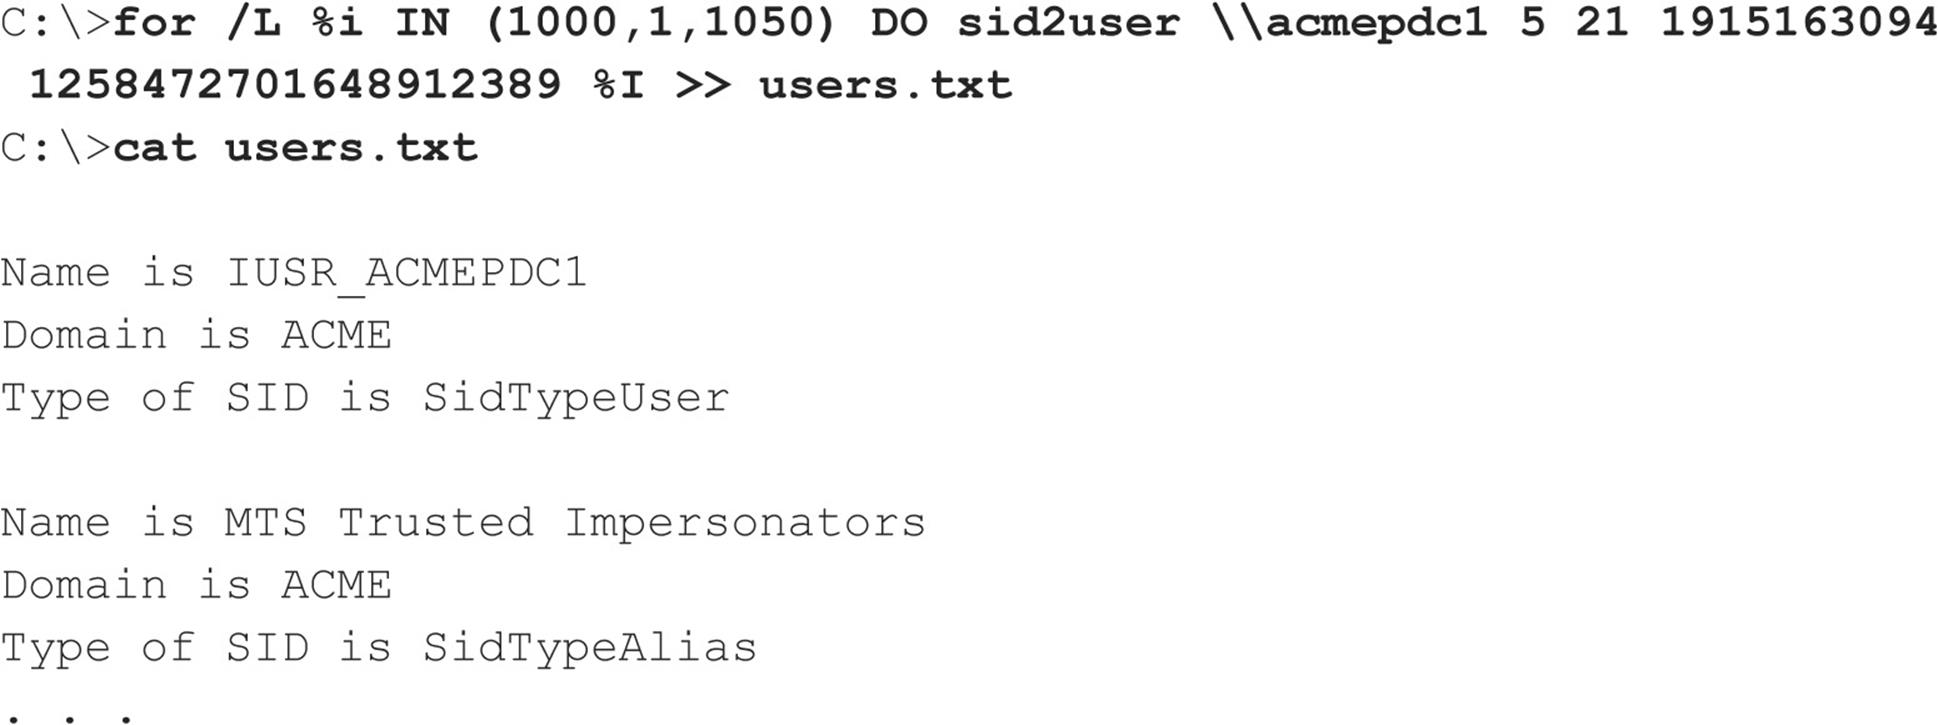
This raw output could be sanitized by piping it through a filter to leave just a list of usernames. Of course, the scripting environment is not limited to the NT shell—Perl, VBScript, or whatever is handy will do. As one last reminder before we move on, realize that this example will successfully dump users as long as TCP port 139 or 445 is open on the target, RestrictAnonymous = 1 notwithstanding.
NOTE One of the myriad features of the all-encompassing Windows hacking suite, Cain and Abel (oxid.it/cain.html) is user enumeration. It even automates the process of first attempting the null session method described previously and then falls back to the sid2user method just described if the target’s RestrictAnonymous is set to 1.
All-in-One Null Session Enumeration Tools Various developers have created a number of all-in-one null session enumeration tools so you can get the most bang for your buck with SMB enumeration. The tool that currently tops the list is Winfingerprint (sourceforge.net/projects/winfingerprint). As suggested by all of the checkboxes viewable in Figure 3-7, Winfingerprint wins for overall functionality, as it has nearly everything you could hope for in a Windows enumeration tool, capable of enumerating everything mentioned previously and more. It can target a single host, lists or ranges of hosts, or just all visible hosts on a segment, and in addition to its null session functionality, Winfingerprint is also capable of enumerating Windows systems via Active Directory and WMI, making it a truly versatile Windows enumeration utility.
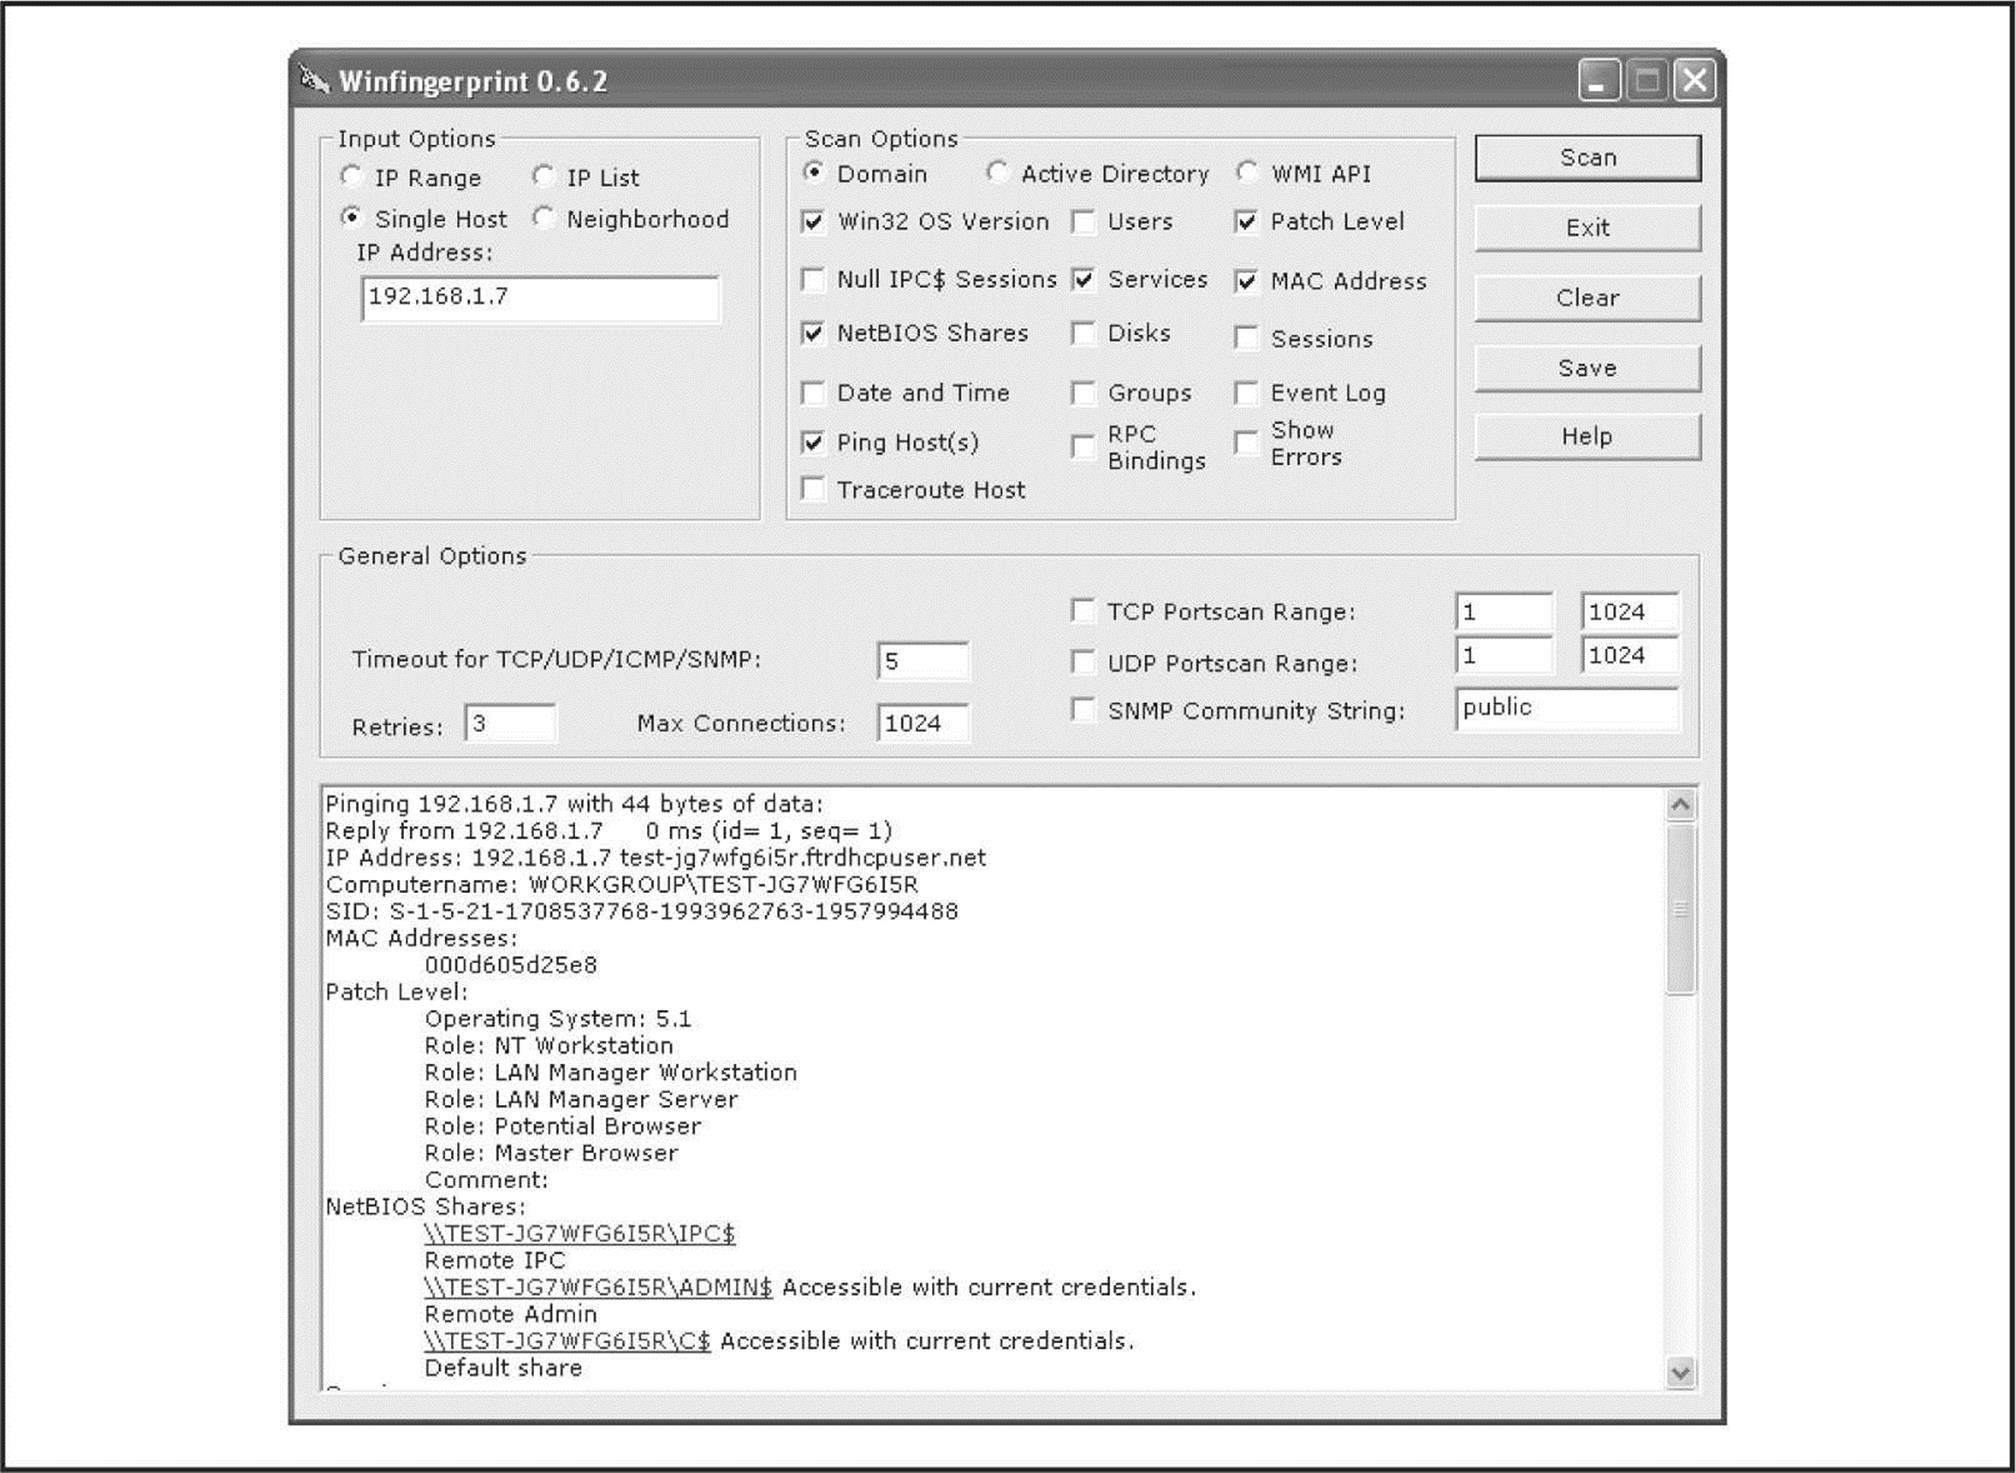
Figure 3-7 Winfingerprint has an easy-to-use GUI and provides a wealth of information.
Another useful all-in-one tool is NBTEnum by Reed Arvin, although it can be more difficult to locate now that its website is no longer online (PacketStorm currently has it at packetstormsecurity.org/files/download/52547/NBTEnum33.zip). NBTEnum shines due to its extensive yet easy-to-read HTML output, intelligent brute-forcing capabilities, and its ability to enumerate a multitude of information using null sessions or under a particular user account. Using the tool is simple: to perform basic enumeration operations simply supply the –q option followed by the hostname. To enable intelligent brute forcing, use the –s option and include a dictionary file. NBTEnum (see Figure 3-8) first checks the server’s account lockout policy and then attempts to brute force only a limited number of passwords so the limit is not reached.
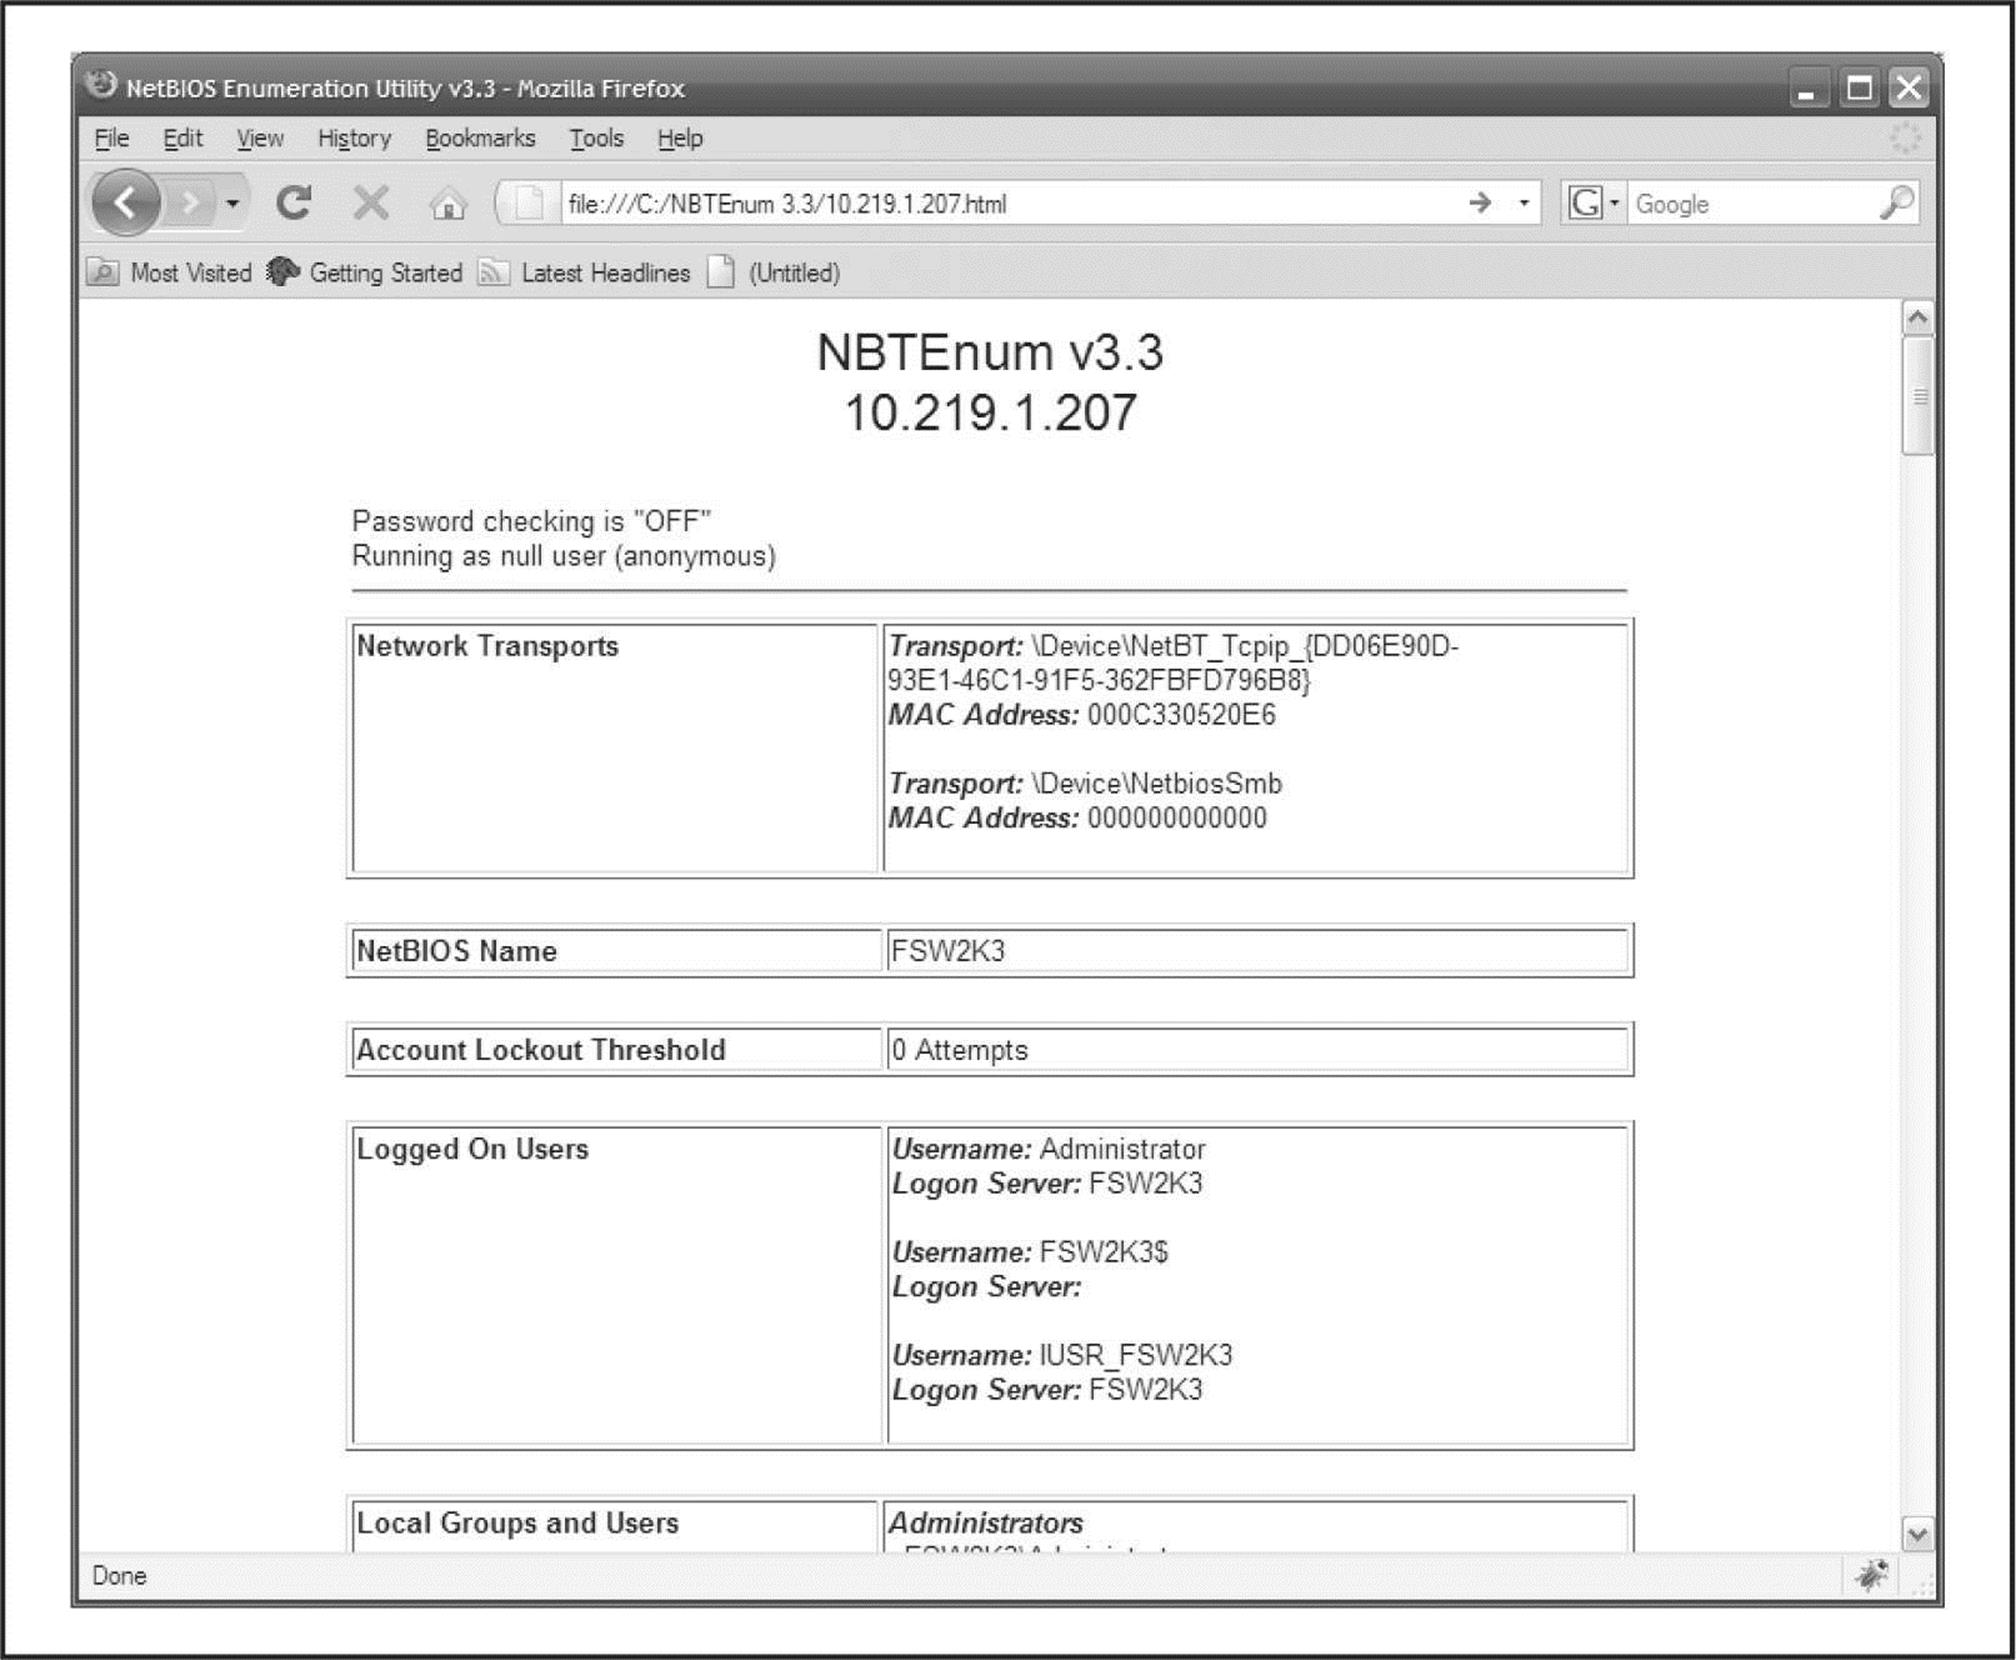
Figure 3-8 NBTEnum provides a wealth of information in an easily readable HTML output.
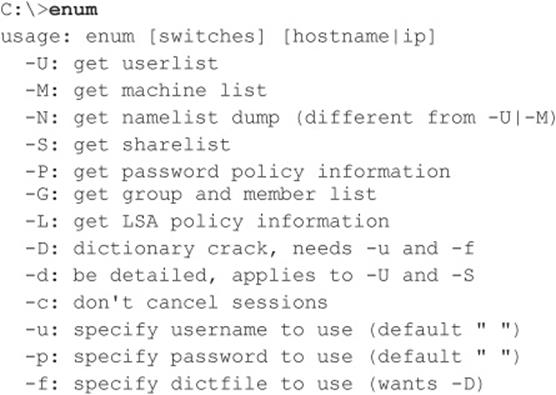
enum, developed by Razor Team from BindView (which has since been acquired by Symantec), is an excellent tool for SMB enumeration. Unfortunately, it is also older in comparison to Winfingerprint and can be much harder to find. It supports automatic setup and teardown of null sessions, password brute forcing, and a ton of additional features that make it a great addition to an attacker’s toolkit. The following listing of the available command-line switches for this tool demonstrates how comprehensive it is:
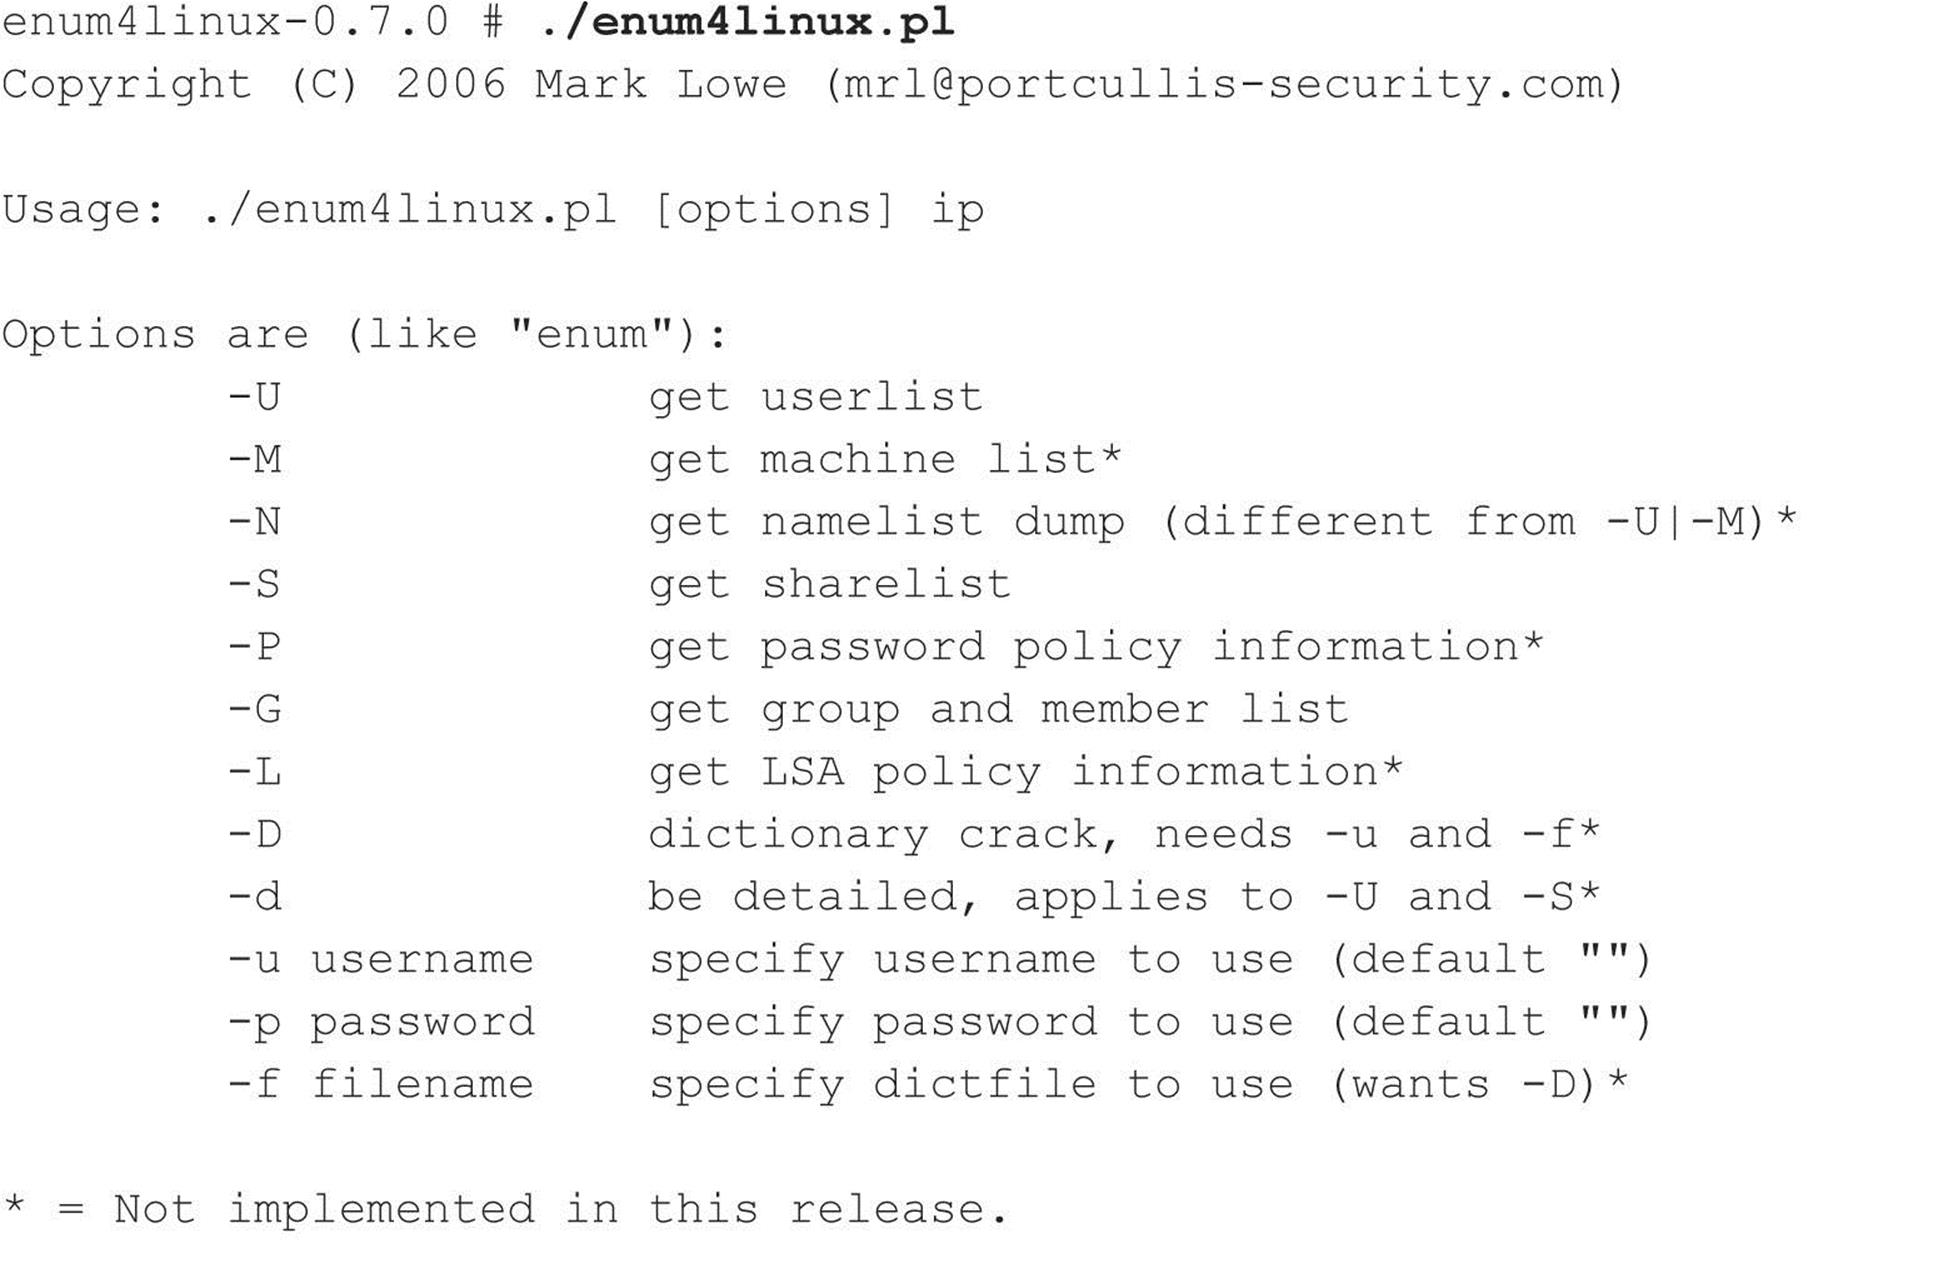
Portcullis Security has developed a Linux clone of enum named enum4linux (labs.portcullis.co.uk/application/enum4linux/), which is a wrapper for common commands available within the Samba suite. It provides the same information plus a number of different options (edited for brevity):
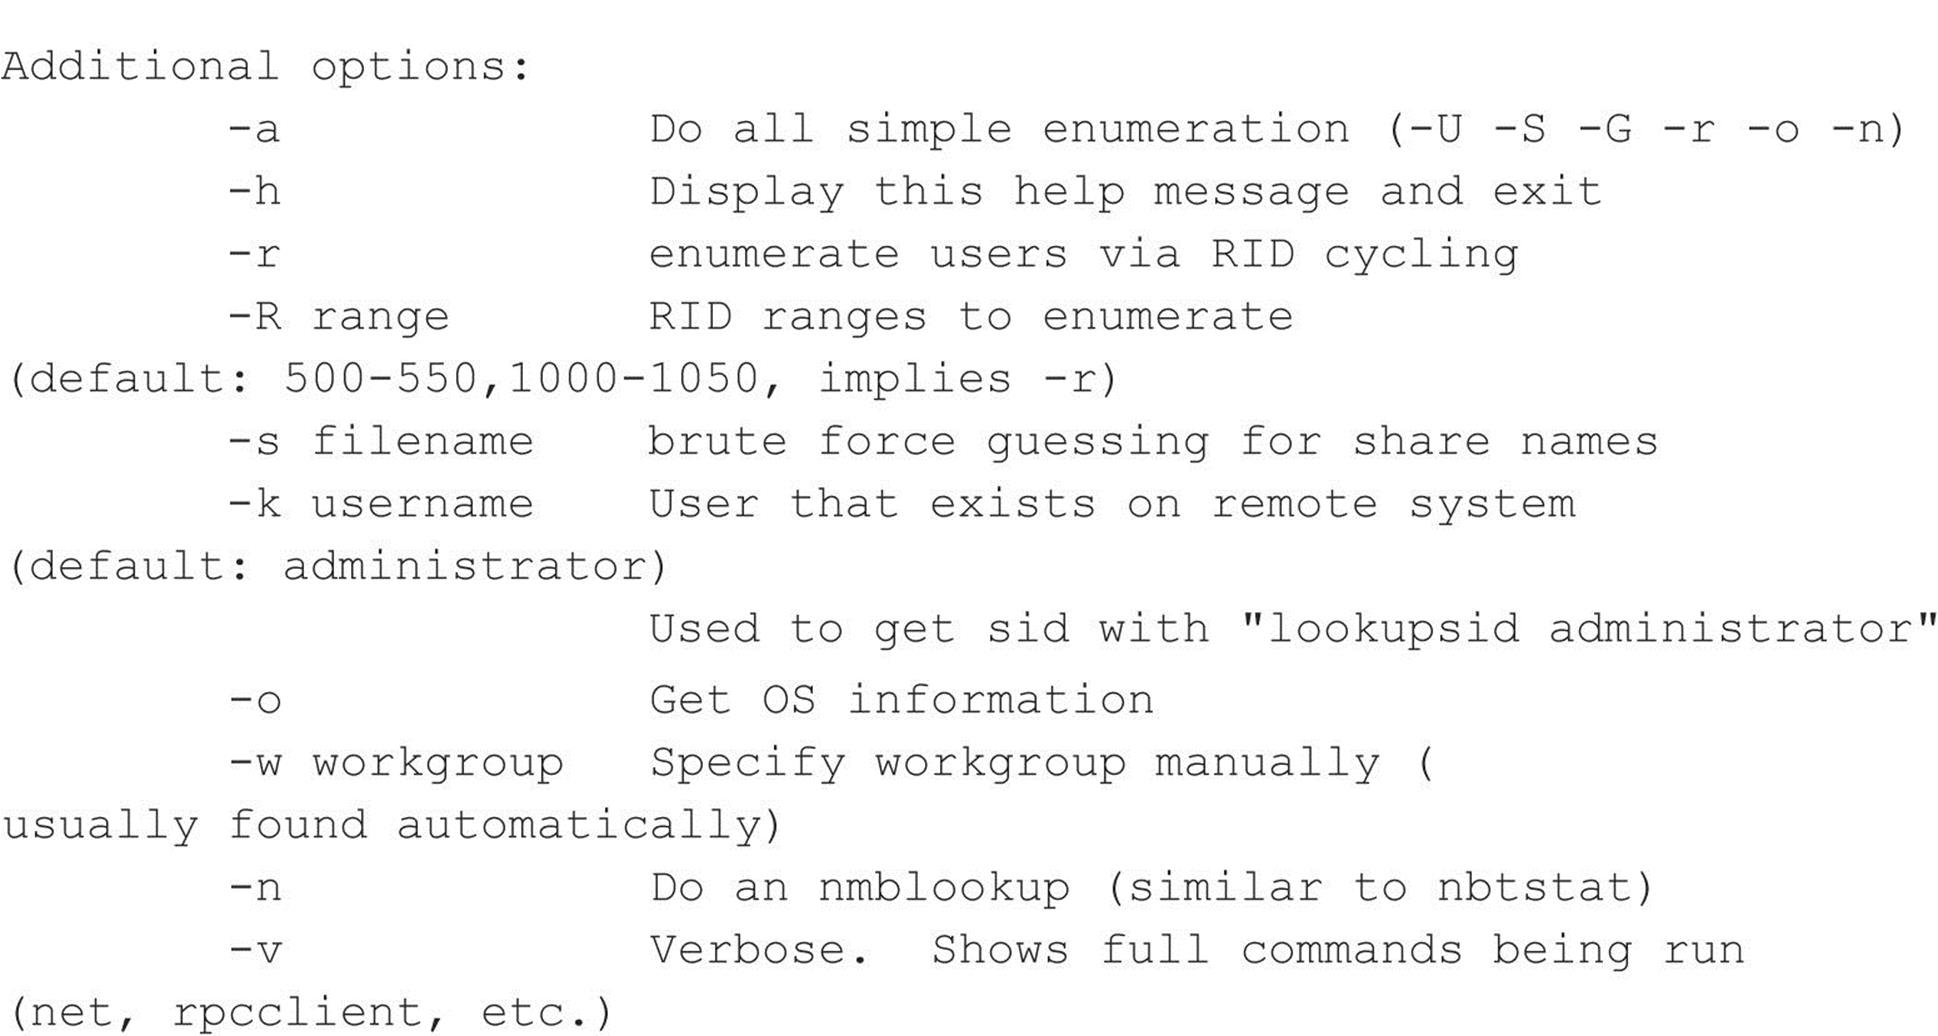
NetE is another older tool written by Sir Dystic of the Cult of the Dead Cow (cultdeadcow.com/tools/nete.html), but it works excellently and extracts a wealth of information from a null session connection. We like to use the /0 switch to perform all checks, but here’s the command syntax for NetE to give you some idea of the comprehensive information it can retrieve via a null session:
Miscellaneous Null Session Enumeration Tools A few other NT Family enumeration tools bear mentioning here. Using a null session, getmac displays the MAC addresses and device names of network interface cards on remote machines. This output can yield useful network information to an attacker casing a system with multiple network interfaces. getmac works even if RestrictAnonymous is set to 1.
Winfo by Arne Vidstrom at ntsecurity.nu extracts user accounts, shares, and interdomain, server, and workstation trust accounts. It’ll even automate the creation of a null session if you want, by using the –n switch.
![]() SMB Null Session Countermeasures
SMB Null Session Countermeasures
Null sessions require access to TCP 139 and/or 445 on Windows 2000 and greater, so the most prudent way to stop them is to filter TCP and UDP ports 139 and 445 at all perimeter network access devices. You could also disable SMB services entirely on individual NT hosts by unbinding WINS Client (TCP/IP) from the appropriate interface using the Network Control Panel’s Bindings tab. Under Windows 2000 and later, this is accomplished by unbinding File and Print Sharing for Microsoft Networks from the appropriate adapter under Network and Dial-up Connections | Advanced | Advanced Settings.
Following NT 4 Service Pack 3, Microsoft provided a facility to prevent enumeration of sensitive information over null sessions without the radical surgery of unbinding SMB from network interfaces (although we still recommend doing that unless SMB services are necessary). It’s called RestrictAnonymous after the Registry key that bears that name. Here are the steps to follow:
1. Open regedt32 and navigate to HKLM\SYSTEM\CurrentControlSet\Control\ LSA.
2. Choose Edit | Add Value and enter the following data:

3. Exit the Registry Editor and restart the computer for the change to take effect.
On Windows 2000 and later, the fix is slightly easier to implement, thanks to Security Policies. The Security Policies MMC snap-in provides a graphical interface to the many arcane security-related Registry settings like RestrictAnonymous that needed to be configured manually under NT4. Even better, these settings can be applied at the Organizational Unit (OU), site, or domain level, so they can be inherited by all child objects in Active Directory if applied from a Windows 2000 and later domain controller. To do this, you must have the Group Policy snap-in. See Chapter 4 for more information about Group Policy.
Interestingly, setting RestrictAnonymous to 1 does not actually block anonymous connections. However, it does prevent most of the information leaks available over the null session, primarily the enumeration of user accounts and shares.
CAUTION Some enumeration tools and techniques still extract sensitive data from remote systems even if RestrictAnonymous is set to 1, so don’t get overconfident.
To completely restrict access to CIFS/SMB information on Windows 2000 and later systems, set the Additional Restrictions For Anonymous Connections policy key to the setting shown in the next illustration, No Access Without Explicit Anonymous Permissions. (This setting is equivalent to setting RestrictAnonymous to 2 in the Windows 2000 and later Registry.)
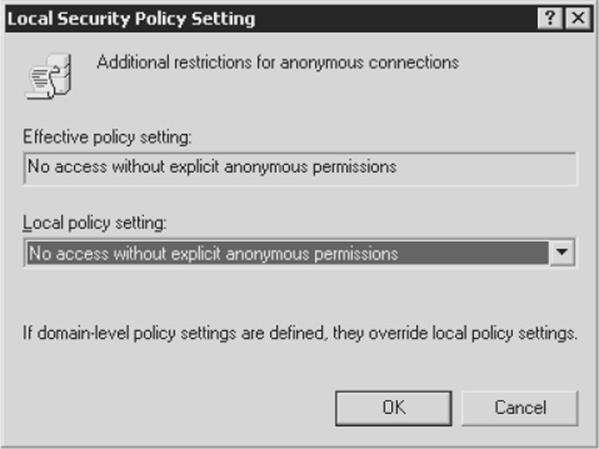
Setting RestrictAnonymous to 2 prevents the Everyone group from being included in anonymous access tokens. It effectively blocks null sessions from being created:

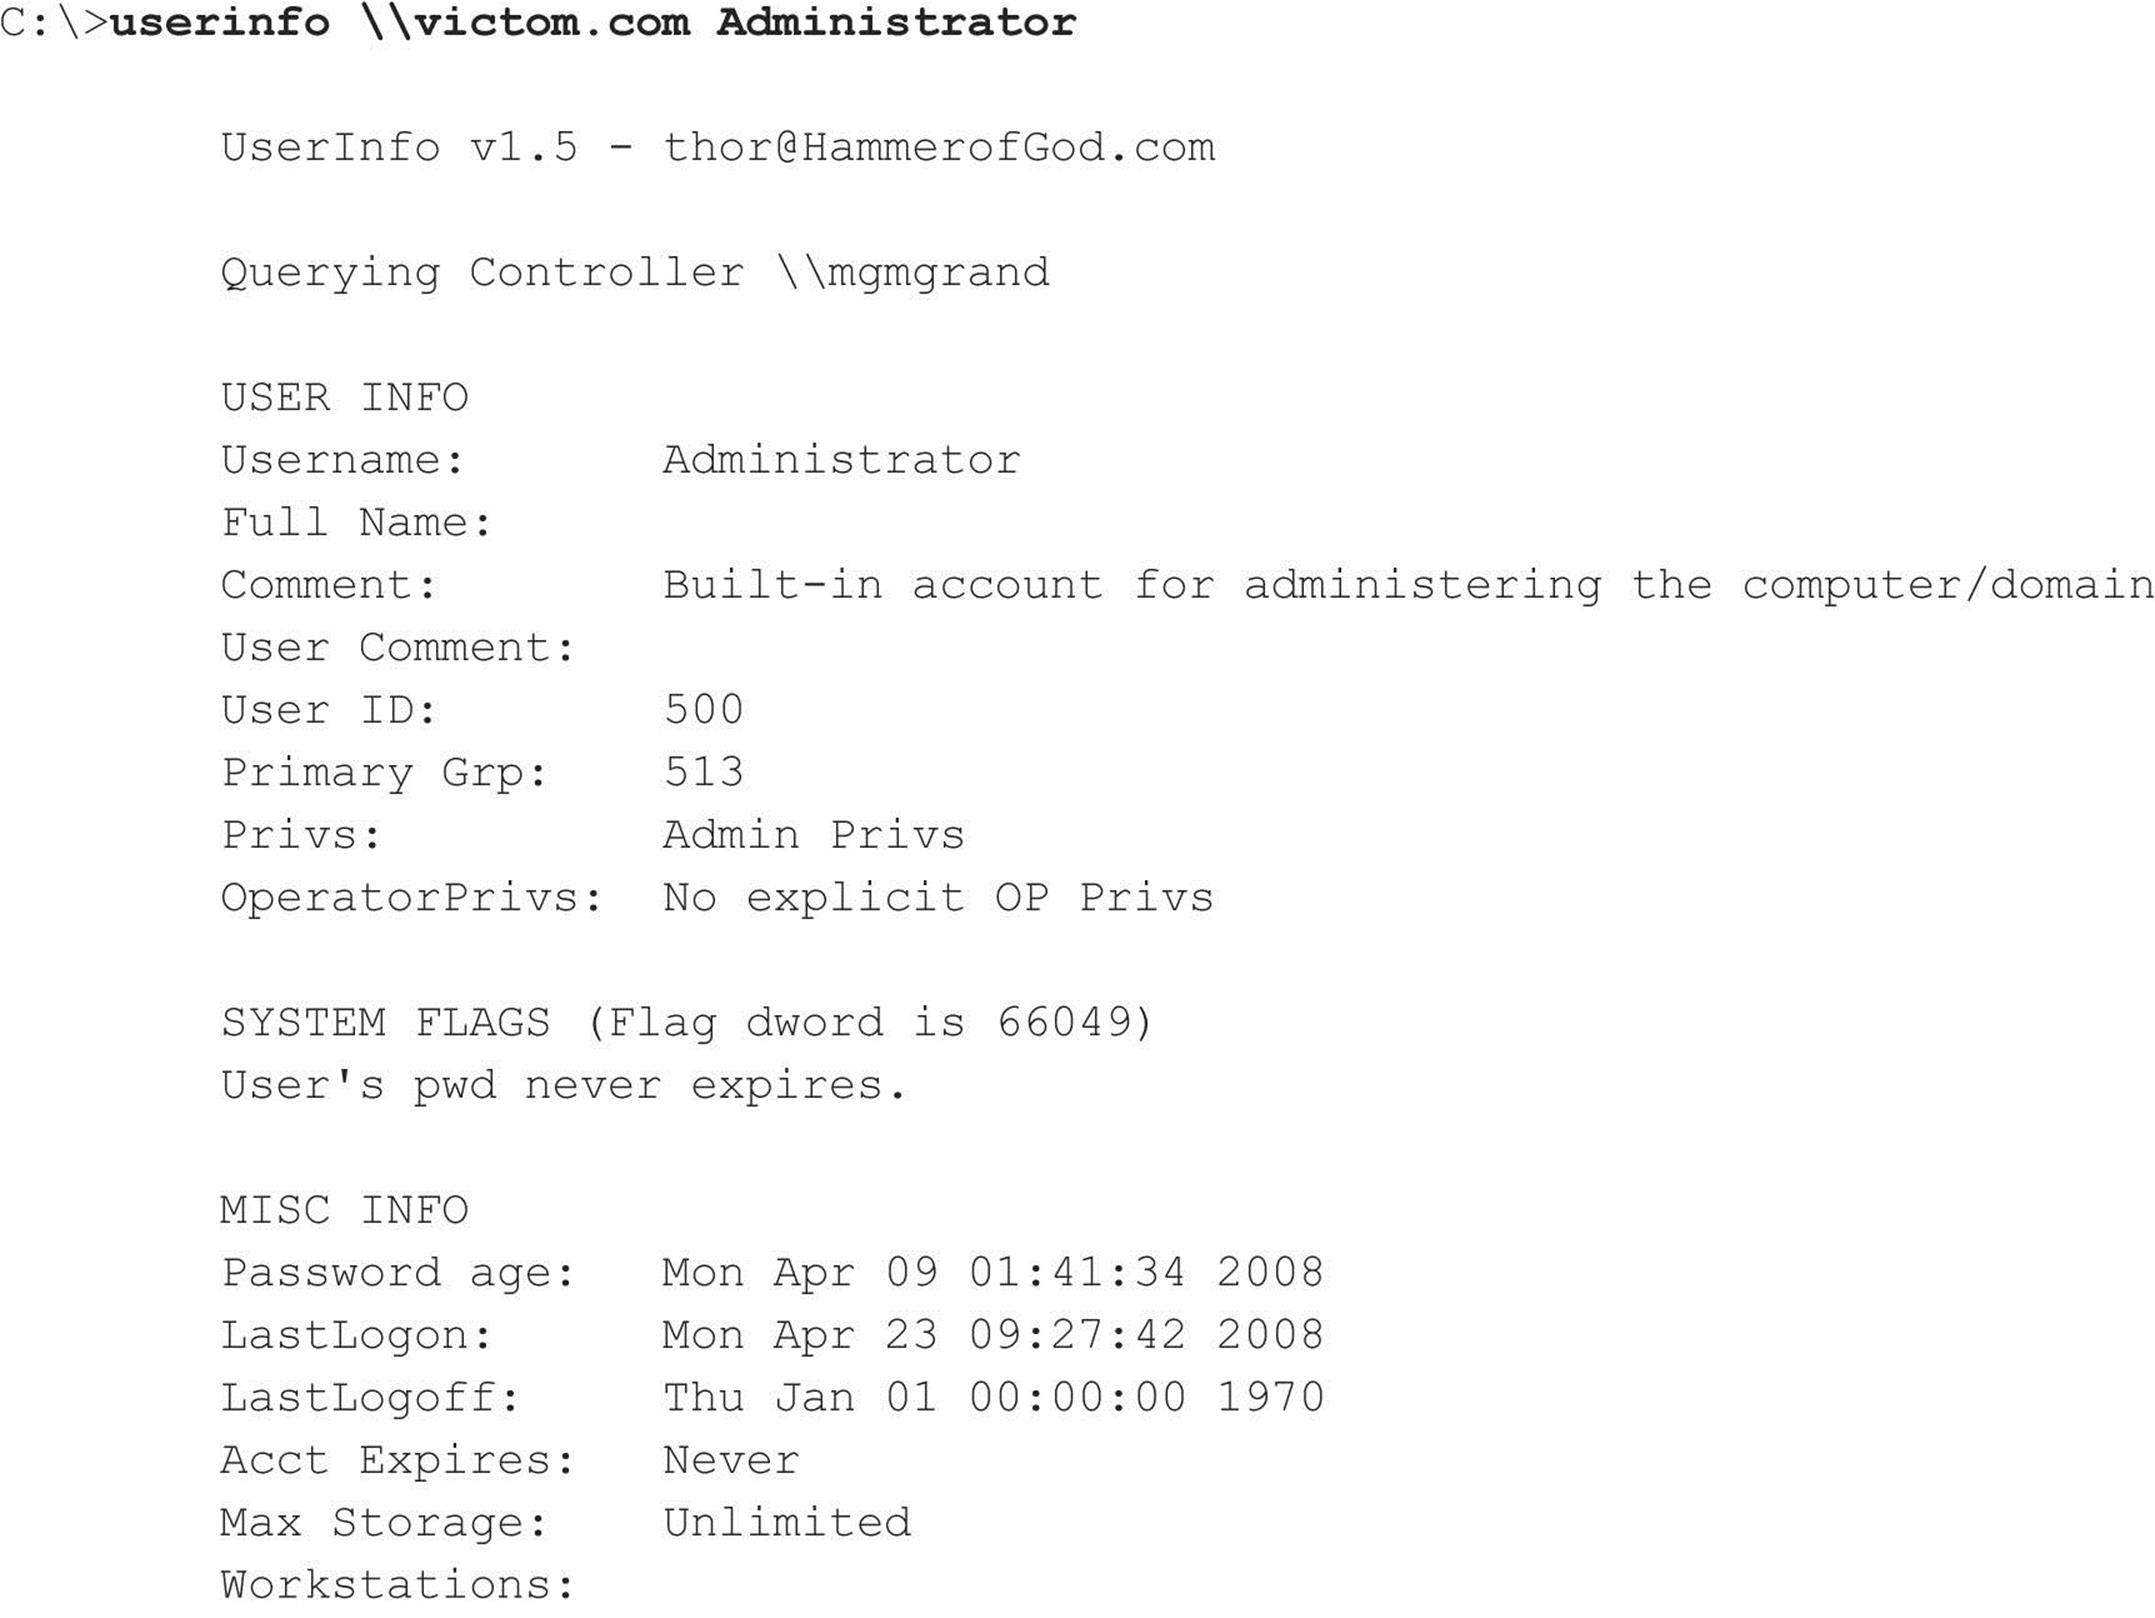
Beating RestrictAnonymous = 1 Don’t get too comfy with RestrictAnonymous. The hacking community has discovered that by querying the NetUserGetInfo API call at Level 3, RestrictAnonymous = 1 can be bypassed. Both NBTEnum (previously mentioned) and the UserInfo tool (HammerofGod.com/download.aspx) enumerate user information over a null session even if RestrictAnonymous is set to 1. (Of course, if RestrictAnonymous is set to 2 on a Windows 2000 or later system, null sessions are not even possible in the first place.) Here’s UserInfo enumerating the Administrator account on a remote system with RestrictAnonymous = 1:
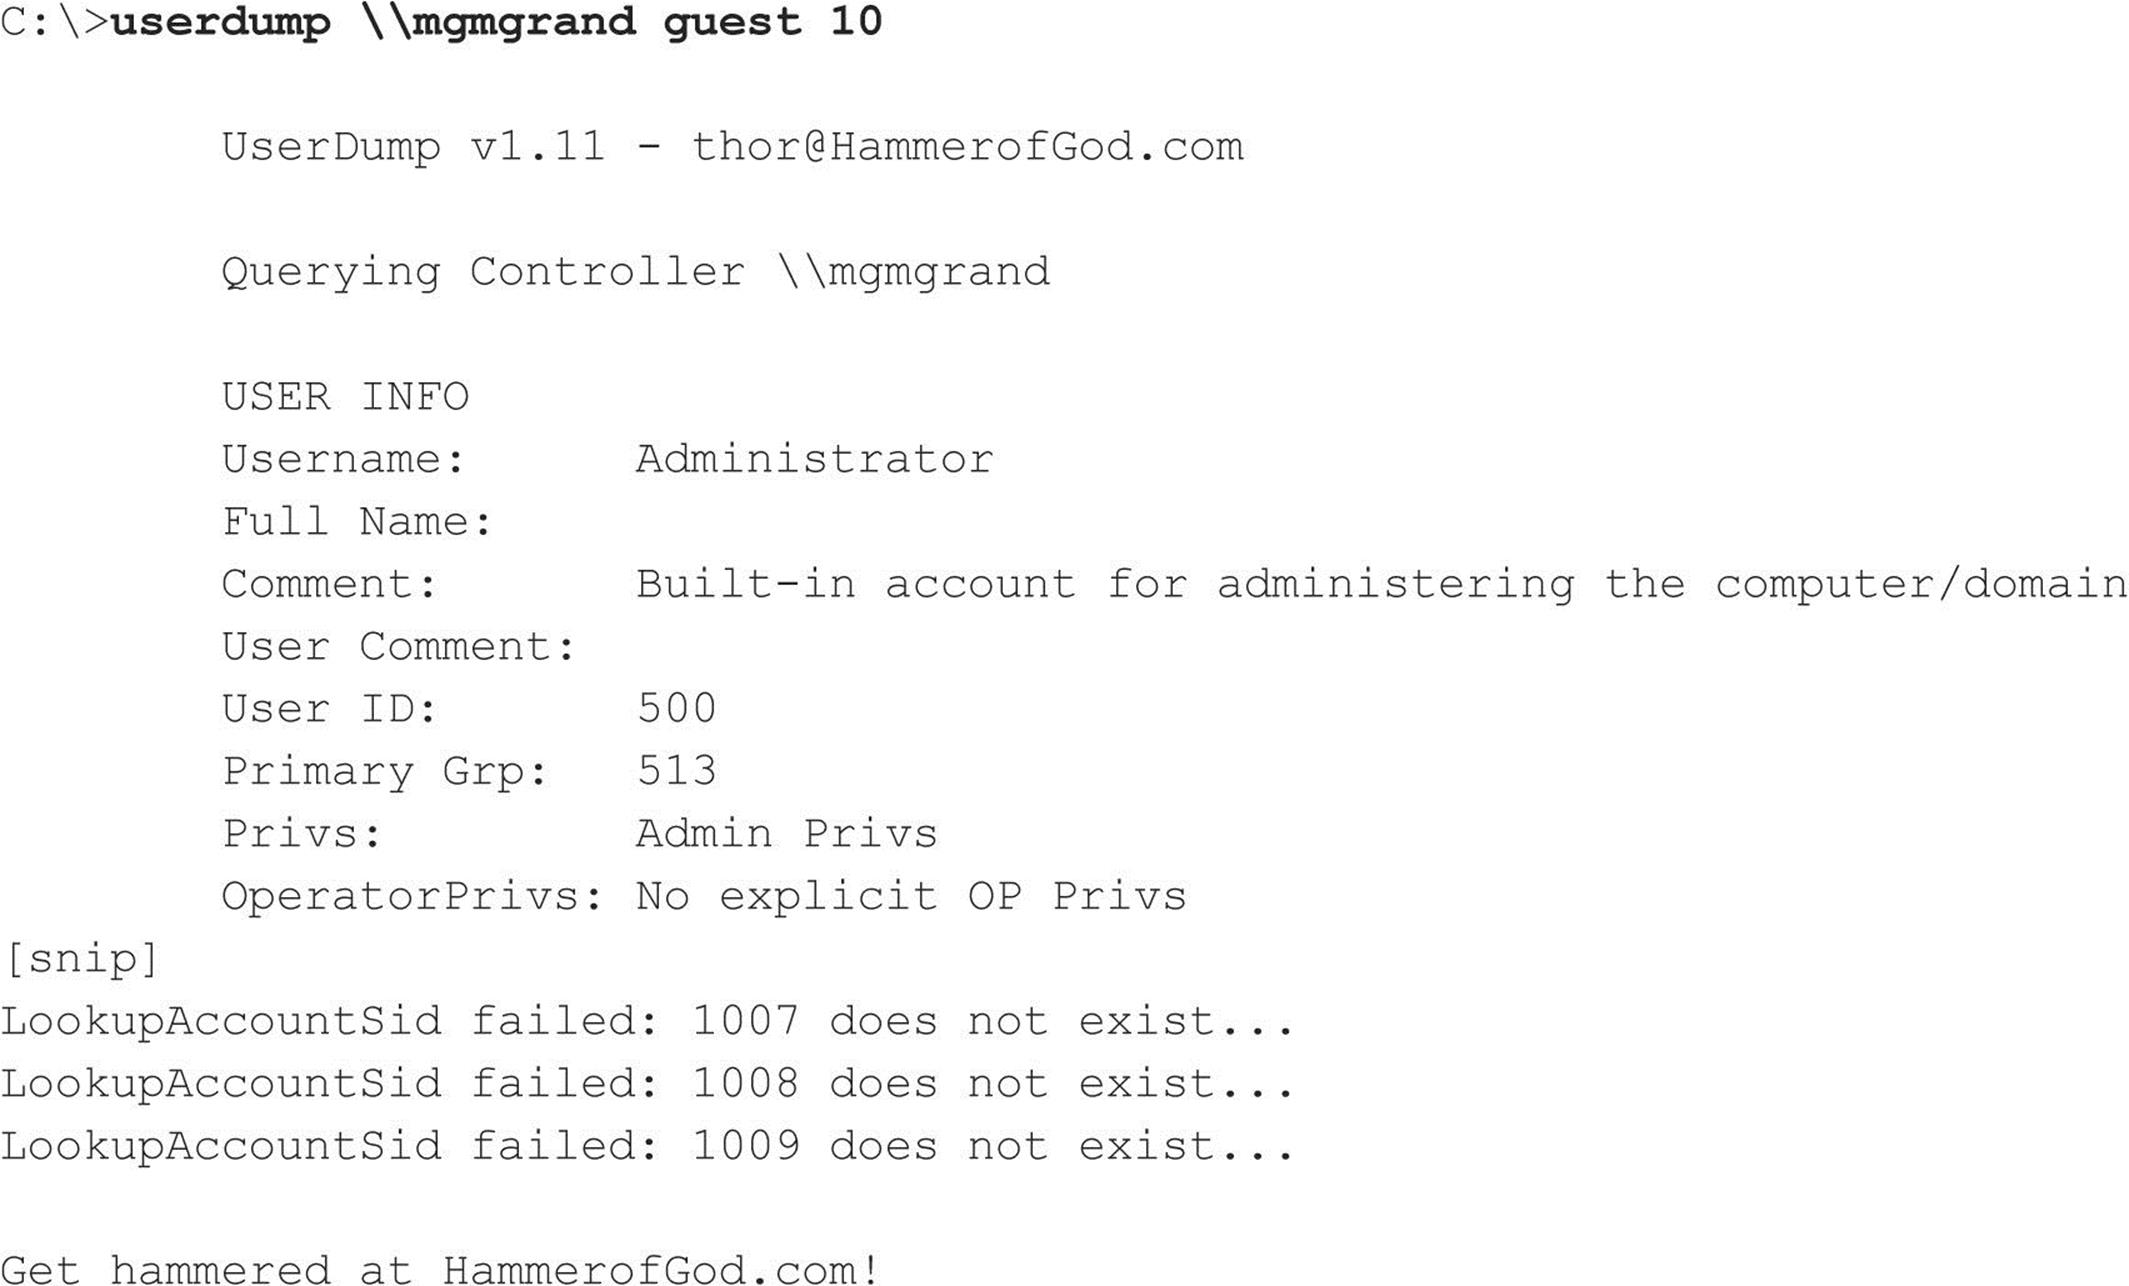
A related tool from HammerofGod.com is UserDump. It enumerates the remote system SID and then “walks” expected RID values to gather all user account names. UserDump takes the name of a known user or group and iterates a user-specified number of times through SIDs 1001 and up. UserDump will always get RID 500 (Administrator) first. Then it begins at RID 1001 plus the maximum number of queries specified. (Setting “MaxQueries” equal to 0 or blank enumerates SID 500 and 1001 only.) Here’s an example of UserDump in action:
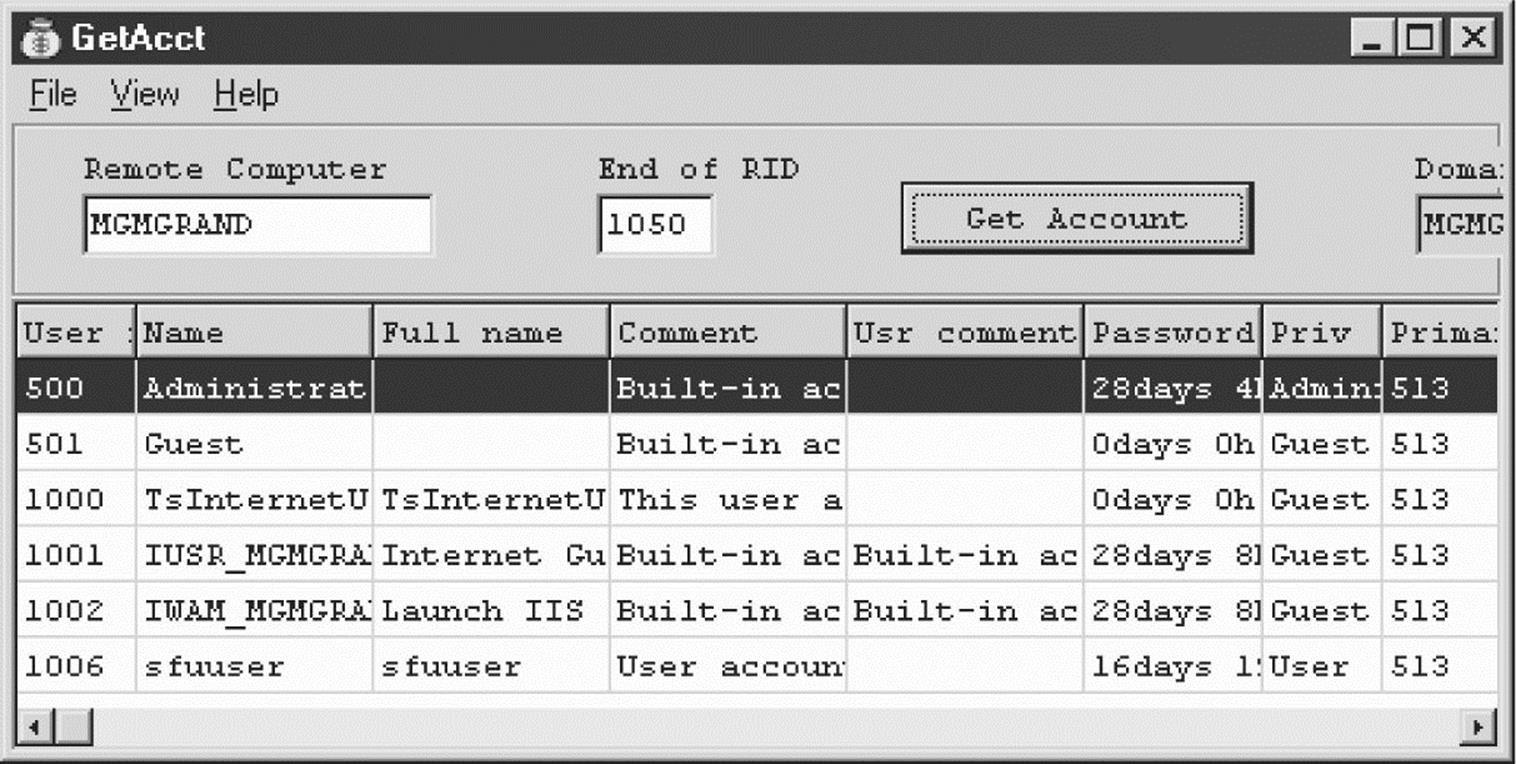
Another tool, GetAcct (securityfriday.com/tools/GetAcct.html) from Urity of Security Friday, performs this same technique. GetAcct has a graphical interface and can export results to a comma-separated file for later analysis. It also does not require the presence of an Administrator or Guest account on the target server. GetAcct is shown next obtaining user account information from a system with RestrictAnonymous set to 1.
Changes to RestrictAnonymous in Windows XP/Server 2003 and Later As we’ve noted in Windows 2000, setting RestrictAnonymous to 2 prevents null users from even connecting to the IPC$ share. However, this setting has the deleterious effect of preventing down-level client access and trusted domain enumeration. The interface to control anonymous access has been redesigned in Windows XP/Server 2003 and later to break out more granularly the actual options controlled by RestrictAnonymous.
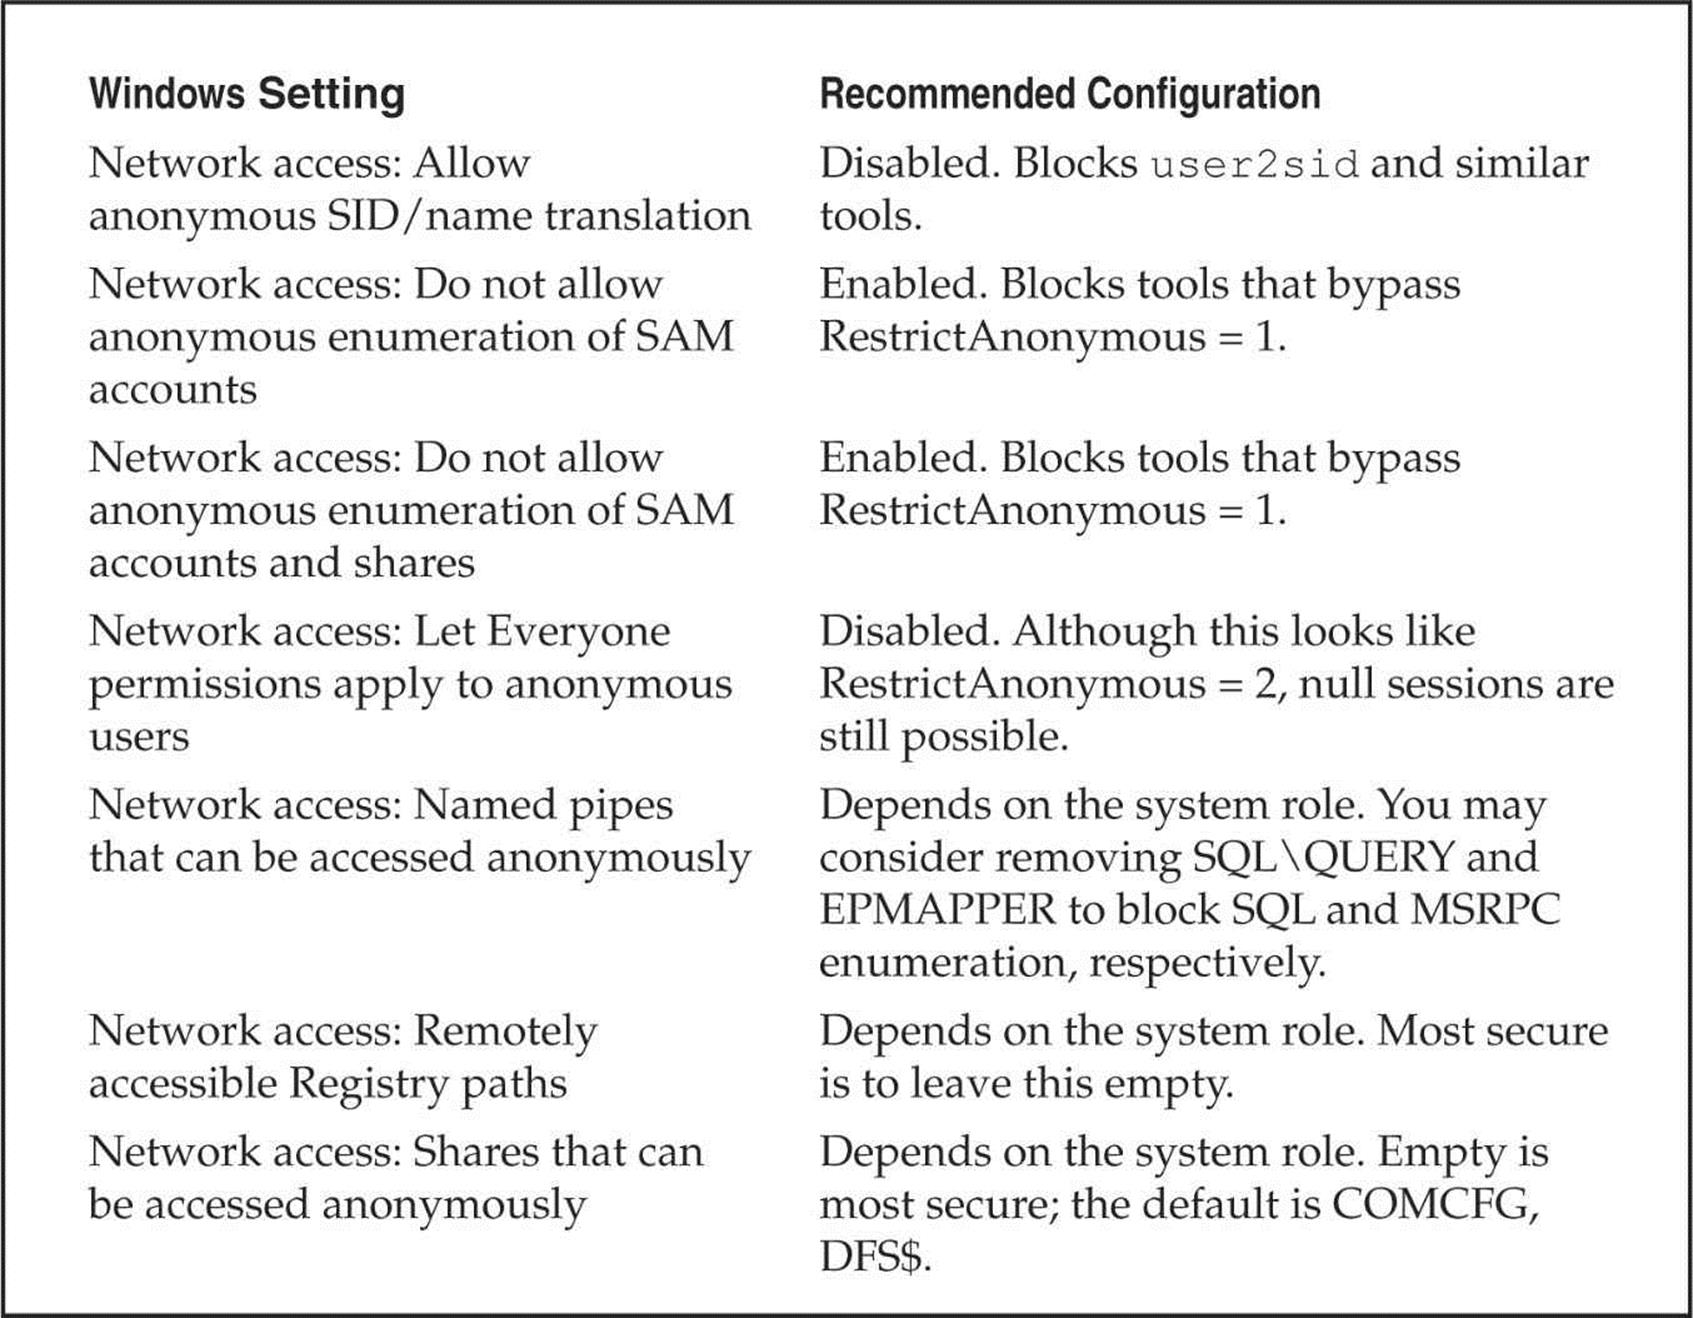
The most immediate change visible when viewing the Security Policy’s Security Options node is that “No Access Without Explicit Anonymous Permissions” (equivalent to setting RestrictAnonymous equal to 2 in Windows 2000) is gone. Under XP/Server 2003 and later, all settings under Security Options have been organized into categories. The settings relevant to restricting anonymous access fall under the category with the prefix “Network access:”. Table 3-3 shows XP/Server 2003 and later settings and our recommended configurations.
Looking at Table 3-3, clearly, the main additional advantage gained by Windows XP/Server 2003 and later is more granular control over resources that are accessible via null sessions. Providing more options is always better, but we still liked the elegant simplicity of Windows 2000’s RestrictAnonymous = 2 because null sessions simply were not possible. Of course, compatibility suffered, but hey, we’re security guys, okay? Microsoft would do well to revive the harshest option for those who want to be hardcore. At any rate, we were unable to penetrate the settings outlined in Table 3-3 using current tools.
Table 3-3 Anonymous Access Settings on Window XP/Server 2003 and Later
NOTE Urity of SecurityFriday.com published a research article in August 2004 noting that even under Windows XP SP2, the \pipe\browser named pipe remains accessible via null session, and that subsequently, the lanmanserver and lanmanworkstation interfaces can be enumerated via the NetrSessionEnum and NetrWkstaUserEnum MSRPC calls, enabling remote listing of local and remote logon usernames. Reportedly, Windows XP SP3, Windows Server 2003, Windows 7, and Windows Server 2008 block this.
Ensure the Registry Is Locked Down Anonymous access settings do not apply to remote Registry access (although, as you have seen, Windows XP/Server 2003’s Security Policy has a separate setting for this). Make sure your Registry is locked down and is not accessible remotely. The appropriate key to check for remote access to the Registry is HKLM\System\CurrentControlSet\Control\SecurePipeServer\Winreg and its associated subkeys. If this key is present, remote access to the Registry is restricted to administrators. It is present by default on Windows NT Server products. The optional AllowedPaths subkey defines specific paths into the Registry that are allowed access, regardless of the security on the Winreg Registry key. Check this as well. For further reading, find Microsoft Knowledge Base Article Q153183 at support.microsoft.com/kb/153183. Also, use great tools such as DumpSec to audit yourself, and make sure there are no leaks.
![]() SNMP Enumeration, UDP 161
SNMP Enumeration, UDP 161
Conceived as a network management and monitoring service, the Simple Network Management Protocol (SNMP) is designed to provide intimate information about network devices, software, and systems. As such, it is a frequent target of attackers. In addition, its general lack of strong security protections has garnered it the colloquial name “Security Not My Problem.”
SNMP’s data is protected by a simple “password” authentication system. Unfortunately, there are several default and widely known passwords for SNMP implementations. For example, the most commonly implemented password for accessing an SNMP agent in read-only mode (the so-called read community string) is “public”. Attackers invariably attempt to guess or use a packet inspection application such as Wireshark (discussed later) to obtain this string if they identify SNMP in port scans.
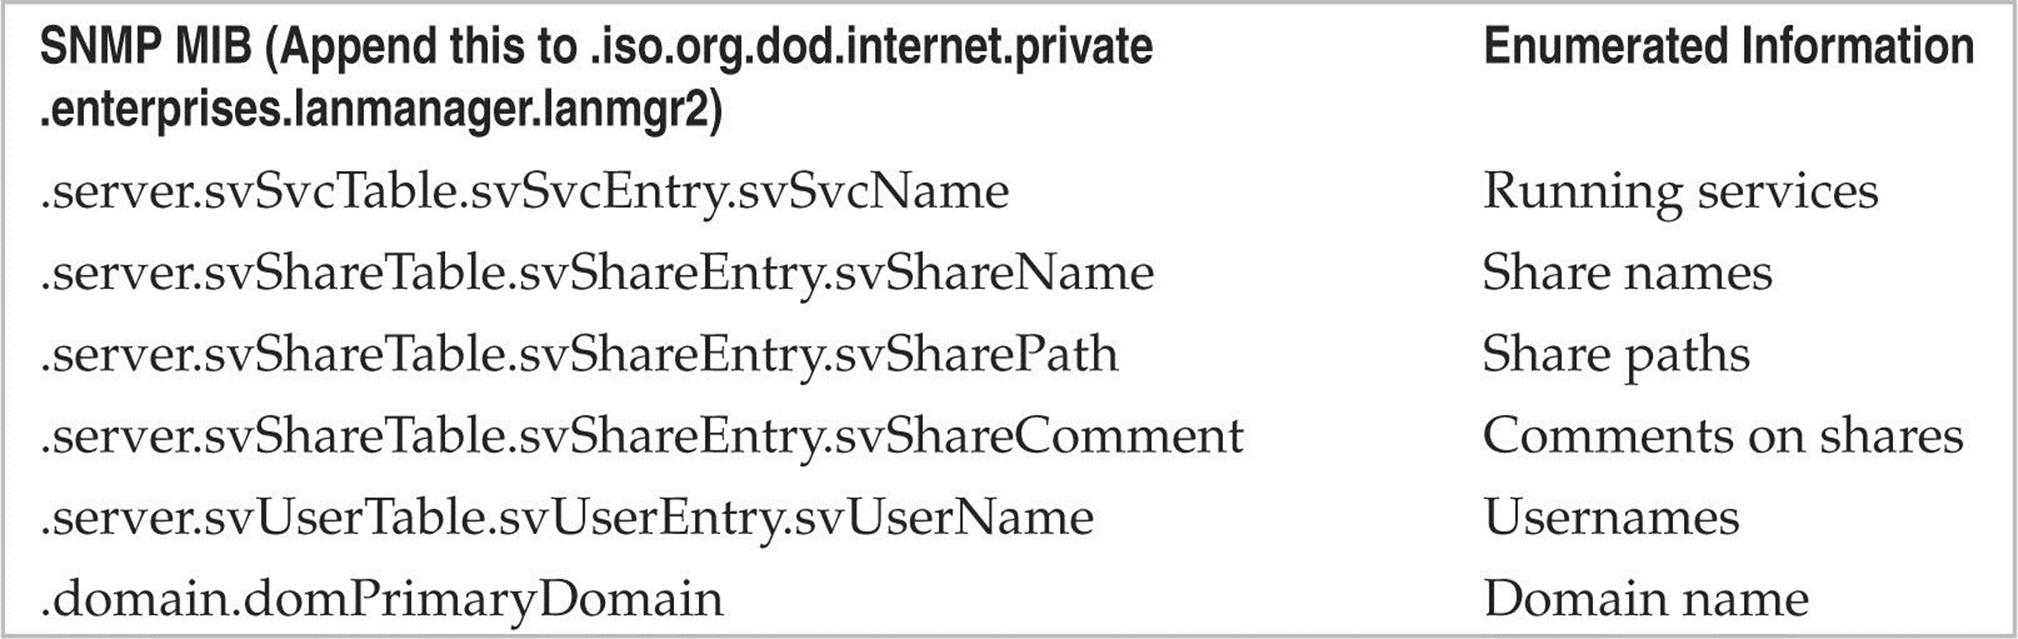
What’s worse, many vendors have implemented their own extensions to the basic SNMP information set (called Management Information Bases, or MIBs). These custom MIBs can contain vendor-specific information—for example, the Microsoft MIB contains the names of Windows user accounts. Therefore, even if you have tightly secured access to other enumerable ports such as TCP 139 and/or 445, your NT Family systems may still cough up similar information if they are running the SNMP service in its default configuration (which—you guessed it—uses “public” as the read community string). Therefore, enumerating Windows users via SNMP is a cakewalk using the RK snmputil SNMP browser:
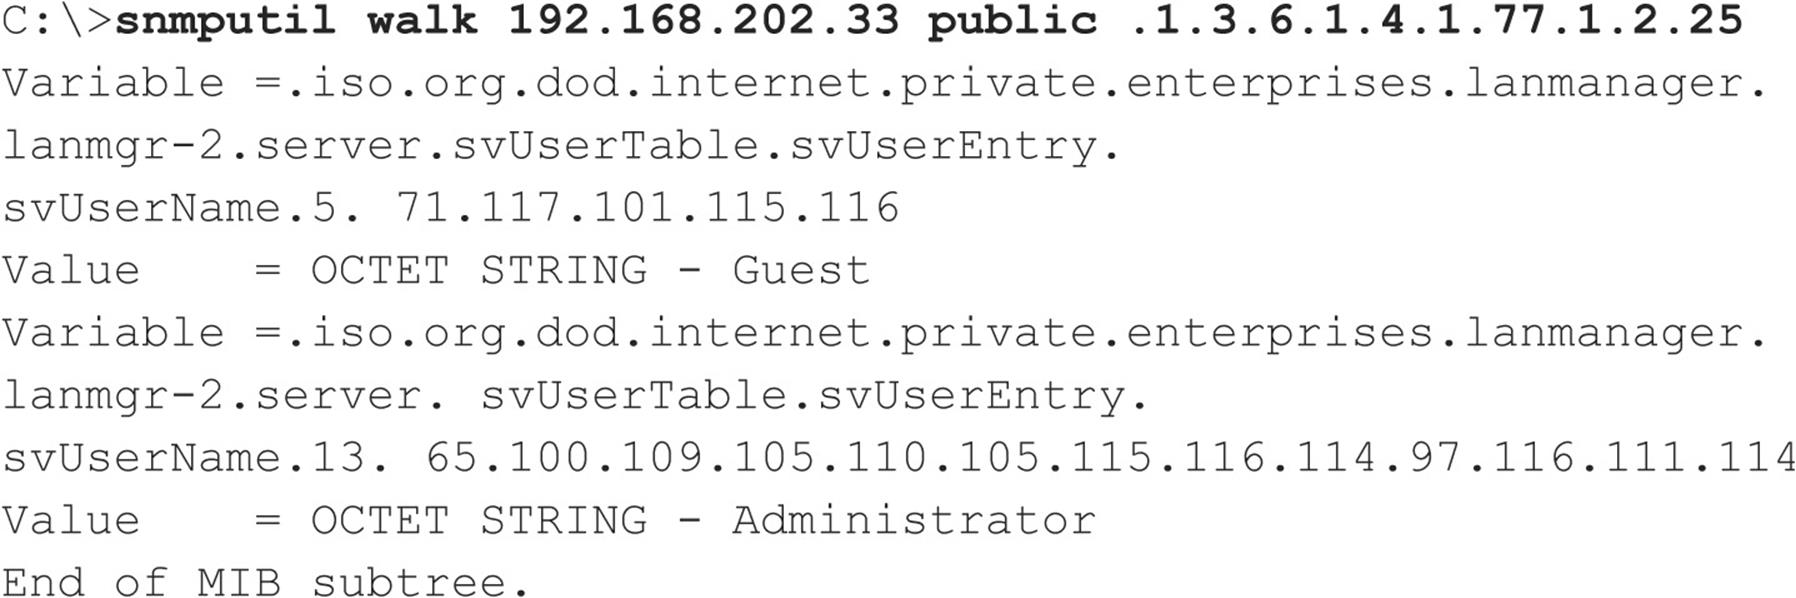
The last variable in the preceding snmputil syntax—.1.3.6.1.4.1.77.1.2.25—is the object identifier (OID) that specifies a specific branch of the Microsoft enterprise MIB. The MIB is a hierarchical namespace, so walking “up” the tree (that is, using a less-specific number such as .1.3.6.1.4.1.77) dumps larger and larger amounts of info. Remembering all those numbers is clunky, so an intruder will use the text string equivalent. The following table lists some segments of the MIB that yield the juicy stuff:
You can also use the UNIX/Linux tool snmpget within the net-snmp suite (netsnmp.sourceforge.net/) to query SNMP, as shown in the next example:

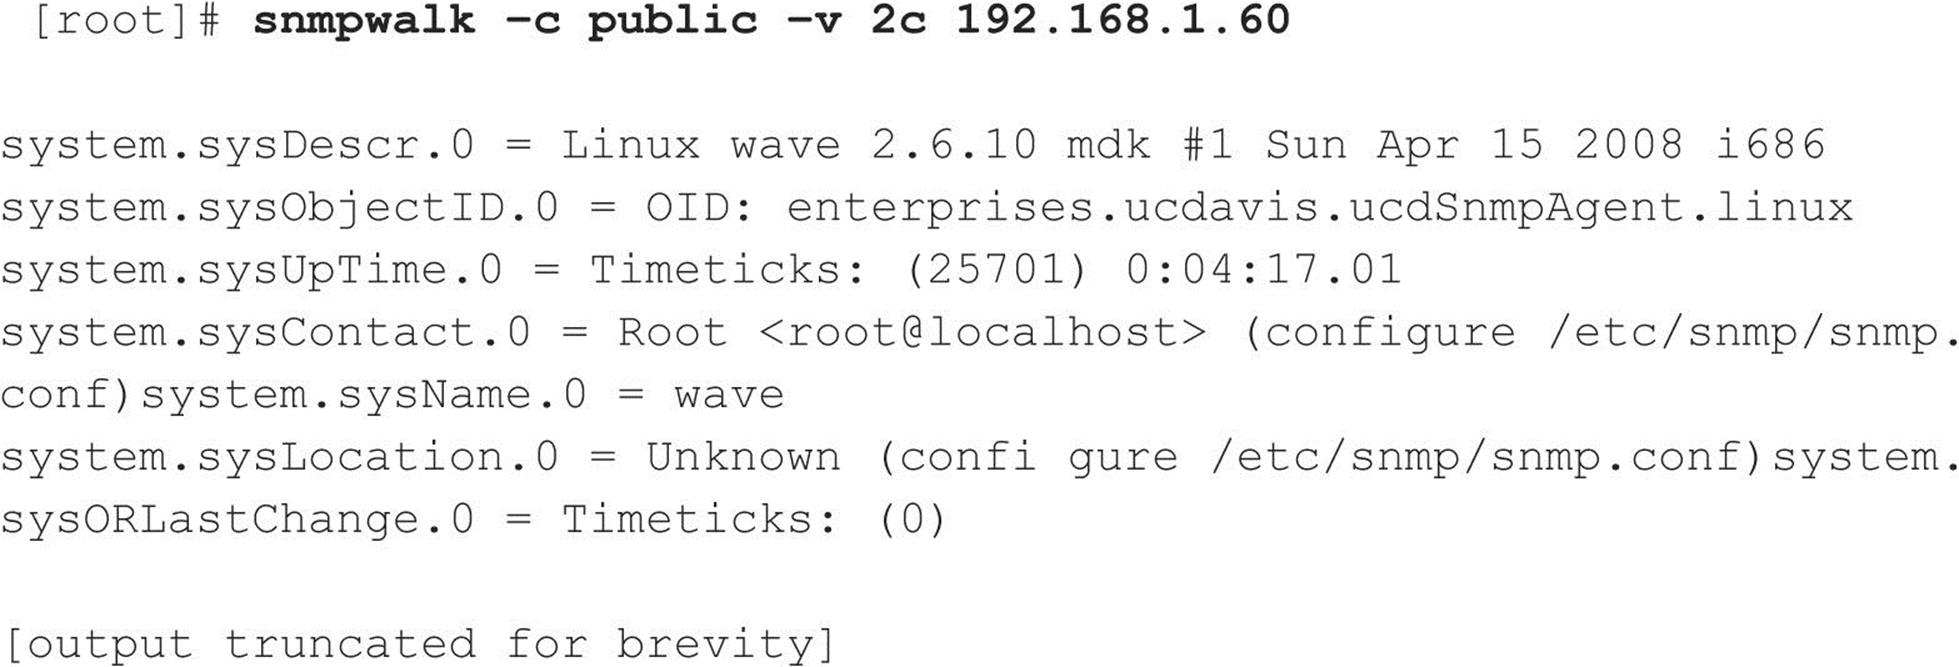
Although snmpget is useful, it is much faster to pilfer the contents of the entire MIB using snmpwalk, as shown here:
You can see our SNMP query provided a lot of information about the target system, including the following:

An attacker could use this wealth of information to try to compromise this system. Worse, if the default write community name was enabled (for example, “private”), an attacker would actually be able to change some of the parameters just listed with the intent of causing a denial of service or compromising the security of the system.
One particularly useful tool for abusing SNMP default write community names is copy-router-config.pl by muts. Cisco network devices allow you to copy their configuration to a TFTP server as long as you have the device’s write community string. With access to a Cisco configuration, an attacker can decode passwords (if they are stored using the old Cisco Type 7 format) or launch a brute-force attack to guess the device’s password (if it is stored using the newer, stronger Type 5 format).
Of course, to avoid all this typing, you could just download the excellent graphical SNMP browser called IP Network Browser from solarwinds.com and see all this information displayed in living color. Figure 3-9 shows the IP Network Browser examining a network for SNMP-aware systems.
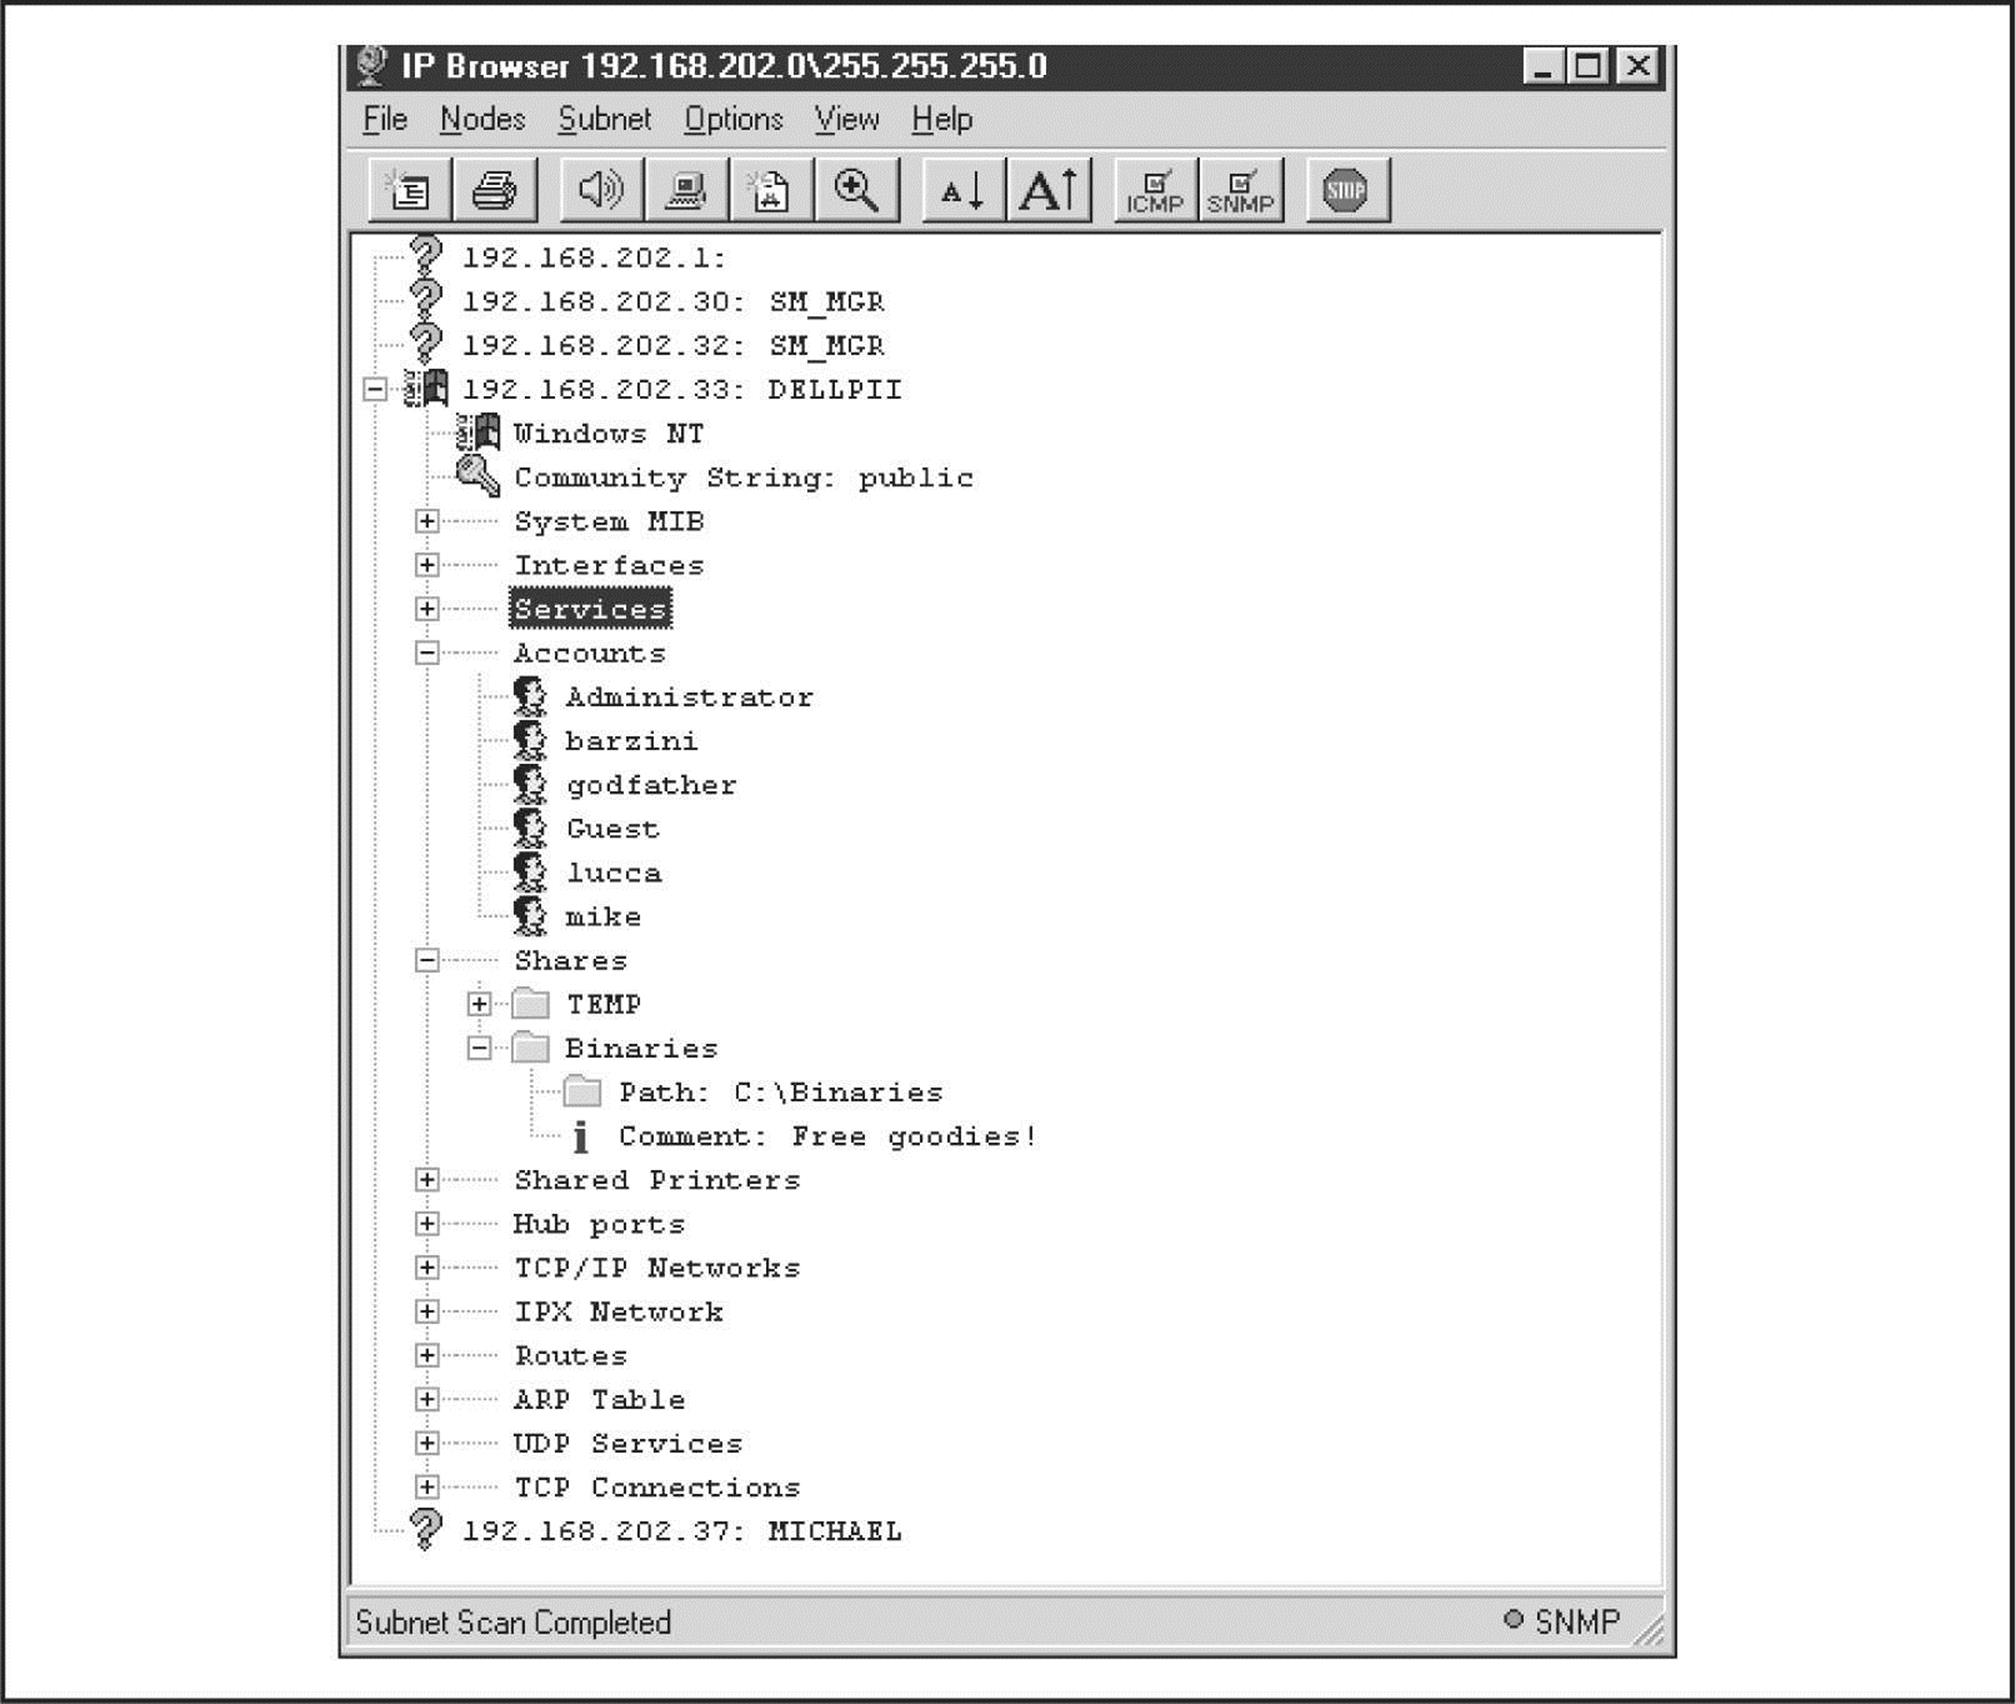
Figure 3-9 SolarWinds’ IP Network Browser expands information available on systems running SNMP agents when provided with the correct community string. The system shown here uses the default string “public”.
SNMP Scanners Querying SNMP is a simple and lightweight task that makes it an ideal service for automated scanning. An easy-to-use Windows-based tool that performs this well is Foundstone's SNScan (mcafee.com/us/downloads/free-tools/snscan.aspx). SNScan asks you to specify a community string and a range to scan; optionally, you can also specify a file with a list of SNMP community strings to test against each host (see Figure 3-10). Two nice design features of SNScan are that it will output the hostname and operating system (as defined within SNMP) for each host successfully queried and all results can be exported to CSV.
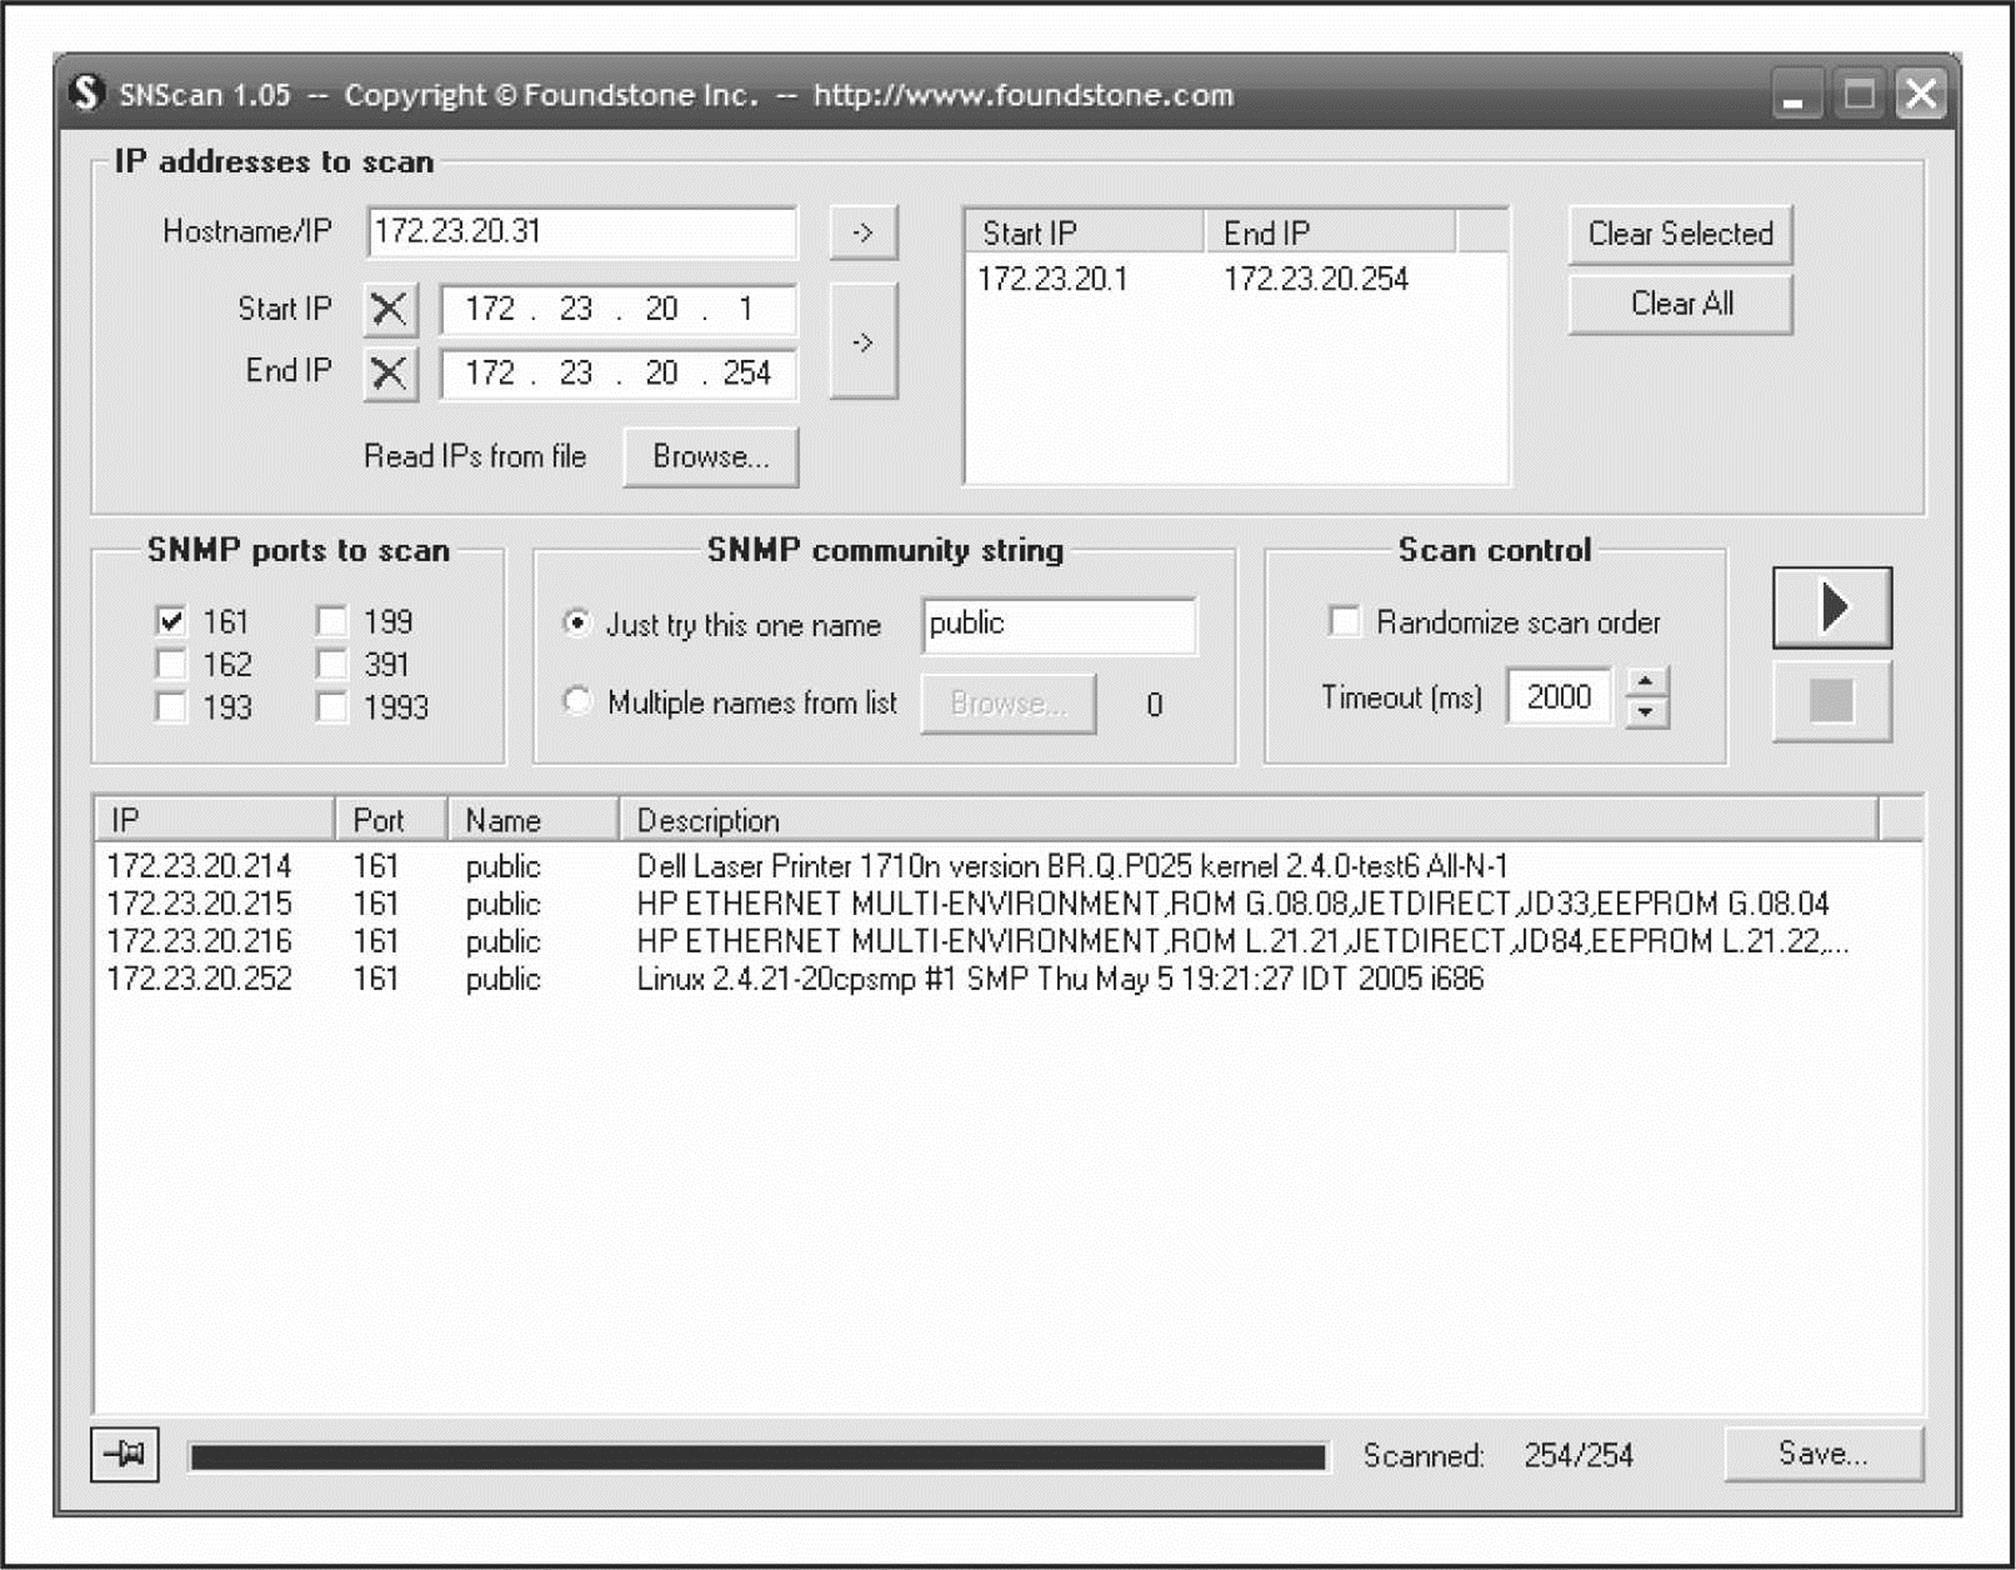
Figure 3-10 SNScan scans a range of hosts to test SNMP community strings.
For the Linux side of things, onesixtyone (portcullis-security.com/16.php) is a tool originally written by solareclipse@phreedom.org and later revamped by the security team at portcullis-security.com. onesixtyone performs all of the same tasks as SNScan, but via the command line.
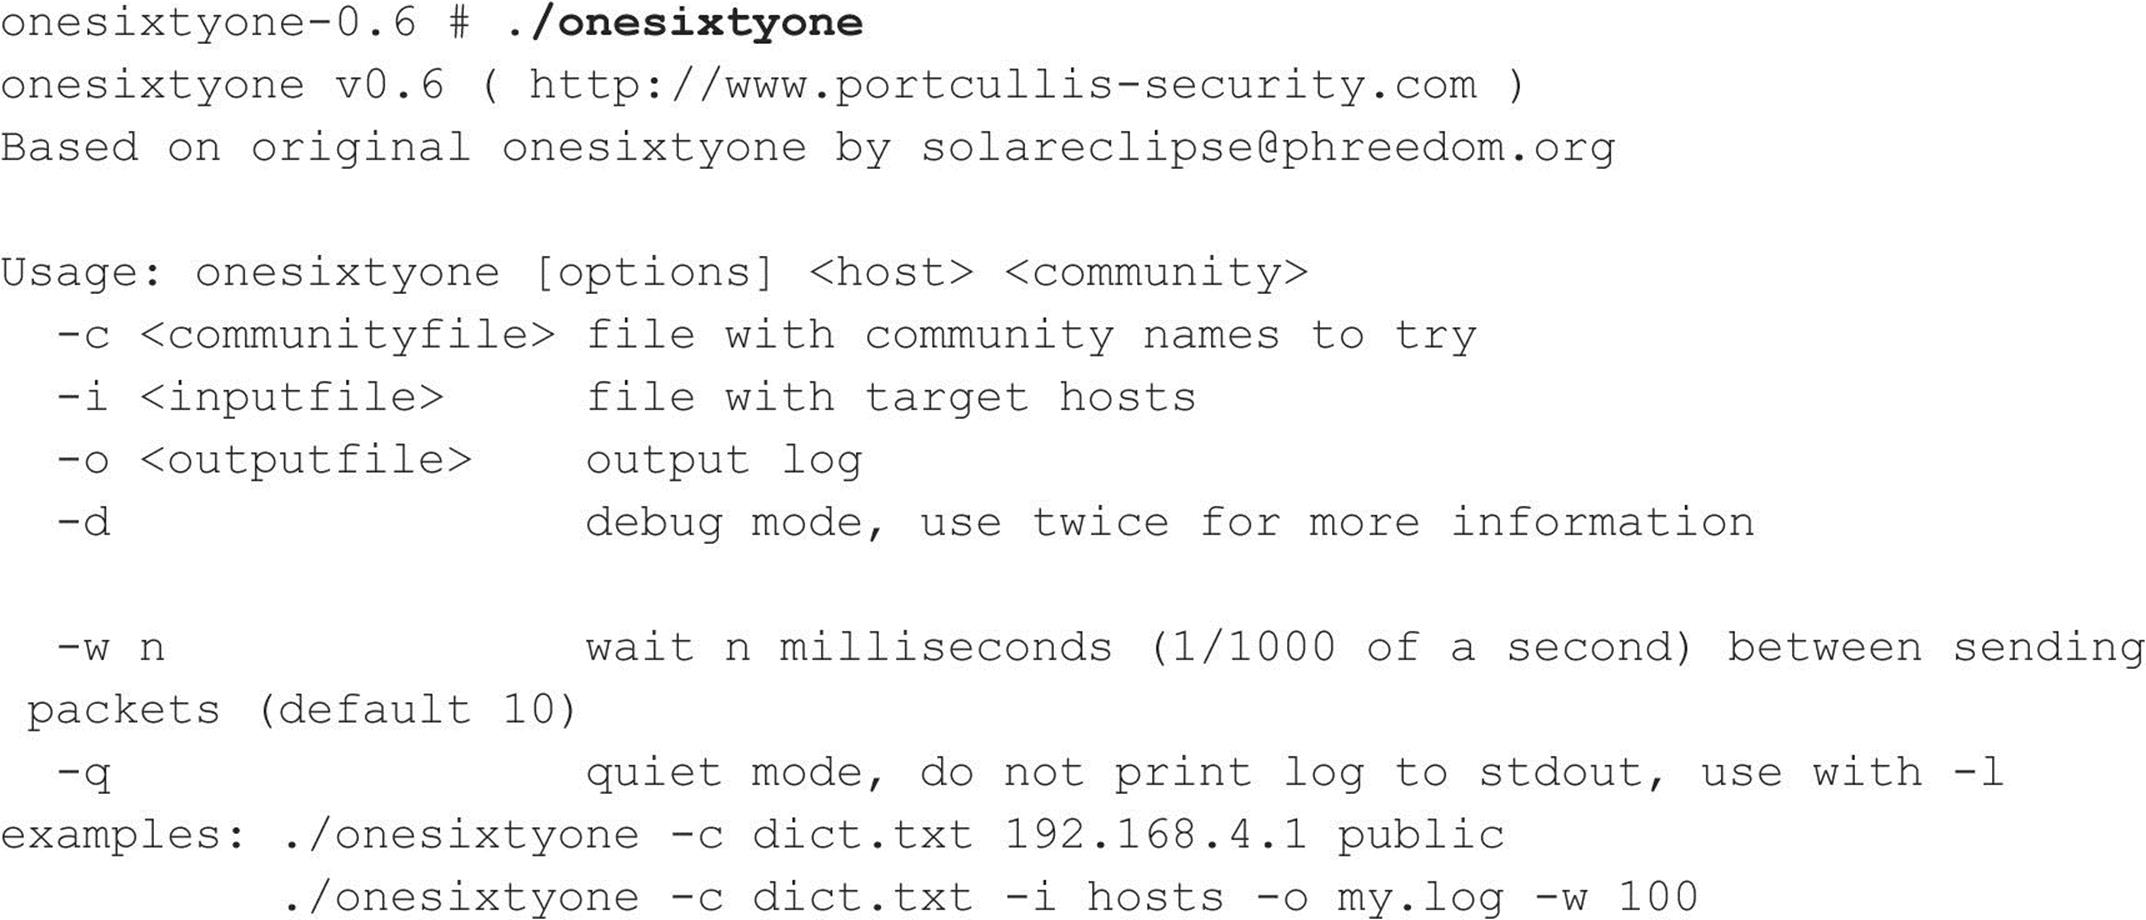
![]() SNMP Enumeration Countermeasures
SNMP Enumeration Countermeasures
The simplest way to prevent such activity is to remove or disable SNMP agents on individual machines. If shutting off SNMP is not an option, at least ensure that it is configured with hard-to-guess community names (not the default “public” or “private”). Of course, if you’re using SNMP to manage your network, make sure to block access to TCP and UDP ports 161 (SNMP GET/SET) at all perimeter network access devices. Finally, restrict access to SNMP agents to the appropriate management console IP address. For example, Microsoft’s SNMP agent can be configured to respond only to SNMP requests originating from an administrator-defined set of IP addresses.
Also consider using SNMP V3, detailed in RFCs 2571–2575. SNMP V3 is much more secure than V1/V2 and provides enhanced encryption and authentication mechanisms. Unfortunately, V1/V2 is the most widely implemented, and many organizations are reluctant to migrate to a more secure version.
On Windows NT Family systems, you can edit the Registry to permit only approved access to the SNMP community name and to prevent Microsoft MIB information from being sent. First, open regedt32 and go to HKLM\System\CurrentControlSet\Services\ SNMP\ Parameters\ValidCommunities. Choose Security | Permissions and then set the permissions to permit access only to approved users. Next, navigate to HKLM\System\ CurrentControlSet\Services\SNMP\Parameters\ExtensionAgents, delete the value that contains the “LANManagerMIB2Agent” string, and then rename the remaining entries to update the sequence. For example, if the deleted value was number 1, then rename 2, 3, and so on, until the sequence begins with 1 and ends with the total number of values in the list.
Hopefully after reading this section, you have a general understanding of why allowing internal SNMP info to leak onto public networks is a definite no-no. For more information on SNMP in general, search for the latest SNMP RFCs at rfc-editor.org.
![]() BGP Enumeration, TCP 179
BGP Enumeration, TCP 179
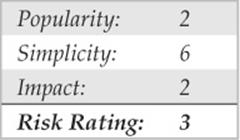
The Border Gateway Protocol (BGP) is the de facto routing protocol on the Internet and is used by routers to propagate information necessary to route IP packets to their destinations. By looking at the BGP routing tables, you can determine the networks associated with a particular corporation to add to your target host matrix. All networks connected to the Internet do not “speak” BGP, and this method may not work with your corporate network. Only networks that have more than one uplink use BGP, and these are typically used by medium-to-large organizations.
The methodology is simple. Here are the steps to perform BGP route enumeration:
1. Determine the Autonomous System Number (ASN) of the target organization.
2. Execute a query on the routers to identify all networks where the AS Path terminates with the organization’s ASN.
BGP Enumeration from the Internet The BGP protocol uses IP network addresses and ASNs exclusively. The ASN is a 16-bit integer that an organization purchases from ARIN to identify itself on the network. You can think of an ASN as an IP address for an organization. Because you cannot execute commands on a router using a company name, the first step is to determine the ASN for an organization. There are two techniques to do this, depending on what type of information you have. One approach, if you have the company name, is to perform a WHOIS search on ARIN with the ASN keyword (see Figure 3-11).
Figure 3-11 Output for a search for “ASN KPE.” The ASN is identified as 16394 for the AS Name KPENY-AS.
Alternatively, if you have an IP address for the organization, you can query a router and use the last entry in the AS Path as the ASN. For example, you can telnet to a public router and perform the following commands:
The list of numbers following “Not advertised to any peer” is the AS Path. Select the last ASN in the path, 16394. Then, to query the router using the last ASN to determine the network addresses associated with the ASN, do the following:

The underscore character (_) is used to denote a space, and the dollar sign ($) is used to denote the end of the AS Path. These characters are necessary to filter out entries where the AS is a transit network. We have removed the duplicate paths in the output listing because they are unnecessary for this discussion. However, the query has identified one network, 63.79.158.0/24, as belonging to KPE.
Performing these steps and going through the output is annoying and suited to automation. Let your code do the walking!
We conclude with a few warnings: Many organizations do not run BGP, and this technique may not work. In this case, if you search the ARIN database, you won’t be able to find an ASN. If you use the second method, the ASN returned could be the ASN of the service provider that is announcing the BGP messages on behalf of its customer. Check ARIN at arin.net/whois to determine whether you have the right ASN. The technique we have demonstrated is a slow process because of the number of routing entries that need to be searched.
Internal Routing Protocol Enumeration Internal routing protocols (that is, RIP, IGRP, and EIGRP) can be very verbose over the local network and often respond to requests made by anyone. Although it doesn’t support BGP, the Autonomous System Scanner (ASS) is part of the Internetwork Routing Protocol Attack Suite (IRPAS) developed by Phenoelit (phenoelit.org/irpas/docu.html). Besides its chuckle-inducing acronym, ASS is a powerful enumeration tool that works by sniffing the local network traffic and doing some direct scanning.
BGP Route Enumeration Countermeasures Unfortunately, no good countermeasures exist for BGP route enumeration. For packets to be routed to your network, BGP must be used. Using nonidentifiable information in ARIN is one possibility, but it doesn’t prevent using the second technique for identifying the ASN. Organizations not running BGP have nothing to worry about, and others can comfort themselves by noting the small risk rating and realizing that the other techniques in this chapter can be used for network enumeration.
![]() Windows Active Directory LDAP Enumeration, TCP/UDP 389 and 3268
Windows Active Directory LDAP Enumeration, TCP/UDP 389 and 3268

The most fundamental change introduced into the NT Family by Windows 2000 is the addition of a Lightweight Directory Access Protocol–based directory service that Microsoft calls Active Directory (AD). AD is designed to contain a unified, logical representation of all the objects relevant to the corporate technology infrastructure. Therefore, from an enumeration perspective, it is potentially a prime source of information leakage. The Windows XP Support Tools (microsoft.com/downloads/details.aspx?FamilyID=49ae8576-9bb9-4126-9761-ba8011fabf38&displaylang=en) include a simple LDAP client called the Active Directory Administration Tool (ldp.exe) that connects to an AD server and browses the contents of the directory.
An attacker can point ldp.exe against a Windows 2000 or later host and all of the existing users and groups can be enumerated with a simple LDAP query. The only thing required to perform this enumeration is to create an authenticated session via LDAP. If an attacker has already compromised an existing account on the target via other means, LDAP can provide an alternative mechanism to enumerate users if NetBIOS ports are blocked or otherwise unavailable.
We illustrate enumeration of users and groups using ldp.exe in the following example, which targets the Windows 2000 domain controller bigdc.labfarce2.org, whose Active Directory root context is DC=labfarce2, DC=org. We assume the Guest account on BIGDC has already been compromised—it has a password of “guest.” Here are the steps involved:
1. Connect to the target using ldp. Open Connection | Connect and enter the IP address or DNS name of the target server. You can connect to the default LDAP port, 389, or use the AD Global Catalog port, 3268. Port 389 is shown here:
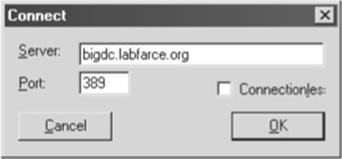
2. Once the connection is made, you authenticate as your compromised Guest user. Select Connections | Bind, make sure the Domain check box is selected with the proper domain name, and enter Guest’s credentials, as shown next:
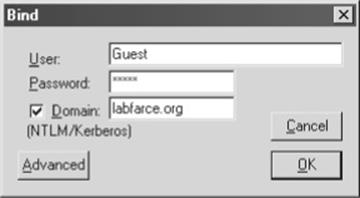
3. Now that an authenticated LDAP session is established, you can actually enumerate users and groups. Open View | Tree and enter the root context in the ensuing dialog box. For example, dc=labfarce2, dc=org is shown here:

4. A node appears in the left pane. Click the plus symbol to unfold it to reveal the base objects under the root of the directory.
5. Double-click the CN=Users and CN=Builtin containers. They unfold to enumerate all the users and all the built-in groups on the server, respectively. The Users container is displayed in Figure 3-12.
How is this possible with a simple guest connection? Certain legacy NT4 services (such as Remote Access Service and SQL Server) must be able to query user and group objects within AD. The Windows 2000 AD installation routine (dcpromo) prompts whether the user wants to relax access permissions on the directory to allow legacy servers to perform these lookups, as shown in Figure 3-12. If the relaxed permissions are selected at installation, user and group objects are accessible to enumeration via LDAP.
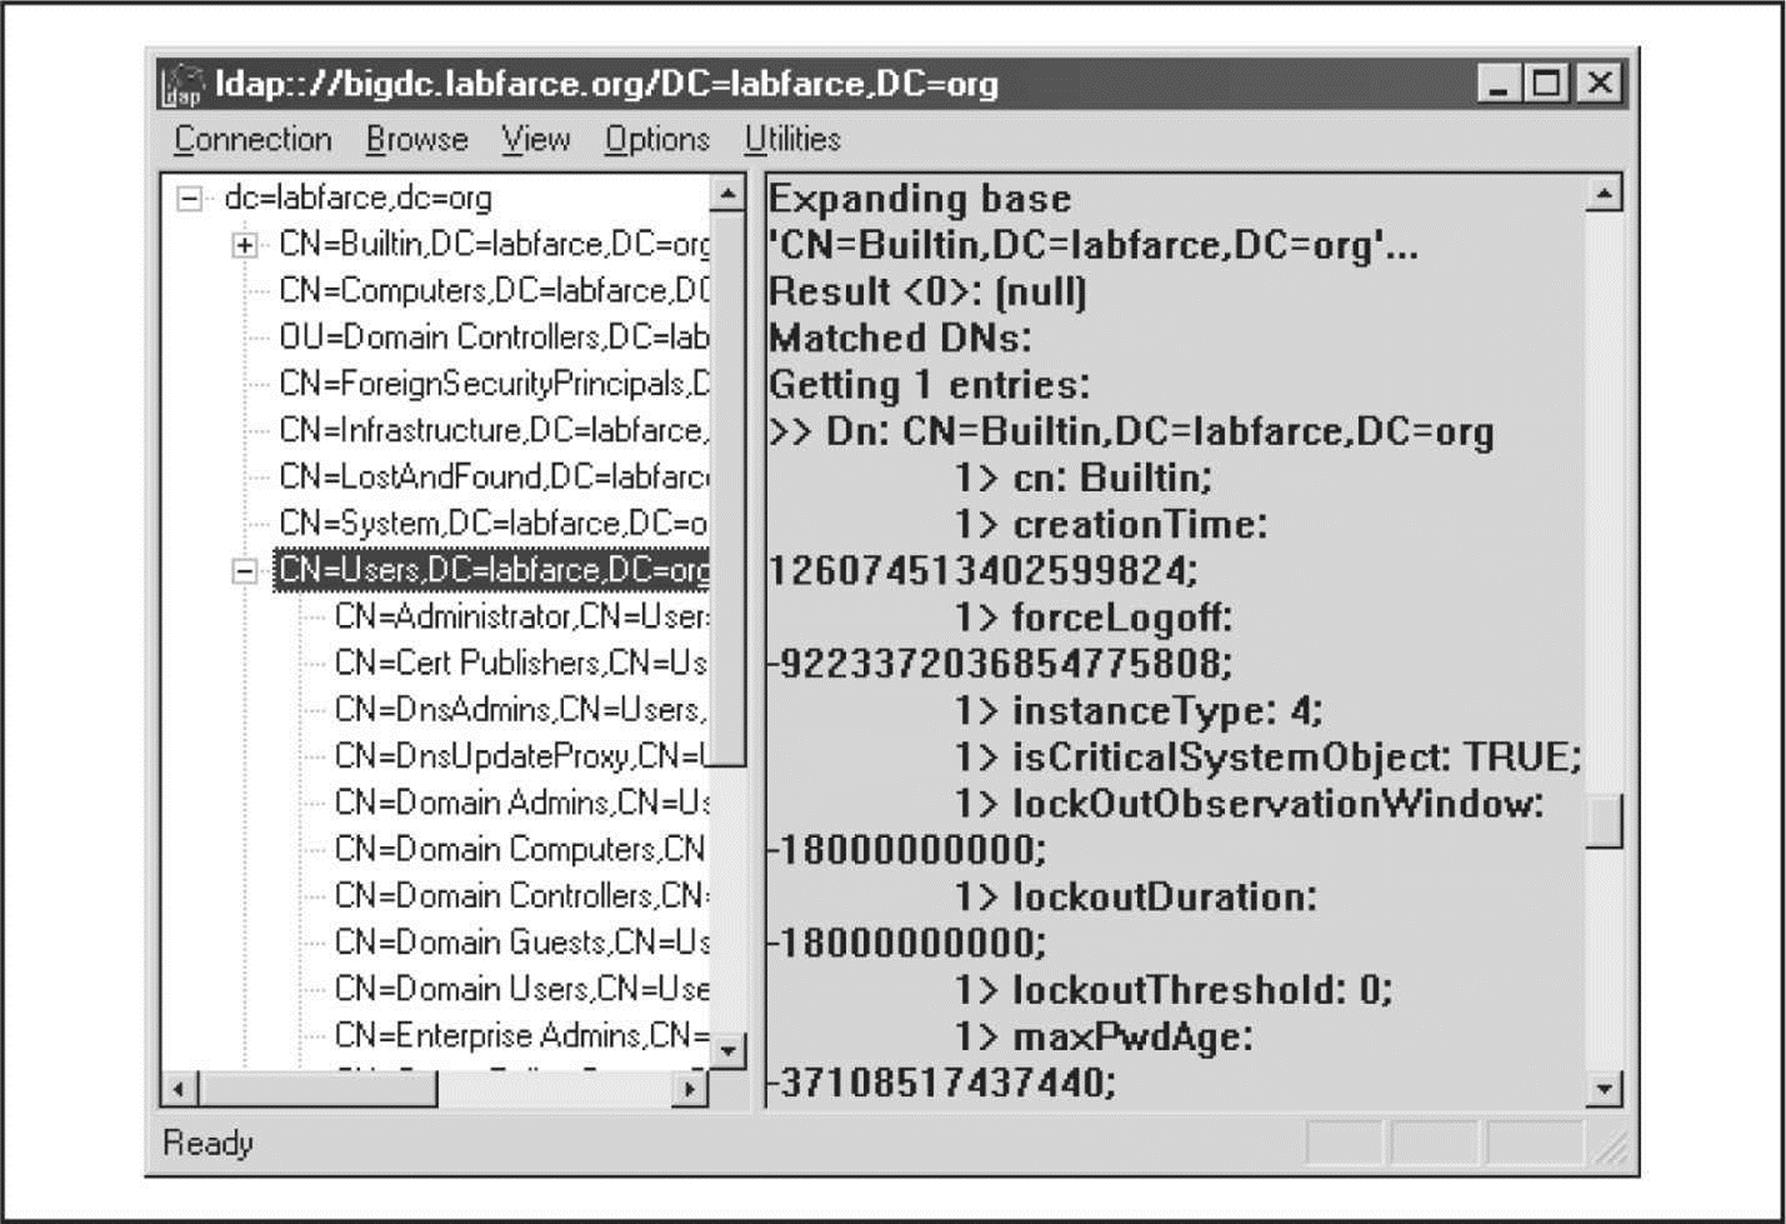
Figure 3-12 The Active Directory Administration Tool, ldp.exe, enumerates Active Directory users and groups via an authenticated connection.
Performing LDAP enumeration in Linux is equally as simple, using either LUMA (luma.sourceforge.net/) or the Java-based JXplorer (jxplorer.org/). Both of these tools are graphical, so you’ll have to be within X Windows to use them. Alternatively, there is ldapenum (sourceforge.net/projects/ldapenum), a command-line Perl script that you can use in both Linux and Windows.
![]() Active Directory Enumeration Countermeasures
Active Directory Enumeration Countermeasures
First and foremost, you should filter access to ports 389 and 3268 at the network border. Unless you plan on exporting AD to the world, no one should have unauthenticated access to the directory.
To prevent this information from leaking out to unauthorized parties on internal semitrusted networks, permissions on AD need to be restricted. The difference between legacy-compatible mode (read “less secure”) and native Windows 2000 essentially boils down to the membership of the built-in local group Pre-Windows 2000 Compatible Access. The Pre-Windows 2000 Compatible Access group has the default access permission to the directory shown in Table 3-4.
Table 3-4 Permissions on Active Directory User and Group Objects for the Pre-Windows 2000 Compatible Access Group

The Active Directory Installation Wizard automatically adds Everyone to the Pre-Windows 2000 Compatible Access group if you select the Permissions Compatible with Pre-Windows 2000 Servers option on the screen shown in Figure 3-13. The special Everyone group includes authenticated sessions with any user. By removing the Everyone group from Pre-Windows 2000 Compatible Access (and then rebooting the domain controllers), the domain operates with the greater security provided by native Windows 2000. If you need to downgrade security again for some reason, the Everyone group can be re-added by running the following command at a command prompt:
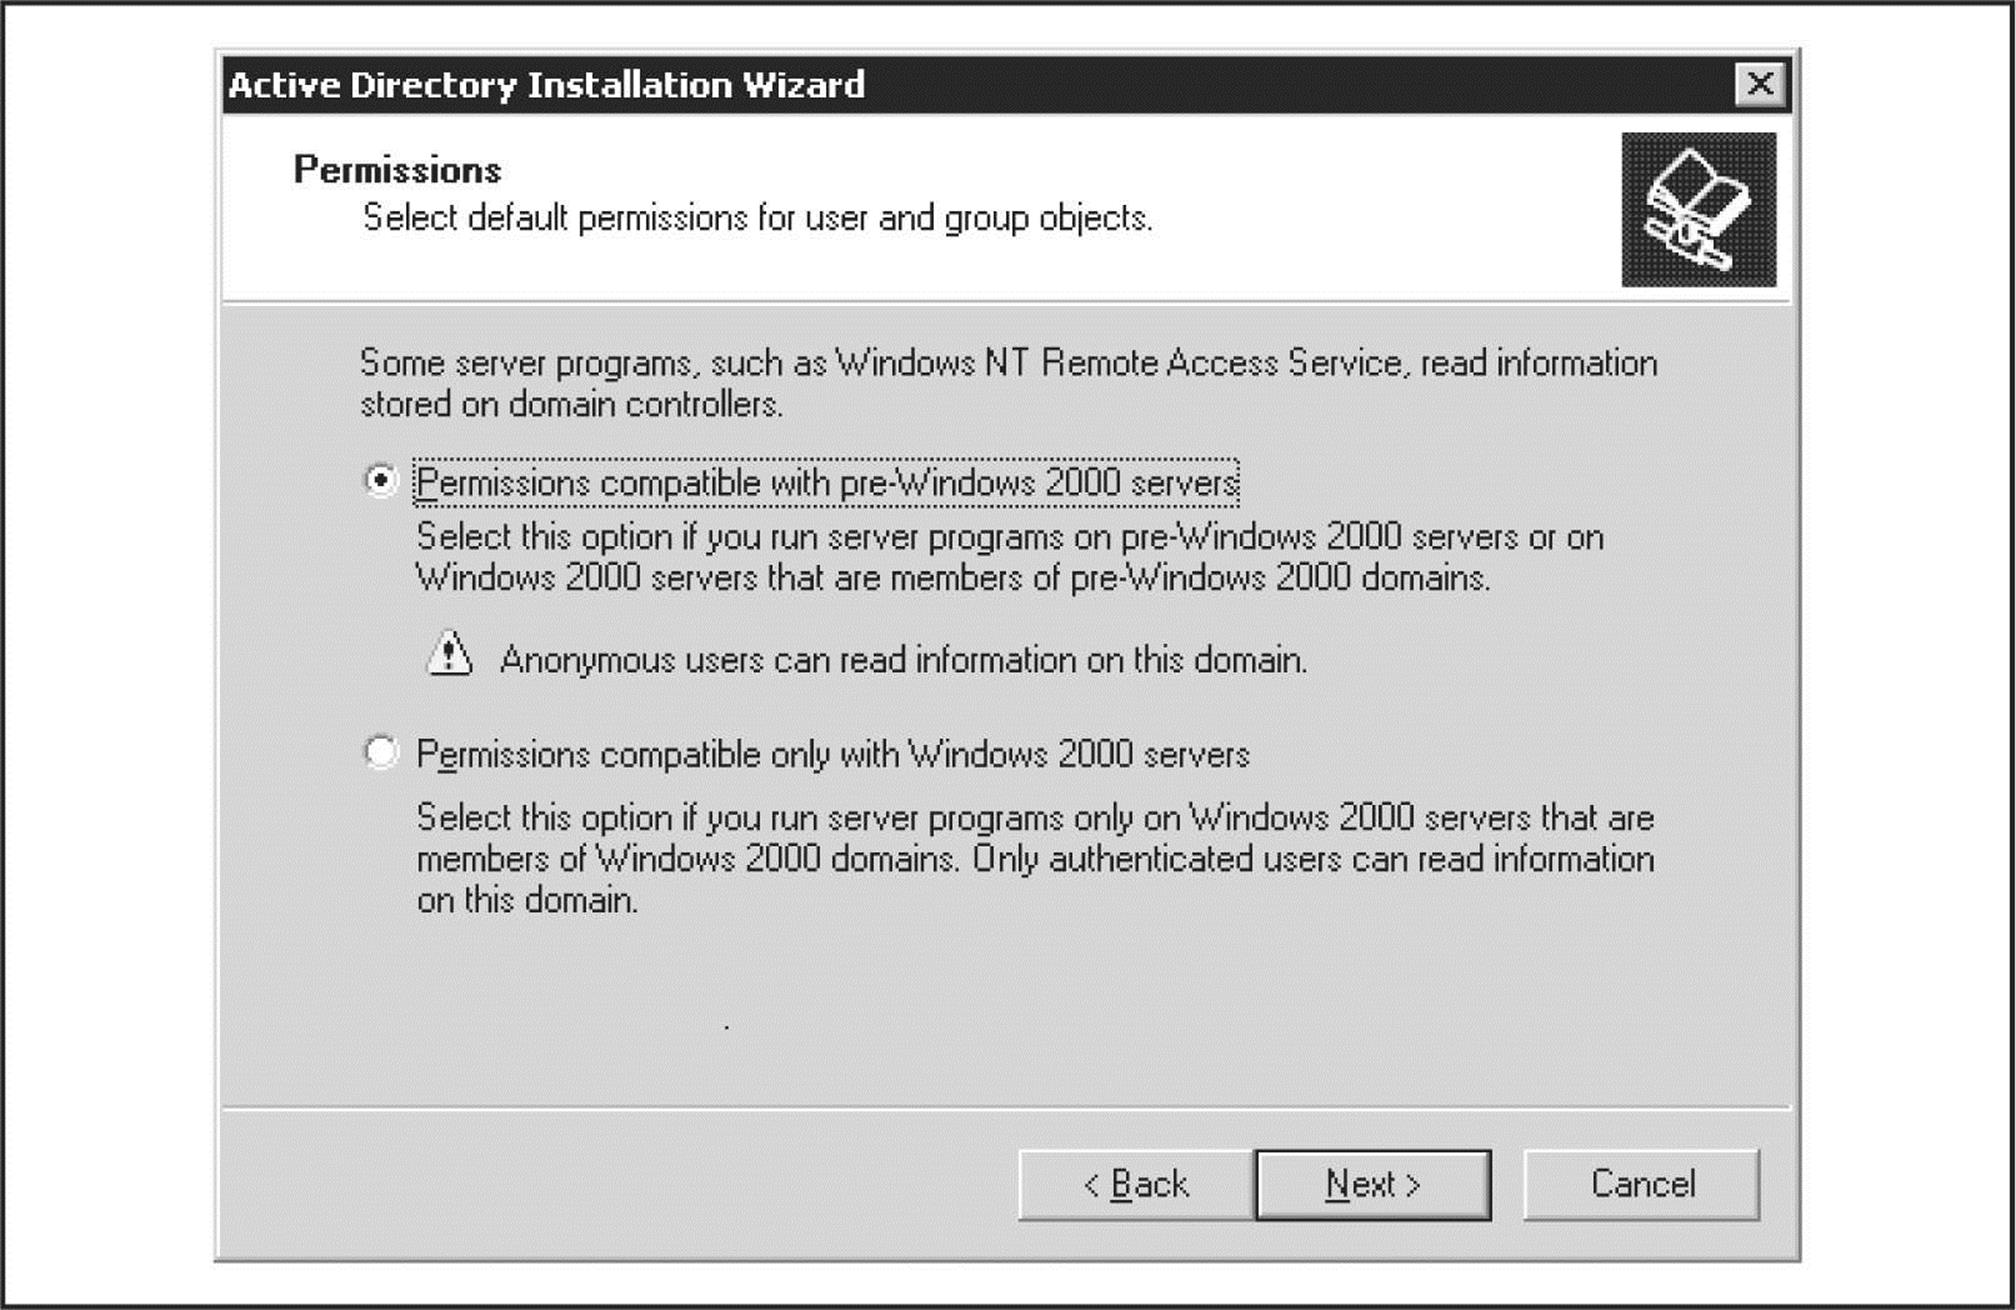
Figure 3-13 The Active Directory Installation Wizard (dcpromo) asks whether default permissions for user and group objects should be relaxed for legacy accessibility.
![]()
For more information, find KB Article Q240855 at support.microsoft.com/kb/240855.
The access control dictated by membership in the Pre-Windows 2000 Compatible Access group also applies to queries run over NetBIOS null sessions. To illustrate this point, consider the two uses of the enum tool (described previously) in the following example. The first time it is run against a Windows 2000 Advanced Server machine with Everyone as a member of the Pre-Windows 2000 Compatible Access group:

Now we remove Everyone from the Compatible group, reboot, and run the same enum query again:
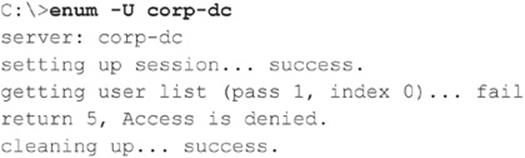
![]() UNIX RPC Enumeration, TCP/UDP 111 and 32771
UNIX RPC Enumeration, TCP/UDP 111 and 32771
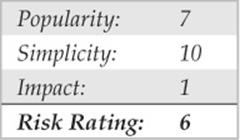
Like any network resource, applications need to have a way to talk to each other over the wires. One of the most popular protocols for doing just that is Remote Procedure Call (RPC). RPC employs a service called the portmapper (now known as rpcbind) to arbitrate between client requests and ports that it dynamically assigns to listening applications. Despite the pain it has historically caused firewall administrators, RPC remains extremely popular. The rpcinfo tool is the equivalent of finger for enumerating RPC applications listening on remote hosts and can be targeted at servers found listening on port 111 (rpcbind) or 32771 (Sun’s alternate portmapper) in previous scans:
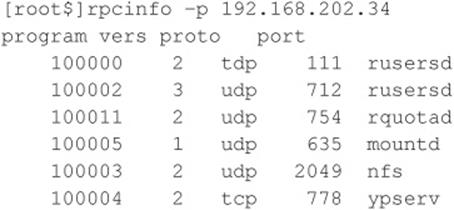
This tells attackers that this host is running rusersd, NFS, and NIS (ypserv is the NIS server). Therefore, rusers and showmount –e produce further information (these tools are all discussed in upcoming sections in this chapter).
For Windows to UNIX functionality Microsoft has developed Windows Services for UNIX (SFU), which is freely available at technet.microsoft.com/en-us/library/bb496506.aspx. Although SFU can be cumbersome at times, it provides a number of the same tools used under UNIX such asshowmount and rpcinfo. The tools have been designed to mimic their UNIX counterparts so the syntax and output are nearly the same:
Hackers can play a few other tricks with RPC. Sun’s Solaris version of UNIX runs a second portmapper on ports above 32771; therefore, a modified version of rpcinfo directed at those ports would extricate the preceding information from a Solaris box even if port 111 were blocked.
The best RPC scanning tool we’ve seen is Nmap, which is discussed extensively in Chapter 8. Hackers used to have to provide specific arguments with rpcinfo to look for RPC applications. For example, to see whether the target system at 192.168.202.34 is running the ToolTalk Database (TTDB) server, which has a known security issue, you could enter
![]()
The number 100083 is the RPC “program number” for TTDB.
Nmap eliminates the need to guess specific program numbers (for example, 100083). Instead, you can supply the –sR option to have Nmap do all the dirty work for you:
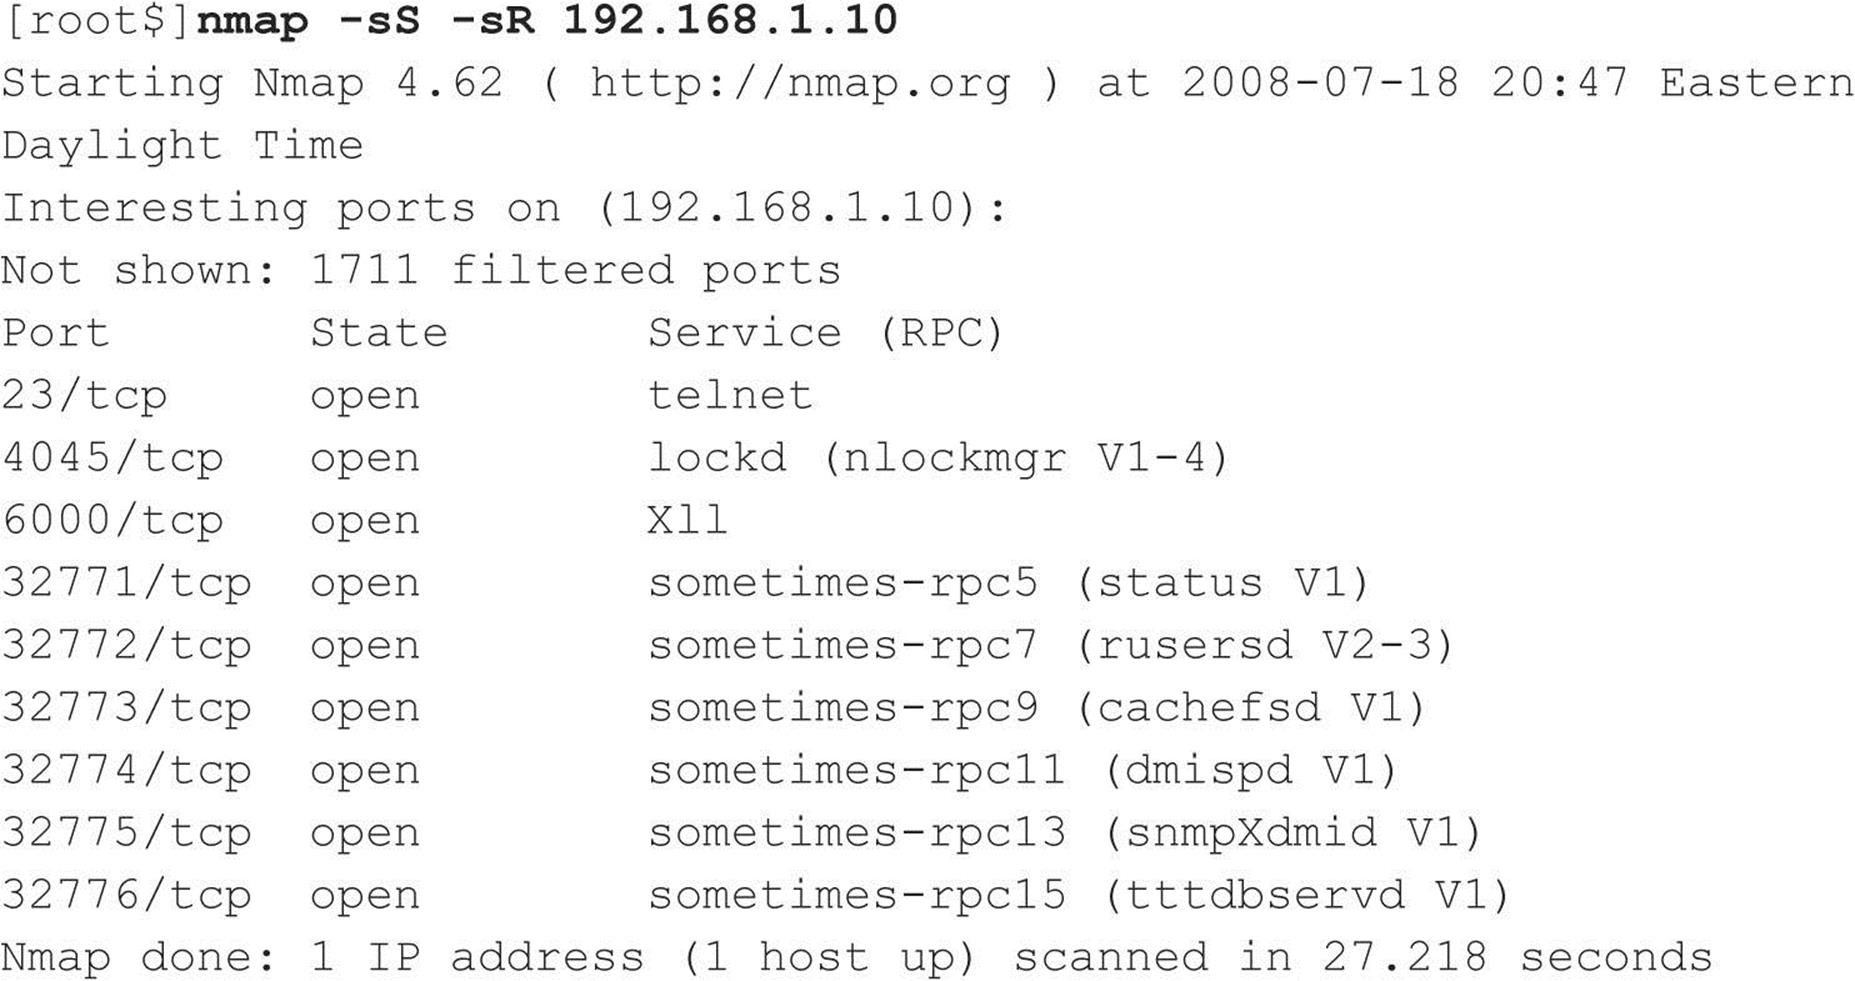
![]() RPC Enumeration Countermeasures
RPC Enumeration Countermeasures
There is no simple way to limit this information leakage other than to use some form of authentication for RPC. (Check with your RPC vendor to learn which options are available.) Alternatively, you can move to a package such as Sun’s Secure RPC that authenticates based on public-key cryptographic mechanisms. Finally, make sure that ports 111 and 32771 (rpcbind), as well as all other RPC ports, are filtered at the firewall or disabled on your UNIX/Linux systems.
![]() rwho (UDP 513) and rusers (RPC Program 100002)
rwho (UDP 513) and rusers (RPC Program 100002)
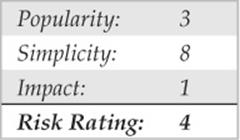
Further down on the food chain than finger are the lesser-used rusers and rwho utilities. rwho returns users currently logged onto a remote host running the rwho daemon (rwhod):

rusers returns similar output with a little more information if you use the –l switch, including the amount of time since the user has typed at the keyboard. This information is provided by the rpc.rusersd Remote Procedure Call (RPC) program if it is running. As discussed in the previous section, RPC portmappers typically run on TCP/UDP 111 and TCP/UDP 32771 on some Sun boxes. Here’s an example of the rusers client enumerating logged-on users on a UNIX system:

![]() rwho and rusers Countermeasures
rwho and rusers Countermeasures
Like finger, these services should just be turned off. They are generally started independently of the inetd superserver, so you’ll have to look for references to rpc.rwhod and rpc.rusersd in startup scripts (usually located in/etc/init.d and/etc/rc*.d) where stand-alone services are initiated. Simply comment out the relevant lines using the # character.
![]() NIS Enumeration, RPC Program 100004
NIS Enumeration, RPC Program 100004

Another potential source of UNIX network information is Network Information System (NIS), a great illustration of a good idea (a distributed database of network information) implemented with poorly thought-out to nonexistent security features. Here’s the main problem with NIS: Once you know the NIS domain name of a server, you can get any of its NIS maps by using a simple RPC query. The NIS maps are the distributed mappings of each domain host’s critical information, such as passwd file contents. A traditional NIS attack involves using NIS client tools to try to guess the domain name. Or a tool such as pscan, written by Pluvius and available from many Internet hacker archives, can ferret out the relevant information using the –n argument.
![]() NIS Countermeasures
NIS Countermeasures
Here’s the take-home point for folks still using NIS: Don’t use an easily guessed string for your domain name (company name, DNS name, and so on). This makes it easy for hackers to retrieve information, including password databases. If you’re not willing to migrate to NIS+ (which has support for data encryption and authentication over secure RPC), then at least edit the/var/yp/securenets file to restrict access to defined hosts/networks or compile ypserv with optional support for TCP Wrappers. Also, don’t include root and other system account information in NIS tables.
![]() SQL Resolution Service Enumeration, UDP 1434
SQL Resolution Service Enumeration, UDP 1434

Microsoft SQL Server has traditionally listened for client connections on TCP port 1433. Beginning with SQL Server 2000, Microsoft introduced the ability to host multiple instances of SQL Server on the same physical computer (think of an instance as a distinct virtual SQL Server). Problem is, according to the rules of TCP/IP, port 1433 can only serve as the default SQL port for one of the instances on a given machine; the rest have to be assigned a different TCP port. The SQL Server 2000 Resolution Service, which later became the SQL Server 2005 and above SQL Server Browser Service, identifies which instances are listening on which ports for remote clients—think of it as analogous to the RPC portmapper, kind of a SQL “instance mapper.” Both the original SQL Server Resolution Service and the newer SQL Server Browser Service listen on UDP 1434.
Chip Andrews of sqlsecurity.com released a Windows-based tool called SQLPing (sqlsecurity.com/Tools/FreeTools/tabid/65/Default.aspx) that queries UDP 1434 and returns instances listening on a given machine, as shown in Figure 3-14. SQLPing also has a good set of complementary functionality such as IP range scanning and brute-force password guessing, which allows an attacker to churn merrily through poorly configured SQL environments.
Figure 3-14 SQLPing scans for instances of SQL Server and guesses a few passwords.
![]() SQL Instance Enumeration Countermeasures
SQL Instance Enumeration Countermeasures
Chip Andrews’s site at sqlsecurity.com lists several steps you can take to hide your servers from tools such as SQLPing. The first is the standard recommendation to restrict access to the service using a firewall. More harsh is Chip’s alternative recommendation to remove all network communication libraries using the Server Network Utility—this will render your SQL Server deaf, dumb, and mute unless you specify (local) or . (a period) for the server name, in which case only local connections will be possible. Finally, you can use the “hide server” option under the TCP/IP netlib in the Server Network Utility and remove all other netlibs. Chip claims to have experienced erratic shifts of the default TCP port to 2433 when performing this step, so be forewarned.
![]() Oracle TNS Enumeration, TCP 1521/2483
Oracle TNS Enumeration, TCP 1521/2483

The Oracle TNS (Transparent Network Substrate) listener, commonly found on TCP port 1521, manages client/server database traffic. The TNS listener can be broken down into two functions: tnslsnr and lsnrctl. Client/server database communication is managed primarily by tnslsnr, whereas lsnrctl handles the administration of tnslsnr. By probing the Oracle TNS listener, or more specifically the lsnrctl function, we can gain useful information such as the database SID, version, operating system, and a variety of other configuration options. The database SID can be extremely useful to know as it is required at login. By knowing the SID for a particular Oracle database, an attacker can launch a brute-force attack against the server. Oracle is notorious for having a vast amount of default accounts that are almost always valid when TNS enumeration is available (if the database admins don’t care enough to lock down the listener service, why would they care enough to remove the default accounts?).
One of the simplest tools to inspect the Oracle TNS listener is the AppSentry Listener Security Check (integrigy.com/security-resources/downloads/lsnrcheck-tool) by Integrigy. This Windows-based freeware application is as point and click as you can get, making TNS enumeration a walk in the park.
For the non-GUI folks, tnscmd.pl is a Perl-based Oracle TNS enumeration tool written by jwa. It was later modified and renamed to tnscmd10g.pl by Saez Scheihing to support the Oracle 10g TNS listener. While these tools perform the basic task of TNS listener enumeration, two additional suites really bring together the most common tasks when attacking Oracle databases.
The Oracle Assessment Kit (OAK) available from databasesecurity.com/dbsec/OAK.zip by David Litchfield and the Oracle Auditing Tools (OAT) available from cqure.net/wp/test/by Patrik Karlsson are two Oracle enumeration suites that provide similar functionality. Although each has its strengths, both OAK and OAT are focused around TNS enumeration, SID enumeration, and password brute forcing. The specific tools within each toolset are identified in Tables 3-5 and 3-6.
Table 3-5 Oracle Assessment Kit (OAK)
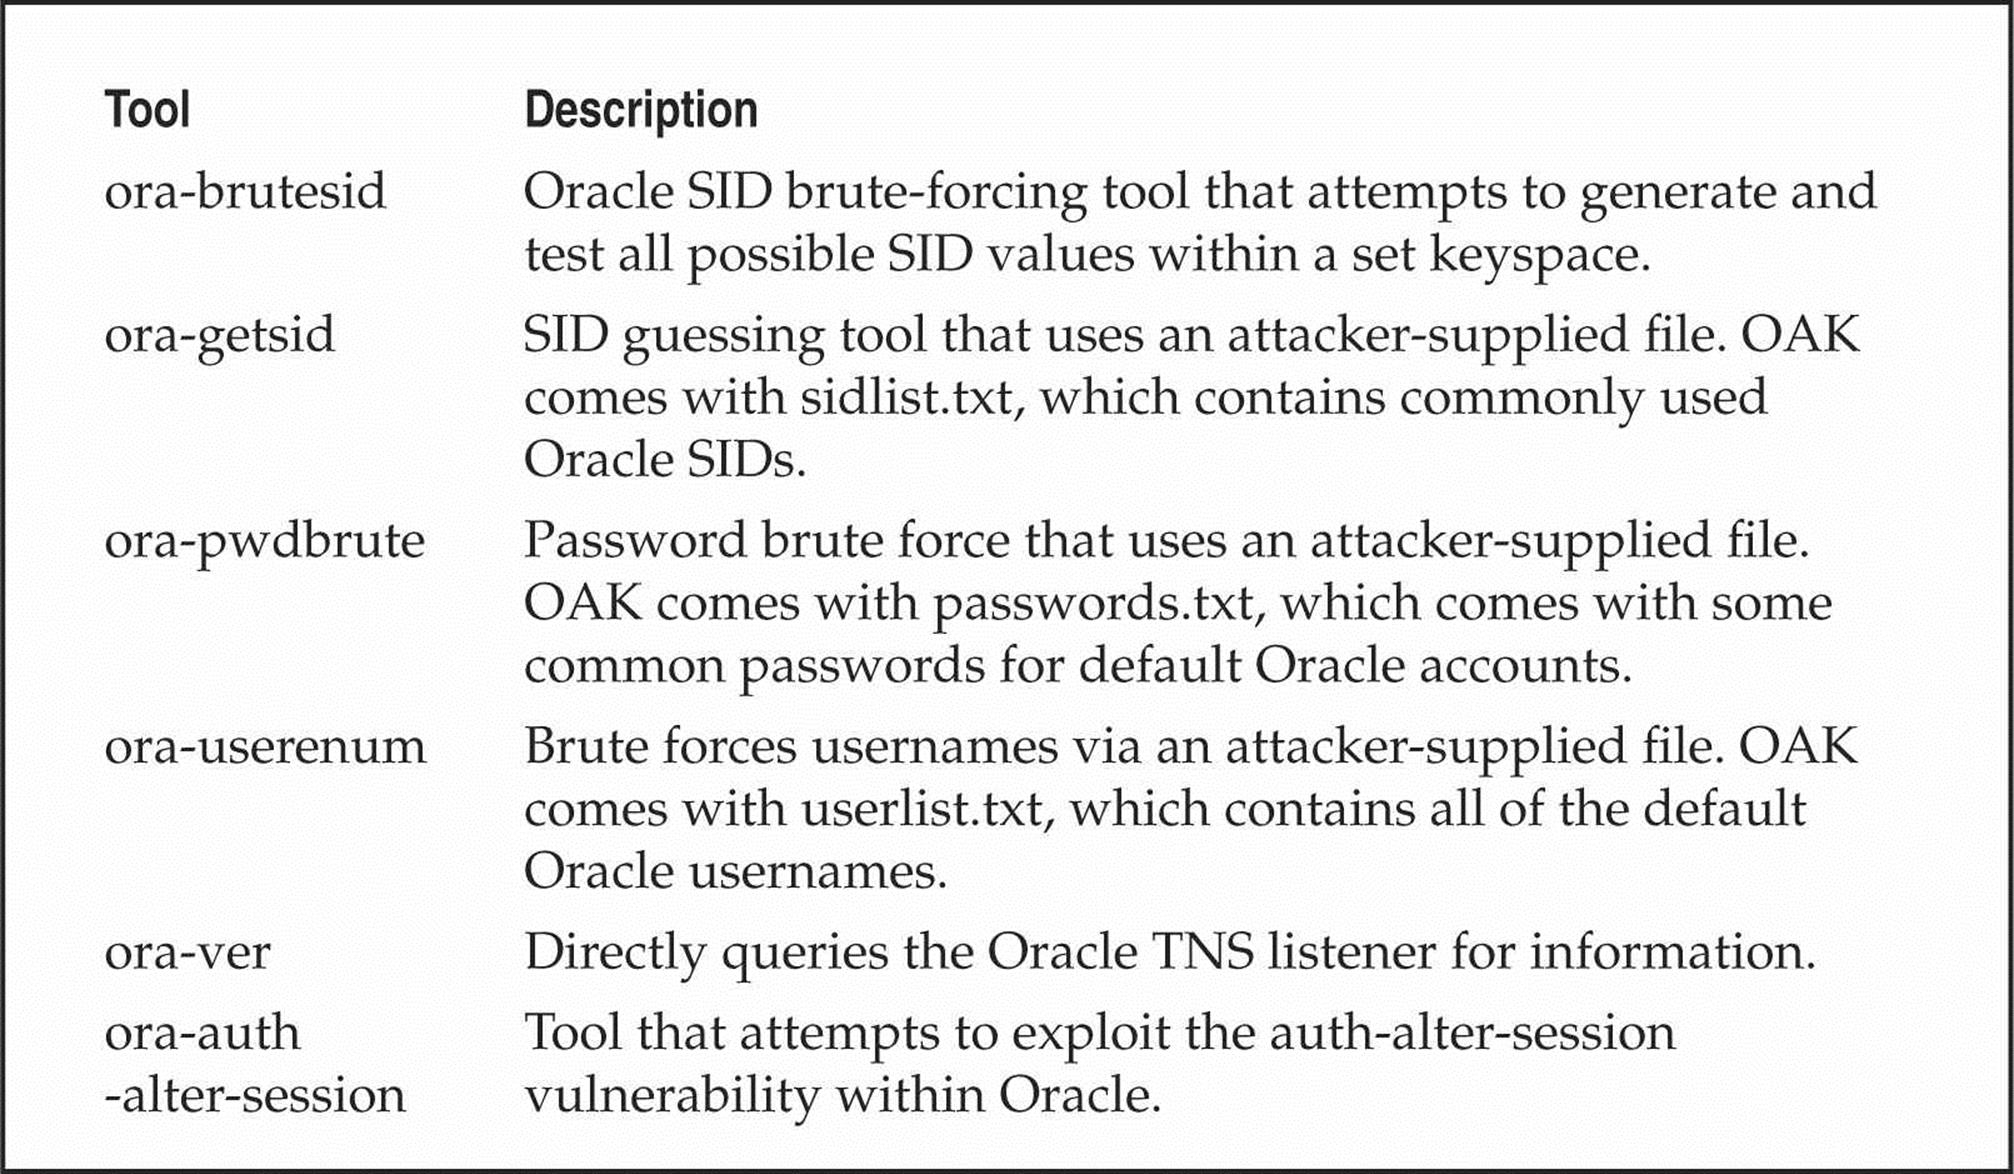
Table 3-6 Oracle Auditing Tools (OAT)
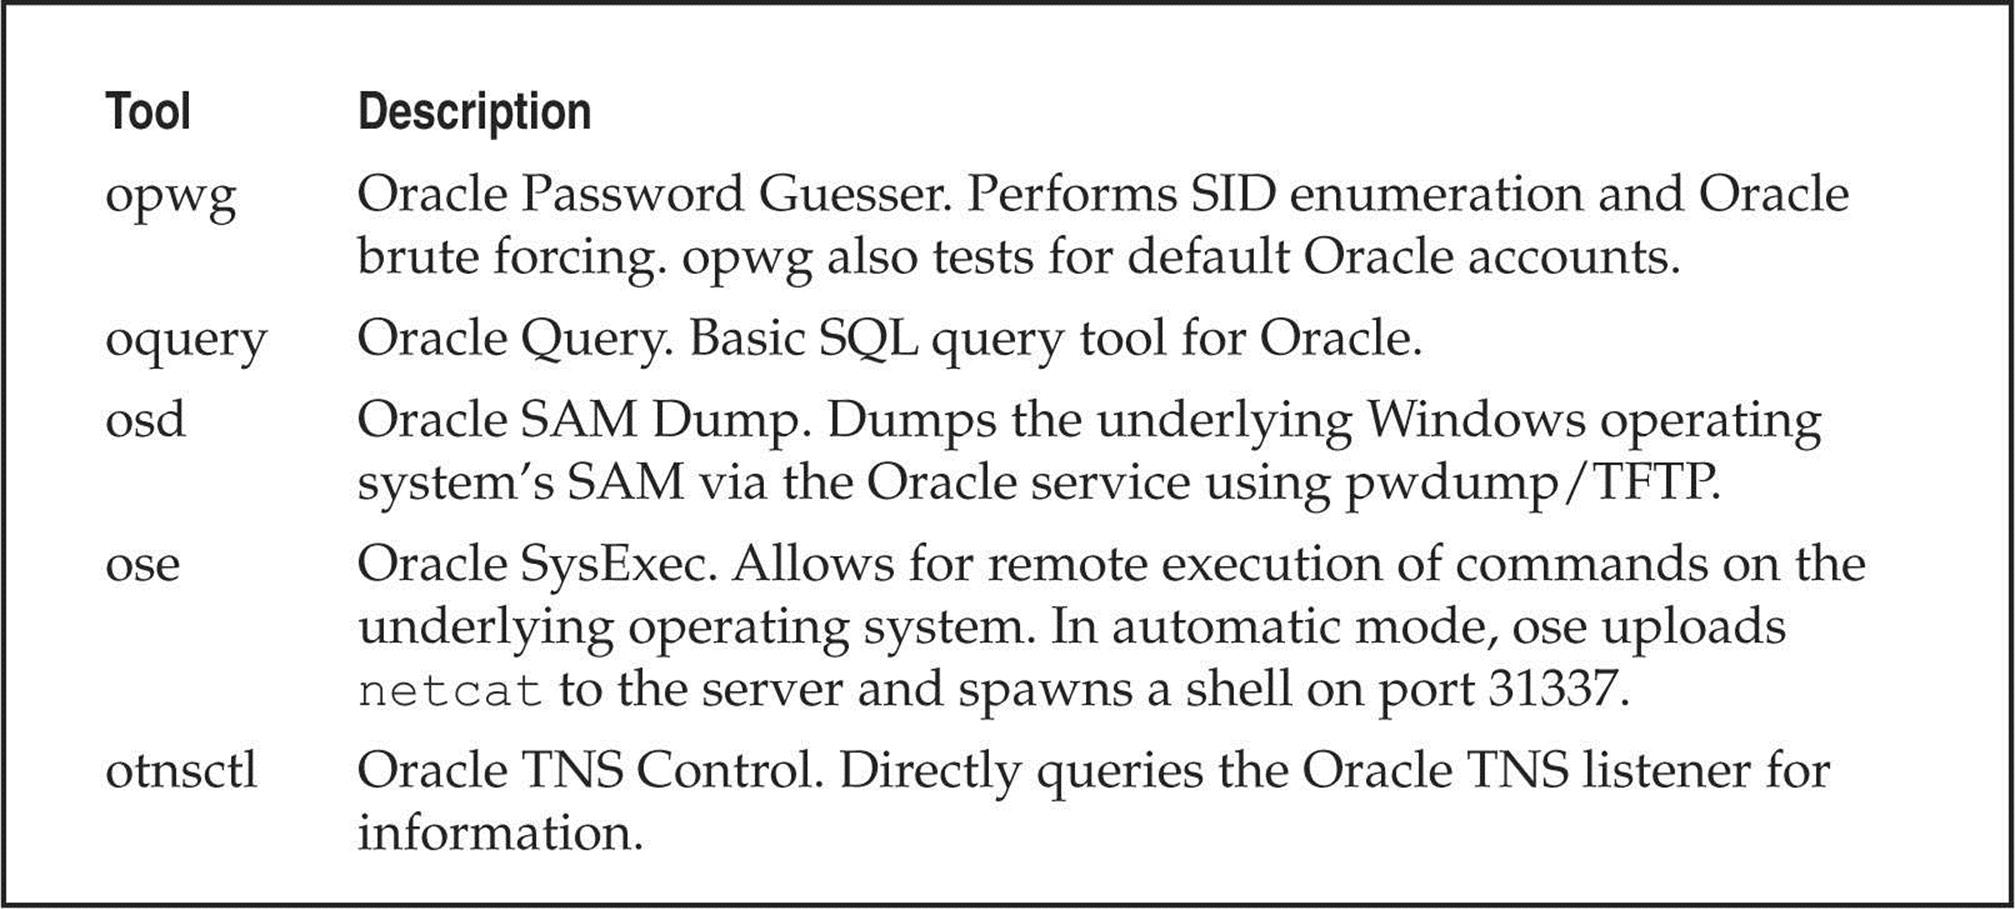
Finally, for the most simple SID enumeration tasks, Patrik Karlsson has also developed the getsids tool (cqure.net/wp/getsids/).
![]() Oracle TNS Enumeration Countermeasures
Oracle TNS Enumeration Countermeasures
Arup Nanda has created Project Lockdown (oracle.com/technetwork/articles/index-087388.html) to address the TNS enumeration issues as well as the general steps to harden the default installation of Oracle. His paper describes how to configure strengthened permissions and how to set the password on the TNS listener so anyone attempting to query the service has to provide a password to obtain information from it. For Oracle 10g and later installations, the default installation is a bit more secure, but these versions also have some downfalls. Integrigy has provided an excellent white paper on Oracle security that further describes this attack and others and also covers how to further secure Oracle. Integrigy’s paper is located at integrigy.com/security-resources/whitepapers/Integrigy_Oracle_Listener_TNS_Security.pdf.
![]() NFS Enumeration, TCP/UDP 2049
NFS Enumeration, TCP/UDP 2049
The UNIX utility showmount is useful for enumerating NFS-exported file systems on a network. For example, say that a previous scan indicated that port 2049 (NFS) is listening on a potential target. You can use showmount to see exactly what directories are being shared:
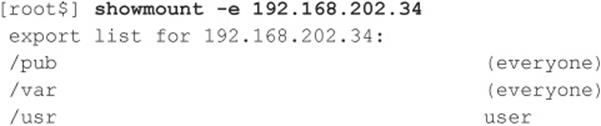
The –e switch shows the NFS server’s export list. For Windows users, Windows Services for UNIX (mentioned previously) also supports the showmount command.
![]() NFS Enumeration Countermeasures
NFS Enumeration Countermeasures
Unfortunately, you cannot do much to plug this leak, as this is NFS’s default behavior. Just make sure your exported file systems have the proper permissions (read/write should be restricted to specific hosts) and that NFS is blocked at the firewall (port 2049). showmount requests can also be logged—another good way to catch interlopers.
NFS isn’t the only file system–sharing software you’ll find on UNIX/Linux anymore, thanks to the growing popularity of the open-source Samba software suite, which provides seamless file and print services to SMB clients. Server Message Block (SMB) forms the underpinnings of Windows networking, as described previously. Samba is available from samba.org and distributed with many Linux packages. Although the Samba server configuration file (/etc/smb.conf) has some straightforward security parameters, misconfiguration can still result in unprotected network shares.
![]() IPSec/IKE Enumeration, UDP 500
IPSec/IKE Enumeration, UDP 500
Attacking from behind a firewall is often akin to shooting fish in a barrel, as even moderate-sized environments often have too much infrastructure and attack surface for administrators to effectively secure to the level of scrutiny that even a modestly skilled attacker can subject them to. As such, high on the list of any attacker’s objectives is obtaining access to the target’s internal network, something that is naturally achievable when exploiting a remote access technology like IPSec.
To exploit an IPSec VPN in the later stages of the attack, the attacker must first enumerate the component of IPSec that manages key negotiations, Internet Key Exchange (IKE), to determine where exactly IPSec is and where to poke at it. Simply determining the existence of an IPSec VPN is not usually possible by conducting a standard port scan of IKE’s UDP port 500 as, per the RFC, incorrectly formatted packets should be silently ignored by any IPSec service.
ike-scan by NTA Monitor (nta-monitor.com/tools/ike-scan/) is an excellent IPSec enumeration tool, as it crafts packets for a host (or range of hosts) in the form that an IPSec server is expecting and in a manner that causes it to both betray its presence and reveal useful information about its configuration.
Useful information coughed up with ike-scan include whether the VPN server is authenticating with pre-shared keys or certificates, whether it is using the Main Mode or Aggressive Mode option, precisely which encryption protocols it is using, and the device vendor (sometimes down to the software revision). Discovery of a pre-shared key, Aggressive Mode VPN typically means the ability to interrogate the VPN server further to obtain a hash of the pre-shared key. ike-scan has an accompanying tool called psk-crack that can take this all the way in later stages of the attack and attempt to brute force or dictionary attack the hash and discover the original key. Watch ike-scan in action, scanning in its default for Main Mode against this network (add an –A or --aggressive to scan for Aggressive Mode):
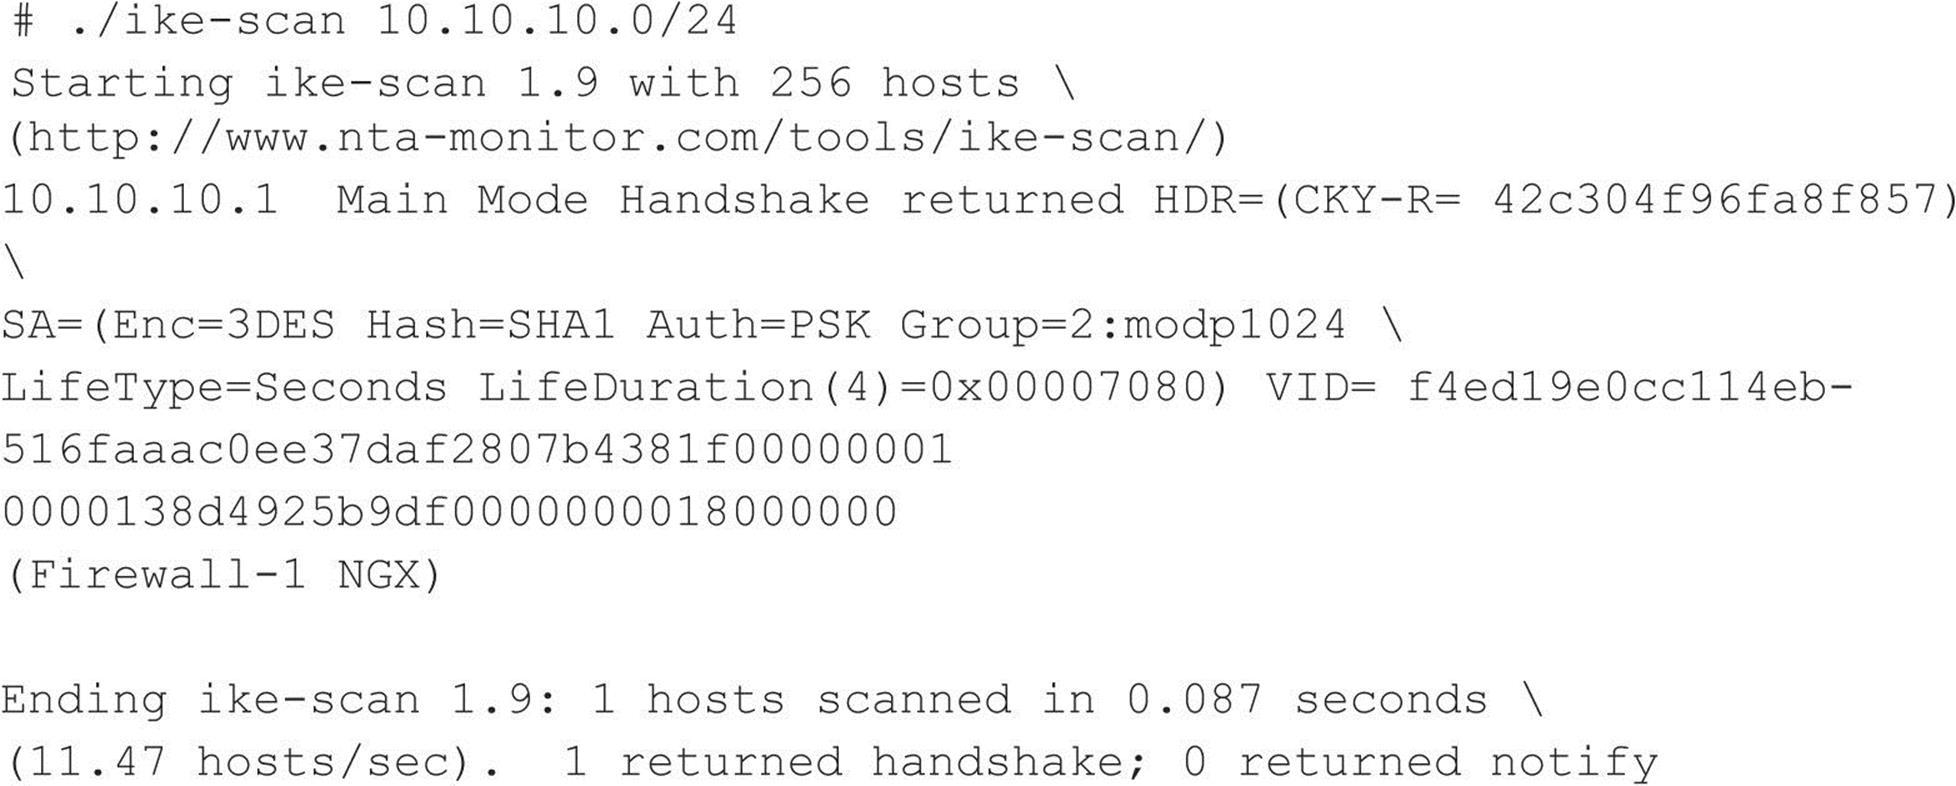
![]() IPSec/IKE Enumeration Countermeasures
IPSec/IKE Enumeration Countermeasures
Implementing source IP address restrictions on an IPSec VPN can stop the techniques described above cold, although often administrators must support users connecting from home networks with dynamic public IP addresses and even random coffee shop Wi-Fi networks, making this approach far from a one-size-fits-all solution. Source IP address VPN restriction is still good practice, typically working best with site-to-site partner connections.
Main Mode does not give away nearly as much information as Aggressive Mode (e.g., the pre-shared key hash, product information), exchanges data between peers more securely, and is less susceptible to denial of service attack, so, if at all possible, use Main Mode. The less secure Aggressive Mode is often used in scenarios where Main Mode is not an option, such as when using pre-shared key authentication with clients whose IP addresses are not known beforehand. The best solution for this scenario though is to use Main Mode with certificates rather than pre-shared keys. Perhaps the worst IPSec VPN configuration is one using Aggressive Mode with pre-shared key authentication and employing a weak password for the key.
SUMMARY
After time, information is the second most powerful tool available to the malicious computer hacker. Fortunately, the good guys can use the same information to lock things down. Of course, we’ve touched on only a handful of the most common applications because time and space prevent us from covering the limitless diversity of network software that exists. However, using the basic concepts outlined here, you should at least have a start on sealing the lips of the loose-talking software on your network, including:
• Fundamental OS architectures The Windows NT Family’s SMB underpinnings make it extremely easy to elicit user credentials, file-system exports, and application info. Lock down NT and its progeny by disabling or restricting access to TCP 139 and 445 and setting RestrictAnonymous (or the related Network Access settings in Windows XP/Server 2003) as suggested earlier in this chapter. Also, remember that newer Windows OSes haven’t totally vanquished these problems, either, and they come with a few new attack points in Active Directory, such as LDAP and DNS.
• SNMP Designed to yield as much information as possible to enterprise management suites, improperly configured SNMP agents that use default community strings such as “public” can give out this data to unauthorized users.
• Leaky OS services Finger and rpcbind are good examples of programs that give away too much information. Additionally, most built-in OS services eagerly present banners containing the version number and vendor at the slightest tickle. Disable programs such as finger, use secure implementations of RPC or TCP Wrappers, and find out from vendors how to turn off those darn banners!
• Custom applications Although we haven’t discussed it much in this chapter, the rise of built-from-scratch web applications has resulted in a concomitant rise in the information given out by poorly conceived customized app code. Test your own apps, audit their design and implementation, and keep up to date with the newest web app hacks in Hacking Exposed Web Applications (webhackingexposed.com).
• Firewalls Many of the sources of these leaks can be screened at the firewall. Having a firewall isn’t an excuse for not patching the holes directly on the machine in question, but it goes a long way toward reducing the risk of exploitation.
Finally, be sure to audit yourself. Wondering what ports and applications are open for enumeration on your machines? Use Nmap and/or Nessus, as explained, to find out yourself. And there are plenty of Internet sites that will scan your systems remotely. A free one we like to use is located at grc.com/x/ne.dll?bh0bkyd2, which will run a simple Nmap scan of a single system or a Class C–sized network (the system requesting the scan must be within this range). For a list of ports and what they are, see iana.org/assignments/port-numbers.
All materials on the site are licensed Creative Commons Attribution-Sharealike 3.0 Unported CC BY-SA 3.0 & GNU Free Documentation License (GFDL)
If you are the copyright holder of any material contained on our site and intend to remove it, please contact our site administrator for approval.
© 2016-2026 All site design rights belong to S.Y.A.