Untangle Network Security (2014)
Chapter 6. Untangle Blockers
After completing the configuration of Untangle networking and administration settings in the previous chapters, we will now start to deal with Untangle modules (also known as apps) and learn how we can utilize them to protect our network. The chapter starts by giving an overview of how to install the different apps, and explaining the applications interface (also known as the faceplate).
Thanks to its position on the network edge, Untangle NGFW can protect your network against a lot of threats before they reach the end user workstations. Among the different threats that Untangle NGFW protects against, this chapter will cover viruses, spam, phishing, tracking cookies, and invasive advertisements.
This chapter will explain how each threat works, and how the anti-threat applications work; also, the chapter will cover the anti-threat technical details, how to configure the anti-threat application, review the scan history, and common issues with the anti-threats and how to avoid them. Finally, the chapter will provide lab-based training for each anti-threat application if possible.
The list of topics that will be covered in this chapter is as follows:
· Dealing with Untangle apps
· Untangle Virus Blocker
· Untangle Spam Blocker
· Untangle Phish Blocker
· Untangle Ad Blocker
Dealing with Untangle NGFW modules
In this section, we will learn how to deal with the different Untangle NGFW modules.
You can add Untangle NGFW modules to your Rack (in other words, install the Untangle NGFW module) by clicking on the module symbol located under the Apps menu.
Note
Some applications will disappear from the Apps menu and won't be available for installation if the Rack contains an app that can conflict with the other app functionality. For example, when you install Spam Blocker, Spam Blocker Lite will disappear and won't be available for installation till you uninstall Spam Blocker.
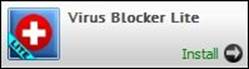
The following figure shows the symbol for Virus Blocker Lite under the Apps menu:
Since Untangle NGFW V10.1, Untangle NGFW modules come preinstalled on the system, so that the installation time would be minimized since no download is needed. Untangle will check your license before adding the modules (only required for the paid apps), then it will enable and add the module to the default Rack, as shown in the following screenshot:
After the installation, the app will appear inside the default rack. The following figure shows the Virus Blocker app installed:

The explanation of the different components of the app faceplate is as follows:
· A: This button allows you to start/stop the app. The green color means that the app is running, yellow means that the app is initializing or transiting between the start and stop states, grey means that the app is turned off, while red means that the app is on but an abnormal condition has occurred (for example, the app license has expired).
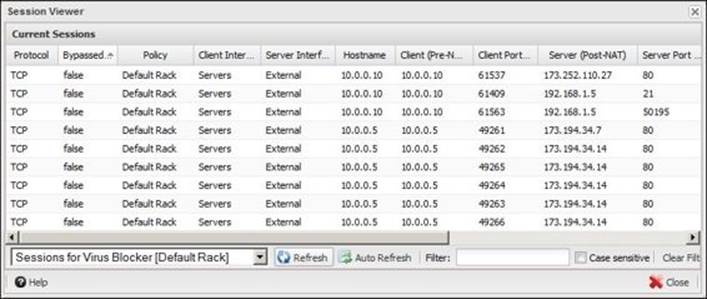
· B: The graph provides a quick view into the activity of the app, and changes in real time as the app processes network traffic. Clicking on the graph will open the session viewer for that app (shown in the following figure):
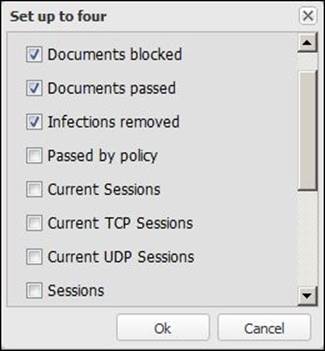
· C: These are the traffic statistics. They show the traffic history since the last system boot. Clicking on the statistics will open a menu from which you can select which statistics are displayed (you can select up to four options) from a list of options:
· D: This is the license information. This part shows you notifications related to your license.
· E: This button allows you to access the app settings.
· F: This button provides you with help about the app by opening the app wiki page. The Help button is also available under the app settings.
· G: This button allows you to purchase the app.
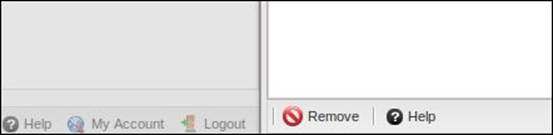
You can remove the app from the Rack by clicking on the Remove button located under the app settings:
Protect your network from viruses
Thanks to its position at the network edge, Untangle Virus Blocker scans the incoming HTTP, FTP, and SMTP traffic to protect your network against viruses, worms, and Trojan horses before they reach the end users' PCs. Untangle offers two versions of Virus Blocker: a paid version based on the Commtouch engine and a free version based on Clam AV.
This section will cover how antivirus programs work, the technical details of the Untangle Virus Blocker, how to configure the Virus Blocker, how to review the Scan history, and finally, the common issues with Virus Blocker.
How the antivirus programs work
Antivirus programs have many methods to detect viruses; the most common method is signature-based detection, which is used by Untangle NGFW Virus Blocker.
Each virus has its unique signature (that is, programming code), the antivirus programs maintain a database of these signatures. The antivirus programs scan each file against this database and if any match is found between the file and the database, the file will be considered an infected file.
The following is the code of the EICAR test file developed by the European Institute for Computer Antivirus Research (EICAR) and Computer Antivirus Research Organization (CARO), to test the response of computer antivirus programs instead of using real malware:
X5O!P%@AP[4\PZX54(P^)7CC)7}$EICAR-STANDARD-ANTIVIRUS-TEST-FILE!$H+H*
Understanding the technical details of Untangle Virus Blocker
Virus Blocker is based on the Commtouch (now CYREN) command antivirus engine, the industry-leading antivirus for Gateways, and one of the top 10 zero-hour threat detectors. Virus Blocker Lite is based on the well-respected open source Clam AV. However, some customizations were done on both the programs by the Untangle team to improve their performance and efficiency on Untangle NGFW.
Virus Blocker scans the Web, e-mails, and file transfer protocols in real time at the network edge before they reach the end user machines, which dramatically decreases the threat of being infected by malware, as most malware infections come from the Internet.
In addition, Virus Blocker can scan archives and compressed files (supporting multiple layers of compression within the compressed file) using on-the-fly decompression of these files. Virus Blocker supports many formats such as ZIP, RAR, TAR, GZIP, BZIP2, MS OLE2, MS Cabinet Files, MS CHM, and MS SZDD.
You can run both Virus Blocker and Virus Blocker Lite at the same time with no problem; the file is first scanned by virus blocker and if no infection is detected, it passes to the Virus Blocker lite for scanning. If a virus was detected by the virus blocker, then the file will not pass to Virus Blocker Lite.
Virus Blocker is automatically updated with new signatures to keep your network protected against any new threats. You can track Virus Blocker events (such as scanning, blocking, and cleaning) via the Event logs tabs; this requires the Reports app to be installed.
Virus Blocker only scans the attachments of the e-mail messages. If a message has no attachment, then it will not be scanned by the virus blocker. In addition, SMTP scanning works for incoming and outgoing traffic.
Virus Blocker only protects from the threats coming from the Internet, and doesn't protect against internal threat sources such as USB thumb drives, and internal network traffic between internal machines. Thus, it's necessary to use desktop antivirus programs simultaneously with Untangle Virus Blocker.
Virus Blocker settings
In this section, we will cover the different Virus Blocker settings available for the Web, e-mail, and FTP protocols.
Configuring the scanning of the web traffic
Here we can configure the scanning of files coming through HTTP traffic. Any infection founded in the HTTP traffic will be automatically removed. The following screenshot shows the web traffic scanning settings for the Virus Blocker Lite:

The different available settings are:
· Scan HTTP: This checkbox enables/disables the scanning of HTTP traffic.
· Advanced Settings: Clicking on this option shows/hides the Edit File Extensions and Edit MIME Types buttons.
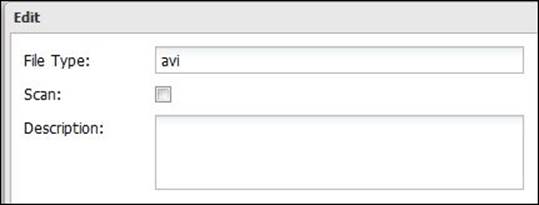
· Edit File Extensions: This defines the file extensions to be scanned by the Virus Blocker. The list (shown in the following screenshot) includes the commonly used file extensions, and by default, the file extensions with higher probability of being infected by a threat are selected for scanning (for example, the .bin extension is selected for scanning while .avi is not selected).
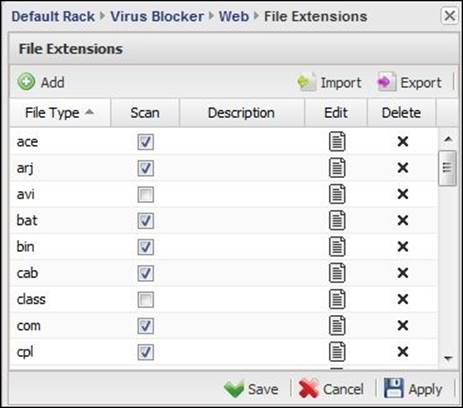
You can change the scan settings from the Scan checkbox located next to each file extension, or under the Edit menu.
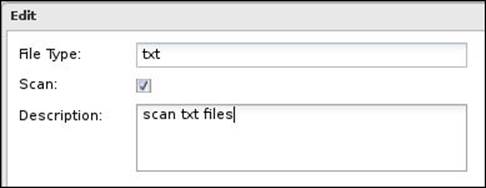
Also, you could add new file extensions via the Add button. For example, if you want to scan .txt files, you will need to add it as shown in the following figure:
In addition, we could import/export a list of the file extensions via the Import and Export buttons, which helps to simplify the process of configuring additional Untangle NGFW servers or retrieving the default settings after changing them.
Tip
It's preferred to use a remote browser to perform the import/export process, so that the exported json file could be saved on the administration PC.
The process of importing/exporting the files list is similar to the backup and restore process covered in Chapter 5, Advanced Administration Settings
Multipurpose Internet Mail Extensions Types (MIME Types) were originally created for e-mails sent using the SMTP protocol to allow e-mail clients to identify attachment files. Nowadays, MIME Types are used with a lot of other protocols; for example, web browsers use them to determine how to display or output files that are not in HTML format by using the proper extension/plugin (for example, flash player).
Tip
A complete list of MIME Types can be found at http://www.freeformatter.com/mime-types-list.html.
By default, only the message/* MIME Type is listed and scanning is enabled for it. Thus, e-mail messages (.eml) encapsulated in other e-mail messages will be scanned:
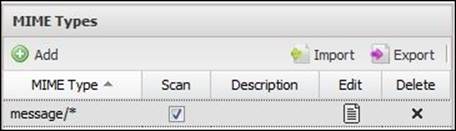
We can add additional MIME types to the list via the Add button, and import/export the list of MIME Types via the Import and Export buttons.
Note
Adding new MIME Types to be scanned will highly increase the server processing and it's not recommended to do so.
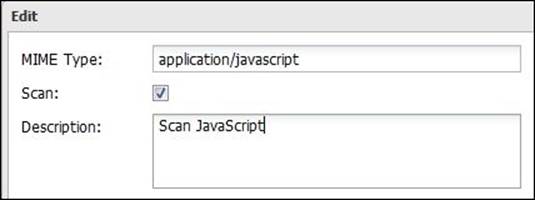
For example, if we want to scan Java scripts, we will add the application/javascript type as shown in the following figure:
Configuring the scanning of the SMTP traffic
Here we will see how to configure the scanning of SMTP Traffic. Virus Blocker will scan the e-mail attachments for viruses and if a virus is detected, Virus Blocker can remove the infected file, or pass the whole message, or delete the whole message.
The following screenshot shows the e-mail scanning settings for Virus Blocker Lite:
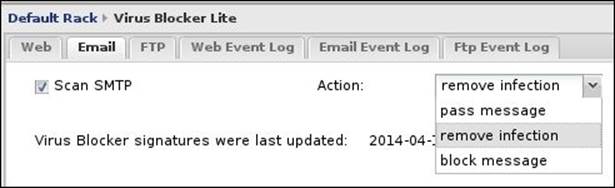
The available settings are:
· Scan SMTP: This checkbox enables/disables the scanning of SMTP traffic (message attachments).
· Action: This is the action that will be taken when a virus is found on a message.
o Pass Message: The original message and its attachments will be delivered to the user untouched; only the subject line will have the [VIRUS] prefix.
o Remove Infection (the default option): The infected files will be removed and the original massage will be delivered to the intended user. Also, the subject line will have the [VIRUS] prefix.
o Block: This drops the whole message and nothing will be delivered to the intended user.
Scanning FTP traffic settings
Here we will look at how to configure the scanning of FTP traffic, as shown in the following screenshot:
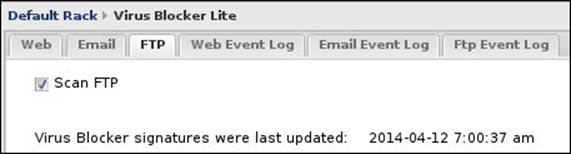
The only available setting is:
· Scan FTP: This checkbox enables/disables the scanning of FTP traffic.
Reviewing the scan history
Here we will cover how we can track Virus Blocker scan events. First, we could review the summary of the current sessions (since the last server boot) through the app faceplate as shown in the following figure:

The second way is through the event logs; there are three different types of event logs based on the different traffic type (that is, Web, e-mail, and FTP). The event log functionality requires the Reports app. The different event logs are:
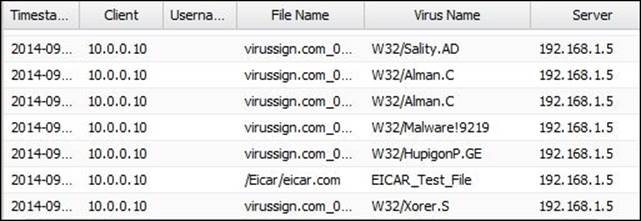
· Web Event Log: Here we can review the scan history of the HTTP traffic. The following figure shows that Virus Blocker protected ABC-Client01 (10.0.1.15) from downloading different viruses:

The Event Log terms are described in the following table:
|
Name |
Description |
|
Timestamp |
Time when the scan occurred |
|
Client |
The IP address of the internal machine that requested the traffic |
|
Username |
The username who initiated the traffic request, available when using the captive portal |
|
Host |
The site from where the traffic was downloaded |
|
URI |
The remaining portion of the full URL of the requested traffic |
|
Virus Name |
The name of the discovered virus, if any |
|
Server |
The IP address of the server from which the traffic was downloaded |
· Email Event Log: Here we can review the scan history of the SMTP traffic; the following table describes the different SMTP event log terms:
|
Name |
Description |
|
Timestamp |
Time when the scan occurred |
|
Client |
The IP address of the internal machine that the e-mail was directed to |
|
Receiver |
The recipient e-mail address |
|
Sender |
The sender e-mail address |
|
Subject |
The e-mail subject |
|
Virus Name |
The name of the discovered virus, if any |
|
Server |
The IP address of the server that sent the e-mail |
· FTP Event Log: Here we can review the scan history of the FTP traffic; the following table describes the different FTP event log terms:
|
Name |
Description |
|
Timestamp |
Time when the scan occurred |
|
Client |
The IP address of the internal machine that requested the traffic |
|
Username |
The username that initiated the traffic request, available when using captive portal |
|
Filename |
The FTP filename |
|
Virus Name |
The name of the discovered virus, if any |
|
Server |
The IP address of the server from which the traffic was downloaded |
The third way is to review the scan history through Reports. By default, a daily report would be send to the administrator. In addition to that, the administrator can generate a report by navigating to Reports | View Reports | Generate Today's Reports and then access the report by clicking on the View Reports button.
The available Virus Blocker reports include:
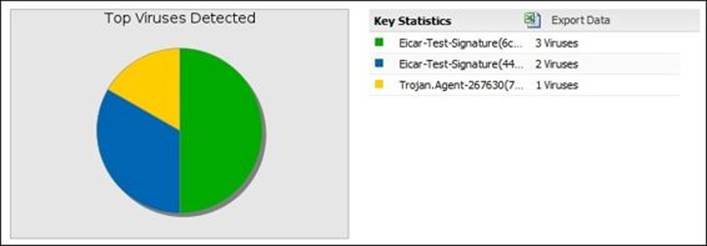
· Viruses Blocked: This gives the average and the maximum viruses' blocks per hour
· Top Viruses Detected: This shows the top detected viruses irrespective they were blocked from e-mail, Web, or FTP traffic
· Top Email Viruses Detected: This shows the top detected viruses coming via e-mail
· Top Web Viruses Detected: This shows the top detected viruses coming through the Web
· Top FTP Viruses Detected: This shows the top detected viruses coming through FTP
The following figure shows the Top Viruses Detected chart for the Virus Blocker Lite daily report:
Identifying the common issues with Untangle Virus Blocker
There are some common issues that occur with Virus Blocker that you may face:
· Windows update traffic is detected as a malware: This is because the Windows update includes virus definition for the Windows defender. In Untangle NGFW Version 10.2, Untangle added pass list (shown in the following screenshot) from which you can specify destinations that you don't want scan traffic from. Microsoft Update is added to the list by default.
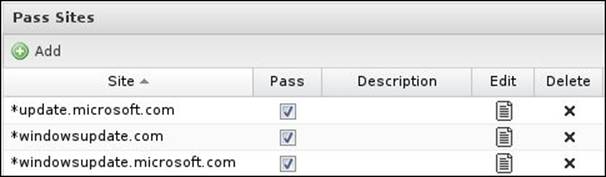
For previous versions, you can create a bypass rule from the Microsoft update website to your WSUS server, or create another Untangle rack from the policy manager that doesn't include the virus blocker and set the traffic from Microsoft update to pass through that rack.
· Some e-mails with large attachments may not be delivered to the SMTP server: A timeout may occur at the SMTP server because of the delay caused by the virus blocker due to the message scan.
· Large infected files don't display the block page, instead they would be downloaded to the destination machine but have a blocked event log status: Large files are delivered to the client at a slower rate than the rate at which they are actually downloaded to prevent client timeout. After Untangle finishes the scanning of the complete file, it will send the rest of the file to the client immediately if the file was not infected, or it will drop the rest of the file if infection was found. Just checking the file size on the client will show that you don't have the complete file.
Lab-based training
It's the time to test the virus blocker functionality. In this lab, we will use the following machines: Untangle-01, ABC-DC01, ABC-EX01, ABC-Client01, Untangle-03, Acme-DC01, Acme-EX01, and Acme-FS01.
This part assumes that the different machines are up and running, and configured as instructed in Chapter 2, Installing Untangle, and Chapter 4, Untangle Advanced Configuration, and no modifications were done on Virus Blocker.
Testing web scanning
For the testing to be done, have a look at the following procedure:
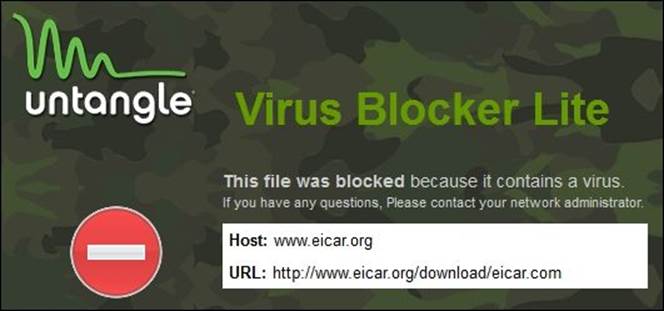
1. On the ABC-Client01, browse to http://www.eicar.org/85-0-download.html, from where you can download the EICAR test file in many formats:
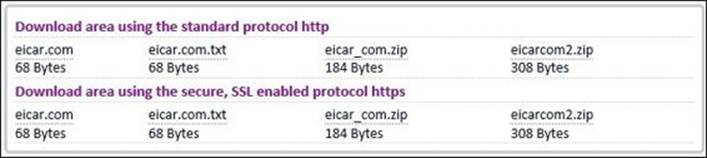
2. Try to download the different file formats under the HTTP part. The block page will appear for the COM and ZIP formats, as shown in the following figure, while the TXT format can be downloaded:
3. To allow the scanning of the TXT format files, we will need to add the TXT extension by navigating to Virus Blocker | Web | Edit File Extension | Add. Now, when you try to download the TXT file format, it will be scanned and blocked by the Virus Blocker.
Also, if you tried to download the files using HTTPS Connection, Untangle will not be able to recognize the files until you install the HTTPS Inspector application.
Testing e-mail scanning
In this test, we will try to send e-mails between ABC.com and Acme.net, attaching virus files to the messages.
Tip
You can get virus samples from http://virussign.com/downloads.html.
The downloadable package is password protected so Virus Blocker will not be able to scan it. However, you can extract it and use the included virus samples on the remaining portion of the lab.
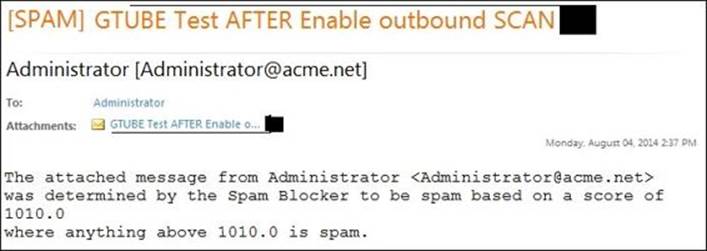
1. In the first step, we will send the e-mail with the attached virus from ABC.com to Acme.net; the virus blocker on Untangle-01 is enabled.
The virus blocker will scan the outgoing SMTP traffic and will take the action defined in the settings part (here, we will remove the infected files and send the message to the original receiver).
The received message subject will be a warning from Virus Blocker that an infection was found and removed, and the original message will be attached as shown in the following figure:
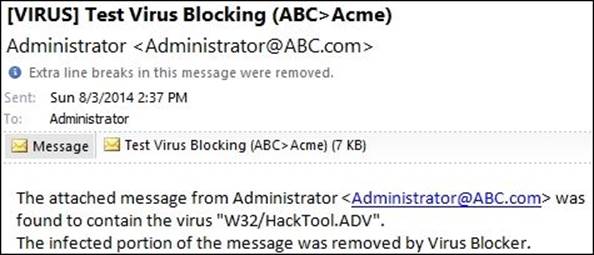
Note
The [VIRUS] prefix will not appear on the quick view section on OWA, you will need to open the message by double-clicking on it to see the prefix.
2. Now, we will try sending from Acme.net to ABC.com, and the virus blocker on Untangle-03 is disabled.
In this the case, the outgoing SMTP Traffic would not be scanned. However, the incoming traffic would be scanned by the virus blocker on Untangle-01.
Again, the infection would be removed and the virus blocker will send an e-mail with the original message attached to the original recipient just like what happened in the previous case.
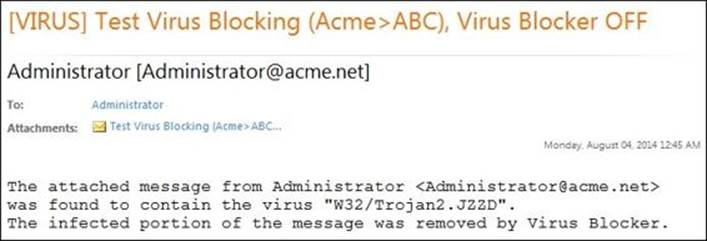
The event log would appear, as in the following figure:
![]()
Testing FTP scanning
On the Acme-FS01, ensure that the FTP server is running, then import the different Eicar file formats to the FTP folder (you can also use the virus samples here). On the ABC-Client01, connect to the FTP server and try to download the different file formats.
Note
Through the lab scenario provided in Chapter 2, Installing Untangle, we state that WG-Client01 needs to access the FTP files on Acme-FS01. We used ABC-client01 here for lab simplicity.
The files will appear to be successfully downloaded, but only parts of the files are received on ABC-Client01, thus the files would be corrupted and wouldn't run, and if you tried to open the Eicar.txt file, you would find the following code:
X5O!P%@AP[4\PZX54(P^)7CC)7}$EICAR-STANDARD-ANTIVIRUS-T
This is instead of the original code, as follows:
X5O!P%@AP[4\PZX54(P^)7CC)7}$EICAR-STANDARD-ANTIVIRUS-TEST-FILE!$H+H*
The event log would be as shown in the following figure:
Spam!!…It's something from the past
Spam consists of identical messages that are sent to numerous recipients by e-mail (that is unsolicited bulk e-mail). Spam e-mails may contain commercial advertisements or links to dangerous sites (that is phishing sites, or sites that include malware).
How anti-spam programs work
Anti-spam programs run many tests against the message, and each test will have a score based on the message criteria. The overall score determines if the message is a spam message or not. The different tests include:
· DNS Black Listing (DNSBL): This contains bad-behavior IPs that were automatically collected using spam detection tools or manually reported. A famous example of a blacklist provider is Spamhaus.
· Heuristic/Signature-based content filtering: This checks for certain known phrases, patterns, and so on; for example, if the message contains dear client, instead of the user's real name, or if the message was sent with a high priority.
· Reputation control: This is the same as heuristic control filtering but based on analysis algorithms not signature databases.
· Collaborative content filtering: This is based on user feedback; for example, when many Hotmail users define a message from the same sender as spam, Hotmail will automatically consider all messages from this sender as spam.
· Sender Policy Framework (SPF): To accept messages from the sender, they must have a valid SPF record to prevent sender address forgery.
· MX callbacks: This verifies the message senders with their MX sever.
· White listing: This is a local list; all e-mails listed here will automatically be accepted and no other filter can stop it.
Understanding the technical details of Untangle Spam Blocker
Untangle Spam Blocker is based on the Apache SpamAssassin project. However, the paid version integrates the Commtouch Anti-spam to improve detection accuracy. Spam Blocker doesn't require you to change your MX record, it will transparently scan the SMTP traffic on its way to the e-mail server.
Unlike Virus Blocker, Spam Blocker, and Spam Blocker Lite can't run simultaneously. In addition, it's a bad practice to use Untangle Spam Blocker after third-party anti-spam solutions (for example, a cloud-based anti-spam solution), as all the e-mails (legitimate, and spam) will be coming from one source, which will make Untangle NGFW consider that source as a specious sender.
From time to time, your inbox may get flooded with spam e-mails, as spammers always change their techniques, and it takes anti-spam solutions some time to understand those techniques and start to release measures against them.
Though the spam blocker pre-configured settings are sufficient for most organizations, you can change these settings at any time if the spam blocker performance isn't enough for you.
Spam Blocker settings
In this section, we will cover the different Spam Blocker settings. The following settings apply on both Spam Blocker and Spam Blocker Lite:
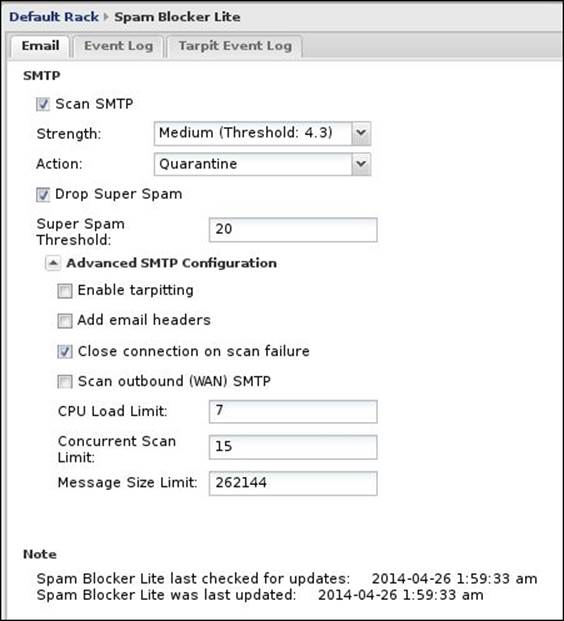
· Scan SMTP: This checkbox enables/disables the scanning of the SMTP traffic.
· Strength: As discussed earlier, each message will have an overall spam score. Here, we could set the score threshold that when met (message score is equal to or higher than this threshold), the message will be considered as spam and the action listed in the Action field will be taken. There are six possible values:
o Extreme (Threshold 3.0): Any message with at least a score of 3.0 will be considered as spam
o Very (Threshold 3.3): Any message with at least a score of 3.3 will be considered as spam
o High (Threshold 3.5): Any message with at least a score of 3.5 will be considered as spam
o Medium (Threshold 4.3): This is the default value; any message with at least a score of 4.3 will be considered as spam
o Low (Threshold 5.0): Any message with at least a score of 5.0 will be considered as spam
o Custom: Here you can enter a custom score
The lower the selected score, the more chance that legitimate e-mails could be considered spam (known as false positive), and the higher the score, the more chance that true spam e-mails with lower scores could pass (known as false negative).
· Action: This covers the action taken on a message if its spam score was high enough; there are four different actions:
o Mark: The message will be delivered to the intended user, but its subject line will have the [Spam] prefix
o Pass: The message will be delivered to the intended user with no modifications
o Drop: Untangle will inform the sending server that the message has been delivered, but it will not deliver the message to the intended user
o Quarantine: Untangle will send the message to the users' e-mail quarantine, thus they can release or delete it
· Drop Super Spam: If checked, any e-mails with a spam score higher than the super spam score will be dropped; this could be useful if you set the previous action to not drop e-mails. With super spam, you can be sure that the dropped message is definitely spam.
· Super Spam Score: This is the score that e-mails must reach to be considered as super spam; the default value is 20.
· Advanced SMTP Configuration: Clicking on this option shows/hides the advanced spam blocker configurations.
· Enable tarpitting: This option enables Tarpit. When enabled, Spam Blocker will check the sender IP against the DNSBL at every SMTP session initiation. If the IP is found on the DNSBL, the session will be rejected before the remote server can send the message. This helps to reduce the Untangle utilization and save the bandwidth, but could increase the false positives as the sender IP could be temporarily listed on the DNSBL. Note that you had taken your decision based on only one test. It's better to leave it unchecked.
· Add email headers: When enabled, Untangle will add the (message spam score and the tests used to get that score) information to the message header.
· Close connection on scan failure: If enabled, when the spam test fails, the connection will be closed, thus the sending message will be retested and the scan will be reapplied on it. If disabled, when the spam test fails, the connection will remain active, thus the message will be delivered to the user without proper scanning.
· Scan outbound (WAN) SMTP: If enabled, the outgoing SMTP traffic will be scanned. This is an unnecessary option, and it's better to close port 25 for all clients on your network expect to the e-mail server.
· CPU Load Limit: The default value is 7. If your CPU utilization exceeded this value, all incoming connections will be rejected by Untangle to prevent more resource utilization, which may led to a server outage.
· Concurrent Scan Limit: This limits the maximum number of e-mails that can be scanned at the same time; the default value is 15. If you are receiving a large number of e-mails, you should consider increasing this number, which will increase the CPU utilization. So, it's better to increase it in small amounts until you get the best value that compromises on performance and message volume.
· Message Size Limit: This is the maximum size of the messages to be scanned by spam blocker. Messages larger than this size will not be scanned by the spam blocker, as most of the spam messages are small in size, and most of the legitimate messages are larger than the default value listed (256 KB). This option is only related to the spam blocker and does not affect the size of the message delivered to your e-mail server.
Note
This skip behavior because the message size is only related to Spam Blocker, Virus Blocker will still scan the messages for any viruses.
Reviewing the scan history
As is the case with the other apps, you can review the scanning history from the app faceplate, through the event log, or from the Reports app. There are two different event log types: the spam blocker event log and trapit event log.
The spam blocker event log
The following table describes the spam blocker event log terms:
|
Name |
Description |
|
Timestamp |
Time when the scan occurred |
|
Receiver |
The recipient e-mail address |
|
Sender |
The sender e-mail address |
|
Subject |
The e-mail subject |
|
Action |
The action taken on the e-mail |
|
Spam Score |
The spam score given to the message |
|
Client |
The IP address of the internal machine that e-mail was directed to |
|
Server |
The IP address of the server that sent the e-mail |
The tarpit event log
The following table describes the spam blocker trapit event log terms:
|
Name |
Description |
|
Timestamp |
The time when the trapit event took place |
|
Action |
The action taken on the e-mail |
|
Sender |
The sender e-mail address—for spam, this is often blank |
|
DNSBL server |
The DNSBL server that identified the sender server as a spammer |
Reports
There are different reports available for Spam Blocker:
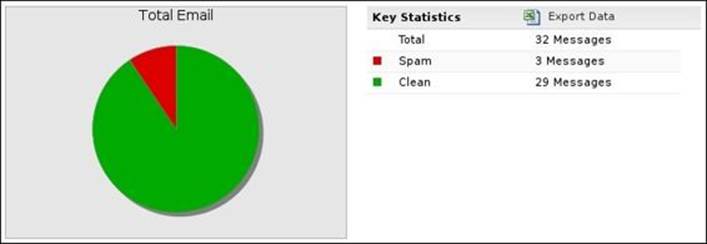
· Total Email: This shows the total number of messages that were received on a single day and how many are spam and how many are clean
· Spam Rate: This gives the maximum and average number of e-mail messages (total/clean/spam) per hour
· Top Ten Spammed: This gives the top ten e-mails that received spam emails
The following figure shows the Total Email report:
Common issues with Spam Blocker
Spam blocker does not block definite spam—this may be due to a DNS problem, you are probably using public DNS service providers such as Open DNS and Google DNS, or it may be that your ISP DNS service doesn't support DNSBL. The free service of DNSBL websites supports limited spam queries per day (100,000 queries per day for all the queries coming from certain the DNS server), which would be reached very quickly with public DNS service providers.
Lab-based training
Again, we are here to prove Untangle NGFW functionality, this time, we will cover Spam Blocker. In this lab, we will use the following machines:
· Untangle-01
· ABC-DC01
· ABC-EX01
· Untangle-03
· Acme-DC01
· Acme-EX01
This part assumes that the different machines are up and running, and configured as instructed in Chapter 2, Installing Untangle, and Chapter 4, Untangle Advanced Configuration, and no modifications were done on Spam Blocker.
Testing the blocking of incoming spam
In this test, we will send an e-mail from Acme.net to ABC.com and will include the following code in the message subject:
XJS*C4JDBQADN1.NSBN3*2IDNEN*GTUBE-STANDARD-ANTI-UBE-TEST-
EMAIL*C.34X
The preceding code is known as Generic Test for Unsolicited Bulk Email (GTUBE), which could be used to test anti-spam programs, as the case of the Eicar file for antivirus programs. The preceding code will make the message score a spam score of 1000 on SpamAssassin.
Tip
In addition to the GTUBE test, you could use spam messages coming to your real e-mail for the testing. Also, you could create a new message with the following subjects, which will score 5.3 on the spam score:
· http://www.gewgul.com/index.html
· http://yah0o.com/login.shtml
· http://payments.g00gle.com/
· https://chaseonline.chase.com/
· https://www.paypal.com/
· http://www.itisatrap.org/firefox/its-a-trap.html
The following figure shows the event log for the Untangle-01 Spam Blocker, which protected ABC Bank from spam messages. The e-mails are coming from Untangle-03 (192.168.1.5) and are destined to ABC-EX01 (10.0.0.10).

As shown in the preceding figure, the GTUBE message scored 1010, which is way higher than the super spam score, so the message will automatically be dropped on Untangle-01. Other messages were quarantined depending on their score, not scanned because outgoing e-mails are not configured to be scanned, and other messages were not scanned because of their size.
Note
This skip behavior because the message size is only related to Spam Blocker, Virus Blocker will still scan the messages for any viruses.
Testing the blocking of outgoing spam
The spam message wasn't blocked by the spam blocker on Untangle-03 because by default, Untangle Spam Blocker doesn't scan the outgoing SMTP traffic. We can modify this by selecting the Scan outbound (WAN) SMTP option located under the Spam Blocker settings. Thus, the messages would be blocked on Untangle-03, and the event log will be as shown in the following figure:
![]()
Testing the marking of spam message functionality
Now, we will uncheck the Drop Super Spam checkbox on Untangle-03, change the action to Mark, and then try to send the message again. The message will be delivered to the original recipient with [Spam] added to the message header, as shown in the following figure:
The event log will be as shown in the following figure:
![]()
Testing the quarantine functionality
The quarantined messages are not delivered to the intended mailbox, and are instead stored on the user quarantine. This is done so that the user can review them and release or delete what they want.
Accessing the quarantine
By default, a daily quarantine digest would be sent to the user when their quarantine has specious messages as shown in the following figure:
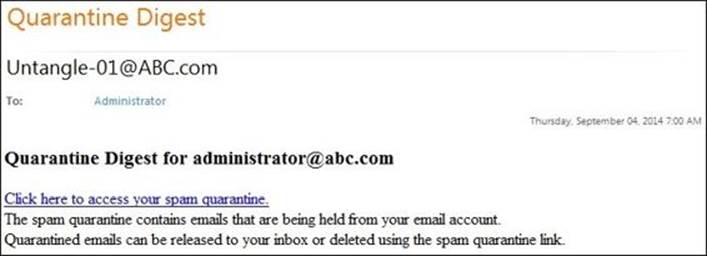
In addition, the user can manually request the quarantine digest anytime by visiting https://UntangleIP:administration_port/quarantine.
Tip
For Untangle-01, the URL would be https://192.168.1.3:444/quarantine/, as we changed the administration port before to 444.
If the default port (port 433) is used, you don't need to add the port number to the URL.
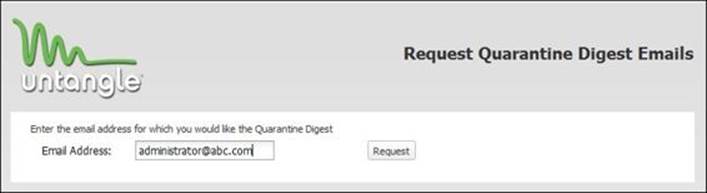
The following figure shows that the ABC bank administrator requires Quarantine Digest for their e-mail. By clicking on the Request button, the Quarantine Digest message would be sent to the user's mailbox:
By clicking on the link provided in the Quarantine Digest message, the user would access their quarantine, where they can manage the quarantined messages as shown in the following figure:
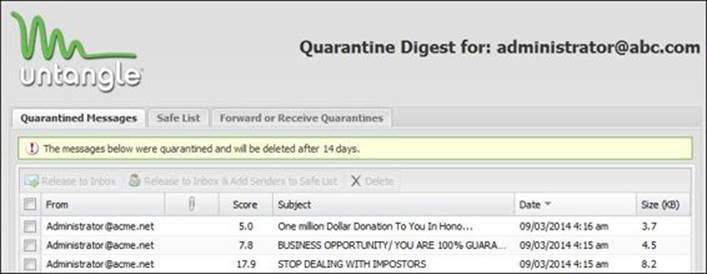
Administrative management of users' quarantines
In addition, the Untangle administrator can manage the user quarantines under Config | Email | Quarantine | User Quarantines, where the user can release or purge the whole user quarantine. The following figure shows four users' quarantines:
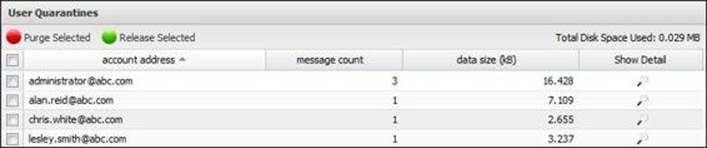
By clicking on Show Detail, the Untangle administrator can view the user quarantine details, and can control individual messages:

No more phishing
Phishing is the act of attempting to acquire sensitive information such as usernames, passwords, and credit card details by pretending to be a trustworthy entity in electronic communication. For example, you could receive an e-mail (apparently from PayPal) that asks you for your password, or asks you to log in to your account to modify some settings through a malicious URL provided in the e-mail, which redirects to a hacker website (looking like the original site) so that they can steal your credentials. Phish Blocker protects against these fraud e-mails.
Technical details of Untangle Phish Blocker
Untangle Phish Blocker leverages Google's Safe Browsing API, which helps you to protect yourself from dangerous websites. Google maintains a list of dangerous websites; in addition to that, Google analyzes website content and initiates warnings if the website seems dangerous. If the e-mail message contains a URL of one of these dangerous websites, it will be considered a phishing e-mail.
Phish Blocker settings
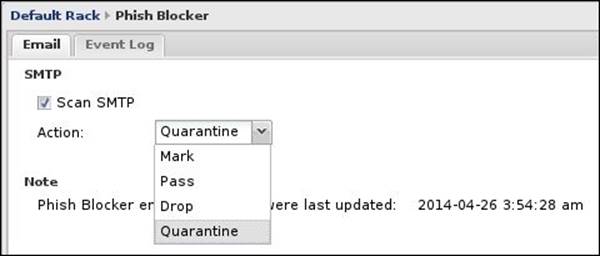
Here we can enable or disable the scanning of SMTP traffic by the phish blocker. We can also set the action that the phish blocker will take if phishing is found, as illustrated in the following screenshot:
· Scan SMTP: This checkbox enables/disables the scanning of SMTP traffic.
· Action: The action that will be taken when a message defined as a phishing e-mail. This action can be one of the following possibilities:
o Mark: The message will be delivered to the intended user, but its subject line will have the[Phish] prefix
o Pass: The message will be delivered to the intended user with no modifications
o Drop: Untangle will inform the sending server that the message has been delivered, but it will not deliver the message to the intended user
o Quarantine: Untangle will send the message to the user's e-mail quarantine and thus they can release or delete it
Reviewing the scan history
As is the case in the other apps, you can review the scanning history from the app faceplate, or through the event log, or from the Reports app. The following table describes the event log terms:
|
Name |
Description |
|
Timestamp |
Time when the scan occurred |
|
Receiver |
The recipient e-mail address |
|
Sender |
The sender e-mail address; for spam, it will often be blank |
|
Subject |
The e-mail subject |
|
Action |
The action taken on the e-mail |
|
Client |
The IP address of the internal machine that the e-mail was directed to |
|
Server |
The IP address of the server that sent the e-mail |
The different available reports available for Phish Blocker include:
· Total Email: This shows the total number of messages that were received on a single day and how many are phishing threats and how many are clean
· Daily Phish Rate: This gives the maximum and average number of e-mail messages (total/clean/phish) per hour
· Top Ten Phishing Victims: These give the top ten e-mails that received phishing e-mails
Utilizing Untangle Ad Blocker
How many times have you been working on important things and been interrupted by a pop-up advertisement? How many times have you been searching for information and got lost because of the number of advertisements that the web page contains?
Have you heard about the possibility of advertisement to download malwares to your computer without even running it? (More info at http://www.tomsguide.com/us/malware-infested-ads,news-19408.html.)
How many times you have searched for something, and found that every website you visit after that search will contain advertisements related to that search? Privacy issues, right?
What if I told you that your input into website order forms, registration pages, payment pages, and other online forms are stored on your device on cookies and there is malware specialized in stealing those cookies? (A good read for you to start with is available athttp://www.pcworld.com/article/2046968/attackers-use-ramnit-malware-to-target-steam-users.html.)
Worried?! No need to worry with Untangle Ad Blocker, which is used to prohibit the invasive advertisements, prevent tracking cookies, and to prevent malware and scam links that come through ads.
Tip
Interested in cookies, advertisements, and privacy? Additional reads for you are available at http://www.allaboutcookies.org/privacy-concerns and http://computer.howstuffworks.com/cookie.htm.
How it works
Ad Blocker is based on AdBlocker Plus. It simply downloads lists of known ad websites and ad extensions and blocks them whenever a user requests them.
Unlike browser plugins, Untangle Ad Blocker works on the network gateway level so it's not possible for individual users to know that a certain ad has been blocked nor can they choose to unblock a specific ad. This can interfere with the proper functionality of some webpages. Unblocking these functionalities could be high administrative overhead, especially in large companies. So, the default of the Untangle Ad Blocker is to be off.
Understanding the settings of Untangle Ad Blocker
This section covers the different settings of the Untangle Ad Blocker.
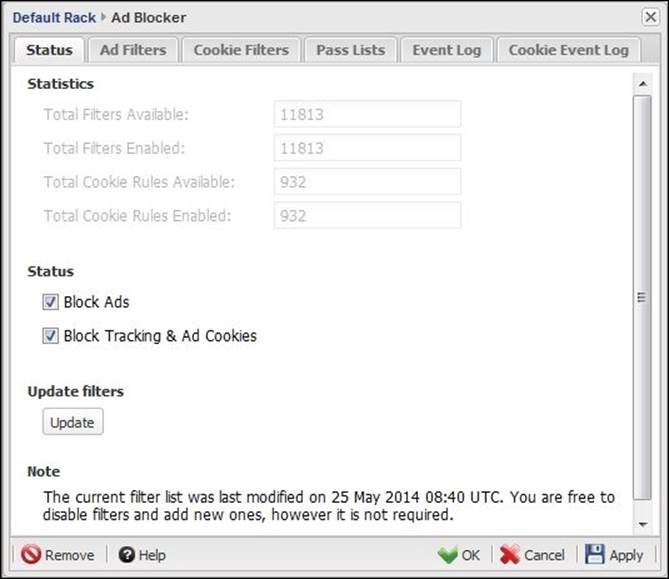
Status
The Status shows the total available ad filters, and how many filters are enabled. It also shows the total available cookies stopping rules and how many are enabled. In addition, here you can enable/disable the blocking of ads and tracking through the relevant checkboxes:
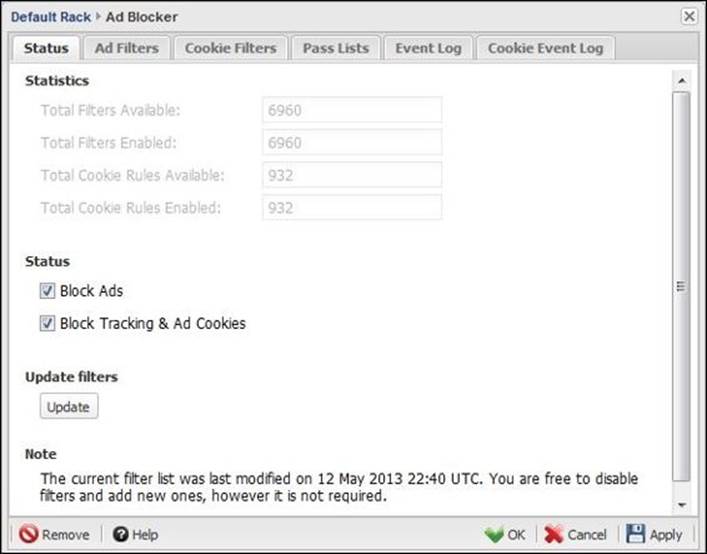
The last update to the filters is shown at the bottom of the page. You can manually update the filters using the Update button. After the update, the total number of available ad filters will be changed as shown in the following figure:
Ad Filters
Ad Filters prevent advertisements from appearing in browsers. We have two lists: Standard Filters and User Defined Filters.
Standard Filters are provided by Untangle NGFW. This list cannot be modified; however, you can enable or disable a certain filter.
In User Defined Filters, the user can add custom rules to block ads. The custom rules should be compatible with the AdBlocker Plus rules (the quick start guide is available at https://adblockplus.org/en/filters):
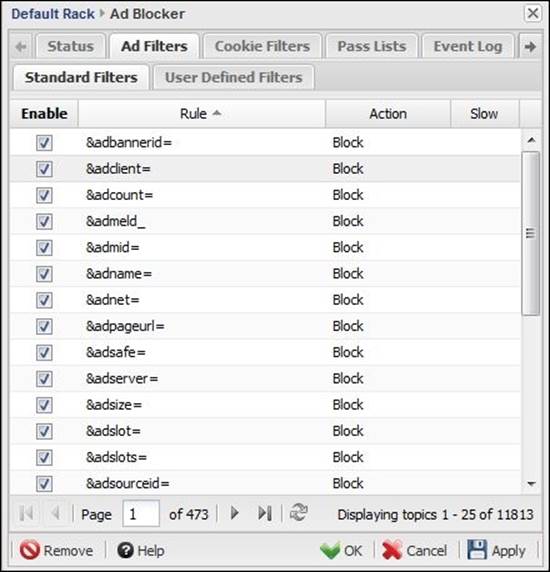
An example of the rules is the first one listed in the preceding figure: &adbannerid=. Banners are a form of advertisement located on web pages. Each banner (advertisement) has a different ID; websites can include that definer (&adbannerid=) to request the banner. Whenever Ad Blocker sees that definer on the URL, it will block that definer.
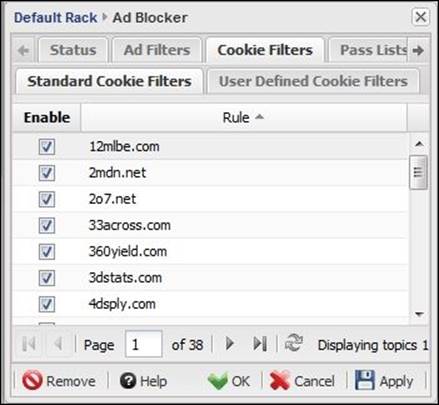
Cookie filters
Cookie filters stop certain websites from storing cookies on your computer to prevent these sites from tracking you. As is the case with the ad filter, we have two lists under the Cookie Filters: one is the default provided by Untangle, and the other is the user-defined list.
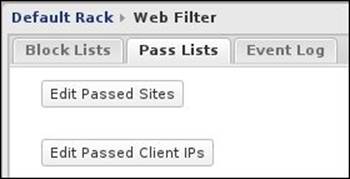
Pass Lists
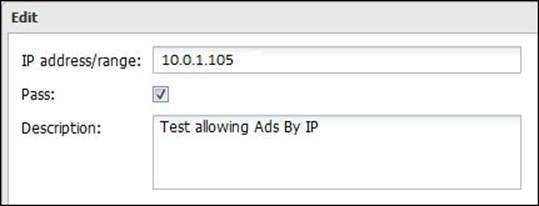
Here, we can configure the Ad Blocker bypassing settings; Edit Passed Sites can be used to allow ads and cookies from certain domains, even if they were blocked by other rules. The Edit Passed Client IPs option (shown in the following figure) could be used to prevent Ad Blocker from blocking ads and cookies directed to a certain client.
Reviewing the scan history
As is the case with each application, we could review the scan history from the application faceplate or from the event logs, or from the Reports app.
The application faceplate provides a summary of the scan history since the last restart, and provide a graph for the current traffic:

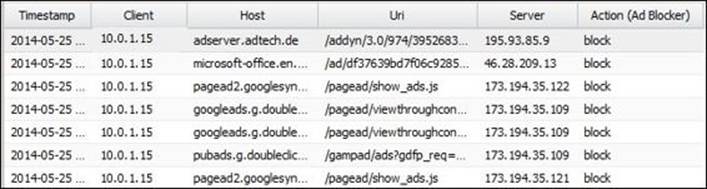
The event logs provide more detailed information about the scanning. Untangle Ad Blocker has two event logs; one is related to the ads and the other is related to the cookies. The following figure shows the ad filters event logs:
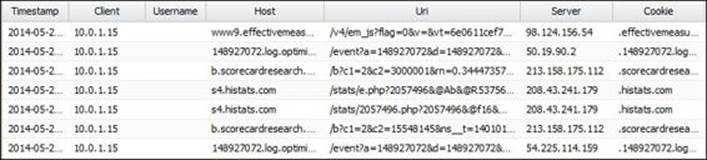
The following figure shows the cookies filter event log:
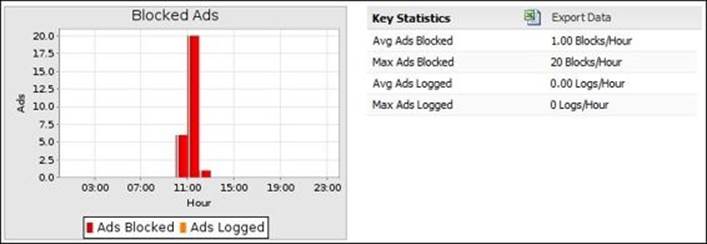
Also, the reports provide a daily summary of the scan history. The available Ad Blocker summary reports are:
· Blocked Ads: This gives the maximum and the average ad blocks/logs per hour
· Blocked Cookies: This gives the maximum and the average number of cookie blocks per hour
· Top Blocked Ad Sites: This shows the top blocked ad sites
· Top ten blocked cookies: This shows the top ten blocked cookies
The following figure shows the blocked ads report:
Lab-based training
In this lab, you are free to surf any website from any machine behind Untangle NGFW. We will only compare the resultant page before enabling the ad blocker and after enabling it.
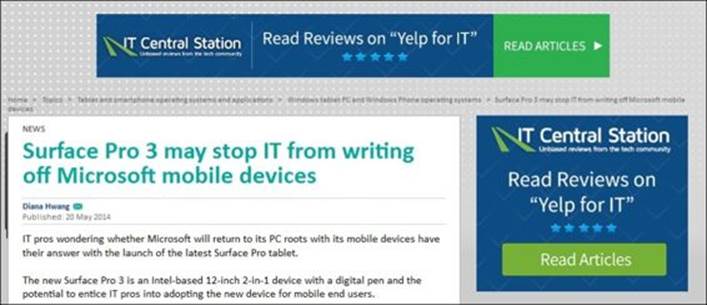
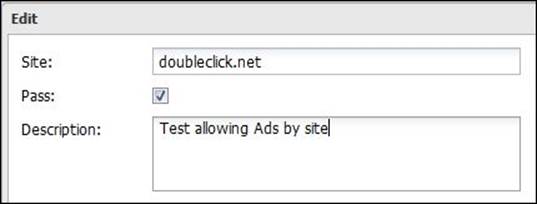
A simple example is shown here for a page that contains ads from doubleclick.net; the page before enabling the ad blocker is as follows:
The same page after enabling the ad blocker will look as shown in the following figure:
We can allow ads from the previous website by adding it to the Passed Sites list as shown in the following figure:
In addition, we could prevent scanning traffic directed to certain IPs via Ad Blocker by setting the Passes Clients IPs rule. For example, the following figure shows a pass rule for the IP of one of the ABC Bank IT team PCs:
Summary
In this chapter, we have covered how to configure and use the different Untangle Blockers (Virus Blocker, Spam Blocker, Phish Blocker, and Ad Blocker) to protect your network. Each application was covered in full detail starting from how it works, how to configure it and review the scan history, and if it has any common issues and how to solve them.
In the next chapter, we will cover how to protect against Denial of Service attacks using the Untangle shield, protecting our network from malicious traffic using Untangle Intrusion prevention, and limiting access from the Internet to your internal resources using the Untangle Firewall application.
All materials on the site are licensed Creative Commons Attribution-Sharealike 3.0 Unported CC BY-SA 3.0 & GNU Free Documentation License (GFDL)
If you are the copyright holder of any material contained on our site and intend to remove it, please contact our site administrator for approval.
© 2016-2026 All site design rights belong to S.Y.A.