BackTrack – Testing Wireless Network Security (2013)
Chapter 3. Surveying Your Wireless Zone
In this chapter, we are going to look at the following with respect to using Backtrack:
· Exploring devices
· Using Kismet
· Working with different tools
· Discovering access points
We should now have a working wireless card that will allow us to start using the powerful tools within Backtrack, which will in turn allow us to survey our wireless zones. When we refer to surveying the wireless zones, we mean looking at the strength of the signal and the channel that the access point is using, along with the security that is set on the access point.
We now want to start up our Backtrack machine, log in to it with a username of root and a password that you have set; if you are still using the default password, it is toor.
Once the Backtrack tool has started, we want to start the window environment; as a quick reminder, enter startx:
root@bt:~# startx
Once the window environment comes up, we want to verify that our network card is recognized in the Backtrack tool. Open a terminal window by going to Applications | Accessories | Terminal.
In the terminal window, enter the following command:
root@bt:~# iwconfig
This should result in the output you see in the next screenshot if your wireless card is active and recognized by Backtrack:
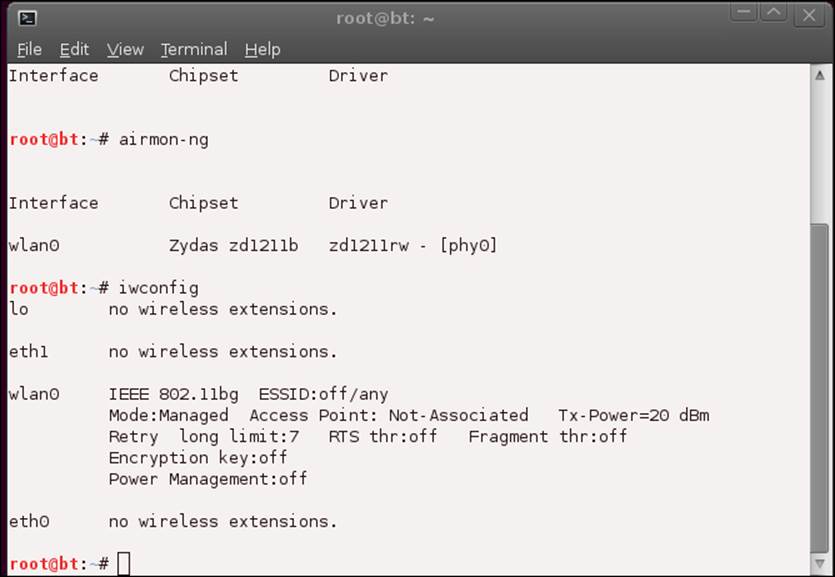
If your card is not recognized, that is, you are not able to see wlan0, refer to the procedures and techniques we used in the previous chapter to get your card working.
Exploring devices
The next thing we want to do is explore the wireless networks that are around us. The first tool we will use within BackTrack is not actually a hacking tool, but it does work for surveying the networks around us and identifying our wireless zone. Navigate toApplications | Internet | Wicd Network Manager.
This will open the tool; if you get a bus error, click on OK. The tool should open and present a window similar to the one shown in the next screenshot:
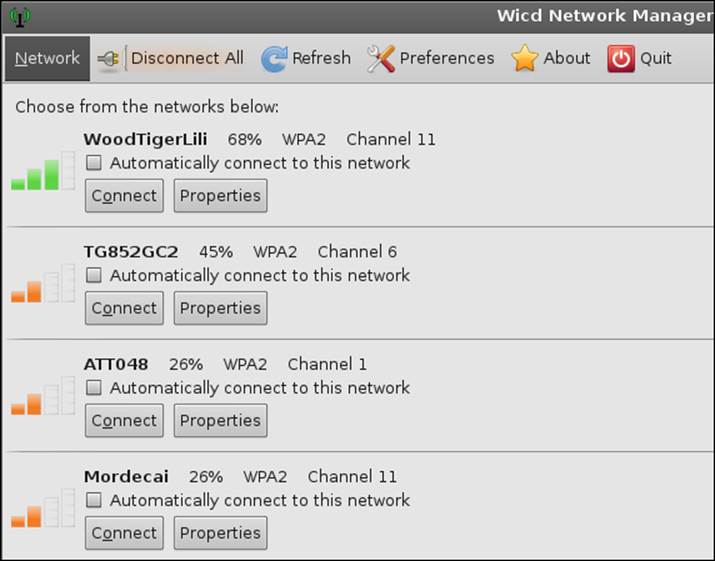
As you can see, the Wicd Network Manager does provide the channel and additional information about the card, so before we go further, we need to discuss what the channels are. In wireless, we have a particular frequency on which the signal is propagated; if everyone is on the same frequency, the result is saturation. So to avoid that, we use different channels for separation and to not overload or saturate a channel. You are probably wondering what channel you should use. Well, this can be a complicated question. This is why we are using this chapter to see how to survey a wireless zone. If everyone is on the same channel near you, it can lead to a degradation in the performance of your wireless network.
A bit about channels—there are a number of channels that are available, which change depending on the version of the 802.11 standard that you are using; so rather than try and explain it here, the Wikipedia site has a good definition on the different channels and which countries use what channels, and you can find that information at http://en.wikipedia.org/wiki/List_of_WLAN_channels.
The next thing we want to do is explore the access point information further, so click on the Information tab (under Properties) of one of the wireless networks that are displayed in the tool. An example of this is provided in the next screenshot:
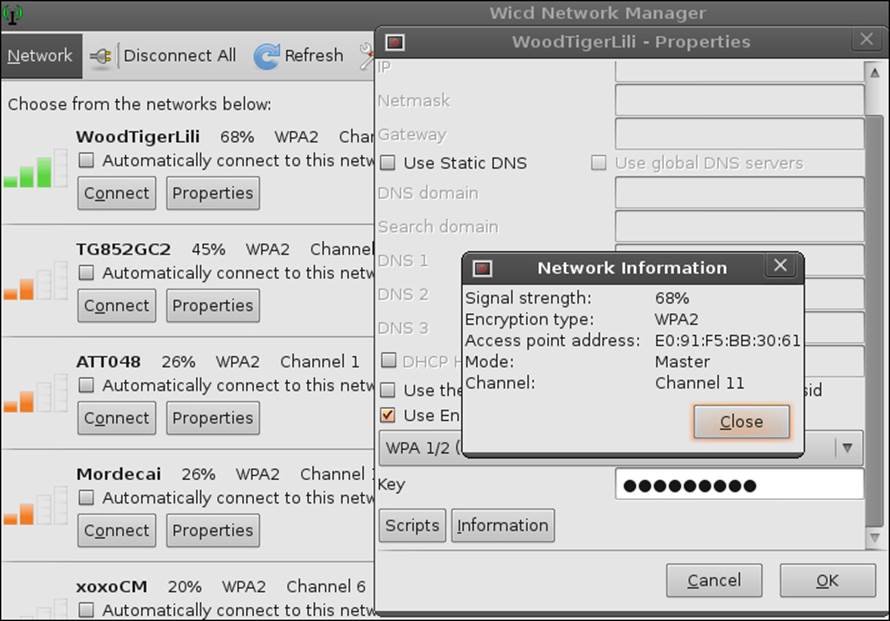
From the screenshot, you can see that the signal strength of the WoodTigerLili access point is at 68%, it is using the WPA2 encryption scheme, and it is on Channel 11. In fact, in this example, all of the discovered access points are using WPA2, which is a good thing with respect to security.
As you may recall from earlier, we have to put the card in promiscuous mode, and the mode we are currently in is the monitor mode of the card. To do this, we use the airmon-ng tool. In a terminal window, enter the following command:
root@bt:~# airmon-ng start <network interface>
This command will start the monitor mode on the interface that has the wireless card. In this example, it is on wlan0. If your card is on another interface, you need to enter that for the command. Once you have entered the command, you should have an output similar to the one shown in the following screenshot:
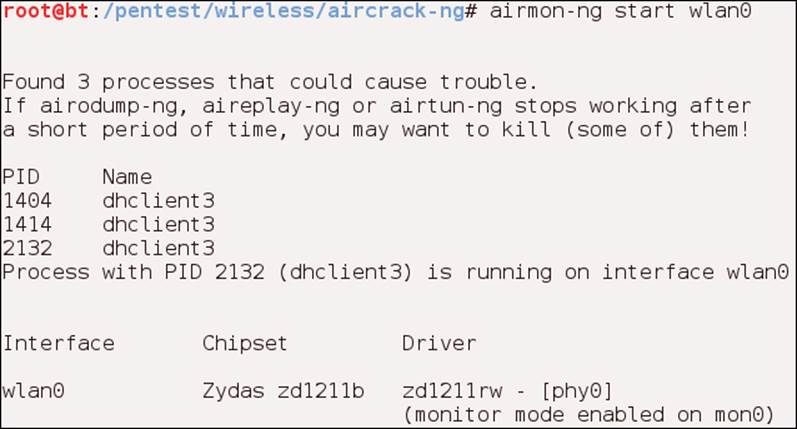
From the output of the command, you can see that the card is in monitor mode; this is now reflected as interface mon0. We will, from this point onwards, use the mon0 interface when we want to process data from the card.
The first command-line tool we will look at is the ssidsniff tool. Go to Applications | Backtrack | Information Gathering | Wireless Analysis | WLAN Analysis | ssidsniff.
In the window that opens, enter the following command:
root@bt:~# ssidsniff –i mon0
The –i refers to the interface to which to bind; in this case, it is mon0, which represents the interface name. This should open the tool, and it will scan and display the networks as it sees them. An example of this is shown in the next screenshot:
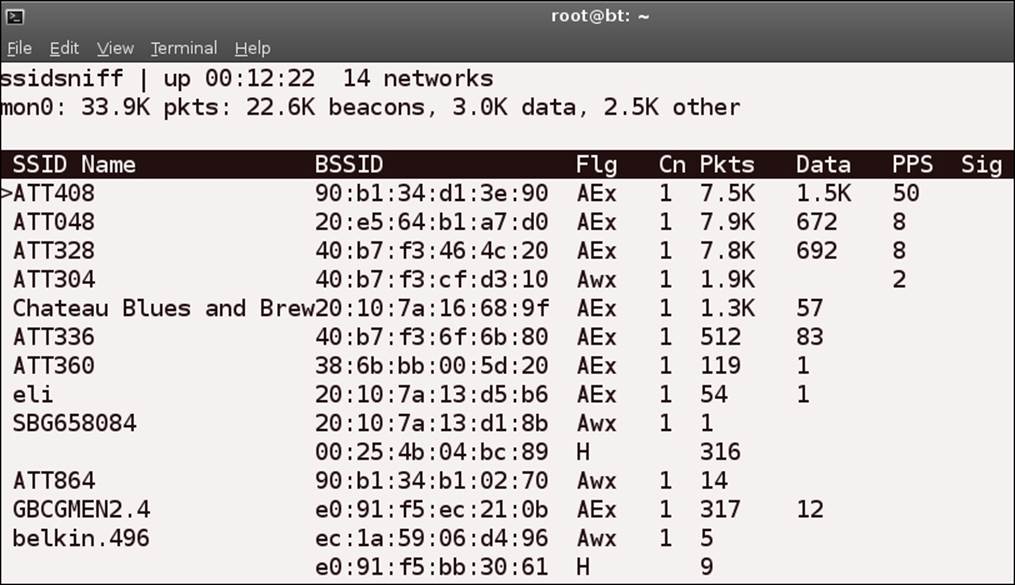
You can use your arrow keys to go through the list; once you have selected a particular SSID, you can explore further by pressing the Enter key. The result of this will be another window that shows additional details about the access point. An example of this is provided in the following screenshot:
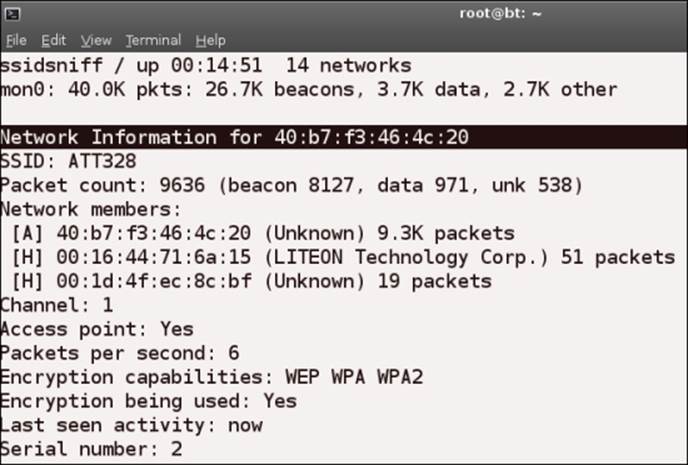
The tool shows you information about the access point and also the machines that are connected to the access point at this time. If you press the D key, any strings that are discovered within the packets will be displayed. Of course, this will not show anything if all of the packets are encrypted.
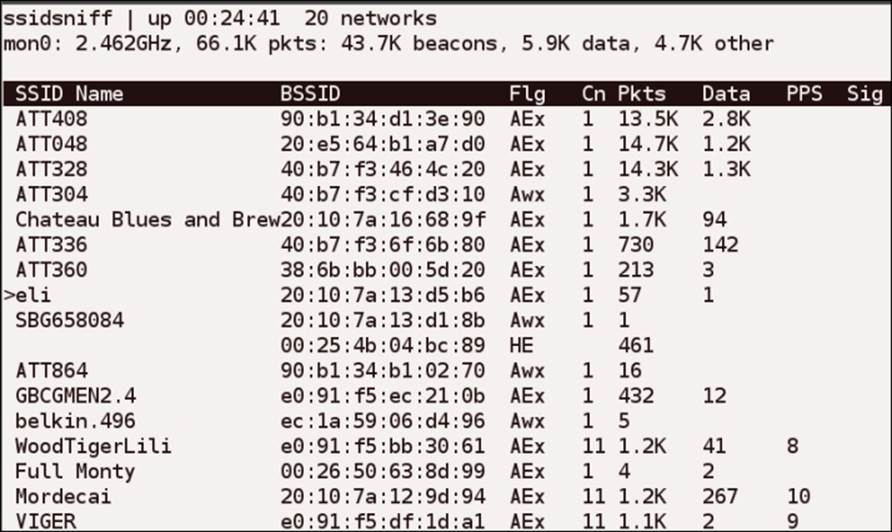
You can sort the access points in a number of ways. By pressing the O key, you can select the field on which to sort; for example, press C if you want to sort by channel. A list that is channel-sorted is shown in the following screenshot:
There are quite a few options with which we can experiment in this tool, but we want to look at some more tools. As always, you are encouraged to explore beyond what we have done in the book.
Working with tools
The next tool we want to work with is the airodump-ng tool. This is another powerful tool with many features that is available within Backtrack. We will look at this tool in more detail in the next chapter, but for now we will use it within the context of surveying our wireless zone. Go to Applications | Backtrack | Information Gathering | Wireless Analysis | WLAN Analysis | airodump-ng.
Once the window opens, enter the following command:
root@bt:~# airodump-ng mon0
This should result in a window that will display information about the access points that are being detected by the card. An example of this is shown in the next screenshot:

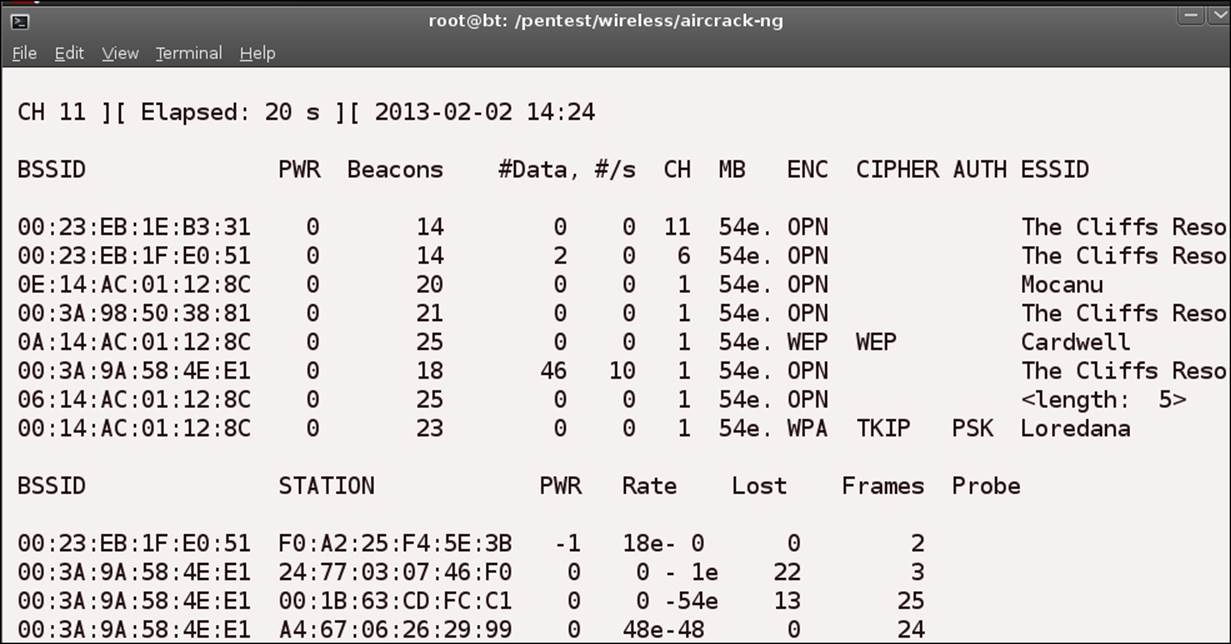
As you can see from the screenshot, the output is similar to that of the ssidsniff tool. One of the features that airodump-ng has is, it can be used with a Global Positioning System (GPS) receiver; it will then display the coordinates of the discovered access points. In the previous screenshot, all of the access points that have been discovered are open, as shown below the ENC field. As such, we do not get to see the encrypted data that is shown by the tool. We will take a look at that now. The next screenshot shows theairodump-ng tool with a discovered access point that has encryption enabled.
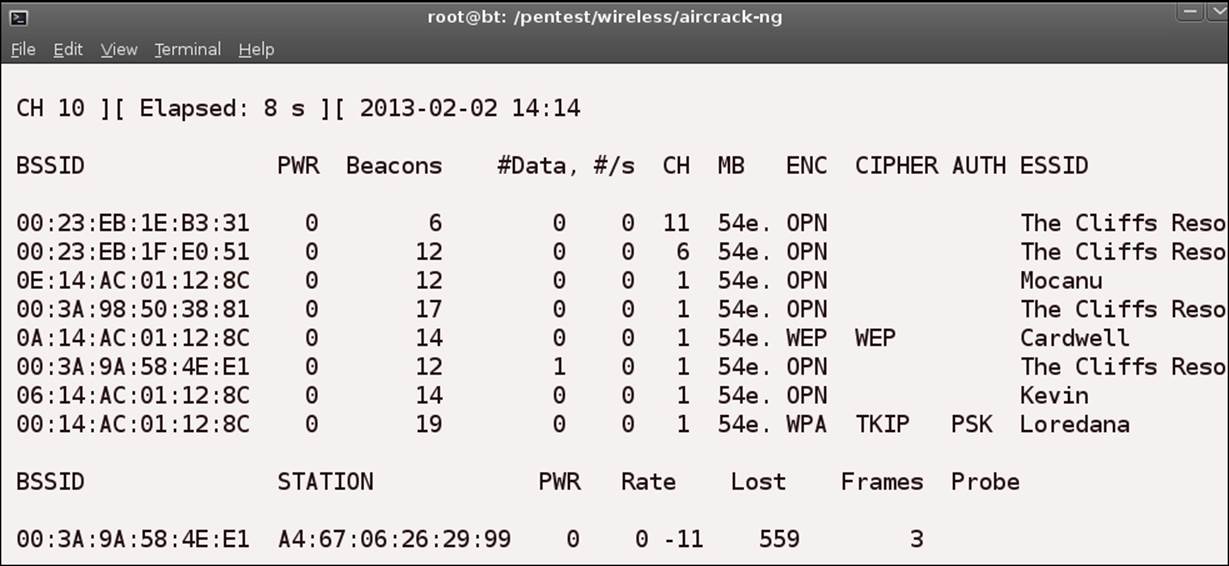
The screenshot now shows that two of the access points, Cardwell and Loredana, have encryption enabled, and that the Loredana access point is running WPA TKIP. Not that long ago there were weaknesses found in this protocol, so it is no longer recommended. We will discuss how to secure wireless networks in a later chapter. Refer to the next screenshot. What is different when you compare it to the previous image?
Have you figured it out? If you look at the penultimate access point, you will notice that there is no SSID name there; however, you do see the tool has detected that it is a five-character SSID, but it does not know what it is. This access point has been configured to cloak its SSID. This is a setting that many will use to hide their access point, but it is not that effective, as we will now show. If you look at the next screenshot, can you determine the name of that access point?
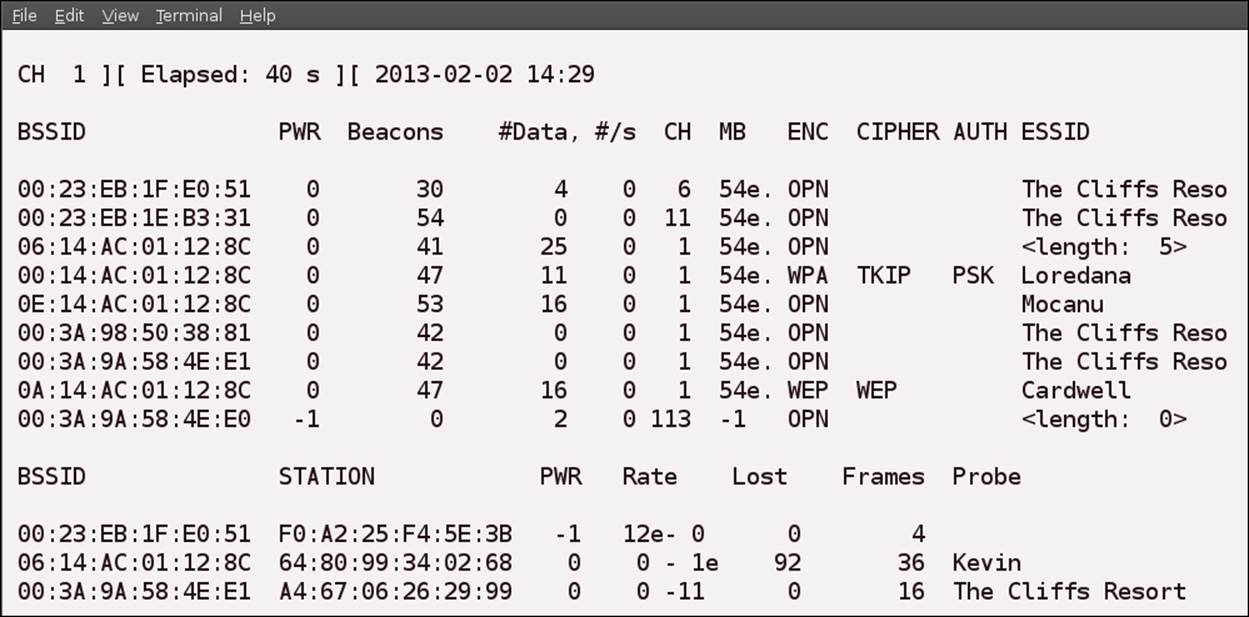
As you can see in the previous screenshot, in the Probe portion of the packet, when the access point is connected to by a client, the SSID is in the response packet. The only protection a cloaked or disabled broadcast of the SSID provides you is if no one connects; because once they connect, the SSID is revealed. In this case, the client station with the MAC address of 64:80:99:34:02:68 has connected and provided us with the missing SSID of the access point named Kevin.
Using Kismet for access point discovery
The next tool we will look at is Kismet. This tool will automatically provide us with the SSID when someone connects to a cloaked network. Go to Applications | Backtrack | Information Gathering | Wireless Analysis | WLAN Analysis | Kismet.
You will get an error, because you first need to start the Kismet server. So what we want to do is start kismet_server. You will get a prompt to start the server; click on Yes. If the prompt does not come up, you can start the server on your own by entering the following command in a terminal window:
root@bt:~# kismet_server -s
You will get a number of errors, mainly because of the GPS; for our purposes, we will ignore them. The next thing you want to do, if you started the server from the terminal window, is quit the client. If you started the server within the GUI, you can skip the next step and remain in the client window. To quit the client, click on Close window under the File menu. Once it has exited, you want to open the tool again by navigating to Applications | Backtrack | Information Gathering | Wireless Analysis | WLAN Analysis |Kismet. If you did not start the server from the command line, you can remain in the client tool. This should show that you are connected to the server now. An example of this is shown in the following screenshot:
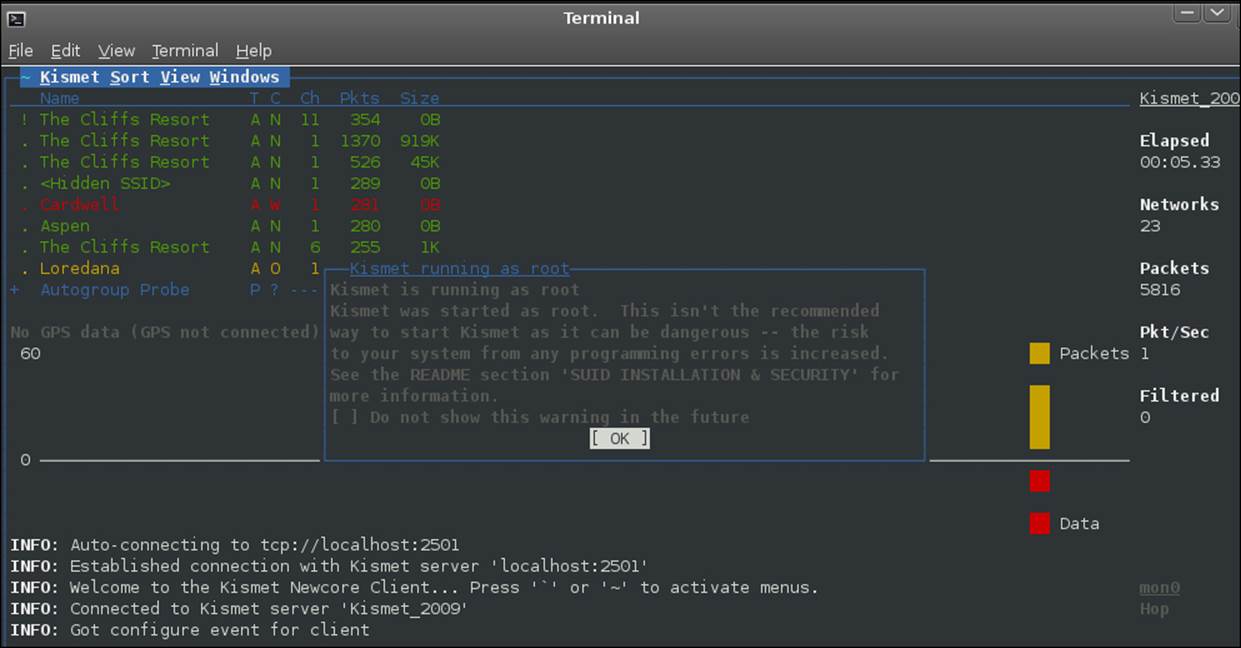
As you can see from the warning, Kismet is running as root, and we really never want to do that; but for now, we will go on, because we are just working with the tool. If you do not see any networks, you will have to specify the mon0 interface. Click on OK to close the warning about running as root. If prompted to add the source, you can enter mon0, and then click on OK. Alternatively, you can go to Kismet | Add Source and then enter the interface mon0.
As you can see in the next screenshot, there is a hidden SSID. Unlike our airodump-ng tool, the Kismet client does not tell us the number of characters for the SSID.

The Kismet tool can be used for many things; it is an excellent packet-capturing tool with a very good logging feature. For a good description and discussion on the tool to identify whether a policy is being adhered to, refer to the following link:
http://scholarworks.sjsu.edu/cgi/viewcontent.cgi?article=1234&context=etd_projects
We can use the Kismet log to identify the network ranges of the access points, as well as for a variety of additional information. An example of this is shown in the following screenshot:

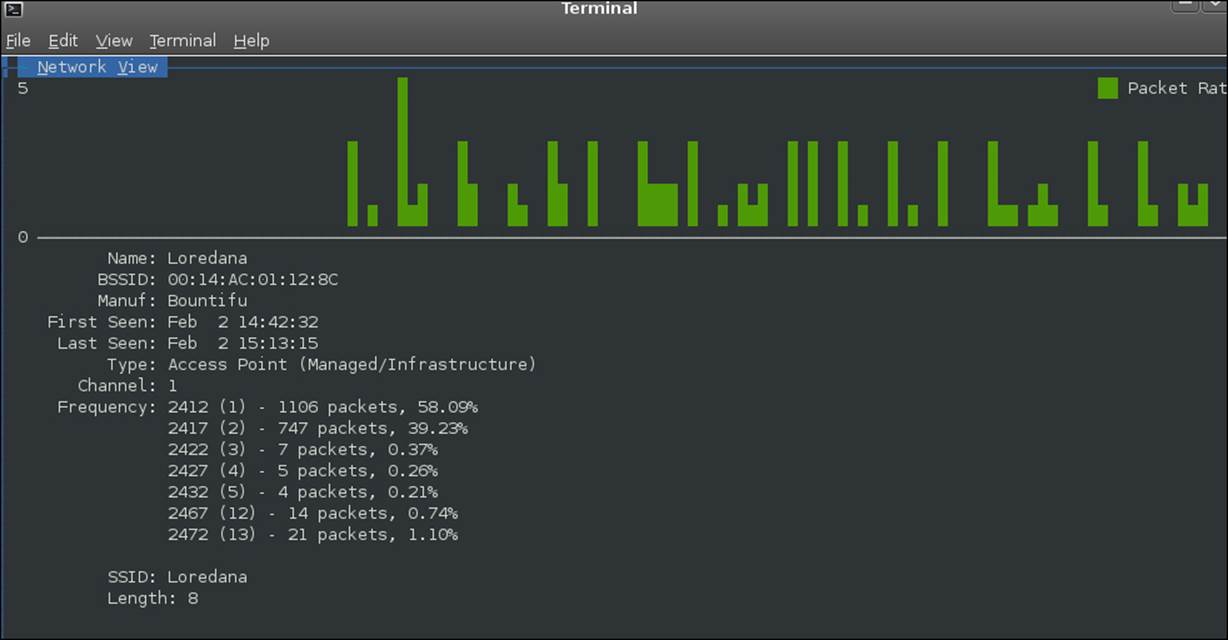
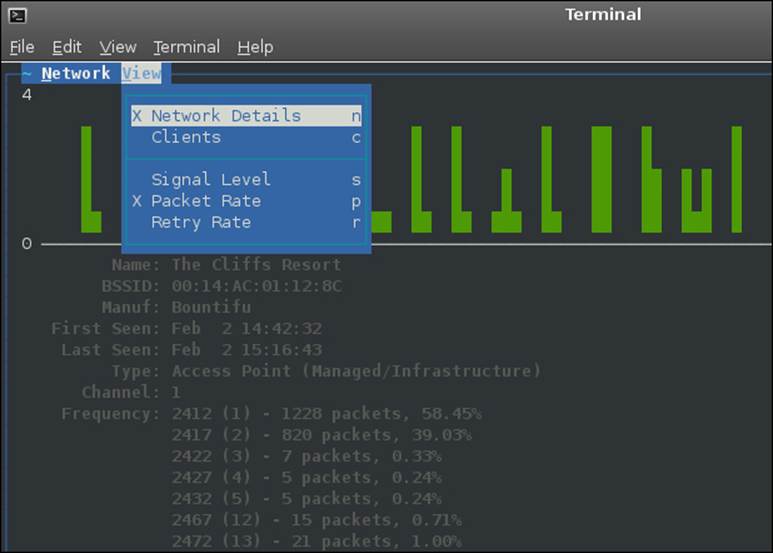
Click on one of the access points that are listed, and then press the Enter key; this will bring up a window with the detailed access point information. The example in the next screenshot reflects detailed information about the Loredana access point:
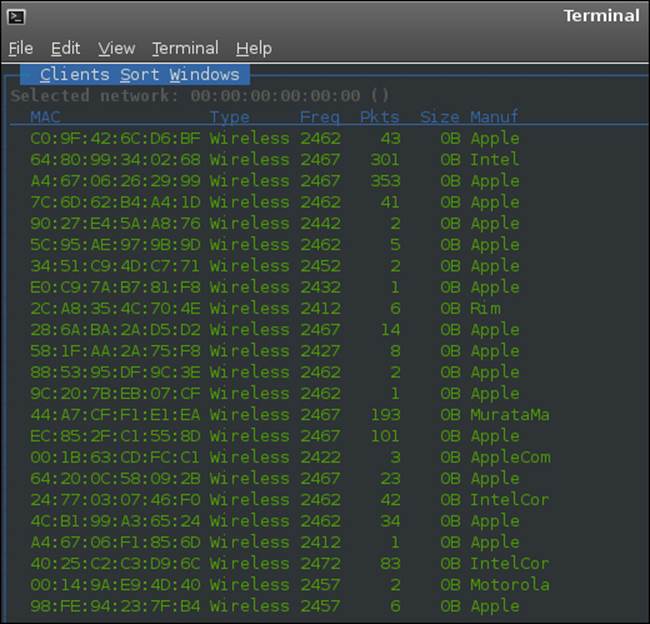
We can also view the clients that are associated with the networks. To do this, click on Clients under the View menu; this will display the clients that are connected to the network. The menu selection for this is reflected in the following screenshot:
If you select the Clients menu option and do not see any clients, you can go to Network | Next network and try to discover a network with connected clients. An example of a network that has connected clients is shown in the following screenshot:

On this network, you can see that there are two connected access points; one is from Cisco and the other is from Intel, and they are connected through a wired connection. There are two devices connected; they are from Samsung and Apple. With Backtrack being a penetration testing tool, we could do a lot more with this information. But as we do not have written authorization, we will not do that. The example shown in the next screenshot is of a network for which the SSID is unknown at this time but which has a number of wireless clients attached to it, so this is probably a group of phones connected. Without further investigation, we cannot determine this for sure.
Discovering hidden access points
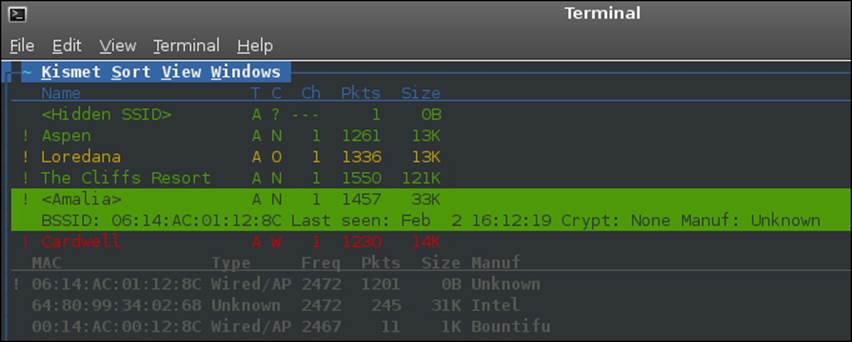
Now that we have looked at quite a bit of information from the Kismet tool, we want to focus on the feature of discovering access points that are hidden. The way to do this is just like we discussed with the airodump-ng tool. We have to have a client connect to the access point while we are observing it. We have done this, and the Kismet tool output is shown as an example in the next screenshot:
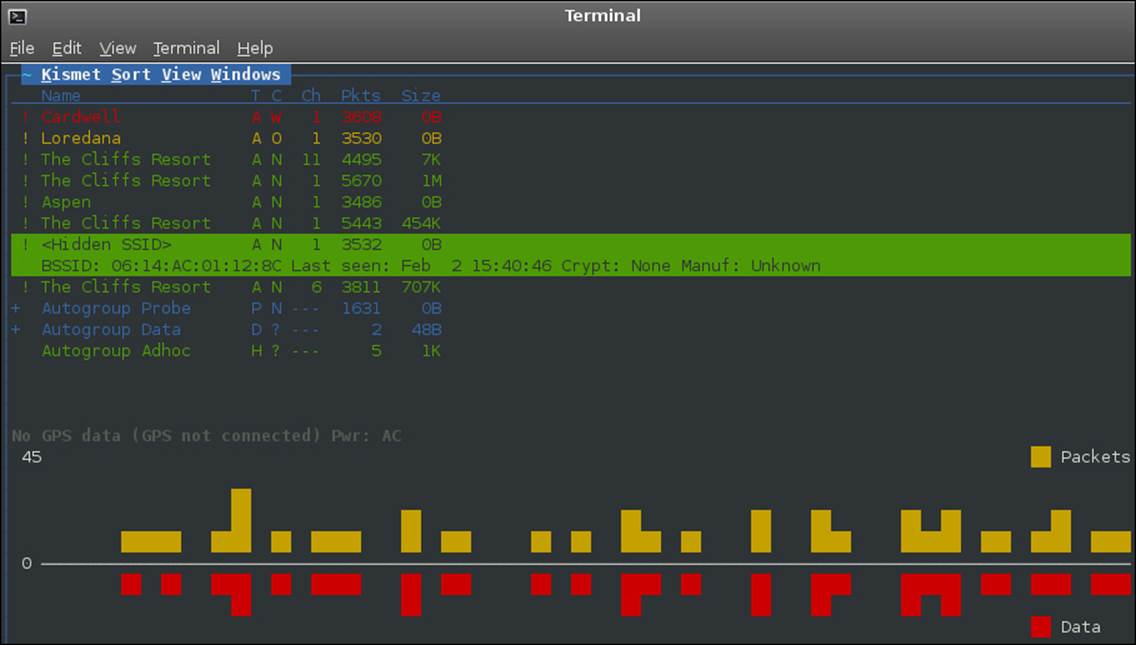
If we press Enter on the highlighted SSID, we gain additional information as shown in the following screenshot:
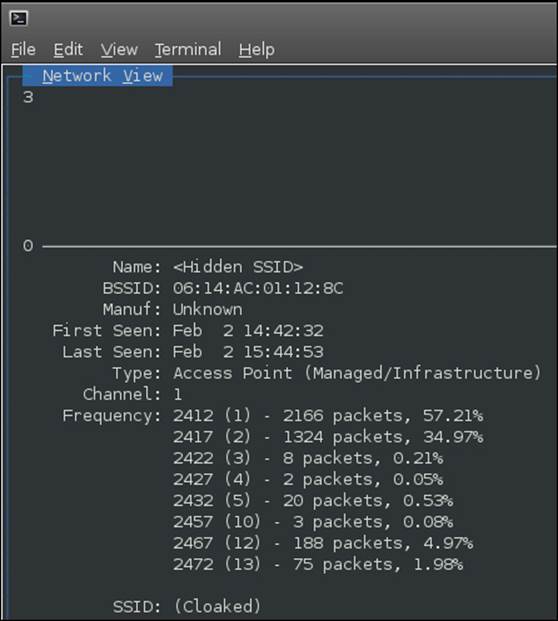
We can also select the connected client to see additional information about the access point. An example of this is provided in the following screenshot:
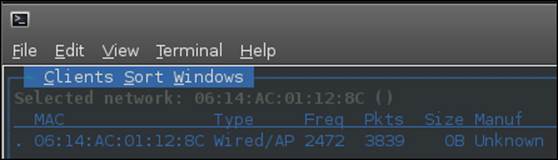
As you can see from the two preceding screenshots, the SSID is cloaked in the first screenshot, and in the second screenshot, the connected client is the actual access point itself. The next thing we want to do is see what happens when a client connects to the cloaked access point. The response from an access point once a client connects to it, even when it is cloaked, is to include the SSID within the packet. The example that is shown in the next screenshot shows what the Kismet tool discovers when the access point is connected to by clients:
We have now shown how to discover any SSID that is hidden; all that is required is for someone to connect to the access point.
We will look at the Wireshark tool next; as you will remember from earlier, we looked at the Wireshark tool. You can start the Wireshark tool in BackTrack by opening a terminal window and entering wireshark:
root@bt:~# wireshark
Once the tool starts, click on the mon0 interface, and then click on the Start button to start a packet capture. An example of a beacon that is sent out when the SSID broadcast is disabled is shown in the next screenshot:
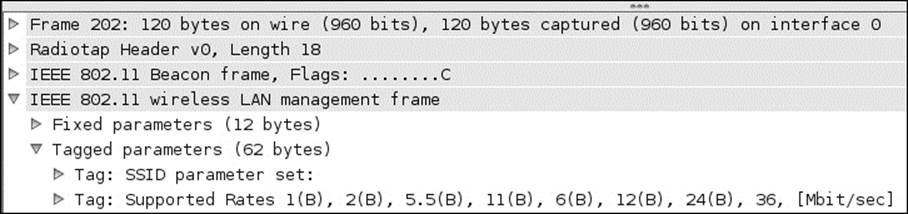
In the previous screenshot, you can see that the SSID parameter set is empty; this is because the SSID broadcast has been disabled. Remember, once a client connects, the response will contain the SSID. An example of this is shown in the next screenshot:
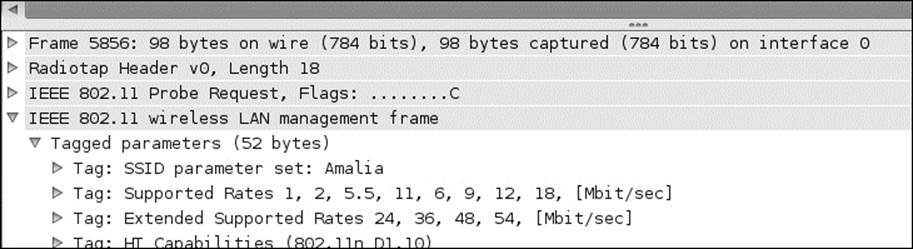
This shows that disabling the SSID is a very limited security feature, and as such, is not recommended. Most vendors do not recommend it because it makes it harder to connect to the access points in some cases.
Summary
In this chapter, we looked at a number of tools that we can be used to survey our wireless zone. We have seen how we could detect the channel on which the access points were running as well as the protection scheme that is enabled, be it WEP, or WPA. Additionally, we can also discover which clients are connected to the network, and the IP address range of the network.
Finally, we saw that disabling the SSID broadcast on wireless in itself has limited value, and as such, it is better to leave it enabled.
In the next chapter, we will look at examples of how attackers can break wireless security. It is very important that we discuss how broken security is breached, and then we can see how to protect it.
All materials on the site are licensed Creative Commons Attribution-Sharealike 3.0 Unported CC BY-SA 3.0 & GNU Free Documentation License (GFDL)
If you are the copyright holder of any material contained on our site and intend to remove it, please contact our site administrator for approval.
© 2016-2026 All site design rights belong to S.Y.A.