QuickBooks 2014: The Missing Manual (2014)
Part II. Bookkeeping
Chapter 14. Bank Accounts and Credit Cards
You’ve opened your mail, plucked out the customer payments, and deposited them in your bank account (Chapter 13). In addition to that, you’ve paid your bills (Chapter 9). Now you can sit back and relax knowing that most of the transactions in your bank and credit card accounts are accounted for. What’s left?
Some stray transactions might pop up—an insurance claim check to deposit or handling the aftermath and bank fees for a customer’s bounced check, to name a few. Plus, running a business typically means that money moves between accounts—from interest-bearing accounts to checking accounts, from PayPal to your checking account, or from merchant credit card accounts to savings. For any financial transaction you perform, QuickBooks has a way to enter it, whether you prefer the guidance of transaction windows or the speed of an account-register window.
Reconciling your accounts to your bank statements is another key process you don’t want to skip. You and your bank can both make mistakes, and reconciling your accounts is the way to catch these discrepancies. Once the bane of bookkeepers everywhere, reconciling is practically automatic now that you can let QuickBooks handle the math.
In this chapter, the section on reconciling (Reconciling Accounts) is the only must-read. And if you want to learn the fastest way to enter any type of bank account transaction, don’t skip the first section (Entering Transactions in an Account Register). You can read about transferring funds, loans, bounced checks, and other financial arcana covered in this chapter as the need arises.
Entering Transactions in an Account Register
QuickBooks includes windows and dialog boxes for making deposits, writing checks, and transferring funds, but you can also record these transactions right in a bank account’s register window. Working in a register window has two advantages over other windows and dialog boxes:
§ Speed. Entering a transaction in a register window is fast, particularly when keyboard shortcuts (like pressing Tab to move between fields) are second nature.
§ Visibility. Transaction windows, such as Write Checks, keep you focused on the transaction at hand; but they take up lots of screen real estate, so it’s tough to see more than one of these windows at a time. But in a register window, you can look at previous transactions for reference.
Opening a Register Window
You have to open a register window before you can enter transactions in it. Luckily, opening these windows couldn’t be easier. Here’s how to open any kind of account’s register window:
1. If the Chart of Accounts window isn’t open, press Ctrl+A (or, on the Home page, click Chart of Accounts) to open it.
The window pops open, listing all the accounts in your chart of accounts.
TIP
If you use the top icon bar, you can open a bank account or credit card register by double-clicking the account you want to see in the Account Balances section on the right side of the Home page. If you use the left icon bar, click View Balances in its middle section and then, in the View Balances section at the top of the icon bar, double-click the account you want.
2. In the Chart of Accounts window, double-click the account whose register window you want to open (Figure 14-1).
This method can open register windows for more than just bank accounts. See the box on Managing Credit Card Accounts to learn about different ways to handle credit card accounts.
NOTE
Income and expense accounts don’t have registers in QuickBooks. So when you double-click an income or expense account in the Chart of Accounts window, QuickBooks generates a QuickReport of the transactions for that account. In the report window, you can take a closer look at a transaction by double-clicking it.
Creating a Transaction in an Account Register
The steps for creating a check in your checking account register (Adding Checks to an Account Register) work for deposits and transfers, too, with only a few minor adjustments. Here’s how to fill in the cells in the register window to create any kind of bank transaction:
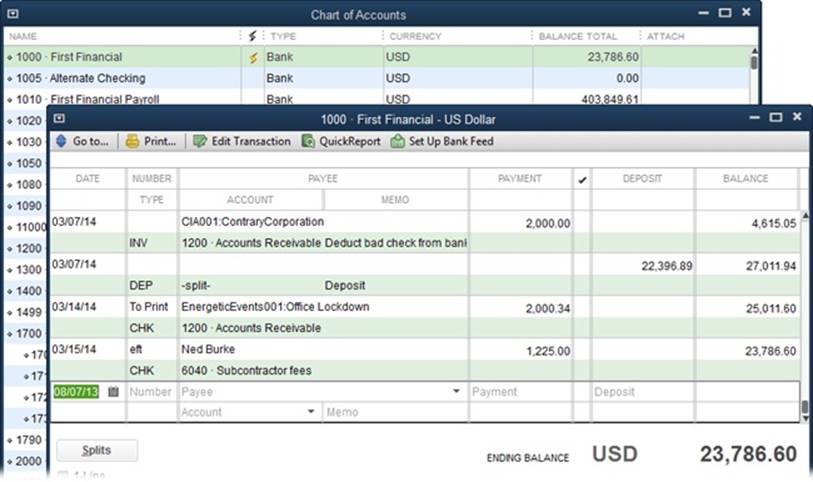
Figure 14-1. You can open a register window by double-clicking any type of account that can have a balance, including checking, savings, money market, and petty cash accounts. In fact, double-clicking opens the register for any account on your balance sheet (Accounts Receivable, Accounts Payable, Credit Card, Asset, Liability, and Equity accounts).
§ Date. When you first open a bank account’s register window, QuickBooks automatically selects the text in the Date field of the first blank transaction. Out of the box, QuickBooks puts the current date in the Date cell, but you can set a preference to have the program fill in the last date you used (Tuning QuickBooks to Your Liking). Tweaking the date by a few days is as easy as pressing + or – until the date is the one you want. (To become a master of date-related keyboard shortcuts, read the box on Keyboard Shortcuts for Dates.)
§ Number. For checks, when you jump to the Number cell (by pressing Tab), QuickBooks automatically fills in the next check number for that bank account. If the number doesn’t match the paper check you want to write, press + or – until the number is correct. (For some types of accounts, like credit cards and assets, the register window has a Ref field instead of a Number field. You can fill in a reference number for the transaction or leave this field blank.)
To make an online payment (see Chapter 24), in the Number cell, type S, which QuickBooks promptly changes to Send (if you’ve set up an online payment service, that is). To enter a deposit, you can bypass the Number and Payment cells regardless of what values they have, as shown inFigure 14-2.
§ Payee. QuickBooks doesn’t require a value in this cell. In fact, if it’s a payee you only occasionally work with, it’s better to not type the vendor’s or other name in the Payee cell for deposits, transfers, or petty cash transactions so your Vendors list doesn’t fill up with names you rarely use. Instead, type a generic name like Deposit or Petty Cash, and then fill in the Memo cell with a description of the transaction, like Insurance Claim.
As you start typing the payee’s name, QuickBooks scans the names in the various lists in your company file (Vendors, Customers, Other Names, and so on) and selects the first one it finds that matches the letters you’ve typed so far. As soon as QuickBooks selects the one you want, press Tab to move to the Payment cell.
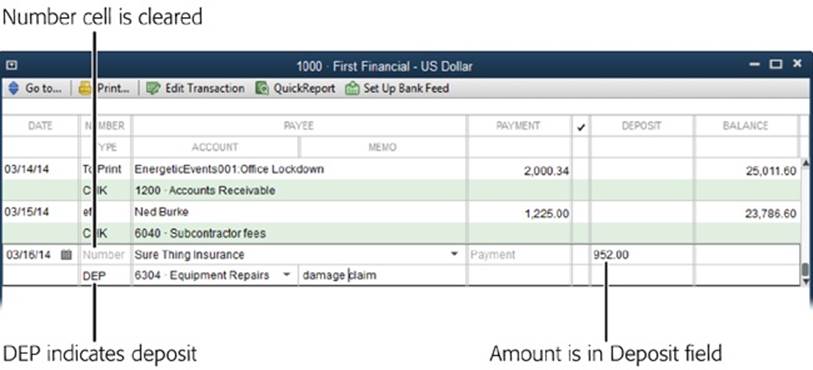
Figure 14-2. You aren’t alone if you frequently type a deposit amount in the Payment cell by mistake. To record a deposit correctly, be sure to enter its value in the Deposit cell. When you move to another cell, QuickBooks springs into action, automatically clearing the check number out of the Number cell and the value out of the Payment cell. It also replaces the code CHK in the Type cell with DEP for deposit.
POWER USERS’ CLINIC: KEYBOARD SHORTCUTS FOR DATES
Pressing + or – to increment dates is a great timesaver, but you might also want to add some of the following keyboard shortcuts to your date-selection arsenal. When the cursor is in the Date field, these can help you jump directly to specific dates:
§ Press T (for Today) to change the date to today.
§ Press M (for Month) to select the first day of the currently selected month. Pressing M additional times jumps to the first days of previous months.
§ Press H (for montH) to select the last day of the currently selected month. Pressing H additional times jumps to the last days of future months.
§ Press W (for Week) to choose the first day of the currently selected week. Pressing W additional times jumps to the first days of previous weeks.
§ Press K (for weeK) to choose the last day of the currently selected week. Pressing K additional times jumps to the last days of future weeks.
§ Press Y (for Year) to choose the first day of the currently selected year. Pressing Y additional times jumps to the first days of previous years.
§ Press R (for yeaR) to choose the last day of the currently selected year. Pressing R additional times jumps to the last days of future years.
You can press these letters multiple times to pick dates further in the past or the future, and combine them with pressing + and – to reach any date you want. But face it: After half a dozen keystrokes, it might be easier to type a numeric date, such as 3/14/14, or to click the Calendar icon and choose the date.
NOTE
QuickBooks keeps track of handwritten and printed check numbers separately. When you use the register window to create a check, QuickBooks fills in the Number cell by incrementing the last handwritten check number. When you choose File→Print Forms→Checks, the program fills in the First Check Number box by incrementing the last printed check number.
§ Payment or Charge. For checks you write, fees that the bank deducts from your account, and petty cash withdrawals, type the amount in the Payment cell. In a credit card register, this field is named Charge for the credit card charges you make.
§ Deposit or Payment. For deposits you make to checking or petty cash, or interest you’ve earned, type the amount in the Deposit cell. In a credit card register, this field is called Payment, because you make payments to a credit card account (the opposite of making payments from a checking account).
NOTE
In QuickBooks transactions, money either goes out or comes in—there’s no in-between. So when you enter a value in the Payment cell, QuickBooks clears the Deposit cell’s value, and vice versa.
§ Account. This cell can play many roles. For instance, when you’re creating a check, choose the account for the expense it represents. If you’re making a deposit, choose the income or expense account to which you want to post the deposit. (For example, depositing an insurance claim check that pays for equipment repair reduces the balance of the expense account for equipment maintenance and repair.) If you’re transferring money to or from another bank account, choose that account instead.
§ Memo. Filling in this cell can jog your memory no matter what type of transaction you create. Enter the bank branch for a deposit (in case your deposit ends up in someone else’s account), the name of the restaurant for a credit card charge, or the items you purchased with petty cash. The contents of this cell appear in the reports you create.
TIP
Remember your accountant’s insistence on an audit trail? If you create a transaction by mistake, don’t delete it. Although QuickBooks’ audit trail keeps track of deleted transactions, the omission can be confusing to others—or to you after some time has passed.
Instead of deleting transactions, void them. That way, the payment or deposit amount changes to zero, but the voided transaction still appears in your company file, so you know that it happened. Because the amount is zero, the transaction doesn’t affect any account balances or financial reports. Before you void a transaction, type a note in its Memo cell that explains why you’re voiding it. Then, in a register window, right-click the transaction and choose the Void option (Void Check, Void Deposit, and so on) on the shortcut menu.
FREQUENTLY ASKED QUESTION: MANAGING CREDIT CARD ACCOUNTS
Are credit cards accounts or vendors?
In QuickBooks, the credit cards you use can be set up as accounts or vendors, depending on how you prefer to record your credit card transactions. Here’s the deal:
§ Credit card account. Tracking credit card charges using an account has several advantages. With a credit card account in QuickBooks, you can enter the charges as they happen (which takes no time at all if you download credit card transactions; Exchanging Data with Your Bank explains how). Then, when you receive your statement, you can reconcile the credit card account as you would a checking account (Reconciling Accounts), so you can see whether your records and your charge card company’s match. To prevent credit card charge payee names from filling your Vendor List with entries you don’t need, store names in the Memo cell or create more general vendors like Gas, Restaurant, and Office Supplies.
§ Credit card vendor. If you set up a credit card as a vendor, you don’t have an account to reconcile when you receive your credit card statement. In addition, the name of every establishment you bless with credit card purchases won’t fill up your Vendor List. The drawback to this approach is that you still have to allocate the money you spent to the appropriate accounts, and you can’t download that split transaction from your credit card company. With statement in hand, open the Enter Credit Card Charges window (choose Banking→Enter Credit Card Charges) to enter a single transaction allocating the total statement balance to each of the charges you made. (On the window’s Expenses and Items tabs, add entries to allocate charges to the appropriate expense accounts.) That way, the transaction does double-duty by reconciling your charges to the statement, which will make your accountant happy.
Handling Bounced Checks
Bouncing one of your own checks is annoying and embarrassing. It can be expensive, too, since banks charge for each check you bounce (and, often, they craftily pay your larger checks before the smaller ones to rack up as many bounced-check charges as possible). Besides depositing money to cover the shortfall and paying those bank fees, you have to tell people to redeposit the checks that bounced or write new ones.
When someone pays your company with a rubber check, it’s just as annoying. In addition to the charges your bank might charge for redepositing a bounced check, you have to do a few things to straighten out your records in QuickBooks when a customer’s check bounces. The following sections explain how to handle bounced checks, whether you wrote them or your customer did.
Managing Bounced Checks You Wrote
If a bill payment you made overdraws your account, your bank returns the check to whomever you paid. You can handle this financial gaffe in a couple of ways. If your cash shortfall was a temporary problem, the easiest solution is to tell the vendor to redeposit your check. In that case, all you need to do is enter a new bill for the bounced check fee that your vendor charges you.
Paying the bill with a new check or by credit card requires a few more steps. Here’s what you have to do:
1. Create a journal entry (Reclassifying Payroll Withholdings) to put the bad check’s amount back into your Accounts Payable account and also back into your checking account.
To do that, in the journal entry’s first line, choose your checking account and fill in the Debit cell with the amount of the bounced check, as shown in Figure 14-3 (foreground).
In the journal entry’s second line, choose your Accounts Payable account. (QuickBooks automatically fills in the Credit cell with the bounced check’s amount, which is what you want.) In the Name cell, choose the vendor you paid. In the Memo cell, type something like “NSF check.”
After you record the journal entry, the bad check amount shows up as billed in the Accounts Payable account (Figure 14-3, background) and as a deposit to your checking account.
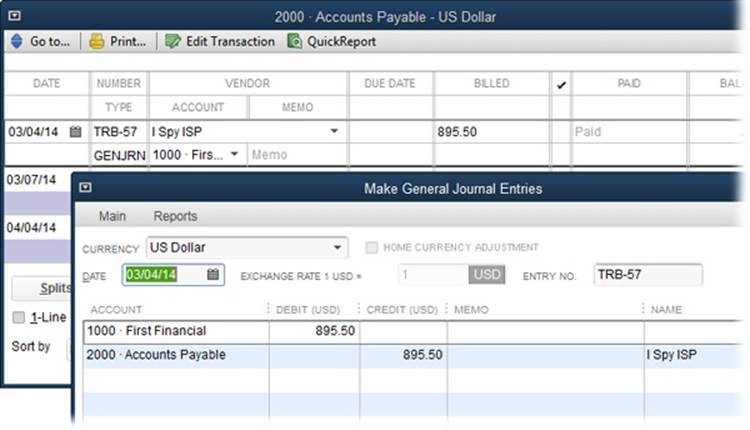
Figure 14-3. Debiting your checking account deposits the bad check’s amount back into the account, which increases its balance, because the check hasn’t been cashed. Crediting the Accounts Payable account means that you still owe your vendor that money.
2. Edit the bill payment to switch the bill back to being unpaid.
In the Vendor Center (Vendors→Vendor Center), on the Vendors tab, select the vendor you paid with a bad check. In the window’s lower right, click the Transactions tab, and then in the Show drop-down list, choose Bill Payments. In the Transactions tab’s table, double-click the payment that bounced; the Bill Payments window opens. In the window’s Bills Paid In This Transaction table, turn off the Pay cell for the payment you made with a bad check, turn on the Pay checkbox for the journal entry, and then click Save.
3. If the vendor charges you a fee for the bad check, create a bill for that charge.
Fill in this bill as you would any other bill (Entering Bills). In the Expenses table, choose an expense account for the fee and enter the amount in the Amount cell.
4. Finally, pay the original bill and the additional fee bill using your new payment method.
On the Home page, click Pay Bills. In the Pay Bills window’s table, select the original bill (and the additional-fee bill, if you created one). In the Method box, choose how you want to pay the bill, and then click Pay Selected Bills.
Now make a resolution to keep enough funds in your checking account to cover your payments.
Using the Record Bounced Check Feature
When a customer’s check bounces, it takes several steps to set things right—which is why you probably charge your customer an extra fee for your trouble. In QuickBooks, the Record Bounced Check feature can help you from start to finish.
TIP
The Record Bounced Check feature works by changing the original invoice’s status back to unpaid. This could lead to some confusion, especially if the invoice was paid in one fiscal year and you handle the bounced check in the next fiscal year. In addition, this feature only works with invoices paid with bounced checks—that is, you can’t use it to handle sales receipts paid with bounced checks. The next section describes another approach to handling customers’ bounced checks that works for every situation.
Here’s how to use the Record Bounced Check feature:
1. Open the Receive Payments window (choose Customers→Receive Payments or, on the Home page, click Receive Payments), and then, at the top of the window, click the left-pointing arrow until the payment whose check bounced appears.
Alternatively, choose Customers→Customer Center, and then on the Customers & Jobs tab, select the customer whose payment bounced. In the center’s lower right, click the Transactions tab, and then, in the Show drop-down list, choose Received Payments. Finally, double-click the payment that bounced.
2. At the top of the Receive Payments window, click Record Bounced Check.
The Manage Bounced Check dialog box opens (Figure 14-4).
3. In the Bank Fee box, type the amount that your bank charged you for the customer’s bounced check. In the Expense Account box, choose the account you use for Bank Service Charges.
When you complete the Record Bounced Check process, QuickBooks deducts the bank fee from your checking account balance.
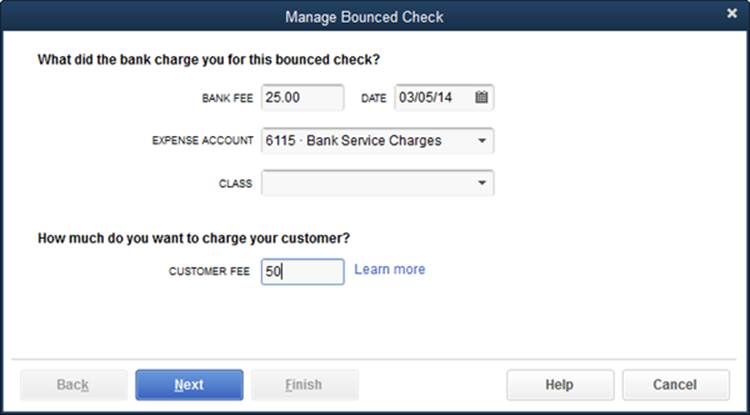
Figure 14-4. The amount you enter in the Bank Fee box represents what your bank charged you for depositing the bounced check. The Record Bounced Check feature creates a transaction that deducts this fee from your checking account balance. The amount in the Customer Fee box is what you charge your customer for giving you a bad check; it ends up on a new invoice that the Record Bounced Check feature creates.
4. In the Customer Fee box, enter the amount you want to charge your customer.
For example, if your bank charged you $25 for your customer’s bad check and you want to tack on another $25 for your inconvenience, enter 50.
5. Click Next.
The Bounced Check Summary dialog box tells you that QuickBooks will mark the invoice corresponding to the bounced check as unpaid, deduct the bad check amount and bank fees from your bank account, and create a new invoice for the fee you’re charging the customer.
6. To set the bounced-check actions in motion, click Finish.
Send the original invoice and the new invoice to your customer and hope the next check you get from it is good.
NOTE
Behind the scenes, QuickBooks creates a journal entry that deducts the amount of the original invoice from your checking account. In the journal entry’s Memo fields, QuickBooks puts the words “Bounced Check#,” so you can’t tell which invoice the bounced check is connected to unless you fill in the Memo field with the original invoice’s number.
Handling Customer’s Bounced Checks on Your Own
As you learned in the previous section, the Record Bounced Check feature doesn’t work in all situations. Fortunately, with a bit of setup, you can easily handle customer’s bounced checks by re-invoicing your wayward customers. The steps you perform are similar to the ones that the Record Bounced Check feature does:
§ Record a transaction that removes the amount of the bounced check from your checking account, because the money never made it there.
§ Record any charges that your bank levied on your account for your customer’s bounced check.
§ Invoice the customer to recover the original payment, your bounced-check charges, and any additional charges you add for your trouble.
Before you can re-invoice your customers, you first need to create items for bounced checks and their associated charges, as explained in the following sections.
Item for Removing the Bounced-Check Amount from Your Bank Account
When a check you deposit bounces, you’ll see two transactions on your next bank statement: the original deposit and a second transaction that removes the deposit amount when the check bounces. You have to create the same transactions in your company file so you don’t overestimate your bank balance and write bad checks of your own. Because the customer hasn’t really paid you, the amount of the check should go back into your Accounts Receivable account.
To create an item that removes the amount of the bounced check from your bank account, create an Other Charge item. Here’s how:
1. Choose Lists→Item List to open the Item List window, and then press Ctrl+N.
The New Item window opens.
2. In the Type drop-down list, choose Other Charge.
The Other Charge item type is perfect for miscellaneous charges that don’t fit any other category.
3. In the Item Name/Number box, type a name for the item, like BadCheck. In the Account drop-down list, choose your bank account, and then click OK.
The new item appears in the Item List.
Items for Bounced-Check Service Charges
Companies typically request reimbursement for bounced-check charges, and many companies tack on additional service charges for the inconvenience of processing a bounced check. Depending on how you account for these charges, you’ll use one or two Other Charge items:
§ Bounced-check charge reimbursement. If you want your customer to pay you back for the bounced-check charge that your bank hit you with, you need an Other Charge item that you can add to an invoice, called something like BadCheck Charge. (Be sure to choose a nontaxable code for the item so that QuickBooks doesn’t calculate sales tax on it.)
QuickBooks doesn’t care whether you post this item to an income account or an expense account, but it’s easier to use an income account if you plan to charge customers an extra service charge for bounced checks, as you’ll learn shortly. If you post your bank’s bounced-check charges to an income account (such as a Service Charge account), you can use the same item for any extra service charge you apply for the hassle of handling bounced checks. Although the customer’s reimbursement appears as income, the bank charge you paid is an expense. The effect on your net profit (income minus expenses) is zero.
§ Bounced-check service charge. Alternatively, you can post bounced-check reimbursements directly to the same expense account you use for bank service charges. With this approach, when you pay your bank’s bounced-check charge, it shows up as an expense in the bank service charge account. When the customer pays you back, QuickBooks credits the bank service charge account to reduce your service charge expenses. The effect on net profit is still zero.
When you use this approach, you need an additional item if you ding your customers with your own bounced-check service charges. Create an Other Charge item for the additional service charge. For the item’s Account, choose your service-charge income account. Like the bounced-check charge reimbursement item, make this item nontaxable.
Recording Bank Charges
The easiest place to record a bounced-check charge is in the bank account’s register window. This technique works for any charge your bank drops on your account, and for service charges and interest your credit card company levies:
1. Press Ctrl+A to open the Chart of Accounts window; there, double-click your bank account to open its register window.
Alternatively, on the Home page, click Check Register. In the Select Account box’s drop-down list, choose your bank account, and then click OK.
2. In the Date cell for the first blank transaction, choose the date when the bank assessed the charge.
QuickBooks automatically fills in the Number cell with the next check number. Be sure to delete that number before saving the transaction to keep your QuickBooks check numbers synchronized with your paper checks.
3. In the Payee cell, type a generic payee name like Bank Charge.
Alternatively, you can type the name of your bank or credit card company.
4. Type the details of the charge in the Memo cell, as shown in Figure 14-5.
For a bounced-check charge, include the name of the customer, a note that the check bounced, and the number of the check that bounced.
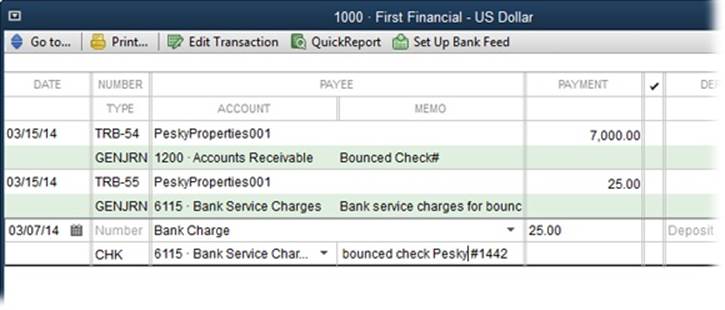
Figure 14-5. In the Memo cell, type a description of the bank charge, such as “bounced check charge,” “minimum balance charge,” the bounced check’s number, and so on.
5. In the Payment cell, type the amount of the charge. In the Account cell, choose the account you use to track bank charges or bounced-check charges.
For a bounced-check charge, choose the income or expense account you use for that purpose. For other bank service charges, choose the corresponding expense account. You have to include a bounced-check charge item on a new invoice in order to recoup this cost, as described in the next section.
TIP
The register window’s Customer:Job cell provides a shortcut to invoicing a customer for bounced-check charges: While the transaction is still selected in the register window, click Splits to open the Splits table. The Account, Amount, and Memo fields are already filled in with the values you’ve provided so far. To make the bank charge billable to the customer who bounced the check, in the Customer:Job cell, choose the customer, and in the “Billable?” cell, turn on the checkbox. Then you can add this billable charge along with any others to the customer’s next invoice (as described in step 5 on Re-invoicing for Bounced Checks).
6. Click Record.
QuickBooks saves the bank charge in your account.
Re-invoicing for Bounced Checks
With the bounced-check items described on Item for Removing the Bounced-Check Amount from Your Bank Account, you can update all the necessary account balances just by re-invoicing the customer for the bounced check. Here’s the short-and-sweet approach:
1. Press Ctrl+I or, on the Home page, click the Create Invoices icon (or choose Invoices→Create Invoices if you’ve set up time-tracking in QuickBooks).
The Create Invoices window opens.
2. In the Customer:Job box, choose the customer that wrote the bad check.
You don’t have to bother filling in fields like P.O. No. and Ship.
3. In the item table, add an item for the bounced check (like the BadCheck item in Figure 14-6).
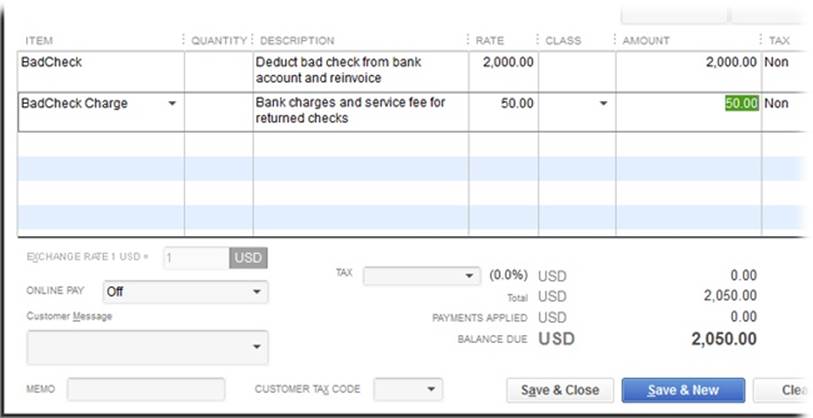
Figure 14-6. To re-invoice the customer for the amount of the bad check, in the first Item cell, choose your bounced-check item (BadCheck, in this example). In the Amount cell, type the amount of the bounced check. In the second item cell, choose the item you created for bounced-check charges. This item’s amount represents what the bank charged you and any additional service fee you charge.
4. In the Amount cell for the bounced-check item, type the amount of the returned check.
Include the full amount of the bounced check.
5. Add a second item to recoup the bounced-check fees that your bank charged you and any additional service charges you want to include. In the Amount cell for the bad-check-charge item, type the amount you’re charging.
Adding an extra fee can help deter customers from writing bad checks. In Figure 14-6, the BadCheck Charge item covers the bank’s $25 charge plus an additional $25 fee your company collects.
If you recorded the bounced-check charge in your bank account as a billable cost to your customer (Re-invoicing for Bounced Checks), at the top of the Create Invoices window, click Add Time/Costs. In the “Choose Billable Time and Costs” dialog box, click the Expenses tab and select the bank charge, and then click OK to add it to the invoice.
6. When you save the invoice, QuickBooks updates the balances of your bank account and Accounts Receivable accounts, as shown in Figure 14-7.
When you first invoice a customer, the invoice amount gets added to your Accounts Receivable balance. The customer’s original payment reduced the Accounts Receivable balance, but the bounced check means you have to remove the original payment amount from your records. Byre-invoicing the customer, you reestablish the balance as outstanding and add the invoice amount back into Accounts Receivable.
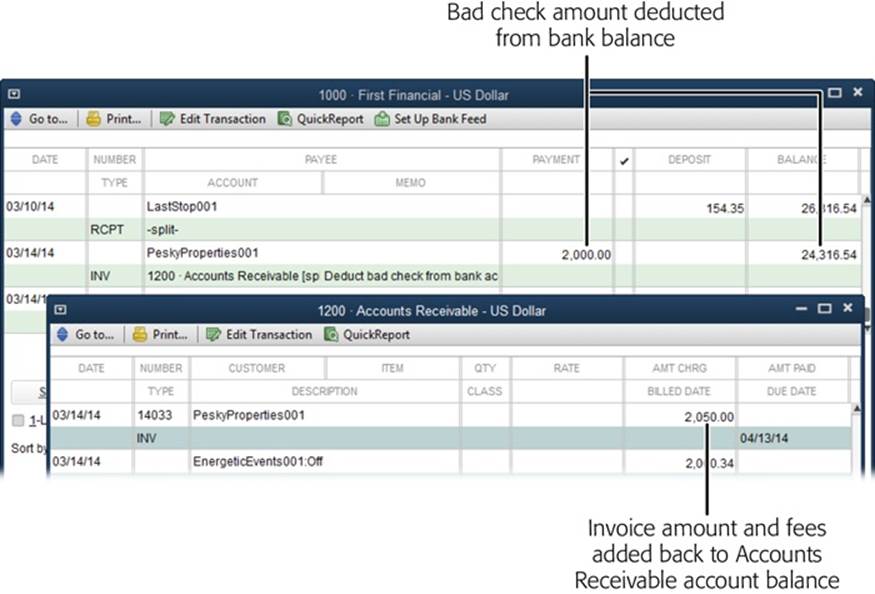
Figure 14-7. The item for a bounced check is linked to your bank account, so adding it to an invoice deducts the value of the bad check from your bank account’s balance (background). The new invoice adds the amount of the bounced check and service charges back into Accounts Receivable (foreground).
7. When the customer sends you a check for this new invoice, click the Receive Payments icon on the Home page to apply that check as a payment for the invoice.
QuickBooks reduces the Accounts Receivable balance by the amount of the payment. (If your customer and the money it owes you are gone for good, see the box on Writing Off Bad Debt to learn what to do next.)
Transferring Funds
With the advent of electronic banking services, transferring funds between accounts has become a staple of account maintenance. Companies stash cash in savings and money market accounts to earn interest and then transfer money into checking right before they pay bills.
Funds transfers have nothing to do with income or expenses—they merely move money from one balance sheet account to another. For example, if you keep money in savings until you pay bills, the money moves from your savings account (an asset account in your chart of accounts) to your checking account (another asset account). Your income, expenses, and, for that matter, your total assets, remain the same before and after the transfer.
TROUBLESHOOTING MOMENT: WRITING OFF BAD DEBT
If you try contacting a customer about a payment only to find that his phone is disconnected, his forwarding address has expired, and an eviction notice is stapled to his office door, you probably aren’t going to get your money. In accounting, admitting that the money is gone for good is called writing off bad debt.
The invoice you create for a customer represents income only if the customer pays it. So, to write off bad debt, you have to remove the income for the unpaid invoice from your financial records. You do that by offsetting the income with an equal amount of expense—you guessed it: the bad debt.
Suppose you invoiced a customer for $5,000, which means that $5,000 is sitting in your Accounts Receivable account as an asset, but you now realize that you’ll never see the money. Here’s how to remove that money from the Accounts Receivable account by means of a bad-debt expense:
1. If you don’t have an account for bad debt, create an Other Expense account (Creating an Account) and name it Bad Debt.
2. Create an Other Charge item (Other Types of Items) and name it Bad Debt. Point it to the Bad Debt account you created, and be sure to make it nontaxable.
3. On the Home page, click the Refunds & Credits icon or choose Customers→Create Credit Memos/Refunds.
4. In the Create Credit Memos/Refunds window’s Custom-er:Job box, choose the customer.
5. In the first item cell, choose the Bad Debt item. When QuickBooks displays a warning about the item being associated with an expense account, simply click OK.
6. In the Amount cell, type the amount that you’re writing off as bad debt, and then click Save & Close to save the credit memo.
7. The Available Credit dialog box opens and asks you what you want to do with the credit. Select the “Apply to an invoice” option, and then click OK.
8. In the “Apply Credit to Invoices” dialog box, turn on the checkmark for the invoice(s) that the customer isn’t going to pay, and then click Done.
When you apply the write-off as a credit against an invoice, QuickBooks removes the money from your Accounts Receivable account, so the program no longer thinks your customer owes the money. And it adds the credit amount to the appropriate income account and to the Bad Debt expense account, so your net profit shows no sign of the income. In addition, if you run a Job Profitability Detail report for that customer, the bad debt appears as a negative number in the Actual Revenue column—that is, a cost that reduces the profitability of the job.
Transferring funds in QuickBooks is easy, whether you use the Transfer Funds feature or enter the transaction directly in an account register window. The steps for creating a transaction in an account register appear on Entering Transactions in an Account Register. If you create a transfer in a bank account register (a savings account, for example), in the transaction’s Account field, choose the bank account to which you’re transferring funds (checking, say).
Here’s how to use the Transfer Funds Between Accounts window:
1. Choose Banking→Transfer Funds.
QuickBooks opens the Transfer Funds Between Accounts window (Figure 14-8).
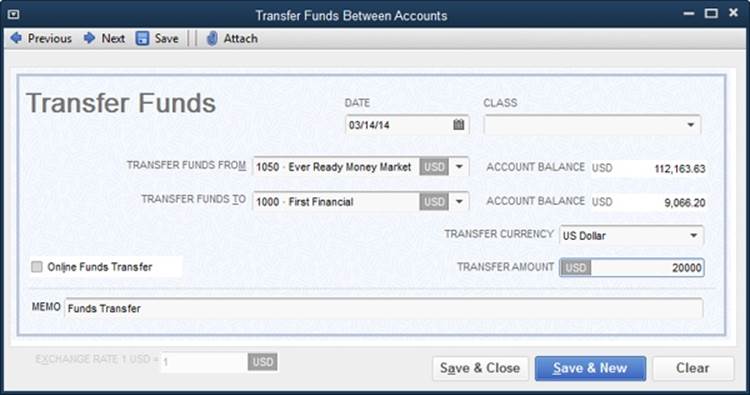
Figure 14-8. This window has one advantage over entering transfers in a bank account register: You can’t create a payment or deposit by mistake. That’s because you can’t save a transfer in this window until you specify both the account that contains the money and the account into which you want to transfer the funds. Also, the Transfer Funds From and Transfer Funds To drop-down menus show only balance sheet accounts (bank, credit card, asset, liability, and equity).
2. After you choose the accounts for the transfer, in the Date box, select the date of the transfer and, in the Transfer Amount field, type the amount you’re transferring.
To record the reason for the transfer, in the Memo box, replace “Funds Transfer” (which QuickBooks adds automatically) with your reason.
If you track classes, the window includes a Class box, too. Depending on the preferences you’ve set, the program might warn you if you leave this box blank. However, transfers usually don’t require a class assignment, so you can dismiss the warning or choose a class for overhead, if you created one.
NOTE
If the two accounts you select are both set up for online banking at the same financial institution, the Online Funds Transfer checkbox appears in the Transfer Funds Between Accounts window. Turn this checkbox on if you want to send the transfer instruction to your bank through QuickBooks.
3. Click Save & Close. (If you’ve got more transfers to make, click Save & New instead.)
In the account register window for either account in the transfer, QuickBooks identifies the transaction by putting TRANSFR in the Type cell.
You still have to transfer the funds between your real-world bank accounts, of course. If you turned on the Online Funds Transfer checkbox to send the transfer instructions, you have to open the Bank Feeds Center (Banking→Bank Feeds→Bank Feeds Center), and send the instructions from there (see Banking Online Using Express Mode if you use Bank Feeds in Express mode and Banking Online Using Classic Mode if you use Classic mode).
Reconciling Accounts
Reconciling a bank statement with a paper check register is tedious and error-prone. Besides the hassle of checking off items on two different paper documents, the check register and the bank statement never seem to agree—likely due to arithmetic mistakes you’ve made.
With QuickBooks, you can leave your pencils unsharpened and stow your calculator in a drawer. When all goes well, you can reconcile your account in QuickBooks with just a few clicks. Discrepancies crop up less often because the program does the math without making mistakes. But problems still occasionally happen—transactions might be missing or numbers don’t match. Fortunately, when your bank statement and QuickBooks account don’t agree, the program helps you find the problems.
Preparing for the First Reconciliation
If you didn’t set the beginning balance for your QuickBooks account to the beginning balance on your bank statement, you might wonder how you can reconcile the bank account the first time around. The best way to resolve this issue is to enter the transactions that happened between that statement’s beginning date and the day you started using QuickBooks. Or you can create a journal entry (Reclassifying Payroll Withholdings) to record the beginning balance. (You’ll select these items as part of your first reconciliation, as described on Starting a Reconciliation.)
NOTE
Alternatively, QuickBooks can align your statement and account the first time you reconcile, as described in the box on Adjusting an Account that Won’t Reconcile. To do so, the program generates a transaction that adjusts your account’s opening balance to match the balance on your bank statement. Account opening balances post to your Opening Bal Equity account, so these adjustments affect your balance sheet. If you use this method, let your accountant know that you changed the opening balance so she can address that change while closing your books at the end of the year.
Preparing for Every Reconciliation
QuickBooks lets you create and edit transactions in the middle of a reconciliation, but reconciling your account flows more smoothly when your transactions are up to date. So take a moment before you reconcile to make sure that you’ve entered all the transactions in your account:
§ Bills. If you paid bills by writing paper checks and forgot to record them in QuickBooks, then on the program’s Home page, click the Pay Bills icon and enter those payments (Entering Bills).
§ Checks. If you find that checks aren’t in your checkbook but you don’t see check transactions in QuickBooks, chances are that you wrote a paper check and didn’t record it in your company file. Create any missing check transactions in the account register (Entering Transactions in an Account Register) or by choosing Banking→Write Checks.
§ Transfers. Create missing transfers in the account register (Entering Transactions in an Account Register) or by choosing Banking→Transfer Funds.
§ Deposits. If you forgot to record deposits of customer payments in QuickBooks, on the program’s Home page, click the Record Deposits icon to add them to your bank account (Recording Deposits). If a deposit appears on your bank statement but doesn’t show up in the “Payments to Deposit” window, you might have forgotten to receive the payment in QuickBooks. For deposits unrelated to customer payments, create the deposit directly in the account’s register (Entering Transactions in an Account Register).
TIP
The easiest way to spot payments you haven’t deposited in QuickBooks is to open the “Payments to Deposit” window (Banking→Make Deposits). Any payments that you’ve received but not deposited in QuickBooks appear in the window’s Select Payments To Deposit table.
§ Online transactions. If you use QuickBooks’ Bank Feeds feature to communicate with your bank, download online transactions (Downloading Statements with Web Connect).
TIP
If you let several months go by without reconciling your account, don’t try to reconcile multiple months at once to catch up—doing so makes discrepancies harder to spot, and locating the source of problems will tax your already-overworked brain. Instead, put your bank statements in chronological order, and then walk through the reconciliation process for each statement.
Starting a Reconciliation
Reconciling an account is a two-part process, and QuickBooks has separate windows for each phase. The first phase includes choosing the account you want to reconcile, entering the ending balance from your bank statement, and entering service charges and interest earned during the statement period. Here’s how to kick off a reconciliation:
1. On the Home page, click the Reconcile icon or choose Banking→Reconcile (or Banking→Reconcile Credit Card if you have a credit card account selected in the Chart of Accounts window).
The Begin Reconciliation window appears.
TIP
If the bank account’s register window is already open, it’s easier to start reconciling by right-clicking the register window and choosing Reconcile on the shortcut menu that appears (or by choosing Banking→Reconcile or Banking→Reconcile Credit Card on the QuickBooks main menu bar). With this approach, the Begin Reconciliation window opens and automatically selects the active bank account.
2. In the Begin Reconciliation window’s Account drop-down list, choose the account you want to reconcile.
The Begin Reconciliation window displays information about the previous reconciliation for this account (if any), as shown in Figure 14-9. The date of the previous reconciliation appears to the right of the Account box (unless you’re reconciling this account for the first time). QuickBooks fills in the Statement Date box with a date one month after the previous reconciliation date. If that date doesn’t match your bank statement’s ending date, replace it with the date from your statement.
QuickBooks automatically sets the beginning balance for this reconciliation to the ending balance of the previous reconciliation (unless this is your first reconciliation). If the beginning balance that the program displays doesn’t match the beginning balance on your bank statement, you need to correct that discrepancy before you can reconcile your account. Click Cancel and turn to Stopping and Restarting a Reconciliation to learn how to fix the problem.
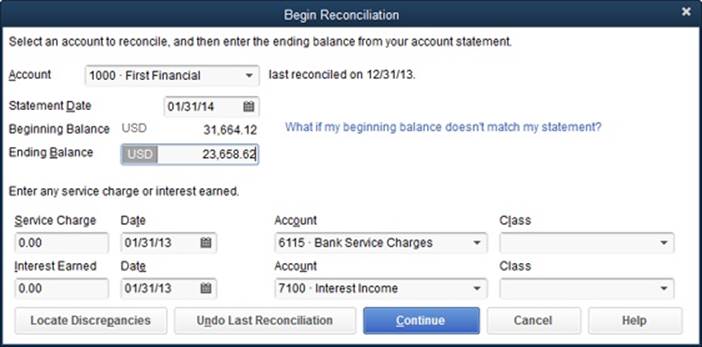
Figure 14-9. QuickBooks uses the ending balance from the previous reconciliation to fill in the beginning balance for this reconciliation. If the beginning balance here doesn’t match the beginning balance on your bank statement, click Cancel and turn to page 378 to learn how to correct the problem.
3. In the Ending Balance box, type the ending balance from your bank statement.
If you turned on multiple currencies, the account’s currency appears to the right of the Beginning Balance and Ending Balance labels. For a foreign-currency account, enter the ending balance in the foreign currency, which is the ending balance that appears on your bank statement.
4. If your bank levies a service charge on your account, in the Service Charge box, type the charge amount. (If you download transactions from your bank, leave this box blank.)
In the Date box to the right of the Service Charge box, choose the date that the charge was assessed if it differs from the statement ending date. In the Account box, choose the account to which you want to post the charge (usually Bank Service Charges or something similar). QuickBooks then creates a service-charge transaction for you.
TIP
If you use Bank Feeds (Importing Report Templates), chances are you’ve already downloaded your service-charge and interest transactions. In that case, don’t enter them in the Begin Reconciliation window or you’ll end up with duplicate transactions.
5. If you’re reconciling an account that pays interest, in the Interest Earned box, type the interest listed on your bank statement.
As you did for the service charge, specify the date and the account that you use to track interest.
NOTE
If you track service fees and interest earned by class, in the Class boxes, choose the appropriate one. For example, classes might apply if you use them to track performance by region. However, if you use classes to track sales by partner, you don’t have to specify a class for interest earned, though you can use a class for overhead if you created one.
6. Click Continue to start reconciling individual transactions.
QuickBooks opens the Reconcile window, where you reconcile the individual transactions, as described next.
Reconciling Transactions
The Reconcile window groups checks and payments on the left side and deposits and other credits on the right side. (For a credit card account, charges and cash advances appear on the left side of the window—since they reduce your balance—and payments and credits appear on the right side.) Marking transactions as cleared is a matter of turning on their checkmarks, as you can see in Figure 14-10. For each transaction that appears on your bank statement, turn on the checkmark for the matching QuickBooks transaction. (If you turn on a checkmark by mistake, just click it again to turn it off.)
NOTE
QuickBooks initially sorts transactions by date with the earliest transaction listed first. If you want to sort them by another field, click the column heading for that field. For example, click “Chk #” if you’re trying to find the check that’s preventing you from reconciling successfully. An up arrow next to the heading indicates that the column is sorted in ascending order (smallest to largest values). Click the column heading again to reverse the order (largest to smallest).
TIP
Initially, the Reconcile window lists all uncleared transactions in the account regardless of when they happened. If transactions after the statement ending date are mixed in, you could select unnecessary transactions by mistake. To filter the list to likely candidates for clearing, turn on the “Hide transactions after the statement’s end date” checkbox at the top right of the window. If you don’t see transactions that appear on your bank statement, turn this checkbox off; you might have created a transaction with the wrong date.
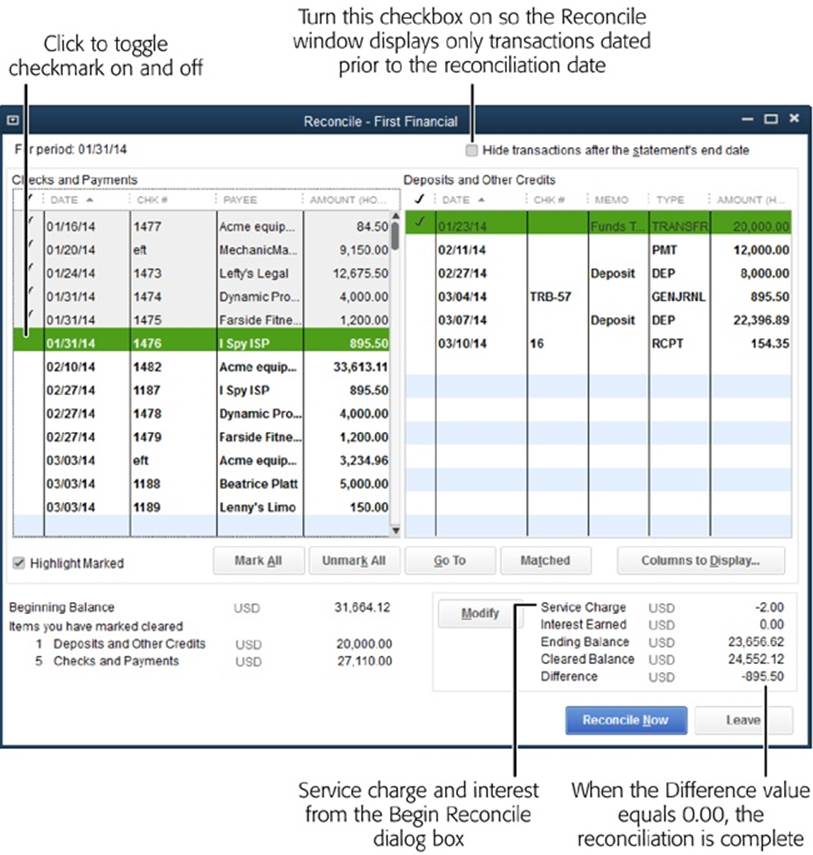
Figure 14-10. When you mark transactions as cleared by turning on their checkmarks, the Cleared Balance and Difference values below the table change to reflect the transactions you select. The Service Charge and Interest Earned values represent the service-charge and interest amounts you entered in the Begin Reconciliation window as a reminder that QuickBooks created those transactions for you. If you forgot to record the service-charge or interest amount, click Modify to reopen the Begin Reconciliation window.
QuickBooks includes several shortcuts for marking a transaction as cleared:
§ Mark All. If you usually end up clearing most of the transactions in the list, click Mark All below the table to select all the transactions. Then turn off the checkmarks for the ones that don’t appear on your bank statement. If you were distracted and selected several transactions by mistake, click Unmark All to start over.
§ Selecting contiguous transactions. Dragging down the checkmark column selects every transaction you pass. (This approach isn’t that helpful if you compare one transaction at a time or if your transactions don’t appear in the same order as those on your bank statement.)
§ Online account access. If you’ve set up Bank Feeds in QuickBooks, click Matched to automatically clear the transactions that you’ve already matched from your QuickStatement (see Chapter 24). Enter the ending date from your printed statement, and then click OK.
When the Difference value in the window’s lower right changes to 0.00, your reconciliation is a success. To officially complete the process, click Reconcile Now. The Select Reconciliation Report dialog box opens (it’s described in the next section). If you don’t want to print a reconciliation report, simply click Close.
NOTE
When you reconcile a credit card account and then click Reconcile Now, QuickBooks opens the Make Payments window. There you can choose to write a check or enter a bill to make a payment toward your credit card balance.
WORKAROUND WORKSHOP: ADJUSTING AN ACCOUNT THAT WON’T RECONCILE
When the Difference value in the Reconcile window obstinately refuses to change to 0.00, reconciling without finding the problem is an option. For example, if you’re one penny off and you can’t solve the problem with a quick review, that 1 cent isn’t worth any more of your time. As you complete the reconciliation, QuickBooks can add an adjustment transaction to make up the difference.
In the Reconcile window, if you click Reconcile Now without zeroing the Difference value, QuickBooks opens the Reconcile Adjustment dialog box. The program tells you what you already know: That there’s an unresolved difference between the Ending Balance from your bank statement and the Cleared Balance in QuickBooks. If you want to try to fix the problem, click “Return to Reconcile.” Or click Leave Reconcile if you want to research the problem. (When you restart the reconciliation, all the work you’ve done so far will still be there.)
To create an adjustment transaction, click Enter Adjustment, and QuickBooks creates a journal entry to zero out the balance. If you stumble across the source of the discrepancy later, you can either void the adjustment journal entry or create a reversing entry (Reclassifications and Corrections).
Reconciliation Reports
After you click Reconcile Now in the Reconcile window, you might notice a short delay while QuickBooks generates your reconciliation reports. These reports may come in handy as a benchmark when you try to locate discrepancies in a future reconciliation.
When the Select Reconciliation Report dialog box opens, you can display or print reconciliation reports. Choose the Summary option for a report that provides the totals for the checks and payments you made, and for the deposits and credits you received. To save the reports for future reference, click Print. Click Close to close the dialog box without printing or viewing the reports. You can look at them later by choosing Reports→Banking→Previous Reconciliation. (If you use QuickBooks Premier or Enterprise, in the Select Previous Reconciliation Report dialog box, the Statement Ending Date box lists the dates of the previous reconciliations for the account. Click the ending date you want and then click Display to run the report.) Figure 14-11 shows what a detailed reconciliation report looks like.
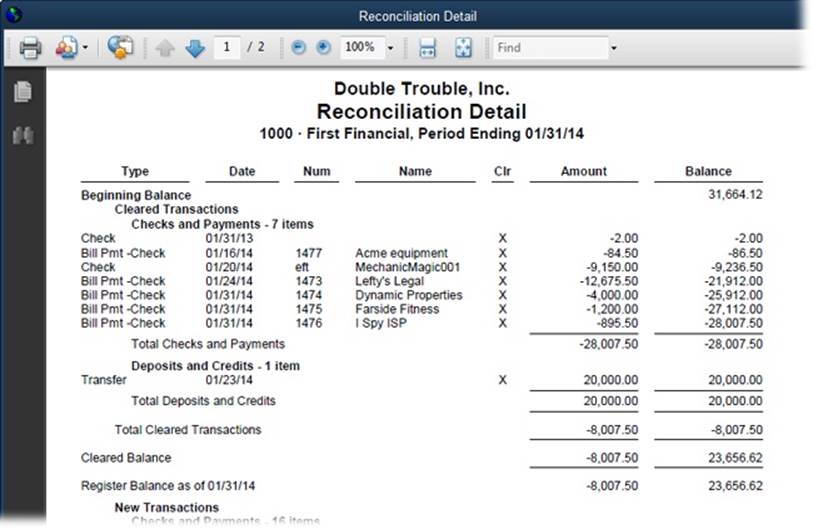
Figure 14-11. In the Select Previous Reconciliation Report dialog box, when you choose the Detail option and then click Display, the report shows your beginning and ending balances and every transaction you cleared. You can view a reconciliation report at any time by choosing Reports→Banking→Previous Reconciliation.
Modifying Transactions During Reconciliation
QuickBooks immediately updates the Reconcile window with changes you make in the account register window, so it’s easy to complete a reconciliation. Missing transactions? Incorrect amounts? Other discrepancies? No problem. You can jump to the register window and make your changes. Then, when you click back to the Reconcile window, the changes are there.
TIP
If you’ve opened both the register window and the reconciliation window, click the one you want to work on. If you use the left icon bar, click Open Windows in the bar’s middle section to see a list of the open windows at the top of the bar; simply click the name of the window you want to work with. If you use the top icon bar, choose View→Open Window List to display the Open Windows list on the left side of the QuickBooks window; you can then click names there to change the active window or dialog box.
Here’s how to make changes while reconciling:
§ Adding transactions. If a transaction appears on your bank statement but isn’t in QuickBooks, switch to the account’s register window or the transaction’s corresponding window (such as Write Checks) and add the transaction.
§ Deleting transactions. If you find duplicate transactions, in the account’s register window, right-click the transaction and choose the corresponding Delete entry on the shortcut menu (or select the transaction and then press Ctrl+D). When you confirm your decision and QuickBooks deletes the transaction, the transaction also disappears from the Reconcile window.
§ Editing transactions. If you notice an error in a transaction, in the Reconcile window, double-click the transaction to open its corresponding window (Write Checks for checks, Make Deposits for deposits, and so on). Correct the mistake, and then save the transaction by clicking Record or Save, depending on the window.
Stopping and Restarting a Reconciliation
If your head hurts and you need a break, don’t worry about losing the reconciliation work you’ve already done. Here’s how to stop and restart a reconciliation:
1. In the Reconcile window, click Leave.
Although QuickBooks closes the window, it remembers what you’ve done. In the account’s register window, you’ll see asterisks in the checkmark column for transactions that you’ve marked as cleared, which indicates that your clearing of that transaction is pending.
2. When you’re reenergized, open the account’s register window, right-click it, and then choose Reconcile on the shortcut menu.
The Begin Reconciliation window opens with the ending balance, service charge, and interest amounts already filled in.
3. Click Continue.
The transactions you marked are, happily, still marked. Pick up where you left off by marking the rest of the transactions that cleared on your bank statement.
Correcting Discrepancies
If you modify a transaction that you’ve already reconciled, QuickBooks displays a dialog box warning you that you changed a reconciled transaction and that your change will affect your reconciliation balance. After all, if you cleared a transaction because it appeared on your bank statement, the transaction is complete, and changing it in QuickBooks doesn’t change it in your bank account. While you technically can change or delete cleared transactions in QuickBooks, doing so is usually a bad idea. (The one situation that usually calls for editing reconciled transactions is when you’re trying to correct a reconciliation problem. Re-Reconciling Corrected Transactions describes how to do this.) This section explains what causes discrepancies, how to hunt down transactions that are causing problems, and how to fix them.
Changing previously cleared transactions is the quickest way to cause mayhem when reconciling accounts. A typical reconciliation problem is when the beginning balance that QuickBooks fills in doesn’t match the beginning balance on your bank statement, which is one reason you might be reading this section. Here are some of the most common causes of discrepancies:
§ Changing the cleared status of a reconciled transaction. In an account register window, you might click a checkmark cell by mistake, which resets the status of that transaction from reconciled (indicated by a checkmark) to cleared (indicated by an asterisk). This change removes that transaction’s amount from the Begin Reconciliation window’s Beginning Balance when you try to reconcile the account.
§ Editing a reconciled transaction’s amount. Changing the amount of a reconciled transaction doesn’t change the amount on your bank statement, but it does affect the beginning balance that QuickBooks calculates.
§ Deleting a reconciled transaction. Suppose you recorded a transaction by using the wrong QuickBooks feature, such as writing a check in the Write Checks window to remit your sales tax instead of using the Pay Sales Tax dialog box. Then, to make matters worse, you reconcile that incorrect transaction as part of your bank account reconciliation. If you delete the check so you can pay the sales tax using the correct QuickBooks feature, your beginning reconciliation balance won’t agree with the one on your bank statement. To fix the error, in the bank account register window, delete the transaction that you recorded using the wrong method by right-clicking the transaction and then choosing “Delete [transaction]” from the shortcut menu. (In this example, the transaction is a check to pay sales tax, so you would choose Delete Check, but it could be a check for payroll or another type of transaction.) Then recreate the transaction using the Pay Sales Tax feature. Now your sale tax is paid the right way, but your beginning balance is messed up due to the deleted transaction; see “Re-reconciling Corrected Transactions” on Re-Reconciling Corrected Transactions to learn how to fix that.
Using the Discrepancy Report to Find Problem Transactions
If your statement and QuickBooks records don’t agree and you don’t know why, the Discrepancy Report can help you find the transactions that are the culprits. This report shows you changes that were made to reconciled transactions, so you can restore them to their original states.
To run the Discrepancy Report, in the Begin Reconciliation window, click Locate Discrepancies, and then, in the Locate Discrepancies window, click Discrepancy Report. (You can also choose Reports→Banking→Reconciliation Discrepancy.)
Seeing transactions on the Discrepancy Report is a big step toward correcting reconciliation problems. Here’s how to interpret the report’s crucial columns:
§ Entered/Last Modified. This is the date that the transaction was created or modified, which doesn’t help you restore the transaction but might help you figure out who’s changing reconciled transactions.
§ Reconciled Amount. This column shows the value the transaction had when you reconciled it. If the transaction’s amount has been changed, use this value to restore the transaction to its original value. For example, –99.95 in this column represents a check or charge for $99.95.
§ Type of Change. This column indicates what aspect of the transaction was changed. For example, “Amount” means that the transaction’s amount changed, “Uncleared” indicates that someone removed the reconciled checkmark in the account register, and “Deleted” means that the transaction was deleted. (The only way to restore a deleted transaction is to recreate it from scratch.)
§ Effect of Change. This value indicates how the change affected the beginning balance of your reconciliation. For example, a $99.95 check that was reset added $99.95 to your bank account. When the Beginning Balance is off and the amount in this column matches that discrepancy, you can be sure that restoring these transactions to their original states will fix the problem.
Once you identify a transaction that was edited after it was reconciled, in the Previous Reconciliations Discrepancy Report window, double-click the transaction to open it in its corresponding window (for example, the Write Checks window for a check). If a transaction’s status was reset from reconciled to cleared, open the account’s register (Entering Transactions in an Account Register), find the transaction, and then click its checkmark cell until a checkmark (which represents a reconciled transaction) appears.
TIP
If your beginning balance is still off after you correct cleared status, amounts, and deleted transactions, run the Audit Trail report (Checking for Problems) to look for other changes that could throw off your reconciliation (for example, a transaction whose account was changed).
Re-Reconciling Corrected Transactions
If you fix changes that were made to reconciled transactions, you then have to re-reconcile those transactions. Fortunately, you can perform a surgical reconciliation to accept these transactions. Here are the steps:
1. Choose Banking→Reconcile and then, in the Begin Reconciliation window’s Account drop-down list, choose the bank account you want to mini-reconcile (if it isn’t already selected).
2. Change the date in the Statement Date box to the date on the bank statement that contains the transaction you corrected.
For example, if the transaction you corrected was made on September 15, fill in the statement date for your September bank statement.
3. In the Ending Balance box, fill in the ending balance from the bank statement (the September statement, in this example), and then click Continue.
The Reconcile window opens.
4. In the Reconcile window, find the corrected transactions in the Checks and Payments list and click their checkmark cells to turn on their checkmarks.
By doing so, the Difference value will change to 0.00.
5. Click Reconcile Now to complete the mini-reconciliation.
The next time you reconcile the account, the beginning balance will match the beginning balance on your bank statement.
Other Ways to Find Discrepancies
Sometimes, your QuickBooks records don’t match your bank’s records because of subtle errors in transactions or because you’ve missed something in the current reconciliation. Try the following techniques to help spot problems:
§ Search for a transaction equal to the amount of the discrepancy. Press Ctrl+F to open the Find window. On the Advanced tab, in the Choose Filter list, select Amount. Next, choose the = option and type the amount in the text box, and then click Find to run the search.
You can also use the Search feature to find a transaction for that amount: Press F3 to open the Search window. In the Amount box, type the amount of the discrepancy, and then click Go.
NOTE
Using Find or Search in this way works only if the discrepancy is caused by one transaction that you cleared or uncleared by mistake. If more than one transaction is to blame, the amount you’re trying to find is the total of all the erroneously cleared transactions, so these methods won’t find a matching value.
§ Look for transactions cleared or uncleared by mistake. Sometimes, the easiest way to find a discrepancy is to start the reconciliation over. In the Reconcile window, click Unmark All to remove the checkmarks from all the transactions. Then begin checking them off as you compare them with your bank statement. Make sure that every transaction on the statement is cleared in the Reconcile window, and that no additional transactions are cleared in that window.
§ Look for duplicate transactions. If you create transactions in QuickBooks and download transactions from your bank’s website, it’s easy to end up with duplicates. And when you clear both of the duplicates, the mistake is hard to spot. If that’s the case, you have to scroll through the register window looking for multiple transactions with the same date, payee, and amount.
§ Compare the number of transactions on your bank statement with the number of cleared transactions on the left side of the Reconcile window (Figure 14-12). Of course, this technique won’t help if you enter transactions in QuickBooks differently than they appear on your bank statement. For example, if you deposit every payment individually but your bank shows one deposit for every business day, your transaction counts won’t match.
§ Look for a deposit entered as a payment or vice versa. To find an error like this, look for transactions whose amounts are half the discrepancy. For example, if a $500 check becomes a $500 deposit by mistake, your reconciliation will be off by $1,000: $500 because a check is missing and another $500 because you have an extra deposit.
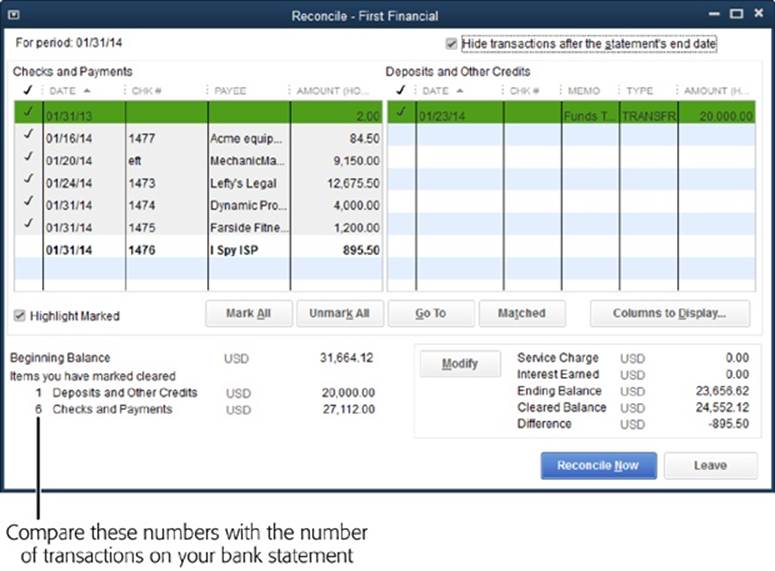
Figure 14-12. As you clear transactions in the Reconcile window’s table, QuickBooks updates the number of items you’ve marked at the window’s bottom left, below the “Items you have marked cleared” label. Compare these numbers with the number of transactions on your bank statement. If the numbers don’t agree, you know to look for either a transaction you didn’t clear or one that you cleared by mistake.
§ Look at each cleared transaction for transposed numbers or other differences between your statement and QuickBooks. It’s easy to type $95.40 when you meant $59.40.
NOTE
If these techniques don’t uncover the problem, your bank might have made a mistake. See When Your Bank Makes a Mistake to learn what to do in that case.
Undoing the Last Reconciliation
If you’re having problems with this month’s reconciliation but suspect that the guilty party is hiding in last month’s reconciliation, you can undo the last reconciliation and start over. When you undo a reconciliation, QuickBooks returns the transactions in it to an uncleared state.
In the Begin Reconciliation window (choose Banking→Reconcile), click Undo Last Reconciliation to open the Undo Previous Reconciliation dialog box. (Although the button’s label and the dialog box’s title don’t match, they both represent the same process.) In the dialog box, click Continue. When the Undo Previous Reconciliation message box appears telling you that the previous reconciliation has been successfully undone, click OK.
QuickBooks unclears all the transactions back to the beginning of the previous reconciliation and returns you to the Begin Reconciliation window. Change the values in the dialog box, and then click Continue to try another reconciliation.
NOTE
Although this process makes QuickBooks remove the cleared status from all the transactions included in your last reconciliation, including service charges and interest, the program doesn’t remove the service charge and interest transactions that it added. So when you restart the reconciliation, don’t re-enter the service charges or interest in the Begin Reconciliation window.
When Your Bank Makes a Mistake
Banks do make mistakes: Digits get transposed or amounts are flat wrong. When this happens, you can’t ignore the difference. In QuickBooks, add an adjustment transaction (Reconciliation Reports) to make up the difference, and be sure to tell your bank about the mistake. (It’s always a good idea to be polite in case the error turns out to be yours.)
When you receive your next statement, check that the bank made an adjustment to correct its mistake. You can then delete your adjustment transaction or add a reversing journal entry to remove your adjustment and reconcile as you normally would.
TIP
For a reminder to check your next statement, create a To Do Note (choose Company→To Do List, and then click Add To Do).
Managing Loans
Unless your business generates cash at an astonishing rate, you’ll probably have to borrow money to purchase big-ticket items that you can’t afford to do without, such as a deluxe cat-herding machine.
In real life, the asset you purchase and the loan you assume are intimately linked—you can’t get the equipment without borrowing the money. But in QuickBooks, loans and the assets they help purchase aren’t connected in any way. You create an asset account to track the purchase price of an asset that you buy. If you take out a loan to pay for that asset, you create a liability account to track the balance of what you owe on the loan. With each payment you make on the loan, you pay off a little bit of the loan’s principal as well as a chunk of interest.
NOTE
On your company’s balance sheet, the value of your assets appears in the Assets section, and the balance you owe on loans shows up in the Liabilities section. The difference between the asset value and the loan balance is your equity in the asset. For example, suppose your cat-herding machine is in primo condition and is worth $70,000 on the open market. If you owe $50,000 on the loan, then your company has $20,000 in equity in that machine.
Most loans amortize your payoff, which means that each payment represents a different amount of interest and principal. At the beginning of a loan, amortized payments are mostly interest and very little principal; that means the lender gets more of its money up front, but it’s also great for your company’s tax deductions. By the end of the loan’s lifecycle, the payments are almost entirely principal. Making loan payments in which the values change each month would be a nightmare if not for Loan Manager, a separate program that comes with QuickBooks that can exchange info with your company file. Loan Manager calculates your loan’s amortization schedule, posts the principal and interest for each payment to the appropriate accounts, and handles escrow payments and fees associated with your loans. This section explains how to use Loan Manager.
NOTE
Loan Manager doesn’t handle loans in which the payment covers only the accrued interest (called interest-only loans). For loans like these, you have to set up payments yourself (Setting Up Payments) and allocate payments to principal and interest using the values on your monthly loan statement.
Setting Up a Loan
Regardless of whether you use Loan Manager, you have to create accounts in QuickBooks to keep track of your loan. You probably already know that you need a liability account for the amount of money you owe. And you also need accounts for the interest you pay on the loan and escrow payments (such as insurance or property tax) that you make. But if you’re planning to use Loan Manager to track your loan, make sure you have all of your loan-tracking elements in place before you start using it. Here are the things you need:
§ Liability account. Create a liability account (Creating Accounts and Subaccounts) to track the money you’ve borrowed. For mortgages and other loans whose terms are longer than a year, use the Long Term Liability account type. For short-term loans (ones with terms of one year or less), use the Other Current Liability account type instead.
When you create the liability account, don’t enter an opening balance. The best way to record money you borrow is with a journal entry (see Chapter 16), which credits the liability account for the loan and debits either the bank account where you deposited the money or the fixed asset account for the asset you purchased.
TIP
If you’ve just started using QuickBooks and have a loan that you’ve partially paid off, fill in the journal entry with what you owed on the loan statement that’s dated just before your QuickBooks company file’s start date. Then enter any loan payments you’ve made since that statement’s ending date to get the account to the current balance.
§ Loan interest account. The interest that you pay on loans is an expense, so create an Expense account (or an Other Expense account, if that’s the type of account your company uses for interest paid) called something like “Interest Paid.” (Loan Manager shows Other Expense accounts in its account drop-down lists, although it lists accounts in alphabetical order, not by type.)
§ Escrow account. If you make escrow payments for things like property taxes and insurance, create an account to track the escrow you’ve paid. Because escrow represents money you’ve paid in advance, use the Current Asset account type.
§ Fees and finance charge expense account. Chances are you’ll pay some sort of fee or finance charge at some point before you pay off the loan. If you don’t have an account for finance charges you pay, set up an Expense account for them.
§ The lender in your Vendor List (Setting Up Vendors). You also need a vendor record for the institution that lent you the money, so you can use it for the payments you make.
The box below tells you what to do if you forgot to perform any of these steps before starting Loan Manager.
WORKAROUND WORKSHOP: WHERE ARE MY ACCOUNTS AND VENDORS?
Loan Manager looks just like any other item in QuickBooks’ Banking menu, but it’s actually a separate small program. When you start Loan Manager, it gleans information from your company file, such as the liability account you created for the loan and the vendor record you set up for your lender.
If you forgot to create accounts or your lender in QuickBooks before launching Loan Manager, you’ll probably jump to your Chart of Accounts window or Vendor List and create them. Although you create the elements you need by doing that, you still won’t see them in Loan Manager’s drop-down lists. (That’s because Loan Manager grabs the info it needs from your company file when you first launch it.) To get them to appear, you have to close Loan Manager (losing all the data you’ve already entered) and create those entries in QuickBooks. Then, after you’ve created the vendor and all the accounts you need, choose Banking→Loan Manager to restart Loan Manager, which now includes your lender and loan accounts in its drop-down lists.
Adding a Loan to Loan Manager
Loan Manager makes it so easy to track and make payments on amortized loans that it’s well worth the steps required to set it up. Before you begin, gather your loan documents like chicks to a mother hen, because Loan Manager wants to know every detail of your loan, as you’ll soon see.
Basic Setup
Once you’ve created the necessary accounts and vendor records (see Setting Up a Loan), follow these steps to tell Loan Manager about your loan:
1. Choose Banking→Loan Manager.
QuickBooks opens the Loan Manager window.
2. In the Loan Manager window, click the “Add a Loan” button.
QuickBooks opens the Add Loan dialog box, which has several screens for all the details of your loan. They’re all described in this section.
3. In the Account Name drop-down list, choose the liability account you created for the loan.
QuickBooks lists only Current Liability and Long Term Liability accounts. After you choose the correct account, Loan Manager displays the account’s current balance.
NOTE
If Loan Manager shows the loan’s balance as zero, you aren’t off the hook for paying back the loan. Loan Manager grabs this balance from the QuickBooks liability account you created for the loan. The loan balance in Loan Manager is zero if you forgot to create a journal entry to set the liability account’s opening balance. To correct this, click the Add Loan dialog box’s Cancel button, and then close Loan Manager. In QuickBooks, create a journal entry to set the liability account’s opening balance, and then restart Loan Manager and set up the loan.
4. In the Lender drop-down list, choose the vendor you created for the company you’re borrowing money from.
If you haven’t set up the lender as a vendor in QuickBooks, you have to close Loan Manager. After you create the vendor in QuickBooks, choose Banking→Loan Manager to restart Loan Manager, which now includes the lender in its Lender drop-down list.
5. In the Origination Date box, choose the origination date on your loan documents.
Loan Manager uses this date to calculate the number of payments remaining, the interest you owe, and when you’ll pay off the loan.
6. In the Original Amount box, type the total amount you borrowed when you first took out the loan.
The Original Amount box is aptly named because it’s always the amount that you originally borrowed. For new loans, the current balance on the loan and the Original Amount are the same. If you’ve paid off a portion of a loan, your current balance (shown below the Account Name box in Figure 14-13) is lower than the Original Amount. If the current balance is zero, you forgot to record the money you borrowed in the liability account (Setting Up a Loan).
7. In the Term boxes, specify the full length of the loan (such as 360 months or 30 years) and then click Next to advance to the screen where you enter payment information (explained next).
Payment Information
When you specify a few details about your loan payments, Loan Manager can calculate a payment schedule for you. And to make sure you don’t forget a loan payment (and incur outrageous late fees), you can tell Loan Manager to create a QuickBooks reminder for your payments. Here’s how:
1. In the “Due Date of Next Payment” box, choose the next payment date.
For a new loan, choose the date of the first payment you’ll make. For an existing loan, choose the next payment date, which usually appears on your last loan statement.

Figure 14-13. Loan Manager automatically selects Months in the Term drop-down list. Specifying the number of months for a 30-year loan is a great refresher for your multiplication tables, but you don’t want to confuse Loan Manager by making an arithmetic error. If your loan’s term is measured in something other than months, in the Term drop-down list, choose the appropriate period (such as Years). Then you can fill in the Term box with the number of periods shown on your loan documents.
2. In the Payment Amount box, type the total amount of your next payment, including principal and interest.
Your payment amount is listed on your loan documents. Loan Manager automatically puts 1 in the Next Payment Number box. For loans that you’ve made payments on already, replace this with the number of the next payment (this, too, should be on your last loan statement).
3. In the Payment Period drop-down list, choose the frequency of your payments.
Loans typically require monthly payments, even when their terms are in years, so Loan Manager automatically selects Monthly here. If your loan requires a different payment schedule, select the appropriate time period from this drop-down list.
4. If your loan includes an escrow payment, choose the Yes option, and then specify the amount of escrow you pay each time and the account to which you want to post the escrow, as shown in Figure 14-14.
5. If you want a reminder before a loan payment is due, leave the “Alert me 10 days before a payment is due” checkbox turned on.
Loan Manager then tells QuickBooks when and how often payments are due, so QuickBooks can create a loan-payment reminder in its Reminders List (Reminders). You can’t change the number of days before a payment is due for the reminder, but 10 days is usually enough to get your payment in on time.

Figure 14-14. Most mortgages include an escrow payment for property taxes and property insurance. (Escrow accounts are asset accounts because you’re setting aside some money to pay expenses later.) When you add an escrow payment, Loan Manager updates the Total Payment value to include principal, interest, and escrow.
6. Click Next to advance to the screen for entering interest rate info (explained next).
Interest Rate Information
For Loan Manager to calculate your amortization schedule (the amount of principal and interest included with each payment), you have to specify the loan’s interest rate. Here’s how:
1. In the Interest Rate box, type the loan’s interest rate.
Use the rate that appears on your loan documents.
2. In the Compounding Period box, choose either Monthly or Exact Days, depending on how the lender calculates compounding interest.
If the lender calculates the interest on your loan once a month, choose Monthly.
If the lender calculates interest using the annual interest rate divided over a fixed number of days in a year, choose Exact Days instead. When you do, Loan Manager activates the Compute Period box. In the past, many lenders simplified calculations by assuming that a year had 12 months of 30 days each; if your lender uses this method, choose 365/360 as the Compute Period. Today, lenders often use the number of days in a year; in that case, choose the 365/365 Compute Period option instead.
3. In the Payment Account drop-down list, choose the account from which you make loan payments, whether you write checks or pay electronically.
Loan Manager includes all your bank accounts in this list.
4. In the Interest Expense Account drop-down list, choose the account you use to track interest you pay. In the Fees/Charges Expense Account drop-down list, choose the account you use for fees and late charges you pay.
Expense accounts and Other Expense accounts are comingled in these drop-down lists, because they appear in alphabetical order, not sorted by type.
5. Click Finish.
Loan Manager calculates the payment schedule for the loan and adds it to its list of loans, shown in Figure 14-15.
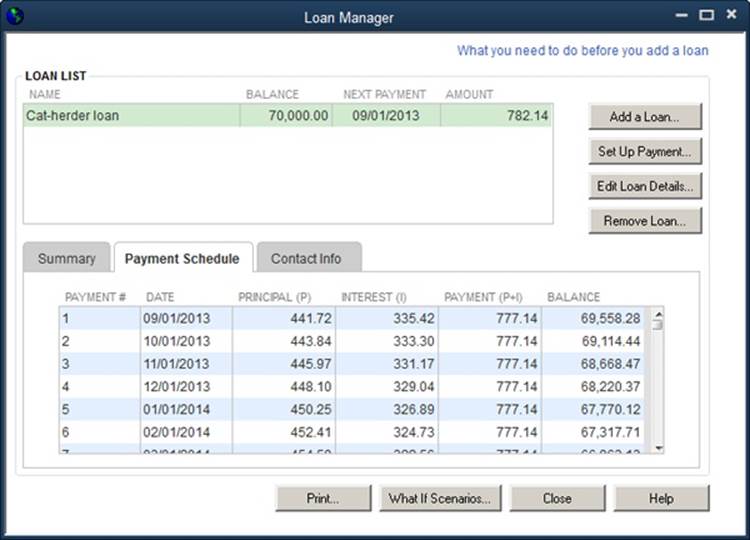
Figure 14-15. When you select a loan in the Loan List table, the tabs at the bottom of the window display information about that loan. Most of the info on the Summary tab is stuff you entered, although Loan Manager does calculate the maturity date (the date when you’ll pay off the loan). The Payment Schedule tab (shown here) lists every payment and the amount of principal and interest each one represents. The info on the Contact Info tab comes directly from the lender’s vendor record in QuickBooks.
Modifying Loan Terms
Some loan characteristics change from time to time. For example, if you have an adjustable-rate mortgage, the interest rate changes every so often. And your escrow payment changes based on your property taxes and insurance premiums. To make changes like these, in the Loan Manager window (choose Banking→Loan Manager), select the loan, and then click Edit Loan Details.
Loan Manager takes you through the same series of screens you saw when you first added the loan (Setting Up a Loan). If you change the interest rate, the program recalculates your payment schedule. If you make a change in escrow, the program updates your payment to include the new escrow amount.
Setting Up Payments
You can set up a loan-payment check or bill in Loan Manager, which hands off the payment info to QuickBooks so the program can record it in your company file. Although Loan Manager can handle this task one payment at a time, it can’t create recurring payments to send the payment that’s due each month. When you see the QuickBooks reminder for your loan payment, you have to run Loan Manager to generate the payment, like so:
1. In the Loan Manager window (Banking→Loan Manager), select the loan you want to pay and then click Set Up Payment.
Loan Manager opens the Set Up Payment dialog box and fills in the information for the next payment, as shown in Figure 14-16.
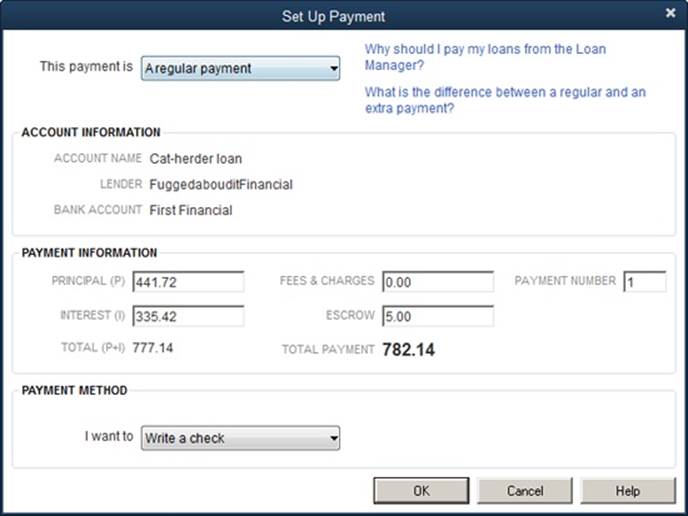
Figure 14-16. When you click Set Up Payment, Loan Manager fills in the Payment Information section of this dialog box with the principal and interest amounts from the loan payment schedule for the next payment that’s due. It also fills in the Payment Number box with the number of the next payment due.
NOTE
If you want to make an extra payment, in the “This payment is” drop-down list, choose “An extra payment.” Because extra payments aren’t part of the loan’s payment schedule, Loan Manager changes the values in the Principal (P), Interest (I), Fees & Charges, and Escrow boxes to zero. If you want to prepay principal on your loan, type the amount that you want to prepay in the Principal (P) box. Or, if you want to pay an annual fee, fill in the Fees & Charges box.
2. In the “I want to” drop-down list at the bottom of the dialog box, choose “Write a check” or “Enter a bill,” and then click OK.
Loan Manager opens the QuickBooks Write Checks or Enter Bills window, respectively, and fills in the boxes with the payment information. If you want, you can change the payment date or other values.
3. In the Write Checks or Enter Bills window, click Save & Close.
The window closes and you’re back in the Loan Manager window, where the value in the loan’s Balance cell has been reduced by the amount of principal that the payment paid off.
If you want to print the payment schedule for your loan, in the Loan Manager window, select it in the window’s Loan List, and then click Print. Or, if you pay off a loan and want to remove it from Loan Manager, select the loan, and then click Remove Loan. (Removing a loan from Loan Manager doesn’t delete any loan transactions or loan accounts in QuickBooks.)
NOTE
If your loan payments include escrow, each payment deposits the escrow amount into your QuickBooks escrow asset account. When your loan statement shows that the lender paid expenses from escrow—like insurance or property taxes—you can record the corresponding payment in QuickBooks: Open the escrow account’s register window (Entering Transactions in an Account Register) and, in the first blank transaction, choose the date and the payee, such as the insurance company or the tax agency. In the Decrease field, type the payment amount (because the payment reduces the balance in the escrow account), and then click Record.
GEM IN THE ROUGH: WHAT-IF SCENARIOS
Because economic conditions and interest rates change, loans aren’t necessarily stable. For example, if you have an adjustable-rate loan, you might want to know what your new payment amount is. Or you might want to find out whether it makes sense to refinance an existing loan when interest rates drop. Loan Manager’s what-if feature is your dry-erase board for trying out loan changes before you make up your mind. When you click the What If Scenarios button, Loan Manager opens the What If Scenarios dialog box, where you can pick from different scenarios depending on whether you’ve already created a loan:
§ How much will I pay with a new loan? You don’t have to go through the third degree to see what a loan will cost. Choose this scenario to enter the key information for a loan and evaluate the payment amounts, total number of payments, total interest, and final balloon payment.
§ Evaluate two new loans. Type in the details of two loans to see which one is better.
§ What if I change my payment amount? This scenario is listed only if you’ve already created a loan in Loan Manager. Paying extra principal can shorten the length of your loan and reduce the total interest you pay. Choose this scenario and then, in the Payment Amount box, type the new amount you plan to pay each month. When you click Calculate, Loan Manager calculates your new maturity date, how much you’ll pay overall, and how much you’ll pay in interest.
§ What if I change my interest rate? If you have an adjustable-rate loan set up in Loan Manager, choose this scenario to preview the changes in payment, interest, and balloon payment for a different rate (higher or lower).
§ What if I refinance my loan? This scenario is listed only if you’ve already created a loan in Loan Manager. When interest rates drop, companies and individuals alike consider refinancing their debt to save money on interest. With this scenario, you type in a new term, payment, interest rate, and payment date to see whether it’s worth refinancing.
The changes you make in the What If Scenarios dialog box don’t change your existing loans. And if you switch to a different scenario or close the dialog box, Loan Manager doesn’t save the information you’ve entered. So if you want a record of different scenarios, click Print after you enter the info for each one.
All materials on the site are licensed Creative Commons Attribution-Sharealike 3.0 Unported CC BY-SA 3.0 & GNU Free Documentation License (GFDL)
If you are the copyright holder of any material contained on our site and intend to remove it, please contact our site administrator for approval.
© 2016-2026 All site design rights belong to S.Y.A.