QuickBooks 2014: The Missing Manual (2014)
Part I. Setting Up QuickBooks
Chapter 6. Data Entry Shortcuts for Lists
If you frequently add or edit more than one customer, vendor, or item at a time, working in a New or Edit window (like New Customer or Edit Item) isn’t only tedious, but it also takes up time you should spend on more important tasks, like selling, managing cash flow, or finding out who has the incriminating pictures from the last company party.
When you set up your company file, the QuickBooks Setup dialog box helps you bring information in from an email program or Excel (Beginning to Use QuickBooks), and you can use that same window anytime you want to add more customers or vendors. Another option is the Add/Edit Multiple List Entries feature. When you’re creating customers, vendors, or items, you can use the Add/Edit Multiple List Entries window to paste data from Excel into QuickBooks. Or, to edit existing records, you can filter or search the list in that window to show just the customers (or vendors, or items) you want to update and then paste in Excel data, type in values, or copy values between records. This chapter shows you how to perform all those tasks.
Then again, you might store info about customers and vendors in other programs such as a database or word-processing program where you create mailing labels. If your other programs can create Excel-compatible files or delimited text files, you can avoid data-entry grunt work by transferring data to or from QuickBooks. (Delimited text files are simply files that separate each piece of data with a comma, space, tab, or other character.) In both types of files, the same kind of info appears in the same position in each line or row, so QuickBooks (as well as other programs) can pull the information into the right places. When you want to transfer a ton of data from another program into QuickBooks, importing is the way to go. By mapping QuickBooks fields to the fields in the other program, you can quickly transfer hundreds or even thousands of records. In this chapter, you’ll learn about the keywords QuickBooks uses to put your data into the correct fields and how to get your import file set up to work with QuickBooks. The chapter wraps up with the steps for importing data into your company file. (Chapter 26 provides the full story on importing and exporting data.)
Adding and Editing Multiple Records
The Add/Edit Multiple List Entries feature is a great tool for adding or updating values in the Customer, Vendor, and Item lists. If you have data in an Excel spreadsheet, you can paste it directly into a table in the Add/Edit Multiple List Entries window. The window’s features for copying or duplicating values between records come in handy with changes like updating the billing address for a customer who sends you job after job. (Typing values into cells works, too, if you notice a typo in one of the records in the list.) And you can customize the window’s table to show only the customers, vendors, or items you want to edit and the fields you want to modify.
This feature goes by different names depending on where you find it in QuickBooks. Choose it in any of these locations to open the Add/Edit Multiple List Entries window:
§ In the Lists menu, choose Add/Edit Multiple List Entries. When you go this route, QuickBooks sets the window’s List box to Customers.
§ In the Customer Center toolbar, click New Customer & Job→Add Multiple Customer:Jobs or Excel→Paste from Excel. QuickBooks sets the List box to Customers.
§ In the Vendor Center toolbar, click New Vendor→Add Multiple Vendors or Excel→Paste from Excel. QuickBooks sets the List box to Vendors.
§ At the bottom of the Item List window (Creating Items), click Item→Add/Edit Multiple Items or Excel→Paste from Excel. QuickBooks sets the List box to Service Items.
Selecting a List to Work With
As mentioned above, if you open the Add/Edit Multiple List Entries window from the Customer Center, Vendor Center, or Item List window, QuickBooks automatically selects the appropriate list in the window’s List drop-down menu. You can switch lists by choosing Customers, Vendors, Service Items, Inventory Parts, or Non-inventory Parts from this drop-down menu.
TIP
If you set up jobs for customers, the Add/Edit Multiple List Entries window’s table includes rows for both customers and jobs. The Name column contains the customer’s name for a customer row and the job’s name for a job row. Usually, you can spot job rows by looking at the Company Name field, since all jobs for that customer will have the same value listed here.
Customizing the Table’s Columns
To paste data from Excel in a jiffy, take a minute to get the columns in the Add/Edit Multiple List Entries window’s table in the same order as the columns in your Excel spreadsheet. If you’re an Excel whiz, you may prefer to rearrange the columns in your spreadsheet. Or you can customize the table in QuickBooks by clicking Customize Columns in the window’s upper right to open the Customize Columns dialog box shown in Figure 6-1.
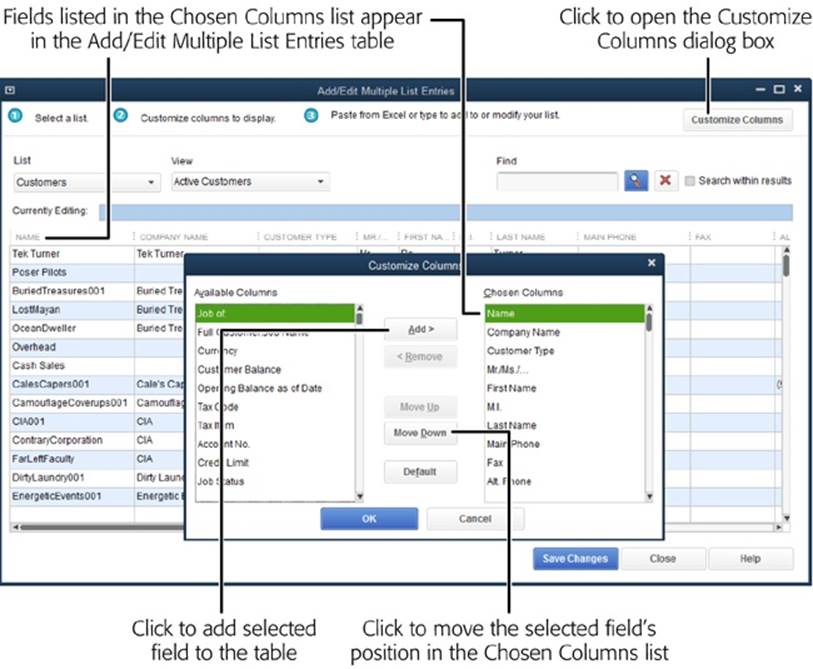
Figure 6-1. In addition to adding and removing columns, you can change the position of a column by selecting it in the Chosen Columns list and then clicking Move Up or Move Down (foreground). If you completely mangle the columns, click Default to restore the original ones. When you click OK, the Customize Columns dialog box closes, and the changes you made are reflected in the table (background).
Here are the table customizations you can make:
§ Add a column. Select the field you want in the Available Columns list, and then click Add. The field jumps over to the Chosen Columns list.
§ Remove a column. Select a field in the Chosen Columns list and then click Remove. The field moves back over to the Available Columns list. You can’t remove required fields like Name; QuickBooks grays out the Remove button if you select a required field in the Chosen Columns list.
§ Reorder columns. In the Chosen Columns list, select the field you want to move to a different position in the table. Then click Move Up or Move Down to move the field up or down in the list, respectively. Moving a field up in the list positions the field farther to the left in the table; moving it down in the list pushes the field’s column to the right in the table.
Displaying the Records You Want
In addition to customizing the columns in the Add/Edit Multiple List Entries table, you can also control which records the table displays. For example, editing entries is easier if you filter the list to display only the ones you want to edit. Here are some ways to control what you see in the table:
§ Filter the entries. The View drop-down list includes several choices for filtering the list. Choose the Active entry (Active Customers, Active Vendors, Active Service Items, and so on) if you want to make changes to only active records in your company file. Choosing the Inactive entry (Inactive Customers, Inactive Inventory Items, and so on) displays only records that you’ve set to inactive status (Hiding Items).
Because QuickBooks doesn’t save the changes you make in the Add/Edit Multiple List Entries window until you click Save Changes, you can filter by Unsaved Customers (or Unsaved Vendors or Unsaved Items) to see all the entries you’ve edited but haven’t yet saved.
Choosing the entry that ends in “with errors” displays only entries that contain invalid values, like a vendor type or tax code that doesn’t exist in your company file. In fact, if you click Save Changes when there are records with errors, QuickBooks automatically filters the list to the “with errors” view so you can see what you need to correct before you can save your changes. Saving Changes explains how to spot and fix errors.
To filter the list to your exact specifications, choose Custom Filter and then fill in the dialog box shown in Figure 6-2 (foreground). For example, if you want to divide your government customers into local, state, and federal groups, you can filter the list to show only records with “Government” in their customer fields. Note that QuickBooks displays only list entries that exactly match what you filter for, so if you type (555) to look for the 555 area code, records that don’t have parentheses around the area code won’t show up.
§ Find entries. Typing a word, value, or phrase in the window’s Find box is similar to applying a custom filter to the list, except that QuickBooks searches all fields. For example, if you type 555 in the Find box and then click the Search button (which has a magnifying glass on it), QuickBooks displays records that contain 555 anywhere, whether it’s in the company name, telephone number, address, or account number field.
TIP
To clear a custom filter or the search criteria you typed in the Find box, simply click the button with the red X on it to the right of the Find box.
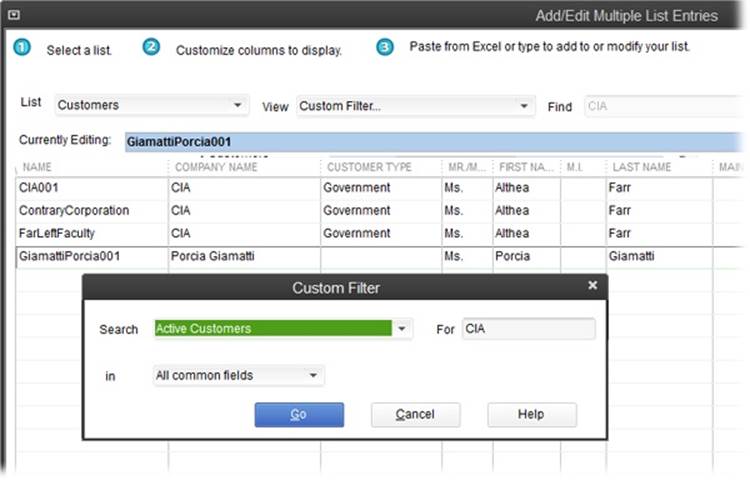
Figure 6-2. In the Custom Filter dialog box, you can type a word, value, or phrase to look for, and specify the fields you want QuickBooks to search. For example, type cia in the For field and set the “in” drop-down list to “All common fields” to find customers with “cia” in fields like Name, Company Name, and so on.
After you search for one value, you can search for something else within the results from the first search. For example, you could do an initial search for customers with “Texas” in their addresses, and then search within those results to find every customer in Dallas. To do so, type the second search value in the Find box, turn on the “Search within results” checkbox, and then click the Search button.
NOTE
QuickBooks is quite literal in its searches, so the entries you see in your search results exactly match what you typed in the Find box. For example, if you type New York, QuickBooks displays customer records that contain that exact phrase, but not ones that use the abbreviation NY.
§ Sort the list entries. To sort the entries in the table, click the column heading for the field you want to sort by, and QuickBooks sorts the records in ascending order (from A to Z or from low to high numbers). Click again to sort in descending order. When the table is sorted by the values in a given column, a small triangle appears to the right of that column’s heading. The triangle points up when the column is sorted in ascending order and down when the values are sorted in descending order.
Adding or Editing List Entries
Whether you want to add new entries or edit existing ones, the Add/Edit Multiple List Entries window offers several handy options. You can type in values or use features like Copy Down to copy values between records. If your data is in an Excel spreadsheet, pasting the info from Excel into the table is a breeze. (When you want to add a new record, you first have to click the first empty row at the bottom of the list.) This section explains how to enter data directly in the table or paste it from Excel.
Entering Data Directly in the Table
For an edit here and a new entry there, the Add/Edit Multiple List Entries table helps take the tedium out of data entry. Here are the various ways to enter values in records:
§ Type values in cells. This method is straightforward: Click a cell and make your changes. When you click a cell that already contains data, the program automatically selects the cell’s contents so you can start typing to replace the existing value. You can also use common editing techniques like dragging to select text or clicking to position your cursor in the text.
§ Copy and paste data within the table. You can also copy and paste data from one cell in the table to another. For example, if a customer with several jobs has relocated its main office, you can copy values from Bill To cells and paste them into the cells for the customer’s jobs. When you copy and paste data within the table, you can copy only one cell at a time. Right-click the cell you want to copy, and then choose Copy on the shortcut menu. Then right-click the cell into which you want to paste the data, and choose Paste on the shortcut menu. Keyboard shortcuts work, too: Press Ctrl+C to copy a cell, and Ctrl+V to paste the copied data. If you want to move the data from the original cell to a new home, use Ctrl+X to cut the data rather than copy it.
TIP
If you want to copy several cells in the Add/Edit Multiple List Entries table, it’s quicker to make the changes in an Excel spreadsheet and then paste the data from Excel into the Add/Edit Multiple List Entries table (Copying and Pasting Values from Excel).
§ Duplicate a row. To create a new record that has many of the same values as an existing record, right-click a cell in the existing row and then choose Duplicate Row from the shortcut menu. The new record appears in the row below the original and contains all the same values as the original record, except that the value in the first field begins with “DUP” to differentiate it from the original. First, edit the Name cell to reflect the new name. Then edit the cells in the row that have different values.
§ Copy values down a column. You can quickly fill in several cells in a column by using the Copy Down feature. Because this feature copies data into all cells below the one you select, it’s important to filter the list (Displaying the Records You Want) to show only the records you want to change. Then right-click the cell you want to copy down the column and choose Copy Down from the shortcut menu. QuickBooks copies the value in the selected cell to all the cells below it in the column, overwriting any existing data. For example, if you want to change the contact name for all the jobs for a particular customer, filter the list to show just the records for that customer (in the Find box, type the customer’s name, and then click the magnifying glass icon). Next, type the new contact into the first Contact cell. Then right-click that cell and choose Copy Down.
§ Insert a row. If you want to insert a blank line in the table (to create a new job for a customer, for example), right-click the row that’s currently where you want the blank line, and then choose Insert Line from the shortcut menu (or press Ctrl+Insert).
§ Delete a row. If you created a record by mistake, you can get rid of it by right-clicking anywhere in its row and then choosing Delete Line. (This entry is grayed out if the entry is used in a transaction or other record, because you can’t delete a record if it’s referenced somewhere else in your company file.)
§ Clear a column. To clear all the values in a column, right-click in the column and then choose Clear Column from the shortcut menu; QuickBooks immediately removes all the values in that column. If you chose this feature by mistake, you can undo the deletion by clicking Close and then, in the Unsaved Customer(s) message box, clicking No.
Copying and Pasting Values from Excel
If you’re a fan of copying and pasting (and who isn’t?), you can copy data from an Excel spreadsheet (a single cell, a range of cells, one or more rows, or one or more columns) and paste it into the table. The only requirement is that the rows and columns in the table and in the spreadsheet have to contain the same information in the same order. You can rearrange the rows and columns either in the Add/Edit Multiple List Entries window (Customizing the Table’s Columns) or in Excel, whichever you prefer.
If you want to copy and paste customers and jobs (or items with subitems), you first have to create the top-level entries, as shown in Figure 6-3. That’s because jobs you paste include the name of the customer in the Company Name field (for items, the parent item’s name appears in the “Subitem of” field). Once the parent entries exist, you can use the Add/Edit Multiple List Entries window again to paste jobs (or subitems).
NOTE
To prevent errors when you copy and paste data, make sure the values you reference—such as accounts, tax codes, and so on—already exist in your company file.
Here’s how to get started with entering data via the Add/Edit Multiple List Entries window, using items as an example:
1. On the QuickBooks Home page, in the Company panel, click Items & Services.
The Item List window opens.
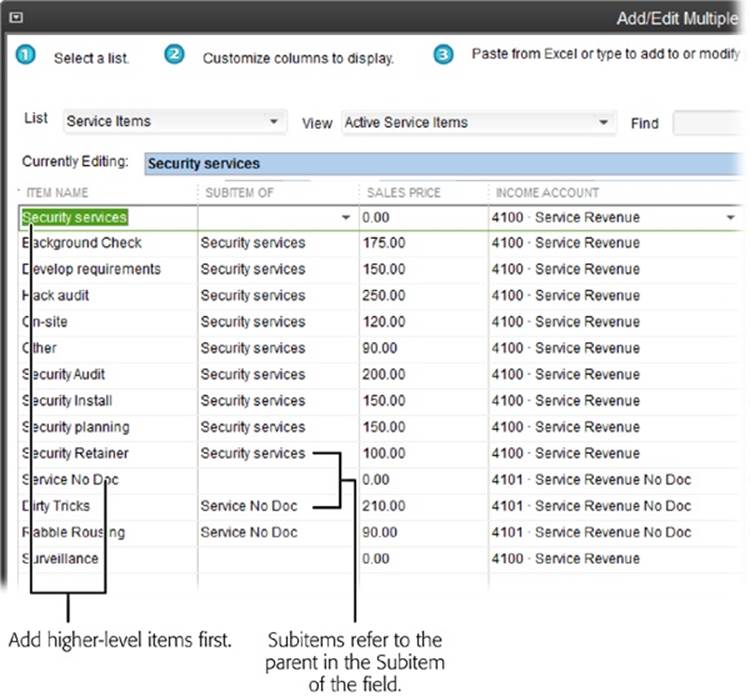
Figure 6-3. Create customers before you create jobs, and create parent items before creating subitems. That way, the company name you paste in the Company Name field (or the parent item name you paste in the “Subitem of” field) will exist in your company file. If you don’t create the parent items first, QuickBooks will display an error message when you try to paste the jobs or subitems.
2. Right-click the Item List window, and then choose Add/Edit Multiple Items from the shortcut menu. (Alternatively, at the bottom of the window, click Item→Add/Edit Multiple Items.)
The Add/Edit Multiple List Entries window opens. The List box is set to Service Items or the type of item you selected the last time you used this window. The table initially displays the active items for the type selected in the List box (Figure 6-4), which makes sense because you typically want to add or edit items that you’re currently using. To filter the list to show specific kinds of items, in the View drop-down menu, choose the kind you want.
3. If you want to work with a different type of item, in the List drop-down menu, choose Customers, Vendors, Service Items, Inventory Parts, or Non-inventory Parts.
The columns in the table vary depending on the list you select and the preferences you’ve turned on. For example, for Service items, the table includes columns for Item Name, Subitem of, Sales Price, Income Account, and—if you’ve turned on the sales tax preference (Setting Up Sales Tax)—Sales Tax Code. If you’ve turned on the preference for inventory (Setting Up Inventory Items) and choose Inventory Parts, you see a COGS Account column, among others. If you choose the Customers or Vendors list, the table initially displays contact info and a few other fields. (See Customizing the Table’s Columns to learn how to customize the columns that appear in the table.)
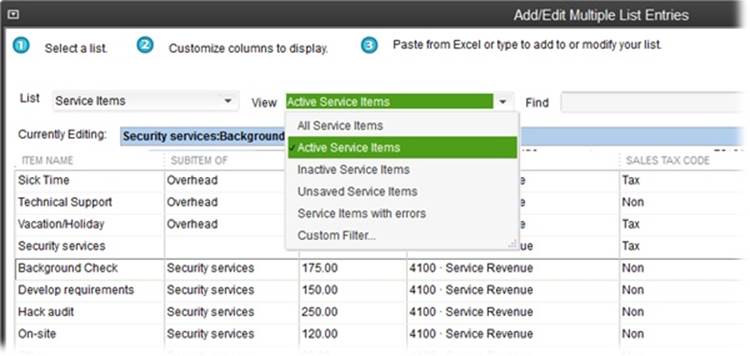
Figure 6-4. In the List drop-down menu, choose the type of item you want to work on. The table displays the active items of the selected type so you can add or edit them. To filter the list, in the View drop-down menu, choose the kind of item you want or choose Custom Filter to define a more targeted filter (page 120).
4. Switch to Excel and copy the data you want from your spreadsheet.
As explained earlier, the order of the columns in the Add/Edit Multiple List Entries table and your Excel spreadsheet have to match or you’ll see errors when you paste the data (which you’ll do in the next step). To fix that, reorder the columns in either Excel or QuickBooks (Customizing the Table’s Columns). When the programs’ columns match, in Excel, select the information you want to paste into QuickBooks and then press Ctrl+C to copy it.
5. Back in the Add/Edit Multiple List Entries window, click the first blank Item Name cell (or Name cell if you’re pasting customer or vendor info), and then press Ctrl+V (or choose Edit→Paste in the main QuickBooks menu bar).
When you paste Excel data into existing records in the Add/Edit Multiple List Entries window, QuickBooks overwrites the existing values in the cells. To paste Excel data into new records, be sure to select the first empty row in the window before pasting the data.
QuickBooks begins pasting the copied data into the selected cell and then continues pasting into the cells below and to the right of the selected cell. Cells that contain data with errors, such as invalid values or list entries that don’t exist in QuickBooks, appear in red text. See Saving Changes to learn how to correct these errors.
TIP
If you want to paste parent and subitems into the Add/Edit Multiple List Entries table, paste the top-level items first and then click Save Changes. Then follow with a separate paste pass for each subsequent level of your Item List. (For customers with jobs, paste the customers first, and then paste their jobs in a second pass.) That way, the parent items you need will already exist so the new entries will paste in without errors.
Saving Changes
After you’ve completed the additions and modifications you want in the Add/Edit Multiple List Entries window, click Save Changes to save your work. QuickBooks saves all the entries that have no errors and tells you how many records it saved.
Correcting Errors
If you try to save changes and QuickBooks finds any errors, like a value that doesn’t exist in the Terms list or a job that belongs to a customer that doesn’t exist in QuickBooks, it filters the entries in the Add/Edit Multiple List Entries window’s table to just those with errors and displays the incorrect values in red text. Point your cursor at a cell to see a hint about the error. For example, if you typed a letter in a price field, QuickBooks tells you that the field contains an invalid character. If the problem is a list entry that doesn’t exist, the “[list name] Not Found” dialog box opens (where “[list name]” is a list like Terms) and tells you the value isn’t in the list. In the dialog box, click Set Up to add the entry to the list. Fix any other errors and then click Save Changes again.
TIP
If you don’t know what’s causing the error, select the incorrect value and delete it by pressing Delete or Backspace. Then, when you figure out what the value should be, you can edit that record in the Add/Edit Multiple List Entries window or the corresponding Edit dialog box.
Importing Customer, Vendor, and Item Information
If you have hundreds of records to stuff into QuickBooks, even copying and pasting can be tedious. But if you can produce a delimited text file or a spreadsheet of customer or vendor info in the program where you currently store it (Importing Data from Other Programs), then you can match up your source data with QuickBooks’ fields and import all your records in one fell swoop.
Delimited files and spreadsheets compartmentalize data by separating each piece of info with a comma or a tab, or by cubbyholing them into columns and rows in a spreadsheet file. These files aren’t necessarily ready to import into QuickBooks, though. Headings in a delimited file or spreadsheet might identify the field names in the program that originally held the information, but QuickBooks has no way of knowing the correlation between those fields and its own.
But don’t worry: QuickBooks helps you import your Excel data for customers, vendors, and items. There’s a data import wizard right in the program. You can use its pre-formatted Excel templates to import data from your own Excel spreadsheet. (If you don’t need any handholding at all, head to Importing Data from Other Programs in Chapter 26 for the full scoop on importing data into QuickBooks.)
TIP
Always back up your company file before you import data in case you run into problems. That way, you can restore your pre-import file and try again. Backing Up Manually dishes out the details on creating a backup file.
Importing with the Excel Import Wizard Templates
QuickBooks’ Excel import wizard is easy to get to and easy to use. The pre-formatted spreadsheets that come with it contain a small subset of the fields associated with each list you can import. For example, the customer template includes columns for basic contact info and an account number. If the fields you want to import are in the wizard’s Excel templates, you can’t beat this wizard for ease of use. (The wizard’s Advanced Import button helps you import info from other Excel spreadsheets. The next section shows you how to put that button to use.)
Here’s how to use the Excel import wizard and its built-in spreadsheets:
1. In QuickBooks, choose File→Utilities→Import→Excel Files.
The “Add Your Excel Data to QuickBooks” wizard opens. (If you see the Add/Edit Multiple List Entries dialog box, click No to proceed to the wizard. If you don’t want to see this message again, turn on the “Do not display” checkbox.)
2. Click the button for the type of data you want to import: Customers, Vendors, or Products I Sell.
You see a message warning that you can’t undo the import and recommending that you back up your company file first. If you want to create a backup, click No, create the backup, and then begin with step 1 again. If you’re ready to import data, click Yes to close the message box.
QuickBooks opens an Excel template for the type of data you’re importing, as shown in Figure 6-5.
3. Copy your data into the template.
Open the Excel spreadsheet whose info you want to get into QuickBooks, select the data you want to copy, and then press Ctrl+C. Next, switch to the Excel template QuickBooks created and press Ctrl+V to paste the data. (If you need help, click the template’s Show Detailed Instructions button.)
4. After you’ve copied all the data from your spreadsheet into the Excel template and none of the template’s cells are yellow, save the template.
In Excel 2010 or 2013, choose File→Save. In Excel 2007, choose Office→Save. Then close the spreadsheet you copied data from.
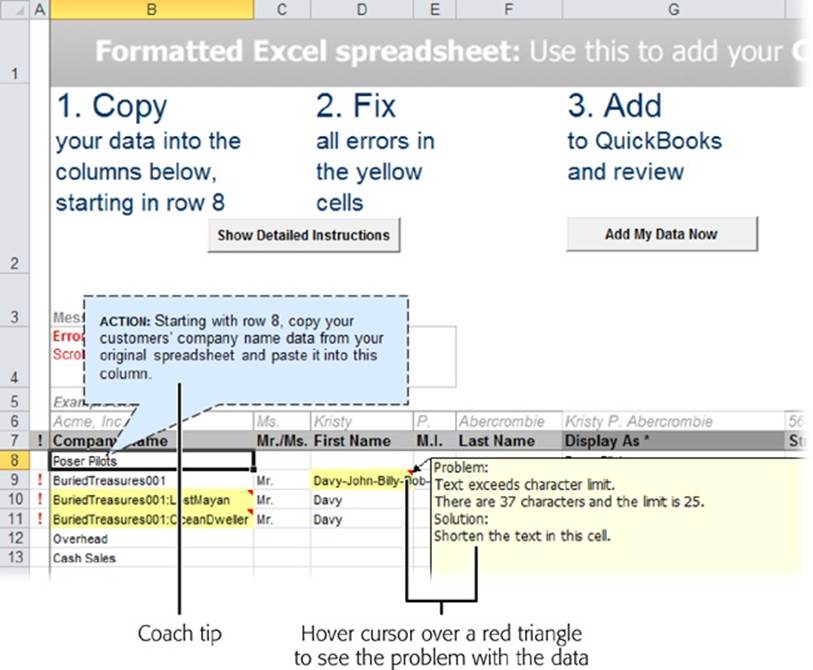
Figure 6-5. The Excel import templates not only get your data into the right fields, but they also help you with every step. For example, the blue box (identified here as a Coach tip) gives you advice about how to copy data from an Excel spreadsheet into the template. If a cell turns yellow, it means there’s a problem with the data in it. Point your cursor at the red triangle in the cell’s upper-right corner to see what the problem is and how to fix it.
5. In QuickBooks’ Excel template, click Add My Data Now.
The “Add Your Excel Data to QuickBooks” wizard shows how much progress it has made importing the data. When it’s done, it places green checkmarks to the left of all three steps and shows how many records it imported. You can click the button that says “View [type of imported info]” to see the list you imported, or click Close and view your lists as you usually do. For example, to see your Customer List, click Customers→Customer Center.
Importing Data From Your Own Excel File
You don’t have to use the data import wizard’s spreadsheets. If your data is already sitting in a spreadsheet, the wizard’s Advanced Import button helps you map your spreadsheet’s columns to QuickBooks fields and then import your data. This section shows you how it works.
Here’s how you import data from an existing Excel file:
1. In QuickBooks, choose File→Utilities→Import→Excel Files. In the “Add Your Excel Data to QuickBooks” wizard, click the Advanced Import button.
The “Import a file” dialog box opens.
TIP
What if you don’t have data in an Excel spreadsheet? There’s no need to set up your own file. The “QuickBooks Import Excel and CSV toolkit” (http://tinyurl.com/7chnkqn) includes a sample Excel spreadsheet with four worksheets. Each worksheet comes with columns that correspond to the fields associated with the Customer, Vendor, Item, and Account Lists. Follow the instructions on the web page to download the toolkit to your computer.
2. In the “Import a file” dialog box, on the “Set up Import” tab, click Browse and select the Excel file you want to import.
QuickBooks then populates the “Choose a sheet in this Excel workbook” drop-down list with the names of the worksheets in the workbook you selected.
3. Use the “Choose a sheet in this Excel workbook” drop-down list to pick the worksheet you want to import.
QuickBooks automatically turns on the “This data file has header rows” checkbox, which is perfect when the first row of the Excel workbook contains text labels for the columns.
4. In the “Choose a mapping” drop-down list, choose <Add New>.
The Mappings dialog box opens.
5. In the “Mapping name” box, type a name for the set of correspondences between fields and columns you’re about to create. In the “Import type” drop-down list, choose the kind of data you’re importing.
You can choose Customer, Vendor, Item, or Account to import data into any of those lists.
6. For each QuickBooks field listed in the left column, in the Import Data column, choose the corresponding Excel header or column name, as shown in Figure 6-6.
The QuickBooks column lists every field associated with the list you selected in the “Import type” drop-down list. If you don’t want to import data into a QuickBooks field, leave the corresponding cell in the Import Data column blank.
7. To tell QuickBooks how to handle duplicate records and errors, click the “Import a file” dialog box’s Preferences tab and choose the settings you want.
Out of the box, QuickBooks selects the “Prompt me and let me decide” option in the Duplicate Handling section, which puts you in charge of deciding what to do. If the records in your company file are up to date, you can choose the “Keep existing data and discard import data” option to keep the records in QuickBooks when the same record exists in your company file and the Excel spreadsheet. Or you can tell the program to replace your existing data in QuickBooks with or without blank fields.
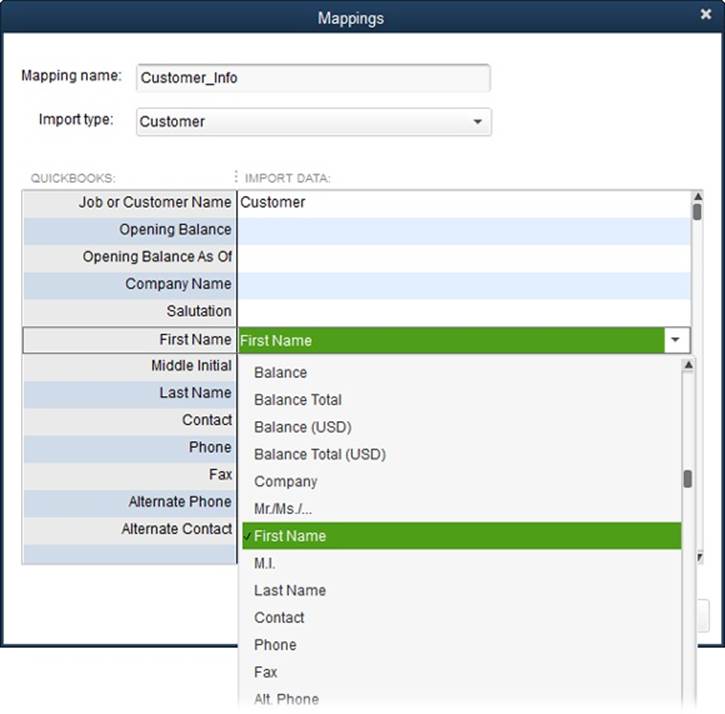
Figure 6-6. If you kept the “This data file has header rows” checkbox turned on in step 3, then the drop-down lists that appear when you click a cell in the Import Data column show the column headings from your Excel spreadsheet. If your spreadsheet doesn’t contain header rows, then the drop-down list will display entries like Column A, Column B, and so on.
Similarly, in the Error Handling section, QuickBooks selects the option that imports all records but leaves fields with errors blank. You can also tell the program to skip records with errors.
8. After you’ve mapped all the columns you want to import to QuickBooks fields, click Save.
The Mappings dialog box closes and you’re back in the “Import a file” dialog box.
9. To review the data you’re about to import, click Preview. In the Preview dialog box, in the “In data preview show” drop-down list, choose “only errors” to see rows of data that contain errors.
When you select an incorrect entry, the “Details for” table shows the values you’re trying to import and what the problem is so you can correct it. You can also select options to skip importing rows with errors or import records and leave error fields blank.
10.Click OK to close the Preview dialog box.
You can also click Import in the Preview dialog box.
11.Back in the “Import a file” dialog box, click Import. Click Yes to complete the import.
A message box tells you how many records were imported and the number of records with errors or warnings. Click OK to close the message box and the “Import a file” dialog box.
That’s it! Go ahead and open the list with the data you imported (for example, click Customers in the Home page to open the Customer Center) and admire your handiwork.