QuickBooks 2014: The Missing Manual (2014)
Part II. Bookkeeping
Chapter 8, Tracking Time and Mileage
Chapter 9, Paying for Expenses
Chapter 10, Invoicing
Chapter 11, Producing Statements
Chapter 12, Transaction Timesavers
Chapter 13, Managing Accounts Receivable
Chapter 14, Bank Accounts and Credit Cards
Chapter 15, Doing Payroll
Chapter 16, Making Journal Entries
Chapter 17, Performing Year-End Tasks
Chapter 8. Tracking Time and Mileage
When customers pay for your services, they’re really buying your knowledge of how to get the job done the best and fastest possible way. That’s why an inexperienced carpenter charges $15 an hour, whereas a master who hammers faster and straighter than a nail gun charges $80 an hour. When it comes right down to it, time is money, so you want to keep track of both with equal accuracy. Product-based companies track time, too. For example, companies that want to increase productivity often start by tracking the time that employees work and what they work on.
There are hordes of off-the-shelf and homegrown time-tracking programs out there, but if your time-tracking needs are fairly simple, you can record time directly in QuickBooks or use its companion Timer program, which you can provide to each person whose work hours you want to track. The advantage of tracking time in QuickBooks is that the hours you record are ready to attach to an invoice (see Invoicing for Billable Time and Costs) or use in payroll (see Creating Employee Records). In this chapter, you’ll learn how to record time in QuickBooks itself. Appendix D (available from this book’s Missing CD page at www.missingmanuals.com/cds) explains the ins and outs of the standalone Timer program.
NOTE
If your time-tracking needs outpace QuickBooks’ time-tracking features, Intuit’s marketplace (http://marketplace.intuit.com) lists about 50 time-tracking solutions that integrate with QuickBooks. Click Search By Business Need, and then click Time Tracking. You can then turn on the checkboxes that appear to specify features you’re looking for, such as online access or the ability to track time against projects. Intuit’s App Center (http://appcenter.intuit.com) also lists a few time-tracking solutions. Type “time tracking” in the Search box and then click the Search button (it looks like a magnifying glass). To search further afield, type keywords like “QuickBooks time tracking” into your favorite Internet search engine.
Mileage is another commodity that many businesses track—or should. Whether your business hinges on driving or merely requires the occasional jaunt, the IRS lets you deduct vehicle mileage, as long as you can document the miles you deduct. And you might charge customers for the miles driven in conjunction with the work you do for them. As you’ll learn in this chapter, QuickBooks can help you track the mileage of company vehicles, which you can use for tax deductions or to charge customers.
Setting Up Time Tracking
For many businesses, approximations of time worked are fine. For example, employees who work on only one or two tasks each day can review the past week and log their hours in a weekly timesheet. But for people with deliciously high hourly rates, you want to capture every minute spent on an activity.
QuickBooks can help you track time whether you take a conscientious approach or a more cavalier one. You can choose from two different ways of recording time with QuickBooks:
§ Enter time data in QuickBooks. You can enter time for individual activities or fill in a weekly timesheet. In the Time/Enter Single Activity dialog box, you can type in the number of hours for a single activity. The dialog box also includes a stopwatch, so you can have it track the time you’re working on a task.
§ Use the QuickBooks Timer stopwatch. This program, which comes on the QuickBooks CD, lets you time activities as you work so you can track your time to the second—as long as you remember to start and stop the Timer at the right moments. (If you forget to turn the Timer on or off, you can edit time entries to correct them.) The best thing about Timer is that you can use it to record time even when QuickBooks isn’t running. Moreover, you can give a copy of Timer to all your employees and subcontractors so they can send you time data to import into QuickBooks.
NOTE
If you download QuickBooks and want the Timer program, you’ll have to order a CD from Intuit by calling (888) 729-1996 and pay $20 plus shipping, handling, and sales tax.
No matter which technique you use to capture time, the setup is the same: You tell QuickBooks that you want to track time and then set up the people who need to track their time (employees and outside contractors alike). You use the customers and items you’ve set up in QuickBooks to identify the billable time you work. If you want to track nonbillable time, you need a few more entries in QuickBooks, which you’ll learn about in the following sections.
Turning on Time Tracking
If you told QuickBooks that you want to track time when you created your company file (Customizing Your Company File), the time-tracking preferences and features should be ready to go. To see whether time tracking is turned on, choose Edit→Preferences→Time & Expenses, and then click the Company Preferences tab (only a QuickBooks administrator can turn time tracking on or off). If the Yes radio button below “Do you track time?” (shown in Figure 8-1) isn’t selected, click it. (If your company file is in multi-user mode, QuickBooks tells you that you have to switch to single-user mode [Switching Between Multi- and Single-User Mode] first.)
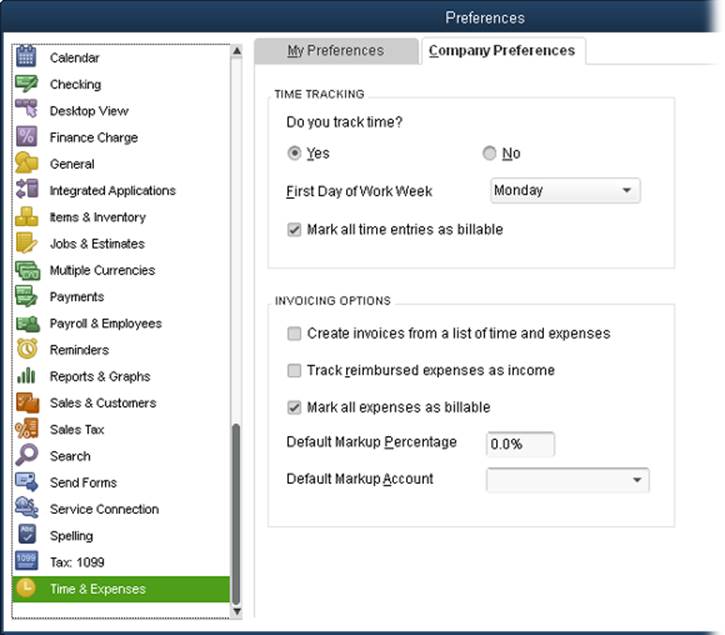
Figure 8-1. If most of your work time is billable, keep the “Mark all time entries as billable” checkbox turned on. That way, whenever you start a new time record, the Billable checkbox will be turned on. On the other hand, turn off the “Mark all time entries as billable” checkbox if you charge by the hour for only a couple of projects.
QuickBooks automatically sets the First Day of Work Week box to Monday to match the Monday-through-Friday workweek of so many businesses. For round-the-clock services, self-employed people, and workaholics, choose whichever day of the week feels most like the beginning of the week. For example, many companies on a seven-day workweek start the week on Sunday. If you use QuickBooks to generate hours for payroll, you should set the program’s workweek to end on the same day as your pay periods. For instance, if your payroll cut-off dates are on Fridays, in the First Day of Work Week drop-down list, choose Saturday so that QuickBooks’ workweek ends on Friday, just like your payroll.
TIP
To learn about time-related invoicing options, see Invoicing for Billable Time and Costs.
Setting Up the People Who Track Time
You can’t enter or import people’s time into QuickBooks unless their names appear in one of your name lists (the Employee List, Vendor List, or Other Names List). If someone whose time you want to track isn’t on one of those lists yet, here’s how you decide which list to use:
§ Employee List. Use this list for your employees whether you pay them by using QuickBooks’ payroll features or in some other way.
§ Vendor List. Add subcontractors and outside consultants (people or companies that send you bills for time) to this list, whether or not their time is billable to customers. (Their time is undoubtedly billable to you.)
§ Other Names List. By process of elimination, anyone who isn’t a vendor or an employee belongs on this list, such as owners who take a draw or partners who take distributions instead of a paycheck (Taking a Draw).
People who enter time in QuickBooks (with a weekly timesheet or in the Time/Enter Single Activity dialog box, not with the standalone Timer program) need the program’s permission to do so. When you set up QuickBooks users, you can set their permissions so they can enter time (What the Access Areas Represent).
Setting Up Items and Customers for Time Tracking
The good news is that you don’t have to do any additional item and customer setup to be able to bill time to your customers. The Service items (Service Items) and customer records (Creating a New Customer) you create for invoicing also work for tracking billable time. When you enter time, you choose the Service item you’re working on. Then QuickBooks totals your hours and figures out how much to charge the customer based on the number of hours you worked and how much you charge per hour for that service.
The only reason you’d need additional items is if you track all the hours that people work, both billable and nonbillable. For example, if you’re trying to reduce overhead costs, you might add items to track the time spent on administrative work or providing customer service, as shown inFigure 8-2. (Creating Items explains how to add items.) The level of detail you track in QuickBooks for nonbillable activities is up to you.
Here’s how you fill in item fields when you create items to track time that you don’t bill to a customer:
§ Type. Use the Service item type (Service Items) because that’s the only one QuickBooks’ time-tracking feature recognizes.
§ Rate. In the New Item or Edit Item dialog box, the Rate field is where you enter how much you charge for the service. Because no money changes hands for nonbillable time, leave this field set to 0.
§ Account. You can’t create an item without assigning it to an account, so create an expense account (Creating Accounts and Subaccounts) and call it something like Nonbillable Work or Overhead Time. If you number accounts, assign the account a number that places it near the end of your Expense type accounts (like 8230).

Figure 8-2. If you want to capture nonbillable activities in one big pot, create a single Service item called Overhead. For greater detail about nonbillable time, you can create a top-level Overhead item and then create subitems for each type of nonbillable work you want to track. Be sure to also create one catchall item, such as Other, to capture the time that doesn’t fit in any other nonbillable category.
§ This service is used in assemblies or is performed by a subcontractor or partner. If a subcontractor performs nonbillable work for you, turn on this checkbox. That way, you can assign the subcontractor’s costs to an expense account and use time tracking to make sure the subcontractor’s bills are correct. For nonbillable items performed by owners and partners, leave this checkbox turned off.
Entering Time in QuickBooks
QuickBooks lets you enter and view time for a single activity or for whole weeks. If you record time after the fact, a weekly timesheet is the fastest way to enter time (and you can enter weekly timesheets for more than one person at once). If you already have one timesheet filled out, you can copy it to speed up your data entry, as the box on Copying Timesheets explains.
To time work as you perform it, the Time/Enter Single Activity dialog box (explained starting on Entering Time for One Activity) is the way to go.
GEM IN THE ROUGH: TIME BY THE BATCH
QuickBooks’ Weekly Timesheet window lets you create timesheets for several people at the same time. The only limitation is that the entries in the weekly timesheet have to be identical for all the people you select—that is, the same customer and job, Service item, notes, class, and hours each day. And if the people are paid through payroll, the Payroll item has to be the same, too.
Here’s how to create a batch timesheet:
1. In the Home page’s Employees panel, click Enter Time and then, on the drop-down menu, choose Use Weekly Timesheet.
2. In the Weekly Timesheet window’s Name drop-down list, choose “Multiple names (Payroll)” if the people are paid through your payroll service, or choose “Multiple names (Non-Payroll)” if they’re paid another way, such as vendors, contractors, or owners who take an owners’ draw.
3. In the “Select Employee, Vendor or Other Name” dialog box, keep the Manual option selected and then click the name of each person you want to add to the batch timesheet to add a checkmark to the left of their names.
4. Click OK.
5. Fill out the weekly timesheet as you would for a single person and then click Save & Close.
QuickBooks creates a timesheet for each person you selected with the information you entered in the timesheet. For example, if you recorded 40 hours of work in the timesheet, each person now has a timesheet showing 40 hours.
Filling out Weekly Timesheets
QuickBooks’ weekly timesheet is the fastest way to enter time for several activities or work that spans several days. Here’s what you do:
1. In the Home page’s Employees panel, click Enter Time and then, on the drop-down menu, choose Use Weekly Timesheet.
QuickBooks opens the Weekly Timesheet window.
NOTE
Even though you can track time for people other than employees (like contractors), you access QuickBooks’ time tracking feature from the Employees menu or the Employees panel on the Home page.
2. In the Name drop-down list, choose the person who performed the work.
Because time tracking is rarely limited to only the people with permission to use QuickBooks, you can enter time for yourself or anyone else. After you choose a name, the program displays a timesheet for the current week and shows any time already entered for that week, as shown inFigure 8-3. (See the box above to learn how to create a batch of timesheets in one fell swoop.)
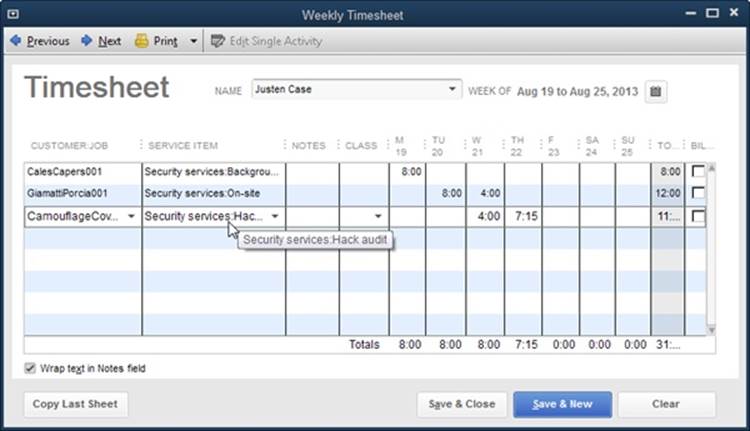
Figure 8-3. The weekly timesheet doesn’t provide much room to display customer names, job names, or more than a few letters of the Service item for the task performed. To see the full contents of a cell in a pop-up tooltip like the one shown here, position your cursor over the cell. You can also drag a corner of the window to resize it or click the Maximize button near the top right of the window to enlarge it.
3. To enter time for a different week, in the window’s toolbar, click Previous or Next until the week you want appears.
To choose a week that’s quite a ways in the past, click the calendar icon to the right of the timesheet’s date range. In the Set Date dialog box that appears, click the arrows to the left or right of the month heading to move to a past or future month. Click any date during the week to choose that workweek. For example, choosing 6 in the March 2014 calendar switches the timesheet to the week beginning March 3, 2014.
TIP
If an earlier timesheet has entries with customers and items that apply to the current timesheet, you can copy the earlier timesheet as described in the box on Copying Timesheets.
4. In the first blank Customer:Job cell (the first column of the timesheet table), choose the customer or job associated with the work that was performed, if applicable.
If the work is billable, choose the customer or job that pays for it. If the time isn’t billable, you can leave this cell blank or choose the customer you created to track nonbillable time. Depending on whether you prefer to keep your hands on the keyboard or the mouse, you can then move to the Service Item cell by clicking it or by pressing Tab.
5. In the Service Item cell, choose the item that represents the work the person performed.
If you use a QuickBooks’ payroll service and pay employees by the hours they work, the Payroll Item column appears to the right of the Service Item column, so you can also fill in the payroll-related item that applies to the time worked. For example, for billable work, choose a Payroll item such as Salary or Employee Income. If the hours are for vacation or sick time, choose the Payroll item you’ve created for that kind of time.
6. In the Notes cell, type any additional information about the work.
If your customers require details about the work performed, store that info in the Notes cell, which then appears on the invoices you create (see Creating a Batch of Time and Expenses Invoices).
TIP
To see the entire contents of Notes cells, make sure the “Wrap text in Notes field” checkbox at the bottom of the Weekly Timesheet window is turned on. That way, each row in the Timesheet table takes up more space, but you won’t have to position your cursor over every Notes cell to see what it contains.
7. If you use classes to track income and expenses (Categorizing with Classes), in the Class column, choose one for the work.
This column appears only if you’ve turned QuickBooks’ class preference on. If you track income by partner, for example, choose the class for the partner who handles that customer. If you use classes to track office branches, choose the class for the branch where the person works.
8. To enter time for a day during the week, click the cell for that day or press Tab until you reach the right cell.
You can enter time in several ways. If you know the number of hours, type them as a decimal or as hours and minutes. For example, for seven and a half hours, type either 7.5 or 7:30. QuickBooks displays the hours in the timesheet based on the time format preference you set (Company-Wide General Preferences). If you know the starting and ending time, QuickBooks can calculate the hours for you. For example, if you type 9-5 in a cell, the program transforms it into eight hours when you move to a different cell (by pressing Tab or clicking another cell).
As you enter time for each day of the week, the Total column on the right side of the table shows the total hours for each activity. The numbers in the Totals row below the table show the total hours for each day and for the entire week.
NOTE
Each row in a weekly timesheet represents one Service item, one customer or job, and one note. So if you perform the same type of work for two different customers, you have to enter that time in two separate rows. You also have to create another row if you want to record a different note for the same customer and the same Service item. You might do this if, for example, you did web-development work for a customer, but want to differentiate the work you did on its online store web page and on its marketing web pages.
9. If the time is for overhead or you aren’t billing the customer for the work and the checkmark in the “Billable?” column is turned on, click it to turn it off. Conversely, if the checkmark is turned off and the time is billable, click the checkbox to turn it on.
If you’ve turned on the “Mark all time entries as billable” preference (Spelling), QuickBooks puts a checkmark in the “Billable?” column automatically. If this preference is turned off, the “Billable?” checkbox is blank unless you click it.
TIP
Adding billable time to customer invoices is easy; it’s described in detail on Invoicing for Billable Time and Costs.
10.To save the timesheet, click Save & Close or Save & New.
If you’re entering time for a number of people, click Save & New to save the current timesheet and open a new blank one. Clicking Save & Close saves the timesheet and closes the Weekly Timesheet window.
UP TO SPEED: COPYING TIMESHEETS
People often work on the same tasks from week to week. QuickBooks can reduce tedium and mistakes—and save you time—by copying entries from a person’s previous timesheet. Here’s how:
1. In the Weekly Timesheet window’s Name field, choose the person’s name.
2. Display the weekly timesheet you want to copy information into by clicking Previous or Next, or clicking the calendar icon.
3. At the bottom of the dialog box, click the Copy Last Sheet button. If the timesheet that’s currently displayed is empty, QuickBooks fills in all the rows with the entries from the person’s last timesheet, including the customer, Service item, class, notes, and hours. If the current timesheet already has values, QuickBooks asks whether you want to replace the entries. Click Yes to replacethe entries with the ones from the last timesheet you opened. Click No to append the entries from the last timesheet as additional rows in this week’s timesheet. To keep the currently displayed timesheet just the way it is, click Cancel.
Entering Time for One Activity
Entering time in a weekly timesheet is quick, but the width of the columns makes it hard to see which customer and Service item you’re tracking. If you prefer readability to speed, the Time/Enter Single Activity dialog box is a better choice. This box also includes a stopwatch you can use to time your work.
TIP
One drawback to the Time/Enter Single Activity dialog box is that you have to fill in every field for every activity. If you grow tired of this form of time entry, then in the window’s toolbar, click Timesheet to switch to the Weekly Timesheet window. The weekly timesheet that appears is for the person you selected in the Time/Enter Single Activity dialog box and the week that includes the selected day.
Here’s how to enter time for one activity at a time:
1. In the Home page’s Employees panel, click Enter Time and then, on the drop-down menu, choose Time/Enter Single Activity.
The Time/Enter Single Activity dialog box opens to today’s date.
2. If you want to record time for a different day, then in the Date field, click the calendar icon and choose the date when the work took place.
When you first open the Time/Enter Single Activity dialog box, QuickBooks selects all the text in the Date box. You can replace that date by simply typing a new one, like 3/07/14.
3. In the Name drop-down list—which includes vendors, employees, and names from the Other Names List—select the person who performed the work.
Employees and other names are near the end of the list.
NOTE
In the Time/Enter Single Activity dialog box, the Payroll Item field appears initially. If you select an employee who’s paid based on her time (Creating Employee Records), then select the Payroll item to which the time applies so that the time data generates the values on the person’s paycheck. (If you choose the name of a person who isn’t paid based on her time, the Payroll Item field disappears.)
4. In the Customer:Job drop-down list, choose a customer or job.
If someone performs work for a real customer or job, choose that customer or job whether or not you bill the time. To track overhead time, choose the customer you created for nonbillable work (Setting Up the People Who Track Time).
5. If the time is billable and the “Billable?” checkbox in the upper-right corner of the window is turned off, click it to turn it on. For nonbillable time, make sure the “Billable?” checkbox is turned off.
If you’ve turned on the “Mark all time entries as billable” preference (Spelling), QuickBooks puts a checkmark in the “Billable?” checkbox automatically. If that preference is turned off, the “Billable?” checkbox is blank unless you click it.
6. In the Service Item drop-down list, choose the item that represents the work performed.
Choose the appropriate item, whether it’s one you use to invoice customers or a nonbillable item you created to track overhead activities. When you’re done, press Tab to move to the Duration box.
7. In the Duration box, enter the hours worked.
If you press Tab to move to the Duration box, QuickBooks automatically selects the contents of the box, so you can simply type the hours worked. If you click the Duration box instead, drag to select its contents.
Enter hours as a decimal or as hours and minutes, such as 5.5 or 5:30. Or, if you know the starting and ending times, type the range to have QuickBooks calculate the hours. For example, if you type 11-5, the program converts it to 6:00 when you tab or click away from the Duration box.
If you work in QuickBooks most of the time, you can also use the Time/Enter Single Activity dialog box to time your work, as shown in Figure 8-4.
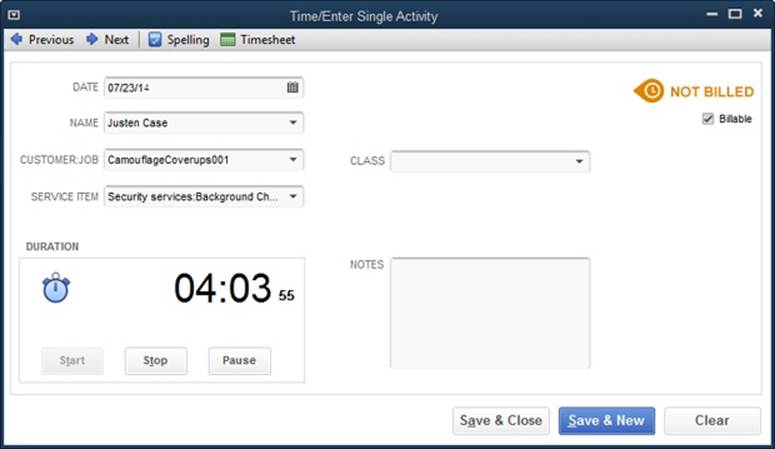
Figure 8-4. To time your current activity, the Date field has to be set to today, since you can’t run a stopwatch for work performed on a different day. To start timing, click the Start button, which is grayed out here. You’ll see the seconds that are passing to the right of the Duration box (where it says “55” here) to show that QuickBooks is timing your work. To pause the stopwatch, click Pause; click Start to start timing again. When you finish the task, click Stop. As long as the stopwatch isn’t timing, you can edit the time by typing the time you want.
NOTE
If you click Previous at the top of the Time/Enter Single Activity dialog box to display another single activity for today and then click Start, the stopwatch feature starts adding additional time to what you’ve already recorded.
8. If you track classes, in the Class field, choose the appropriate one. (This field appears only if classes are turned on.) To add notes about the activity, type text in the Notes box.
These notes appear in the Notes column of the Weekly Timesheet window and, for billable work, appear on invoices you generate from time worked.
9. To save the transaction, click Save & New or Save & Close.
When you click Save & New, the saved activity represents time for only one day. To record time for another day’s work even if it’s for the same worker, customer, and Service item, you have to create a new activity.
Running Time Reports
Customers don’t like being charged for too many hours, and workers are quick to complain if they’re paid for too few. So before you use time records either for billing customers or feeding your payroll records, it’s a good idea to generate reports to make sure your time data is correct. (Creating Employee Records explains how to set up employees in QuickBooks so their reported time links to your QuickBooks payroll service.)
To generate a time report in QuickBooks, choose Reports→Jobs, Time & Mileage, and then select the report you want. Here are the ones you can choose from and what they’re useful for:
§ Time by Job Summary. If you bill by the job, this handy report shows hours by customer or job, summarized by Service items, which helps you review the total hours worked on a job during a given period. Because of its high-level view, this report is perfect for spotting time charged to inappropriate Service items or hours that exceed job limits. Overly high or low hours—or Service items that don’t belong on a job—are red flags for data-entry errors. If hours seem too high or low, you can drill down with the Time by Job Detail report (described next) to investigate.
§ Time by Job Detail. Use this report to verify that hours were correctly set as billable or nonbillable. It’s grouped first by customer/job and then by Service item, but each time entry shows the date the hours were worked, who performed the work, and whether the work is billable (the billing status is listed as Unbilled for billable hours not yet invoiced, Billed for invoiced billable hours, or Not Billable).
§ Time by Name. This report shows the hours people have worked on each customer or job, as shown in Figure 8-5. QuickBooks sets the report’s date range to This Fiscal Year-to-date, but if you want to check timesheets for accuracy, you can change it to Last Week, This Week, or whatever time period you want. If a person reports too many or too few hours for a period, use the Weekly Timesheet window (Filling out Weekly Timesheets) to look for signs of inaccurate or missing time reports.
§ Time by Item. This report groups hours by Service item and then by customer or job. You can use this report to analyze how your billable and nonbillable time is spent, either to cut unproductive activities or to determine staffing needs.
Tracking Mileage
If you charge customers for mileage, keeping track of the billable miles you drive helps you get all the reimbursements you’re due. But all business-related mileage is tax-deductible, so tracking nonbillable business mileage is important, too. Customers and the IRS alike want records of the miles you drive, and QuickBooks can help you produce that documentation.
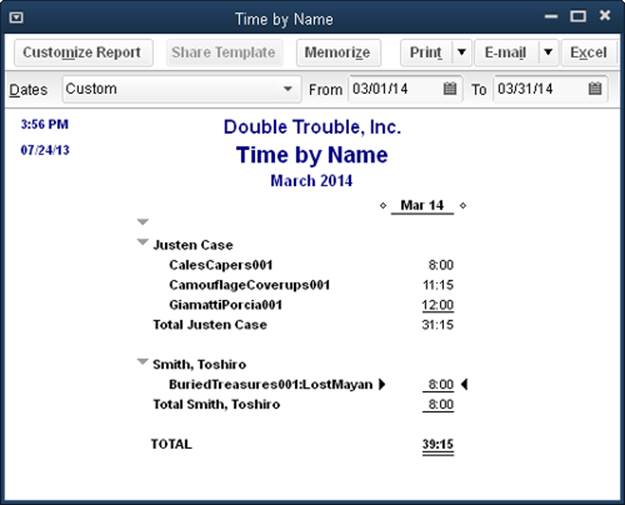
Figure 8-5. The Time by Name report summarizes the hours someone works for each customer or job. To see the dates and times of the work, put your cursor over an hourly total. When the magnifying glass icon appears (not shown here), double-click the time to open a “Time by Name Detail” report.
NOTE
QuickBooks’ mileage-tracking feature is intended for tracking the miles you drive using company vehicles (and, if you run your own company, the business miles you drive using your own car), not other vehicle expenses, such as fuel or tolls. Likewise, you don’t use QuickBooks to record miles driven by employees, vendors, or subcontractors, which instead go straight to an expense account. For example, if a vendor bills you for mileage, when you enter the bill in QuickBooks (Entering Bills), you assign that charge to an expense account, such as Travel-Mileage. Or when you write a check to reimburse an employee for mileage driven, you assign that reimbursement to the expense account for mileage.
Adding a Vehicle
To track mileage for a company vehicle, you first have to add the vehicle to QuickBooks’ Vehicle List. Here’s how:
1. Open the Vehicle List window by choosing Lists→Customer & Vendor Profile Lists→Vehicle List.
2. To add a new vehicle, press Ctrl+N or click Vehicle→New.
The New Vehicle window (Figure 8-6) opens.
3. In the Vehicle field, type a name for the vehicle.
To easily identify your company cars and trucks, include the type of vehicle and a way to differentiate it from others. For instance, if your company’s cars are all white Jeeps, use the license plate number as the name rather than the make and color.
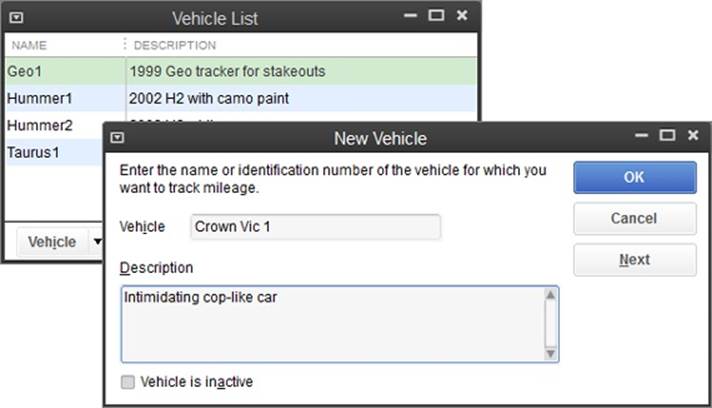
Figure 8-6. QuickBooks doesn’t want to know much about company vehicles. All you have to do is give the vehicle a name. You can add any details you want in the Description box. After you click OK, the vehicle takes its place in the Vehicle List (shown in the background here).
4. In the Description box, type additional info such as the year, make, model, license plate number, or Vehicle Identification Number (VIN).
To change this information later, in the Vehicle List window, double-click the vehicle’s name, and then, in the Edit Vehicle dialog box, edit the name or description.
5. Click OK.
That’s it. The name and description appear in the Vehicle List window.
Setting the Mileage Rate
For tax purposes, you can deduct mileage expenses based on a standard rate or by tracking the actual costs of operating and maintaining your vehicles. Using a standard mileage rate is convenient—simply multiply the miles you drove by the rate to calculate your vehicle deduction. The box on Mileage Rates and Invoice Items explains how you charge customers for mileage if your mileage charge differs from the IRS standard rate. (You don’t have to set a mileage rate to record the miles you drive, but you’ll need a rate in place before you run your tax reports.)
TIP
If you own an expensive car with expensive maintenance needs, actual costs might provide a larger deduction than the IRS’s standard rate. (You can deduct either the standard-rate amount or your actual costs, but not both.) But to deduct what you spend on gas, tires, repairs, insurance, and so on, you have to keep track of these expenses. As usual, the tax rules for deducting operating and maintenance costs are, well, taxing. So before you choose this approach, ask your accountant or the IRS if you can deduct actual costs and whether it’s the best approach.
QuickBooks stores multiple mileage rates along with their effective dates, because standard mileage rates usually change at the beginning of each calendar year. Here’s how to set a mileage rate:
1. Choose Company→Enter Vehicle Mileage.
The Enter Vehicle Mileage window opens.
2. In the window’s toolbar, click Mileage Rates.
QuickBooks opens the Mileage Rates window shown in Figure 8-7.
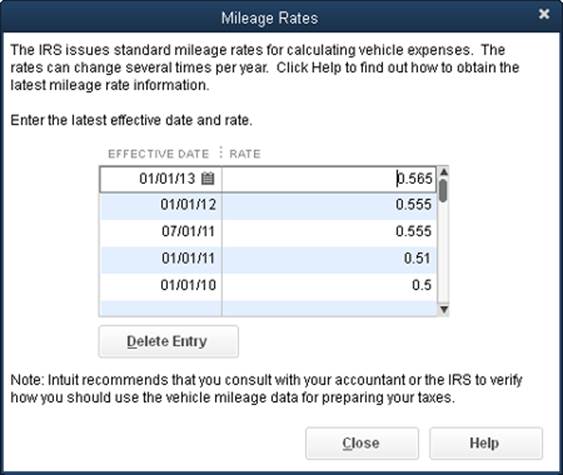
Figure 8-7. QuickBooks displays the standard mileage rates with the most recent one at the top and older rates below it.
3. To add a new rate, click the first blank Effective Date cell at the bottom of the list, and then choose the date that the new mileage rate becomes effective, such as 1/1/2013.
You can either type the date or click the calendar icon.
4. In the Rate cell, type the rate in dollars, such as .565 for 56.5 cents.
The mileage rate is 56.5 cents per mile beginning January 1, 2013, as documented on the IRS website, www.irs.gov. If you’re reading this after 2013, be sure to check that site to see if this rate has changed.
5. Click Close when you’re done.
When it’s time to prepare your tax return, you can run the Mileage by Vehicle Summary report to see the miles driven for each company vehicle and the resulting mileage deduction. To calculate your deduction, QuickBooks multiplies the recorded miles by the mileage rate that was in effect when they were driven.
FREQUENTLY ASKED QUESTION: MILEAGE RATES AND INVOICE ITEMS
What if the IRS’s rate is different from the rate I charge customers for mileage?
The rates you enter in the Mileage Rates window (Setting the Mileage Rate) are the standard rates set by the IRS for tax purposes. The IRS doesn’t care one whit what you charge your customers for miles, so you can charge them whatever you want.
For the reimbursable miles that you drive, you need to create a Service or Other Charge item in your Item List. (In the Enter Vehicle Mileage window, the Item drop-down list includes only these two types of items.) When you create the item, you can assign it the rate that you charge customers per mile or leave the rate at zero if you charge variable mileage rates.
For an Other Charge item, the “Amount or %” box is the place to enter the mileage rate, as shown in Figure 8-8. (For a Service type item, use the Rate box instead.) In the Account box, choose the income or expense account you use for reimbursable mileage, whether it’s specific to mileage or a catchall reimbursable cost account.
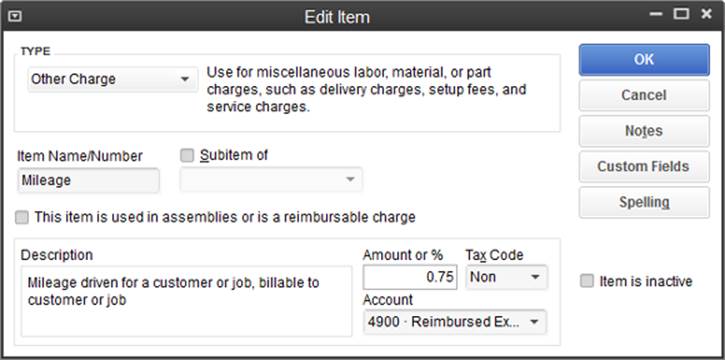
Figure 8-8. When you create an item for mileage, you can enter whatever rate per mile you want. When you add the mileage to an invoice, QuickBooks multiplies the number of billable miles driven by the rate you set for that mileage item.
Recording Mileage Driven
Once you’ve added a vehicle to the Vehicle List, you’re ready to record mileage. Here’s how you fill in the Enter Vehicle Mileage window to record billable and nonbillable miles you’ve driven:
1. Open the Enter Vehicle Mileage window (Company→Enter Vehicle Mileage) and then, in the Vehicle box, choose the vehicle that you drove.
If you forgot to add the vehicle to QuickBooks’ Vehicle List, you can create it now by choosing <Add New> from the drop-down menu.
2. In the Trip Start Date and Trip End Date boxes, choose when you started and completed the trip.
If you’re recording mileage for one day of onsite work, choose the same day in both boxes. On the other hand, if you used a company car to drive to another city for several days, the Trip Start Date is the day you headed out of town and the Trip End Date is the day you returned.
3. In the Odometer Start and Odometer End boxes, type what the vehicle’s mileage was before you began driving and what it was when you returned, as shown in Figure 8-9. Or just type how far you drove into the Total Miles box.
If you fill in the Odometer boxes, QuickBooks automatically calculates the miles you drove and plops that number in the Total Miles box.
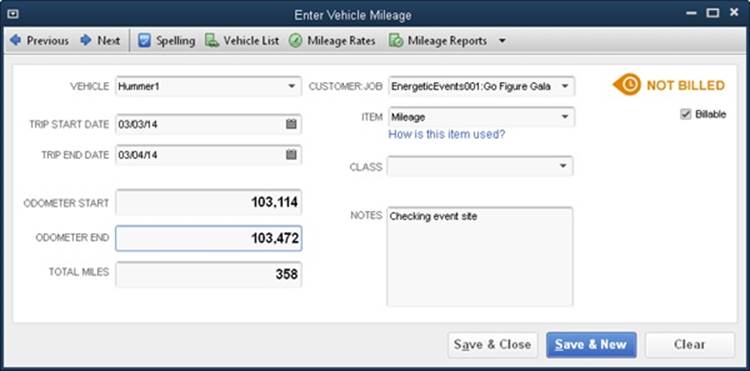
Figure 8-9. If you usually forget to check your starting mileage, you can ignore the Odometer Start and Odometer End boxes entirely. Instead, in the Total Miles box, type the mileage you drove, such as 358 for a 358-mile trip for your customer. You can type the mileage with or without commas (1,500 or 1500).
NOTE
The drawback to filling in the Enter Vehicle Mileage dialog box’s Total Miles field is that your mileage record doesn’t include the odometer readings that the IRS wants to see. But if every mile you drive is for business, you can prove your deduction by showing the IRS an odometer reading at the beginning of the year and one at the end of the year.
4. If your mileage is billable to a customer or job, turn on the Billable checkbox. Then, in the Customer:Job box, choose the customer or job to which you want to assign the mileage, and in the Item drop-down list, choose the item you created for mileage (Recording Mileage Driven).
If the mileage isn’t billable to a customer, keep the Billable checkbox turned off and leave the Customer:Job and Item boxes blank.
5. If you track classes, then in the Class box, choose the appropriate one.
For example, if you use classes to track branch performance, choose the class for the branch the vehicle belongs to. However, if you track partner income with classes and the mileage is nonbillable, you don’t need to assign a class (or you can choose a class you set up for overhead).
6. To further document the reason for the mileage, type details in the Notes box. Then, to save the mileage and close the dialog box, click Save & Close.
If you want to enter additional mileage for other customers and jobs, click Save & New instead.
Generating Mileage Reports
Mileage reports come in handy when you prepare your taxes or if your customers question their mileage charges. These reports are simple, mainly because you don’t track that much mileage information in QuickBooks. You can generate mileage reports by choosing Reports→Jobs, Time & Mileage, and then selecting a report. Or, if you have the Enter Vehicle Mileage window open, in the window’s toolbar, click the down arrow to the right of the Mileage Reports button and select a report.
Here are the reports you can choose and what they’re useful for:
§ Mileage by Vehicle Summary. For your tax documentation, this report shows the total miles you drove each vehicle and the corresponding mileage expense (which QuickBooks calculates using the standard IRS mileage rate in effect at the time). The date range is set initially to This Tax Year. If you wait until after January 1 to gather your tax documentation, then in the Dates box, choose Last Tax Year instead.
§ Mileage by Vehicle Detail. This report shows each trip that contributed to a vehicle’s mileage. For each one, the report includes the trip’s end date, miles driven, mileage rate, and mileage expense. If you have questions about your deductions, double-click an entry to open the Enter Vehicle Mileage window for that transaction.
§ Mileage by Job Summary. If you charge customers for mileage, run this report to see both total miles driven and the billable mileage by customer and job. QuickBooks uses the rate you set in the Service or Other Charge item to calculate the billable amount.
§ Mileage by Job Detail. If a customer has a question about mileage you charged, this report is the quickest way to find the charges in question. The report groups mileage by customer or job but lists each trip in its own line. The report shows each trip’s end date, miles driven, billing status, mileage rate, and billable amount, so you can answer almost any mileage-related question a customer might have.