Marketing Automation For Dummies (2014)
Part I. Getting Started with Marketing Automation
Chapter 4. Setting Up a New Marketing Automation Tool
In This Chapter
![]() Developing a step-by-step plan
Developing a step-by-step plan
![]() Identifying efficiencies and quick wins
Identifying efficiencies and quick wins
![]() Activating your solution and working with IT
Activating your solution and working with IT
Before you begin implementing a marketing automation program, you need to have your house in order and set up your tool. You’re going to need buy-in from other stakeholders and commitments of time to develop content and integrate technologies. You’ll be asking your organization to shift in a few different directions, and support from other departments is necessary to make your implementation a success.
In this chapter, I explain how to plan ahead and complete the preparation necessary to set you up for success. I also tell you what you need to know before you begin setting up your chosen tool. This chapter also covers the most common issues companies encounter when implementing marketing automation, and how to avoid them.
Listing Resources Needed for Initial Setup
You need a few specific items and resources to implement your solution. The following sections explain the steps involved and show you how to assemble your team. Setup preparation involves listing the resources you need, blocking time on your IT team’s calendar, and getting the rest of your stakeholders on board.
Breaking down your integration into steps
Implementing your marketing automation tool can easily be broken down into three overarching steps, shown in Table 4-1.You should take the steps in the table in the order they appear if you have never implemented a marketing automation tool before.
Table 4-1 Basic Implementation Steps with Time Estimates
|
Step |
Items Required |
Estimated Time |
|
Step 1: Connecting |
IT resource |
1 hour |
|
Authenticating email tool, creating CNAME |
2 hours |
|
|
CRM admin, website admin |
2 hours plus 5 minutes per custom field |
|
|
Step 2: Importing |
Email templates |
25 minutes per template |
|
Nurturing templates |
15 minutes per template |
|
|
Auto responder templates |
20 minutes per template |
|
|
Landing page templates |
1 hour upper template |
|
|
Data sets in CSV file (CLEANED) |
10 hours of uploading |
|
|
Step 3: Building |
List of quick wins |
1 hour meeting |
|
Nurturing program outlines |
5–10 hours |
|
|
Sales lead qualification process and scoring process |
5 hours of planning with your sales team |
|
|
Form layout |
5 hours |
|
|
Segmentation ideas |
2 hours |
The connecting process includes various levels because each marketing channel and each data source requires a new connection. However, many of these connections aren’t required for you to begin, and they can be implemented over time as you turn on additional functionality. Connecting your website, customer relationship management (CRM), and marketing channels is most important. In the connecting stage, you need to work hand in hand with your IT department. If you are your IT department, you’ll need to have full access to your technical infrastructure. I suggest getting a hand from someone because these first steps can take a while if you’re inexperienced, but they can be done in under an hour by an experienced IT professional.
After you are connected, you can begin to import your HTML and data sets. In the beginning, you need only a few basic templates. Plan to further develop the basic templates over time. This process is relatively easy and is completely based on how prepared you are before you get to this step. If you have spent adequate time educating yourself, you should have specific templates ready for your marketing automation tool and can quickly import them.
After your data sets are imported, you can start building your assets as well as your automations. This step involves specific knowledge of your tool and may require you to be trained on your tool before you begin. I cover the basics of how to build forms, landing pages, scoring models, and automations throughout the rest of the book.
 Make sure that you have all your resources ready before you begin implementation. Many times, I see companies stall their implementation because they have not prepared their templates, don’t know what data sets they want to use, and haven’t thought out their automations yet. Don’t forget your data sets, which include but are not limited to items such as a list of prospects, sales data, email lists, and any other set of information you need to run segmentation or an automation. Save time during implementation and have these items ready when you begin.
Committing to developing content
Most companies that engage in online marketing understand the value of creating content. Content provides search engine optimization (SEO) value, backlinks, and the benefits of thought leadership. When preparing for marketing automation, don’t neglect to commit to an investment in content. Your commitment should include creating new content, testing new content mediums, and learning to use content in new ways. Here’s what I mean in more detail:
· Creating new content: Your marketing automation tool will help you identify which content you should be creating, but you need to commit to the time and resources to build new pieces of content. Estimate creating a minimum of three to four new pieces of content per quarter.
· Testing new content mediums: New content also needs to be tested across new mediums. You will easily be able to test effectiveness with your marketing automation reporting functionality. For example, you should plan tests such as watching conversions to determine whether a video converts more prospects to customers when hosted on your site or on YouTube. You need to set aside time for constant testing, because testing leads to small increases in effectiveness of your programs over time.
· Learning to use content in new ways: A single piece of content can be used in many different ways. You can save time if your main content can be broken up into smaller pieces of content for use in emails and landing pages. For example, a 15-page white paper can be divided into three separate five-page pieces targeted to a different step in the buying cycle. This breakdown will help you get more time savings out of a content effort and maximize your value at the same time.
Teaming up for best results
You need a team of people to make your implementation successful. Following is an overview of each person or group you are likely to need, and a brief description of what that person will be doing over the course of the implementation.
· Marketing team: Responsible for email creation, forms, landing page look and feel, lead flow process, nurturing program design, and PPC integration.
· Webmaster: Responsible for placing JavaScript tracking code within the element of web pages and for implementing iFrame code for your forms.
· IT admin: Responsible for creating vanity domain records (as in www2.yourdomain.com) and implementing email authentication with DKIM, Domain Keys, SPF, and SenderID. I discuss setting up email authentication in Chapter 10.
· Marketing agency (if applicable): Responsible for overall online marketing, lead management, and lead nurturing strategy, as well as for landing page and email asset creation.
· Sales leadership: Responsible for coordinating sales training, adopting of email plug-in, and working with marketing to set lead assignment processes.
· CRM admin (if applicable): Responsible for installing the marketing automation module into your CRM, setting up custom fields and layouts (should they be required), and adding any other required integrations, which may include iFrames and possibly custom code.
Furthering your investment in online marketing
Marketing automation does not work without online marketing, and online marketing is not as effective without marketing automation. You need to continue to invest in both to ensure your success. You should consider investing time for testing new online marketing methods and continually creating new content.
Before you ramp up your online marketing campaigns, do the opposite. Consider putting your online marketing efforts on hold for your first month with a marketing automation tool. This will give you the ability to create a baseline, from which you can measure future campaigns.
Read Seth Godin’s book Permission Marketing, as well as Peppers and Rogers’ The One to One Future, before you begin. These books lay out the foundation for modern marketing for you.
Targeting Efficiency in Your Implementation
Automating your marketing activities allows you and your company to remove many of the manual tasks performed on a daily basis. That way, you can become a much more efficient organization.
The next sections show you how to identify your efficiency gains and include them in your initial implementation. I also explain how to identify quick wins and bottlenecks in your marketing funnel so that you can focus your implementation on the efficiencies your organization needs in return for the money invested.
Identifying your quick wins and major pain points
When setting up your tool, start by focusing on quick wins. Quick wins are the first three or more efficiency gains that will return the largest benefits soonest after implementing your solution. By focusing on quick wins, your implementation will gain the most efficiency in the shortest amount of time.
The following list of quick wins contains the most common marketing activities that can be made more efficient through automation:
· Lead qualification
· Lead scoring
· List management
· List cleaning
· Lead assignment
· ROI reporting
· Lead nurturing
Efficiency equates to financial savings
Many analysts have measured financial savings after marketing automation is adopted by a company. Gartner Research reports a 15 percent savings on creative production as a result of implementing marketing automation.
A savings of 15 percent on the cost of creative production is very significant and usually will easily cover the cost of a solution. However, people don’t buy marketing automation for cost savings. Look at cost savings as a bonus, and stay focused on building a sovereign department that can execute all your required activities without the need for external resources such as IT support.
In addition to the aforementioned quick wins of marketing automation, there are also many benefits of automation to look forward to and to include in your initial implementation.
After identifying your most compelling quick wins, you should define your largest business efficiency frustrations, using the following list as a guide. A company without marketing automation is likely to experience at least one of the following four major weaknesses, or “pain” points:
· Lack of IT efficiency: You experience inefficiency when creating, executing, reporting on, and managing online campaigns due to limited technical knowledge. Or, you may be beholden to your IT department for your HTML needs, website updates, or connecting data between tools because you can’t execute these efforts without IT support. I explain how marketing automation removes the need for additional IT by giving you tools to work with these features without technical knowledge.
· Disconnected marketing tools: Manual efforts, such as data exporting or manual reporting, are frustrating due to the lack of connectivity between your marketing tools, and you find yourself often using spreadsheets to keep track of prospect interactions across tools.
· Cumbersome lead generation: You experience a lack of efficiency when managing, tracking, and increasing your lead flow with the same budget.
· Lack of alignment between marketing and sales: Your marketing and sales departments spend time and energy arguing over lead quality, lead flow, lead assignment, or campaign reporting.
 Identifying quick wins and major pain points are the fastest ways to realize the value of your marketing automation tool and will provide you with a solid foundation for future expansion of that tool. As you evaluate marketing automation and prove its value over time, many aspects of it will provide you with continuous value.
Uncovering the bottlenecks in your marketing workflow
In order for your implementation to dig further into the value of efficiency gained through marketing automation, consider where automation is most likely to impact the bottlenecks in your marketing workflow. Bottlenecks are places in your marketing operations where an inefficient process causes a fast operation to slow down. Your implementation should focus on the specific places where automation will help you gain efficiency by eliminating bottlenecks. To identify your bottlenecks, follow these simple steps:
1. Whiteboard your current marketing world.
Start by drawing your full marketing universe. Include every lead-generation channel, marketing channel, and tool that you use to execute these. Draw them on a whiteboard so that you can make sure you understand the flow of data and the processes you currently use.
2. Circle your pain points.
With a different color, circle your pain points. Bottlenecks often happen one step before or after a pain point.
3. Make a list of the bottlenecks that cause your pain points.
Prioritize the list by identifying which of your bottlenecks will have the largest impact on your main marketing goals when eliminated.
4. Circle your pain points.
If you can identify your largest bottleneck, and work just to solve that one issue during your first year of using a marketing automation tool, you will derive significant value from your purchase. Move on to smaller bottlenecks later. Identifying these bottlenecks before you purchase a solution also helps you to select the correct tool. I discuss choosing the right solution in Chapter 3.
First Steps to Activating Your Solution
After you’ve done your initial preparation, as described in the previous sections of this chapter, you should be ready to start playing with the technology. You want to take setting up the system very seriously. Doing the setup wrong will cause you a lot of frustration. I suggest making sure that you have all your team members ready to go and have time booked on the calendars of both your IT admin and your webmaster.
Creating your alias
Your alias is the “vanity name” you will be using. It is also referred to as a CNAME. The reason you need to set up an alias is that 99.9 percent of all marketing automation solutions are software-as-a-service (SaaS)-based technologies. This means that they are hosted online, not on your servers. Because your marketing automation tool is not on your servers, landing pages created in your tool will not appear to be hosted by your company unless you create a vanity URL to fix this. See Figure 4-1 to see the difference between a landing page that has a vanity URL and one that does not.
For example, if you are using Pardot.com as your solution, and your company is site.com, you need to set up a CNAME so that all landing pages and emails that are sent from Pardot.com reflect your company’s name. So you will need to set up a CNAME, which might be go.site.com.
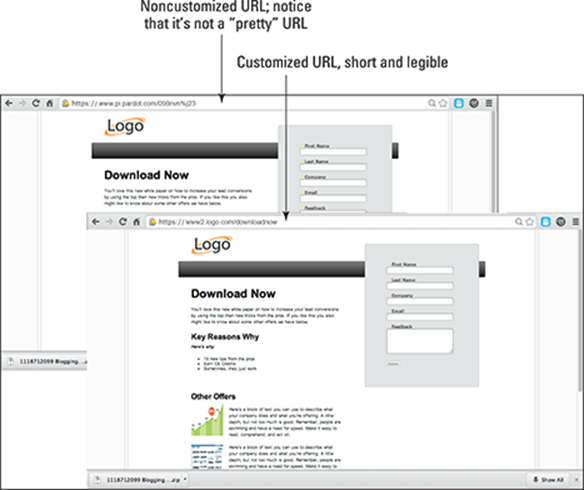
Figure 4-1: Landing page with a vanity URL vs. one without a vanity URL.
Here are the steps you should take to create your CNAME. Figure 4-2 shows an example of what you need for setup.
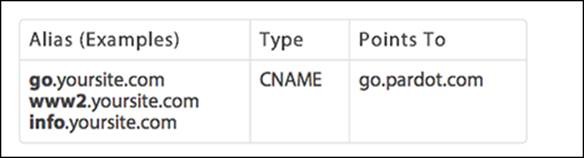
Figure 4-2: Create a CNAME using an alias, type, and points.
You need access to your web hosting service to complete the following steps:
1. Choose your CNAME/Alias.
This process is required by the majority of marketing automation tools; however, depending on your hosting service, details may vary from what I describe here. Hosting companies generally use the same process, but you might notice slight differences from these steps. You are free to choose any alias you’d like, but I recommend something unobtrusive to give your visitors the best possible user experience. For example, if your domain is www.site.com, I recommend www2.site.com, which is commonly used in marketing. Other options are
· go.site.com
· content.site.com
· info.site.com
· news.site.com
· marketing.site.com
2. Log in to your domain’s DNS record.
Your DNS record is the record on your IP address that SPAM filters use to verify whether emails sent from your vendor are really okay to send. The DNS entry allows the SPAM filter to ping your IP address and verify that the emails are really being sent by you. This is to protect you from people hijacking your email tool and spamming the world. You need to set up three things inside your DNS record:
· Alias
· Type
· Points to
3. Wait for your DNS to propagate.
Keep checking your DNS record account. It may take up to 24 hours.
4. Log in to your marketing automation tool to edit your account settings.
Each tool requires you to do this in a different way, but you need to insert the alias information in to your system.
5. Verify that your CNAME is working correctly.
If everything is set up correctly and your DNS change has taken effect, entering your vanity into a browser should redirect to your home page. That is the easiest way to verify that your new CNAME is working correctly.
Adding tracking code to your website
Tracking code is a small piece of code you will be placing on your site. The tracking code places a cookie on each person’s browser. A cookie is a small tracking beacon used to follow people’s actions while on your site. The process of adding tracking code to your website will vary based on how your website is set up. If you are, like most companies, using a content management system (CMS) such as WordPress or Drupal, the addition of the tracking codes should be fairly easy. If you don’t have a content-management system, you need your webmaster to assist you in this process. Adding the tracking code is a simple copy-and-paste operation. The trick is in knowing where to paste the code, as I explain in the upcoming steps.
Cookies can be controversial, especially depending on the country you’re in. Many European countries have different laws regarding what you may or may not do with cookies. I suggest researching this issue first before you use them. In most countries (including the USA), it is sufficient to place a note in the terms and conditions of your website stating that your website uses cookies and that by using your website, users agree to your terms of use. However, you should check with your local laws to be sure.
Follow these steps to add tracking code to your website:
1. Obtain your tracking code in your marketing automation tool.
The code is a piece of JavaScript, as shown in Figure 4-3. Depending on your tool, this piece of code may be short or long; the code varies from one tool to another.
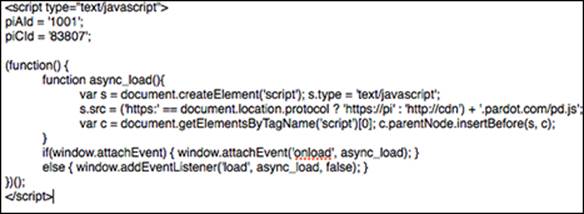
Figure 4-3: Tracking code is JavaScript found in your marketing automation tool.
2. Locate your global footer in your content management system.
For example, Figure 4-4 shows the global footer in a WordPress website. If you don’t have a content management system, your webmaster needs to complete this step and the next step for you.
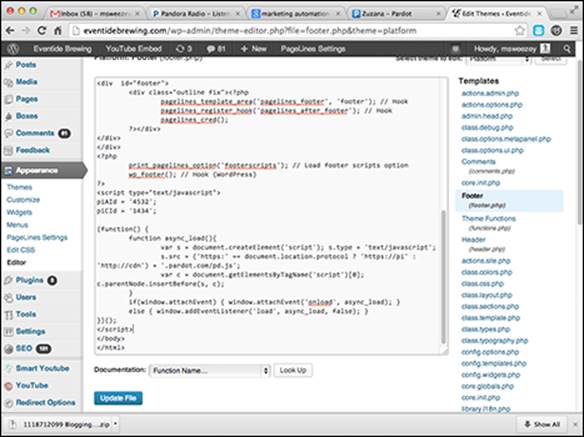
Figure 4-4: The global footer of a WordPress site, where your tracking code goes.
3. When you have found your tracking code and located your global footer, copy and paste your tracking code into the footer.
Figure 4-5 shows tracking code from the Pardot marketing automation system properly placed in the global footer of a content management system. Make sure to paste the code into every web property you own.
Most marketing automation tools let you customize your code to allow for specific parameters to be passed through to your solution. For example, you can customize your code for scoring and segmenting directly on the page a person is on. You can code the page to increase a person’s score directly if she visits the page, or change her lead source after visiting your blog so that you know which deals your blog influenced.
Importing assets into your marketing automation tool
The next sections show you how to import four different assets into your marketing automation tool. Assets are any piece of content that you plan to use with your marketing automation tool, such as
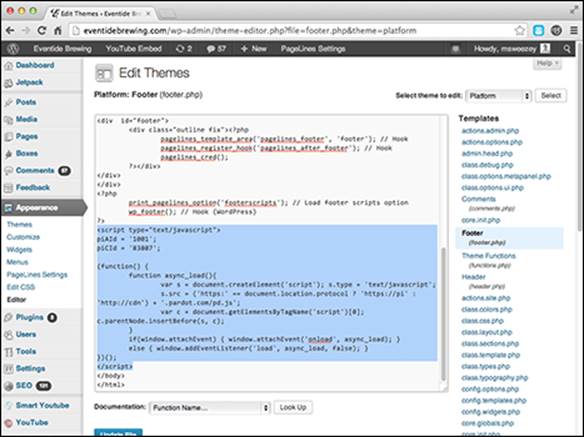
Figure 4-5: Copy and paste tracking code in the global footer.
· A form
· A template
· Web content
Assets are the key for lead generation. Make sure that you understand the difference between assets you host and those hosted on other sites, and how you need to connect these assets.
Uploading assets into your marketing automation platform is usually as simple as copying and pasting. The only difference is the fact that you might be asked to put some special automations on the asset. Although the steps you take after your asset is uploaded depend on your tool, it’s usually easier than falling off a log.
Assets such as white papers, videos, forms, and landing pages that are hosted on your site are uploaded into your marketing automation platform. Your marketing automation platform allows you to publish these assets and track individual leads engaging with them. If you are hosting assets on another site, one that you don’t control, you still upload the asset to your marketing automation tool, using a custom URL to paste to the other site.
The URL is the key item. Whether a site is hosted by you or by someone else, as long as you can obtain the URL and use a custom redirect, you can track the asset. You can therefore track many more assets than you can normally host on any given solution.
Integrating traceable content
Traceable content is any content that can be tracked when your audience engages with it. Tracking a user’s interaction with your content allows follow-up automations to take place. There are many different types of content, including videos, white papers, podcasts, sales sheets, and so on. Treat all content the same to make this process easy.
All content that you upload into your marketing automation solution becomes accessible through a URL and traceable back to each person who interacts with the content. You can use your content URLs as links on your website or as links in a tweet on Twitter to promote your latest white paper.
Uploading content is as simple as uploading a picture to Facebook. If the content you want to use exists on a third-party site, your vendor needs to show you how to include that content in your tools with custom redirected URLs, as shown in Figure 4-6.
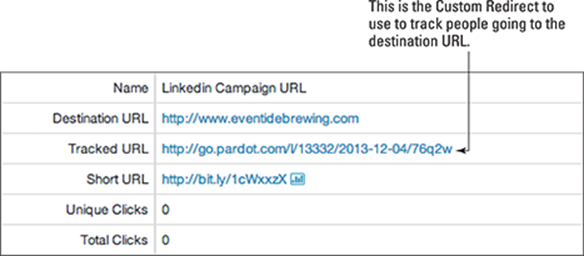
Figure 4-6: Talk to your vendor about redirected URLs for tracking content not hosted on your site.
Setting up SPF/Sender ID
SPF stands for Sender Policy Framework, which is an industry-standard form of email authentication designed to prevent email spoofing. To implement SPF, you need to add a TXT record to your domain name server (DNS). A TXT record is a text record in your DNS that can verify a domain to send emails on your behalf. Domain name server is the technical term for the way your email domain name connects with your email server through various Internet protocols. You have different ways to set up your SPF record depending on how your email is currently configured. If you’re not familiar with your SPF, consult your current email vendor to find out how to set it up. The following list helps you to know what your next steps are depending on your current situation:
· If you do not have an SPF record: Check with your vendor for your SPF TXT record. It is likely to look like the following:
v=spf1 mx include:aspmx.pardot.com ~all
· If you already have an SPF record listed: Consult with your IT staff or the person responsible for maintaining your domain’s SPF statement. Let that person know that you’d like to add a new SPF record to your existing SPF statement. It’s important to note that the SPF protocol allows a maximum of ten lookups total.
· Sender ID will set up automatically: The SPF record in your domain’s DNS setup will automatically be used to authenticate mail servers through Microsoft’s Sender ID program because SPF and Sender ID are now merged. You do have to make sure that the SPF information is complete and accurate.
Setting up DomainKeys
DomainKeys is an email authentication system designed to verify the DNS domain of an email sender to verify message integrity. This protocol is largely backed by Yahoo!. To implement DomainKeys, add two new TXT records to your DNS, as shown in Figure 4-7.

Figure 4-7: Setting up DomainKeys requires two TXT records.
The first record contains the general DomainKeys settings:
domainkey.yoursite.com TXT "t=y; o=~;"
The second record is your actual key:
._domainkey.yoursite.com TXT "k=rsa;
p=MEwwDSJHJKoZIhvcNAQEBBQADOwAwOAIxANDl1x8anhySwnWoafyw
EUeuNoNbav9JrAdUAsqln8YYA0jkARmuox2EdWkU5fkrzQKJHSGB"
smtpapi._domainkey.yoursite.com TXT "k=rsa;
t=s;
p=MEwwDSJHJKoZIhvcNAQEBBQADOwAwOAIxANDl1x8anhySwnWoafyw
EUeuNoNbav9JrAdUAsqln8YYA0jkARmuox2EdWkU5fkrzQKJHSGB"
Removing IT from Your Marketing Work Flow
The first goal of most marketing automation tools is to give a marketer a single tool to manage all marketing executions with minimal technical skills required. This feature of marketing automation solutions is very compelling to smaller organizations and to organizations limited by technical resources. The next sections show you how to remove IT from your marketing work flow.
Dragging and dropping IT out of your marketing work flow
All online marketing and content marketing require a significant amount of knowledge in HyperText Markup Language (HTML) and Cascading Style Sheets (CSS). The problem is, most marketers do not know how to write in these languages.
Most modern online marketing revolves around content marketing. Content marketing involves many moving parts, including HTML programming, to build and connect the following:
· A form to protect the content
· A landing page to host the form and the content itself
· Connections to social media
· Email marketing
· Other online marketing for promoting the content
Marketing automation tools still use HTML, but they allow marketers to have a single platform for execution of all online marketing campaigns without the need for programming HTML from scratch. That way, you gain the ability to easily create HTML without needing IT support.
Most marketing automation tools use a WYSIWYG editor that allows you to drag and drop content into emails, forms, and landing pages, as shown in Figure 4-8. WYSIWYG is an acronym that stands for What You See Is What You Get. When you drag or drop something onto your screen with a WYSIWYG editor, the editor creates the code automatically, saving you a trip to the IT department to ask for code support.
You can connect your entire campaign by using a WYSIWYG editor to drag and drop code in all the necessary places, thereby connecting your forms to your CRM system, email tools, and website. You can also build entire forms quickly and publish them online in a matter of seconds. You will never need IT again to build, launch, or maintain a marketing campaign. So if you add up all the hours you spend with IT before marketing automation, your implementation can demonstrate a savings of time and money based on the hours saved and devoted to more marketing-focused efforts.
 When you are considering marketing automation, make sure that you are looking closely at the level of flexibility of the WYSIWYG application. Dragging and dropping content is limited by the WYSIWYG editor’s features, so make sure that the application you choose allows you to build the programs you want to run. I discuss choosing a solution in Chapter 3.
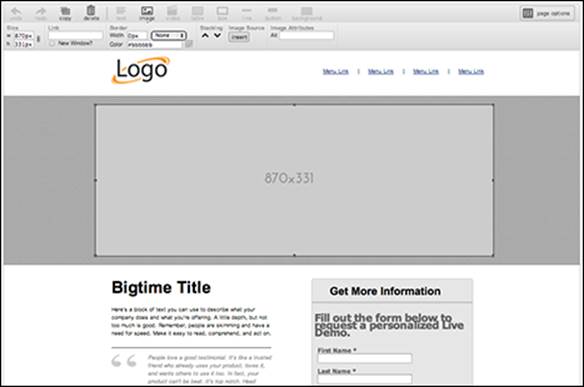
Figure 4-8: Use a WYSIWYG editor to build landing pages without HTML coding.
The single prospect record
Marketing involves targeting groups of people and individuals within those groups. Without marketing automation, IT is usually responsible for making sure that mass-marketing efforts are tracked on an individual level. This is because large databases are involved to connect multiple data points from multiple marketing applications. Marketing automation solves this issue without IT because all efforts are executed from a single tool. Sharing a single database allows for all marketing efforts to be attributed to an individual in a database, creating a single-prospect record(see Figure 4-9).
Using marketing automation, a single-prospect record can easily show the prospect’s individual engagement with sales and marketing, all on the same screen.
With marketing automation in place, the idea of a single-prospect record is no longer an issue for IT to solve. That’s because a singular platform for execution allows for a single-prospect view of marketing engagement. Showing the value of automating single-prospect records to both marketing and sales will help you show a lot of value for your investment in marketing automation.
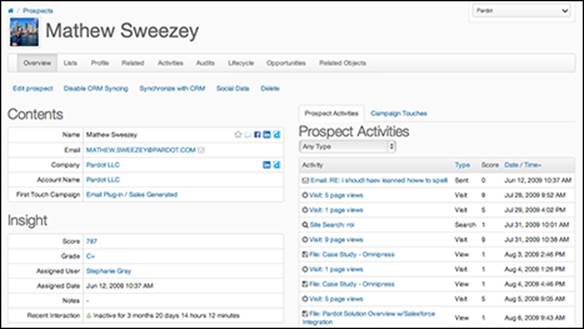
Figure 4-9: Single-prospect records can be generated without IT involvement.
Single view is the future
The single view of a customer is the key to the future of marketing campaigns. The benefit of a single-prospect view is that it helps to connect both marketing and sales. It allows sales staff to see why a lead is being passed to them and how to follow up with the lead. It also gives them the upper hand to close the deal more quickly. For marketers, single-prospect view allows for better segmentation, personalization, and advanced automations. This single view makes all other automations possible. It is the life blood of marketing automation.
Consider also that the single view will include things you currently can’t track, such as actions and behaviors. Your current database may include which emails were sent to a prospect, or the employee count of that prospect’s company. The single-prospect view could also include which pages of your website were viewed and which keywords were searched on by your prospect. The single-prospect record can therefore provide a level of detail you’ve never had before in marketing or sales. This visibility into every action is what makes the single-prospect record so rich and marketing automation so powerful.
Learning that sometimes automation needs a hand
Not everything can be automated. In fact, trying to go with 100 percent automation is not always best. I’ve worked for many companies that use automation and still manually inspect each lead using a member of the lead assignment team before the lead is sent to sales. This approach ensures that lead assignment rules are kept to a minimum and makes for an even better relationship between marketing and sales.
Also, sometimes not everything can be automated. Amazon.com proved this when it released a tool called Mechanical Turk. It is a way for you to have real people doing manual tasks that are too complicated to do through software. An example is finding contact information for people. If Amazon sees the value in manual tasks, you should, too.
Overautomating processes is one of the more frequent issues that companies run into. Whenever you think marketing automation should get you 100 percent automated, remember Frankenstein. You are building a monster when you do this, and overautomation will become the slave of your tool. The main causes of overbuilding are people who are new to marketing automation, or those who did not invest enough time in understanding marketing automation processes.
If you find yourself wondering why one simple task takes a number of interdependent rules, you are probably trying to overautomate, or you have a bad process in place.
 Marketing automation tools are built with best practices in mind. If your processes are not following best practices, you need to rework your processes to fit into a new tool. Failing to do so can cause lots of issues with process flow.
If you find yourself in an overautomated environment, start changing the amount of automation by going back to your main goals. Work with your vendor to identify modern best practices for achieving your goals, and see whether your vendor can suggest a better way through a new process or a feature you’re not aware of.
All materials on the site are licensed Creative Commons Attribution-Sharealike 3.0 Unported CC BY-SA 3.0 & GNU Free Documentation License (GFDL)
If you are the copyright holder of any material contained on our site and intend to remove it, please contact our site administrator for approval.
© 2016-2026 All site design rights belong to S.Y.A.