Learning Internet of Things (2015)
Chapter 2. The HTTP Protocol
Now that we have a definition for Internet of Things, where do we start? It is safe to assume that most people that use a computer today have had an experience of Hypertext Transfer Protocol (HTTP), perhaps without even knowing it. When they "surf the Web", what they do is they navigate between pages using a browser that communicates with the server using HTTP. Some even go so far as identifying the Internet with the Web when they say they "go on the Internet" or "search the Internet".
Yet HTTP has become much more than navigation between pages on the Internet. Today, it is also used in machine to machine (M2M) communication, automation, and Internet of Things, among other things. So much is done on the Internet today, using the HTTP protocol, because it is easily accessible and easy to relate to. For this reason, we are starting our study of Internet of Things by studying HTTP. This will allow you to get a good grasp of its strengths and weaknesses, even though it is perhaps one of the more technically complex protocols. We will present the basic features of HTTP; look at the different available HTTP methods; study the request/response pattern and the ways to handle events, user authentication, and web services.
Before we begin, let's review some of the basic concepts used in HTTP which we will be looking at:
· The basics of HTTP
· How to add HTTP support to the sensor, actuator, and controller projects
· How common communication patterns such as request/response and event subscription can be utilized using HTTP
HTTP basics
HTTP is a stateless request/response protocol where clients request information from a server and the server responds to these requests accordingly. A request is basically made up of a method, a resource, some headers, and some optional content. A response is made up of a three-digit status code, some headers and some optional content. This can be observed in the following diagram:

HTTP request/response pattern
Each resource, originally thought to be a collection of Hypertext documents or HTML documents, is identified by a Uniform Resource Locator (URL). Clients simply use the GET method to request a resource from the corresponding server. In the structure of the URL presented next, the resource is identified by the path and the server by the authority portions of the URL. The PUT and DELETE methods allow clients to upload and remove content from the server, while the POST method allows them to send data to a resource on the server, for instance, in a web form. The structure of a URL is shown in the following diagram:

Structure of a Uniform Resource Locator (URL)
HTTP defines a set of headers that can be used to attach metainformation about the requests and responses sent over the network. These headers are human readable key - value text pairs that contain information about how content is encoded, for how long it is valid, what type of content is desired, and so on. The type of content is identified by a Content-Type header, which identifies the type of content that is being transmitted. Headers also provide a means to authenticate clients to the server and a mechanism to introduce states in HTTP. By introducing cookies, which are text strings, the servers can ask the client to remember the cookies, which the client can then add to each request that is made to the server.
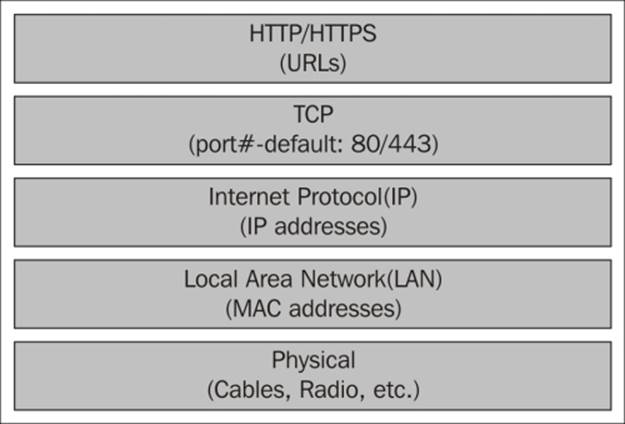
HTTP works on top of the Internet Protocol (IP). In this protocol, machines are addressed using an IP address, which makes it possible to communicate between different local area networks (LANs) that might use different addressing schemes, even though themost common ones are Ethernet-type networks that use media access control (MAC) addresses. Communication in HTTP is then done over a Transmission Control Protocol (TCP) connection between the client and the server. The TCP connection makes sure that the packets are not lost and are received in the same order in which they were sent. The connection endpoints are defined by the corresponding IP addresses and a corresponding port number. The assigned default port number for HTTP is 80, but other port numbers can also be used; the alternative HTTP port 8080 is common.
Tip
To simplify communication, Domain Name System (DNS) servers provide a mechanism of using host names instead of IP addresses when referencing a machine on the IP network.
Encryption can done through the use of Secure Sockets Layer (SSL) or Transport Layer Security (TLS). When this is done, the protocol is normally named Hypertext Transfer Protocol Secure (HTTPS) and the communication is performed on a separate port, normally 443. In this case, most commonly the server, but also the client, can be authenticated using X.509 certificates that are based on a Public Key Infrastructure (PKI), where anybody with access to the public part of the certificate can encrypt data meant for the holder of the private part of the certificate. The private part is required to decrypt the information. These certificates allow the validation of the domain of the server or the identity of the client. They also provide a means to check who their issuer is and whether the certificates are invalid because they have been revoked. The Internet architecture is shown in the following diagram:
HTTP is a cornerstone of service-oriented architecture (SOA), where methods for publishing services through HTTP are called web services. One important manner of publishing web services is called Simple Object Access Protocol (SOAP), where web methods, their arguments, return values, bindings, and so on, are encoded in a specific XML format. It is then documented using the Web Services Description Language (WSDL). Another popular method of publishing web services is called Representational State Transfer (REST). This provides a simpler, loosely-coupled architecture where methods are implemented based on the normal HTTP methods and URL query parameters, instead of encoding them in XML using SOAP.
Recent developments based on the use of HTTP include Linked Data; a re-abstraction of the Web, where any type of data can be identified using a Unique Resource Identifier (URI), semantic representation of this data into Semantic Triples, as well as semantic data formats such as Resource Description Framework (RDF), readable by machines, or Terse RDF Triple Language (TURTLE), more readily readable by humans. While the collection of HTTP-based Internet resources is called the Web, these later efforts are known under the name 'the semantic web'.
Tip
For a thorough review of HTTP, please see Appendix E, Fundamentals of HTTP.
Adding HTTP support to the sensor
We are now ready to add web support to our working sensor, which we prepared in the previous chapter, and publish its data using the HTTP protocol. The following are the three basic strategies that one can use when publishing data using HTTP:
· In the first strategy the sensor is a client who publishes information to a server on the Internet. The server acts as a broker and informs the interested parties about sensor values. This pattern is called publish/subscribe, and it will be discussed later in this book. It has the advantage of simplifying handling events, but it makes it more difficult to get momentary values. Sensors can also be placed behind firewalls, as long as the server is publically available on the Internet.
· Another way is to let all entities in the network be both clients and servers, depending on what they need to do. This pattern will be discussed in Chapter 3, The UPnP Protocol. This reduces latency in communication, but requires all participants to be on the same side of any firewalls.
· The method we will employ in this chapter is to let the sensor become an HTTP server, and anybody who is interested in knowing the status of the sensor become the clients. This is advantageous as getting momentary values is easy but sending events is more difficult. It also allows easy access to the sensor from the parties behind firewalls if the sensor is publically available on the Internet.
Setting up an HTTP server on the sensor
Setting up an HTTP server on the sensor is simple if you are using the Clayster libraries. In the following sections, we will demonstrate with images how to set up an HTTP server and publish different kinds of data such as XML, JavaScript Object Notation(JSON), Resource Description Framework (RDF), Terse RDF Triple Language (TURTLE), and HTML. However, before we begin, we need to add references to namespaces in our application. Add the following code at the top, since it is needed to be able to work with XML, text, and images:
using System.Xml;
using System.Text;
using System.IO;
using System.Drawing;
Then, add references to the following Clayster namespaces, which will help us to work with HTTP and the different content types mentioned earlier:
using Clayster.Library.Internet;
using Clayster.Library.Internet.HTTP;
using Clayster.Library.Internet.HTML;
using Clayster.Library.Internet.MIME;
using Clayster.Library.Internet.JSON;
using Clayster.Library.Internet.Semantic.Turtle;
using Clayster.Library.Internet.Semantic.Rdf;
using Clayster.Library.IoT;
using Clayster.Library.IoT.SensorData;
using Clayster.Library.Math;
The Internet library helps us with communication and encoding, the IoT library with interoperability, and the Math library with graphs.
During application initialization, we will first tell the libraries that we do not want the system to search for and use proxy servers (first parameter), and that we don't lock these settings (second parameter). Proxy servers force HTTP communication to pass through them. This makes them useful network tools and allows an added layer of security and monitoring. However. unless you have one in your network, it can be annoying during application development if the application has to always look for proxy servers in the network when none exist. This also causes a delay during application initialization, because other HTTP communication is paused until the search times out. Application initialization is done using the following code:
HttpSocketClient.RegisterHttpProxyUse (false, false);
To instantiate an HTTP server, we add the following code before application initialization ends and the main loop begins:
HttpServer HttpServer = new HttpServer (80, 10, true, true, 1);
Log.Information ("HTTP Server receiving requests on port " + HttpServer.Port.ToString ());
This opens a small HTTP server on port 80, which requires the application to be run with superuser privileges, which maintains a connection backlog of 10 simultaneous connection attempts, allows both GET and POST methods, and allocates one working thread to handle synchronous web requests. The HTTP server can process both synchronous and asynchronous web resources:
· A synchronous web resource responds within the HTTP handler we register for each resource. These are executed within the context of a working thread.
· An asynchronous web resource handles processing outside the context of the actual request and is responsible for responding by itself. This is not executed within the context of a working thread.
Note
For now, we will focus on synchronous web resources and leave asynchronous web resources for later.
Now we are ready to register web resources on the server. We will create the following web resources:
HttpServer.Register ("/", HttpGetRoot, false);
HttpServer.Register ("/html", HttpGetHtml, false);
HttpServer.Register ("/historygraph", HttpGetHistoryGraph, false);
HttpServer.Register ("/xml", HttpGetXml, false);
HttpServer.Register ("/json", HttpGetJson, false);
HttpServer.Register ("/turtle", HttpGetTurtle, false);
HttpServer.Register ("/rdf", HttpGetRdf, false);
These are all registered as synchronous web resources that do not require authentication (the third parameter in each call). We will handle authentication later in this chapter. Here, we have registered the path of each resource and connected that path with an HTTP handler method, which will process each corresponding request.
In the previous example, we chose to register web resources using methods that will return the corresponding information dynamically. It is also possible to register web resources based on the HttpServerSynchronousResource and HttpServerAsynchronousResourceclasses and implement the functionality as an override of the existing methods. In addition, it is also possible to register static content, either in the form of embedded resources using the HttpServerEmbeddedResource class or in the form of files in the filesystem using the HttpServerResourceFolder class. In our examples, however, we've chosen to only register resources that generate dynamic content.
We also need to correctly dispose of our server when the application ends, or the application will not be terminated correctly. This is done by adding the following disposal method call in the termination section of the main application:
HttpServer.Dispose ();
Setting up an HTTPS server on the sensor
If we want to add an HTTPS support to the application, we will need an X.509Certificate with a valid private key. First, we will have to load this certificate to the server's memory. For this, we will need its password, which can be obtained through the following code:
X509Certificate2 Certificate = new X509Certificate2 ("Certificate.pfx", "PASSWORD");
We then create the HTTPS server in a way similar to the HTTP server that we just created, except we will now also tell the server to use SSL/TLS (sixth parameter) and not the client certificates (seventh parameter) and provide the server certificate to use in HTTPS:
HttpServer HttpsServer = new HttpServer (443, 10, true, true, 1, true, false, Certificate);
Log.Information ("HTTPS Server receiving requests on port " + HttpsServer.Port.ToString ());
We will then make sure that the same resources that are registered on the HTTP server are also registered on the HTTPS server:
foreach (IHttpServerResource Resource in HttpServer.GetResources())
HttpsServer.Register (Resource);
We will also need to correctly dispose of the HTTPS server when the application ends, just as we did in the case of the HTTP server. As usual, we will do this in the termination section of the main application, as follows:
HttpsServer.Dispose ();
Adding a root menu
The first web resource we will add is a root menu, which is accessible through the path /. It will return an HTML page with links to what can be seen on the device. We will add the root menu method as follows:
private static void HttpGetRoot (HttpServerResponse resp, HttpServerRequest req)
{
networkLed.High ();
try
{
resp.ContentType = "text/html";
resp.Encoding = System.Text.Encoding.UTF8;
resp.ReturnCode = HttpStatusCode.Successful_OK;
} finally
{
networkLed.Low ();
}
}
This preceding method still does not return any page.
This is because the method header contains the HTTP response object resp, and the response should be written to this parameter. The original request can be found in the req parameter. Notice the use of the networkLed digital output in a try-finally block to signal web access to one of our resources. This pattern will be used throughout this book.
Before responding to the query, the method has to inform the recipient what kind of response it will receive. This is done by setting the ContentType parameter of the response object. If we return an HTML page, we use the Internet media type text/html here. Since we send text back, we also have to choose a text encoding. We choose the UTF8 encoding, which is common on the Web. We also make sure to inform the client, that the operation was successful, and that the OK status code (200) is returned.
We will now return the actual HTML page, a very crude one, having the following code:
resp.Write ("<html><head><title>Sensor</title></head>");
resp.Write ("<body><h1>Welcome to Sensor</h1>");
resp.Write ("<p>Below, choose what you want to do.</p><ul>");
resp.Write ("<li>View Data</li><ul>");
resp.Write ("<li><a href='/xml?Momentary=1'>");
resp.Write ("View data as XML using REST</a></li>");
resp.Write ("<li><a href='/json?Momentary=1'>");
resp.Write ("View data as JSON using REST</a></li>");
resp.Write ("<li><a href='/turtle?Momentary=1'>");
resp.Write ("View data as TURTLE using REST</a></li>");
resp.Write ("<li><a href='/rdf?Momentary=1'>");
resp.Write ("View data as RDF using REST</a></li>");
resp.Write ("<li><a href='/html'>");
resp.Write ("Data in a HTML page with graphs</a></li></ul>");
resp.Write ("</body></html>");
And then we are done! The previous code will show the following view in a browser when navigating to the root:

Displaying measured information in an HTML page
We are now ready to display our measured information to anybody through a web page (or HTML page). We've registered the path /html to an HTTP handler method named HttpGetHtml. We will now start implementing it, as follows:
private static void HttpGetHtml (HttpServerResponse resp,
HttpServerRequest req)
{
networkLed.High ();
try
{
resp.ContentType = "text/html";
resp.Encoding = System.Text.Encoding.UTF8;
resp.Expires = DateTime.Now;
resp.ReturnCode = HttpStatusCode.Successful_OK;
lock (synchObject)
{
}
}
finally
{
networkLed.Low ();
}
}
The only difference here, compared to the previous method, is that we have added a property to the response: an expiry date and time. Since our values are momentary and are updated every second, we will tell the client that the page expires immediately. This ensures the page is not cached on the client side, and it is reloaded properly when the user wants to see the page again. We also added a lock statement, using our synchronization object, to make sure that access to the momentary values are only available from one thread at a time.
We can now start to return our momentary values, from within the lock statement:
resp.Write ("<html><head>");
resp.Write ("<meta http-equiv='refresh' content='60'/>");
resp.Write ("<title>Sensor Readout</title></head>");
resp.Write ("<body><h1>Readout, ");
resp.Write (DateTime.Now.ToString ());
resp.Write ("</h1><table><tr><td>Temperature:</td>");
resp.Write ("<td style='width:20px'/><td>");
resp.Write (HtmlUtilities.Escape (temperatureC.ToString ("F1")));
resp.Write (" C</td></tr><tr><td>Light:</td><td/><td>");
resp.Write (HtmlUtilities.Escape (lightPercent.ToString ("F1")));
resp.Write (" %</td></tr><tr><td>Motion:</td><td/><td>");
resp.Write (motionDetected.ToString ());
resp.Write ("</td></tr></table>");
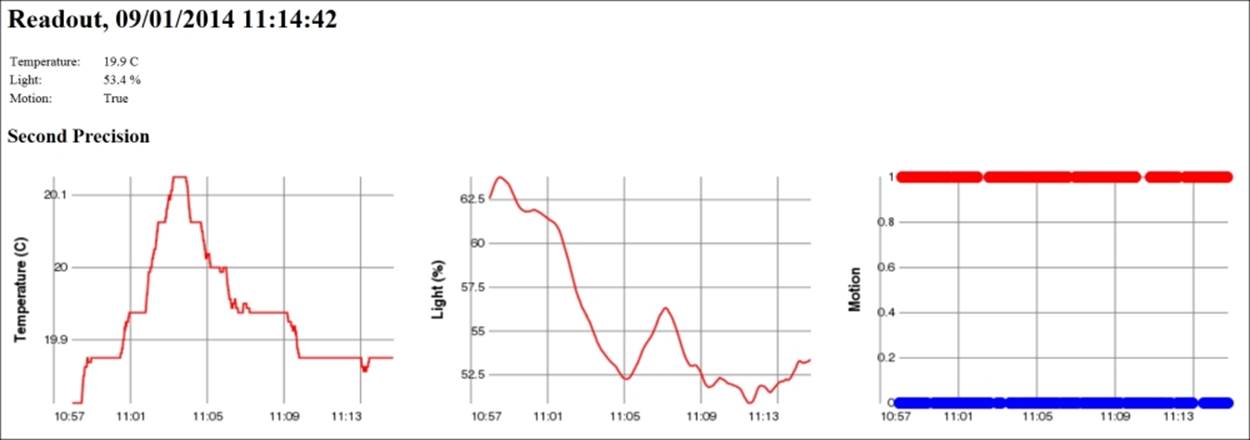
We would like to draw your attention to the meta tag at the top of an HTML document. This tag tells the client to refresh the page every 60 seconds. So, by using this meta tag, the page automatically updates itself every minute when it is kept open.
Historical data is best displayed using graphs. To do this, we will output image tags with references to our historygraph web resource, as follows:
if (perSecond.Count > 1)
{
resp.Write ("<h2>Second Precision</h2>");
resp.Write ("<table><tr><td>");
resp.Write ("<img src='historygraph?p=temp&base=sec&");
resp.Write ("w=350&h=250' width='480' height='320'/></td>");
resp.Write ("<td style='width:20px'/><td>");
resp.Write ("<img src='historygraph?p=light&base=sec&");
resp.Write ("w=350&h=250' width='480' height='320'/></td>");
resp.Write ("<td style='width:20px'/><td>");
resp.Write ("<img src='historygraph?p=motion&base=sec&");
resp.Write ("w=350&h=250' width='480' height='320'/></td>");
resp.Write ("</tr></table>");
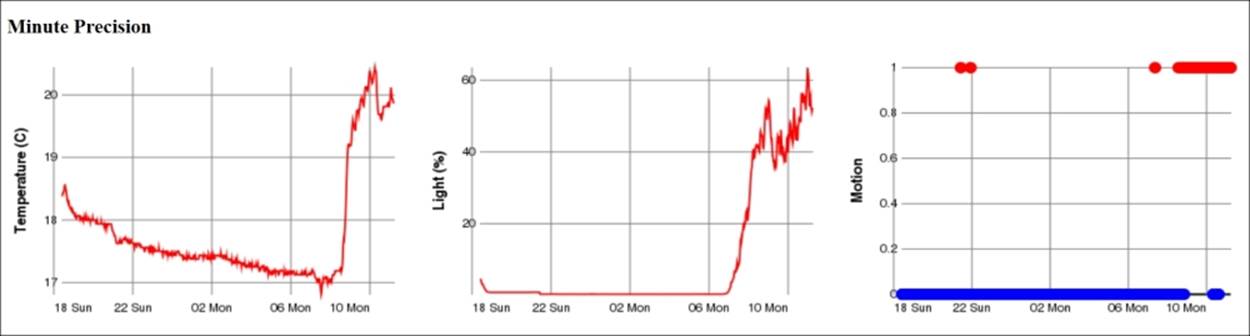
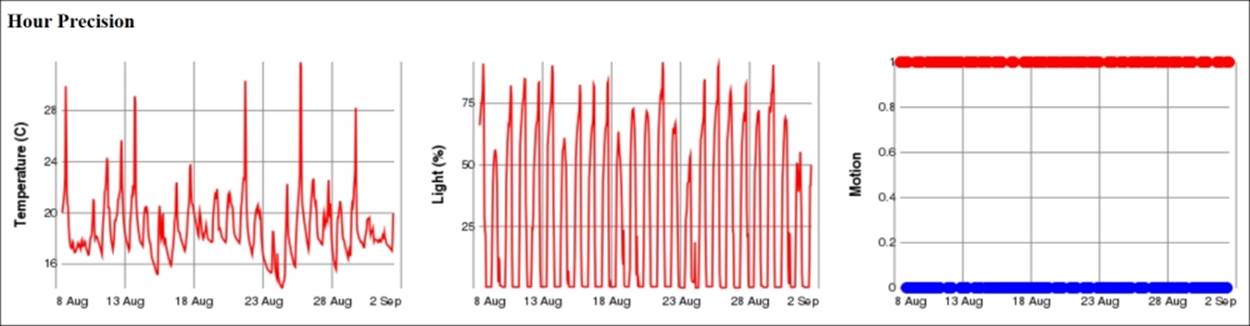
Here, we have used query parameters to inform the historygraph resource what we want it to draw. The p parameter defines the parameter, the base parameter the time base, and the w and h parameters the width and height respectively of the resulting graph. We will now do the same for minutes, hours, days, and months by assigning the base query parameter the values min, h, day and month respectively.
We will then close all if statements and terminate the HTML page before we send it to the client:
}
resp.Write ("</body><html>");
Generating graphics dynamically
Before we can view the page, we also need to create our historygraph resource that will generate the graph images referenced from the HTML page. We will start by defining the method in our usual way:
private static void HttpGetHistoryGraph (HttpServerResponse resp,
HttpServerRequest req)
{
networkLed.High ();
try
{
}
finally
{
networkLed.Low ();
}
}
Within the try section of our method, we start by parsing the query parameters of the request. If we find any errors in the request that cannot be mended or ignored, we make sure to throw an HttpException exception by taking the HTTPStatusCode value and illustrating the error as a parameter. This causes the correct error response to be returned to the client. We start by parsing the width and height of the image to be generated:
int Width, Height;
if (!req.Query.TryGetValue ("w", out s) || !int.TryParse (s, out Width) || Width <= 0 || Width > 2048)
throw new HttpException (HttpStatusCode.ClientError_BadRequest);
if (!req.Query.TryGetValue ("h", out s) || !int.TryParse (s, out Height) || Height <= 0 || Height > 2048)
throw new HttpException (HttpStatusCode.ClientError_BadRequest);
Then we extract the parameter to plot the graph. The parameter is stored in the p query parameter. From this value, we will extract the property name corresponding to the parameter in our Record class and the ValueAxis title in the graph. To do this, we will first define some variables:
string ValueAxis;
string ParameterName;
string s;
We will then extract the value of the p parameter:
if (!req.Query.TryGetValue ("p", out s))
throw new HttpException (HttpStatusCode.ClientError_BadRequest);
We will then look at the value of this parameter to deduce the Record property name and the ValueAxis title:
switch (s)
{
case "temp":
ParameterName = "TemperatureC";
ValueAxis = "Temperature (C)";
break;
case "light":
ParameterName = "LightPercent";
ValueAxis = "Light (%)";
break;
case "motion":
ParameterName = "Motion";
ValueAxis = "Motion";
break;
default:
throw new HttpException (HttpStatusCode.ClientError_BadRequest);
}
We will need to extract the value of the base query parameter to know what time base should be graphed:
if (!req.Query.TryGetValue ("base", out s))
throw new HttpException (HttpStatusCode.ClientError_BadRequest);
In the Clayster.Library.Math library, there are tools to generate graphs. These tools can, of course, be accessed programmatically if desired. However, since we already use the library, we can also use its scripting capabilities, which make it easier to create graphs. Variables accessed by script are defined in a Variables collection. So, we need to create one of these:
Variables v = new Variables();
We also need to tell the client for how long the graph will be valid or when the graph will expire. So, we will need the current date and time:
DateTime Now = DateTime.Now;
Access to any historical information must be done within a thread-safe critical section of the code. To achieve this, we will use our synchronization object again:
lock (synchObject)
{
}
Within this critical section, we can now safely access our historical data. It is only the List<T> objects that we need to protect and not the Records objects. So, as soon as we've populated the Variables collection with the arrays returned using the ToArray() method, we can unlock our synchronization object again. The following switch statement needs to be executed in the critical section:
switch (s)
{
case "sec":
v ["Records"] = perSecond.ToArray ();
resp.Expires = Now;
break;
case "min":
v ["Records"] = perMinute.ToArray ();
resp.Expires = new DateTime (Now.Year, Now.Month, Now.Day, Now.Hour, Now.Minute, 0).AddMinutes (1);
break;
The hour, day, and month cases (h, day, and month respectively) will be handled analogously. We will also make sure to include a default statement that returns an HTTP error, making sure bad requests are handled properly:
default:
throw new HttpException (
HttpStatusCode.ClientError_BadRequest);
}
Now, the Variables collection contains a variable called Records that contains an array of Record objects to draw. Furthermore, the ParameterName variable contains the name of the value property to draw. The Timestamp property of each Record object contains values for the time axis. Now we have everything we need to plot the graph. We only need to choose the type of graph to plot.
The motion detector reports Boolean values. Plotting the motion values using lines or curves may just cause a mess if it regularly reports motion and non-motion. A better option is perhaps the use of a scatter graph, where each value is displayed using a small colored disc (say, of radius 5 pixels). We interpret false values to be equal to 0 and paint them Blue, and true values to be equal to 1 and paint them Red.
The Clayster script to accomplish this would be as follows:
scatter2d(Records.Timestamp,
if (Values:=Records.Motion) then 1 else 0,5,
if Values then 'Red' else 'Blue','','Motion')
The other two properties are easier to draw since they can be drawn as simple line graphs:
line2d(Records.Timestamp,Records.Property,'Value Axis')
The Expression class handles parsing and evaluation of Clayster script expressions. This class has two static methods for parsing an expression: Parse() and ParseCached(). If the expressions are from a limited set of expressions, ParseCached() can be used. It only parses an expression once and remembers it. If expressions contain a random component, Parse() should be used since caching does not fulfill any purpose except exhausting the server memory.
The parsed expression has an Evaluate() method that can be used to evaluate the expression. The method takes a Variables collection, which represents the variables available to the expression when evaluating it. All graphical functions return an object of the Graphclass. This object can be used to generate the image we want to return. First, we need a Graph variable to store our script evaluation result:
Graph Result;
We will then generate, parse, and evaluate our script, as follows:
if (ParameterName == "Motion")
Result = Expression.ParseCached ("scatter2d("+
"Records.Timestamp, "+
"if (Values:=Records.Motion) then 1 else 0,5, "+
"if Values then 'Red' else 'Blue','','Motion')").
Evaluate (v) as Graph;
else
Result = Expression.ParseCached ("line2d("+
"Records.Timestamp,Records." + ParameterName +
",'','" + ValueAxis + "')").Evaluate (v)as Graph;
We now have our graph. All that is left to do is to generate a bitmapped image from it, to return to the client. We will first get the bitmapped image, as follows:
Image Img = Result.GetImage (Width, Height);
Then we need to encode it so that it can be sent to the client. This is done using Multi-Purpose Internet Mail Extensions (MIME) encoding of the image. We can use MimeUtilities to encode the image, as follows:
byte[] Data = MimeUtilities.Encode (Img, out s);
The Encode() method on MimeUtilities returns a byte array of the encoded object. It also returns the Internet media type or content type that is used to describe how the object was encoded. We tell the client the content type that was used, and that the operation was performed successfully. We then return the binary block of data representing our image, as follows:
resp.ContentType = s;
resp.ReturnCode = HttpStatusCode.Successful_OK;
resp.WriteBinary (Data);
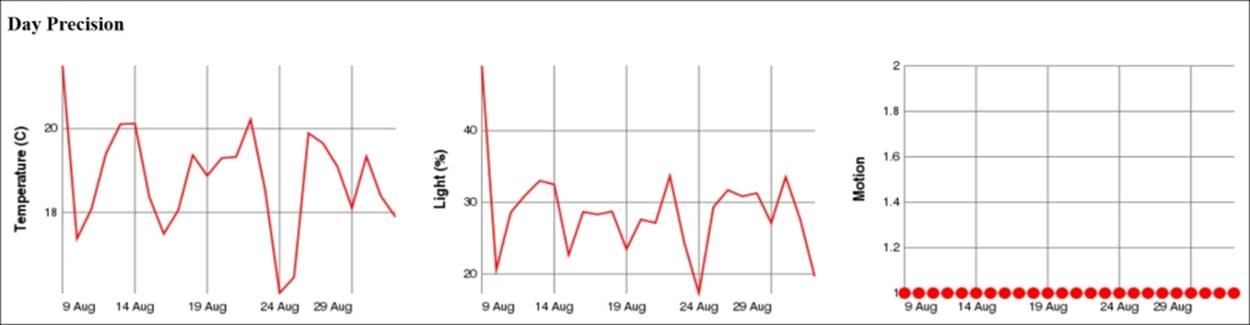
We can now view our /html page and see not only our momentary values at the top but also graphs displaying values per second, per minute, per hour, per day, and per month, depending on how long we let the sensor work and collect data. At this point, data is not persisted, so as soon as the data is reset, the sensor will lose all the history.
Creating sensor data resources
We have now created interfaces to display sensor data to humans, and are now ready to export the same sensor data to machines. We have registered four web resources to export sensor data to four different formats with the same names: /xml, /json, /turtle, and/rdf. Luckily, we don't have to write these export methods explicitly as long as we export the sensor data. Clayster.Library.IoT helps us to export sensor data to these different formats through the use of an interface named ISensorDataExport.
We will create our four web resources, one for each data format. We will begin with the resource that exports XML data:
private static void HttpGetXml (HttpServerResponse resp,
HttpServerRequest req)
{
HttpGetSensorData (resp, req, "text/xml",
new SensorDataXmlExport (resp.TextWriter));
}
We can use the same code to export data to different formats by replacing the key arguments, as shown in the following table:
|
Format |
Method |
Content Type |
Export class |
|
XML |
HttpGetXml |
text/xml |
SensorDataXmlExport |
|
JSON |
HttpGetJson |
application/json |
SensorDataJsonExport |
|
TURTLE |
HttpGetTurtle |
text/turtle |
SensorDataTurtleExport |
|
RDF |
HttpGetRdf |
application/rdf+xml |
SensorDataRdfExport |
Interpreting the readout request
Clayster.Library.IoT can also help the application to interpret query parameters for sensor data queries in an interoperable manner. This is done by using objects of the ReadoutRequest class, as follows:
private static void HttpGetSensorData (HttpServerResponse resp, HttpServerRequest req,string ContentType, ISensorDataExport ExportModule)
{
ReadoutRequest Request = new ReadoutRequest (req);
HttpGetSensorData (resp, ContentType, ExportModule, Request);
}
Often, as in our case, a sensor or a meter has a lot of data. It is definitely not desirable to return all the data to everybody who requests information. In our case, the sensor can store up to 5000 records of historical information. So, why should we export all this information to somebody who only wants to see the momentary values? We shouldn't. The ReadoutRequest class in the Clayster.Library.IoT.SensorData namespace helps us to parse a sensor data request query in an interoperable fashion and lets us know the type of data that is requested. It helps us determine which field names to report on which nodes. It also helps us to limit the output to specific readout types or a specific time interval. In addition, it provides all external credentials used in distributed transactions. Appendix F,Sensor Data Query Parameters, provides a detailed explanation of the query parameters that are used by the ReadoutRequest class.
Testing our data export
Data export is now complete, and so the next step is to test the different data formats and see what they look like. First, we will test our XML data export using an URL similar to the following:
http://192.168.0.29/xml?Momentary=1&HistoricalDay=1&Temperature=1
This will only read momentary and daily historical-temperature values. Data will come in an unformatted manner, but viewing the data in a browser provides some form of formatting. If we want JSON instead of XML, we must call the /json resource instead:
http://192.168.0.29/json?Momentary=1&HistoricalDay=1&Temperature=1
The data that is returned can be formatted using online JSON formatting tools to get a better overview of its structure. To test the TURTLE and RDF versions of the data export, we just need to use the URLs similar to the following:
http://192.168.0.29/turtle?Momentary=1&HistoricalDay=1&Temperature=1
http://192.168.0.29/rdf?Momentary=1&HistoricalDay=1&Temperature=1
Note
If you've setup HTTPS on your device, you access the resources using the https URI scheme instead of the http URI scheme.
User authentication
Publishing things on the Internet is risky. Anybody with access to the thing might also try to use it with malicious intent. For this reason, it is important to protect all public interfaces with some form of user authentication mechanism to make sure only approved users with correct privileges are given access to the device.
Tip
As discussed in the introduction to HTTP, there are several types of user authentication mechanisms to choose from. High-value entities are best protected using both server-side and client-side certificates over an encrypted connection (HTTPS). Although this book does not necessarily deal with things of high individual value, some form of protection is still needed.
We have two types of authentication:
· The first is the www authentication mechanism provided by the HTTP protocol itself. This mechanism is suitable for automation
· The second is a login process embedded into the web application itself, and it uses sessions to maintain user login credentials
Both of these will be explained in Appendix G, Security in HTTP.
Adding events for enhanced network performance
Earlier we had a discussion about the positive and negative aspects of letting the sensor be an HTTP server. One of the positive aspects is that it is very easy for others to get current information when they want. However, it is difficult for the sensor to inform interested parties when something happens. If we would have let the sensor act as a HTTP client instead, the roles would have been reversed. It would have been easy to inform others when something happens, but it would have been difficult for interested parties to get current information when they wanted it.
Since we have chosen to let the sensor be an HTTP server, Appendix H, Delayed Responses in HTTP, is dedicated to show how we can inform interested parties of events that occur on the device and when they occur, without the need for constant polling of the device. This architecture will lend itself naturally to a subscription pattern, where different parties can subscribe to different types of events in a natural fashion. These event resources will be used later by the controller to receive information when critical events occur, without the need to constantly poll the sensor.
Adding HTTP support to the actuator
In automation, apart from having a normal web interface, it is important to be able to provide interoperable interfaces for control. One of the simplest methods to achieve this is through web services. This section shows you how to add support to an application for web services that support both SOAP and REST.
Creating the web services resource
A web services resource is a special type of synchronous web resource. Instead of you parsing a query string or decode data in the response, the web service engine does that for you. All you need to do is create methods as you normally do, perhaps with some added documentation, and the web service engine will publish these methods using both SOAP and REST. Before we define our web service, we need the references to System.Web and System.Web.Services in our application. We also need to add a namespace reference to our application:
using System.Web.Services;
We will define a web service resource by creating a class that derives from HttpServerWebService. Apart from providing the path of the web service locally on the HTTP server, you also need to define a namespace for the web service. This namespace defines the interface and web services with the same namespace, even though they are hosted on different servers, and are supposed to be interoperable. This can be seen in the following code:
private class WebServiceAPI : HttpServerWebService
{
public WebServiceAPI ()
: base ("/ws")
{
}
public override string Namespace
{
get
{
return "http://clayster.com/learniot/actuator/ws/1.0/";
}
}
}
The web service engine can help you test your web services by creating test forms for them. Normally, these test forms are only available if you navigate to the web service from the same machine. Since we also work with Raspberry Pi boards from remote computers, we must explicitly activate test forms even for remote requests. However, as soon as we do not need these test forms, they should be made inaccessible from the remote machines. We can activate test forms by using the following property override:
public override bool CanShowTestFormOnRemoteComputers
{
get
{
return true;
}
}
Since web services are used for control and can cause problems if accessed by malicious users, it is important that we register the resource enabling authentication. This is important once the test forms have been activated. We can register the web services activating authentication, as follows:
HttpServer.Register (new WebServiceAPI (), true);
Accessing individual outputs
Let's begin to create web service methods. We will start with methods for control of individual outputs. For instance, the following method will allow us to get the output status of one specific digital output:
[WebMethod]
[WebMethodDocumentation ("Returns the current status of the digital output.")]
public bool GetDigitalOutput ([WebMethodParameterDocumentation ("Digital Output Number. Possible values are 1 to 8.")]int Nr)
{
if (Nr >= 1 && Nr <= 8)
return digitalOutputs [Nr - 1].Value;
else
return false;
}
The WebMethod attribute tells the web service engine that this method should be published, and it can be accessed through the web service. To help the consumer of the web service, we should also provide documentation on how the web service works. This is done by adding the WebMethodDocumentation attributes on each method, and the WebMethodParameterDocumentation attributes in each input parameter. This documentation will be displayed in test forms and WSDL documents describing the web service.
We will also create a method for setting an individual output, as follows:
[WebMethod]
[WebMethodDocumentation ("Sets the value of a specific digital output.")]
public void SetDigitalOutput (
[WebMethodParameterDocumentation (
"Digital Output Number. Possible values are 1 to 8.")]
int Nr,
[WebMethodParameterDocumentation ("Output State to set.")]
bool Value)
{
if (Nr >= 1 && Nr <= 8)
{
digitalOutputs [Nr - 1].Value = Value;
state.SetDO (Nr, Value);
state.UpdateIfModified ();
}
}
Collective access to outputs
The web services class also provides web methods for setting and getting all digital outputs at once. Here, the digital outputs are encoded into one byte, where each output corresponds to one bit (DO1=bit 0 … DO8=bit 7). The following methods are implemented analogously with the previous method:
public byte GetDigitalOutputs ();
public void SetDigitalOutputs (byte Values);
Accessing the alarm output
In the same way, the following two web methods are published for getting and setting the state of the alarm output:
public bool GetAlarmOutput ();
public void SetAlarmOutput ();
Using the test form
To access the test form of a web service, we only need to browse to the resource using a browser. In our case, the path of our web service is /ws; so, if the IP address of our Raspberry Pi is 192.168.0.23, we only need to go to http://192.168.0.23/ws and we will see something similar to the following in the browser:
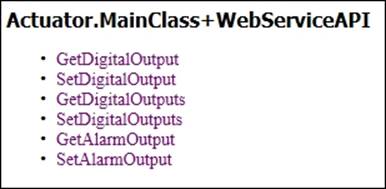
The main page of the web service will contain links to each method published by the service. Clicking on any of the methods will open the test form for that web method in a separate tab. The following image shows the test form for the SetDigitalOutput web method:
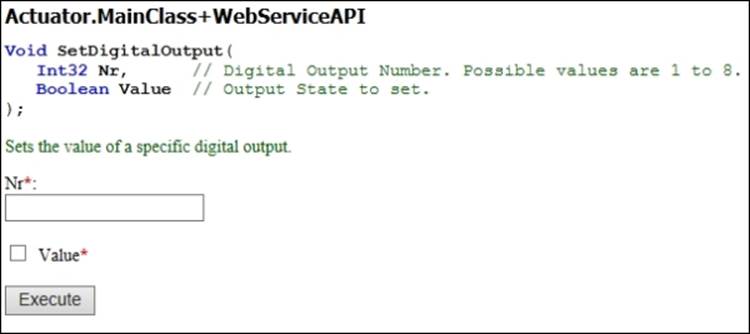
You will notice that the web service documentation that we added to the method and its parameters are displayed in the test form. Since no default value attributes were added to any of the parameters, all parameters are required. This is indicated on the image by a red asterisk against each parameter. If you want to specify default values for parameters, you can use any of the available WebMethodParameterDefault* attributes.
When you click on the Execute button, the method will be executed and a new tab will open that will contain the response of the call. If the web method has a return type set as void, the new tab will simply be blank. Otherwise, the return type will contain a SOAP message encoded using XML.
Accessing WSDL
The SOAP web service interface is documented in what is called a Web Service Definition Language (WSDL) document. This document is automatically generated by the web services engine. You can access it through the same URL through which you would access the test form by adding ?wsdl at the end (http://192.168.0.23/ws?wsdl).
By using this WSDL you can use development tools to automatically create code to access your web service. You can also use web service test tools like SoapUI to test and automate your web services in a simple manner. You can download and test SoapUI athttp://www.soapui.org/.
Using the REST web service interface
The web services that we created earlier can also be accessed using a REST-like web service interface. This is done by using a HTTP GET operation on the web service resource, where the parameters are encoded as query parameters in the URL. A special query parameter named op is used to identify the method. For example, to set output number five, we only have to perform an HTTP GET operation similar to the following URL:
http://192.168.0.23/ws?op=SetDigitalOutput&Nr=5&Value=1
If the web service has optional parameters, which means there are parameters that have default values defined for them, then these do not need to be present in the URL. If they are not present, they will receive the default values defined for them in the code.
Note
The method of using HTTP GET to perform control operations might not work as expected if clients or in-between proxies cache the result. This might happen if multiple requests are issued quickly. The response will be clearly marked not to be cached, but some clients and proxies might ignore this fact since the HTTP GET operation is assumed to be idempotent, which means that the same method call twice is assumed to be equal to just one method call. If this is a concern, the POST method should always be used. If using relative-value arguments (like Increase By) instead of absolute-value arguments (like Set to), this is the case. The GET method, however, provides an exceptionally easy way to test and use a service.
Adding HTTP support to the controller
We now have a sensor and an actuator that speaks HTTP. To tie these together, we also need to add HTTP to the controller. The controller will act as an HTTP client, as opposed to our previous examples where each application acted as an HTTP server. We will use the HttpSocketClient class to access the web resources provided by the sensor. We will create our connection to our sensor, as follows:
HttpSocketClient HttpClient;
HttpClient = new HttpSocketClient ("192.168.0.29", 80, new DigestAuthentication ("Peter", "Waher"));
HttpClient.ReceiveTimeout = 30000;
HttpClient.Open ();
Here, we will add the client-side version of the digest authentication scheme found in Clayster.Library.Internet.HTTP.ClientCredentials. We will also specify a timeout of 30,000 milliseconds since we will use the even subscription mechanism of retrieving data from the sensor.
To get data from the sensor is easy. All that is needed to do is get the XML using the GET method and call the UpdateFields() method described in the previous chapter, to parse the XML and flag any corresponding control actions:
HttpResponse Response = HttpClient.GET (Resource);
Xml = Response.Xml;
if (UpdateFields (Xml))
{
hasValues = true;
CheckControlRules ();
}
The first time we access the sensor, we just get the sensor data in the normal way by using the following code:
Resource = "/xml?Momentary=1&Light=1&Motion=1";
Subscribing to events
Now that we know the current state of the sensor, we only need to get data from the sensor when it implies a control action change. Instead of constantly polling the sensor using the resource above, we will use the event resources published by the sensor. This is detailed in Appendix H, Delayed Responses in HTTP. There are nine different states and by knowing the current control states, we can calculate when these states will change.
States can change when the state of LEDs change, when the motion changes and when the light is below 20 percent. So, we need to check the distance of the light density to one of these three states: when one more LED is lit, when one more LED is unlit, or when the light reaches 20 percent. This can be done with the following code:
int NrLeds = (int)System.Math.Round ((8 * lightPercent) / 100);
double LightNextStepDown = 100 * (NrLeds - 0.1) / 8;
double LightNextStepUp = 100 * (NrLeds + 1) / 8;
double DistDown = System.Math.Abs (lightPercent - LightNextStepDown);
double DistUp = System.Math.Abs (LightNextStepUp - lightPercent);
double Dist20 = System.Math.Abs (20 - lightPercent);
double MinDist = System.Math.Min (System.Math.Min (DistDown, DistUp), Dist20);
We will also impose a minimum distance, in case we are very close to a tipping point:
if (MinDist < 1)
MinDist = 1;
We can then create the resource string that would let us subscribe to an event from the sensor that is tailored to our needs:
StringBuilder sb = new StringBuilder ();
sb.Append ("/event/xml?Light=");
sb.Append (XmlUtilities.DoubleToString (lightPercent, 1));
sb.Append ("&LightDiff=");
sb.Append (XmlUtilities.DoubleToString (MinDist, 1));
sb.Append ("&Motion=");
sb.Append (motion ? "1" : "0");
sb.Append ("&Timeout=25");
Resource = sb.ToString ();
We will then put the previous code in the main loop, and keep subscribing to events from the sensor. In turn the sensor will simply wait until the corresponding event occurs or the request times out. If the event subscription times out, the controller will at least get the latest momentary values on which the next event subscription will be based.
Note
A timeout argument is used to tell the client how long it should wait (in seconds) before returning an empty response. Such a timeout is necessary since the underlying TCP connection will be dropped if no communication occurs within a given time period. This time depends on the network and the routers used between the client and the server. When the possibly empty response is returned a new, similar request will be made immediately.
Creating the control thread
Control of the actuator will be done in a separate thread so that sensor communication is not affected. From the main thread, we can start the control thread, as follows:
Thread ControlThread;
ControlThread = new Thread (ControlHttp);
ControlThread.Name = "Control HTTP";
ControlThread.Priority = ThreadPriority.Normal;
ControlThread.Start ();
When terminating the application, we will simply abort the thread by calling the Abort() method:
ControlThread.Abort ();
ControlThread = null;
The control thread in itself is a very simple thread. It simply waits for events to occur, based on what happens to the two AutoResetEvent objects defined earlier:
private static void ControlHttp ()
{
try
{
WaitHandle[] Handles = new WaitHandle[]
{updateLeds, updateAlarm };
while (true)
{
try
{
switch (WaitHandle.WaitAny (Handles, 1000))
{
}
}
catch (Exception ex)
{
Log.Exception (ex);
}
}
}
catch (ThreadAbortException)
{
Thread.ResetAbort ();
}
catch (Exception ex)
{
Log.Exception (ex);
}
}
The static WaitHandle.WaitAny() method waits for an event to occur on any of the event objects available in the array. It returns a zero-based index to the event object that was triggered and a negative value when the operation times out. Only one event object can trigger at the a time. Furthermore, the AutoResetEvent objects, as the name implies, auto-reset themselves when they are triggered in the thread. This means that they can be set again from the other thread and trigger a new event.
Controlling the actuator
The first event object is updateLeds. It is set when the LEDs on the actuator needs to be changed. The lastLedMask variable contains the state of how the LEDs should be lit. We perform the LED control by using the REST interface on our web service method that we defined earlier:
case 0:// Update LEDS
int i;
lock (synchObject)
{
i = lastLedMask;
}
HttpUtilities.GET ("http://Peter:Waher@192.168.0.23/ws/?" + "op=SetDigitalOutputs&Values=" + i.ToString ());
break;
Note how it is possible to include the user credentials in the URL directly. HttpUtilities will make the corresponding operations necessary to connect, and authenticate itself, and the GET method fetches the contents from the corresponding resource.
The second event object concerns itself with the status of the alarm output. The lastAlarm variable contains the desired state of the alarm output. Also, we perform the alarm control using the REST interface to the corresponding web service method defined in the actuator project:
case 1:// Update Alarm
bool b;
lock (synchObject)
{
b = lastAlarm.Value;
}
HttpUtilities.GET (http://Peter:Waher@192.168.0.23/ws/?+ "op=SetAlarmOutput&Value=" + (b ? "true" : "false"));
break;
Summary
In this chapter, you were provided with a brief overview of the Web and the protocols and components that have been used to build the Web. You have seen how to apply HTTP to sensors, actuators, and controllers. You have also learned how to utilize its strengths and compensate for some of its weaknesses. You have used the request/response pattern and used delayed responses to simulate event notification. You have also applied basic security by authenticating users and maintaining sessions. Finally, you also implemented web services for interoperable automation.
In the next chapter, you will learn about how the HTTP protocol has been extended and used by Universal Plug and Play (UPnP) to provide a means for automatic device-and-service discovery and an alternative method for event notification.