Learning Internet of Things (2015)
Chapter 3. The UPnP Protocol
Universal Plug and Play (UPnP) is a protocol or an architecture that uses multiple protocols, helps devices in ad hoc IP networks to discover each other, detects services hosted by each device, and executes actions and reports events. Ad hoc networks are networks with no predefined topology or configuration; here, devices find themselves and adapt themselves to the surrounding environment. UPnP is largely used by consumer electronics in home or office environments. In this chapter, you will learn:
· The basic UPnP device architecture
· How to create a UPnP device and service description documents
· How to implement a UPnP service
· How to discover devices and subscribe to events through them
Tip
All source code presented in this book is available for download. Source code for this chapter and the next, can be downloaded here:
https://github.com/Clayster/Learning-IoT-UPnP
Introducing UPnP
UPnP is a very common protocol. It is used by almost all network-enabled consumer electronics products used in your home or office, and as such, it is a vital part of Digital Living Network Alliance (DLNA). The standard body for UPnP is the UPnP Forum (upnp.org). UPnP is largely based on an HTTP application where both clients and servers are participants. This HTTP is, however, extended so that it can be used over TCP as well as UDP, where both use unicast addressing (HTTPU) and multicast addressing (HTTPMU).
Discovery of devices in the network is performed using Simple Service Discovery Protocol (SSDP), which is based on HTTP over UDP, and event subscriptions and notifications are based on General Event Notification Architecture (GENA). Both SSDP and GENA introduce new HTTP methods to search, notify and subscribe to and unsubscribe from an event. Devices find each other by notifying the network of their existence using multicast addressing and the available services. However, they can also search for the network using multicast addressing for certain types of devices or services. Actions on services are called using SOAP web service calls.
Providing a service architecture
UPnP defines an object hierarchy for UPnP-compliant devices. Each device consists of a root device. Each root device can publish zero or more services and embedded devices. Each embedded device can iteratively publish more services and embedded devices by itself. Each service in turn publishes a set of actions and state variables. Actions are methods that can be called on the service using SOAP web service method calls. Actions take a set of arguments. Each argument has a name, direction (if it is input or output), and a state variable reference. From this reference, the data type of the argument is deduced. State variables define the current state of a service, and each one has a name, data type, and variable value. Furthermore, state variables can be normal, evented, and/or multicast-evented. When evented state variables change their value, they are propagated to the network through event messages. Normally, evented state variables are sent only to subscribers who use normal HTTP. Multicast-evented state variables are propagated through multicast HTTPMU NOTIFY messages on the SSDP multicast addresses being used, but using a different port number. There's no need to subscribe to such event variables in order to be kept updated on their values.
Documenting device and service capabilities
Each UPnP-compatible device in the network is described in a Device Description Document (DDD), an XML document hosted by the device itself. When the device makes its presence known to the network, it always includes a reference to the location of this document. Interested parties then download the document and any referenced material to learn what type of device this is and how to interact with it. The document includes some basic information understandable by machines, but it also includes information for human interfaces. Finally, the DDD includes references to embedded devices, if any, and references to any services published by the device.
Each service published by a device is described in a standalone Service Control Protocol Description (SCPD) document, each one an XML document also hosted by the device. Even though SOAP is used to call methods on each service, UPnP-compliant services are drastically reduced in functionality compared to normal SOAP web services. SOAP and WSDL simply give devices too many options, making interoperability a problem. For this reason, a simpler service architecture is used. Instead of using WSDL to describe the service methods, you can use the scpd.xml document to do this directly.
For a more detailed introduction to UPnP, please refer to Appendix I, Fundamentals of UPnP.
Tip
To be able to develop and test applications for a given protocol, it is often helpful if you have tools available that can be used to test and monitor your progress. For UPnP, one such useful set of tools is available in the Open Source project, "Developer Tools for UPnP technologies". In particular, the Device Spy application is useful to interact with UPnP-compliant devices in your network. You can download these tools and the source code from http://opentools.homeip.net/dev-tools-for-upnp.
Creating a device description document
We are now ready to add support for UPnP to our camera. To begin, we will create a subfolder called UPnP. Here we will put all our UPnP-related files. We will make all these files embedded resources (selecting Embedded Resource as the Build Action for the corresponding files). This makes the compiler embed the files into the executable file that is generated when the compiler builds the project. The first file we will add to the project is a DDD called CameraDevice.xml that represents our root device. Our project will only host one root device. This document is an XML document, and it begins by stating what version of UPnP is used:
<?xml version="1.0" encoding="utf-8"?>
<root xmlns="urn:schemas-upnp-org:device-1-0">
<specVersion>
<major>1</major>
<minor>0</minor>
</specVersion>
The next element contains the base URL of the document. All references made in the document will be relative to this base URL. Since we do not know the IP address and port number to be used in the actual camera when it is installed, we put in placeholders instead, which we will replace with the actual values at runtime:
<URLBase>http://{IP}:{PORT}</URLBase>
Choosing a device type
This is where the device description begins. It starts with the device type. The device type is actually a URN that uses a specific format:
urn:DOMAIN:device:NAME
The DOMAIN attribute is replaced by the domain name of the party that creates the interface (with dots replaced by hyphens), and NAME is a unique name, within the namespace of the domain, for the device type. UPnP Forum defines a list of standard device types that can be used. It can be found at http://upnp.org/sdcps-and-certification/standards/sdcps/. Among these, one exists for digital security cameras, the DigitalSecurityCamera:1 interface that can be found at http://upnp.org/specs/ha/UPnP-ha-DigitalSecurityCamera-v1-Device.pdf. The device type URN of this device is urn:schemas-upnp-org:device:DigitalSecurityCamera:1. If we are satisfied with this, we can simply copy the files from the UPnP Forum and continue.
However, when we look at the specification, we notice that there are many items that are not suitable for our project: one optional service interface concerning video, which our camera does not support, and another interface concerning settings. But these settings are not applicable in our case, as our camera does everything for us automatically. We only want to publish pictures taken through the DigitalSecurityCameraStillImage:1 interface.
To be able to create a new device type, albeit based on an existing standardized device type, we need to create our own device type URN and we need to do this using a domain name we have control over. We also need to give it a device type name. We will call our camera learningIoTCamera, and give it a version number, namely 1. We formalize this in our device description document as follows:
<deviceType>urn:clayster-com:device:learningIotCamera:1</deviceType>
Being friendly
URNs are machine-readable but difficult to understand for human users. For this reason, we also need to give the device a "friendly" name, meaning a name for human users:
<friendlyName>Learning-IoT Camera ({IP})</friendlyName>
We then provide some information about the manufacturer of the device:
<manufacturer>Clayster</manufacturer>
<manufacturerURL>http://clayster.com/</manufacturerURL>
This is followed by some information about the device model:
<modelDescription>UPnP Camera sample from the Learning-IoT book.</modelDescription>
<modelName>Learning-IoT Camera</modelName>
<modelNumber>CAM1</modelNumber>
<modelURL>http://clayster.com/learning-iot</modelURL>
Providing the device with an identity
We also need to specify a Unique Device Name (UDN). This is a number that is unique to each individual device and will be, in our case, a GUID generated by the device during the initial configuration. It will be used by others who interact with the device, and it needs to remain the same even if the device restarts. Since we do not know the ID beforehand, we will put a placeholder that we can replace later in the XML document:
<UDN>uuid:{UDN}</UDN>
We can also provide a Universal Product Code (UPC) in the file if we have one. If we don't, we leave the tag empty:
<UPC/>
Adding icons
Custom icons are nice, especially if you are used to graphical user interfaces. UPnP devices can publish a varied number of icons in different resolutions so that graphical user interfaces that display the devices in the network in different ways can choose the icon that best suits their needs. In our example, we will choose a freely available camera icon drawn by LeoYue (alias), which can be found at http://www.iconarchive.com/show/the-bourne-ultimatum-icons-by-leoyue/Camera-icon.html.
Then, save this icon in seven different resolutions (16 x 16, 24 x 24, 32 x 32, 48 x 48, 64 x 64, 128 x 128, and 256 x 256) as seven different PNG files in the UPnP folder of our project. We make all the image files embedded resources. We then list these icons in the device description document as follows. We only include the first icon here for reference while the other six are analogous and represented by an ellipsis (…):
<iconList>
<icon>
<mimetype>image/png</mimetype>
<width>16</width>
<height>16</height>
<depth>32</depth>
<url>/Icon/16x16.png</url>
</icon>
…
</iconList>
It is worthwhile to mention that the icons have not been published through our web interface yet, but we need to provide relative URLs to the icons. We will have to remember the paths provided to the icons here so that we can make sure we publish them correctly through our web interface later.
Adding references to services
Following the icons comes the list of services supported by the device. In our case, the list will only contain one service, the DigitalSecurityCameraStillImage:1 service, published by the UPnP Forum (http://upnp.org/specs/ha/UPnP-ha-StillImage-v1-Service.pdf). We begin by adding both a URN that identifies the service type and another URN that provides a service ID for the service:
<serviceType>urn:schemas-upnp-org:service:
DigitalSecurityCameraStillImage:1</serviceType>
<serviceId>urn:upnp-org:serviceId:
DigitalSecurityCameraStillImage</serviceId>
Note
In the preceding example, the URNs have been split into two rows for readability. In the actual example, they need to be provided on one line without any whitespace.
We then provide a relative URL to the SCPD document, which we will create shortly:
<SCPDURL>
/StillImageService.xml
</SCPDURL>
We also need to provide relative URLs that will be used for control (executing actions on the service) and event subscription. In our example, we will handle both using the same web resource:
<controlURL>/StillImage</controlURL>
<eventSubURL>/StillImage</eventSubURL>
Topping off with a URL to a web presentation page
We finish the device description document by providing a relative URL to an HTML page that can be used for web presentation of the device. Here, we list our /html web resource:
<presentationURL>/html</presentationURL>
Creating the service description document
In our example, we will only implement one service: the DigitalSecurityCameraStillImage:1 interface provided by the UPnP forum (http://upnp.org/specs/ha/UPnP-ha-StillImage-v1-Service.pdf). The service description XML already exists; it is published by the UPnP Forum. However, we still need to create a file in our project that our device can use to publish the SCPD XML document. The file we will create will be called StillImageService.xml, and we will put it in the UPnP folder together with the other UPnP-related files. We will also make sure the file is created as an embedded resource of the project.
The service file begins with a specification of the UPnP version that is used:
<?xml version="1.0" encoding="utf-8"?>
<scpd xmlns="urn:schemas-upnp-org:service-1-0">
<specVersion>
<major>1</major>
<minor>0</minor>
</specVersion>
Adding actions
Directly following the version follows a list of actions published by the service. Each action is defined by a name and a list of arguments. Each argument in turn also has a name, a direction, and a reference to a state variable that defines the underlying state variable and the data type being referenced. The first action in our example is defined as follows:
<actionList>
<action>
<name>GetAvailableEncodings</name>
<argumentList>
<argument>
<name>RetAvailableEncodings</name>
<direction>out</direction>
<relatedStateVariable>AvailableEncodings
</relatedStateVariable>
</argument>
</argumentList>
</action>
</actionList>
Note
The new line added to the relatedStateVariable element in the preceding code is only inserted for readability.
Adding state variables
After having listed all the actions, the corresponding state variables need to be listed. In our example, there will be variables that send events and variables that do not. State variables are defined as follows. Only the first two state variables are listed here:
<serviceStateTable>
<stateVariable sendEvents="no">
<name>AvailableEncodings</name>
<dataType>string</dataType>
</stateVariable>
<stateVariable sendEvents="yes">
<name>DefaultEncoding</name>
<dataType>string</dataType>
</stateVariable>
</serviceStateTable>
When we are done with listing our state variables, we are done with the service document:
</scpd>
For a list of data types available in UPnP, refer to Appendix J, Data types in UPnP.
Adding a unique device name
We need each device to have a unique identity or UDN. To do this, we add a udn property to our DefaultSettings class. We initialize the property with a new GUID so that the first time the application is run and a new object created, it will receive a new unique GUIDidentifier as udn.
private string udn = Guid.NewGuid().ToString();
The public interface for our property is defined as follows:
[DBShortStringClipped (false)]
public string UDN
{
get
{
return this.udn;
}
set
{
if(this.udn != value)
{
this.udn = value;
this.Modified = true;
}
}
}
Providing a web interface
The camera project comes with a web interface that allows us to interact with the camera through a browser. We will use this interface not only to test our camera, but also to link to it from our UPnP interface. To avoid repetition of how to create such web interfaces, only an overview of the web interface is provided here. For a more detailed description of how this web interface is developed, please refer to Appendix K, Camera Web Interface.
The web interface has two basic resources. First, the /html resource returns HTML that displays the camera, and then we have /camera, which returns an image. Both take query parameters. Encoding controls image encoding by providing the Internet media type to use. Compression controls the compression ratio and can be a number between 0 and 255. Resolution controls image resolution and can take one of the three values: 160 x 120, 320 x 240, or 640 x 480. Both resources will be available in a protected and an unprotected version. The protected version will be used in the web interface and requires the user to log in and create a session before the camera can be viewed. The unprotected version, which will be used in the UPnP interface, does not require any user authentication since it is assumed to be accessible only in the local area network.
Creating a UPnP interface
UPnP is based on HTTP and extensions of HTTP onto UDP. As mentioned earlier, UPnP is originally thought of to work in protected networks where devices communicate with each other, unhindered by firewalls. Since we also aim for our device to be connected to the Internet, we need to create two different HTTP interfaces: one for the Internet that is protected and one for the local area network that is unprotected. The protected interface will work on the standard HTTP port 80, and the UPnP server will, in our case, work on port 8080. This port number is not fixed by any standard; it can be any free port. Port numbers below 1024 will require superuser privileges when you run the application. Since notification of presence is done using multicast UDP, everybody will be aware of the IP and port number to use when communicating with the device. We begin by defining our HTTP server to use for UPnP:
private static HttpServer upnpServer;
We then create our second HTTP server like we did for our first:
upnpServer = new HttpServer(8080, 10, true, true, 1);
Log.Information("UPnP Server receiving requests on port " + upnpServer.Port.ToString ());
We also publish the web interface through the UPnP interface, but this time with the unprotected version:
upnpServer.Register("/", HttpGetRootUnprotected,
HttpPostRoot, false);
When the application closes, we need to dispose of this object too to make sure any threads are closed. Otherwise, the application will not close properly:
upnpServer.Dispose();
Registering UPnP resources
Next, we publish our device and service description documents. These are built into the executable file as embedded resources. Each embedded resource has its own unique resource name, which is the namespace of the project. In our case, this is Camera and is followed by a period (.); this is in turn followed by the path of the embedded file where the directory separator (/ or \) is replaced by dots. The service description document requires no changes, so we return it as is. But the device description document requires that we replace placeholders with actual values, so we register a method with the resource to be able to modify the document when requested. This is done as follows:
upnpServer.Register("/CameraDevice.xml",
HttpGetCameraDevice, false);
upnpServer.Register(new HttpServerEmbeddedResource
("/StillImageService.xml",
"Camera.UPnP.StillImageService.xml"));
Tip
To avoid problems for potential receivers—if you're handling text files as binary files, as is the case with our service file where the content type is set manually (from the file extension in our case)—make sure you save the corresponding files using a text editor that lets you save them without a byte order mark. Alternatively, you can provide a preamble to avoid problems with conflicting encodings. Refer to Appendix L, Text Encoding on the Web, for a discussion on the different types of encodings for text content on the Web.
We register the path to our icons in a similar manner. Here, the 16 x 16 icon is registered, and the 24 x 24, 32 x 32, 48 x 48, 64 x 64, 128 x 128, and 256 x 256 are registered in a similar manner:
("/Icon/16x16.png", "Camera.UPnP.16x16.png"));
Tip
In .NET on Windows, filenames that start with a digit, as is the case with the filenames of our icons, get resource names prefixed by underscores (_). This is not the case when you run an application on MONO. If you're running the application on Windows, the resource name for the first icon would be, for instance, Camera.UPnP._16x16.png.
Replacing placeholders
Our device description document (DDD) contains three placeholders that need to be replaced with actual values: {IP} with the IP address that others can use to reach the device, {PORT} with the port number that we will use while communicating with the device, and finally, {UDN} that has to be replaced by the unique device name generated for our device instance. We start by defining our method as follows:
private static void HttpGetCameraDevice (HttpServerResponse resp, HttpServerRequest req)
{
networkLed.High();
try
{
We then load the XML from our embedded resource into a string that we can modify:
string Xml;
byte[] Data;
int c;
using (Stream stream = Assembly.GetExecutingAssembly ().
GetManifestResourceStream ("Camera.UPnP.CameraDevice.xml"))
{
c = (int)stream.Length;
Data = new byte[c];
stream.Position = 0;
stream.Read(Data, 0, c);
Xml = TextDecoder.DecodeString (Data, System.Text.Encoding.UTF8);
}
We then need to find the IP address of the device to return. This IP address would normally depend on what network interface the request is made on, and the underlying protocol that is being used (for instance, IPv4 or IPv6). Since we are running our application on Raspberry Pi, we assume there is only one network interface, and it'll be great if we find an IP address that matches the same protocol as that of the request:
string HostName = System.Net.Dns.GetHostName ();
System.Net.IPHostEntry HostEntry = System.Net.Dns.GetHostEntry (HostName);
foreach(System.Net.IPAddress Address in HostEntry.AddressList)
{
if(Address.AddressFamily == req.ClientEndPoint.AddressFamily)
{
Xml = Xml.Replace("{IP}", Address.ToString());
break;
}
}
Setting up the port number and unique device name is easier. The first is chosen by us; the second is generated during the first execution of the application and is available in our defaultSettings object:
Xml = Xml.Replace("{PORT}", upnpServer.Port.ToString ());
Xml = Xml.Replace("{UDN}", defaultSettings.UDN);
We then returned the finished XML as follows:
resp.ContentType = "text/xml";
resp.Encoding = System.Text.Encoding.UTF8;
resp.ReturnCode = HttpStatusCode.Successful_OK;
resp.Write(Xml);
}
finally
{
networkLed.Low();
}
}
Adding support for SSDP
To add support for SSDP, we will also need to add an SSDP client from the Clayster.Library.Internet.SSDP library to the main class:
private static SsdpClient ssdpClient;
We then instantiate it after the creation of the UPnP HTTP server:
ssdpClient = new SsdpClient(upnpServer, 10, true, true, false, false, false, 30);
The first parameter connects the SSDP client with our newly created HTTP server, dedicated to UPnP. Any multicast messages sent will have a time-to-live (TTL) of 10 router hops. We will activate it for the IPv4 and IPv6 link-local UPnP multicast addresses (the first two true-valued arguments), but not for the IPv6 site-local, organization-local, or global multicast addresses (the following three false-valued arguments). Searching for new devices on the network will be performed every 30 seconds.
When the application closes, we need to dispose of this object too to make sure any threads are closed as well. Otherwise, the application will not close properly.
ssdpClient.Dispose();
We attach event handlers to the SSDP client. The OnNotify event is raised when searching is done and can be used to notify the network of the available interfaces on the device itself. OnDiscovery event is raised when an incoming search request has been received:
ssdpClient.OnNotify += OnSsdpNotify;
ssdpClient.OnDiscovery += OnSsdpDiscovery;
We will also need to use the random number generator defined for session management to generate random delay times:
private static Random gen = new Random ();
Notifying the network
You can notify the network of your presence and service capabilities. This is done by multicasting NOTIFY messages to the network. We can do this from the OnNotify event handler that is called when the SSDP client itself searches the network for devices. In our case, this is done every 30 seconds. We only have two interfaces to publish on the network, and we begin by publishing the interface for the root device:
private static void OnSsdpNotify(object Sender, SsdpNotifyEventArgs e)
{
e.SendNotification(DateTime.Now.AddMinutes (30), "/CameraDevice.xml", SsdpClient.UpnpRootDevice, "uuid:" + defaultSettings.UDN + "::upnp:rootdevice");
The first parameter determines the lifetime of the interface. This means clients do not need to fetch a new interface description during the next 30 minutes. We then point to our device description document resource and tell the network that the notification concerns a root device and the unique device name it has. We then publish the service interface:
e.SendNotification (DateTime.Now.AddMinutes (30), "/StillImageService.xml", "urn:schemas-upnp-" + "org:service:DigitalSecurityCameraStillImage:1", "uuid:" + defaultSettings.UDN + ":service:DigitalSecurityCameraStillImage:1");
}
In this case, we also state that the service file is valid for 30 minutes. We then point to its resource and tell the network that it concerns a DigitalSecurityCameraStillImage:1 service and the unique service name it has.
After these two notifications, recipients in the network will note of the presence and capabilities of our camera, even if they do not actively search for it.
Responding to searches
When a search is performed, it is sent to the network that uses multicast addressing. Anybody listening to the corresponding multicast address will receive the search request. To avoid spam in a large network, with possible packet loss as a result, the search lets clients respond within a random amount of time, provided the response is sent before the given maximum response time elapses. Furthermore, the search can be restricted to certain device types or services types to avoid unwanted responses being sent. Responding to search requests is much like notifying the network about your interfaces, except that you must check whether the corresponding interface is desired and you send the response as a unicast message back to the one who requested it within the time period specified. And if you're sending multiple notifications, it's recommended that you spread them out and send them over the allotted time to avoid bursts.
We begin by analyzing the search request to see whether any of our interfaces are desired, how many and which ones:
private static void OnSsdpDiscovery(object Sender, SsdpDiscoveryEventArgs e)
{
int i, c = 0;
bool ReportDevice = false;
bool ReportService = false;
if (e.ReportInterface(SsdpClient.UpnpRootDevice) || e.ReportInterface("urn:clayster:device:learningIotCamera:1"))
{
ReportDevice = true;
c++;
}
if (e.ReportInterface("urn:schemas-upnp-org:service:" + "DigitalSecurityCameraStillImage:1"))
{
ReportService = true;
c++;
}
We then create a random number of points in the response interval where we will return the responses:
double[] k = new double[c];
lock (lastAccessBySessionId)
{
for (i = 0; i < c; i++)
k [i] = gen.NextDouble ();
}
The random number generator is not thread-safe, so we need to make sure that access to it is done from only one thread at a time. Since we use the random number generator defined for session management, we perform the lock on lastAccessBySessionId, which is the same object that is locked when the session management generates a random number.
Since we always want the order of interfaces reported to be the same, we need to sort our set of random time points:
Array.Sort (k);
i = 0;
If our device description document is desired, we start a timer counting down to the first random time point, scaled for the allowed number of seconds to respond, and make sure that the timer elapses only once and reports it to our interface:
if(ReportDevice)
{
System.Timers.Timer t = new System.Timers.Timer ( e.MaximumWaitTime * 1000 * k[i++] + 1);
t.AutoReset = false;
t.Elapsed += (o2, e2) =>
{
e.SendResponse (DateTime.Now.AddMinutes (30), "/CameraDevice.xml", SsdpClient.UpnpRootDevice, "uuid:" + defaultSettings.UDN + "::upnp:rootdevice");
};
t.Start ();
}
We do the same with our service interface:
if (ReportService)
{
System.Timers.Timer t = new System.Timers.Timer ( e.MaximumWaitTime * 1000 * k[i++] + 1);
t.AutoReset = false;
t.Elapsed += (o2, e2) =>
{
e.SendResponse (DateTime.Now.AddMinutes (30),
"/StillImageService.xml",
"urn:schemas-upnp-org:service:" +
"DigitalSecurityCameraStillImage:1",
"uuid:" + defaultSettings.UDN +
":service:" +
"DigitalSecurityCameraStillImage:1");
};
t.Start ();
}
}
Implementing the Still Image service
As we have seen, UPnP services use SOAP to call actions published by the service. But instead of using WSDL to describe the service method calls, a Service Control Protocol Description (SCPD) document is used. Apart from being much more restrictive when it comes to defining web methods, it also has an added feature that is not supported by normal web services: handling of GENA-type events and event subscriptions. When we implement a UPnP web service, we will do so by inheriting the UPnPWebService class defined in the Clayster.Library.Internet.UPnP namespace. This class in turn is inherited from the normal HttpServerWebService class but adds event handling and subscription capabilities to the web service:
public class DigitalSecurityCameraStillImage : UPnPWebService
{
public DigitalSecurityCameraStillImage() : base("/StillImage")
{
Initializing evented state variables
Still in the constructor of the web service, there are no subscribers to the state variables it publishes. By using the NotifySubscribers method from within the constructor, we don't actually send the state variables to anybody. What we do is inform about the underlying event handling mechanism of the initial values of the existing state variables. This is done as follows:
this.NotifySubscribers (
new KeyValuePair<string, string> ("DefaultResolution",
MainClass.defaultSettings.Resolution.ToString ().
Substring (1)),
new KeyValuePair<string, string> (
"DefaultCompressionLevel",
MainClass.defaultSettings.CompressionLevel.
ToString ()),
new KeyValuePair<string, string> ("DefaultEncoding",
MainClass.defaultSettings.ImageEncoding));
Providing web service properties
Before we can get the web service to work, we need to provide some properties. One is the SOAP namespace of the web service, which is the UPnP-service-type URN:
public override string Namespace
{
get
{
return "urn:schemas-upnp-org:service:" + "DigitalSecurityCameraStillImage:1";
}
}
We also need to provide the UPnP service identity:
public override string ServiceID
{
get
{
return "urn:upnp-org:serviceId:" + "DigitalSecurityCameraStillImage";
}
}
If we want to be able to test the web service using a test form, we must enable this feature to be accessed from remote machines:
public override bool CanShowTestFormOnRemoteComputers
{
get
{
return true;
}
}
Adding service properties
To facilitate working with evented state variables, we will define the service properties that encapsulate these state variables and notify the possible subscribers when changes occur. By using these properties, we make sure the corresponding state variables work as expected throughout the application. We begin with the DefaultResolution state variable, remembering that the actual value lies in the static defaultSettings database object:
public LinkSpriteJpegColorCamera.ImageSize DefaultResolution
{
get
{
return MainClass.defaultSettings.Resolution;
}
set
{
if(value != MainClass.defaultSettings.Resolution)
{
MainClass.defaultSettings.Resolution = value;
MainClass.defaultSettings.UpdateIfModified ();
this.NotifySubscribers ("DefaultResolution", MainClass.defaultSettings.Resolution.ToString ().Substring (1));
}
}
}
Similarly, we encapsulate the DefaultCompressionLevel and DefaultEncoding state variables in two other properties, implemented in the same manner.
Adding actions
Adding the actions from the service definition available at http://upnp.org/specs/ha/UPnP-ha-StillImage-v1-Service.pdf is a very simple task once we get this far. They are implemented as normal web methods. Input parameters are specified as normal method parameters, and output parameters are defined using the out keyword. It's sufficient here to simply show the web method declarations:
public void GetDefaultEncoding(out string RetEncoding);
public void SetDefaultEncoding(string ReqEncoding);
public void GetAvailableEncodings(out string RetAvailableEncodings);
Similar methods are then implemented for the DefaultCompressionLevel and DefaultResolution state variables as well.
Tip
To return a UPnP error from a web method, simply throw an exception of the type UPnPException instead of the normal HttpException. It is common for UPnP service descriptions to specify certain UPnP errors to be returned for certain conditions.
It is similarly a very easy task to add actions that provide the caller with URLs to our image (/camera) and web presentation (/html) resources, with appropriate query parameters. The web method declarations for the corresponding actions are as follows:
public void GetImageURL(HttpServerRequest Request, string ReqEncoding, string ReqCompression, string ReqResolution, out string RetImageURL);
public void GetDefaultImageURL(HttpServerRequest Request, out string RetImageURL);
public void GetImagePresentationURL(HttpServerRequest Request, string ReqEncoding, string ReqCompression, string ReqResolution, out string RetImagePresentationURL);
public void GetDefaultImagePresentationURL(HttpServerRequest Request, out string RetImagePresentationURL);
Using our camera
Our camera project is now complete. It can be run and tested using a browser for the web interface and an application like Device Spy from UPnP Developer Tools. Here, we will present how you can use the device from another application, such as from our controller application.
Setting up UPnP
As in our camera project, we need to create a UPnP interface towards the network. For this, we need an HTTP server and an SSDP client:
private static HttpServer upnpServer;
private static SsdpClient ssdpClient;
First, we set up the HTTP server in the similar way we set up the camera project:
upnpServer = new HttpServer (8080, 10, true, true, 1);
Log.Information ("UPnP Server receiving requests on port " + upnpServer.Port.ToString ());
We also set up the SSDP client likewise:
ssdpClient = new SsdpClient (upnpServer, 10, true, true, false, false, false, 30);
When the application closes, we need to dispose of these two objects too to make sure any threads are closed as well. Otherwise, the application will not close properly.
ssdpClient.Dispose ();
upnpServer.Dispose ();
Discovering devices and services
In our controller application, we will listen to notifications from UPnP-compliant still image cameras instead of actively publishing interfaces of our own. The SSDP client maintains a list of found devices and interfaces for us. All we need to do is react to changes to this list. We do this by adding an event handler for the OnUpdated event, as follows:
ssdpClient.OnUpdated += NetworkUpdated;
In our OnUpdated event handler, we can examine the SSDP client, which contains a list of devices found in the network in the Devices property:
private static void NetworkUpdated (object Sender, EventArgs e)
{
IUPnPDevice[] Devices = ssdpClient.Devices;
We can loop through all the devices found and their services to see whether we can find a still image camera service somewhere:
foreach (IUPnPDevice Device in Devices)
{
foreach (IUPnPService Service in Device.Services)
{
if(Service.ServiceType == "urn:schemas-" + upnp-org:service:" + "DigitalSecurityCameraStillImage:1")
{
Subscribing to events
Subscribing to events once you have an UPnP service is easy. First, you need to construct a callback URL to a resource on the local machine that will receive the event; then, you simply call the SubscribeToEvents() method as follows:
int TimeoutSec = 5 * 60;
string Sid = Service.SubscribeToEvents (Callback, ref TimeoutSec);
You provide the callback URL and a timeout parameter that provides the service with a timeout interval in seconds, before which the subscription needs to be updated, or it will automatically expire. Note that the service might update the timeout interval if it chooses to do so. The SubscribeToEvents method returns a subscription identity (SID) that can be used when referring to a subscription in the future. To update an active subscription, to stop it from expiring, the following call has to be made before the timeout event occurs:
TimeoutSec = 5 * 60;
Service.UpdateSubscription (Sid, ref TimeoutSec);
Receiving events
We have already mentioned that events from the camera are posted to a callback URL, provided when subscribing to events from the service. We can use the predefined web resource class UPnPEvents that is defined in the Clayster.Library.Internet.UPnPnamespace. It handles the POST request and decodes the payload. We begin by defining such a static resource variable in our application:
private static UPnPEvents events;
We then create an instance, with the resource name /events in our case, and register it with our HTTP server dedicated to UPnP:
events = new UPnPEvents ("/events");
upnpServer.Register (events);
This resource has an event called OnEventsReceived, which is raised whenever an event is received. We add an event handler for this event:
events.OnEventsReceived += EventsReceived;
In our event handler, we can access any state variables provided in the event message by examining the PropertySet event argument property. Any part of the URL path trailing after /events will be available in the SubItem property:
private static void EventsReceived(object Sender,UPnPPropertySetEventArgs e)
{
string SubPath = e.SubItem;
Dictionary<string,string> Variables = new Dictionary<string,string>();
foreach(KeyValuePair<string,string> Var in e.PropertySet)Variables [Var.Key] = Var.Value;
For a detailed description on how cameras are tracked in the network by the controller application and how event subscriptions are maintained, please refer to Appendix N, Tracking Cameras.
Executing actions
Now that we know what cameras are available in the network and their state variables, we want to use them by taking pictures with them. To do this, we need to call an action on each still image camera service, for instance, the GetDefaultImageURL action, so we get a URL we can use to take a picture and download the image. Calling a UPnP action is simple. If the variable Service is a UPnP Service, meaning it implements the IUPnPService interface, we first get a reference to the action we need to call. Since we already know it supports the still image camera service interface, we simply get the GetDefaultImageURL action as follows:
UPnPAction GetDefaultImageURL = Service ["GetDefaultImageURL"];
To call an action, we provide input parameters in a Variables collection, with Variables being defined in Clayster.Library.Math. Output parameters will be available after the call in the same collection. In our case, we have no input parameters and one output parameter. We execute the action as follows:
Variables v = new Variables ();
GetDefaultImageURL.Execute (v);
string ImageURL = (string)v ["RetImageURL"];
Once you have the URL, it is simply a matter of downloading the image, which implicitly takes a new picture. Appendix M, Sending Mail with Snapshots, describes in more detail how this method is used to download images from all the available cameras in the network and send them embedded in an HTML-formatted mail to a preconfigured mail address.
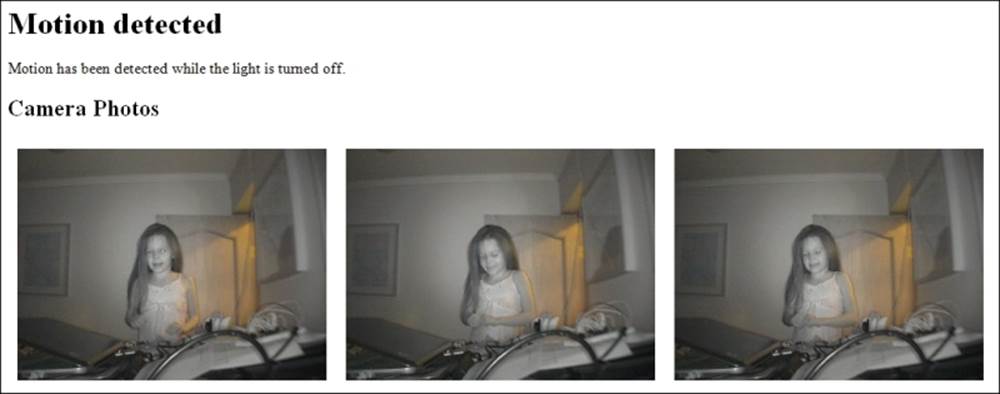
We now have a complete system. The following screenshot is taken from a mail sent from the controller where we can see who it is that sneaks into our office at night and steals our resistors:
Summary
In this chapter, you had a brief introduction to UPnP and how it can be used in Internet of Things applications. Apart from using the request/response pattern and web services, you now how to discover devices in the local area network and how to subscribe to events to detect changes in device states. You have also learned how to document available services and methods in interoperable documents and how such documents can be used to develop solutions where parts are interchangeable.
In the next chapter, we will introduce the CoAP protocol and see how it reduces the complexity of the HTTP protocol to be better suited for resource-constrained devices and networks.