Learning Internet of Things (2015)
Chapter 4. The CoAP Protocol
As we have seen, HTTP is a tremendously popular protocol. In Chapter 3, The UPnP Protocol, we also saw the benefits of simplifying HTTP and using it over UDP instead of TCP. But for tiny resource-constrained devices that communicate over resource-constrained IP networks, HTTPU is not a practical option because it requires too many resources and too much bandwidth. This is especially the case when the underlying network limits the size of datagrams, which is the case when you use IPv6 over Low power Wireless Personal Area Networks (6LoWPAN), a radio networking protocol based on the latest version of Internet Protocol Version 6 (IPv6). Constrained Application Protocol (CoAP) is an attempt to solve this. In this chapter, we will show you how CoAP can be used in IoT by applying it to the sensor, actuator, and controller projects defined in the previous chapters.
In this chapter, you will learn the following:
· The basic operations available in CoAP
· How to publish CoAP resources
· How to subscribe to CoAP events
· How to use blocks to transport large content
· How to discover existing CoAP resources
· How to test CoAP resources
Tip
All of the source code presented in this book is available for download. The source code for this chapter and the next one can be downloaded from https://github.com/Clayster/Learning-IoT-CoAP.
Making HTTP binary
The main difference between CoAP and HTTPU is that CoAP replaces the text headers used in HTTPU with more compact binary headers, and furthermore, it reduces the number of options available in the header. This makes it much easier to encode and parse CoAP messages. CoAP also reduces the set of methods that can be used; it allows you to have four methods: GET, POST, PUT, and DELETE. Also, in CoAP, method calls can be made using confirmable and nonconfirmable message services. When you receive a confirmable message, the receiver always returns an acknowledgement. The sender can, in turn, resend messages if an acknowledgement is not returned within the given time period. The number of response code has also been reduced to make implementation simpler. CoAP also broke away from the Internet Media Type scheme used in HTTP and other protocols and replaced this with a reduced set of Content-Formats, where each format is identified by a number instead of its corresponding Internet Media Type. A detailed list of the numbers assigned to different options, methods, status code, and Content-Formats used in CoAP can be found at http://www.iana.org/assignments/core-parameters/.
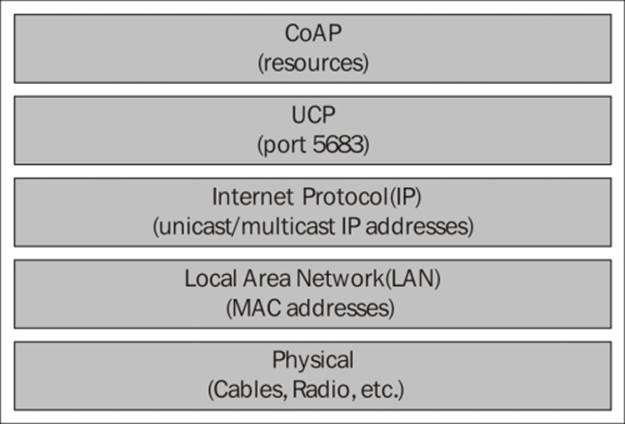
Apart from retaining the request/response capabilities of HTTP and a reduced set of methods and options, CoAP also provides a few new features. Like with HTTPU, CoAP supports multicasting. This can be used to detect devices or communicate through firewalls, as we saw in Chapter 3, The UPnP Protocol. CoAP also provides a set of useful extensions. One of these extensions provides a block transfer algorithm, which allows you to transfer larger amounts of data. (In constrained networks, large might be very small, compared to normal home or office IP networks.) Another extension allows you to have an event subscription and notification architecture where observable resources, which emit notifications when events occur, can be subscribed to. CoAP also supports encryption in the unicast case through the use of Datagram Transport Layer Security (DTLS). The unencrypted version of CoAP is displayed in the following protocol stack diagram:
Finding development tools
Since CoAP is relatively new, the availability of development tools for this protocol is somewhat restricted. There exists an add-on to Firefox, which allows you to view and interact with CoAP resources. This is called Copper (Cu) and can be downloaded fromhttps://addons.mozilla.org/en-US/firefox/addon/copper-270430/. A web-based CoAP test tool can be found at http://coap.me/, and a CoAP interoperability server can be found at http://vs0.inf.ethz.ch/.
Note
Other useful information related to CoAP can be found at http://coap.technology/.
Adding CoAP to our sensor
CoAP is a very lightweight protocol, and making our sensor interact with CoAP is very easy. First, we will set up a CoAP endpoint. (An endpoint acts both as a client and a server in the HTTP sense.). We can use the CoAP endpoint, CoapEndpoint, defined in theClayster.Library.Internet.CoAP namespace. Before our main loop, we add the following:
CoapEndpoint CoapEndpoint = new CoapEndpoint ();
Log.Information ("CoAP endpoint receiving requests on port " + CoapEndpoint.Port.ToString ());
Tip
If we want to see what communication is being established through CoAP endpoint, we would need to register a LineListener that would output everything to the console, as follows:
CoapEndpoint.RegisterLineListener (new ConsoleOutLineListenerSink (BinaryFormat.Hexadecimal, true));
There are many different types of line listeners available, defined in the Clayster.Library.Internet.LineListeners namespace; you can define your own line listeners by implementing the ILineListener interface.
Defining our first CoAP resources
Our first CoAP resource will be called temp/txt and will publish the current temperature in plain text format. We do this as follows:
CoapEndpoint.RegisterResource ("temp/txt",
"Current Temperature, as text.",
CoapBlockSize.BlockLimit_64Bytes, false, 30, true,
(Request, Payload) =>
{
return FieldNumeric.Format (temperatureC, "C", 1);
});
While you can register any class derived from CoapResource as a resource on the CoAP endpoint, we prefer to use the lambda version that implicitly creates a resource for us since the actual resource code is so tiny. In the preceding code, the first parameter defines the name of the resource, in our case, temp/txt. If the IP address of our device is 192.168.0.29, we will be able to access this resource through the use of the coap://192.168.0.29/temp/txt URL. The second parameter provides a descriptive title for the resource. This text will be used when documenting available resources on the end point, as will be described later. The third parameter is the default block size for the resource. When transmitting large payloads using CoAP, the payload will be divided into blocks if it is larger than the default block size. These blocks will then be transmitted to separate datagrams. The fourth parameter tells the endpoint that the resource does not handle any subpaths to the resource (coap://192.168.0.29/temp/txt/example for instance). We provide a default maximum age for the content returned by the resource in the fifth parameter; in our case, we set it to 30 seconds. In the sixth parameter, we tell the endpoint that the resource is observable. This means that subscribers can subscribe to events from this resource and the endpoint will regularly be notifying subscribers of new values. This will happen at least when the maximum age is reached or when the resource triggers a notification manually. Following these parameters, you can provide delegates for the GET, POST, PUT, and DELETE methods correspondingly. We only provide a GET method through a lambda function that returns a string containing the temperature formatted with one decimal and suffixed by a space and the unit C, for example, "23.1 C".
We define a light resource in the same way. Here, we create an observable light/txt resource that returns the light density in percent with a maximum age of 2 seconds:
CoapEndpoint.RegisterResource ("light/txt", "Current Light Density, as text.", CoapBlockSize.BlockLimit_64Bytes, false, 2, true, (Request, Payload) =>
{
return FieldNumeric.Format (lightPercent, "%", 1);
});
Manually triggering an event notification
The previous resources are observable, but they only notify event subscribers when the maximum age is reached. To be able to notify subscribers when something happens, you first need to have access to the CoAP resource. In our case, since these resources are created implicitly, we need to store the implicitly-generated resource. We create a static variable for the motion resource that will inform subscribers whether motion is detected:
private static CoapResource motionTxt = null;
We then register the motion resource, as we did with other resources, but we store the implicitly created resource object at the end:
motionTxt = CoapEndpoint.RegisterResource ("motion/txt", "Motion detection, as text.",CoapBlockSize.BlockLimit_64Bytes, false, 10, true, (Request, Payload) =>
{
return motionDetected ? "1" : "0";
});
Here, our motion resource returns a plain text, either 1 or 0, depending on whether motion is detected or not. The resource is observable and updates subscribers with the current status of the motion detector at least every ten seconds. But we want to provide better response time than this without spamming the network. This can be done by manually triggering the event notification mechanism.
In our measurement loop, when we check the status of the PIR sensor, we check whether the state has changed. To notify any subscribers immediately if a change is detected, we simply call the NotifySubscribers() method, as follows:
if (MotionChanged && motionTxt != null)
motionTxt.NotifySubscribers ();
Registering data readout resources
Apart from the tiny momentary values published previously, we will also provide the XML, JSON, TURTLE, and RDF data formats through CoAP resources as well. Since these may be large, we must use the block transfer algorithm available in CoAP to divide the contents into multiple packets. This block transfer algorithm is incorporated into the CoAP endpoint class, and all we need to do is provide the desired block size (in bytes) when we register the resource. To make it easier to experiment, we will register our resources for all the available CoAP block sizes, which are defined in the CoapBlockSize enumeration. The available block sizes are 16, 32, 64, 128, 256, 512, and 1,024 bytes per block. The corresponding enumeration values are 0 for 16 bytes/block through 6 for 1024 bytes/block. We begin by looping through the available block sizes, avoiding the BlockLimit_Datagram option, which disables block transfer:
foreach (CoapBlockSize BlockSize in Enum.GetValues(typeof(CoapBlockSize)))
{
if (BlockSize == CoapBlockSize.BlockLimit_Datagram)
continue;
string Bytes = (1 << (4 + (int)BlockSize)).ToString ();
We then register an XML resource for the corresponding block size:
CoapEndpoint.RegisterResource ("xml/" + Bytes, "Complete sensor readout, in XML. Control content using " + "query parmeters. Block size=" + Bytes + " bytes.", BlockSize, false, 30, false, CoapGetXml);
JSON, TURTLE, and RDF resources are registered in a similar manner. The only things that differ are the resource names, titles, and resource methods, as follows:
CoapEndpoint.RegisterResource ("json/" + Bytes, "Complete sensor readout, in JSON. Control content using " + "query parmeters. Block size=" + Bytes + " bytes.", BlockSize, false, 30, false, CoapGetJson);
CoapEndpoint.RegisterResource ("turtle/" + Bytes, "Complete sensor readout, in TURTLE. Control content " + "using query parmeters. Block size=" + Bytes + " bytes.", BlockSize, false, 30, false, CoapGetTurtle);
CoapEndpoint.RegisterResource ("rdf/" + Bytes, "Complete sensor readout, in RDF. Control content using " + "query parmeters. Block size=" + Bytes + " bytes.", BlockSize, false, 30, false, CoapGetRdf);
Returning XML
To return XML from a CoAP resource method, you need to return an XmlDocument object. This way, CoAPEndpoint will know how to encode the response correctly. If you're returning a string value, it will be encoded as plain text, and not XML. We use our XML encoding methods defined earlier, load the XML into an XmlDocument object, and return it as follows:
private static object CoapGetXml (CoapRequest Request, object Payload)
{
StringBuilder sb = new StringBuilder ();
ISensorDataExport SensorDataExport = new SensorDataXmlExport (sb, false, true);
ExportSensorData (SensorDataExport, new ReadoutRequest (Request.ToHttpRequest ()));
XmlDocument Xml = new XmlDocument ();
Xml.LoadXml (sb.ToString ());
return Xml;
}
Note that the ReadoutRequest class that parses URL query options takes an HttpServerRequest object. This object contains the query parameters. We can use the ToHttpRequest() method on the CoapRequest object to convert the CoAPRequest object to a correspondingHTTPRequest object. Since CoAP is very similar to HTTP, we can reuse HTTP-based logic easily in this way.
At the time of writing this, there is no CoAP Content-Format for RDF. So we choose to return RDF data as XML data as well since it's the closest option:
private static object CoapGetRdf (CoapRequest Request, object Payload)
{
StringBuilder sb = new StringBuilder ();
HttpServerRequest HttpRequest = Request.ToHttpRequest ();
ISensorDataExport SensorDataExport = new SensorDataRdfExport (sb, HttpRequest);
ExportSensorData (SensorDataExport, new ReadoutRequest (HttpRequest));
XmlDocument Xml = new XmlDocument ();
Xml.LoadXml (sb.ToString ());
return Xml;
}
Returning JSON
To return JSON from a CoAP resource method, you need to return an array object if the result is an array, or SortedDictionary<string,object> if it is an object. These are classes that are recognized by the pluggable CoAP Content-Format encoders. In our case, we generate JSON using the methods developed earlier and use the JsonUtilities class to parse it and return the correct type of object:
private static object CoapGetJson (CoapRequest Request, object Payload)
{
StringBuilder sb = new StringBuilder ();
ISensorDataExport SensorDataExport = new SensorDataJsonExport (sb);
ExportSensorData (SensorDataExport, new ReadoutRequest (Request.ToHttpRequest ()));
return JsonUtilities.Parse (sb.ToString ());
}
Returning plain text
As mentioned previously, returning plain text is done by simply returning a string value in the CoAP resource method. Since TURTLE does not have a CoAP Content-Format at the time of writing this, we return it as plain text instead. We use our previously defined method to generate TURTLE, as follows:
private static object CoapGetTurtle (CoapRequest Request, object Payload)
{
StringBuilder sb = new StringBuilder ();
HttpServerRequest HttpRequest = Request.ToHttpRequest ();
ISensorDataExport SensorDataExport = new SensorDataTurtleExport (sb, HttpRequest);
ExportSensorData (SensorDataExport, new ReadoutRequest (HttpRequest));
return sb.ToString ();
}
Tip
Creating customized CoAP encoding and decoding is easy. All you need to do is implement one or both of the interfaces, ICoapEncoder and ICoapDecoder that are defined in Clayster.Library.Internet.CoAP.Encoding, in a custom class. There is no need to register the class anywhere. As long as the class has a public default constructor defined (one that takes no parameters), the framework will find it automatically.
Discovering CoAP resources
The CoAP endpoint registers a resource by itself called .well-known/core. Here, it publishes a Link Format document called the Constrained RESTful Environments (CoRE) Link Format document. This document contains a list of resources published by the endpoint and some basic information about these documents. This document corresponds in some sense to WSDL documents for web services, even though the Link Format document is very lightweight. It consists of a sequence of resources and some corresponding attributes for each resource.
Tip
The generation of the Link Format document is done automatically. It includes resources, titles, and the observable status. If you want to include more information for a resource, you can override the AppendLinkFormatResourceOptions method in the CoAPResourceclass to add your own resource attributes to the document. The format of the document is fully described in RFC 6690, which you can read at http://tools.ietf.org/html/rfc6690.
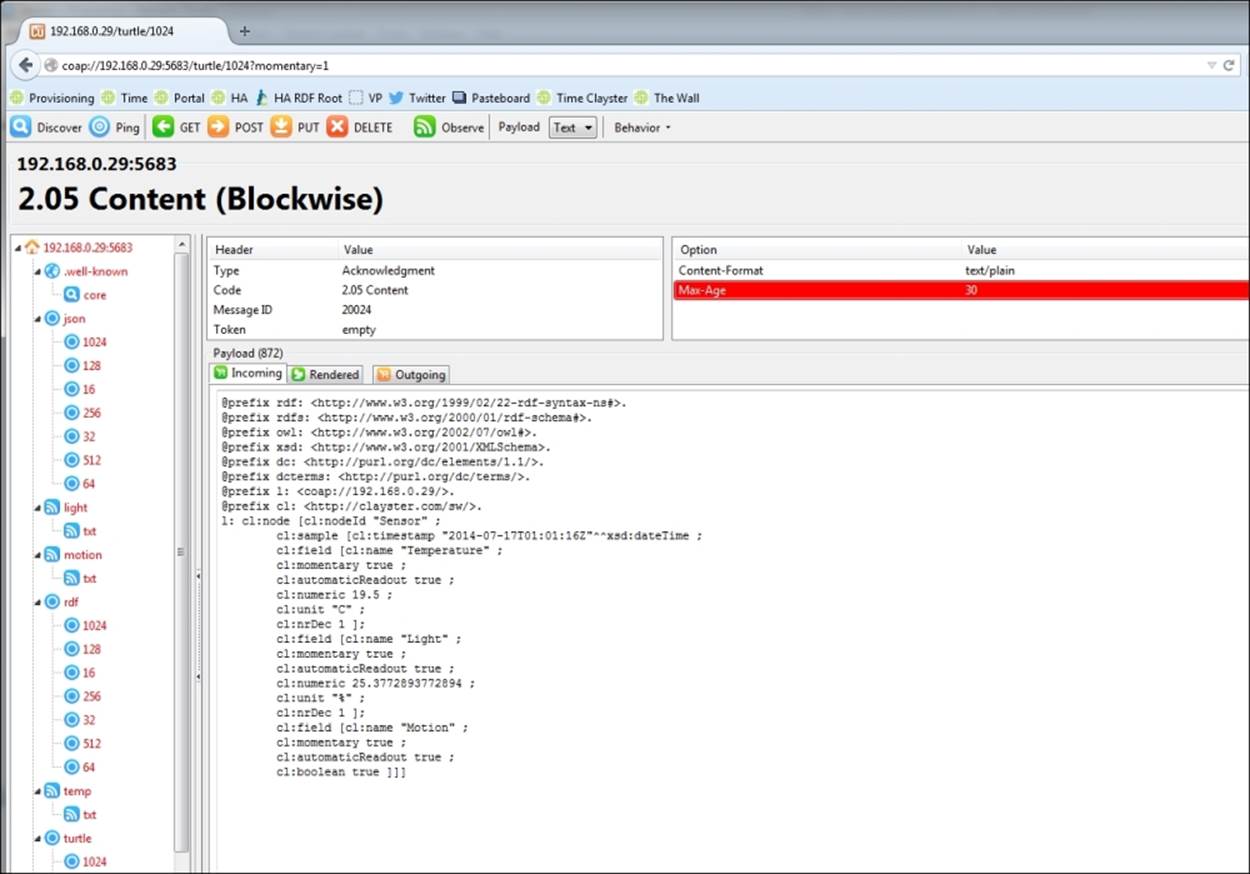
When an entity wants to discover what resources are available on a device, it gets the link document from the .well-known/core resource. We can try this in the Cu Firefox plugin when our sensor has been started. By clicking on the Discover button, the interface downloads the document and populates a tree view to the left with the available resources that are found.
Testing our CoAP resources
We can also select any of the resources found and try any of the methods in the interface. We can try to get the values of a resource by clicking on the GET button. The Incoming tab will display the results. If we want to observe how a resource varies over time, we need to click on the Observe button instead of the GET button. This also sends a GET query, but with observe options requesting to be notified when the resource is changed. If you send data to a resource, for instance by executing the POST or PUT method, you would need to provide the payload in the Outgoing tab. Any query parameters will be set in the URL as usual. The following image illustrates a GET operation against our TURTLE resource:
Adding CoAP to our actuator
Adding CoAP to the actuator is done in more or less the same way as the sensor. The main difference between the two is that the resources will be used for the control resource instead of data readout. For this reason, the POST method will be used instead of GET to send data to the actuator. We start by adding a CoAP endpoint to our actuator, as follows:
CoapEndpoint CoapEndpoint = new CoapEndpoint ();
Log.Information ("CoAP endpoint receiving requests on port " + CoapEndpoint.Port.ToString ());
Defining simple control resources
First, we define a series of simple control resources named do N /txt that can be used to read the state of the digital output, as well as change their status using simple plain text GET and POST method calls. In the resource name, N is used to identify which digital output is being referred to. When we register the resource, we need to provide two delegates. The first delegate will handle the GET method call and the second delegate will handle the POST method call. This can be seen in the following code snippet:
for(i = 1; i <= 8; i++)
{
CoapEndpoint.RegisterResource("do" + i.ToString() + "/txt", "Digital Output " + i.ToString() + ", as text.", CoapBlockSize.BlockLimit_64Bytes, false, 30, false, CoapGetDigitalOutputTxt, CoapSetDigitalOutputTxt);
}
Similarly, we define a compound resource named do/txt that can be used to manage all the output in one operation:
CoapEndpoint.RegisterResource("do/txt", "Digital Outputs, as a number 0-255 as text.", CoapBlockSize.BlockLimit_64Bytes, false, 30, false, CoapGetDigitalOutputsTxt, CoapSetDigitalOutputsTxt);
We also publish a simple resource named alarm/txt for the alarm:
CoapEndpoint.RegisterResource("alarm/txt", "Alarm Output " + i.ToString () + ", as text.", CoapBlockSize.BlockLimit_64Bytes, false, 30, false, CoapGetAlarmOutputTxt, CoapSetAlarmOutputTxt);
Tip
The source code for the actuator project also contains resources to provide the sensor data readout of the actuator. This is implemented in the same manner as for the sensor project.
Parsing the URL in CoAP
The CoapGetDigitlOutputTxt method uses the URL to identify which digital output is being referenced. In CoAP, you don't need to parse the URL as a string since the request is not made in the form of a string URL to begin with. Instead, all parts of the URL are sent as options in the request. To start, let's first define our GET method that returns the current state of a digital output:
private static object CoapGetDigitalOutputTxt (CoapRequest Request, object DecodedPayload)
{
int Index;
if(!GetDigitalOutputIndex(Request, out Index))
throw new CoapException (CoapResponseCode.ClientError_NotFound);
return digitalOutputs [Index - 1].Value ? "1" : "0";
}
So, to find the digital output, we need to loop through the options of the CoAP request, single out the URI Path options (defined by the CoapOptionUriPath class, which is defined in the Clayster.Library.Internet.CoAP.Options namespace), and then extract the index from these options if found. Note that each segment in the path is represented by a UriPath option. So, the do1/txt resource is represented by two URI path options: one for do1 and another for txt. This can be done as follows:
private static bool GetDigitalOutputIndex (CoapRequest Request,
out int Index)
{
CoapOptionUriPath Path;
Index = 0;
foreach (CoapOption Option in Request.Options)
{
if ((Path = Option as CoapOptionUriPath) != null &&
Path.Value.StartsWith ("do"))
{
if (int.TryParse (Path.Value.Substring (2),
out Index))
return true;
}
}
return false;
}
Tip
Other useful options include the CoapOptionAccept option, where the client tells the server what type of content it desires, and the CoapOptionUriQuery option, where each similar option provides one query statement of the form p=v for a parameter p and a value v.
Controlling the output using CoAP
The CoapGetDigitlOutputTxt method defined in the previous section returns a simple string containing 1 if the corresponding digital output is high and 0 if it is low. Let's now implement the POST method that will allow us to control the output using the text payload provided in the same format. We first define the method as follows:
private static object CoapSetDigitalOutputTxt (CoapRequest Request, object DecodedPayload)
{
int Index;
if(!GetDigitalOutputIndex (Request, out Index))
throw new CoapException (CoapResponseCode.ClientError_NotFound);
Data posted along with the method call is found in the DecodedPayload parameter. What type of value this is depends on how the call was encoded. We first check whether it has been encoded as a plain text string:
string s = DecodedPayload as string;
If Content-Format information is left out of the call, the decoder wouldn't know how to decode the payload. In this case, the payload is simply an array of bytes. To improve interoperability, we will provide default decoding of such data by explicitly converting it into a string, as follows:
if(s == null && DecodedPayload is byte[])
s = System.Text.Encoding.UTF8.GetString ((byte[])DecodedPayload);
Next, we have to parse the string. If not successful, we consider it a bad request and return a corresponding error to the caller:
bool b;
if(s == null || !XmlUtilities.TryParseBoolean (s, out b))
throw new CoapException (CoapResponseCode.ClientError_BadRequest);
We then perform the actual control in the same manner as done in the case of HTTP. When done, we return a successful response code to the caller in the following manner:
return CoapResponseCode.Success_Changed;
}
Tip
Notice that when returning content, you return the object itself. A CoAP encoder will be assigned that will encode the object for you. In this case, the response code of the message will automatically be set to Success_Content. If you don't want to return any content and only return a specific response code, you simply need to return a value of the CoapResponseCode enumeration type.
The other control methods are implemented in a similar manner and can be viewed in the source code for the Actuator project.
Using CoAP in our controller
Like with the sensor and the actuator, we need a CoAP endpoint in our controller to be able to communicate over CoAP:
private static void MonitorCoap()
{
CoapEndpoint Endpoint = new CoapEndpoint();
Monitoring observable resources
We want to monitor two of our observable resources: the light sensor and the motion detector on our sensor. The simplest way to do this is to use the CoapObserver class, as shown in the next code snippet. This class performs the corresponding event subscription call to the resource and makes sure the values are constantly being reported, as expected. If no values are received within a given time frame, it will issue new event subscription calls. In this way, the observer recovers messages if they are lost or the observed resource is restarted:
CoapObserver LightObserver = new CoapObserver (Endpoint, true,"192.168.0.15", CoapEndpoint.DefaultCoapPort, "light/txt",string.Empty, 2 * 5);
CoapObserver MotionObserver = new CoapObserver (Endpoint, true, "192.168.0.15", CoapEndpoint.DefaultCoapPort, "motion/txt", string.Empty, 10 * 5);
The first parameter in the constructor refers to the CoAP endpoint that is responsible for the communication. The second Boolean parameter tells the observer whether confirmable or nonconfirmable messages are to be used. Confirmable messages require acknowledgment messages to be sent when received, which permits the sender to use a retry mechanism to make an attempt to ensure the message is delivered even in cases when messages are dropped for various reasons.
The third parameter is the IP address or the hostname of the machine hosting the observable resource. The fourth parameter is the corresponding CoAP port that is used. Following these parameters is the name of the resource. This is followed by any query parameters (none in our case) and eventually an acceptable number of seconds before new subscription requests could be sent, unless notifications are received within this time frame. As a window, we use five times the maximum age for our resources for when should the notifications be received or new subscription requests sent.
Receiving notifications
There are two events in the observer class: OnDataReceived is raised when a new notification is received and OnError when an error message or timeout event occurs. These two events can be used to control the behavior of our application. We begin by declaring two local variables:
bool HasLightValue = false;
bool HasMotionValue = false;
We use the OnDataReceived event to react to incoming light density notifications, as follows:
LightObserver.OnDataReceived += (o, e) =>
{
The notification payload from the resource will be a string, and it is available in the Response property. We examine it and see whether it has the correct format and whether we can extract the numerical value from it:
string s = e.Response as string;
double d;
if(!string.IsNullOrEmpty(s) && s.EndsWith(" %") && XmlUtilities.TryParseDouble(s.Substring(0, s.Length - 2), out d))
{
If we can do this, we store it in our control variables:
lightPercent = d;
if(!HasLightValue)
{
HasLightValue = true;
if(HasMotionValue)
hasValues = true;
}
Having done this, we call the CheckControlRules method defined earlier. This method will look for the available values and signal appropriate actions:
CheckControlRules();
}
};
We implement the reception of motion notifications in a similar manner.
Performing control actions
The last thing we need to do is perform the actual control actions by calling the resources defined in the actuator. Control actions in our application are flagged through event objects that the controller monitors. Instead of calling an HTTP resource, as we did previously to set the LEDs of the actuator corresponding to the value of the light sensor reports, we send a confirmable POST message using CoAP. Here, the variable i contains a value between 0 and 255 representing the state of each LED:
Endpoint.StartPOST(true, "192.168.0.23", CoapEndpoint.DefaultCoapPort, "do/txt", string.Empty, i.ToString(), CoapBlockSize.BlockLimit_64Bytes, null, null);
We use the asynchronous StartPOST() method instead of the synchronous POST() method since for our purposes, it is sufficient to start sending the command. Since we use the confirmable message service (the first parameter), the CoAP endpoint will perform retries if no acknowledgement is received from the actuator. The second and third parameters define the name or IP address of the host machine hosting the resource, together with the port number to use. The fourth parameter corresponds to the actual resource, and the fifth to any query parameters (none in our case). The sixth parameter contains the actual payload of the message, which in our case is simply the byte value that corresponds to the digital output states. After the payload, we define a maximum block size for the delivery of the message. Finally, a callback method is sent to call when the message has been sent or failed, and a state parameter is sent to the callback method. In our example, we don't need to worry about the success or failure of the message; so we leave these as null. Sending the command to control the alarm output is done in a similar manner.
We are now done with the CoAP implementation in the sensor, actuator, and controller applications. To access the complete source code, please download the example projects.
Tip
You are encouraged to compare the communication between the sensor, controller, and actuator using line listeners, WireShark, or other sniffing tools. You should do this using the HTTP versions from the previous chapter first and then the CoAP versions from this chapter. This will enable you to see the real differences between HTTP and CoAP and be able to compare telegram sizes and so on.
Summary
In this chapter, we covered the basics of the CoAP protocol along with some of its strengths and weaknesses. We have seen how we can use it in our sensor, actuator, and controller projects as a simple means to create Internet of Things applications.
In the next chapter, we will introduce the publish/subscribe pattern and the use of message brokers as an alternative method of communication.
All materials on the site are licensed Creative Commons Attribution-Sharealike 3.0 Unported CC BY-SA 3.0 & GNU Free Documentation License (GFDL)
If you are the copyright holder of any material contained on our site and intend to remove it, please contact our site administrator for approval.
© 2016-2026 All site design rights belong to S.Y.A.