Learning Web Application Development (2014)
Chapter 4. The Interactivity
So far, we’ve studied three very important aspects of web application development. Sadly, however, we haven’t built an application that actually does anything. We’ve just been able to structure content and then style it so it looks interesting.
In this chapter, we’re going to start exploring interactivity. This will allow us to go beyond building web pages that don’t change. Instead, we’ll begin building dynamic applications that respond to user input.
To this end, we’ll learn a little bit about JavaScript, the scripting language that runs inside every web browser, and jQuery, a JavaScript library that’s useful for manipulating the DOM (among other things). In addition, we’ll spend some time learning the basics of JavaScript as a language, with an emphasis on using and manipulating arrays.
Hello, JavaScript!
Let’s start with an example. As before, we’ll create a directory in Projects called Chapter4. In this directory, we’ll start by creating a subdirectory called Example1 and open that directory in Sublime. Next, we’ll create three files: index.html, style.css, and app.js. We’ll start with index.html:
<!doctype html>
<html>
<head>
<title>App Name</title>
<link href="style.css" rel="stylesheet" type="text/css">
</head>
<body>
<h1>App Name</h1>
<p>App Description</p>
<script src="http://code.jquery.com/jquery-2.0.3.min.js"></script>
<script src="app.js"></script>
</body>
</html>
Everything in index.html should be familiar with the exception of the <script> tags at the bottom of the body element. Like the link element, script elements allow you to associate external files with your HTML, but the script elements typically point to JavaScript files. Another important thing to note is that unlike the <link> tag, <script> will always require a closing tag.
We choose to place the <script> tags in the body element instead of the head for a technical reason: the browser displays the page in a top-down fashion, creating the DOM elements as it comes across them in the HTML document. By placing the <script> tags at the end, the JavaScript files will be one of the last things the page loads. Because JavaScript files are often very large and take a bit of time to load, we like to do that last so that the user will get visual feedback from the other elements as fast as possible.
The first <script> tag includes a commonly used client-side library called jQuery, which we’re going to learn a lot about in the coming sections. It loads jQuery from http://code.jquery.com, a content delivery network. This means we’re not keeping a copy of jQuery on our local machine. Instead, we tell the browser to download it from an external site similar to the way we handled Google Fonts in the previous chapter. So our computer will need to be connected to the Internet for this example to work properly.
The second script element includes the app.js script that contains the JavaScript code that we write. We’ll create that file next.
We also have a linked CSS file, which we’ve set up to remove the default margin and the padding of all the elements on the page. Using the universal selector will cause CSS Lint to give us a warning, but we’ll ignore the warning for the time being:
* {
margin: 0;
padding: 0;
}
Our app.js file is the one we are most interested in, and its content is shown in the following code. Before we discuss it, go ahead and type it in exactly as you see here, and then open up index.html in your web browser:
var main = function () {
"use strict";
window.alert("hello world!");
};
$(document).ready(main);
If you typed in everything correctly, you should see an alert dialog box that says hello world! when the page loads, as shown in Figure 4-1.
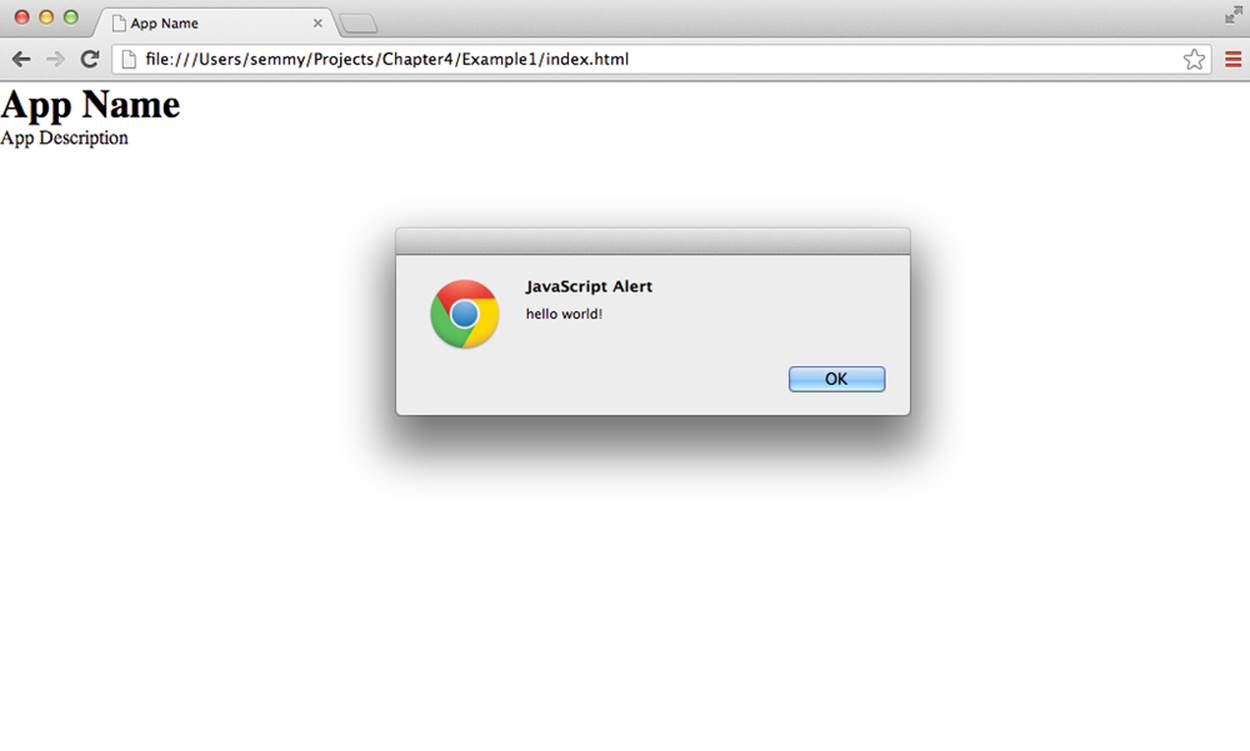
Figure 4-1. Our first (sort of) interactive app
This is a basic skeleton that we’ll use in all of our JavaScript programs. It does two primary things that you can generalize to the rest of the client-side app code in this book: (1) it defines a global function called main, which is the entry point for the execution of our program, and (2) it uses jQuery to set up the execution of the main function once the HTML document is fully loaded and ready.
The code is also set up to run in strict mode, which disallows certain bad aspects of JavaScript that have caused problems for programmers in the past. This will always be the first line in our main function. The script also creates the “hello world!” dialog, but that’s just for this example.
Our First Interactive App
Now we’ll use jQuery to create something a little more interesting. Our goal is to create a simple app that allows the user to enter some text, which subsequently will be appended to the page in a different place. This example will demonstrate that it’s very easy to make interesting things happen in a few lines of code.
Let’s start by creating a new directory in our Chapter4 directory called Example2. Initialize an empty Git repository and open the directory in Sublime. Re-create the three example files from the preceding section (index.html, style.css, and app.js). As has been discussed in previous chapters, it’s a good idea to memorize this basic skeleton structure so that you can create it from scratch without having to copy any code.
Once you have the skeleton project set up, go ahead and make your initial commit to your Git repository.
The Structure
Let’s take a quick look at the user interface before we get started. It is shown in Figure 4-2.
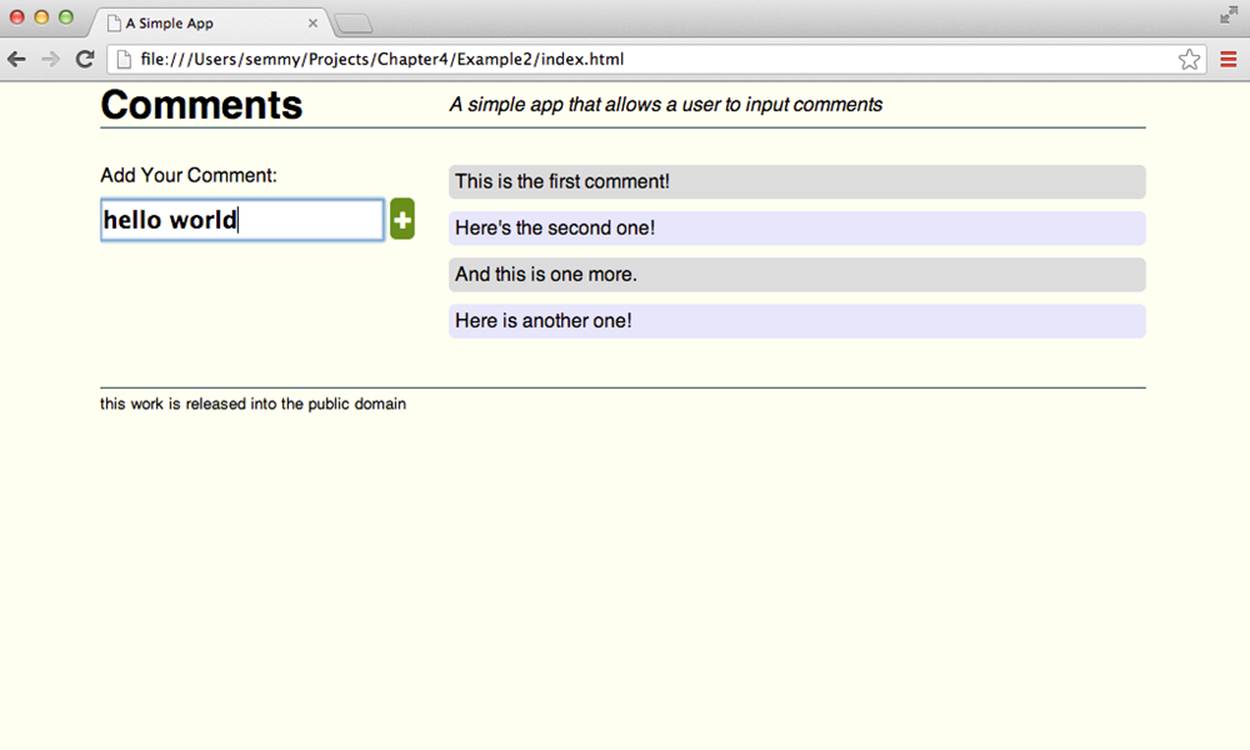
Figure 4-2. The user interface for our first interactive app
You’ll see that the structure consists of three primary elements: the header, the footer, and main. With this in mind, we can modify our HTML to outline our user interface:
<!doctype html>
<html>
<head>
<title>A Simple App</title>
<link href="style.css" rel="stylesheet" type="text/css">
</head>
<body>
<header>
</header>
<main>
<!-- note that we use a dash here for our CSS class name
that contains multiple words, that's a CSS convention -->
<section class="comment-input">
</section>
<section class="comments">
</section>
</main>
<footer>
</footer>
<script src="http://code.jquery.com/jquery-2.0.3.min.js"></script>
<script src="app.js"></script>
</body>
</html>
Once you modify your HTML to look similar to the preceding code, commit it to your Git repository. Next, fill in the header and footer elements, along with the primary part of the main content on the left side, to correspond with the design in Figure 4-2. Hopefully you can see that some of the sections will have an <h1>, <h2>, or <h3> tag along with some content. Add those now.
For the comment-input section, we’ll use a new HTML tag: <input>. The input element represents an input text box, and doesn’t require a closing tag. Add an empty <input> tag to the comment-input section. You can also add the paragraph with our “Add Your Comment:” prompt:
<section class="comment-input">
<p>Add Your Comment:</p>
<input type="text">
</section>
In the .comments section, add a few example comments that will simply be paragraph tags. This will help us with the styling. So, for example, we may modify our comments section to look something like this:
<section class="comments">
<p>This is the first comment!</p>
<p>Here's the second one!</p>
<p>And this is one more.</p>
<p>Here is another one</p>
</section>
Finally, we’ll add a button element labeled with a + character. Although we haven’t seen the button element yet, there’s nothing particularly special about it until we attach a JavaScript behavior to it. To add a button, we’ll add the <button> tag immediately following the <input> tag. The code contained in my comment-input section looks something like this:
<section class="comment-input">
<p>Add Your Comment:</p>
<input type="text"><button>+</button>
</section>
Once we have the structure defined, let’s commit it to our Git repository and move on to styling the page.
The Style
The style consists of a few simple things. First, it might be helpful to use a reset, but don’t feel obligated to do so for this example. At minimum you’ll want to keep the simple CSS starting point where we’ve zeroed out the default margin and padding.
The width of the body is 855 pixels in this example, with the left column taking up a third of that. The other two-thirds of the body consists of the comments.
One interesting aspect of the comments section is that we’ve alternated colors for comments. In other words, the even-numbered comments are one color, and the odd-numbered comments are another. We can achieve this effect using pure CSS—we’ll simply use the nth-child pseudoclass along with the even or odd value. For example, if we want to alternate the colors lavender and gainsboro, we can create CSS rulesets that look like this:
.commentsp:nth-child(even) {
background: lavender;
}
.commentsp:nth-child(odd) {
background: gainsboro;
}
If you’ve added some example comments, you should see the background colors alternate once you add this ruleset to the CSS. Notice that we’ve also given our comments a slight border-radius to make them have rounded edges.
Other than that, the rest of this layout should follow previous examples pretty closely. Finish styling the interface as best as you can and commit your code to the Git repository so we can move on to making it interactive. If you have trouble, you can see it in our GitHub repository.
The Interactivity
Now we’re ready to work on the interactivity. We’ll build this example step by step, making Git commits along the way.
Handling click events
Let’s start by doing the following: when the user clicks the + button, we’ll insert a new comment into the comments section. To do this, we’ll begin by modifying our app.js code to look like this:
var main = function () {
"use strict";
$(".comment-input button").on("click", function (event) {
console.log("Hello World!");
});
};
$(document).ready(main);
Open up your page in your browser and open the Chrome Developer Tools as described in the previous chapter. Once there, click the Console tab in the top bar of the Developer Tools. Now, when you click the + button on the page, you should see “Hello World!” appear in the console! If everything is set up and working correctly, it’s a good time to commit your progress to your Git repository.
What’s happening here? This code is attaching an event listener to the DOM element referenced in the call to the $ function. Notice that the contents of the $ look a lot like a CSS selector—and that’s no coincidence! That’s exactly what it is! jQuery allows you to easily target elements in the DOM using CSS selectors, and then manipulate them using JavaScript.
The event for which we’re listening on the button element is the “click” event. The listener itself is a function that simply prints “Hello World!” to the console. So we can translate the code into English as follows: when the user clicks the +, print “Hello World!” to the console.
Of course, we don’t actually want to print “Hello World!” to the console—we want to add a comment to the comments section. To move toward making that happen, we’ll modify our code slightly, replacing the console.log with another line of jQuery that appends a DOM element to the comments section:
var main = function () {
"use strict";
$(".comment-input button").on("click", function (event) {
$(".comments").append("<p>this is a new comment</p>");
});
};
$(document).ready(main);
Reload your browser window, and if all goes well you should be able to click + and see “this is a new comment” added to the comments section. You’ll notice that the jQuery code (which starts with the $) selects the comments section in the same way that we select it in our CSS file, and then appends some HTML code to it. If everything is working, commit your code with a meaningful commit message. If it’s not working, go back and make sure you’ve typed it in correctly.
Dynamically manipulating the DOM
We’ve made some progress toward our goal, but every time we click the button it adds the exact same content. We want to change the text in the paragraph based on the content contained in the input box. We’ll start by creating a variable to hold the DOM element that we’re going to append:
var main = function () {
"use strict";
$(".comment-input button").on("click", function (event) {
var $new_comment = $("<p>");
$new_comment.text("this is a new comment");
$(".comments").append($new_comment);
});
};
$(document).ready(main);
This modification hasn’t actually changed anything that our code is doing: it simply refactored it so that we can more easily customize the text content of the paragraph tag. Specifically, we’ve added a variable declaration and assignment. The variable name $new_comment can be anything that we want, but if the variable will hold a jQuery object, it’s sometimes helpful to distinguish it by using the $ as the first character.
The first line of the new code creates a new paragraph element as a jQuery object, and the second line changes the text content of the new paragraph element to “this is a new comment.” Because jQuery allows for chaining function calls, we can actually do both lines in a single line if we’d prefer:
var $new_comment = $("<p>").text("this is a new comment");
Even if we do use the chaining feature in jQuery, it’s important to remember that two things are happening here—a new paragraph element is being created, and then the text content of the paragraph element is being changed to “this is a new comment.”
Next, we’d like to get the content of the input box to store it in the variable that we’ve created. Before moving on, however, take a moment and try to figure out how to target the input element that is contained in the .comment-input section with jQuery.
Hopefully you gave it a try using CSS selectors! The answer is the following:
$(".comment-input input");
Just like in CSS, this line targets the elements with the .comment-input class, and then drills down to target the input elements that are descendants of the .comment-input sections. Because only one element meets this criteria, it is the only element that will be selected.
Now that we know that, we can get the content out. It turns out that jQuery has a function that returns the content of an input box, and that function is called val, which is just shorthand for value. We can access the content of the input box by using the following code:
$(".comment-input input").val();
Now we just need to do something with it! In this case, we’re going to make the content of the input box the text value of our new paragraph element. So we can refactor our code to look like this:
var main = function () {
"use strict";
$(".comment-input button").on("click", function (event) {
var $new_comment = $("<p>"),
comment_text = $(".comment-input input").val();
$new_comment.text(comment_text);
$(".comments").append($new_comment);
});
};
$(document).ready(main);
And if we’d like, we can do much of this in a single line without using an intermediate variable to store the result of the call to the val function:
var $new_comment = $("<p>").text($(".comment-input input").val());
Now open the app in your browser. If everything is working correctly you should be able to type content into the text box, and then click the button and see the content added to the comment section. If something isn’t working, you can double-check to make sure you have all your semicolons and parentheses in the correct place, and then open up the Chrome Developer Tools to check to see if there are any errors in the console. The error might give you clues to what you’ve typed incorrectly.
Once you get everything working to your satisfaction, commit the changes to your Git repository with a meaningful commit message.
At this point everything should be roughly working. For our users, however, the experience leaves a lot to be desired and we can make a few minor changes that would substantially improve it.
A better clicking experience
Note that when we hover over the + sign, the cursor remains an arrow. Your user will expect the cursor to turn into a pointing finger when hovering over clickable elements. We can fix this by making our button contained in an a tag, but we can also easily fix it with a minor change to our CSS. We can select the span element in the .comment_input section and style the pointer using the hover pseudoclass:
.comment_inputspan:hover {
cursor: pointer;
}
Once we make that change, we should see the cursor change as our users will expect.
Squashing a bug
You probably didn’t realize that there’s a bug in our code yet, but it turns out that there is! It’s probably useful to take a moment to think about the expected behavior of the application and see if you can find it.
If you still haven’t found it, here it is: when we click the add button and there is no content in our input box, our jQuery program adds an empty p element to the DOM. How does this bug present itself? It actually appears as a problem with the even/odd coloring scheme that we applied in our CSS.
To see this bug rear its ugly head, start by reloading the page. Next, type in one comment using the input box, clear out the box, click the add button, and then add another comment. If you followed those directions, you’ll see that the two comments that show up are the same color! That’s because the empty comment is taking the odd color and it doesn’t show up.
We can also verify the bug is caused by the empty p element by using the Elements tab in the Chrome Developer Tools window. Start by opening the Chrome Developer Tools and clicking the Elements tab. Next, drill down into the main element and then into the comments section. After you have that section open, click the button with no content in the input box. You’ll see the empty p elements added.
How can we fix this? Basically, we’ll insert a check to see if the content of the input box is empty before we do anything with it. We can do this using an if statement:
$(".comment-input button").on("click", function (event) {
var $new_comment;
if ($(".comment-input input").val() !== "") {
$new_comment = $("<p>").text($(".comment-input input").val());
$(".comments").append($new_comment);
}
});
The !== confirms that the content of the input box does not equal the empty string, which is basically equivalent to checking to see if the input box is empty. So the if statement only executes the code if the input box is not empty. This simple change should fix the bug, and once we do that, it’s a good idea to go ahead and make a commit to your Git repository.
NOTE
Notice that we moved the variable declaration above the if statement. It’s always a good idea to keep your variables declared at the top of your function definitions.
Clearing out the input box
The next major user experience problem is that the input box is not clearing out when users click the button. If they want to enter a second comment, they have to manually delete the content that was there previously. It’s actually pretty easy to clear it out: if we call the val method of the jQuery object with an explicit value, it will fill the box with that value. In other words, we can clear out the current content by sending the empty string to the val method:
$(".comment-input input").val("");
So one more line of code will add this feature:
$(".comment-input button").on("click", function (event) {
var $new_comment;
if ($(".comment-input input").val() !== "") {
var $new_comment = $("<p>").text($(".comment-input input").val());
$(".comments").append($new_comment);
$(".comment-input input").val("");
}
});
Making the Enter key work as expected
Another thing that users will expect is that the Enter key on the keyboard should submit the comment. This is often true when we’re interacting with a chat program, for example.
How can we make that happen? We can add an additional event handler that listens for the keypress event on the input element itself. We can add this directly after our click event handler:
$(".comment-input input").on("keypress", function (event) {
console.log("hello world!");
});
Note that two main differences exist between this listener and our previous listener. The first is that this listener is set up to listen for the keypress event instead of the click event. The second is that we’re listening for an event on a different element: in this case we’re listening on the input box, whereas in the previous example we were listening on the button element.
If you try out this code, you’ll see that “Hello World!” gets logged to the Chrome developer console every time we type a key. We want to ignore most key presses in the input box and only react when the user presses the Enter key. To do this we can use the event local variable that we ignored in the previous handler—that holds the value of the key pressed. How can we see that value? Let’s modify our code slightly:
$(".comment-input input").on("keypress", function (event) {
console.log("this is the keyCode " + event.keyCode);
});
Note that the C in keyCode is capitalized. This is an example of camelCase: when we have a variable name that has multiple words in it, we capitalize each word after the first.
In the output, we’re using + to concatenate the value of the keyCode to the string that starts “this is the keyCode.” When your code is running, you’ll see the actual value of the keyCode in the output.
Now when we reload the browser and start typing into the input box, we’ll see the keyCodes scroll up the screen. We can use this to figure out the keyCode for the Enter key. Once we do that, we can wrap our code in an if statement to only respond to the Enter key:
$(".comment-input input").on("keypress", function (event) {
if (keyCode === 13) {
console.log("this is the keyCode " + event.keyCode);
}
});
This code only prints out the keyCode when the Enter key is pressed. Finally, we can copy the code from our other event listener that adds a new comment:
$(".comment-input input").on("keypress", function (event) {
var $new_comment;
if (event.keyCode === 13) {
if ($(".comment-input input").val() !== "") {
var $new_comment = $("<p>").text($(".comment-input input").val());
$(".comments").append($new_comment);
$(".comment-input input").val("");
}
}
});
Fading in our new comment
Now all of our important features should be working. But let’s add one more aspect to the experience: instead of the new comment just appearing immediately, let’s have it fade in. Fortunately, jQuery makes this very easy because every jQuery element has a fadeIn method built in. But in order to have the element fade in, we’ll need to ensure that it’s hidden first. To do that, we’ll call the hide method on the element before appending it to the DOM. The following code does exactly that:
$(".comment-input button").on("click", function (event) {
var $new_comment;
if ($(".comment-input input").val() !== "") {
$new_comment = $("<p>").text($(".comment-input input").val());
$new_comment.hide();
$(".comments").append($new_comment);
$new_comment.fadeIn();
$(".comment-input input").val("");
}
});
Now, when we add a comment with the button, we’ll see it fade in slowly instead of appearing. We should also modify our keypress event to do the same thing. Once you get that working, go ahead and commit your code.
Refactoring for simplicity
At this point, my app.js file looks like this, and yours should look similar:
var main = function () {
"use strict";
$(".comment-input button").on("click", function (event) {
var $new_comment;
if ($(".comment-input input").val() !== "") {
$new_comment = $("<p>").text($(".comment-input input").val());
$new_comment.hide();
$(".comments").append($new_comment);
$new_comment.fadeIn();
$(".comment-input input").val("");
}
});
$(".comment-input input").on("keypress", function (event) {
var $new_comment;
if (event.keyCode === 13) {
if ($(".comment-input input").val() !== "") {
$new_comment = $("<p>").text($(".comment-input input").val());
$new_comment.hide();
$(".comments").append($new_comment);
$new_comment.fadeIn();
$(".comment-input input").val("");
}
}
});
};
$(document).ready(main);
One thing you’ll immediately notice is that we have duplicated code. In particular, our code that adds a comment is duplicated in both event handlers, and when we changed one of them to fade in the text, we had to change the other as well. This violates a principle of software development known as the DRY (Don’t Repeat Yourself) principle. Whenever we are cutting and pasting code, a little red light should go off in our mind to warn us that there’s probably a better way to do what we’re trying to do. In this case, we can rearrange our code to look like this:
var main = function () {
"use strict";
var addCommentFromInputBox = function () {
var $new_comment;
if ($(".comment-input input").val() !== "") {
$new_comment = $("<p>").text($(".comment-input input").val());
$new_comment.hide();
$(".comments").append($new_comment);
$new_comment.fadeIn();
$(".comment-input input").val("");
}
};
$(".comment-input button").on("click", function (event) {
addCommentFromInputBox();
});
$(".comment-input input").on("keypress", function (event) {
if (event.keyCode === 13) {
addCommentFromInputBox();
}
});
};
$(document).ready(main);
In this example, we abstract the duplicated code as a reusable function and then call the function in each of the event listeners. We do this by declaring a variable to store the function and then defining the function. This leads to code that is much more maintainable: now when we have to make a change to the comment-adding behavior, we only have to do it in one place!
jQuery Generalizations
Wow—that example was pretty intense, but hopefully you made it through in one piece! On the bright side, we got to see a lot of the types of things that jQuery can do. Now let’s take a step back and examine some of the things that we can generalize from that example. Essentially, jQuery offers us three things:
§ A streamlined, expressive approach to DOM manipulation
§ A consistent approach to DOM event handling
§ A simplified approach to AJAX
We’ll study the first two in this chapter, and the third in the next. It’s also worth mentioning that jQuery also has a tremendous number of third-party plug-ins that can quickly and easily enhance websites.
Setting Up a Project
Before we begin, let’s start by discussing a little more about our workflow. Generally, the client-side portion of our application can span multiple HTML, CSS, and JavaScript files. Therefore, it’s often helpful to keep those things organized in a meaningful way.
From here on out, we’ll keep all of our HTML files in the root of our project directory, and then we’ll have three subdirectories called stylesheets, images, and javascripts. We’ll make sure that their content appropriately reflects their names.
This changes things slightly when we’re linking stylesheets or importing scripts. Here’s an example of how this change affects our HTML:
<!doctype html>
<html>
<head>
<link href="stylesheets/reset.css" rel="stylesheet">
<link href="stylesheets/style.css" rel="stylesheet">
</head>
<body>
<script src="http://code.jquery.com/jquery-2.0.3.min.js"></script>
<script src="javascripts/app.js"></script>
</body>
</html>
Note that we’ve had to explictly qualify the location of our script and CSS files by prepending them with a forward slash and the directory name.
Comments
Before we start typing in real code, it’s probably good to start with a discussion of JavaScript comments. Just like in HTML and CSS, we can put comments in our JavaScript to annotate our code for human readers. There are two types of comments: a single-line comment and a multiline comment. Single-line comments are created by using two forward slashes next to each other, and multiline comments look just like CSS comments:
// this is a single-line comment, which runs to the end of the line
var a = 5; // this is a single-line comment following some actual code
/* This is a multiline comment that will run until
we close it. It looks like a CSS comment */
Selectors
As we’ve seen in the previous example, jQuery selectors are very similar to CSS selectors. In fact, we can use any CSS selector as a jQuery selector. So, for example, the following jQuery selectors select exactly what we’d expect:
$("*"); // selects all elements in the document
$("h1"); // selects all of the h1 elements
$("p"); // selects all of the p elements
$("p .first"); // selects all paragraph elements with the class 'first'
$(".first"); // selects all elements with the class 'first'
$("p:nth-child(3)"); // selects all paragraph elements that are the third child
It turns out that jQuery selectors aren’t identical to CSS selectors in all cases. In fact, jQuery adds a rich set of pseudoclasses and pseudoelements that are not currently available in CSS. Additionally, certain valid CSS identifiers have to be represented differently when used in jQuery (special characters such as . must be escaped by two backslashes). But for our purposes, we are going to think of jQuery selectors as CSS selectors that return DOM elements that we can manipulate in our JavaScript. If you’re interested in learning more, you can check out the jQuery selector documentation.
DOM Manipulation
Once we’ve successfully used selectors to add elements to the DOM, it’s likely that we’re going to want to manipulate them in some way. jQuery makes that pretty easy.
Adding elements to the DOM
To get started, it’s helpful to remember our tree mental model for the DOM. For instance, consider this HTML snippet:
<body>
<h1>This is an example!</h1>
<main>
</main>
<footer>
</footer>
</body>
Note that our main and footer elements are empty. We can draw a tree diagram as shown in Figure 4-3.
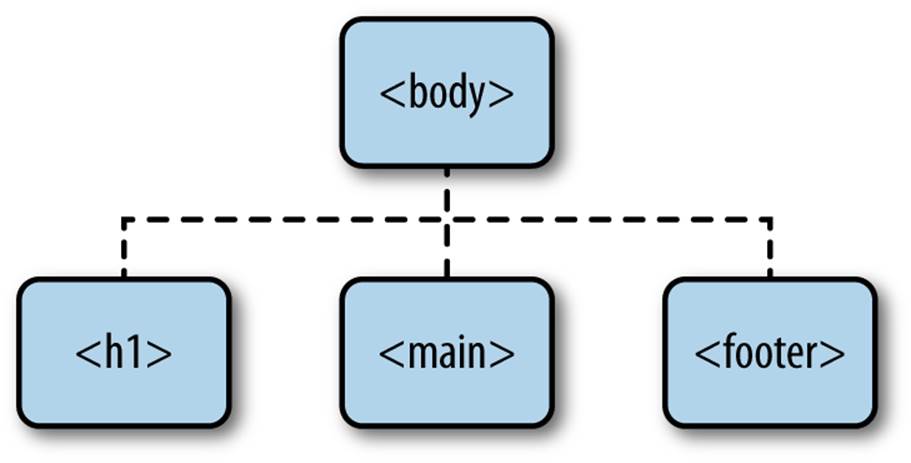
Figure 4-3. A tree diagram of the DOM before any manipulation is done with jQuery
To create an element, we use the same $ operator that we use to select an element. Instead of sending in a selector, however, we send in the tag representing the element we’d like to create:
// By convention, I start jQuery object variables with a $
var $newUL = $("<ul>"); //create a new li element
var $newParagraphElement = $("<p>"); // create a new p element
Once we’ve created an element, we can add things to it, including other HTML elements. For example, we can add text to our p element like this:
$newParagraphElement.text("this is a paragraph");
After we execute that code, our paragraph DOM element will be equivalent to the following HTML:
<p>this is a paragraph</p>
The ul and the p elements that we’ve created are not part of the DOM that appears on the page yet, so our tree diagram would have those new elements floating off in space, but referenced by their associated jQuery variables. This is illustrated in Figure 4-4.
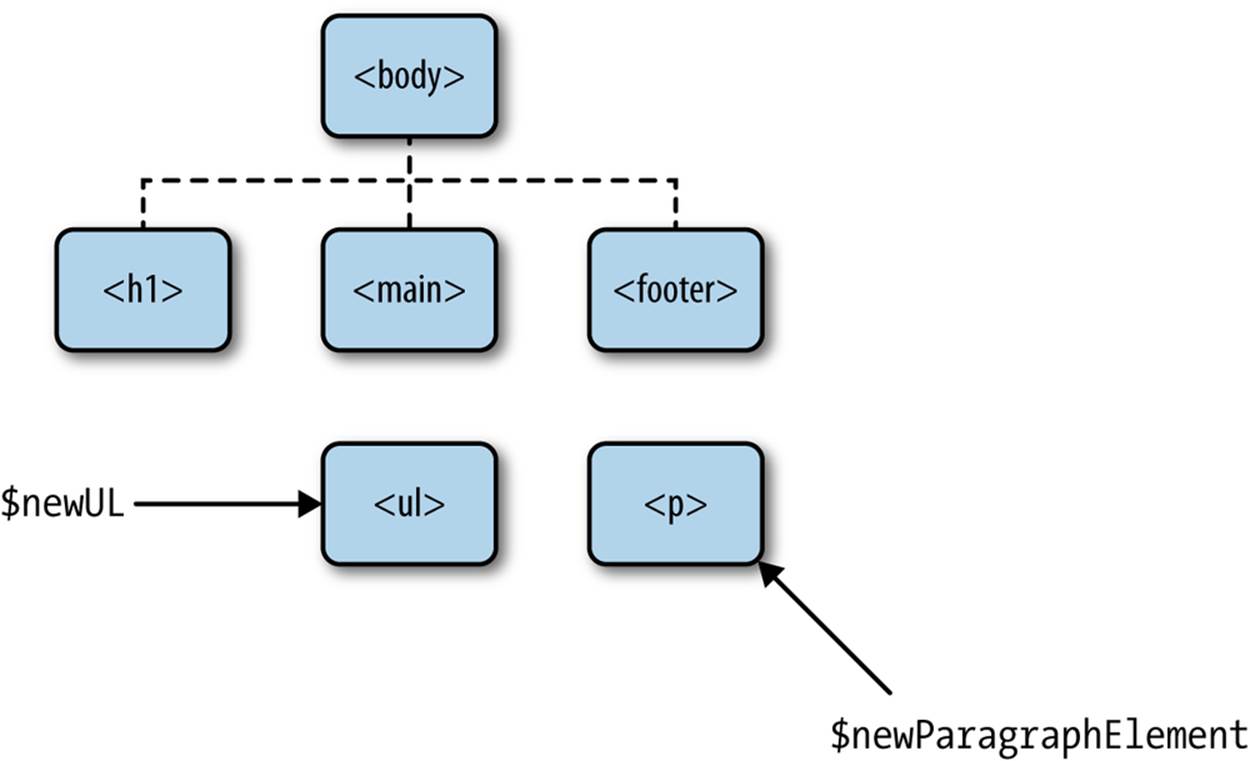
Figure 4-4. After the ul and p elements are created, but not yet attached to the DOM
We can add it to the page by selecting the element to which we want to append it, and then calling the append function on the jQuery object. For example, if we want to add this element as a child of the footer element, we can do the following:
$("footer").append($newParagraphElement);
Now our content should appear in the footer because the element is connected to the tree diagram! It looks something like Figure 4-5.

Figure 4-5. The DOM, after the p element is added to the footer
We can actually build far more complicated DOM structures before we make them appear on the page. For example, we can add li elements to the ul element we created previously:
// we can chain our creation and call to add the text
var $listItemOne = $("<li>").text("this is the first list item");
var $listItemTwo = $("<li>").text("second list item");
var $listItemThree = $("<li>").text("OMG third list item");
// now we'll append these elements to the ul element we created earlier
$newUL.append($listItemOne);
$newUL.append($listItemTwo);
$newUL.append($listItemThree);
At this point, we have a new subtree disconnected from the rest of the tree. It looks something like Figure 4-6.
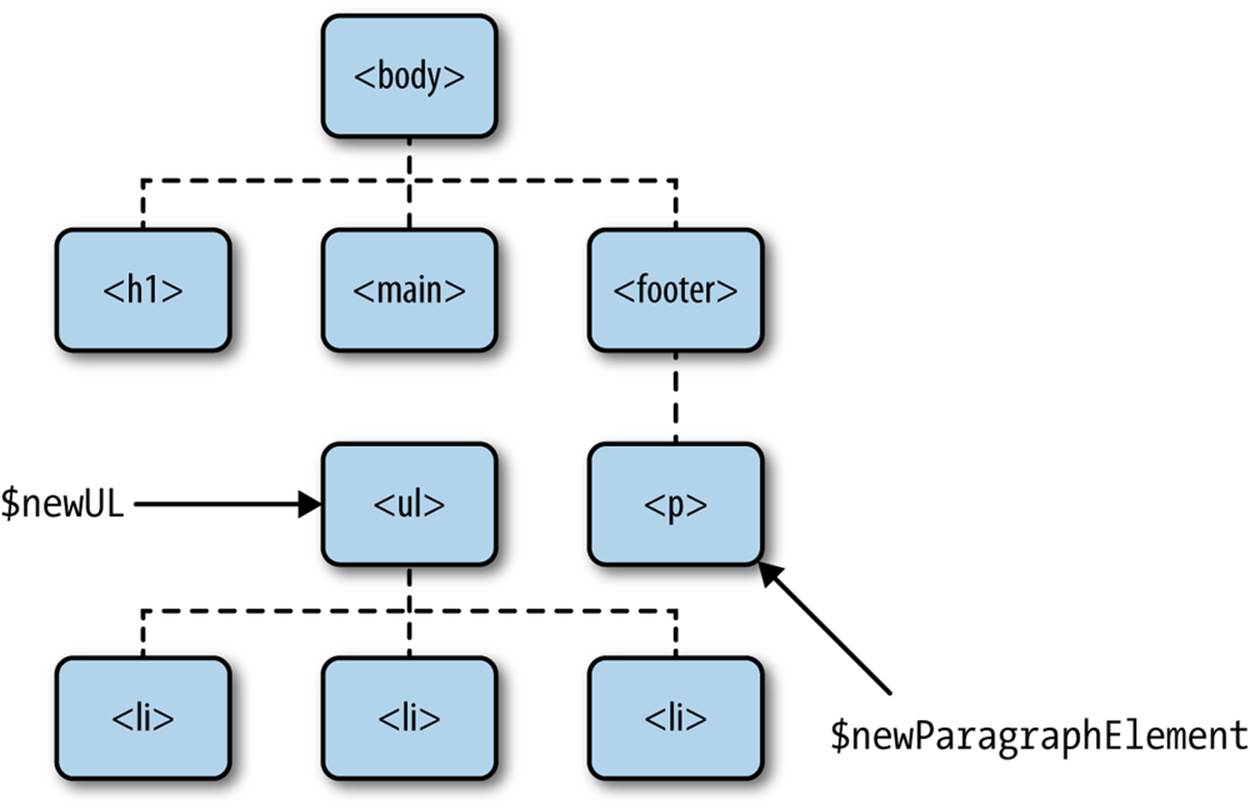
Figure 4-6. The DOM, with an unconnected subtree that represents a ul element
Now suppose we want to attach this subtree to the body as part of the main element. We follow the same pattern as before, but we only have to attach the root of our subtree!
$("main").append($newUL);
Now our DOM tree looks like Figure 4-7.

Figure 4-7. The DOM, with an unconnected subtree that represents a ul element
jQuery provides some flexibility in adding things once we have a DOM element selected. For instance, we can prepend elements instead of appending them, which makes them the first child of the parent node:
var $footerFirstChild = $("<p>").text("I'm the first child of the footer!");
$("footer").prepend($footerFirstChild);
In addition, we can use appendTo or prependTo to change the way our code reads:
// this is equivalent to the previous line
$footerFirstChild.appendTo($("footer"));
Don’t forget that we can also use the Elements tab in the Chrome Developer Tools to confirm that our DOM is updated as described in the previous section.
Removing elements from the DOM
Removing elements is almost as easy, and jQuery provides a couple ways of doing this. One thing we can do is just use the remove function on a selector, which will remove the selected element(s) from the DOM:
// remove the first list item from
// the list we created previously
$("ul li:first-child").remove();
We can also delete all children of an element by using the empty function on a jQuery object. So, for instance, to clear the list items that we created in the previous example we could do the following:
// remove all children from the
// list we created previously
$newUL.empty();
In the first example, we learned that we could use fadeIn to have an invisible element fade in. In addition to that, we can make elements disappear using fadeOut or slideUp before removing them from the DOM!
// this will remove the footer paragraph from the DOM.
$("footer p").fadeOut();
It turns out that fadeOut doesn’t actually remove the element from the DOM—it just hides it. To remove it, we have to call remove on the element, but we have to do it after it is finished fading out. This means we have to schedule it to happen asynchronously, which we’ll learn how to do in the next section.
Events and Asynchronicity
In the first example of this chapter, we saw how to process both the click event and the keypress event. In general, we can process any event using the on pattern. For example, we can respond to the dblclick event, which is triggered when a user double-clicks:
$(".button").on("dblclick", function () {
alert("Hey! You double-clicked!");
});
In general, this style of programming is called event-driven or asynchronous programming. How is that different from traditional programming? We’re likely used to our code executing like this:
console.log("this will print first");
console.log("this will print second");
console.log("this will print third");
With asynchronous programming, certain event-related functions take callbacks, or functions that are to be executed later, as arguments. This makes it so the execution order is not always so clear:
console.log("this will print first");
$("button").on("click", function () {
console.log("this will only print when someone clicks");
});
console.log("this will print second");
Here is another example that doesn’t rely on user input for callbacks to be executed. We’ve already seen the ready function, which waits until the DOM is ready to execute the callback. The setTimeout function behaves similarly, but it executes the callback after the specified number of milliseconds have passed:
// This is a jQuery event that executes the callback
// when the DOM is ready. In this example, we're using
// an anonymous function instead of sending the main
// function as an argument
$(document).ready(function () {
console.log("this will print when the document is ready");
});
// This is a built-in JavaScript function that executes
// after the specified number of milliseconds
setTimeout(function () {
console.log("this will print after 3 seconds");
}, 3000);
// this will print before anything else, even though
// it appears last
console.log("this will print first");
Right now, event-driven programming based on user interaction probably makes sense, and the examples involving setTimeout and the ready function should be relatively easy to understand. The problems start to arise when we want to sequence events. For example, consider a situation where we are using jQuery’s slideDown function to animate some text sliding down:
var main = function () {
"use strict";
// create and hide our content as a div
var $content = $("<div>Hello World!</div>").hide();
// append the content to the body element
$("body").append($content);
// slide the content down for 2 seconds
$content.slideDown(2000);
};
$(document).ready(main);
Now suppose we’d like to fade in a second message after the content slides down. We might immediately try to do something like this:
var main = function () {
"use strict";
// create and hide our content as a div
var $content = $("<div>Hello World!</div>").hide();
var $moreContent = $("<div>Goodbye World!</div>").hide();
// append the content to the body element
$("body").append($content);
// slide the content down for 2 seconds
$content.slideDown(2000);
// append the second content to the body
$("body").append($moreContent);
// fade in the second content
$moreContent.fadeIn();
}
$(document).ready(main);
Type in this code and run it. You’ll see that the “Goodbye World!” div fades in while the “Hello World!” div is sliding down. This is not what we wanted. Take a moment and think about why that is happening.
You’ve probably figured out that the slideDown function is happening asynchronously. This means that the code that follows is being executed while the slide down is occurring! Fortunately, jQuery offers us a workaround—most asynchronous functions accept an optional callback parameter as its last argument, which allows us to sequence asynchronous events. So we can achieve the effect we’re shooting for by modifying our code as follows:
var main = function () {
"use strict";
// create and hide our content as a div
var $content = $("<div>Hello World!</div>").hide();
var $moreContent = $("<div>Goodbye World!</div>").hide();
// append the content to the body element
$("body").append($content);
// slide the content down for 2 seconds
// and then execute the callback which
// contains the second content
$content.slideDown(2000, function () {
// append the second content to the body
$("body").append($moreContent);
// fade in the second content
$moreContent.fadeIn();
});
};
$(document).ready(main);
We would use the same approach to finish off our example from the previous section. To remove the p element from the footer when it is finished fading out, we would do something like this:
$("footer p").fadeOut(1000, function () {
// this will happen when the p element
// is finished fading out
$("footer p").remove();
});
Later on in the book, we’ll see other examples of asynchronous programming with Node.js, but for now it’s good to get the hang of these functions and understand the patterns.
JavaScript Generalizations
A number of frontend developers know a lot about HTML and CSS, and then enough jQuery to get plug-ins working and do some basic DOM manipulation. A knowledge of those three things can get you pretty far in frontend web development. On the other hand, it’s a good idea to learn as much about JavaScript as possible in order to be a highly effective frontend engineer and to build more complex web applications.
In this section, we’ll review some of the basics of JavaScript. My plan is to keep it short and to focus on the most important aspects of the language. We’ll see an example that ties all of these ideas together at the end of the chapter.
Interacting with JavaScript in the Chrome JavaScript Console
It turns out that we don’t have to create an entire project to start playing around with JavaScript. Chrome has a pretty nice interactive JavaScript interpreter built into its Developer Tools!
Let’s start by opening a new window or tab in our browser and open the Chrome Developer Tools as described in the previous chapter (go to View → Developer and click Developer Tools). Next, click the Console tab at the top. You should be greeted with a prompt that looks similar toFigure 4-8.
We can now interact with the JavaScript Console. For example, type in the following code, pressing Enter after each line:
5+2;
//=> 7
Math.random();
//=> 0.3896130360662937
console.log("hello world!");
//=> hello world!
The first line should print out 7, because the numerical expression evaluates to 7. The second line should print out a random decimal number between 0 and 1.
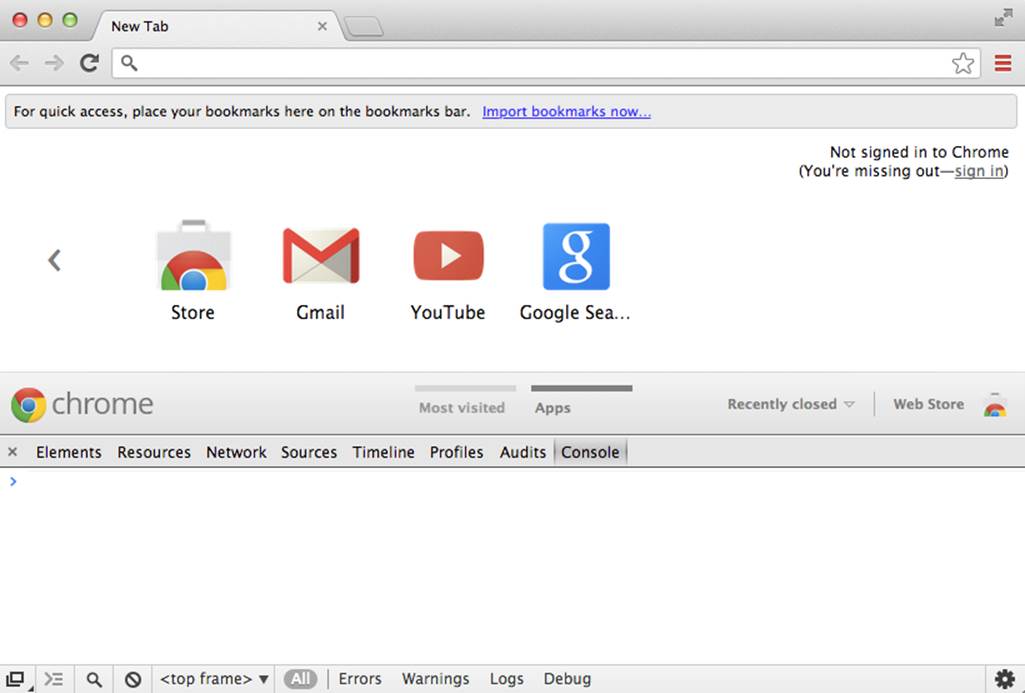
Figure 4-8. The Chrome JavaScript Console
The last line should print out “hello world!” followed by a line that says “undefined.” That’s okay—Chrome always prints out the result of evaluating the last line. The console.log statement does something, but it doesn’t actually evaluate to anything, which is why Chrome prints outundefined.
For the rest of this section, you can type the examples directly into the JavaScript Console with one minor caveat. If you need to type in something that appears on multiple lines (like an if statement or a for loop), you’ll need to press Shift-Enter instead of just Enter at the end of the line.Give it a try by typing in the following code:
var number = 5;
if (number >= 3) {
console.log("The number is bigger than 3!");
}
//=> The number is bigger than 3!
Also note that you can press the up and down arrows on your keyboard to navigate through your previously typed code snippets (just like you can navigate your command history in your terminal window).
Variables and Types
JavaScript is not a strongly typed language. This means that variables can hold any data of any type (like integers, strings, and numbers with decimals). This is different from languages like Java or C++, where variables have to be declared to hold specific types:
// This holds a string
var message = "hello world!";
// These hold numbers
var count = 1;
var pi = 3.1415;
// This holds a boolean
var isFun = true;
console.log(message);
//=> hello world!
console.log(pi);
//=> 3.1415
console.log(isFun);
//=> true
Variable declarations/definitions can be defined as a single statement separated by commas. As I mentioned before, it’s a good idea to put them at the top of your function definition. This convention creates consistency that adds to the readability of your code:
var main = function () {
"use strict";
var message = "hello world!",
count = 1,
pi = 3.1415,
isFun = true;
console.log(message);
};
Functions
We’ve seen a lot of examples of functions so far. Unlike C++ and Java, functions are first-class citizens. That means we can assign functions to variables, send in functions as parameters to other functions, and define anonymous functions (which are simply functions without names):
// define a function and store it
// in a variable called sayHello
var sayHello = function () {
console.log("hello world!");
}
// execute the function in the sayHello variable
sayHello();
//=> "hello world!"
Similar to other languages, JavaScript functions can have inputs and an output. The inputs are often referred to as arguments or parameters and they are specified inside the parentheses of the function definition. The output is often referred to as the return value and is always preceded by the keyword return:
// define a function called add which
// accepts two inputs: num1 and num2
// and has one output: the sum of the
// two numbers
var add = function (num1, num2) {
// add the inputs, and store the result in sum
var sum = num1 + num2;
// return the sum
return sum;
}
// execute the add function with 5 and 2 as inputs
add(5,2);
//=> 7
One interesting consequence of the fact that functions are first-class objects in JavaScript is that we can use other functions as inputs to functions. We’ve utilized this pattern by sending in anonymous functions as callbacks, but we’ve also used named functions. For example, we sent in a function called main to the ready function in jQuery:
// the main entry point of our program
var main = function () {
"use strict";
console.log("hello world!");
};
// set up main to run once the DOM is ready
$(document).ready(main);
Although C++ has function pointers, it doesn’t easily admit anonymous functions so code patterns like those that we’ve seen aren’t often used. Likewise, at least at the time of this writing, Java has no easy mechanism for creating functions that accept other functions as parameters.
In the next chapters, we’ll have the opportunity to write functions that take other functions as parameters. This becomes helpful when we’re doing more complex asynchronous programming.
Selection
One of the first control structures we learn in any language is the if statement. This lets us tell the interpreter that a block of code should only be executed if some condition is true:
var count = 101;
if (count > 100) {
console.log("the count is bigger than 100");
}
//=> the count is bigger than 100
count = 99;
if (count > 100) {
console.log("the count is bigger than 100");
}
//=> prints nothing
An else statement allows us to do something different if the condition is false:
var count = 99;
if (count > 100) {
console.log("the count is bigger than 100");
} else {
console.log("the count is less than 100");
}
//=> the count is less than 100
Sometimes we’ll find that we want to do multiple mutually exclusive things depending on different conditions. When that’s necessary, the if-else-if pattern often comes in handy:
var count = 150;
if (count < 100) {
console.log("the count is less than 100");
} elseif (count <= 200) {
console.log("the count is between 100 and 200 inclusive");
} else {
console.log("the count is bigger than 200");
}
//=> the count is between 100 and 200 inclusive
Best of all, conditions don’t have to be simple. We can use the && (and), || (or), and ! (not) operators to build more complex conditions. As mentioned in Chapter 2, the | key is found right above the Enter key on your keyboard—you’ll have to hold down Shift to get it instead of the backslash:
// check to see if *any* of the conditions are true
if (cardRank === "king" || cardRank === "queen" || cardRank === "jack") {
console.log("that's a high ranking card!");
} else {
console.log("not quite royalty!");
}
// check if the card is the ace of spades
if (cardRank === "ace" && cardSuit === "spades") {
console.log("THAT'S THE ACE OF SPADES!");
} else {
console.log("Sadly, that's not the ace of spades");
}
// check if the card is *not* the ace of spades
// by flipping the output using the ! operator
if (!(cardRank === "ace" && cardSuit === "spades")) {
console.log("That card is not the ace of spades!");
}
NOTE
In JavaScript, a single equals sign represents an assignment statement, and a triple equals sign represents a comparison that returns true or false if the left and right sides of the expression are equivalent. We’ll talk more about that later.
Iteration
Often, we’ll have to do things multiple times. For example, suppose we want to print out the first 100 numbers. Obviously we can do this in a pretty naive way:
console.log(0);
console.log(1);
console.log(2);
// ... ugh
console.log(99);
console.log(100);
That’s a lot of code! It’s much easier to use a looping structure to print out all 100 numbers:
var num; // this will be the number that we print out
// print 101 numbers starting with 0
for (num = 0; num <= 100; num = num + 1) {
console.log(num);
}
This achieves the same thing as the preceding code, but in a much more concise way. This is an example of a for loop.
A for loop consists of four (pun intended) things. Three of them are in the parentheses that follow the word for and I refer to those as the initialization statement, the continuation condition, and the update statement. The fourth is the loop body, which is the code that is in between the curly braces. The initialization statement occurs just before the loop body runs for the first time. The update statement runs each time the loop body completes. And the continuation condition is checked right before the loop body is run (even the first time).
Here are two annotated for loops that achieve the same result—printing out the even numbers less than 100:
var i;
// initialization: i gets set to 0
// continuation: keep going as long as i is smaller than 100
// update: add 2 to i
// body: print out i
// in other words, print out only the even numbers starting with 0 and ending
// with 98
for (i = 0; i < 100; i = i + 2) {
console.log(i);
}
// initialization: i gets set to 0
// continuation: keep going as long as i is smaller than 100
// update: add 1 to i
// body: print out i only if the remainder when dividing i by 2 is 0
// print out only the even numbers starting with 0 and ending with 98
for (i = 0; i < 100; i = i + 1) {
if (i%2 === 0) {
console.log(i);
}
}
In the second example, we use the remainder operator (%), which yields the remainder from integer division. In other words, 5%2 evaluates to 1 because 5/2 is 2 with a remainder of 1. In the example, we’re using this operator to check for divisibility by 2 (which tells us the number is even). Even though this operator may seem esoteric, it’s actually extremely useful. In fact, it’s so useful for experienced programmers that questions involving it are often asked at job interviews for programming positions (see the FizzBuzz practice problem at the end of this chapter).
If you’re familiar with while and do...while loops from Java or C++, you’ll be pleased to know that JavaScript supports these as well. I like keeping it simple, so I’ll only use for loops (and forEach loops on arrays) for the remainder of this book.
Arrays
Loops are interesting in general, but extraordinarily useful in the context of arrays. Arrays are simply indexed collections of JavaScript entities. One way of thinking of arrays is as a single variable that can hold multiple values. Here’s a simple example that creates an array:
var greetings = ["hello", "namaste", "hola", "salut", "aloha"];
We can generalize this example pretty easily: we create an array literal by using the square brackets and then listing out the elements separated by commas. This array has five elements in it, each of which is a string. Here’s an example with an array of integers:
var primes = [2, 3, 5, 7, 11, 13, 17, 19, 23, 29];
We can index into the arrays to get certain elements by using the variable name followed by square brackets. The indexing for arrays always starts at 0 and ends at one less than the length of the array:
console.log(greetings[1]);
//=> 'namaste'
console.log(greetings[0]);
//=> 'hello'
console.log(primes[4]);
//=> 11
console.log(greetings[4]);
//=> 'aloha'
Likewise, we can set individual elements of the array by using the same indexing trick:
greetings[3] = "bonjour"; // changes 'salut' to 'bonjour'
What if we want to print all the elements of the array? One approach is to use the length property of the array to build a continuation condition for a for loop:
var index;
for (index = 0; index < greetings.length; index = index + 1) {
console.log(greetings[index]);
}
This is a perfectly valid approach, and one that is often used in JavaScript along with other languages like Java. But JavaScript has a slightly nicer JavaScripty way of achieving the same thing. Every array has a forEach loop attached to it, which takes in a function that operates on each element:
// the forEach loop takes a function as an argument
// and calls it for each element of the array
greetings.forEach(function (element) {
console.log(element);
});
This is nicer because it removes the need to maintain an extra variable such as index in the previous example. It’s often the case that removing a variable declaration will make our code less error prone.
In addition to including the forEach function, JavaScript arrays have some other advantages over raw arrays in C++ or Java. First, they can grow and shrink dynamically. Second, they have several functions built in that let us do some common operations. For example, we’ll commonly want to add elements to the end of our array. We can use the push function to do that:
// create an empty array
var cardSuits = [];
cardSuits.push("clubs");
console.log(cardSuits);
//=> ["clubs"]
cardSuits.push("diamonds");
console.log(cardSuits);
//=> ["clubs", "diamonds"]
cardSuits.push("hearts");
console.log(cardSuits);
//=> ["clubs", "diamonds", "hearts"]
cardSuits.push("spades");
console.log(cardSuits);
//=> ["clubs", "diamonds", "hearts", "spades"]
There are many other built-in functions on JavaScript arrays, but we’ll leave it with push for now. We’ll learn a few others as we move forward.
Arrays and loops are pretty essential tools no matter what programming language you’re working in. The only way to master them is to practice creating them and using them. Several practice problems at the end of this chapter will get you creating and manipulating arrays using loops.
Using JSLint to Identify Potential Problems
Like HTML and CSS, it’s pretty easy to write JavaScript code that works but doesn’t conform to best practices. In fact, this is really easy to do when you’re first starting out with the language. For example, consider the following code:
cardRank = "king";
if (cardRank = "king") {
console.log("the card is a king!");
} else {
console.log("the card is not a king!");
}
//=> the card is a king!
At first glance, this code looks just fine, and it seems to work! Type it into the Chrome JavaScript Console and you’ll see the output that you would expect! But let’s change the code slightly—let’s set cardRank to “queen”:
cardRank = "queen";
if (cardRank = "king") {
console.log("the card is a king!");
} else {
console.log("the card is not a king!");
}
//=> the card is a king!
Now the error is probably a little more clear. The problem is that our if statement contains an assignment statement instead of a comparison, and the assignment statement is evaluating to a truthy value. It’s not essential that we understand what a truthy value is at this point, or why it causes the if statement to execute its code block, but we do have to understand that the error comes from the fact that we’ve accidentally used = (assignment) instead of === (comparison).
We can fix this by changing the assignment to a comparison:
if (cardRank === "king") {
console.log("the card is a king!");
} else {
console.log("the card is not a king!");
}
There’s actually another subtle problem with this code. Fortunately, there’s a JavaScript analog to CSS Lint called (not surprisingly) JSLint. The JSLint home page is shown in Figure 4-9.
Let’s cut and paste our original code into JSLint and see what it tells us. It should respond as shown in Figure 4-10.
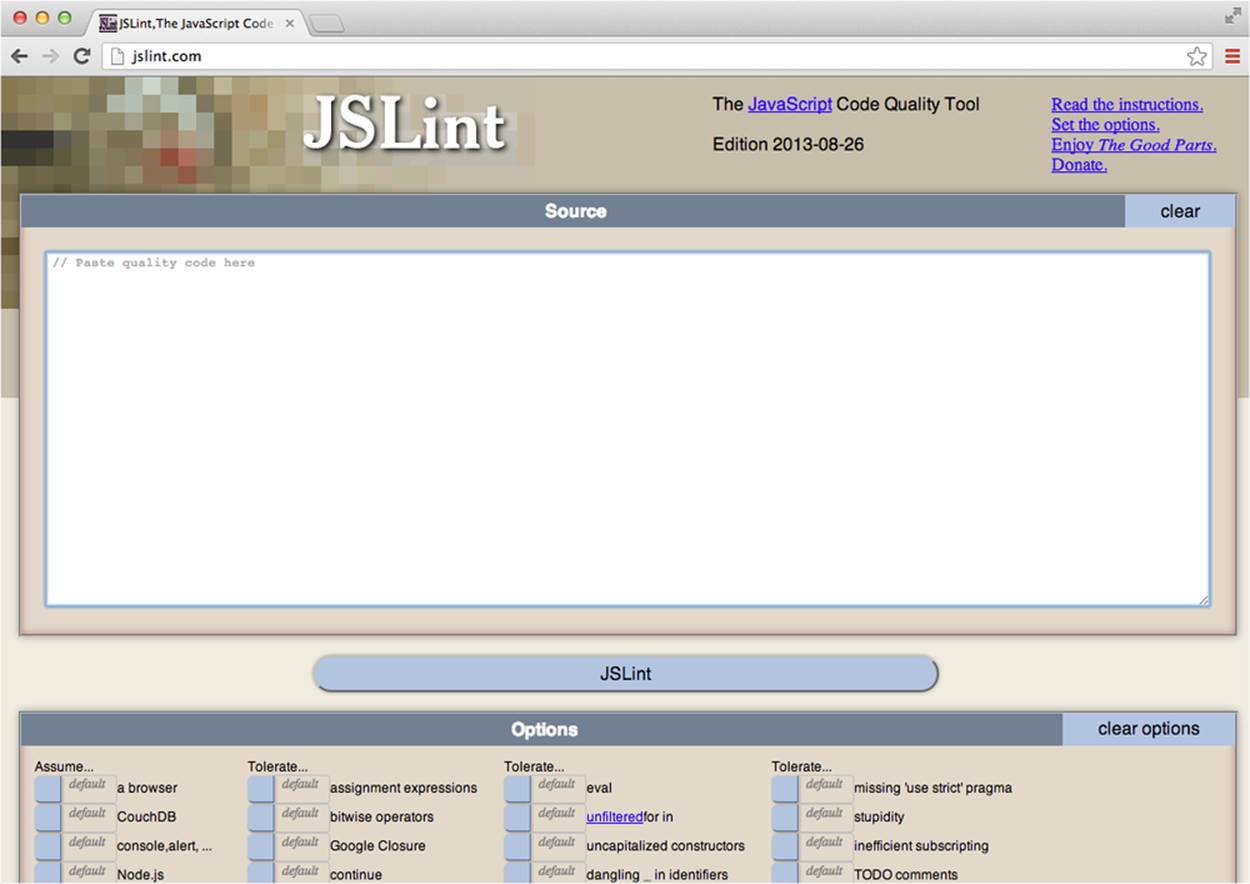
Figure 4-9. The home page for JSLint
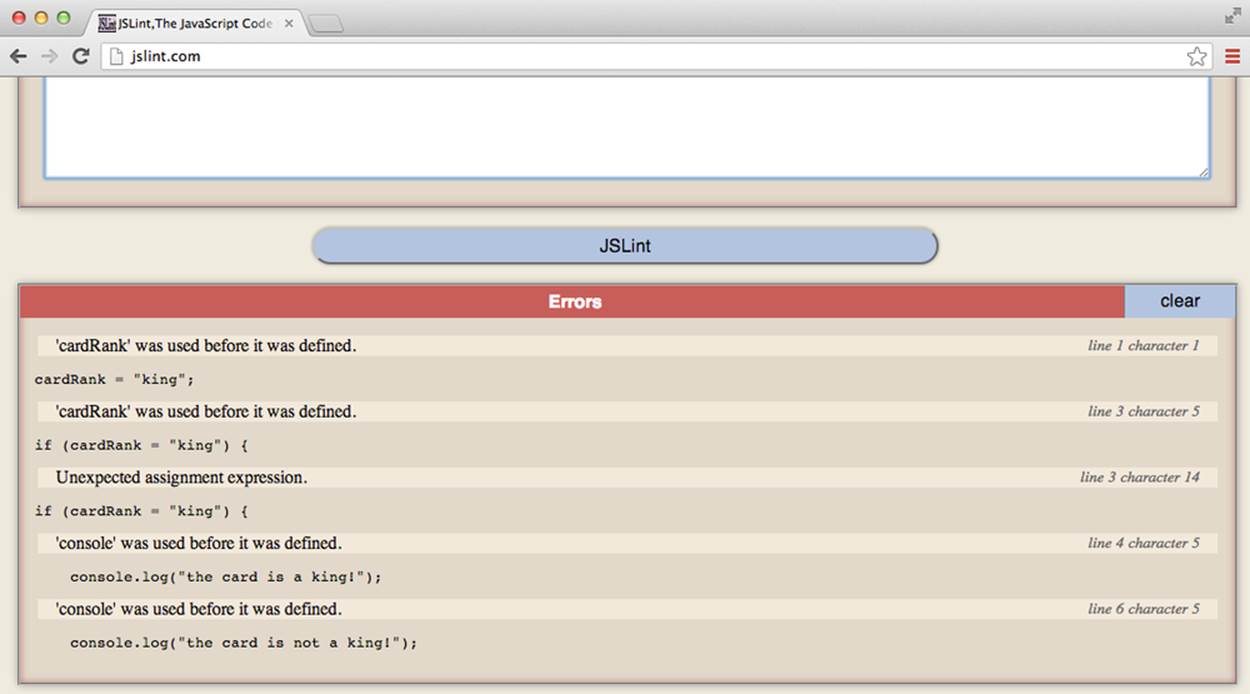
Figure 4-10. Our first errors in JSLint!
The first errors that we see are related to the subtle error that I mentioned earlier. JavaScript does not absolutely require that we declare variables before we use them, but this can often lead to unintended consequences. It’s better to make sure we declare all variables with the var keyword. So let’s modify our code so that it declares the variable in addition to defining it:
var cardRank = "king";
Once we do that and re-Lint our code, we’ll see the first two errors go away. The next one is the assignment problem that I mentioned before. Once we fix that one we’re left with the last two.
The last two errors are about the global variable console being used before it is defined. We can’t simply add the word var in front of that variable because we didn’t create it. Instead, we can go down to the JSLint options and turn on the console, alert, ... globals option and those errors will go away.
Like CSS Lint, JSLint is about as close as you can get to having a professional JavaScript programmer looking over your shoulder while you code. Lots of times, its warnings will be strange and you’ll have to do some work to figure out how to fix them (Google is a great starting point for this), but it’s well worth it and you’ll learn how to write better JavaScript code much more efficiently.
Adding Interactivity to Amazeriffic
Let’s put some of these ideas together in an example. We’ll flesh out our idea for Amazeriffic as an app that keeps track of a to-do list. To achieve this, we’ll build a tabbed interface with three tabs—the first tab will display our to-do list with the newest items first, as shown in Figure 4-11.
The second tab will display the same list, but have the list appear with the oldest items first, as shown in Figure 4-12.
And the last tab will have an input box where we can add new to-do items, as shown in Figure 4-13.
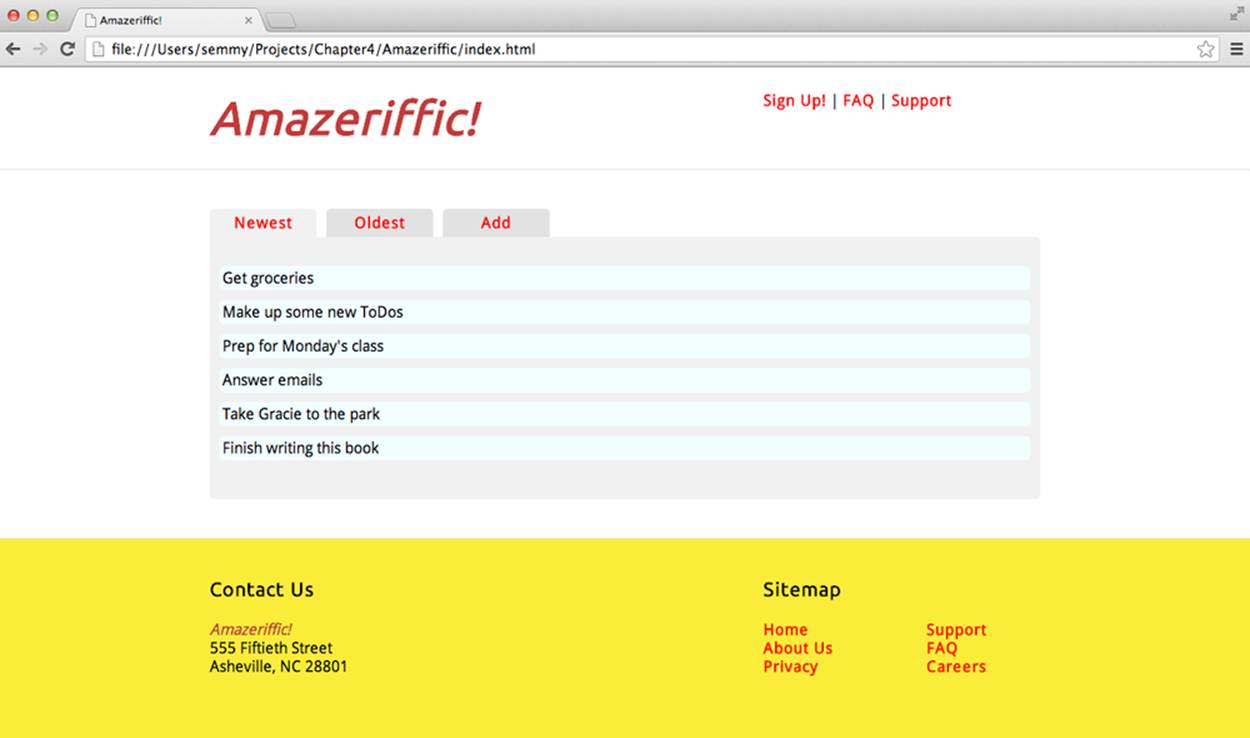
Figure 4-11. Our first tab, with the to-do items listed in order of newest to oldest
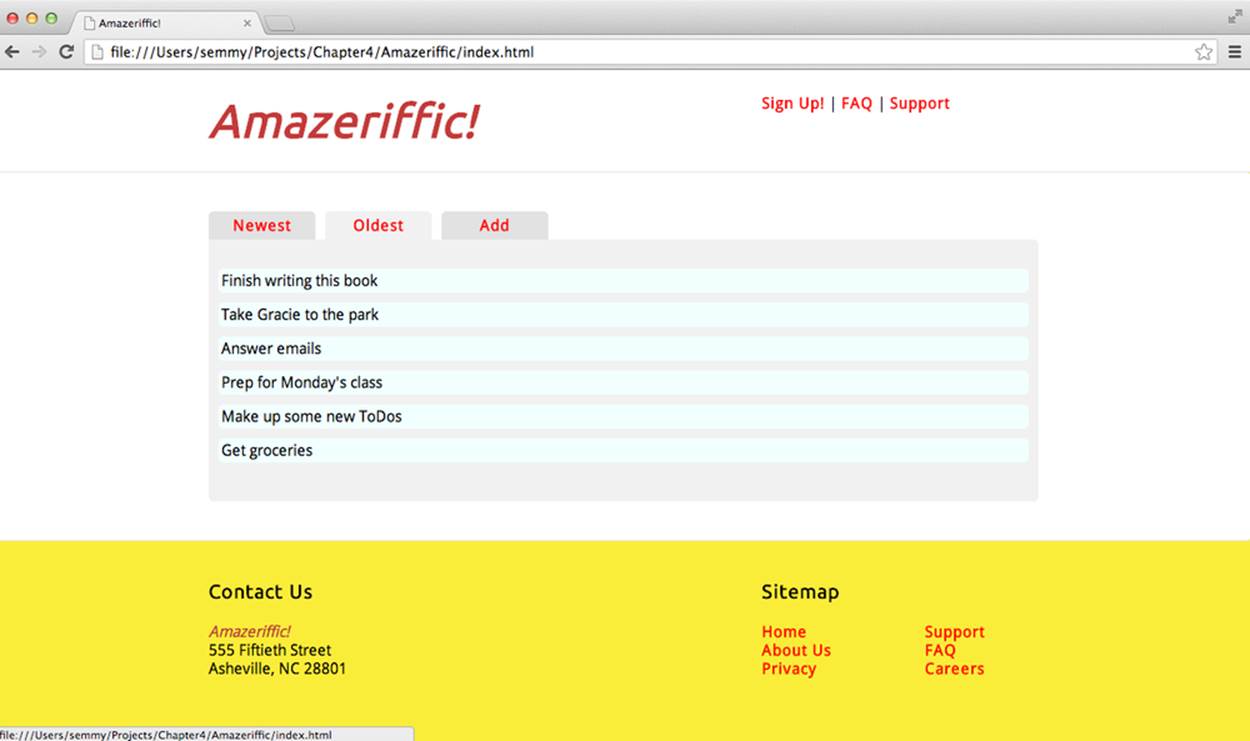
Figure 4-12. Our second tab, with the to-do items listed in order of oldest to newest
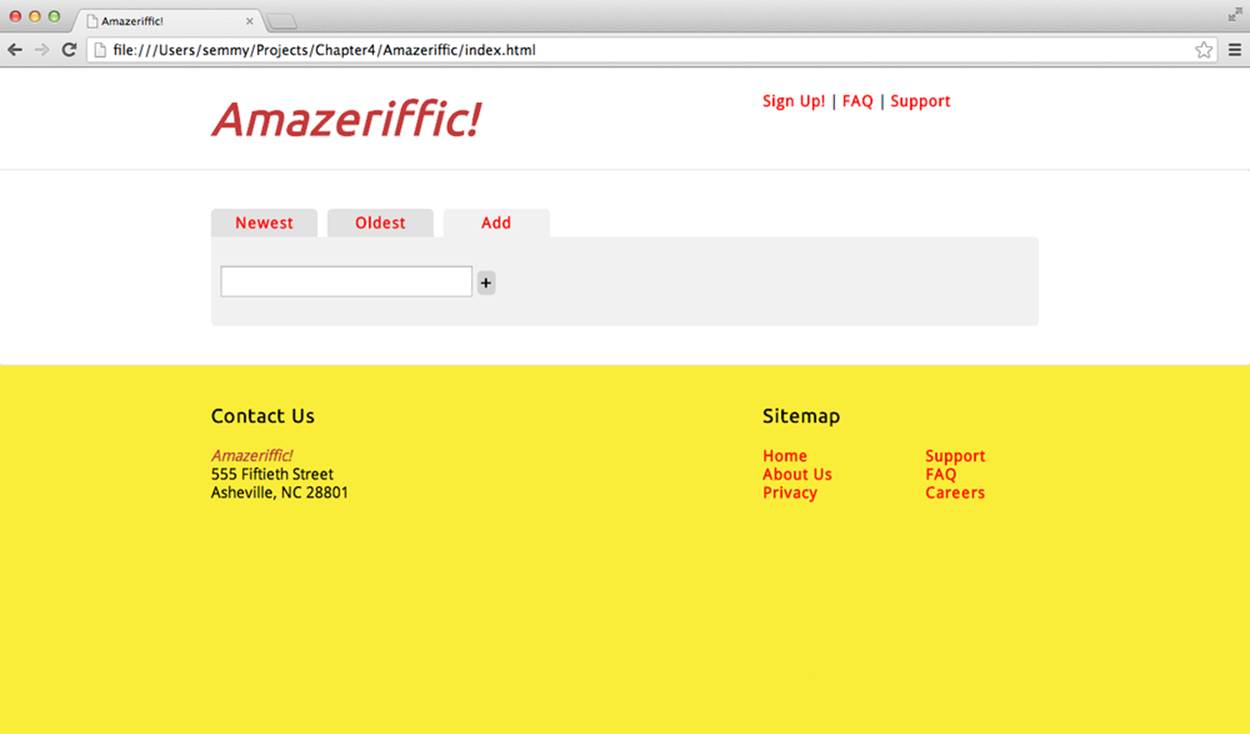
Figure 4-13. The tab that lets us add another to-do item
Getting Started
Because we’ve seen several examples with Git up to this point, I’ll let you decide the appropriate times and places to update your repository in this example. Just make sure that you actually create a Git repository and update it regularly as we work our way through the example.
You’ll also see that I’ve reused much of the design from the last example in the previous chapter. Therefore, you should be able to copy your work (namely, the HTML and the CSS) from the previous chapter. In this case, though, we’ll want to create our javascripts and stylesheets directory to keep our code organized.
The Structure and Style
We can start by modifying the main element to contain our UI. My HTML for the main element looks like this:
<main>
<div class="container">
<div class="tabs">
<a href=""><span class="active">Newest</span></a>
<a href=""><span>Oldest</span></a>
<a href=""><span>Add</span></a>
</div>
<div class="content">
<ul>
<li>Get Groceries</li>
<li>Make up some new ToDos</li>
<li>Prep for Monday's class</li>
<li>Answer recruiter emails on LinkedIn</li>
<li>Take Gracie to the park</li>
<li>Finish writing book</li>
</ul>
</div>
</div>
</main>
You can use this basic structure for the main element, along with your work from Chapter 3 to style the page. Here are the style rules for my tabs:
.tabsaspan {
display: inline-block;
border-radius: 5px 5px 0 0;
width: 100px;
margin-right: 10px;
text-align: center;
background: #ddd;
padding: 5px;
}
You’ll see one new thing here: I’ve set the display property to inline-block. Recall that inline elements like span don’t have a width property, whereas block elements do, but they appear on a new line. The inline-block setting creates a hybrid element, giving the span a widthproperty that I set to 100px. This makes it so every tab has the same width.
Of course, I also have an extra ruleset for the active tab. This makes the active tab have the same color as the content background, which gives the interface some visual depth:
.tabs a span.active {
background: #eee;
}
The Interactivity
Let’s move on to the really interesting part: the JavaScript! Of course, at this point we should have included both jQuery and /javascripts/app.js via a script element at the bottom of our body element in the HTML. So we can start our app.js with our basic skeleton program:
var main = function () {
"use strict";
console.log("hello world!");
};
$(document).ready(main);
Recall that if we open this in our browser window, we should see hello world! in the JavaScript Console if everything is set up properly. Go ahead and do that.
Creating the tab functionality
If everything is working correctly, let’s get our tabs—for lack of a better word—tabbing. We’ll start with some code that responds to click events for each tab:
var main = function () {
"use strict";
$(".tabs a:nth-child(1)").on("click", function () {
// make all the tabs inactive
$(".tabs span").removeClass("active");
// make the first tab active
$(".tabs a:nth-child(1) span").addClass("active");
// empty the main content so we can recreate it
$("main .content").empty();
// return false so we don't follow the link
returnfalse;
});
$(".tabs a:nth-child(2)").on("click", function () {
$(".tabs span").removeClass("active");
$(".tabs a:nth-child(2) span").addClass("active");
$("main .content").empty();
returnfalse;
});
$(".tabs a:nth-child(3)").on("click", function () {
$(".tabs span").removeClass("active");
$(".tabs a:nth-child(2) span").addClass("active");
$("main .content").empty();
returnfalse;
});
};
If you’re paying close attention, you’ll notice that we’ve violated the DRY principle here—there’s definitely some copy-pasting going on. That should tell us that we need to abstract some part of this as a function. You should give that a try now, without looking ahead. Go on. I’ll wait.
Refactoring the code using a function
I hope you at least took the time to think about it before looking at the solution! Did it occur to you to use a function that takes an argument that represented the tab number? If so, great! If not, that’s okay—you’ll get it eventually. It just takes practice.
It’s okay if your solution looks different from mine, but the key is that you understand how my solution works:
var main = function () {
"use strict";
var makeTabActive = function (tabNumber) {
// construct the selector from the tabNumber
var tabSelector = ".tabs a:nth-child(" + tabNumber + ") span";
$(".tabs span").removeClass("active");
$(tabSelector).addClass("active");
};
$(".tabs a:nth-child(1)").on("click", function () {
makeTabActive(1);
returnfalse;
});
$(".tabs a:nth-child(2)").on("click", function () {
makeTabActive(2);
returnfalse;
});
$(".tabs a:nth-child(3)").on("click", function () {
makeTabActive(3);
returnfalse;
});
};
You may have tried to put the return false inside the makeTabActive function, but that will cause problems. We have to leave it inside the click handler, because the listener has to return false or else the browser will try to follow the link.
Refactoring the code using a loop
So we’ve cut our number of code lines down a bit and, in doing so, made it so it’s less likely that we’ve made errors. But we can do even better. Notice how we’ve set up three tabs using numbers: 1, 2, 3. If we were to package that in a for loop that iterates over those numbers, we can set up our listeners easily! Go ahead and give that a try.
This even removes the need for the makeTabActive function altogether, because we’re packaging the important lines of code in the loop! My solution to that looks something like this:
var main = function () {
"use strict";
var tabNumber;
for (tabNumber = 1; tabNumber <= 3; tabNumber++) {
var tabSelector = ".tabs a:nth-child(" + tabNumber + ") span";
$(tabSelector).on("click", function () {
$(".tabs span").removeClass("active");
$(tabSelector).addClass("active");
returnfalse;
});
}
};
Refactoring the code using a forEach loop
It turns out that there’s even another solution! jQuery allows us to select a set of elements and then iterate over it as an array! In this simplification, we’ll iterate over all of our span elements inside the tabs, creating a click handler for each:
var main = function () {
"use strict";
$(".tabs a span").toArray().forEach(function (element) {
// create a click handler for this element
$(element).on("click", function () {
$(".tabs a span").removeClass("active");
$(element).addClass("active");
$("main .content").empty();
returnfalse;
});
});
};
NOTE
The array that jQuery creates is an array of DOM elements, not jQuery objects. We have to turn them into jQuery objects by wrapping them in a $() function call.
So that’s three ways of making the same thing happen. There may even be other solutions, but I think these last two are pretty good—they are short, easily understandable (if you understand looping, that is) and they make it easy to add more tabs.
Manipulating content
Now we have another problem to solve. The tabs are going to fill the main .content element with different content depending on which tab is clicked. This is pretty easy if we know which child of the .tabs elements we’re on. For example, if we’re the first child of the .tabs element we do one thing, and if we’re the second we do something different. But it turns out this is a little tricky, because inside our click handler we have access to the span element that’s a child of the a element that we’re interested in. A tree diagram for our situation would look something likeFigure 4-14.
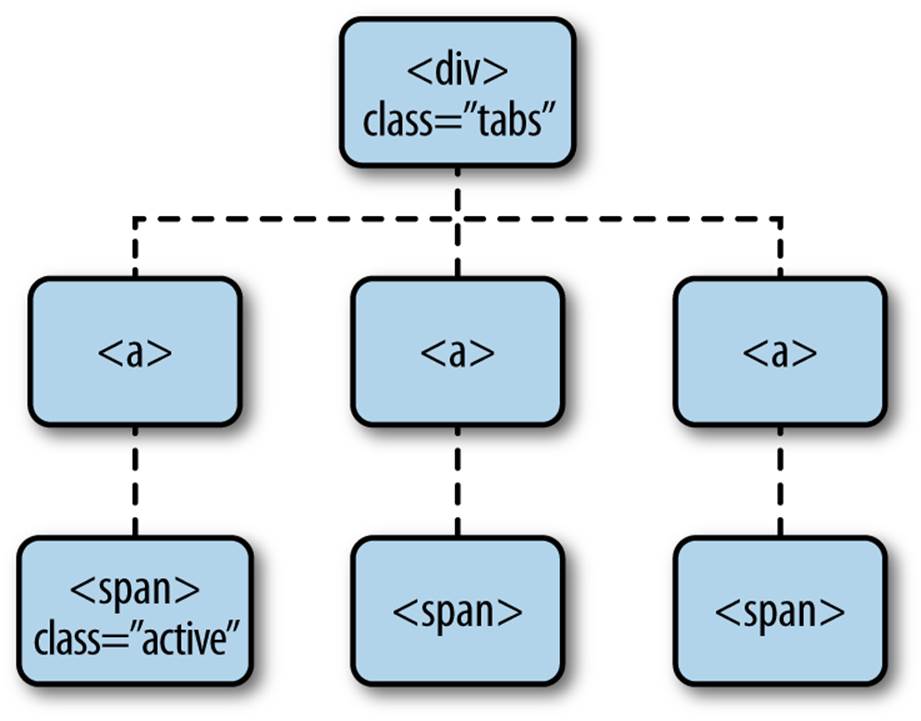
Figure 4-14. We need to know the index of the span element on which we click
It turns out that jQuery gives us a really nice way of selecting the parent of a jQuery object—it’s the appropriately named parent function! But then we need to determine which child it is. It turns out that jQuery also gives us the is function, which allows us to test a selector against the current jQuery object. This is probably challenging to understand in the abstract, but it’s pretty readable when you see it in action. Here’s a quick example:
// test whether the parent of the $me jQuery object
// is the first child of its parent
if ($me.parent().is(":first-child")) {
console.log("MY PARENT IS A FIRST CHILD!!");
} else {
console.log("my parent is not a first child.");
}
We can use this pattern and the :nth-child selector to determine what we need to do in our tab example:
var main = function () {
"use strict";
$(".tabs a span").toArray().forEach(function (element) {
// create a click handler for this element
$(element).on("click", function () {
// since we're using the jQuery version of element,
// we'll go ahead and create a temporary variable
// so we don't need to keep recreating it
var $element = $(element);
$(".tabs a span").removeClass("active");
$element.addClass("active");
$("main .content").empty();
if ($element.parent().is(":nth-child(1)")) {
console.log("FIRST TAB CLICKED!");
} elseif ($element.parent().is(":nth-child(2)")) {
console.log("SECOND TAB CLICKED!");
} elseif ($element.parent().is(":nth-child(3)")) {
console.log("THIRD TAB CLICKED!");
}
returnfalse;
});
});
};
When you run this with the Chrome JavaScript Console opened, you should see the appropriate message appear when its associated tab is clicked! Easy peasy!
Setting up the tab content
Setting up the tab content requires a little bit of work. First of all, we’ll start by storing the to-dos themselves as strings in an array. To make this happen, we’ll add a variable in our main function that holds an array literal with our to-do items:
var main = function () {
"use strict";
var toDos = [
"Finish writing this book",
"Take Gracie to the park",
"Answer emails",
"Prep for Monday's class",
"Make up some new ToDos",
"Get Groceries"
];
//... other tab-related stuff
};
Now when we add to-dos, all we have to do is push them onto the end of the array. That has the consequence that it keeps the oldest to-dos earlier in the array, which means the newest ones are last. Therefore, the second tab (Oldest) will list them in the order they appear in the array, while the first tab will list them backward.
To start, I’ll show you how to set up the content when the second tab is clicked, and will leave construction of the content of the other tabs to you. To build the content for the first and second tab, we’ll simply create a ul element, and then loop over the to-dos adding an li element for each of them. Note that for the first tab, however, we’ll have to loop over the elements backward, so we’ll use a traditional for loop in that case. For the second tab, however, we can use the preferable forEach loop. The code will change to look something like this:
$(element).on("click", function () {
var $element = $(element),
$content;
$(".tabs a span").removeClass("active");
$element.addClass("active");
$("main .content").empty();
if ($element.parent().is(":nth-child(1)")) {
console.log("FIRST TAB CLICKED!");
} elseif ($element.parent().is(":nth-child(2)")) {
$content = $("<ul>");
toDos.forEach(function (todo) {
$content.append($("<li>").text(todo));
});
$("main .content").append($content);
} elseif ($element.parent().is(":nth-child(3)")) {
console.log("THIRD TAB CLICKED!");
}
})
Like I mentioned before, building the content for the first tab will be similar. Once we do that, we actually no longer need the hardcoded content in the HTML at all! We can trigger a fake click on the first tab by adding a single line at the end of our main function, right after we set up the click handlers. This will dynamically construct our content:
$(".tabs a:first-child span").trigger("click");
Once we have that set up correctly, we can remove the hardcoded to-do elements in index.html.
For the third tab, we’ll need to do something a little different—we’ll need to create an input element and a button element just as we had in the comments example at the beginning of this chapter. But for this example, we should practice building the DOM subtree using jQuery instead of incorporating it into the HTML. We’ll also have to add an event listener to the button. In this case, instead of adding an element to the DOM as we did in the earlier example, we will just add it to our toDo array by using the push function.
You can see the finished example in our GitHub repository.
Summary
In this chapter, we’ve learned about adding interactivity to a web application by using jQuery and JavaScript. jQuery is a widely used library that abstracts some of the difficulties of manipulating the DOM and event handling (among other things). The event-driven nature of a user interface running in the browser creates the need to write asynchronous code. The easiest way to get started with this is by attaching callback functions to events.
JavaScript is the full-featured programming language supported by all web browsers. As a beginning web app developer and programmer, it’s important to work toward mastering a few fundamental concepts, including variables, if and if-else statements, and various looping structures. Arrays are another essential component of all programming languages, so understanding how to create and manipulate them is also important.
JSLint is a tool that is similar to CSS Lint or the HTML validator—it keeps you from falling into common JavaScript traps. It’s a good idea to run your code through it periodically.
More Practice and Further Reading
Memorization
Let’s add a few steps to your memorization practice:
1. Create a directory called javascripts to store your .js files.
2. Create a simple JS program and store it in a file called app.js. The file should either alert “hello world” or print it to the console. This should happen in a main function, which should be called with jQuery’s document.ready function.
3. Import your script along with jQuery into your HTML document at the bottom of the <body> tag.
4. Reload the page in Chrome to confirm that it behaves correctly.
5. Add the file and HTML changes to your Git repository.
jQuery Plug-ins
Part of the reason that jQuery is so popular is the fact that it has a huge community of web developers who create plug-ins that allow you to include incredible effects on your page. I encourage you to visit http://plugins.jquery.com to see the types of plug-ins that are available. I also encourage you to experiment with a few jQuery plug-ins. You’ll have to read the plug-ins’ documentation to see if you can make them work, but it’s well worth your time.
One of my favorite plug-ins is called colorbox, which allows you to easily include an animated photo gallery on your page. The author has written very clear documentation for getting it to work.
jQuery Selectors
Type up the following HTML document and store it in a file called selectorpractice.html:
<!doctype html>
<html>
<head>
</head>
<body>
<h1>Hi</h1>
<h2 class="important">Hi again</h2>
<p>Random unattached paragraph</p>
<div class="relevant">
<p class="a">first</p>
<p class="a">second</p>
<p>third</p>
<p>fourth</p>
<p class="a">fifth</p>
<p class="a">sixth</p>
<p>seventh</p>
</div>
</body>
</html>
Next, create a simple app.js file with the following content. Use two <script> tags to import jQuery and then this file at the bottom of the body element:
var main = function () {
"use strict;"
$("*").css("color","red");
};
$(document).ready(main);
The css function allows us to change the style of the selected elements using jQuery. The default code uses the universal CSS selector to make every element in the DOM red. For the following questions we’ll change the jQuery selector to make only the specified elements turn red. For example, if we want to make the <h1> tag red, we would use the following selector:
$("h1").css("color","red");
The last few steps are much easier if you take a look at the jQuery selector documentation. Along with the selectors we’ve seen in this chapter, you’ll want to pay special attention to the :not and :gt selectors:
1. Select the h2 element by its class.
2. Select the first paragraph of the relevant paragraphs.
3. Select the third paragraph of the relevant paragraphs.
4. Select all of the paragraphs on the page.
5. Select all of the relevant paragraphs.
6. Select the second, fourth, and sixth relevant paragraphs.
7. Select the seventh relevant paragraph.
8. Select the fifth, sixth, and seventh relevant paragraphs.
9. Select the relevant paragraphs that are not of class a.
FizzBuzz
If you’re thinking about applying for a job as a computer programmer, you should really understand how to solve the FizzBuzz problem. As far as I know, the FizzBuzz problem was popularized in a blog post by Jeff Atwood entitled Why Can’t Programmers…Program?. In this post, he laments the fact that so many people who apply for jobs as programmers can’t solve a simple problem.
The problem is essentially this:
Write a program that prints the numbers from 1 to 100. But for multiples of three print “Fizz” instead of the number and for the multiples of five print “Buzz.” For numbers which are multiples of both three and five print “FizzBuzz.”
Based on the background and tools I introduced to you in this chapter, you should be able to solve this problem using a for loop, along with a series of if-else statements and the remainder operator.
I should add that I’m not sure this is a particularly good test of whether or not someone can program, nor am I sure that the inability to solve this problem on the spot should disqualify someone from a programming position. There are numerous reasons that a person may not be able to solve this problem that have nothing to do with his ability to write computer programs at the junior level. But it is what it is, and you’ll likely be asked this question at some point. It’s a good idea to memorize the solution.
Array Practice
Another common source of job interview questions are arrays. There’s a good reason for this: they are definitely the most commonly used data structure in computer programs, and every programming language has them in some form. Try to answer every question in this section using the material from this chapter. I’ll start with a simple one and include a few different answers:
Write a function that accepts an array of numbers as an argument and returns their sum.
The simplest solution to this question would look something like this:
var sum = function (nums) {
var sumSoFar = 0,
i;
// loop over the array, adding the sum
for (i = 0; i < nums.length; i++) {
sumSoFar = sumSoFar + nums[i];
}
// now that we've finished traversing the array
// the sumSoFar variable should have the sum
// of all the numbers
return sumSoFar;
};
sum([1,2,3,4]);
//=> 10
Similarly, we could use a forEach loop:
var sum = function (nums) {
var sumSoFar = 0;
// use a forEach loop
nums.forEach(function (value) {
sumSoFar = sumSoFar + value;
});
return sumSoFar;
};
sum([1,2,3,4]);
//=> 10
The forEach loop is preferable here, because it removes the need to maintain the i variable. In general, this is a good thing—removing a variable that regularly changes its state in our program makes our code less error prone. In fact, if we want to get rid of all of the temporary local variables, we can use an array function called reduce that wraps a lot of this up nicely:
var sum = function (nums) {
return nums.reduce(function (sumSoFar, value) {
return sumSoFar + value;
}, 0);
};
sum([1,2,3,4]);
//=> 10
I’m not going to spend any more time talking about the reduce function, but if this intrigues you I encourage you to read more about it on the Web.
It’s also worth noting that we’re not checking the inputs to our function. For example, what happens if we try to send in something that’s not an array?
sum(5);
//=> TypeError!
sum("hello world");
//=> TypeError!
There are lots of ways we can correct for this, but let’s not spend a lot of time worrying about it now. If you’re writing code for a job interview, however, it’s always a good idea to check inputs to any function.
Here’s a series of questions that will allow you to practice with arrays:
1. Write a function that accepts an array of numbers as an argument and returns their average.
2. Write a function that accepts an array of numbers as an argument and returns the largest number in the array.
3. Write a function that accepts an array of numbers and returns true if it contains at least one even number, false otherwise.
4. Write a function that accepts an array of numbers and returns true if every number is even, false otherwise.
5. Write a function that accepts two arguments—an array of strings and a string—and returns true if the string is contained in the array, false otherwise. For example, your function should behave as follows:
6. arrayContains(["hello", "world"], "hello");
7. //=> true
8.
9. arrayContains(["hello", "world"], "goodbye");
10.//=> false
11.
12.arrayContains(["hello", "world", "goodbye"], "goodbye");
//=> true
13.Write a function that is similar to the previous one, but returns true only if the array contains the given string at least twice:
14.arrayContainsTwo(["a","b","a","c"], "a");
15.//=> true
16.
17.arrayContainsTwo(["a","b","a","c"], "b");
18.//=> false
19.
20.arrayContainsTwo(["a","b","a","c","a"], "a");
//=> true
Once you have that working, write a function called arrayContainsThree that behaves similarly, but for three instead of two. Now, we’ll generalize the previous problem. Write a function that accepts three arguments and returns true if the array contains the element n times, where n is the third argument:
arrayContainsNTimes(["a","b","a","c","a"], "a", 3);
//=> true
arrayContainsNTimes(["a","b","a","c","a"], "a", 2);
//=> true
arrayContainsNTimes(["a","b","a","c","a"], "a", 4);
//=> false
arrayContainsNTimes(["a","b","a","c","a"], "b", 2);
//=> false
arrayContainsNTimes(["a","b","a","c","a"], "b", 1);
//=> true
arrayContainsNTimes(["a","b","a","c","a"], "d", 0);
//=> true
Project Euler
Another great source of practice problems is Project Euler. It has a series of programming problems that don’t require advanced knowledge to solve correctly. Most of the problems boil down to finding a single number. Once you find that number, you type it into the website, and—if you’re correct—you’ll be given access to a discussion board where other people post solutions and discuss the best way to solve the problem.
I was once presented with a question that was taken nearly word-for-word from a Project Euler problem when I was interviewing with a well-known software company.
Other JavaScript References
JavaScript is a popular language, and because of this there are numerous books that cover it. Unfortunately, Doug Crockford claims that the majority of these books “are quite awful. They contain errors, poor examples, and promote bad practices.” I tend to agree with him (although I hope he wouldn’t put my book into that category!).
That being said, I haven’t found a good book that covers JavaScript programming for novice programmers, or people who know very little about programming in general. On the other hand, there are several excellent books for intermediate to advanced JavaScript programmers. I can highly recommend Crockford’s book JavaScript: The Good Parts (O’Reilly, 2008) as one of the better books on the JavaScript language in general. I also think David Herman’s Effective JavaScript (Addison-Wesley, 2012) has a lot of good practical advice for intermediate-level JavaScript programmers.
If you’re looking for general practical information relating to JavaScript software development, I encourage you to take a look at Nick Zackas’s Maintainable JavaScript (O’Reilly, 2012). And once you get the hang of object-oriented programming in JS, you may want to check out Michael Fogus’s Functional JavaScript (O’Reilly, 2013), which offers a different, but completely engaging, perspective.
All materials on the site are licensed Creative Commons Attribution-Sharealike 3.0 Unported CC BY-SA 3.0 & GNU Free Documentation License (GFDL)
If you are the copyright holder of any material contained on our site and intend to remove it, please contact our site administrator for approval.
© 2016-2026 All site design rights belong to S.Y.A.