Learning Web Application Development (2014)
Chapter 5. The Bridge
We’ve mostly finished our journey through the client-side portion of a web application. Although I haven’t stated it explicitly, when I refer to the client-side portion of a web app, I’m talking about the part of the program that runs in your web browser. The other side of the story is the server-side part of the application, which runs and stores information outside of your web browser, usually on a remote computer.
This chapter is not about the server-side part of a web application, but it is about a collection of technologies that allow the client and server to more easily exchange information. I like to think of this set of technologies as the bridge between the client and the server.
Specifically, we’ll study JavaScript objects, JSON (JavaScript Object Notation), and AJAX (Asynchronous JavaScript And XML—a misnomer of sorts). These topics will prepare us for Node.js, which we’ll study in the next chapter.
Hello, JavaScript Objects!
Before we start talking about transferring data between computers, we need to discuss one more important JavaScript primitive: objects. You may have heard of object-oriented programming in the past, and if you’ve programmed in C++ or Java you’ve most likely seen the topic in detail.
Though these ideas are very important for software engineering in general, object-oriented programming in JavaScript is a different beast altogether, so it’s best to forget about them when you’re first learning. Instead, we’re going to take a slightly naive view of objects for the time being: they are simple collections of variables relating to one particular entity. Let’s start with an example.
Representing Playing Cards
In the previous chapter, we saw some examples involving playing cards. A playing card has two basic attributes: a suit (one of clubs, diamonds, hearts, or spades), and a rank (two through ten or a face card, which is one of jack, queen, king, or ace). Now suppose that we want to take this example a bit further and create a web app that plays poker. This will require us to represent a five-card hand in JavaScript.
The most basic approach using the tools that I’ve presented would involve keeping 10 variables, one for each card rank and one for each card suit:
var cardOneSuit = "hearts",
cardOneRank = "two",
cardTwoSuit = "spades",
cardTwoRank = "ace",
cardThreeSuit = "spades",
cardThreeRank = "five",
// ...
cardFiveSuitRank = "seven";
Hopefully you realize that this is a tedious solution. And if you went through the previous chapter carefully, I hope you’re thinking that an array of five elements might simplify things! But the problem is that each card has two attributes, so how can we do that with an array?
You might consider a solution that looks like this:
var cardHandSuits = ["hearts", "spades", "spades", "clubs", "diamonds"],
cardHandRanks = ["two", "ace", "five", "king", "seven"];
This is definitely better, but it still has a major issue in common with the previous solution: there is nothing associating a single suit with a single rank in our program—we have to keep track of the connection in our head. Whenever there are entities in our program that are strongly related, but only in the programmer’s mind instead of in some programmatic structure, we’re adding a lot of complexity. And it turns out it’s completely unnecessary if we use objects!
An object is simply a collection of multiple variables that are related in some way. To create one we use curly braces, and then we can access the internal variables of an object by using the dot (.) operator. Here’s an example that creates a single card:
// create a card object with a rank of 'two'
// and a suit of 'hearts'
var cardOne = { "rank":"two", "suit":"hearts" };
// print the rank of cardOne
console.log(cardOne.rank);
//=> two
//print the suit of cardOne
console.log(cardOne.suit);
//=> hearts
Once we create the object, we can always change it later. For example, we can change the rank and suit of cardOne:
// change the card to the ace of spades
cardOne.rank = "ace";
cardOne.suit = "spades";
console.log(cardOne);
//=> Object {rank: "ace", suit: "spades"}
Like an array, we can create an empty object and then add attributes to it later:
// create an empty object
var card = {};
// set the rank to ace
card.rank = "ace";
console.log(card);
//=> Object {rank: "ace"}
// set the suit to hearts
card.suit = "hearts";
console.log(card);
//=> Object {rank: "ace", suit: "hearts"}
Now if we want to represent a hand of cards, we can create an array and populate it with card objects instead of keeping two separate arrays!
// create an empty array
var cards = [];
// push the two of hearts onto the array
cards.push( {"rank": "two", "suit":"hearts"} );
cards.push( {"rank": "ace", "suit":"spades"} );
cards.push( {"rank": "five", "suit":"spades"} );
cards.push( {"rank": "king", "suit":"clubs"} );
cards.push( {"rank": "seven", "suit":"diamonds"} );
// print the first and third card in the hand
console.log(cards[0]);
//=> Object {rank: "two", suit: "hearts"}
console.log(cards[2]);
//=> Object {rank: "five", suit: "spades"}
If we prefer, we can also create one long array literal to build a hand of cards:
// create an array of cards
// with a big array literal
var cards = [
{"rank": "two", "suit":"hearts"},
{"rank": "ace", "suit":"spades"},
{"rank": "five", "suit":"spades"},
{"rank": "king", "suit":"clubs"},
{"rank": "seven", "suit":"diamonds"}
];
Generalizations
As I mentioned before, we can think of JavaScript objects as collections of variables, each of which have a name and a value. To create an empty object, we simply use the open and closing curly braces:
// create an empty object
var s = {};
And then we can add variables to the object using the dot . operator:
s.name = "Semmy";
The variables inside an object can be of any type, including strings (which we’ve seen in all the previous examples), arrays, or even other objects!
s.age = 36; // a number
s.friends = [ "Mark", "Emily", "Bruce", "Sylvan" ];
s.dog = { "name":"Gracie", "breed":"Shepherd Mix" };
console.log(s.age);
//=> 36
console.log(s.friends[1]);
//=> "Emily"
console.log(s.dog);
//=> Object {name: "Gracie", breed: "Shepherd Mix"}
console.log(s.dog.name);
//=> "Gracie"
We can also create object literals, which are simply full objects defined in code!
var g = {
"name": "Gordon",
"age": 36,
"friends": ["Sara", "Andy", "Roger", "Brandon"],
"dog": {"name":"Pi", "breed":"Lab Mix" }
}
console.log(g.name);
//=> "Gordon"
console.log(g.friends[2]);
//=> "Roger"
console.log(g.dog.breed);
//=> "Lab Mix"
On occasion, we’ll need to use the special null value that represents “no object”:
var b = {
"name": "John",
"age" : 45,
"friends" : [ "Sara", "Jim" ],
"dog" : null
}
In this example, John does not have a dog. We may also want to use null to signify that we’re finished with an object:
// assign currentPerson to the object g
var currentPerson = g;
// ... do some stuff with currentPerson
// set currentPerson to null
currentPerson = null;
We’ll use a null reference as a placeholder for an object, particularly in Chapter 6 when we start talking about errors. Specifically, our callback functions will be called with null when there was no error associated with the request.
Speaking generally, objects give us a lot of flexibility in terms of storing and manipulating data. It’s also worth noting that because function variables in JavaScript behave just like any other variables, we can store them in objects. For example, we’ve already seen how we can access functions that are attached to jQuery objects:
// get a dom element
var $headerTag = $("h1");
// $headerTag is an object which has a function
// attached called fadeOut
$headerTag.fadeOut();
Objects with functions attached are a pretty incredible tool for abstraction (which leads to the idea of object-oriented programming), but we’re going to defer that discussion for the time being. Instead, in this chapter we’re going to focus on using objects to exchange information with other web applications.
Communication Between Computers
It’s nearly impossible to build a web application today without tapping into other previously existing applications. As an example, you may want your application to allow users to log in via their Twitter accounts. Or you may want to make your application post updates to a user’s Facebook feed. This means that your application will need to have the ability to exchange information with these services. The standard format that is used on the Web today is the JSON format, and if you understand JavaScript objects, you already understand JSON!
JSON
A JSON object is nothing more than a JavaScript object literal in the form of a string (with some technical caveats—but we can ignore most of them for now). This means that when we want to send some information to another service, we simply build a JavaScript object in our code, convert it into a string, and send it! Most of the time, AJAX libraries will take care of the majority of this for us, so to a programmer it looks like the programs are simply exchanging objects!
For example, suppose I want to define a JSON object in an external file—I can simply encode it just as I would inside a JavaScript program:
{
"rank":"ten",
"suit":"hearts"
}
It turns out that taking a JSON string and converting it into an object that a computer program can use is very easy in most programming languages! In JavaScript, however, it’s super easy, because the format itself is just a string version of an object literal. Most JavaScript environments offer a JSON object that we can interact with. For example, open up the Chrome console and type in the following:
// we create a JSON string with single quotes
var jsonString = '{"rank":"ten", "suit":"hearts"}'
// JSON.parse converts it into an object
var card = JSON.parse(jsonString);
console.log(card.rank);
//=> "ten"
console.log(card.suit);
//=> "hearts"
TIP
Note that we’ve created the jsonString string by using single quotes instead of our usual double quotes. It turns out that JavaScript doesn’t care which you use, but JSON does. Because we need to create a string within a string, we use single quotes on the outside and double quotes on the inside.
We can also convert a JSON object into a string by using the stringify function:
console.log(JSON.stringify(card));
//=> {"rank":"ten","suit":"hearts"}
So now that we understand how to create JSON objects in external files and as strings inside our program, let’s see how we exchange them between computers.
AJAX
AJAX stands for Asynchrnonous JavaScript And XML which, as I said in the introduction, is a bit of a misnomer. The common data-interchange format that preceded JSON was called XML, which looked much more like HTML. And although XML is still widely used in many applications, there has been a major move to JSON since AJAX was invented.
Despite the fact that it’s an acronym full of technical words, it’s actually not very complicated. The basic idea behind AJAX is that your application can send and receive information to other computers without reloading the web page. One of the first examples of this (and still one of the best) is Google’s Gmail web app, which arrived on the scene about 10 years ago! If you’ve used that, you’ve seen how new mail just magically appears in your inbox—in other words, you don’t have to reload the page to get new messages. That’s an example of AJAX.
Accessing an External JSON File
OK, enough with the theory. Let’s see an example of AJAX in action. First, let’s create a skeleton application. We’ll ignore CSS for the time being just to get the example up and running. Hopefully, at this point, you can create an HTML page from memory that says “Hello World!” in an h1element and has an empty main element. We’ll also want to include a script element with a link to jQuery from a CDN (which we explained in Chapter 4) and a <script> tag containing a link to app.js, our basic JavaScript application. That file should live in a directory called javascriptsand it will look something like this:
var main = function () {
"use strict";
console.log("Hello World!");
}
$(document).ready(main);
Open up your basic app in Chrome and open the JavaScript console. As always, if everything is working correctly, you should see “Hello World!” printed.
Next, we’ll create a new directory inside our example directory called cards. Inside that directory, we’ll create a file called aceOfSpades.json, which will look just like one of the previous JavaScript object definitions:
{
"rank" : "ace",
"suit" : "spades"
}
Now we want to access this file in our program via AJAX, which—for the time being—will present a bit of a problem.
Overcoming Browser Security Restrictions
When JavaScript was invented, it was designed to be run in a web browser. This meant that, due to security restrictions, it was not allowed to access the local files stored on your computer. You can imagine the types of problems that might arise if that were to be allowed—any website you visited would have full access to your computer!
Needless to say, that’s a security concern that continues to this day. On the other hand, we’re allowed to access certain types of files from the same server that delivered the JavaScript file. JSON files are the perfect example of this: I can do an AJAX request to a server and access any JSON files that it makes available. Sadly, we won’t be running a server until the next chapter, so for the time being we’re going to use a straightforward workaround using Chrome.
WARNING
It’s probably not a good idea to surf the Web with these security safeguards turned off. Make sure you restart your browser normally before visiting sites other than those that you build yourself.
To start Chrome without this particular security restriction turned on, we’ll start by completely shutting it down. Next, if we’re in Mac OS we’ll open a terminal and type the following command:
hostname $ open -a Google\ Chrome --args --allow-file-access-from-files
If we’re running Windows, we can do the same thing by clicking the Start menu, typing run in the search bar, and then entering the following command into the run box:
%userprofile%\AppData\Local\Google\Chrome\Application\chrome.exe
–allow-file-access-from-files
This should open Chrome with the previously mentioned security restriction turned off. Like I said, we’ll only use this trick for this example in this chapter—in the next chapter, we’ll actually be running a real server and this won’t be necessary. For the time being, however, let’s verify that it’s working.
The getJSON Function
If we’ve successfully disabled Chrome’s cross-site scripting security restriction, we can easily get access to the local JSON file in our program. To do so, we’ll use jQuery’s getJSON function. Like many of our JavaScript examples, this jQuery request will be asynchronous so we’ll have to add a callback:
var main = function () {
"use strict";
// getJSON even parses the JSON for us, so we don't need to
// call JSON.parse
$.getJSON("cards/aceOfSpades.json", function (card) {
// print the card to the console
console.log(card);
});
};
$(document).ready(main);
If we’ve done everything correctly, when we open our page in Chrome (with the cross-site scripting restrictions turned off), we should see the card appear in the console window. Now we can use it in our program just like any other JavaScript object!
var main = function () {
"use strict";
console.log("Hello World!");
$.getJSON("cards/aceOfSpades.json", function (card) {
// create an element to hold the card
var $cardParagraph = $("<p>");
// create the
$cardParagraph.text(card.rank + " of " + card.suit);
// append the card paragraph to main
$("main").append($cardParagraph);
});
}
$(document).ready(main);
A JSON Array
We can even have more complex JSON objects in the file. For example, it can consist of an array of objects instead of a single object. To see this in action, create the following file called hand.json:
[
{ "suit" : "spades", "rank" : "ace" },
{ "suit" : "hearts", "rank" : "ten" },
{ "suit" : "spades", "rank" : "five" },
{ "suit" : "clubs", "rank" : "three" },
{ "suit" : "diamonds", "rank" : "three" }
]
Now add the following getJSON right below your previous one:
var main = function () {
"use strict";
console.log("Hello World!");
$.getJSON("cards/aceOfSpades.json", function (card) {
// create an element to hold the card
var $cardParagraph = $("<p>");
// create the card text
$cardParagraph.text(card.rank + " of " + card.suit);
// append the card paragraph to main
$("main").append($cardParagraph);
});
$.getJSON("cards/hand.json", function (hand) {
var $list = $("<ul>");
// hand is an array, so we can iterate over it
// using a forEach loop
hand.forEach(function (card) {
// create a list item to hold the card
// and append it to the list
var $card = $("<li>");
$card.text(card.rank + " of " + card.suit);
$list.append($card);
});
// append the list to main
$("main").append($list);
});
};
$(document).ready(main);
NOTE
In this example, we reuse the card variable in the forEach loop of the second call to getJSON. This is because the variable goes out-of-scope at the end of the first call to getJSON. We’re not going to belabor JavaScript scoping rules here, but I thought it would be worthwhile to point out in case it causes confusion.
When we run our application, our page should look something like Figure 5-1.
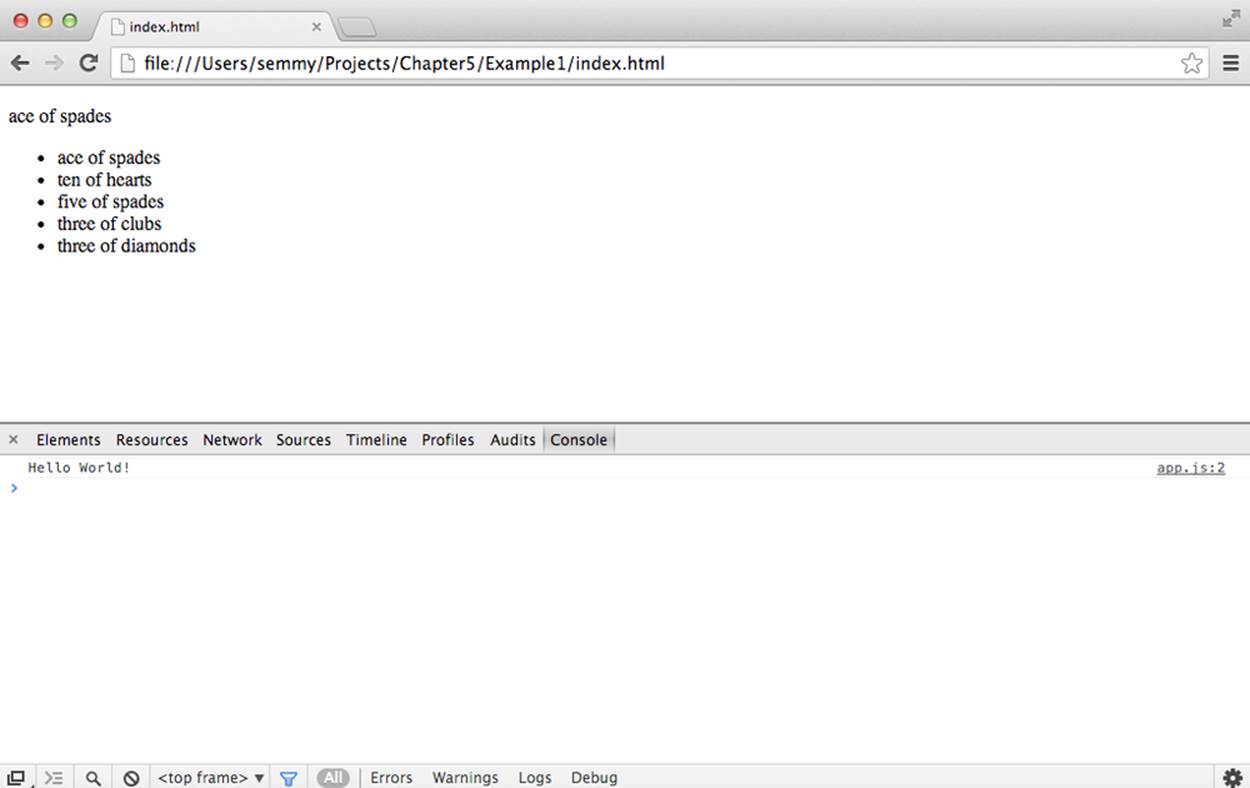
Figure 5-1. Our first AJAX application!
So What?
I realize that this example is not super exciting. In fact, you’re probably thinking it would be just as easy to simply define those objects inside our code. Why bother with the separate file?
Well, imagine if the data was coming from another computer. In that case, we wouldn’t be able to explicitly define it in our code. In fact, we may not even know what the object looks like in advance! For example, suppose we wanted to get the most recently posted dog pictures from Flickr.
Getting Images from Flickr
Let’s create another skeleton application, this time with a CSS file. Open up Sublime and go into the Chapter5 directory of your Projects directory. Create a directory called Flickr. Inside of that create your usual javascripts and stylesheets directories along with your app.js and style.css files. Make it so app.js prints out hello world to the JavaScript console. Create an index.html file that links all the files together to create a basic web application.
Wow! If you can do all that from memory, you’ve come a long way! If you have to look back occasionally, that’s okay, but it’s a good idea to memorize and practice the basic setup. The more basic stuff you can do from memory, the more you can let your brain focus on some of the more difficult stuff.
My HTML file looks like this:
<!doctype html>
<html>
<head>
<title>Flickr App</title>
<link rel="stylesheet" href="stylesheets/style.css">
</head>
<body>
<header>
</header>
<main>
<div class="photos">
</div>
</main>
<footer>
</footer>
<script src="http://code.jquery.com/jquery-2.0.3.min.js"></script>
<script src="javascripts/app.js"></script>
</body>
</html>
Now we’re going to attempt to generalize an example that’s right out of the jQuery documentation, which is available at http://api.jquery.com. We’ll change it a little to fit our narrative better. In this example, we’ll use JavaScript to pull images from Flickr, Yahoo!’s photo-sharing service. Before we do that, open your web browser and type in the following URL:
http://api.flickr.com/services/feeds/photos_public.gne?tags=dogs&format=json
The response should appear directly in your web browser as JSON. For me, the response looked something like this:
jsonFlickrFeed({
"title": "Recent Uploads tagged dogs",
"link": "http://www.flickr.com/photos/tags/dogs/",
"description": "",
"modified": "2013-10-06T19:42:49Z",
"generator": "http://www.flickr.com/",
"items": [
{
"title": "Huck and Moxie ride stroller",
"link": "http://www.flickr.com/photos/animaltourism/10124023233/",
"media": {"m":"http://bit.ly/1bVvkn2"},
"date_taken": "2013-09-20T09:14:25-08:00",
"description": "...description string...",
"published": "2013-10-06T19:45:14Z",
"author": "nobody@flickr.com (animaltourism.com)",
"author_id": "8659451@N03",
"tags": "park dog beagle dogs brooklyn ride stroller prospect hounds"
},
{
"title": "6th Oct Susie: \"You know that thing you\'re eating?\"",
"link": "http://www.flickr.com/photos/cardedfolderol/10123495123/",
"media": {"m":"http://bit.ly/1bVvbQw"},
"date_taken": "2013-10-06T14:47:59-08:00",
"description": "...description string...",
"published": "2013-10-06T19:14:22Z",
"author": "nobody@flickr.com (Cardedfolderol)",
"author_id": "79284220@N08",
"tags": "pets dogs animal mammal canine"
},
{
"title": "6th Oct Susie ready to leave",
"link": "http://www.flickr.com/photos/cardedfolderol/10123488173/",
"media": {"m":"http://bit.ly/1bVvpXJ"},
"date_taken": "2013-10-06T14:49:59-08:00",
"description": "...description string...",
"published": "2013-10-06T19:14:23Z",
"author": "nobody@flickr.com (Cardedfolderol)",
"author_id": "79284220@N08",
"tags": "pets dogs animal mammal canine"
}
]
});
You’ll see that it looks a lot more complicated than the examples we’ve seen so far, but the basic structure/format remains the same. It starts out with some basic information about the request, and then has a property called items, which is an array of images. Each element of the array contains another object called media, which has a property, m, that includes a link to the image. In the second chapter, we learned we could add an image to our HTML document with the <img> tag. We’ll do that now.
Let’s take this step by step. First, we’re going to add a line to our main function that sets up the URL in a variable, and then we’re going to call jQuery’s getJSON function as we did before:
var main = function () {
"use strict";
// this is actually just one string,
// but I spread it out over two lines
// to make it more readable
var url = "http://api.flickr.com/services/feeds/photos_public.gne?" +
"tags=dogs&format=json&jsoncallback=?";
$.getJSON(url, function (flickrResponse) {
// we'll simply print the response to the console
// for the time being
console.log(flickrResponse);
});
};
$(document).ready(main);
Now if we’ve set everything up correctly, when we run this, the object that Flickr responds with will be printed in the console and we can examine it by drilling down into it with the drop-down arrows. This will help us troubleshoot if we run into problems as we move forward.
Next, we’re going to modify the code so that instead of printing out the entire object, we’ll just print out each URL individually. In other words, we’ll iterate over the items object using a forEach loop:
$.getJSON(url, function (flickrResponse) {
flickrResponse.items.forEach(function (photo) {
console.log(photo.media.m);
});
});
This should print out a sequence of URLs in the console—you should even be able to click them and see the image! Next, we’ll actually insert them into the DOM. To do so, we’ll be using the jQuery attr function, which we haven’t used yet. We’ll use this to manually set the src attribute in our <img> tag:
$.getJSON(url, function (flickrResponse) {
flickrResponse.items.forEach(function (photo) {
// create a new jQuery element to hold the image
var $img = $("<img>");
// set the attribute to the url
// contained in the response
$img.attr("src", photo.media.m);
// attach the img tag to the main
// photos element
$("main .photos").append($img);
});
});
Now when we reload the page, we’ll actually see the images from Flickr! And if we change the original URL to a tag different from dog, the entire page will change! As usual, we can easily add jQuery effects to make things happen in a slightly nicer way:
$.getJSON(url, function (flickrResponse) {
flickrResponse.items.forEach(function (photo) {
// create a new jQuery element to hold the image
// but hide it so we can fade it in
var $img = $("<img>").hide();
// set the attribute to the url
// contained in the response
$img.attr("src", photo.media.m);
// attach the img tag to the main
// photos element and then fade it in
$("main .photos").append($img);
$img.fadeIn();
});
});
Now the images will fade in when the page loads. In the practice problems at the end of the chapter, we’ll modify this so that the page cycles through the images, displaying one image at a time.
Adding a Tags Feature to Amazeriffic
Now that we understand how to use JavaScript objects and JSON, it might be helpful to integrate some of what we’ve learned into our Amazeriffic application. In this example, we’ll add tags to each to-do item. We can use these tags to sort our to-do list in a different, but still meaningful, way. In addition, we can initialize our to-do list from a JSON file instead of having the array hardcoded.
To start with, we can copy our entire Amazeriffic directory from our Chapter4 directory into our Chapter5 directory. This will give us a solid starting point so we don’t have to rewrite all of that code.
Next, let’s add a JSON file with our to-do list. We can save this in a file called todos.json in the root directory of our project (the root directory is the one that contains the index.html file):
[
{
"description" : "Get groceries",
"tags" : [ "shopping", "chores" ]
},
{
"description" : "Make up some new ToDos",
"tags" : [ "writing", "work" ]
},
{
"description" : "Prep for Monday's class",
"tags" : [ "work", "teaching" ]
},
{
"description" : "Answer emails",
"tags" : [ "work" ]
},
{
"description" : "Take Gracie to the park",
"tags" : [ "chores", "pets" ]
},
{
"description" : "Finish writing this book",
"tags" : [ "writing", "work" ]
}
]
You’ll see that this JSON file contains an array of to-do items, and that each item has an array of strings that are tags. Our goal is to have the tags work as a secondary method of organizing our to-do list.
To incorporate this new feature, we’ll need to add some jQuery code that reads our JSON file. But because our main function from the previous chapter depends on the to-dos, we’ll need to modify it so that it calls getJSON before it calls main. To do that, we’ll add an anonymous function to our document.ready call that calls getJSON and then calls main with the result:
var main = function (toDoObjects) {
"use strict";
// now main has access to our toDo list!
};
$(document).ready(function () {
$.getJSON("todos.json", function (toDoObjects) {
// call main with the to-dos as an argument
main(toDoObjects);
});
});
One minor issue is that our code won’t work because we’ve changed the structure of our to-do object. Previously, it was an array of strings that was the description of the to-do item, but now it is an array of objects. If we just want our code to work the way it did before, we can create our old array type from the new array type using the map function.
The map Function
The map function takes an array and creates a new array from it by applying a function to each element. Fire up your Chrome console and try the following:
// we'll create an array of numbers
var nums = [1, 2, 3, 4, 5];
// now we'll apply the map function
// which creates a new array
var squares = nums.map(function (num) {
return num*num;
});
console.log(squares);
//=> [1, 4, 9, 16, 25]
In this example, the function that returns num*num is applied to each element to create the new array. This may seem like an esoteric example, but here’s a more interesting one:
// we'll create an array of names
var names = [ "emily", "mark", "bruce", "andrea", "pablo" ];
// now we'll create a new array of names
// where the first letter is capitalized
var capitalizedNames = names.map(function (name) {
// get the first letter
var firstLetter = name[0];
// return the uppercased first letter along
// with the string starting at index 1
return firstLetter.toUpperCase() + name.substring(1);
});
console.log(capitalizedNames);
//=> [ "Emily", "Mark", "Bruce", "Andrea", "Pablo" ]
So you can see that we’ve created an array of capitalized names without even iterating over the array ourselves!
Now that we understand how map works, it’s almost trivial to create our old array from the new one:
var main = function (toDoObjectss) {
"use strict";
var toDos = toDoObjects.map(function (toDo) {
// we'll just return the description
// of this toDoObject
return toDo.description;
});
// now all of our old code should work exactly as it did!
// ...
};
$(document).ready(function () {
$.getJSON("todos.json", function (toDoObjects) {
// we'll call main with toDos as an argument
main(toDoObjects);
});
});
Now that we have all of our old code working exactly as it did before, we can create a Tags tab.
Adding a Tags Tab
We’ll start by adding a Tags tab to our UI. Because we’ve built our code to be (relatively) flexible, that’s not all that difficult. We simply have to start by going into index.html and adding code for a tab called “Tags” between our “Oldest” and “Add” tabs:
<div class="tabs">
<a href=""><span class="active">Newest</span></a>
<a href=""><span>Oldest</span></a>
<a href=""><span>Tags</span></a>
<a href=""><span>Add</span></a>
</div>
That additional line will add a tab to our UI and (almost) everything will work exactly as we’d expect. The only problem is that we built our tabs based on their location in this list. So, when we click the Tags tab, we’ll see the interface for the Add button. This is definitely not our expected behavior, but—fortunately—requires only a minor modification.
All we need to do is add an additional else-if block in the middle of our tab code and rearrange the numbers slightly. When I did that in my code, the relevant section ended up looking like this:
} elseif ($element.parent().is(":nth-child(3)")) {
// THIS IS THE TAGS TAB CODE
console.log("the tags tab was clicked!");
} elseif ($element.parent().is(":nth-child(4)")) {
$input = $("<input>"),
$button = $("<button>").text("+");
$button.on("click", function () {
toDos.push($input.val());
$input.val("");
});
$content = $("<div>").append($input).append($button);
}
Building the UI
Now that we know how to set that up, let’s take a quick look at our goal for this tab in Figure 5-2.
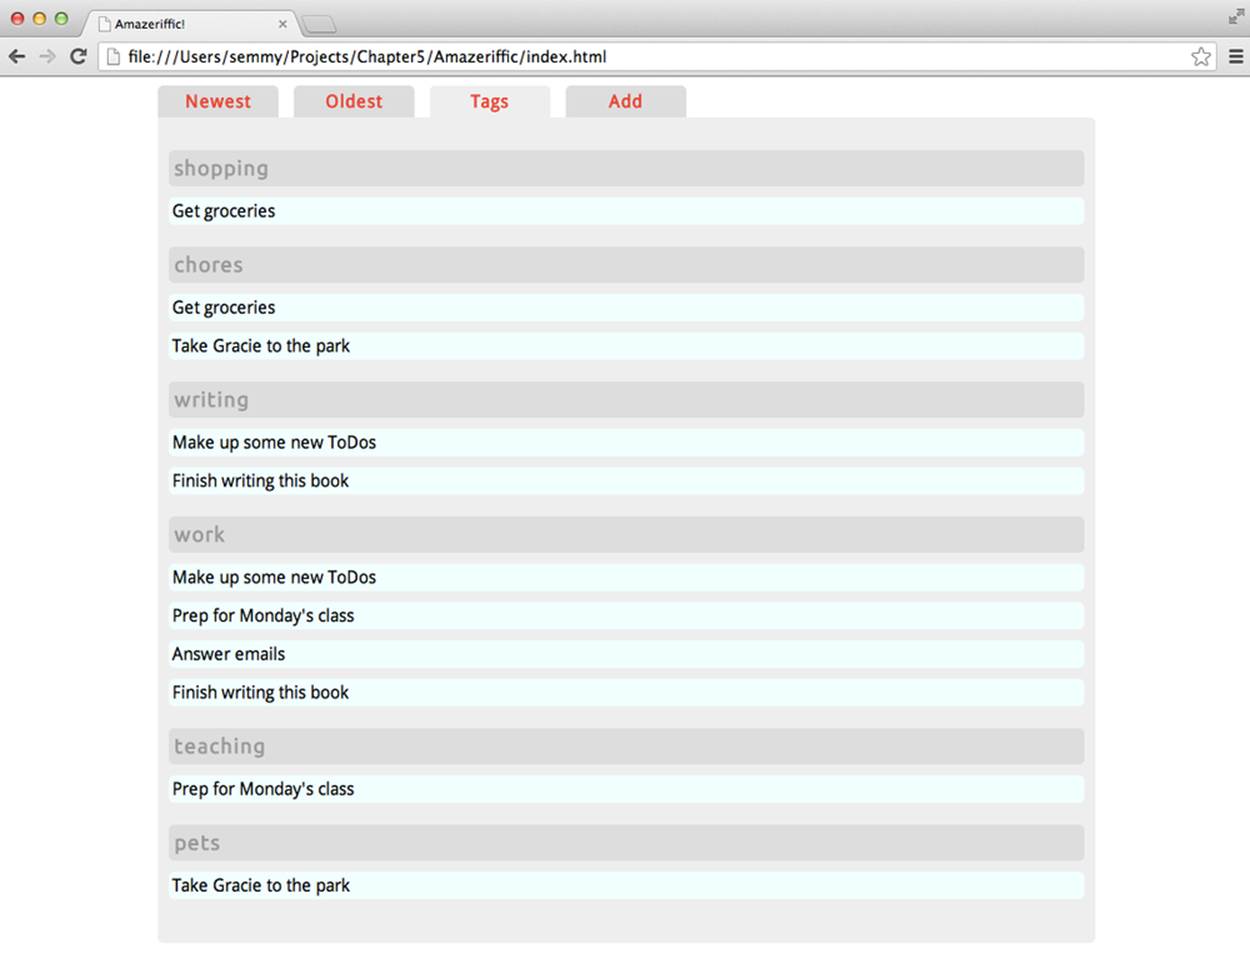
Figure 5-2. Our goal for the Tags tab
For this tab, we’re planning to list out all of the tags as headers, and then add the to-do descriptions that are tagged with that category. That means our to-do descriptions can appear in multiple places.
The problem here, however, is that our JSON object isn’t really stored in a way that makes this very easy. It would be easier if our toDoObjects were stored in a format organized by tags:
[
{
"name": "shopping",
"toDos": ["Get groceries"]
},
{
"name": "chores",
"toDos": ["Get groceries", "Take Gracie to the park"]
},
{
"name": "writing",
"toDos": ["Make up some new ToDos", "Finish writing this book"]
},
{
"name": "work",
"toDos": ["Make up some new ToDos", "Prep for Monday's class",
"Answer emails", "Finish writing this book"]
},
{
"name": "teaching",
"toDos": ["Prep for Monday's class"]
},
{
"name": "pets",
"toDos": ["Take Gracie to the park"]
}
]
Fortunately, we can easily modify our original toDoObjects object to be in this format using a series of forEach and map function calls! But we’ll leave this transformation for the next section and focus instead on creating the UI. So let’s hardcode this (or maybe a simplified version of this) into our Tags tab code as a variable called organizedByTag:
} elseif ($element.parent().is(":nth-child(3)")) {
// THIS IS THE TAGS TAB CODE
console.log("the tags tab was clicked!");
var organizedByTag = [
{
"name": "shopping",
"toDos": ["Get groceries"]
},
{
"name": "chores",
"toDos": ["Get groceries", "Take Gracie to the park"]
},
/* etc */
];
}
Now our goal is to iterate over this object, adding a new section to the .content element of our page as we do so. To do this, we simply add an h3 element along with a ul and a list of li elements for each tag. The ul and li elements are built just like they were in the previous chapter, so the style should stay exactly the same. I also added styling for my h3 element to the style.css file to get it to look the way it does in the previous example:
} elseif ($element.parent().is(":nth-child(3)")) {
// THIS IS THE TAGS TAB CODE
console.log("the tags tab was clicked!");
var organizedByTag = [
/* etc */
]
organizedByTag.forEach(function (tag) {
var $tagName = $("<h3>").text(tag.name),
$content = $("<ul>");
tag.toDos.forEach(function (description) {
var $li = $("<li>").text(description);
$content.append($li);
});
$("main .content").append($tagName);
$("main .content").append($content);
});
}
Now we have two things left to do. We’ll need to modify the Add tab to accept a list of categories with a to-do item, and we’ll need to figure out how to modify our current list of to-do objects into a list of items organized by the tag names. Let’s start with the latter first, so that our app will dynamically update when we add new items.
Creating an Intermediate Tags Data Structure
When I’m confronted with a problem that seems like it’s going to need to be solved in more than a few lines of code, that usually clues me in that I should abstract it as a function. In this case, we want to build a function called organizeByTags that takes an object stored in our program like this:
[
{
"description" : "Get groceries",
"tags" : [ "shopping", "chores" ]
},
{
"description" : "Make up some new ToDos",
"tags" : [ "writing", "work" ]
},
/* etc */
]
and converts it into an object that’s stored like this:
[
{
"name": "shopping",
"toDos": ["Get groceries"]
},
{
"name": "chores",
"toDos": ["Get groceries", "Take Gracie to the park"]
},
/* etc */
]
Once we have the function, we can simply modify it and put it in the place of our hard-coded object like this:
} elseif ($element.parent().is(":nth-child(3)")) {
// THIS IS THE TAGS TAB CODE
console.log("the tags tab was clicked!");
var organizedByTag = organizeByTag(toDoObjects);
}
Setting up a test bed
We could try to get something like this working in the Chrome console, but that becomes a bit cumbersome when functions get long or complicated. My preferred way of setting this up is to build an external JavaScript program that contains the function and tests it out by printing stuff to the console. Once I’m happy with the way it’s working, I’ll incorporate it into my working code.
To do this, it’s sometimes nice to have a simple unused HTML file lying around in our file hierarchy. This file does nothing more than add a script file that we can use for trying things out. The HTML file doesn’t even need any of our usual boilerplate content:
<script src="http://code.jquery.com/jquery-2.0.3.min.js"></script>
<script src="test.js"></script>
Now if we save that file as index.html and create test.js with the following content, we should see “organizeByTag called” on the console, along with the example object that we’ve set up:
var toDoObjects = [
{
"description" : "Get groceries",
"tags" : [ "shopping", "chores" ]
},
{
"description" : "Make up some new ToDos",
"tags" : [ "writing", "work" ]
},
/* etc */
];
var organizeByTags = function (toDoObjects) {
console.log("organizeByTags called");
};
var main = function () {
"use strict";
var organizeByTags = function () {
console.log("organizeByTags called");
};
organizeByTags(toDoObjects);
};
$(document).ready(main);
Once you have this set up, I encourage you to spend some time trying to solve this problem on your own. It’s tricky, but once you see the solution I expect that you’ll understand it. Trying it out yourself will help you get a good sense of how much you can do.
I’ll also add that there are several ways to solve this, which is often the case when it comes to computer programming. I’m going to show you my solution, but it’s often instructive to see how your solution differs from mine.
My solution
My solution is relatively easy to explain in two parts. First, I create an array that contains all the possible tags by iterating over the initial structure using a forEach loop. Once I have that, I use the map function to map the tags array to my desired object by iterating over the to-dos and finding the ones that have that tag.
Let’s start with the first part. The only new thing we use here is the indexOf function that is included with all arrays. We can see how it works by interacting with the Chrome console:
var nums = [1, 2, 3, 4, 5];
nums.indexOf(3);
//=> 2
nums.indexOf(1);
//=> 0
nums.indexOf(10);
//=> -1
We can generalize this 'margin-top:0cm;margin-right:0cm;margin-bottom:0cm; margin-left:20.0pt;margin-bottom:.0001pt;line-height:normal;vertical-align: baseline'>var msgs = ["hello", "goodbye", "world"];
msgs.indexOf("goodbye");
//=> 1
msgs.indexOf("hello");
//=> 0
msgs.indexOf("HEY!");
//=> -1
We’ll use this function to keep from adding duplicates to our tags array:
var organizeByTags = function (toDoObjects) {
// create an empty tags array
var tags = [];
// iterate over all toDos
toDoObjects.forEach(function (toDo) {
// iterate over each tag in this toDo
toDo.tags.forEach(function (tag) {
// make sure the tag is not already
// in the tag array
if (tags.indexOf(tag) === -1) {
tags.push(tag);
}
});
});
console.log(tags);
};
When we run this, it should print out the tag names without duplicates. That means we’re halfway there! In the second part of the solution I use the map function:
var organizeByTags = function (toDoObjects) {
/* the first part from above */
var tagObjects = tags.map(function (tag) {
// here we find all the to-do objects
// that contain that tag
var toDosWithTag = [];
toDoObjects.forEach(function (toDo) {
// check to make sure the result
// of indexOf is *not* equal to -1
if (toDo.tags.indexOf(tag) !== -1) {
toDosWithTag.push(toDo.description);
}
});
// we map each tag to an object that
// contains the name of the tag and an array
return { "name": tag, "toDos": toDosWithTag };
});
console.log(tagObjects);
};
Now that we have the function created and working correctly, we can incorporate it into the main function of our app code and it should work! Like I mentioned before, this problem admits several different solutions, so it’s good to try to come up with some others!
Tags as Part of Our Input
So now we’ve managed to get the to-do objects organized and displayed by tags, but how can we add tags to the new elements that we input in the Add tab? That requires us modifying the code that displays the tab interface. I’d like to set it up so it looks like Figure 5-3.
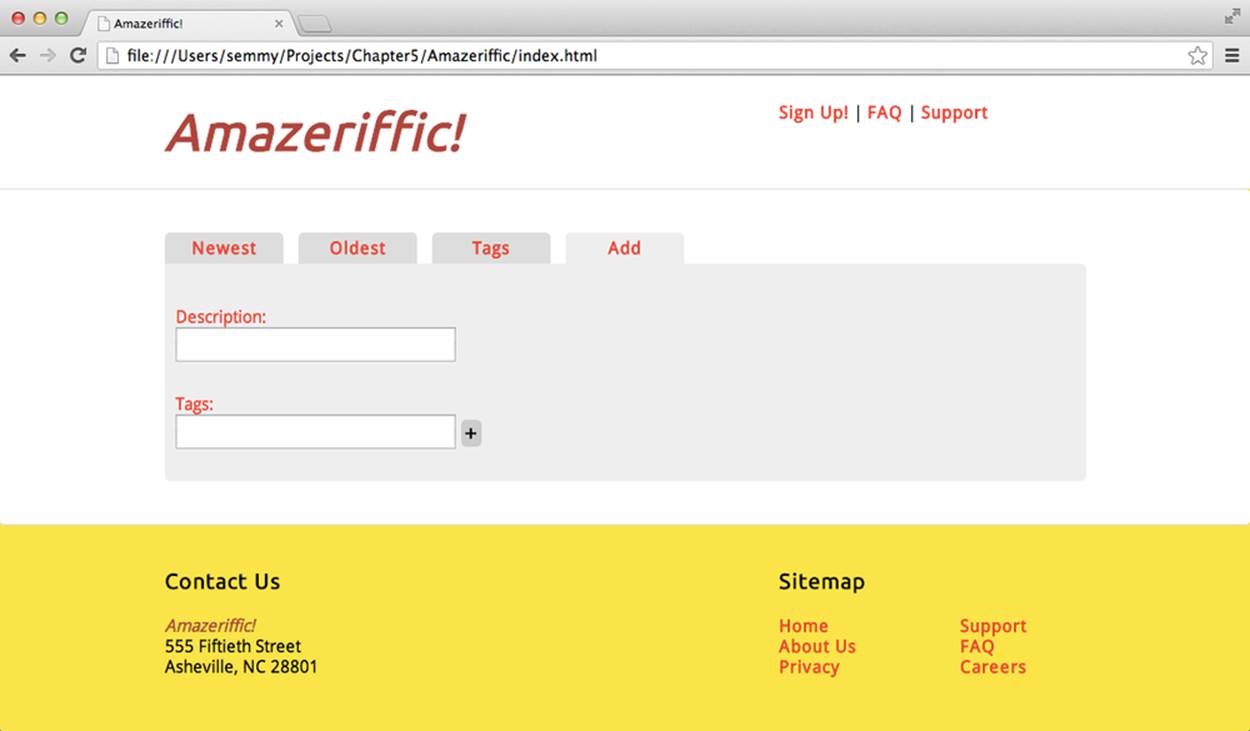
Figure 5-3. Our goal for the Add tab
As you can see, it now has two input boxes. In the second one, we’ll let the user input a comma-separated list of tags, which we’ll incorporate into the object when we add it.
If you finished the final example in the previous chapter, you probably have code that looks something like this:
} elseif ($element.parent().is(":nth-child(4)")) {
var $input = $("<input>"),
$button = $("<span>").text("+");
$button.on("click", function () {
toDos.push($input.val());
$input.val("");
});
$content = $("<div>").append($input).append($button);
}
To make the UI look like it does in Figure 5-3, we need to add an additional input box and the labels. Then we need to modify the $button handler to create an array out of the tags and insert those into the objects.
One thing that we’ll need to know is how to split the string object. It turns out that all strings have a built-in function called split that does just that—it splits a single string into an array of strings. And just like most of the other functions we’ve learned, we can see how it works inside the Chrome console:
var words = "hello,world,goodbye,world";
// this splits the array on a comma
var arrayOfWords = words.split(",");
console.log(arrayOfWords);
//=> ["hello","world","goodbye","world"]
arrayOfWords[1];
//=> "world"
arrayOfWords[0];
//=> "hello"
We’ll let the user input a string of comma-separated words that are tags and then add them as an array to the object.
Last, but not least, we’ll need to re-create our toDos array from the new toDoObjects array. To do this, I cut and pasted the code that we used at the top of the main function (and in doing so, violated the DRY principle—I encourage you to try to fix that). My code ended up looking like this:
} elseif ($element.parent().is(":nth-child(4)")) {
var $input = $("<input>").addClass("description"),
$inputLabel = $("<p>").text("Description: "),
$tagInput = $("<input>").addClass("tags"),
$tagLabel = $("<p>").text("Tags: "),
$button = $("<span>").text("+");
$button.on("click", function () {
var description = $input.val(),
// split on the comma
tags = $tagInput.val().split(",");
toDoObjects.push({"description":description, "tags":tags});
// update toDos
toDos = toDoObjects.map(function (toDo) {
return toDo.description;
});
$input.val("");
$tagInput.val("");
});
}
Summary
In this chapter, we studied three major topics at a rudimentary level: JavaScript objects, JSON, and AJAX. I introduced JavaScript objects as a way to store related data as a single entity in a program. Objects are created using curly braces, and properties are added and accessed using the .(dot) operator.
You can think of JSON as simply a string representation of a JavaScript object that can be processed by any programming language. JSON is used to transfer data between computer programs—in our case between the web browser (the client) and the server. In addition, many web services (including Flickr, Twitter, and Facebook) offer application programming interfaces (APIs) that allow us to send and request information to and from their services using the JSON format.
Typically, when we want to send or receive information to or from a server-side program, we use a technology called AJAX. This allows us to dynamically update the information on our web page without actually reloading the page. jQuery offers several AJAX functions that we’ll learn in later chapters, but we looked at the getJSON function in this chapter.
More Practice and Further Reading
Flickr Slideshow
In this problem, you’ll build a simple application that allows the user to enter a search term, and then presents a series of images from Flickr that have that tag. The images should fade out and fade in sequentially.
To do this, we’ll use the setTimeout function that was mentioned briefly in Chapter 4. This function allows us to schedule an event to happen after a specified period of time. For example, suppose we wanted to log “hello world!” after five seconds. We could do this as follows:
// print 'hello world' after five seconds
setTimeout(function () {
console.log("hello world!");
}, 5000);
Notice that the arguments to this function are backward from what we’re used to—typically the callback goes at the end. This is a quirk that we just have to remember. Also notice that the second argument represents the number of milliseconds that we should wait before executing the callback function.
Now suppose that we simply wanted to fade in and fade out an array of messages:
var messages = ["first message", "second message", "third", "fourth"];
We could start with a simple HTML body:
<body>
<div class="message"></div>
</body>
Then we can set up our main function in app.js to do the following:
var main = function () {
var messages = ["first message", "second message", "third", "fourth"];
var displayMessage = function (messageIndex) {
// create and hide the DOM element
var $message = $("<p>").text(messages[messageIndex]).hide();
// clear out the current content
// it would be better to select the current
// paragraph and fade it out.
$(".message").empty();
// append the message with messageIndex to the DOM
$(".message").append($message);
// fade in the message
$message.fadeIn();
setTimeout(function () {
// In 3 seconds call displayMessage again with the next index
messageIndex = messageIndex + 1;
displayMessage(messageIndex);
}, 3000);
};
displayMessage(0);
}
$(document).ready(main);
This will fade in the messages in order, cycling once every three seconds. There is, however, a minor problem with this—once we get to the end, we’ll start seeing the word undefined appear because we’ve fallen off the end of the array. We can fix this by including an if statement to check if we’re at the end and, if we are, setting the index back to 0.
WARNING
We probably don’t want to actually add this effect to a web page. It’s a modern equivalent to the maligned <blink> tag that was removed from HTML because it was super annoying.
Now we can generalize this. First, we should do an AJAX request to get the image data from Flickr, and then instead of adding a paragraph element to the DOM, we’ll add an img element instead of a p element. We’ll set the src attribute of the img element to the Flickr image.
Once we have that working, we’ll create an interface that lets the user enter a tag to search for, and then generates the slideshow with images that include the specified tag. This is a nice exercise that should take you some time, especially if you decide to add some basic styling and really coordinate the images correctly. I encourage you to give it a try!
Object Practice
One of my favorite problems to share with beginning programmers relates to identifying poker hands. If you’re not familiar with the family of card games based on poker, that’s OK. They are all related to patterns that occur in hands of five playing cards. The hands are as follows:
Pair
Two cards of the same rank
Two pair
Two cards of the same rank, plus two cards of another rank
Three of a kind
Three cards of the same rank
Straight
Five ranks in order, but an ace can count as the highest or lowest rank
Flush
Five cards of the same suit
Full house
Two cards of the same rank, plus three cards of another rank
Four of a kind
Four cards of the same rank
Straight flush
Five cards of the same suit, where the ranks form a straight
Royal flush
A straight flush, where the straight starts at a 10 and ends at an ace
We’ll refer to any hand that doesn’t meet one of these criteria as a bust. Note that the hands are not mutually exclusive—a hand that contains a three of a kind also contains a pair, and a full house contains two pair. In this set of problems, we’ll write JavaScript functions that test whether an array of five cards has one of these properties.
There are many ways to solve these problems, and some are way more efficient or require much less code than others. But our goal here is to practice with objects, arrays, and conditional statements. So we’ll follow an approach that allows us to build a series of helper functions that we can use to determine if a set of five cards matches a certain type of hand.
To start, let’s see what a hand might look like:
var hand = [
{ "rank":"two", "suit":"spades" },
{ "rank":"four", "suit":"hearts" },
{ "rank":"two", "suit":"clubs" },
{ "rank":"king", "suit":"spades" },
{ "rank":"eight", "suit":"diamonds" }
];
In this example, our hand contains a pair of twos. It might be a good idea to construct an example for each of the other types of hands before going any further.
How do we determine if a hand meets one of the criteria? We’re going to reduce it to a problem that we solved at the end of Chapter 4! If you finished those problems, you’ll remember that I had you write a function called containsNTimes that accepted three arguments: an array, an item to search for, and a minimum number of times that it needed to appear. Now imagine if we sent in an array of ranks to that function:
// there are 2 twos
containsNTimes(["two","four","two","king","eight"], "two", 2);
//=> true
This tells us that the array of ranks has a pair! We can similarly use this to determine if there’s a three of a kind or a four of a kind!
// there are not 3 twos
containsNTimes(["two","four","two","king","eight"], "two", 3);
//=> false
So now we’ve reduced the problem to turning our array of card objects into an array of ranks. It turns out that’s pretty easy using the map function that we learned in this chapter:
// our "hand" is the hand array defined above
hand.map(function (card) {
return card.rank;
});
//=> ["two","four","two","king","eight"]
So we can assign the result of the call to map as a variable, and then send that into our containsNTimes function to determine if it has a pair of twos:
var handRanks,
result;
handRanks = hand.map(function (card) {
return card.rank;
});
//result holds 'true'
result = containsNTimes(handRanks, "two", 2);
To finish this off, we create an array of all possible ranks, and use a forEach loop to determine if the hand contains a pair of any of them:
// this is all of our possible ranks
var ranks = ["two","three","four","five","six","seven","eight",
"nine","ten","jack","queen","king","ace"];
var containsPair = function (hand) {
// we'll assume that it doesn't have a pair
// until we find evidence to the contrary
var result = false,
handRanks;
// create our array of hand ranks
handRanks = hand.map(function (card) {
return card.rank;
});
// search for a pair of any rank
ranks.forEach(function (rank) {
if (containsNTimes(handRanks, rank, 2)) {
// we found a pair!
result = true;
}
});
// this is set to true if we found a pair
// it's false if we didn't
return result;
};
Now that we’ve seen an example, try generalizing it to write a function for each of the other ranks (e.g., containsThreeOfAKind). For two pair and a full house, you’ll need to keep track of the actual ranks of the elements you find. For the flush, you’ll need to extract the suits from the array of objects instead of the ranks.
A straight is a little harder, but here’s a hint: a straight does not contain a pair (which you can determine by flipping the result of the containsPair function using the ! operator), and the difference between the highest card and the lowest card is 4. So it would be good to write a couple of helper functions to find the highest card rank and the lowest card rank as numbers (for instance, a jack would be 11, a queen would be 12, a king 13, and an ace would be 14). Once you have those functions, you can determine if a hand has a straight by confirming that it doesn’t contain a pair and the difference between the high card and low card is 4.
You can also build up all of the rest of the functions by using existing functions. For instance, a straight flush is just a flush that also contains a straight. And a royal flush is a straight flush where the high card is an ace (or the low card is a 10).
Other APIs
Now that you’ve seen that you can easily pull in data from Flickr and play with the results, it’s sometimes fun to pull data in from other APIs. It turns out that many APIs allow you to access data in the same way we accessed the Flickr data.
Programmable Web keeps a list. For the site to work with jQuery’s getJSON function, it needs to support a technology called JSONP. You can pull up a list of APIs that support JSONP and you can read more about JSONP on Wikipedia.
You’ll need to read the documentation for the specific API to determine how to format your query URL, but playing around with other APIs is a great way to practice your AJAX skills.
All materials on the site are licensed Creative Commons Attribution-Sharealike 3.0 Unported CC BY-SA 3.0 & GNU Free Documentation License (GFDL)
If you are the copyright holder of any material contained on our site and intend to remove it, please contact our site administrator for approval.
© 2016-2026 All site design rights belong to S.Y.A.