Learning Web Application Development (2014)
Chapter 6. The Server
At this point, we’ve seen the major technologies associated with the client-side part of a web application. We’ve also learned a bit about how the browser communicates with a server using JSON and AJAX. Next, we’re going to delve into server-side programming.
Understanding the server-side part of the application will require us to learn more about the client-server model, the HTTP protocol, and Node.js. Node.js is a relatively new (and exciting) technology that allows us to easily build event-driven servers using JavaScript.
Setting Up Your Environment
Setting up a development environment that supports building database-driven applications can be a daunting task, and describing the procedure for Windows, Mac OS, and Linux is way beyond the scope of this book. To simplify the process, I’ve created a set of scripts that will get you up and running relatively quickly using Vagrant and VirtualBox.
Vagrant is a tool that helps build a development environment using a virtual machine. You can think of a virtual machine as a separate computer running completely within the confines of your computer. We’ll elaborate more on this in Mental Models. For now, just understand that we’ll be using Vagrant along with VirtualBox to build a virtual server-side development environment. This environment will include the majority of the tools that we’ll use throughout the rest of this book.
Obviously, part of this process is about convenience: even though installing a Node.js development environment on your local machine is pretty easy (and I will encourage you to do it in the practice problems at the end of the chapter), adding a full server-stack including MongoDB and Redis is nontrivial and takes a bit of time and patience.
Another reason we’re doing this is consistency. Because I’m writing the scripts, I have a little more control over the versions of Node.js, MongoDB, and Redis that are installed. Furthermore, using Vagrant allows us to have the same development environment running whether you’re using Windows, Mac OS, or Linux. This will (hopefully) minimize any issues arising due to OS differences.
I also think that running our development environment inside of VirtualBox separates out the server part of the application in a very clear way. This makes it a useful pedagogical abstraction for someone learning the basics of web application development.
Installing VirtualBox and Vagrant
First, you’ll need to install the latest version of VirtualBox. At the time of this writing, the latest version is 4.2.18. You can go to http://www.virtualbox.org (shown in Figure 6-1), click the Downloads link on the left side of the page, and download the appropriate version for your operating system. Once downloaded, the installation and setup process will differ depending on your operating system, so make sure to follow the appropriate instructions.
Figure 6-1. The VirtualBox home page
Next, you’ll need to install the latest version of Vagrant. The latest version at the time of this writing is 1.4. To get the latest version, you can go to http://www.vagrantup.com (see Figure 6-2), click the Downloads link in the upper-right corner, and grab the latest installer for your platform. After downloading it, double-click the package and install it in the same way you installed VirtualBox.

Figure 6-2. The Vagrant home page
If you’re running Windows, you may have to reboot your machine after the installation to make sure your file path is set up correctly. You can test this out by opening a command window (click your Start menu, and type cmd into the search box) and typing vagrant --version at the prompt:
C:\Users\semmy>vagrant --version
Vagrant version 1.4.0
If that works, you’re ready to go. If it does not, reboot your machine and try typing the vagrant command again.
Building Your Virtual Machine
If all is well, you’re ready to clone the Git repository called node-dev-bootstrap from my GitHub page. This basically means you’ll be downloading an entire Git repository that I’ve created and putting it on your computer. If you’re using Windows this will require you to open your git-bash prompt. In either case, go into your Projects directory and clone the node-dev-bootstrap repository using the following command:
hostname $ git clone https://github.com/semmypurewal/node-dev-bootstrap Chapter6
This will create a directory called Chapter6 and clone the node-dev-bootstrap repository into it. Next you can enter the project directory and type the vagrant up command:
hostname $ cd Chapter6
hostname $ vagrant up
NOTE
If you’re running Windows, you may get a warning from the firewall asking if the program “vboxheadless” should allowed to access the network. It’s safe to say “yes.”
If everything worked correctly, Vagrant will build your virtual machine. This will take a few minutes. Be patient.
Connecting to Your Virtual Machine with SSH
Once it’s finished, your virtual machine should be running. How do you check? You’ll need to use a network technology called SSH (which stands for Secure Shell) to “connect” to the server through your terminal window.
If you’re using Mac OS or Linux, it’s pretty easy because your platform comes with a built-in SSH client. If you’re running Windows, however, you may need to manually install an SSH client.
Either way, go ahead and type:
hostname $ vagrant ssh
If you’re running Mac OS, it will connect you to your virtual machine. If you’re running Windows, it may or may not work depending on the version. If it doesn’t work, Vagrant will give you login credentials (most likely the host will be 127.0.0.1 and the port will be 2222). You’ll need to download an SSH client to connect—I recommend PuTTY, which is available at the PuTTY downloads page. The PuTTY home page is shown in Figure 6-3.
When you open up PuTTY, you’ll type in the Host Name and the Port that Vagrant specified into the appropriate input boxes, as shown in Figure 6-4.
Then click Open. PuTTY will connect to your virtual server and ask you for a username and password. Both of these should be preset to “vagrant.”
Figure 6-3. The PuTTY home/download page
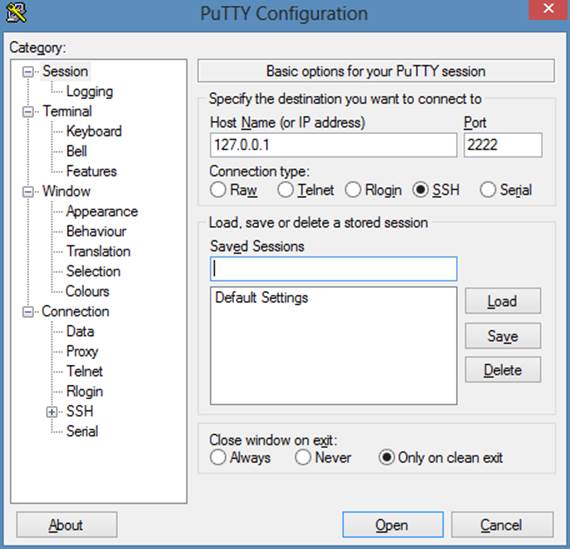
Figure 6-4. Setting up PuTTY to connect to your virtual machine
Hello, Node.js!
Once you’re logged in, you can navigate the terminal shell of your remote computer in the same way that you navigate the terminal shell of your local computer. For example, you can list the contents of your virtual machine directory in the same way that you examine the contents of a directory on your local machine—using the ls command:
vagrant $ ls
app postinstall.sh
You can ignore the postinstall.sh file for now. Using the command-line skills you learned in earlier chapters, navigate to the app directory of your virtual machine:
vagrant $ cd app
vagrant $ ls
server.js
You should see a file called server.js there. Let’s make sure everything is working by starting it using the node command:
vagrant $ node server.js
Server listening on port 3000
You’ll see a message that says "Server listening on port 3000" and should no longer get a terminal prompt. That’s because your server is running. You can confirm that by opening Chrome and typing localhost:3000 in your address bar. If everything worked correctly, you should see a “Hello World!” message. It should look something like Figure 6-5.
First things first: you can stop the program from the terminal window by hitting Ctrl-C. Once you’re done working, you can exit out of your virtual server by typing exit:
vagrant $ exit
logout
Connection to 127.0.0.1 closed.
If you’ve logged in to your virtual machine via PuTTY on Windows, this will shut down the program. Then you can return to the terminal that you used to start your virtual machine. If you’re in Mac OS, you’ll immediately go back to your command line. Either way, you can stop the server by typing vagrant halt:
hostname $ vagrant halt
[default] Attempting graceful shutdown of VM...
You’ll want to halt your VM whenever you’re not using it because having a virtual machine running in the background will definitely be a drain on your computer’s resources. Once halted, you can restart your box with vagrant up.
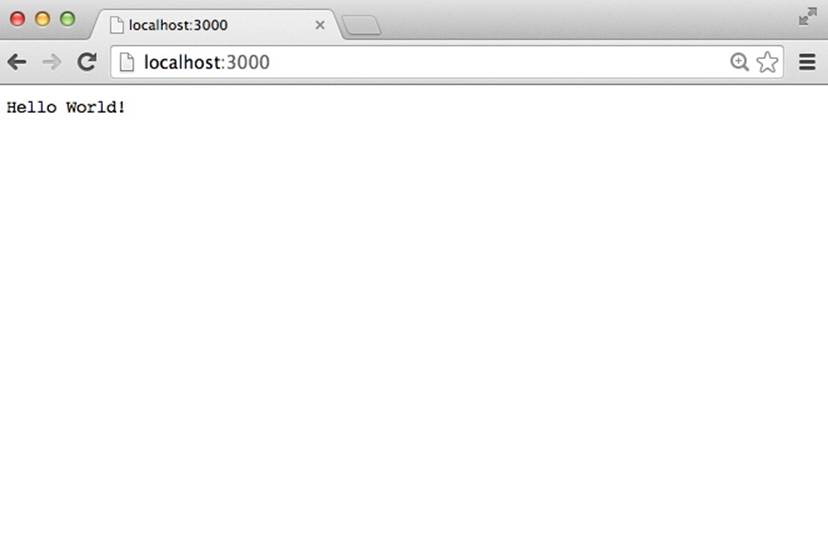
Figure 6-5. The default Node server viewed from Chrome
TIP
To completely remove the Vagrant-built virtual machine from your computer, you can type vagrant destroy. That will result in your VM being rebuilt next time you type vagrant up from that directory. So I would recommend sticking with vagrant halt for the time being.
Mental Models
In this section, we’ll discuss some of the ways to think about clients, servers, hosts, and guests.
Clients and Servers
In the field of computer networking, we typically think of computer programs as being either client programs or server programs. Traditionally, a server program abstracts some resource over a network that multiple client programs want to access. For example, someone might want to transfer files from a remote computer to a local computer. An FTP server is a program that implements the File Transfer Protocol, which allows users to do exactly this. An FTP client is a program that can connect and transfer programs from an FTP server. The most general client-server model is illustrated in Figure 6-6.
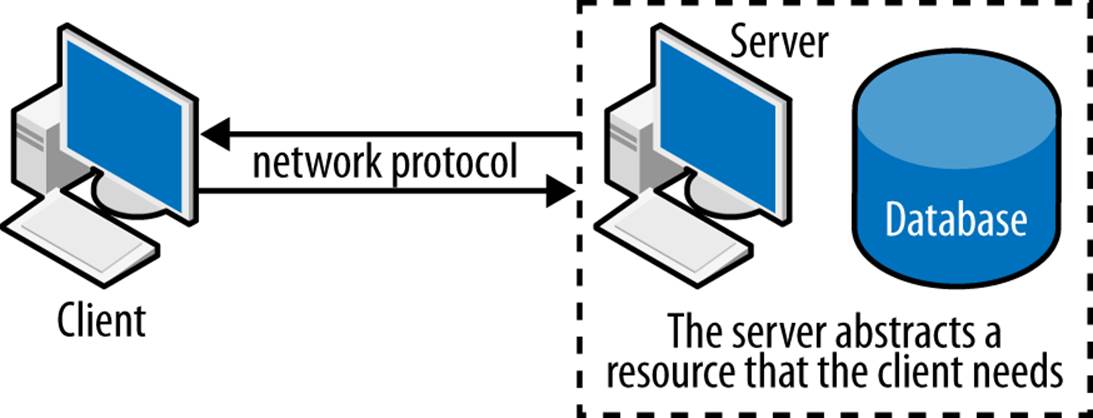
Figure 6-6. The client-server model
A lot of detail goes on in the world of computer networking that is ancillary to web application development, but a few important things are worth understanding.
The first is that (most of the time) the client is a web browser and the server is a remote machine that is abstracting resources via the Hypertext Transfer Protocol, or HTTP for short. Although it was originally designed to transfer HTML documents between computers, the HTTP protocol can now be used to abstract many different types of resources on a remote computer (for instance, documents, databases, or any other type of storage). We’ll have a lot more to say about HTTP later on in the book, but for now we can think of it as the protocol that we’re using to connect browsers to remote computers.
Our HTTP servers will be used to deliver the client-side part of the application that the web browser will interpret. In particular, all of the HTML, CSS, and JavaScript that we’ve learned up to this point will be delivered to the browser via the server. The client-side program running in the browser will be responsible for getting information from or sending information to our server, usually via AJAX.
Hosts and Guests
Typically, our HTTP server is running on a remote machine (in fact, later on in the book we’ll make that happen). This causes problems for developers—if we’re running our code on a remote server we have to actually either edit the code on the remote server and restart it, or we have to edit the code locally and push it every time we want to try it out. This can be highly inefficient.
We’re working around this problem by running the server locally on our machine. In fact, we’re taking it one step further. Instead of just running a server program and all of the software locally, we’re creating a virtual machine inside our local computer that is running the server. To us, it almost looks like it’s a remote machine (meaning we connect to it via SSH, which is the way we connect to real remote machines). But because it’s running locally, we can easily share our development folder with our local machine so we can edit files.
Our local computer (that is running the virtual machine) is referred to as the host machine. The virtual machine is referred to as the guest machine. For the rest of this chapter, we’ll have both running and I’ll differentiate between them.
Practicalities
This abstraction can lead to some confusion—one that’s worth overcoming early. First of all, it’s good to list out the applications you have running in the development process, and the window that they are associated with:
The browser
You’ll be using Chrome to test changes to your application.
The text editor
If you’ve been following along, this will most likely be Sublime. This will edit files living in a shared folder on both your host and guest machines.
Git
You’ll have a Git terminal window open. You’ll use Git from your host machine. If you’re in Mac OS or Linux, this will be a terminal window. If you’re in Windows, this will be the git-bash prompt.
Vagrant
You’ll most likely interact with Vagrant in the same window that you use to interact with Git. That means you can type vagrant up and vagrant halt in the same place that you type git commit.
SSH
This will be running on your host machine, but you’ll be using it to interact with your guest machine. If you’re in Windows, this will be either PuTTY or an additional git-bash window depending on whether vagrant ssh connects you directly. If you’re in Mac OS, it’s a good idea to have an additional terminal open.
I typically have at least two terminal windows open in addition to the browser and my text editor. This is partially illustrated in Figure 6-7, although the text editor window isn’t shown.
Hello, HTTP!
Now that we roughly understand the relationship between the guest virtual machine and our host machine, let’s try to understand the actual code. Like I mentioned before, the great thing about running our code in virtual machine on our local computer (versus running it remotely) is that we can access and edit the code directly on our local computer using whatever text editor we choose.
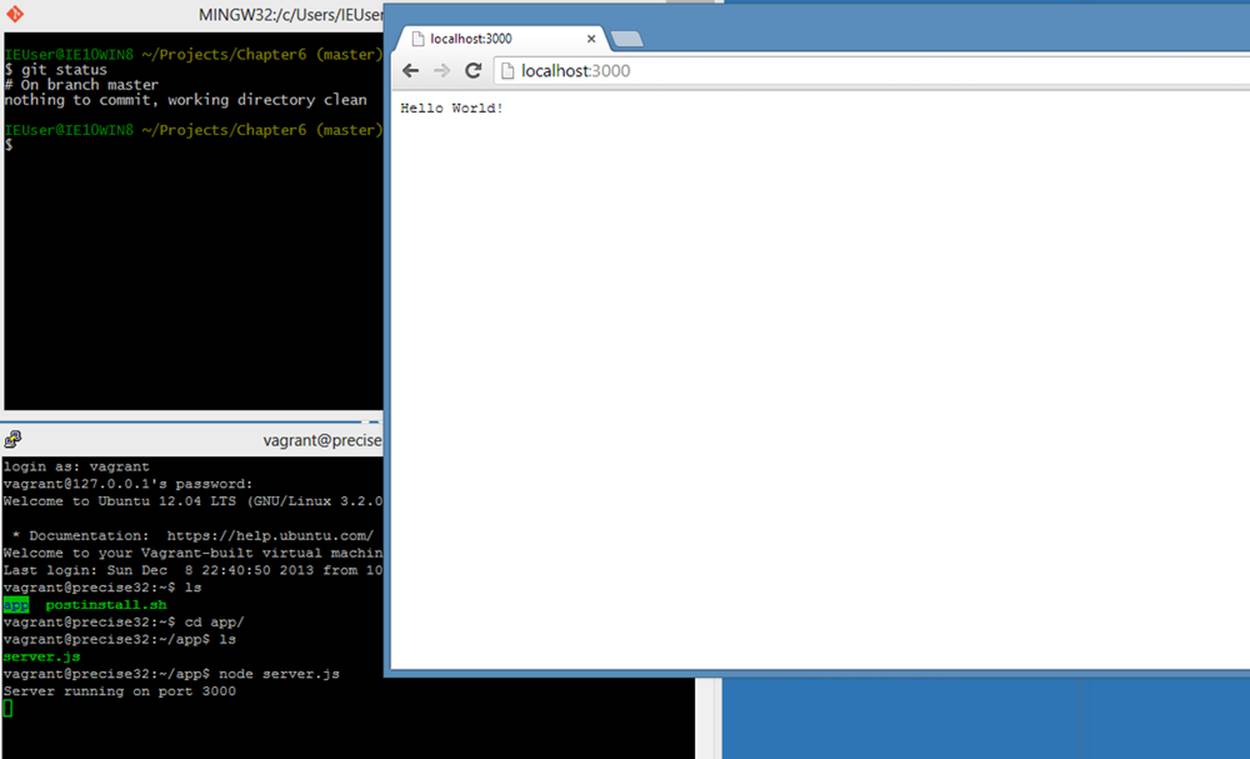
Figure 6-7. git-bash, PuTTY, and Chrome running in Windows
Using Sublime, open up the app directory inside the Chapter6 directory. You should see a file called server.js that should look something like this:
var http = require("http"),
server;
server = http.createServer(function (req, res) {
res.writeHead(200, {"Content-Type": "text/plain"});
res.end("Hello World!");
});
server.listen(3000);
console.log("Server listening on port 3000");
This code shouldn’t look completely unfamiliar to you—you should be able to immediately identify some variable declarations, a console.log statement, an anonymous function, a JSON object, and the callback pattern that we used when we built UI elements in earlier chapters.
So what is this code doing? It turns out it’s doing a lot—it’s creating an HTTP server that is responding to web browser requests! As mentioned before, HTTP stands for HyperText Transfer Protocol and it’s the basic technology that’s behind the World Wide Web! You may have heard of programs like Apache or Nginx—these are industrial-strength, configurable HTTP server programs that are designed to host big websites. Our HTTP server is much simpler than that: it’s simply accepting a browser request and responding with a text response that says “Hello World.”
We can think of the code as behaving exactly as our jQuery click handler behaves—the difference is that instead of the callback being called when a user clicks, it is called whenever a client (in this case, the browser) connects. The req parameter is an object that represents the HTTP request that is coming to our server from the client, and the res parameter is an object that represents the HTTP response that we’ll send back to the client. The req.writeHead function creates the HTTP header that sets the attributes of the response, and the res.end function completes the response by adding “Hello World.”
After we create the server, we make it listen on port 3000 (which is why we type 3000 after localhost in our web browser’s address bar). The console.log statement prints out the statement to the server terminal when we run the program.
Modules and Express
Phew! That probably seems like a lot for such a little program! It’s more than you likely realize—an HTTP server is a nontrivial piece of software that takes a good deal of skill to write correctly. Fortunately, we don’t have to worry about the details because we imported the code via the Node.js http module. A module is simply a collection of code that we can use without completely understanding how it works internally—all we have to understand is the API that it exposes to us. The first line in our code is the require statement, which imports the http module and stores it in the http variable.
This HTTP server module is interesting if we need a bare-bones, stripped down HTTP server that simply accepts and responds to client requests. Once we want to start sending HTML or CSS files from the server, however, things become much more complicated. We can build a more complex server on top of the basic HTTP server that Node.js gives us but, lucky for us, somebody else already solved that problem, too! The Express module creates a layer on top of the core http module that handles a lot of complex things that we don’t want to handle ourselves, like serving up static HTML, CSS, and client-side JavaScript files.
Indeed, one of the joys of programming in Node is that we can leverage numerous modules like Express, many of which do very useful things. The http module that we used earlier is part of the core distribution of Node.js, so we don’t have to do anything special to use it. Express is not part of the core distribution of Node, so we need to do a little more work before we can access it as easily as we access the http module.
Fortunately, it turns out that every distribution of Node comes with another program called the Node Package Manager (or NPM for short). This tool allows us to easily install modules and then immediately leverage them in our code.
Installing Express with NPM
NPM is pretty easy to use. Let’s start by creating a new directory inside the app directory and call it Express. You can do this in Sublime or in the terminal window. Either way, once you get the directory created, you’ll want to SSH into your Vagrant box and navigate to the Express directory.Then you can type in npm install express:
vagrant $ ls
app postinstall.sh
vagrant $ cd app
vagrant $ ls
Express server.js
vagrant $ cd Express
vagrant $ npm install express
WARNING
Occasionally, NPM and VirtualBox will not work nicely together on a Windows machine. If you get errors when you attempt to install Express, try running the command npm install express --no-bin-links and see if that helps.
NPM will respond by installing Express and a long list of its dependencies. Where do they get installed? It turns out that they get installed in your current directory, inside a subdirectory called node_modules. We can easily confirm this:
vagrant $ pwd
/home/vagrant/app/Express
vagrant $ ls
server.js node_modules
vagrant $ ls node_modules
express
Our First Express Server
Now that the Express module is installed, we can create a simple Express server. Let’s create a file inside our Express directory called server.js and add the following content:
var express = require("express"),
http = require("http"),
app;
// Create our Express-powered HTTP server
// and have it listen on port 3000
app = express();
http.createServer(app).listen(3000);
// set up our routes
app.get("/hello", function (req, res) {
res.send("Hello World!");
});
app.get("/goodbye", function (req, res) {
res.send("Goodbye World!");
});
This may remind you of our previous example, but there are a few noticeable differences. First of all, we don’t need to set up HTTP headers in the callbacks because Express does that for us. Also, we’re simply using res.send instead of res.write or res.end. And last, but probably most important, we’ve set up two routes: hello and goodbye. We’ll see what this does once we open our browser, but first let’s start up the server.
Recall that we can do that by typing node server.js from the Express directory on our guest machine. Now when we go to our web browser, we can type localhost:3000 like we did before. This time, however, we should see an error that says “Cannot GET /”. But, if instead, we type inlocalhost:3000/hello or localhost:3000/goodbye, we should see the message that we specified in the callbacks. Try it now.
As you can see, the addition of hello and goodbye after the main URL of our app specifies which function gets fired. And you’ll also see that Express doesn’t set up a default route for us. If we want to make localhost:3000/ work as it did before, we simply set up a root route by adding another three lines to server.js:
app.get("/", function (req, res) {
res.send("This is the root route!");
});
If we stop our server (by pressing Ctrl-C) and start it again, we will be able to access localhost:3000 as we did before! Express is handling the complexities of routing—we simply tell it what we want it to do when certain routes are requested.
Sending Your Client App
We’ve seen that we can send information to the web browser from the server. But what if we want to send something like a basic HTML page? Then things can get complicated relatively quickly. For example, we might try to do something like this:
app.get("/index.html", function (req, res) {
res.send("<html><head></head><body><h1>Hello World!</h1></body></html>");
});
Although this will work, creating HTML that is bigger than this small example will become extremely cumbersome. Fortunately, Express solves this problem for us by allowing us to use it as a static file server. In doing so we can create HTML, CSS, and client-side JavaScript files as we’ve been doing throughout the rest of the book! And it turns out that it only takes one more line of code.
Let’s start by creating a new directory in our app directory called Express. Create a server.js file that looks like this:
var express = require("express"),
http = require("http"),
app = express();
// set up a static file directory to use for default routing
// also see the note below about Windows
app.use(express.static(__dirname + "/client");
// Create our Express-powered HTTP server
http.createServer(app).listen(3000);
// set up our routes
app.get("/hello", function (req, res) {
res.send("Hello World!");
});
app.get("/goodbye", function (req, res) {
res.send("Goodbye World!");
});
NOTE
If you try to run this example in Windows instead of your virtual machine, you’ll most likely run into trouble because of the filenames. For simplicity of exposition, I’ve left out using the core path module that will make directory paths cross-platform compatible. On the other hand, I have used it in the code in our GitHub repository, so if you’re having problems take a look at the examples there.
In the preceding example, we’ve used app.use to create a static file server directory. This means that any request sent to our server will initially be resolved by the static file directory (client) before it is handed off to our routes. This means that if we have a file called index.html in our clientdirectory and we go to localhost:3000/index.html, it will return the contents of the file. If the file doesn’t exist, it will then check to see if there’s a match among our routes.
WARNING
Here’s where some confusion can arise—if you have a route with the same name as a file in your client directory, how does Express respond? It resolves to the client directory first, so if there’s a match it doesn’t even look at your routes. Be careful not to have routes and files that have the same name—that is almost certainly not what you intend to do.
Let’s give this a try by copying one of our client-side apps into the client directory. Pick any of the apps that we’ve previously created (or, better yet, practice creating one from scratch) and copy it into the client directory of the Express directory.
We can now run our server from our guest machine using node server.js. Because the main HTML page is stored in the file index.html, when we open the page localhost:3000/index.html in our browser, we should see it—including the CSS and the JavaScript!
Generalizations
In general, we’ll build all of our web apps following this pattern. We’ll have the browser code stored inside the client directory, and we’ll have an Express server defined in a file called server.js. We’ll also import and/or create modules to support the server-side part of our program.
The only thing we haven’t seen yet is how to set up communication between the client and the server. As alluded to in the previous chapter, we’ll use AJAX for communication and we’ll use the JSON format to represent our messages. The next example will demonstrate this in addition to leveraging modules that do more interesting things—like connecting to the Twitter API.
Counting Tweets
In this example, we’ll connect to the Twitter API and stream some data into our server. Let’s start by firing up our virtual machine if it’s not already running. So if you haven’t already, type vagrant up from the app directory inside your Chapter6 directory. Next, let’s SSH into our guest machine. If we’re in Windows, this may require us to use PuTTY, and if we’re in Mac OS or Linux, we’ll just type vagrant ssh.
Inside our app directory, we’ll create a new directory called Twitter. Remember that even though we create this directory on our guest machine, the directory is mirrored on our host machine, so we can also open that directory (the app directory inside the Projects directory) in Sublime.
Getting Your Twitter Credentials
To access the Twitter streaming API, you’ll need to first set up an application and log in with your Twitter credentials. Of course, if you don’t already have an account on Twitter, you’ll need to create one—but don’t worry! I’m not going to make you tweet anything!
After you log in to the Twitter developer page, you’ll need to click the “Create a new application” button in the upper-right corner. Once you do that, you’ll be presented with a form that looks something like Figure 6-8. Fill out all of the fields and submit your request.
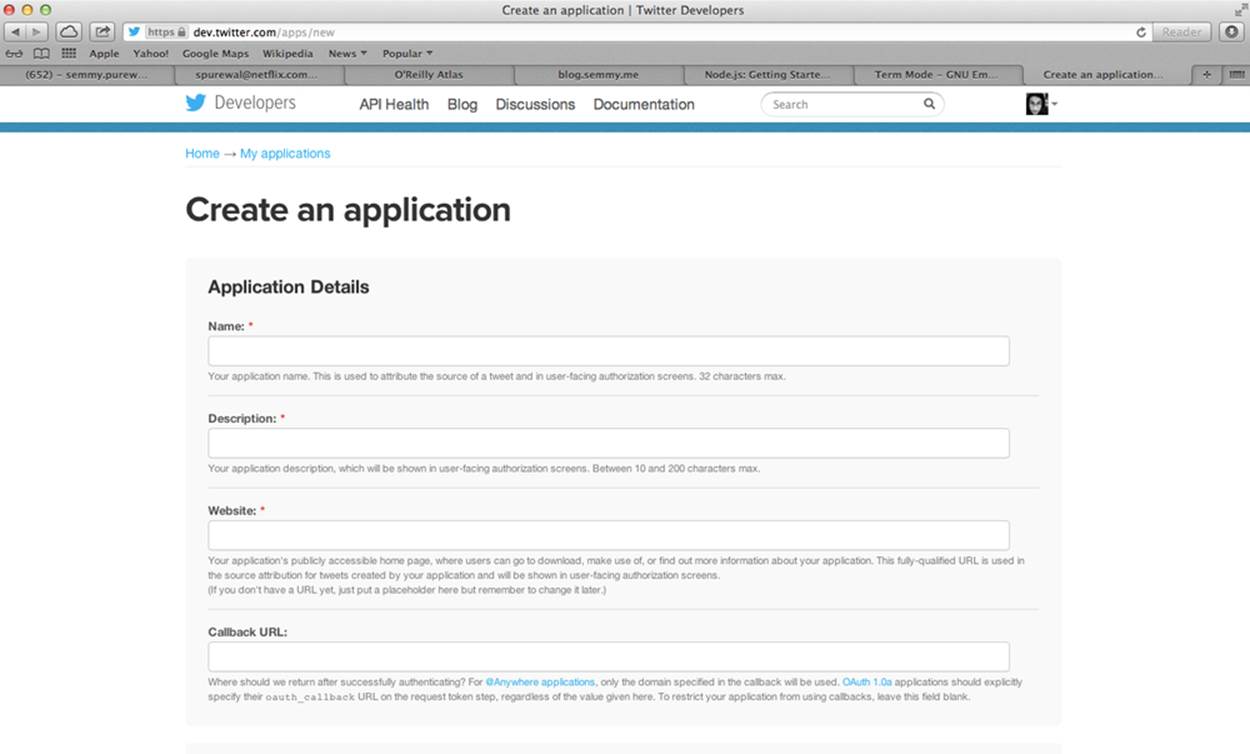
Figure 6-8. The form you use to create your first Twitter application!
TIP
There’s a starred field in the form that requires you to add a website for your application. You probably don’t have one just yet, so feel free to put a placeholder (I like to use www.example.com). You won’t need to worry about a Callback URL for this example.
If your request is successful, you’ll be presented with a page that includes all of your app’s information including the Consumer key and Consumer secret. To access the streaming API, you’ll also need to create an Access token for your app. You can get one by clicking the button at the bottom that says “Create my access token.” When the page reloads, you should have all the credentials necessary to get the next example working.
Now we’ll set up a simple file called credentials.json that we’ll access from our program. This file will contain a single JSON object that includes your Twitter credentials. You’ll replace the following strings with your actual credentials from the application home page on Twitter (don’t forget to leave the quotes around them, because they are stored as strings):
{
"consumer_key": "your consumer key here",
"consumer_secret": "your consumer secret here",
"access_token_key": "your access token key here",
"access_token_secret": "your access token secret here"
}
TIP
Whenever you build apps that require credentials, it’s a good idea to leave them out of your Git repository just in case you want to share your code with someone else. That’s why it’s advantageous to store your credentials in a separate file. Git allows you to have a special .gitignore file that specifies local files that should be left out of your repository.
Connecting to the Twitter API
We’ll start by installing the ntwitter module via NPM:
vagrant $ mkdir Twitter
vagrant $ cd Twitter
vagrant $ npm install ntwitter
vagrant $ ls node_modules
express ntwitter
Now we’ll create another file called tweet_counter.js that will include the code that actually accesses the Twitter API. Note that we require the ntwitter module in the same way we required the http module in the server example. When we require the credentials.json file, we need to tell Node where to find it because, unlike express and ntwitter, we didn’t install it with NPM. That’s why we prepend it with ./—that tells Node to look in the current directory:
var ntwitter = require("ntwitter"),
credentials = require("./credentials.json"),
twitter;
// set up our twitter object
twitter = ntwitter(credentials);
// set up our twitter stream with three parameters,
// separated by commas
twitter.stream(
// the first parameter is a string
"statuses/filter",
// second parameter, an object containing an array
{ "track": ["awesome", "cool", "rad", "gnarly", "groovy"] },
// the third parameter is our callback for when the stream is created
function(stream) {
stream.on("data", function(tweet) {
console.log(tweet.text);
});
}
);
If we’ve set up everything properly, we can now type node tweet_counter from our virtual machine and we should see our terminal window fill up with tweets that have those words in them! If you’re scared that your computer is going crazy, calm down and hit Ctrl-C to stop the stream.
What’s Happening Here?
Let’s take a look at the code again. We’ll see several familiar things. First, we’re declaring three variables and importing the ntwitter module along with our credentials.json file. Next we’re creating a variable called twitter and storing the result of calling the ntwitter function with our credentials as an argument. This initializes the twitter object so we can start streaming.
After that, we define the stream by calling the twitter object’s stream function. This function takes three arguments. The first is a string representing the type of stream—we’ll filter the tweets by a list of words. The second is an object that contains information about our filter rules (in this case we’re only watching for the occurrence of certain words—we can also filter by location, among other things). And last but not least, we send in a callback that is called when the stream is created.
The stream argument is itself an object on which we can listen for events (like a DOM element in jQuery). The event we’re listening for is “data” and that event is fired whenever a new tweet comes through the stream. What do we do when we get a new tweet? We simply print it to the console! That’s all it takes to stream Twitter to our terminal window!
Storing Counts
Instead of just printing the tweets to the console, let’s keep a count of the number of times we’ve seen certain words. This means we’ll need a separate variable for each word. Because we’re keeping multiple variables all representing something similar, it probably makes sense to use an object representing the counts. The attribute associated with each count is the word, and the value of the attribute is the number of times that word has appeared.
We can modify the beginning of our code to declare and create such an object:
var ntwitter = require("ntwitter"),
credentials = require("./credentials.json"),
twitter,
counts = {};
counts.awesome = 0;
counts.cool = 0;
counts.rad = 0;
counts.gnarly = 0;
counts.groovy = 0;
This initializes all the values to 0, meaning we haven’t seen any of the words yet.
Using the indexOf function to find words
When we get data through our Twitter stream, we’ll need to see if the text property of the tweet object has the word we’re looking for. In the previous chapter, we saw that arrays have a method called indexOf that checks an array to see if it contains an object. It turns out strings have exactly the same functionality! A string object’s indexOf function will return the index of the first appearance of a substring within a string, or –1 if the substring does not appear. For example, try typing the following into the Chrome JavaScript console:
var tweet = "This is a tweet! It has lots of words but less than 140 characters."
// We use indexOf to see if it contains certain words
tweet.indexOf("tweet");
//=> 10
tweet.indexOf("This");
//=> 0
tweet.indexOf("words");
//=> 32
tweet.indexOf("char");
//=> 56
tweet.indexOf("hello");
//=> -1
// note that indexOf is case-sensitive!
tweet.indexOf("Tweet");
//=> -1
So you’ll see that indexOf will search the tweet for a given word, and if the word appears as a substring the result will be bigger than –1. This allows us to remove the console.log statement and modify our code to do something like this:
function(stream) {
stream.on("data", function(tweet) {
if (tweet.indexOf("awesome") > -1) {
// increment the awesome counter
counts.awesome = counts.awesome + 1;
}
});
}
Using the setInterval function to schedule tasks
Without the console.log statement, how do we know if our code is working? One approach is to print out the counts every few seconds. That’s a bit more manageable than printing out every tweet that we see. To do this, we can add a call to the setInterval function at the bottom of our streaming code:
// print the awesome count every 3 seconds
setInterval(function () {
console.log("awesome: " + counts.awesome);
}, 3000);
Like the setTimeout function that we’ve used before, the setInterval function schedules a function to be called in the future. The difference is that it repeats the function call every time the number of milliseconds specified passes. So, in this case, the program logs the awesome count every three seconds.
If we’re just interested in counting the number of times the word awesome appears, our entire twitter.js file would look something like this:
var ntwitter = require("ntwitter"),
credentials = require("./credentials.json"),
twitter,
counts = {};
// set up our twitter object
twitter = ntwitter(credentials);
// initialize our counters
counts.awesome = 0;
twitter.stream(
"statuses/filter",
{ "track": ["awesome", "cool", "rad", "gnarly", "groovy"] },
function(stream) {
stream.on("data", function(tweet) {
if (tweet.indexOf("awesome") > -1) {
// increment the awesome counter
counts.awesome = counts.awesome + 1;
}
});
}
);
// print the awesome count every 3 seconds
setInterval(function () {
console.log("awesome: " + counts.awesome);
}, 3000);
Run this in your virtual machine by typing node tweet_counter.js to see it in action.
Modularizing Our Tweet Counter
Even though it’s great that we can see tweets appearing in the terminal window, it would be better if we could somehow connect our tweet counter with an HTTP server so we can display the counts in our web browser. There are two possible ways to do this. The first possibility involves creating a server inside our tweet counter code that generates the page. This is a perfectly reasonable solution for a beginner.
The second solution is to convert the tweet counter code into a module, and then import the module into a program that has an HTTP server (like our original server example). In this case, the second solution is better because it allows us to make the tweet counter code reusable in other projects. In fact, I would say this solution follows what is emerging as one of the core tenets of the Node.js philosophy: create small modules that do one thing and do it well.
How can we convert our tweet counter code into a module? It turns out it’s pretty easy. Every module has a special variable called module.exports that stores everything that we want to expose to the outside world. So in this case, we’d want to expose the counts object, which will be updated by the tweet_counter module as long as our program is running. At the bottom of the code in our tweet_counter.js we can simply add the following line to export the object:
module.exports = counts;
NOTE
Here, we’ve exported an object that contains several integers, but you can export any type of JavaScript object, including functions. In the practice section at the end of this chapter, I’ll give you a chance to make this module more usable by generalizing it so that it exports a function instead of an object.
Importing Our Module Into Express
Recall that our simple Express server looked something like this:
var express = require("express"),
http = require("http"),
app = express();
// configure the app to use the client directory for static files
app.use(express.static(__dirname + "/client"));
// create the server and have it listen
http.createServer(app).listen(3000);
// set up routes
app.get("/", function (req, res) {
res.send("Hello World!");
});
Now we’ll simply modify this code so that it imports our tweet counter module and uses the counts that we’ve exported, and we’ll return the counts to the browser as JSON:
var express = require("express"),
http = require("http"),
tweetCounts = require("./tweet_counter.js"),
app = express();
// configure the app to use the client directory for static files
app.use(express.static(__dirname + "/client"));
// create the server and have it listen
http.createServer(app).listen(3000);
// set up routes
app.get("/counts.json", function (req, res) {
// res.json returns the entire object as a JSON file
res.json(tweetCounts);
});
If we log in to our guest machine, we can enter the app directory and run the server with node app. When we do that, we’ll see the terminal print out the counts every three seconds, but now we can open up our browser and connect to localhost:3000/counts.json and we should see the JSON object returned to us!
How can we leverage the JSON object in our client code? With AJAX, of course!
Setting Up a Client
Let’s create a skeleton client that includes our usual index.html, styles/style.css, and javascripts/app.js files that we’ve become accustomed to programming on the client side. Either create them directly in the client directory, or create them elsewhere and use the cp command to copy them into the client directory. Run the server from your guest machine’s app directory:
vagrant $ node app.js
If you set up your javascripts/app.js file to print out hello world and go to localhost:3000/index.html in your browser, you should see the hello world printed to the JavaScript console as we have before.
If that works, let’s modify our client-side app.js file to get the counts.json object with a call to jQuery’s getJSON function:
var main = function () {
"use strict";
$.getJSON("/counts.json", function (wordCounts) {
// Now "wordCounts" will be the object that
// is returned by the counts.json route we
// set up in Express
console.log(wordCounts);
});
}
$(document).ready(main);
Now our call to getJSON is connecting to the counts.json route we set up in Express, which is returning the counts. If everything is wired up correctly, this should print out the counts object to the console. We can explore the object in the console by drilling down with the drop-down arrows. And if we reload the page, we’ll be able to see the updated values!
We can now modify our code to insert the counts into the DOM using jQuery’s DOM manipulation capabilities. Here’s a simple way to set this up:
var main = function () {
"use strict";
var insertCountsIntoDOM = function (counts) {
// your DOM manipulation code here
};
// notice that insertCountsIntoDOM gets called with
// the counts parameter when getJSON returns
$.getJSON("counts.json", insertCountsIntoDOM);
}
$(document).ready(main);
Why set it up this way? Because, this actually allows us to do something we did with the server-side code—we can use the setInterval function to dynamically update the page!
var main = function () {
"use strict";
var insertCountsIntoDOM = function (counts) {
// your DOM manipulation code here
};
// check the counts value every 5 seconds,
// and insert the updated version into the DOM
setInterval(function () {
$.getJSON("counts.json", insertCountsIntoDOM);
}, 5000);
}
$(document).ready(main);
I challenge you to play around with this code and really try to customize it and understand how it’s working. This is our first example of a full web application that has both a client and server component, where both are communicating via AJAX.
Creating a Server for Amazeriffic
If you worked through the last example in the previous chapter, you managed to get Amazeriffic handling a to-do list served by a JSON file instead of having it hardcoded into your program. We can take that code and, with a few minor modifications, keep the to-do list stored on the server. For this example, I’ll also get you started with Git so you can track your changes as you’re working through it.
Setting Up Our Directories
We’ll start by creating a directory inside our Chapter6/app directory that we’ll call Amazeriffic. Remember that it doesn’t matter if we do this on the host or the guest machine. Inside that directory, we’ll create a directory to store our client code. We’ll call it client and let’s copy the contents of our last Amazeriffic example from Chapter 5.
One important difference between this example and the example from Chapter 5 is that we’ll be storing our to-do list on the server. This means we will no longer need the todo.json file that stores the initial state of the to-do list. But because we’ll want to eventually copy the contents of that file into our server, it would be helpful to keep the file around with a different name. To rename a file from the command line we simply use the mv command, which stands for “move”:
hostname $ mv client/todos.json client/todos.OLD.json
Initializing a Git Repository
Next, we’ll initialize our Git repository to include the copied files. Remember, we interact with Git from our host machine. From here, I’ll let you decide the appropriate times to make commits:
hostname $ git init
Initialized empty Git repository ...
After that we can check the status of our repository and commit the client-side files as we’ve done in previous chapters. Now we can switch to our guest machine to install the Express module. Navigate to the Amazeriffic directory and type the following npm command:
vagrant $ pwd
/home/vagrant/app/Amazeriffic
vagrant $ npm install express
Building the Server
As it stands now, our app works perfectly fine under the assumption that the user never switches to another browser or another computer, and never reloads the page. Unfortunately, if the user does either of those things, she’ll lose all the to-do items that she’s created and will be back at square one.
We’ll solve this problem by storing our to-do list on the server, and initializing our client with the data stored on the server. To get started, we’ll create a to-do list in a variable on the server, and set up a JSON route that will return it:
var express = require("express"),
http = require("http"),
app = express(),
toDos = {
// set up todo list here by copying
// the content from todos.OLD.json
};
app.use(express.static(__dirname + "/client"));
http.createServer(app).listen(3000);
// This route takes the place of our
// todos.json file in our example from
// Chapter 5
app.get("todos.json", function (req, res) {
res.json(toDos);
});
Running the Server
Make sure you’re in your guest machine terminal and run app.js with Node:
vagrant $ node app.js
Once the app is running, we should be able to visit our app by opening Chrome and entering localhost:3000/index.html in the address bar! In fact, we should be able to simply type localhost:3000 into the address bar and the server will automatically route itself to index.html, which is typically considered the default page.
At this point, everything should work exactly as it did before, but we haven’t really solved either of our problems yet. That’s because our to-do list is being delivered by the server, but our client isn’t sending any updates yet. And we haven’t yet learned how to send information to the server when things get updated on the client.
Posting Information to the Server
Up until now, we’ve only had our client programs getting data from the server. This means our apps are only supporting one-way communication between the client and the server. To do this, we’ve relied on the getJSON function in jQuery. It turns out that jQuery has a function that allows us to just as easily send JSON to the server, but our server has to be prepared to accept it and do something with it.
The process of sending data from the client to the server over the HTTP protocol is called a post. We can start by setting up a post route in our Express server. The following example will set up a post route that simply prints a string out to the server terminal:
app.post("/todos", function (req, res) {
console.log("data has been posted to the server!");
// send back a simple object
res.json({"message":"You posted to the server!"});
});
It looks just like our get routes, except we’ve replaced the get function call with a post function call. In practice, the difference is that we can’t simply visit the route using our browser as we’ve done with the get routes. Instead, we need to modify our client-side JavaScript to post to the route to see the message. We’ll do that when the user clicks the Add button. Modify your client code so it looks like this:
// this is inside a main function
// where toDoObjects has been
// previously defined
$button.on("click", function () {
var description = $input.val(),
tags = $tagInput.val().split(",");
toDoObjects.push({"description":description, "tags":tags});
//here' we'll do a quick post to our todos route
$.post("todos", {}, function (response) {
// this callback is called with the server responds
console.log("We posted and the server responded!");
console.log(response);
});
// update toDos
toDos = toDoObjects.map(function (toDo) {
return toDo.description;
});
$input.val("");
$tagInput.val("");
});
The first argument to the $.post function is the route that we want to post to, the second is the data (represented as an object) that we want to send, and the third is the callback for the server response. At this point, our code should work exactly as it did before, only when we click the Add button, we’ll see the server print out a message on its console and the client will print out the server’s response.
So we’re part of the way there, but we haven’t actually sent a to-do item to the server yet. As I mentioned, the second argument to the post function is the object that gets sent to the server. It turns out that it’s pretty easy to change the empty object to our new to-do object, but we have to do a little more work on the server to make it usable.
The easiest way to do this is to use Express’s urlencoded plug-in, which will turn JSON sent by jQuery into a JavaScript object that the server can use:
var express = require("express"),
http = require("http"),
app = express()
toDos = {
// ...
};;
app.use(express.static(__dirname + "/client"));
// tell Express to parse incoming
// JSON objects
app.use(express.urlencoded());
app.post("/todos", function (req, res) {
// the object is now stored in req.body
var newToDo = req.body;
console.log(newToDo);
toDos.push(newToDo);
// send back a simple object
res.json({"message":"You posted to the server!"});
});
This iteration of the server will print the object to the server’s console when it is sent. After that, it will actually add the new to-do item to its list. Now a minor modification to our client app will actually send over the new to-do item:
$button.on("click", function () {
var description = $input.val(),
tags = $tagInput.val().split(","),
// create the new to-do item
newToDo = {"description":description, "tags":tags};
$.post("todos", newToDo, function (result) {
console.log(result);
// we'll wait to push the new object
// on the client until after the server
// returns
toDoObjects.push(newToDo);
// update toDos
toDos = toDoObjects.map(function (toDo) {
return toDo.description;
});
$input.val("");
$tagInput.val("");
});
});
This will send the new to-do item to the server and then print the server’s response message to the JavaScript console. After it does that, it will add the new toDo object to the client’s to-do list.
At this point, we can actually open up our app in two different browser windows, add to-do items in one of the browser windows, and reload it in the other to see the updated content!
Summary
In this chapter, we learned the basics of server-side programming using Node.js. Node.js is a platform that allows us to write servers in the JavaScript language. We commonly use it to write HTTP servers that communicate with our client applications that run in the browser.
Node.js programs are typically made up of many individual modules. We can create our own modules by writing some code and then attaching the parts we want to expose to the module.exports object. Afterward, we can import it into another program using the require function.
NPM is the Node.js Package Manager, which allows us to install Node.js modules that we didn’t write ourselves and aren’t included with the Node.js distribution. For example, we installed the Express module using NPM. Express is a wrapper around the Node.js http module that meets a lot of our common expectations of an HTTP server. Specifically, it allows us to easily serve our client-side HTML, CSS, and JavaScript files. It also lets us set up custom routes to server behaviors.
We used VirtualBox and Vagrant to set up a basic environment. These tools aren’t essential to understanding how web applications work, but they help bootstrap the development process. Additionally, they create a clear separation between the client (the browser running on our host machine) and the server (the Node.js program running on our guest machine).
Last but not least, we learned how to set up an HTTP post request using jQuery, and how to have our server respond to HTTP post requests through Express.
More Practice and Further Reading
Installing Node.js Locally
In this chapter, we installed Node on a virtual machine via Vagrant. One primary reason for doing this is that the Vagrant scripts also set up software that we’ll use in Chapter 7 and Chapter 8. It turns out, however, that installing Node.js on your local computer is very, very easy, and all of the examples in this chapter should work on your local machine with minimal changes. If you go to http://nodejs.org/download, you should be able to find installation packages for your platform.
It’s a good idea to give this a try. If you can get it set up on your host machine, you can globally install a few other tools that might be useful, including JSHint, CSS Lint, and an HTML5 validator.
JSHint and CSS Lint via NPM
In Chapter 4, we learned about JSLint, a code quality-control tool that tells us when our code is violating certain JavaScript best practices. We used the online tool available at http://jslint.com, which required us to cut and paste our code into the browser. If this hasn’t already become a problem for you, it definitely will as your code base grows.
It turns out that when we have Node.js installed on our local machine, we can use NPM to install other command-line tools that might come in handy, such as JSHint. JSHint is very similar to JSLint, and can be used to check your code. You’ll want to drop to the command line and install it with NPM. We use the -g option to tell NPM that we want to install this package globally. This makes jshint available as a standard command-line application, instead of installing it as a library in the local node_modules directory:
hostname $ sudo npm install jshint -g
NOTE
In Mac OS and Linux, we have to use sudo to install packages globally. This is not necessary in Windows.
Once we do that, we can run JSHint directly on our files. Consider the following file called test.js:
var main = function () {
console.log("hello world");
}
$(document).ready(main);
This code will, of course, run perfectly in the browser, but it’s missing a semicolon after the definition of the main function. JSHint will tell us that:
hostname $ jshint test.js
test.js: line 3, col 2, Missing semicolon.
1 error
If our code is in good shape, JSHint will not output anything. If we add the missing semicolon and run JSHint, we won’t see any response:
hostname $ jshint test.js
hostname $
Having JSHint installed on our machine makes it much easier to check our code quality for both server- and client-side code, so there’s no excuse not to do it! You’ll also find that JSHint is much more flexible, allowing you to easily set options from the command line. See the documentation at http://jshint.com/docs.
Similarly, NPM allows us to install and run CSS Lint from the command line, which makes it much easier to check our CSS for errors and bad practices:
hostname $ sudo npm install csslint -g
There are several options for HTML validators and linters as well. If you find yourself doing a lot more HTML, you may want to find one that suits your needs.
Generalizing Our Tweet Counter Code
Our tweet counter tracks an array of words on Twitter. In our code, however, we had to list out the words in several different places. For example, at the top of our tweet_counter.js file, we see the following:
counts.awesome = 0;
counts.cool = 0;
counts.rad = 0;
counts.gnarly = 0;
counts.groovy = 0;
And then, later, we see that we’ve told the ntwitter module to track those words:
{ "track": ["awesome", "cool", "rad", "gnarly", "groovy"] },
If you’ve already generalized the code, it’s possible that you did something similar to increment your counters:
if (tweet.indexOf("awesome") > -1) {
// increment the awesome counter
counts.awesome = counts.awesome + 1;
}
if (tweet.indexOf("cool") > -1) {
// increment the cool counter
counts.cool = counts.cool + 1;
}
Why is this a problem? If we want to add or remove words from our code, we have to modify the code in three places! How can we improve this? First, we can define the array in exactly one place: at the top of our tweet_counter module:
var trackedWords = ["awesome", "cool", "rad", "gnarly", "groovy"];
This allows us to use the variable when we create the Twitter counter:
{ "track": trackedWords };
To improve the rest of the code, we’ll use an awesome feature of JavaScript objects: the ability to use an object as a map data structure where the attributes are strings. It turns out that the following two approaches to indexing into an object are equivalent:
// this accesses the awesome counter
// using the dot operator
counts.awesome = 0;
counts.awesome = counts.awesome + 1;
// this accesses the awesome counter
// using a string
counts["awesome"] = 0;
counts["awesome"] = counts["awesome"] + 1;
Generally, it’s a good idea to stick with the dot operator, because JavaScript programmers tend to find that more readable (and JSLint will complain when you don’t). But the string-with-square-brackets approach has the advantage that we can use variables to access the values:
var word = "awesome";
counts[word] = 0;
counts[word] = counts[word] + 1;
Do you see where I’m going with this? Here’s an approach to initializing our counter object that only depends on the array:
// create an empty object
var counts = {};
trackedWords.forEach(function (word) {
counts[word] = 0;
});
This cycles through each word and initializes the count to 0. Similarly, we can update our code that checks to see if the tweet contains that word with a forEach loop! Once we do that, we can simply add or remove a word from our initial array and our entire app will be updated!
This makes our module a little more maintainable overall, but we can improve it even more. Imagine if instead of exporting the counts for specific tracked words, we allow the consumer of our module to decide which words should be tracked. For example, a consumer of our module might prefer to use it like this:
var tweetCounter = require("./tweet_counter.js"),
counts;
// this starts our tweetCounter with the specified
// words instead of the built-in word list
counts = tweetCounter(["hello", "world"]);
We can achieve this by exporting a function instead of the counts object:
var setUpTweetCounter = function (words) {
// set up the counts object
// and the ntwitter stream
// using the words array
// ...
// at the end, return the counts
return counts;
}
module.exports = setUpTweetCounter;
This makes our module way more flexible from the consumer’s perspective. A program that uses our module can decide which words should be tracked without ever looking at our code. Setting this up is a great exercise, so give it a try!
Poker API
Here’s a straightforward project that will give you practice creating an API using Express. Create an Express app that responds to a single post route: /hand. The route should accept an object that represents a poker hand, and then respond with a JSON object that specifies the best hand that it has. For example, if the following object gets posted:
[
{ "rank":"two", "suit":"spades" },
{ "rank":"four", "suit":"hearts" },
{ "rank":"two", "suit":"clubs" },
{ "rank":"king", "suit":"spades" },
{ "rank":"eight", "suit":"diamonds" }
]
Our API might respond like this, where we use the null reference (introduced in Chapter 5) to represent “no object”:
{
"handString":"Pair",
"error": null
}
In other words, in this example we’ve sent a valid hand (five cards) and the highest rank of the hand is a pair. We set the error property to null to signify that there is no error. Alternatively, if someone posts an invalid hand (for example, if it has invalid ranks or too many cards), we’ll set the handString to null and send back an error string:
{
"handString": null,
"error": "Invalid Card Hand!"
}
To facilitate this, we’ll want to package the functions we wrote in Chapter 5 as a Node.js module. To use it in our app, we’ll want to import it into our Express server like this:
var poker = require("./poker.js");
And then utilize functions like this:
var hand = [
{ "rank":"two", "suit":"spades" },
{ "rank":"four", "suit":"hearts" },
{ "rank":"two", "suit":"clubs" },
{ "rank":"king", "suit":"spades" },
{ "rank":"eight", "suit":"diamonds" }
]
var hasPair = poker.containsPair(hand);
//hasPair will be true now
How can we do this? We’ll create a poker object in our module definition with several functions:
var poker = {};
poker.containsPair = function (hand) {
// ... define the function
}
poker.containsThreeOfAKind = function (hand) {
// ... define the function
}
module.exports = poker;
Our poker module will have several internal functions that we won’t include in our exported object. For example, we’ll include the containsNTimes function inside our module, but we won’t export it:
var poker = {},
containsNTimes; // declare the function
// here we define our 'private' functions
// we don't add them to the poker object
containsNTimes = function (array, item, n) {
// ... define the function
};
poker.containsPair = function (hand) {
// ... use containsNTimes here
}
poker.containsThreeOfAKind = function (hand) {
// ... use containsNTimes here
}
// only export the poker-related functions
module.exports = poker;
We’ll want to include a few more functions that validate that the hand is actually a poker hand, and we may even want to include a function that returns an object as specified by the API. Then our route callback will essentially be a single line:
app.post("/hand", function (req, res) {
var result = poker.getHand(req.body.hand);
res.json(result);
});
To get this to work, you’ll need to write a client app that creates some hands and posts them to your server with jQuery. If you can make all of this happen, you’re really starting to get it!
All materials on the site are licensed Creative Commons Attribution-Sharealike 3.0 Unported CC BY-SA 3.0 & GNU Free Documentation License (GFDL)
If you are the copyright holder of any material contained on our site and intend to remove it, please contact our site administrator for approval.
© 2016-2026 All site design rights belong to S.Y.A.