Facebook All-in-One For Dummies, 2nd Edition (2014)
Book II. Connecting with Others
Chapter 4. Sharing Videos
In This Chapter
![]() Using video to encourage sharing
Using video to encourage sharing
![]() Uploading video to Facebook
Uploading video to Facebook
![]() Using apps to share your other video channels on Facebook
Using apps to share your other video channels on Facebook
![]() Making the most of your video efforts
Making the most of your video efforts
People on Facebook love video links! After all, the primary goals of Facebook are to connect with people and to share. Video is interesting and easily shared. Also, when you deal with people online primarily through text, sharing a bit of yourself through video allows you to connect with your friends or followers in a more personal way.
Facebook makes it easy for friends and followers to view video: They just click the video and watch it in their news feed. They don’t have to view a slideshow (as with images), and they don’t leave Facebook (as with clicking a link). Video allows you to interact with your friends and followers on their terms, without asking them to leave their Facebook news feed. When you make Facebook interaction easy for your friends and followers, Facebook rewards you by showing your updates in their news feeds more often. (Facebook uses something called the News Feed algorithm to weight your interactions in Facebook; for more about this algorithm, turn to Book V, Chapter 3.) Video is win-win!
This chapter explains how you can integrate video with your personal timeline as well as your business page. We show you how to shoot video right from your Facebook page, upload video from your computer, and integrate videos from other channels (such as YouTube or Vimeo). We also give you some tips on what kinds of video to share and how to produce great videos.
Benefits of Using Video
The goal of creating video and sharing it on Facebook is to have others also view and share your video content. You probably want all your content shared, but you really want video shared because it counts for so much in the News Feed algorithm.
Consider that the average number of friends a Facebook follower has is 229. When someone shares your video, that video has the potential to be seen by all the followers or friends of that person. When you consider the reach of just one person, you can imagine how a video could go viral quickly if it’s shared by several people.
 Not many people are using video on Facebook to its full potential. Right now is a great time to be the pioneer and draw people into your business page. Be the first in your niche to embrace it! You can shoot video anywhere and upload on-the-fly if you have your laptop or smartphone with you. It’s never been easier to be a roving reporter or share your latest event.
What kind of video should you share? That depends on your audience. Book V, Chapter 2 explains the importance of knowing your audience and giving them what they want — whether they want to solve a problem, learn something, be entertained, or more. Sharing video that gives your audience what they want is the best way to encourage sharing. Here are a few ideas for video to create and share:
· Showcase the best. Every week, you can showcase a specific product or service to your audience. Sometimes a video does a better job of showing off a product’s features than a photo.
· Conduct an interview. Whether you’re interviewing customers with testimonials or simply interviewing an expert in your niche, a video is much more interesting than a written transcript.
· Create a tutorial. Instructional videos are priceless. Many times written instructions are hard to follow, but a short video showing exactly how to do something is news you can use.
· Be funny. Most videos shared by friends and fans have one thing in common: They make us laugh. Sharing tutorials or interviews may appeal to part of your audience, but if you want to reach past your audience to their friends, you need to make them laugh. Not every video can be humorous, and that’s okay. Just don’t be afraid to try something new or step out of your comfort zone.
Another use of video is to connect with your friends and followers in a different way from standard text updates or shared links. If you have something to say fairly quickly, you can create a short video update right from your personal timeline or business page. Facebook video can be a little rough, but it is a quick way to share information with your friends and followers. If you’re interested in using a video on Facebook but aren’t sure what to discuss, here are a few ideas:
· Ask a short question to start a discussion. We’ve seen a few social media business pages do this — fans love it and respond with many comments! Start by asking a general question, briefly give your take on it, and open it up to your fans. You can ask multiple-choice questions, ask questions requiring a one-word answer, or ask about an experience. The goal is to cast a broad net to attract the most answers possible. We think you’ll find that people are intrigued by video questions.
· Give a concise answer to a frequently asked question. If you’re receiving the same question over and over, you may want to address it quickly on your business page with a video response. Or, on your personal timeline, you can provide updates to family members (because your most frequently asked question is probably what you’re up to personally).
· Promote an event or share highlights from past events. Offline events are a great way to make a personal connection with your fans. You can create a video invitation to your upcoming conference, book signing, workshop, open house — whatever you’re planning. If you have access to video-editing software, you can create a video that includes highlights from previous events, and then upload it to your business page to show fans how much fun they’ll have at your event. After your event, use your video-editing software to create and share another highlight reel showcasing your fans who attended (or some of your headlining talent).
· Show off your haul. Over the past few years, bloggers and vloggers (video bloggers) have started sharing their haul (deals they find while shopping). Rather than typing out where you found the deals, what you bought, and how you saved, you can create a video and show off your deal-snagging prowess (and your excitement).
Uploading Video to Facebook
More often than not, you want to share video that you didn’t take with Facebook’s video app. On Facebook, you can share video from just about any source: a video file from your computer, a video from another social media channel (such as YouTube), or even a video from your smartphone.
Loading a video directly into Facebook, especially for a business page, rather than sharing a link to a video that resides on another platform (such as YouTube), has two benefits:
· When you upload a video directly to your business page, Facebook places a link in the top-left corner of the video that encourages people to Like your business page. This link appears only when the user hovers the mouse cursor over the video and appears only to people who haven’t already Liked your page.
· You can tag others in your video if you’re uploading via your personal timeline. When someone is tagged, it shows up in the person's news feed and has the potential to be shared among multiple users.
Sharing video from your computer
First things first: To record a video on your computer, you must have a webcam.
Before you share video from your computer, check that the video is less than 1024MB and less than 20 minutes long. In addition, you must own the video (in other words, you or your friends made the video).
Whether you’re posting video to your personal timeline or your business page, you can customize the share setting to determine who sees your video in their news feed. To customize your share setting, click the down arrow next to the Post button.
Because business pages are public platforms, they have fewer customized sharing options.
Although you can limit which followers see your video in their news feed, anyone (follower or not) can visit your business page and click the Video link below your cover photo to see all the videos you’ve uploaded to your business page. If you have multiple applications or tabs, you may have to click the down arrow to find the video link.
Follow these instructions to upload a video file to your personal timeline or business page from your computer:
1. Navigate to your news feed or personal timeline and click the Photo link above the status update text box.
Facebook gives you two choices: Upload Photos/Video and Create Photo Album, as shown in Figure 4-1.
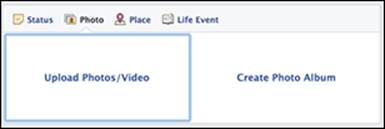
Figure 4-1: Upload your video.
2. Click Upload Photos/Video.
3. Type a short status update introducing your video.
4. Click the Browse button and find and select the video file you want to share.
5. (Optional) Use the toolbar to tag people in your video, assign a location to the video, and set your sharing preferences.
6. Click the Post button to publish the video.
Sharing video from your phone
You can share video from your smartphone in a few ways. We cover using the Facebook smartphone app here, but you can also check out Chapter 6 in this minibook for instructions on using Facebook’s mobile upload service.
The Facebook smartphone app doesn’t allow you to share video on your Facebook business page. You can share video only on your personal timeline.
An easy way to share video directly from your smartphone is to download the Facebook app from the application store associated with your brand of phone (such as App Store for iPhones or Android Play Store for Android phones).
When you have the Facebook app installed on your smartphone, follow these steps to take video with your phone and share it immediately on Facebook:
1. Open the Facebook application on your smartphone.
2. Navigate to your personal timeline.
3. Tap the Photo button.
Your photo gallery appears and you can select one or more photos or videos to upload directly. Facebook allows you to view only the selected photos, not the entire gallery.
4. To create a video to upload, tap the camera icon in the lower-left corner.
Facebook simplifies the interface by letting you choose to take a picture with the center camera icon or the video icon, which is in the lower-left corner. You can choose the front or back camera of your phone and adjust flash options.
5. Take a video as you normally would with your phone.
6. When you’ve finished recording, tap the Use button.
A new page appears with text boxes for Title and Description.
7. Tap inside the Title text box and type a title for your video.
The title appears next to your video in your news feed.
8. Tap the Description text box and type a description of your video.
The description appears as your status update above the video in your news feed.
9. Tap the Upload button in the top-right corner of the screen.
In a few moments, your video will appear in your news feed.
Sharing video from another social media channel
You won’t always want to create new video or share video from your computer. Instead, you may find videos to share via websites such as YouTube or Vimeo (two of the most popular video-sharing sites). This section explains how to share videos from those sites on your personal timeline and business page.
Sharing video from YouTube
When you find a video on YouTube that you’d like to share — maybe it’s one from your own YouTube channel or one you just found — you can share the video by following these steps:
1. Click the Share link below the video.
An expanded menu appears, as shown in Figure 4-2.
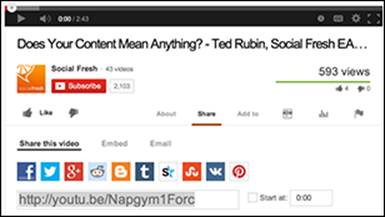
Figure 4-2: The expanded Share menu on YouTube.
2. Click the Facebook icon.
A new tab opens in your browser, as shown in Figure 4-3.
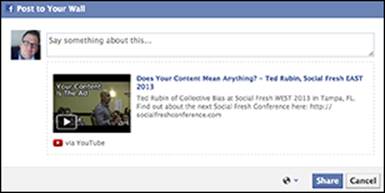
Figure 4-3: Sharing content is easy.
3. In the text box, type a status update to give the video context.
4. In the lower-right corner next to Share, use the privacy options to select who should see the video.
5. Click the Share button in the lower-right corner.
Sharing video from Vimeo
When you find a video on Vimeo that you want to share on Facebook, just follow these instructions:
1. Click the paper airplane (Share) icon to the right of the video, as shown in Figure 4-4.
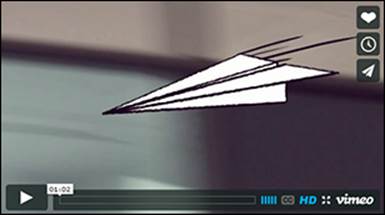
Figure 4-4: The Vimeo Share button.
2. In the Share this Video dialog box (see Figure 4-5), click the Facebook icon.
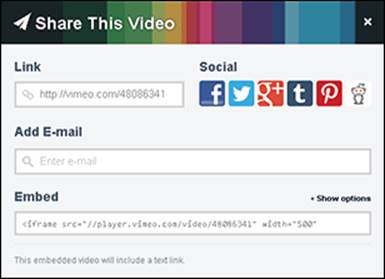
Figure 4-5: Sharing a Vimeo video.
3. In the text box, type a status update to give the video context.
4. Click the Share Link button in the lower-right corner.
Customizing Your Video
After you’ve shared a video and it’s out in the wild, you can let it run its course or you can customize a few aspects (such as tagging people in the video or editing the title. First, though, you need to find the video you’ve uploaded to your timeline or business page.
Finding your video on Facebook
To find a video you recently shared on your personal timeline or business page, you can look on your personal timeline or business page to see if it’s still visible. If it is, click the title of the video (which is probably something generic like the date and time you recorded the video). If you don’t see the video listed on your personal timeline or business page, you can follow these instructions to find it:
1. Go to your personal timeline or business page and click the Photos link under your cover image.
Your Photos page appears.
2. On the Photos page, click the Albums link, as shown in Figure 4-6.
The second album includes all the videos you have created, uploaded, or been tagged in.
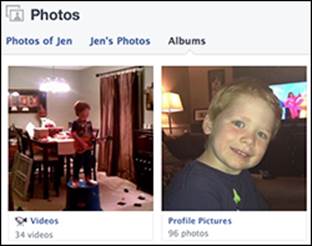
Figure 4-6: See all your videos to select one to edit.
3. Click the video you want to edit.
A page appears that lists the video and the editing features. See the next section, “Editing your video,” for instructions on customizing specific aspects of your video.
Editing your video
Facebook doesn’t currently offer full-fledged video-editing software. If you want control over frame-by-frame content or want to enhance a video with music or text, you need to do that with video-editing software on your computer, such as Final Cut Pro, Adobe Premiere, or iMovie.
When you click a video to edit it, regardless of whether you uploaded the video to your timeline or to your business page, you see a page similar to the one in Figure 4-7.
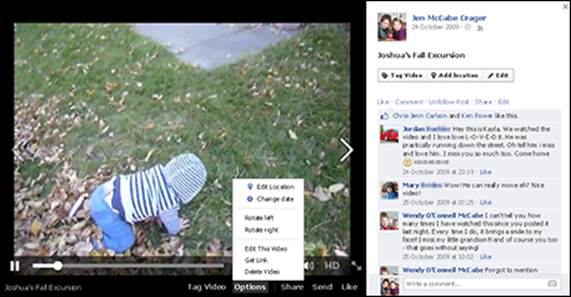
Figure 4-7: The video page looks the same for videos shared on your personal timeline or your business page.
The Facebook video page has the following options in the right sidebar:
· Tag Video button: Click the Tag Video button, and options appear in the top-right corner. Click the Who Were with You text box and type the name of the person or people you want to tag in the video. You also have the option of associating a location with your video (perhaps where the video was shot). Click the Where Was This Video Taken text box and type the city or country you want associated with your video.
 It’s spammy to tag people or pages that aren’t in your video or photo. If you posted this video to a business page, you can’t tag individual followers unless you’re connected with them via your personal timeline (in other words, you need to be Facebook friends with them).
· Add Location button: Add where the video was taken.
· Edit button: Click the Edit button to add or change the title of the video, add a description, tag people, add a location, or select a date.
· Like link and Comment link: On the right side of the page, you see a list of comments people have made about the video. You can respond to comments, delete comments, and Like or Unlike the video or comments.
· Follow/Unfollow Post link: When you post a video or comment on a video, the default setting is to receive notification when others comment or Like the video. If you don’t want a notification when people interact with your photo, click Unfollow Post. If you change your mind, return to the video and click Follow Post.
· Share link: Click the Share link and use the Share on Your Own Timeline drop-down list to choose where you’d like to share the video. You have the option of sharing this video on your personal timeline, on a friend’s personal timeline, in a group, on your business page (if you administer more than one business page, you’ll see a list of all the pages you’re affiliated with), or via a private message. After you choose where to share the video, type a short introduction of the video to give your audience context, and then click the Share Video button.
· Edit link: Click the Edit link to do the main customization of your video. The Edit Video page has the following options:
· In This Video: You can tag people in your video. Start typing the name of the person you want to tag and then choose them from the menu. You must be connected to the person via your personal timeline to tag them. You can tag other business pages whether you have Liked them or not.
· Title: Give your video a name. The default title is the date and time you recorded the video.
· Where: Type the location where you took the video.
· When: Type the date when you took the video.
· Description: Type an overview of what people can expect to see when they watch your video. Go ahead and use keywords in your paragraph if you can, especially if this video appears on your business page. Keywords will help others find your video.
· Privacy: If you’re posting the video to your personal timeline, you can determine who can see the video, using the Privacy drop-down list. If you’re posting the video on your business page, anyone can view the video. Your business page is not tied to your personal timeline privacy settings, and the video will be public.
· Choose a Thumbnail: Scroll through the optional thumbnail pictures (if available), and stop on the one you like.
· Save, Delete, or Cancel: If you click Save, your updates (title, description, tags, and so on) are saved. If you click Delete, your video is permanently deleted — no take-backs. If you click Cancel, your updates are not saved, and your video is still published to your timeline.
Below the video itself, you see the following options:
· Options: This button enables you to edit the location, change the date, rotate the video left or right, edit the video, embed the video, get the video link, and delete the video.
· Send: You can send the video as a private Facebook message to only selected people.
· Tag Video: Include your Facebook friends or those who were in the video.
· Share: Post the video to your timeline, a friend’s timeline, a group page, a business page you manage, or a private message.
· Like: Click to Like the video.
Using Facebook Apps to Share Video on Your Business Page
Business pages have an option not available to personal timelines: You can install Facebook applications. A Facebook application (or app) provides additional functionality for a business page. If your business already has a video channel established outside Facebook (for example, on YouTube), you can use a Facebook app to import your video library to your Facebook business page. Flip to Book VI, Chapter 1 for instructions on how to install a third-party Facebook app on your business page.
Facebook video applications are abundant. Here are three you might want to try:
· Hike (www.facebook.com/HikeSocialApps/app_190754877670914): With Hike, you can easily add YouTube and Vimeo videos to your Facebook page. You can add your entire channel quickly, saving you the work of embedding videos one at a time. Free, pro, and agency versions of the app are available.
· ShortStack’s video applet (www.shortstack.com): ShortStack offers free Facebook applications for up to 2,000 followers. (For the pricing structure when you have more than 2,000 followers, go to www.shortstack.com/pricing.) The ShortStack app allows you to automatically update your Facebook page with your YouTube or Vimeo playlists.
· Vocus (http://vocus.com): Vocus is a marketing and PR platform that includes social platform integration. The monthly fee ranges from $300 to $2500 per month based on the features you need. (See http://vocus.com/pricing/ for a full explanation of Vocus pricing.) Depending on the plan you choose, Vocus may include marketing campaigns, e-mail templates, landing pages, news releases, publicity alerts, content monitoring, local listings, analytics, and other services.
Producing Great Video Clips
Shooting good video takes practice. It would be great if we all had access to hair and makeup artists and professional videographers at our whim. Even without those people at your disposal, you can still ensure that the video you create is the best it can be. Here are a few tried-and-true tips:
· Have a script. Depending on what you want to accomplish, it’s almost always better to put some thought into what you’d like to say before you try to say it. You can write a complete script or just an outline.
· Keep practicing. As with everything, practice makes perfect. If you’re not comfortable in front of the camera, don’t give up. Film a few practice runs, and watch them. Make notes about what you want to change, and practice again. It may be uncomfortable in the beginning, but you’ll get used to it — and your video will improve.
· Slow your speech. A common mistake people make when recording video is speaking at their normal rate. Slow down a little. If you’re nervous, you’ll probably speak even faster than normal, so keep that in mind and consciously slow your speech. Remember, it’s okay to pause. That’s a normal part of speech.
· Consider your background. It’s possible you’ve stopped seeing that pile of laundry in the corner that you’re going to put away tomorrow, but we promise that your friends and fans will notice. Find a background that won’t distract from you and your message.
· Check your lighting. It’s a bummer when you nail the script but can’t see yourself because you forgot to do a test run to ensure that your lighting was bright enough.
· Film someplace quiet. Sometimes you become so used to background noise (kids, pets, the TV, even the heat or air conditioner running), you don’t hear it anymore. Unfortunately, your camera picks it up. Background noise is distracting, and in some cases, it can be louder than your own message.
· Use a tripod. Even if you’re a brain surgeon with super-steady hands, don’t try to hold the camera while you’re filming yourself. When you speak, you move as you gesticulate to enforce your point. Your video will suffer. Using a tripod ensures that your video will be smooth.