Facebook All-in-One For Dummies, 2nd Edition (2014)
Book II. Connecting with Others
Chapter 3. Sharing Photos
In This Chapter
![]() Uploading pictures to Facebook from your computer
Uploading pictures to Facebook from your computer
![]() Using Instagram with Facebook
Using Instagram with Facebook
![]() Attaching photos to your comments
Attaching photos to your comments
![]() Making albums to hold your photos
Making albums to hold your photos
![]() Knowing when and how to tag friends in your photos
Knowing when and how to tag friends in your photos
![]() Using applications to share photos on Facebook
Using applications to share photos on Facebook
It doesn’t take long to realize that photos and videos catch attention in your news feed more than simple text updates do. Because pictures stand out, they have a better chance of encouraging interaction (such as a Like, comment, or share). The more an individual interacts with your content, the more Facebook thinks that person wants to see your updates, and the more your updates appear in his or her news feed. (For more discussion on how Facebook determines what shows up in the news feed, see Book V, Chapter 3.)
In this chapter, we explain how to upload images to your personal timeline and your business page, how to create and edit photo albums, and how to tag people in the images you upload. We also introduce you to some third-party applications you can use on your smartphone to upload images to your timeline or business page.
Uploading Images from Your Computer
Facebook displays uploaded photos as a large photo if you upload a single image or a series of smaller photos if you upload several images at a time, as shown in Figure 3-1.
The instructions for uploading images to your personal timeline, a business page, or a photo album are essentially the same, with minor differences in the way the menu is labeled and the ability to tag people when uploading the image.
Photos appear in your news feed unless you customize your sharing options. When you post individual photos to your timeline or news feed without creating an album for them, an album called Timeline Photos is created for you.

Figure 3-1: Facebook displays your photos in the news feed.
If you want to upload photos to your business page, you need to navigate directly to your page and start from there. If you want to upload an image and have it associated with your personal timeline, you have a few options. You can
· Click the Add Photos/Video link at the top of your news feed page.
· Navigate to your timeline and click the Photo link above the status update text box.
· Navigate to your timeline and click the Photos link to the right of your personal information under your cover photo.
To upload your image via a regular status update (either on your personal timeline or a business page), follow these instructions:
1. Click the Add Photos/Video link above the status update text box.
Two choices appear. You can upload a photo from your computer or create a photo album.
2. Click the Upload Photos/Video link.
3. Click the Browse button and choose the file you want to upload to Facebook.
4. Type a status update related to your photo.
5. (Optional) Tag people, add a date and time, link a place, include what you are doing, and customize who will see your image by using the icons in the gray strip below your status update text box.
6. Click the Post button to publish your picture and status update in your news feed.
Your image is immediately shown in your news feed and placed in the Timeline Photos album. The people who can see your image are determined by your customizations in Step 5. Anyone you tag in the image will be able to see the image.
 You may want to use photo-editing software to manipulate your image before you upload it to Facebook. Some photo-editing software allows you to save your image for the web by pulling out extraneous digital information so that your image loads faster on a web page. Unfortunately, saving your images for the web may also cause them to appear grainy when you upload them to Facebook. Photos look their best on Facebook when you save them as .jpg files; other images, such as line art or cartoons, look best when saved as .png files.
Adding Photos with Instagram
Instagram is a free, popular photo-sharing application that can transform photos taken with a mobile device by adding a digital filter, creating unique looks as shown in Figure 3-2.
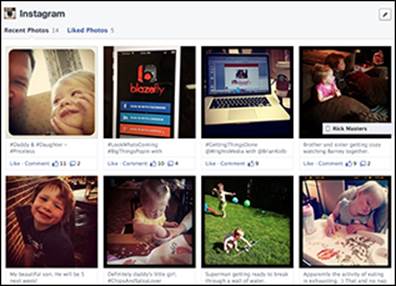
Figure 3-2: Instagram integrated with your Facebook profile.
You can integrate Instagram with Facebook in the following three ways:
· Add an Instagram Feed tab on your Facebook page. Statigram, which is available at http://statigr.am/instagram-promote, makes this process easy. You can display your Instagram feed, add a #hashtag feed, and do a whole lot more. Their Photo Gallery widget displays your Instagram photos on your blog or website.
· Add InstaTab to your page: InstaTab, which is available at www.facebook.com/instatabapp, is easy to set up. It enables users to click individual photos and engage with each one.
· Post directly to Facebook through the Instagram app. The Instagram app is available in the App Store and through Google Play. Simply take a picture on your mobile device or select one in your phone's gallery. Then choose the Share option and select Facebook. To allow Instagram access to your photos, you must connect it to your Facebook account.
Adding a Photo to Your Comments
You can add a photo to your comments, as shown in Figure 3-3. This feature enables you to respond to others not only with words but also with pictures. Include a photo to add humor or to tell a story without a lot of words.

Figure 3-3: Add a photo to your comments.
To add a photo, simply click the camera icon to the right in the comment section. A pop-up box appears, displaying the contents of your computer. Select the photo from the desired location and click Open.
Creating and Editing Albums
A friend's Great-Grandma Anna used to keep a scrapbook of all the photos she took around her farm. She had formal photos as well as impromptu and illusion photos where she had tried her hand at playing with depth of field to make it look like Grandpa Wayne was holding a pumpkin bigger than he was. All the photos went into an album — and those albums are in a box in a closet. Likewise, Jen has ten or so albums filled with her kids’ baby pictures in her closet. Sometimes those albums get pulled out of the closet, but not often. Let’s face it, printed photos and albums are passé: Just about everyone is taking photos with their digital cameras or smartphones, storing those photos on their computers, and sharing them with friends via sites like Facebook and Flickr (www.flickr.com) or personal blogs.
Digital albums are handy because you can access your photos any time and share them with friends and family (or the public at large), and they don’t take up valuable closet space. Facebook makes it fairly easy to create your own digital photo albums and share your memories (or the latest in your string of shenanigans) with whoever you like. What hasn’t changed is the need for organization; storing photos in specific albums on Facebook makes them easier to find later. In this section, we explain how Facebook sorts your photos into albums, and how you can create new albums and control the privacy of those albums.
Any time you upload a photo, Facebook places that photo into an album. Which album your photo ends up in depends on how you uploaded and used the image:
· When you upload an image directly to your timeline via a status update, Facebook puts the photo in the Timeline Photos album.
· When you want a picture to be part of a specific album, you can upload the photo directly to that album or, if the album doesn’t already exist, create an album.
· When you share a picture from your phone or other mobile device, Facebook puts the photo in the Mobile Uploads album. See Chapter 6 of this minibook for information on making regular updates with your mobile device.
You can create as many Facebook albums as you want, and you can upload about 1000 images into an album before Facebook considers it full and automatically creates a new album for you (you can edit the new album’s name and privacy).
To create an album, you can start from one of two places:
· Click the Photo link above your status update text box and choose Create Photo Album, as shown in Figure 3-4. This option works for both personal timelines and business pages.
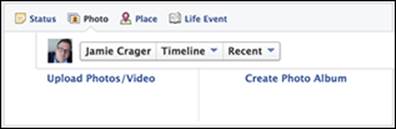
Figure 3-4: Click the Photo link above your status update box.
· Click the Photos link under your cover photo, as shown in Figure 3-5, and then click the +Create Album button in the top-right corner of the page. This option is available only for your personal timeline.
Regardless of your starting point, after you select your first photo from your desktop, the photo album window appears, as shown in Figure 3-6.

Figure 3-5: Click the Photos link under your cover photo.
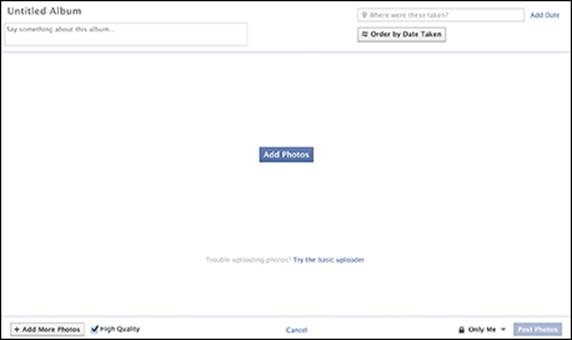
Figure 3-6: The photo album creation window.
When the photos start uploading, you see the status of your upload (the upload status bar disappears when your images are fully loaded). When your images are loaded, they appear similar to Figure 3-7.
Next, follow these steps:
1. Type the information you want to include in the album.
Type the name of the album, the description, the location, and the date. You can also customize the information associated with the photo (as opposed to the album). You can include a comment, tag people, set the date and time the photo was taken, and even provide additional location information.
If you type the name of an existing album, your photos are placed in a new album with the same name rather than in the existing album. To place photos in a specific album, see the instructions in the later section “Uploading new photos to an existing album.”
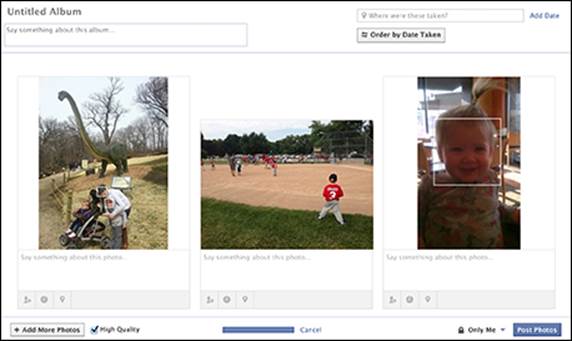
Figure 3-7: After your new images are uploaded, you can tag them, comment on them, or assign a location.
2. If you want to arrange the photos in the album so they appear in chronological order or reverse chronological order, click Order by Date Taken.
3. If you want to upload more photos to this album, click the +Add More Photos button in the lower-left corner.
4. If you want to upload the best version of an image, make sure that the High Quality check box is selected.
Note that the image may take longer to upload. If you don't select High Quality, your image may appear grainy. (If you have a poor image to begin with, it will likely still look poor when you upload it to Facebook.)
5. Set the album's privacy by using the share drop-down list in the lower-right corner.
You can choose Public, Friends, Only Me, or Custom. Note that this option isn’t available for business pages.
6. Click the Post Photos button.
The Album page appears. From here, you can view the photos in your album or edit your album.
To edit an album, go to your personal timeline or your business page and click the Photos link under your cover photo. On the Photos page that appears, click the Albums link at the top. Then click the picture or title of the album you want to edit, and click the Edit button in the upper-right corner.
The Edit Album page offers editing several options:
· Album Name: You can change the name of the album by deleting the old name and typing a new one. This option is available for both personal timeline and business page albums.
· Where: Change the location associated with your album or refine it even more. For example, if you assigned a state location to an album (say, New York), you could change it to reflect the city (New York City), a part of the city (Manhattan), or even a specific location (Dylan’s Candy Bar). This option is available for both personal timeline and business page albums.
· Date: Assign a year and month to your album. You can add a specific date by clicking the +Add Day link. This option is available for only personal timeline albums.
· Description: You can add or change the description of your album here. This option is available for both personal timeline and business page albums.
· Privacy: Use the drop-down list to customize your privacy settings for this album. Remember that anyone tagged in a photo that resides in the album can see the photo. This option is available for only personal timeline albums.
· Edit Photos: Move your cursor over the picture, and click the arrow that appears in the upper-right corner. A drop-down menu appears with the following options: Move to Other Album, Make Album Cover, and Delete the Photo. These options are available for both personal timeline and business page albums.
· Album Contributors: Add people who are allowed to upload photos to the album and edit information.
When you have finished, click Done to save your changes.
Uploading new photos to an existing album
Photo albums are rarely static, and you probably want to add to them over time. No problem! After you create an album, it’s easy to add more pictures to it. Just follow these steps:
1. Navigate to your personal timeline or business page and click the Photos link under your cover photo.
2. Click the Albums link, and then click the album to which you want to add pictures.
You’re taken to a page for that album that shows all the photos included in that album.
3. Click the Add Photos button in the top-right corner.
The Upload Photos pop-up window appears.
4. Choose the photo(s) you want to upload to your album, and then click Open.
The Upload Photos dialog box reappears and shows the status of your upload. While you’re waiting for your photos to upload, you can edit the information as stated earlier in this chapter.
5. If your pictures have a recognizable face, click anywhere in the picture to tag a friend.
6. Click the Post Photos button.
The album page reappears and shows all the pictures in that album, including the ones you just uploaded.
 Note that you won’t see the Add Photos button in the following albums:
· Timeline Photos: Photos appear in this album only when you post them directly to your personal timeline or business page via a status update.
· Mobile Uploads: Photos appear in this album only when you upload them from your mobile device.
· Cover Photos: This album holds only photos you’ve used as cover photos. (See Book I, Chapter 2 for instructions on how to set your cover photo.)
· Profile Pictures: This album holds only photos you’ve used as your personal profile picture. (See Book I, Chapter 2 for instructions on how to set your profile picture.)
· Some third-party app albums: If you’re using a mobile app such as Instagram, you won’t be able to manually add pictures to those albums.
If you move your cursor over an album, you can see its pictures without clicking into it.
Moving photos from one album to another
To move a photo from one album to another, navigate to your personal timeline or business page. Then click the Photos link under your cover photo to go to your Albums page. From there, just follow these steps to move your photos from one album to another:
1. Click the album in which the picture currently resides.
A page appears displaying all the pictures in that album.
2. Either click the Edit button in the upper-right corner or the pencil icon that appears when you move your cursor over a photo.
Note: The Profile Pictures and Cover Photos albums don’t offer the Edit button option.
3. If you clicked the Edit button, mouse over the picture and click the arrow in the upper-right corner.
4. Select the Move to Other Album link.
A new page appears, similar to the one shown in Figure 3-8. Note: You will see a message alerting you only if the picture you are moving is part of a post.
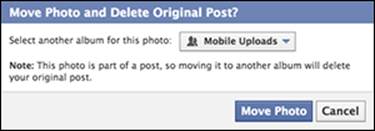
Figure 3-8: You can move photos from one album to another.
5. Click the Move To drop-down list under the picture you want to move, and then select the album to which you want to move the picture.
6. Click the Move Photo button.
The Album page for the original album appears, but the picture you moved is gone. To see the picture, click the Albums link. On the Albums page that appears, click the album to which you moved the picture.
Editing privacy settings for albums
Privacy is a big issue, especially when it comes to pictures and video. (See Book I, Chapter 4 for a further discussion of online privacy and how you can protect yourself and others.) You can customize not only the overall privacy settings for your Facebook account but also the privacy for individual photo albums in your personal timeline (business page albums are automatically public). First navigate to your timeline, and then follow these steps:
1. Click the Photos link under your cover photo.
The Photos page appears.
2. Select the Albums link.
3. Click the sharing icon to display the drop-down list shown in Figure 3-9, and choose who can see your albums.
You can choose a general category or list, such as Public or Friends. For finer control, choose Custom and make your selections in the Custom Privacy dialog box that appears.

Figure 3-9: Determine who can or can’t see your pictures.
4. (Optional) Select an option from the Custom drop-down list, type the name of the people or lists you want to hide the album from in the Hide This From text box, and click Save Changes.
 When you’re sharing pictures on Facebook, be aware of the following:
· Only the album owner can change the privacy settings. You’re in charge of your albums, regardless of who you share them with. And if someone shares an album that contains your picture, that person controls who sees it, not you.
· Although you can’t change the privacy settings for the Mobile Uploads album, you can change the privacy settings for each picture within that album.
To change the privacy for the individual pictures in the Mobile Uploads album, click the album, and then click the picture you want to work with. The photo viewer appears with that picture, as shown in Figure 3-10. From the sharing drop-down list, select a privacy setting.
· If you share an album or a picture with others, they can download those pictures to their computers. If you don’t want people to save or share a particular photo (say, if you are doing something questionable or embarrassing), you probably shouldn’t upload the photo to Facebook (or anywhere online, for that matter).
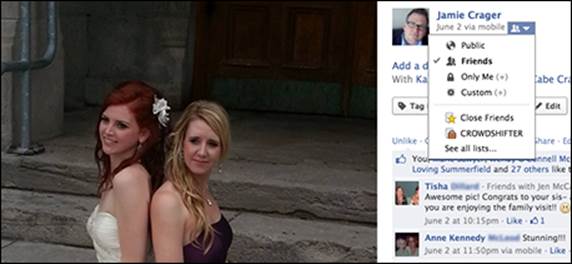
Figure 3-10: Control who sees your pictures.
Editing Pictures
Facebook doesn’t currently offer the options of full-fledged photo-editing software. If you want control over removing red-eye, enhancing color, or cropping an image, you need to do that with photo-editing software on your computer, such as Adobe Photoshop, Photoshop Elements, or GIMP (free at http://gimp.org). However, Facebook does enable you to do basic edits such as tagging people in a photo, adding a location tag or date to your photo, and rotating your photo.
To find the picture you want to edit, navigate to your personal timeline or business page, and click the Photos link to view your album, photo, and video page. The albums you’ve created are at the top of the page. You can click any of these to work with a specific photo you’ve uploaded, or if you scroll down a bit more, you’ll see photos and video in which you’ve been tagged (uploaded by others).
Find and click the picture you want to edit. The picture appears in the photo viewer. Mouse over the image to reveal the options shown in Figure 3-11.
The Facebook photo viewer page has the following options along the bottom of the screen:
· Tag Photo: You can tag people in photos, videos, and status updates. Tagging is like labeling your photo with the names of people who appear in the picture. When you tag people, the photo shows up in their news feed, and they are alerted that you’ve uploaded a picture of them. To tag someone in your picture, click the Tag Photo button, and then click the person’s face. A box appears where you clicked, along with a menu. Type the name of the person you want to tag. You can repeat the process for each person in the picture, if you want.
Figure 3-11: The photo viewer shows pictures full size and allows you to make several edits.
If you posted the picture to a business page, you can’t tag individuals unless the two of you are Facebook friends.
 It’s considered bad form to tag people or business pages that aren’t in your photo. Although Facebook is a social platform, not everyone has the same ideas about how to share on Facebook. You may be fine with others tagging you in photos; others may find it to be an invasion of personal privacy.
Jamie has one friend who scanned in high school senior pictures of people and invited them to tag themselves (few did). We’re glad the friend who uploaded the photos didn’t tag them herself, but we might go one step further and suggest that if the picture doesn't show you, ask permission before posting it. Not everyone likes to share everything.
Finally, there’s the issue of spamming. When you tag someone who isn’t relevant to your picture (for example, a Facebook friend who isn’t pictured or a business page that doesn’t relate to your image), you’re spamming them — and no one likes to be spammed.
· Options: You can edit the location, change the date, rotate the picture left or right, download the image, make it a profile picture, make it a cover photo, get the image link, move to another album, and delete the photo.
When you remove a tagged photo from your personal timeline or business page, the photo is not removed from Facebook. The picture is still visible via the person who posted it originally.
· Share: When you upload a photo, it appears in your news feed. However, you may want to share a picture again later or share it with a wider audience. Click the Share button, and use the drop-down list to choose where you’d like to share the photo. You have the option of sharing this photo on your timeline, on a friend’s timeline, in a group, on your business page (if you administer more than one business page, you see a list of all the pages with which you’re affiliated), or via private message. When you’ve chosen where to share the photo, type a short introduction for the image to give your audience context, and click the Share Photo button.
· Send: You can send the photo as a private Facebook message, so only the people you sent it to can see it.
· Like/Unlike: If you want to Like or Unlike your photo, click this button or the link under the photo description.
The top of the right column shows who shared the photo, when they shared it, and how it was posted. Below the photo of the person who shared the photo, you see the photo's caption, followed by the names of everyone tagged in the photo.
Next are the following three buttons:
· Tag Photo: This button, which is the same as the Tag Photo button under the photo, enables you to tag or add your friends to the picture.
· Add Location: You have the option of associating a location with your photo. Click this option and type the city or country you want associated with your picture in the Where Was This Photo Taken text box. Click Done Editing to save your changes.
· Edit: This button allows you to change the description of the photo, tag people who were with you, and set the location of where you took the photo. Just click in the text box that appears; start typing a description, someone’s name, or the location; and then click the Save button.Note: You see this button only if you are looking at your photos. If someone has tagged you, you will not see the Edit button or link.
Next in the right column are options to Like, Comment, Unfollow Post, Share, and Edit.
You also have the option to Report/Remove Tag or Send [Original Poster] a message. If you think someone has tagged you unnecessarily in a photo just to get your attention (that is, you’re not really in the picture), you can click the Options link under the photo, and then select Report/Remove Tag to mark the image as spam and report it to Facebook or to untag yourself. When you click this link, a dialog box appears, as shown in Figure 3-12. Select the radio button next to the issue(s) you want to report, click the Continue button, and follow the directions. If you accidentally click this link, just click Cancel.
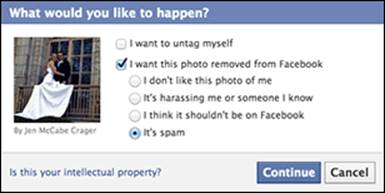
Figure 3-12: Report and remove offensive or spammy photos.
When someone else shares a picture of you and tags you in it, you can click it to edit it, but you’ll find that you have limited options because the photo doesn’t belong to you — it belongs to whoever shared it. Figure 3-13 shows what a shared photo looks like when you click it.
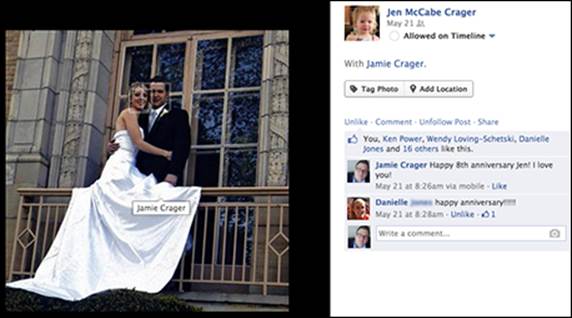
Figure 3-13: You can’t fully edit pictures uploaded by someone else.
Using Smartphone Apps to Share Photos
You won't always be sitting at your computer when you want to upload photos to Facebook. Sometimes you’re out and about, and you want to share what you’re doing or document an event you’re attending. Luckily, several applications for your smartphone are available that enable you to take a picture and share it directly on Facebook. A few you may want to consider are
· Instagram (http://instagr.am/; free): This app allows you to take a picture and choose among several filters to apply before you share the photo. Instagram is one of the most popular photo apps for sharing pictures on Facebook.
· GLMPS (http://glmps.com/; free): This innovative camera app is currently available only for the iPhone. What makes it stand out from the other apps is that it takes a few seconds of video before it snaps the picture, giving you a better idea of the moment you captured in the picture.
· Camera+ (http://campl.us/; $1.99): This iPhone app provides a lot of bang for just two bucks. You can set the exposure and focus separately, choose among four shooting modes (including stabilizer and timer), and use the onscreen grid to ensure your photos aren’t crooked. When you’re finished with the shot, share it on Facebook, Twitter, or Flickr.
And, of course, you can download the Facebook app for your smartphone. The Facebook app allows you to take photos, write updates associated with your photos, tag people, and post everything right from your smartphone. (For more information about using mobile Facebook, check out Chapter 6 in this minibook.)
All materials on the site are licensed Creative Commons Attribution-Sharealike 3.0 Unported CC BY-SA 3.0 & GNU Free Documentation License (GFDL)
If you are the copyright holder of any material contained on our site and intend to remove it, please contact our site administrator for approval.
© 2016-2026 All site design rights belong to S.Y.A.