Facebook All-in-One For Dummies, 2nd Edition (2014)
Book II. Connecting with Others
Chapter 6. Going Mobile
In This Chapter
![]() Using the Facebook smartphone app
Using the Facebook smartphone app
![]() Using the Facebook mobile website
Using the Facebook mobile website
![]() Using Facebook on simple mobile phones
Using Facebook on simple mobile phones
![]() Checking in
Checking in
The capability to go mobile is certainly a big reason why Facebook has experienced such success. Take Facebook with you to capture parts of your life and share it with family and friends. Picture this: You’re at a ball game, you catch a fly ball (we’ve seen it on TV so we know it happens), and you want to share that excitement with your friends. What do you do? You share it on Facebook — not just a status update but also a picture of the ball as visual proof of your story.
Facebook also has implemented Location Services into the mobile experience. That’s where Facebook uses GPS and other services to note where you are in an update, if you allow it to. With Location Services on, you can check in to venues and tag that place on your update. In this chapter, we talk about what Facebook is like when you go mobile.
 Location Services allows apps on your phone to use cellular, Wi-Fi, and Global Positioning System (GPS) data to identify your approximate location — as long as these settings on your smartphone are turned on and connected to their respective networks. The information is always collected anonymously, and your personal information is not used or identified. Using Location Services with Facebook allows Facebook to associate a location with your update and enables you to search for events or places in your area.
Going Mobile
Many Facebook features that you’re accustomed to on your full-screen computer browser can be accessed through the mobile site or a mobile app on your smartphone. The site has been reformatted to fit the phone’s screen, and you use touchscreen features in most cases. Facebook is a little different in your mobile browser or smartphone app, but it’s still familiar.
You can not only update statuses, share photos, and more but also take advantage of Location Services, present in many smartphones. So although you give up some features in the standard Facebook site, you gain other features. Furthermore, most phones have cameras, so you can easily share a little piece of every experience you have by snapping a shot and sending it directly to Facebook.
Going mobile is a great way to enjoy Facebook. As Facebook continues to improve its mobile site and apps, it enables you to access more features that previously were limited to only the desktop version of the site. As shown in Figure 6-1, Facebook mobile allows you to access the search feature, your personal timeline and business page, your news feed (just as you would see it on your desktop), all your groups, and chat services.
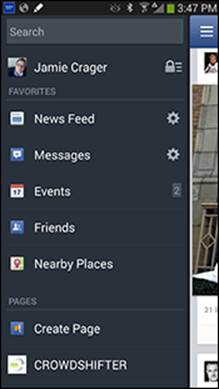
Figure 6-1: Accessing Facebook on a smartphone.
Using the Facebook Smartphone App
 Because many different smartphones are available, the Facebook app on your phone may look different from the screenshots you see in this chapter, and it may have some different features as well. (We used the Facebook Android app on the Note 3 to capture the images in this chapter.)
Features of the smartphone app
Here’s a rundown of the major features of the smartphone app:
· News feed: When you first open your Facebook app, the default screen is the news feed, shown in Figure 6-2. The news feed displays the full status updates of your friends, similar to the desktop view.
To view your news feed by top stories or most recent stories, select the navigation menu in the top-left corner, tap the gear icon next to the news feed, and make your choice from the menu that appears.
As you browse your mobile news feed, you see previews of pictures, along with the option to Like or comment on an update. You also see a note of how many comments or Likes a post has received.
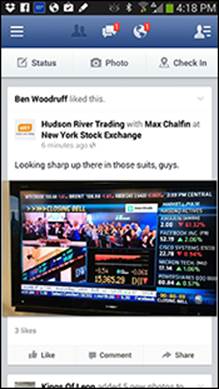
Figure 6-2: The news feed on the smartphone app.
· Likes and comments: If you want to interact with a post, you have several options:
· To immediately Like the post, tap the Like link.
· To leave a comment, tap the Comment link. The Comment screen appears, as shown in Figure 6-3. Type your comment and then tap the Post button.
· To see the entire thread of comments related to a post, tap the Comments link (or tap the comment bubble at the bottom of the post). You also have the option to type a comment and join the conversation, as shown in the Write a Comment area at the bottom of Figure 6-4.
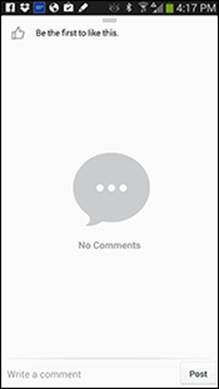
Figure 6-3: A Facebook comment text box on the Note 3.
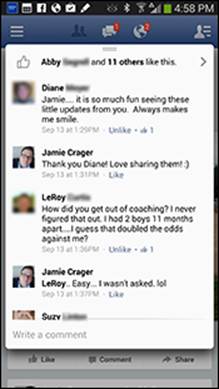
Figure 6-4: Comment thread on a Note 3.
· Left sidebar: Tap the navigation icon at the top left of your screen (it looks like three stacked lines) to view the left sidebar. You will then be able to sort the news feed; access messages; view events; visit your friends’ pages; find nearby places; see updates from your pages, lists, groups, and those you are following; and see the apps that you have installed. You can also access App Settings, Account Settings, Privacy Settings, and Code Generator; edit your favorites; report a problem; visit Help Center; and log out.
· Notifications: All your notifications appear at the top of the screen, similar to what you see on the top right of your desktop screen. If you have a notification, a red badge appears on one of the following icons:
· Friend requests: The silhouette of two heads indicates you have a pending friend request. Tap the icon to respond to this friend request.
· Messages: The chat boxes indicate you have a message in your inbox. Tap this icon to go to your inbox. (You can access your inbox from the left sidebar as well.) Then, to start a private message with a friend, tap the messages icon (the cartoon bubbles) in the upper-right corner and select your friend from the list on the right.
· General notifications: The globe tells you that you have general notifications, such as someone Liking a post, commenting on a post, or inviting you to an event. Tap this icon to see a list of your most recent notifications.
· Status updates: You can create a mobile status update from the news feed screen or your personal timeline. If you’re looking at your main news feed, find the Status, Photo, and Check In buttons at the top of the screen. Then:
· To write a text update, tap the Status button and begin typing in the text box that appears. You can tag others with you, share where you are, take a picture, add an icon that indicates what you are doing, and customize your sharing options for this update.
· To share a photo or video, tap the Photo button. Tap the Take Photo or Video button to begin shooting, or tap the Choose From Library button to select a photo or video you’ve already captured.
· To select a place near you, tap the Check In button. (We cover the Places feature at the end of the chapter.) If you need to add a new place, start typing the name of the place in the Search text box. If the place doesn’t appear as you type, you can add it by tapping the AddPlace Name option, as shown in Figure 6-5.
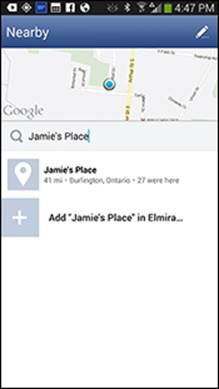
Figure 6-5: Adding a place.
Updating your status on the Facebook app
To post a status update using the Facebook app, follow these steps:
1. Tap Status.
The Write Post screen appears, as shown in Figure 6-6.
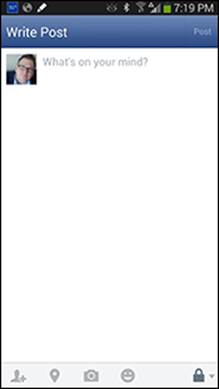
Figure 6-6: The Update Status screen.
2. Begin typing what you'd like to share.
3. If you want to tag a friend in your status update:
1. Tap the friend icon.
The friend icon looks like a silhouette with a plus sign. A screen appears with a list of friends in alphabetical order.
2. Use the search text box at the top to type a name.
Facebook also provides a list of all your friends, with suggested friends near the top.
3. Select the name or names from the suggested list.
4. Tap Done to return to your update or post.
4. If you want to indicate your location (check in):
1. Tap the pushpin icon.
2. Type your location in the search bar or select it from the recommended locations below the search bar. (If your location doesn't appear, tap the Add Your Location option.)
5. If you want to add a photo or video:
1. Tap the camera icon.
2. Select the photo or photos from your gallery by tapping the check mark in the upper-right corner of each photo.
You can also tag people in the photos you select.
3. Tap the pen icon in the lower-right corner.
You see your photo or photos in your status update box.
6. If you want to add a What Are You Doing icon:
1. Tap the happy face icon to open a list.
2. Select a category and then choose a subcategory.
3. Select the subcategory.
7. If you want to select the audience for your update:
1. Tap the privacy icon in the lower-right corner.
2. In the list that appears, select whether to make your update public, to share only with friends, or to be more selective.
The icon changes after you update this setting.
8. Tap the Post button to share your update.
You can post only as yourself when using the mobile Facebook app; you can’t post as your business page (see Book IV, Chapter 2 for a full explanation of how to use Facebook as yourself or as your business page). That means if you post an update to your business page from your mobile device, you’re posting as you, not as your business page. As a result, your fans won’t see your updates unless they are friends with your personal timeline on Facebook.
Understanding the limitations of the Facebook app
The limitations of mobile apps grow fewer and fewer as the capabilities of mobile devices increase. The main limitation is a smartphone’s smaller screen size, which changes the way you use the functions of Facebook. And because touchscreen devices are common, the way you interact with the application is different.
Finally, iOS (the iPhone, iPod touch, and iPad operating systems) and the Android operating system are the most popular smartphone and tablet OSes. If your mobile phone doesn't use one of these operating systems, it might have fewer features because less development attention is paid to less popular mobile operating systems.
Accessing Facebook on a Smartphone or Tablet
Facebook’s mobile website is called Facebook Touch Mobile. The look and functionality of the Facebook mobile website (not the smartphone app) differs little from one mobile device to the next because much of the user interface is built into the website, not the device’s operating system. With the mobile site, Facebook detects what browser you’re using and loads the compatible version of the mobile site.
To access Facebook Touch Mobile, simply open your (touchscreen) mobile device’s browser and type touch.facebook.com. Your browser is automatically detected and the mobile site loads. Figure 6-7 shows a Facebook business page using the Facebook Touch Mobile site on an Android phone. This site looks similar on iPhone devices as well.
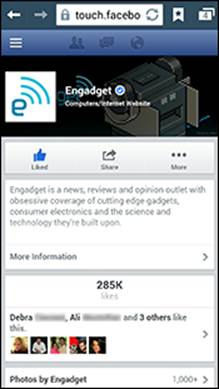
Figure 6-7: A timeline on Facebook Mobile (shown on an Android phone).
When you comment on other people’s photos using the Facebook Touch Mobile site, the appearance is slightly different than on the Facebook app.
Using Facebook on a Cellphone
If you want to go mobile but don’t have a smartphone, you can still post Facebook updates using text messages on a regular cellphone. With Facebook’s text-based services, you can
· Update your status
· Add a friend by name or phone number
· Subscribe to someone’s status for mobile updates
· Unsubscribe from someone’s status updates
· Upload photos
All these features are performed by texting the appropriate code to Facebook’s short code 32665 (which spells FBOOK on your alphanumeric phone keypad).
 Unless you have unlimited texts with your cellphone plan, keep in mind that text messaging rates apply to texts you send to Facebook. Don’t end up with a huge cellphone bill next month because you texted a few hundred status updates, photos, and such.
Setting up your Facebook account to accept text messages
To be able to use Facebook via SMS (that is, text messages), you first have to set up your mobile phone with your Facebook account. To do so, follow these steps:
1. Log in to Facebook.
2. Click the gear icon and choose Account Settings.
The General Account Settings page appears.
3. In the left sidebar, click the Mobile link.
The Mobile Settings page appears, so you can add your mobile phone to your Facebook account.
4. Click the button to add a phone to your account.
If prompted to add your password, do so.
5. Select your country and carrier, and then click Next.
6. When prompted, text the letter F to 32665 from your phone.
The Activate Facebook Texts dialog box appears, as shown in Figure 6-8, asking for the confirmation code. You should receive a text message with that code within a few minutes.
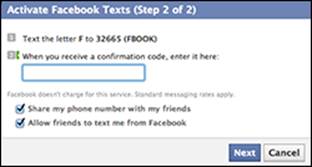
Figure 6-8: Enter the confirmation code.
7. Enter the confirmation code, and then click Next.
You have completed the process of enabling Facebook SMS messages for your phone.
Updating your status via text
After you confirm your cellphone number with Facebook, you can use Facebook SMS features to keep your friends up-do-date and vice versa, no matter what kind of mobile phone you have. Here’s how:
· To update your status, text the status to 32665 from your mobile phone.
· To add a friend, text the name of your friend (for example, John Smith) or your friend’s phone number to 32665.
· To subscribe to a friend’s updates so that they come directly to your phone as text messages, text Subscribe and your friend’s name (for example, Subscribe Jane Smith) to 32665. Text Unsubscribe along with the friend's name to cancel the friend’s updates.
· To stop SMS updates, text Stop to 32665.
After you've added your mobile phone number to your account, your number appears on the info page of your timeline. This information enables friends to send you text messages via Facebook messages. (Discover more about messages in Chapter 8 of this minibook).
If you don’t want your Facebook friends to have access to your mobile number via Facebook, simply disable the setting. As you can see in Figure 6-9, two check boxes allow friends to send you text messages and to share your number with friends. Deselect these check boxes to keep your mobile number private.
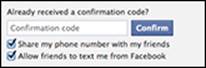
Figure 6-9: Allow (or restrict) texts from friends via Facebook.
Changing your mobile number
If you need to change the mobile number associated with your account, click the gear icon and choose Account Settings. Click Mobile, and then click the Remove link next to your mobile number on the Mobile Settings page. After doing this, you need to go through the setup process to add a new phone number, as described in the earlier section, “Setting up your Facebook account to accept text messages.”
Using your cellphone to text pictures and posts to Facebook
If you want to text (send) pictures to Facebook from a simple cellphone, you can do so by sending a text (MMS) message. To do this, text photos to 32665, and you will receive a message telling you the e-mail address to send pictures to. If your mobile plan and phone support picture mail, you can send a message to an e-mail address in the same way you would text to another phone number. When you text a picture to the Facebook e-mail address, Facebook updates your status with the photo that you included in your message.
Checking In to Places
When you are out and about, Facebook Places allows you to check in to a physical location (for instance, a restaurant) with your mobile phone. Your check-in becomes a status update in the news feed, with location information telling your friends where you are. Places is a social utility to connect with friends who work, live, or study around you. Because people use Facebook to connect with others, Places is a way to connect with others in real life while also connecting on Facebook.
To use Places, you need to enable Location Services on your smartphone so that Facebook can search for places near you based on your GPS location. Places allows you to see other people who have checked in to that location, as well as tag friends who are with you at that time. Being tagged in Places by a friend is much like being mentioned in a status update.
Using Places to connect
Facebook places are locations listed in Facebook where people can post an update that they are there, or comment and find out who else has checked in to that location. In some cases, a business may have merged their Places listing with their business page, which makes the place and the business page one and the same. In this case, when you check in at that business, your update will link to the business page.
Have you ever gone to a concert or sporting event, only to find out later that your friends were there as well? With Facebook Places, you can connect in real time with friends who choose to check in to Places.
Recently, Jamie went to a football game and checked in via Facebook Places. As he checked in, he discovered a friend had checked in as well! Although thousands of people were at the game, Places allowed Jamie to discover friends who were there.
You can use Places on an iPhone or on Android devices, as well as using the browser of any web-enabled mobile device. The examples in the following sections use the mobile version of Facebook. The iPhone and Android apps may look a little different, but most of the functionality is the same.
Using Location Services
To use Facebook Places, you can access the function from your smartphone (using GPS or Location Services), or you can access it from your computer (such as a laptop while you’re at a location). To access Places with a mobile device, you need a smartphone to access the full mobile browser capabilities. You must enable Location Services so that Facebook can access your phone’s location and find places near you. The first time you use Places, you see a screen asking you to allow Facebook permission to access Location Services.
Finding your place
When you’re at a location where you'd like to check in, pull out your mobile phone and open Facebook. (You can open Facebook through your phone’s browser or use the Facebook app.) Tap the Status button at the top of the screen. A box appears, where you can enter your status.
To check in to a location on your smartphone, follow these steps:
1. Tap the check-in icon (the pushpin) at the top of the Facebook app.
Alternatively, you can tap Check In on the opening screen of your mobile app.
2. A list of nearby places appears, as shown in Figure 6-10; select the appropriate Place.
If you don’t see the place in the list, search for it by name. If the place isn’t already in your Places list, you see the option to add it.
If you're using one of Facebook’s official apps (on an iPhone or an Android device), what you see on the device may look a little different than the screen in Figure 6-10.
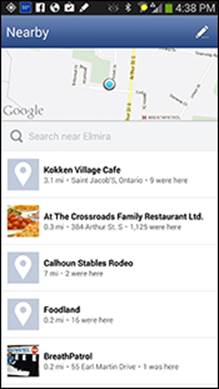
Figure 6-10: Checking in to a location.
3. Enter your status.
After you select the place and add a status update, that place becomes a link in your status update.
4. (Optional) Tag friends who are with you as follows:
1. Tap the add friends icon (the silhouette with a plus sign) below the Post text box.
2. Type your friends’ names or select their names from the list.
3. Tap Done.
When you tag friends, Facebook links to their timelines in your update and indicates that they are with you where you checked in. If they’re already using Places, it will be as if they checked in without having to do anything. Tagging a friend will appear in your check-in details, as well as on your friends’ timelines.
If you accidentally tag the wrong person, you can remove the tag by deleting the person's name or by tapping the check mark that appears next to his or her name.
5. Click Post.
Finding friends on Places
You can find out who else is on Places in two ways:
· Check into a place and seeing who is already there and has checked in.
· Look at recent check-ins from your friends after clicking Places from your home screen.
You can adjust the privacy settings each time you check into a place to customize who can see your check-in.