Facebook All-in-One For Dummies, 2nd Edition (2014)
Book II. Connecting with Others
Chapter 7. Keeping Up with Events
In This Chapter
![]() Finding events on Facebook
Finding events on Facebook
![]() Creating your own events
Creating your own events
![]() Privacy settings for events
Privacy settings for events
![]() Using Facebook to promote events
Using Facebook to promote events
Facebook is a great tool for connecting with your friends and finding out what they’re doing. And with Facebook events, you can plan and promote an occasion, invite friends, and then see who has declined and who is planning to attend.
Planning and keeping track of events in life can be challenging. Facebook makes it simple to set up small events, such as a dinner party for six, or a large event, such as a concert you're promoting beyond your own network. Facebook makes it easy to see what events you’re attending and who else is going. You can even coordinate events with popular online calendars such as Google Calendar or Mac’s iCal.
What makes Facebook events so great is their integration with other Facebook activities. Users can share with friends and comment on events to which they are invited. Public events appear in your news feed, so you have the opportunity to let your friends know what’s going on. Your friends then have a link to find out more, share information, include pictures, and join the event. If you want to get the word out about your event, friends that RSVP to the event can invite their friends on Facebook, too!
In this chapter, we show you how to use Facebook to manage all the events you're attending, RSVP to events, and interact with friends on the events screen. We also show you how you can use Facebook events to create your own events and promote them to friends and beyond.
Introducing Events
Events are an easy way to interact with others. To plan an event in Facebook, you need to understand how people discover events in Facebook. When an event is created and you invite people, they see it in two areas:
· In their notifications (see Figure 7-1)
· In the Favorites section on the left side of the news feed
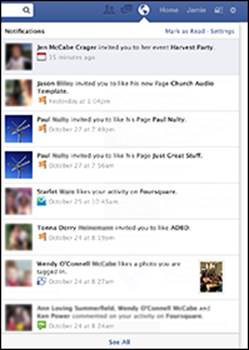
Figure 7-1: Event notifications.
Notifications for event invitations are mixed in with other notifications, so if you don’t pay close attention to notifications, you might miss one. Keep in mind that the situation is the same for your friends.
Events describe the time, place, and details about the gathering, and also list the attendees. The great thing about the virtual world is that the event place can be anywhere. For example, if you're planning a worldwide “hug a puppy” day, a Facebook event is the ideal way to do so. People that respond to the event invitation are shown as attending. They can post links, pictures, and videos, as well as share the event and invite others. When people join an event, they’re notified any time someone posts something in the group. A Facebook event can be a way to bring people together, even if they’re not actually physically close together.
Understanding Events Basics
The Facebook events feature enables you to do a lot more than just send out invitations. You can
· Create an event
· Define the details and location
· Share the event as a status update
· Share pictures, links, and videos on the event's home page
· Make the event private or public
· See what events are going on now and later
· RSVP for events and see who else is attending
· Synchronize Facebook events with your online calendar (such as iCal or Google Calendar)
The Events section is below the Favorites category, in the left sidebar of your news feed. Click Events and you’ll see the current events to which you've been invited (as well as the birthdays of your friends). You can view events in a list view or a calendar view. You can also join the event (RSVP), decline the event, or send a Maybe response from here. Click any event to go directly to that event's home page, where you can see specific information.
Getting the lay of the land
As shown in Figure 7-2, a Facebook event has a concise layout that enables you to see all the basic details of the event and interact with those invited to the event.
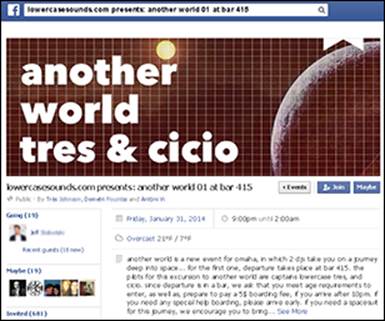
Figure 7-2: An event's home page.
An event's home page displays the following details:
· Picture: When creating an event, you can upload a picture, too.
· Time, location, created by: Be sure to include basic information such as when the event starts and its location. When you create an event, the page includes a link so people can click directly to your Facebook personal timeline or to a business page.
· More information: Part of an effectively planned event is explaining what the event is, why you’re hosting it, and any other relevant information attendees may find useful.
· The event wall: This feature is a great way for the invitees to share with each other. You (and attendees) can post links, videos, photos, and any text post that you want, which is shared with all invitees.
· Edit Event and Message Guests buttons: Visible only to the event creator, the Edit Event and Message Guests buttons enable you to make changes to the event and send a message to everyone that has RSVP'd, respectively.
· +Join, Maybe, and Decline buttons: If you’re not the creator of an event, these buttons appear at the top right of an event's home page. Click Join if you will be attending the event; click Maybe if you’re not sure; and click Decline if you will not attend the event. When you click Join or Maybe, you may have the option to invite more friends if the event creator has enabled that option. If you click Decline, you can write a post on the wall with your regrets (remember that the event wall is public). Or you can click Skip if you’d rather not leave a note. If you change your mind about your RSVP, you can click the Going button at the top of the page and change your RSVP status.
Kinds of events
You can plan, promote, and host an unlimited variety of gatherings by using Facebook events. Events fall into two categories:
· Public events: If your event is at a public venue and anyone is welcome to attend, make it a public event. With public events, anyone can find the event and add themselves to the guest list. Concerts, rallies, festivals, and town meetings are all ideal as public events. You can tell whether an event is public simply by looking at the event's home page. The title of the event at the top of the screen will say that it is a public event (refer to Figure 7-1). You also have the option to invite friends, share the event via your personal timeline, and RSVP to the event.
· Private events: Private events are for private parties where the attendance is by invitation only. Private events can be seen only by those who are on the invitation list, and they do not appear in search and results. When an event is private, you see Invite Only below the event title, as shown in Figure 7-3. Some great uses of the private events function are private birthday parties, business meetings, and weddings. If you’re planning to surprise someone and are organizing the plan on Facebook, make the event private. The administrator (creator) of a private event can allow users to invite others in the Event Settings screen or limit this function to the event administrator only.
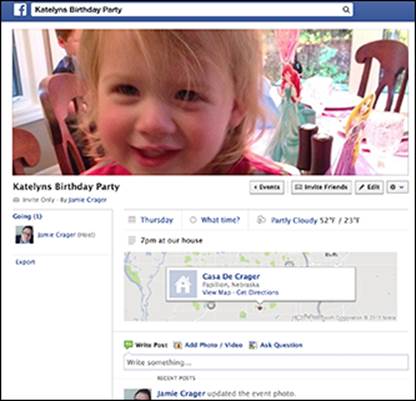
Figure 7-3: A private event.
Later in the chapter, we explain how to create these sorts of events and establish event permissions as public or private.
Finding and Interacting with Events
If you’re looking for something to do this weekend, Facebook events might be the place to go. Maybe you’re searching for concerts in your area or something fun for the kids. Perhaps you just want to see how your friends are planning their day or weekend. You can use the Event search function for all these reasons.
 Some people may make their event public, but not necessarily because it's truly a public occasion. One reason why people might make an event public is so people they forgot to put on the guest list can still find the event.
Searching events
To find an event you’ve been invited to, start on your main news feed page. If you've recently been invited to any events, you see these in the Favorites section on the left side of your home page, as shown in Figure 7-4. You can see upcoming events also in the upper-right corner of the news feed page, just below the top navigation, as shown in Figure 7-5.
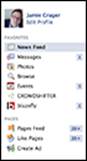
Figure 7-4: Events you’re invited to appear on the left side.
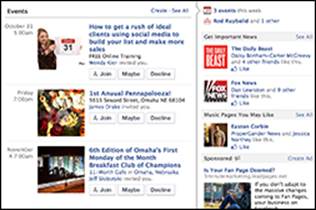
Figure 7-5: Events you’re invited to appear also on the right.
Below your profile picture on your home page is an Events link. This link takes you to the page where you can view all events that are in your event list, including invitations and events to which you have sent an RSVP.
When you click the Events link, you see an additional option, Friends’ Events. This option enables you to see all upcoming public events created by your friends, organized into three groups:
· Today
· This Week
· This Month
These events include events that your friends are going to, even if you are not friends with the event creator. Click the title of any event to find out details and RSVP to the event.
RSVP to an event
When you're invited to an event, you receive a notification indicating that your friend has invited you. That event invitation also appears in your events list.
You can respond to an event in three simple ways. On your home screen, click the Events link below your profile picture to go to the events page. You see any events to which you've been invited. Then do one of the following:
· To the right of the event, click Join, Maybe, or Decline to RSVP.
· Click the Invites button at the top of the page. The Event Invites page appears, as shown in Figure 7-6. Click Join, Maybe, or Decline. Or if you want to see more information about the event, click the title of the event.
· Click the event title to go directly to the event's description. Click Join, Maybe, or Decline to RSVP. When you decline an invitation, you have the option to ignore future invitations from this sender.
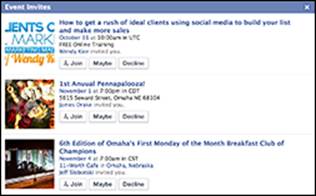
Figure 7-6: Event invites.
On the events page, if you move your mouse cursor over the event title in calendar view without clicking, you'll see some details about the event, as well as options to RSVP.
Checking out who is attending the event
Face it, the cool factor is important for most people. Who wants to go to a party if no one awesome is going to be there? To better plan your appearances, you can see who has already stated that they’re attending an event. The left sidebar of an event's home page lists the people who have submitted their RSVP to the event, as shown in Figure 7-7.
As long as the guest list has been made public, you can see who responded as Going, Maybe, and Invited. If the administrator has chosen to not show the guest list on the event's home page, you can’t see who is attending.

Figure 7-7: Those that have RSVP'd to an event.
Interacting on the event wall
The event wall enables you to connect with others on the guest list before and even after the event. You can write on the event wall after you accept the invite (join the event). If you don’t accept the invite, you can only comment on updates from other people, as shown in Figure 7-8.
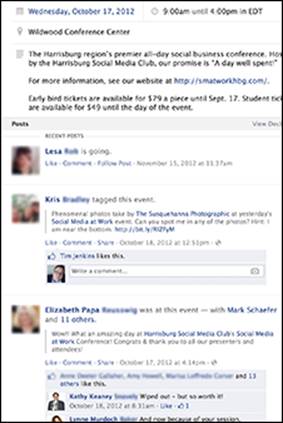
Figure 7-8: Interacting on an event wall.
Synchronizing Events and Birthdays with Your Online Calendar
If you’re like us, you’ve grown to depend on the mobile calendar on your smartphone or the iCal, Microsoft Outlook, or Google Calendar that you access on your computer. If you’re going to take your Facebook events and birthdays seriously, synchronizing your calendar is a must.
You can synchronize events and birthdays with your calendars in three ways:
· Sync a single event by e-mail
· Sync a single event by downloading the calendar file
· Sync all your Facebook events by subscribing to the calendar feed
 You may find it valuable to synchronize all events if you’re close with all the people you connect with on Facebook, or if you like to see what’s going on at a glance from your online calendar. Some people like to have all their friends’ birthdays in their calendar, and this is a great way to do that. You’ll never miss a birthday again.
If you prefer to be more selective with what goes on your calendar, you may feel that a single appointment here and there is all you'll need to transfer. You can do this easily, too.
Synchronizing all your events
To synchronize all your events on Facebook with your other calendars, follow these steps:
1. Click the Events link below your profile picture to go to the events page.
2. Click the gear icon in the upper-right corner, next to the Today button, and choose Export, as shown in Figure 7-9.

Figure 7-9: Export events to other calendars.
3. Select the Export Your Friends’ Birthdays link or the Upcoming Events link (see Figure 7-10).
If you’re using iCal or Microsoft Outlook, clicking the link opens that calendar tool, displays a URL link, and asks you to confirm that you’re subscribing to the calendar. If you're using an online calendar, such as Google Calendar, you need to copy the URL link and enter it in your calendar.
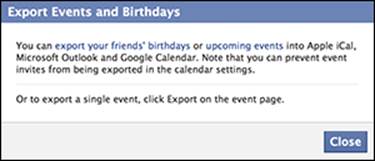
Figure 7-10: The Export Events and Birthdays dialog box.
4. Click Subscribe to sync your Facebook events and birthdays with your calendar.
Synchronizing a single event
To synchronize a single event to your calendar, do the following:
1. Navigate to the events page.
2. Click the Export link at the bottom of the left sidebar, or click the gear icon in the upper-right corner and select Export Event.
The Export Event dialog box appears.
3. Choose whether to save the event to your calendar or have the event e-mailed to you.
You can select from any of the e-mail addresses you have associated with your Facebook account.
4. Do one of the following:
· If you chose to save the event to your calendar: Click Export. The event will be downloaded to your Downloads folder. Select the file to open the event in your Calendar, and then click Save.
· If you chose to have the event e-mailed to you: You'll receive a calendar invite by e-mail. Click Add to Calendar in the e-mail message.
You can also choose to Subscribe to all upcoming events on your calendar by clicking the link at the bottom of the Export Event dialog box.
Creating an Event
To create your own event, you need to provide basic information about the event. In just a few minutes, you can tell all your friends the what, where, and when of the event.
To create an event and fill in the details, follow these steps:
1. Navigate to the events page, and click the +Create an Event button, in the top right.
The Create New Event dialog box appears, as shown in Figure 7-11.
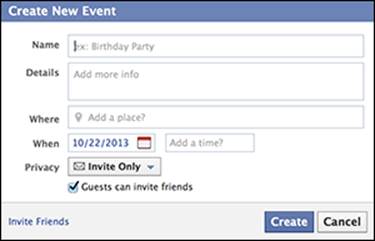
Figure 7-11: Create your event and fill in all the details.
2. In the Name text box, type a name for the event.
3. In the Details text box, type the details of the event.
You might tell your guests what to wear (casual or black tie, for example), what to expect, or what to bring (a dish if you’re hosting a potluck, for example). You can type anything you want in the Details text box.
4. In the Where text box, type the meeting place.
Typing in this text box starts a search for places with that name. You can type the name of a place (such as Meadowbrook Country Club), or you can type the address of the venue.
5. In the When text box, click the calendar icon and choose the date of your event.
6. In the Add a Time text box, type the time of your event.
7. Make a selection in the Privacy drop-down list:
· Public: Public events are open for everyone to see and anyone can RSVP. In addition, public events show up in search results. People who visit the public event’s home page can leave comments on the event wall, including uploading pictures, links, and videos. Note: You can comment on other people’s updates if you have not accepted the invite. You can leave a status update only if you joined the event.
· Friends of Guests: Invited guests can invite other people to whom you may not be connected. The event won't be seen by those who are not on the guest list, but anyone on the guest list can add others to the guest list.
· Invite Only: Only people you invite can view and join the event.
8. If you want to allow guests to invite friends, select the Guests Can Invite Friends check box.
9. Click the Invite Friends link at the bottom left.
The Invite Friends dialog box appears.
10. Select the check boxes next to the friends you’re inviting, and then click Save.
Facebook sends the selected friends a notification that you have invited them to the event.
11. Click the Create button.
You see the event's home page again.
For any event that you want to promote and get others to promote, be sure to make it a public event so that it can be found and shared by others. Doing this may open up the opportunity for people to share the event and help you to promote it.
Adding a picture to your event
An event picture is not required, but it sure helps, especially if you want to get people excited about your event. A good picture can help describe the event (see Figure 7-12).
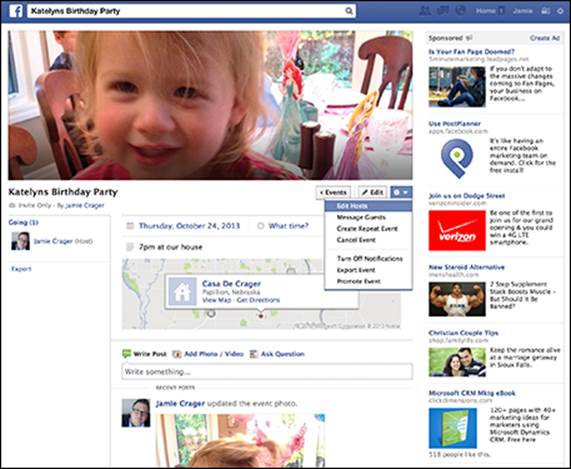
Figure 7-12: Add an event photo.
To upload a picture for your event, navigate to your event's home page and follow these steps:
1. Click the Add Event Photo button, at the top right.
The Add Event Photo dialog box appears.
2. Choose one of the following:
· From My Photos: Click the picture you want to add.
· Upload a Photo: Locate the photo and then click Open.
3. To make changes, move your cursor over the photo (at any time) to display the Change Event Photo button. Select that button and make your changes.
You can choose another photo, reposition the photo, and remove it.
Inviting friends
When you invite friends, you can send them a basic invitation or you can send them a personal message explaining what the event is and why you want them to come. You can invite friends when creating the event or after the event is created. Guests can also invite friends if you allow them to do so.
To invite friends to an event, follow these steps:
1. When you’re creating an event, click the Invite Friends link.
Note: If you’re inviting guests to an event after it has been created, whether you’re the event creator or just on the guest list, click the Invite Friends button at the top right of the event’s home page.
The Invite Friends dialog box appears, as shown in Figure 7-13.
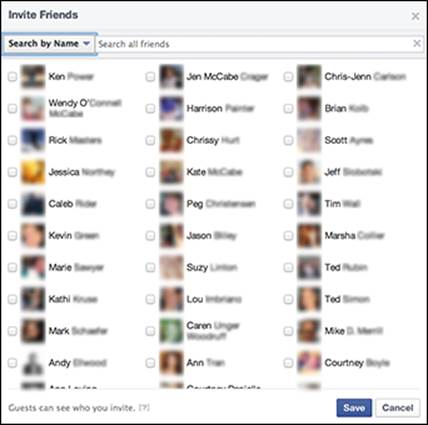
Figure 7-13: Select the check box next to people you'd like to meet.
2. Select the check box that appears next to each profile picture for each friend you want to invite.
Use the Search by Name drop-down list to search for friends. As you type, the list of friends narrows to match the name you’re typing.
You can use the list also to invite entire lists, groups, and attendees of other event pages.
3. Click the Save button.
Your invitations have been sent!
Making changes to an event
If you would like to turn off the display of the guest list for a public or a private event, click the Edit button (below the event Photo) and deselect the Show Guest List check box. You might deselect this option when you don’t want the guest list to be public information prior to the event. Or you might deselect this option for an event in which you don’t want people to decide whether to go based on the guest list.
Click the gear icon in the upper-right corner of the event's home page to display the following settings:
· Edit Hosts: Add or delete the event's hosts.
· Message Guests: Send a message to specific guests or all guests.
· Create Repeat Event: Create a new event with the same details of the current event.
· Stop Notifications: Turn on or off event notifications.
· Export Event: Export the event to a calendar or send it to an e-mail address.
· Promote Event: Promote the event through a Facebook ad.
Promoting Events on Facebook
The features described in this chapter are designed to make it easier to promote events. With as many event invitations that people send out, it can be easy to miss or gloss over events that don’t catch your attention. Here are some simple best practices that can help you make a Facebook event more successful:
· Make sure your event is public, so it's easy for people to see the event or find it in a search.
· Give the event a name that makes it clear why someone would want to come to the event. For example, if the event is a concert, be sure to include the name of the artists. It also helps to include the city name so that people searching for local events can find it.
· Share the event in your status update with a link to the event's home page. That gives people an additional place to find out about the event if they didn’t see an invitation. You can do this by copying the link from your browser when you’re on the event's home page. Better yet, just click Share at the top of the event's home page!
· Send out messages to guests with updates about the upcoming event. Getting people more involved before the event makes a big difference. Just be sure you don't send too many updates.
· Post pictures and videos on the event wall. These notifications will go to everyone on the guest list. Pictures get a lot of clicks because they’re eye-catching and engaging.
· Send a personal message to a few people you know and ask them if they can help you share your event.
· Only invite people who you know would be interested in your event. For instance, if you’re holding a local event, just invite your local friends (unless you know an out-of-towner will be visiting). Many people stop checking their event invitations simply because so many are irrelevant to them.
· Use Facebook ads. Click the gear icon in the upper-right corner and select the Promote Event link. Then follow the instructions on the Advertise on Facebook page.
All materials on the site are licensed Creative Commons Attribution-Sharealike 3.0 Unported CC BY-SA 3.0 & GNU Free Documentation License (GFDL)
If you are the copyright holder of any material contained on our site and intend to remove it, please contact our site administrator for approval.
© 2016-2026 All site design rights belong to S.Y.A.