Facebook All-in-One For Dummies, 2nd Edition (2014)
Book III. Connecting to Other Social Media
Chapter 2. Connecting Facebook to Everything Else
In This Chapter
![]() Understanding the basics of Facebook Platform
Understanding the basics of Facebook Platform
![]() Connecting your Twitter account to Facebook
Connecting your Twitter account to Facebook
![]() Using Facebook badges
Using Facebook badges
![]() Integrating Facebook into all your marketing efforts
Integrating Facebook into all your marketing efforts
Facebook is a lot more than a place for status updates. It offers fantastic ways for people to connect with friends and for businesses to connect with customers while they enjoy all the features of Facebook across the web. This chapter introduces the ways that you can connect your personal timeline and business page in the areas of your choosing. We explain how to integrate Facebook with Twitter, add social-sharing tools to your website and blog, and add a social networking element to your offline marketing activities.
Understanding the Basics of Facebook Platform
Developers are provided with a set of tools globally called Facebook Platform. Facebook Platform refers to the API (Application Programming Interface) that developers use to connect a website or app to Facebook. Any time you use Facebook to log in to a site or you click the Like button on a website, the website owner has used Facebook Platform to provide these features in the website.
Facebook Platform is used in many ways; in the context of websites, it is often called Facebook for Websites. Facebook for Websites allows you to enjoy all the social features of Facebook while maintaining the safety features that prevent your data from being accessed maliciously. Facebook offers several options to website and app developers to make your experience on the web more social.
Facebook for Websites enables you to sign in to other sites or online services using your Facebook e-mail login and password and automatically take your Facebook profile information to your favorite sites. Because of Facebook’s tremendous popularity, it’s common to find sites and applications that have utilized Facebook for Websites, simplifying your online activity. For example, if you use Pinterest, you can log in using Facebook — you don’t have to make another user profile to create a Pinterest account.
Many of the sites using Facebook for Websites require you to give them permission to access certain information in your timeline or business page, as shown in Figure 2-1. Facebook describes this function as an application (or app) and requires you to give the app specific permission to access your timeline or page.
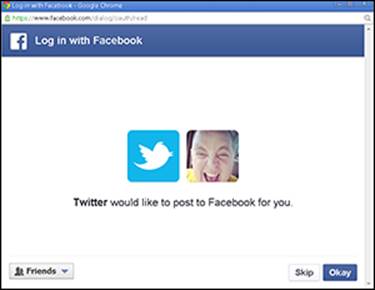
Figure 2-1: Apps request permission to access your timeline or page.
The information that the app accesses is normally just what it needs for the function and purpose of the app. For example, if you’re using the social check-in site Foursquare, you might receive badges posted on your timeline as a trophy or an award when completing certain check-ins. For this reason, Foursquare needs to access your timeline feed.
Some websites or applications are designed to enhance Facebook business pages. If you’re managing a business page and attach an app to it, the app’s access will be to that business page you administer (you can determine which ones; when you install an app, it doesn’t have to apply to all your business pages).
When the app requests access, the request shows the specific things that the app needs to access. For instance, in Figure 2-1, Scott is installing the Twitter app on his personal timeline. The app needs to post to Facebook as him. Why does the app need to post on Facebook as him? Well, Scott is installing the Twitter app so that when he posts to Twitter, the same update is broadcast to both Twitter and Facebook.
Facebook’s OAuth service allows applications to follow a standardized way of ensuring privacy and security while letting apps you choose connect with Facebook and engage with the features and functions of the platform. OAuth is the permission tool that verifies that your information is safe and accessible only as authorized. For you as a user, authorizing other applications is simple. Most applications have an easy process by which you give them permission to access Facebook.
The OAuth process allows you to have peace of mind when using certain services or applications. Some sites eliminate their own form of sign in and use Facebook Platform. For example, popular sites such as Pinterest, Etsy, and ShortStack enable you to sign up or log in with your Facebook account rather than with an e-mail and a password. In this way, you can manage your online connections without having to create accounts.
Finding Common Uses for Facebook Platform
Facebook Platform allows developers and site owners to use various Facebook features outside Facebook. The following list describes ways you might use Facebook Platform:
· Login information: Facebook for Websites eliminates the need for you to create a user account on a site. Instead, you sign into Facebook, and Facebook signs you into the site. Figure 2-2 shows the Connect with Facebook button on the Klout site.
Facebook Platform is handy for people who would like to use the features and benefits of Facebook in other websites or applications. When you log in to another site using Facebook, you gain access to tools for sharing, commenting, and connecting in the same way as in Facebook.

Figure 2-2: Click Connect with Facebook to log in.
· Facebook games and apps: Games such as Angry Birds (see Figure 2-3) are a kind of app used in Facebook. This type of app has a specific functionality that allows you to access certain functions, such as playing games against your friends.
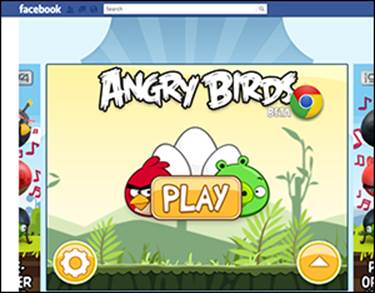
Figure 2-3: Playing games in Facebook.
· Facebook comments on other sites: You can leave comments on blogs or other sites that use the Facebook comment feature just as in Facebook. When a blog or article includes Facebook comments, the comments section shows your Facebook profile picture, as shown in Figure 2-4. Comments posted on a website are visible in the website, regardless of the user’s privacy settings. If you want to post the comment to your personal timeline, click Post to Facebook. The comment will be visible to only those who are permitted to see your timeline.

Figure 2-4: Comments on other sites.
· Social bookmarking: Sites such as Pinterest, a social media site for pinning photos that you find on the Internet and want to reference later (for say, home decorating ideas), also enable you to use Facebook to log in (see Figure 2-5). If you log in to Pinterest using your Facebook account, you can easily find out which of your Facebook friends are also using Pinterest. This saves you the work of manually searching for friends you want to follow on Pinterest.
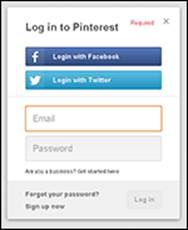
Figure 2-5: Use Facebook to log in to social bookmarking sites.
· Like, Share, and Recommend buttons: The site owner can embed these buttons into his or her site. With the click of a button (see Figure 2-6), you can share interesting content from sites with your friends. When you click the Like, Share, or Recommend button, a post appears in your friends’ news feeds with a link back to the site. In some cases, you can write a short note about the link to give it context.

Figure 2-6: A Like button on a website.
· Posting tweets to Facebook with the Facebook app for Twitter: As you create tweets in Twitter, the Facebook Twitter app allows you to post your tweets directly to your Facebook stream automatically. This feature is helpful if you want to seamlessly syndicate each tweet as a Facebook status as well. Similarly, many social media sites such as Foursquare and Instagram offer you the ability to automatically include your activity in your Facebook activity.
· Sharing your blog posts on Facebook: Bloggers may find it useful to share blog posts on Facebook as a way of alerting their readers that they have added a new post. Some third-party tools allow a blogger to post a status update previewing the post along with a link directing readers right to the blog post.
Connecting to Facebook
Many people and businesses don’t have time to manually post updates to all the various social media platforms. Instead, they cross-post from one site to another automatically — when one account is updated, it sends a post to the others. In this section, we briefly discuss how you can connect Facebook to your blog, Twitter, and Google+.
Connecting your blog to Facebook
If you want to drive traffic to your blog site using Facebook, you can use a third-party app to connect your blog to Facebook. An app such as HootSuite or Post Planner enables you to post a status update with a link to the blog post. This method differs based on the app that you use.
HootSuite and Post Planner are typically used for posting status updates to several accounts from one screen. Both apps enable you to schedule the updates so you can control when they're posted. (See Chapter 3 of this minibook for more about scheduling updates with third-party apps.)
To connect your blog and Facebook in HootSuite, follow these steps:
1. Log in to HootSuite at http://hootsuite.com.
2. Click the gear icon in the left panel.
3. Click RSS/Atom.
4. Click the plus sign to add a new feed.
5. Add the URL of the feed, and then select the social account to which you want to send the feed.
6. Click Save Feed.
Connecting your Twitter account to Facebook
Some Twitter users connect with people in a different way than they do on Facebook, while others prefer to syndicate their Twitter updates to the status updates on their Facebook personal timeline (this feature doesn’t work with a business page).
 Think carefully before integrating Twitter and Facebook. You don’t always have the same audience in both places, so the information you share on each platform may not be relevant in both places. Or, if you do have the same audience, you want to be sure you’re not inundating them with the same information at the same time in several places.
Connecting your personal timeline to Twitter is easy:
1. Go to your personal timeline, and type Twitter in the search box at the top of the screen.
The first result in the list is most likely the original application. The app you’re looking for is simply named Twitter and displays the Twitter name and bird logo.
2. ClickTwitter in the list.
The page shown in Figure 2-7 appears.

Figure 2-7: Post your tweets to Facebook.
3. Click the yellow button to go to your Twitter settings.
The Twitter login screen appears.
4. Type your Twitter username or e-mail and your password in the appropriate text boxes, and then click Sign In.
Your Twitter Profile page appears.
5. Click the Connect to Facebook button.
A screen appears, asking for permission (refer to Figure 2-1).
6. Click Okay.
7. Change the privacy settings, if desired, and then click Okay.
Now all of your updates on Twitter will also post as a Facebook status update. Keep in mind that @replies and direct messages will not post to your Facebook status.
People update frequently on Twitter. Facebook is a different environment. If you're a busy tweeter, consider whether or not it makes sense for you to syndicate your Twitter feed to Facebook.
Connecting Google+ to Facebook
You can connect Google+ so that posts there also go to Facebook. However, you can't post from Facebook to Google+.
To connect Google+ to Facebook, you need to install an extension on Google Chrome (the web browser), such as http://socialba.com, or use a site such as http://friendsplus.me/ or https://ifttt.com/.
 A quick search in the Google Chrome store provides many extensions for cross-posting from Google+ to Facebook. However, we caution you to take a deep look into these extensions to make sure they are from a trustworthy source.
Using Facebook Social Plugins
When you’re browsing the web, you often see several features that make the web more social by using Facebook Platform. The biggest benefits are a single sign-in for many websites and the capability to Like a business page while on the website. These features are enabled withFacebook plugins, also referred to as social plugins. Facebook plugins are found at http://developers.facebook.com/docs/plugins/, as shown in Figure 2-8.
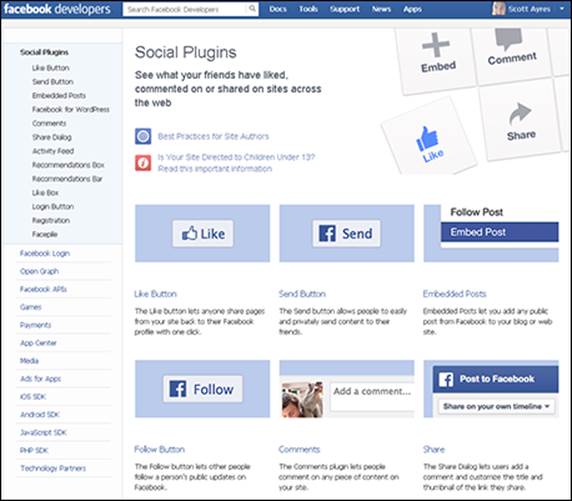
Figure 2-8: Add Like and Send buttons to your blog.
In most cases, social plugins don’t require you to do anything to use them if you’re signed into Facebook. Your browser can keep you signed in (you need to select the Keep Me Logged In check box when you first log in to Facebook). These plugins include the following:
· Like or share button: Share links to articles or pages directly to your personal Facebook timeline.
· Share button: Add a personal message to links before sharing them on Facebook.
· Send button: Send content directly to your friends.
· Embedded posts: Place a public post from a business page or person on Facebook into the content of your website or blog.
· Follow button: Subscribe to the public updates of others on Facebook.
· Comments: Comment on any content on a site.
· Activity Feed: See what your friends are doing on a site.
· Recommendations box: Display the most recommended content on your site based on Likes by your friends or other people on that site.
· Recommendations bar: Like content, get recommendations, and share what you are reading.
· Like box: Like a business page and view its stream directly from its website.
· Registration: Sign up for a website by using your Facebook account.
· Facepile: Display the pictures of people who have Liked a business page or registered for a site.
· Login button: Log in to a site by using your Facebook account. (Facebook Login is not considered a social plugin any longer.)
Using social plugins such as the Share, Like, and Recommend buttons makes your site more social. Facebook’s social plugins are great for giving your visitors a way to recommend your site to their friends. You might want to use social plugins in the following places:
· Individual posts/article: By providing fresh, interesting content, blogging drives new traffic to your site. Asking your readers to click Share is an easy way to increase that traffic to your blog entry. Using the share button as social proof also tells the reader ahead of time how interesting the article may be because social-sharing buttons show how many people have already shared the article. If others see that your link has been shared a lot, they may click through (and share) as well because so many others have done so.
· Individual products in an online store: If you sell products on your site, getting referrals from other customers is the best way to get new business. That’s the beauty of the Like and share buttons. Those who share your product are instantly sharing your product with all their friends. The best sales pitch for your product is a recommendation from a happy customer.
Increasing traffic by giving your loyal readers and visitors an easy way to share with their friends is important. People are more likely to do what's easy, so Facebook’s social plugins can help increase your website’s popularity! The Facebook social tools allow you to share in Facebook in two primary ways:
· As a Like or a Recommend: These show up in your activity feed. A Like or Recommend may appear in news feeds, if your friends have the broadest view settings, and on your timeline, as shown in Figure 2-9.

Figure 2-9: Likes show up on your timeline.
· As a status update: Readers click a button like the one shown in Figure 2-10, which prompts them to share an article as a status update or add it to their timelines.
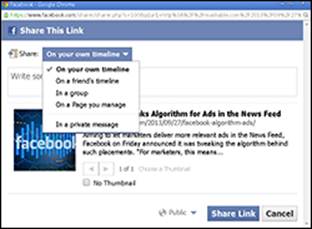
Figure 2-10: Sharing as a status update.
Where should you put your share button? Some say that putting the share button at the top of the blog enables readers to instantly see the social proof if the story has been read. Others say that people don’t want to scroll to the top to share an article or blog post they’ve just read. Scott thinks that the top and the sidebar are usually the optimal places for the share button.
Another option is to put one share button at the top of the article showing, for example, how many people have already Liked the article, and put the rest — such as share buttons for Facebook, Twitter, and Google+ — at the bottom of the article. When you put the social proof (how many people Like the article) at the top, you encourage others to read the article. And when you also put the other share buttons at the bottom, readers can quickly share the article to multiple social media platforms without scrolling back to the top. You can see how Scott positions share buttons on the Post Planner blog site, at http://postplanner.com/blog. The site uses the Flare plugin for WordPress to display social-sharing icons.
The bottom line? Put the share button wherever you feel is best, but make sure you consider the two schools of thought when setting up your site.
Using Facebook Badges for Social Proof
Badges are add-ons that you can place on your site to show a little bit of information from Facebook, such as text from your business page or your favorite Facebook photos. (See Figure 2-11.) You can use badges as a way to attract friends, followers, or interaction on Facebook. For example, a badge on your personal site can show how many people have Liked your business page as proof to visitors that they should as well.
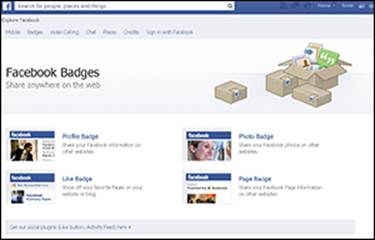
Figure 2-11: Add Facebook badges to your site.
You can add the following types of Facebook badges to your site:
· Profile badges link directly to your timeline and show information about you, as shown in Figure 2-12.
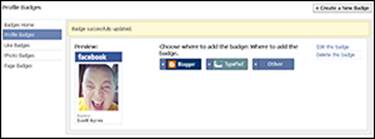
Figure 2-12: Profile badges include your Timeline info on your site.
· Like badges show off business pages that you Like.
· Photo badges showcases your favorite pictures on Facebook on other sites.
· Page badges promote your business page on other sites (see Figure 2-13). They display your picture and how many people Like your business page.
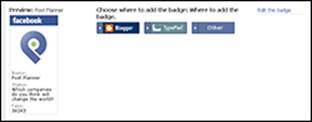
Figure 2-13: Page badges shows off your business page.
Integrating Facebook with Marketing Efforts for Your Business
To get the most out of Facebook, you have to take it a step further and integrate it into all your other marketing efforts. Connecting a business page to your blog or website, and other social networks such as Twitter, is one way to broaden your reach when using Facebook as a marketing tool.
Facebook provides brands and networkers a way to extend the relationship with their customers beyond limited in-person interaction. Often, when customers have another way to communicate with you, however simple it may be, the value of that relationship increases. The following sections discuss a few ways to foster that relationship and invite your customers, friends, and those you network with to connect with you on Facebook as well.
Business cards
In the business world, you hand your business card out to nearly everyone you talk to. Business cards are obviously designed to provide someone the details of how they can contact you at a later time. Include your Facebook username on your business card so that when people are connecting with you for business, you’re offering them the opportunity to connect with you socially as well.
Some fear that the mix between business and personal is not a wise idea. Scott disagrees. If you enjoy and believe in what you do, you should be more than happy to offer that to your friends. Also, when you reach out to someone in a friendly manner (by friending them on Facebook), you add a friendship factor to the relationship that in many cases increases the chances that people will buy from you. On the other hand, you might prefer to invite people to connect with you on your business page if they're interested in doing business with you. For example, although Scott has the follow feature enabled on his personal timeline, he only friends people he knows well. He likes to keep a personal space for himself and his family and friends.
Website or blog
If you own a business or blog, put a link to your business page on your website. Sometimes, giving people the opportunity to connect involves simply letting them know that you'd like to be connected on Facebook.
Sign or QR code in store or print materials
If you own a retail business, people can’t click a button to connect with you on Facebook in your store to Like your business page on Facebook. However, many people carry smartphones, so you can use QR codes to direct customers to your business page. A QR code is a barcode that directs a device to your site of choice using a barcode scanner app. (We like the QR Reader app for iPhone or Android.) The QR code in Figure 2-14 directs a smartphone to Scott’s personal timeline. Feel free to give it a try and follow Scott.

Figure 2-14: QR codes direct people to Facebook.
QR codes are a great way to make it simple for people to find your business page when they’re not likely to write down the URL and visit it later. Make sure that you create a sign that explains what people will find when they scan the code!
Wherever you had your phone number in the year 2000
Today, Facebook is one of the most common ways of communicating. But only a few years ago, the best way to reach people was by phone. Remember when you used to write down your phone number on a gum wrapper when you wanted to give someone a way to reach you? Well, put your Facebook username there instead! The same goes for your business page. If you provide yard work, for example, wouldn’t it be great if everyone who saw the logo on your truck also saw the URL of your Facebook business page?