Facebook All-in-One For Dummies, 2nd Edition (2014)
Book III. Connecting to Other Social Media
Chapter 3. Flying on Autopilot
In This Chapter
![]() Automating your Facebook marketing
Automating your Facebook marketing
![]() Scheduling posts to Facebook with third-party tools
Scheduling posts to Facebook with third-party tools
![]() Setting up notifications
Setting up notifications
![]() Connecting a WordPress blog
Connecting a WordPress blog
With all the third-party tools designed to manage your social media activity, the Facebook developer API (Application Programming Interface) has opened the door to great efficiency and automation. Automation is most interesting to those who manage social media for marketing because in that field it’s important not to miss a beat. Marketing types should be on Facebook all the time to make sure they reach as many customers as possible. Because there's no way for that to happen, they need to turn to some Facebook productivity tools to make sure that they have the furthest reach without maintaining a nonstop connection.
Facebook’s API allows third-party sites and web services to help you make your Facebook activity more manageable. In this chapter, we explain some of the ways that you can make it easier to keep your business pages and personal timeline active without having to sacrifice all your time.
Automating Facebook to Achieve Marketing Goals
Because you can’t be online all the time to post updates, respond to comments, add friends, or suggest Likes, you may decide to automate some Facebook tasks. Before you start, however, consider the purpose of automating your Facebook marketing. Think about your goals.
If you’re a marketer, you probably want to accomplish some or all of the following goals:
· Increase business page Likes
· Deliver quality content to followers and friends
· Drive traffic from Facebook to your blog or website
· Monitor the public use of keywords using search
· Maintain engagement with customers and followers
These goals aren’t accomplished through a “set it and forget it” mentality. Flying on autopilot works only with these important points in mind: You must have great, consistent content and activity that engages your consumers and followers. In other words, you have to connect with your supporters so they will continue to connect with you. Here are some ways to automate with such goals in mind:
· Synchronize and schedule content to decrease the number of times you have to log in to post recurring or predetermined updates.
· Set up alerts so that you know when you need to respond to a comment (or not).
· Be sure that each one of your blogs is posted on Facebook to drive traffic to your other sites.
Scheduling Updates with Post Planner or HootSuite
Scheduling updates using a third-party tool such as HootSuite or Post Planner is a great way to consolidate your marketing activities and be more efficient. Some reasons why you might want to do this are
· You have an event you’re promoting and need to share updates throughout the week.
· You have a blog or contest you want to share now and also later, when other viewers may be online.
· You want to increase your efficiency for general status posts by creating several at one time, but you want to schedule them to post intermittently.
· You want to share several things but don’t want to flood your readers all at once.
Post Planner and HootSuite are useful tools for users at any level. You'll find one of these tools useful if you’re sharing information on multiple social networks or if you want to be more productive by sharing specific marketing messages planned throughout the week, month, and so on.
HootSuite allows you to manage both your personal timeline and your business page, as well as Twitter accounts and other social networks. Post Planner focuses on posting content to Facebook profiles and business pages. See Figures 3-1 and 3-2 for examples of the screen view of HootSuite and Post Planner, respectively.
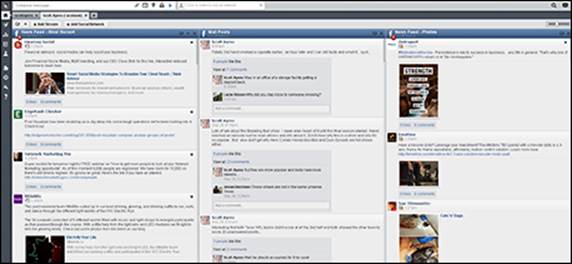
Figure 3-1: HootSuite for managing Facebook.
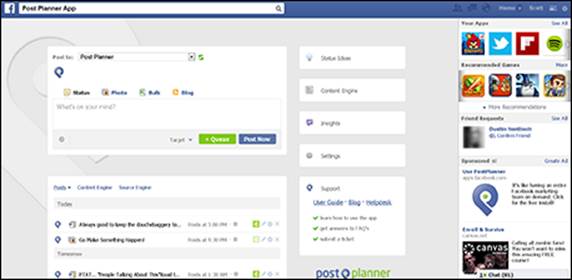
Figure 3-2: Post Planner for managing Facebook.
We find these tools most useful for creating updates that you want to share on multiple social networks. Both are free, and you can access them online through a browser. Post Planner is an app used inside the Facebook platform, whereas HootSuite can be used by logging in to their site or as an extension in your browser or on your mobile device.
HootSuite and Post Planner both enable you to post and to plan posts, but HootSuite also allows you to post to Twitter and respond to posts. On the other hand, Post Planner allows a huge array of content curation methods that HootSuite does not. Both allow multiple accounts, allow scheduling, and can be accessed through the web. Both applications also work with one or more business pages as well as personal timelines.
Following are some of the Facebook functions you can manage from these tools:
· Posting status updates: The core function of any Facebook user is posting an update. You can do this in HootSuite or Post Planner.
· Scheduling updates: Post Planner and HootSuite offer post scheduling, including a batch upload through a .csv (comma separated values) spreadsheet for bulk uploading of updates.
· Commenting on your own and other people’s posts: HootSuite displays content in vertical streams. Your news feed column is one of the standard column options, and you can create others. When you see a friend's update in the news feed column, you can comment on it in HootSuite. Post Planner doesn't have this capability.
· Finding status ideas: Along with being a tool to schedule posts to your personal timeline and business pages, Post Planner also supplies users with many methods of finding content to post. The Status Ideas engine has tons of categories and ideas to choose from, such as questions, fill-in-the blanks, seasonal posts, and Facebook contests. You simply choose one and post to your accounts. You can also find trending content in the Content engine, which contains feeds from blogs all around the globe based on keyword. HootSuite doesn't offer this functionality.
· Creating keyword searches: Creating a keyword search based on your brand name or topics related to your industry is one of the most interesting ways to learn about your market or find out when someone is asking about the services you provide. HootSuite can perform keyword searches, as shown in Figure 3-3. Post Planner doesn’t offer keyword searches for Facebook.
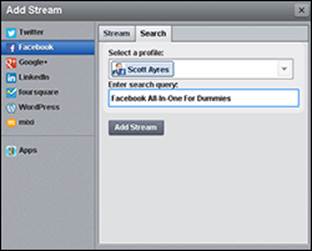
Figure 3-3: Creating a keyword search in HootSuite.
 When you schedule posts to your personal timeline or business page, don’t forget to interact with the post. It’s one thing to plan and schedule your content, but if you're not going to interact with and engage with those following you, there's no point in posting.
 If you’re updating a business page and a personal timeline at the same time, consider the audience of each. If many of your Facebook friends are also followers of your business page, they are likely to see the same post back to back. We highly recommend separating these by at least a few minutes. It might also be wise to differentiate the content so that it comes across as fresh.
Setting Up Notifications for Business Pages
When you’re flying on autopilot, you need to make sure that you still personally respond to comments on your business pages. Notifications are a great way to be alerted when you need to respond to a comment.
To set up notifications for your business page, do the following:
1. Click the gear icon on the far-right side of the blue navigation bar and choose Account Settings.
2. Choose Notifications.
The Notifications Settings page appears, as shown in Figure 3-4.
3. In the What You Get Notified About section, find the Pages You Manage row and click its Edit link.
4. Select the check box next to each business page from which you want notifications, as shown in Figure 3-5.
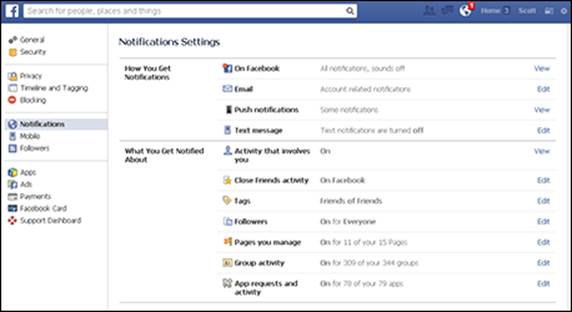
Figure 3-4: Set up notifications on this page.
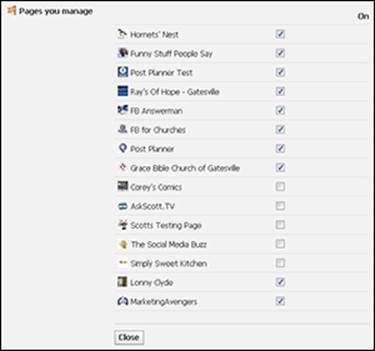
Figure 3-5: Select the business pages.
5. Click Close.
The Notifications Settings screen reappears.
6. In the How You Get Notifications section, find the Email row and click its Edit link.
The screen shown in Figure 3-6 appears.
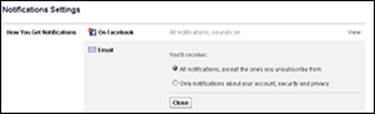
Figure 3-6: Turn on or off e-mail notifications.
7. Select the first radio button to receive all notifications, and then click Close.
Avoiding automation blunders
The two primary functions of any Facebook automation are to syndicate content that you’re posting on other sites or social networks and to schedule posts.
It’s important to keep tabs on that content, because when you post automatically rather than manually, it’s easy to forget that you have content posting from third-party apps. The result can be that you mistakenly post the same content manually or fail to respond to comments.
When scheduling updates, be conscious of the date and time that your update will be going out. It’s important to revisit your scheduled content and adjust as necessary. For example, if you have an automatic post going out that says something like “Looking forward to a great day,” but it happens to be the day that there's a major disaster, you’ll look extremely insensitive.
If you’re syndicating updates from other sources such as a blog or Twitter, be aware of the balance of content coming from that source in addition to any updates you may post directly to Facebook. Otherwise, you could risk updating too much and lose interest from your readers.
Connecting Your WordPress Blog to Facebook
Often times, the biggest source of traffic to a blog or website is social media sharing. You can post your blog on a page tab through an RSS feed (see Chapter 2 of this minibook), but this doesn’t drive traffic to your blog site. If you’re trying to drive traffic, perhaps to monetize your blog, you may want to use a third-party tool that automatically shares your blog posts to Facebook.
If you have a WordPress website (a common blogging platform), you can choose from any number of plugins to connect your blog to Facebook.
 Some plugins or services require a Facebook developer application because Facebook uses the Facebook developer platform to connect to other sites. To create an application, go to https://developers.facebook.com/apps, and click the Create New App button at the top of the screen. This application is the foundation used for all types of ways of connecting to Facebook features on other sites.
Following is a brief description of a few popular plugins:
· Simple Facebook Connect: This plugin consists of a framework and a series of subsystems to add any kind of Facebook functionality with much less code writing. We recommend this plugin for the more expert user who’s looking for a lot of Facebook features (including but not limited to sharing blogs on a business page).
To use this plugin, first you have to install it on your WordPress site and activate it, and then you need to create a Facebook page tab so that you can enable individual features that it provides as you choose. Simple Facebook Connect provides the following features:
· Users can comment using Facebook credentials.
· You can automatically publish new posts to Facebook.
· You can integrate comments made on Facebook back into your own site.
· Open Graph tags are implemented automatically.
· Wordbooker: This plugin enables you to cross-post your blog posts to your business page and personal timeline. Wordbooker is easy to install and easy to authorize.
After you’ve downloaded and installed the plugin on your blog, go to the plugin settings page, where you’re prompted to authorize Facebook to connect to the plugin. Then you’re ready to go. Check the Wordbooker settings page for other customizations. If you’re the administrator of more than one business page or group, you can select, with each post, which one you'd like to publish to.
 You can always take the shorter and simpler route and use share buttons on your blog. Then the reader (or you) can share the blog easily to Facebook by clicking a button. The post is sent to your timeline but not to a business page.
Follow these steps to set up an application to connect your WordPress blog to Facebook:
1. To create an app, point your browser to https://developers.facebook.com/apps and click the Create New App button.
2. If you haven't registered as a developer, click the green Register button and complete the registration process.
3. Type the app name.
The app name can be anything you want it to be, as long as the name isn’t already taken.
4. Click Continue.
5. Type the CAPTCHA in the text box, and then click Continue.
CAPTCHA is simply words and other characters that appear on your screen to manually verify you’re a real person.
The app’s Basic page appears. Make sure your contact e-mail is accurate.
6. In the App Domains field, type your site's domain and press Enter.
The site domain is the simple address without the http:// prefix (such as example.com).
7. Save your changes.
Scroll down and click the Save Changes button.
You can now see the completed page tab after you save your changes. You can find it also by pointing your browser to https://developers.facebook.com/apps.
Typically, when you're connecting your blog with a plugin, it will ask for the app ID and app secret. You find these on the app home page, just below the app’s name.