Facebook All-in-One For Dummies, 2nd Edition (2014)
Book VI. Developing Facebook Apps
Chapter 2. Building Canvas Apps and Page Tabs
In This Chapter
![]() Seeing the difference between canvas apps and page tabs
Seeing the difference between canvas apps and page tabs
![]() Building your dev app
Building your dev app
![]() Defining roles for your app
Defining roles for your app
![]() Facebook Insights
Facebook Insights
If you’re embarking into the app-driving marketing space, it’s time to consider the format of your application. Facebook apps, like many other web apps, can be designed in a nearly unlimited number of formats. The sky is the limit. Facebook apps take on four major forms:
· Page tabs
· Canvas apps
· Social plug-ins
· Websites and mobile apps
A myriad of Facebook features can be embedded into other websites, apps, and web tools known as Facebook Platform. With Facebook Platform, you can create an app that integrates with the Facebook API to use various Facebook features. These apps can be created in the context of any of the preceding applications, and can bring Facebook features right into your own website or mobile app. You can find out more about Facebook Platform for Websites in Chapters 3 and 4 of this minibook. In this chapter, we focus on page tabs and canvas pages.
Finding the Differences between Canvas Apps and Page Tabs
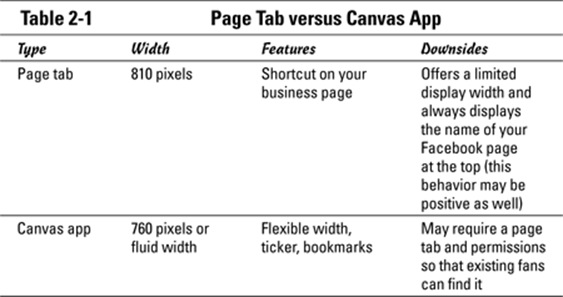
When you develop an application, you need to know from the start whether the app will appear on a page tab or a canvas app. Page tabs and canvas apps have similar functionality, but they have enough differences (display size, for one) that one or the other may be better suited to house your app. The following sections describe page tabs and canvas apps to help you choose which is better for displaying your app.
Let us clarify the relationship among page tabs, canvas apps, and apps. All Facebook apps are built using Facebook Platform, which allows you to take the application you build (using any common web code language) and connect it to Facebook’s features. When someone uses your app in the context of Facebook, the app needs to be displayed somewhere. Canvas apps and page tabs are your two choices on Facebook:
· Page tab: A page (sometimes called a tab) where your app can be displayed in the context of your business page, as shown in Figure 2-1. A page tab is simply an iframe space that’s 810 pixels wide, in which your app is viewed within the context of your brand’s Facebook page. Every Page tab has the name of the page and number of likes at the top.
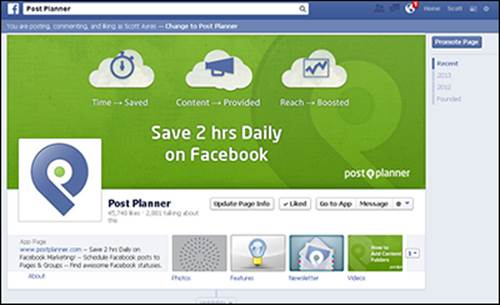
Figure 2-1: Page tabs are part of your business page.
· Canvas app: A place where your app can be displayed in the context of its own space. Canvas apps have a different format; they take up the entire page and display, in a column to the right of the app, ads and other apps the user has used.
Page tab features
Page tabs appear in the center of a business page; shortcuts to page tabs appear as thumbnail images below the cover photo on the business page. Page tabs take up a width of 810 pixels and appear in the same relative area as the timeline on your business page.
In a page tab, you can have a completely functional, interactive application, or you can simply display an image to enhance the look of your page. Companies often treat page tabs as a way of personalizing their social environment on the web. An example of a page tab app is shown in Figure 2-2.
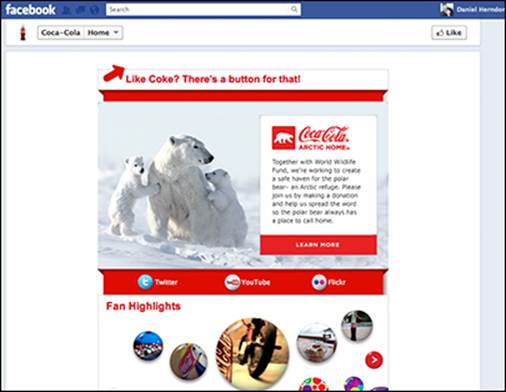
Figure 2-2: A Facebook page tab app.
 Because page tabs appear in the context of your business page, people can quickly find your app and use it instantly. If you want to increase traffic to your page to increase your Facebook audience, use page tabs to create a destination space. In this case, you may initially develop an app for short interactions (such as getting votes in a photo contest).
Canvas app features
A canvas app is 760 pixels wide by default. However, you have the option of making a canvas app a fluid width, in which the application expands to the width of the user’s browser.
Canvas apps offer a few additional interactive components for users that page tabs lack. A defining characteristic of canvas apps is the blank canvas given to the app to do practically anything you want inside the Facebook.com website. Canvas apps have the Facebook logo and other header information at the top. Unlike page tabs, canvas apps are not associated with any page information at the top, such as the number of Likes or the page name. Canvas apps all have ads on the right, with a list of other apps that the user has used and other similar apps above the ads. You can find and discover new canvas apps by clicking Apps in the left column of your Facebook news feed.
 Canvas apps and page tabs can work well together, if they are designed to complement each other.
Because a canvas app redirects users to another page, you may end up developing a custom page tab as well to direct the user to your app.
If you create a canvas app as a promotional tool for your business, you’ll want to build a link in your business’s Facebook page to promote the app and its function. One retailer used a page tab as a customized look for its page with a button linking to the canvas app that housed its catalog. This was a great use of these two options because the page presents the branding and information about the company. However, when someone decides to look at the catalog, they link to another area (the canvas app) that they may spend several minutes reviewing.
Choosing between a page tab and a canvas app
Depending on the app, it may be obvious whether a page tab or a canvas app is the better choice. Other times, it’s not so simple to decide between the two. Table 2-1 gives you a rundown of the size and features of page tabs and canvas apps to help you decide which to use.
Creating Your App
The first step to building your own app is to set up your app inside Facebook’s app builder. You take this step to become a developer on Facebook and to have a place to find all your apps.
Follow these steps to set up your first app:
1. Point your browser to https://developers.facebook.com/apps.
An authorization screen appears, as shown in Figure 2-3. You need to allow the app to access basic information on your timeline to use it. This is all that’s required to have developer capabilities with Facebook.
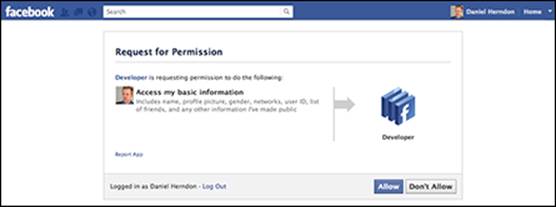
Figure 2-3: Click Allow to become a developer.
2. Click Allow.
After you complete the authentication, you see the apps page. The first time you go to the apps page, you see a blank screen and the Create New App button, as shown in Figure 2-4.

Figure 2-4: The Developer screen before you create apps.
3. Click the Create New App button.
The Create New App dialog box appears, asking you to name the app. See Figure 2-5.
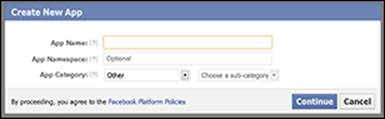
Figure 2-5: Naming your app.
4. In the App Name text box, type what you want the app to be called. In the App Namespace text box, type what you want to appear at the end of the app’s URL.
You can name your app whatever you want, but note that the namespace can’t have uppercase letters or symbols. For example, if you type fordummies in the App Namespace text box, your app’s URL will be http://apps.facebook.com/fordummies.
The App Namespace field must be filled in with a name that hasn’t been taken by another app. If the name you chose is taken, Facebook will immediately indicate that it isn’t available. (If you’re having trouble finding a name that hasn’t already been taken, you can always determine the namespace later.)
Leave the other fields blank, and your app will be fine. If you want to learn more about all these fields, be sure to check out Facebook Application Development For Dummies by Jesse Stay.
5. Click Continue.
If Facebook needs any more verifying info here, they will ask for it. For instance, you may have to enter a series of letters and numbers to prove that you’re human (called a CAPTCHA). For most people, however, your app is created.
You just created your core app! You’re now on the configuration screen of your brand-new app, as shown in Figure 2-6.
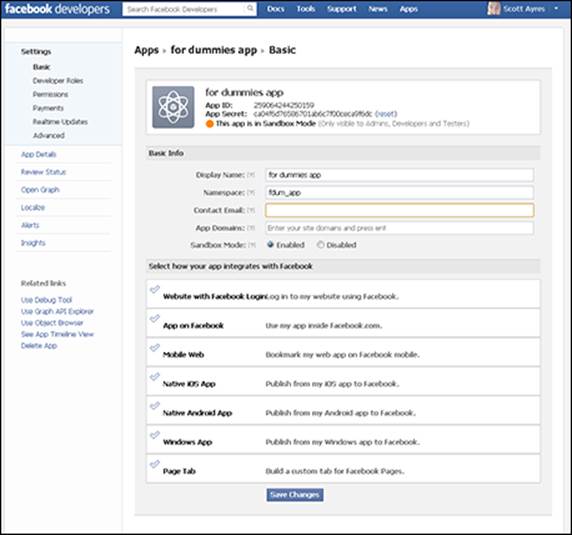
Figure 2-6: The App Settings page.
Getting to Know App Settings
After you create the app, you have a little bit more discovery to do to move on to the next step, where you integrate your app into Facebook. This app is the foundation that allows you to plug in any type of apps, including those hosted on page tabs and on canvas apps, as well as all other Facebook integrations for websites.
Every app has a timeline similar to a business page. The first part of the App Settings page displays your app icon and profile picture, which will appear on the app timeline page. The app icon will also appear on the left column of the user’s timeline if the user installs the app, as well as in the apps section of other canvas apps that the user runs.
From the App Settings page, you can change the following options:
· App ID and app secret: The App ID is a unique identifier of the app itself, sort of like a catalog number for the app. The app secret is a (yes, you guessed it) secret code that you use to authenticate the application when conducting an API call with another app. (An API call is when your app is calling upon the application programming interface of Facebook to use its features.) This older feature is rarely needed anymore. You'll probably never use the app secret if you use auth tokens to authorize API calls.
· App Display Name and App Namespace: These fields are the app name and namespace that you chose when you created the app.
· Contact E-mail: By default, the Contact E-mail is the e-mail address associated with your Facebook timeline. You can change this if needed.
· App Domain: Use this field to enable authorization on domains and subdomains. If your app is part of your website (and not necessarily on a business page or a canvas app), the core Facebook app will know to authorize that domain and subdomain, such as example.com oranything.example.com.
· Sandbox Mode: If you select this option, only app developers will be able to see and use your app. You need to deselect this option when your app goes live so that others can use the app.
You also need a server to host your app and a URL that points to the location on your server from which the app will load. This URL tells Facebook where to look for your app. You’ll use this URL in the website and app sections mentioned next.
In the section of the App Settings page that was shown in Figure 2-6, you need to select the type of app that you want to launch. Facebook has seven types of apps to deploy with the Facebook developer tools:
· Website with Facebook Login: Facebook can be used to log in to a website in place of your website’s separate login credentials. Select this section, and enter your domain name (website URL) in the text box.
· App on Facebook: An app on Facebook is any of those that we refer to most frequently in this book. This means that the app will be accessed somewhere in Facebook, through a canvas app. To use this feature, you select the App on Facebook section and enter two URLs. Make sure that you type the entire URL, including the http:// portion.
In the Canvas URL text box, enter the URL for the web page where your app is hosted. The secure Canvas URL text box typically takes the same URL, only with https instead of http. Users have the option to enable secured browsing using HTTPS on their Account Settings page. To support these users, you need to set up your destination URL on a secured server using an SSL certificate. This is the default destination for users viewing your app. If a secure URL isn’t available, users will be warned that they’re about to enter unsecured browsing. Facebook requires you to have an SSL certificate but doesn’t completely block out the unsecured version.
· Mobile Web: If you redirect users to a mobile site, select this option and enter the URL. The Mobile Web option is applicable for games or other applications that are supported on both standard web and mobile web. When you use this feature, users can bookmark your app on Facebook Mobile, and your app will be seen in their friends' mobile news feeds.
· Native iOS App: Use this feature to publish an iPhone app to Facebook. For example, if you have a shopping app, your app could have a feature that allows users to post products they’re interested in on their timelines. To create an iPhone app, you need to fill in five fields. Refer to Apple’s developer toolkit for further information about these fields:
· iOS Bundle ID
· iPhone App Store ID
· iPad App Store ID
· Single Sign On
· URL Scheme Suffix
· Native Android App: To publish a Facebook app on an Android phone, you have to fill in the following fields:
· Package Name
· Class Name
· Key Hashes
· Single Sign On
Please refer to the Android developer documentation to identify each of these.
· Windows App: To publish a Facebook app on a Windows phone, you have to enter the Windows Store ID and, optionally, the Windows Phone Store ID (which is currently in beta).
· Page Tab: The last option, Page Tab, is where you create a custom Facebook tab. Click this row and fill in the following text boxes:
· Page Tab Name: Enter the name of the tab that will appear on your Facebook Page.
· Page Tab URL: Enter the HTTP version of the URL you will be viewing in the tab.
· Secure Page Tab URL: Enter the HTTPS version of the destination web application.
· Page Tab Edit URL: Enter the administrator edit link (if you have one available) to access the editing of the app.
· Page Tab Width: Select between Normal (810 pixels) or Narrow (520 pixels). This option sets the page width used when your app is displayed in a custom app tab.
· Page Tab Image: This image will represent your app in the list of apps at the top of your Facebook page. If your only goal is to enhance the look and feel of your Facebook page, as mentioned in Chapter 1 of this minibook, this image is the only thing you need.
App Details page
The App Details page, shown in Figure 2-7, is where you customize details provided to users, such as descriptions of the app and where to find your privacy policy. Users see an authorization dialog box when you use Open Graph for your app. (Open Graph is the integration feature that Facebook uses to share activity on your timeline; see the following section for more.) To get to the App Details page, click the App Details link in the left sidebar (refer to Figure 2-6).
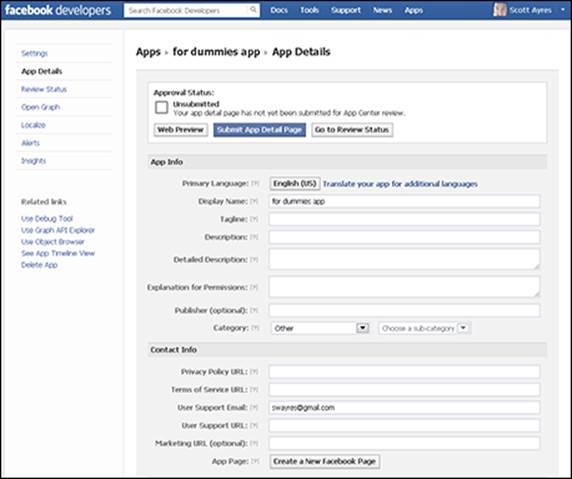
Figure 2-7: Customize the details.
As you complete the text boxes in this app, you can click the web preview button on your screen to see how the dialog box will appear. Each URL text box just directs users to the page on your site that you enter as the source for that information. For example, if your privacy policy is atwww.mycoolapp.com/privacy, enter that URL into the Privacy Policy URL text box.
Open Graph
Open Graph is the integration of Facebook that makes your app more engaging. Using Open Graph allows you to deeply interweave the social elements of Facebook with your app and create a more social experience. Begin by clicking Open Graph in the left sidebar (refer to Figure 2-6).
The foundation of Open Graph apps are stories, which contain apps, actors, actions, and objects:
· Actor: The person who published the story.
· App: The app that publishes the story on the actor’s behalf. Every story is generated by an app, and every story includes the app used to create it.
· Action: The activity the actor performs, such as Finished Reading. Facebook provides a number of common actions that can be used to create stories, or you can create your own.
· Object: The object with which the actor interacts. Objects are publicly accessible web pages hosted on the Internet. Almost any web page can be an object. Objects are public information.
In your app, you have an action that people do in your app and an object that people connect with by doing that action. For example, if your app allows users to track their movie experiences, the social activity that the users are sharing is watching a movie. In this case, the action is Watch. That action has the corresponding object, Movie.
An app like this would be targeted at making real-life experiences more social by sharing them with friends. These actions would be shared on the user’s timeline, in news feeds, and in the ticker. This takes the social act of Liking a page or an article a step further by allowing a Facebook app to define more actions. You have complete freedom to define your actions and objects. To get started in creating an Open Graph story, click the Create a New Story button (see Figure 2-8).
 You have to have added a namespace, mentioned in the “Getting to Know App Settings” section, previously in this chapter, to create an Open Graph story.
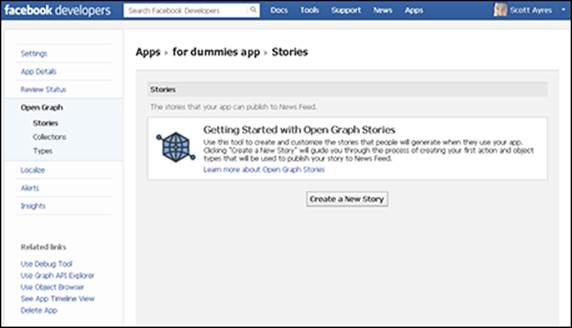
Figure 2-8: Creating an open graph story.
 When deciding how to implement an Open Graph app, don’t think too much about the activities being done in the app itself. Instead, think about building apps to make activities more social. Open Graph apps are all about stories being shared on the user’s timeline. For example, if your business is a gym and you want to engage people in your experience through Facebook, your app could contain tutorials giving people a routine to follow, in which they complete steps as they move through the routine. Your action might be Complete and your object might be Exercise.
 Facebook has a strict approval process for Open Graph stories to ensure that certain standards are followed. The core of the matter is to create actions that make sense and protect the integrity of the Open Graph concept. Facebook wants to make sure that your app publishes actions that are simple, genuine, and not abusive. You can read these guidelines in the Facebook Developer help section at http://developers.facebook.com/docs/opengraph/opengraph-approval.
After clicking the Add Custom Story button, the dialog box shown in Figure 2-9 appears. You can add any action type you want and then associate it with a listed object type or create your own object type. When you’re satisfied with your selection, click the Create button.
If your selection is incorrect, Facebook will tell you why and you’ll need to adjust it to fit the parameters of Open Graph.
For each action type, your app settings page gives you a code that you use to build app functions around the action. You can add more actions and objects to your app.
After you create your story, you’ll be able to see a summary of the objects that a person has interacted with in your app.
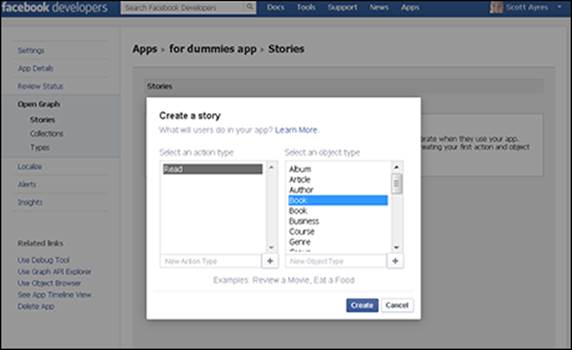
Figure 2-9: Entering an action and an object type.
Defining roles for your app
When developing an app, you might be working as part of a team. Depending on the level of detail and the size of your team, you can add and remove team members from your dev app. Just like business pages, apps have administrators assigned to them who have rights to edit and manage the page. A dev app has a few additional roles, as shown in Figure 2-10.
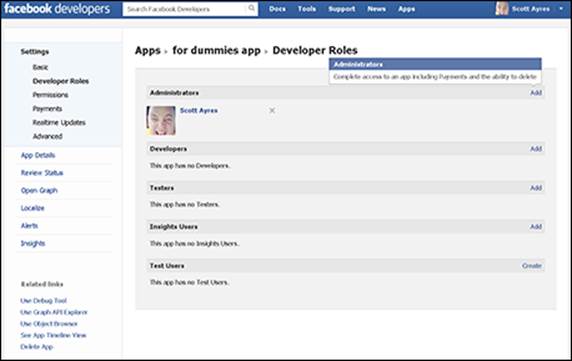
Figure 2-10: Defining roles in your dev app.
The following list shows the roles assigned to a Facebook dev app:
· Administrators have complete access to the dev app. They can access all the app’s settings.
· Developers can access all technical settings, but are restricted from changing the secret key, changing or adding additional users, and deleting the application.
· Testers can test the application in what is called sandbox mode. They can’t make any changes to the app.
· Insights users can access Insights for marketing purposes but can’t modify the application in any way.
· Test users are imaginary users that Facebook allows you to create to access the app to test its functionality. When you use the test user, Facebook creates a login URL that expires in two hours. You can access a user access token to take actions on behalf of the user and test API functions. You can create up to 500 test users for an app.
Insights in Facebook Apps
Insights, shown in Figure 2-11, tells you which users use your app and how they use it. Although Insights provides limited data, the data is invaluable if you intend to use the app as a marketing tool.
Insights has several areas that provide critical information to the app developer:
· Overview: A snapshot of your app's activity, including the number of users, data on sharing, and a measure of performance based on API requests (that is, how many times the app pulls data).
· Users: The number of users who use your app. The numbers are broken down into total active users, daily active users, new users by day, and demographic information. Lastly, the list shares how many users remove your app.
· Traffic: Statistics showing how much and how often your app is used. This option also allows you to access your app’s performance.
· Open Graph: Open Graph details. You can see how much activity the app gets (such as Likes and comments), clickthrough rates of stories your app posts (the percentage of viewers who clicked), and ticker and news feed impressions. The subcategories for Open Graph are
· Story CTR (Click Through Rate)
· Likes and Comments
· Aggregation Activity
· Ticker
· Demographics
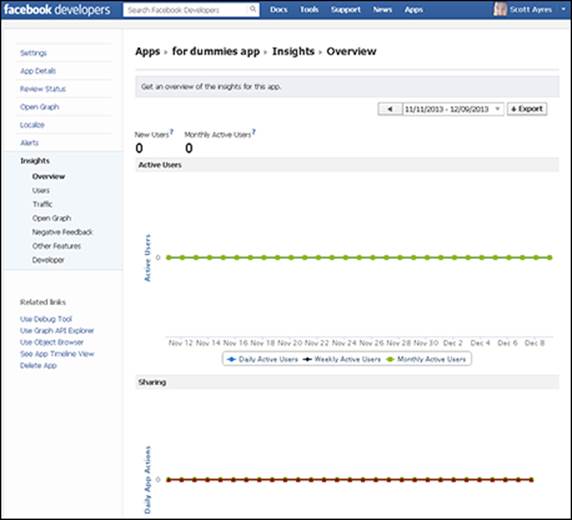
Figure 2-11: Dev app Insights.
· Negative Feedback: The negative feedback your app receives. You can use this feedback to improve your app.
· Other Features: Ratings and revenue. The App ratings section shows you the ratings that users have given your app. The Payments section tracks the revenue your app brings in and any chargebacks or refunds.
· Developer: The technical efficiency of your app and the activity the app gets. The latter detail can be different than the number of users because some users may perform a lot of activities but others may spend only a short time in your app. This section also assesses any glitches in the app — API errors, restrictions, and warnings — so you can keep your app working properly.
All these items can be viewed by week, month, or a specific date range. You also can export the data to an Excel spreadsheet or a .csv (Comma Separated Value) file. These analytics are critical in measuring the effectiveness of your app. You can use this data also for marketing purposes to measure one effort against another.