Facebook All-in-One For Dummies, 2nd Edition (2014)
Book I. Creating a Timeline
Chapter 3. Touring the Interface
In This Chapter
![]() Understanding how each part of your news feed works
Understanding how each part of your news feed works
![]() Managing your ticker
Managing your ticker
![]() Curating your timeline
Curating your timeline
Facebook has many features, including the news feed, your personal timeline, and business pages. Each offers a different way to view or access content. This chapter explains how the two most prominent pages — your news feed and personal timeline — work.
In this chapter, we share some screen shots of the news feed and personal timeline and explain the main elements of each. Both the news feed and timeline have a lot of functionality. There’s a lot to cover, so let’s get started!
Navigating Your News Feed Page
Your Facebook news feed is your main Facebook page. (We sometimes refer to the main Facebook page as your Facebook home page.) You see it every time you log in, and it’s where you find the most functionality for interacting on Facebook. Your timeline is important too because it’s where you archive your content, but your news feed is where you’ll spend most of your time.
We explain the news feed page in terms of five main parts: top navigation, left navigation, your main news feed, right navigation, and the ticker and chat panes (see Figure 3-1). Each of these parts has important functionality. The following sections explain how you can use them to get the most out of your Facebook experience.

Figure 3-1: Your news feed page has five main parts.
Top navigation
The top navigation on your news feed page consists of a blue toolbar. The elements on the toolbar, from left to right, are as follows:
· Facebook link: This link is the Facebook logo. When you click it — anywhere on Facebook — you return to your news feed page.
· Search text box: Use this text box to search for friends, business pages, or general information. Facebook refers to the search box as Graph Search.
· Friend requests icon: Any time you receive a friend request, you see this icon highlighted with a number telling you how many requests you have. You can click the icon, whether it’s highlighted or not, to see if you have any pending friend requests. From there, you can confirm the request or click Not Now to ignore the request. If you click Not Now, Facebook will ask if you know the person outside Facebook. If you click Yes, nothing happens. If you click No, Facebook will not allow that person to send you any more friend requests. Remember, if you ignore the request, that person can still see your public updates and become a follower.
· Messages icon: When someone sends you a private message, this icon is highlighted, with a number telling you how many messages are new and waiting to be read. You can click this icon to see recent messages, send a new message, or see all your messages.
· Notifications icon: When someone interacts with your content, tags you in an update, responds to a comment thread you posted on, or posts to a group to which you belong, this icon (the globe) is highlighted, with a number indicating how many new updates your friends have added.
· Home link: This link brings you back to the news feed page, just like the Facebook link on the far-left side of the toolbar.
· Link to your timeline: This link appears with your name. When you click it, you go to your timeline.
· Privacy shortcuts: This icon (the lock) opens a drop-down menu that enables you to quickly and easily access and change your privacy settings.
· Account menu: This icon is either a down arrow or a gear. Click it to display a menu that gives you access to such things as Facebook ads, settings, and the activity log.
The top navigation toolbar is static and appears on every page. It’s a handy way to quickly navigate Facebook.
Left navigation
The left sidebar of your news feed page houses links to your timeline, favorites, groups, friend lists, apps, pages, and interest lists. Because you use this navigation quite a bit, Facebook allows you to customize it to make it fit your habits. For instance, if you find that you visit a particular Facebook group quite a bit, you can move that group to your Favorites list so it’s readily available at the top of your navigation list. In the next few sections, we explain each of the main navigation choices and provide instructions on moving an item to your favorites list.
 If you move your mouse over any of the main categories in the left navigation sidebar, you see the More option. When you click More, the main news feed area displays a list of your groups, lists, business pages, and apps. The list gives you the option to edit individual items and tells you how often you’ve used the item.
Timeline
At the top of the left navigation, you see your profile picture and your name. When you click either item, you go directly to your timeline. Later in this chapter, we explain the features of your timeline and how to use them to interact with your friends and colleagues.
Favorites
By default, the Favorites list contains links to your news feed, messages, photos, and events. You may or may not see a link labeled Find Friends (if you’re new to Facebook, you’ll probably see this option). The Favorites list is handy because you can keep all the groups and lists you use the most in one place for easy access. (See Book II, Chapter 5 for information on using Facebook groups and Chapter 4 of this minibook for help creating lists.)
To move an item to your Favorites list, follow these steps:
1. Move your cursor over the item (group or list name) you want to move to the Favorites area.
2. Click the pencil icon.
3. Choose Add to Favorites from the menu.
The item appears in the Favorites list.
You can rearrange the order of your Favorites list by moving your cursor over one of the items in the list, clicking the pencil icon, and choosing Rearrange from the menu. Then you can click and drag items to change their position. The only item that cannot be moved is your news feed; it stays static at the top of your Favorites list.
To remove an item from your Favorites list, move your cursor over the item you want to remove, click the pencil icon, and choose Remove from the menu. The item moves back to its original place in the navigation. For instance, if you remove a group from your Favorites list, you can still find it under the Groups heading.
Groups
The Groups option won’t appear in your left navigation unless you’re part of one or more Facebook groups. We explain how you can connect with others through groups in Book II, Chapter 5. When you start participating in a Facebook group, the title of that group appears in the Groups section of the left navigation. You can click the title of a group to find its latest updates.
Lists
In Chapter 4 of this minibook, we explain why lists are useful and how to create one (or several). Because the news feed is ever changing, it’s easy to miss updates from people who interest you. Facebook tries to guess what you’re most interested in (by using an algorithm — see Book V, Chapter 3), but it doesn’t always get it right. Creating lists to organize your friends as well as pages and people you follow helps you quickly see recent updates by specific people. For example, we have lists for local friends, high school friends, blogs, Facebook marketing pages, blogging buddies, and family. When you click the title of each list, your news feed switches from displaying the most recent updates or top stories updates of everyone with whom you’re connected to showing updates from the people you included in a particular list. We find we don’t miss as many updates from important people when we use lists.
Apps and Pages
The Apps and Pages headers list the applications you have associated with your Facebook account and the business pages you administer, respectively. Both seem to list apps or business pages based on how often you use an app or visit a business page. In addition, the order of a list may change depending on what page you are viewing (for example, the news feed versus a group page).
News feed
You can update your status right from your news feed. At the top of the middle section of the page, you see options for Update Status and Add Photos/Video. Just click the one you want to use, and share what’s on your mind.
The main part of your news feed page is in the center of the page. This is where you see updates from your Facebook friends, groups, people you follow, and business pages you’ve Liked.
Your news feed is made up of the following:
· Top stories: Displays updates from people or business pages that have gained lots of interaction and engagement. Top stories are based on factors such as how many friends are commenting on a post. Stories are listed according to relevance rather than chronological order.
· Most recent: Displays a chronological list of the most recent updates from people and business pages to which you are connected.
As you can see in Figure 3-2, you can sort your news feed between top stories and most recent. Facebook uses an algorithm to try to determine your affinity for each person and page with which you’re associated on Facebook — sometimes the algorithm is right, sometimes it’s wrong. (Read more about the news feed algorithm and other Facebook analytics in Book V, Chapter 3.
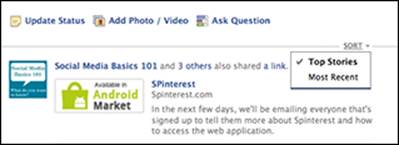
Figure 3-2: Click the Sort link to switch between Top Stories and Most Recent.
Both top stories and most recent stories can include updates from friends, people you follow, groups, apps, and business pages. Updates from people you haven’t interacted with regularly are shown in the ticker in the right sidebar. (We get to the ticker later in this chapter.)
If you want to remove a story from your news feed, hover your cursor over the story until you see an arrow at the top right. Click the arrow to display the menu shown in Figure 3-3, and then choose I Don’t Want to See This.
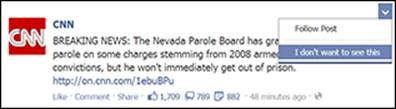
Figure 3-3: It’s easy to hide a story from your news feed.
After choosing this option you see some or all of the following choices:
· Hide All From: This option hides that person or business page from your news feed forever so you won’t see updates again. Facebook will then ask you the question Why don’t you want to see this? and provide several responses from which you can choose. Note that some responses lead to additional questions and selections.
· Hide All by Name of Application: You see this option only if the story was posted by a third-party application (such as Post Planner, HootSuite, FarmVille, Twitter, or Instagram). When you select this option, you can hide all updates from that application.
When you post your own status updates, or share photos, videos, or links, they appear in the news feeds of your followers and friends (unless you’ve applied a privacy setting to those updates; we explain how to do that in Book II, Chapter 2). As you can imagine, you should be careful about what you post because it’s likely that many others will see it. (If you have questions about your Facebook privacy, see Chapter 4 of this minibook.)
Right navigation
Facebook tends to roll out changes here and there, and the right sidebar is where things sometimes jump around a bit. By the time you read this, the right sidebar may have changed yet again.
If your chat feature is off, you'll see your ticker in the top of the right sidebar. (We describe the ticker in the next section.) Below the ticker, you have application alerts — usually about upcoming birthdays and events (see Book II, Chapter 7 for more about Facebook events). When you click the birthday person’s name, the Today’s Birthdays window pops up and provides a place for you to write a quick note to your friend, which is automatically posted to his or her timeline, and buy your friend a gift. Similarly, if you click the name of an upcoming event, the Event pop-up appears and gives an overview of the event, complete with a link to the event page and the option to RSVP to the event.
Under application alerts, you can see sponsored stories. Sponsored stories are a type of advertisement that relies on showing you which of your friends have interacted with a company or its business page recently. Sometimes Facebook swaps the sponsored stories area and the ticker, so what you see may be different from what others see.
The right sidebar changes depending on the type of Facebook page you’re viewing. Following is a discussion of the basic options you’re likely to see on specific types of pages:
· Facebook group page: The right navigation area is an overview of how many members are in the group. Next is a text box so you can add someone to the group. (Just start typing the person's name, and then choose him or her from the list that appears. Remember that you have to be friends with someone to add him or her to a group.) Then you see suggested groups, sometimes you see recommended pages followed by sponsored stories.
· Facebook list feed: If you're viewing a list you created, the right navigation of any specific list displays the Manage List button. Click it to rename your list, edit the people in the list, choose which update types appear in the list, or archive the list. Next, you see the On This List section, which allows you to see a snapshot of the Facebook friends you’ve included in the list, as well as a See All link to display all the people in the list. Below that is a text box so you can add someone to the list (just start typing the person's name, and then select him or her from the list that appears). The List Suggestions heading is next and provides a list of people Facebook thinks may fit with your list. Click the Add button to add a person to the list, or click x to remove the person from the list.
· Facebook messages: The main Messages page doesn’t have a right-side navigation. However, when you click to individual messages, sponsored ads appear on the right side.
Ticker and Chat panes
The ticker and chat panes appear at the far right of your Facebook page. The ticker displays updates in real time from your friends, groups, and business pages you follow. Whereas your news feed focuses on displaying content from the people and business pages with which you interact most, the ticker is a running stream of what everyone is doing, whether you regularly interact with them or not.
Chat is texting in real time with someone in Facebook. Chats aren’t broadcast through your news feed, ticker, or timeline; they are private. We explain chat in more detail in Book II, Chapter 8.
No matter what page you’re looking at — news feed, timeline, messages, groups, and so on — you’ll see the ticker and chat panes. However, you can make the panes smaller or larger by clicking and dragging the bar between them.
To hide the ticker and chat panes, click the Hide sidebar icon, as shown in Figure 3-4. The chat panel collapses. If you're on the home page, the ticker moves to the right sidebar; otherwise, you don't see the ticker.
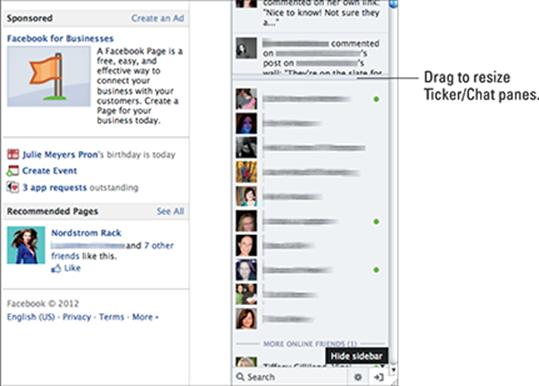
Figure 3-4: You can hide the chat and ticker column.
As Facebook rolls out more activity applications, you’ll see those updates in your ticker. Activity applications are the way Facebook wants you to interact with others. Facebook’s take is that you’re out there living life, and you want a more robust way to share what you’re doing. Instead of just Liking a book, you can share that you’ve read the book. Or you can share that you hiked a trail, watched a movie, or played a game.
If you notice something come through your ticker and want to see more about it, move your cursor over the update, and an expanded view appears. You see the status update and any comments to the status, and you can Like or comment on the status yourself.
 When you notice that someone in your ticker has commented on your business page, you can respond right from the ticker as your business! Hover your cursor over the comment, and a pop-up window appears with the option to comment, as shown in Figure 3-5.
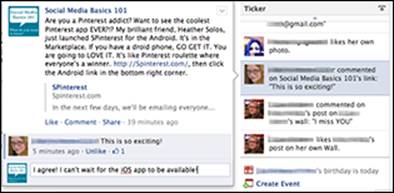
Figure 3-5: Comment as your business page directly from your ticker.
Navigating Your Timeline
Your personal timeline is a record of all the content you’ve shared throughout your time on Facebook. It’s been referred to as a digital scrapbook, and that’s fairly accurate. But if you’re not the crafty type or not into scrapbooking, don’t let that moniker deter you. Your timeline is simply a way to organize your Facebook interactions.
You can highlight important events in your life (Facebook calls these milestones), hide updates, or add events after the fact. For instance, maybe you took your first trip to Europe years before you joined Facebook. With timeline, you can create a new update that appears in the correct chronological spot in your timeline. The update can include pictures, music you listened to while traveling, your own travel notes, a map of your travels, and more. When you’ve created the new event (or story), you can feature it so others can have a complete picture of your experience — or you can relive the experience yourself.
Watch Facebook’s video about how the timeline works at www.facebook.com/about/timeline.
Familiarizing yourself with the timeline
The timeline has many features you can use to control how you share your content with others — even after you’ve already shared via the news feed. First, though, you need to know how to find your timeline. After you log in to Facebook, click anywhere you see your name (in the left sidebar navigation, or the top blue navigation toolbar, or in comments you leave). Your timeline appears, similar to the one shown in Figure 3-6.
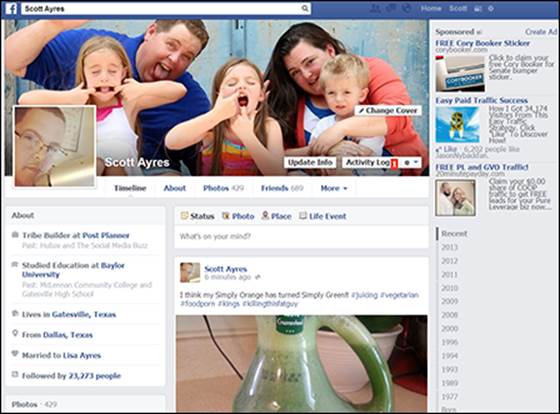
Figure 3-6: An example of a timeline on Facebook.
As you can see from Figure 3-6, the timeline is all about the visual splash! Following is a rundown of each item on your timeline:
· Cover photo: The focus of your timeline, your cover photo can have a big effect when people visit your page. You can choose any of your previously uploaded pictures to use as your cover image, or you can upload a new image.
It’s handy to know that the cover image is 851 pixels wide by 315 pixels high, so you can edit the photo before you upload it. You can use a picture that’s smaller than 851 x 315, but Facebook stretches the photo to fit, so it may be distorted.
· Profile photo: The photo you choose as your profile photo becomes your Facebook avatar — it’s the picture people see next to your status updates, comments, and stories. You can use a photo you’ve already uploaded to Facebook, or you can upload a new picture. Some people like to change profile pictures regularly, while others like to keep theirs the same. We suggest changing your profile photo only as necessary. Your friends will come to recognize your image, and they will find you easily as they skim the news feed.
· Update Info button: Click this button to see your About page, where you can update where you work; your education, relationships, and quotes; where you live; contact information; and your short Basic Info and About Me blurbs.
· Activity Log button: Click this button, which appears only to you (and not to visitors to your page), to view and edit your activity on Facebook, as shown in Figure 3-7. You'll see comments on other’s posts and your posts; songs you’ve listened to; pages, photos, and status updates you've liked; people you've followed; and more. You can see how a post was originally shared and hide a story from your timeline (by clicking the pencil to the far right of the story). To change the share setting for an update you made to your timeline, click the share drop-down list (which sports two silhouettes, a globe, a lock, or a gear, depending on your current setting) and choose a new setting from the menu.
In the default activity log view, you see all your activity. For other views, choose from one of the options in the left sidebar. For example, you can view activity related only to photos, Likes, or games.
Because the timeline makes it easy to find current and past status updates, it’s a good idea to review your activity log and check the permissions on previous stories. You may want to hide some of those party pictures from your colleagues.
· Gear icon: Clicking the gear icon displays a drop-down list that enables you to view your timeline as others see it — either the public at large or a specific Facebook friend. (You can read more about this setting in Chapter 4 of this minibook.) You can control who can add items to your timeline and who can see things on your timeline as well. In addition, you can manage tags and add a Facebook badge to your site.
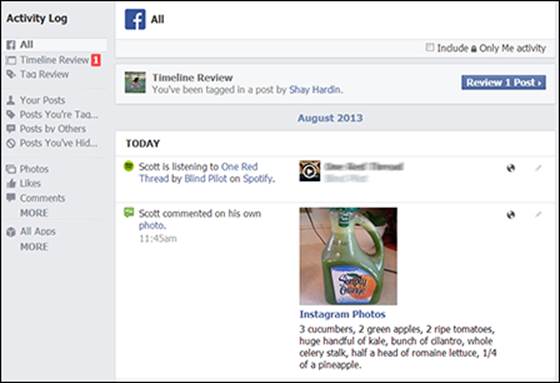
Figure 3-7: See all your activity on Facebook.
· Change Cover button: This button appears only when you hover your cursor over your cover photo. Clicking it gives you the opportunity to change the cover photo for your timeline. You can use a photo you've already uploaded to your profile or you can upload a new photo.
· Sections: On the left side of your timeline, just below your cover photo, you see the three content categories: About, Photos, and Friends. You can't change the order of these or remove them.
To display or hide any section, click the pencil icon in that particular section and choose Manage Sections. A lightbox appears. To remove activity or change settings, click the section name (such as Instagram). For sections such as TV Shows, you can click the plus sign to see recommended shows to add to the section or type the names of TV shows in the search box that you’d like to add.
· About: You see links to your current employer, education, current city of residence, and relationship status if you’ve shared that information. You can click the About link or the pencil icon in the About box to edit these items.
· Photos: Click Photos to display a page displaying photos you've uploaded, albums you’ve created, and photos in which you've been tagged. You can also click individual photos and scroll through them. Click the pencil icon to edit all sections or see the photos hidden from the timeline.
· Friends: In this section, you see how many Facebook friends you have and profile images of nine of your friends. Click the pencil icon to edit all sections and change your privacy settings, such as who can see your friends list, who you're following, and who can see your followers.
· More: Hover your cursor over the More link to display a drop-down menu that enables you to manage a particular section such as TV shows, books, Likes, music, movies, events, and groups. After you make a selection, you can edit the content shown to others. If you choose an app such as Instagram, you can remove an image, change the app’s settings, or hide the section. If you choose TV Shows, you can see a list of the shows you’ve watched and want to watch and pages you’ve Liked related to TV shows. We discuss where these sections appear on your timeline next.
From here, everyone’s timeline will look different. You might see sections with apps you’ve used, pages you’ve Liked, games you’ve played, or TV shows and movies you've added.
The right side of your timeline contains all your posts, most recent first, as well as items in which you’ve been tagged. To see past updates, scroll down or click the date to jump to a specific year.
As you scroll, your cover photo is replaced with drop-down menus that take you to your timeline or certain years. You can post a status update, a photo, a place, or a life event. Continue scrolling and you’ll see that the updates continue to load until you get a few weeks or months into the past.
Facebook then shows you Earlier in that year and gives you the option to choose between seeing Highlights or All Stories. The left side now displays what was added to your timeline during this period. For instance, Scott can see that in 2013 he added 113 friends and Liked a total of 658 pages. On the right he can continue to see stories posted to his timeline as he scrolls.
If you choose Highlights, Facebook displays any stories you've chosen to highlight as well as stories you posted that were popular. You'll see a range of post dates and an option to see more posts from that date range. If you choose All Stories, every story posted on your timeline will appear.
Each status update has a pencil icon in the upper right. Click that icon to change the date, add a location, highlight the post, or hide that update from the timeline. If the update is from an app such as Instagram, you see additional options, such as Show on Timeline, Allow on Timeline, and Hide from Timeline. You can delete the update or mark it as spam. For photos you upload to your timeline, you see options to edit the album containing the photo and to reposition the photo.
These tools allow you to have complete control over how you share previous updates and content with others.
Hiding a story from your timeline
To hide a story from your timeline, you can visit your activity log or your main timeline.
In your activity log, search for the story by clicking the correct month or year. When you find the story you want to edit, click the pencil on the far right to display the menu shown in Figure 3-8, and choose Hidden from Timeline.
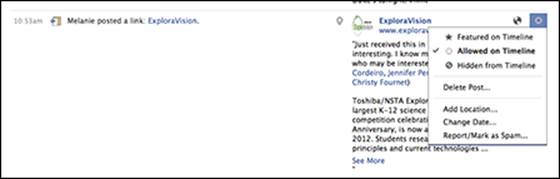
Figure 3-8: Use the activity log menu to edit stories in your timeline.
To hide a story from your main timeline, move your cursor over the story. When the pencil icon appears, click it to display a menu and then choose Hide from Timeline.
You can reinstate any story by returning to the activity log and choosing Allowed on Timeline.
 Your timeline can be an amazing tool for keeping track of your major life moments and sharing them with others. Keep in mind, though, that you don’t own your space on Facebook. Although it’s unlikely that you’ll lose your timeline, there are no guarantees. We recommend that you keep backups of photos and important updates on your own computer (and create a backup of that as well). Facebook shouldn’t be your only means of recording photos, video, and any other special content.
Adding a past event to your timeline
You add updates, photos, and events to a past date in the Status box. Facebook lets you choose the year, month, day, and even the time of day for the update.
The timeline is a chronological representation of the content you’ve shared with others, but it can be more than that. You can create a multimedia profile of your major life events to share with friends, family, and others. You can add photos, videos, and comments by year — even for the years before Facebook was around. You can start with the year you were born and go from there, or you can start at any point you like — you have that control.