Facebook All-in-One For Dummies, 2nd Edition (2014)
Book I. Creating a Timeline
Chapter 4. Customizing Your Privacy Settings
In This Chapter
![]() Knowing how to protect your privacy online
Knowing how to protect your privacy online
![]() Managing your privacy settings
Managing your privacy settings
![]() Understanding how privacy options change what others see
Understanding how privacy options change what others see
![]() Using Facebook lists
Using Facebook lists
![]() Discovering interest lists
Discovering interest lists
Online privacy is a topic we’re passionate about. The way you interact online is trackable and findable (and yes, Google, Facebook, Amazon, and others are tracking your interactions and behavior). You’re constantly creating your digital footprint by purchasing items online, using Google to find something, creating a Facebook account, interacting with blogs and websites, and so on. Nothing is wrong with that — in fact, it’s almost impossible to not have a digital footprint these days.
The important thing to understand is that you, and you alone, are responsible for your privacy. Don’t rely on the sites you visit to protect your information. Although it’s reasonable to expect a site not to compromise your credit card information, it’s up to you to decide what information to share, who to share it with, and how you’ll share other information you find. Take the time to review your privacy options and understand how they work. This chapter helps you navigate Facebook’s privacy options and explains how you can take control of how you share your information on the Facebook platform.
Understanding Online Privacy
You're always in charge of your privacy — online and offline. The platform isn’t responsible for protecting you; protecting yourself is your responsibility. Would it be easier if the tool, in this case Facebook, started out with your privacy set to the highest level instead of the most open level? Perhaps. But consider two things:
· Facebook’s mission isn’t to provide a personal space for you. Facebook wants to create an open community whose members constantly share their lives and milestones with others. It makes sense that Facebook encourages that by setting the default privacy to be more open rather than closed.
· Regardless of the default privacy settings, you'll most likely want to tweak them to your satisfaction.
Facebook also engages in frictionless sharing, in which the default setting in applications you install is to allow the application to automatically share updates. For example, when you play a game such as Bejeweled on your smartphone, each time you make a high score, a window pops up and asks if you’d like to share with your Facebook friends. Facebook calls that interruption in play friction and believes that eliminating that step allows for a smoother interaction between you and the application and allows for more opportunities for sharing on Facebook. Many applications default to frictionless sharing (that is, they automatically share your actions with the news feed), but you can change that setting by visiting your application’s dashboard.
You still have full control over what you share. If you don’t want to share your actions with people, you don’t have to install the application (or if you want the application, at least check to be sure the application offers the option to customize how you share). If you don’t want everyone to see your timeline updates, change your share setting to Friends Only. If you want to share your updates with select people, you can customize your updates by clicking the Public button below your Status Update text box and choosing who can and can’t see your update.
 Consider this: Do you use the free Wi-Fi at your local coffee shop or library or anywhere? Are you concerned that whoever is supplying the Wi-Fi isn’t covering your privacy? Why not? When you’re on public Wi-Fi, someone could easily hijack your passwords and make purchases on sites that you’ve logged in to, so it’s best to change your working and browsing habits when you aren’t using a secure Wi-Fi connection. That’s your responsibility.
Taking Responsibility for Your Own Privacy
The way Facebook works is that you share information with friends. Some of that information is considered public (your name, user ID, and profile picture), and some of it is considered private, and you can elect not to share it with others (via the privacy settings we discuss throughout this chapter). As we mention previously, Facebook relies on you to customize your settings and actively participate in protecting your privacy.
 Check your privacy settings regularly, and adjust them as necessary. Facebook doesn’t always alert you to changes.
An important first step in protecting your online privacy, whether with Facebook or another website, is to ensure that you have a strong password in place so your account is less likely to be compromised. Here are a few tips for taking charge of your privacy on Facebook (also see Chapter2 of this minibook):
· Turn on Facebook’s secure browsing option. Facebook has an option that allows you to browse the site using a secure connection. You’ll know you’re using the secure connection because the address bar will show https:// instead of http://. This option is on by default. If you turned it off and want to turn it back on, click the down arrow or gear at the top right of any Facebook page and choose Settings. Click the Security link in the left sidebar, and click the Edit link in the Secure Browsing row. Select the Browse Facebook on a Secure Connection (https) When Possible check box, and then click the Save Changes button.
· Enable Facebook login notifications. If you’re concerned that someone may try to access your Facebook account, login notifications will send you an alert when your account is accessed from a device (for example, a computer or phone) that you haven’t used before. To turn on login notifications, click the down arrow or gear at the top right of any Facebook page and choose Settings. Click the Security link in the left sidebar, and then click the Edit link in the Login Notifications row. Select the Email check box or the Text Message/Push Notification check box (or both, if you want) to receive alerts, and then click the Save Changes button.
· Assign more than one admin to your business page. If you should ever find your Facebook account compromised or locked, it would be a shame to lose your business page access as well. Choose a person you trust to act as admin for you. (Similar to giving a neighbor a house key in case you lock yourself out.) Doing so will provide you access to the business page if necessary.
Managing and Customizing Your Privacy Settings
We explain how you can control the privacy of individual status updates in Book II, Chapter 2. This chapter explains how you can control your account privacy in general. To access your general Facebook privacy options, click the down arrow or gear icon in the top-right corner, and choose Settings from the menu. Then click the Privacy link in the left sidebar. The Privacy Settings page appears and explains how you can manage your privacy settings.
When you land on the Privacy Settings page, you see the Privacy Settings and Tools heading and the following three questions:
· Who can see my stuff? Choose who can see your future posts. If you choose Public, everyone on Facebook (whether you’ve friended them or not) can see what you post, who you tag, and any photos or videos you post. You essentially turn off any privacy settings. You can also choose to show your posts to friends or to yourself, or you can choose the Custom option.
If you choose the Custom option, the Custom Privacy dialog box appears. You can make your account (all your updates and uploads) visible to the following:
· Friends: People you are personally connected to on Facebook
· Friends of Friends: People connected to your connections; you may or may not know those people
· Specific People or Lists: People you have chosen from your list of friends or lists you created
· Only Me: No one but yourself
You can also hide status updates from specific people or lists by typing a name or list name in the Don’t Share This With text box.
The second option enables you to review anything in which you’ve been tagged. Click this option to see an activity log for your account. You can delete activity or change an activity's setting.
The third option enables you to limit all past posts to friends only. This feature is handy when you have mistakenly made posts public or you decide to make your postings more private. The Limit the Audience for Past Posts tool allows you to change the share setting from public to friends. Any previous posts you shared as public will be changed as well. Simply click the Limit Old Posts button.
· Who can contact me? Determine who can send you friend requests. You can choose from everyone, friends of friends, or no one.
The second option lets you filter your Facebook messages. If you choose the strict setting, messages from people you aren’t friends with will likely end up in your Other inbox.
· Who can look me up? The options here are simple. In the first option, you determine who can look you up using the e-mail address or phone number you provided. Like most settings on Facebook, you can choose everyone, friends of friends, or friends.
Next, you decide if you want to allow other search engines to link to your timeline. When the setting is on, it’s easier for other search engines to link to your timeline in search results. If you turn off the setting, people will not be able to find your timeline by using a simple Google or Bing search.
 For more information on privacy and security, visit www.facebook.com/security and www.facebook.com/help/privacy.
Blocked People and Apps settings
Facebook provides several ways for you to control how you interact with others (and how they interact with you). On the General Account Settings page, click the Blocking link in the left sidebar. The Manage Blocking page appears and provides options for the following:
· Add Friends to Your Restricted List: We explain lists a little later in this chapter. One of the lists Facebook provides for you is the restricted list. When you add someone to this list, he or she can’t see any of your updates unless those updates are public. Luckily, Facebook doesn’t notify people when you add them to your restricted list. To add people to your restricted list, click the Edit List link.
· Block Users: If you don’t want to interact with someone on Facebook, you can block him from connecting with you. He can’t see your updates, and you can’t see his. The exception is groups you both belong to and apps or games you both use. To block someone, type his name or e-mail address into the appropriate text box, and click the Block button. A list of people you have blocked appears under the text boxes. You can unblock someone by clicking the Unblock link next to his name.
· Block App Invites: Sometimes, you may have a friend who really likes Facebook apps and games and constantly invites you to join them by installing those apps and games. Those invites can clutter up your stream and get annoying. Facebook allows you to block app invites from specific people so your account will ignore future invites. In the text box, start typing the name of the friend whose app requests you want to ignore, and Facebook provides a list of matching names. Choose the correct name from the list, and future requests are ignored. To unblock the requests, just click the Unblock link next to the person’s name.
· Block Event Invites: This option is similar to Block App Invites. If you’re receiving too many event invitations from someone, you can set your account to ignore future invites from her. In the text box, start typing the name of the friend whose event invites you want to ignore, and Facebook provides a list of matching names. Choose the correct name from the list, and future requests are ignored. To unblock the requests, just click the Unblock link next to the person’s name.
· List Blocked Apps: This section lists all Facebook applications you've blocked. To block an application, you can visit its business page (use the Search text box to find the app’s business page) and then click the gear icon below your cover photo and choose the Block App link. You’re asked to confirm that you want to block the app. To unblock an app, just click the Unblock link next to the name of the application.
Understanding How Privacy Settings Affect What Others See
When you customize your privacy settings, it’s helpful to know how those settings affect how you and others see things on Facebook. Want to see how your personal timeline looks to others? Just follow these steps:
1. Go to your timeline and click the gear icon (next to the Update Info and Activity Log links), and then choose View As.
An alert appears at the top of the page that says This is what your timeline looks like to: Public.
2. Click View as a Specific Person, and then type the person’s name in the text box to see how your timeline looks to that person.
3. Click X when you’re finished.
The next few sections explain how people can find you on Facebook, how friend requests work, and how you can control how you share your status updates.
How people can find you
We’ve said before that the crux of Facebook is social sharing. Generally, Facebook would love to have everyone’s information accessible to all others because it believes that an open exchange is the wave of the future. Facebook may be right. However, many haven’t caught up to that vision and demand more privacy.
If you’d like to exert some control over how you’re contacted by others on Facebook, the first thing you need to consider is whether you want people to be able to find you on Facebook. To control your privacy settings, click the down arrow or gear icon in the upper-right corner and choose Settings. Then click the Privacy link in the left sidebar. Your choices in the Who Can Look Me Up section determine how visible you are to others via Facebook search. Your choices are as follows:
· Everyone: If you want anyone to find you on Facebook, choose this option. If you really want an open experience on Facebook, this is the way to go.
· Friends of Friends: If you know you’re not quite ready to friend everyone out there, consider choosing the Friends of Friends option.
· Friends: Don’t want anyone finding you that you haven’t already found and connected with first? This is your option. It’s the most closed and private option available for personal timeline searches.
 Your personal timeline is searchable only within Facebook, but business pages are searchable outside Facebook via Google, Bing, Yahoo!, and so on. The settings you choose in Privacy Settings apply only to your personal timeline. For more information about business pages, see Book IV.
How friend requests work
When you want to connect with someone on Facebook, you send a friend request. Sometimes, you receive a friend request you don’t want to approve for one reason or another. Maybe the request is from someone you don’t know. Or maybe you know her, but you don’t want to connect with her on Facebook for whatever reason. (See Chapter 2 of this minibook for more information and advice about choosing Facebook friends.) You have a few options:
· You can choose to accept the friend request and share your timeline freely. If that’s the case, remember that you can exclude individuals from specific content by clicking the share drop-down list under your status updates. (The share list sports two silhouettes, a globe, a lock, or a gear, depending on your current settings.)
· You can choose to ignore the request (click the Not Now button next to the request) — essentially putting the friendship on hold in the ether by neither accepting nor declining the invitation. Anyone you ignore can still see any status updates that are shared with the public rather than specific people or lists, but he or she can’t comment.
· You can always accept the friend request and assign the person to a specific list. We love lists because they allow you to control how you share things across the board. We explain lists later in this chapter.
How your updates are shared
Earlier in this chapter, we show you how to set your default privacy for status updates and photos, and we mention that you can set the privacy individually for each status update you share. When you set your privacy to public, you're essentially allowing anyone on Facebook to see your update — but only friends can comment on those updates, with the following exceptions:
· If you post a status update that tags someone, anyone who is friends with the person you tagged can comment on your status update — even if you’re not friends with them.
· If you turn on the Follow option for your Facebook account (see Book II, Chapter 2), anyone who follows your updates can see and comment on any public updates.
On a related note, when Facebook released the timeline version of personal profiles, your updates from previous months and years became more readily available. This may or may not be a problem for you, depending on what you’ve shared over the years. Luckily, Facebook recognized the issue and included a way for you to change the share setting for individual pieces of content. As you set up your timeline (see Chapter 3 of this minibook), you may choose to customize how you share certain things. To change the share setting for previously shared content, follow these instructions:
1. Visit your personal timeline and click the Activity Log button directly below your cover photo.
Your Activity Log page appears.
2. Find the status update for which you want to change the sharing preference.
 If you hover your cursor over the share icon (two silhouettes, a globe, a lock, or a gear, depending on your current settings), you can see the original share setting for a status update, as shown in Figure 4-1.

Figure 4-1: The original share setting for any status update.
3. Click the share icon and choose a sharing option from the list, as shown in Figure 4-2.
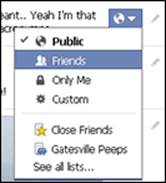
Figure 4-2: Change who can see previous status updates.
Utilizing Lists So You Don’t Miss a Thing
One of the biggest complaints about Facebook is that the news feed doesn’t always show what users want to see. Facebook uses the News Feed algorithm (see Book V, Chapter 3) to track what content you interact with most, and then it tries to determine what updates you want to see. The problem is that it’s not a perfect system, and sometimes you can miss updates from people you’re interested in keeping up with, but you may not comment on or Like their updates regularly.
To keep track of people easily, we suggest using the Lists feature. You can create multiple lists for various groups of people. For instance, Scott created lists for family, high school friends, local friends, blogging friends, and so on. Each list includes specific people (and yes, there’s some overlap because some friends are included in more than one list). When you click a list name, your news feed shows only the recent updates from the people included in the list, so you’re less likely to miss an update you’re interested in.
You can see a catalog of your current Facebook friend lists in the left sidebar on your news feed page. Click Friends to see a complete list of your lists, as shown in Figure 4-3).
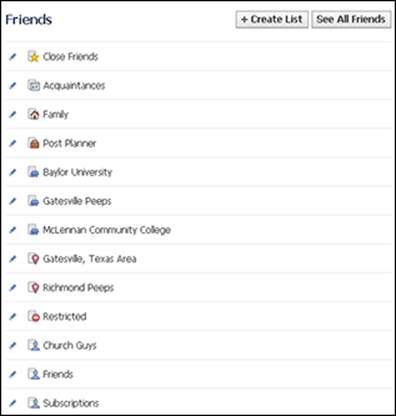
Figure 4-3: Find your lists in the sidebar under Friends.
You can also use lists to conceal your chat availability. To do that, just click the gear icon at the bottom of your Facebook chat window (it’s on the right side of your page). From the menu, choose Advanced Settings. In the dialog box that appears, you can customize who can and can’t see you on chat. Click to select one of these options:
· Turn on Chat for All Friends Except: This option allows you to type specific Facebook friend names or list names in the text box. Those individuals (or those on a list) won’t see you as available to chat.
· Turn on Chat for Only Some Friends: Type the names of Facebook friends or lists you want to be able to see you. This option is handy if you want only a few people to know you’re available to chat.
· Turn Off Chat (Go Offline): If you don’t want to be available to chat, select this option. None of your Facebook friends or lists will see you as available.
Facebook creates several smart lists to help you organize your friends, family, and colleagues so you can better track their status updates. These lists compare your shared information about work, education, family, and city with the shared information of your Facebook connections. When there’s a match, Facebook adds that person to your smart list. Facebook continues to update these lists as you add or remove friends from your contacts or as your friends update their information. The smart lists Facebook creates are as follows:
· Family: Facebook populates this list with people you have said you’re related to or vice versa. You can add or remove people as appropriate.
· School: Facebook creates a list for both high school and college/university (if you share that information), and then autopopulates those lists with people from your friends list who have indicated they went to the same high school or college as you. You can edit this list, so feel free to add or remove people as necessary.
· Work: Similar to school lists, Facebook creates a list (or lists) based on your shared work history. Facebook tries to populate this list with others from your friends list who indicate that they’ve also worked at a company you shared. If you manually add someone to a work list, Facebook notifies that person.
· Your city: This is another autopopulated and autoupdated list. Facebook places friends you’re connected to in this list, and if anyone updates his or her information to include this city, that person is added to this list automatically. Again, you can edit this list accordingly.
In addition to these smart lists, Facebook creates the Acquaintances and Close Friends lists. Technically, these aren’t smart lists because Facebook doesn’t automatically populate them or update them, but the lists are there for you to use. You can add people to and remove people from the lists as you like.
Although you can’t delete a list made by Facebook, you can add or remove people from those lists or hide the list.
Creating a list
You don’t have to use any of Facebook’s premade lists, and you can definitely create your own. To create your own list, follow these steps:
1. Click the Friends link in the left sidebar.
2. Click the Create List button at the top of the page.
3. In the dialog box that appears, type the name of the new list.
4. Type the name of any friends you want to add as members of this list.
5. Click the Create button.
6. Click the Add Friends link box to add more friends to the list.
Use the drop-down list on the dialog box to choose the type of information to use for population. You can choose Friends, Pages, or Following. You can even choose items from each of those options for inclusion in a single list.
If you click the title of a list, you can type an update on that page that is visible only to the people included on that list.
Making a list a favorite
The order of your lists in the left sidebar changes to show the one you most recently edited at the top. If you find you have specific lists you want to check often, we suggest you add them to your favorites (so that the lists are easily accessible). The Favorites list appears at the top of the left sidebar on the news feed page, as shown in Figure 4-4.
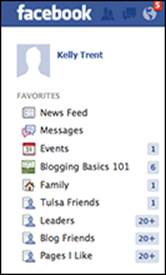
Figure 4-4: Your favorites are shown at the top of the left sidebar.
Add a list to your favorites by following these instructions:
1. Move your cursor over the list you want to move to your favorites.
A pencil icon appears to the left of the list title.
2. Click the pencil icon and choose Add to Favorites from the menu.
The list title moves from the Lists menu to the Favorites menu in the left sidebar.
You can change the order of the Favorites menu by moving your mouse over any item in the Favorites list, clicking the pencil icon that appears, and choosing Rearrange from the menu. At that point, you can click and drag any item to a new position in the list. When you’re happy with the new order, click the Done link.
Managing your lists
Lists are most useful when they work in a way that fits your workflow. You may find that you need to rename a list; add or remove friends, business pages, or followers from a list; customize what information is shared via a list; or delete a list that is no longer relevant. The editing options you have depend on the list you want to edit. We explain each option in the following sections.
Rename List option
To rename a list, simply click the name of the list, click the Manage List button, and choose Rename List from the menu. A text box appears at the top of the page, as shown in Figure 4-5. Just type the new name there and click Save. Note: Not all lists have the option to rename them (for example, you can’t rename Close Friends).
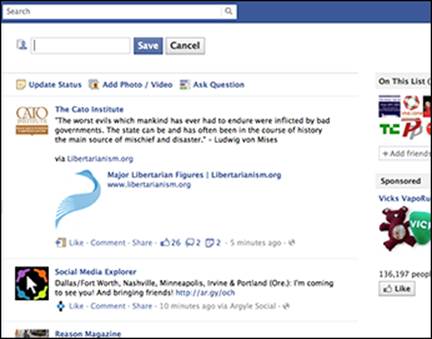
Figure 4-5: Use the text box at the top of the page to rename your list.
Add/Remove Friends option
The Add/Remove Friends option doesn’t just apply to friends — you can also add or remove business pages or subscriptions to some lists. To add and remove friends from any list, regardless of whether you or Facebook created it, click the name of the list, and click the Manage List button. Choose Edit List from the menu, and a dialog box appears, showing pictures of the people on this list. In the top-left corner, click the Friends drop-down list to see whether business pages and followers are available to edit. You can also choose On This List to see people, business pages, or followers already included in a specific list. To add or remove a friend, business page, or follower, simply click the picture (a check mark appears by the picture to show it’s selected), and then click Finish.
When you accept a new friend or send a friend request, be sure to put that person in a list right then. This way, you don’t forget, and the settings apply to your new friend immediately.
Choose Update Types option
Rather than see every update from the people on a given list, you can customize the information you see by following these steps:
1. Click the name of the list you want to edit.
The news feed switches to show the updates from people included in that list, and a Manage List button appears in the top-right corner.
2. Click the Manage List button and choose the Choose Update Types option.
The menu now includes a list of the types of updates you'll see. The default is to show all types of updates. To not see a particular type of update, click to deselect it.
3. Click the type(s) of updates you don’t want to see in your news feed (for example, Games).
4. When you’re finished, click anywhere on the page to close the list, and your settings are saved.
Delete List option
You can delete some lists if you find they aren’t useful to you (again, not all lists have this option). Deletion can’t be undone, but any content you shared with people in a list is still visible to those people even when the list is gone. To delete a list, click the name of the list you want to get rid of, click the Manage List button, and choose Delete List from the menu. A warning message appears to remind you that your actions are permanent and content is still visible to people in the list. Click Delete List to finish.
Discovering Interest Lists
Like regular lists, interest lists allow you to follow your favorite people, friends, and business pages in one place. The difference between a regular list and an interest list is that when you set up your interest list, others can follow it — and you can follow the interest lists others create. It’s another great way to control what you see in your news feed.
It’s becoming harder to have your business page updates show up in people’s news feeds unless they regularly interact with your page. If your brand is on Facebook, interest lists have the potential to increase your reach each time your business page is included in a list. Why? The people subscribing to a list are particularly interested in those people and business pages sharing relevant information — they are a targeted audience that is more likely to interact with your content.
To find your interest list, navigate to your news feed and scroll down until you see the Interests category at the bottom of the left sidebar. If you don’t see the Interests category, click the More link at the bottom of the sidebar.
Below the Interests category title, you see the interest lists you’ve created or followed. Don’t worry if you haven’t created or followed any lists; we explain how to do those things in the next section.
Creating or following an interest list
If you’d like to keep tabs on groups of people and business pages, you can create an interest list to do that. As we explain earlier, interest lists are handy because they aren’t private to you (unless you set the list privacy settings to Only Me), and you can share your list(s) with others. This is an excellent way to promote topics, brands, or people you support. You can also follow lists that others create.
In the preceding section, we explain how to find your interest list in the left sidebar. From there, you can create a new interest list either by clicking the Add Interests link in the left sidebar or by clicking the Add Interests button at the top of the main column. The main column shows a list of interest lists created by others that you may like. At this point, you can do three things:
· Follow a list. To follow a suggested list, click the Follow button next to any list you want to follow.
· Search for lists that may be of interest to you. Type a topic or keyword in the search text box, and Facebook autopopulates the list with relevant interest lists that you may want to follow. Click the Follow button next to the lists you want to keep up with.
· Create an interest list. We explain how to do this next.
To create a list, follow these steps:
1. At the top of the main column, click the Create List button.
The Create New List dialog box appears, as shown in Figure 4-6.
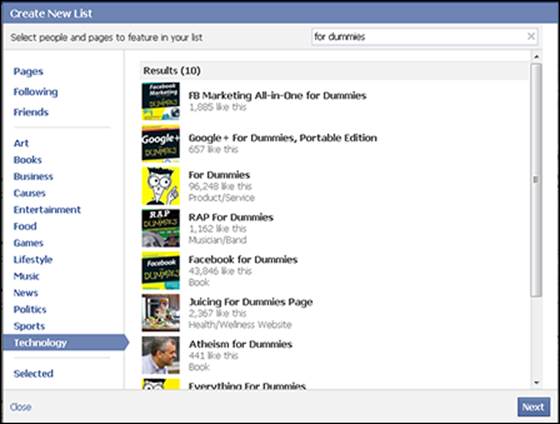
Figure 4-6: The Create New List dialog box offers several choices for new interest lists.
2. (Optional) Click one of the category choices in the left sidebar.
If you choose Pages, Following, or Friends, you need to type a name in the search text box at the top of the dialog box or scroll through the images shown. Facebook autopopulates results based on what you type.
If you choose one of the other categories (such as Art, Games, or Technology), Facebook finds and shows results related to that category (you may or may not already Like these business pages).
3. Click the picture of all the items you want to include in your interest list.
You can also use the search text box at the top of the dialog box to find friends, people, or business pages you follow, and add them to the list as well. Remember that you don’t have to click the Follow button on a business page to be able to add the business to your interest list.
4. Click Next when you’re finished. (You can add to the list later.)
The settings page for your list appears.
5. In the List Name box, type the name of your list.
The list name can be whatever you like, but we suggest using common, descriptive words so that others can easily find your list.
6. Determine your list’s privacy settings:
· Public: Anyone on Facebook can find and follow your list.
· Friends: Only your Facebook friends can find and follow your list.
· Only Me: You are the only person who can see this list.
Followers can’t add items to or delete items from your list.
7. Click Done.
Facebook displays the news feed for your interest list.
When you create an interest list, it shows up in your regular news feed. You also have the option of reading that interest list’s specific feed by clicking the name of your interest list in the left sidebar of your Facebook home page.
Managing your interest list
Your interest lists are meant to evolve. Maybe you’ll decide to change your share setting so a wider audience can follow your interest list. Or you may find interesting business pages or people to include — on Facebook, another social media platform, or in real life. In the following sections, we explain how you can manage your interest list.
Changing your interest list's share setting
While looking at the news feed for the list you want to manage, at the top of the middle column, you see the title of your interest list, who created the list (in this case, you), and how many people currently follow your list. You also see an icon indicating the share setting for this list. You can click that icon and change the share setting for your list, as shown in Figure 4-7. Choose the setting that you want, and it takes effect immediately.
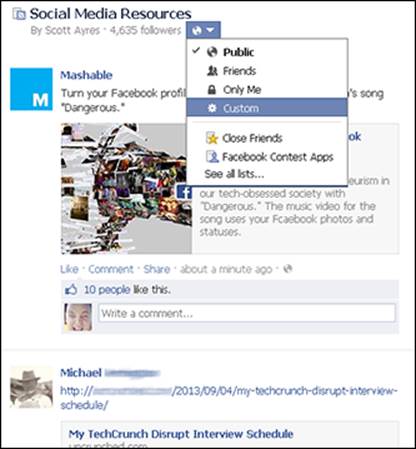
Figure 4-7: Easily change the share setting of your list any time.
Managing other aspects of your interest list
While looking at the news feed for the list you want to manage, click the Manage List button at the top of the right column. The following options are available:
· Rename List: Choose this option if you want to rename your list. In the text box that appears at the top of the middle column, type the new list name. Click the Save button to save and implement your changes.
· Edit List: Choose this option if you want to add or delete people you follow, business pages, or friends from your list. In the dialog box that appears, click the items you want to remove (you can add them back later, if you like). Use the drop-down list in the top-left corner of the dialog box to filter your options by Friends, Pages, or Following, and then type a name in the text box in the top-right corner. Facebook autopopulates a list of items you can add to or delete from your interest list. Click the Finish button to save your changes.
You can navigate directly to a business page or personal timeline to add it to your interest list. For example, Scott visited the For Dummies Facebook Page (www.facebook.com/fordummies) so he could add it to his interest list for social media resources (www.facebook.com/lists/3064736890271). Figure 4-8 shows how he used the gear icon and its menu to add the business page to his interest list.

Figure 4-8: Visit business pages or personal timelines to add them to your interest list.
· Choose Update Types: Just like with friends and followers, you can choose which status updates appear in your interest list's news feed. Click Choose Update Types to see the list of options. By default, all options are chosen. To remove an option from the news feed, click it. (Its check mark disappears.) This option is another way to exert more control over the information you see in your news feed so it’s not cluttered with stuff you’re not interested in.
· Notification Settings: This option lets you decide if you want to receive a notification when others choose to follow your list. Click Save to save and implement your changes.
Any changes you make to your notification settings apply to all your interest lists, not just the one you’re currently editing.
· Delete List: You can delete an interest list at any time. Choose Delete List, and the Delete (Interest List Title) dialog box appears. If you choose to delete a list, it’s permanent. You can’t reinstate the list later. However, you can create a new interest list (with the same name, even) and add the same friends, followers, and business pages to it. Keep in mind, though, that anyone who followed your list will have to refollow your new list. Click Delete List if you want to continue to delete your list.
Sharing your interest list with others
We mention earlier that one of the features that sets interest lists apart from regular lists is that others can follow your interest lists. To gain followers, you need to share your list to get the ball rolling.
To share a list with others, go to the main news feed for that interest list, and click the Share button at the top of the right column. The Share dialog box appears, and now you can share your list through your own timeline, a friend’s timeline, a group, your own business page, or a private message. Use the drop-down list to choose the share option you want to use. Write a quick update inviting others to follow your list (be sure to explain what your list contains and why people would want to follow), and then click the Share button.
You can’t share interest lists that are set to appear only to you. To change the share setting for a list, see the “Changing your interest list's share setting” section, earlier in this chapter.
If you share your interest list via a status update, several cool things happen. The status update shows a block of the people or business pages included in your list. When users or fans move their cursor over that block of images, it expands as shown in Figure 4-9. Now the user can click each link to go to that business page or timeline.
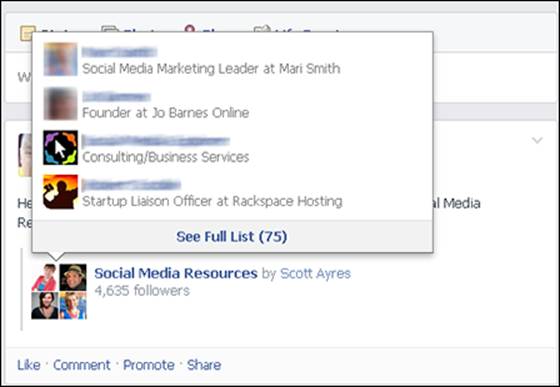
Figure 4-9: See a limited list of the timelines and business pages in your interest list.
The user can also click the See Full List link to see all the personal timelines and business pages in your interest list in a dialog box similar to the one in Figure 4-10.

Figure 4-10: See a full list of the personal timelines and business pages in your interest list.
The dialog box includes a link to each timeline or business page, as well as the option to Like individual business pages or follow timeline updates.
All materials on the site are licensed Creative Commons Attribution-Sharealike 3.0 Unported CC BY-SA 3.0 & GNU Free Documentation License (GFDL)
If you are the copyright holder of any material contained on our site and intend to remove it, please contact our site administrator for approval.
© 2016-2026 All site design rights belong to S.Y.A.