Salesforce.com For Dummies, 5th Edition (2014)
Part III. Driving Sales with Sales Cloud

 For more on how you can empower your sales team, go to www.dummies.com/extras/salesforcedotcom.
In this part …
· Learn how to track your prospects
· Organize your sales with Opportunities
· Manage your product catalog and price books
Chapter 9. Prospecting Leads
In This Chapter
![]() Defining important lead terms
Defining important lead terms
![]() Creating, importing, and sharing leads
Creating, importing, and sharing leads
![]() Arranging your leads
Arranging your leads
![]() Converting leads
Converting leads
![]() Keeping your leads database up to date
Keeping your leads database up to date
![]() Building your leads database with Data.com
Building your leads database with Data.com
Often, we hear frustrated salespeople say, “We could hit our numbers if we just had enough leads to fill our pipeline.” Leads are the building blocks by which many companies drive their sales.
Loosely defined, a lead is a person or a company that might be interested in your services. Some organizations refer to them as visitors because those persons haven’t shared any information about themselves yet. Others call them prospects because a lead has to be someone who has expressed interest in your service. Whatever your favorite terminology is, you can use leads to efficiently follow up on sales inquiries, aggressively attack new markets, and vastly improve your sales pipeline.
In this chapter, you can discover all the basic tricks you need to convert leads into revenue. You need to get your existing leads into Salesforce, organize them in a logical fashion, and update them when you follow up with them. Also, we discuss how to convert a lead into an actual opportunity that you can link to an account and a contact. If you’re an online marketing or e-mail manager or administrator, we devote an entire section to how you can manage and maintain your lead database. Finally, we review how to expand your leads with Data.com.
Introducing the Lead Record
A lead record consists of a number of fields that you use to capture information about a potential lead. A lead record has only two modes: an Edit mode, in which you can modify the fields, and a Saved mode, in which you can view the fields and related lists.
The standard record comes predefined with several fields. Most of the terms are immediately clear, but if you want specific definitions, click the Help & Training link in the upper-right corner of Salesforce. In the following list, we describe the most important standard fields:
· Lead Owner: The person who owns the lead. If no one owns the lead, Salesforce can automatically place the lead in a queue. You can then assign the lead to a group of users (for example, “Corporate Sales — West Region”), who can take leads in the order in which they arrive in the queue.
· Lead Status: One of three required fields on a lead record. Lead Status is a drop-down list of values, and this field is critical if you want to follow a standard lead process. We talk more about lead status in the nearby sidebar “Building an effective lead process.”
· Lead Source: A standard, but not required, field on a lead record. If you use it, you can define and track the sources of your leads by using this field.
 Lead sources are the originators of leads that come knocking at your door. These can be related to broad communication channels (a toll-free number, cold call, or web form, for example), more specific types of marketing venues (trade show, print ad, partner referral, and so on), or a blend of both. It’s up to you. Always remember to balance your desire to get really granular data with the tolerance of the users who often have but a few seconds to customize this field (alongside other fields). And if you really want to track granular details of where leads are coming from, seriously consider using campaigns or a third-party marketing automation tool, described further in Chapter 13.
Building an effective lead process
The key to a successful lead program that contributes to sales is a well-constructed lead process built into your Lead Status drop-down list. Salesforce provides a default list of four statuses: Open, Contacted, Qualified, and Unqualified. These statuses may appear straightforward, but they require definition because those four choices might not mirror your process or your terminology. The good news is that after you define the statuses, your administrator can quickly modify the values. The process starts with the Lead Status field, but it doesn’t end there. Here are some additional suggestions for how you might construct your lean, mean, lead-generating machine:
· Build fields to capture qualification criteria.
· Make it clear at what point in the process a lead should be converted to an opportunity.
· Decide who’ll manage the lead program and what that entails. Usually that’s the same person who sends out e-mail campaigns. Make sure that he or she has sufficient permissions to administer the lead database.
· Figure out at what point in the process a lead should be deleted or archived.
· Set up queues, if it makes sense, to manage the workload and drive the competitive spirit.
· When you figure out your process, train your users so that everyone knows what’s expected of him or her.
 When you first get a lead, you’ll likely want to qualify that lead to make sure that a sales opportunity really exists for you. For example, perhaps you want to be certain that the lead has the budget and a real interest and isn’t just kicking tires. A marketing-qualified lead is a lead that meets your sales and marketing’s teams qualification requirements to hand over the discussion to a salesperson. Teams in the Marketing or Sales department can own this responsibility.
You’ll have your own definition of what qualifies as a lead, so jot it down, and then seek out someone to customize your lead record. (See Chapter 20 for the how-to details on building fields, rearranging your layouts, and other design tricks.) You’ll have greater success with leads if you collect the right information.
Just like eating vegetables may be a reluctant chore for some of you, writing useful help text and descriptions for each field you create is vital to a healthy CRM system. It may seem laborious at first, and you may write terribly unhelpful descriptions. But fast-forward 6–18 months when new team members are scratching their heads wondering why certain fields were created and you can’t remember why … do yourself and your teammates a favor. Write down who requested a field, and for what purpose.
Setting Up Your Leads
Before you can begin working your leads, you need to add the lead records into Salesforce. In the following sections, we show you three quick approaches for lead creation, and if needed, how to share your leads with the right people. Then, if you want to capture leads from your website, see Chapter 13 for details on generating Web-to-Lead forms.
Adding new leads
The best way to manually create a lead is to use the Create New drop-down list on the sidebar. To create a lead using this method, follow these simple steps:
1. Select the Create Lead item from the Create New drop-down list.
A New Lead page appears in Edit mode, as shown in Figure 9-1. The only prefilled field is the Lead Status field.
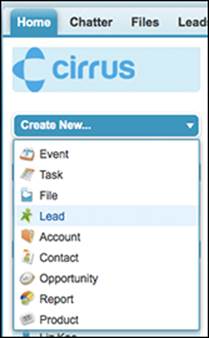
Figure 9-1: Filling out a lead record.
2. Fill in the fields as much as you can.
At a minimum, you must complete the Last Name and Company fields.
You can add a list of target companies as leads, even if you don’t yet know the names of the right people. In certain cases, you might have only the name of a company because you know you want to target it, but you don’t yet know who to call. You can work with incomplete information. In these cases, we recommend that you type ? or unknown in the Last Name field so that you know this information is missing.
3. When you’re done, click the Save button or the Save & New button.
· Save: The lead record appears in Saved mode, and your changes are displayed in the fields.
· Save & New: Salesforce knows that salespeople commonly add multiple leads before working them. If you click Save & New, the lead is saved, and a New Lead page appears in Edit mode.
When entering or editing records, click the Save button or the Save & New button when you’re done. Otherwise, you don’t save the information that you just typed for that record. If you make this mistake and haven’t yet logged out of Salesforce, try clicking the Back button on your browser (as opposed to hitting your head in frustration), which hopefully gets you back to the record in Edit mode. Then, click Save and breathe a sigh of relief.
Cloning an existing lead
If you’re developing relationships within a particular company and want to enter multiple leads for that company, you can save time by cloning leads. For example, say that you already created a lead record for Sergey Brin at Google. When you talk to his assistant, she courteously refers you to Larry Page. In this case, cloning can save you many extra steps.
To clone a lead record from an existing lead, follow these steps:
1. Click the Clone button at the top of the lead record.
A new lead record appears in Edit mode. All the information is identical to the previous lead record.
2. Edit the information on the new lead, where appropriate.
Pay attention to what’s prefilled because you want to avoid inaccurate information on the new lead record.
3. Click Save when you’re done.
The newly created lead reappears in Saved mode. To verify this, click the link to the older lead, which you can find in the Recent Items section on the sidebar.
Importing your leads
If you already have a file of leads, you probably want a faster way to get them into Salesforce than entering them manually. You must be an administrator to import leads, so if you’re not, find your administrator, tell her what you’re trying to do, and have her read this section.
Although you can import up to 50,000 leads at the same time as an administrator, test an import with five or so leads first, just to make sure that you know what you’re doing. After the test data is imported, review your new lead records to make sure that they contain all the information that you want to have brought in. Delete the test records, refine your import file, and then run through the final import.
 If you’re a new salesperson who just came from a competitor and you happened to bring all your leads with you to upload into your new company’s CRM system, hold up. It is terrible practice to dump in tens of thousands of unreviewed data into your nice CRM system. You’re just moving potentially dirty data from an old home into a new one. Think that’s someone else’s problem? Just wait until people start going through it and finding quadruplicates, old job titles, and other pollution. Instead, take a more measured approach. Can you name the top 50 companies that you should be targeting? See how many leads are from any of those companies, and start with that as an upload. Broaden your range slowly.
To import lead files, follow these steps:
1. On the Leads home page, click the Import Leads link at the bottom of the page, below the Tools heading.
The Lead Import Wizard page appears, providing you with a four-step process to import your records, plus helpful hints.
2. In your existing lead file or system, compare your fields against the lead fields in Salesforce. Map all your fields between your current system and Salesforce.
If you can map all the necessary fields, move to the next step. If not, add fields to the lead record by customizing Salesforce. (See Chapter 20 for simple instructions on adding fields.)
While someone is mapping the fields from your current system to Salesforce, you should also be talking with your company about cleaning up that data. Now’s a good time to discuss which of your current system’s fields are still needed in the new world. Some fields may have been used several years ago, but no one’s been filling them in since you can remember, and no one’s bothered to remove or hide them from the current system. Even worse, no one can recall what those fields were for, or maybe you have multiple fields with very similar names! Also, you could have lots of duplicate or partial records. Discuss with your company and your Salesforce consultant about best approaches to cleaning up this information.
 Mapping is a technical term for matching one field to another field, typically in different databases, to properly move data. For example, in Microsoft Outlook, you type a corporation’s name into the Company field. In Salesforce, you typically use the Account Name field. These two different labels have the same meaning. Mapping is the process by which you decide that data from the Company field in Outlook should correspond to the Account Name field in Salesforce.
3. Export your file.
You might have leads in an existing database or spreadsheet, such as Microsoft Excel, Oracle CRM On Demand, or Microsoft Dynamics. Most systems like these have simple tools for exporting data into various formats. Select the records and the fields that you want. Then, export the file and save it in a .csv format. If your leads are already in spreadsheet format (such as Excel), just resave the file in .csv format.
4. Review your lead data.
You’ve probably heard the old adage “garbage in, garbage out.” Regardless of whether your company spent some time with initial housecleaning before this step, it’s important to review this data again at this point. Clean up your information before you bring it into Salesforce so that you can save yourself the effort later.
5. When you’re done with the preparation, click the Start the Import Wizard link on the Lead Import Wizard.
A pop-up window labeled Step 1 of 3: Upload the File appears, as shown in Figure 9-2.
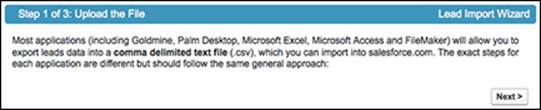
Figure 9-2: Uploading the lead file.
6. Complete the fields in Step 1 of the wizard.
Assuming that you already prepared your file, you probably just need to follow these steps:
1. Load the file by clicking the Choose File button and selecting the correct file on your computer.
2. Select a default lead source, if relevant.
3. Apply an assignment rule if you want leads to route directly to assigned reps.
If you don’t use an assignment rule, all the leads that you import are assigned to you unless you otherwise specify a lead owner in the file. (See the section “Creating assignment rules for automatic routing,” later in this chapter.)
4. Select the check box if you want to use assignment rule settings to send e-mail notifications to the record owners.
5. Verify the character coding.
Salesforce prefills this picklist based on your company profile, and you rarely have to change it.
6. Select the matching type.
If you want Salesforce to avoid importing duplicate records, choose whether you want to identify a duplicate lead by matching Salesforce ID, name, or e-mail. If a lead record with the matching criteria already exists in Salesforce, that record is updated with the information in your file.
7. Select the check box if you want to trigger workflow rules to new and updated records.
See Chapter 20 for tips on improving workflow.
7. When you’re done with Step 1 of the wizard, click Next.
The Field Mapping page appears.
8. Map the fields between your file and Salesforce and then click Next.
The Field Mapping page displays all the Salesforce lead fields as labels with drop-down lists that correspond to the fields in your file. Simply go through the list of fields and select the field from the corresponding file that you’re importing which maps to the Salesforce field, as shown in Figure 9-3.
After you click Next, the Review and Confirm page appears, displaying a list of warnings, if any, on your impending import.
9. Review the messages for possible errors.
This step basically warns you about problems with the data or lets you know about fields that you haven’t mapped. If you discover an error, you can click the Back button and refine your mapping, or even close the wizard so that you can improve your import file. You might have to start over, but at least you avoid importing bad or incomplete data.
10. When you’re satisfied with your mapping, click the Import Now button.
An Importing page appears to let you know that the import is in progress, including an estimate of how long it will take.
11. Click the Finish button.
The pop-up window closes.
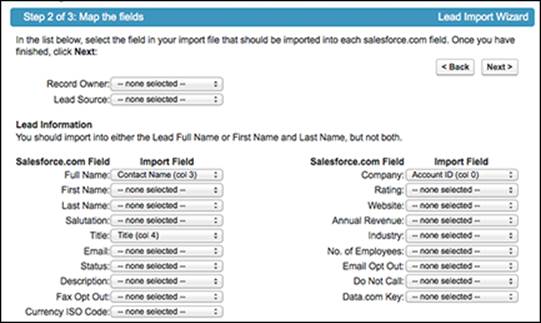
Figure 9-3: Mapping the lead fields.
12. Check the lead records that you imported.
Salesforce sends you an e-mail after your file has been successfully imported. To check your handiwork, click the Leads tab to go to your Leads home page. In the View drop-down list, select Today’s Leads to see a list of the leads that were created today. Click the link for a lead that you just imported and review the information for accuracy.
Importing leads is one of the fastest ways for you to set up your leads in Salesforce so that you can begin working them.
Breaking into unchartered waters
A leading Internet performance-monitoringcompany wanted to sell its services to a variety of new, untested markets. This salesforce.com customer had a stronghold in financial services but wanted to extend its client base to other Fortune 500 companies. Because of the specific nature of its business, the actual names of the decision makers that it wanted to target was publicly unavailable.
Marketing simply imported the Fortune 500 list and set the Last Name field as Unknown. Then, the company used Salesforce and a team of sales development reps to generate leads and set up appointments between actual buyers and the company’s outside field sales reps. In just a few short months, this use of Salesforce dramatically helped improve qualified lead generation and increased the pipeline and new bookings while breaking ground in new markets.
Organizing Your Leads
When you have some leads in Salesforce, you want to organize them to make them productive. When we work with companies, we often hear this request from salespeople: “I just want to see my data, and it needs to be the way that I want to look at it.” Just like Goldilocks, you want your leads to look just right.
In the following sections, we show you how you can use views on the Leads home page to provide greater focus for you and your sales teams. Then, for even more robust organization of your lead information, see Chapter 17 for specifics on how to build custom lead reports.
Using lead views
When you select a view, you’re basically specifying criteria to limit the results that you get back. For example, if you’re one of many sales reps, you might not want to waste your time sifting through all your company’s leads; you want to see just the ones that you own. With Salesforce, you can do that in one click. On the Leads home page, Salesforce comes with four predefined views:
· All Open Leads: Provides a list of all the lead records in which the Lead Status is still Open
· My Unread Leads: Gives you a list of your leads that you haven’t yet viewed
· Today’s Leads: Shows you only leads that were created today
· Recently Viewed Leads: Allows you to look at a list of recently viewed leads
To try out a preset view, go to the Leads home page and follow these steps (as shown in Figure 9-4):
1. Click the navigation arrow in the View drop-down list.
The four options in the preceding bulleted list appear, maybe along with some other choices that have been created for you.
2. Select one of the views.
For example, if you select the My Unread Leads view, a list page appears, displaying any of your unread leads. From this list page, you can perform a variety of standard operations, including editing, deleting, and viewing a record. See Chapter 2 for details on using list pages.
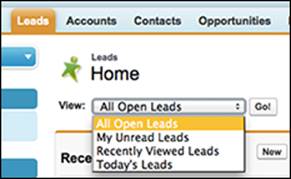
Figure 9-4: Previewing lead views on the Leads home page.
Creating custom lead views
For many users, the preset views are a good start. If you want special lists for the way that you follow up on your leads, though, build custom views. For example, if you call only on companies in the manufacturing industry located in the state of Florida with revenue over one billion dollars, take a minute and build a custom view. This custom view is always accessible to you, thus saving you time.
To create a view from scratch, follow these simple steps:
1. On the Leads home page, to the right of the View drop-down list, click the Create New View link.
A Create New View page appears, which includes a wizard to help create your view, as shown in Figure 9-5.
2. Enter a name for the view.
For example, you might call the view Big Florida Manufacturers.
3. Decide whether you want this view to search the entire leads database, your leads, or a queue.
If your company’s marketing department uses Salesforce’s campaign feature, you can further limit your view to leads associated with a specific campaign.
4. Under the Specify Filter Criteria step, select the criteria for your search.
A basic criteria query is made up of three elements:
· Field: The first box is a drop-down list that contains all the fields on the lead record. For example, you could choose the Industry field.
· Operator: The second box is a drop-down list that contains operators for your search. That sounds complicated, but it’s easier than you think. Taking the example from the preceding bullet, you’d select Equals from the drop-down list.
· Value: In the third box, you type the value that you want in the search. For this example, you’d type manufacturing.
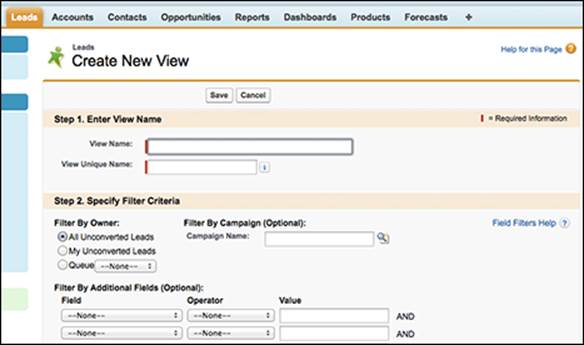
Figure 9-5: Building a custom lead view.
5. Select the columns that you want to be displayed on your list page.
Although Salesforce’s preset views display common fields, such as Email and State, you can select as many as 15 lead fields to display on your list page.
6. Under the Restrict Visibility step, decide whether you want others to see your custom view and select the appropriate radio button.
Your decision is made simple if the Visibility step doesn’t appear. Otherwise, think about whether other users can benefit from this view when you complete this step.
7. When you’re done, click Save.
You’re taken to a new list page, which is completely customized based on the search criteria that you chose in Step 4.
Accepting leads from a queue
If you’re a rep assigned to a queue, you can access the queue in the View drop-down list on the Leads home page. The queue list page looks just like a regular list page, but you can use it to grab and claim leads. (See the section “Making use of lead queues,” later in this chapter, for details on setting up queues.)
To pull leads from a queue and make them your own, go to the Leads home page and follow these steps:
1. Select the queue name from the View drop-down list.
The queue list page appears.
2. Select check boxes in the Action column to the left of leads that you want to claim.
Your manager might have specific guidelines. This is your chance to click into some records and try to pick the hottest leads.
3. Click the Accept button.
The queue list page reappears, minus the lead or leads that you selected.
Another way to keep your leads organized is to make sure that multiple versions of the same person don’t show up in Salesforce. This can wreak havoc as people update activity information on different records for the same person. Salesforce detects whether duplicate records already exist and merges them for you. Read the next section to see how to de-duplicate lead records.
Following Up on Leads
After you receive a new lead, you want a quick way to follow up and determine what you caught: a big one, a warm one, or just another person kicking tires. Your company might already have a standard lead qualification process, but the following sections talk about some of the ways that you can use Salesforce to pursue leads.
Finding and merging duplicate lead records
Before following up on a new lead, click the Find Duplicates button on the specific lead record to see whether a record already exists. You probably know that duplicates frequently occur with leads. For example, if you capture leads from your website, the same visitor might fill in your web form multiple times, even with the best of intentions. Instead of wasting your time or upsetting the existing lead, check first for duplicates.
By checking for duplicates, you might increase your chances of a qualified lead. When you merge duplicate records, the remaining record inherits not only the information you select but also linked records on related lists.
To merge lead records, you must be the lead owner of the records, the lead owner’s manager (that is, the lead owner must be subordinate to you in the role hierarchy), or a system administrator.
To find and merge duplicate leads, follow these steps:
1. Go to a lead record that you suspect or know has duplicates.
2. Click the Find Duplicates button at the top of the lead record.
A Search for Duplicates page appears, in five sections. The first section determines how you want to search Salesforce for duplicates. By default, Salesforce looks for a duplicate with a matching name, company, e-mail address, or phone number. The remaining four sections show any matching lead, contact, account, or opportunity records, based on the default matching criteria.
3. Select or deselect search criteria boxes to narrow or expand your search. Click the Search button to return updated results.
Records matching any of the selected search criteria appear in their appropriate sections.
4. Review the duplicate lead records and select a maximum of three records to merge.
In Salesforce, you can merge only three records at a time.
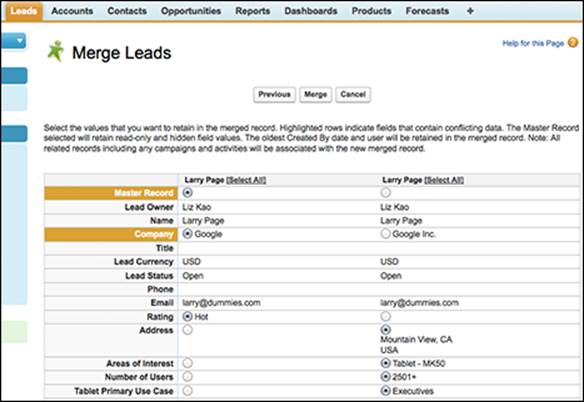
Figure 9-6: Merging duplicate lead records.
5. Click the Merge Leads button in the Matching Leads related list.
A Merge Leads page appears, displaying, side by side, the selected records and any fields that have been completed, as shown in Figure 9-6.
6. Compare the information and select the radio buttons to choose the values that you want to retain.
At the top of each column, you can also choose to keep all the values from one record by clicking the Select All link.
7. When you finish reviewing, click the Merge button.
A pop-up window appears, prompting you to validate that you want to perform the merge. After you click OK, the merged lead reappears. Any records from related lists are kept.
Tracking leads with related lists
How can you remember all the interactions that took place with a lead? Some of us have a hard enough time remembering what we did yesterday, let alone three weeks ago with 200 leads. Related lists on a lead record can help you capture all that information so that it’s at your fingertips the next time you talk to a lead.
If you’re looking for typical ways that salespeople use lead-related lists on a lead record, read the following list for an example:
· Log a Call: The next time you respond to a lead and want to record what you said, click the Log a Call button and enter the details.
· New Task: You plan to call the lead back next Friday when you know that the gatekeeper is on vacation. Click New Task and set a tickler for yourself for Friday. (See Chapter 7 for details on how to fill out a new task record.)
· Send an Email: You get through to the lead, and he asks you to send him an introductory e-mail about your company. Click the Send an Email button to send and track the e-mail directly from Salesforce. We talk more about sending e-mail through Salesforce in Chapter 8.
· New Event: The lead agrees to a demo. Click New Event and schedule a meeting so that you don’t forget.
Updating lead fields
In the course of your lead qualification, you inevitably collect pertinent information that you want to save directly on the lead record. Every time you capture important data on your lead, update your lead record by doing the following:
1. Double-click a field on the lead record to modify that field.
If you see a padlock icon in that field, you can’t modify it. Check with your system administrator to find out whether he specifically locked this field, or whether it’s one of those important system fields that Salesforce doesn’t allow anyone to change.
2. Complete the fields, as necessary, to determine whether the lead is qualified.
3. Update the Lead Status field when you make progress.
Even if you discover that the lead is a waste of your time, that’s progress.
4. Click Save when you’re done making changes.
At some point, you might decide that a lead can’t become a qualified opportunity at this time. In that case, you can archive the lead by changing its status. Archiving inactive leads allows you to get a sense of how many leads are still being worked.
Converting qualified leads
When you decide that a lead is actually a qualified opportunity, you can start using Salesforce’s full opportunity tracking system. To do so, you must convert the lead to an opportunity. This conversion gives you two benefits:
· Converting a lead to an opportunity allows you to track multiple contacts within an account, which you can do more easily than tracking a single individual lead.
In other words, if you have ten leads from Microsoft, none of them are linked with each other in Salesforce. But, by converting a lead, you create an account called Microsoft and you link all the Microsoft coworkers as contacts for the same account.
· Your goal is to ABC (always be closing), so the sooner you can start managing opportunities and not just leads, the healthier your pipeline and wallet.
For a qualified lead, your sales process begins where your lead process ends.
When deciding whether to add names of companies or businesspeople as leads or as accounts with contacts, remember that the leads module of Salesforce is nonrelational from lead to lead. If you’re serious about going after a particular company, and the inter-relationships of business contacts will be important, we recommend that you add the target as an account, rather than as a lead.
To convert a lead to an opportunity, follow these steps:
1. Click the Convert button on a lead record that you want to convert.
The Convert button is located at the top and bottom of the lead record. A Convert Lead page appears; see Figure 9-7.
2. Complete the required fields.
Required fields are highlighted in red. Here’s a summary:
· Record Owner: If the lead owner remains the record owner, don’t change the selection. If the owner changes, click the Lookup icon and choose from the list of users. Select the Send Email to the Owner check box, if needed.
· Account Name: If Salesforce doesn’t find an account that closely matches the Company field from your lead, it creates a new account record. In the event that it does find a match, select an option from the drop-down list, depending on whether you want to create a new account or associate the lead to the existing account.
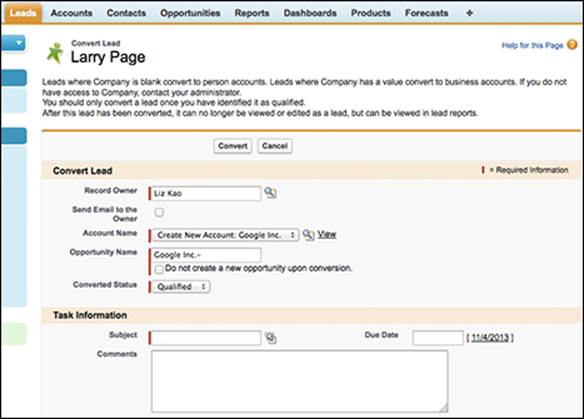
Figure 9-7: Converting a lead.
· Opportunity Name: If you want to create an opportunity, complete this field by giving the opportunity a name. (We typically recommend that the name of an opportunity be the account name followed by a hyphen and then a summary of the product interest. For example: Amazon – New Hardware.) You don’t have to always create an opportunity record when you convert a lead. Sometimes, the lead that you’re converting is associated with an existing opportunity. In these situations, select the Do Not Create a New Opportunity upon Conversion check box to avoid creating a new opportunity. Then, see Chapter 10 for details on how to link contacts to existing opportunities.
· Converted Status: Salesforce prefills this field with the default value that your company has chosen for a qualified lead. Don’t change this field unless your company has multiple selections for a qualified lead.
· Task Information: You can create a follow-up task right in these fields, but you don’t have to. Complete these fields only if it saves you a step.
3. When you’re done, click the Convert button.
If Salesforce finds a contact record that matches your lead, you can then decide to associate it with the existing contact record. Otherwise, a contact record appears for your former lead. That contact is linked to an account corresponding to the lead’s Company field, and all associated records from related lists are carried over. If you chose to create an opportunity in Step 2, you can see the opportunity on both the account and contact record’s Opportunity related lists.
Maintaining Your Lead Database
If you’re a system administrator or a lead manager who has the right permissions (we specify those permissions in the following sections), one of your greatest challenges is managing what hopefully will become a large pool of leads.
Lead databases can become unwieldy over time, so you need to keep them clean. For example, say that you work for a company that regularly collects leads from industry conferences. Someone who hadn’t read this book ended up importing a lot of leads into Salesforce without any review beforehand. After a year, your leads database might have many duplicates and plenty of garbage. Salesforce provides a number of simple tools to make short work of cleaning up your leads and other tasks.
The biggest problems we see with leads involve assigning, identifying duplicate records and merging them together (also known as de-duping), transferring, archiving, and deleting. We know: You hate to get rid of anything. However, sometimes it’s necessary and relatively painless.
Making use of lead queues
If you have a sales team made up of multiple people (often called sales development reps, or SDRs) responsible for harvesting leads collectively, you might want to set up lead queues. For example, some companies hire SDRs to handle leads on a first-come, first-served basis. You might just find that your reps work harder if they all have an equal chance to go after a fresh pool of leads.
If you’re an administrator or user who has permission to customize Salesforce, you can set up lead queues. Follow these steps:
1. Choose Setup⇒Administer⇒Manage Users⇒Queues.
A Queues page appears.
2. Click New to create a new queue.
The New Queue page appears in Edit mode, as shown in Figure 9-8.
3. Name the queue and specify the Lead object to associate with this queue.
4. Add members to the queue.
Members can be users, groups, or roles in your company who’ll be part of the queue. For example, you might label the queue Western Field Sales and then choose users who make up the Western Sales team.
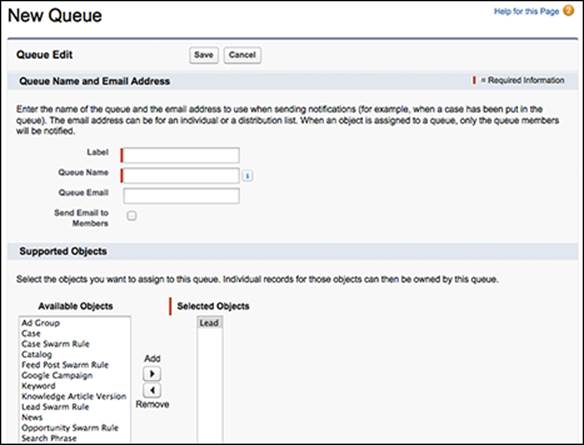
Figure 9-8: Creating a new lead queue.
5. When you’re done, click Save.
You can now use this queue when you organize and reassign lead records.
Lead queues can be viewed in the same place on your Leads home page where you view your custom lead views. The name of the lead queue is automatically added to the drop-down list for the lead views. Pretty neat, huh?
Creating assignment rules for automatic routing
If your company generates a lot of leads, assignment rules can help distribute the workload and get leads to the right users. Assignment rules give you a better chance to keep leads from becoming stagnant. A lead assignment rule is a feature that lets the administrator define who should receive a lead and under what conditions. For example, if your reps have sales territories defined by ZIP Codes or countries, you can use those ZIP Codes or countries to dictate who gets what leads.
To create a lead assignment rule, follow these steps:
1. Choose Setup⇒Build⇒Customize⇒Leads⇒Assignment Rules.
If you haven’t yet set the default lead owner, the Lead Settings page appears, asking you to select the default lead owner. The buck stops with this person or queue, as far as lead routing goes. After you make this selection, Salesforce returns you to the Lead Assignment Rules page.
2. Click New to create a new assignment rule.
The New Lead Assignment Rule page appears in Edit mode.
3. Enter a title in the Rule Name field, select the check box if you want to make it the active assignment rule, and click the Save button.
The Lead Assignment Rule page reappears. You can have only one active rule at any time, but the rule can have multiple entries. Click the rule name to go to the detail page for that rule.
4. Click New in the Rule Entries related list.
A Rule Entry Edit page appears.
5. Complete the steps as follows:
1. Enter a number in the Order field to set the order.
2. Select criteria to define the rule.
See the section “Creating custom lead views,” earlier in this chapter, for details on selecting criteria. In this case, you might enter ZIP Code Equals 02474.
3. Use the drop-down list and Lookup icon to select the user or queue.
4. Use the Lookup icon to choose an Email Notification Template.
You can set the assignment rules to send e-mail alerts to recipients of new leads.
6. When done, click the Save button or the Save & New button.
· Save: The New Lead Assignment Rule page reappears.
· Save & New: A new Rule Entry Edit page appears, and you can repeat Steps 5 and 6 until you finish.
Transferring leads
You might need to transfer leads for a variety of reasons. For instance, after you set up your lead records in Salesforce, you need to give them to the right people on a different team. Or maybe some reps just weren’t following up, so you took their leads away after swatting their noses with a rolled-up newspaper.
To transfer leads, you must be an administrator or a user with Manage Leads and Transfer Leads permissions. If you want to reassign many leads at the same time, take these steps:
1. From the Leads home page, select a view from which you can see some leads that you want to reassign.
The list page appears.
2. In the Action column of the lead list, select the check boxes to the left of the lead records that you want to assign to someone else.
3. Click the Change Owner button at the top of the page.
The Change Lead Owner page appears.
4. Select the user or queue that you intend to reassign leads to, and then click Save.
The lead list reappears, and the lead owners have been changed. The new lead owner can be optionally notified via e-mail of this ownership change. Just select the Send Notification Email check box before clicking the Save button.
If you’re an administrator, you can use the Mass Transfer Leads tool in Setup to accomplish the same goals of reassigning en masse. See Chapter 22 for details on mass-transferring leads.
If you’re reassigning one lead at a time, you can transfer ownership directly from a lead record. Follow these steps:
1. On the lead record, to the right of the Lead Owner field, click the Change link.
The link is in square brackets. The Change Lead Owner page appears.
2. Select the user or queue that you’re assigning the lead to.
You use this same page when you’re assigning multiple leads, but here, you can choose to notify the recipient with an e-mail.
3. (Optional) Select the Send Notification check box to notify the new owner of the reassignment.
4. When you’re done, click Save.
The lead record reappears, displaying your ownership change.
Changing the status of multiple records
An administrator or a user who has Manage Leads and Transfer Leads permissions can change the status of multiple records at the same time. This feature comes in handy if, during a process, a lead manager reviews leads prior to assigning them to reps.
To change the status of multiple leads at the same time, follow these steps:
1. From the Leads home page, select a view.
The list page appears.
2. In the Action column of the lead list, select the check boxes to the left of the lead records that require a status change.
To select all the leads in this view, select the check box to the left of the Action column header, which selects all the leads on this page.
For example, if you’re eyeballing a list of leads from a trade show, you might select obviously bogus leads.
3. Click the Change Status button at the top of the page.
The Change Status page appears.
4. Select a status from the New Status drop-down list and click Save.
The lead list reappears.
If you require industrial-strength de-duplication tools, a number of proven technology partners handle de-duplication with Salesforce, plus a variety of other data management tasks. You can check out these offerings on the AppExchange directory by searching for “Data Cleansing” in the search bar.
Mass-deleting lead records
Periodically, be sure to delete records that are unqualified or of no value to your company. You must be an administrator to mass-delete records.
Some companies add a To Be Deleted value to their Lead Status field to denote garbage. Then, periodically, the administrator deletes those records.
If you want to delete multiple records at a time, follow these steps:
1. On the Leads home page, click the Mass Delete Leads link below the Tools heading.
A Mass Delete Leads page appears, including a three-step deletion wizard.
2. Review the steps and then type the search criteria for the leads that you want to delete.
For example, if you want to delete unqualified leads, enter a filter in which Lead Status Equals Unqualified.
3. Click the Search button.
The page reappears, displaying your results at the bottom of the page.
4. Select all records or just the records that you want to delete by selecting the appropriate check boxes.
To select all the search results for deletion, click the Select All link at the top of the list.
5. Click the Delete button after you complete selecting the records for deletion.
The search results are updated to omit the record(s) you deleted.
When deleting records, always be cautious, but don’t overly stress out. When you delete records, that information is placed in your Recycle Bin, and you can access as many as 5,000 records for 30 days. To undelete a record, click the Recycle Bin link on your sidebar, find the record, and undelete it. Then, count your blessings and breathe into a paper bag until the panic attack subsides.
Building Your Lead Database with Data.com
Data.com (www.data.com) is an online source of millions of business professionals and Dun & Bradstreet (D&B) information about companies. It’s used to compare, update, and clean lead information in your Salesforce org, against information that exists with D&B. Data.com’s partnership with D&B provides the industrial-strength, third-party validation of lead information, because many people who sign up for things online can often use as little real information as possible when they’re in the early stages of researching a product. A free, light version (Data.com Connect) is even available if you don’t have much of a budget, and it’s based on a very simple quid pro quo model. For businesspeople researching others, in particular companies or industries, Data.com Connect lets you view people’s phone and e-mail information in exchange for submitting or updating the contact information of someone within your network. I scratch your back, you scratch mine, as the saying goes.
Data.com is a nifty add-on feature that helps both update and expand your leads (and accounts and contacts). Here’s a high-level overview on how it works:
1. From within Salesforce, it flags any of your lead data when a discrepancy exists between the information you have and what’s in Data.com.
You get to choose which lead fields Data.com reviews to determine this and which flagged records you want to be updated. Don’t worry: You can also lock certain records so that they’re not reviewed.
2. You can mine Data.com for new leads based on certain criteria (like Industry = Manufacturing, State = California, Company Revenue = $500 million – $1 billion ) that you choose, to build your own custom prospecting list. Data.com searches its database for matches and adds them to your Salesforce database on a regular basis.
Data.com has a few different products to help with each aspect of de-duping or list building. To get more information, visit its website’s Products section at www.data.com/products.