Salesforce.com For Dummies, 5th Edition (2014)
Part II. Keeping Track of Customer Relationships
Chapter 8. Sending E-Mail
In This Chapter
![]() Getting to know Salesforce e-mail fields
Getting to know Salesforce e-mail fields
![]() Setting e-mail options
Setting e-mail options
![]() Sending an e-mail
Sending an e-mail
![]() Delivering mass e-mails
Delivering mass e-mails
![]() Keeping an eye on e-mails after you send them
Keeping an eye on e-mails after you send them
E-mail is a fundamental method for communicating with customers, prospects, and friends. By using e-mail correctly, you can manage more sales territory and be responsive to customers. However, by not using e-mail appropriately, you can leave a bad impression or lose a client.
If e-mail is an indispensable part of your business, you and other users can send e-mail from Salesforce and track the communication history from relevant records, such as accounts, contacts, opportunities, and cases. This capability is helpful if you inherit a major customer account because you can potentially view all the e-mail interactions from a single account record.
Sending an e-mail is a cinch, and if that were all this chapter covered, we’d have summarized it in just one section. But Salesforce provides additional e-mail tools to help you better sell to, service, and wow your customers. In this chapter, we show you all the tricks and best practices for sending a basic e-mail, mass e-mailing, using templates, and tracking responses.
Understanding E-Mail Fields in Salesforce
An e-mail in Salesforce is an activity record comprising fields for the message and for the people you want to keep in the loop on the message.
The e-mail record comes with standard fields that people commonly use when sending e-mail. Most fields are self-explanatory, but the following list summarizes some additional fields:
· Related To: Use this field to relate the e-mail to an account, opportunity, campaign, case, or other standard or custom object record in Salesforce, depending on your edition. By completing this field, the e-mail is stored under the Activity History related list of that record. See the “Creating and sending e-mail” section, later in this chapter.
· Additional To: Use this field to type in additional primary recipients. They don’t have to be contacts or leads in Salesforce.
· Attachment: Of course, you know what an e-mail attachment is, but we wanted to let you know that the size limit is 10MB per e-mail within Salesforce.
Setting Up Your E-Mail
Before you begin e-mailing people from Salesforce, check out a couple of setup options that can save you time and headaches. In the following sections, we show you how to personalize your outbound e-mail as well as how to build personal e-mail templates for common messages that you send to people.
Personalizing your e-mail settings
When you send an e-mail via Salesforce, the recipient can receive the message just as if you sent the e-mail from your standard e-mail program. The e-mail message appears as if it came from your business e-mail address, and you can use a standard signature to go with your message. And if the recipient replies to your e-mail, that reply e-mail comes right to your standard e-mail inbox. To pull this off, though, you need to personalize your e-mail settings in Salesforce.
To set up your e-mail, follow these steps:
1. Choose My Settings⇒Email⇒My Email Settings.
The My Email Settings page appears in Edit mode.
2. Modify the first two required fields, as necessary, to specify the outgoing name and the return e-mail address.
3. Select the Yes radio button if you want to send a blind carbon copy (Bcc) to your standard e-mail inbox.
That way, you can still keep e-mails in customer folders in your e-mail application.
4. Modify the Email Signature field.
If you’re personalizing your e-mail settings for the first time, you might notice a default signature from Salesforce. This message appears at the bottom of your e-mail in lieu of your signature. Unless you’re using Personal Edition, go ahead and change it.
5. Click Save.
The Email page under Personal Setup appears, and your settings are modified.
Building personal e-mail templates
If you ask your top sales reps about sending e-mail, they’ll probably tell you that they don’t re-create the wheel every time they send certain messages to customers. It’s a waste of their time, and time is money. Instead, they use templates and form letters to send the same message with less work.
In your standard sales process, you probably send a variety of e-mails to customers, including
· Letters of introduction
· Thank-you notes
· Responses to common objections
· Answers on competition
Although you do need to personalize a message to fit the specific details of a customer, you probably use certain effective phrases and sentences over and over again. Instead of searching for a prior message and cutting and pasting, you can create personal e-mail templates and improve your productivity.
To create a personal template, follow these steps:
1. Choose My Settings⇒Email⇒Email Templates.
An Email Templates page appears.
2. Select the My Personal Email Templates folder in the drop-down list, if it’s not already set to that.
3. Click the New Template button.
Step 1 of the template wizard appears.
4. Select the radio button for Text, HTML, Custom, or Visualforce to set the type of e-mail that you want to create and click Next.
· Text: Uses a basic text-only template without any formatting.
· HTML: Uses a previously created letterhead and supports HTML formatting.
· Visualforce: Uses a saved Visualforce page.
· Custom: Lets you paste previously created HTML code as your template.
The next page of the wizard appears, and the content of the page depends on the choice you made. Using HTML is most common and has certain advantages, both from appearance and tracking standpoints, but older e-mail programs cannot receive HTML e-mail.
5. If you select Text in the previous step, complete the template fields provided (see Figure 8-1) and then click Save.
You can use the template only after you select the Available for Use check box.
After clicking Save, a Text Email Template page for your new template appears in Saved mode with an Attachments related list.
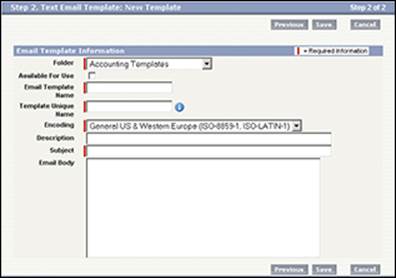
Figure 8-1: Create a text template.
6. (Optional) Attach a document.
7. If you select either HTML option (HTML or Custom) in Step 4, enter the properties for the e-mail template and click the Save & Next button.
If you choose to build your e-mail template with a letterhead, you have to select a previously created letterhead and then a layout by using the drop-down lists provided. After you click the Save & Next button, the Step 3 page of the wizard appears.
 You can create HTML or Custom e-mail templates only if you have the Edit HTML Templates permission. See an admin if you don’t have the right permissions.
8. Create the HTML version by typing and formatting the content and copying and pasting merge fields.
9. Click Preview to review your work and, when you’re done, click the Save & Next button.
The Step 4 page of the wizard appears.
10. Enter the text version of the e-mail template.
For those customers who can’t or don’t want to receive HTML e-mails, they can receive the text version. If the message is similar or identical to the HTML version, click the Copy Text from HTML Version button and modify the content, as needed.
11. Click the Save button.
An HTML or Custom Email Template page for your new template appears in Saved mode with an Attachments related list, which you can use for attaching standard documents.
We show you how to use your e-mail template in the later section “Using e-mail templates.”
Creating letterheads
If you are a system administrator, you can create and save custom branded letterheads to ensure that all your templates have a similar look and feel.
To create a letterhead, follow these steps:
1. Choose Setup⇒Administer⇒Communication Templates⇒Letterheads.
If this is your first time visiting, an Understanding Letterheads page appears. You can bypass it by clicking the Next button.
2. Click the New Letterhead button.
The Letterhead Properties section of the New Letterhead wizard appears.
3. Select the Available For Use check box. Then fill in the required fields marked in red and optionally enter a description.
If you don’t want to let anyone use the letterhead just yet, you can leave the Available For Use check box deselected for now.
4. Click the Save button.
The Letterhead Details section of the New Letterhead Wizard appears (see Figure 8-2). This is where you can graphically design your letterhead.
5. Click the Edit Background Color button.
The Background Color window opens with the default color as gray. You can set it to any HTML color code or use the Paint Can button to select from a color chart. When you’re done, click the OK button to close the window.
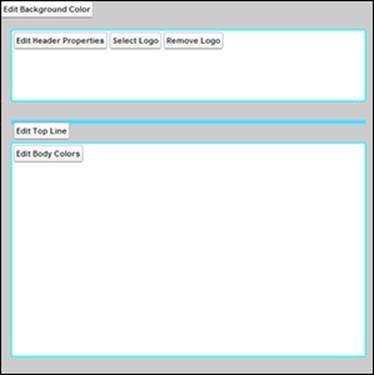
Figure 8-2: Create a letterhead.
6. Click the Select Logo button.
The Attach File window opens to let you select from any image that has already been uploaded to the Documents tab in Salesforce. When you find the file you want, click its name to select it and close the window.
7. Click the Edit Header Properties button.
The Header Properties window opens. You can specify the background color, the horizontal and vertical alignment, and the height of the Header section to ensure that your logo looks great. When you’re done, click the OK button to close the window.
8. Click the Edit Top Line button.
The Top Color and Height window opens. If you don’t want a top line, you can set the line color to the same as your background and set the height to 0. When you’re done, click the OK button to close the window.
9. Click the remaining buttons to make additional edits to your letterhead.
You can configure the middle and bottom lines, the footer properties and logo, and the body background color, just like you did in the previous steps.
10. Click the Save button.
A preview of your new letterhead is shown. You can always make additional changes by clicking the Edit Letterhead button.
Saving Third-Party E-Mails to Salesforce
Salesforce allows you to send e-mails to leads and contacts; however, the management of the conversations (that is, the back and forth of e-mail dialog that occurs) happens in your company’s e-mail management system of choice.
Many companies today are moving their e-mail systems online to reduce the costs of using and maintaining traditional e-mail software systems like Microsoft Exchange and Outlook. Don’t get us wrong; Outlook is the big gorilla of the e-mail (officially called “productivity tools”) space. At the same time, using web-based e-mail systems like Google Apps or Office 365 has gained a lot of momentum.
 Chapter 3 explains how to download the Salesforce for Outlook plug-in to synchronize e-mails in Outlook with Salesforce.
If you’re using a web-based e-mail system, you can still save and track your outbound e-mails to Salesforce, too, which allows you to connect an e-mail to a record.
Activating the Email to Salesforce feature
To first activate the Email to Salesforce feature, have your administrator choose Setup⇒Administer⇒Email Administration⇒Email to Salesforce. Click the Edit button in the middle of the Email to Salesforce page to select the Active check box and enable Email to Salesforce.
If you have sophisticated e-mail security policies and know whether your e-mail domains support the SPF, SenderID, or DomainKeys protocols, be sure that the admin also selects the Advanced Email Security Settings check box. Salesforce uses these protocols to verify the legitimacy of the sender’s e-mail server. If the e-mail server passes at least one of these protocols, Salesforce processes that e-mail and proceeds to log it as an activity under a lead or contact.
After you make your check box selections and click the Save button in the middle of the page, a pop-up box appears that optionally allows the admin to notify all Salesforce users about the Email to Salesforce feature.
Identifying your Email to Salesforce address
After your administrator activates Email to Salesforce, choose My Settings⇒Email⇒My Email to Salesforce to get to the My Email to Salesforce page. In the middle of the page, a highlighted field notes your Email to Salesforce address. Whenever you’re writing an e-mail in your online e-mail system (we use Gmail as the example), paste that address into the BCC field of your e-mail. When you send your e-mail, it’s logged as a completed task in Salesforce, under whichever lead or contact record whose e-mail address matches that in the To field.
If you send and receive e-mail from multiple addresses (and possibly from the same inbox), you can list all your e-mail addresses so that Salesforce can associate correspondence from those e-mail addresses to the automatically generated Email to Salesforce address. To edit your e-mail addresses, follow these steps:
1. In the My Acceptable Email Addresses field, add all the e-mail addresses that apply, separated by commas.
2. In the Email Associations section, select the Opportunities, Leads, or Contacts check box, depending on which object(s) you want Salesforce to attach your external e-mails to.
3. (Optional) Select the Always Save Email Attachments check box to have Salesforce include any attached files on your external e-mails.
4. (Optional) Select the Email Me Confirmation of Association check box to set your preference for whether you want to be sent a link via e-mail of your newly created e-mail record in Salesforce.
Saving an e-mail to Salesforce
After you set your Email to Salesforce special e-mail address, it’s time to use it.
Keeping your web browser open to Salesforce and the My Email to Salesforce page, open a new browser window to access your online e-mail system and compose an e-mail (again, we use Google Gmail as example) to a person whose e-mail you know is in Salesforce, associated with a lead or contact. (Make sure that your relationship with this person allows you to send test e-mails to him or her, or you might have some explaining to do!) Simply copy the special e-mail address and paste it into the BCC field. When you’re done writing the body of the e-mail, send it, andvoilà! Almost instantaneously, it appears as an activity associated with that lead or contact.
Sending E-Mail from Salesforce
You can send an e-mail to any lead or contact stored in Salesforce with a valid e-mail address. By sending from Salesforce, you can ensure that you and your team members can keep track of critical outbound communications to customers and prospects.
Creating and sending e-mail
You can initiate your outbound e-mail from many different records in Salesforce, including opportunity, account, case, campaign, lead, and contact records. To create and send an e-mail, go to the relevant record and follow these steps:
1. Click the Send an Email button on the Activity History related list.
A Send an Email page appears, as shown in Figure 8-3. The Email format is in Text, with a Switch to Format link appearing to the right of it. Alternatively, click the Send an Email button in the HTML Email Status related list to default to HTML format. Either way, if you change your mind, you can always switch formats on the Send an Email edit page.
If you have organization-wide e-mail addresses set up in Salesforce, you can select one as your From address. If not, your standard e-mail address will default as the From address.
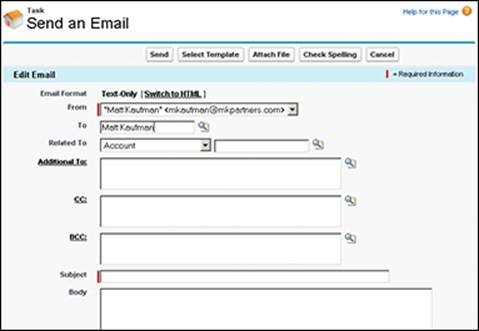
Figure 8-3: Composing an e-mail.
2. Decide in what format you want to send your e-mail:
· Switch to Text Only: You want to send the message using only text — no HTML. A dialog box appears to warn you that any HTML formatting will be removed. When you click OK, the box disappears, and the format is switched.
· Switch to HTML: Send your message in HTML format.
If you decide to send your e-mail with HTML, you get an added bonus of being able to track your e-mail. See the later section “Tracking HTML e-mails.”
3. Type the recipient’s name in the To field and then click the Lookup icon at the right of the field to search for the contact or lead.
A pop-up window appears, containing a search tool and a list of search results.
If you send an e-mail from the relevant lead or contact record, you can eliminate this step because the To field is prefilled. But, remember to use the Related To field to associate the e-mail to other records, such as an opportunity.
4. Select the correct person by clicking the name, or refine your search by modifying the name or using wildcards; then click Go.
When you select the recipient, the pop-up window disappears, and the To field is populated with your selection.
5. Use the Related To drop-down list to associate the e-mail with the correct type of record, and then click the Lookup icon to the right of the adjacent field to find the exact record — similar to the process in Steps 3 and 4.
Depending on which record you started from, the Related To drop-down list might already be filled.
6. In the Additional To field, type additional primary recipient e-mails.
These folks get their e-mail on the To list when they receive and open your message. They don’t have to be contacts or leads.
7. Click the CC link or the BCC link to copy other contacts or users to the e-mail.
A pop-up window appears, containing a drop-down list for coworkers at your company and for contacts of the account.
8. Select names in the Contacts list box, use the double arrows to include them as recipients, and then click Save.
The pop-up window disappears, and the CC and BCC fields reflect your selections.
9. Click in the CC or BCC fields and add additional e-mail addresses, as needed.
Salesforce allows you to send e-mails to people who aren’t contacts, leads, or users. Just type the e-mail address directly into this field.
If you want to use an e-mail template, stop here and go to the next section.
10. Complete the Subject and Body fields of the message and then click Send.
If your contact or lead in the To field doesn’t yet have an e-mail address, this absence is flagged before you send the e-mail. A Click Here to Edit the Email Address link appears that you can click to associate an e-mail with the record without having to leave your Send an Email page.
The record that you started from reappears, and a link to a copy of your e-mail appears in the Activity History related lists of the records that you linked.
Using e-mail templates
In the section “Building personal e-mail templates,” earlier in this chapter, we show you how to create a personalized template. In this section, you find out how to send an e-mail that uses a template you created. First, create an e-mail (as described in the preceding section), and then follow these additional steps before you send it:
1. Before you modify the Subject and Body fields, click the Select Template button at the top of the page.
A pop-up window appears, displaying a list of available templates.
2. Click the Folder drop-down list and select the folder where you saved your template.
The pop-up window refreshes, displaying a list of available templates based on your folder selection, as shown in Figure 8-4.
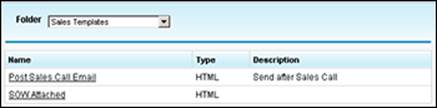
Figure 8-4: Available e-mail templates.
3. Select the desired template by clicking the relevant link in the Name column.
The pop-up window disappears, and the page reappears with content based on the template that you selected.
4. Modify the message to further personalize the e-mail and then click Send.
The record you started from reappears, and a link to a copy of your e-mail appears under the Activity History related lists of the linked records.
Sending Mass E-Mail
If you struggle to stay in touch with prospects or customers on a regular basis, you can use Salesforce to send mass e-mails and shorten your workload. Mass e-mail is particularly helpful for sales reps who send common messages that don’t require high levels of personalization. For example, if you’re an institutional sales rep selling shares of a hedge fund, you might want to send a monthly e-mail newsletter to sophisticated investors specifically interested in your fund.
When sending mass e-mail, Professional Edition users can send a maximum of 250 e-mails at a time. Enterprise Edition users can send as many as 500 e-mails, and Unlimited and Performance Edition users can send as many as 1,000 e-mails. A company is limited to 1,000 e-mails per day.
You can send a mass e-mail to contacts or leads — the method is similar.
To send out a mass e-mail, go to the Contacts home page or Leads home page, and follow these simple steps:
1. Click the Mass Email Contacts link or the Mass Email Leads link (depending on which home page you’re on) under the Tools section.
The Recipient Selection page appears.
2. Specify the recipients that you want to include in the e-mail from the View drop-down list and click the Go button.
If you find the recipients you want, skip to Step 5.
3. If you can’t find the view that you want from the View drop-down list, click the Create New View link.
The Create New View page appears. In most circumstances, you need to create a custom view.
4. To create the new view, fill in the information that you want to use to filter the recipients for your mass e-mail and then click Save.
For example, if you want to send an e-mail to all customer contacts located in New York, you can build a view. (See Chapter 4 for general details on how to create custom views.) When you click Save, the Recipient Selection page reappears, displaying a list of contacts that meet your criteria.
Any of your leads or contacts that have the Email Opt Out check box selected are automatically omitted from these lists.
5. Review the list and select the check boxes to designate the contacts to whom you want to send the mass e-mail.
Contacts or leads that don’t have e-mail addresses lack an available check box in the Action column.
6. When you’re satisfied with your selections, click Next.
A Template Selection page appears, where you can select an e-mail template from the e-mail template folders and associated lists.
7. Use the Folder drop-down list to locate the right folder and template.
You can skip this step if you already see the desired e-mail template on the list results.
8. Select the desired e-mail template by selecting the appropriate radio button in the Name column, and then click Next.
A Preview Template appears.
9. Review the content for the mass e-mail and then click Next.
A Confirmation page appears, summarizing the number of contacts that will receive the mass e-mail.
10. Select the appropriate check boxes if you want to receive a blind copy, store an activity, and/or use your signature.
11. Give this mass e-mail a name in the Mass Email Name field.
12. Use the radio buttons to select whether you want to send the e-mail now or schedule it for delivery (set the time and date in the Schedule for Delivery On and Time Zone fields).
13. When you’re done, click Send.
A Complete page appears, confirming the delivery of your mass e-mail.
Tracking E-Mail
By sending and storing important business-related e-mails in Salesforce, you and your teams can get a more complete picture of what’s happening with your accounts, contacts, and so on. In the following sections, we show you the basic ways to view your e-mail records and a special feature in Salesforce that allows you to track HTML e-mails.
Viewing e-mails in Activity History
When you send an e-mail from Salesforce, a copy of your message is logged as a task record on the Activity History related list of related records. For example, if you send an e-mail from an opportunity record in Salesforce, you can view that e-mail from the related Opportunity, Contact, and Account detail pages. See Figure 8-5 for an example.
On an Activity History related list, you can also click the View All button if you want to see the completed activities (including e-mail) on a single page.

Figure 8-5: Viewing e-mail records on an Activity History related list.
Tracking HTML e-mails
If you often wonder whether customers pay attention to e-mails that you send them, you can use the HTML Email Status related list for confirmation that the e-mail was opened. Sales reps can use this feature to see whether contacts and leads are opening and viewing important e-mails on quotes, proposals, and so on.
 When you send an HTML e-mail from Salesforce, the e-mail is embedded with an invisible pixel that can be used for tracking.
You can view that e-mail not only from the Activity History related list but also from the HTML Email Status related list of a lead or contact record.
The HTML Email Status related list (see Figure 8-6) shows data on a number of key elements, including the dates the e-mail was sent, first opened, and last opened, as well as the total number of times it was opened. Although this information isn’t a sure-fire way to determine whether your customer wants to buy, some reps use this feature to measure interest on a single e-mail or even mass e-mails.

Figure 8-6: Viewing e-mail records on an HTML Email Status related list.
Integrating with Outlook e-mail
If your company uses Microsoft Outlook for e-mail, you can work from within that application and still track your e-mails in Salesforce. You may be accustomed to receiving and sending your e-mails from Outlook, so this Salesforce feature can help you capture both inbound and outbound e-mail on relevant records in Salesforce. For more information on using Salesforce for Outlook, see Chapter 3.