Salesforce.com For Dummies, 5th Edition (2014)
Part III. Driving Sales with Sales Cloud
Chapter 11. Tracking Products and Price Books
In This Chapter
![]() Defining products and price books
Defining products and price books
![]() Using products and price books
Using products and price books
![]() Creating products
Creating products
![]() Establishing and updating product schedules
Establishing and updating product schedules
![]() Maintaining product lists and price books
Maintaining product lists and price books
A product, as its name implies, is a product or service that you sell to customers. Products are the individual line items that make up an opportunity. Depending on your goals for Salesforce, you might not need to immediately incorporate Salesforce’s product-type features into your opportunities. But if you sell multiple products and services and you struggle with product-level visibility, Salesforce provides powerful and easy tools to implement solutions for Professional, Enterprise, and Performance Edition users.
Using products in Salesforce benefits sales reps and people in product marketing, management, and development throughout your organization. Sales reps can quickly locate the price of a product and select products to calculate an opportunity’s amount. Marketing, management, or development professionals can get vital sales information to support strategic business planning, new product development, and product life cycle management.
In this chapter, we show sales teams how to use products and price books with opportunities (if your administrator has already set that up). Before setting up products and price books, though, administrators first need to do some advanced planning. We discuss how to create a product catalog, set up schedules, and build price books. We then show you how to maintain products and price books on an ongoing basis to facilitate your sales goals. We conclude this chapter by showing you how to generate quotes that incorporate items from your product catalog so that you can e-mail them to your contacts.
Discovering Products and Price Books
You need to know two key and interrelated terms before you can begin planning your product strategy in Salesforce:
· Products: Individual items that you sell through your opportunities. All products belong to one universal product catalog. After you create a product, though, you can associate it to one or multiple price books with identical or different prices. For example, you may use multiple price books if you use one set of prices when selling to qualified nonprofit agencies and a different price list for companies in the private sector.
A product can have an associated schedule based on quantity, revenue, or both. If you sell products and break out schedules to forecast revenue recognition or for planning, you can use Salesforce to reflect important schedules for products linked to opportunities.
 To access the Products home page, click the Products tab. If you can’t see that, confirm that the Force.com drop-down list in the upper-right corner of the screen is set at Sales (versus something like Call Center). If you still don’t see it, check with your system administrator.
· Price book: A collection of products and their associated prices. A product with its associated price is a price book entry. You can also create custom price books based on your unique sales model.
You can associate a price book, add products, and build schedules on an opportunity through the Products related list on an Opportunity detail page.
Defining standard product fields
A product record consists of a number of fields that you use to capture information about a product you sell. If you’re involved in shaping products for your company, most of the standard fields are obvious. If you want specific definitions, click the Help link in the upper-right corner of Salesforce.
Here are a couple of important pointers on understanding the standard product record fields:
· Product Name: The name of your product. Make sure to use titles that are clear and familiar to your sales reps and customers.
· Product Code: An internal code or product ID used to identify your product. If your existing products and product codes reside in a financial database and you want to plan for integration, make sure that the product codes are consistent.
· Product Description: Text to distinguish products from each other. If you’re in product management or marketing, describe your products so that they’re obvious and useful for your sales teams.
· Product Family: The category of the product. Use this drop-down list when building reports that reflect sales data by product category. For example, if you work for a technology value-added reseller (VAR), you might want to reflect your pipeline by families that include hardware, software, services, training, and maintenance. You can set up products in Salesforce so that each product automatically maps to a product family.
· Active: This check box must be selected to make the product available to your users.
· Quantity Scheduling Enabled: Select this check box to enable quantity scheduling for a product. If you don’t see this check box, your administrator hasn’t enabled it.
· Revenue Scheduling Enabled: Select this check box to enable revenue scheduling for a product. If you don’t see this check box, your administrator hasn’t enabled it.
Understanding the different types of pricing
Salesforce allows you to customize your pricing based on the way you sell. If you use products in Salesforce, your company has three different options for pricing:
· Standard Prices: Default prices that you establish for your products when you set up your standard price book
· List Prices: Prices that you set up for custom price books
· Sales Price: Price of a product determined by the sales rep when he adds a product to an opportunity
See the following section for details on adding products to opportunities.
Using Products and Price Books
Sales reps can add products with specific prices to their opportunities, and Salesforce automatically calculates the Amount field on an opportunity record. If you’re a sales rep selling multiple products and managing multiple opportunities at the same time, you can take the frustration out of remembering what you offered to a customer. If you’re a sales manager, you can segment your pipelines and forecasts by product lines. And if you’re in product management or marketing, products in Salesforce can give you real insight into product demand from your markets.
Adding products to opportunities
To take advantage of products, your company must first set up a product catalog as well as one or more price books. See the section “Building the Product Catalog,” later in this chapter, for the how-to details on setting up your products and price books. After this is done, sales reps can add products to an opportunity by going to a specific opportunity and following these steps:
1. Scroll down the Opportunity detail page to the Products related list and then click the Choose Price Book button.
A Choose Price Book page appears. If your company has made only one price book available to you, you can bypass this step and start with Step 2.
2. Select the appropriate price book from the Price Book drop-down list and then click Save.
The Opportunity detail page appears again. The Products related list now shows the name of the price book in parentheses.
 On an opportunity, you can use only one price book at a time.
3. Click the Add Product button on the Products related list.
A Product Selection page appears, as shown in Figure 11-1. This shows all the products in your selected price book.
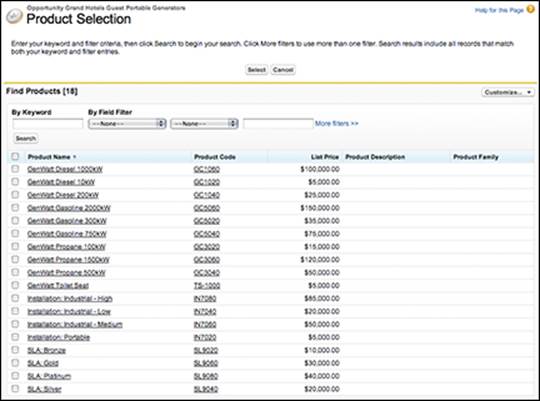
Figure 11-1: Finding your products.
4. If the resulting list of products is too long for your tastes, you may narrow the results by entering a keyword or filter criteria, and then clicking the Search button to begin your search.
The page reappears with your search results in a table at the bottom of the page.
5. Select the check boxes next to the products that you want, and then click the Select button.
An Add Products page appears with your selections and fields for you to provide line item details. The Sales Price field is prefilled with the default sales price from the price book that you selected.
6. Fill in the line item details.
You must, at a minimum, fill in the Quantity and Sales Price fields for each selected product. The Date field is typically used to reflect an expected shipping or delivery date for the product.
7. When you’re done, click the Save button or the Save & More button.
Clicking the Save & More button takes you back to the Product Selection page. If you click the Save button, the Opportunity detail page reappears. Notice that the Amount and Quantity fields on the opportunity record have changed based on the total from the products you added.
Updating product details for an opportunity
If you need to change the details on your product selections in the course of the sales cycle, you can do this easily on the Products related list of the opportunity record. For example, if your customer wants to add another product, increase product quantities, or demand a better product discount, you need to know how to modify products.
To modify products on your opportunity, we suggest the following:
· Delete a product from the opportunity. Click the Del link next to the product on the Products related list.
· Edit all the products on the opportunity. Click the Edit All button.
· Edit one product at a time. Click the Edit link next to the product on the related list.
· Reorder the products on your Products related list. Click the Sort button.
If you find yourself unable to modify the sales price on your products, you may want to politely confirm the intent with your sales manager. Some companies lock in the sales price for sales reps so that they must adhere to a predefined discount approval policy.
Adding and updating schedules on opportunities
If you manage opportunities in which your products or services are delivered over time, you can create schedules for your products by quantity, revenue, or both. By using schedules, you and your users can benefit in multiple ways:
· If you’re on a sales team: You get a gauge on revenue recognition, which could be significant if that affects compensation.
· If you’re in product management: You can better forecast and plan for the amount of units that you’ll have to deliver in future quarters.
· If you’re part of a services organization: Schedules updated by reps provide a real-time gauge in planning your resources and projects.
Your system administrator must first set up your products with scheduling. (See the section “Setting Up Schedules,” later in this chapter, for more specifics on schedules, and see Chapter 20 for the details on customizing Salesforce.)
After scheduling is enabled for a product, set up a schedule by going to the Opportunity detail page and following these steps:
1. Click the desired product in the Product Name column of the Products related list.
An Opportunity Product page appears with a Schedule related list.
2. Click the Establish button in the Schedule related list.
An Establish Schedule page appears.
3. Complete the fields and click Save.
Your fields might vary, depending on whether the product is set up for quantity, revenue, or combined scheduling. When you click Save, a schedule appears based on your choices.
4. Review and modify the schedule.
If the revenues or quantities aren’t equal over the periods that you first established, you can type over the values in the schedule.
5. When you’re done, click Save.
The Opportunity Product page reappears with the schedule you established.
Over the course of an opportunity, if terms change, you can adjust the schedule on a product by clicking the buttons on the Opportunity Product page. To access an Opportunity Product page, go to the relevant opportunity record, scroll down to the Products related list, and click the desired product link from the Product column. The Opportunity Product page for the selected product appears with a Schedule related list. You can do the following with the schedule:
· Modify the schedule. Click the Edit button.
· Delete the schedule. Click the Delete button.
· Establish the schedule all over again. Click the Re-establish button.
Searching for products
You can search for specific products easily by using the Find Products search tool on the Products home page.
Instead of searching from the Products home page, you can search for products from your main home page. Your administrator must set this up for your company. For details on adding this home page tool, see Chapter 20 for customizing Salesforce and consult with your administrator.
To search for a product, go to the Products home page and follow these steps:
1. Enter keywords in the Find Products search tool and then click the Find Product button.
A Product Search page appears with a list of possible selections, as shown in Figure 11-2.
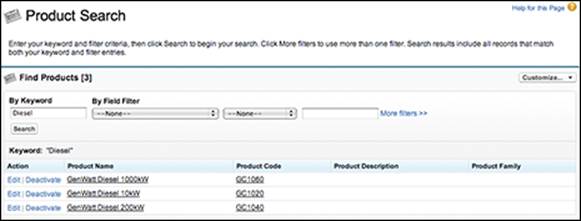
Figure 11-2: Search for a product.
2. If necessary, use the Find Products search tool to enter more keywords or filters to refine your search and again click the Find Product button.
The list results change based on your criteria.
3. Click a link in the Product Name column to go directly to the product.
The Product detail page appears.
Creating custom views for products and price lists
If the existing lists don’t provide the views that you want, you can create custom views for products and price lists. You can define your views to see additional standard or custom fields in list form. See Chapter 4 for details on creating custom views.
Building the Product Catalog
If you have a vested interest in your product strategy, be aware and take advantage of all the options that Salesforce provides for customizing products and price books. The more you plan ahead, the better you can implement products and price books for how your sales teams sell. As you make products and price books active, your sales reps can start associating products to their opportunities.
Planning products for success
For products, consider the characteristics of your products outside the standard realm that you want to analyze. In most companies, the product management or marketing teams own and maintain these records in coordination with finance. You should pull together a cross-functional team made up of sales, marketing, finance, and product management users to decide what you want to achieve from products in Salesforce. Then work with your system administrator to customize the product record to meet your specific needs. For more details on customization, see Chapter20.
For pricing, consider whether to have set pricing on your products or whether you prefer to keep the pricing simple at the beginning. Many customers of Salesforce, for example, set the prices on their products at $0 or $1 and then depend on their sales reps to fill in the sales prices when they prepare an opportunity. Other companies invest time and effort in creating actual standard or list prices on products to provide guidance to their sales reps.
Adding products to the product catalog
Before your sales reps can begin linking products to their opportunities, you need to add the products into Salesforce.
To add a product, log in to Salesforce and follow these steps:
1. Select the Create Product option from the Create New drop-down list on the sidebar.
A New Product page appears, as shown in Figure 11-3.
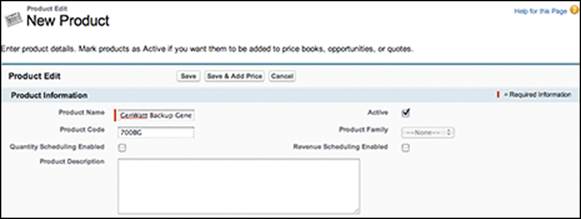
Figure 11-3: Add a product to the product catalog.
2. Complete the fields.
Your exact fields might vary, but see the section “Defining standard product fields,” earlier in this chapter, for info on the standard fields.
3. When you’re done, click Save.
The Product detail page for your new product appears with related lists for standard prices and price lists.
Changing product details in the product catalog
Over time, marketing or product managers may need to update details about a product. You can make most of your changes to a product from its detail page. Go to a specific product and take a look at this list of actions that you can perform. (You must have “edit” permissions on products to perform these steps. See Chapter 19 for details on granting the right permissions to the right people.)
· Edit the product record. Click the Edit button. For example, if the name of your product changes, you can change the product name and then save and automatically update all opportunities that include that product with the modified name.
· Delete the product. Click Delete and then click OK in the dialog box that appears. In circumstances in which you’re no longer offering a product but it’s linked to opportunities, it’s better that you deactivate or archive the product rather than delete it. See the following bullets.
· Deactivate the product. Click the Edit button, deselect the Active check box, and then click Save. Take this path if you might offer the product in the future.
· Delete and archive the product. Click Delete and then click OK in the dialog box that appears. In the event that your product is linked to opportunities, a Deletion Problems page appears with suggested options. Click the Archive link if you’re still intent on deleting the product but not altering the existing opportunities.
If you want to keep your sales reps informed of any changes to your products (for example, if a product is no longer offered or if its name changed), you can use Salesforce Chatter so that any changes to a product’s status or its name are reported in a Chatter feed. Interested users need to just follow the actions of the person who makes those changes (usually someone in Sales Operations), or they can follow the specific product, too. (See Chapter 6 for more information on setting up Chatter and its feeds and following users and records.)
Setting Up Schedules
If your company wants to track annuity streams, stay aware of key shipping dates, or estimate when revenue will be recognized on products, you can also set up schedules on all or some products.
Enabling schedules for your company
Your administrator first needs to enable schedules before you can add them on specific products.
If your company wants to track shipping dates with Salesforce, you need to enable quantity scheduling. If your company wants to measure revenue recognition or anticipate upcoming payments, be sure to enable revenue scheduling. If your company wants to do both, you’d enable both types of scheduling.
To set up schedules, follow these steps:
1. Choose Setup⇒Build⇒Customize⇒Products⇒Schedule Setup.
The Schedule Setup page appears, as shown in Figure 11-4.
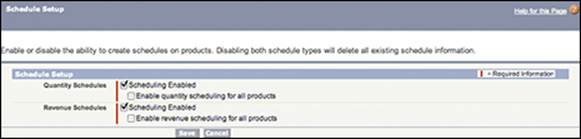
Figure 11-4: Enable schedules for your company.
2. Select the appropriate check boxes.
You can choose to enable schedules based on quantities, revenue, or both. You can also choose to enable schedules for all products.
3. When you’re done, click Save.
The Products page reappears.
Adding and updating a default schedule
After schedules have been enabled, you can create default schedules on existing products or while you’re adding new products.
By creating default schedules, you can simplify repetitive tasks for sales reps. With this setting, a default schedule is created when a sales rep adds a product to an opportunity. A sales rep can still reestablish a product schedule on an opportunity. The product date determines the start date for the installments.
 If you sell a basic service with different payment plans, consider creating a unique product for each payment plan and then using default revenue schedules. By doing this, you can simplify the data entry for the rep and reduce the chance of error.
To create a default schedule, follow these steps:
1. Select the Create Product option on the sidebar or click the Edit button on a product record.
A Product page appears in Edit mode. If scheduling is enabled, you see additional fields for quantity and/or revenue scheduling.
2. Complete the fields, as appropriate.
Here are some tips on completing the default schedule:
· Schedule Type: Select Divide if you want to divide the opportunity amount into installments. Select Repeat if you want to repeat the quantity or revenue on each installment.
· Installment Period: Define the frequency.
· Number of Installments: Define the duration.
3. When you’re done, click Save.
The Product detail page appears.
 If your product has both quantity and revenue default scheduling, quantity scheduling is calculated first and drives the total amount. Then, revenue scheduling divides the amount.
To update a default product schedule, follow these steps:
1. From the Products home page, search for the product whose schedule you’d like to update, using your preferred method.
See the “Searching for products” section, earlier in this chapter, for specifics. A Product Search page appears.
2. Click the product name of the specific product to edit.
The Product page appears.
3. Click the Edit button to update schedule information.
4. When you’re done, click Save.
The Product page for your product appears with the updated information.
Managing Price Books
Some companies require just one universal price book. Many other companies, however, want custom price books based on their unique selling needs. Examples include price books that are based on the following:
· Geography: For a global company, the Japanese sales team might sell a subset of the products sold by their North American counterparts (and at different prices and in different currencies).
· Partner tiers: In some companies that sell via partners, strategic partners might get preferential pricing.
· Sales teams: If your company is divided into sales teams that sell different products, you can use custom price books to simplify the product selection for groups.
· Volume discounts: Some companies build price books based on volume purchases.
· Seasonality: Some companies change their pricing based on seasonal buying patterns. You can use custom price books to communicate pricing changes to your sales reps during these periods.
If the standard price book meets your objectives, keep it simple. Otherwise, in the following sections, we show you how to set up your price books.
Adding to the standard price book
Every time you add a standard price to a product, you automatically associate it to the standard price book. You can do this while you’re creating products, or you can add the standard prices after you’ve built the product records.
Adding standard prices while creating products
The easiest way to add a standard price is while you’re creating products. To use this method, start creating a product record as you normally would; see the section “Building the Product Catalog,” earlier in this chapter. Instead of clicking Save, though, follow these steps:
1. Click the Save & Add Price button (refer to Figure 11-3).
An Add Standard Price page appears, as shown in Figure 11-5.
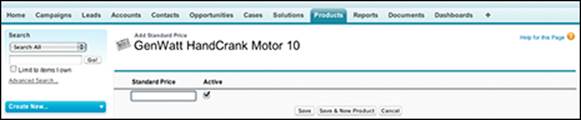
Figure 11-5: Add a standard price.
2. Complete the field and click Save.
The Product detail page appears, and a standard price displays on the Standard Price related list.
Adding or editing standard prices for existing products
You can also create the products first and add prices later. To add or edit a standard price, go to the desired Product detail page and follow these steps:
1. Click the Add button on the Standard Price related list.
If standard prices already exist, you can click Edit or Edit All. The result is the same: An Add or Edit Standard Price page appears.
2. Complete or modify the Standard Price field, as necessary, and then click Save.
The Product detail page reappears with any changes reflected on the Standard Price related list.
Creating a custom price book
To create a price book, you need to be an administrator or have permission to manage price books.
To create a price book from scratch, go to the Products home page and follow these steps:
1. Click the Manage Price Books link under the Maintenance section, near the bottom of the page.
A Price Book page appears with related lists for active and inactive price books.
2. Click the New button on the Active Price Books related list.
A New Price Book page appears in Edit mode.
3. Complete the fields.
Select the Active check box if you want to make the price book available.
4. When you’re done, click Save.
The Price Book detail page for your new price book appears with a Products related list.
Adding products to a custom price book
After the price book has been established, you can add products to it. A product listed on a price book is also referred to as a price book entry. To add products to an existing price book, go to a price book and follow these steps:
1. Click the Add button on the Products related list.
A Product Selection page appears with a search tool and a list of products.
2. Enter keywords and filter criteria, and then click the Search button to narrow your search.
The Product Selection page reappears with a list of products based on your search criteria.
3. Use the check boxes on the search results to choose products and then click the Select button.
An Add List Price page appears.
4. Complete the fields.
Select the check boxes in the Use Standard Price column if you want to use the standard price for the list price of a product or just enter a list price. You can select the Active check boxes to make products immediately available in the price book.
5. When you’re done, click Save (or Save & More if you want to find more products).
After you save the product, the Price Book detail page reappears, and your selected products have been added to the Products related list.
Making global changes to price books
Maintaining accurate and up-to-date product and price lists is challenging, especially if you have an extensive product catalog and/or complex pricing. If you’re responsible for such a daunting task, you can use tools that are located on the Products home page to save time.
Changing activation on price books
At times, you’ll want to make a price book unavailable to sales reps. Maybe you had to raise prices on a family of products or you stopped selling a product line. You probably need to preserve the current price book because existing customers and some prospects are still being associated to those products and prices, but new customers will need to be tied to the new catalog. Rest assured that you can deactivate one or more price books almost instantly so that sales reps won’t be able to tie new opportunities to old information.
To deactivate a price book, go the Products home page and follow these steps:
1. Click the Manage Price Books link under the Maintenance section.
The Price Book detail page appears with related lists for active and inactive price books.
2. On the Active Price Books related list, click the Deactivate link next to a price book that you want to make unavailable.
The Price Book detail page reappears, and the selected price book now appears in the Inactive Price Books related list.
To reactivate price books, you follow a similar process, the difference being that you click the Activate link adjacent to a price book listed in the Inactive Price Books related list.
Cloning price books
On occasion, you might want to create a price book that closely resembles an existing price book. Instead of starting from scratch, you can clone from an existing price book and then make changes, as necessary.
To clone a price book, follow these steps:
1. Click the Manage Price Books link under the Maintenance section.
The Price Book page appears with related lists for active and inactive price books.
2. Click the New button on the Active Price Books related list.
A New Price Book page appears.
3. Complete the fields and use the Existing Price Book drop-down list to select a price book to clone.
4. Rename the clone in the Price Book Name field, and give it a description in the Description field. Select the Active check box when you want the new price book to be available to others for use.
5. When you’re done, click Save.
The new Price Book page appears with a Products related list cloned from the existing price book.
6. If needed, click Edit or Edit All on the Products related list to change the list prices.
7. If needed, click Add or Delete in the Products related list to add or delete price book entries.
Deleting price books
 You can delete price books, but if the price book is associated with existing opportunities, beware. In those circumstances, we recommend the following actions:
· Deactivate (rather than delete) the price book so that the linkage between opportunities and products stays intact.
· Delete the associated opportunity records first, and then delete the price book.
· Archive the price book entries prior to deleting. Then, even if you delete the price book record, the products associated with opportunities are retained.
If you still want to delete a price book, follow these steps:
1. On the Products home page, click the Manage Price Books link under the Maintenance section.
The Price Book detail page appears with related lists for active and inactive price books.
2. Click the link for the desired price book.
The specific Price Book page appears.
3. Click Delete and then click OK in the dialog box that appears.
If you select a price book that isn’t associated with opportunities, you return to the Price Book detail page with the lists of price books. If a Deletion Problems page appears, follow the suggestions provided in the preceding bulleted list and on the Deletion Problems page.
Generating Quotes
Salesforce allows the ability to generate quotes from the product and price book information collected in your opportunities. You can make PDFs of quotes to e-mail to customers, and a complete history of what you’ve created is automatically stored within Salesforce. From the initial creation of a lead, to when you’re sending your prospect a quote for new business, Salesforce helps you all the way. You’ll still need to use your savvy sales skills to get your prospect to agree to what you’re actually quoting, but that’s where the art of sales balances the science.
Customizing quotes
Quotes use many standard fields that are prepopulated with information already existing in the Account and Opportunity records. This makes quote creation that much more streamlined in Salesforce because you don’t have to spend time retyping a customer’s address, contact information, or what they ordered (unless you want to). Check out all the standard Quote fields by choosing Setup⇒Build⇒Customize⇒Quotes⇒Fields.
To create a custom field for your quote, follow these steps:
1. Choose Setup⇒Build⇒Customize⇒Quotes⇒Fields.
The Quote Fields page appears.
2. Scroll down to the Quote Custom Fields & Relationship section.
3. Click New to create a new field.
The New Custom Field Wizard begins, consistent with what we’ve discussed with other objects. (For example, in Chapter 20, we discuss creating new custom fields.)
4. Click Save when you’re done with the wizard.
You return to the Quote Fields page.
Preparing quotes for customers
For those of you working on the front lines with prospects and customers, creating a new quote is a cinch.
To create a new quote, follow these steps:
1. Select an Opportunity record that matches the potential deal you want to issue a quote for.
2. Scroll down and look for the Quotes related list, shown in Figure 11-6.
If you don’t see it, ask your administrator to enable quotes.

Figure 11-6: Create a new quote.
3. Click the New Quote button.
A New Quote detail page appears, in Edit mode.
4. Enter the quote name, expiration date of the quote, the quote’s status, and other information requested in the fields.
5. Click Save when done.
The Quote page appears.
Revising quotes
As you progress in your negotiation cycle, you may need to modify the information in your quote. This can include modifying the information captured in the quote fields, or it can mean actually changing the prices of what you originally offered.
To revise your quote, follow these steps:
1. From the opportunity record, scroll down to the Quotes related list section.
2. Locate the quote that you want to revise and click the Edit link to the left of the quote name.
The Quote Edit page appears for that quote.
3. After you make your changes, click Save.
The Opportunity page reappears.
To modify the actual line items that you quoted, follow these steps:
1. Scroll down the page and note the Quote Line Items related list.
If you choose to offer an item for below list price, you can edit the information here to record the actual sales price you want to quote.
2. Click the Edit link to the left of the quote line item description.
The Quote Line Item edit page appears.
3. Modify the applicable fields if you’re providing a discount.
This spells out the amount of the discount and where it’s being applied.
The Discount field is a percentage (%) discount, and it calculates the equivalent value based on the Subtotal.
4. Click Save when done.
The Quote page reappears.
Sending quotes
After you have your quote just right, it’s time to send it to the customer. To e-mail (or fax) your quote to your customer, you first need a PDF copy of the quote.
To create a PDF of your quote, follow these steps:
1. Go to the Opportunity record’s Quote related list.
2. Click the quote you want to send.
The Quote page appears.
3. Click the Create PDF button.
You’re shown a preview of your quote.
4. When you’re ready to save the quote, click Save to Quote or click Save and Email Quote.
This allows you to save the PDF to the Quote record as an attachment for later use (or faxing), or to save the quote and also e-mail it to the contact that you prepared the quote for.
If you made modifications to the products listed in your quote, you can sync those with the original Opportunity record associated with the quote. You can only sync one opportunity to one quote at a time, though. This ensures that the prices on the most recent quote you put out there are accurately reflected in the Opportunity record (or vice versa). To sync a quote to an opportunity, click the Start Sync button.
All materials on the site are licensed Creative Commons Attribution-Sharealike 3.0 Unported CC BY-SA 3.0 & GNU Free Documentation License (GFDL)
If you are the copyright holder of any material contained on our site and intend to remove it, please contact our site administrator for approval.
© 2016-2026 All site design rights belong to S.Y.A.