Salesforce.com For Dummies, 5th Edition (2014)
Part IV. Optimizing Demand with Marketing Cloud
 Understand how third-party marketing automation vendors integrate with Salesforce at www.dummies.com/extras/salesforcedotcom.
In this part …
· Find out about managing marketing campaigns in Salesforce, using the company’s Campaign record.
· Design a campaign from scratch, to track the various life cycle stages that make sense to your business.
· Build a target list based on names already in Salesforce, or even those from purchased lists.
· Design a Web-to-Lead form to drive leads to campaign-related landing pages.
Chapter 13. Driving Demand with Campaigns
In This Chapter
![]() Creating campaigns
Creating campaigns
![]() Creating a target list
Creating a target list
![]() Executing a campaign
Executing a campaign
![]() Assessing campaign effectiveness
Assessing campaign effectiveness
Companies want to increase revenue by spending marketing dollars intelligently. However, because of the disconnect between sales and marketing teams, managers have a harder time executing campaigns, let alone tracking and measuring the results of their marketing programs. Now, more than ever, marketing departments have to prove that they are contributing to the sales funnel versus being regarded as a cost center. Marketing executives have to show that their marketing spending is resulting in new customers. If this sounds familiar to you, campaigns in Salesforce can help you manage and track your marketing programs more effectively, helping you manage your customer acquisition costs, bring in more qualified leads, and contribute more to sales.
A campaign is any marketing project that you want to plan, manage, and track in Salesforce. The higher-level goal is to create something (a content piece or an event, for example) that generates demand for your product or service. Depending on your current or planned strategies, types of campaigns include trade shows, search engine marketing, e-mail marketing messages, online promotions, webinars, online events, and print advertising, although this is by no means a complete list.
In this chapter, you find out how to create and manage campaigns, segment target lists, execute campaigns, track responses, and analyze campaign effectiveness.
 To administer campaigns, you must be a system administrator or a user with permission to manage campaigns (that is, a marketing manager type). See Chapter 20 for details on configuring your user information and profile to manage campaigns.
Understanding Campaigns
Available for Professional, Enterprise, and Performance Edition users, the Campaign module in Salesforce is a set of tools that you use to manage, track, and measure your marketing programs. Its foundation is the campaign record, which can be manually or automatically linked to lead, contact, and/or opportunity records to provide real metrics on campaign effectiveness.
A campaign record comes standard with a set of fields that help you manage and track your campaigns. The following list describes the fields that you use most often to measure campaign effectiveness:
· Campaign Name: This is the name of your marketing project. Choose a name that’s readily obvious to sales reps and other users whose leads or contacts might be included in the campaign. For example, if you send monthly e-mail newsletters, you might distinguish each campaign by month, as in “Administrators Newsletter — May 14” and “Support Agent Newsletter — June 15.”
· Type: This drop-down list includes the types of campaigns that you run within your marketing mix (Direct Mail, Email, and so on).
· Status: This drop-down list defines the statuses of a campaign. Salesforce provides a simple default drop-down list of statuses to measure a campaign’s progress, from the initial planning stages to completion. By using this field, you and others can make sure that the campaign is on track.
· Start Date: This date field tracks when a campaign begins.
· End Date: This date field tracks when a campaign ends.
· Expected Revenue: This currency field estimates how much revenue the campaign will generate.
· Budgeted Cost: This is the amount that you have budgeted for the marketing project.
· Actual Cost: This is the amount that the project actually cost.
· Expected Response: This percentage field is your best guess of the response rate of a campaign. For example, if your e-mail campaigns typically receive a 2 percent response rate, you might use this value to benchmark the effectiveness of the campaign you’ll be tracking in Salesforce.
· Num Sent: This is the amount of people targeted in the campaign. For example, if you executed an e-mail campaign to 10,000 e-mail addresses, that would be your Num Sent.
· Active: This check box marks whether a campaign is active. If you don’t select it, the particular campaign doesn’t appear in reports, or on related lists and other campaign drop-down lists on lead, contact, and opportunity records.
· Description: This field allows you to describe the campaign so that other users who want more detailed information on the campaign can get a solid snapshot.
 Depending on your marketing processes, terminology, and goals, you or your system administrator should modify the drop-down list values and change the fields on the record. (See Chapter 20 for details on customizing Salesforce.)
If you’re a marketing manager, you can plan and manage the majority of your campaign preparation inside Salesforce. You can
· Lay out your entire marketing plan of projects.
· Build the basic framework and business case for a project.
· Define statuses and success metrics for campaign responses. Success metrics measure how you determine whether the campaign was worth your company’s time, money, and effort.
· Develop a detailed project plan so that important tasks get accomplished.
In the following sections, we show you where and how to accomplish these tasks.
In mid-2013, salesforce.com acquired ExactTarget, a marketing automation company that itself had previously acquired an e-mail marketing provider called Pardot. We will be following closely to see how ExactTarget technology slowly becomes integrated more into Salesforce’s native campaign functionality.
Creating a new campaign
To create a campaign, log in to Salesforce and follow these steps:
1. Select the Campaign option from the Create New drop-down list on the taskbar.
A New Campaign page appears, as shown in Figure 13-1.
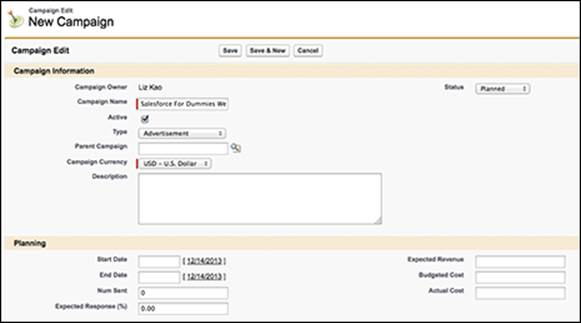
Figure 13-1: Fill in the campaign record.
2. Fill in the fields as much as possible or as required.
If you manage marketing programs for your company, you should see few surprises in the campaign fields. See the preceding section for a summary of the standard entry fields.
3. When you’re done, click Save.
Optionally, you can click Save & New if you have more than one campaign to create and want to immediately start on the next one.
After you save your final campaign, the campaign page reappears with the information you entered as well as additional system-generated fields that automatically update as your company makes progress on a campaign.
You can associate campaigns to a parent campaign and see the aggregate performance statistics in one place. For example, our Salesforce.com For Dummies, 5th Edition Launch Event could be a parent campaign to other campaigns such as Email Drop, Banner Ad, and Dreamforce book signing. To group campaigns into a campaign hierarchy, have your Salesforce administrator add the Parent Campaign field to your Campaign page layout. You can then use that field to associate child campaigns with a parent. See Chapter 20 for more information on page layouts.
Modifying the member status
A campaign member is a lead or a contact who’s part of a specific campaign. Depending on the type of campaign you’re running, you can modify the campaign to have a unique set of member statuses. For example, the member statuses that you track for an e-mail campaign (Sent, Responded) are typically different from those of a trade show that you’re sponsoring.
To customize member statuses for a specific campaign, follow these steps:
1. Go to the campaign record and click the Advanced Setup button.
The Campaign Member Status page for your campaign appears. When you first begin to create campaigns, Salesforce creates a default set of member status values of Sent and Responded.
2. In the Member Status Values related list, click the Edit button.
The Campaign Member Status page appears in Edit mode, as shown in Figure 13-2.
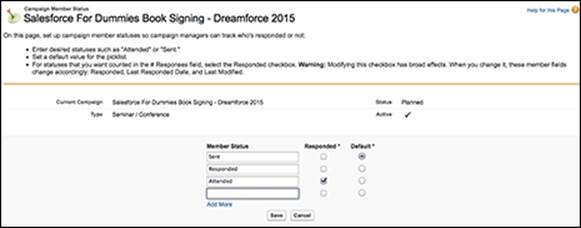
Figure 13-2: Editing the Campaign Member Status.
3. Modify statuses by entering a new value in the Member Status column.
For example, if you’re sponsoring a booth at a conference, the preregistrants list is part of the package, and if you want to invite attendees to visit your booth, you might add member statuses of Registered, Invited, Attended, Visited Booth, and Met at Show.
4. Select the check box in the Responded column to classify a status as responded.
This field tracks the Expected Response Rate field against the actual response rate.
5. Use the Default column to select a default value.
6. Click Save.
The Campaign Member Status page reappears with your changes.
Building Target Lists
One of the biggest challenges that marketing managers face is developing the right target lists for a campaign. Target lists are the lists of people you’re targeting in your campaign. Depending on the type of campaign that you’re planning, your lists might come from different sources, such as rented or purchased lists from third-party providers or existing lists of leads and contacts already entered in Salesforce. If your target list is comprised of the latter, you can create your target list directly from the Salesforce Reports tab and associate specific campaigns to those leads and contacts, or you may add leads and contacts directly to specific campaigns.
Using rented lists
With a rented list, your options are limited. Depending on the circumstances, sometimes you don’t know who’s on the list because the list is controlled by the vendor. Other times, you agree to limited use terms, such as one-time usage. In these circumstances, simply use the external list as the target list instead of importing the list into Salesforce.
You can use Salesforce to improve the quality of rented lists. Many third-party vendors look for duplicate names, confirm that they all point to the same person, and then help you merge them into one file. They do this by comparing their database against your customer database when they’re generating the record count for a rented list. As long as you can trust the vendor, you can quickly use Salesforce to generate a file of your existing contacts to compare. By getting rid of duplicates first, you can stretch your marketing dollars by making sure that you’re not paying for contacts you already have. And if you’re doing a mixed campaign of rented and owned lists, you stand a better chance of not upsetting a customer with duplicate mail.
Importing new campaign members
If you own or purchase a list and intend for your teams to follow up on all the records, you can import the list into Salesforce as lead records and automatically link the records to a campaign. Here, we show you how to select a list on your computer to import, mass-associate various characteristics to the list (such as the lead source or campaign), perform the import, and verify that your settings came through.
To import a list and attribute it to a campaign, follow these steps:
1. On the campaign record, click the Advanced Setup button, verify that the member statuses are accurate, and then return to the campaign record by clicking the Back button in your browser.
2. Click the Manage Members button.
A drop-down list appears.
3. Choose the Add Members – Import File option.
The Campaign Member Import Wizard starts.
4. Click the Import Leads button.
Step 1 of the Lead Import Wizard appears. Here, you associate various field statuses to the list of leads that you want to import.
5. Prepare your file, following the instructions that the wizard gives you.
Here are the main steps to perform:
1. Add and fill in a column for Member Status unless all records will use the default member status.
or
Add and fill in a column for Lead Owner unless you’ll be the owner or you’re applying lead assignment rules.
2. Save the file in a .csv format on your computer.
6. In the wizard, click the Browse button to select the file from your computer.
A Choose File dialog box appears.
7. Locate your file and click Open.
The dialog box closes, and the filename appears in the field.
8. Use the drop-down list to select a lead source.
9. (Optional) Use the next drop-down list to select an assignment rule.
10. (Optional) Select the Use Assignment Rule Settings to Send Notification Emails to Record Owners check box.
11. Verify the campaign to which your leads will be assigned.
12. Verify the default member status.
13. Leave the character encoding unchanged unless necessary.
If you’re using this within the United States, you most likely won’t be changing this. To be sure, check with your system administrator.
14. (Optional) Select the Trigger Workflow Rules for New Leads check box if you want workflow rules to work on new or updated records.
15. When you’re done, click Next.
Step 2 of the wizard appears, where you confirm the mapping of the Salesforce field to the correct column in your uploaded file.
16. Map the fields by comparing the Salesforce Field columns against the corresponding drop-down lists in the Import Field columns.
17. When you’re done, click Next.
Step 3 of the wizard appears.
18. Review and confirm the import, and when you’re done, click the Import Now button.
Your new campaign members will appear under your campaign record, which you can access from the Campaign tab.
Targeting existing members with the Integrated Campaign Builder
Assuming that your company has already imported users’ leads and contacts, you can build your target lists directly in Salesforce in three ways:
· Associating existing leads and contacts en masse to a campaign
· Adding members from custom reports
· Adding members from a List View
After you link your desired leads or contacts with a specific campaign, you can begin to target them.
Adding members from a campaign record
To associate existing leads or contacts to a campaign you’re planning, start by making sure that you can see the leads or contacts via a List View. See Chapter 5 (contacts) or Chapter 9 (leads) for information on using List View. You can add as many as 200 leads or contacts per List View page. Then, follow these steps:
1. From the specific campaign record, click the Manage Members button.
A picklist appears.
2. Select the Add Members – Search option.
In this example, we add existing leads. The Manage Members Wizard appears.
3. In the Manage Members Wizard, do the following:
1. From the Add Members subtab, in the Choose Member Type to Search section, confirm that the Leads radio button is selected.
This is the default.
2. Specify the Filter Criteria.
You may use an existing lead view or create new criteria now to get the leads you want for this campaign.
 If you’re not yet sure what subset of leads to use, step back and give this some thought. E-mailing all the leads in your database might not be a wise decision.
4. Click Go after you select your criteria.
The search results appear below the filter criteria.
5. Select the check box next to the appropriate leads that you want to be added to this campaign, as shown in Figure 13-3.

Figure 13-3: View leads to associate with a campaign.
6. Click the Add with Status drop-down list to immediately select and associate the member status with those selected leads.
Your selected leads now appear on the Existing Members subtab.
 Don’t worry. If your itchy trigger finger got you to add some members before you were ready, you can use the handy Remove button to disassociate the members from this campaign and start over again.
7. Repeat Steps 2–5, selecting new views, as needed.
8. Click the Back to Campaign: [Campaign Name] link below the Manage Members page name when finished.
The campaign record reappears.
Adding members from a custom report
As many as 50,000 leads or contacts in a single lead, contact, or campaign report may be associated to a campaign. To add existing members by running a report, follow these steps:
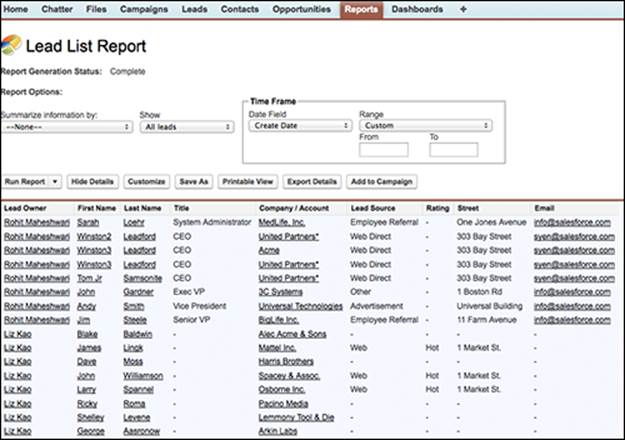
1. From the Reports home page, click a custom report of the leads or contacts that you’ll be targeting. (See Chapter 17 for more information on creating custom reports.)
A Reports page appears, as shown in Figure 13-4.
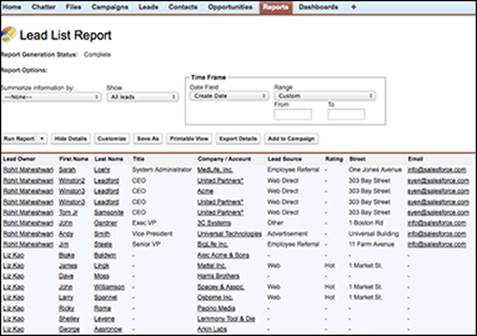
Figure 13-4: Add report members to a campaign.
2. Click the Add to Campaign button.
The Add Members Wizard appears.
3. Select an existing campaign for the Campaign field. Use the Lookup icon to search for your match.
4. After a campaign is selected, choose the appropriate status from the Member Status drop-down list, as shown in Figure 13-5.
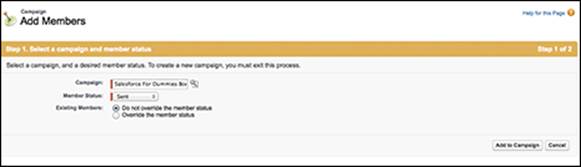
Figure 13-5: Selecting the member status for report members.
5. Use the radio buttons to toggle whether you want the existing member statuses to be overridden by this member status.
The default is to not override existing member statuses.
6. Click Add to Campaign to continue.
Step 2 of the wizard appears with a status message of your attempt.
7. Click Done when information has been verified.
You’re returned to your custom report page.
Adding members from a view
If you’ve followed our example to this point, from any lead or contact view page, you can add members to campaigns. Note that the capability to add members to campaigns from any lead or contact view page allows only marketing managers to select and add members one page at a time, so it’s best for adding a small amount of members. If your view is more than one page, you have to advance to that page and then add members. To add a member from a List View, make sure that the view has already been created and follow these steps (to see how to make custom List Views, read Chapter 9 or 10):
1. At the view’s results page, select the check box next to the appropriate member names that you want to add to your campaign.
In Figure 13-6, we add some contacts to a campaign.
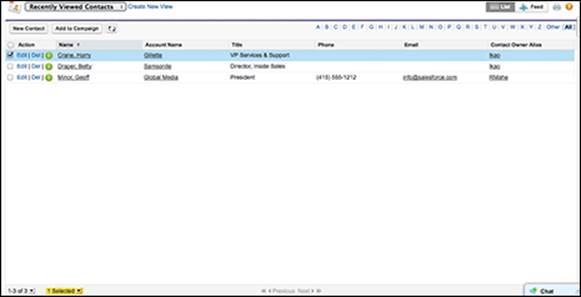
Figure 13-6: Add list members to a campaign.
2. Click the Add to Campaign button after your members have been selected.
The Add Members Wizard appears.
3. Select an existing campaign for the Campaign field. Use the Lookup icon to search for your match.
4. After a campaign is selected, choose the appropriate status from the Member Status drop-down list.
5. Click Add to Campaign to continue.
Step 2 of the wizard appears with a status message of your attempt.
6. Click Done when information has been verified.
You return to your view page.
Executing Campaigns
Depending on the type of campaigns you’re running, you might execute those campaigns online, offline, or in combination. And, based on the complexity of the campaign and your resources, you can use Salesforce to assist with the execution parts of your campaign.
Delivering an online campaign
If you send e-mail campaigns as part of your marketing strategy (and who doesn’t nowadays), you can use Salesforce for elements of the execution. Those elements might include
· Exporting an e-mail list from Salesforce for delivery to your e-mail execution vendor or internal resource
· Building a web form to capture leads as part of your e-mail or webinar campaign
See the later section “Using Web-to-Lead forms.”
· Using standard e-mail templates with merge fields so that you can control the look and feel of your messaging
You can use Salesforce to deliver and track mass e-mails, but Salesforce wasn’t designed or intended to be used for large-scale, mass e-mail marketing. Some Salesforce customers use the mass e-mailing tool for small campaigns. Depending on which edition of Salesforce you have, you can send 100 (Professional), 500 (Enterprise), or 1,000 (Performance) e-mails per mass mailing. Your company is always limited to 1,000 e-mails per day.
Several e-mail automation vendors have integrated their campaign execution tools with Salesforce. With this integration, marketing managers can more seamlessly deliver e-mail campaigns from Salesforce. The costs and functionality vary across the e-mail marketing vendors, so check out the options on the Force.com AppExchange directory at www.appexchange.com. Search using the keyword email.
Executing an offline campaign
If you execute offline campaigns, you can also use Salesforce in a variety of ways to simplify the process. How you use Salesforce depends on the type of campaign, but here are some suggestions:
· If you’re sponsoring a conference: Set up a web registration form for your booth computers to capture information on attendees who visit your booth.
· If you’re sending out direct mail pieces: Use Salesforce to generate lists for your fulfillment vendor.
Tracking Responses
After you launch a campaign, you can use Salesforce to track responses. In Salesforce, you have three basic types of tracking mechanisms, which we describe in the following sections.
To track responses on a campaign, you need to be able to view the Campaign related list on lead and contact records. If you can’t view this list, see Chapter 20 on customizing page layouts or see your system administrator for help.
Using Web-to-Lead forms
Whenever we help clients with using Salesforce, we take a look at their Contact Us web page. If it’s filled with a bunch of e-mail addresses (like info@mycompany.com), we immediately recommend that they get Web-to-Lead up and running. After all, a company with a website using Salesforce in this day and age should take advantage of capturing information via an online form.
Web-to-Lead is a Salesforce feature that enables your company to easily capture leads from your websites and automatically generate new leads in Salesforce. With Web-to-Lead, you can collect information from your websites and generate as many as 500 new leads daily. Say that you already have a registration or a lead form on your public website. With Salesforce, you can — in minutes — generate HTML code that your webmaster can apply to your existing form. Then, when people fill out the form on your website, the information is routed instantaneously to users in Salesforce. By using Web-to-Lead, your reps can follow up on leads in a timely manner.
Specifically for campaign tracking, you can also create forms for specific landing pages designed for a unique campaign to capture information on a campaign member who responds.
Before you can capture leads from an external web page, though, you need to enable Web-to-Lead, add any additional custom fields to your lead record, generate the HTML code, and add the code into a web page. Of course, involve your web team and web designers to test and review this before it goes live.
Enabling Web-to-Lead
All Salesforce customers can capture leads from web forms. First, check whether you need to turn it on for your company.
Log in to Salesforce and follow these steps:
1. Choose Setup⇒Customize⇒Leads⇒Web-to-Lead.
The Web-to-Lead Setup page appears. Under Web-to-Lead Settings, make sure that Web-to-Lead is enabled. You can tell by looking for the Web-to Lead Enabled check box. If it’s selected, you’re good to go. If not, go to the next step.
2. If Web-to-Lead isn’t enabled, click the Edit button.
The Web-to-Lead Settings edit page appears.
3. Fill out the fields on the page.
Salesforce provides three fields:
· Web-to-Lead Enabled: Select this check box.
· Default Lead Creator: Use the Lookup icon to select the default creator for when a lead is generated from a web form. You usually select the user who manages marketing campaigns for your organization.
· Default Response Template: Select a default e-mail response template. You don’t need to have one, but it’s a good practice to reply to leads so that they know you got their request.
4. When you’re done, click Save.
The Web-to-Lead Setup page reappears.
Generating HTML
You can use a tool in Salesforce that takes the guesswork out of generating HTML code for your web forms.
To generate a general or a campaign-specific Web-to-Lead form, log in to Salesforce and follow these steps. If you just finished the steps in the preceding section, click the Create Web-to-Lead Form button in the Web-to-Lead Setup page, and you’ll arrive here.
1. Choose Setup⇒Customize⇒Leads⇒Web-to-Lead.
A Web-to-Lead Setup page appears.
2. Click the Create Web-to-Lead Form button in the Web-to-Lead Settings section.
The Web-to-Lead Setup page appears.
3. In the Create a Web-to-Lead Form section, customize which fields you want to include on your Web-to-Lead form.
Click a field name in the Available Fields column, as shown in Figure 13-7, and then click the Add arrow button to add that field from the Available Fields column to the Selected Fields column. Conversely, remove fields from the Selected Fields column by similarly clicking a field name in the Selected Fields column and then clicking the Remove arrow.
Balance selecting enough fields so that they help you route the lead to the right person with the patience level of the prospect filling out the form.
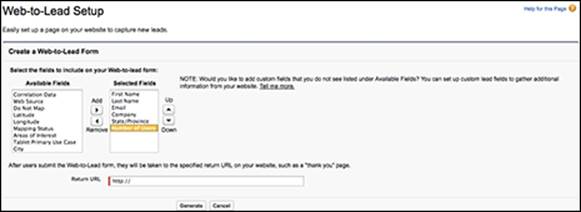
Figure 13-7: Creating a Web-to-Lead form.
4. In the Return URL field, enter a return URL (if known) and then click the Generate button at the bottom of the page.
The return URL corresponds to the landing page that appears after the lead has submitted his information online. If you don’t know whether you have one, or which one to use, check with your marketing manager and your web manager. When you click the Generate button, a page appears with HTML code inserted in a box, as shown in Figure 13-8.
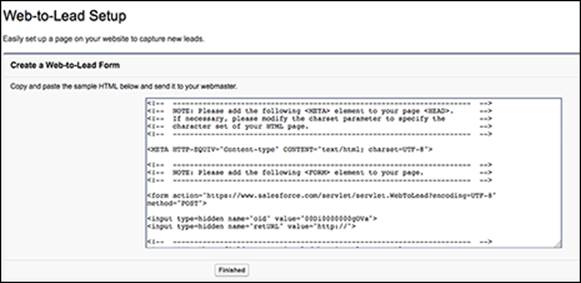
Figure 13-8: Generating basic HTML for your Web-to-Lead form.
If you’re creating a web form specific to a campaign, create the campaign first, and make sure that you selected the Active check box for that campaign record. By doing this, you can select the fields for Campaign and Campaign Member Status, which enables you to track the specific campaign.
5. Copy and paste the HTML code into a text file and send it to your webmaster.
6. Click Finished when done.
You return to the Web-to-Lead Setup page.
Viewing and testing the form
You can view and test the HTML code as an actual form by using your favorite web publishing application and a browser.
To view and test the form, follow these steps:
1. Open a new file in your favorite web publishing program.
Popular programs include FrontPage, Dreamweaver, and HomeSite. You can even use Notepad or TextMate.
2. Copy and paste the HTML code in the HTML mode.
3. Save the web page in HTML format (not .txt!) on your computer.
4. Open a browser and choose File⇒Open to open the web page.
A web form appears with the lead fields that you selected. The form is relatively unformatted, but your webmaster can apply code to make the form fit with your desired look and feel.
5. Fill out the basic form and click the Submit button.
If you inserted a return URL, that page appears. If not, a page appears that displays the information that was sent to Salesforce.
6. Log in to Salesforce and click the Leads tab.
7. Select Today’s Leads from the Views drop-down list.
The leads list for today appears. If the test lead isn’t listed, click the Refresh button in your browser until the test lead appears.
8. Click the test lead’s link under the Name column to validate the information from your test lead.
The lead record appears and displays the information that you submitted. Don’t forget to delete the test lead record after you’re comfortable that everything’s working!
9. Scroll down to the Campaign related list.
You should see a link to the campaign and the default member status. If you selected the Campaign Member Status field when generating the HTML code, you can apply a member status to all leads derived from the web form.
Manually updating member statuses
If your campaign is designed to have recipients respond by phone or e-mail, your reps can manually update records as they interact with campaign members. Reps might have to create lead or contact records first if you didn’t build your target list from Salesforce. For example, if you rent a third-party list for an e-mail campaign, the respondent might not yet be recorded in Salesforce.
To manually update a lead or contact responding to a campaign, follow these steps:
1. In the sidebar Search, search for the lead or contact.
See Chapter 2 for details on using Search.
2. If you can’t find the lead or contact record, create it.
See Chapters 5 and 9 for details on creating contact and lead records, respectively. If you find the record, skip this step.
3. Go to the specific lead or contact record page.
4. Click the Edit button, make any changes to the record, and click Save.
For example, you might use the fields to enter additional information supplied by the respondent.
5. Use the related lists to log any related information or future activities.
Adding a member to a campaign
In those circumstances when your target list was built externally, reps need to add the member to the campaign.
To manually add a member to a campaign, go to the lead or contact record and follow these steps:
1. In the Campaign History related list, click the Add to Campaign button.
A Lookup box appears.
2. Select the appropriate campaign view from the Search Within drop-down list to narrow your options, and use the search bar to find a campaign within that view.
The Search Results page appears.
3. Click the campaign name.
The New Campaign Member page appears.
4. Select the appropriate member status from the Status drop-down list and click Save.
The Campaign Member detail page appears.
Updating the status of a current member
If the lead or contact is already linked to the campaign in Salesforce, you’ll want to update the member status when he or she responds.
To update member status manually, go to the lead or contact record and follow these steps:
1. Scroll down the page to the Campaign History related list, and click the Edit button next to the relevant Campaign Name.
The Campaign Member Edit page appears.
2. Use the Status drop-down list to change the status and then click Save.
Mass-updating campaign statuses
If leads or contacts that are part of a campaign respond in a batch, you can do a mass update of campaign members. For example, if you sent an e-mail campaign to existing contacts and received a batch of online registrations as responses, you could perform a mass update. The following sections tell you two ways to update statuses: in a campaign or in a report. Sometimes you’ll be working directly out of a campaign. Other times you might be running a specific report that isn’t campaign related (for example, an existing “Northern California Active Customers” report), but you might want to update the status of people that turn up in that data set.
Mass updating all member statuses in a campaign
To mass update campaign statuses for all contacts or all leads in a campaign, log in to Salesforce and follow these steps:
1. Click the Campaigns tab and select the specific campaign whose members’ statuses you’d like to update.
2. Click the Manage Members button.
A picklist appears.
3. Select the Edit Members – Search option.
The Manage Member page appears, with the Existing Members subtab selected.
4. Use the filter criteria, as needed, to narrow the members that you want to update.
You can also manually select which members to update by selecting the check box next to their names in the results.
5. Select members to be updated for this campaign, as shown in Figure 13-9.
You may select up to 200 members to update.
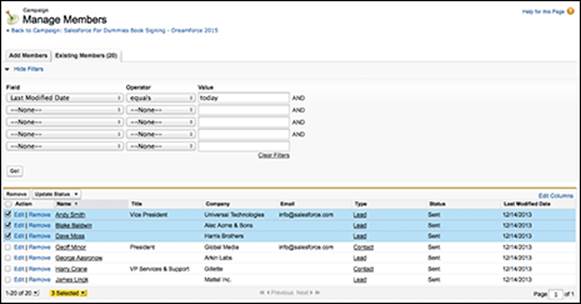
Figure 13-9: Updating existing campaign member statuses in bulk.
6. Click Update Status to apply the new status to your selected members.
A status bar displays the results of the operation. You may continue updating by selecting new views, or click the Back to Campaign: [Campaign Name] link when done.
Mass updating all member statuses in a report
To update the status of several members at once, follow these steps:
1. Click the Reports tab and scroll down to the Campaigns Reports folder from the left sidebar.
2. Click the Campaign Call Down Report link.
A page appears, allowing you to select a specific campaign.
3. Use the Lookup icon to choose a campaign and click the Run Report button, as shown in Figure 13-10.
A Campaign Call Down Report for your campaign appears.
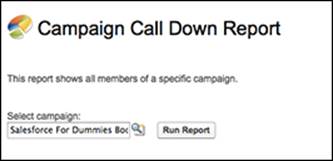
Figure 13-10: Selecting a campaign from within the Campaign Call Down report.
4. Click the Add to Campaign button.
The Add Members Wizard opens.
5. Confirm the campaign in the Campaign field. Use the Lookup icon to search for your match.
6. After a campaign is selected, choose the appropriate status from the Member Status drop-down list.
7. Use the radio buttons to toggle whether you want the existing member statuses to be overridden by this member status.
The default is to not override existing member statuses. However, if your goal is to update all statuses of members in this report, choose to override the status.
8. Click Add to Campaign to continue.
Step 2 of the wizard appears with a status message of your attempt.
9. Verify the information and click Done.
You return to your view page.
You may also mass-update campaign statuses for contacts or leads in a campaign by updating the information in a .csv file first and then importing it. For example, a trade show exhibitor may give you a file of all show attendees that you can cross-reference with leads that you invited. After you know which of your invitees actually attended, you may import this file into Salesforce. Just make sure to add and edit a column for Member Status (unless all records will use the default status) and have a column for Lead or Contact ID. Then, click the Manage Members button, click the Update Status — Import File link, and follow the guidelines to update the campaign history. See the “Importing new campaign members” section, earlier in this chapter, for more information.