Salesforce.com For Dummies, 5th Edition (2014)
Part I. Salesforce Basics
Chapter 2. Navigating Salesforce
In This Chapter
![]() Introducing Salesforce terminology
Introducing Salesforce terminology
![]() Logging in to the site
Logging in to the site
![]() Getting to know all the home pages
Getting to know all the home pages
![]() Working with new records
Working with new records
![]() Detailing the record page
Detailing the record page
![]() Finding help and setup options
Finding help and setup options
If an application isn’t easy to use, you won’t use it. Period. Salesforce succeeds not only because it offers a universe of integrated tools but also because users can pick it up within minutes. You navigate it much the same way you do other websites: by pointing and clicking over text links and buttons.
Still, you have so many ways to navigate Salesforce that it makes sense to lay down the obvious (and not-so-obvious) best practices for getting around the application.
 Even if you’re familiar with Salesforce, you might want to scan this chapter because we cover terms that we use repeatedly throughout this book.
In this chapter, you can find out how to log in to the Salesforce site and use the home page to manage your activities, create records, and jump to other tabs. We briefly review the major tabs and describe how to use the interior home pages, list pages, detail pages, and related lists. Finally, we cover where you can go for help.
Getting Familiar with Basic Terms
Before we delve into the mechanics of navigating Salesforce, familiarize yourself with these basic terms:
· Salesforce: When we use the term Salesforce, we mean the secure website that your users log in to that contains your customer information. Salesforce.com, Inc., offers a family of products and has over 100,000 clients who use its service, but each company’s secure website is separate from the other websites and might look different to suit that company’s unique needs. When we use the terms Sales Cloud or Service Cloud, those are parts of Salesforce specifically meant for use by sales and marketing, or by a support organization.
· Home tab: This is the main page that appears when you log in to Salesforce or click the Home tab.
· Tabs: Clickable links appear at the top of any Salesforce page. When selected, a link is highlighted and looks like a tab, and so we continue to call them tabs. Each tab represents a major module in which your company needs to know some information. By clicking a tab, you go to a tab-specific home page. For example, if you click the Accounts tab, the Accounts home page appears.
· Apps: Apps are tabs that have been grouped together and given a name, providing you with the convenience of seeing only those tabs most relevant to you.
· Tab home pages: These are the pages where you go to find, organize, and manage specific information related to a particular tab. For example, to access your opportunity records, you could go to the Opportunities home page.
· Record: This is made up of a bunch of fields that hold information to describe a specific item. For example, a contact record typically contains fields pertinent to a person, including name, title, phone number, and e-mail address. A record is displayed on a detail page.
· Detail page: This web page shows both the saved record and a set of related lists pertinent to the record.
 We often use the terms record and detail page interchangeably. From a detail page, you can perform and track a variety of tasks related to the specific record. For example, if you have and are looking at an Account detail page for Cisco, you see fields about the company and lists of other records related to Cisco.
· Related lists: These lists comprise other records linked to the record that you’re looking at. For example, the Account detail page for Acme might display related lists of contacts, opportunities, activities, and so on associated with that company.
· Sidebar: Located on the left margin of a Salesforce page, the sidebar displays messages and alerts, custom links, recent items, and a drop-down list that you can use to create new records.
Accessing Salesforce
You need to log in to your account to access your company’s instance of Salesforce because every company’s Salesforce website is different, and salesforce.com goes to great lengths to protect your information.
Setting up a password
The first time you log in to the Salesforce service, you receive an e-mail entitled Salesforce login confirmation. To set your password, follow these steps:
1. Open the e-mail and click the link provided.
A page appears, prompting you to set a new password and security question.
2. Complete the fields.
Be sure to select a question and provide an answer that can verify your identity if you forget your password. Use this password from now on unless your administrator resets the password.
3. When you’re done, click Save.
The home page of Salesforce appears.
Logging in
You log in to Salesforce just as you would any other secure website.
To log in, open a browser and follow these steps:
1. In your browser’s address bar, type login.salesforce.com and then press Enter.
The salesforce.com login page appears as shown in Figure 2-1.
2. Enter your username and password and then click the Login button.
Your username is typically your corporate e-mail address. Select the Remember User Name check box if you want your computer to remember it. After you click the Login button, your main home page appears.
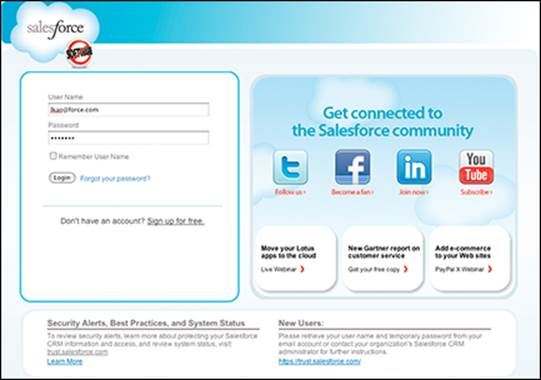
Figure 2-1: Logging in to Salesforce.
 To save yourself steps when logging in, use your browser tools to bookmark the login page.
 For security purposes, Salesforce notices whether you’re trying to log in to the website from a different computer or a different browser than the one you first used. If this happens, make sure that you have access to your e-mail inbox or mobile phone because Salesforce e-mails or SMS messages you a confirmation code to confirm that you are who you say you are (and that you’re just using a different computer or browser to log in).
Navigating the Home Page
Every time you log in to Salesforce, you begin at your home page. The look and feel of the elements on your home page are similar to other users’ home pages, but the tasks and events that appear in the body of the page are specific to you.
Use the home page to manage your calendar and tasks, jump to other areas by clicking tabs, or access recent records by using the sidebar. If your company has customized the home page, you might also see key charts or graphs from your company’s dashboards. (Dashboards are visual snapshots of key performance metrics based on your custom report data.)
Finding records with Search
At the top of every Salesforce page you will find the Global Search bar. You can find a majority of the information that you want by using Search. To search for information, follow these steps:
1. At the top of Salesforce, enter keywords into the Search field and then click the Search button.
A Search Results page appears, as shown in Figure 2-2. Salesforce organizes the search results in lists according to the major types of records, including accounts, contacts, opportunities, and leads.
2. Scroll down the page. If you find a record that you want to look at, click a link in the Name column for that record grouping.
The detail page appears, allowing you to review the record and its related lists.
3. If you see too many results, you can limit them to items you own or search for an exact phrase by clicking the Options link on the Search Results page. You can also select a single type of record from the list in the sidebar.
If you can’t find what you’re looking for, try adding the * wildcard before, after, or in the middle of your keywords to expand your search to words that start with, end with, or are similar to your keywords.
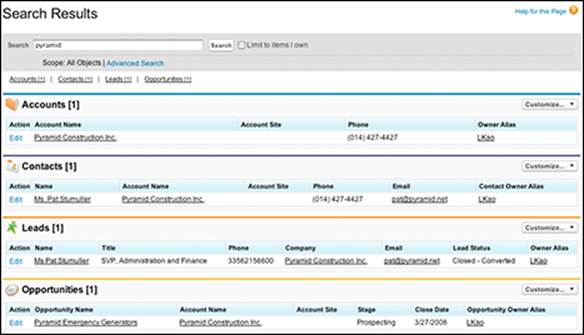
Figure 2-2: Looking at a Search Results page.
If you’re focusing on a page (such as a list of search results or a report) and want to open one of the results in a new window, instead of clicking the link, right-click that link and choose Open Link in New Window from the contextual menu that appears.
Managing your calendar
The calendar section of the home page defaults to a calendar of the current month and your scheduled events for the next seven days. Like other calendar tools, the calendar allows you to drill down. Your scheduled events are based on events that you assigned to yourself or that other users have assigned to you.
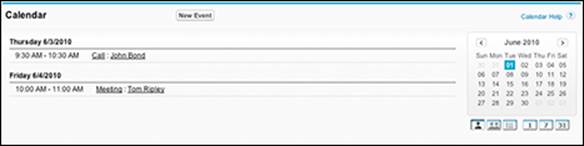
Figure 2-3: Looking over your calendar options.
From this calendar section (shown in Figure 2-3), you can do the following:
· Schedule a new activity: Click the New Event button, and a New Event page appears in Edit mode. (See Chapter 7 to see how to complete a new event record.)
· View an event record: If you see a listed event, click the link. A page appears with details on the activity.
· Drill into your schedule: Click a date on the calendar to drill into your schedule for a specific day. The Day View page appears.
· Schedule a group activity: Click the Multi User View icon (which looks like two little people). A page appears for the selected day that displays the availability of multiple users. From there, click the New Event button and follow the same instructions for scheduling a new event, as described in detail in Chapter 7.
Tracking your tasks
On the home page, you see a section entitled My Tasks, which displays tasks that you created for yourself or that have been assigned to you.
A task is an activity that you need to do, and it can have a due date. Unlike an event, however, a task doesn’t have a specific time and duration. For example, if you want to remind yourself to send a proposal, you typically create a task instead of scheduling an event. (See Chapter 7 for additional tips on managing tasks.)
From the My Tasks section (as shown in Figure 2-4), you can do the following:
· Add a new task: Click the New button, and a New Task page appears in Edit mode.
· Change task view: Use the drop-down list at the top right of the My Tasks section to select from a list of common task views. For example, select Overdue to see your open tasks that are past their respective due dates.
· Review a task: Click a link in the Subject column to review a task. A task record appears with details.
· Go to associated records: Click links in the Name or the Related To column.
· Complete the task and enter any details before saving: Click the X link in the Complete column. You can also use this link to update a task, but if you haven’t completed the task, remember to adjust the Status field before you save it.
· See more tasks: If you have several tasks in your list, the View More link appears at the bottom of the My Tasks section on the home page. Click it to see more tasks on the list. The Day View appears, and the My Tasks section appears in the right column.

Figure 2-4: Reviewing the My Tasks section from the home page.
Using dashboard snapshots from the home page
If your company has customized your home page, you might also see and select up to three key charts or tables from your dashboards. Dashboards display important information from reports in Salesforce that can provide key performance indicators on the health of your business. Each dashboard chart or table is a component. (See Chapter 18 for details on building dashboards that can measure and analyze your business.) As of this writing, dashboards are available in the Group, Professional, Enterprise, and Performance Editions.
If you see a chart or table on your home page, you can also perform these actions from the Dashboard section:
· Click a chart or table to drill into the detail: A report page appears with the data that supports the graphic.
· Choose a different dashboard: Click the Customize Page button at the upper right of the section. The Customize Your Home Page page appears, and here you can select from available dashboards if you have the proper administrator permissions. Your home page displays a snapshot of only the three components along the top of any dashboard.
· Refresh the dashboard snapshot: Click the Refresh button at the top of the section. In the left of the section, a date and timestamp appear showing when your dashboard was last refreshed.
Accessing information with the sidebar
The sidebar is the column on the left that appears on just about every page of Salesforce except for dashboards and reports. On the home page, use the sidebar to quickly go back to pages you recently accessed, stay informed about important company messages, click links to useful websites, and create new records.
Creating new records
Use the compact Create New picklist on the sidebar to quickly create any new record.
Revisiting recent items
The Recent Items section displays up to ten records that you most recently clicked. Use the list to quickly get back to records that you’ve been working on, even if you logged out and logged back in. The recent items show an icon and the name or number of the record. These items include mostly the records that are organized under a tab heading, such as Accounts, Contacts, and so on. To visit the detail record of a recent item, simply click a listed link.
Getting more out of your home page sidebar
With the help of your administrator, you can offer other tools and information from the sidebar on the home page to improve productivity and drive overall adoption. Review the following tips, see Chapter 21 on customizing Salesforce, and consult with your administrator if some of these features could help your organization:
· Update company messages: Your administrator can add messages to the home page to keep users informed of important announcements. For example, if you’re in sales management, you might want to use the home page to alert reps to end-of-quarter goals or bonus incentives.
· Emphasize important custom links: If you rely on other websites to do your jobs, your administrator can help you post them for all your users or just ones that fit certain profiles. For example, if you have a company intranet, your company can add useful links to the home page sidebar so that you can quickly access information outside of Salesforce without ever leaving Salesforce.
 If you’d rather not have the sidebar take up some of your browser window’s real estate, Salesforce allows you to hide and expand the sidebar when you want. Your administrator can set up this option by choosing Setup⇒Build⇒Customize⇒User Interface and selecting the Enable Collapsible Sidebar check box.
Navigating the Apps
Salesforce allows you to organize tabs into groups. These groups, also known as apps, help reduce screen clutter and give you quicker access to the tabs that you use the most. For example, a marketing manager might rarely use the Cases or Opportunities tabs but spend most of her time looking at Campaigns and Leads.
With the salesforce.com Force.com platform, your company can now create custom apps for more specific uses within CRM — or for anything else, for that matter. Sales reps can use an expense reporting app, and product managers can use a product release app to manage their product requirements. The mind-blowing part of all this is that apps can be comprised of standard tabs or custom ones that you create. Anyone in your company can benefit from sharing one set of data. And don’t worry if you’re not the most creative type. Salesforce.com has a bunch of prebuilt apps available (for free or for an additional charge), which we discuss in more detail in Chapter 21.
Discovering the Force.com app menu
In the upper-right corner of any Salesforce page, you can find the Force.com App Menu (see Figure 2-5). The drop-down list allows you to switch between apps. You find some standard tab groupings, such as Sales and Call Center. Administrators can also add or create new apps to address what their specific users need to see. Don’t worry if you choose an app and see new tabs. You can always go back to the drop-down list, select your previous app, and have your familiar tabs return.
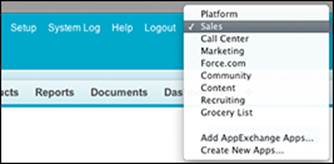
Figure 2-5: Choosing apps by using the Force.com app menu.
Finding out about the tabs
If the tabs in Salesforce look familiar, they should. When the founders of salesforce.com designed it, they patterned the site after popular websites such as Amazon.com, where you click a tab to jump to an area.
In this section, we describe the major tabs in Salesforce and show you how to use the tab home pages to quickly access, manage, or organize information.
Each tab within Salesforce represents a major module or data element in an interconnected database. That’s as technical as we get.
In the following list, we briefly describe each of the standard tabs (as shown in Figure 2-6). We devote a chapter to each of the tabs mentioned here:
· Campaigns: Specific marketing activities that you manage to drive leads, build a brand, or stimulate demand.
· Leads: Suspects (people and companies with whom you want to do business). But don’t start grilling your lead about where she was on the morning of June 23 because the only clue you’ll gather is the sound of a dial tone.
· Accounts: Companies with whom you currently do or previously did business. You can track all types of accounts, including customers, prospects, former customers, partners, and competitors.
· Contacts: Individuals associated with your accounts.
· Opportunities: The deals that you pursue to track transactions or drive revenue for your company. Your open opportunities constitute your pipeline, and opportunities can contribute to your forecast.
· Cases: Customer inquiries that your support teams work on to manage and resolve.
· Knowledge: Answers to cases and other frequently asked questions.
· Products: Your company’s products and services, associated with the prices for which you offer them. You can link products and their prices to your opportunities.
· Reports: Data analyses for you and your entire organization. Salesforce provides a variety of best practices reports, and you can build custom reports on the fly to better measure your business.
· Content: The sales and marketing collateral and documents that you use as part of your selling or service processes.
· Dashboards: Graphs, charts, and tables based on your custom reports. You can use dashboards to visually measure and analyze key elements of your business.
![]()
Figure 2-6: Navigating through the tabs.
Discovering a tab home page
When you click a tab, the tab’s interior home page appears. For example, if you click the Accounts tab, the Accounts home page appears. The tab’s home page is where you can view, organize, track, and maintain all the records within that tab.
Do this right now: Click every tab visible to you.
The look and feel of the interior home pages never change, regardless of which tab you click (except for the Home, Reports, and Dashboards tabs). On the left, you have the sidebar with the Create New drop-down list, Recent Items, and (depending on your company and the tab) a Quick Create tool. In the body of the page, you have a View drop-down list, a Recent Items section related to whichever tab you’re on (for example, Recent Accounts), and sections for popular Reports and Tools (see Figure 2-7).
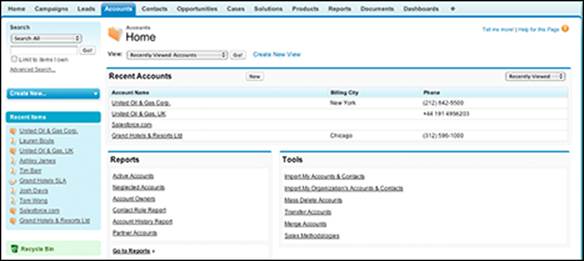
Figure 2-7: Decon‑structing the tab home page.
Using the View drop-down list
Strategy and execution are all about focus. With custom list views, you can see and use lists to better focus on your business. A list view is a segment of the tab’s records based on defined criteria. When you select a list view, a list of records appears based on your criteria.
On each tab, Salesforce provides a selection of popular default views to get you started. To try a list view (using Accounts as the example), follow these steps (which apply to all tabs):
1. Click the Accounts tab.
The Accounts home page appears (refer to Figure 2-7).
2. Select My Accounts from the View drop-down list.
A list page appears that displays a set of columns representing certain standard account fields and a list of your account records. If no account records appear, you don’t own any in Salesforce.
3. From the list page, you can perform a variety of functions:
· Re-sort the list: Click a column header. For example, if you click the Account Name header, the list sorts alphabetically, as shown in Figure 2-8.
· View records beginning with a certain letter: Click that letter link above the list to view those records.
If a user sorts by a column other than name, the letter search looks for values in that column starting with the selected letter. For example, if sorting by State, selecting C filters for accounts with states starting with C rather than account names starting with C.
· Display fewer or more records on the page: Click the up or down button at the bottom of the page or the Next Page link to see the next set of records.
· View a specific record: Click the link for that record in the Account Name column. The Account detail page appears, displaying the record and its related lists.
· Update a specific record: Click the Edit link at the beginning of its row. The account record appears in Edit mode.
· Delete a record: Click the Del link near the beginning of that record’s row. A pop-up window appears, prompting you to click OK to accept the deletion. If you click OK, the list page reappears, minus the account that you just wiped out. Don’t worry: Later in this chapter, in the section “Resurrecting records from the Recycle Bin,” we show you how to bring recently deleted records back to life.
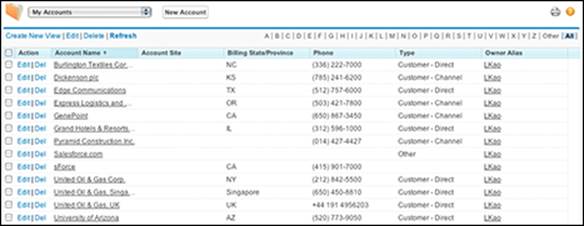
Figure 2-8: Re-sorting a list.
Building a custom list view
If you have a particular way that you like to look at records, you can build a custom list view. If you have the right permissions, you can share this view with other groups or your entire organization. (Or maybe you should just keep your views to yourself.)
To create a custom list view (using Contacts as the example), follow these steps (which apply to all tabs):
1. Click the Contacts tab.
The Contacts home page appears.
2. To the right of the View drop-down list, click the Create New View link.
A Create New View page appears.
3. Name the view by typing a title in the View Name field.
For example, if you want to create a list of your contacts that are senior executives, use a title like My Senior Execs.
4. Select whether you want to search All Contacts or just My Contacts by selecting one of the two radio buttons.
In this example, select the My Contacts radio button.
For this running example, assume that your marketing manager created campaigns. You might want to tie a campaign to filter your List View after identifying which contacts you want the view to search.
5. Type the campaign name into the Campaign Name field.
Tying a campaign to your List View filters your results to those contacts related to a specific marketing campaign. You must have the proper permissions in the Professional, Enterprise, and Performance Editions for this capability.
6. (Optional) Below the Filter by Additional Fields area, enter search criteria.
A basic criteria query is made up of three elements:
· Field: The leftmost box is a drop-down list of all the fields on the contact record. In this example, choose Title.
· Operator: The middle box is a drop-down list of operators for your search. That sounds complicated, but it’s easier than you think. For this example, select the Contains option.
· Value: In the rightmost box, type the value that you want in the search. In this example, you might type vp, vice president, ceo, cio, cto.
7. Select the columns that you want to have displayed by selecting a value from the drop-down lists in some of or all the fields provided.
Although Salesforce’s preset views take common fields, such as Phone and Email, you can select any of up to 15 fields to display on your custom view page.
8. Decide whether you want others to see your custom view.
Administrators and certain users have this permission. Your decision is made simple if the step doesn’t appear. Otherwise, select one of the three options. (Basically, the three radio buttons translate to all, none, or selective.) If you choose the third option, use the drop-down list to select a group and then click the arrows to move that group into the Shared To column.
9. Click Save.
A new list view appears based on your custom criteria. If you don’t get all the results that you anticipate, double-check and refine the filter criteria. For example, if your list should include directors but doesn’t, click the Edit link and update the view.
 As long as you save your custom list view, you can use it later from the Views menu.
Reviewing the Recent Items section
On a tab’s home page, just below the views, you see a Recent Items section. (The name of the item will match whatever type of record you’re on. For example, Recent Accounts is the section name if you’re on the Accounts tab.) This section comes with three or four relevant columns that you can modify. You can see as few as 10 items and as many as 25 items at a time by clicking the link at the bottom of the table.
To test the Recent Items section (by using Leads as the example), go to the Leads home page and follow these steps (which you can apply to all tabs):
1. In the Recent Leads section, select an option from the drop-down list at the upper-right corner of the table.
The table reappears with changes based on what you select.
2. Click a link in the table to go to a record.
The detail page appears, displaying the record and related lists.
3. Click the New button in the upper middle of the table to create a new lead record.
A New Lead page appears in Edit mode, ready and waiting. (See Chapter 9 to read more about the fields in the Lead record.)
Reviewing common reports
In the lower-left corner of a tab’s home page, Salesforce displays a small selection of commonly used reports associated with that tab. You can click a link to go directly to the report or click the Go to Reports link, which takes you to the Reports home page.
Tooling through the Tools section
In the lower-right corner of a tab’s home page, Salesforce provides a set of unique tools associated with a particular tab. Depending on which tab you’re viewing, use these tools to help you manage and maintain records within that tab. For example, on the Accounts home page, in the Tools section, you can click the Merge Accounts link to merge duplicate accounts. See the related chapters later in this book for details on using specific tools.
Managing Records
By using the Create New drop-down list on the sidebar of any page in Salesforce, you can easily add new records into Salesforce. You might find yourself in the position of having deleted important files; don’t worry, though, because Salesforce gives you a way to put them back in their rightful spots before anyone notices that they’re missing.
Creating records
To create a record (by using Contacts as the example), follow these steps (which can be applied to all Create New Items on the picklist):
1. On the home page, select the Contact option on the Create New picklist, as shown in Figure 2-9.
A New Contact page appears in Edit mode.
2. Complete the fields, as necessary.
Even while you’re in Edit mode, the Create New picklist is available.
3. When you’re done, click Save.
The Contact detail page appears, and here you can begin tracking information.
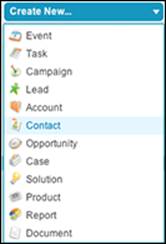
Figure 2-9: Creating records by using the Create New drop-down list.
Resurrecting records from the Recycle Bin
Occasionally, you delete a record and regret it. Don’t panic — the Salesforce Recycle Bin gives you 15 days to restore recently deleted records, including any associated records (such as activities deleted in the process) and your credibility.
To restore a deleted record, follow these steps:
1. On your sidebar, click the Recycle Bin link.
The Recycle Bin page appears. If you’re an administrator, use the View picklist to view and restore records deleted within the last 15 days by other users.
2. Navigate the list as you would a normal list page until you find the desired record or records.
3. Select the check box(es) in the Action column corresponding to the record(s) that you want to restore.
You can click the Select All link to select all the records on the page.
4. When you’re done, click the Undelete button.
The Recycle Bin page reappears, and a link to your restored record appears in the sidebar below Recent Items.
Detailing the Record
After you create a record, the record appears on its own detail page (see Figure 2-10). You can use the detail page to update the record fields or manage and track activities and common operations on the related lists displayed below the record. In this section, we show you how to navigate the detail page. The other chapters in this book give you specific details about managing particular related lists.
Many of the features that we describe in the following sections aren’t enabled by default. Have your administrator choose Setup⇒Build⇒Customize⇒User Interface to turn on many of these capabilities.
Saving time with hover links
At the top of any record’s detail page is a row of several links. Each link corresponds to a list of other records related to the current one. The label for each link consists of the name of that type of record as well as the number that are related. So when you’re looking at an Account detail page, instead of scrolling down the page to see whether any contacts exist, you can see how many exist right at the top. But wait, it gets better: You can click the link and immediately jump down to the bottom of the detail page to where that Related List is normally found. And if you want to be even more efficient, instead of clicking the link, just hover your mouse over it. Salesforce will show you a preview of the related list that even includes buttons to create new records and clickable links to existing ones.
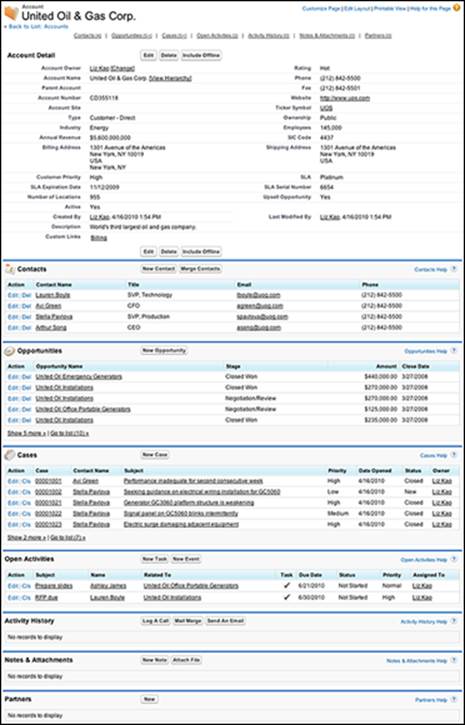
Figure 2-10: Looking over the detail page.
Using links and buttons on the detail page
At the top of any record’s detail page, you can use several links and buttons to perform different actions. Go to any detail page and try these out:
· Toggle between list and details. At the upper left of the page, click the Back to List link. If you’ve been working from a list, that list page appears. Click the Back button on your browser to return to the detail page.
· Edit a record. Click the Edit button to edit the record. The record appears in Edit mode. Click the Cancel button to return to the detail page.
· Delete the current record. Click the Delete button to delete the current record that you’re viewing. Click the Cancel button in the pop-up window if you change your mind about the deletion.
· Share the record with other users. Click the Sharing button. (This button doesn’t appear on all records.) Click the Back button within your browser to return to the detail page.
· Quickly jump to the corresponding related list farther down the page. Click the related list “hover links” at the top of each detail page, if enabled by your administrator. Alternatively, hover your mouse over the link to open a snapshot of the records displayed in that related list.
· View a printable version of the page in a new window. Click the Printable View link in the upper right, and then click the Print This Page link in the upper-right corner of the window to print a copy of the entire page. Many users like to print hard copies that they can review while traveling.
Modifying records with inline editing
To cut down on the number of steps you have to take when you update records in Salesforce, you can edit fields directly in detail pages.
 Make sure that your administrator has enabled this feature.
Follow these steps to edit a field directly in that web page, without having to go to another page. Salesforce calls this inline editing.
1. Hover your mouse over any field on a record that you own (or have permission to edit).
Figure 2-11 shows the e-mail address of a contact within a company being updated.
An icon appears to the right of a field, telling you whether you can edit that field:
· Pencil: This icon appears to the right of editable fields, which become highlighted.
· Padlock: This icon appears to the right of fields that you can’t edit.
· None: You can edit a field that doesn’t have an icon, but not with the inline editing feature. You have to edit the record the old-fashioned way, using the Edit button.
2. Double-click an editable field and update the information in that field.
3. Press Enter to complete editing that field.
4. After you finish editing all the fields you want for that record, click the Save button for the record.
If you happen to delete information in a field that requires something in it, don’t worry. Salesforce has a couple stop-gap measures to prevent you from messing things up. An Undo arrow icon appears before you save the record, and Salesforce is smart enough to remind you about required fields before letting you save your changes.
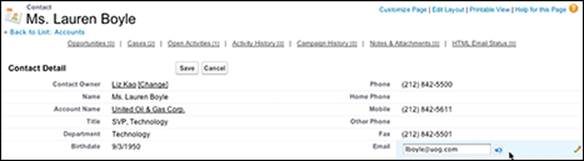
Figure 2-11: Editing a field inline.
Capitalizing on related lists
Related lists: Say it three times so you don’t forget the term. By designing the page with related lists, Salesforce enables you to gain 360-degree customer visibility and ensure that more detailed information is only a click away. For example, if you open an Account detail page for one of your major customers and scroll down below the record fields, you can see multiple contacts, activities, opportunities, cases, notes, attachments, and so on listed as links from organized related lists. And if you don’t see these links, you have work to do.
Looking things up with lookup hovers
On any detail page, you can hover your mouse over a lookup field to get a pop-up preview of that other record’s contents. Figure 2-12 shows a preview of the account record by hovering over a contact’s company name.
The lookup hover feature isn’t enabled by default, so if you want it, ask your administrator to set it up for you.
A lookup field is any field that actually links to another record. A lookup field’s content is underlined to show that it acts as a link to another record. (Just don’t confuse lookup fields with the set of related lists that appears below the main body of a record’s detail page.)
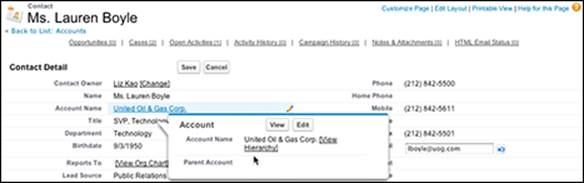
Figure 2-12: Hovering over a lookup field provides a preview of that record.
Getting Help and Setting Up
In the upper-right corner of any Salesforce page, to the left of the Force.com app menu, you find a set of links that can help you get more out of Salesforce:
· Your Name: This menu will be labeled with your full name. Click the down arrow next to your name to select links to edit your personal information or your personal settings.
· Setup: Click this link to open a page containing the Personal Setup menu. Modify your personal setup, or if you're an administrator, administer and customize Salesforce for your company.
· Help & Training: Click this link to open a window that contains the Salesforce Help & Training home page and additional tabs for help, support, and training.
If the Developer Console link appears in the Your Name menu, ignore it for now. This link is for technical administrators who use it to analyze or troubleshoot automated processes and the use of Apex code.
All materials on the site are licensed Creative Commons Attribution-Sharealike 3.0 Unported CC BY-SA 3.0 & GNU Free Documentation License (GFDL)
If you are the copyright holder of any material contained on our site and intend to remove it, please contact our site administrator for approval.
© 2016-2026 All site design rights belong to S.Y.A.